

Optelec Sentry+, Sentry+ HD User Manual

Sentry
+
Sentry
+
HD
User manual
Bedienungsanleitung


Optelec Sentry+ / Sentry+ HD
English Page 1
Sentry+
Sentry
+
HD
User manual
Version 5.0
Copyright 2013 Optelec, The Netherlands
All rights reserved
Optelec
P.O. Box 399
2990 AJ Barendrecht
The Netherlands
Telefon: +31 88 6783-444. Fax +31 88 6783-400
E-Mail: info@optelec.nl
Internet: www.optelec.com

Optelec Sentry+ / Sentry+ HD
English Page 2

Optelec Sentry+ / Sentry+ HD
English Page 3
WEEE Notice
The directive on Waste Electrical and Electronic Equipment (WEEE),
which entered into force as European law on 13
th
February 2003,
resulted in a major change in the treatment of electrical equipment at
end-of-life.
The purpose of this Directive is, as a first priority, the prevention of
WEEE, and in addition, to promote the reuse, recycling and other forms
of recovery of such wastes so as to reduce disposal.
The WEEE logo (shown at the left) on the product or its box
indicates that this product must not be disposed of or dumped
with your other household waste. You are liable to dispose of all
your electronic or electrical waste equipment by relocating over
to the specified collection point for recycling of such hazardous waste.
Isolated collection and proper recovery of your electronic and electrical
waste equipment at the time of disposal will allow us to help conserving
natural resources. Moreover, proper recycling of the electronic and
electrical waste equipment will ensure safety of human health and
environment. For more information about electronic and electrical waste
equipment disposal, recovery, and collection points, please contact your
local city centre, household waste disposal service, shop from where you
purchased the equipment, or manufacturer of the equipment.

Optelec Sentry+ / Sentry+ HD
English Page 4

Optelec Sentry+ / Sentry+ HD
English Page 5
Sentry
+
Sentry
+
HD
User manual
April, 2013
Optelec was founded in 1975 in Rockanje, the Netherlands. Since then,
Optelec has developed and produced innovative products to assist blind
and visually impaired people in their daily activities. Visit the Optelec
website at www.optelec.com for extensive information about Optelec
products and services.
All rights, in particular the rights of reproduction as well as translation, are
reserved. No parts of this manual may be copied, in any form whatsoever,
without written approval by Optelec.
Every effort has been made to ensure that the information contained in
this user manual is correct at the time of issue. Neither Optelec, nor its
agents, assume any responsibility for errors or damages resulting from
use other than described in this manual.

Optelec Sentry+ / Sentry+ HD
English Page 6
Index
1.
Introduction ......................................................................................... 7
About this manual ......................................................................... 7
2. Important safety information ................................................................ 8
3. What’s in the box? ............................................................................... 9
4. Getting to know your Sentry+ [HD] ................................................... 10
Setting up your Sentry+ [HD] ...................................................... 10
Positioning the camera and the camera arm .............................. 12
Close-up and distance viewing ................................................... 12
Use of the built-in object lighting ................................................. 12
5. Operation of the Sentry+ [HD] control panel ...................................... 13
Switch On/Off .............................................................................. 13
Setting the magnification ............................................................. 13
Wide screen mode ...................................................................... 13
The overview mode ..................................................................... 14
Viewing modes ............................................................................ 14
Semi-colours ............................................................................... 14
Auto-focus On/Off ....................................................................... 14
Contrast ...................................................................................... 14
Brightness ................................................................................... 15
Activating line markers/window blinds ........................................ 15
Reading line and window shades activating ............................... 15
Reading line colours ................................................................... 15
Key switch ................................................................................... 15
Picture switch .............................................................................. 15
Reset ........................................................................................... 15
6. Sentry+ Specifications ....................................................................... 16
7.
Sentry
+
HD Specifications ................................................................. 17
8. Compliances ..................................................................................... 18
9. Warranty Conditions .......................................................................... 20
Contact information…………………………………………………………...21

Optelec Sentry+ / Sentry+ HD
English Page 7
1. Introduction
Congratulations on choosing the Sentry
+
or the Sentry+ HD, a high quality
electronic magnifier designed by Optelec. Sentry
+
[HD] is the term which
is basically used for both devices in this User manual. The Sentry
+
[HD] is
an auto-focus electronic magnifier designed for use at different locations:
at home, in school or at the office. Use the Sentry
+
for reading, writing,
viewing photographs, craftwork and much more.
The Sentry
+
[HD] is designed for optimal efficiency when working with a
stand-alone monitor. The Sentry
+
[HD] can be operated ergonomically
from the control panel and when used in combination with the Optelec
TwinView monitor it can be connected to a computer.
If you have any questions or suggestions concerning the use of this
product, please contact your Optelec distributor or the Optelec
headquarters using the contact information found at the end of this user
manual. Your feedback is greatly appreciated. We hope you enjoy
working with your Sentry
+
[HD].
About this manual
This user manual provides a comprehensive guide to the features and
operation of the Sentry
+
[HD] electronic magnifier. Please read this user
manual carefully before using the Sentry
+
[HD] and keep it in a safe place
for future reference.

Optelec Sentry+ / Sentry+ HD
English Page 8
2. Important safety information
Optelec does not assume any liability or responsibility for incorrectly
detected content of texts or their interpretation by Sentry
+
[HD].
Please have important documents checked additionally.
Only use the Sentry
+
[HD] indoors.
Do not expose the Sentry
+
[HD] to extreme or rapid changes in
temperature or humidity. These conditions may damage the
electronics or optics of the Sentry
+
[HD].
Do not place the unit on an unstable surface. It may fall, causing
serious damage to the unit or injuries to the user.
To avoid injuries, always assemble, disassemble and handle the
components of the Sentry
+
[HD] with good care as there are movable
and rotatable parts.
Do not expose the Sentry
+
[HD] to excessive heat or direct sunlight to
avoid the risk of fire.
Do not remove any parts of the Sentry
+
[HD]. Contact your Optelec
distributor to service the Sentry
+
[HD] if necessary. Do not open any
of the components as this will void the warranty. Each component
contains parts which should only be serviced by an Optelec repair
specialist.
To avoid risk of electrical damage, keep the Sentry
+
[HD] away from
fluids and chemicals
Handle the Sentry
+
[HD] with care. Rough handling will damage the
internal components.
Do not use the Sentry
+
[HD] near inadequately shielded medical
devices.
Always unplug the Sentry
+
[HD] before cleaning. Use a soft damp
cloth to clean the exterior. Do not use cleaning agents or abrasive
materials as they will damage the unit.
Make sure you connect the Sentry
+
[HD] to an earthed mains power
(AC) outlet for your safety.
Do not use the Sentry
+
[HD] unit under 0° or above 40° Celsius.
Use of the Sentry
+
[HD] other than that described in this user manual will
exclude it from warranty conditions.

Optelec Sentry+ / Sentry+ HD
English Page 9
3. What’s in the box?
The Sentry
+
[HD] package contains the following:
The Sentry
+
[HD] camera arm
Base plate for the camera arm
Bolt and screw for assembling the base plate and the camera arm
Control panel
2 different lens attachments
Power supply
2 DVI-cables
User manual
If any of these items are missing from your package, please contact your
local Optelec distributor.

Optelec Sentry+ / Sentry+ HD
English Page 10
4. Getting to know your Sentry+ [HD]
Setting up your Sentry+ [HD]
To set up the Sentry
+
[HD] please follow the steps described below:
1. Assemble the base plate and the camera arm by using the bolt
and screw provided.
2. Place the assembled unit and the control panel nearby your
monitor on a steady surface.
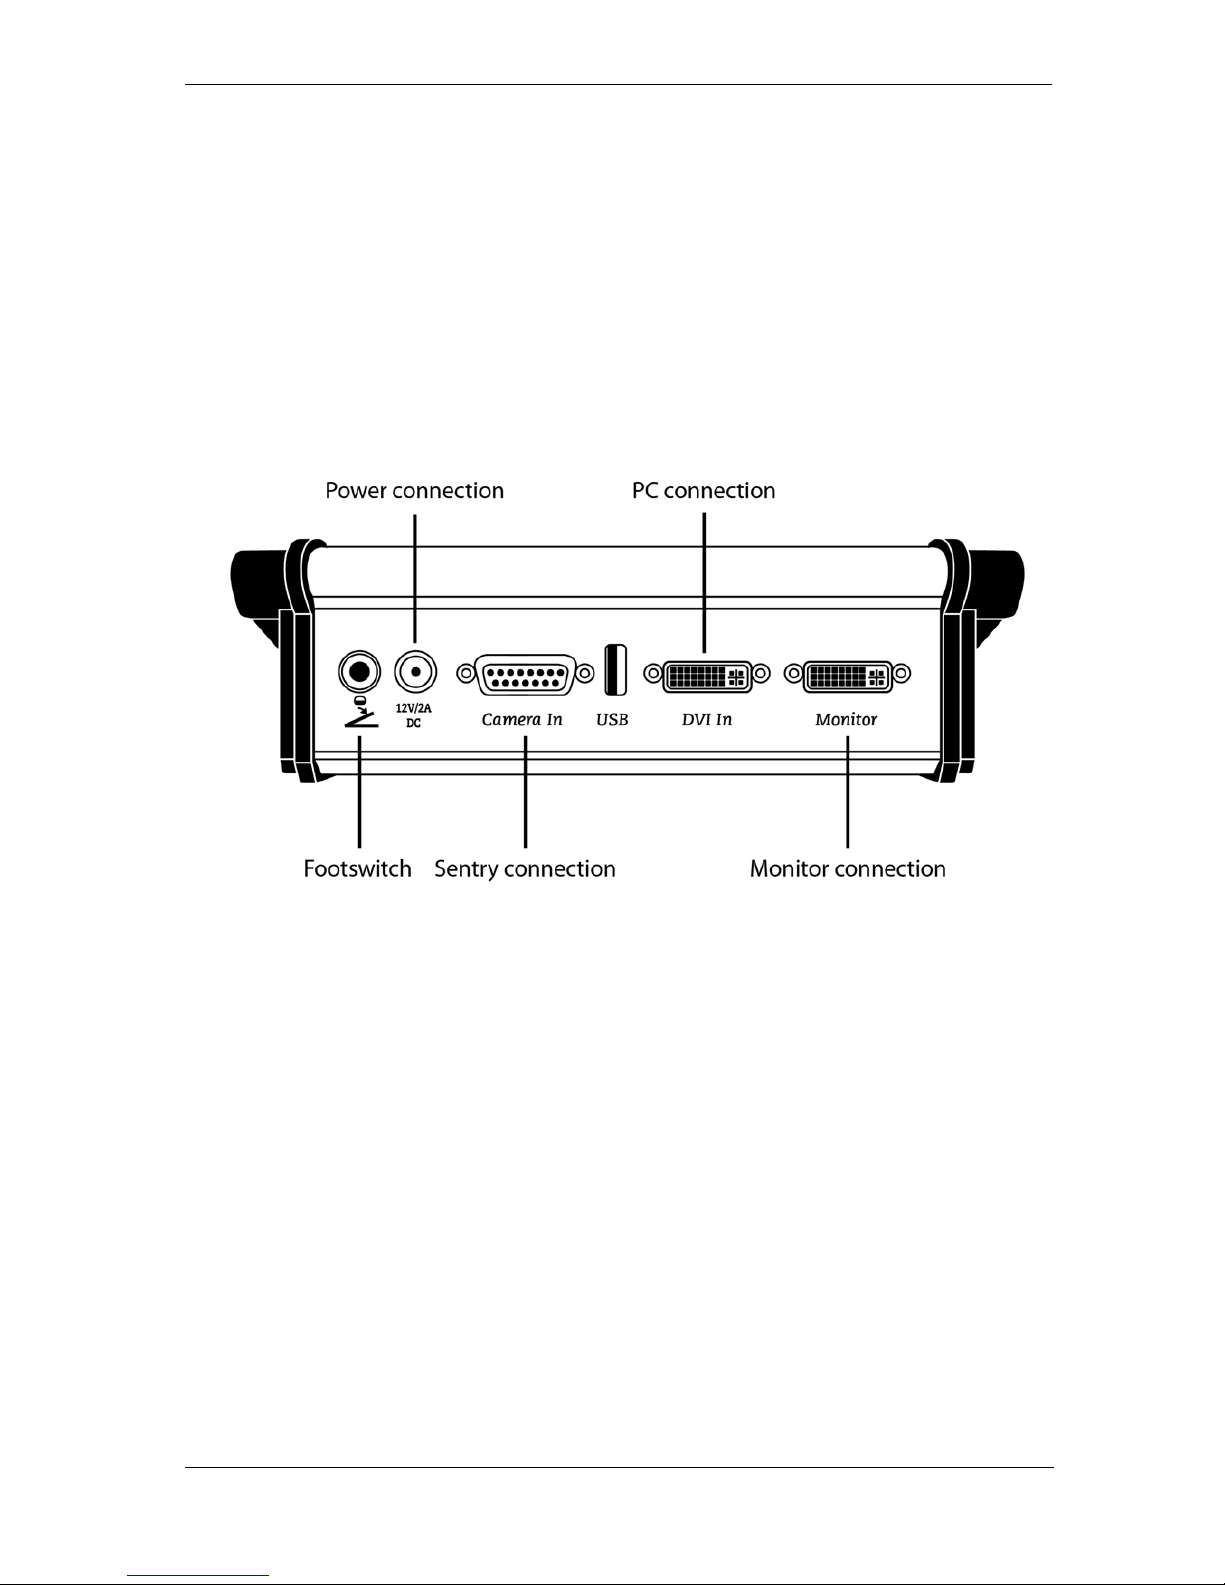
3. Connect the cable of the Sentry
+
[HD] camera arm to the camera
connection at the rear of the control panel (look at the picture on
page 11).
Optelec Sentry+ / Sentry+ HD
English Page 11
4. Connect the DVI-cable of your monitor to the as “monitor” labelled
connection of the control panel.
5. By using the delivered DVI-cable connect your computer to the as
“DVI In” labelled connection of the control panel.
6. Additionally you can use a footswitch. Connect this to the first left
connector at the rear of the control panel.
7. Connect the supplied power supply to the power connection at the
back of the control box and plug the power cord into a power
outlet. Your Sentry
+
[HD] is now ready for use.

Optelec Sentry+ / Sentry+ HD
English Page 12
Positioning the camera and the camera arm
The Sentry+ [HD] features a flexible camera head and a rotatable camera
arm. The camera head can be swivelled around a horizontal and a
vertical axis. The camera arm can be rotated around the base. Point the
camera to read a document nearby. When you want to look in the
distance (for example at a blackboard) or at yourself, you need to remove
the close-up lens and turn the camera in a horizontal position. By
loosening the screw lock at the end of the camera arm, you can adjust the
height of the camera (this will affect the magnification range).
Close-up and distance viewing
The position of the camera can be adjusted for desktop or distance
viewing. To view objects within 55 cm, position the close-up lens in front
of the camera unit. To view objects at a more distant proximity, position
the close-up lens away from the camera. To prevent losing the close-up
lens, attach the lens to the top side of the camera head.
Use the near lens with the flattened edgings for the position below and
use the round lens for the upper position.
Use of the built-in object lighting
The double LED-lighting is built in to the camera arm
for use in poorly-lit environments. The lighting can be
switched on and off by pushing the zoom button in the
following order: “step 1/ step 2/ Off”.
Optelec Sentry+ / Sentry+ HD
English Page 13
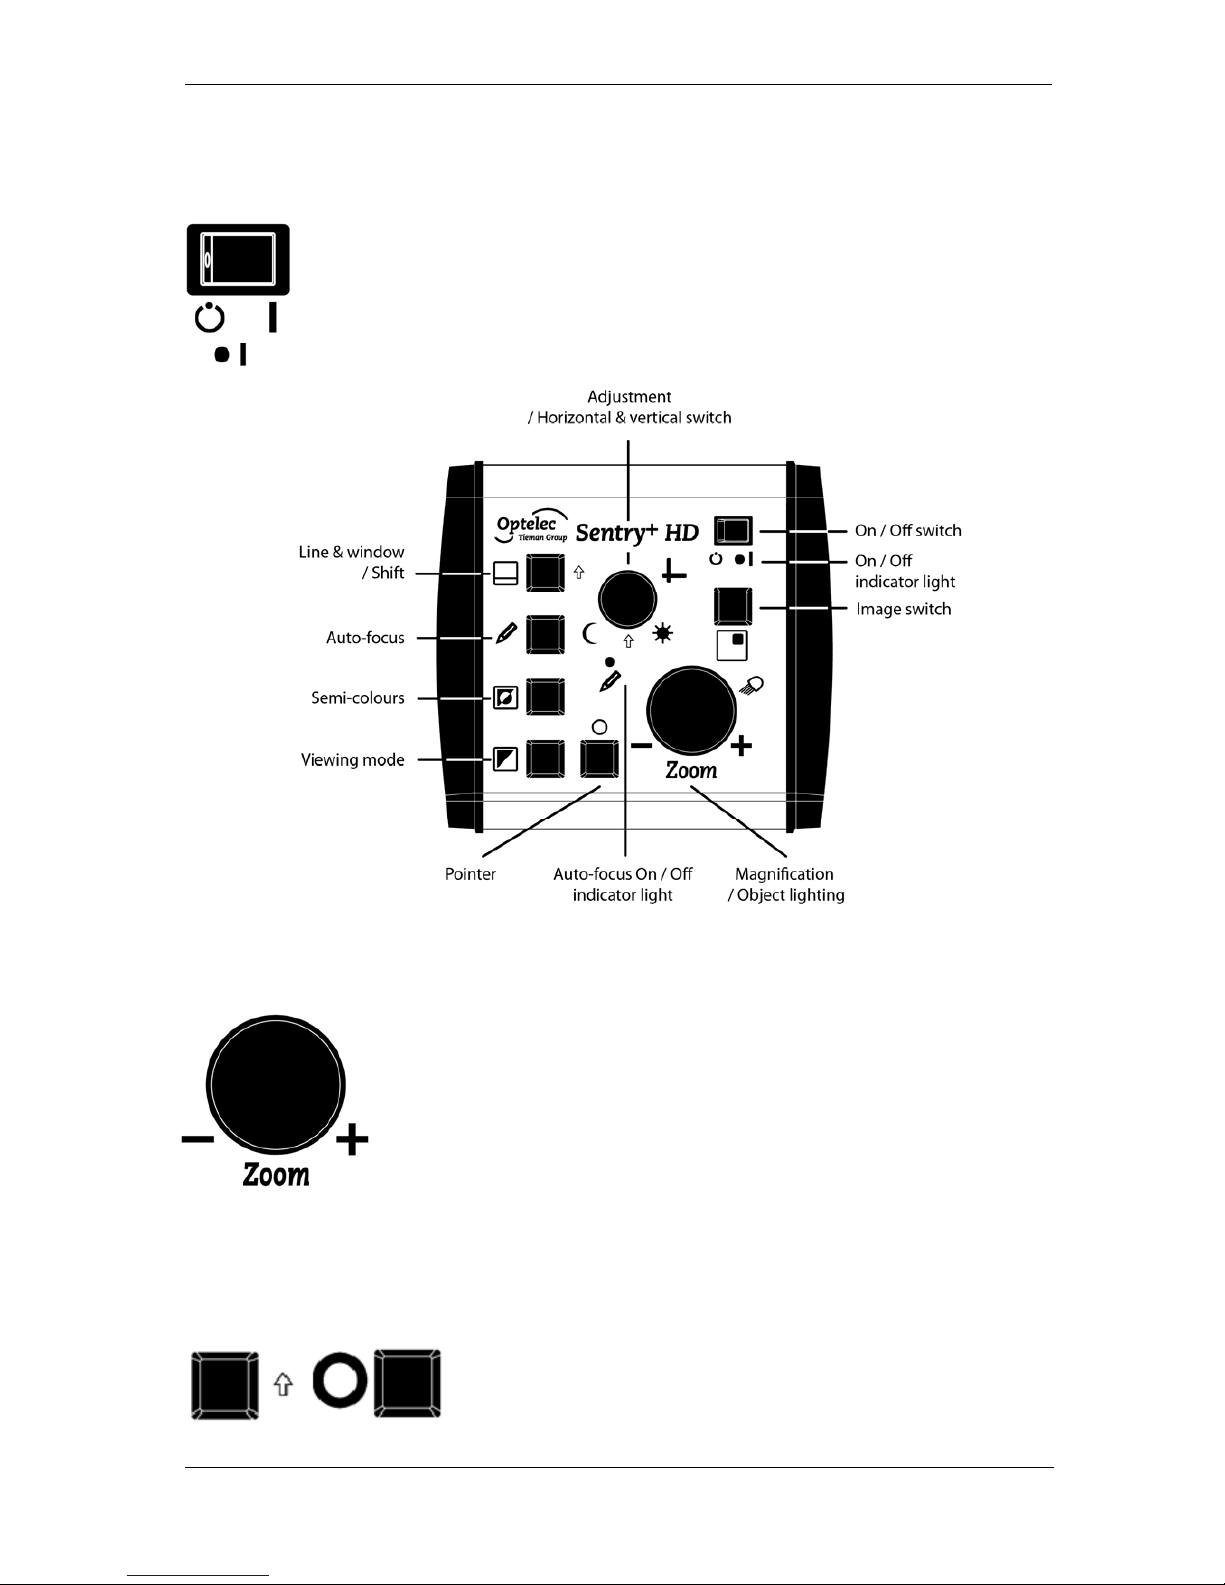
5. Operation of the Sentry+ [HD] control panel
Switch On / Off
Press the On / Off switch, located at the top right Corner of the
control panel to switch on the Sentry
+
[HD]. The On / Off
indicator light will illuminate when the control panel is switched
on. The monitor needs to be switched on separately.
Setting the magnification
Turning the Zoom control allows you to select the
desired magnification level. The Sentry
+
[HD] magnifies
text and images from 1 to 70 times the original size on a
22-inch screen. Turning the circular control anticlockwise will decrease the magnification. Similarly,
turning the circular control clockwise will increase the
magnification.
Wide screen mode – only at Sentry+
By pressing the Shift key along with the overview
button you can switch between three views:
Widescreen, flexible widescreen and without
widescreen. Widescreen is the factory setting.
 Loading...