

Page 1

Sentry
+
Sentry
+
HD
User manual
Bedienungsanleitung
Page 2

Page 3

Optelec Sentry+ / Sentry+ HD
English Page 1
Sentry+
Sentry
+
HD
User manual
Version 5.0
Copyright 2013 Optelec, The Netherlands
All rights reserved
Optelec
P.O. Box 399
2990 AJ Barendrecht
The Netherlands
Telefon: +31 88 6783-444. Fax +31 88 6783-400
E-Mail: [email protected]
Internet: www.optelec.com
Page 4

Optelec Sentry+ / Sentry+ HD
English Page 2
Page 5

Optelec Sentry+ / Sentry+ HD
English Page 3
WEEE Notice
The directive on Waste Electrical and Electronic Equipment (WEEE),
which entered into force as European law on 13
th
February 2003,
resulted in a major change in the treatment of electrical equipment at
end-of-life.
The purpose of this Directive is, as a first priority, the prevention of
WEEE, and in addition, to promote the reuse, recycling and other forms
of recovery of such wastes so as to reduce disposal.
The WEEE logo (shown at the left) on the product or its box
indicates that this product must not be disposed of or dumped
with your other household waste. You are liable to dispose of all
your electronic or electrical waste equipment by relocating over
to the specified collection point for recycling of such hazardous waste.
Isolated collection and proper recovery of your electronic and electrical
waste equipment at the time of disposal will allow us to help conserving
natural resources. Moreover, proper recycling of the electronic and
electrical waste equipment will ensure safety of human health and
environment. For more information about electronic and electrical waste
equipment disposal, recovery, and collection points, please contact your
local city centre, household waste disposal service, shop from where you
purchased the equipment, or manufacturer of the equipment.
Page 6

Optelec Sentry+ / Sentry+ HD
English Page 4
Page 7

Optelec Sentry+ / Sentry+ HD
English Page 5
Sentry
+
Sentry
+
HD
User manual
April, 2013
Optelec was founded in 1975 in Rockanje, the Netherlands. Since then,
Optelec has developed and produced innovative products to assist blind
and visually impaired people in their daily activities. Visit the Optelec
website at www.optelec.com for extensive information about Optelec
products and services.
All rights, in particular the rights of reproduction as well as translation, are
reserved. No parts of this manual may be copied, in any form whatsoever,
without written approval by Optelec.
Every effort has been made to ensure that the information contained in
this user manual is correct at the time of issue. Neither Optelec, nor its
agents, assume any responsibility for errors or damages resulting from
use other than described in this manual.
Page 8

Optelec Sentry+ / Sentry+ HD
English Page 6
Index
1.
Introduction ......................................................................................... 7
About this manual ......................................................................... 7
2. Important safety information ................................................................ 8
3. What’s in the box? ............................................................................... 9
4. Getting to know your Sentry+ [HD] ................................................... 10
Setting up your Sentry+ [HD] ...................................................... 10
Positioning the camera and the camera arm .............................. 12
Close-up and distance viewing ................................................... 12
Use of the built-in object lighting ................................................. 12
5. Operation of the Sentry+ [HD] control panel ...................................... 13
Switch On/Off .............................................................................. 13
Setting the magnification ............................................................. 13
Wide screen mode ...................................................................... 13
The overview mode ..................................................................... 14
Viewing modes ............................................................................ 14
Semi-colours ............................................................................... 14
Auto-focus On/Off ....................................................................... 14
Contrast ...................................................................................... 14
Brightness ................................................................................... 15
Activating line markers/window blinds ........................................ 15
Reading line and window shades activating ............................... 15
Reading line colours ................................................................... 15
Key switch ................................................................................... 15
Picture switch .............................................................................. 15
Reset ........................................................................................... 15
6. Sentry+ Specifications ....................................................................... 16
7.
Sentry
+
HD Specifications ................................................................. 17
8. Compliances ..................................................................................... 18
9. Warranty Conditions .......................................................................... 20
Contact information…………………………………………………………...21
Page 9

Optelec Sentry+ / Sentry+ HD
English Page 7
1. Introduction
Congratulations on choosing the Sentry
+
or the Sentry+ HD, a high quality
electronic magnifier designed by Optelec. Sentry
+
[HD] is the term which
is basically used for both devices in this User manual. The Sentry
+
[HD] is
an auto-focus electronic magnifier designed for use at different locations:
at home, in school or at the office. Use the Sentry
+
for reading, writing,
viewing photographs, craftwork and much more.
The Sentry
+
[HD] is designed for optimal efficiency when working with a
stand-alone monitor. The Sentry
+
[HD] can be operated ergonomically
from the control panel and when used in combination with the Optelec
TwinView monitor it can be connected to a computer.
If you have any questions or suggestions concerning the use of this
product, please contact your Optelec distributor or the Optelec
headquarters using the contact information found at the end of this user
manual. Your feedback is greatly appreciated. We hope you enjoy
working with your Sentry
+
[HD].
About this manual
This user manual provides a comprehensive guide to the features and
operation of the Sentry
+
[HD] electronic magnifier. Please read this user
manual carefully before using the Sentry
+
[HD] and keep it in a safe place
for future reference.
Page 10

Optelec Sentry+ / Sentry+ HD
English Page 8
2. Important safety information
Optelec does not assume any liability or responsibility for incorrectly
detected content of texts or their interpretation by Sentry
+
[HD].
Please have important documents checked additionally.
Only use the Sentry
+
[HD] indoors.
Do not expose the Sentry
+
[HD] to extreme or rapid changes in
temperature or humidity. These conditions may damage the
electronics or optics of the Sentry
+
[HD].
Do not place the unit on an unstable surface. It may fall, causing
serious damage to the unit or injuries to the user.
To avoid injuries, always assemble, disassemble and handle the
components of the Sentry
+
[HD] with good care as there are movable
and rotatable parts.
Do not expose the Sentry
+
[HD] to excessive heat or direct sunlight to
avoid the risk of fire.
Do not remove any parts of the Sentry
+
[HD]. Contact your Optelec
distributor to service the Sentry
+
[HD] if necessary. Do not open any
of the components as this will void the warranty. Each component
contains parts which should only be serviced by an Optelec repair
specialist.
To avoid risk of electrical damage, keep the Sentry
+
[HD] away from
fluids and chemicals
Handle the Sentry
+
[HD] with care. Rough handling will damage the
internal components.
Do not use the Sentry
+
[HD] near inadequately shielded medical
devices.
Always unplug the Sentry
+
[HD] before cleaning. Use a soft damp
cloth to clean the exterior. Do not use cleaning agents or abrasive
materials as they will damage the unit.
Make sure you connect the Sentry
+
[HD] to an earthed mains power
(AC) outlet for your safety.
Do not use the Sentry
+
[HD] unit under 0° or above 40° Celsius.
Use of the Sentry
+
[HD] other than that described in this user manual will
exclude it from warranty conditions.
Page 11

Optelec Sentry+ / Sentry+ HD
English Page 9
3. What’s in the box?
The Sentry
+
[HD] package contains the following:
The Sentry
+
[HD] camera arm
Base plate for the camera arm
Bolt and screw for assembling the base plate and the camera arm
Control panel
2 different lens attachments
Power supply
2 DVI-cables
User manual
If any of these items are missing from your package, please contact your
local Optelec distributor.
Page 12

Optelec Sentry+ / Sentry+ HD
English Page 10
4. Getting to know your Sentry+ [HD]
Setting up your Sentry+ [HD]
To set up the Sentry
+
[HD] please follow the steps described below:
1. Assemble the base plate and the camera arm by using the bolt
and screw provided.
2. Place the assembled unit and the control panel nearby your
monitor on a steady surface.
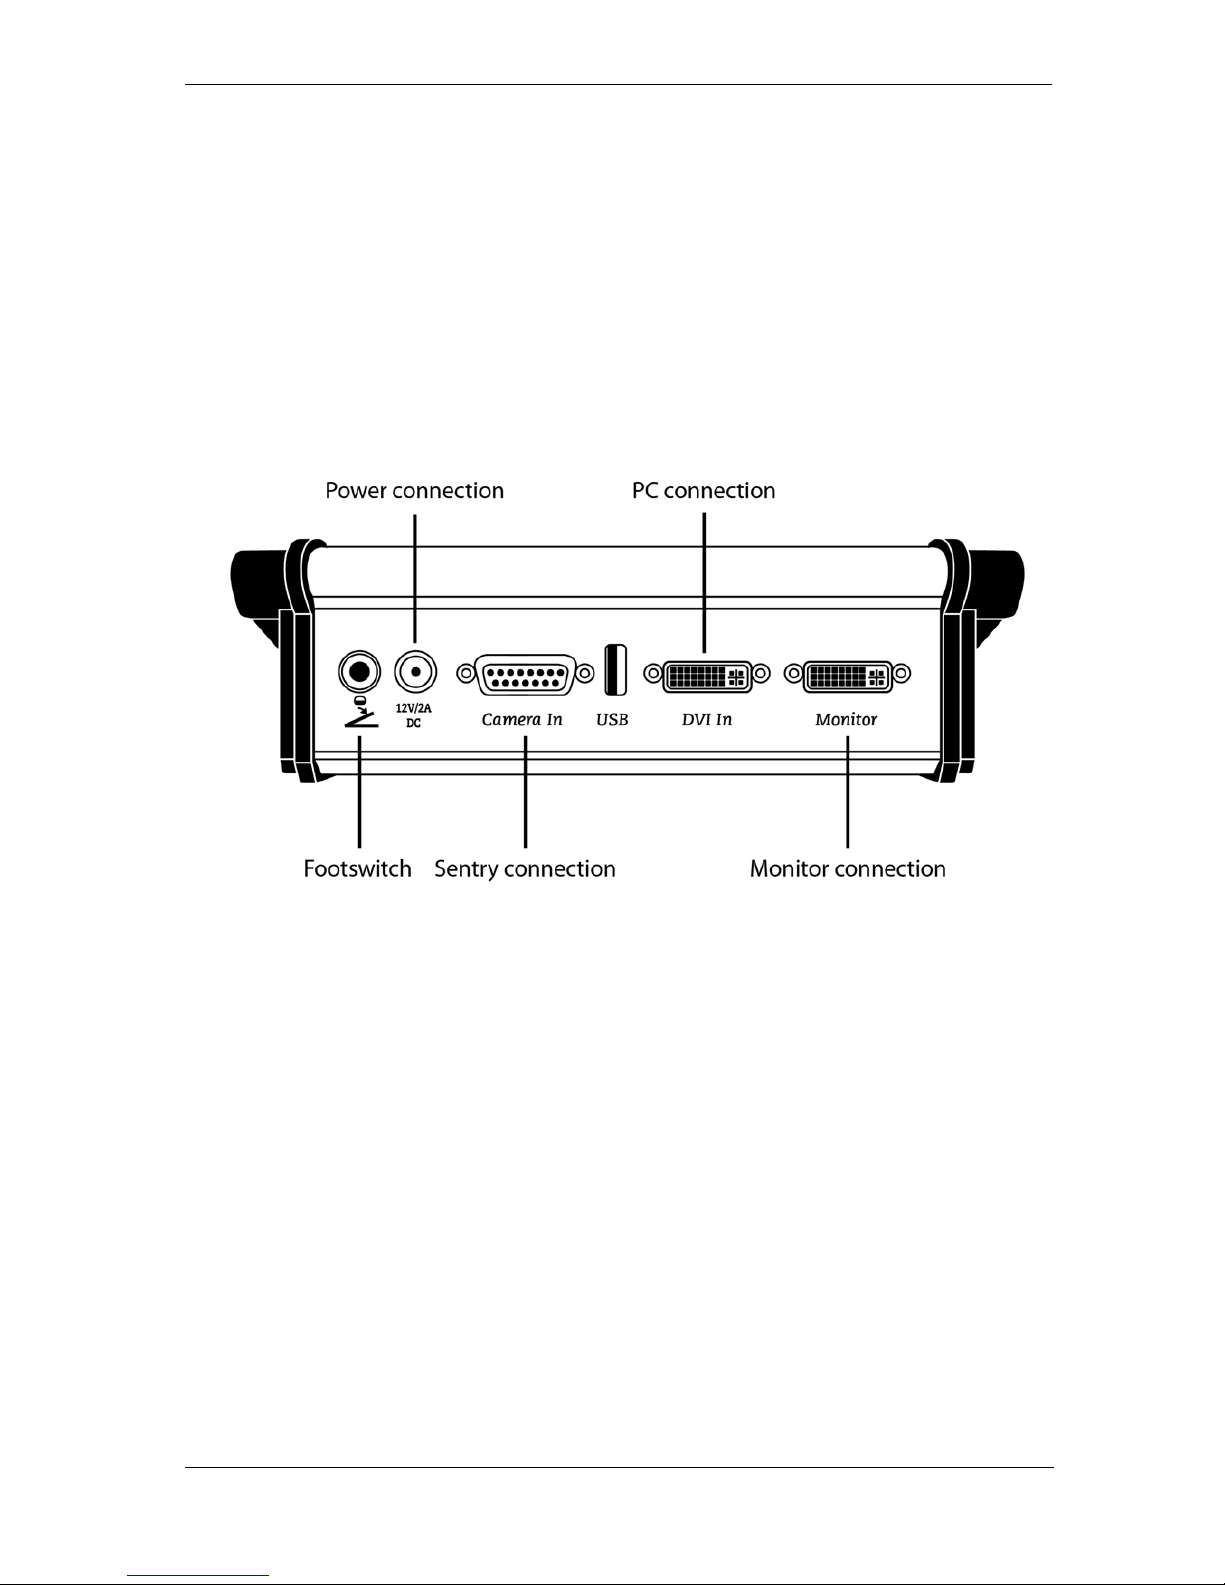
3. Connect the cable of the Sentry
+
[HD] camera arm to the camera
connection at the rear of the control panel (look at the picture on
page 11).
Page 13
Optelec Sentry+ / Sentry+ HD
English Page 11
4. Connect the DVI-cable of your monitor to the as “monitor” labelled
connection of the control panel.
5. By using the delivered DVI-cable connect your computer to the as
“DVI In” labelled connection of the control panel.
6. Additionally you can use a footswitch. Connect this to the first left
connector at the rear of the control panel.
7. Connect the supplied power supply to the power connection at the
back of the control box and plug the power cord into a power
outlet. Your Sentry
+
[HD] is now ready for use.
Page 14

Optelec Sentry+ / Sentry+ HD
English Page 12
Positioning the camera and the camera arm
The Sentry+ [HD] features a flexible camera head and a rotatable camera
arm. The camera head can be swivelled around a horizontal and a
vertical axis. The camera arm can be rotated around the base. Point the
camera to read a document nearby. When you want to look in the
distance (for example at a blackboard) or at yourself, you need to remove
the close-up lens and turn the camera in a horizontal position. By
loosening the screw lock at the end of the camera arm, you can adjust the
height of the camera (this will affect the magnification range).
Close-up and distance viewing
The position of the camera can be adjusted for desktop or distance
viewing. To view objects within 55 cm, position the close-up lens in front
of the camera unit. To view objects at a more distant proximity, position
the close-up lens away from the camera. To prevent losing the close-up
lens, attach the lens to the top side of the camera head.
Use the near lens with the flattened edgings for the position below and
use the round lens for the upper position.
Use of the built-in object lighting
The double LED-lighting is built in to the camera arm
for use in poorly-lit environments. The lighting can be
switched on and off by pushing the zoom button in the
following order: “step 1/ step 2/ Off”.
Page 15
Optelec Sentry+ / Sentry+ HD
English Page 13
5. Operation of the Sentry+ [HD] control panel
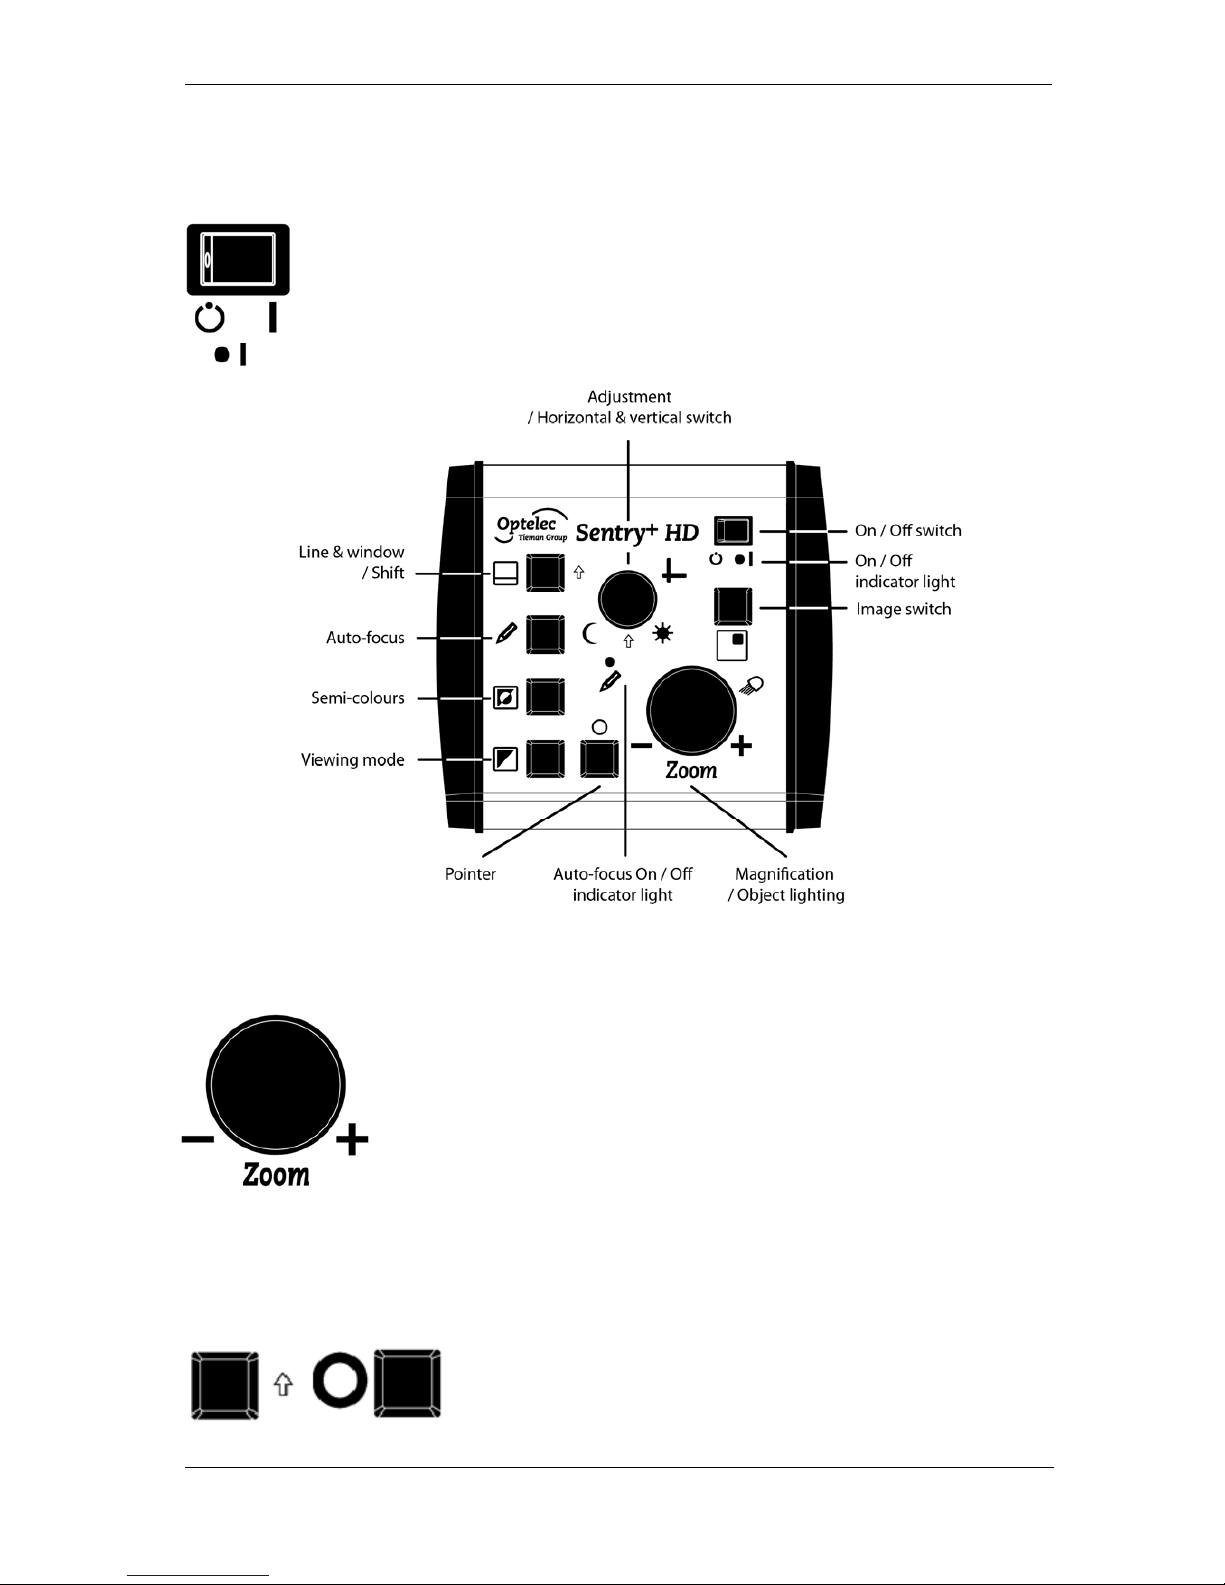
Switch On / Off
Press the On / Off switch, located at the top right Corner of the
control panel to switch on the Sentry
+
[HD]. The On / Off
indicator light will illuminate when the control panel is switched
on. The monitor needs to be switched on separately.
Setting the magnification
Turning the Zoom control allows you to select the
desired magnification level. The Sentry
+
[HD] magnifies
text and images from 1 to 70 times the original size on a
22-inch screen. Turning the circular control anticlockwise will decrease the magnification. Similarly,
turning the circular control clockwise will increase the
magnification.
Wide screen mode – only at Sentry+
By pressing the Shift key along with the overview
button you can switch between three views:
Widescreen, flexible widescreen and without
widescreen. Widescreen is the factory setting.
Page 16
Optelec Sentry+ / Sentry+ HD
English Page 14
The overview mode
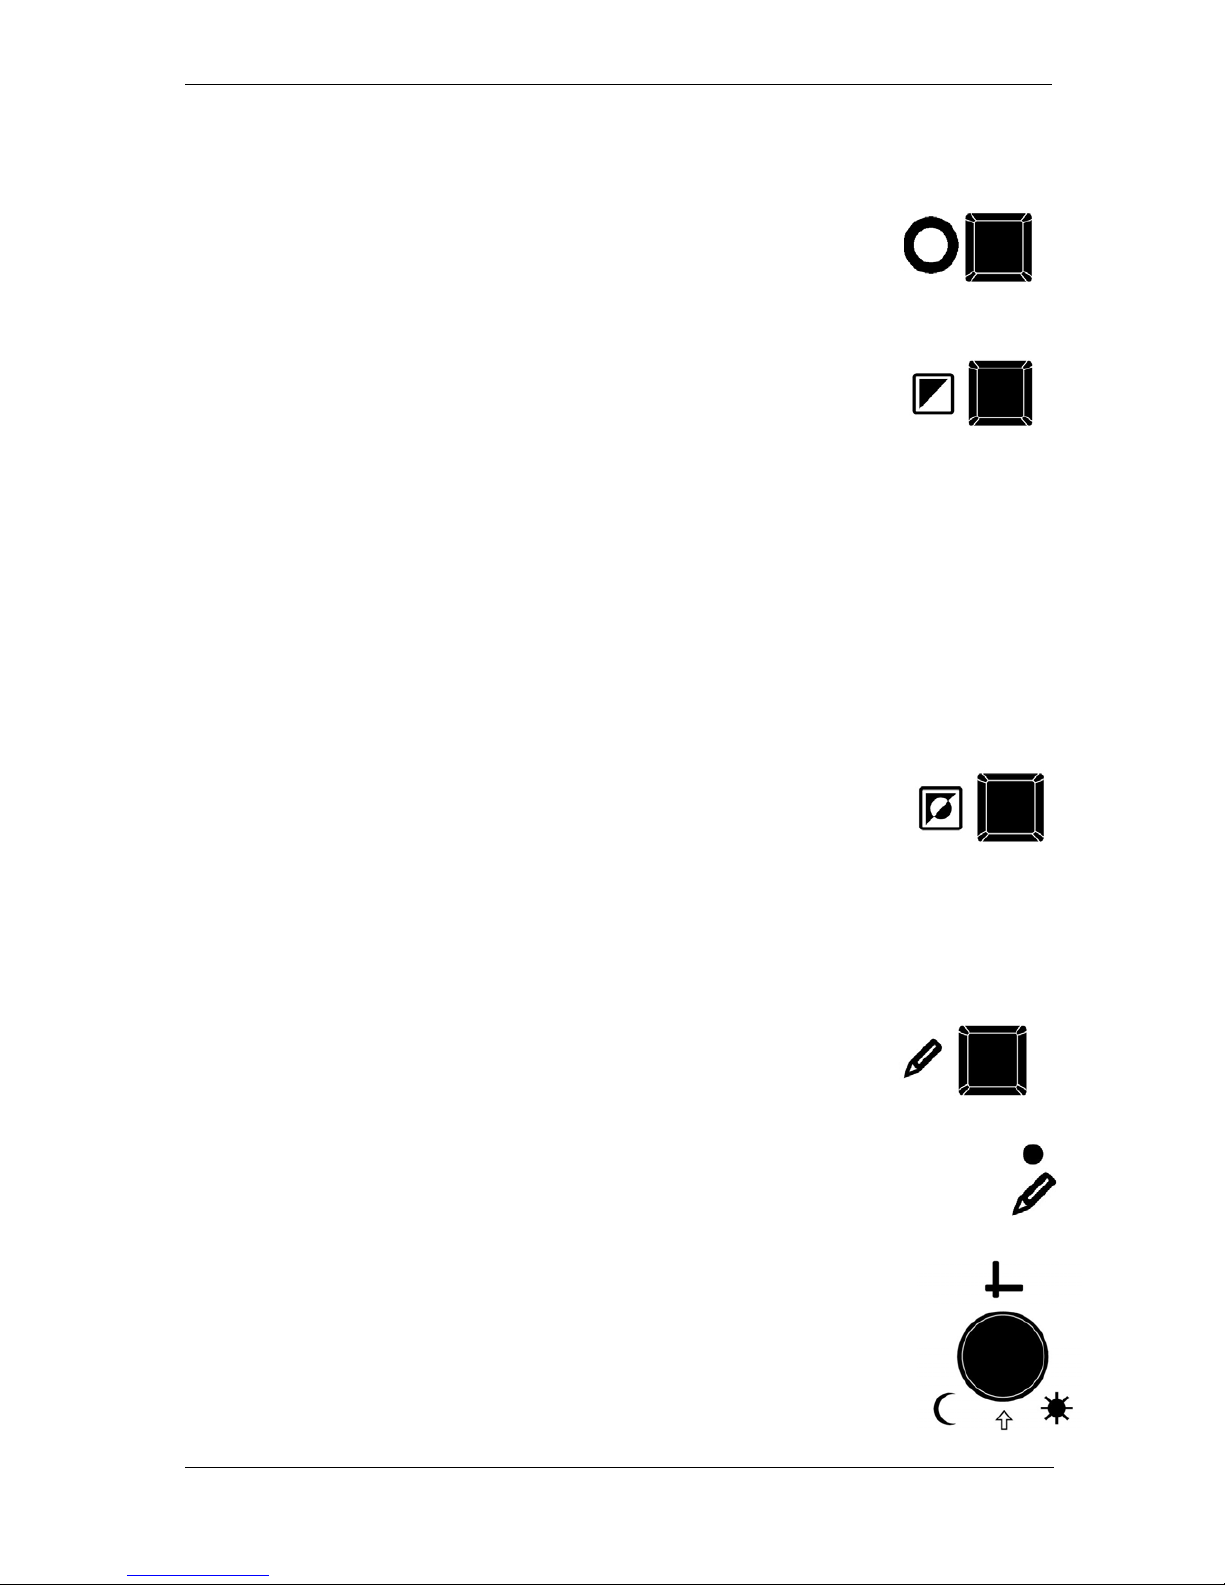
By pressing the overview key you can activate a crosshair
target on the visual screen, which shows you the centre of
the image of the camera. By pressing this key twice the
crosshair target will disappear.
Viewing modes
Pressing this button will cycle you through three viewing
modes:
1- Full Colour Photo mode
This mode will display text, pictures and objects in full colour.
2- Positive Reading mode
This mode enhances the foreground / background contrast. Pictures
and text will be displayed in black text on a white background.
3- Negative Reading mode
This mode reverses the positive image. Pictures and text will be
displayed as white text on a black background.
Semi-colours
You can activate this function in the Positive and Negative
Reading Modes only. Pressing this button cycles you
through a wide range of different foreground and background colour
combinations. You may choose to display text in a pair of selectable
colours when more contrast is needed or when alternate colour
combinations provide easier reading.
Auto-focus On / Off
The Sentry+ [HD] features automatic focusing to produce a
clear image at any time. When the auto-focus is not active
the red LED indicator will illuminate. Press this button to switch to
Focus Lock which stops the Sentry
+
[HD] from continuously
focusing. This is useful for tasks such as writing, painting or
enjoying craftwork. Pressing this button will re-activate the autofocus and the red LED indicator light will turn off again.
Contrast
The contrast changes with the adjustment button, which is
presented on the right. Rotating this button counter
clockwise decreases the contrast and rotating the button
clockwise increases the contrast.
Page 17
Optelec Sentry+ / Sentry+ HD
English Page 15
Brightness
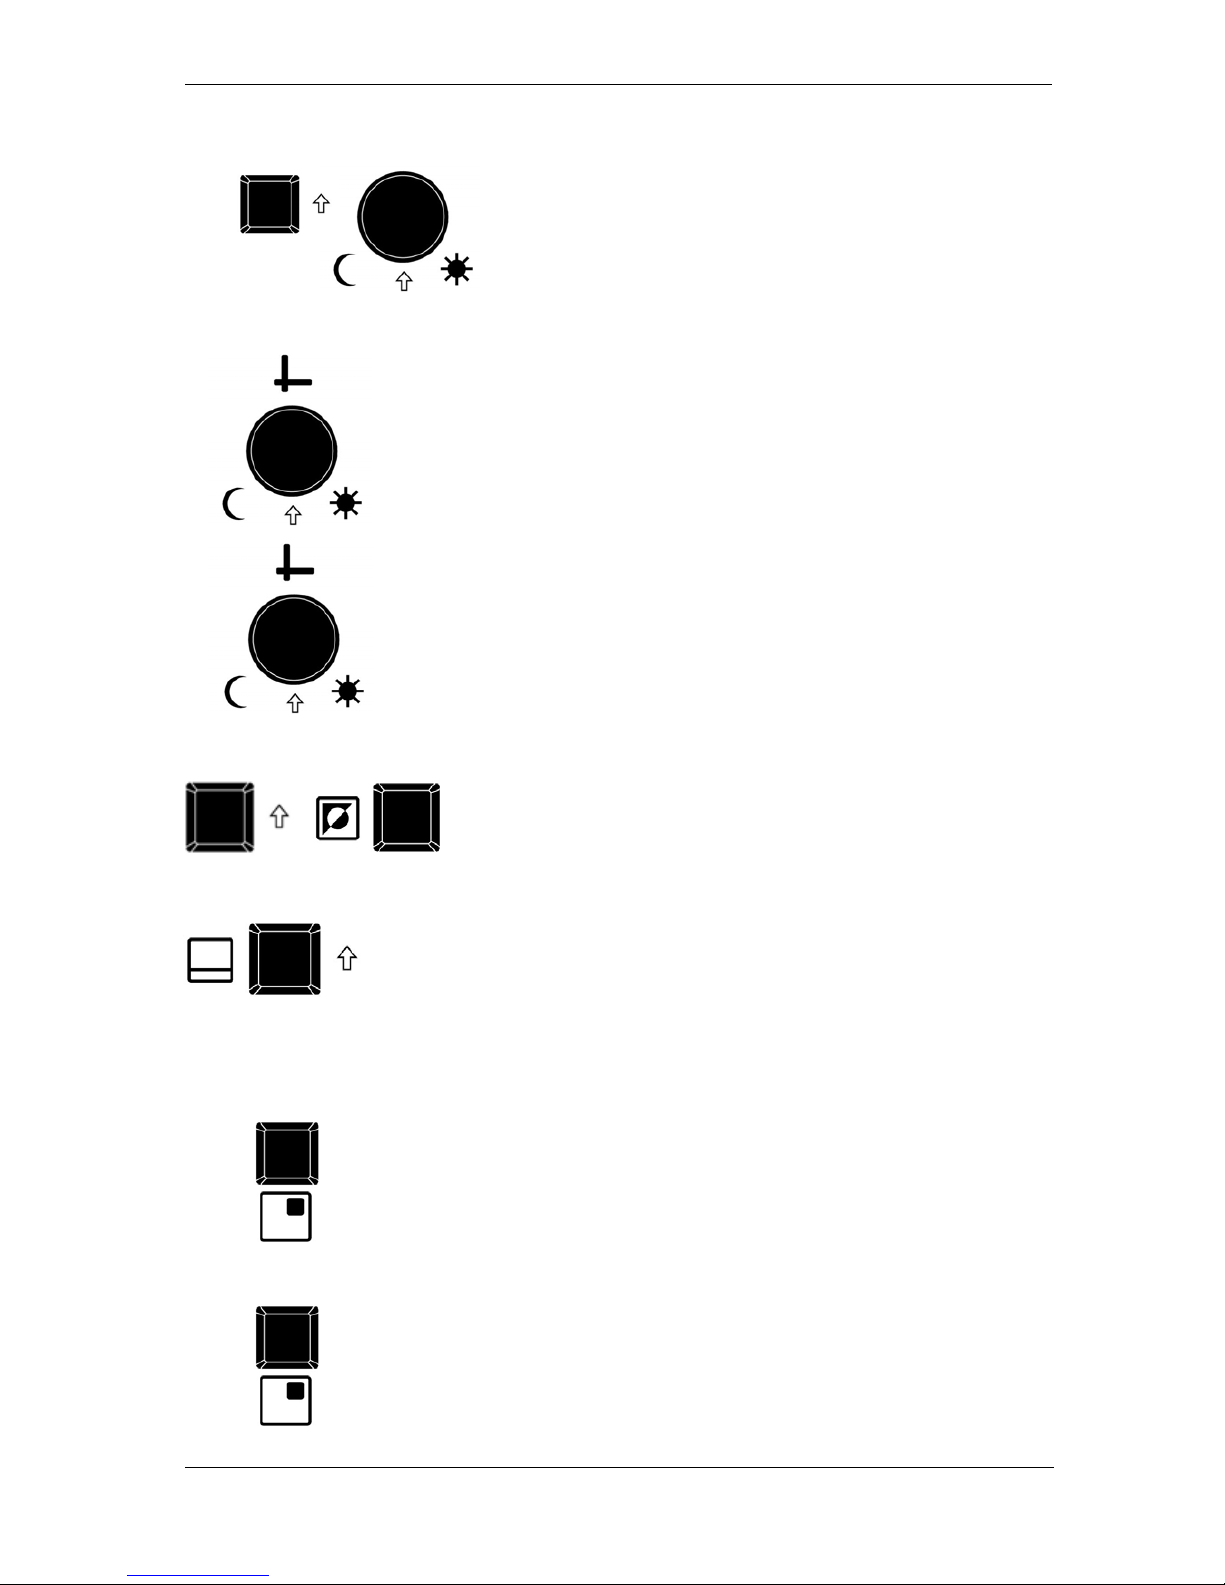
Turning the button whilst simultaneously
pressing the adjacent Shift button allows you to
adjust the brightness of the Sentry
+
[HD] image.
Turn the control anti-clockwise to decrease the
brightness. Turn the circular control clockwise
to increase the brightness.
Activating line markers / window blinds
Pressing this button cycles you through line markers,
window blinds and back to full screen. Horizontal line
markers and window blinds are used to make reading
easier.
Reading line and window shades adjustment
When line markers or window blinds are activated,
turning this circular control will change their orientation.
Reading line colours
By pressing the Shift key along with the Semicolours button you can change the reading line
colours. The photo mode can be change
separately. Black is the factory setting.
Key switch
This key enables additional functions. Pressing and
holding this key while rotating the upper adjustment
button allows you to change additional functions such as
line distance, window shade distance and changes in
brightness.
Picture switch
By pressing this button you can switch between the
image from the Sentry
+
[HD] camera and the PC image.
If you have a footswitch available, you can control
switching the image by pressing the footswitch.
Reset
Press this button when the Sentry+ [HD] is switched off.
Switch the Sentry
+
[HD] on while pressing this button
and keep the button pressed for 2 seconds. The Sentry
+
[HD] will now start with the original settings.
Page 18

Optelec Sentry+ / Sentry+ HD
English Page 16
6. Sentry+ Specifications
- Camera : 18x optical zoom
- Viewing modes : Full colour photo mode
High contrast black-on-white
High contrast white-on-black
- Semi-colours : 8 foreground / background
colour combinations
- Magnification : 2 to 50 times on a 17“ monitor
- Focus : Autofocus with focus lock and manual
focus
- Monitor output and input : DVI
- Screen frequency : 60 Hz
- Camera movements : 200° tilting and 360° swivel
- Light : LED
- Close-up lens : Removable
- Weight unit : 5.5 kg / 194 ounces
- Weight control panel : 0.85 kg / 30 ounces
- Weight power supply : 0.18 kg / 6.3 ounces
- Power supply input : 100-240 V 50-60 Hz AC
- Power supply output : 12 V / 2 Amp. DC
Operating conditions
Humidity : < 75%, no condensation
Temperature : 0 – 40 °C
Storage & transport conditions
Humidity : < 75%, no condensation
Temperature : -20 – 60 °C
WARNING: The use of accessories, transducers and cables other than
those specified, with the exception of transducers and cables sold by the
manufacturer of the Sentry
+
as replacement parts for internal
components, may result in increased emissions or decreased immunity of
the Sentry
+
.
Optelec nor its partners do not take any responsibility when using the
product and its accessories other than those specified in this manual.
For additional questions on the Sentry
+
regarding service, installation or
operation, contact your local distributor or nearest Optelec office (details
at the end of this user manual).
Page 19

Optelec Sentry+ / Sentry+ HD
English Page 17
7. Sentry+ HD Specifications
- Camera : 1080 HD 20x optical zoom
- Viewing modes : Full colour photo mode
High contrast black-on-white
High contrast white-on-black
- Semi-colours : 8 foreground / background
colour combinations
- Magnification : 2 to 50 times on a 17“ monitor
- Focus : Autofocus with focus lock and manual
focus
- Monitor output and input : DVI
- Screen frequency : 60 Hz
- Camera movements : 200° tilting and 360° swivel
- Light : LED
- Close-up lens : Removable
- Weight unit : 5.5 kg / 194 ounces
- Weight control panel : 0.85 kg / 30 ounces
- Weight power supply : 0.18 kg / 6.3 ounces
- Power supply input : 100-240 V 50-60 Hz AC
- Power supply output : 12 V / 2 Amp. DC
Operating conditions
Humidity : < 75%, no condensation
Temperature : 0 – 40 °C
Storage & transport conditions
Humidity : < 75%, no condensation
Temperature : -20 – 60 °C
WARNING: The use of accessories, transducers and cables other than
those specified, with the exception of transducers and cables sold by the
manufacturer of the Sentry
+
HD as replacement parts for internal
components, may result in increased emissions or decreased immunity of
the Sentry
+
HD.
Optelec nor its partners do not take any responsibility when using the
product and its accessories other than those specified in this manual.
For additional questions on the Sentry
+ HD
regarding service, installation
or operation, contact your local distributor or nearest Optelec office
(details at the end of this user manual).
Page 20

Optelec Sentry+ / Sentry+ HD
English Page 18
8. Compliances
This product complies with the safety and EMC requirements of the
directives:
EN60601-1: 2007-07
EN60601-1-2: 2007-12
Optelec
Breslau 4
2993 LT Barendrecht
The Netherlands
EU – Declaration of conformity
Barendrecht, the Netherlands
October 2008
The manufacturer declares that the Sentry
+
and Sentry+ HD electronic
magnifier complies to the safety guidelines and directives of the European
Community.
This EU – declaration of conformity is based on tests according to the
directives:
EN60601-1: 2007-07 and EN60601-1-2: 2007-12 by an independent
Notified body.
Warning: The use of accessories, power supply units or cables which are
not determined as original replacement equipment can cause higher
emission or lower immunity of the Sentry
+
and Sentry+ HD.
This device bears the CE approval mark
(UL/CSA/TÜV approved)
Page 21

Optelec Sentry+ / Sentry+ HD
English Page 19
This electronic device is tested and shows compliance with the limits of
the 60601-1 and the supplementary standards. These limits are
determined to guarantee reasonable protection against harmful
influences from other electronic devices. This electronic device uses
electronic high frequency circuits and with this it produces legal electronic
high frequency radiation. Improper use or false spare parts or
accessories can influence other electronic devices in your household.
Nevertheless there is no guarantee that influence in a particular matter
excludes other electronic devices.
In case this device has a disturbing effect on other electronic receivers, at
first you can try to solve the failure by the following procedures:
- Change the location of the receiving antenna of the interfered device.
- Enlarge the distance between the Sentry
+
and your receiver.
- Use a different socket-outlet than the receiver.
- Ask your dealer or an electrician.
WARNING: You are cautioned that changes or modifications not
expressly approved by the party responsible for compliance could void
your authority to operate the equipment.
Page 22

Optelec Sentry+ / Sentry+ HD
English Page 20
9. Warranty Conditions
Optelec warrants the Sentry+ [HD], effective from the date of delivery, to
be free of any defects in material and workmanship.
Optelec reserves the right to repair or replace any purchased Sentry
+
[HD]
with a similar or improved product.
In no event shall Optelec or its suppliers be held liable for any indirect or
consequential damages. The original user’s remedies are limited to
replacement of Sentry
+
[HD] modules. This warranty is valid only when
serviced in the country of original purchase, and with intact seals. For
additional warranty claims or service during or after warranty period,
please contact your Optelec distributor.
Optelec is not responsible for any uses of this device other than those
described in this manual.
Page 23

Optelec Sentry+ / Sentry+ HD
English Page 21
Optelec Headquarters Optelec BV
Breslau 4
2993 LT Barendrecht,
The Netherlands
T: +31 (0)88 6783 444
www.optelec.eu
Optelec Offices Worldwide Optel ec NV
Baron Ruzettelaan 29
8310 Bruges
Belgium
T: +32 (0)50 35 7555
www.optelec.be
Optelec Canada
1832, Boulevard Marie-Victorin
Longueuil, QC J4G 1Y9
Canada
T: +1 (0)450 677-1171
www.optelec.ca
Optelec GmbH
Fritzlarer Straße 25
34613 Schwalmstadt, Germany
T: +49 (0)6691 96170
www.optelec.de
Optelec Nederland BV
Breslau 4
2993 LT Barendrecht
The Netherlands
T: +31 (0)88 6783 555
www.optelec.nl
Optelec UK
2 Millfield House, Woodshots Meadow, Croxley
Green Business Park,
Watford WD18 8YX
United Kingdom
T: +44 (1923) 23 13 13
www.optelec.co.uk
Optelec US Ltd
3030 Enterprise Court
Suite C, Vista, CA 92081
U.S.A.
T: +1 (800) 828 4200
www.optelec.com
Page 24

Page 25

Optelec Sentry+ / Sentry+ HD
Page 26

Optelec Sentry+ / Sentry+ HD
Deutsch Seite 1
Sentry+
Sentry
+
HD
Bedienungsanleitung
Version 5.0
Copyright 2013 Optelec, The Netherlands
Alle Rechte vorbehalten
Optelec
P.O. Box 399
2990 AJ Barendrecht
The Netherlands
Telefon: +31 88 6783-444. Fax +31 88 6783-400
E-Mail: [email protected]
Internet: www.optelec.com
Page 27

Optelec Sentry+ / Sentry+ HD
Deutsch Seite 2
Page 28

Optelec Sentry+ / Sentry+ HD
Deutsch Seite 3
WEEE Richtlinie
Die WEEE-Richtlinie (Waste Electrical and Electronic Equipment; deutsch:
(Elektro- und Elektronikgeräte-Abfall) ist die EG-Richtlinie 2002/96/EG zur
Reduktion der zunehmenden Menge an Elektronik-schrott aus nicht mehr
benutzten Elektro- und Elektronikgeräten. Die EU-Richtlinie ist im Jahr
2003 in Kraft getreten.
Oberstes Ziel dieser Richtlinie ist das Vermeiden, Verringern sowie
umweltverträgliche Entsorgen der zunehmenden Mengen an Elektro- und
Elektronikschrott.
Das WEEE Zeichen (links gezeigt) auf dem Produkt oder der
Verpackung gibt an, dass dieses Produkt nicht mit dem üblichen
Haushaltsmüll entsorgt werden darf. Sie sind dafür verantwortlich,
Ihren Elektroabfall über eine speziell dafür geeignete
Sammelstelle für Wiederverwertung zu entsorgen.
Getrennte Sammlung und sachgerechte Behandlung in einer
Verwertungsanlage hilft uns, die Rohstoffe zu erhalten. Außerdem hilft die
richtige Wiederverwertung durch das WEEE System, die menschliche
Gesundheit sicherzustellen. Für mehr Informationen über das
Wiederverwertungssystem für elektronische und elektrische Geräte über
Sammelstellen wenden Sie sich bitte an Ihre örtliche Stadt- oder
Gemeindeverwaltung, den Haushalt-Abfallbeseitigung-Dienst oder Ihren
Händler, von dem Sie das Gerät kauften.
Page 29

Optelec Sentry+ / Sentry+ HD
Deutsch Seite 4
Page 30

Optelec Sentry+ / Sentry+ HD
Deutsch Seite 5
Sentry+
Sentry
+
HD
Bedienungsanleitung
April 2013
Optelec wurde 1975 in Rockanje in den Niederlanden gegründet.
Seit 1975 entwickelt und produziert Optelec innovative Produkte, die
sehbehinderten und blinden Menschen den Alltag erleichtern.
Besuchen Sie die Internetseite wenn Sie mehr über Optelec erfahren
wollen: www.optelec.com
Alle Rechte, besonders das Recht der Reproduktion, wie auch der
Übersetzung, sind gesichert.
Diese Bedienungsanleitung darf in keiner Form, auch nicht teilweise, ohne
die schriftliche Einwilligung der Tieman Group kopiert werden.
Es wurde alles unternommen, um sicherzustellen, dass alle Informationen
in dieser Anleitung zur Zeit der Entstehung richtig sind.
Optelec oder einer der Optelec Partner wird nicht für die Fehler oder
Schäden haften, die durch falsche Handhabung entstanden sind.
Page 31

Optelec Sentry+ / Sentry+ HD
Deutsch Seite 6
Inhalt
1.
Einführung ........................................................................................... 7
Über diese Anleitung ..................................................................... 7
2. Wichtige Sicherheitshinweise .............................................................. 8
3. Lieferumfang ..................................................................................... 10
4. Lernen Sie Ihre Sentry+ [HD] kennen ................................................ 11
Aufbauen der Sentry+ [HD].......................................................... 11
Positionieren der Kamera und des Kamera-Arms ....................... 13
Nah- und Fernbereich ................................................................. 13
Benutzen der eingebauten Beleuchtung ..................................... 13
5. Benutzung der Bedientastatur ........................................................... 14
Ein- und Ausschalten .................................................................. 14
Einstellen der Vergrößerung ....................................................... 14
Der Breitbildmodus – nur bei Sentry+ .......................................... 14
Der Übersichtsmodus ................................................................. 15
Ansichtsmodus ............................................................................ 15
Lesefarben .................................................................................. 15
Autofokus Ein/Aus ....................................................................... 15
Kontrast ....................................................................................... 15
Helligkeit ..................................................................................... 16
Hilfslinien und Bildschirmabdeckung aktivieren .......................... 16
Hilfslinien und Bildschirmabdeckung einstellen .......................... 16
Hilfslinienfarbe einstellen ............................................................ 16
Umschaltfunktionstaste ............................................................... 16
Bildumschaltung .......................................................................... 16
Reset ........................................................................................... 16
6. Sentry+ [HD] Spezifikationen ............................................................. 17
7. Erklärungen ....................................................................................... 19
8. Garantiebedingungen ........................................................................ 21
Kontaktinformationen ............................................................................... 21
Page 32

Optelec Sentry+ / Sentry+ HD
Deutsch Seite 7
1. Einführung
Herzlichen Glückwunsch zur Wahl der Sentry
+
beziehungsweise der
Sentry
+
HD, ein qualitativ hochwertiges Echtfarb-Vergrößerungssystem,
entwickelt von Optelec. In dieser Bedienungsanleitung wird hauptsächlich
die Bezeichnung Sentry
+
[HD] für beide Geräte verwendet. Die Sentry+
[HD] ist ein Bildschirmlesegerät mit Autofokus für Zuhause und Beruf, um
sehbehinderte Menschen in unterschiedlichen Einsatzbereichen zu
unterstützen. Benutzen Sie die Sentry
+
[HD] zum Lesen, Schreiben, Bilder
ansehen, zum Handarbeiten u. v. m.
Die Sentry
+
[HD] wurde für optimales Arbeiten mit einem allein stehenden
Monitor entwickelt. Sie kann von einem Bedienpult aus oder mit einem PC
verbunden bedient werden. Sollten Sie Fragen oder Anregungen zu
diesem Produkt haben, wenden Sie sich bitte an Ihren Händler oder an
Optelec. Die Kontaktdaten finden Sie auf der letzten Seite dieser
Bedienungsanleitung. Ihre Anregungen sind herzlich willkommen. Wir
hoffen, dass Ihnen die Arbeit mit der Sentry
+
[HD] viel Spaß bereitet.
Über diese Anleitung
Dieses Handbuch bietet Ihnen eine umfassende Beschreibung über die
Handhabung und die Funktionen des Bildschirmlesegerätes Sentry
+
[HD].
Bitte lesen Sie dieses Handbuch aufmerksam, bevor Sie die Sentry
+
[HD]
benutzen und halten Sie es zum Nachschlagen bereit.
Page 33

Optelec Sentry+ / Sentry+ HD
Deutsch Seite 8
2. Wichtige Sicherheitshinweise
Optelec übernimmt keine Verantwortung oder Haftung für die durch
die Sentry
+
[HD] fehlerhaft erkannten Inhalte von Texten oder deren
Interpretation. Wichtige Dokumente lassen Sie bitte zusätzlich
überprüfen.
Benutzen Sie die Sentry
+
[HD] nur in geschlossenen Räumen.
Vermeiden Sie hohe Temperaturschwankungen und Feuchtigkeit.
Diese Bedingungen können die Elektronik oder die Optik Ihrer Sentry
+
[HD] beschädigen.
Stellen Sie die Sentry
+
[HD] an einen sicheren Ort. Das Herunterfallen
kann zu Beschädigungen am Gerät oder Verletzungen des Benutzers
führen.
Um Schäden zu vermeiden, behandeln Sie die Komponenten der
Sentry
+
[HD] mit großer Sorgfalt, da es sich um bewegliche und
rotierende Teile handelt.
Setzen Sie die Sentry
+
[HD] keiner großen Hitze und direkter
Sonnenbestrahlung aus, um ein Entflammen des Gerätes zu
vermeiden.
Entfernen Sie keine Teile der Sentry
+
[HD]. Setzen Sie sich bei
Störungen unbedingt mit Ihrem Optelec-Händler in Verbindung. Öffnen
Sie das Gerät nicht, dadurch erlischt die Gewährleistung. Alle
Komponenten enthalten Teile, die nur von einem Optelec-Mitarbeiter
repariert werden können.
Um elektrische Schäden zu vermeiden, halten Sie die Sentry
+
[HD]
von Flüssigkeiten und Chemikalien fern.
Behandeln Sie die Sentry
+
[HD] sorgfältig. Unsachgemäße
Behandlung führt zu Schäden der Bauteile.
Benutzen Sie die Sentry
+
[HD] nicht in der Nähe von empfindlichen
medizinischen Geräten.
Ziehen Sie vor dem Reinigen der Sentry
+
[HD] immer den Netzstecker
heraus. Benutzen Sie ein weiches Tuch zum Säubern der Sentry
+
[HD]. Benutzen Sie kein Putzmittel oder aggressive Stoffe zum
Reinigen, es könnte das Gerät beschädigen.
Stellen Sie sicher, dass die Sentry
+
[HD] an eine geerdete Steckdose
angeschlossen wird, um Ihre Sicherheit zu gewährleisten.
Benutzen Sie die Sentry
+
[HD] nicht unter 0° oder über +40° Celsius.
Page 34

Optelec Sentry+ / Sentry+ HD
Deutsch Seite 9
Wird die Sentry+ [HD] anders als in diesem Handbuch beschrieben
benutzt, erlischt die Gewährleistung!
Page 35

Optelec Sentry+ / Sentry+ HD
Deutsch Seite 10
3. Lieferumfang
Zum Lieferumfang der Sentry
+
[HD] gehören folgende Teile:
Sentry
+
[HD] Kamera-Arm
Grundplatte für den Sentry
+
[HD]-Kamera-Arm
Bolzen und Schraube zur Befestigung an der Grundplatte
Steuereinheit
2 unterschiedliche Vorsatzlinsen
Netzteil
2 DVI-Anschlusskabel
Benutzerhandbuch
Sollte eines dieser Teile fehlen, setzen Sie sich bitte mit Ihrem OptelecHändler in Verbindung.
Page 36

Optelec Sentry+ / Sentry+ HD
Deutsch Seite 11
4. Lernen Sie Ihre Sentry+ [HD] kennen
Aufbauen der Sentry+ [HD]
Um die Sentry
+
[HD] aufzubauen, gehen Sie wie folgt vor:
1. Befestigen Sie mit dem Abstandshalter und der Schraube den
Kameraarm auf der Bodenplatte.
2. Stellen Sie den zusammengebauten Kameraarm und die
Steuereinheit in unmittelbare Nähe Ihres Computerbildschirms auf
eine geeignete Stellfläche.
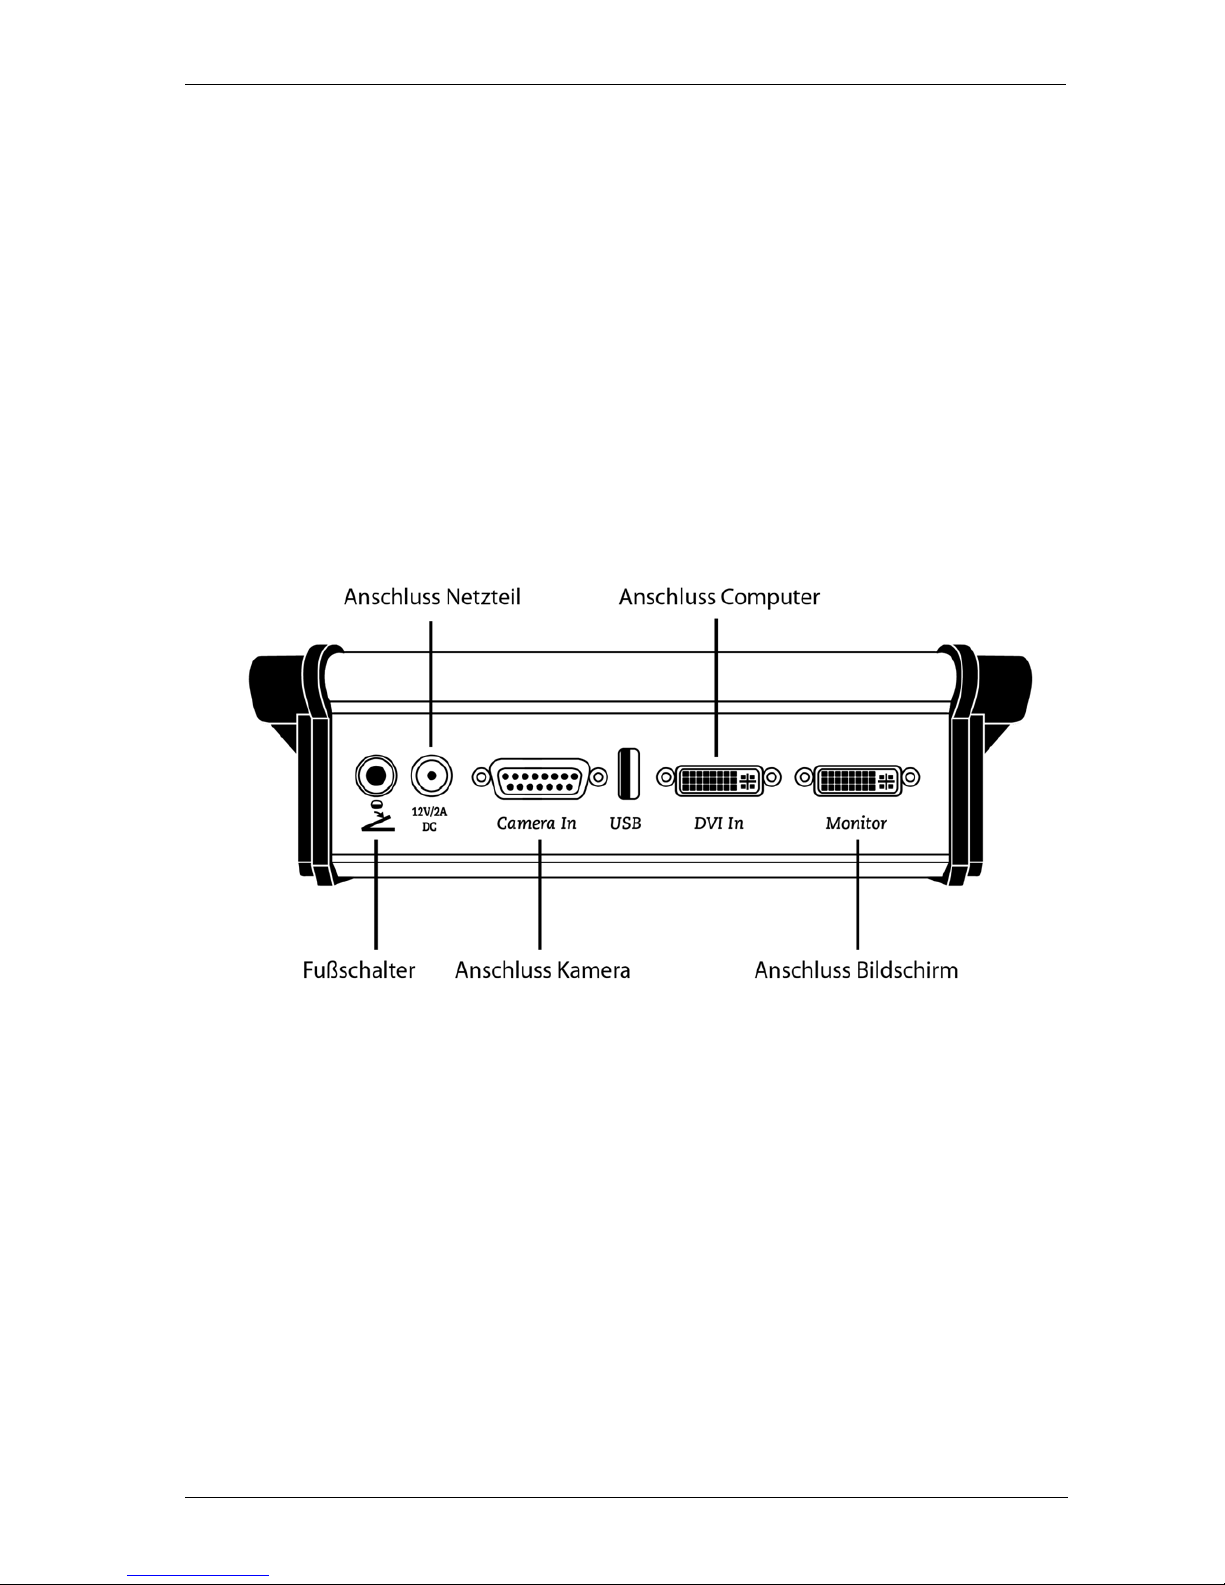
3. Die Steuereinheit der Sentry
+
[HD] wird mit der Kamera verbunden
(Camera In bezeichnet).
Page 37
Optelec Sentry+ / Sentry+ HD
Deutsch Seite 12
4. Verbinden Sie das DVI-Kabel Ihres Computerbildschirms mit der
Schnittstelle an der Steuereinheit, die mit „Monitor“ beschriftet ist.
5. Verbinden Sie den Computer mit dem im Lieferumfang enthalten
DVI-Kabel mit der Schnittstelle, die mit „DVI-IN“ beschriftet ist.
6. Benutzen Sie zusätzlich einen Fußschalter, so stecken Sie dessen
Anschlussstecker in die äußere Buchse neben der 12 Volt Stromversorgungsbuchse.
7. Schließen Sie das Kabel des mitgelieferten Netzteiles an die mit
12V/2A bezeichnete Stromversorgungsbuchse an der hinteren Seite
des Gerätes an. Das Netzteil selbst stecken Sie danach in die
Steckdose.
Page 38

Optelec Sentry+ / Sentry+ HD
Deutsch Seite 13
Positionieren der Kamera und des Kamera-Arms
Die Sentry+ [HD] bietet einen flexiblen Kamerakopf und einen drehbaren
Kamera-Arm. Der Kamerakopf kann um eine horizontale und eine vertikale
Achse gedreht werden. Der Kamera-Arm kann um die Grundplatte gedreht
werden. Richten Sie die Kamera auf ein Dokument im Nahbereich.
Alternativ dazu entfernen Sie die Nahlinse und schwenken Sie die Kamera
in eine horizontale Position, um in die Ferne zu blicken oder um sich selbst
anzusehen. Durch das Lösen, nicht Abschrauben, der Verriegelungsschraube am Kamera-Arm-Ende können Sie die Höhe der Kamera und
damit die Vergrößerung zusätzlich verstellen.
Nah- und Fernbereich
Die Kamera kann im Nah- oder im Fernbereich benutzt werden. Um ein
Objekt im Bereich bis 55 cm Entfernung zu betrachten, befestigen Sie die
Nahlinse vor der Kameraeinheit. Um weiter entfernte Objekte zu
betrachten, entfernen Sie die Nahlinse vor der Kamera. Um die Nahlinse
nicht zu verlieren, setzen Sie sie auf die Oberseite des Kameragehäuses.
Benutzen Sie die Nahlinse mit abgeflachten Rändern für die untere
Position, die komplett runde Nahlinse für die obere Position.
Benutzen der eingebauten Beleuchtung
Eine zweifach LED-Beleuchtung ist im Kamera-Arm
integriert, um bei schlechten Lichtverhältnissen
eingesetzt zu werden. Die Beleuchtung kann durch
Drücken dieses Drehknopfes als Taster in der
Reihenfolge: “Stufe 1 / Stufe 2 / Aus“ ein- und ausgeschaltet werden.
Page 39
Optelec Sentry+ / Sentry+ HD
Deutsch Seite 14
5. Benutzung der Bedientastatur
Ein- und Ausschalten
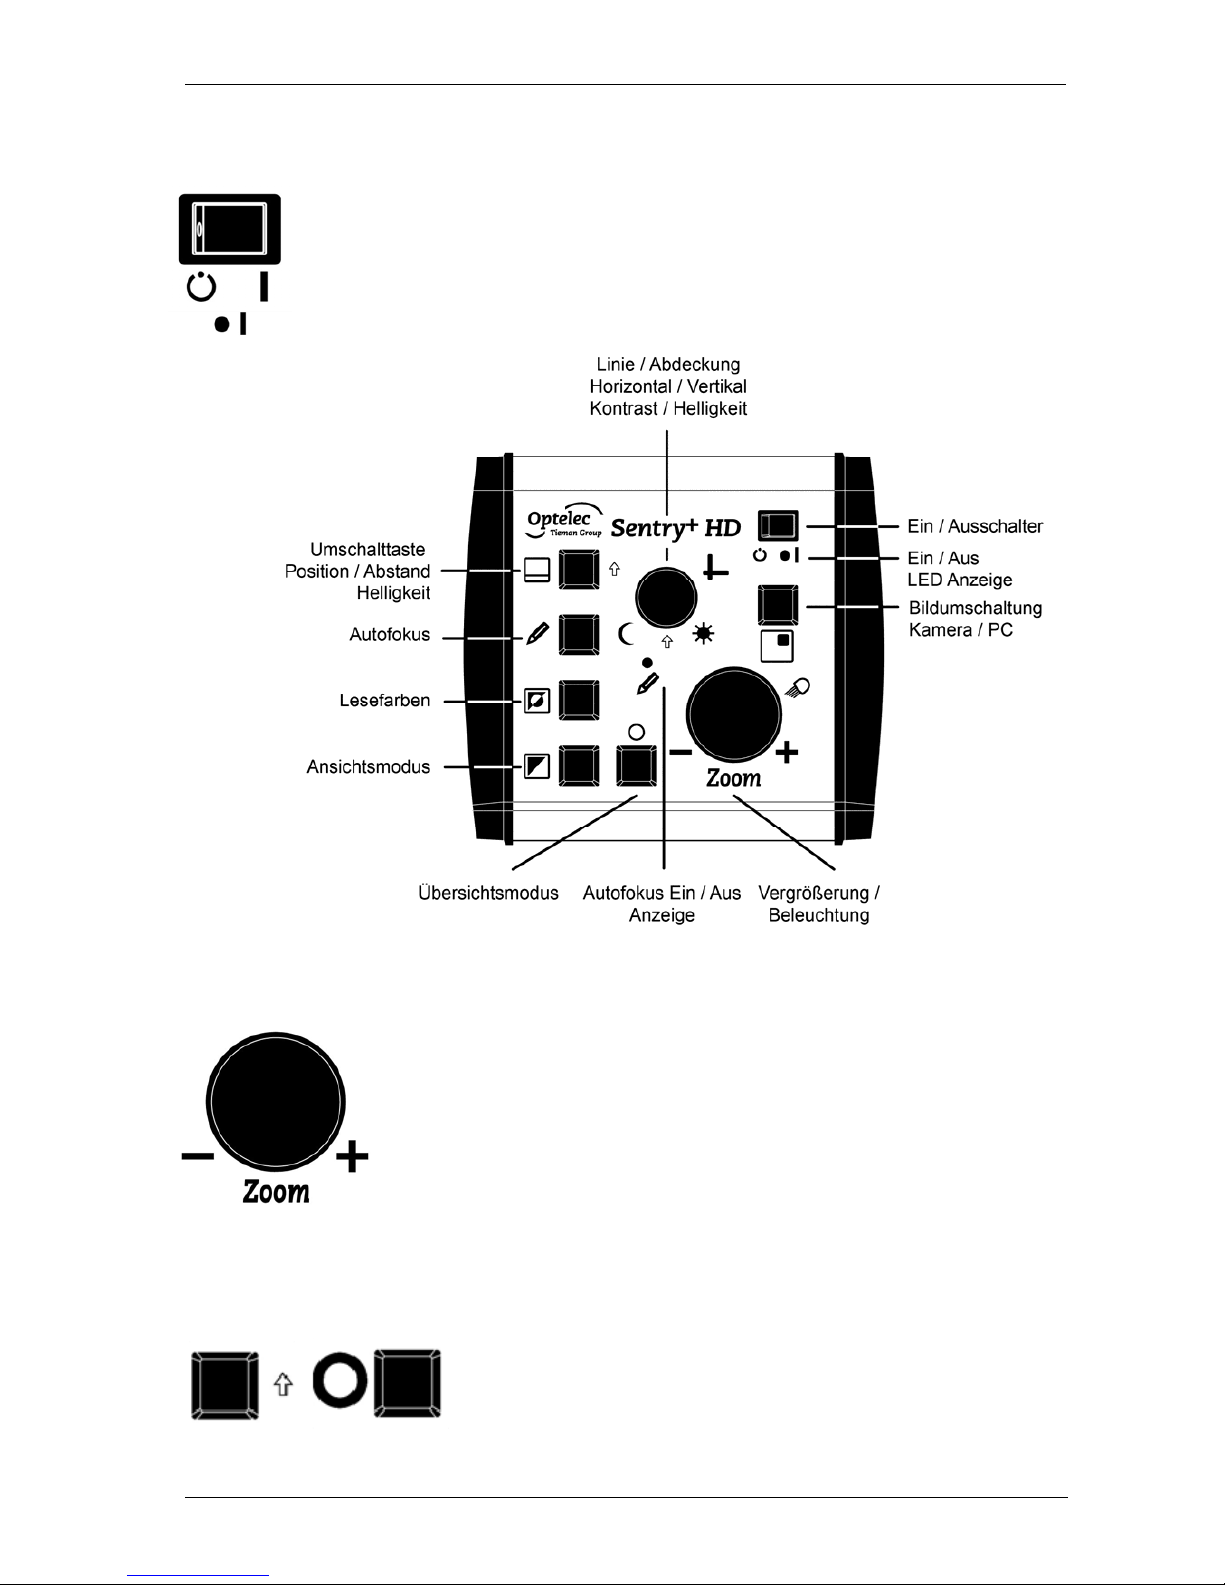
Drücken Sie den an der oberen rechten Ecke angebrachten
Schalter, um die Sentry
+
[HD] ein- und auszuschalten. Wenn die
Ein/Aus-LED leuchtet, ist die Sentry
+
[HD] eingeschaltet. Der
Bildschirm muss zusätzlich eingeschaltet werden.
Einstellen der Vergrößerung
Drehen Sie den Zoom-Knopf, um die Vergrößerung
einzustellen. Die Sentry
+
[HD] vergrößert Texte und
Bilder von 1 bis 70fach mit einem 56 cm-Bildschirm.
Bewegen Sie den Drehknopf entgegen des
Uhrzeigersinns, wird die Vergrößerung geringer. Analog
dazu wird die Vergrößerung höher, wenn Sie im
Uhrzeigersinn drehen.
Der Breitbildmodus – nur bei Sentry
+
Durch Drücken der Umschalttaste zusammen mit
der Übersichtstaste schalten Sie zwischen drei
Darstellungen um: Breitbild, flexibles Breitbild und
kein Breitbild. Werksseitig ist Breitbild eingestellt.
Page 40

Optelec Sentry+ / Sentry+ HD
Deutsch Seite 15
Der Übersichtsmodus
Durch Drücken der Übersichtstaste aktivieren Sie ein
Fadenkreuz auf dem Bildschirm, das Ihnen den Mittelpunkt
der Kamera-Abbildung zeigt. Mit dem zweiten Druck verschwindet das Fadenkreuz wieder.
Ansichtsmodus
Mit dieser Taste gehen Sie durch 3 mögliche Ansichtsmodi:
1- Echtfarben-Fotomodus
Dieser Modus zeigt Ihnen Texte, Bilder oder Objekte in Echtfarbe.
2- Positiv-Lesemodus
Dieser Modus optimiert Vorder- und Hintergrundkontrast. Bilder und
Text werden schwarz auf weißem Hintergrund dargestellt.
3- Negativ-Lesemodus
Dieser Modus invertiert den Positiv-Modus. Bilder und Texte werden in
Weiß auf schwarzem Hintergrund dargestellt.
Lesefarben
Diese Funktion kann nur im Positiv- und Negativmodus
aktiviert werden.
Durch Drücken dieser Taste gelangen Sie durch eine Vielzahl
verschiedener Vorder- und Hintergrund-Farbkombinationen. Wählen Sie
eine für Sie passende Farbkombination mit mehr oder weniger Kontrast
aus, um komfortabel lesen zu können.
Autofokus Ein/Aus
Die Sentry+ [HD] bietet Ihnen einen Autofokus, der zu jeder
Zeit eine klare Abbildung erzeugt. Wenn der Autofokus
nicht aktiv ist, leuchtet die rote LED-Anzeige. Durch Drücken der
Fokus-Taste fixieren Sie den Fokus, der Autofokus ist abgeschaltet.
Dies ist sinnvoll beim Schreiben, Malen oder Handarbeiten.
Erneutes Drücken der Fokus-Taste schaltet den Autofokus wieder
ein und die rote LED erlischt.
Kontrast
Den Kontrast verändern Sie mit dem abgebildeten
Drehregler. Entgegen des Uhrzeigersinns wird die
Darstellung kontrastärmer, im Uhrzeigersinn kontrastreicher.
Page 41
Optelec Sentry+ / Sentry+ HD
Deutsch Seite 16
Helligkeit
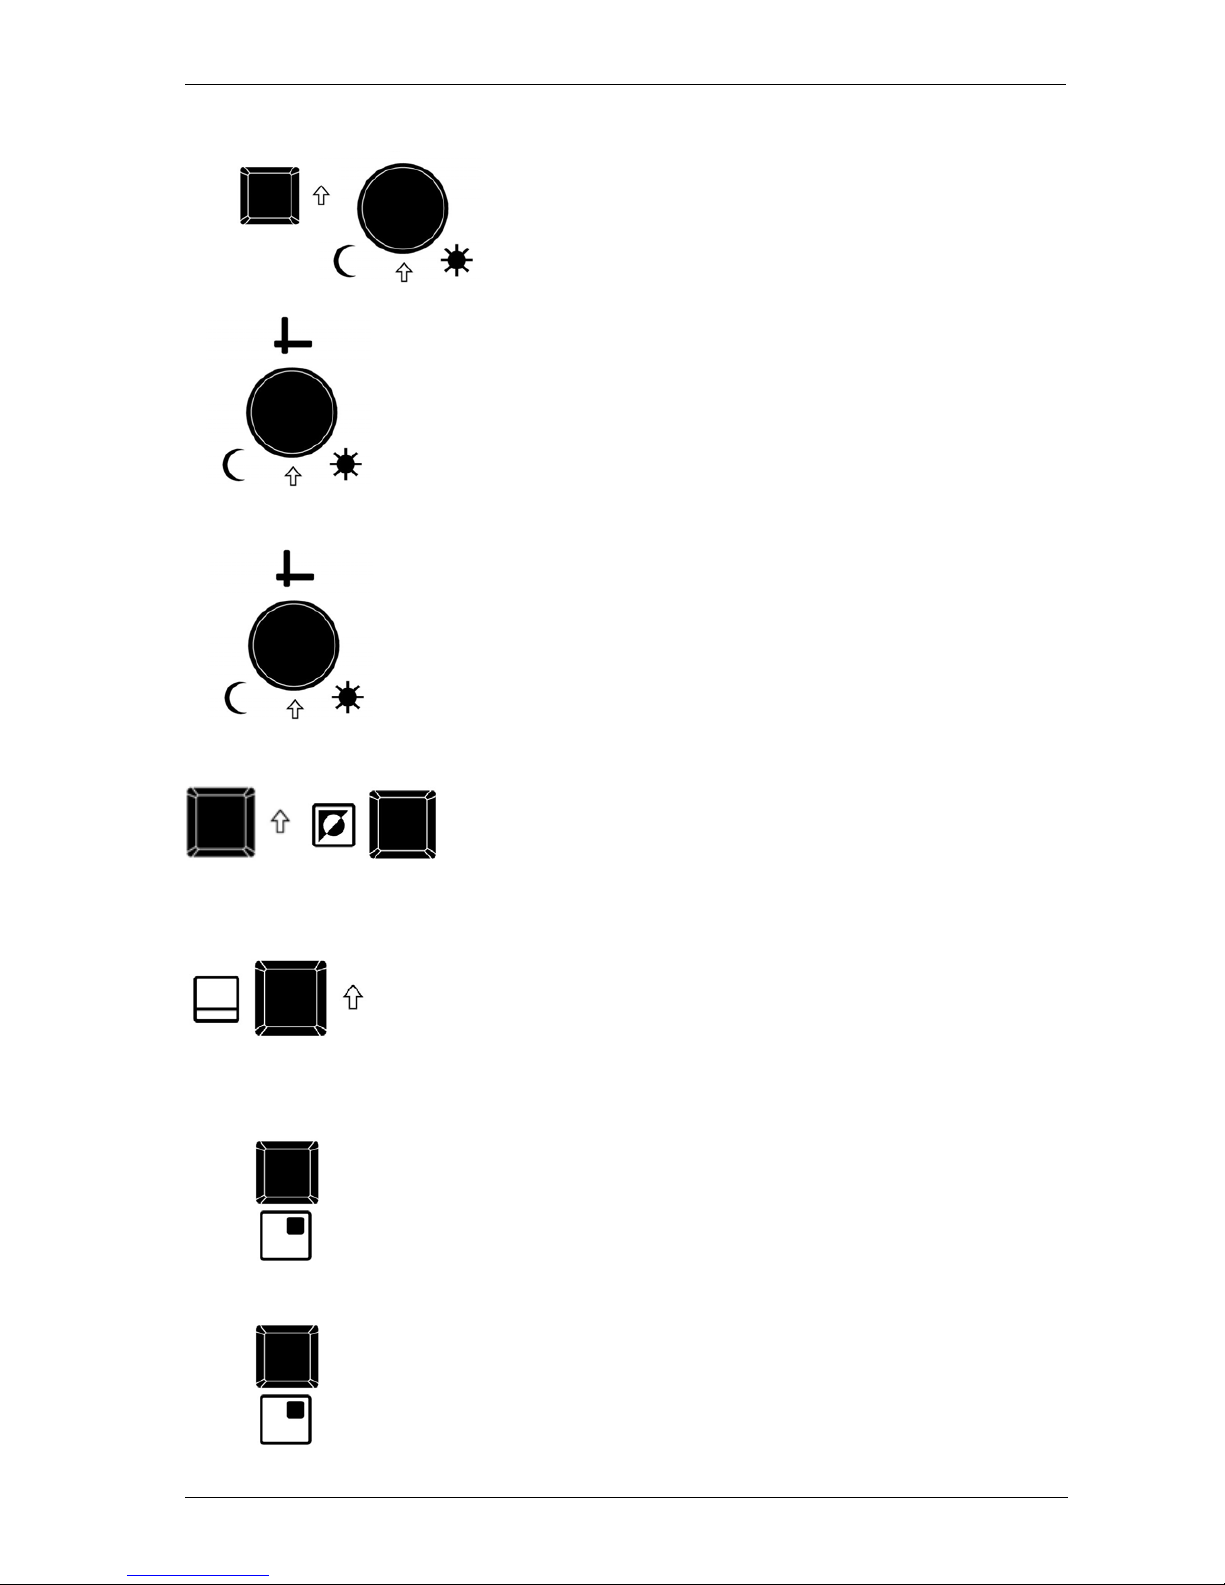
Das Bewegen des Drehknopfes bei gedrückter
Umschalttaste erlaubt Ihnen, die Helligkeit des
Sentry
+
[HD]-Bildes einzustellen. Entgegen des
Uhrzeigersinns wird die Darstellung dunkler, im
Uhrzeigersinn heller.
Hilfslinien und Bildschirmabdeckung
aktivieren
Durch Drücken dieses Drehknopfes als Taste gelangen
Sie zur Hilfslinie, Bildschirmabdeckung und wieder zurück
zur Vollbild-Darstellung. Horizontale Hilfslinien und
Bildschirmabdeckung erleichtern Ihnen das Lesen.
Hilfslinien und Bildschirmabdeckung
einstellen
Wenn Hilfslinien oder Bildschirmabdeckung aktiv sind, hat
der Drehknopf eine andere Funktion. Sie können hiermit
die Position und den Abstand der Linien einstellen.
Hilfslinienfarbe einstellen
Durch Drücken der Umschalttaste zusammen mit
der Lesefarbentaste ändern Sie die Hilfslinienfarbe.
Der Fotomodus lässt sich gesondert einstellen.
Werksseitig ist schwarz eingestellt.
Umschaltfunktionstaste
Diese Taste funktioniert als Zusatztaste. Drücken und
halten Sie diese Taste zusammen mit dem Drehen des
oberen kleinen Drehknopfes, so erhalten Sie weitere
Funktionen wie Linienabstand, Abdeckungsabstand und
Helligkeitsänderung.
Bildumschaltung
Mit dieser Taste wechseln Sie die Anzeige zwischen
Kamerabild und dem Vollbild des PC. Sollten Sie einen
Fußschalter besitzen, so können Sie mit diesem die
Umschaltung zusätzlich bedienen.
Reset
Drücken Sie diese Taste bei ausgeschaltetem Gerät.
Nun schalten Sie mit gedrückter Taste ein und lassen
nach 2 Sekunden die Taste wieder los.
Die Sentry
+
[HD] startet nun mit den Werkseinstellungen.
Page 42

Optelec Sentry+ / Sentry+ HD
Deutsch Seite 17
6. Sentry+ Spezifikationen
- Kamera : 18x optischer Zoom
- Ansichtsmodi : Echtfarbdarstellung
Kontrastdarstellung Schwarz auf Weiß
Kontrastdarstellung Weiß auf Schwarz
- Lesefarben : Kontrastdarstellung
9 Vordergrund / Hintergrund
Farbkombinationen
- Vergrößerung : 2 bis 50fach bei einem 43 cm Monitor
- Fokus : Autofokus (abschaltbar)
- Monitor Ein/Ausgang : DVI für Breitbild-TFT
- Bildwiederholfrequenz : 60 Hz
- Kamerabewegung : 200° Neigung und 360° drehbar
- Beleuchtung : LED
- Nahlinsen 2 und 3 : Abnehmbar
- Gewicht komplett : 5.5 kg
- Gewicht Bedientastatur : 0.85 kg
- Gewicht Netzteil : 0.18 kg
- Netzteil Eingang : 100-240 V 50-60 Hz AC
- Netzteil Ausgang : 12 V / 2 A DC
Betriebsbedingungen:
Luftfeuchtigkeit : < 75%, keine Kondensation
Temperatur : 0 bis 40 °C
Lager und Transportbedingungen:
Luftfeuchtigkeit : < 75%, keine Kondensation
Temperatur : -20 bis 60 °C
WARNUNG: Benutzen Sie nur alle von Optelec mitgelieferten
Zubehörteile. Eine Nutzung anderer Kabel, Kabelverlängerungen, Netzteile, Akkus oder nicht geprüften PCs, Notebooks oder Monitore kann die
EU-Richtlinien gemäß des EMV- und Sicherheitsgesetzes verletzen. Die
Firma Optelec und ihre Partner übernehmen in diesem Falle keine
Verantwortung für Fehler und verursachte Schäden. Bei weiteren Fragen
zur Sentry
+
betreffend Service, Installation oder Betrieb kontaktieren Sie
bitte Ihren lokalen Händler oder Ihr nächst- gelegenes Optelec Büro.
(Adressen finden Sie am Ende dieser Anleitung).
Page 43

Optelec Sentry+ / Sentry+ HD
Deutsch Seite 18
Sentry+ HD Spezifikationen
- Kamera : 1080 HD 20x optischer Zoom
- Ansichtsmodi : Echtfarbdarstellung
Kontrastdarstellung Schwarz auf Weiß
Kontrastdarstellung Weiß auf Schwarz
- Lesefarben : Kontrastdarstellung
9 Vordergrund / Hintergrund
Farbkombinationen
- Vergrößerung : 2 bis 50fach bei einem 43 cm Monitor
- Fokus : Autofokus (abschaltbar)
- Monitor Ein/Ausgang : DVI für Breitbild-TFT
- Bildwiederholfrequenz : 60 Hz
- Kamerabewegung : 200° Neigung und 360° drehbar
- Beleuchtung : LED
- Nahlinsen 2 und 3 : Abnehmbar
- Gewicht komplett : 5.5 kg
- Gewicht Bedientastatur : 0.85 kg
- Gewicht Netzteil : 0.18 kg
- Netzteil Eingang : 100-240 V 50-60 Hz AC
- Netzteil Ausgang : 12 V / 2 A DC
Betriebsbedingungen:
Luftfeuchtigkeit : < 75%, keine Kondensation
Temperatur : 0 bis 40 °C
Lager und Transportbedingungen:
Luftfeuchtigkeit : < 75%, keine Kondensation
Temperatur : -20 bis 60 °C
WARNUNG: Benutzen Sie nur alle von Optelec mitgelieferten
Zubehörteile. Eine Nutzung anderer Kabel, Kabelverlängerungen, Netzteile, Akkus oder nicht geprüften PCs, Notebooks oder Monitore kann die
EU-Richtlinien gemäß des EMV- und Sicherheitsgesetzes verletzen. Die
Firma Optelec und ihre Partner übernehmen in diesem Falle keine
Verantwortung für Fehler und verursachte Schäden. Bei weiteren Fragen
zur Sentry
+
HD betreffend Service, Installation oder Betrieb kontaktieren
Sie bitte Ihren lokalen Händler oder Ihr nächst- gelegenes Optelec Büro.
(Adressen finden Sie am Ende dieser Anleitung).
Page 44

Optelec Sentry+ / Sentry+ HD
Deutsch Seite 19
7. Erklärungen
RoHS Übereinstimmung
Dieses Produkt stimmt mit der Direktive 2002/95/EC des Europäischen
Parlaments und dem Europäischen Rat vom 27. Januar 2003 über die
Reduzierung gefährlicher Substanzen in elektrischen und elektronischen
Geräten (RoHS) überein.
Dieses Produkt erfüllt die Anforderungen der folgenden Richtlinien in
Bezug auf Sicherheit und elektromagnetische Verträglichkeit:
EN60601-1: 2007-07
EN60601-1-2: 2007-12
Optelec
Breslau 4
2993 LT Barendrecht
The Netherlands
EU – Konformitätserklärung
Barendrecht, The Netherlands
March 2012
Der Hersteller erklärt in eigener Verantwortung, dass die
Bildschirmlesegeräte
Sentry
+
und Sentry+ HD
mit den Sicherheitsbestimmungen und Direktiven der Europäischen
Gemeinschaft 93/42/EWG Klasse I übereinstimmten.
WARNUNG: Die Benutzung von Zubehörteilen, Netzteilen oder Kabeln,
die nicht vom Hersteller als original Ersatz- oder Zubehörteile bestimmt
sind, können eine erhöhte Emission oder verringerte Immunität der Sentry
+
und Sentry
+
HD zur Folge haben.
Dieses Gerät trägt das CE Zeichen
Page 45

Optelec Sentry+ / Sentry+ HD
Deutsch Seite 20
Dieses Gerät ist getestet und zeigt die Übereinstimmung mit den Grenzen
der 60601-1 und deren Ergänzungsnormen. Diese Grenzen sind festgelegt
worden, um einen vernünftigen Schutz gegen schädliche Beeinflussung
anderer elektrischer Geräte zu gewährleisten. Dieses Gerät benutzt
elektrisch hochfrequente Schaltungen und erzeugt damit zulässige
elektrisch hochfrequente Abstrahlungen und kann bei unsachgemäßer
Behandlung oder beim Einsatz nicht vom Hersteller zugelassener
Zubehör- und Ersatzteile einen Einfluss auf Umfeld oder Haushalt anderer
elektrischer Geräte haben. Es gibt jedoch keine Garantie, dass eine
Beeinflussung in einem besonderen Fall anderer elektrischer Geräte
ausgeschlossen ist. Falls dieses Gerät eine störende Wirkung auf andere
elektrische Funk-Empfangseinrichtungen hat, können Sie zuerst
versuchen, die Störung durch folgende Maßnahmen zu beheben:
- Verändern Sie den Standort der Empfangsantenne des gestörten
Gerätes
- Vergrößern Sie den Abstand zwischen der Sentry
+
[HD] und Ihrem
Empfangsgerät.
- Benutzen Sie eine andere Stromversorgungssteckdose als die, die Ihr
Empfangsgerät benutzt.
- Ziehen Sie Ihren Händler oder einen elektronischen Fachmann zu Rate.
WARNUNG: Sie sind darauf aufmerksam gemacht worden, dass die
Betriebserlaubnis für das Gerät verfällt, wenn Änderungen oder
Modifikationen von nicht autorisierten Stellen vorgenommen werden.
Page 46

Optelec Sentry+ / Sentry+ HD
Deutsch Seite 21
8. Garantiebedingungen
Optelec garantiert, dass die Sentry+ [HD] ab dem Lieferdatum keine
Material- oder Verarbeitungsfehler aufweist.
Die Garantie ist nicht übertragbar und gilt nicht für Gruppen, MehrfachAnwender oder Agenturen. Die Sentry
+
[HD] wurde für Endkunden bzw.
Einzelpersonen zur Verwendung zu Hause oder am Arbeitsplatz
konzipiert. Optelec behält sich das Recht vor, die Sentry
+
[HD] zu
reparieren oder durch ein ähnliches oder besseres Produkt zu ersetzen.
Eine Haftung von Optelec oder seinen Vertretern für indirekte oder direkte
mittelbare Schäden ist in jedem Fall ausgeschlossen. Die dem
ursprünglichen Benutzer zustehenden Rechtsmittel beschränken sich auf
den Austausch der Sentry
+
[HD].
Diese Garantie ist nur unter der Voraussetzung gültig, dass die
Gerätewartung in dem Land erfolgte, in dem es gekauft wurde, und dass
alle Versiegelungen unversehrt sind. Bitte wenden Sie sich im Falle von
zusätzlichen Garantieansprüchen oder Wartungsmaßnahmen während
oder nach der Laufzeit der Garantie an Ihren Händler.
Optelec übernimmt keine Haftung für die Verwendung dieses Gerätes,
wenn es auf eine andere, zu den Beschreibungen in diesem Handbuch
abweichende Art und Weise verwendet wurde.
Page 47

Optelec Sentry+ / Sentry+ HD
Deutsch Seite 22
Optelec Hauptverwaltung Optelec BV
Breslau 4
2993 LT Barendrecht,
The Netherlands
T: +31 88 6783-444
www.optelec.com
Optelec International Optelec NV
Baron Ruzettelaan 29
8310 Brugge
Belgium
T: +32 50 35 7555
www.optelec.be
Optelec Canada
1832, Boulevard Marie-Victorin
Longueuil, QC J4G 1Y9
Canada
T: +1 450 677-1171
www.optelec.com
Optelec GmbH
Fritzlarer Straße 25
34613 Schwalmstadt, Germany
T: +49 6691 9617-0
www.optelec.de
Optelec Nederland BV
Breslau 4
2993 LT Barendrecht
The Netherlands
T: +31 88 6783-555
www.optelec.nl
Optelec UK
2 Millfield House, Woodshots Meadow, Croxley
Green Business Park,
Watford WD18 8YX
United Kingdom
T: +44 1923 231313
www.optelec.co.uk
Optelec US Ltd
3030 Enterprise Court
Suite C, Vista, CA 92081
U.S.A.
T: +1 800 8264200
www.optelec.com
Page 48

 Loading...