

Optelec MultiView HD User Manual
Optelec MultiView HD
1

Optelec MultiView HD
2
Index
1.
Introduction .......................................................................................... 7
About this manual ................................................................................. 7
2. What’s in the Box? .............................................................................. 8
3. Getting to Know Your MultiView HD ................................................... 9
Setting up the MultiView HD .................................................................. 9
Choosing between left- or right-hand usage ........................................ 10
Positioning the camera head and camera arm .................................... 10
Left/Right Rotation .............................................................................. 10
Camera positions ................................................................................ 11
Close-up viewing ................................................................................. 12
Self-viewing ......................................................................................... 12
Distance viewing ................................................................................. 12
4. Getting Started ................................................................................... 13
Switching On / Off ............................................................................... 13
Setting the level of magnification ......................................................... 13
Viewing modes .................................................................................... 13
Find function ....................................................................................... 14
Autofocus lock ..................................................................................... 14
Using the Snapshot button .................................................................. 14
Activating line markers / window shades ............................................. 15
Positioning line markers / window shades ........................................... 15
White Balance ..................................................................................... 15
Brightness adjustment ......................................................................... 15
Left/Right Rotation .............................................................................. 16
Frequency settings .............................................................................. 16
LED On/Off ......................................................................................... 16
Appendix A: Safety ..................................................................................... 17
Appendix B: Technical information ........................................................... 18
Appendix C: Warranty and compliances .................................................. 19
Optelec offices worldwide .......................................................................... 79
Inhoudsopgave
1. Introductie .......................................................................................... 21
Over deze handleiding ........................................................................ 21
2. Inhoud van de verpakking ................................................................. 22
3. De MultiView HD leren kennen .......................................................... 23
De MultiView HD installeren ................................................................ 23
Kiezen tussen links- of rechtshandig gebruik ....................................... 24
De camera en arm positioneren ........................................................... 24
Camera posities ................................................................................... 25

Optelec MultiView HD
3
Dichtbij kijken ....................................................................................... 25
Uzelf bekijken ...................................................................................... 26
Veraf kijken ......................................................................................... 26
4. Aan de slag ........................................................................................ 27
Aan / uit schakelaar ............................................................................. 27
Vergroting instellen ............................................................................. 27
Weergave modus ................................................................................ 27
Zoekfunctie ......................................................................................... 28
Auto-focus ........................................................................................... 28
De Snapshot toets gebruiken .............................................................. 28
Activeren beeldmarkering / beeldafdekking ......................................... 29
Positioneren beeldmarkering / beeldafdekking .................................... 29
Wit balans ........................................................................................... 29
Helderheid aanpassen ........................................................................ 30
Links / rechts rotatie ............................................................................ 30
Frequentie instelling. ........................................................................... 30
LED aan/uit ......................................................................................... 30
Bijlage A Belangrijke veiligheids informatie ............................................. 31
Bijlage B: Specificaties van de MultiView HD ........................................... 32
Bijlage C: Garantie bepalingen en nalevingen ......................................... 33
Optelec kantoren wereldwijd ..................................................................... 79
Table des matières
1. Introduction ........................................................................................ 35
À propos du manuel ............................................................................ 35
2. Le matériel dans la boîte ................................................................... 36
3. Connaître votre MultiView HD ........................................................... 37
Installation du MultiView HD ................................................................ 37
Choisir entre l’usage pour droitier et pour gaucher .............................. 38
Positionnement de la caméra et du bras de la caméra ........................ 38
Rotation gauche/droite ........................................................................ 38
Positions de la caméra ........................................................................ 39
Mode de visualisation rapprochée ....................................................... 40
Mode auto-visualisation ...................................................................... 40
Mode de visualisation éloignée ........................................................... 40
4. Fonctionnement ................................................................................. 41
Allumer et éteindre l’appareil ............................................................... 41
Réglage du niveau de grossissement .................................................. 41
Sélection du mode de visualisation ...................................................... 41
Fonction rechercher ............................................................................. 42
Verrouillage de la fonction mise au point automatique ......................... 42
Utilisation de la touche photo instantanée ............................................ 43
Activation des lignes et des caches ..................................................... 43
Positionnement des lignes et des caches ............................................ 43

Optelec MultiView HD
4
Équilibre des blancs ............................................................................ 44
Réglage de la luminosité ..................................................................... 44
Rotation vers la gauche et la droite ..................................................... 44
Réglage de la fréquence ..................................................................... 44
Allumer et éteindre l’éclairage DEL ..................................................... 45
Annexe A: Mesures de sécurité ................................................................. 46
Annexe B: Renseignements Techniques .................................................. 47
Annexe C: Garantie et conformité ............................................................. 48
Optelec dans le monde .............................................................................. 79
Índice
1.
Introducción ....................................................................................... 50
Acerca de este manual ....................................................................... 50
2. ¿Qué contiene la caja? ...................................................................... 51
3. Conocer su MultiView HD ................................................................. 52
Instalación del MultiView HD ............................................................... 52
Montaje para usuarios zurdos o diestros ............................................. 53
Posición del cabezal y brazo de la cámara ......................................... 53
Rotación izquierda/derecha ................................................................. 53
Posiciones de la cámara ..................................................................... 55
Visualización de cerca ........................................................................ 55
Auto-visualización ............................................................................... 56
Visualización a distancia ..................................................................... 56
4. Iniciar su MultiView HD ..................................................................... 57
Encender y apagar el MultiView HD .................................................... 57
Regular la amplificación ...................................................................... 57
Modos de visualización ....................................................................... 57
Función de búsqueda .......................................................................... 58
Bloqueo de auto-foco .......................................................................... 58
Botón de foto instantánea ................................................................... 59
Marcadores de línea/tonos de ventana ............................................... 59
Posicionar los marcadores de línea/tonos de ventana ........................ 59
Balance de blancos ............................................................................. 60
Ajustar el brillo .................................................................................... 60
Rotación Izquierda/Derecha ................................................................ 60
Parámetros de frecuencia ................................................................... 60
Encender y apagar la luz de LED ........................................................ 60
Apéndice A: Seguridad .............................................................................. 61
Apéndice B: Características técnicas ....................................................... 62
Apéndice C: Condiciones de garantía y conformidad ............................. 63
Optelec en el mundo .................................................................................. 79

Optelec MultiView HD
5
Inhalt
1. Einführung ......................................................................................... 65
Über diese Anleitung ........................................................................... 65
2. Was ist im Paket ................................................................................ 66
3. Lernen Sie Ihren MultiView HD kennen ............................................ 67
Aufbau ................................................................................................ 67
Linkshändige/Rechtshändige Bedienung auswählen .......................... 68
Positionieren des Kamerakopfes und des Kameraarmes .................... 68
Kamerapositionen ............................................................................... 69
Nahsicht .............................................................................................. 70
Selbstansicht ....................................................................................... 70
Fernsicht ............................................................................................. 70
4. Inbetriebnahme .................................................................................. 71
Ein-/Ausschalten ................................................................................. 71
Vergrößerung einstellen ...................................................................... 71
Darstellungsmodi ................................................................................ 71
Übersichtsfunktion ............................................................................... 72
Autofokus ausschalten ........................................................................ 72
Schnappschussfunktion verwenden .................................................... 73
Hilfslinien und Bildschirmabdeckung ................................................... 73
Hilfslinien und Bildschirmabdeckung ausrichten .................................. 73
Weißabgleich (White Balance) ............................................................ 74
Helligkeit einstellen ............................................................................. 74
Links/Rechts Drehung ......................................................................... 74
Frequenz Einstellung .......................................................................... 74
LED Ein/Aus ........................................................................................ 75
Anhang A: Sicherheit und Pflege .............................................................. 76
Anhang B: Technische Information .......................................................... 77
Anhang C: Garantiebedingungen und Erklärungen ................................. 78
Optelec Zweigniederlassungen Weltweit .................................................. 79

Optelec MultiView HD
6 English
User Manual
Version 1.1
© 2014 Optelec, the Netherlands.
All rights reserved
Optelec
2993 LT Barendrecht
The Netherlands
Telephone: +31 (0)88 6783 444. Fax +31 (0)88 6783 400
Internet: www.optelec.com

Optelec MultiView HD
English 7
1. Introduction
Congratulations on choosing the MultiView HD, an easily-transportable HD
video magnifier from Optelec. Use the MultiView HD for reading, writing,
viewing photographs, doing crafts, viewing distant objects, putting on
makeup, and so much more!
The MultiView HD enables you to view printed text, images and objects in
different colors, and to magnify them up to more than 75 times on a 22” or
24” wide screen display. With its ergonomic control pad, flexible camera
arm and optional light-weight X-Y table, the MultiView HD offers superior
operating and reading comfort. The MultiView HD can be used at home, at
school and in the office.
If you have any questions or suggestions concerning this product, please
contact your distributor or the Optelec headquarters by consulting the
contact information page found at the end of this user manual. Your
feedback is greatly appreciated. We hope you enjoy working with your
MultiView HD.
About this manual
At Optelec, we are constantly improving our products and their
functionalities. Therefore, it is possible that this manual is not the latest
version. Please download the most up-to-date manual on www.optelec.com
at the Support section.
This user manual offers a comprehensive guide to the features and
operation of the MultiView HD video magnifier. The illustrations in this user
manual may be different from the actual situation. Optelec will not assume
any responsibility for the misinterpretation of any of the content found in this
user manual. Please read this user manual carefully before using your
MultiView HD.

Optelec MultiView HD
8 English
2. What’s in the Box?
The MultiView HD packaging contains the following items:
− The MultiView HD video magnifier
− A control pad
− A power cable
− A lens cloth
− This user manual
Optional accessories:
− A carrying case for the MultiView 22 inch (not available for the
MultiView 24 inch)
− An X-Y reading table
If any items are missing from your package, please contact your local
Optelec distributor.
Optelec MultiView HD
English 9
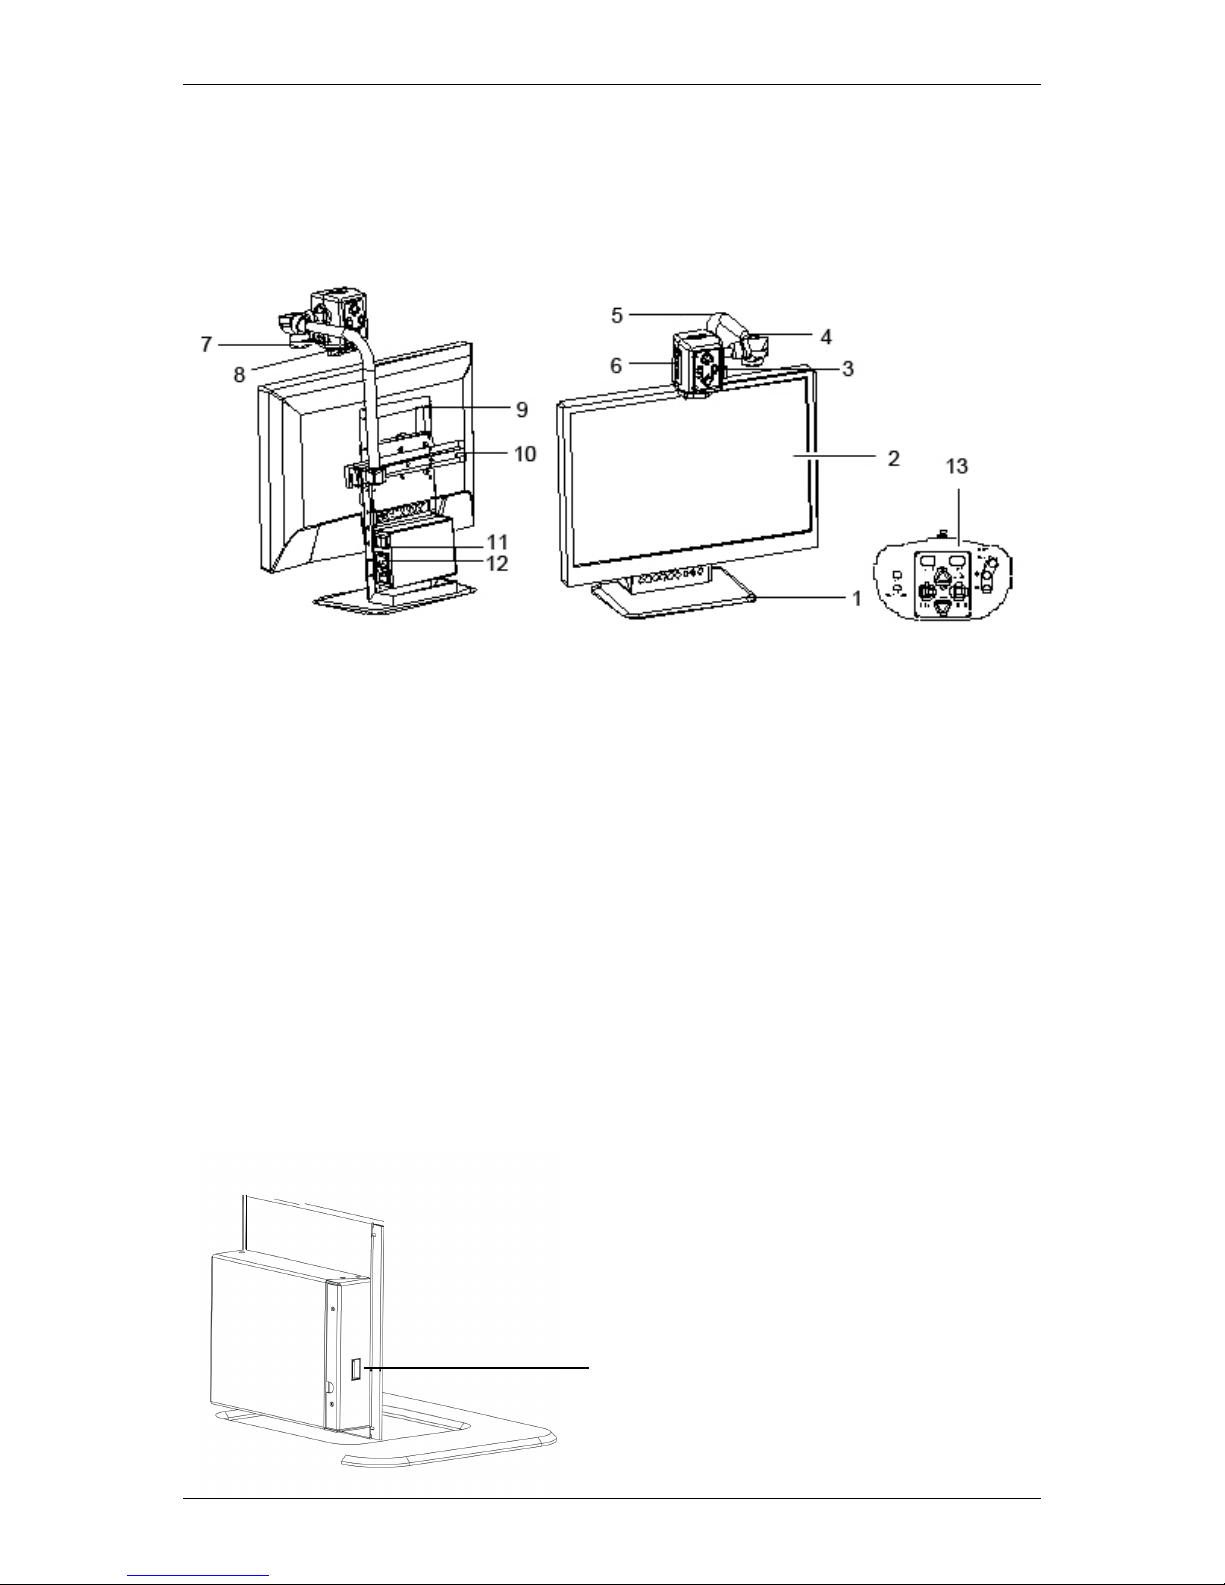
3. Getting to Know Your MultiView HD
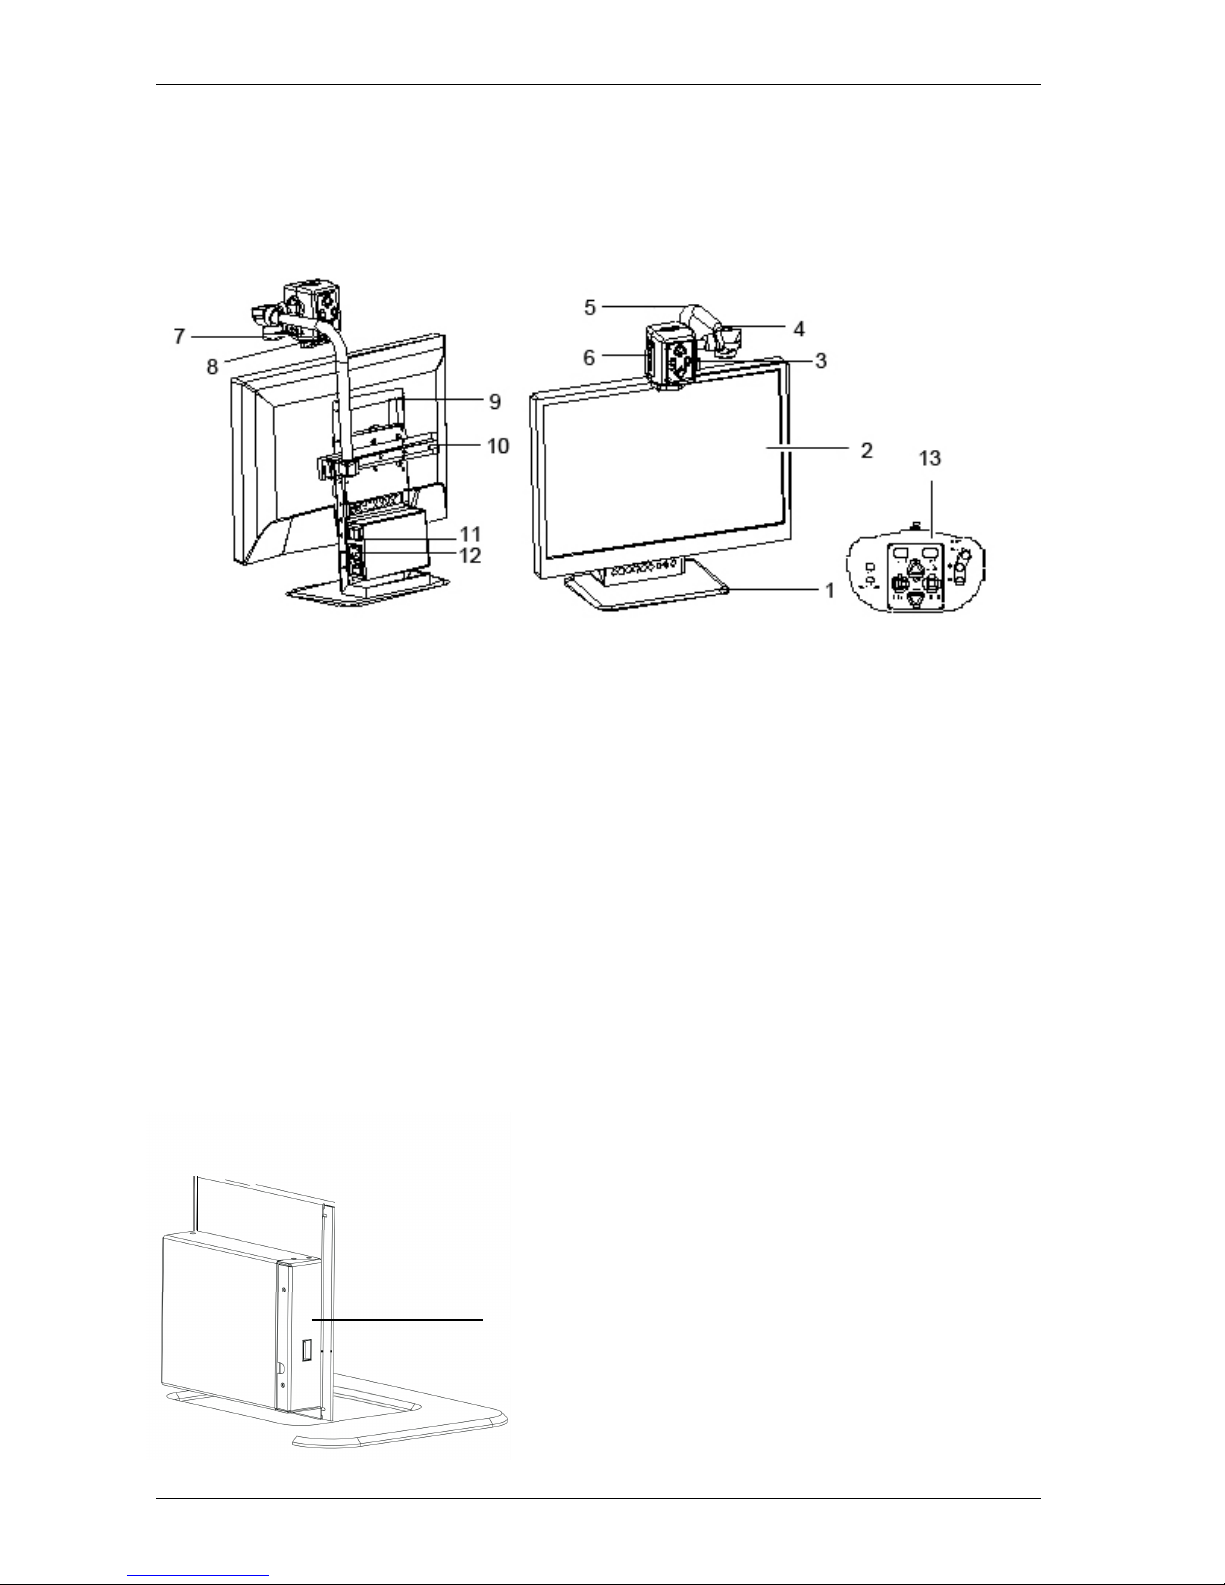
The following figure shows the MultiView HD’s main components.
1. Base stand 8. Close-up lens
2. 22” / 24” wide screen display 9. Handle
3. LED On/Off button 10. Arm Slide
4. Camera arm 11. Power On/Off
5. Camera Rotation Axes 12. Power socket
6. Camera head 13. Control Pad
7. LED light
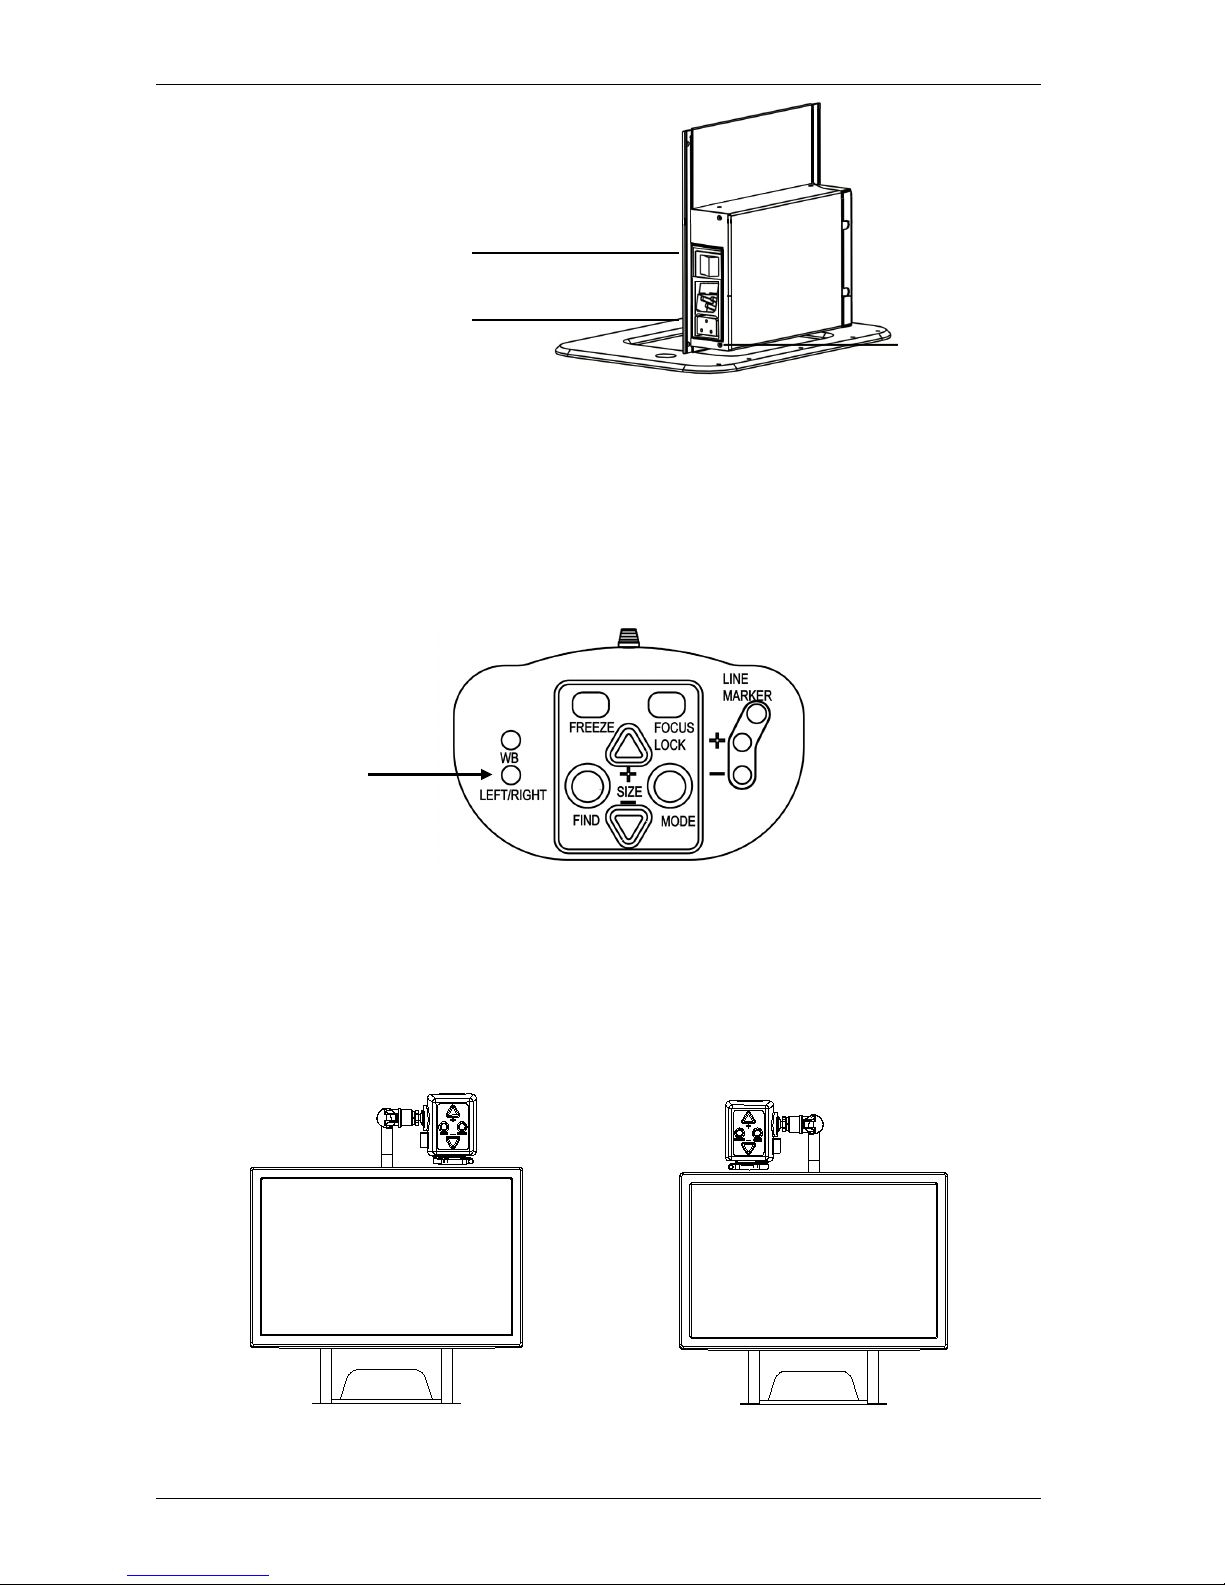
Setting up the MultiView HD
To set up the MultiView HD, please follow the steps described below:
− Connect the control pad in the USB port located on the left side of the
base stand.
− Connect the power cable in the power connector located on the right
side of the base stand.
− Plug the other end of the power cable into an electrical power outlet.
Control Pad USB Interface
Optelec MultiView HD
10 English
Choosing between left- or right-hand usage
The MultiView HD is designed for both left- and right-hand users. To set the
unit according to the type of user, position the camera head as described in
the next paragraph and rotate the MultiView HD image, if necessary, by
pressing the Left/Right Rotation button.
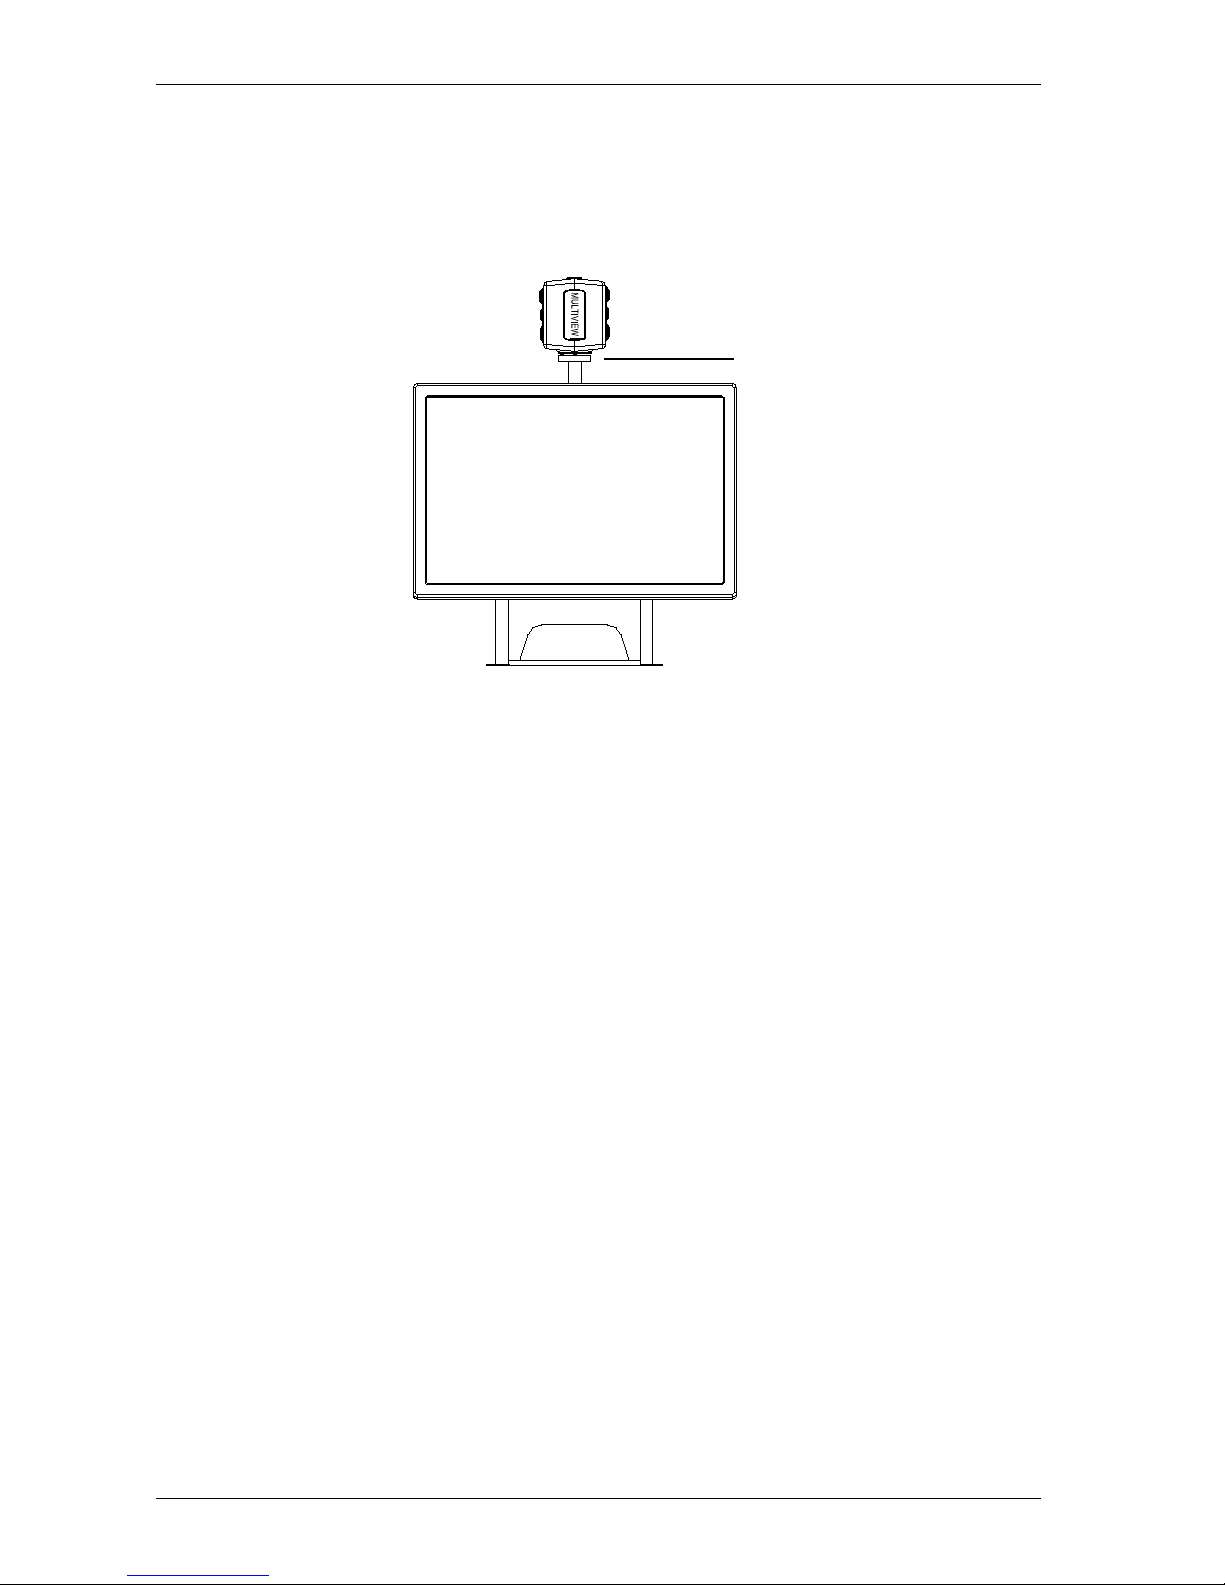
Positioning the camera head and camera arm
The MultiView HD features a flexible camera head and camera arm. The
camera head can be rotated 180 degrees at a vertical axis in front of the
screen to suit either the left- or right-handed user. The following figure
shows the camera head in the position for right- and left-handed users.
Camera position for right-handed user Camera position for left-handed user
Power Switch
Power Interface
Left/Right Rotation
Optelec MultiView HD
English 11
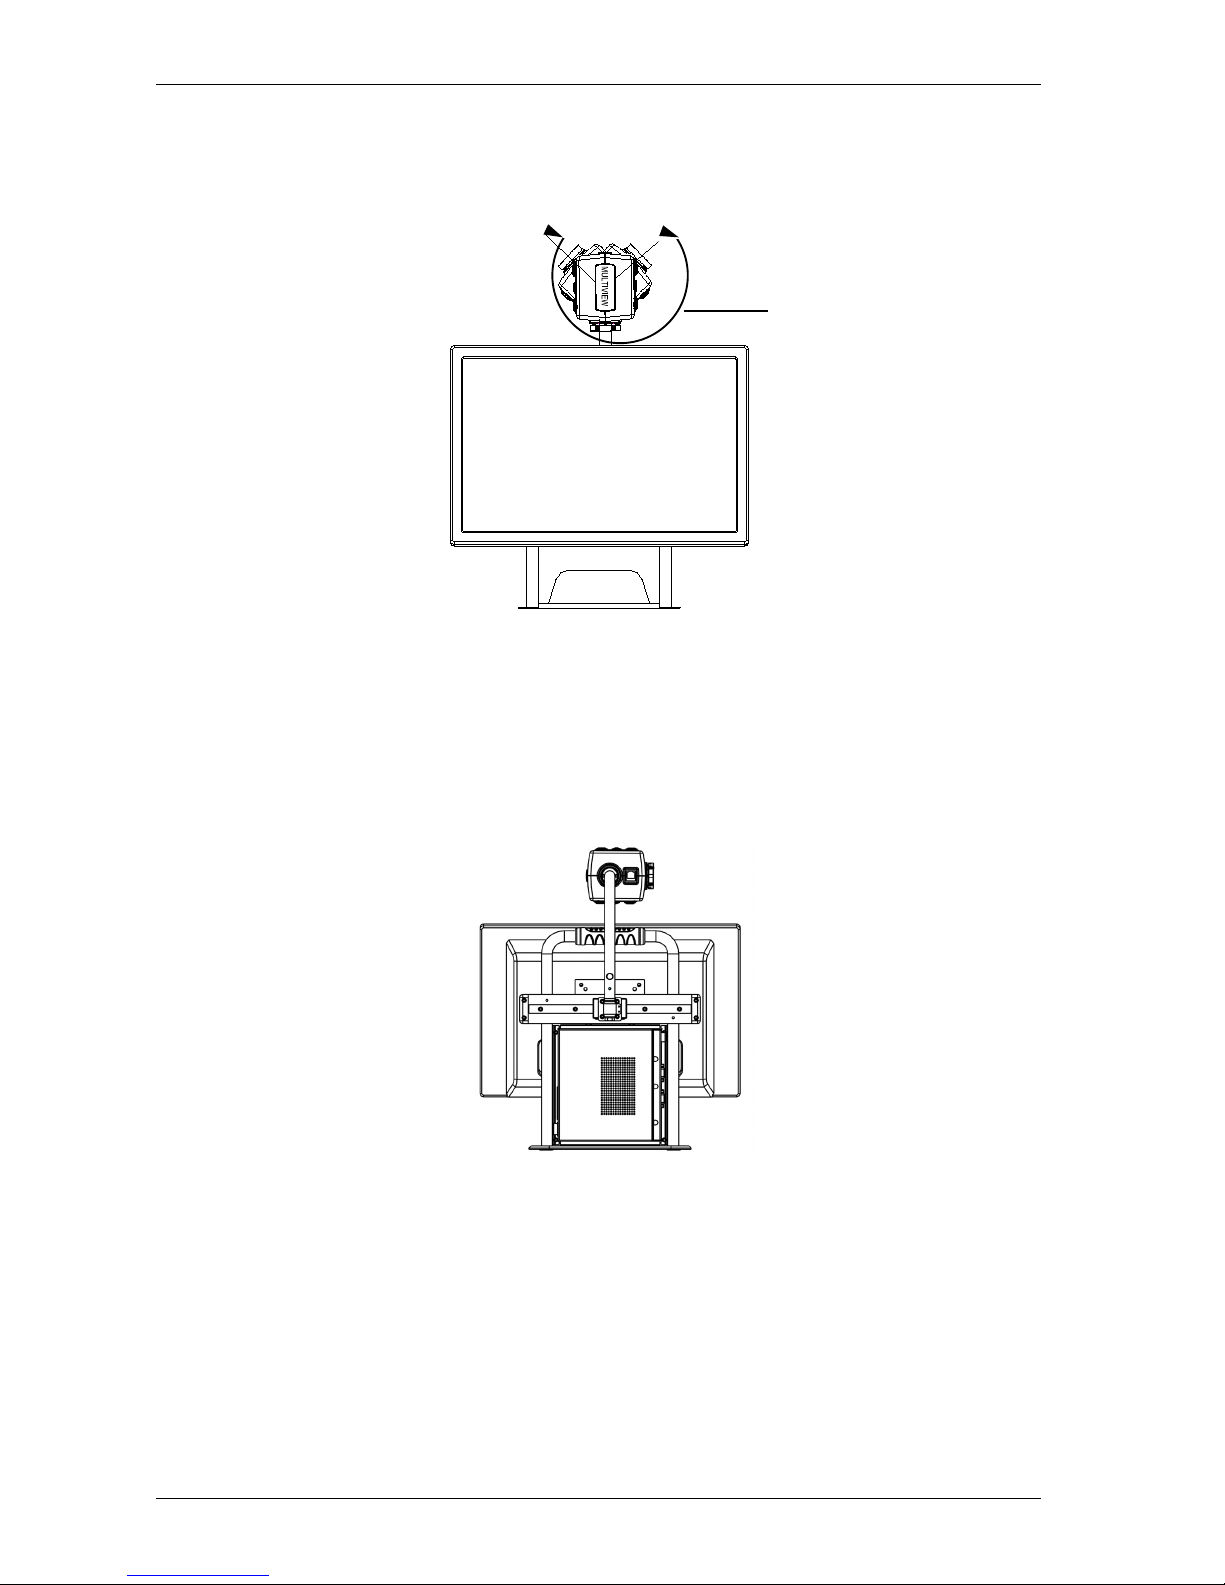
At a horizontal axis, the camera head can be tilted 270 degrees. Tilt the
camera head and rotate it to view objects further away such as a
whiteboard. The following figure shows the different tilt movements.
Note: Do not force the camera head beyond its limit as this could
permanently damage the rotation axis feature.
The camera arm can be moved from left to right, and from right to left, by
using the slider located at the back of the base stand. The following figure
shows the slider.
Camera positions
The MultiView HD automatically returns to its original settings when the
camera is switched from close-up to distance viewing and vice-versa. For
example, when the camera is tilted quickly from the whiteboard you are
viewing to the top of your desk, your preferred viewing mode and
magnification settings will automatically be applied. Three setting options
can be stored: close-up viewing, self-viewing and distance viewing.
270 degrees tilt
Optelec MultiView HD
12 English
Close-up viewing
To view objects placed on a table, or to write under the camera, point the
camera head toward the top of the desk and position the close-up lens in
front of the camera. The recommended distance for close-up viewing is
between 30 and 40 cm (12 and 16 inches).
Self-viewing
To view yourself and to use the MultiView HD as a mirror, point the camera
toward you and position the close-up lens away from the camera. The
recommended distance for self-viewing is 40 to 50 cm (16 to 20 inches).
Distance viewing
To view objects further away at a distance between 1 and 5 m (3 and 15
feet), point the camera head toward the object and remove the close-up
lens. This viewing mode can be used to read text on a whiteboard.
Close-up lens
in front of the camera
Optelec MultiView HD
English 13
4. Getting Started
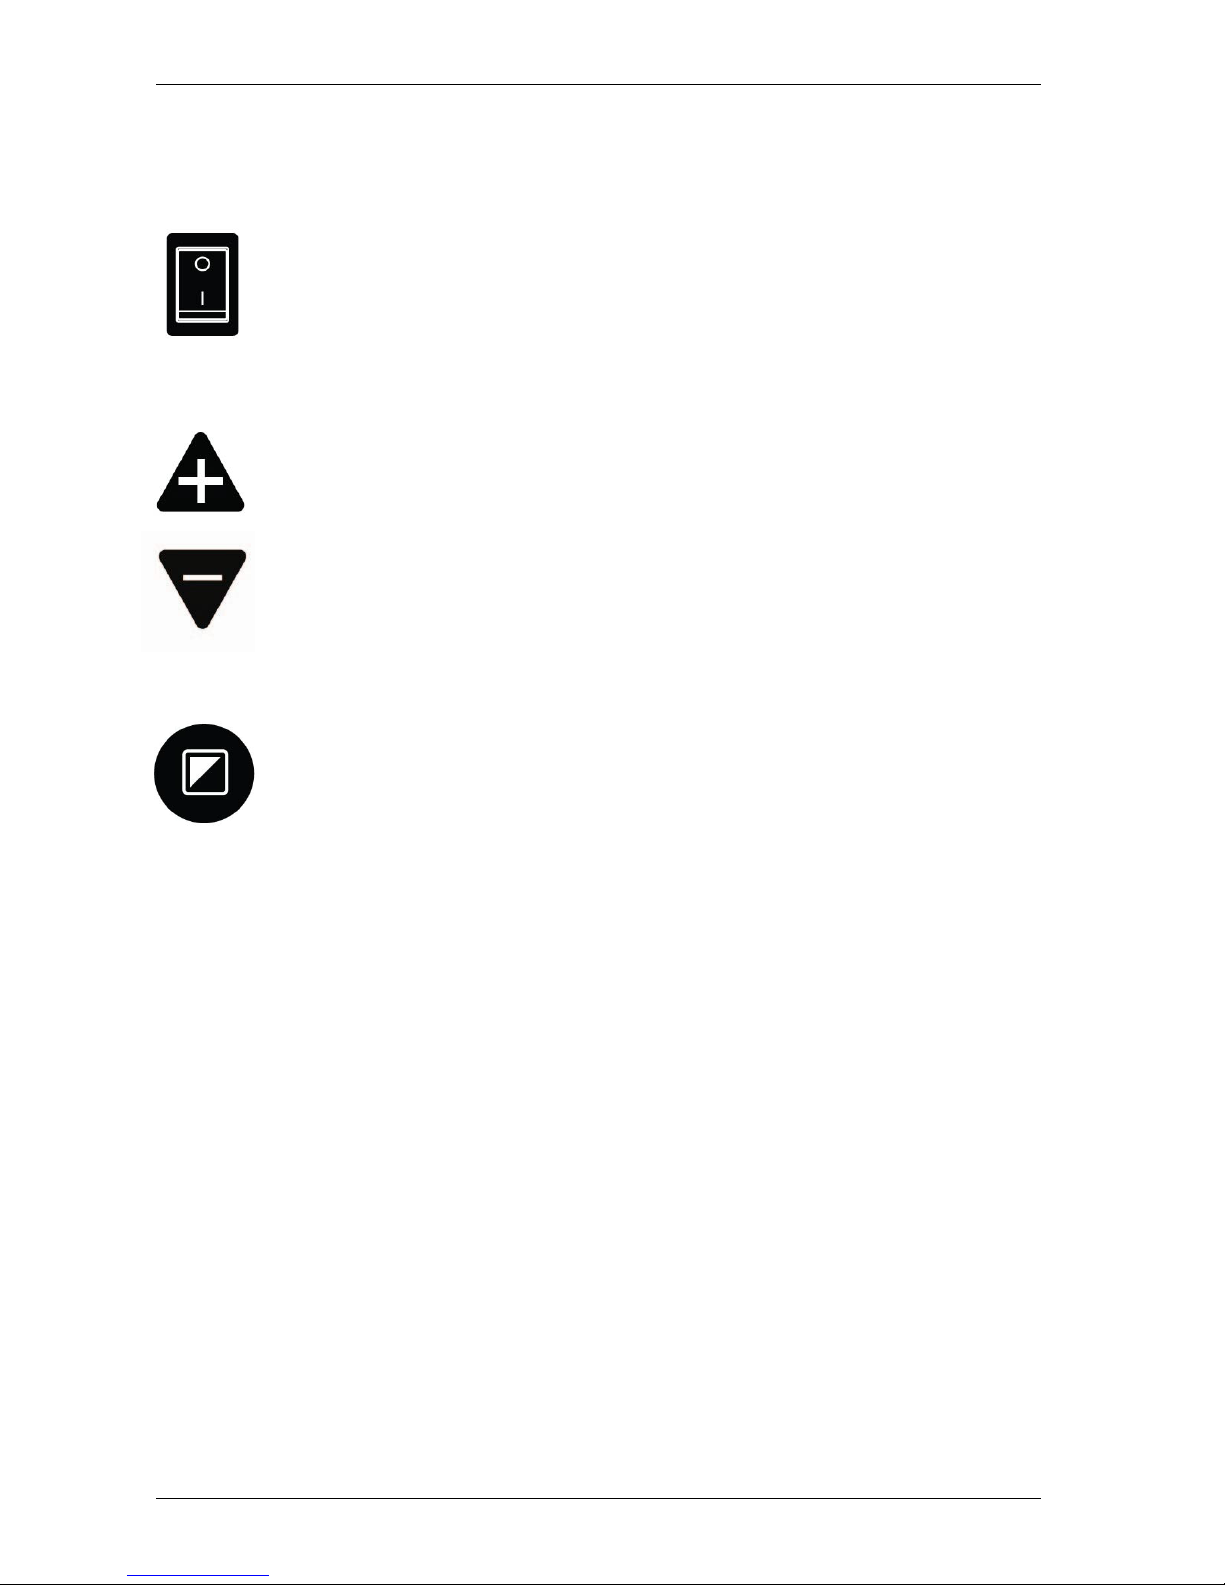
Switching On / Off
Press the On / Off switch located on the right side of the base unit
to turn the MultiView HD on or off.
Setting the level of magnification
Press the + and – button located at the centre of the control pad,
or on the camera head, to adjust the level of magnification. To
increase the magnification, press the + button and to decrease it,
press the – button. To adjust the level of magnification in a
continuous manner, press and hold down either buttons for a few
seconds. The MultiView HD can magnify text and objects from 2
to 81 times their original size (depending on the monitor size) and
at a surface distance of 40 cm away from the camera.
Viewing modes
Pressing the Mode button on the control pad or on the camera
head will cycle you through 8 different viewing modes:
− Full Color Photo Mode
This mode will display text, pictures and objects in full color.
− Gray Scale Photo Mode
This mode will display text, pictures and object in shades of gray.
− Positive Reading Mode (High contrast black on white)
This mode enhances the foreground / background contrast. Pictures
and text will be displayed with a black foreground on a white
background.
− Negative Reading Mode (High contrast white on black)
This mode reverses the positive image. Pictures and text will be
displayed with a white foreground on a black background.
− High contrast white on blue
This mode will display white text on a blue background.
− High contrast yellow on black
This mode will display yellow text on a black background.
− High contrast blue on yellow
This mode will display blue text on a yellow background.
− High contrast green on black
This mode will display green text on a black background.
Optelec MultiView HD
14 English
The MultiView HD allows you to customize the 4 high contrast color
combinations that you can select in the Mode menu. Pressing the Left/Right
Rotation button and the Lines & Windows button simultaneously will display
the message “Set” on the top right of the screen. You can now customize
the high contrast color combinations.
− Press the Up button to change the foreground color.
− Press the Down button to change the background color.
If you want to restore the default settings, press and hold the Left/Right
Rotation button and Mode button on the control pad simultaneously for 3
seconds. Please note that the Full Color Photo Mode, Gray Mode, Negative
Reading Mode, and Positive Reading Mode cannot be customized.
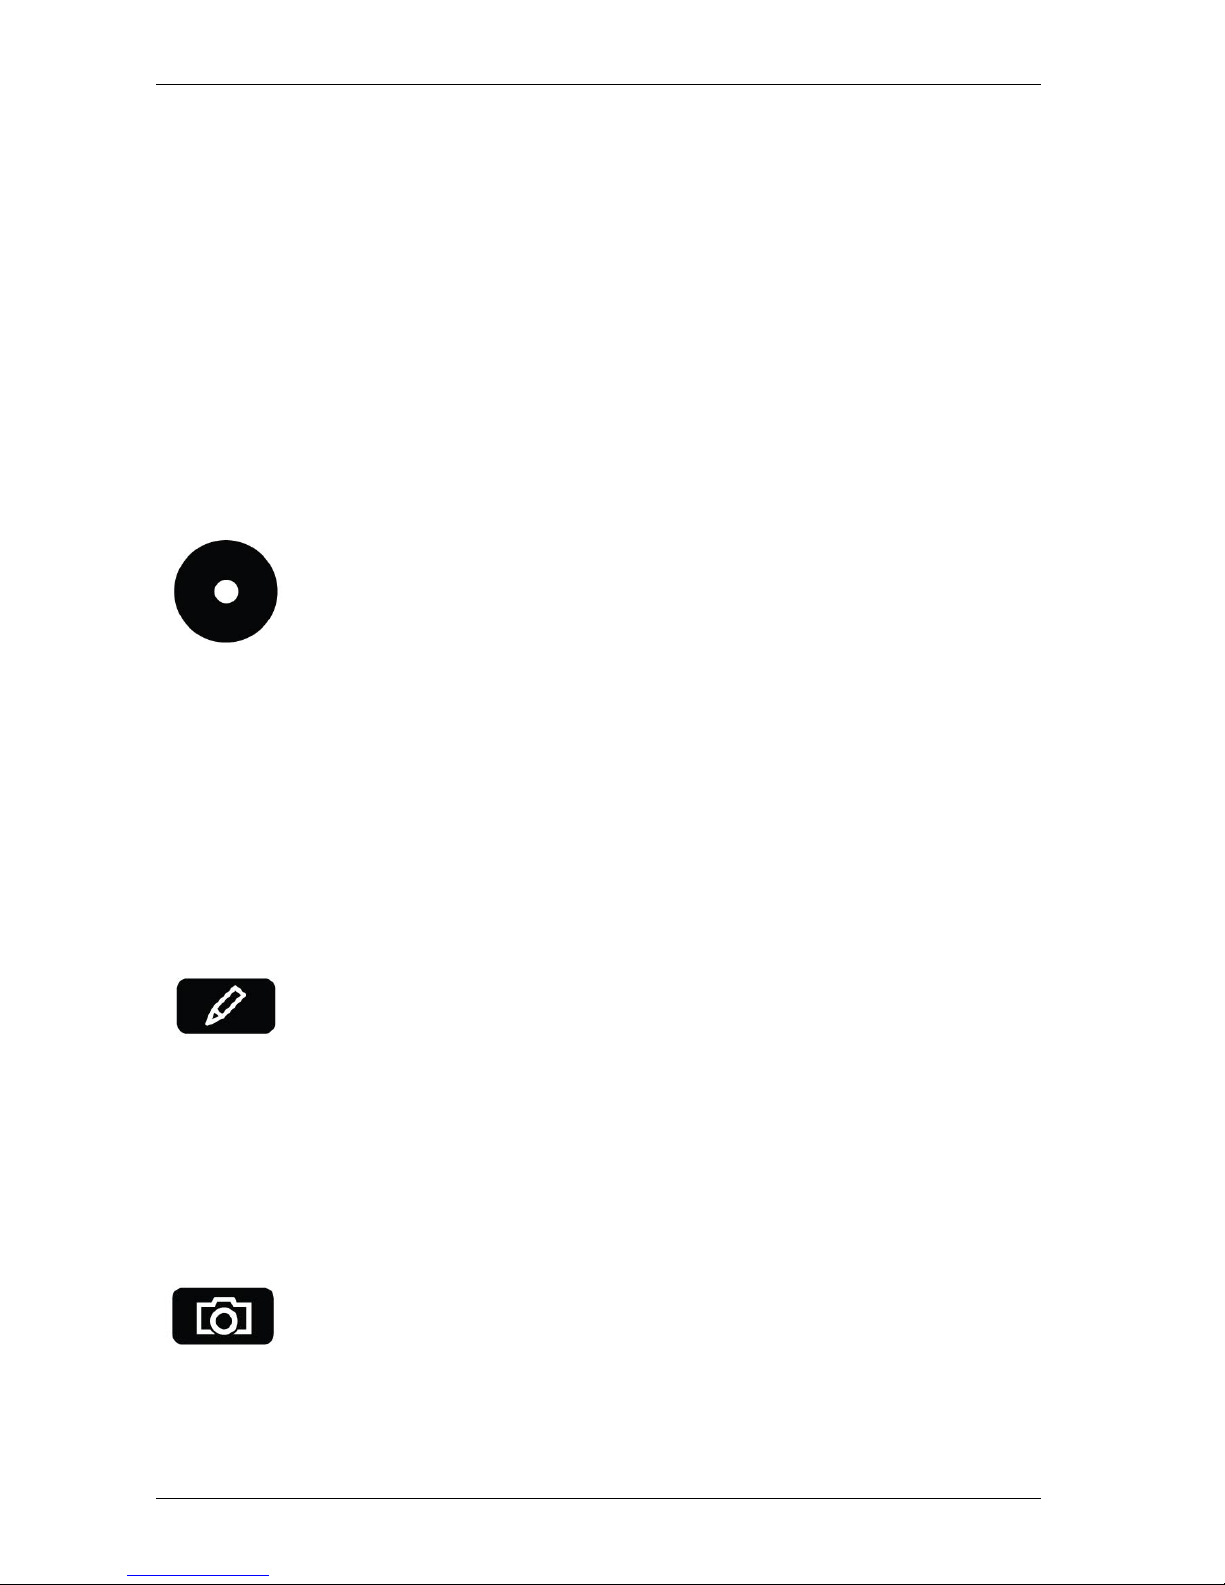
Find function
The find function is a useful tool that provides a global view of
the document on screen, enabling you to quickly scroll through
the text.
Press the Find button on the control pad or on the camera
head, and hold it down to activate the find function. When the
find function is activated, the MultiView HD
will automatically
zoom out to its minimum magnification to provide maximum overview. A
sign will appear to indicate the centre point of the screen. Move the camera
to properly centre your text on screen. Once you have selected your
position in the text, release the button. The MultiView HD will automatically
zoom in on the portion of text following your selected position, and will revert
to your previous magnification setting.
Autofocus lock
The MultiView HD has an autofocus feature that allows you to
adjust the clarity of the image on screen. When the MultiView
HD is turned on, the system will start up in the autofocus mode.
Press the Autofocus button located on the control pad to lock
the focus. This will stop the MultiView HD from continuously readjusting the
focus. The message “Focus lock” will appear in the upper right-hand corner
of the screen. This is useful for tasks such as writing, painting or doing
craftwork. Pressing the Autofocus button again will unlock the focus and the
message “Focus lock” disappears.
Using the Snapshot button
The Snapshot button allows you to take a temporary picture of
a text or an image. Press the Snapshot button on the control
pad to freeze the image. Pressing the Snapshot button again
will unfreeze the image.
In Shapshot mode, you have the possibility to pan through images that are
zoomed in.
Optelec MultiView HD
English 15
− Hold the WB button and press the + button to move the picture up.
− Hold the WB button and press the – button to move the picture down.
− Hold the WB button and press the Find button to move the picture to
the left.
− Hold the WB button and press the Mode button to move the picture to
the right.
− Press the Snapshot button again to unfreeze the picture.
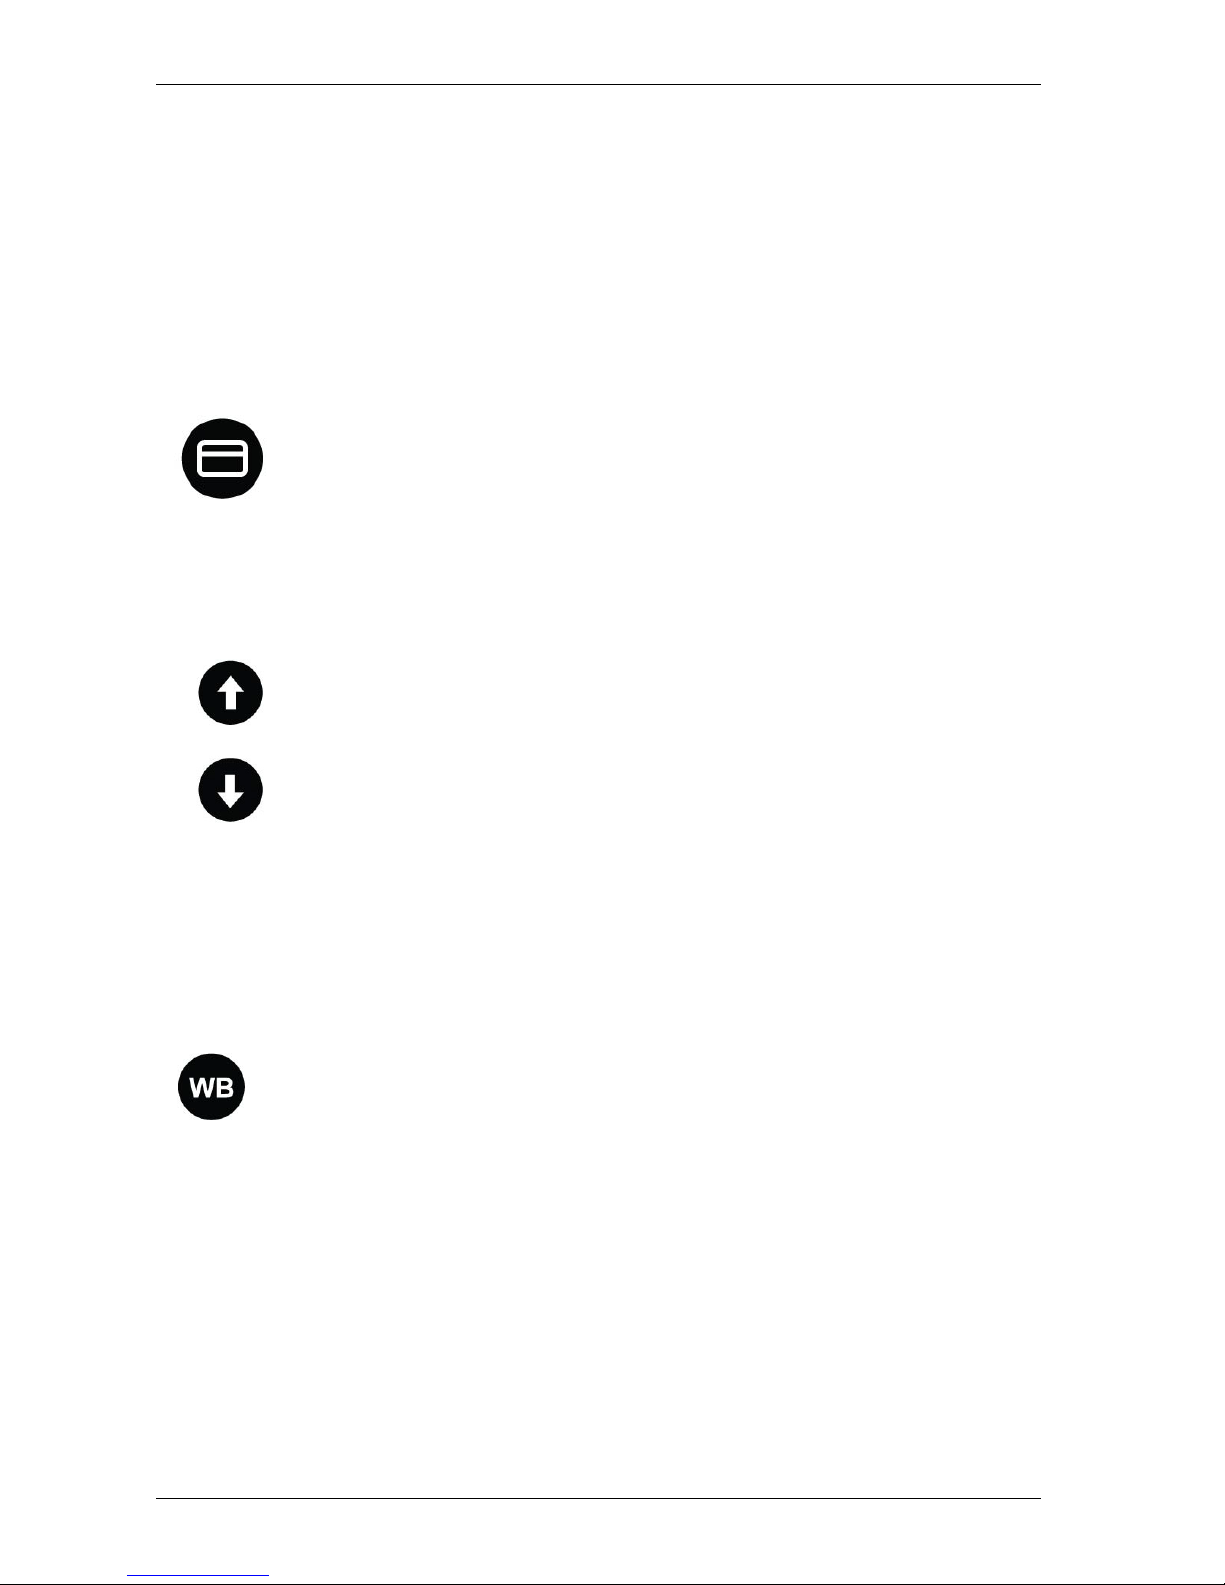
Activating line markers / window shades
Pressing the Lines & Windows button on the control pad cycles
you through the following options: horizontal line markers,
horizontal window shades, vertical line markers, vertical
window shades and full screen camera image. Line markers
are used as guides to read text more easily. Window shades
are used to block parts of the image when the screen is too bright.
Positioning line markers / window shades
When horizontal line markers or window shades are activated,
press the Up and Down buttons to change the space size
between line markers / window shades.
To widen the space, press the Up button.
To narrow the space, press the Down button.
The MultiView HD allows you to move the line marker and
windows up, down, left and right.
− To move the window or lines up or left, press the Line marker and Up
button simultaneously.
− To move the window or lines down or right, press the Line Marker and
Down button simultaneously.
White Balance
The White Balance is used to adjust the color representation
displayed in full color photo mode. Press the WB button on the
control pad to cycle through three White Balance settings:
− Normal color mode
This color mode displays the more neutral color settings.
− Warm color mode
This mode will enhance the warm colors of a picture such as the color
red.
− Cool color mode
This mode will enhance the cool colors of a picture such as the color
blue.
Brightness adjustment
The brightness can be adjusted in High Contrast Mode.

Optelec MultiView HD
16 English
− To increase the brightness, press the WB and Up button
simultaneously.
− To decrease the brightness, press the WB and the Down button
simultaneously.
− To achieve a more vivid image in a dark environment, please adjust
the white balance with the WB button.
Left/Right Rotation
Depending on the camera position, the camera image may
be upside down. To rotate the camera image, simply press
the Left/Right Rotation button.
Frequency settings
Depending on your country, the preferred frequency is 50Hz or 60Hz. By
default, the power frequency is 50Hz in Europe and 60Hz in the US. To
switch from 50 Hz to 60Hz or vice versa, press the Mode, +, and – buttons
on the camera head simultaneously for 5 seconds.
LED On/Off
By default, the LED light is turned off. Press the red LED button to turn the
light on. Press again to turn the light off.
LED Button

Optelec MultiView HD
English 17
Appendix A: Safety
Safety and Care
Only use the MultiView HD indoors.
Do not expose the MultiView HD to extreme or rapid changes in
temperature or humidity. Do not place the MultiView HD near a radiator
or heater, or where it may be exposed to direct sunlight. These
conditions may damage the MultiView HD’s electronic or optical
components.
Do not use the MultiView HD near other electrical appliances or
inadequately-shielded medical devices as this could cause
electromagnetic interferences.
Do not place the MultiView HD on an unstable surface as it may result in
a fall, causing serious damage to the unit or injury to the user.
Handle the MultiView HD with care. Any rough handling will damage its
internal components.
When moving the MultiView HD to another location, disconnect the
power cable along with all other cables from all external connectors. To
carry the MultiView HD in a safe and easy manner, use the provided
handle located at the back of the unit.
The reading table and camera arm feature moving mechanical parts.
Please ensure your safety when removing or adjusting these mechanical
parts (users are not recommended to remove these mechanical parts
frequently). Injury could occur if fingers or loose clothing become caught
in the operating mechanisms. If you experience any difficulties operating
the unit safely, please ask for help by contacting your local Optelec
distributor.
Do not remove any parts from the MultiView HD. Contact your local
Optelec distributor to service your MultiView HD, if needed. Do not open
any of the components as this will void the warranty. Each component
contains parts which should only be serviced by an Optelec repair
specialist.
Always turn the power off when the system is not in use.
Always unplug the system before cleaning it. Use a soft cloth to clean its
external parts. Do not use cleaning agents or abrasive materials as they
will damage your unit. Avoid touching the lens of the camera and keep it
clean by using proper cleaning means.
Only use the supplied power cable.
Do not use the unit in temperatures under +5°C and above +40°C.
Any use of the MultiView HD other than what is described in this user
manual will exclude it from warranty conditions.

Optelec MultiView HD
18 English
Appendix B: Technical information
Focus : Autofocus with focus lock
Monitor : 22” or 24” LED monitor
Magnification : 2 x – 75 x (22” monitor)
: 2.2 x – 81 x (24” monitor)
Dimensions : 55 x 44 x 20 cm
Weight : Unit: approx. 7.5 kg (depending on monitor size)
Viewing modes : Full color photo mode
Gray scale photo mode
High contrast black on white
High contrast white on black
High contrast white on blue
High contrast yellow on black
High contrast blue on yellow
High contrast green on black
Power : Input 100 - 240 Volt
Output 12 Volt / 6 A
Net frequency : 50 - 60 Hz
Operating conditions
Temperature : +5°C to +40°C
Humidity : < 70%, no condensation
Storage & transport conditions
Temperature : -10°C to +40°C
Humidity : < 95 %, no condensation

Optelec MultiView HD
English 19
Appendix C: Warranty and compliances
Warranty
Optelec warrants the MultiView HD, effective from the date of delivery, to be
free of any defects in material and workmanship.
Warranty is not transferable and does not apply to groups or multi users.
The MultiView HD has been designed for the individual purchaser and to be
used in a home or office environment. Optelec reserves the right to repair or
replace any purchased MultiView HD with a similar or superior product.
In no event shall Optelec or any of its distributors be held liable for any
indirect or consequential damages. This warranty is valid only when
serviced in the original country of purchase and if seals are intact. For
additional warranty claims or for service during or after warranty period,
please contact your distributor.
Optelec takes no responsibility for any other use of this device than the use
described in this manual.
Compliances
This product complies with the safety and EMC requirements, which fall
under the following directives:
Safety
EN 60950-1
EMC
EN 55022
EN 55024
FCC
FCC part 15 Class B
WARNING: The use of accessories, transducers and cables other than
those specified and sold by the manufacturer of the MultiView HD as
replacement parts for components, may result in increased emissions or
decreased immunity of the MultiView HD.
This device bears the CE and FCC approval mark.

Optelec MultiView HD
20 Nederlands
Gebruikershandleiding
Versie 1.1
© 2014 Optelec, Nederland.
Alle rechten voorbehouden.
Optelec
2993 LT Barendrecht
Nederland
Telefoon: +31 (0)88 6783 444. Fax: +31 (0)88 6783 400
Internet: www.optelec.com

Optelec MultiView HD
Nederlands 21
1. Introductie
Gefeliciteerd met de aanschaf van uw MultiView HD, een eenvoudig
vervoerbare HD beeldschermloep van Optelec. Gebruik de MultiView HD
voor lezen, schrijven, foto’s bekijken, handwerk, veraf kijken, opmaken en
nog veel meer.
De MultiView HD maakt het u mogelijk gedrukte tekst te lezen en
afbeeldingen en objecten tot 75 maal te vergroten op een 22” en 24”
breedbeeldscherm in verschillende kleuren. Met het ergonomische
bedieningspaneel, flexibele camera arm en een optioneel lichtgewicht
X-Y tafel biedt de MultiView HD gebruiks –en leescomfort. De MultiView
HD kan thuis, op school of op het werk gebruikt worden.
Als u nog vragen of suggesties heeft met betrekking tot het gebruik van
dit product, kunt u contact opnemen met uw Optelec distributeur of het
Optelec hoofdkantoor. Deze gegevens zijn aan het einde van deze
gebruikershandleiding terug te vinden. Wij hopen dat u geniet van het
werken met de MultiView HD.
Over deze handleiding
Optelec verbetert continue haar producten en de functionaliteit ervan. Het
kan daarom voorkomen dat deze handleiding niet de meest recente
versie is. Kijk daarom op onze website www.optelec.com
onder Support
om te zien of er een recentere versie beschikbaar is.
Deze handleiding biedt een uitgebreid overzicht van de functies en
werking van de MultiView HD. Foto's in deze handleiding kunnen afwijken
van de werkelijke situatie. Optelec behoudt alle rechten voor de
interpretatie van alle inhoud van deze gebruikershandleiding. Lees deze
gebruikershandleiding zorgvuldig door voordat u de MultiView HD
gebruikt. Bewaar deze handleiding zodat u deze indien gewenst kan
raadplegen.

Optelec MultiView HD
22 Nederlands
2. Inhoud van de verpakking
De MultiView HD verpakking bevat de volgende onderdelen:
− De MultiView HD
− Een bedieningspaneel
− Een voedingskabel
− Een lens doekje
− Deze gebruikershandleiding
Optionele accessoires:
− Een draagtas voor de MultiView met 22” scherm (niet beschikbaar
voor 24”)
− Een X-Y leestafel
Indien een van deze onderdelen ontbreekt, neem dan contact op met uw
leverancier.
Optelec MultiView HD
Nederlands 23
3. De MultiView HD leren kennen
De volgende afbeelding toont de belangrijkste componenten van de
MultiView HD.
1. Voet 8. Lens voor dichtbij
2. 22” of 24” monitor 9. Handvat
3. LED aan/uit knop 10. Schuifstang
4. Camera arm 11. Aan/uit schakelaar
5. Camera rotatie as 12. Aansluiting voedingskabel
6. Camera 13. Bedieningspaneel
7. LED licht
De MultiView HD installeren
Om de MultiView HD te installeren, volg de volgende stappen:
− Sluit het bedieningspaneel aan op de USB-aansluiting aan de
linkerzijde van de voet.
− Sluit de voedingskabel aan, aan de rechterzijde van de voet.
− Steek de andere kant van de voedingskabel in het stopcontact.
USB aansluiting
bedieningspaneel

Optelec MultiView HD
24 Nederlands
Kiezen tussen links- of rechtshandig gebruik
De MultiView HD is ontworpen voor zowel links als rechtshandige
gebruikers. Voor het instellen hiervan, stel de camera in zoals
beschreven in de volgende paragraaf en draai het MultiView HD beeld
indien nodig door de knop ‘links /
rechts’ in te drukken
.
De camera en arm positioneren
De MultiView HD beschikt over een flexibele camera en arm. De camera
kan 180 graden worden gedraaid voor het scherm, rond een verticale as
die zowel links als rechts te gebruiken is. De volgende afbeelding toont
de camerapositie voor rechts –en linkshandig gebruik.
Camera voor rechtshandig gebruik Camera voor linkshandig gebruik
Aan/uit schakelaar
Aansluiting voedingskabel
Links/rechts
 Loading...