

Page 1
Page 2

Optelec FarView
English Page 2
WEEE Notice
The directive on Waste Electrical and Electronic Equipment (WEEE), which entered into force as
European law on 13
th
February 2003, resulted in a major change in the treatment of electrical equipment
at end-of-life.
The purpose of this Directive is, as a first priority, the prevention of WEEE, and in addition, to promote
the reuse, recycling and other forms of recovery of such wastes so as to reduce disposal.
The WEEE logo (shown at the left) on the product or its box indicates that this product must
not be disposed of or dumped with your other household waste. You are liable to dispose of
all your electronic or electrical waste equipment by relocating over to the specified collection
point for recycling of such hazardous waste. Isolated collection and proper recovery of your
electronic and electrical waste equipment at the time of disposal will allow us to help
conserving natural resources. Moreover, proper recycling of the electronic and electrical
waste equipment will ensure safety of human health and environment. For more information
about electronic and electrical waste equipment disposal, recovery, and collection points,
please contact your local city centre, household waste disposal service, shop from where you
purchased the equipment, or manufacturer of the equipment.
RoHS Compliance
This product is in compliance with Directive 2002/95/EC of the European Parliament and of the Council
of 27 January 2003, on the restriction of the use of certain hazardous substances in electrical and
electronic equipment (RoHS) and its amendments.
Page 3

Optelec FarView
English Page 3
European Union Notice
Products with CE marking comply with the Medical Device Directive (93 / 42 / EEC) class 1 issued by the
Commission of the European Community.
Compliance with these directives implies conformity to the following international standards:
IEC 60601-1;
IEC 60601-1-2
FCC
FCC part 15 Class B
THE FOLLOWING APPLIES ONLY IN THE U.S.A.
FCC Notice:
This equipment has been tested and found to comply with the limits for a Class B digital device, pursuant
to Part 15 of the FCC rules. These limits are designed to provide reasonable protection against harmful
interference in a residential installation. This equipment generates, uses, and can radiate radio
frequency energy and, if not installed and used in accordance with the instructions, may cause harmful
interference to radio communications. However, there is no guarantee that interference will not occur in a
particular installation. If this equipment does cause harmful interference to radio or television reception,
which can be determined by turning the equipment off and on, the user is encouraged to try to correct
the interference by one or more of the following measures:
- Reorient or relocate the receiving antenna.
- Increase the separation between the equipment and receiver.
Page 4

Optelec FarView
English Page 4
- Connect the equipment into an outlet on a circuit different from that to which the receiver is
connected.
- Consult the dealer or an experienced radio / TV technician for help.
FCC Caution:
To assure continued compliance, follow the attached installation instructions and use only shielded
interface cables with ferrite core when connecting to computer or peripheral devices. Any changes or
modifications not expressly approved by the party responsible for compliance could void the user’s
authority to operate this equipment.
Declaration of Conformity
Trade name: Optelec
Model No.: FARVIEW-US
Responsible party: Optelec U.S. Ltd
3030 Enterprise Court, Ste C, Vista, CA 92081 U.S.A
Support Contact: Optelec U.S. Ltd
1 (800) 826-4200
This device complies with Part 15 of the FCC Rules. Operation is subject to the following two conditions:
(1) This device may not cause harmful interference, and (2) this device must accept any interference
received, including interference that may cause undesired operation.
Page 5
Optelec FarView
English Page 5
FarView
User Manual
FarView Version 1.0
© 2008 Optelec, the Netherlands
All rights reserved
Optelec
P.O. Box 399
2990 AJ Barendrecht
The Netherlands
Phone: +31 (0)88 678 34 44
E-mail: [email protected]
Internet: www.optelec.com
Page 6

Optelec FarView
English Page 6
Contents
1. Introduction...............................................................................................................................8
About this manual..............................................................................................................9
What’s in the box? .............................................................................................................9
2. Getting to know your FarView.................................................................................................10
Front side / Display side...................................................................................................10
Bottom side......................................................................................................................11
Right side.........................................................................................................................12
Left side ...........................................................................................................................13
Top side...........................................................................................................................15
Back side / Camera side..................................................................................................17
3. Power and battery use............................................................................................................19
Charging the batteries...................................................................................................... 19
Turning the power on and off...........................................................................................20
Battery indicator...............................................................................................................20
Stand-by mode and system auto off ................................................................................ 20
Mode selector button ....................................................................................................... 21
4. Using the FarView for close-up viewing..................................................................................22
Using the zoom button..................................................................................................... 23
Selecting a viewing mode ................................................................................................23
Contrast settings..............................................................................................................24
Using the FarView for writing...........................................................................................25
Page 7

Optelec FarView
English Page 7
5. Using the FarView for distance viewing..................................................................................26
Using the zoom button..................................................................................................... 27
Selecting a viewing mode ................................................................................................27
Contrast settings..............................................................................................................28
Taking pictures with the FarView (Document Read Mode)..............................................29
Storing images and documents........................................................................................29
6. Picture Playback Mode...........................................................................................................31
Picture selection and adjustment.....................................................................................32
7. Using the FarView Menu........................................................................................................34
Opening the menu ........................................................................................................... 34
Modifying settings in the menu.........................................................................................35
8. Connecting the FarView to other equipment...........................................................................40
Viewing images on an external monitor or TV with VGA terminal....................................40
Connecting the FarView to a PC......................................................................................40
9. Others.....................................................................................................................................42
Message display..............................................................................................................42
Troubleshooting...............................................................................................................43
Appendix A: Safety..................................................................................................................48
Appendix B: Technical information..........................................................................................50
Page 8

Optelec FarView
English Page 8
1. Introduction
Congratulations on choosing the FarView, a pocketsize electronic video magnifier from Optelec.
Optelec’s FarView magnifies printed text and images, taken from any distance, up to 42 times in
live mode or zoom 14 times in playback mode on a 4.3” wide screen display.
With its versatile camera, enabling both distance and close-up viewing, the FarView offers an
enhanced design that extends operating comfort. The integrated snapshot function and built-in
memory allow you to store and recall up to 100 images. The FarView is designed for every day
use in any location. Stored images can be recalled at any moment with a simple press of a
button. Ergonomically placed buttons and a built-in menu allow the user to enhance reading
comfort. The document read mode enables scrolling through a captured text via the ergonomic
scrolling button and auto-scroll to the beginning of the text.
If you have any questions or suggestions concerning the use of this product, please contact
your distributor or the Optelec headquarters using the contact information on the last page of
this manual. Your feedback is greatly appreciated. We hope you enjoy working with your
FarView.
Page 9

Optelec FarView
English Page 9
About this manual
This manual will familiarize you with the FarView’s features and basic operation. Please read
this manual carefully before using your device.
What’s in the box?
The FarView’s packaging contains the following:
- The FarView video magnifier
- A shoulder strap
- A protection and carrying pouch
- A power cable with power adapter
- An USB cable
- The user manual
Optional accessories for FarView include a VGA out IF cable that connects FarView to a VGA
monitor.
If any items are missing from your package, please contact your distributor.
Page 10
Optelec FarView
English Page 10
2. Getting to know your FarView
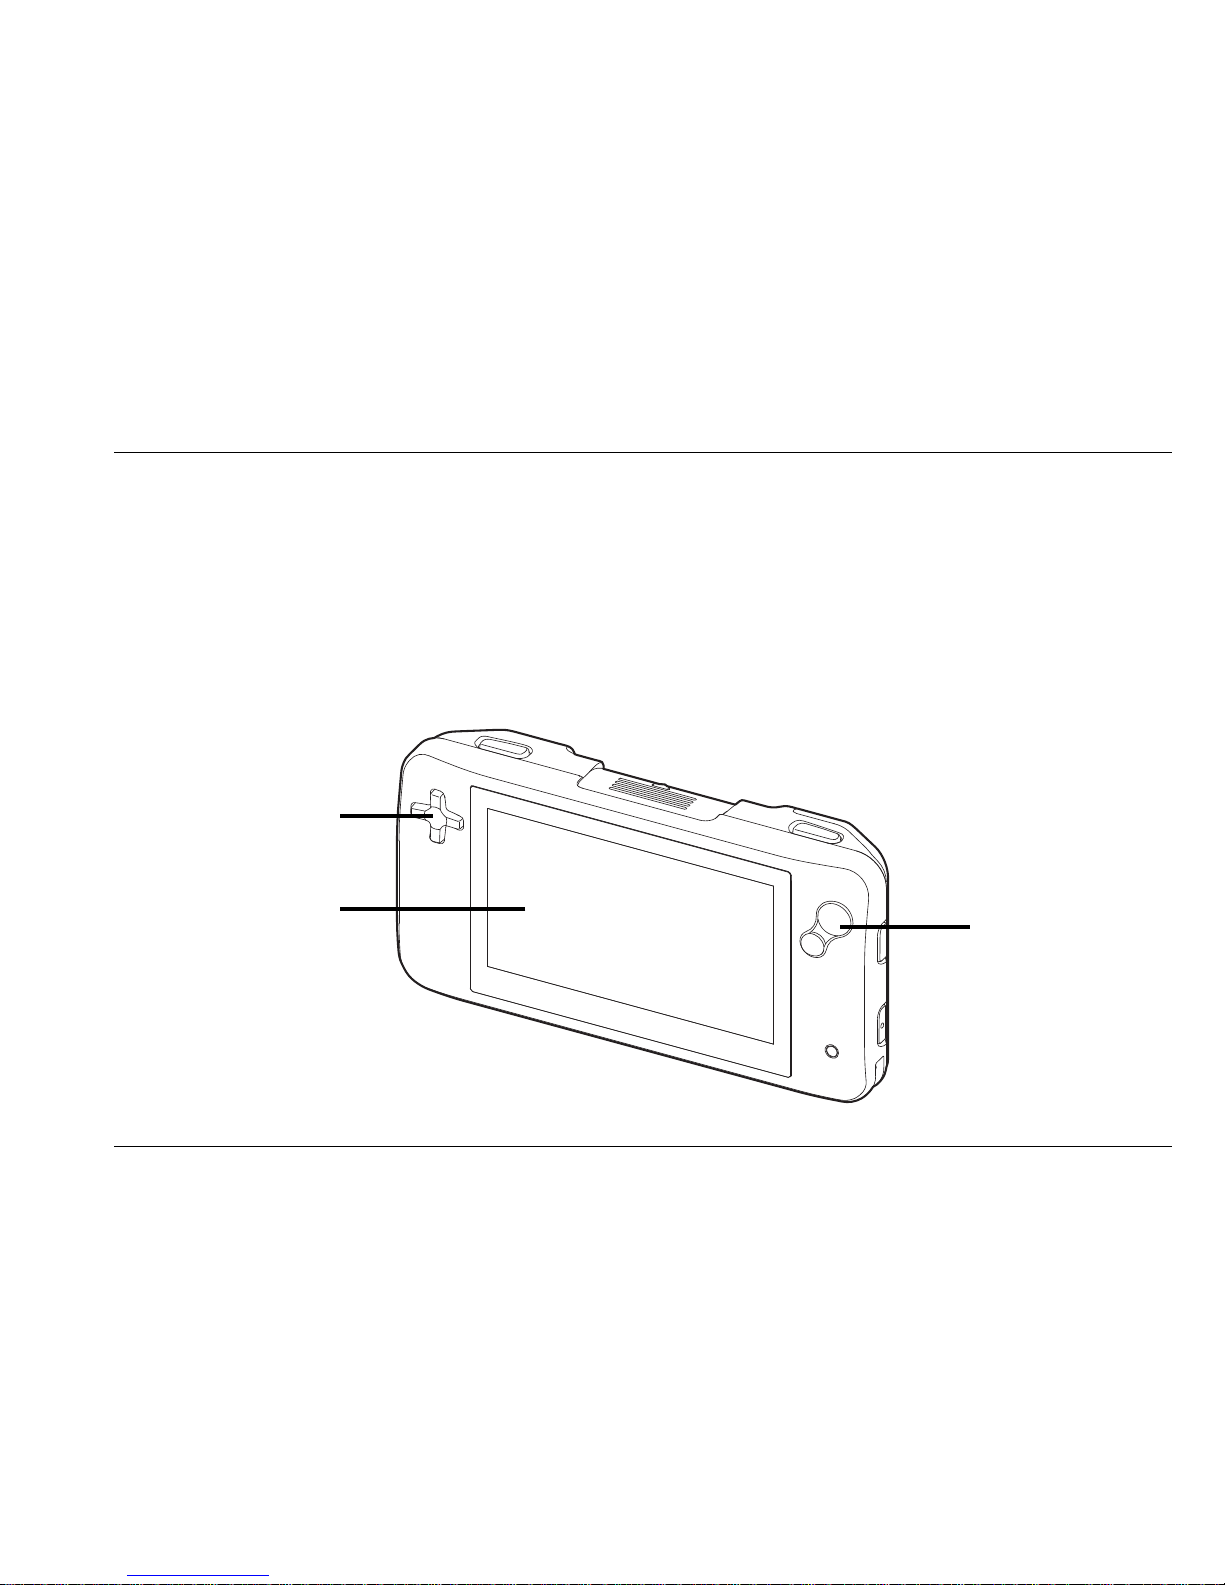
The unit is placed correctly in front of you when the display is facing towards you and the plus
shaped button is located on the left side of the screen.
Front side / Display side
The following figure shows the front side or display side of the FarView.
Cursor button
4.3” wide screen display
Zoom button
Page 11
Optelec FarView
English Page 11
Cursor button Pressing these buttons enable navigation through images and
the FarView menu.
4.3” wide screen display The 4.3” wide screen displays text and images.
Zoom button Pressing the zoom button allows you to change the
magnification.
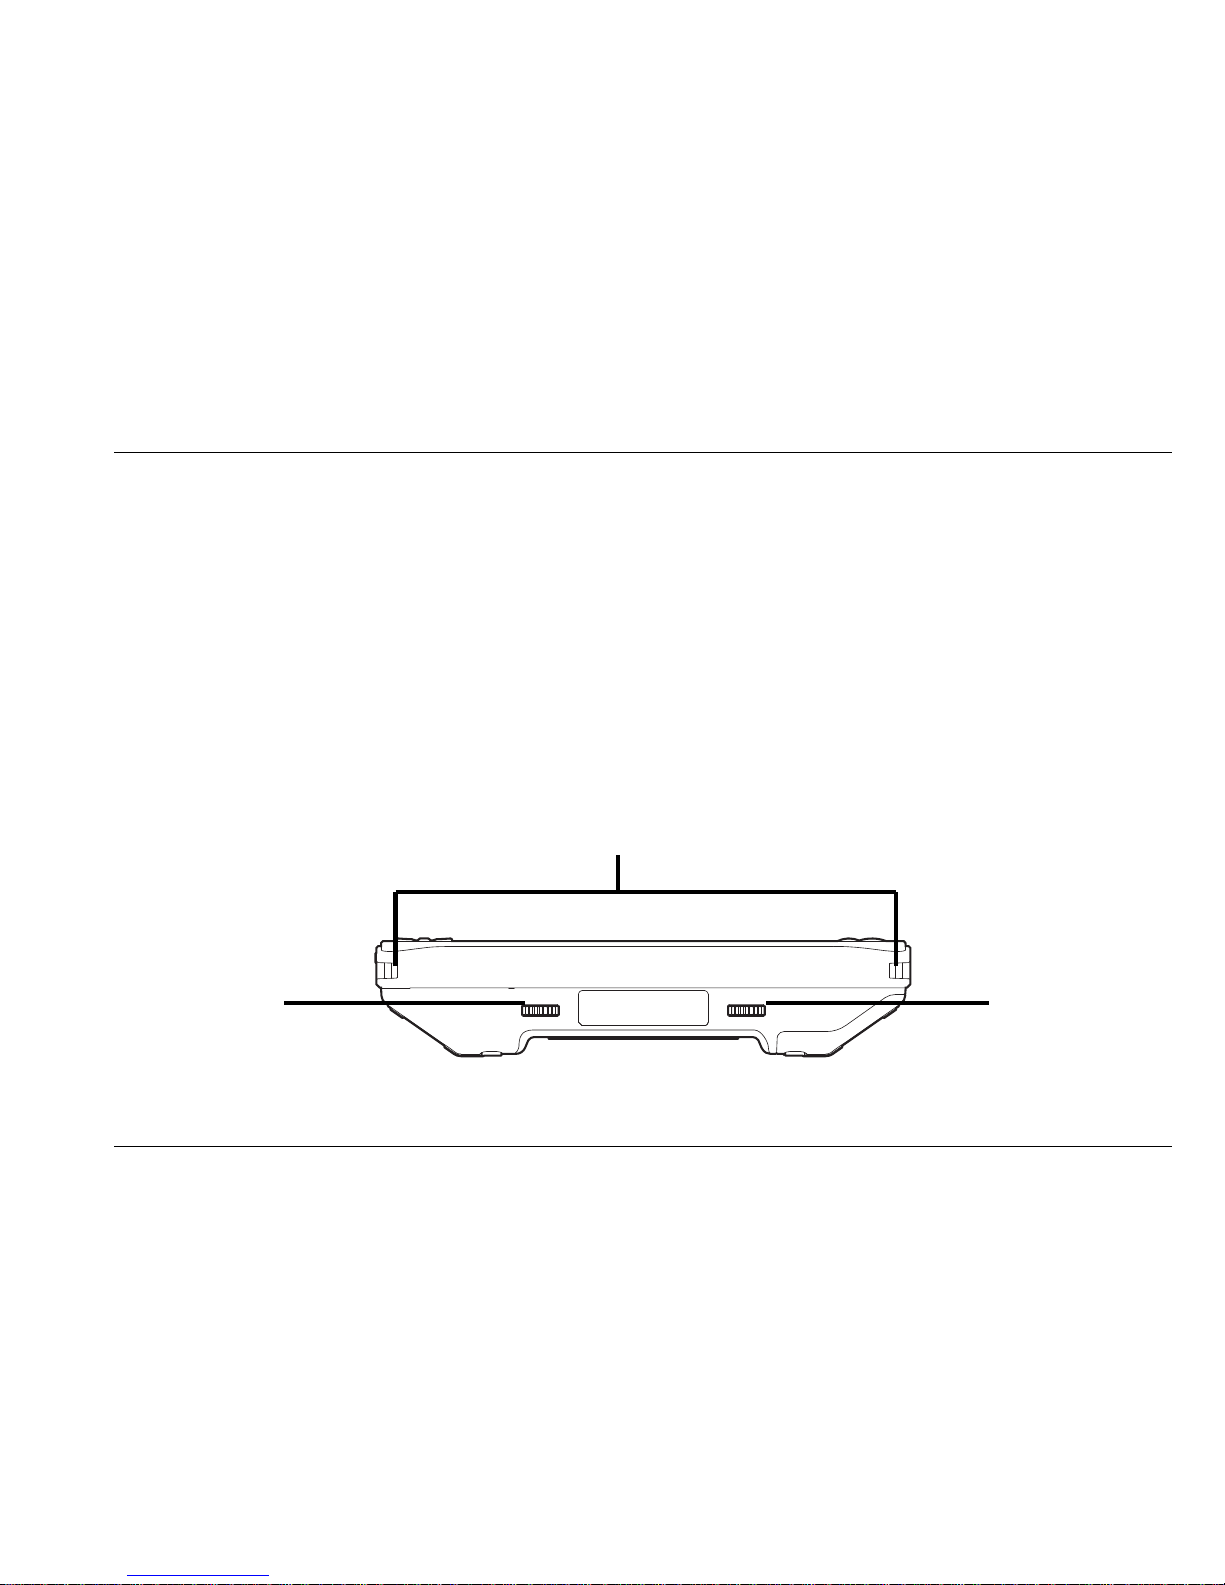
Bottom side
The following figure shows the bottom side of the FarView.
Color mode button
Contrast
adjustment
button
Straps eyelets
Page 12
Optelec FarView
English Page 12
Strap eyelets The strap eyelets allow you to attach the shoulder strap that
came with your FarView.
Contrast adjustment button Rotating the adjustment button allows you to increase or
decrease the contrast
Color mode button Rotating the color mode button allows you to change the
foreground and background colors of the FarView’s screen.
Right side
The following figure shows the right side of the FarView.
Menu button
On / off button
Page 13
Optelec FarView
English Page 13
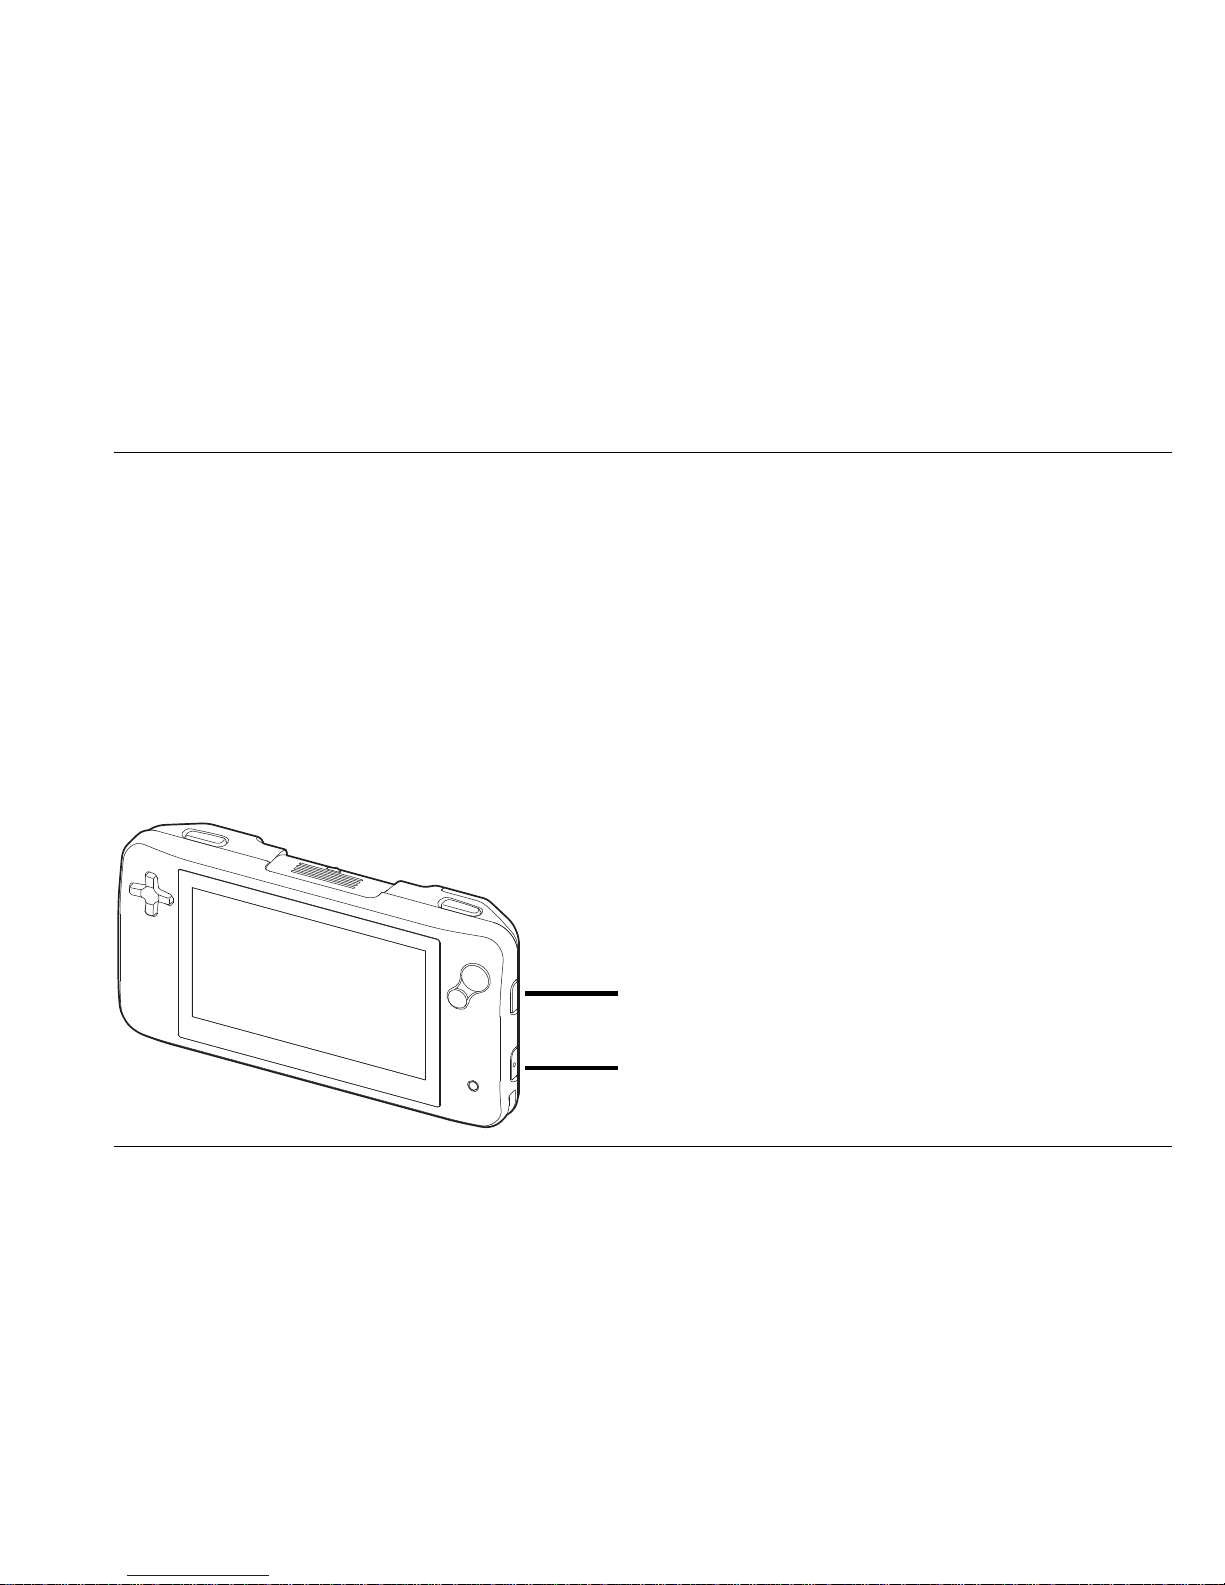
Menu button Pressing this button will open and close the FarView’s
integrated menu.
On / off button Press and hold the power button for approximately two seconds
to turn the power on and off. When switching the unit on, the
power light located on the right side of the screen will light up.
This light automatically goes off when switching off the FarView.
Left side
The following figure shows the left side of the FarView.
View mode
selector switch
Mode selector
button
Page 14

Optelec FarView
English Page 14
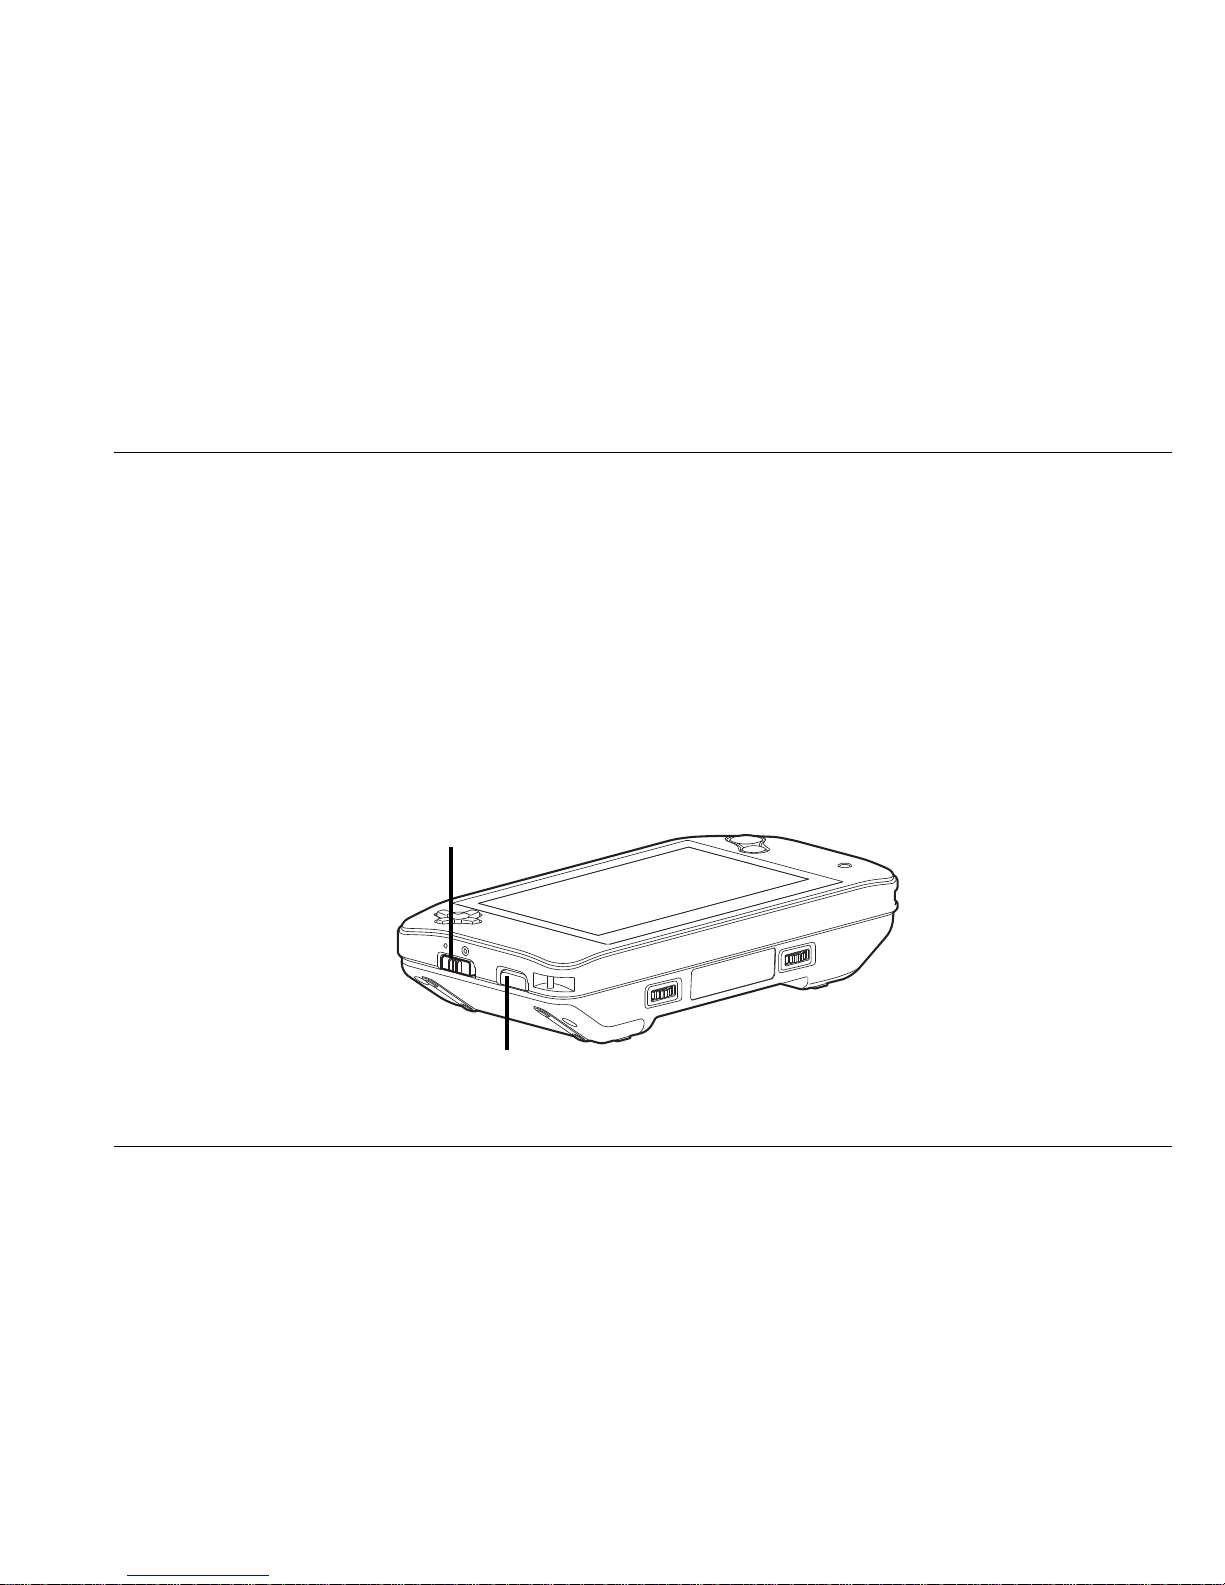
View mode selector switch Switching this button allows you to select either the close-up or
distance viewing mode. Moving the switch towards you will set
the unit to distance mode. Moving the switch away from you will
set the unit to close-up view.
Mode selector button Pressing the mode selector button allows you to switch back
and forth between the live view mode and playback mode. By
default, the FarView will start in live mode.
Page 15
Optelec FarView
English Page 15
Top side
The following figure shows the top side of the FarView.
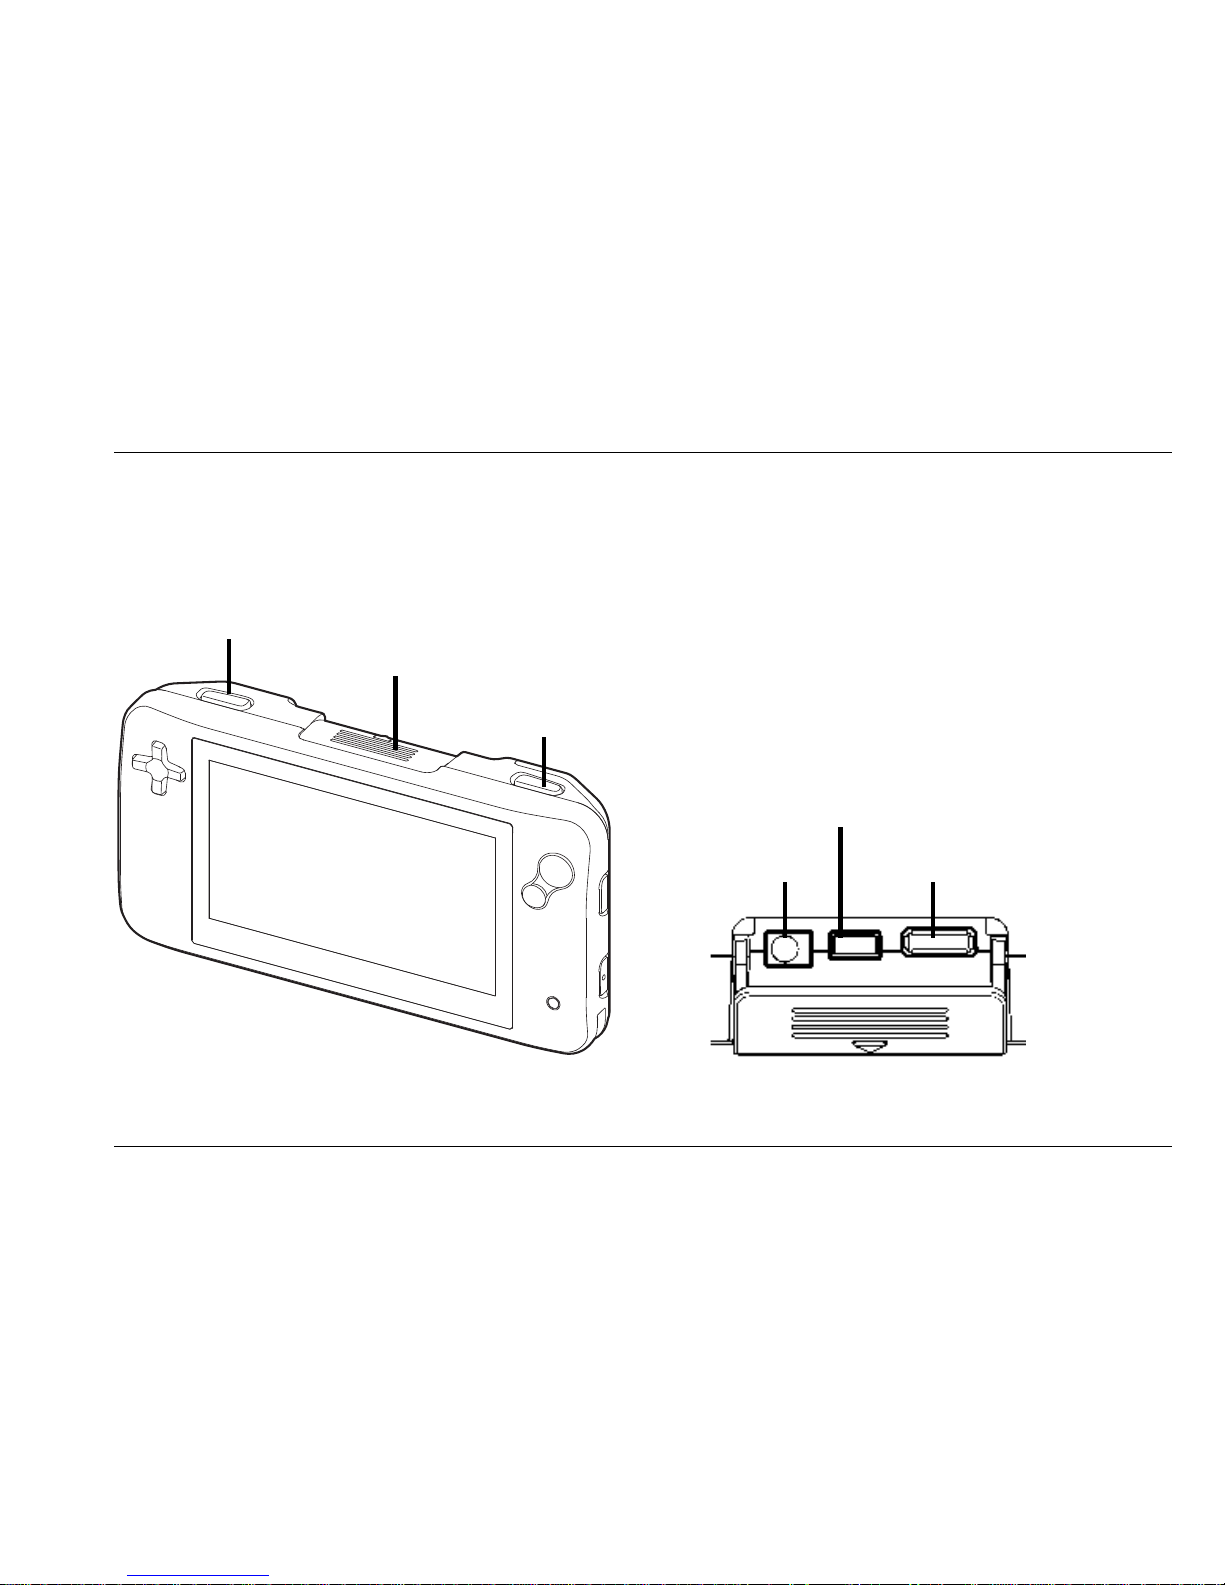
Focus / Return button Pressing the return button allows you to focus the camera on
the object or text you wish to magnify.
Focus / Return button
Cover
Snapshot button
VGA OUT port DC IN jack
USB port
Page 16

Optelec FarView
English Page 16
Cover The cover protects the power and monitor / PC connectors from
dust and dirt. Upon opening the cover, you fill find the following:
- DC IN jack The AC adapter cable plugs into this jack. Use only the model
of the AC adapter that is provided with the FarView.
- USB port The USB port allows you to connect the FarView to a PC with
Windows 2000, XP or Vista operating system.
- VGA out connector This connector can be used to connect the FarView to an
external VGA monitor or TV with VGA terminal. Please note that
the optionally available VGA OUT IF cable is required to
connect the FarView to a VGA monitor or TV with VGA terminal.
Snapshot button Pressing this button allows you to capture images. Images will
be saved in the FarView’s internal memory.
Page 17
Optelec FarView
English Page 17
Back side / Camera side
The following figure shows the back side or camera side of the FarView.
Camera
Lights
Reading stand
Reading stand
Page 18

Optelec FarView
English Page 18
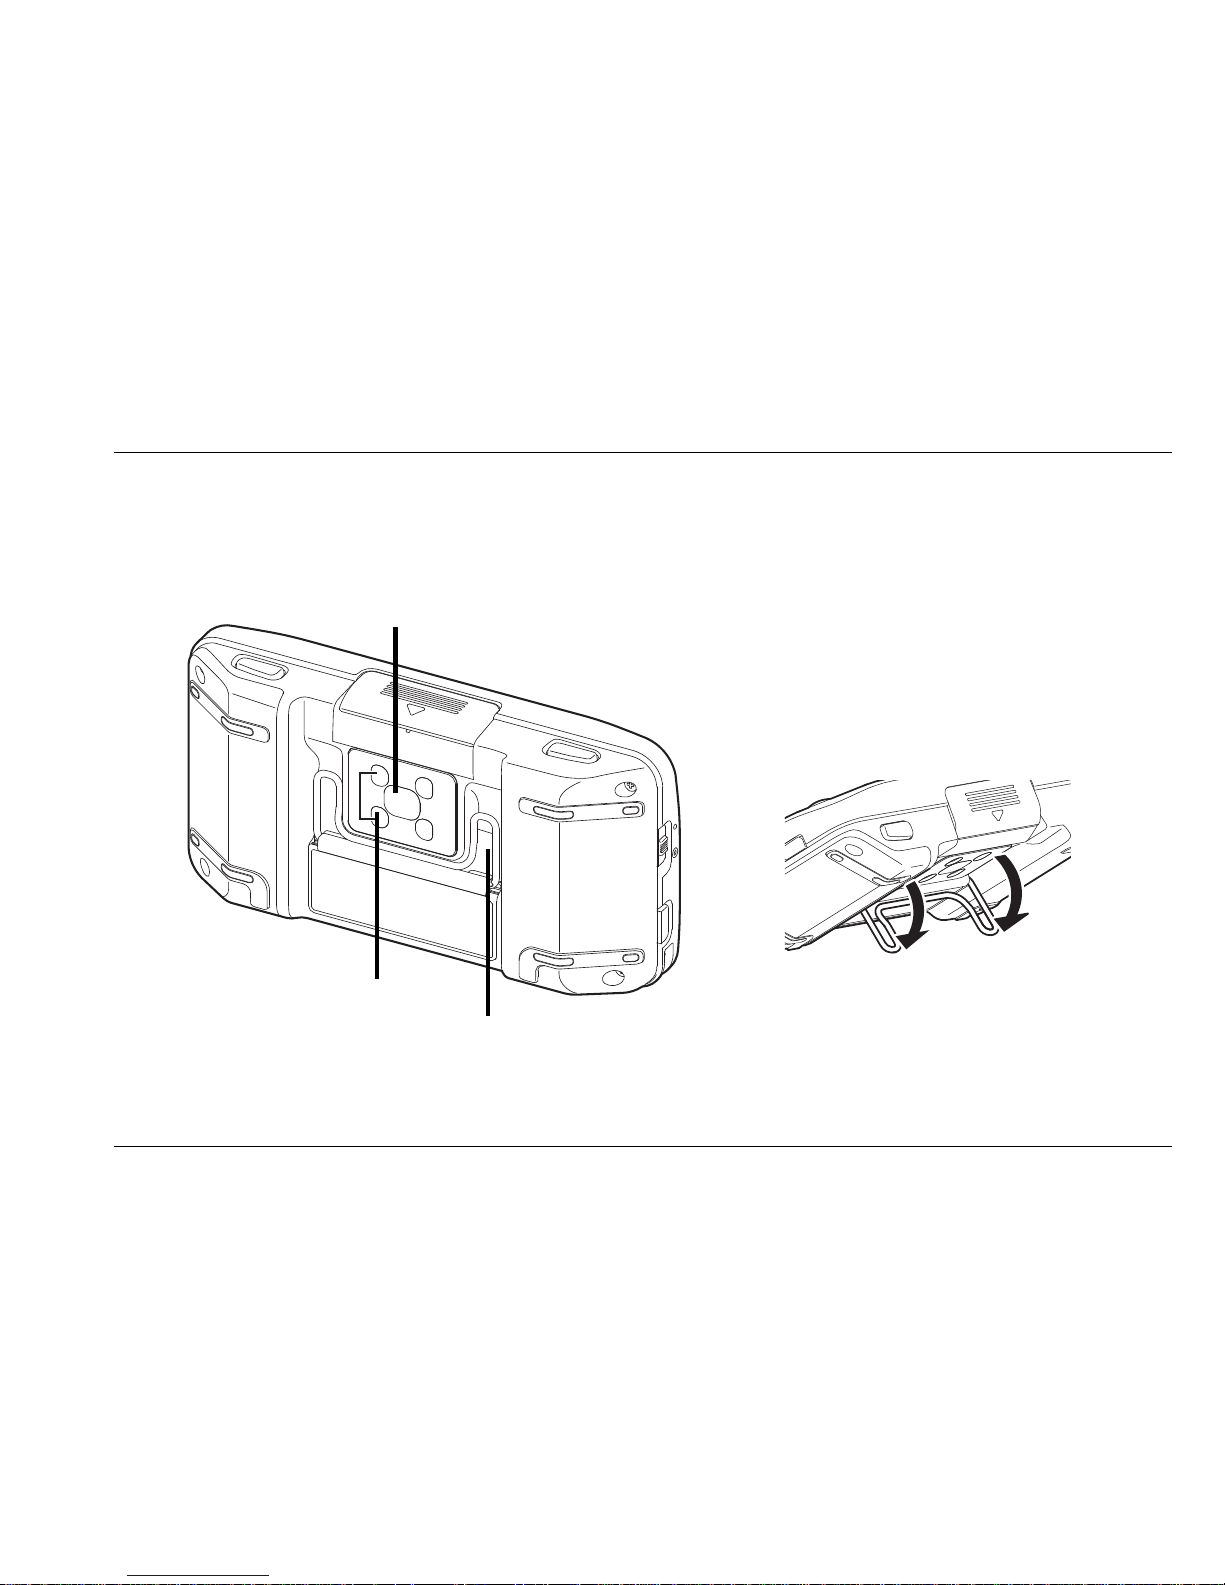
Camera The FarView features a high resolution continuous auto-focus
camera that can be used for both distance and close-up
viewing.
Light The lights can be switched on and off. The lights will
automatically be switched on when the unit is switched into
close-up viewing mode.
Reading stand Pull and place the reading stand for enhanced reading comfort
in close-up live mode.
Attention: we strongly advise you to open and close the
reading stand carefully as to avoid hurting your fingers.
Page 19

Optelec FarView
English Page 19
3. Power and battery use
When the AC adapter is not connected, the FarView relies on the integrated batteries as its
main power source.
Charging the batteries
When using the FarView for the first time, make sure that the batteries are is fully charged.
Charging the batteries takes approximately 4.5 hours. When the batteries are fully charged, the
FarView’s operating time is approximately 2.5 hours in live mode and 4 hours in playback mode.
To charge the batteries, plug in the adapter that was supplied with the unit into the DC IN jack,
located at the top side of the unit. Plug the other end into a power outlet. The power indicator
located on the right side of the screen will blink to indicate that the batteries are charging. When
the batteries are fully charged this indicator will switch off.
The unit can continue to be used while it is still plugged into the AC adapter.
Page 20

Optelec FarView
English Page 20
Turning the power on and off
Switch the unit on and off by pressing the rectangular button, located on the right side of the
unit, for approximately two seconds. By default the FarView will start in live viewing mode.
Battery indicator
When the unit is switched on, the battery level will be indicated on the screen for about two
seconds. When the batteries are exhausted, this indicator will start blinking and the unit will
generate a few beeps. Plug in the AC adapter to charge the batteries.
Stand-by mode and system auto off
This feature will switch the FarView into stand-by mode when not used for about 3 minutes.
While in stand-by mode, the LCD display will switch off and the power indicator will start
blinking. Pressing any button, other than the power button, will switch off the stand-by mode and
you will automatically return to the previous mode.
If the unit continues to go unused for an additional 4 minutes, while in stand-by mode, this
feature will automatically turn off the power off to save the batteries. Press the power button for
two seconds to switch the unit on again.
When plugged into an AC adapter, the unit will not go into stand-by mode.
Page 21

Optelec FarView
English Page 21
Mode selector button
The FarView has two viewing modes: the “live viewing mode” and the “playback mode”.
Live viewing mode: This is used for looking at objects and text at any distance in
real time. The image displayed on the screen can be captured
using the snapshot button. Alternatively, information can be
viewed and magnified in real-time.
Playback mode: Images stored in the internal memory can be recalled and
displayed on the FarView’s 4.3” widescreen.
Pressing the mode selector button allows you to switch between the live viewing mode and
playback mode. By default the FarView will start in the live viewing mode when it is switched on.
Page 22
Optelec FarView
English Page 22
4. Using the FarView for close-up viewing
To start using the FarView, turn on the power by pressing the on / off button on the right side of
the unit, and select the live viewing mode by pressing the rectangular button on the left side of
the unit.
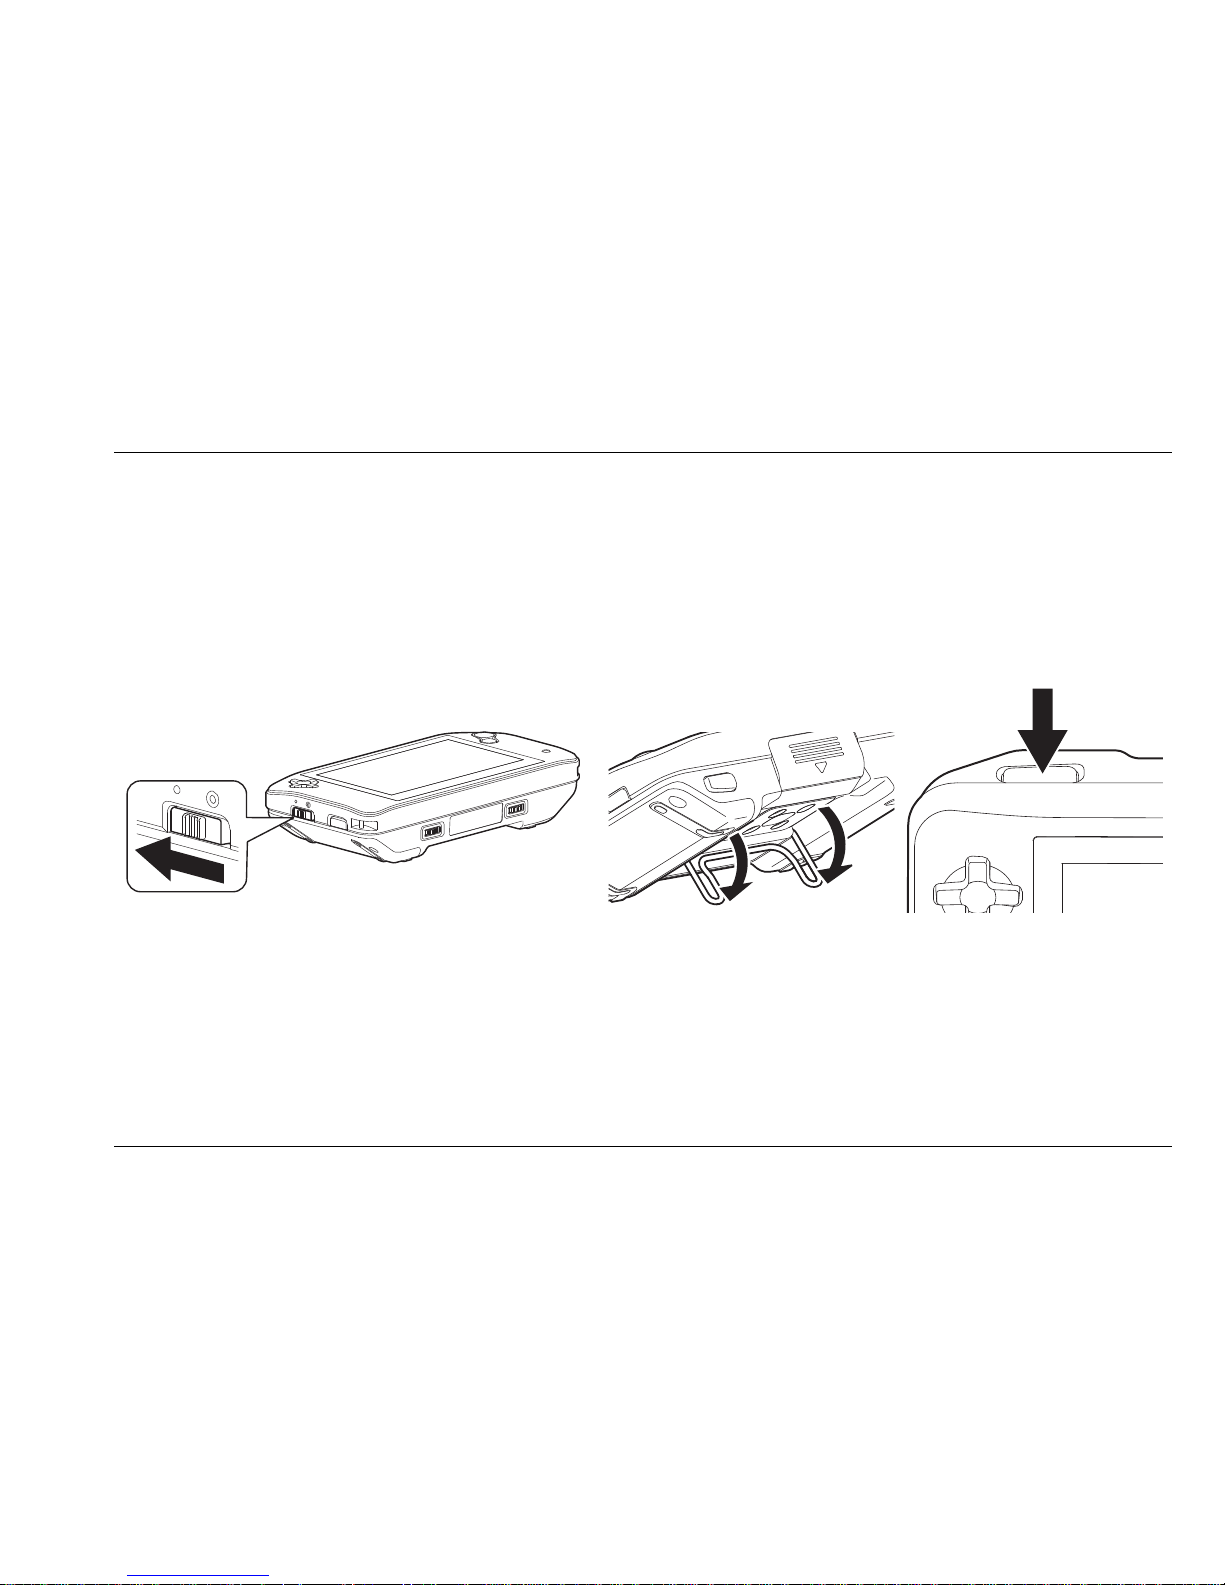
1. Select the close-up mode by moving the view mode selector switch to close-up mode.
The view mode selector is located on the left side of the unit.
2. Unfold the reading stand and place the FarView over your reading material.
3. Press the focus / return button to focus the text.
4. Move the FarView over the text and use the zoom, contrast and color setting buttons to
adjust the image to your needs. You can also use the contrast adjustment and screen
brightness settings in the menu to adjust the contrast and brightness.
Page 23
Optelec FarView
English Page 23
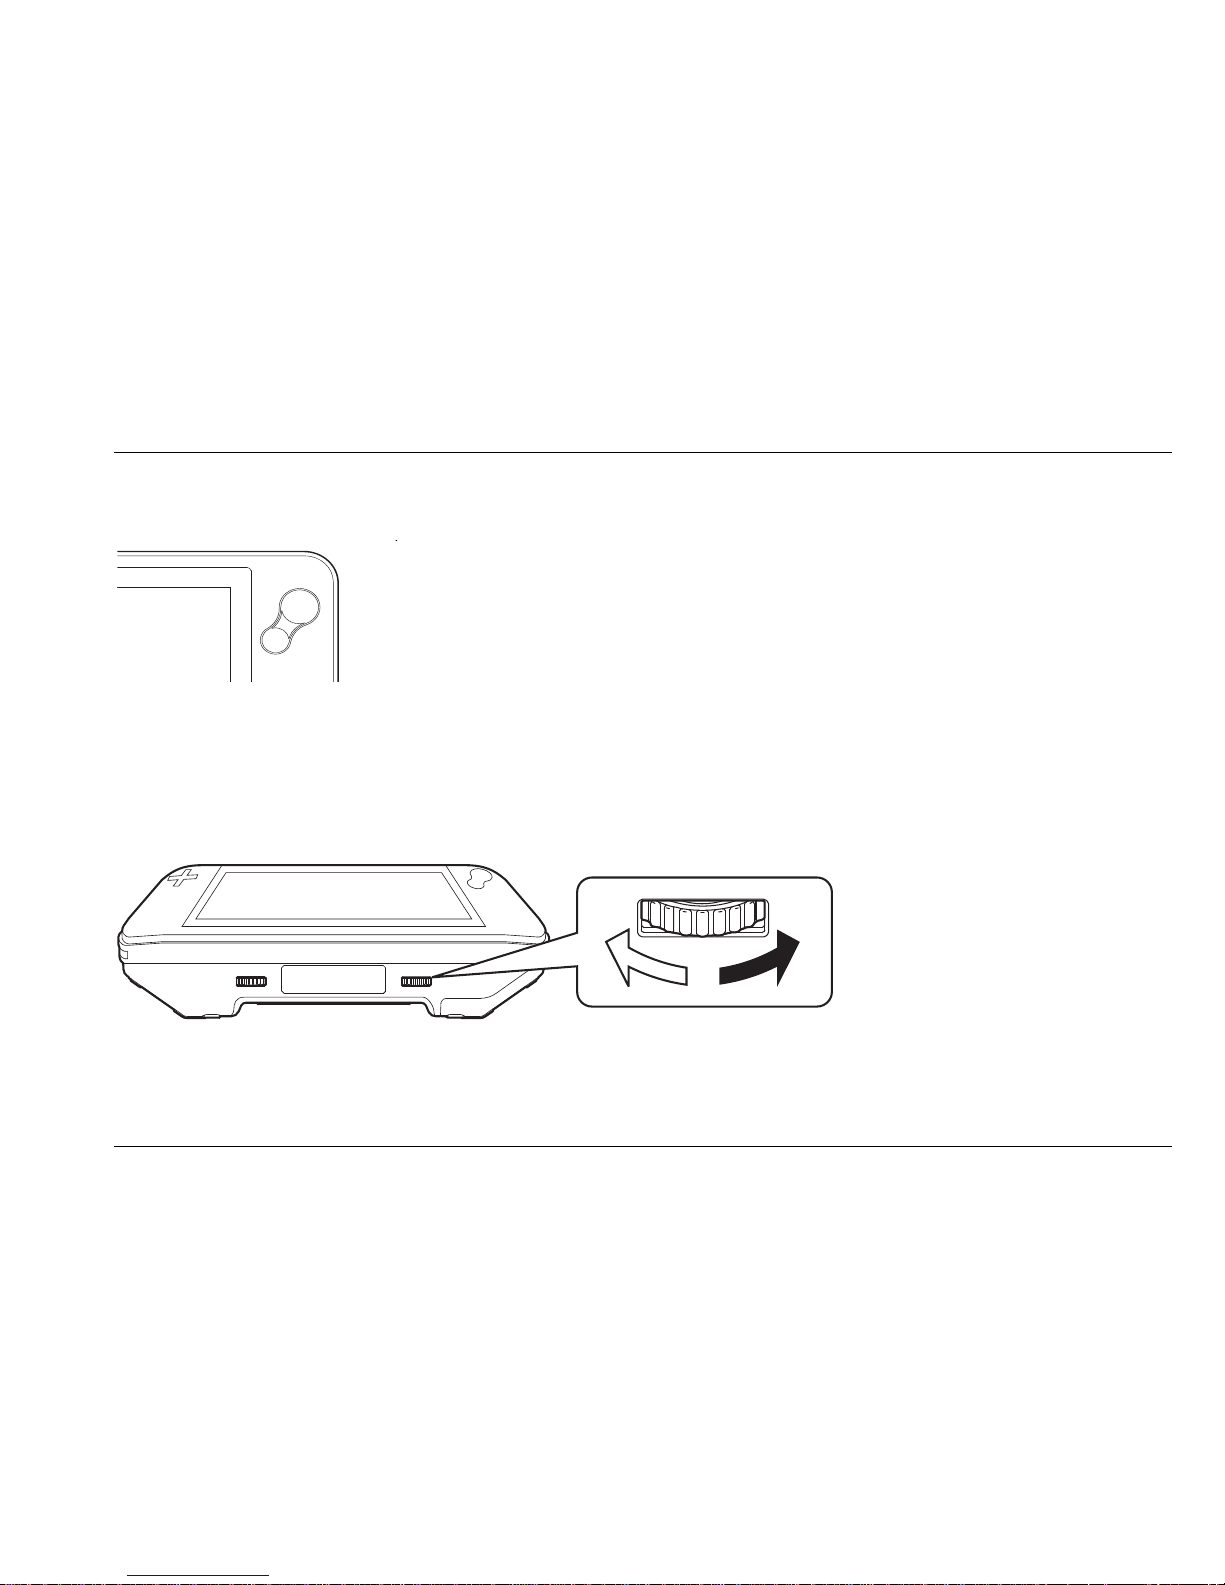
Using the zoom button
Press the zoom button, located on the right side of the screen, to
change the magnification. Pressing the larger part of the button allows
you to increase the magnification, whereas pressing the smaller part
of the button will decrease the magnification.
Selecting a viewing mode
Rotating the color mode button, located right on the right of the bottom side of the unit, allows
you to select among six viewing modes.
- Photo mode: view text and images in full color
- Negative mode: reading in high contrast white text on black background
- Positive mode: reading in high contrast black text on white background
Page 24
Optelec FarView
English Page 24
- Yellow-Black mode: reading in high contrast yellow text on black background
- Yellow-Blue mode: reading in high contrast yellow text on blue background
- Blue-Yellow mode: reading in high contrast blue text on yellow background
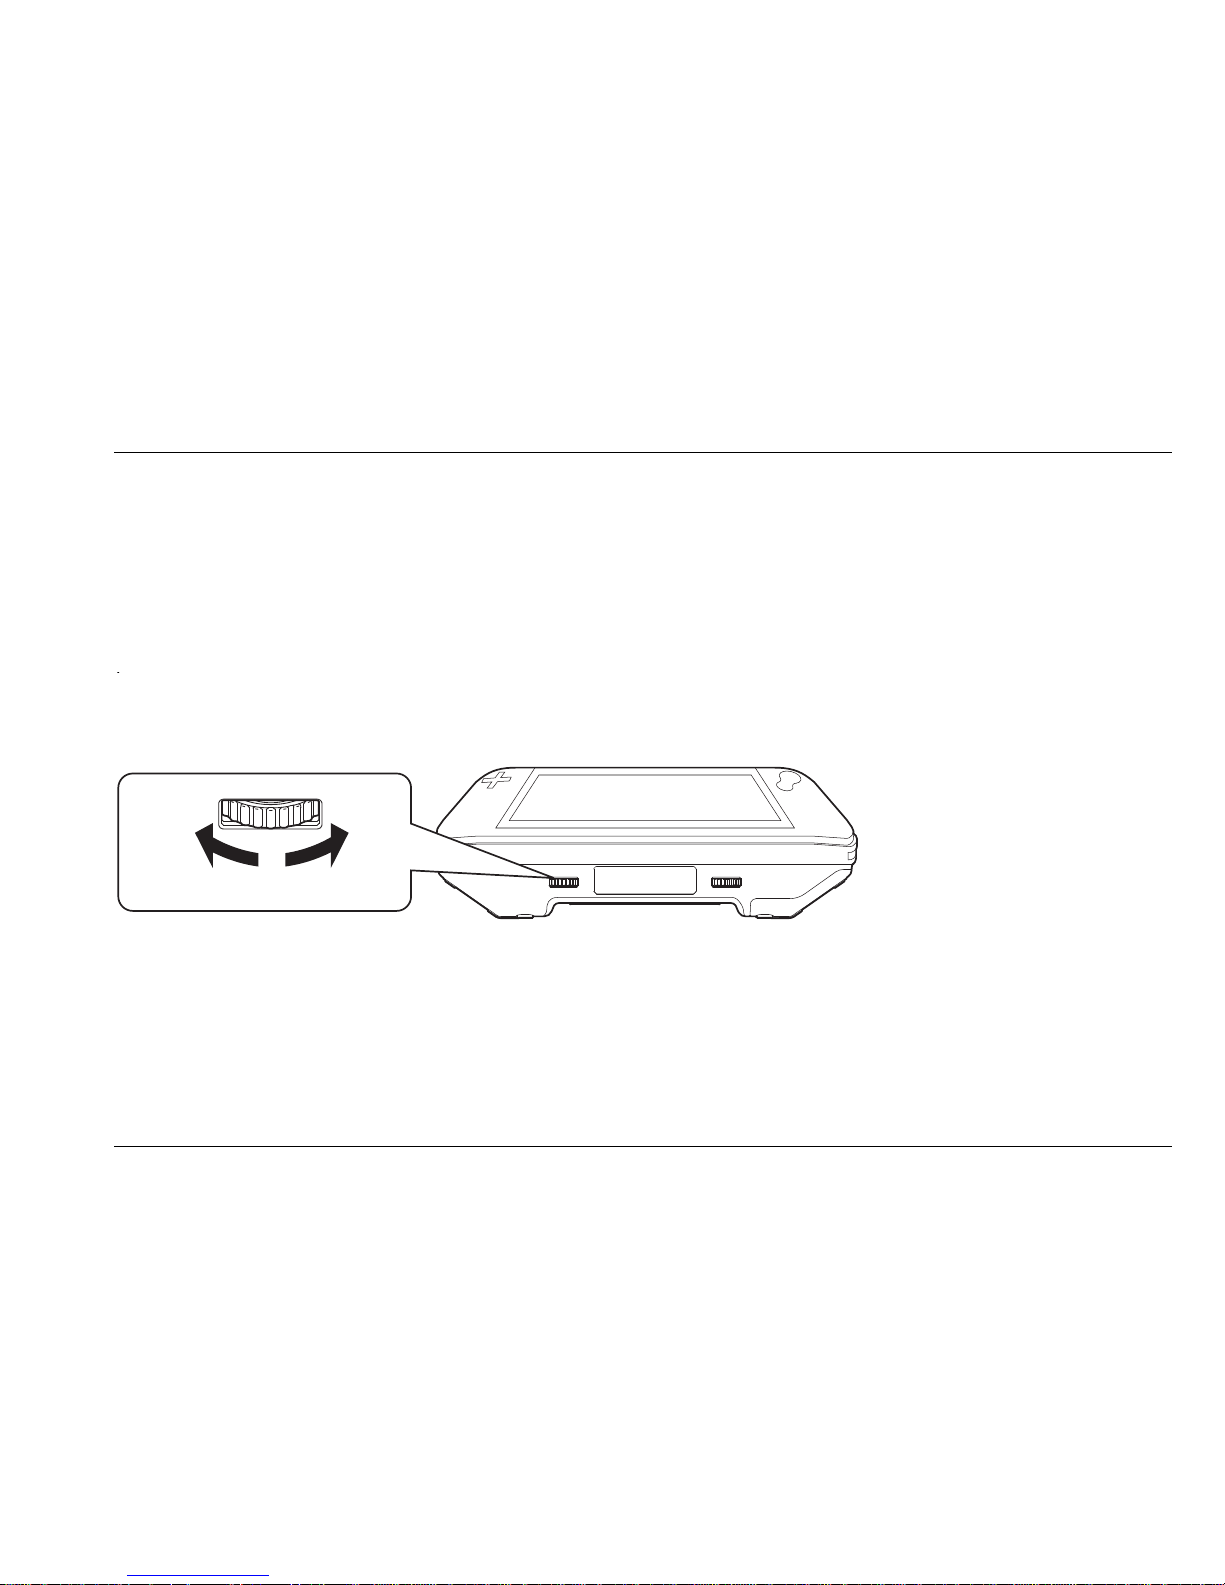
Contrast settings
Rotating the contrast adjustment button, located left on the left of the bottom side of the unit,
allows you to adjust the contrast for a clearer image.
Page 25
Optelec FarView
English Page 25
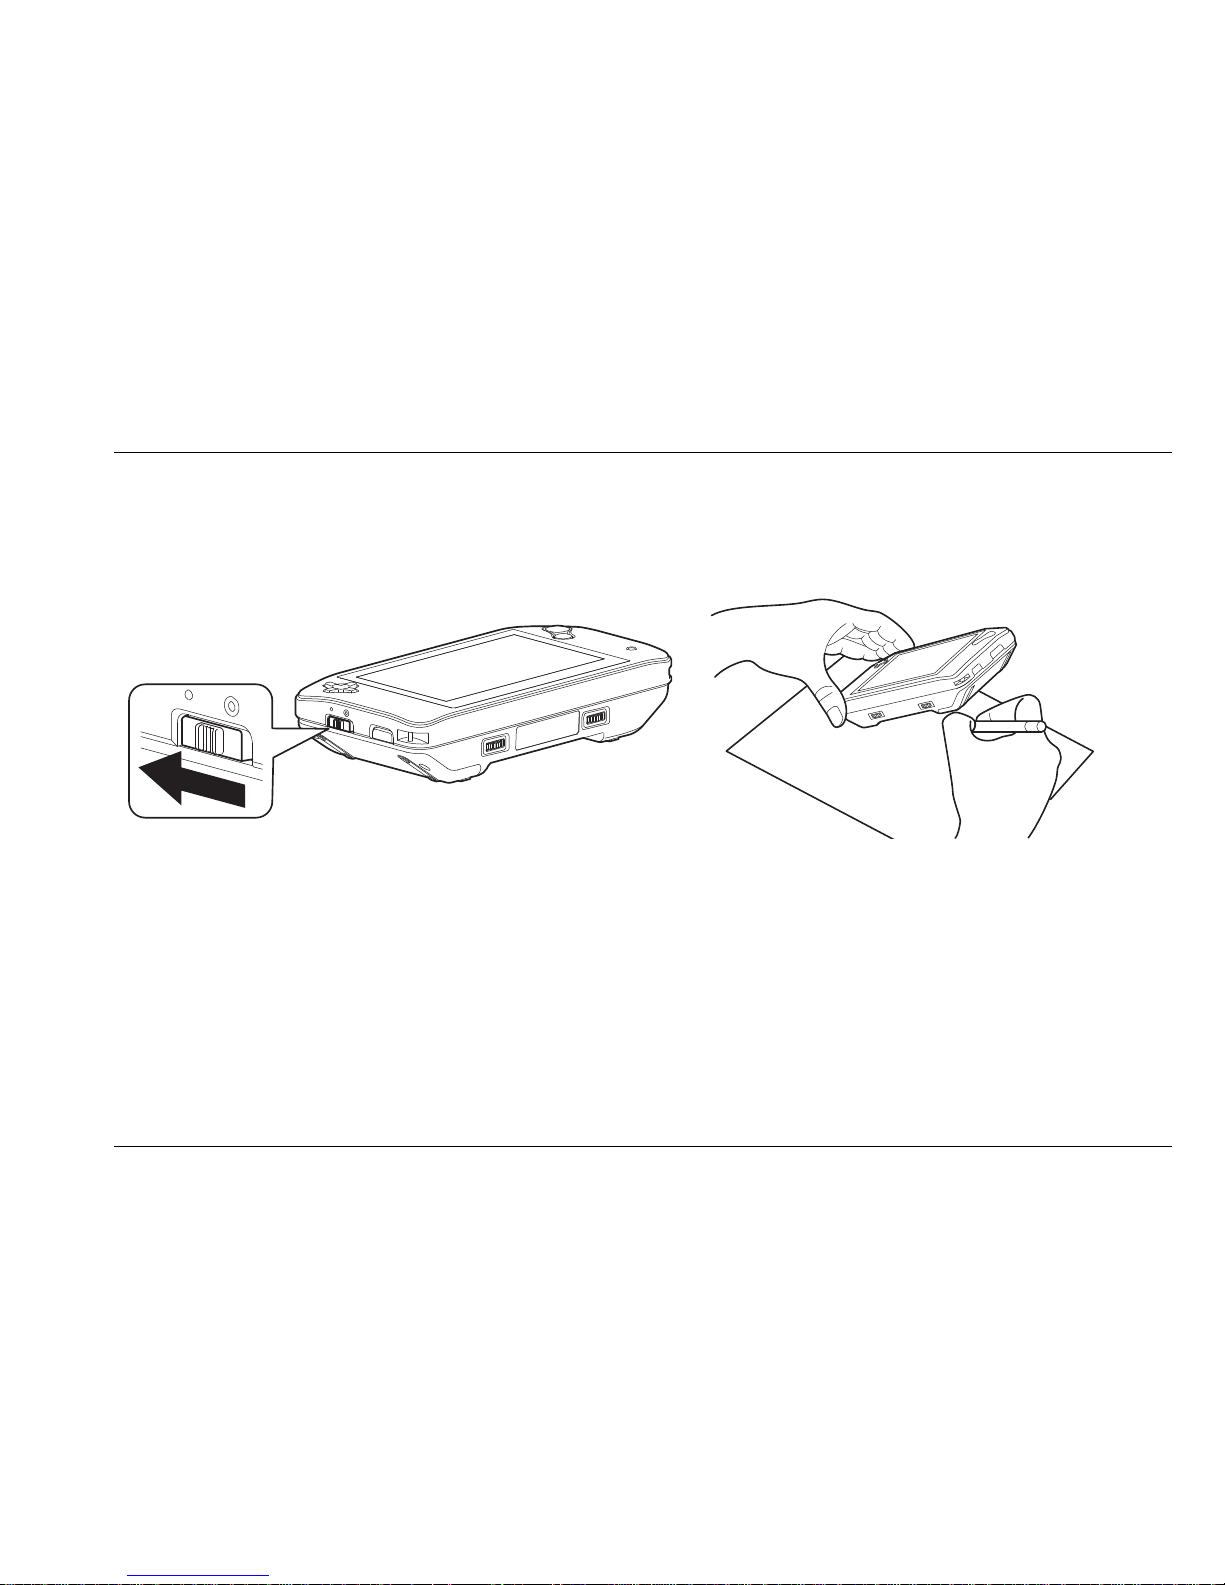
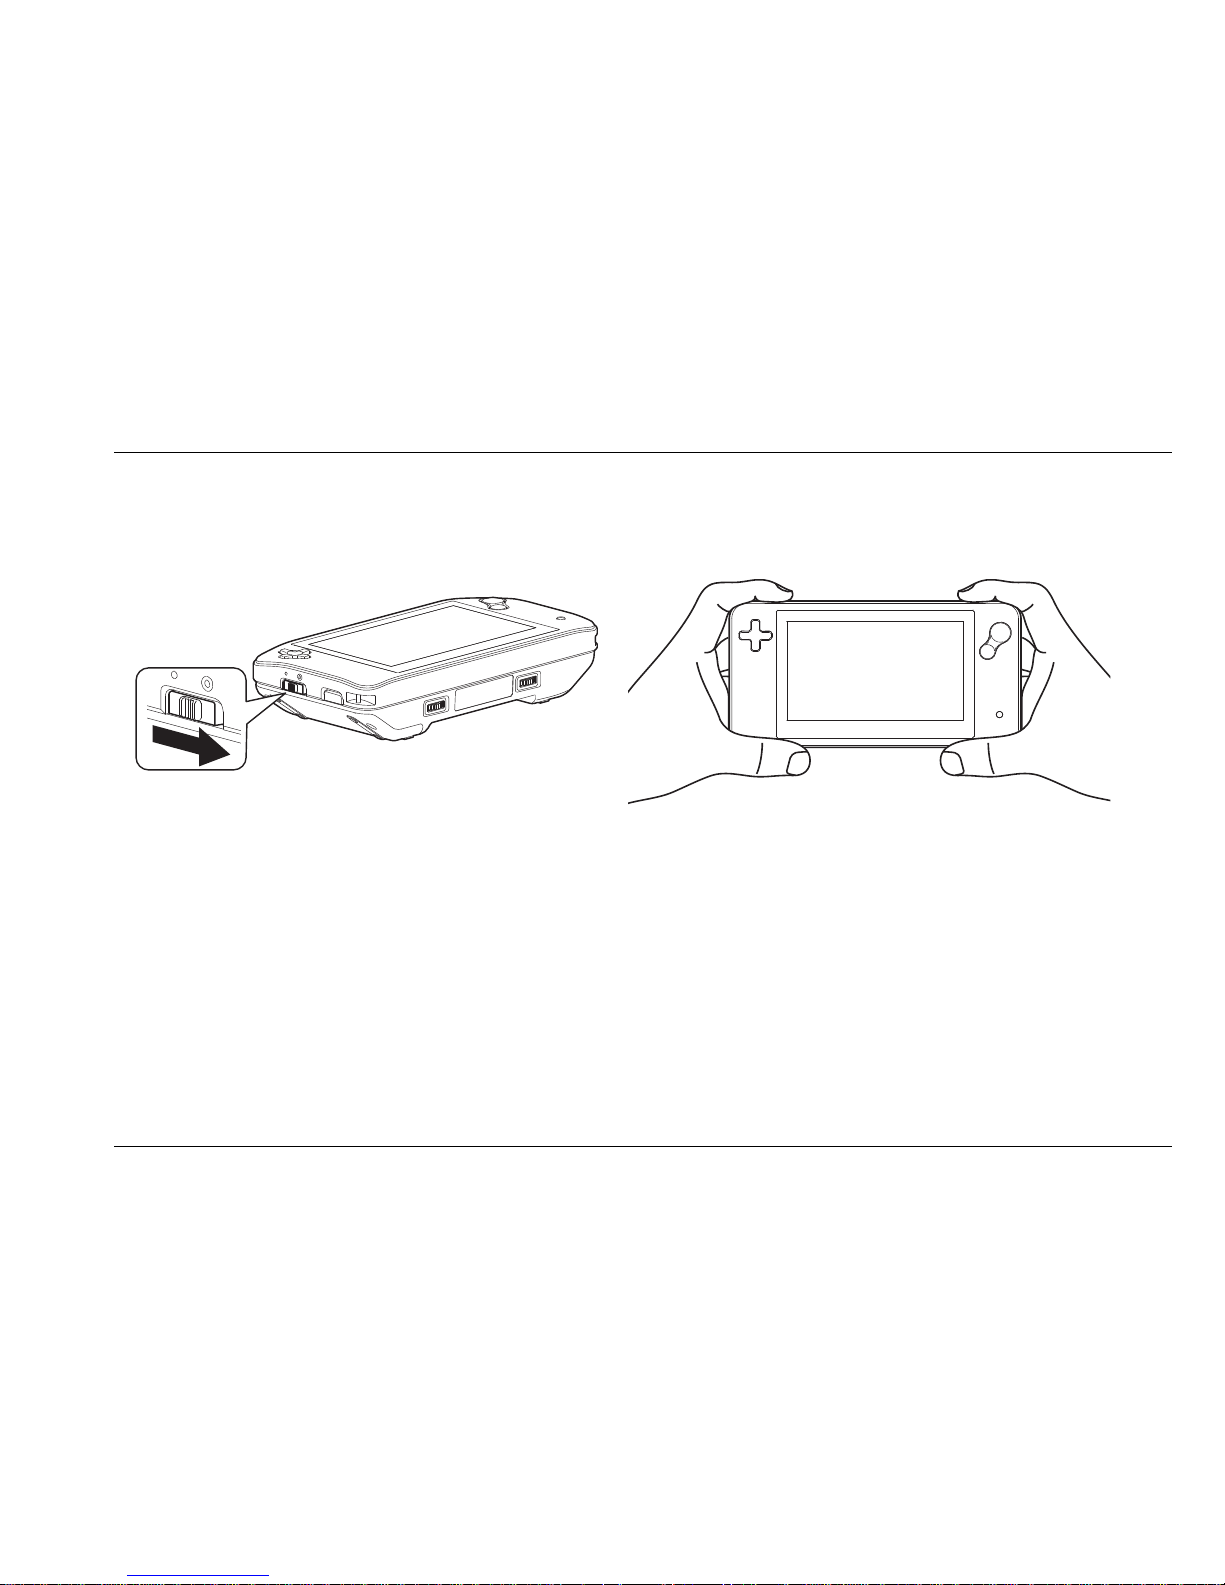
Using the FarView for writing
1. Select the close-up viewing mode by setting the view mode selector switch to close-up
mode.
2. Place the unit on the paper with the display facing up.
3. Press the FarView down on the cursor button side.
4. Press the focus / return button to focus on the text.
5. Place your pen under the raised side to start writing
Page 26
Optelec FarView
English Page 26
5. Using the FarView for distance viewing
1. Select the distance mode by moving the view mode selector switch into distance mode.
The view mode selector is located on the left side of the unit.
2. Direct the unit to the text or object that you wish to look at, and use the zoom, contrast
and color settings buttons to adjust the image to your needs. You can also use the
contrast adjustment and screen brightness settings in the menu to adjust the contrast
and brightness.
Page 27
Optelec FarView
English Page 27
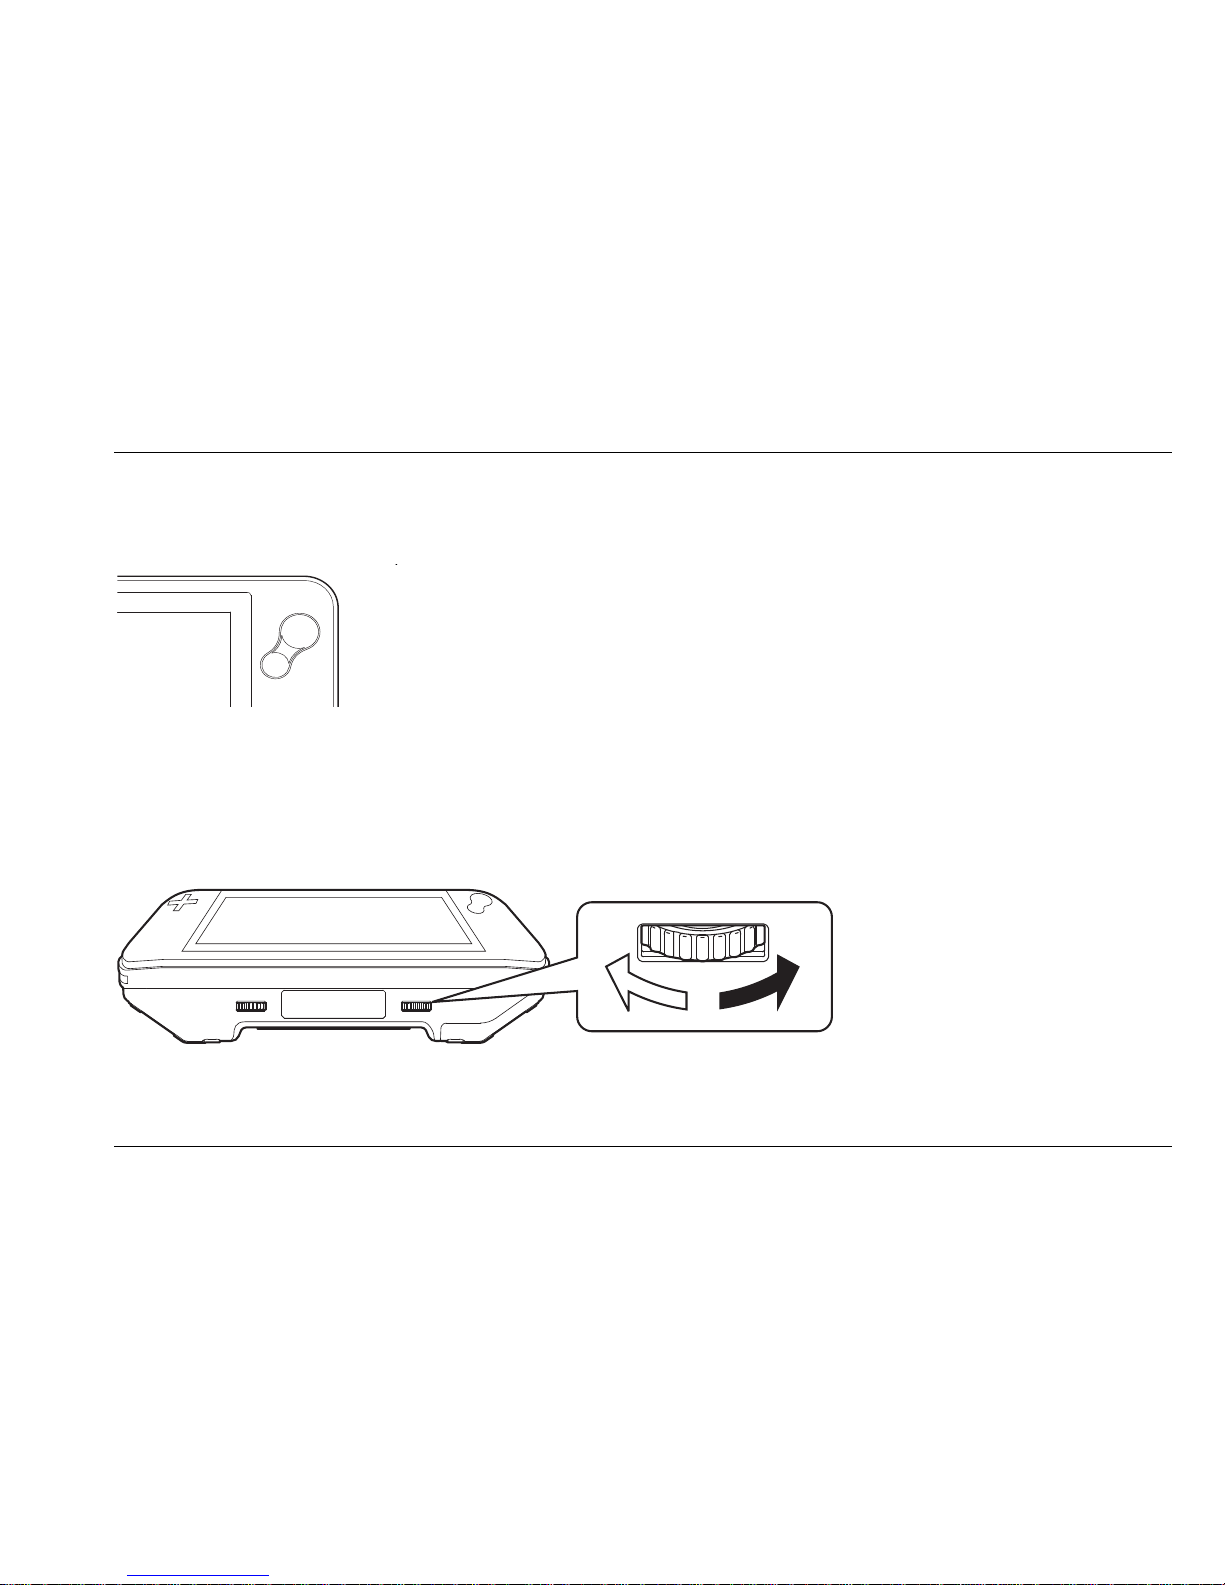
Using the zoom button
Press the zoom button, located on the right side of the screen, to
change the magnification. Pressing the larger side of the button allows
you to increase the magnification, whereas pressing the smaller side
of the button will decrease the magnification.
Selecting a viewing mode
Rotating the color mode button, located on the right of the bottom side of the unit, allows you to
select among the six viewing modes.
- Photo mode: view text and images in full color
- Negative mode: reading in high contrast white text on black background
Page 28
Optelec FarView
English Page 28
- Positive mode: reading in high contrast black text on white background
- Yellow-Black mode: reading in high contrast yellow text on black background
- Yellow-Blue mode: reading in high contrast yellow text on blue background
- Blue-Yellow mode: reading in high contrast blue text on yellow background
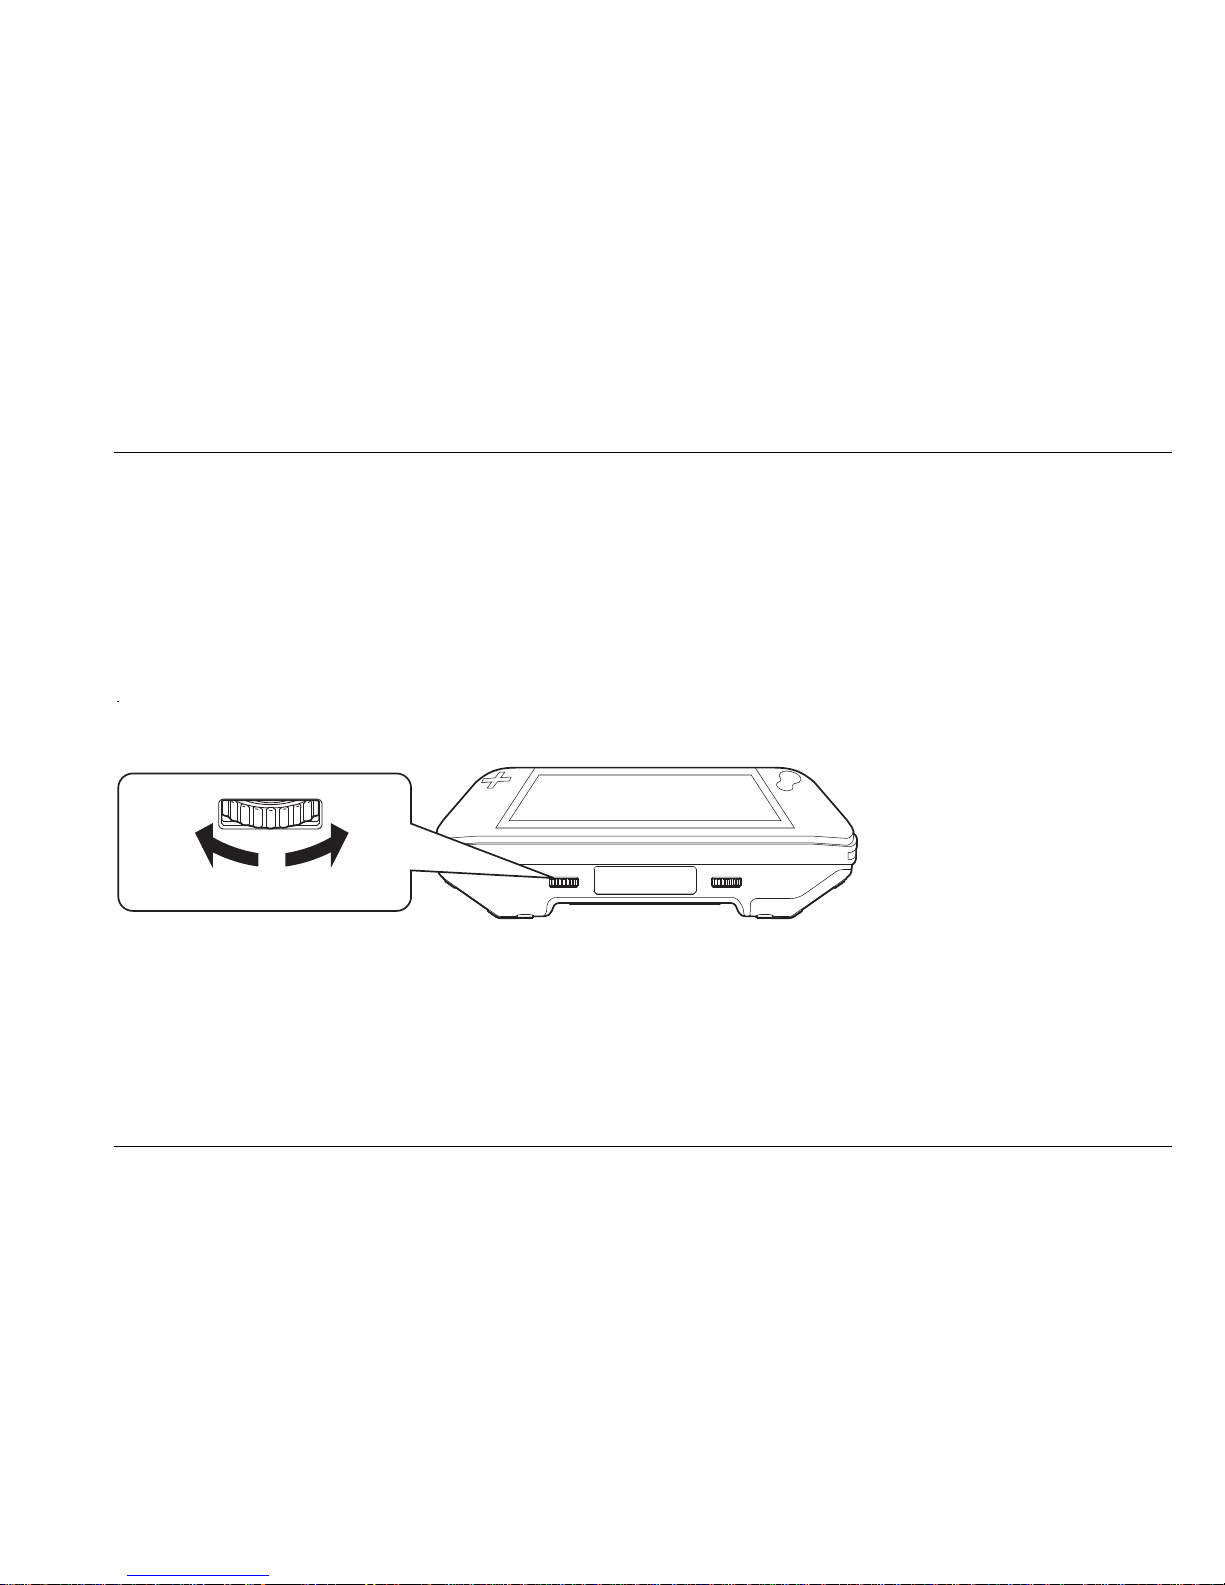
Contrast settings
Rotating the contrast adjustment button, located on the left of the bottom side of the unit, allows
you to adjust the contrast for a clearer image.
Page 29
Optelec FarView
English Page 29
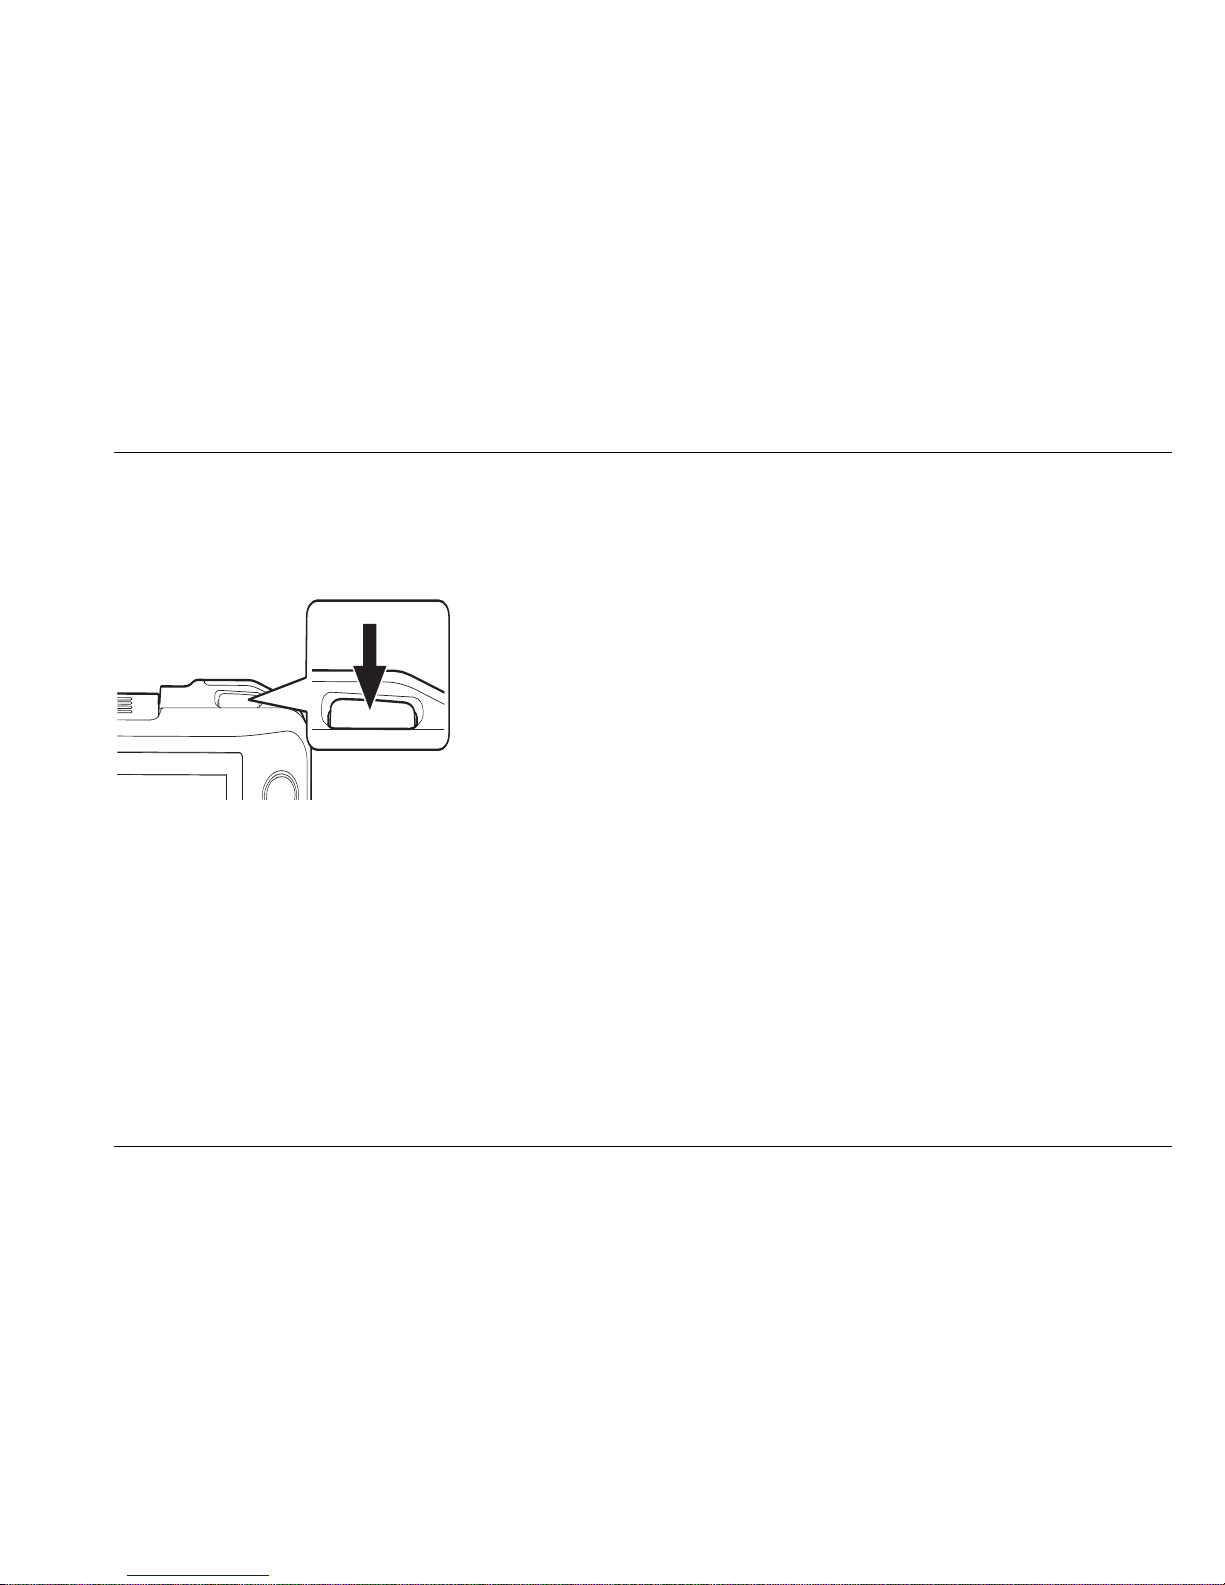
Taking pictures with the FarView (Document Read Mode)
- Direct the FarView towards the text or image
- Press the oval shaped snapshot button, located right at
the top side of the unit. The FarView generates a beep to
indicate that the focus is adjusted, followed by a second
beep, indicating that the picture is taken.
- View the picture on the screen of the FarView
- Captured images are automatically saved in the
FarView’s integrated memory for later reference.
Note! This function also allows you to capture a complete A4 or Letter size document or multiple
pages of a book or magazine. Store the pages in the internal memory and recall the page while
on the go or while sitting in a comfortable chair.
Storing images and documents
Pictures are automatically stored in the internal memory. When you take a picture, you will see
both the picture as well as the number of stored pictures displayed on the screen for
approximately two seconds. The FarView can store up to 100 images in the internal memory.
For more information about setting the maximum number of pictures, please refer to chapter 7
Page 30

Optelec FarView
English Page 30
Please note that when the number of pictures exceeds the allowed 100 images, the first picture
will automatically be deleted. To protect pictures from automatic deletion, please refer to chapter
7.
Page 31
Optelec FarView
English Page 31
6. Picture Playback Mode
The pictures stored in the FarView’s internal memory can be recalled and displayed on the
screen.
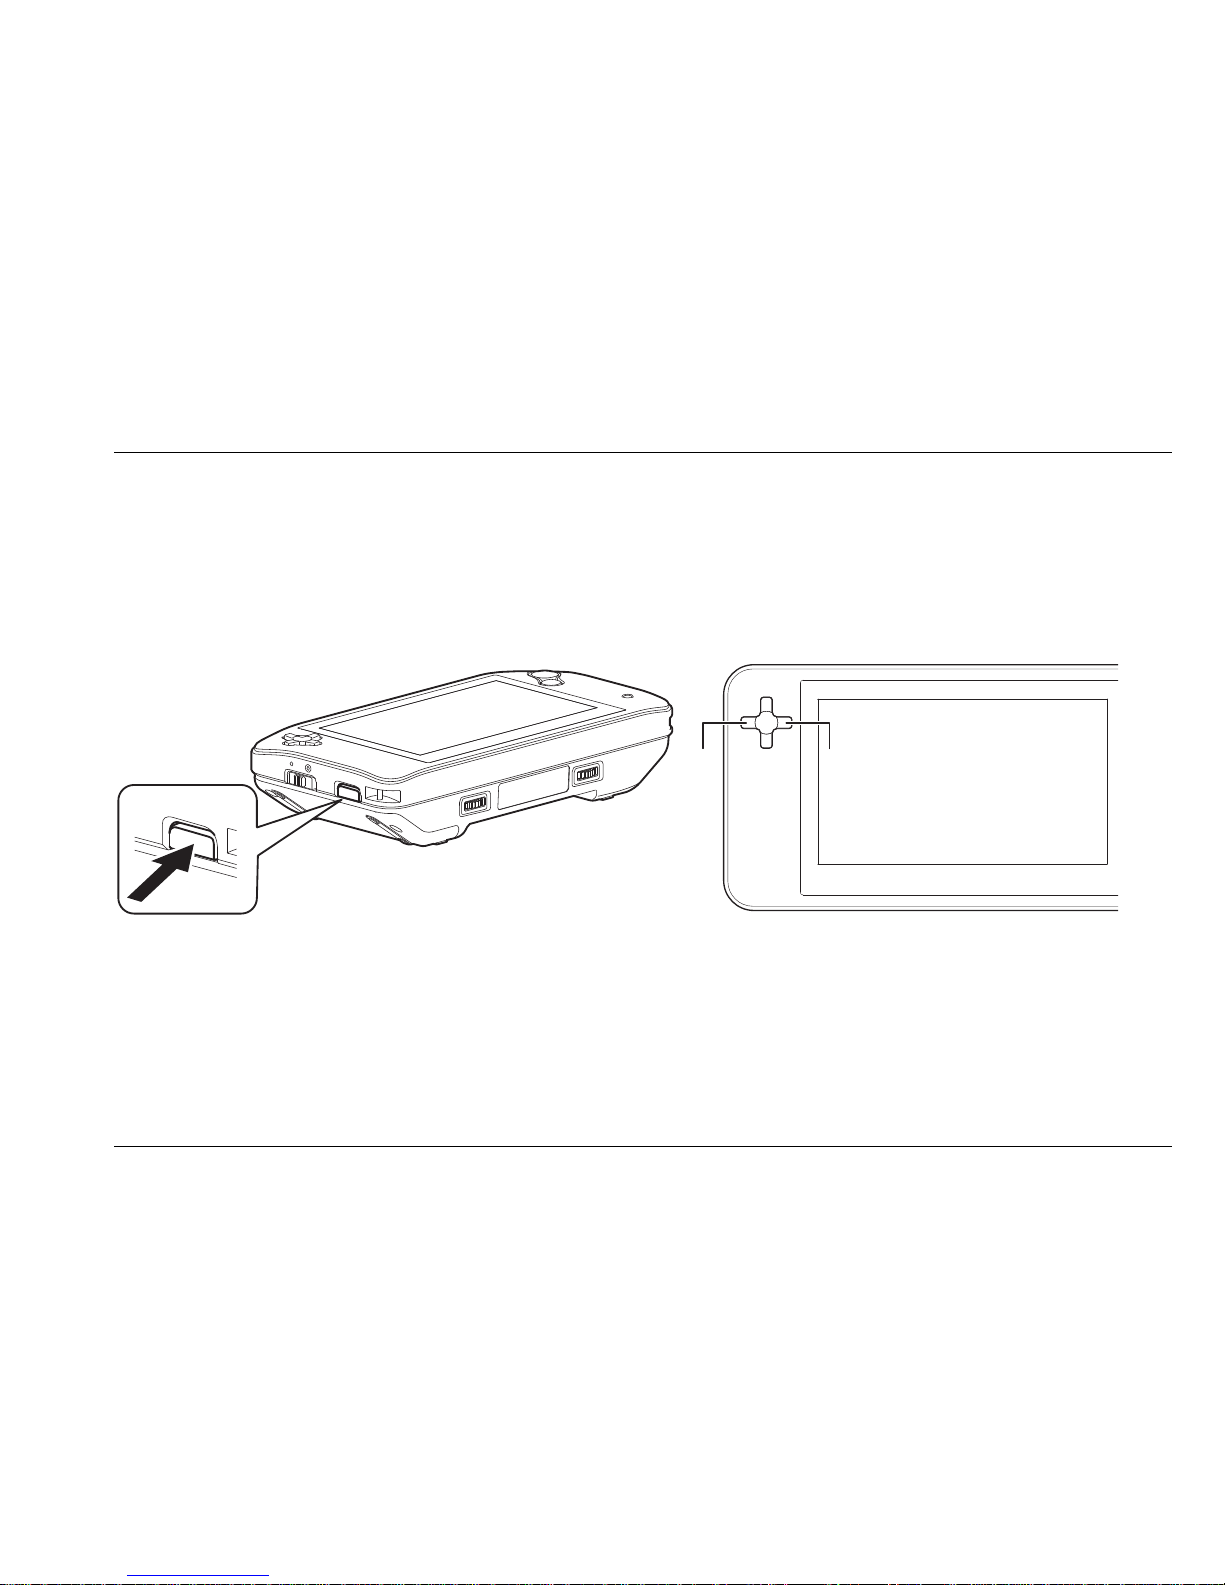
1. Switch the unit into playback mode by pressing the mode selector button on the left side
of the unit.
2. Use the cursor buttons, located on the left side of the screen, to navigate through the
images. Pressing the left cursor button will display the previous image, whereas pressing
the right cursor button will display the next image.
Page 32

Optelec FarView
English Page 32
Picture selection and adjustment
The pictures stored in the FarView’s internal memory can be recalled and displayed on the
screen.
Use the zoom button, contrast adjustment button or color settings button to adjust the images to
your needs.
You can also use the menu to adjust the contrast, rotate the picture and adjust screen
brightness. More information about these and other features can be found in chapter 7.
To enhance reading comfort, you can use the skew settings, return / stop position setting and
scroll speed setting. Please keep in mind that the image displayed on the screen can only be
scrolled when the image is magnified.
FarView features an automatic scrolling feature, allowing automatic scrolling to the beginning of
the line. To optimally use this feature, follow the steps below:
1. Display the preferred position in the text to set the return position
2. Press and hold the focus / return button for approximately 2 seconds (until the unit
generates a beep) to set the return position. The return position is marked on the left side
of the screen.
3. Display the preferred position in the text to set the stop position.
Page 33

Optelec FarView
English Page 33
4. Press and hold the snapshot button for approximately 2 seconds (until the unit generates
a beep) to set the stop position. The stop position is marked on the right side of the
screen.
Use the scrolling buttons to navigate through the text. Press the focus / return button when you
have reached the end of the line or column to scroll automatically to the beginning of the line or
column.
To cancel the return and stop position, press and hold respectively the focus / return or
snapshot button.
Please note that the automatic scrolling feature will be disabled when:
- displaying other images;
- switching to live viewing mode;
- connecting the FarView to an external monitor or PC
Pressing the snapshot button will return the magnified image to its original size. Press the left
and right cursor buttons to continue navigating through the images saved in the unit’s memory.
For more information on rotating pictures or enhancing reading comfort, please refer to chapter
7.
Page 34
Optelec FarView
English Page 34
7. Using the FarView Menu
The FarView has an integrated menu that enables you to adjust many built-in settings to your
needs.
Opening the menu
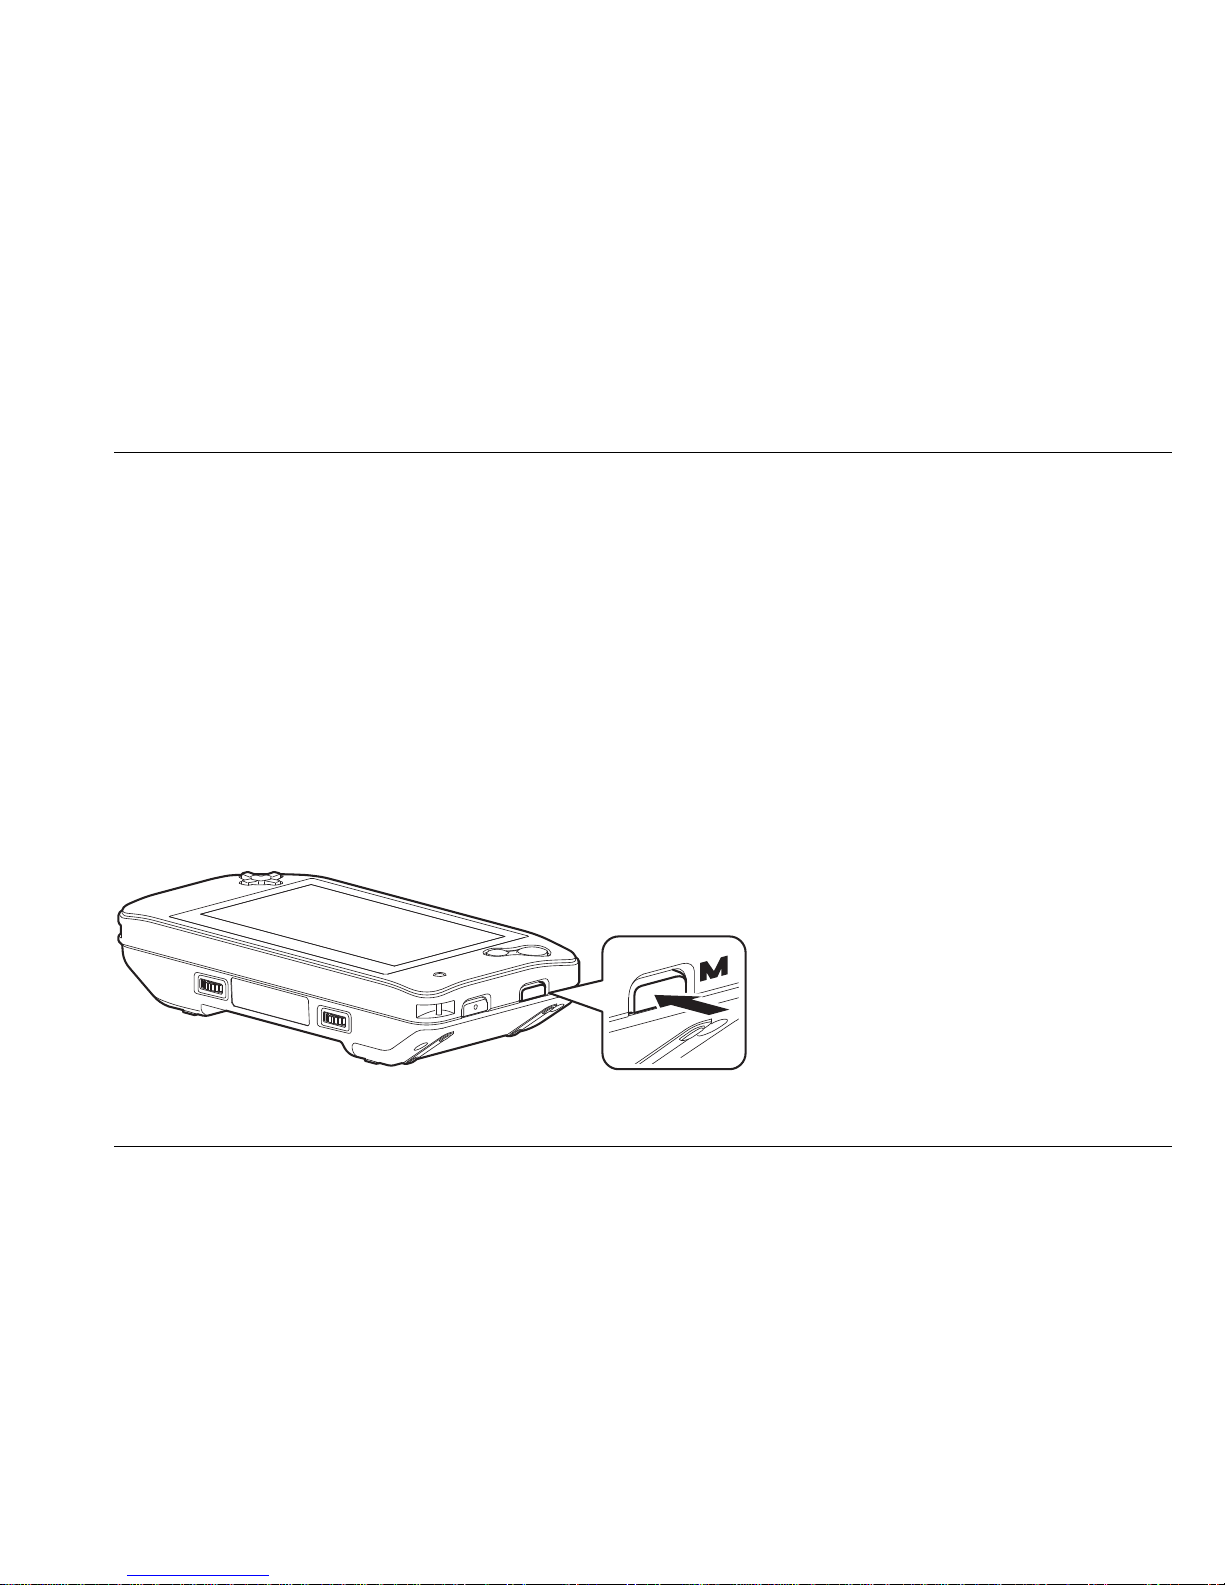
Press the menu button, located on the right side of the unit, to open the main menu. Use the
cursor buttons ‘up’ and ‘down’ to navigate through the menu. Press the right cursor button to
open the selected menu item.
To close the menu, press the menu button again and return to the viewing mode.
Page 35
Optelec FarView
English Page 35
Modifying settings in the menu
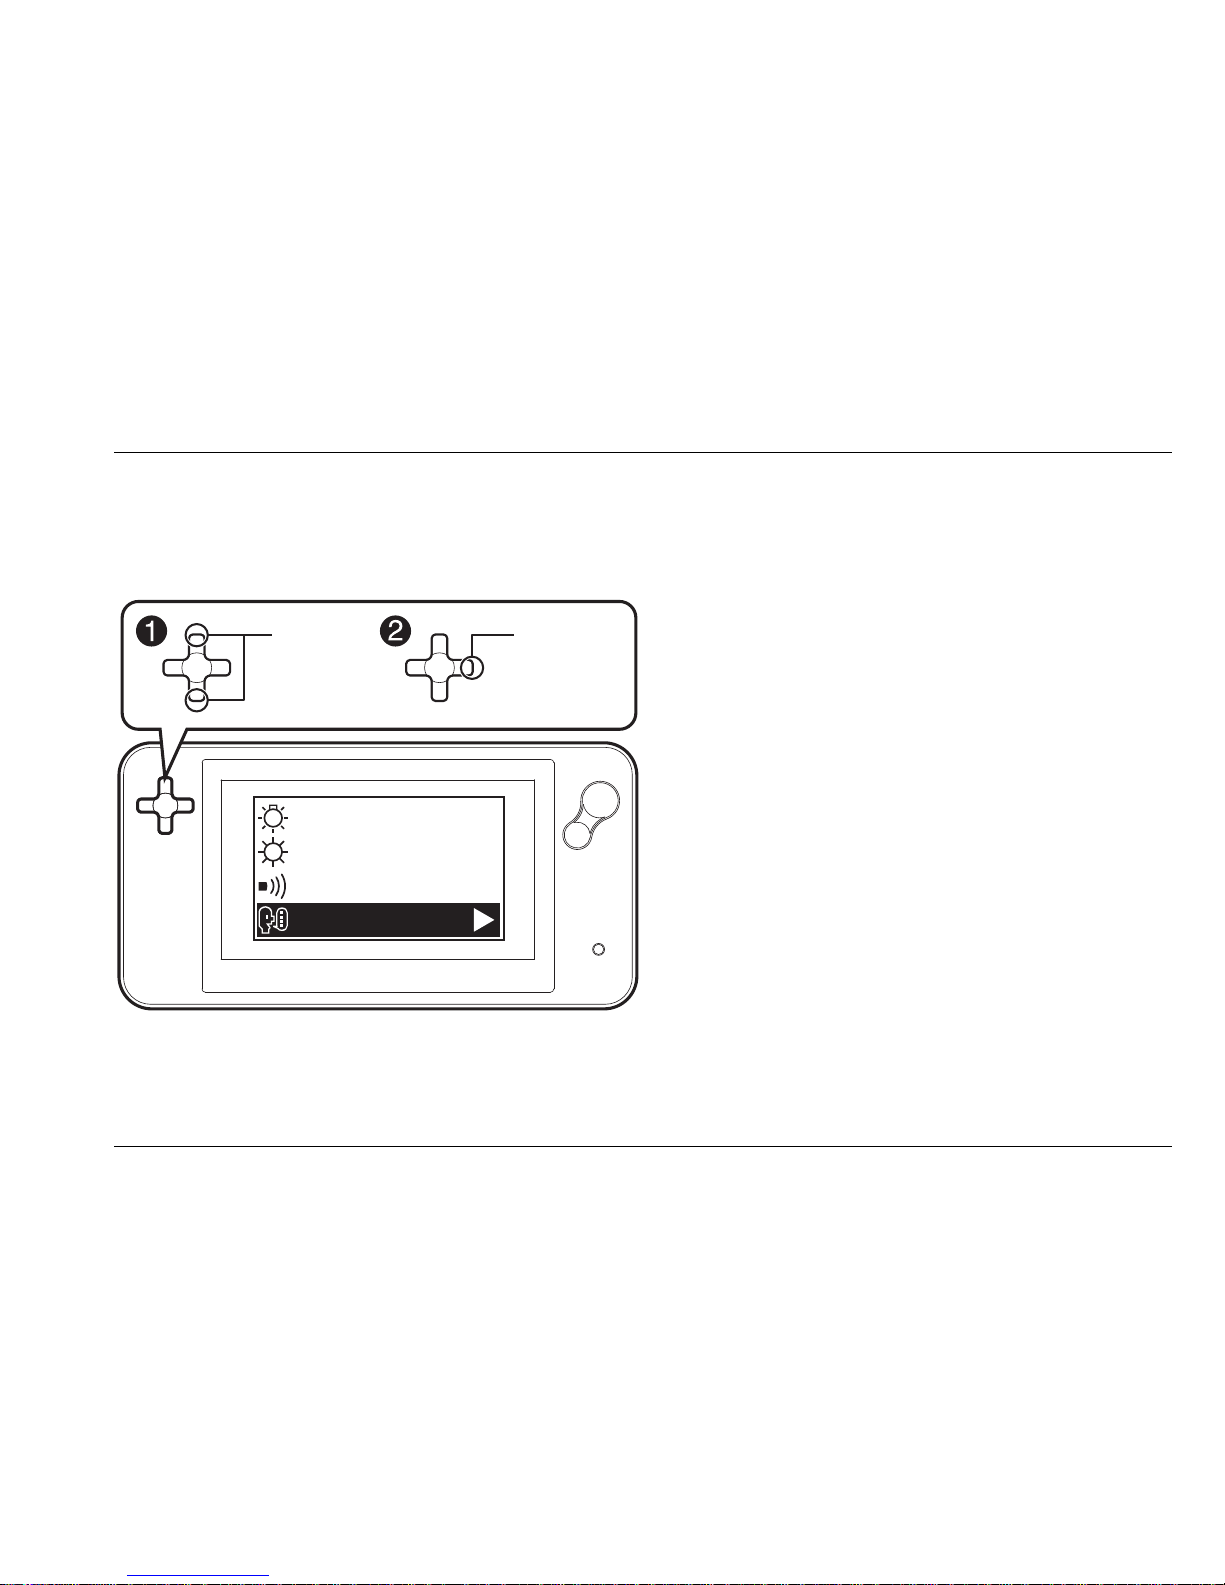
The FarView menu has 12 items. These allow you to configure the FarView or to access
information about the FarView’s current status.
LIGHT
BRIGHTNESS
BEEP
LANGUAGE
Menu Button
Open menu Menu button
Next menu item Cursor down button
Page 36

Optelec FarView
English Page 36
Previous menu item Cursor up button
Select menu item Cursor right button
Modify value in menu field Cursor up and down buttons
Accept value and close menu Press menu button twice
Close menu Menu button
Contrast (live view and playback view) can be adjusted using the ‘up’ and ‘down’ cursor
buttons. Either ‘AUTO’ contrast or ‘MANUAL’ contrast can be selected. Press the right cursor
button to confirm your selection.
Auto: the contrast is adjusted automatically.
Manual: the contrast is adjusted according to your needs, using the color mode button.
Please note that the unit automatically returns to the ‘AUTO’ setting when the unit is switched
off and back on again.
Light (live view): the light can be to set on or off in the close up live viewing mode. Press the
‘up’ and ‘down’ cursor buttons to select ‘ON’ or ‘OFF’ and press the right cursor button to
confirm your setting. By default, the unit starts in light ‘ON’ mode every time it is switched on.
Rotate (playback view): this feature allows you to rotate the image displayed on screen to 90º
toward the left or right, or to 180º. Use the ‘up’ and ‘down’ cursor buttons to navigate through
the different rotating options, and press the right cursor button to confirm your setting. Please
note that protected images cannot be rotated
Page 37

Optelec FarView
English Page 37
Delete (playback view): display the picture on the screen that you wish to delete and press the
menu button. Select ‘DELETE’ and press the right cursor button to confirm. Select either ‘THIS’,
‘ALL’ or ‘NO’ to delete either the selected picture, all pictures or no pictures.
When selecting ‘ALL’ a dialog box will appear asking you if you want to delete all pictures.
Select either ‘YES’ or ‘NO’ and confirm your choice by pressing the right cursor button.
Please note that protected images cannot be deleted when selecting ‘DELETE ALL’. To delete
protected images, you must first cancel the protection setting in the ‘PROTECTION’ submenu.
Scroll speed (playback view): this can be adjusted to your needs by pressing ‘up’ and ‘down’
cursor buttons. Pressing the ‘up’ button will increase the scrolling speed. Pressing the ‘down’
button will decrease the scrolling speed.
Skew (playback view): when a picture is not aligned properly, the skew settings can be used to
correct the alignment. The skew can be adjusted by pressing the ‘up’ and ‘down’ cursor buttons.
The guideline will rotate 1º each time the ‘up’ or ‘down’ button is pressed. Press the menu
button twice to save your settings and to return to playback mode.
Please note that switching off the unit or selecting another image in playback mode will cancel
the settings. Pressing the left or right scrolling buttons, allows you to return to playback mode.
Brightness (live view and playback view): this can be adjusted by pressing the ‘up’ and ‘down’
cursor buttons. This submenu features four levels. Press the ‘up’ button to increase the
Page 38

Optelec FarView
English Page 38
brightness and press the ‘down’ button to decrease the brightness. The brightness settings will
be saved automatically, even when the unit is switched off. Please note that the brightness
cannot be adjusted when the FarView is connected to an external monitor.
Protect (playback view): pictures stored in the internal memory can be protected from
accidental deletion. Select ‘PROTECT’ while the unit is in playback mode and then press the
right cursor button to confirm your setting. A protection mark will appear on screen to indicate
that the picture is protected. Pressing the ‘up’ and ‘down’ cursor buttons will cancel the
protection settings.
To continue protecting images, select another picture and repeat the same procedure.
Beep (live view and playback view): this can be switched ‘ON’ or ‘OFF’, by pressing the ‘up’ and
‘down’ cursor buttons. By default, sounds are switched on. Sound settings are automatically
saved when switching the unit off and back on again.
Language (live view and playback view): press the ‘up’ and ‘down’ cursor buttons to navigate
the language menu and press the right cursor button to confirm your setting. The language
menu features 7 different language options:
- Japanese
- English
- French
- German
Page 39

Optelec FarView
English Page 39
- Spanish
- Italian
- Dutch
The language setting is automatically saved when the unit is switched off and back on again.
The default language setting is ‘ENGLISH’.
Number of image (live view): this setting allows you to set the maximum number of images that
can be stored in the FarView’s internal memory. You can select 30 images or 100 images.
Press the ‘up’ and ‘down’ cursor buttons followed by the right cursor button to select your
preferred setting. By default this setting is set to 30 images.
Reset (live view and playback view): this allows you to restore the factory settings. Selecting
this option will restore the ‘contrast’, ‘light’, ‘scroll’, ‘brightness’ and ‘beep’ settings.
Page 40

Optelec FarView
English Page 40
8. Connecting the FarView to other equipment
The FarView can be connected to an external VGA monitor or PC to view images at a more
comfortable size.
Viewing images on an external monitor or TV with VGA terminal
Plug the VGA cable (available as an option) into the VGA OUT port, located on the top side of
the unit. Plug the other end of the VGA cable to the external monitor or TV.
Please make sure that the power is switched off when connecting the unit to an external VGA
monitor or TV. When connecting the FarView to a TV, make sure that the select the external
input mode on your television is selected.
Connecting the FarView to a PC
Connect the FarView to your computer to save, play, print and email your pictures.
1. Switch the power off and connect the FarView to the AC adapter into your FarView.
2. Switch the power back on.
3. Connect the FarView to the PC by using a USB cable
Page 41

Optelec FarView
English Page 41
Once connected to the PC the text ‘PC CONNECTED’ will appear on the screen. Unplugging
the USB cable will switch the unit back into the previous used mode.
The FarView’s drive can be found in the ‘My Computer’ folder on your PC.
To exit the PC mode, please follow the instruction in the ‘Safely remove hardware’ dialog box
found in your PC’s system task tray.
Page 42
Optelec FarView
English Page 42
9. Others
Message display
MESSAGE ACTION
No Image No saved images. Take pictures and store
them in the internal memory.
Irregular Image data The image might be damaged, making it
impossible to view the image in playback
mode. Please delete file.
Please connect AC adapter When connecting the unit to a PC via a USB
cable, make sure that the AC adapter is
plugged in.
Accessing Please do not unplug the USB cable or AC
adapter when accessing the memory, as this
may automatically delete images stored in the
internal memory.
This image is protected Release the protection before deleting or
rotating images.
Too many protected image. Please protect off. Cancel protection and delete images to gain
extra space.
Page 43
Optelec FarView
English Page 43
Cannot save, please delete some images When more than 30 images are stored, the
number of images option cannot be set to 30.
Please make sure to:
Delete images until the number of
pictures equals or is lower than 30.
Set the number of images to 100.
Cannot operate The image might be damaged, making it
impossible to protect or rotate the image.
Please delete file.
Memory is full
Delete images (make sure to cancel
protection settings to delete protected
images).
Check if the number of images is set to
100.
Memory card access error Please turn the unit off and back on again.
Camera / Lens error Please turn the unit off and back on again.
Communication error Please turn the unit off and back on again.
Troubleshooting
Battery and power source
Questions Answers
Page 44
Optelec FarView
English Page 44
Unit does not work even when power is turned
on
Press and hold the power button (for
approximately 2 seconds)
Press and hold focus / return button
and menu button for approximately 2
seconds simultaneously
Battery is exhausted. Please recharge.
LCD monitor lights shut off even if power is
turned on
When the unit is connected to an external
monitor, the lights of the display automatically
switch off
Unit switches off as soon as power is turned
on
Batteries are exhausted. Please recharge.
The power cannot be turned off Press and hold both the return and menu
buttons down (for approximately 2 seconds)
simultaneously.
Battery and power source
Questions Answers
Cannot record picture
Check if the unit is in the live viewing
mode
Cancel protection settings
Recorded picture looks white
Lens is dirty (fingerprints, etc.)
Turn the power off and gently clean the
Page 45
Optelec FarView
English Page 45
lens surface with a soft dry cloth
The object is not focused properly
Make sure to select the correct viewing
mode; close-up viewing or distance
viewing
Object or text is outside of focus range
Caused by subject movement or hand
movement
Make sure to take the picture right after
the shutter button is pressed
Do not move the unit or object until the
picture has been taken and is fixed on the
screen
Lens
Questions Answers
Picture is skewed or color surroundings differ
from the actual scene
While recording pictures, the images may
skew slightly or may be colored on the outline.
LCD monitor
Questions Answers
LCD monitor lights switch off while the power
is turned on.
When the unit goes unused for about 3
minutes, it automatically switches into standby
Page 46
Optelec FarView
English Page 46
mode. Press any button, except for the on / off
button, to switch the lights back on.
Brightness is unstable This might occur when the aperture value is
set (this does not affect the recorded pictures.)
Monitor flickers indoors Monitor may flicker after switching unit on (this
prevents any influences from fluorescent
lighting).
Black/blue/red/green dots or interference
appears. Monitor looks distorted when touched
This is not a malfunction. These dots will not
be recorded on the actual picture.
Playback
Questions Answers
Cannot view pictures
Check if the unit is set to playback
mode.
No pictures in the internal memory.
Picture is too bright or too dark
Check if the unit is set to playback
mode.
Adjust the brightness by rotating the
contrast adjustment button.
Connection with an external monitor or PC
Questions Answers
Page 47
Optelec FarView
English Page 47
No image appears on TV or external monitor
The unit is not connected properly
When the unit is connected to a TV,
make sure to set the TV input to
external input mode
Cannot send pictures to computer
The unit is not connected properly.
Check if the computer has recognized
the camera.
Plug the AC adapter into the computer.
Others
Questions Answers
Unit is warm The unit may become warm during use or
while charging. This does not affect the unit’s
performance or quality. Please do not touch
warm parts of the unit for a long period of time,
as to avoid harmed skin.
Questions Answers
There is a noise by zooming in live viewing
mode.
While optical zooming, there is a little noise
normally.
Page 48

Optelec FarView
English Page 48
Appendix A: Safety
Do not drop or knock the unit or put a lot of pressure on it. This may damage the FarView,
lens or monitor.
Do not use the FarView near electromagnetic equipment, radio transmitters or high voltage
lines.
Do not expose the FarView to excessive heat or direct sunlight as to avoid the risk of fire.
Do not remove any parts of the FarView. Contact an Optelec authorized service organisation
in your area.
To avoid risk of electrical damage, keep your FarView away from fluids and chemicals.
Handle the FarView with care. Rough handling will damage its internal components.
Do not use the FarView near inadequately-shielded medical devices.
Contact your dealer to service this equipment or batteries if necessary. Do not open your
unit as it will void the warranty.
Always unplug the system before cleaning it. Use a soft damp cloth to clean the exterior. Do
not use cleaning agents or abrasive materials as they will damage your unit.
Use only the supplied power adapter.
Unplug this apparatus during lightning storms or when unused for long periods of time.
Use of the FarView other than described in this manual will exclude it from warranty conditions.
Page 49

Optelec FarView
English Page 49
Power Adapter Safety
The switching power supply is intended use for medical electrical equipment purpose, not direct to
contact to patient.
Please read these safety instructions carefully.
Please keep this safety instructions for later reference.
Please disconnect this equipment from AC outlet before cleaning. Don‘t use liquid or sprayed
detergent for cleaning. Use moisture sheet or cloth for cleaning.
For pluggable equipment, the socket-outlet shall be installed near the equipment and shall be easily
accessible.
Please keep this equipment from humidity.
Lay this equipment on a reliable surface when install. A drop or fall could cause injury.
Make sure the voltage of the power source when connect the equipment to the power outlet.
Place the power cord such a way that people can not step on it. Do not place anything over the
power cord.
If the equipment is not use for long time, disconnect the equipment from mains to avoid being
damaged by transient over-voltage.
If one of the following situations arises, get the equipment checked by service personnel:
o The Power cord or plug is damaged.
o Liquid has penetrated into the equipment.
o The equipment has been exposed to moisture.
o The equipment has not work well or you can not get it work according to user‘s manual.
o The equipment has dropped and damaged.
o If the equipment has obvious sign of breakage.
Page 50

Optelec FarView
English Page 50
Appendix B: Technical information
Magnification Up to 42 times
Live viewing mode (close-up): 3 – 12 times
Live viewing mode (distance): 2.7 – 42 times
Playback mode: Up to 14 times zoom
Viewing modes Full color photo mode,
High contrast white on black, High contrast black on white,
High contrast blue on yellow, High contrast yellow on blue,
High contrast yellow on black
Focus Auto-focus
Screen 4.3” widescreen TFT
Battery power Up to 4 hours continuous use
Live viewing mode: 2.5 hours
Playback mode: 4 hours
Charging time 4.5 hours
Battery model Lithium-ion (Li-ion) rechargeable batteries
Weight 290 grams / 10.2 ounces (incl. batteries and excl. adapter)
Power consumption DC 5V, 640mA (Live viewing mode), 440mA (Playback mode)
Power adapter input 100 – 240V, 50 / 60Hz, 0.33A – 0.16A
Power adapter output DC 5V, 2A
Power adapter model UMI312-0520
Page 51

Optelec FarView
English Page 51
Storage and transport conditions:
Relative humidity: 5 – 90%, no condensation
Temperature: -10° – 60° C
Atmospheric pressure: 700 – 1060 hPa
Recommended operating conditions:
Relative humidity: 10 – 80%, no condensation
Temperature: 5 – 35° C
Atmospheric pressure: 700 – 1060 hPa
Note: Used batteries should be disposed of in a depot that is designated by competent local
authorities.
About picture data
Recorded data may be damaged or lost if the unit breaks down due to inappropriate handling.
Neither Optelec nor its partners will be held liable for any damages suffered due to loss of
recorded data.
WARNING: The use of accessories, transducers and cables, with the exception of transducers
and cables sold by the FarView’s manufacturer as replacement parts, may result in increased
emissions or decreased immunity of the FarView.
-If you see this symbol-
Page 52
Optelec FarView
English Page 52
Information on Disposal for other Countries outside the
European Union.
This symbol is only valid in the European Union.
If you wish to discard this product, please contact your local
authorities or dealer and ask for the correct method of disposal.
TYPE B APPLIED PART
This product complies with the safety and EMC requirements of the directives:
IEC 60601-1;
IEC 60601-1-2
FCC
FCC part 15 Class B
This device bears the CE and FCC approval mark
Page 53
FarView
Gebruikershandleiding
FarView Versie 1.0
© 2008 Optelec, the Netherlands
All rights reserved
Optelec BV
P.O. Box 399
2990 AJ Barendrecht
The Netherlands
Phone: +31 (0)88 678 34 44
E-mail: [email protected]
Internet: www.optelec.com
Page 54

Optelec FarView
Nederlands Pagina 2
Inhoud
1. Inleiding....................................................................................................................................4
Over deze handleiding....................................................................................................... 5
Inhoud van de verpakking..................................................................................................5
2. De FarView leren kennen.........................................................................................................6
Voorzijde / Beeldschermzijde.............................................................................................6
Onderzijde..........................................................................................................................7
Rechterzijde.......................................................................................................................8
Linkerzijde side..................................................................................................................9
Bovenzijde .......................................................................................................................11
Achterzijde / Camerazijde................................................................................................ 13
3. Netstroom en batterijgebruik...................................................................................................15
De batterijen laden...........................................................................................................15
Aan- / uitschakelen van de FarView.................................................................................16
Batterij indicator...............................................................................................................16
Stand-by modus en automatisch uitschakelen.................................................................16
Modus knop .....................................................................................................................17
4. De FarView in dichtbij modus.................................................................................................18
De vergrotingstoets gebruiken.........................................................................................19
Een leesstand selecteren.................................................................................................19
Het contrast instellen ....................................................................................................... 20
Page 55

Optelec FarView
Nederlands Pagina 3
Schrijven met de FarView................................................................................................21
5. De FarView in veraf modus ....................................................................................................22
De vergrotingstoets gebruiken.........................................................................................23
Een leesstand selecteren.................................................................................................23
Het contrast instellen ....................................................................................................... 24
Foto’s nemen met de FarView (Documentleesmodus) ....................................................25
Beelden en documenten opslaan.....................................................................................25
6. Weergave modus ...................................................................................................................27
Beeldselectie en -aanpassing..........................................................................................28
7. Het FarView Menu gebruiken .................................................................................................30
Het menu openen ............................................................................................................ 30
Instellingen in het menu wijzigen .....................................................................................31
8. De FarView aansluiten op externe apparatuur .......................................................................36
Beelden bekijken op een externe monitor of TV met VGA aansluiting............................. 36
De FarView aansluiten op een PC................................................................................... 36
9. Overig.....................................................................................................................................38
Meldingen ........................................................................................................................38
Problemen en Oplossingen..............................................................................................40
Bijlage A: Veiligheid ................................................................................................................44
Bijlage B: Technische informatie............................................................................................. 45
Page 56

Optelec FarView
Nederlands Pagina 4
1. Inleiding
Gefeliciteerd met de aankoop van FarView, een electronische draagbare beeldschermloep van
Optelec. FarView is ontwikkeld voor dagelijks gebruik op iedere locatie. Optelec’s FarView
vergroot tekst en afbeeldingen dichtbij en veraf tot 42 maal in de live modus en tot 14 maal
zoom in weergavemodus en geeft deze weer op een 4,3” breedbeeldscherm.
De veelzijdige camera maakt het mogelijk objecten en informatie dichtbij en veraf te bekijken.
De snapshot functie en het geïntegreerde menu maken het mogelijk een maximum van 100
beelden op te slaan en op ieder tijdstip te bekijken. Opgeslagen beelden kunnen, met behulp
van één enkele toets, op ieder moment bekeken worden. Ergonomisch gepositioneerde
bedieningstoetsen en een geïntegreerd menu bieden optimaal gebruiksgemak. In de
documentleesmodus scrollt u, met behulp van scrolling toetsen, moeiteloos door iedere tekst.
Mocht u vragen of suggesties hebben betreffende het gebruik van dit product, neem dan
contact op met uw leverancier of direct met het Optelec hoofdkantoor (zie gegevens op de
laatste pagina van deze handleiding). Wij hopen dat u met veel plezier gebruik zal maken van
de FarView.
Page 57

Optelec FarView
Nederlands Pagina 5
Over deze handleiding
Deze handleiding geeft u een overzicht over de mogelijkheden en het gebruik van de FarView.
Wij raden u aan deze handleiding aandachtig te lezen alvorens u het product gaat gebruiken.
Inhoud van de verpakking
De FarView verpakking bevat de volgende onderdelen:
- De FarView beeldschermloep
- Een halskoord
- Een bescherm- en draagtas
- Een netsnoer en adapter
- Deze handleiding
Optioneel kunt u een VGA out IF kabel aanschaffen. Hiermee kunt u de FarView aansluiten op
een VGA monitor.
Mochten één of meerdere items ontbreken, neem dan contact op met uw leverancier.
Page 58
Optelec FarView
Nederlands Pagina 6
2. De FarView leren kennen
Het product is op de juiste wijze voor u geplaatst wanneer het beeldscherm naar u toe is gericht
en de ‘plus’ toets zich aan de linkerzijde van het scherm bevindt.
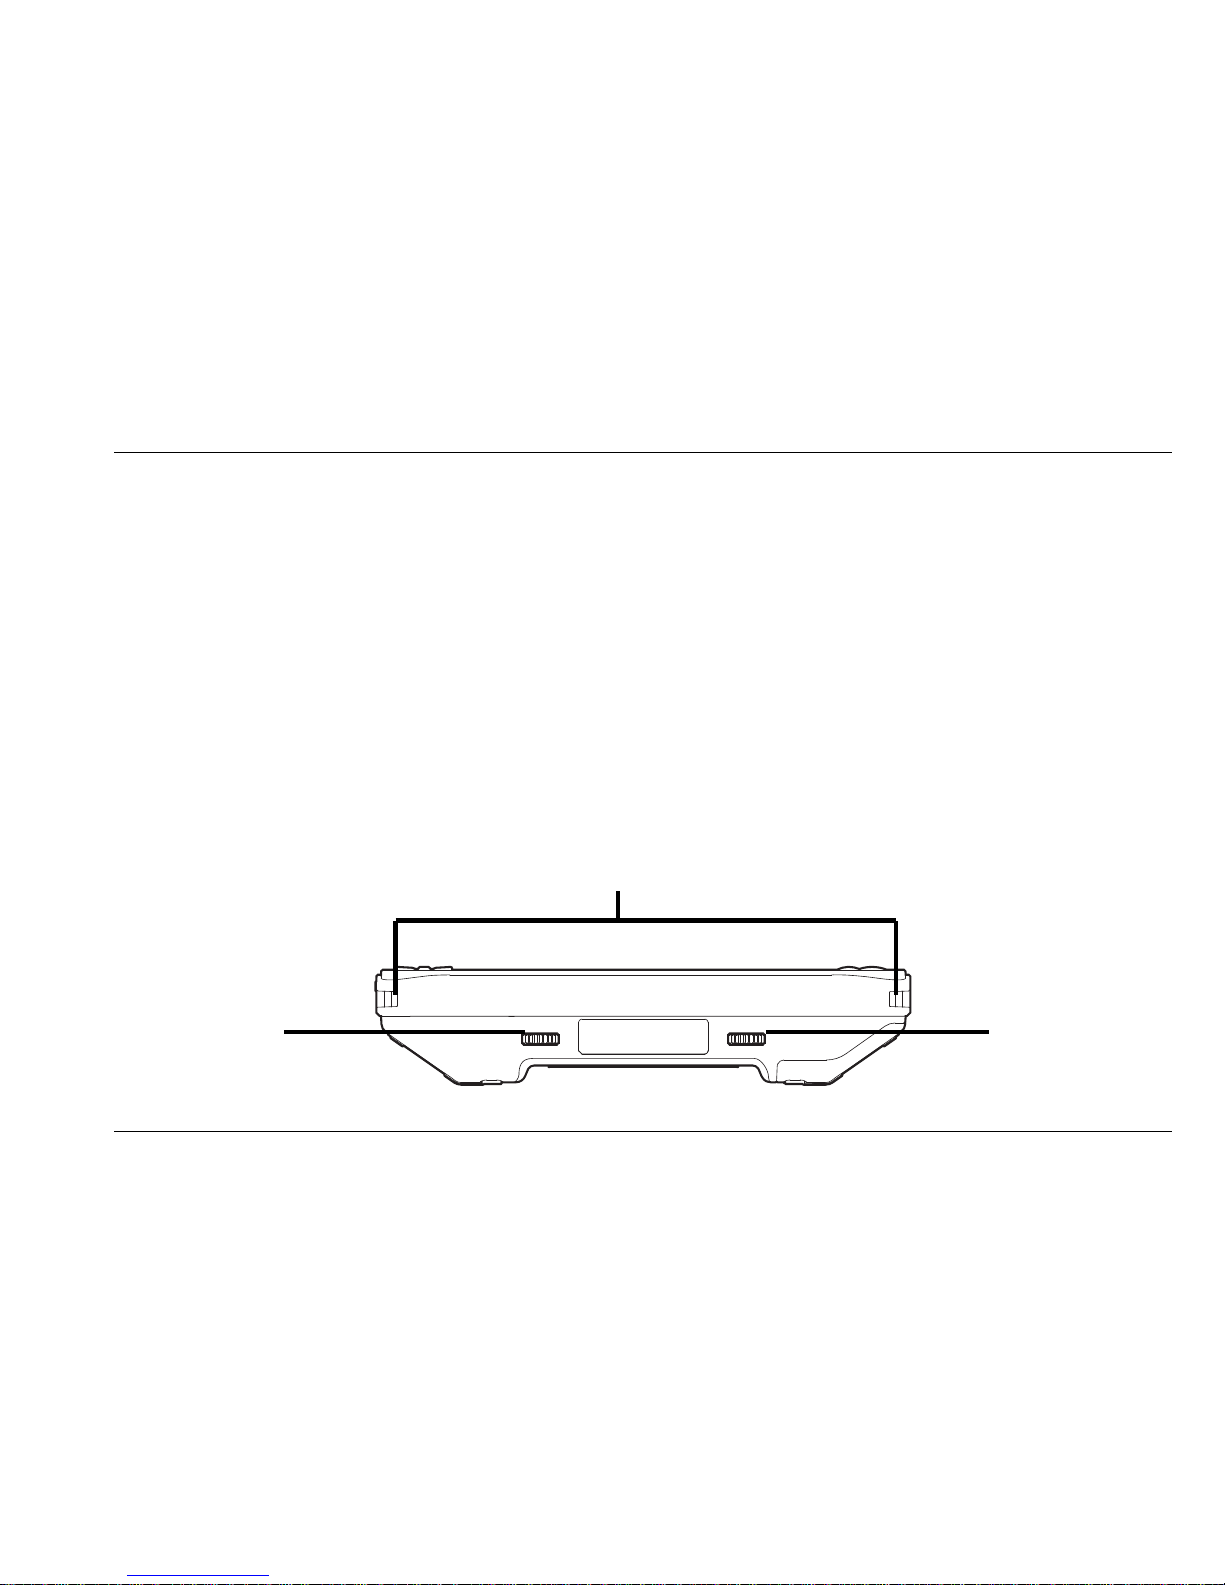
Voorzijde / Beeldschermzijde
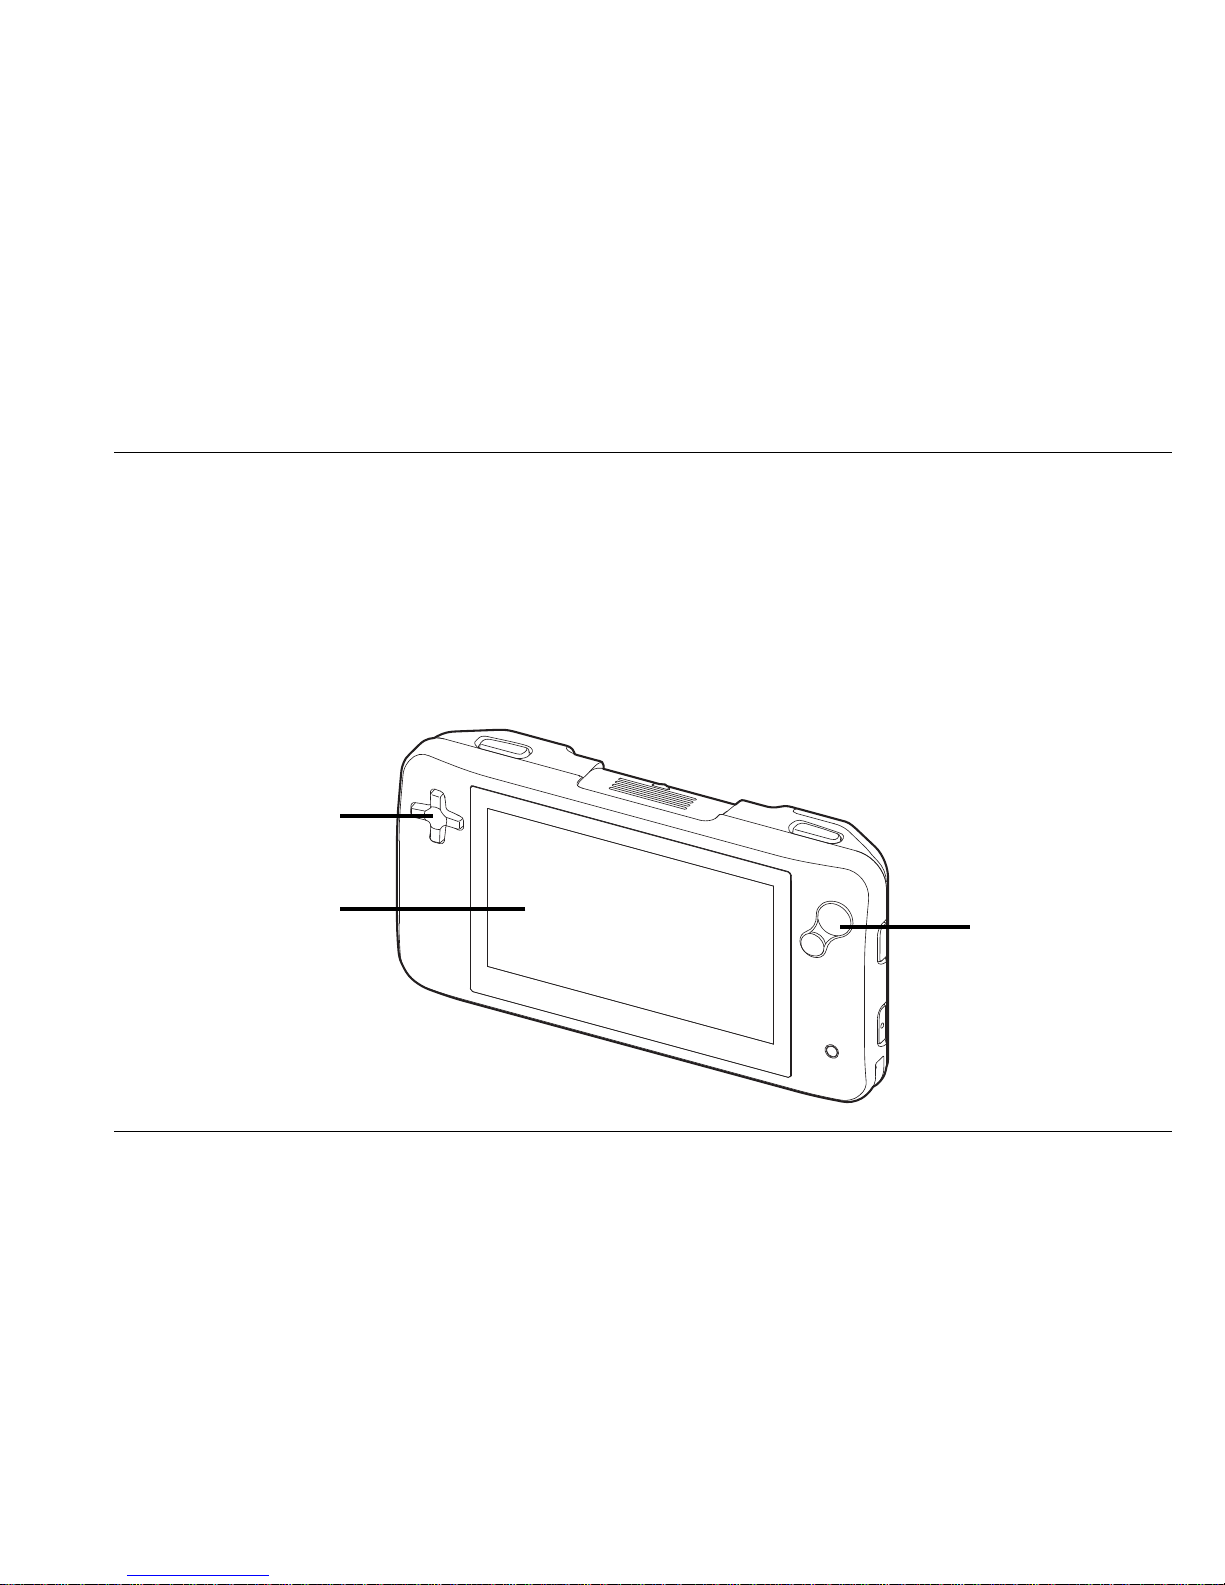
De volgende afbeelding laat de voorzijde van de FarView zien.
Cursor toets
4.3” breedbeeldscherm
Vergrotingstoets
Page 59
Optelec FarView
Nederlands Pagina 7
Cursor toets Druk deze toets in om door een beeld te scrollen of door het
menu van de FarView te navigeren.
4.3” breedbeeldscherm Het 4,3” breedbeeldsc herm geeft tekst en afbeeldingen weer
Vergrotingstoets Druk de bovenzijde van deze knop in om de vergroting te
verhogen. Druk de onderzijde van de knop in om de vergroting
te verlagen.
Onderzijde
De volgende afbeelding laat de onderzijde van de FarView zien.
Contrast
toets
Halskoord ogen
Page 60

Optelec FarView
Nederlands Pagina 8
Halskoord ogen Hier kunt u het halskoord, dat met de FarView is geleverd
vastmaken.
Contrast knop Roteer de contrast knop om het contrast te verhogen of
verlagen
Leesstanden knop Roteer de leesstanden knop om de voor- en
achtergrondkleuren te wijzigen.
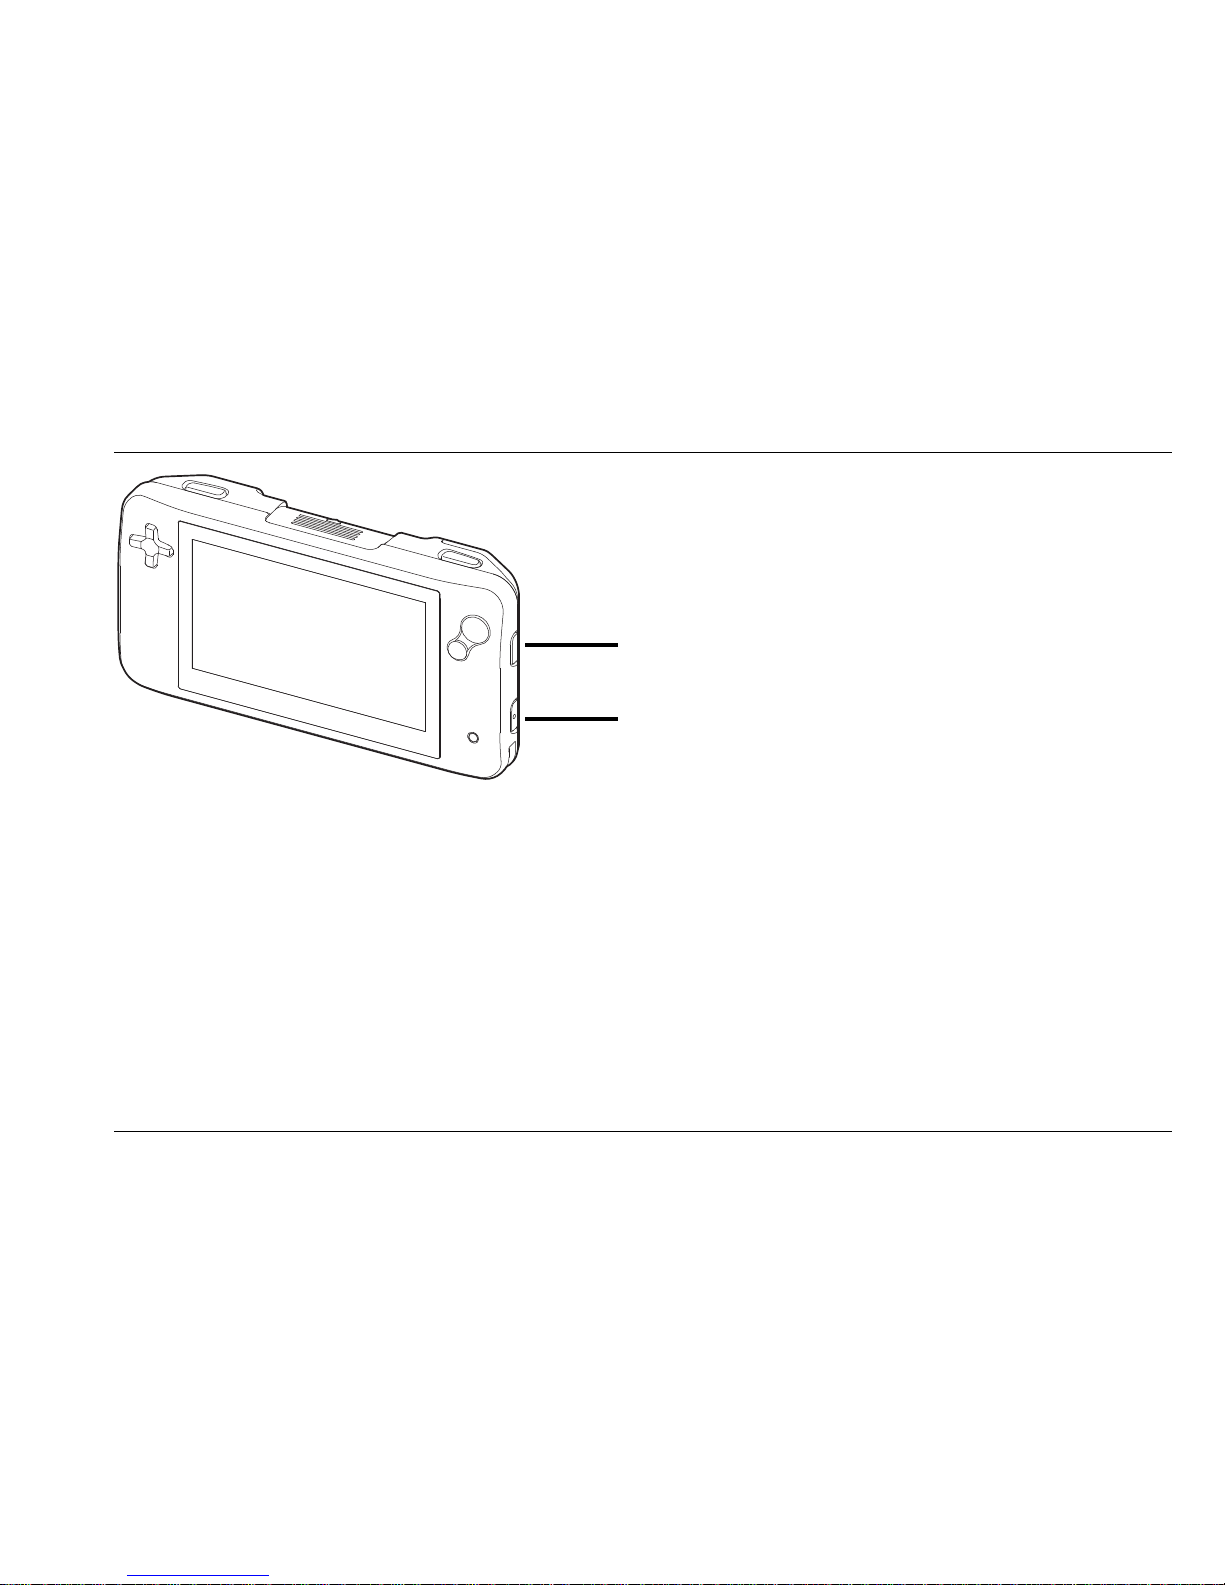
Rechterzijde
Onderstaande afbeelding laat de rechterzijde van de FarView zien.
Page 61
Optelec FarView
Nederlands Pagina 9
Menu toets Druk deze knop in om het geïntegreerde menu te openen en
sluiten
Aan / uit schakelaar Druk deze knop gedurende twee seconden in om de unit aan-
en uit te schakelen. Wanneer de unit is ingeschakeld zal het
lampje aan de rechterzijde van het scherm oplichten. Dit lampje
zal automatisch uitgaan wanneer de FarView wordt
uitgeschakeld.
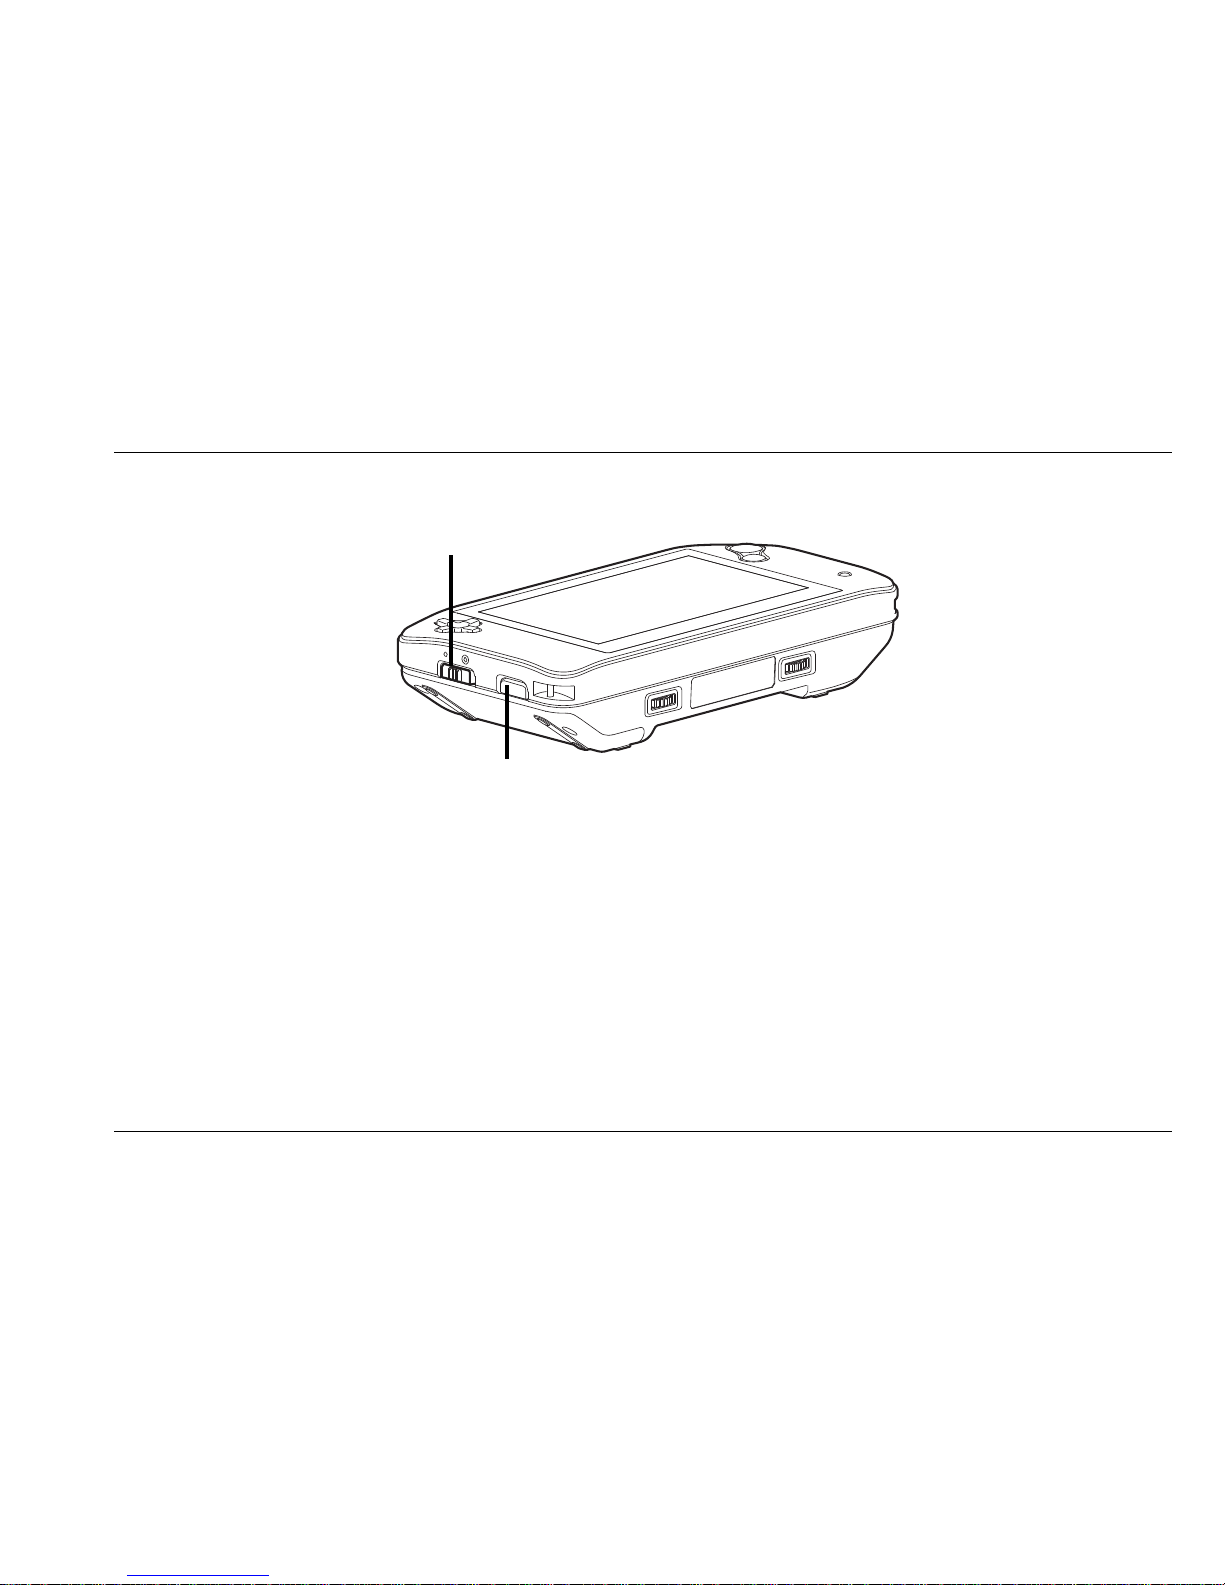
Linkerzijde side
De volgende afbeelding laat de linkerzijde van de FarView zien.
Menu knop
Aan / uit schakelaar
Page 62
Optelec FarView
Nederlands Pagina 10
Dichtbij / veraf schakelaar Schuif de schakelaar omlaag of omhoog om de unit in
respectievelijk veraf of dichtbij modus te zetten.
Modus knop Druk deze knop in om te schakelen tussen live modus en
weergave modus. Wanneer de unit wordt ingeschakeld, start
deze standaard op in live modus.
Dichtbij / veraf
schakelaar
Modus toets
Page 63
Optelec FarView
Nederlands Pagina 11
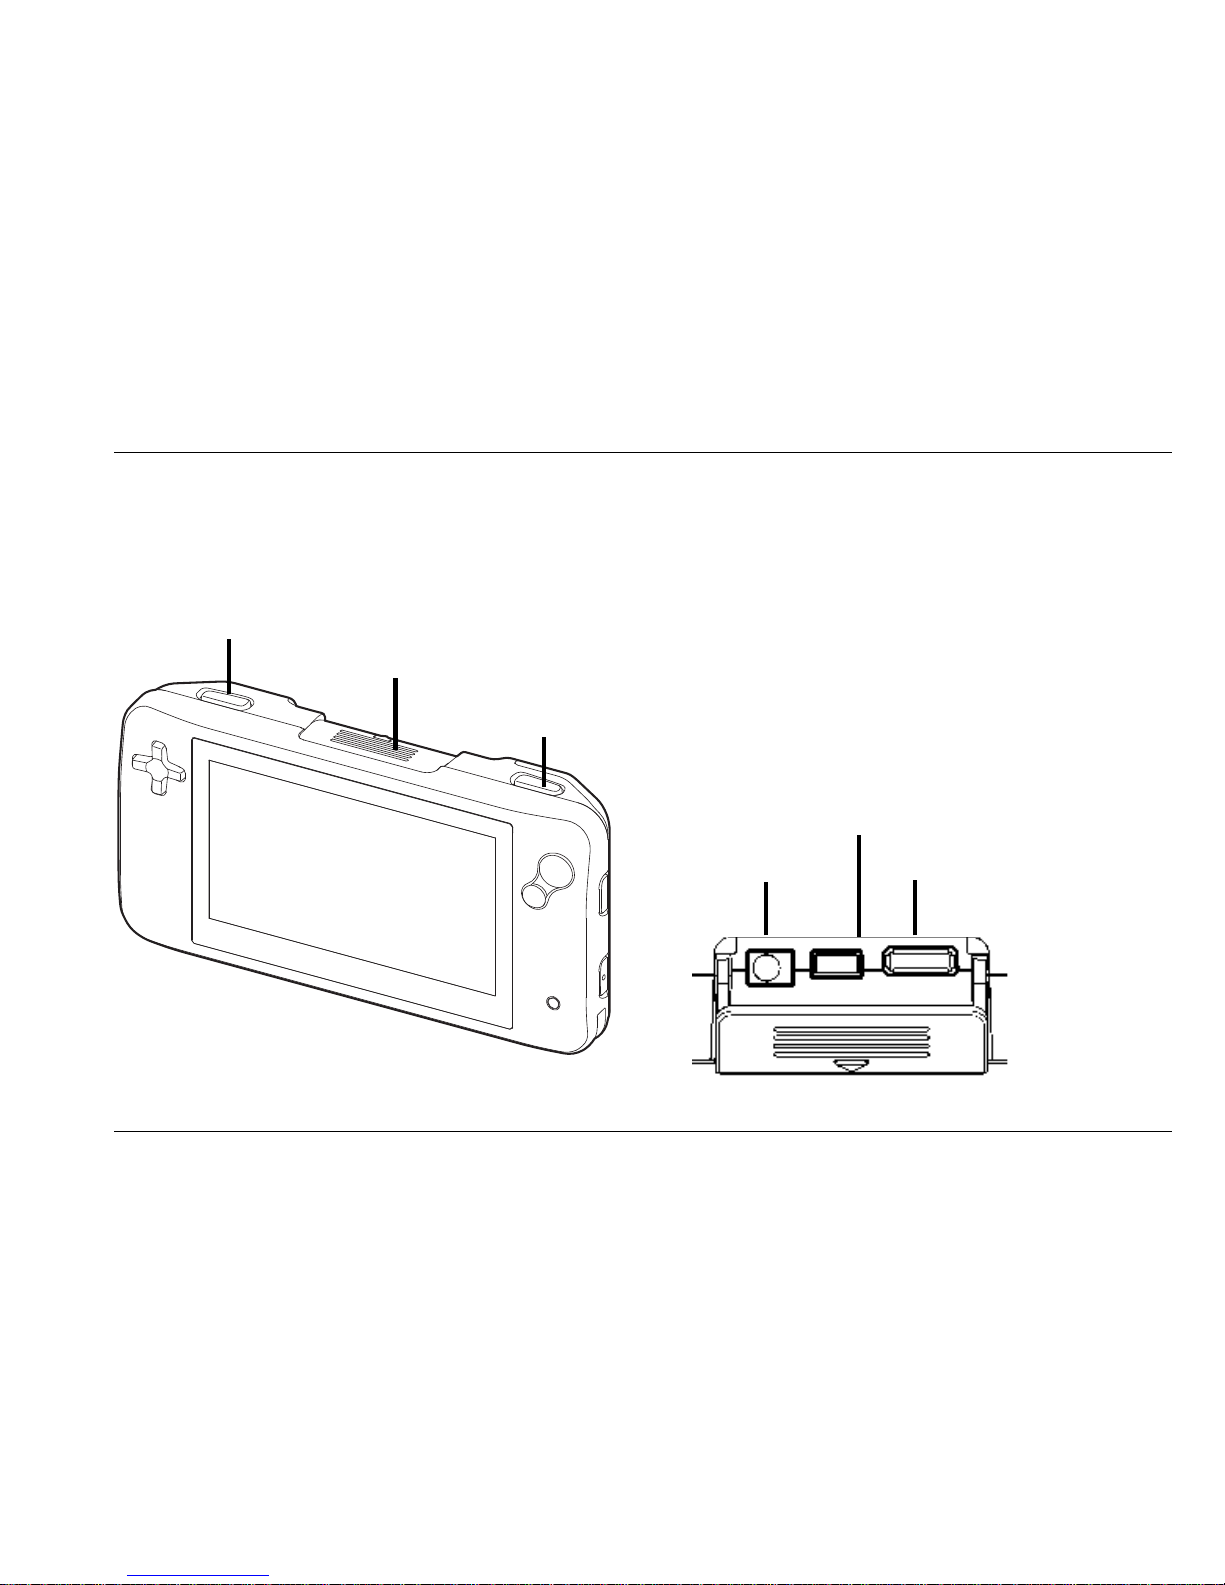
Bovenzijde
De volgende afbeelding laat de bovenzijde van de FarView zien.
Focus / Retour toets
Klepje
Snapshot knop
VGA OUT aansluiting DC IN aansluiting
USB aansluiting
Page 64

Optelec FarView
Nederlands Pagina 12
Focus / Retour knop Druk deze knop in om te focusseren op een object of tekst die u
wenst te vergroten. In weergave modus kan deze knop gebruikt
worden voor automatisch scrollen.
Klepje Het klepje beschermt de adapter, monitor en PC aansluitingen
tegen vuil en stof. Wanneer u het klepje opent, ziet u de
volgende aansluitingen:
- DC IN aansluiting Verbind the AC adapter met deze aansluiting. Wij raden u aan
enkel de bijgeleverde adapter te gebruiken om het apparaat op
te laden.
- USB aansluiting Via de USB aansluiting, verbind u de FarView met een PC met
het Windows 2000, XP of Vista besturingssysteem.
- VGA out aansluiting Deze connector kan worden gebruikt om de FarView aan te
sluiten op een externe VGA monitor of TV met VGA aansluiting.
N.B. Om de FarView aan te sluiten op een externe monitor of
TV dient u de optioneel vekrijgbare VGA OUT IF kabel aan te
schaffen.
Snapshot knop Met de snapshop knop maakt u een foto van een tekts of
afbeelding. Deze beelden worden automatisch opgeslagen.
Page 65
Optelec FarView
Nederlands Pagina 13
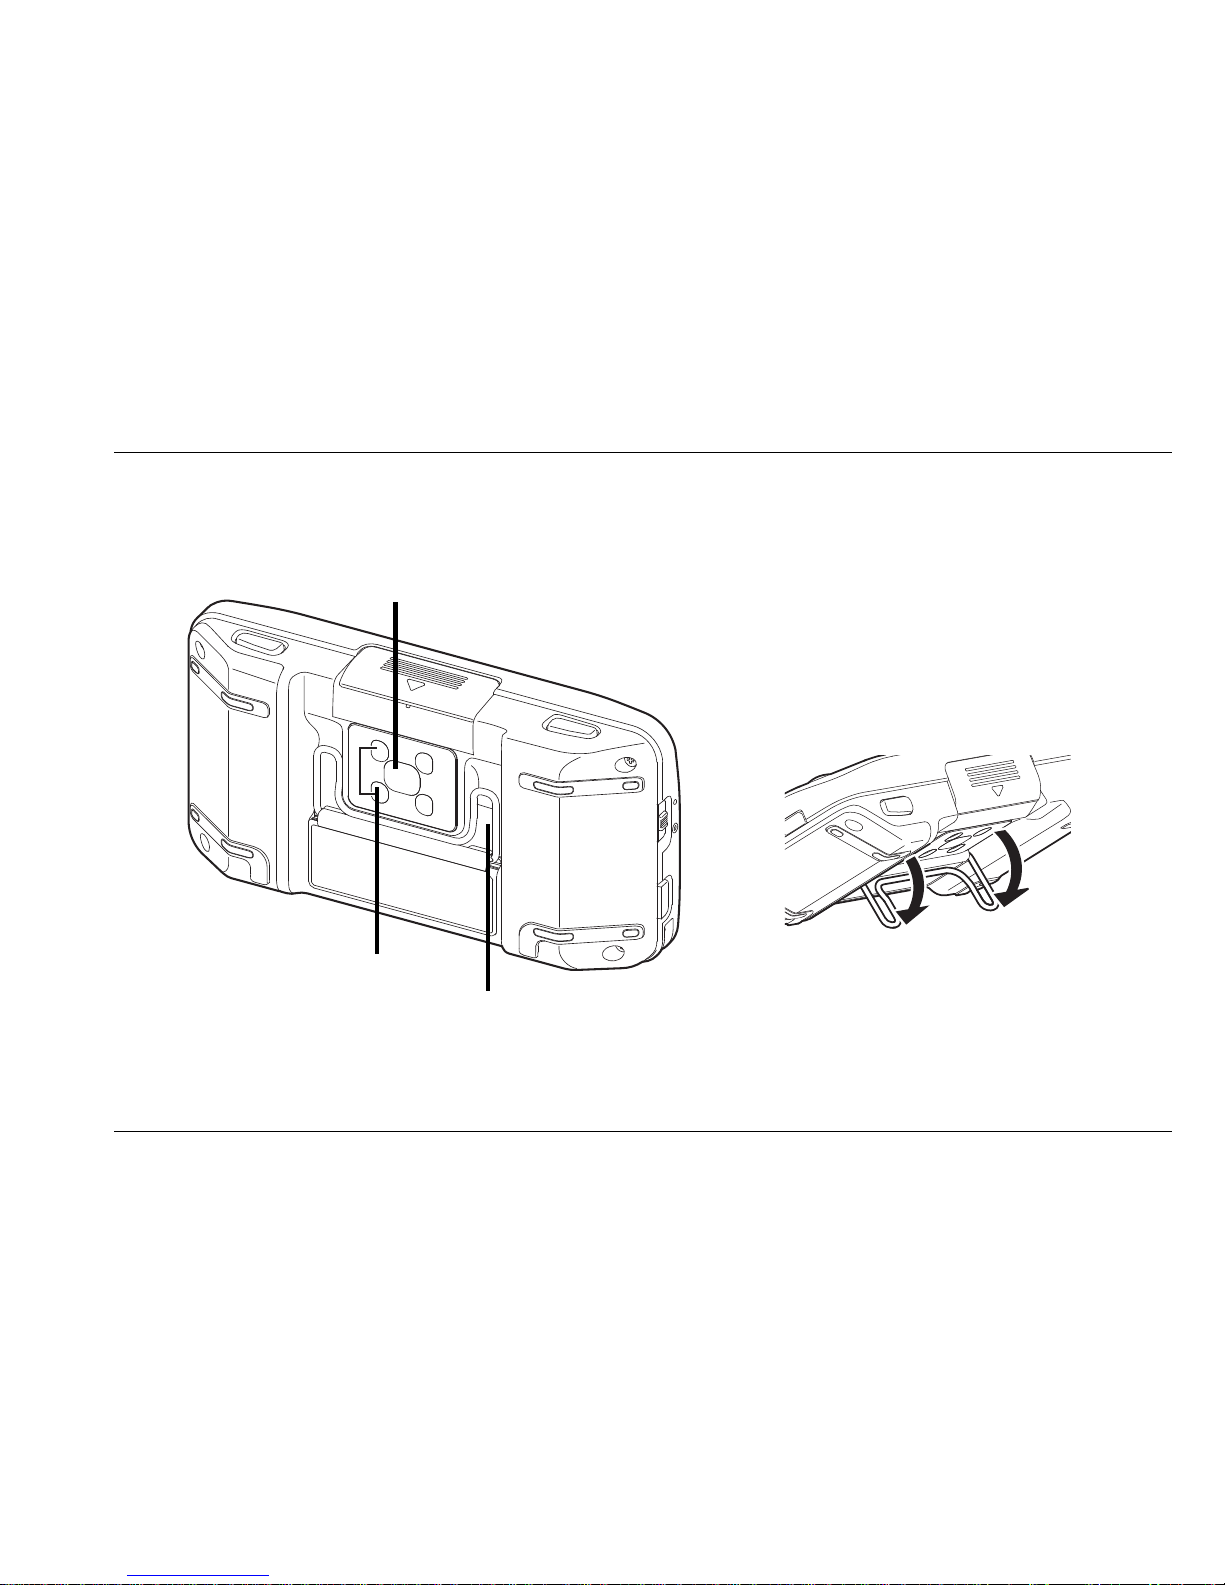
Achterzijde / Camerazijde
Onderstaande afbeelding laat de achterzijde van de FarView zien.
Camera
Verlichting
Leesstand
Leesstand
Page 66

Optelec FarView
Nederlands Pagina 14
Camera De FarView beschikt over een hoge resolutie auto-focus
camera die voor dichtbij en veraf gebruikt kan worden.
Verlichting De verlichting kan in- en uitgeschakeld worden. In dichtbij
modus zal de verlichting automatisch worden ingeschakeld.
Leesstand Schuif de leesstand uit voor optimal leesgemak in de dichtbij
modus.
N.B.: Wij adviseren u de leesstand voorzichtig te openen en
sluiten.
Page 67

Optelec FarView
Nederlands Pagina 15
3. Netstroom en batterijgebruik
Wanneer de AC adapter niet is aangesloten, werkt de FarView op geïntegreerde oplaadbaare
batterijen.
De batterijen laden
Wanneer u de FarView voor het eerst gebruikt, raden wij u aan de batterijen volledig te laden.
Het opladen van de batterijen duurt ongeveer 4,5 uur. Wanneer de batterijen volledig zijn
opgeladen, kunt u de FarView minimaal 2,5 uur in live modus en 4 uur in weergavemodus
gebruiken.
Om de batterijen te laden, dient u de bijgeleverde adapter aan te sluiten op de
adapteraansluiting aan de bovenzijde van de unit. Sluit de andere zijde van de adapter aan op
een stopcontact. De FarView is aan het laden wanneer het lampje aan de rechterzijde van het
scherm knippert. Wanneer de FarView volledig is geladen, schakelt het lampje automatisch uit.
Tijdens het laden kan de FarView gewoon gebruikt worden.
Page 68

Optelec FarView
Nederlands Pagina 16
Aan- / uitschakelen van de FarView
Druk de rechthoekige knop, aan de rechterzijde van de unit, twee seconden in om de unit aanen uit te schakelen. De FarView start standaard op in live modus.
Batterij indicator
Wanneer de unit wordt ingeschakeld, wordt het batterij niveau gedurende twee seconden
weergegeven op het scherm. Wanneer de batterijen bijna leeg zijn, zal de batterij indicator
knipperen en zal de unit een aantal piepjes genereren. Sluit de unit met behulp van de AC
adapater aan op een stopcontact om de batterijen te laden.
Stand-by modus en automatisch uitschakelen
Deze functie schakelt de FarView automatisch in stand-by mode wanneer deze 3 minuten
aaneengesloten niet is gebruikt. Wanneer de unit in stand-by modus is, zal het LCD scherm
uitschakelen en zal het lampje rechts van het scherm knipperen. Druk een willekeurige knop in,
met uitzondering van de aan / uit schakelaar, om terug te keren naar de voorgaande modus.
Wanneer de unit in stand-by modus gedurende 4 minuten niet wordt gebruikt, zal deze
automatisch uitschakelen. Druk de aan / uit schakelaar gedurende twee seconden in om de unit
aan te zetten.
Page 69

Optelec FarView
Nederlands Pagina 17
Wanneer de FarView is aangesloten op de AC adapter, zal de unit niet in stand-by modus
keren.
Modus knop
De FarView beschikt over twee standen: de “live modus” en de “weergave modus”.
Live modus: In deze modus kunt u objecten en teksten veraf en dichtbij
bekijken en vergroten. Bovendien kan het op het beeldscherm
weergegeven beeld worden vastgelegd en opgeslagen.
Weergave modus: Beelden die in het interne geheugen zijn opgeslagen kunnen op
ieder gewenst moment worden opgeroepen en bekeken op het
4,3” breedbeeldscherm.
Wanneer u de modus knop aan de linkerzijde van de FarView indrukt, schakelt u
achtereenvolgens tussen live modus en weergave modes. Wanneer u de FarView aanzet, start
deze standaard op in live modus.
Page 70
Optelec FarView
Nederlands Pagina 18
4. De FarView in dichtbij modus
Druk de oranje, rechthoekige knop aan de rechterzijde van de FarView gedurende twee
seconden in om de unit aan en uit te schakelen. De unit zal standaard starten in live leesmodus.
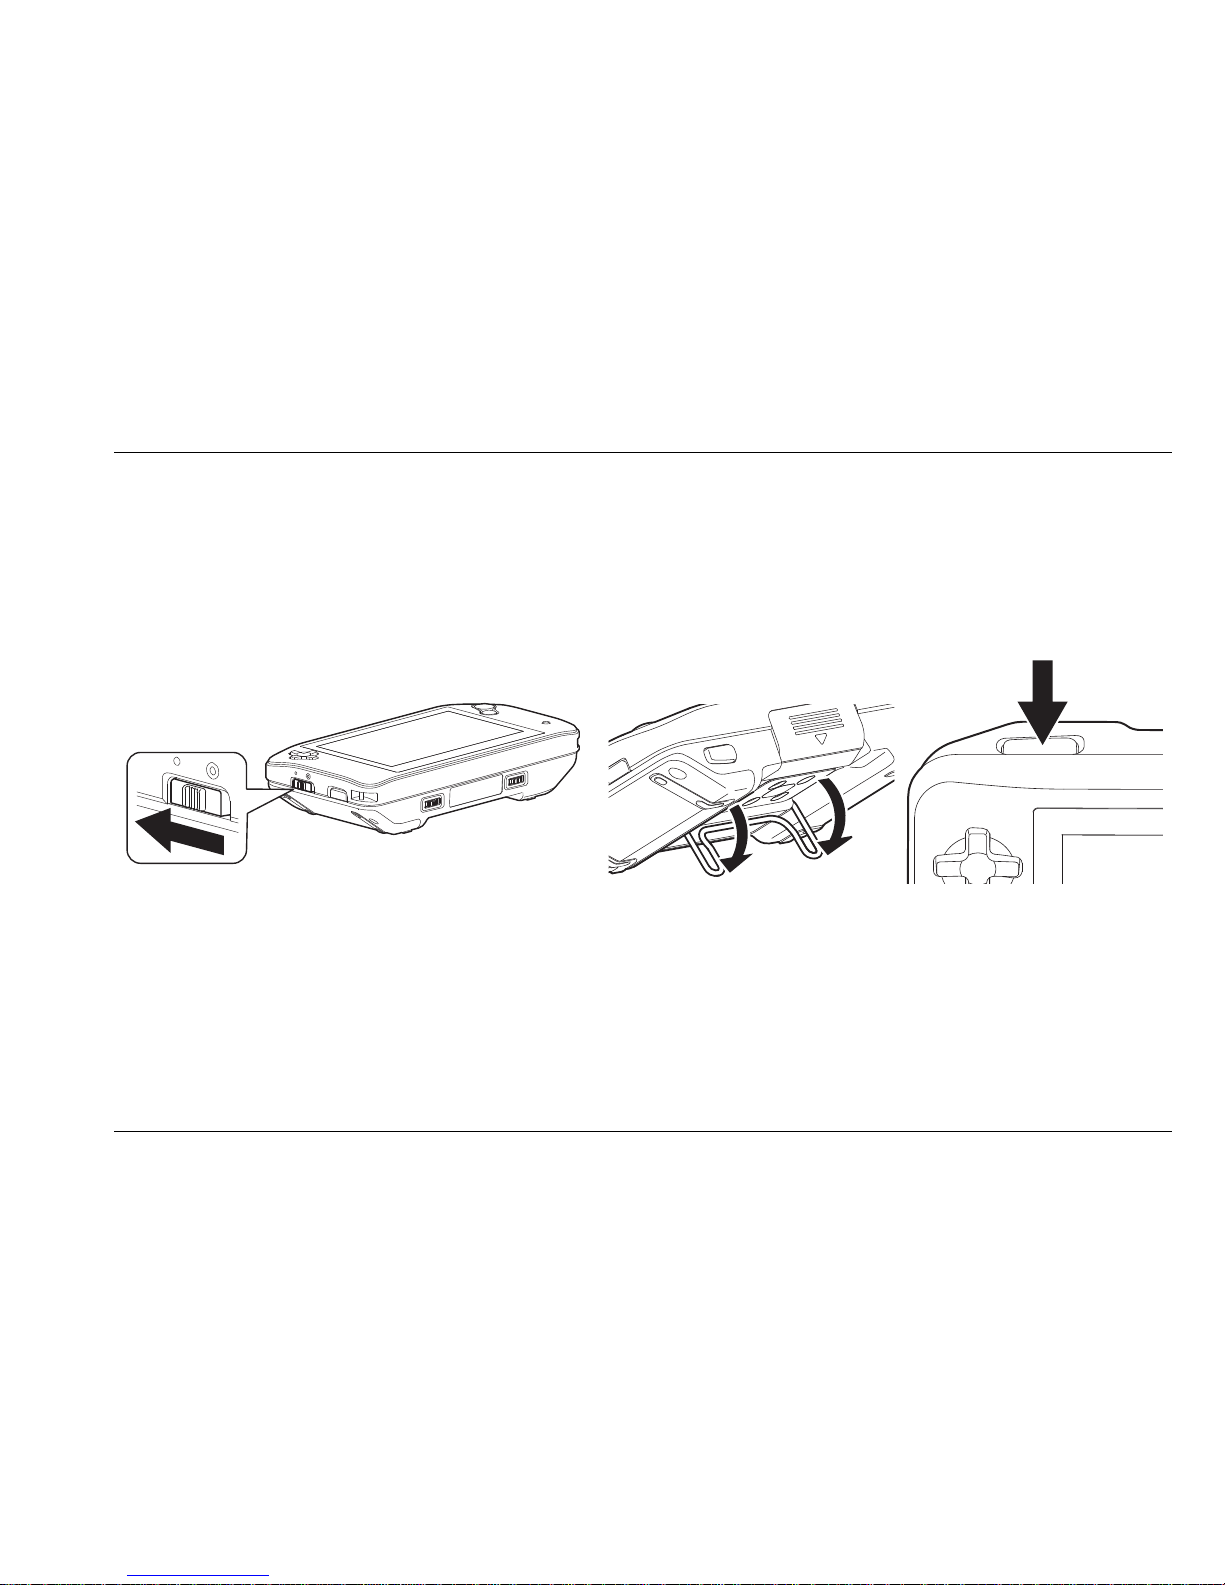
1. Selecteer de dichtbij modus door de schakelaar aan de linkerzijde van de unit omhoog te
schuiven. Op de unit wordt de close-up modus middels een tulp icoon weergegeven.
2. Trek the leesstand aan de onderzijde uit en plaats de unit op de tekst die u wenst te
lezen.
3. Druk de focus / retour knop in om de unit scherm te laten stellen op de tekst.
Page 71
Optelec FarView
Nederlands Pagina 19
4. Beweeg de FarView over de tekst en gebruik de vergrotings-, contrast en
leesstandenknoppen om het beeld aan te passen aan uw wensen. Indien gewenst, kunt
u de contrast- en helderheidsinstellingen via het menu aanpassen.
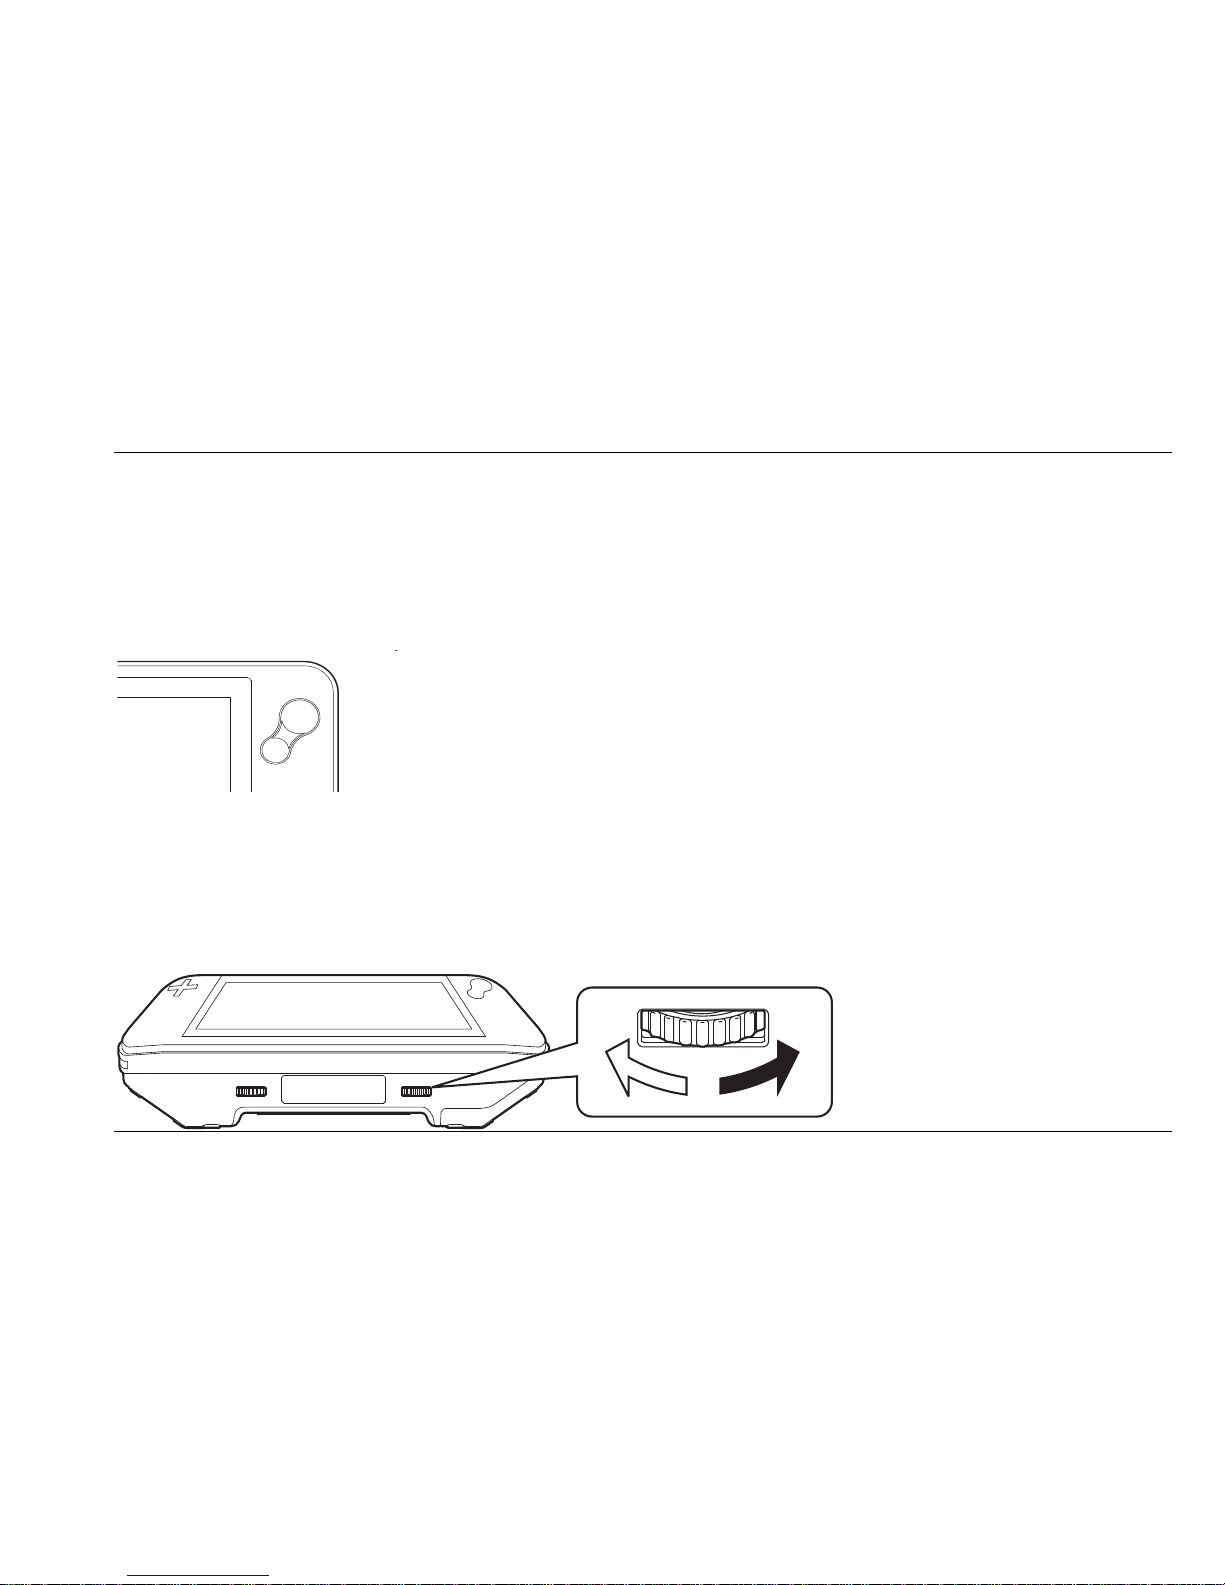
De vergrotingstoets gebruiken
Druk de vergrotingsknop aan de rechterzijde van het scherm in om de
vergroting te wijzigen. Druk het kleinere gedeelte van deze toets in om
de vergroting te verlagen. Wanneer u het grotere gedeelte van deze
toets indrukt, zal de vergroting verhogen.
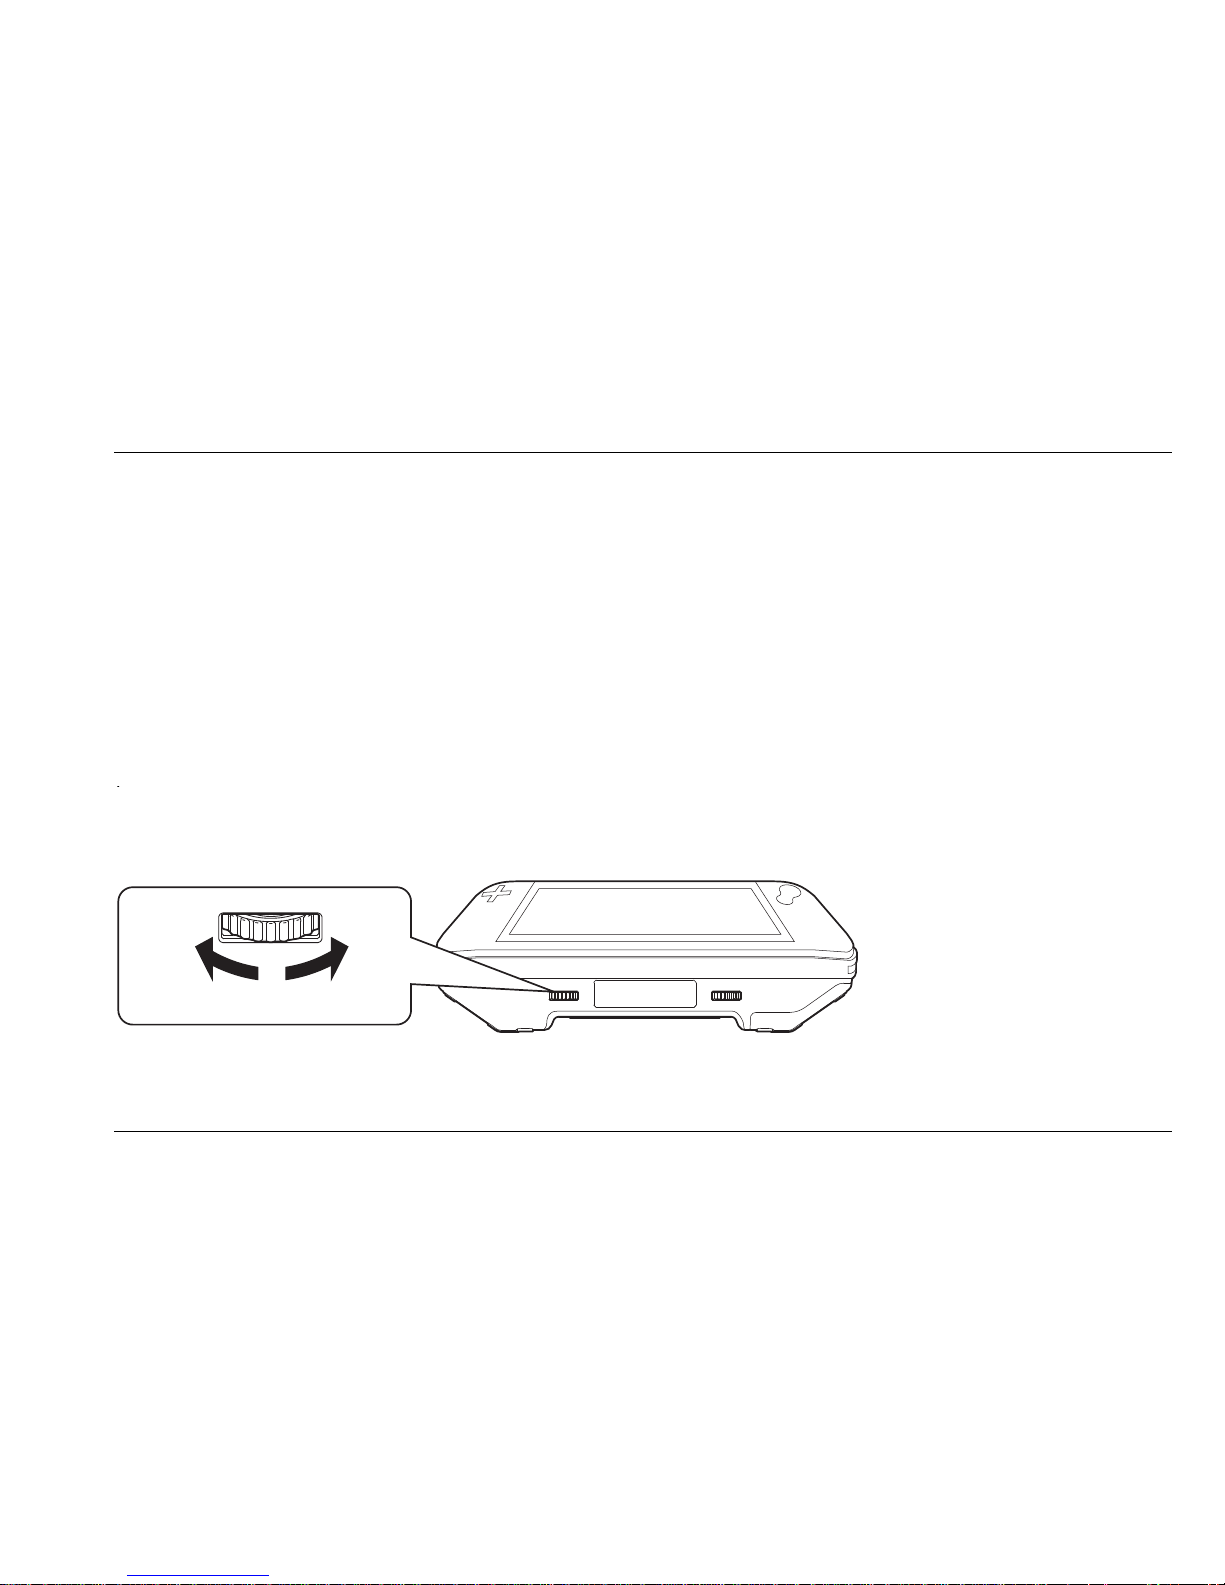
Een leesstand selecteren
Roteer de leesstandenknop, rechts aan de onderzijde van de unit, om één van de zes
leesstanden te selecteren.
Page 72
Optelec FarView
Nederlands Pagina 20
- Kleurenweergave: voor het bekijken van tekst en foto’s in kleur.
- Negatef: lezen in hoog contrast witte tekst op zwarte achtergrond.
- Positief: lezen in hoog contrast zwarte tekst op witte achtergrond.
- Geel-Zwart modus: lezen in hoog contrast gele tekst op zwarte achtergrond.
- Geel-Blauw modus: lezen in hoog contrast gele tekst op blauwe achtergrond.
- Blauw-Geel modus: lezen in hoog contrast blauwe tekst op gele achtergrond.
Het contrast instellen
Roteer de contrast knop, links aan de onderzijde van de unit, om het contrast aan te passen
aan uw behoeften.
Page 73
Optelec FarView
Nederlands Pagina 21
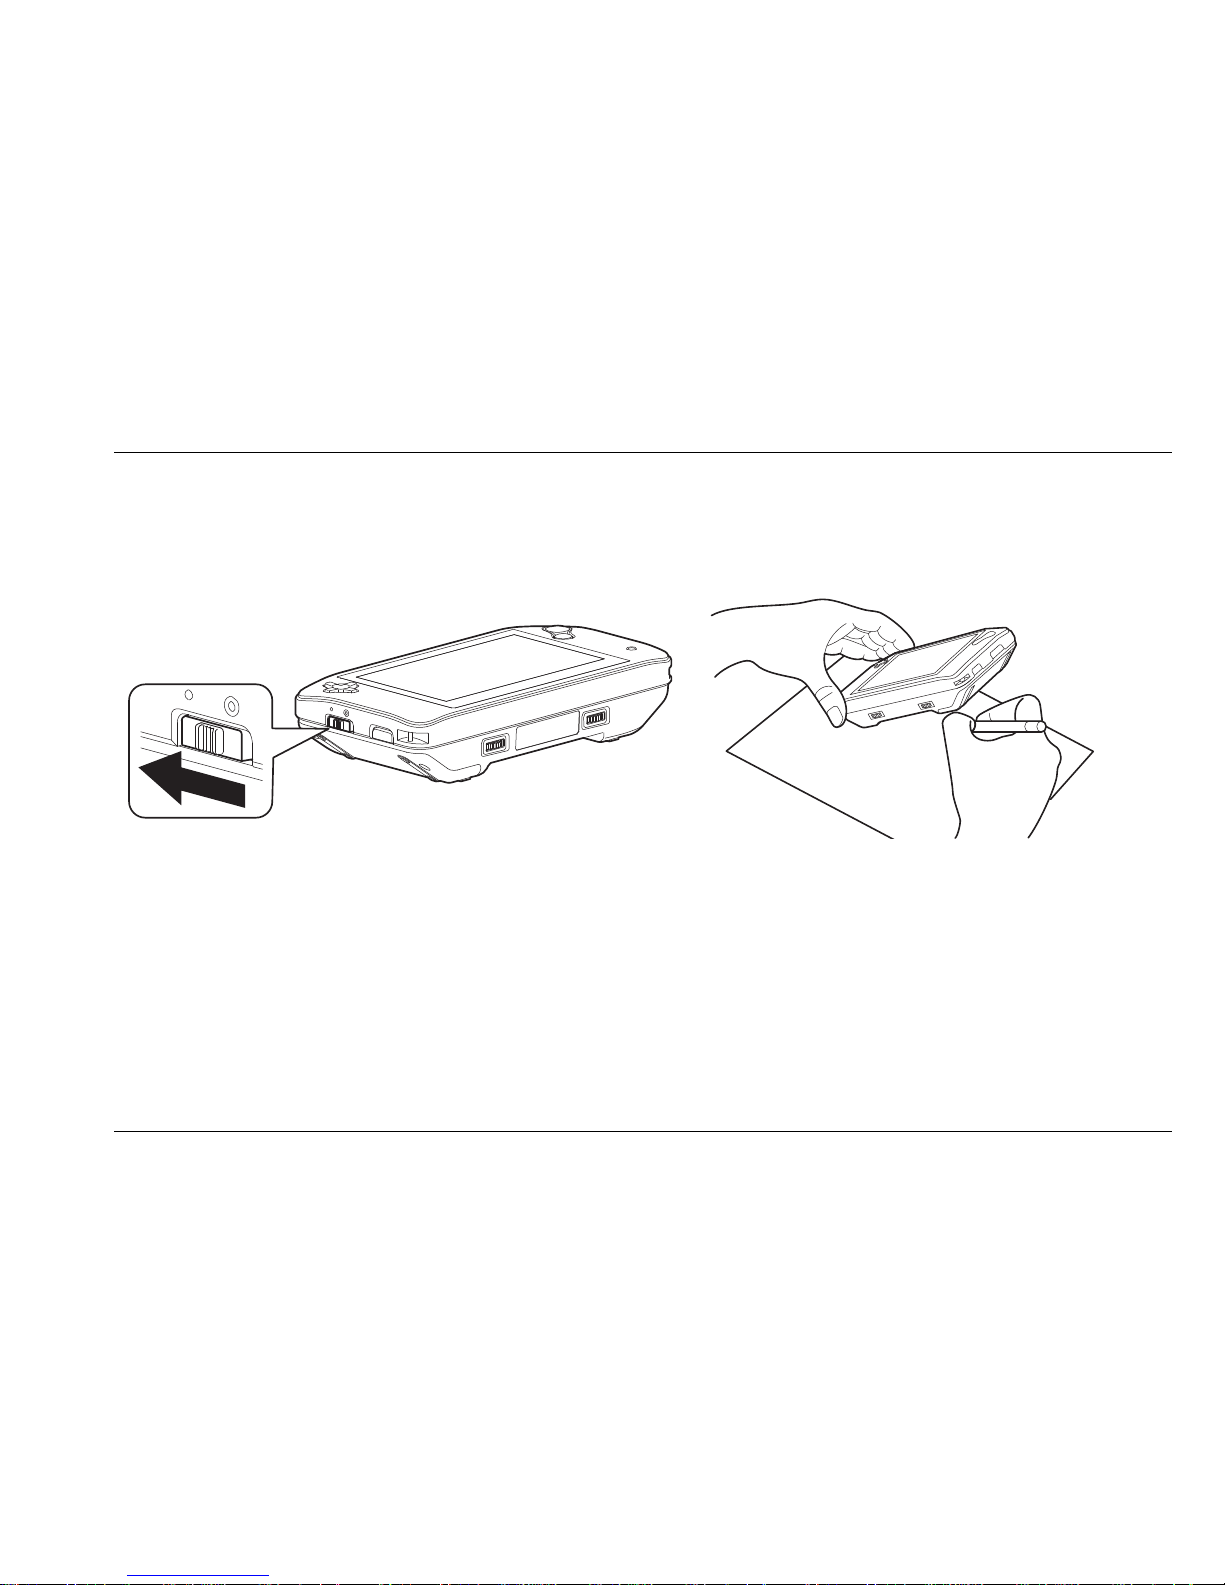
Schrijven met de FarView
1. Selecteer de dichtbij modus door de schakelaar aan de linkerzijde van de unit omhoog te
schuiven. De dichtbij modus is middels een tulp icoon gemarkeerd.
2. Plaats de unit over het papier (scherm naar boven).
3. Druk de FarView naar beneden aan de zijde van de cursor toetsen.
4. Druk de focus / retour toets in om te scherp te stellen op de tekst.
5. Plaats uw pen onder de verhoogde zijde om te schrijven.
Page 74
Optelec FarView
Nederlands Pagina 22
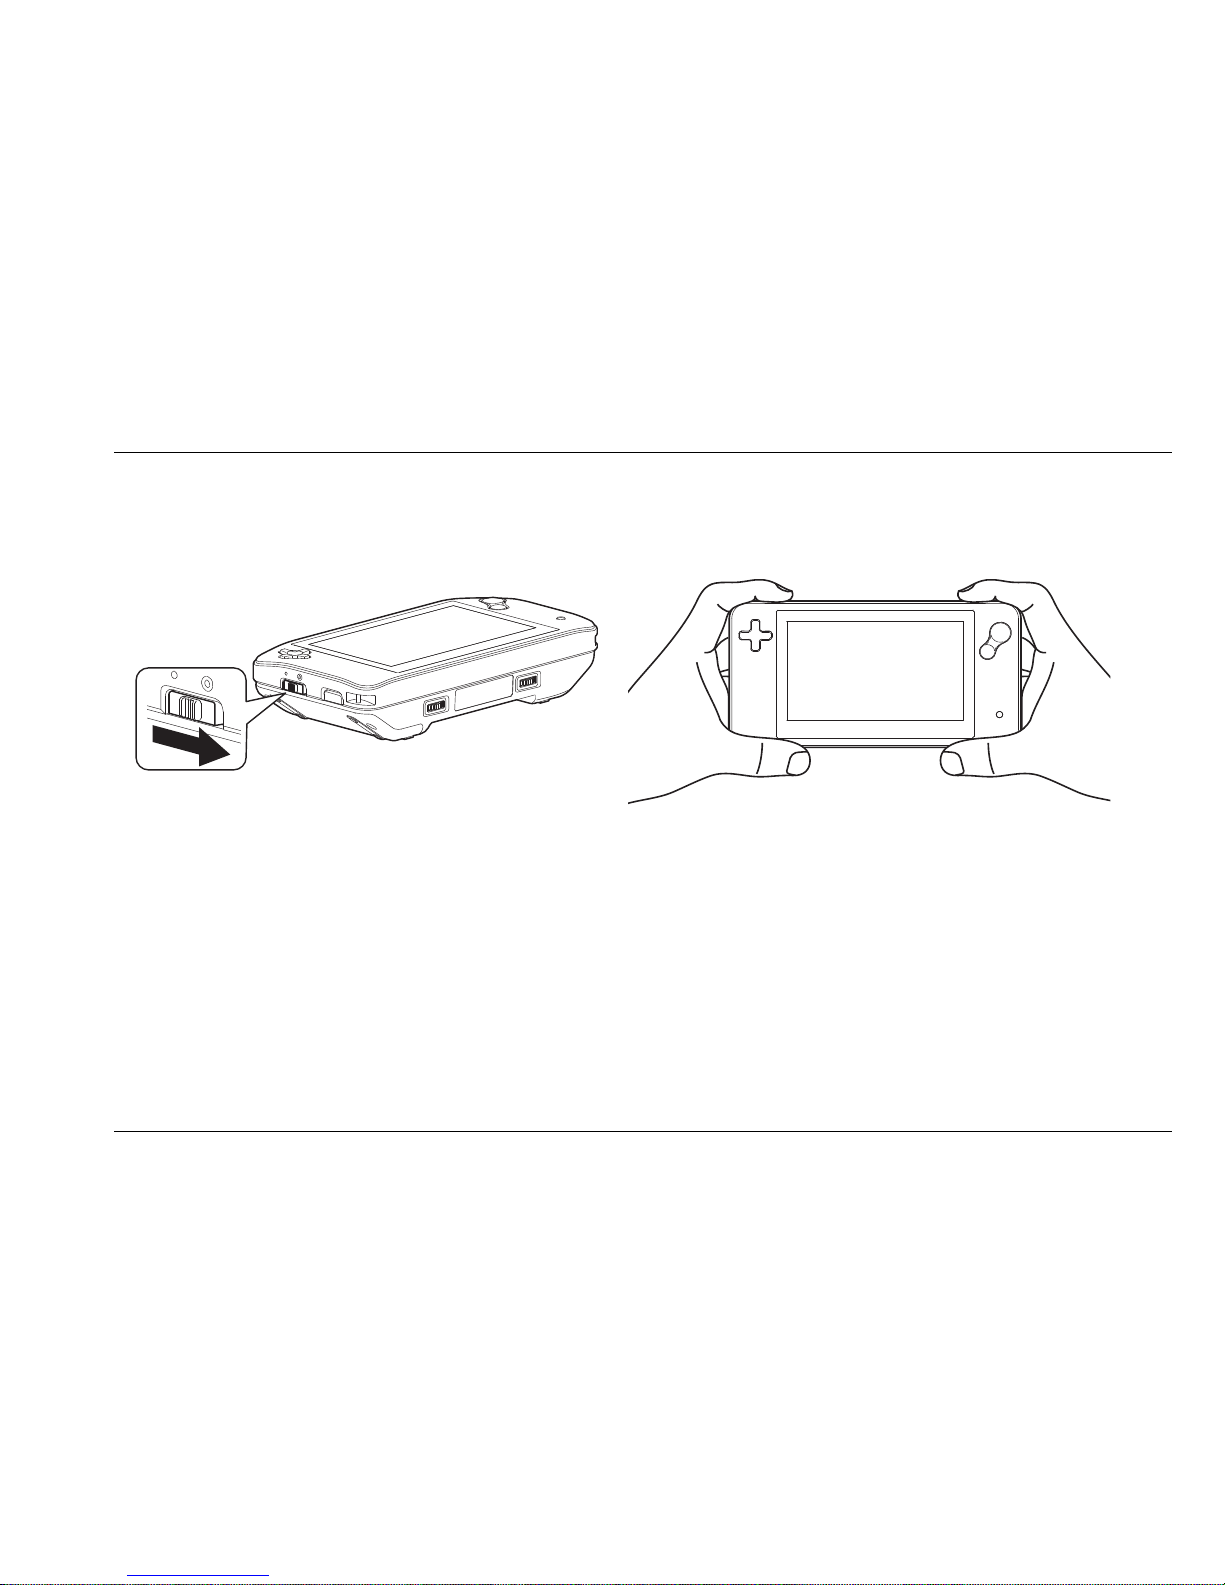
5. De FarView in veraf modus
1. Selecteer de veraf modus door de schakelaar aan de linkerzijde van de unit in veraf
modus te schuiven. De veraf modus wordt middels een icoon in de vorm van een berg
aangegeven.
2. Richt de tekst op het object dat u wenst te vergroten en gebruik de vergrotings- en
contrastknoppen om het beeld aan te passen aan uw behoeften.
Page 75
Optelec FarView
Nederlands Pagina 23
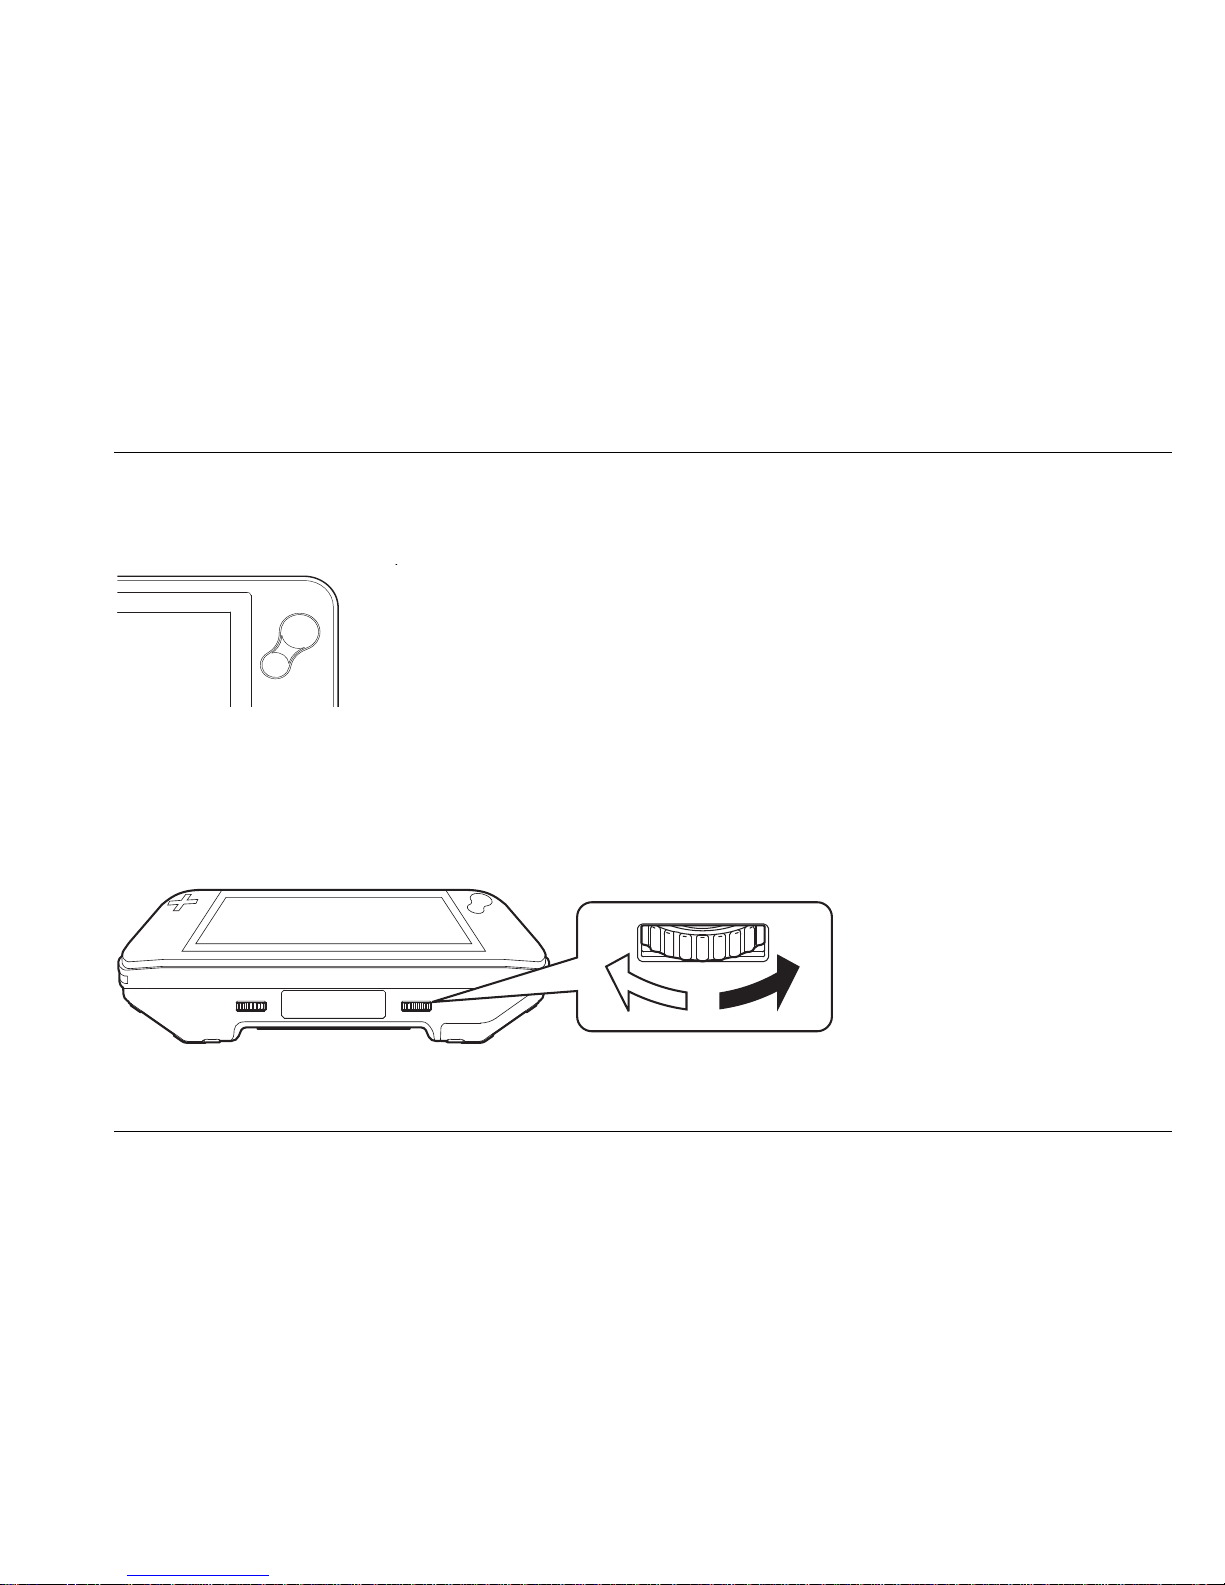
De vergrotingstoets gebruiken
Druk de vergrotingsknop aan de rechterzijde van het scherm in om de
vergroting te wijzigen. Druk het kleinere gedeelte van deze toets in om
de vergroting te verlagen. Wanneer u het grotere gedeelte van deze
toets indrukt, zal de vergroting verhogen.
Een leesstand selecteren
Roteer de leesstandenknop, rechts aan de onderzijde van de unit, om één van de zes
leesstanden te selecteren.
- Kleurenweergave: voor het bekijken van tekst en foto’s in kleur.
- Negatef: lezen in hoog contrast witte tekst op zwarte achtergrond.
Page 76
Optelec FarView
Nederlands Pagina 24
- Positief: lezen in hoog contrast zwarte tekst op witte achtergrond.
- Geel-Zwart modus: lezen in hoog contrast gele tekst op zwarte achtergrond.
- Geel-Blauw modus: lezen in hoog contrast gele tekst op blauwe achtergrond.
- Blauw-Geel modus: lezen in hoog contrast blauwe tekst op gele achtergrond.
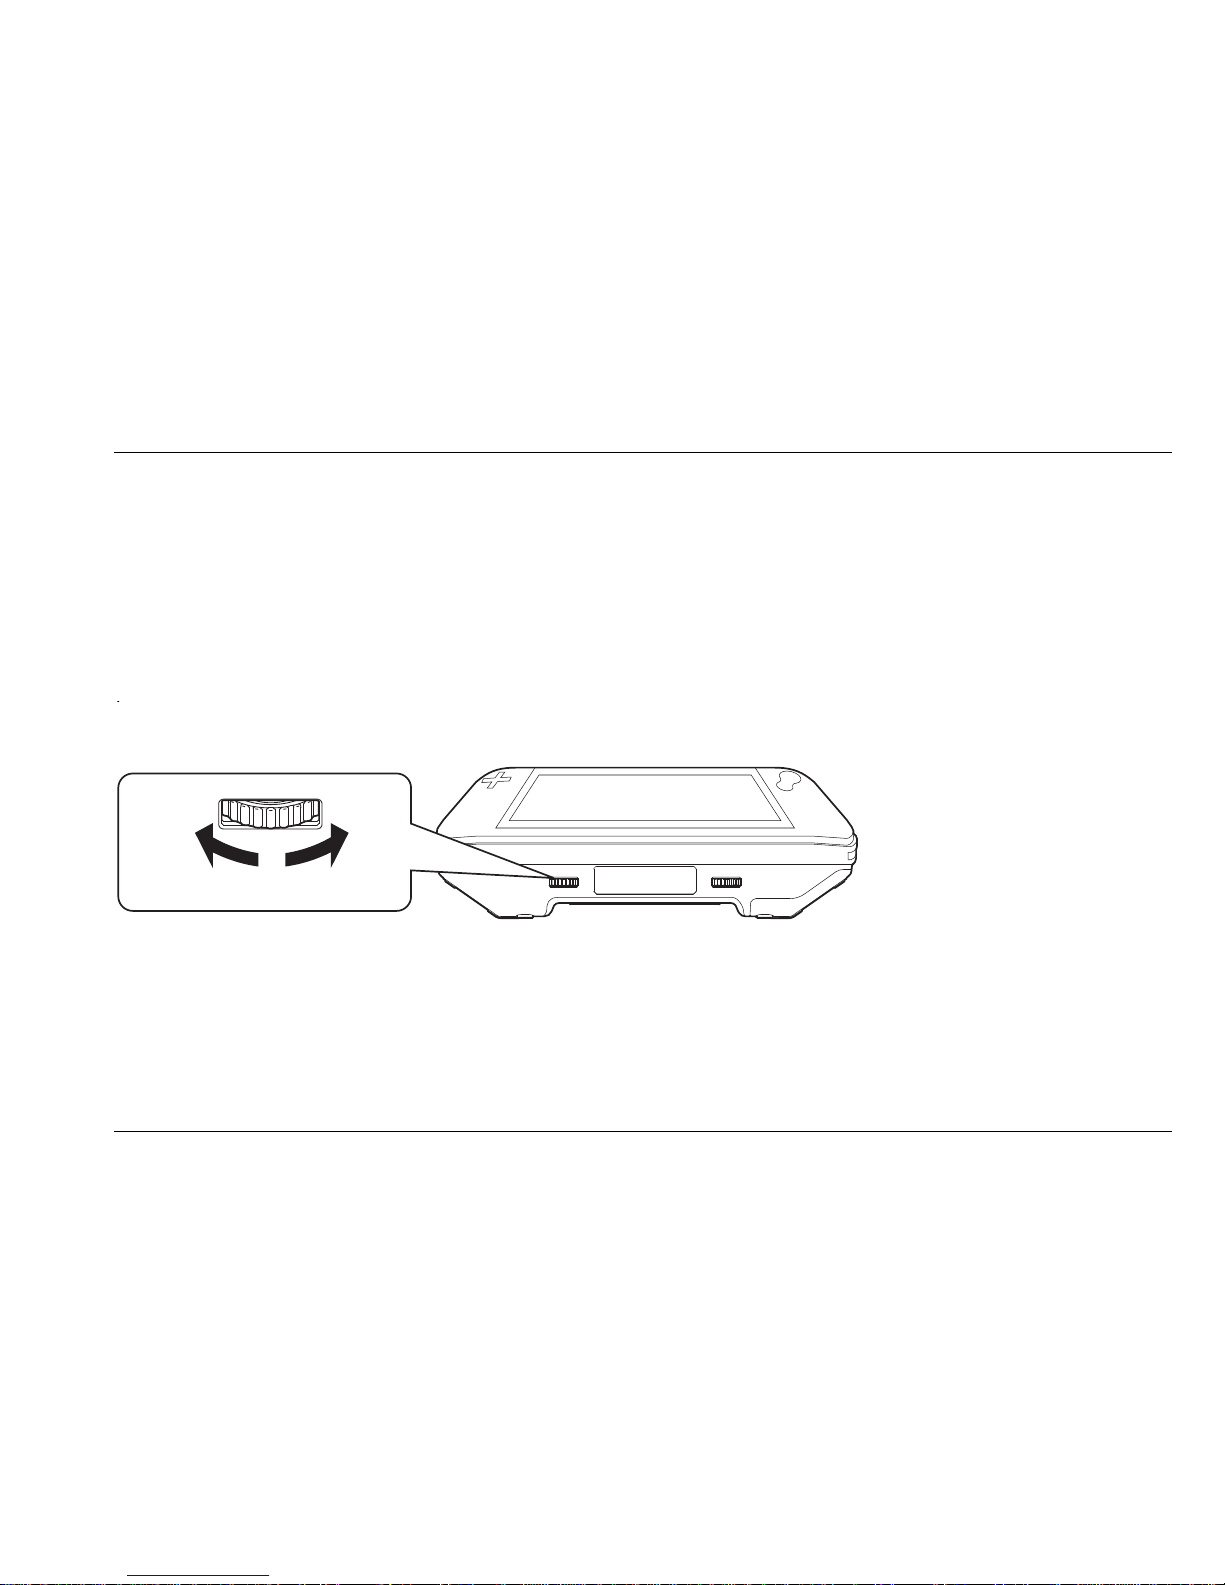
Het contrast instellen
Roteer de contrast knop, links aan de onderzijde van de unit, om het contrast aan te passen
aan uw behoeften.
Page 77
Optelec FarView
Nederlands Pagina 25
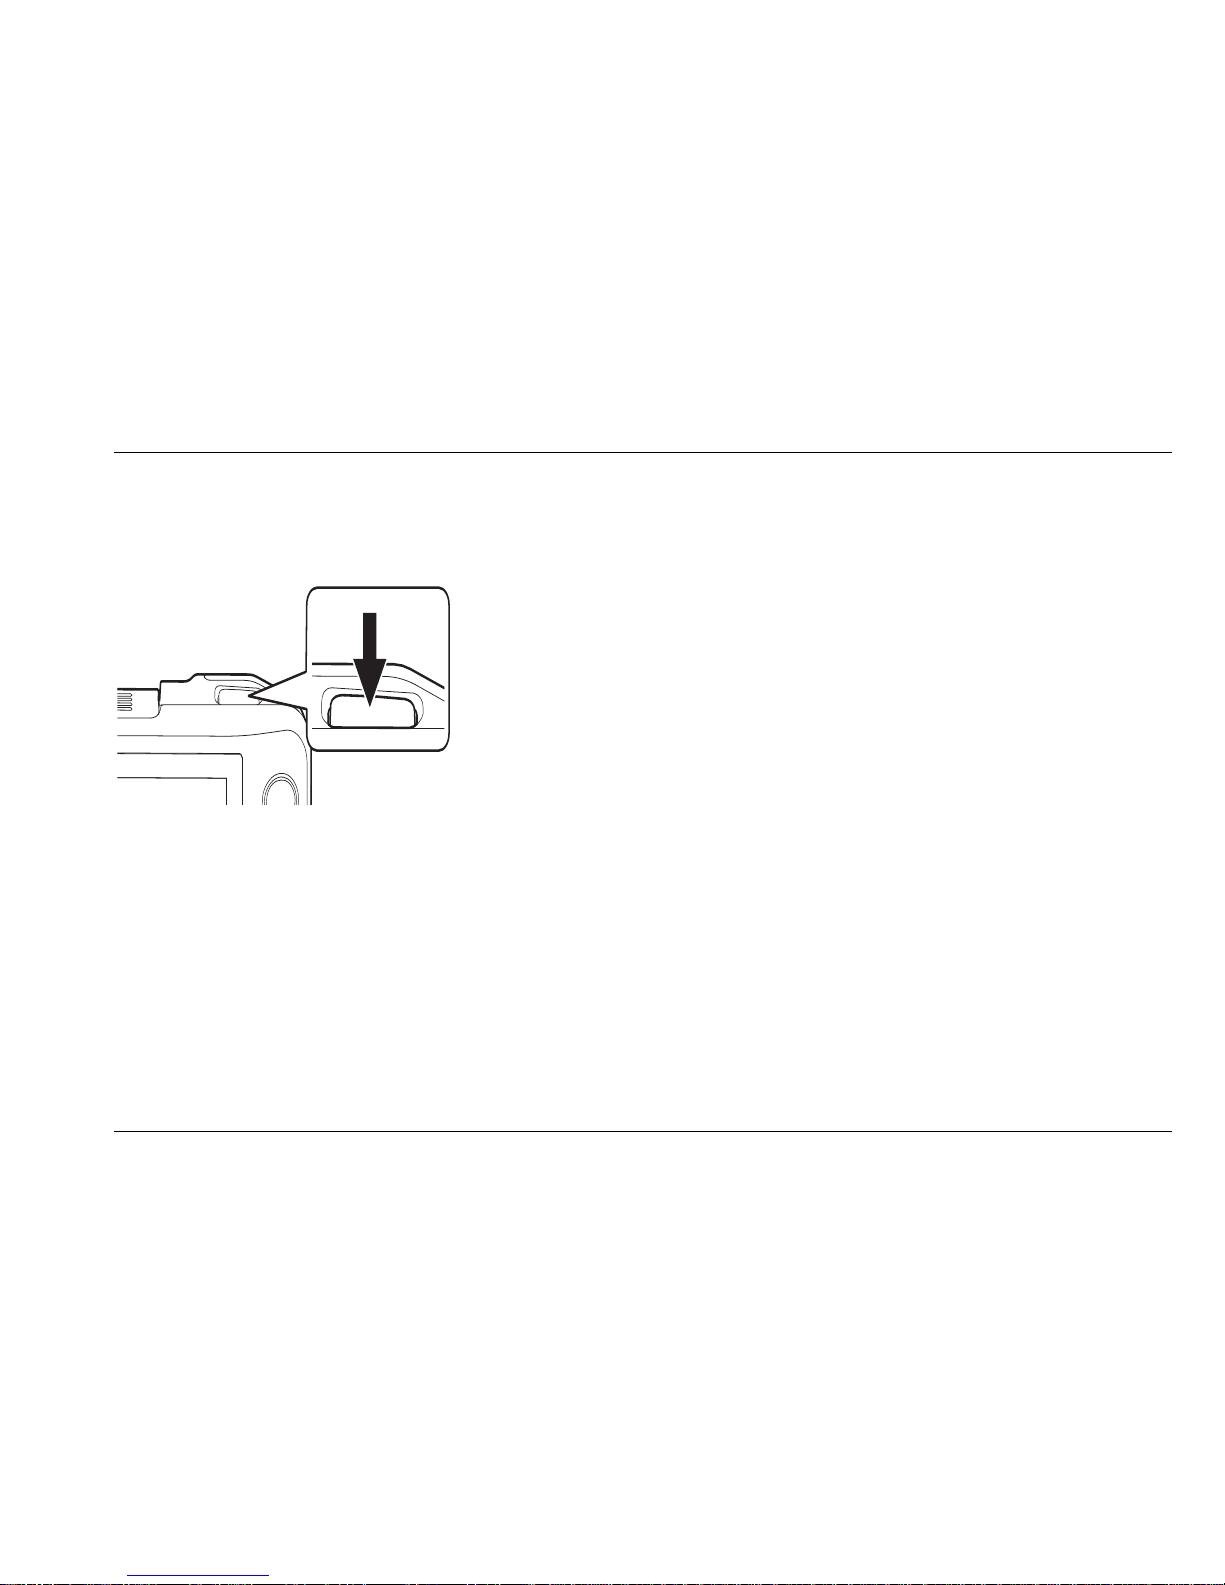
Foto’s nemen met de FarView (Documentleesmodus)
- Richt de FarView naar de afbeelding of tekst
- Druk de ovaalvormige knop aan de bovenzijde van de
unit in. De FarView produceert een toon om aan te
geven dat de focus is ingesteld, gevolgd door een
tweede toon om aan te geven dat de foto is genomen.
- Bekijk het beeld op het scherm van de FarView
- Vastgelegde beelden worden automatisch opgeslagen in
het geïntegreerde geheugen en kunnen ieder gewenst
moment worden bekeken via de weergavemodus.
N.B!: Via deze functie kunt u eenvoudig een compleet A4 document of meerdere pagina’s van
een boek of tijdschrift vastleggen en opslaan. De opgeslagen beelden kunt u op ieder moment
oproepen, waardoor u zowel onderweg als thuis in uw favoriete stoel de geselecteerde beelden
optimaal kunt bekijken.
Beelden en documenten opslaan
Vastgelegde beelden worden automatisch opgeslagen in het geheugen van de FarView.
Wanneer u een foto heeft genomen, worden zowel het vastgelegde beeld als het nummer van
Page 78

Optelec FarView
Nederlands Pagina 26
de foto gedurende twee seconden op het scherm weergegeven. Maximaal kunnen 100 beelden
worden opgeslagen in het interne geheugen van de FarView. Voor meer informatie over het
opslaan van beelden, verwijzen wij u door naar hoofdstuk 7.
N.B. Wanneer u meer dan 100 beelden opslaat, zal het eerste beeld automatisch worden
verwijderd. Om beelden te beschermen tegen automatisch verwijderen, verwijzen wij u door
naar hoofdstuk 7.
Page 79
Optelec FarView
Nederlands Pagina 27
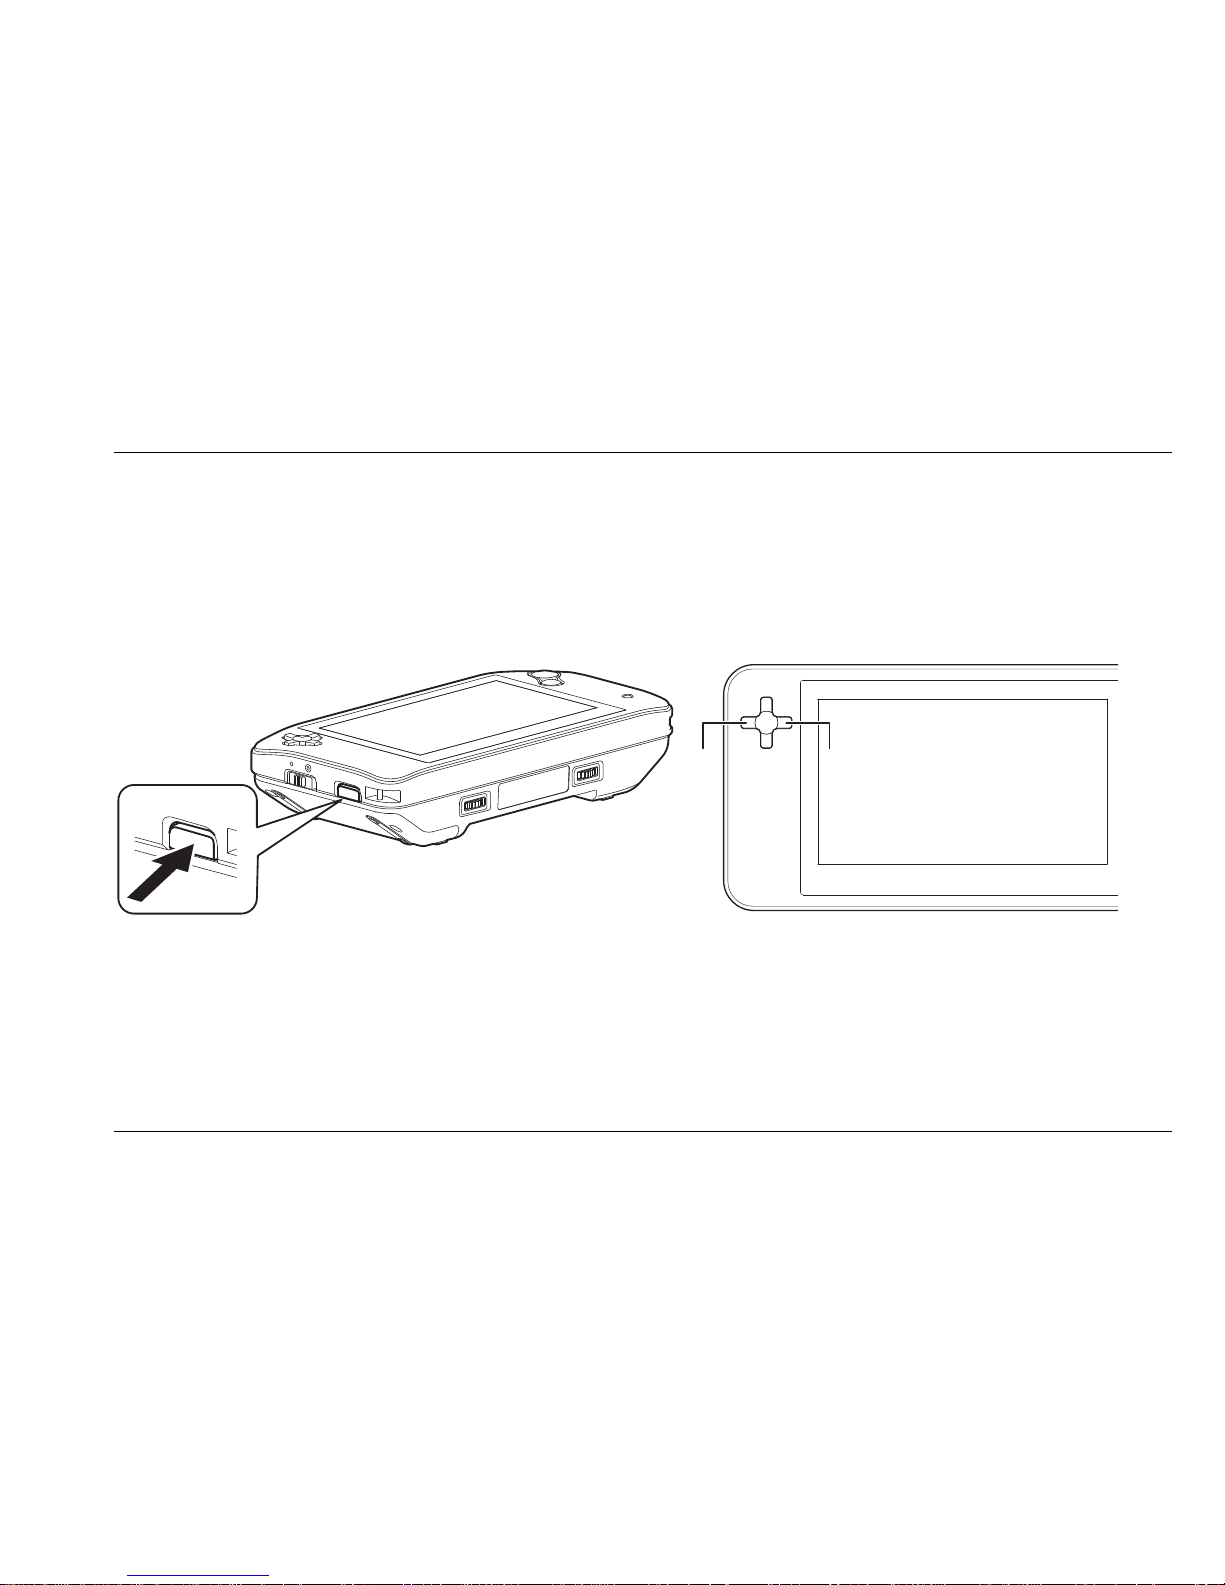
6. Weergave modus
Beelden die in het interne geheugen van de FarView zijn opgeslagen kunnen op ieder gewenst
moment worden opgeroepen en bekeken op het beeldscherm.
1. Selecteer de weergave modus door de knop aan de linkerzijde van de unit in te drukken.
2. Gebruik de cursor toetsen aan de linkerzijde van het scherm om door de opgeslagen
beelden te bladeren. Wanneer u de linker cursor toets indrukt wordt het voorgaande
beeld weergegeven, terwijl het indrukken van de rechter cursor toets het volgende beeld
zal weergeven.
Page 80

Optelec FarView
Nederlands Pagina 28
Beeldselectie en -aanpassing
Beelden die op het interne geheugen van de FarView zijn opgeslagen kunnen op ieder gewenst
moment worden opgeroepen en bekeken op het beeldscherm.
Gebruik de vergrotings-, contrast- en leesstandenknoppen om de beelden aan te passen aan
uw wensen.
Via het geïntegreerde menu kunt u onder andere het beeld roteren en het contrast en de
helderheid aanpassen. Voor meer informatie over deze en andere menu instellingen verwijzen
wij u naar hoofdstuk 7.
Via de functies beelduitlijning, retour / stop positie instellingen en scrollsnelheid, kunt u het
lezen met FarView verder optimaliseren. Houdt er rekening mee dat u enkel door een tekst of
beeld kunt scrollen wanneer u deze in de weergave modus heeft vergroot.
FarView beschikt over een automatische scrollfunctie, die het mogelijk maakt automatisch terug
te scrollen naar het begin van de regel. Om optimaal gebruik te maken van deze functie, volgt u
onderstaand stappenplan:
1. Geef de gewenste startpositie weer in het scherm van de FarView.
2. Druk de focus / retour knop gedurende twee seconden in (tot de unit een geluidssignaal
geeft) om de startpositie te markeren. De startposite wordt aan de linkerzijde middels een
verticale markering weergegeven.
Page 81

Optelec FarView
Nederlands Pagina 29
3. Geef de gewenste stopposite weer in het scherm van de FarView.
4. Druk de snapshot knop gedurende twee seconden in (tot de unit een geluidssignaal
geeft) om de stoppositie te markeren. De stoppositie wordt aan de rechterzijde van het
scherm middels een verticale markering weergegeven.
Gebruik vervolgens de cursor knoppen om door de tekst te navigeren. Wanneer u aan het eind
van de regel bent, drukt u op de focus / retour knop om automatisch terug te scrollen naar het
begin van de regel.
Om de start / stop positie te verwijderen, drukt u achtereenvolgens de focus / retour knop en
snapshot knop in.
De automatische scroll functie wordt automatisch onderbroken indien:
- u een ander beeld selecteert;
- u overschakelt naar de live modus;
- de FarView wordt aangesloten op een externe monitor of PC
Wanneer u in de weergave modus de snapshot knop indrukt, keert u automatisch terug naar de
oorspronkelijke beeldinstellingen. Gebruik vervolgens de cursor knoppen om door de
opgeslagen beelden te navigeren.
Voor meer informatie over het roteren van beelden of het verhogen van het leescomfort,
verwijzen wij u naar hoofdstuk 7.
Page 82
Optelec FarView
Nederlands Pagina 30
7. Het FarView Menu gebruiken
De FarView beschikt over een geïntegreerd menu waarmee u diverse instellingen kunt wijzigen.
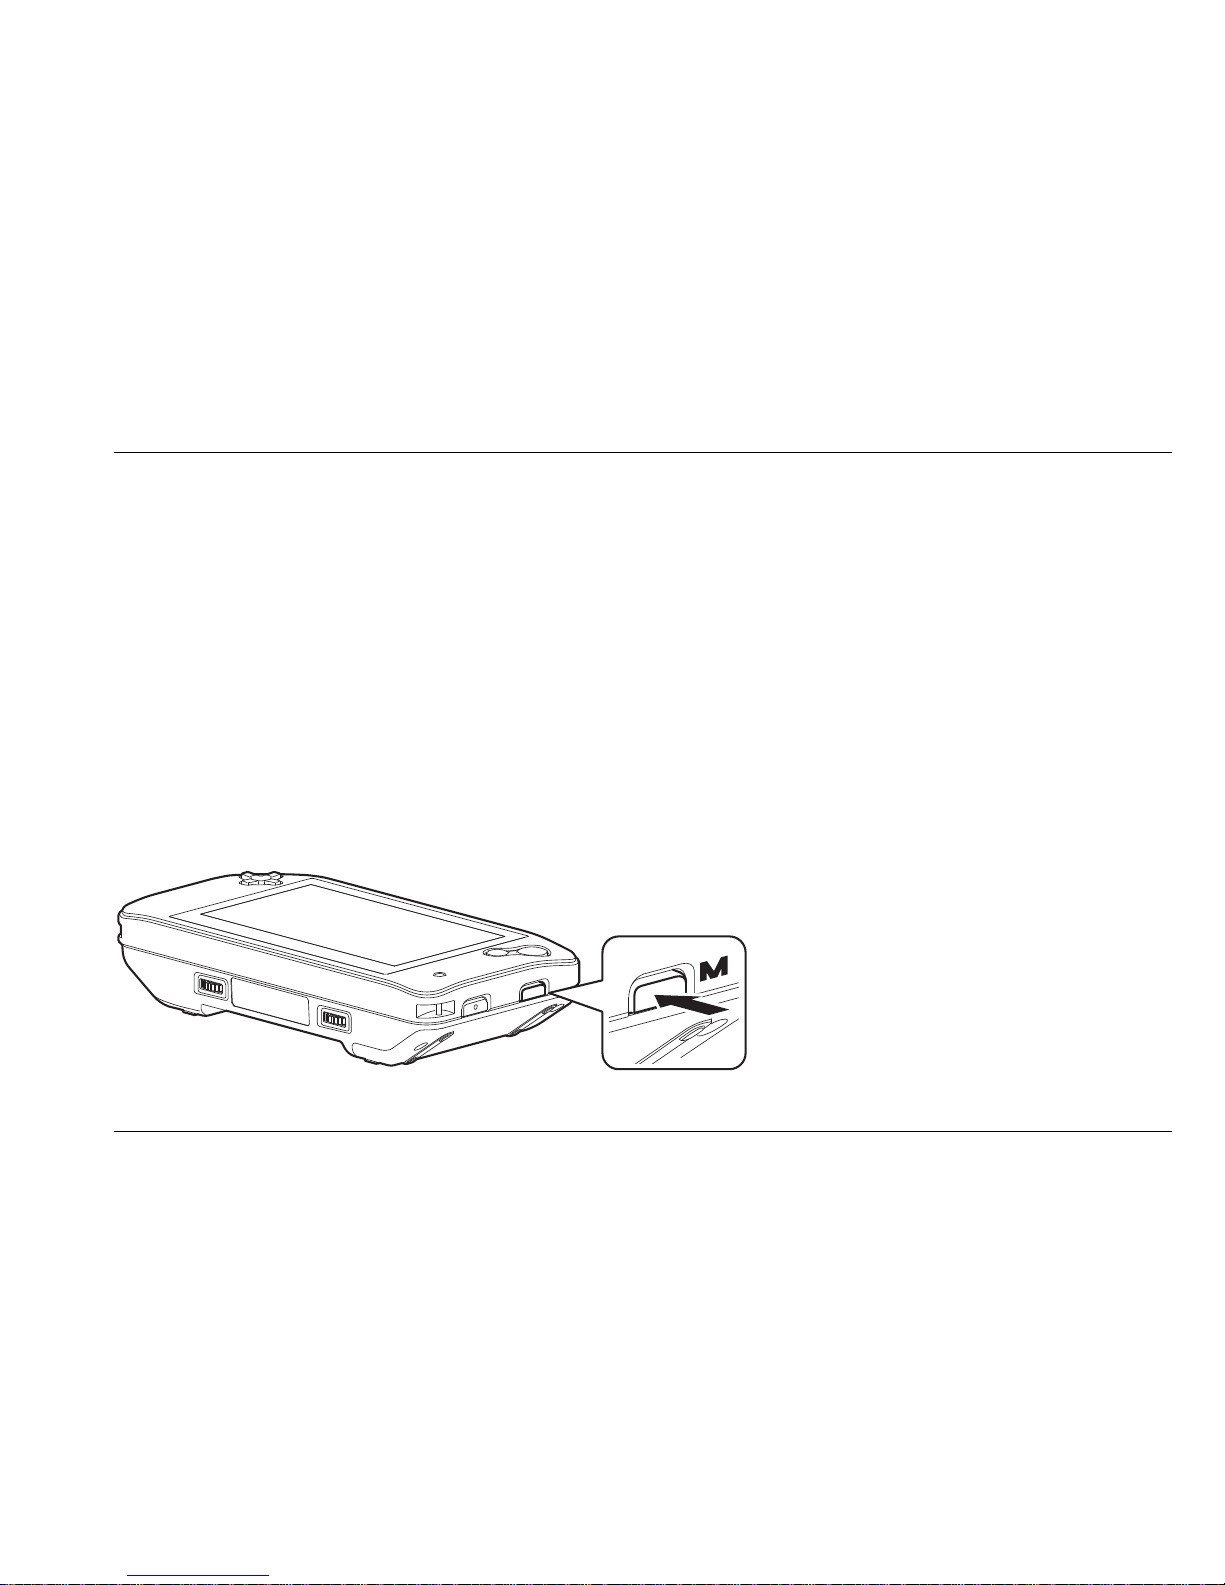
Het menu openen
Om het menu te activeren, drukt u de rechthoekige toets aan de rechterzijde van de unit in.
Gebruik vervolgens de cursor toetsen omhoog en omlaag om door de verschillende menu items
te lopen. Druk de rechter cursor knop in om een geselecteerd menu item te openen.
Druk de menu knop nogmaals in om het menu te sluiten en terug te keren naar de voorgaande
modus.
Page 83
Optelec FarView
Nederlands Pagina 31
Instellingen in het menu wijzigen
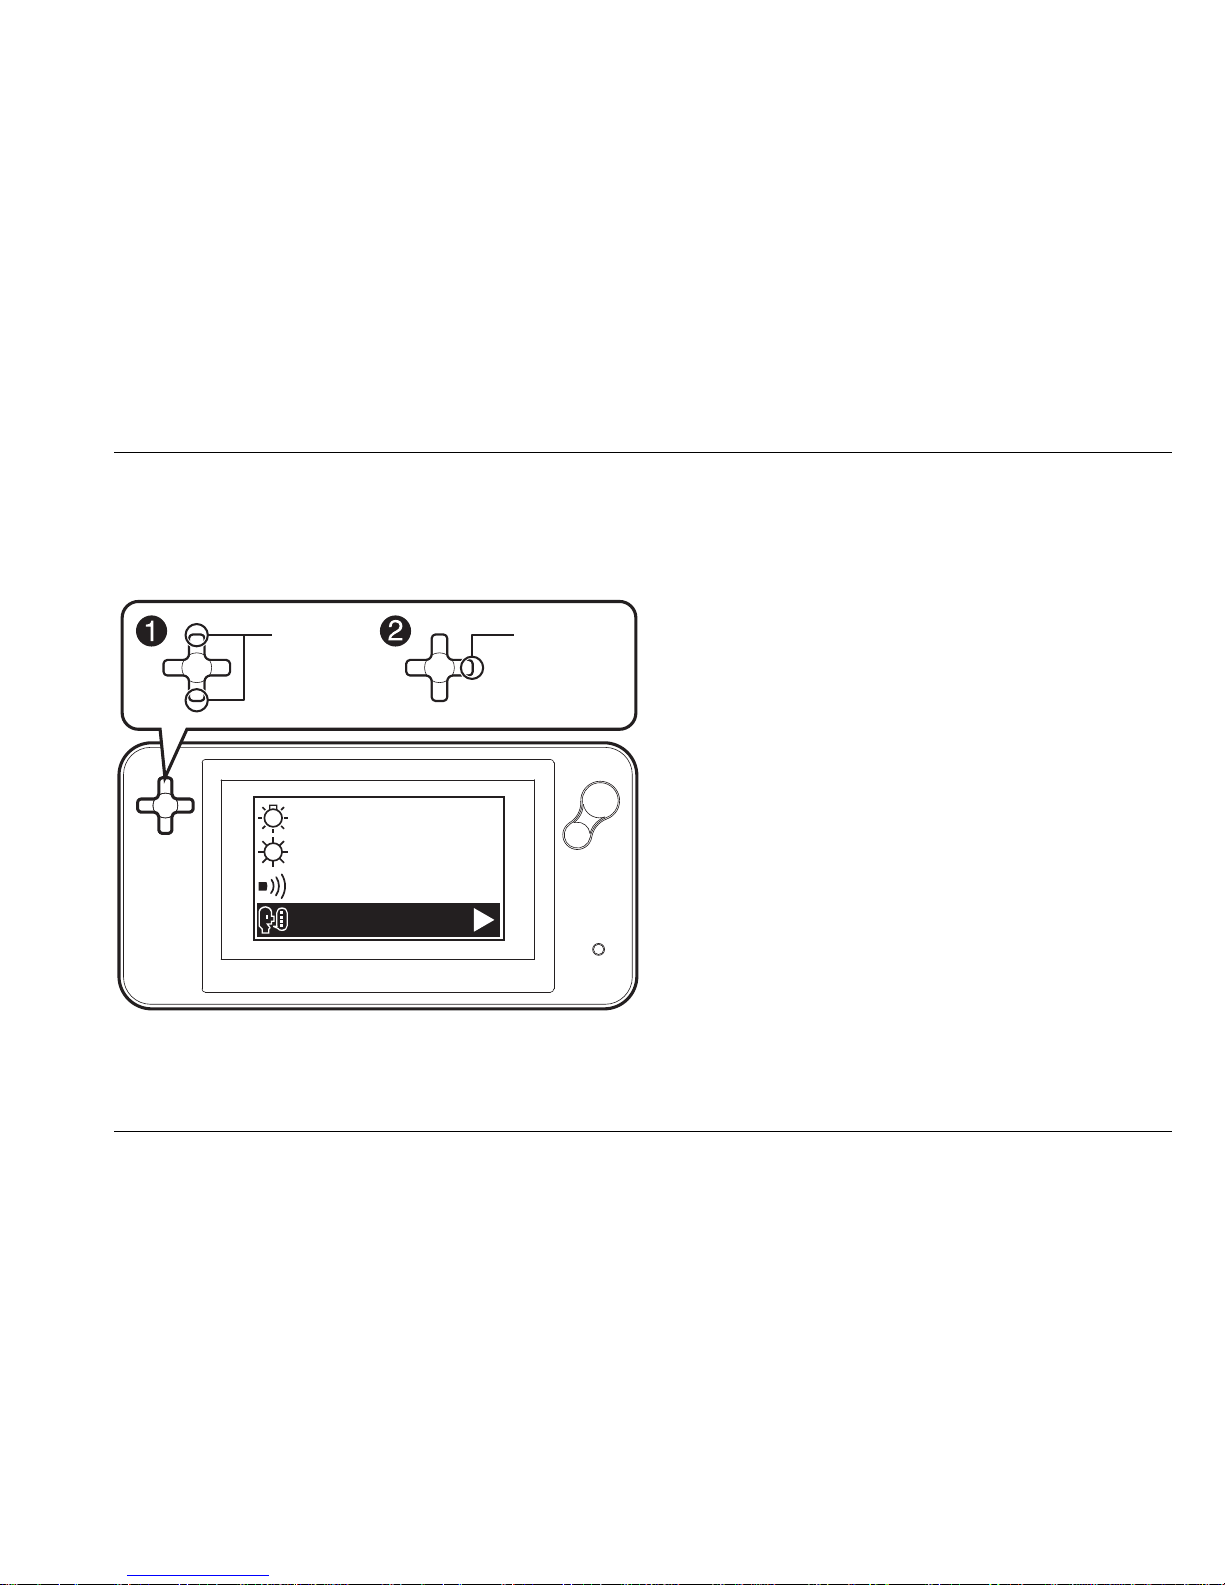
Het FarView menu telt 12 items. Hiermee kunt u de FarView configureren of informatie over de
huidige status van de FarView bekijken.
LIGHT
BRIGHTNESS
BEEP
LANGUAGE
Menu Knop
Menu openen Menu knop
Volgend menu item Cursor omlaag knop
Page 84

Optelec FarView
Nederlands Pagina 32
Voorgaand menu item Cursor omhoog knop
Menu item selecteren Cursor rechts knop
Waarde menu item wijzigen Cursor omhoog en omlaag knoppen
Wijziging accepteren en sluiten Menu knop tweemaal indrukken
Menu sluiten Menu knop
Contrast (live modus en weergave modus) kan middels cursor knoppen ‘omhoog’ en ‘omlaag’
worden aangepast. U heeft de keuze tussen ‘AUTO’ en ‘HANDMATIG’. Druk nadat u uw keuze
heeft gemaakt op de rechter cursor toets om uw keuze te bevestigen en op te slaan.
Auto: contrast wordt automatisch aangepast.
Handmatig: contrast wordt aangepast aan uw behoeftes door middel van het roteren van de
contrast knop.
Wanneer de unit wordt aan- en uitgeschakeld, zal deze instelling automatisch terugkeren naar
‘AUTO’.
Licht (live modus) kan worden in- of uitgeschakeld in dichtbij live modus. Druk de cursor
toetsen ‘omhoog’ en ‘omlaag’ in om ‘AAN’ of ‘UIT’ te selecteren en druk vervolgens de rechter
cursor toets in om uw keuze te bevestigen. Standaard zal de verlichting in dichtbij modus zijn
ingeschakeld.
Draaien (weergave modus). Met deze optie kunt u het geselecteerde beeld 90º links of rechts
draaien of 180º roteren. Gebruik de cursor toetsen ‘omhoog’ en ‘omlaag’ om door de
Page 85

Optelec FarView
Nederlands Pagina 33
verschillende opties te lopen en bevestig uw keuze met behulp van de rechter cursor toets.
Houdt er rekening mee dat beschermde beelden niet kunnen worden geroteerd.
Wissen (weergave modus). Geef het beeld dat u wenst te verwijderen weer op het scherm van
de FarView en open het menu. Selecteer ‘WISSEN’ en druk de rechter cursor toets in om het
geselecteerde beeld te verwijderen. Selecteer ‘DIT’, ‘ALLE’ of ‘NEE’ om enkel het geselecteerde
beeld, alle beelden of geen beeld(en) te wissen. Wanneer u ‘ALLE’ selecteert, zal een dialoog
box verschijnen die u vraagt of u alle beelden wilt verwijderen. Selecteer ‘JA’ of ‘NEE’ en
bevestig uw keuze door middel van het indrukken van de rechter cursor toets.
Beschermde beelden zullen niet worden verwijderd wanneer u ‘ALLES WISSEN’ heeft
geselecteerd. Om beschermde beelden te verwijderen, dient u de instellingen in het submenu
‘BESCHERM’ te wijzigen.
Scrollen (weergave modus). De scrollsnelheid kan aangepast worden middels de cursor
‘omhoog’ en ‘omlaag’ knoppen. Druk de ‘omhoog’ en ‘omlaag’ cursor toetsen in om de scroll
snelheid respectievelijk te verhogen of verlagen.
Uitlijnen (weergave modus). Wanneer een opgeslagen beeld niet correct is uitgelijnd, kunt u via
deze optie de tekst recht uitlijnen. Beelduitlijning kan middels het indrukken van de cursor
toetsen ‘omhoog’ en ‘omlaag’ worden aangepast. Iedere keer dat één van deze knoppen wordt
ingedrukt zal het beeld 1º omhoog of omlaag roteren. Druk twee maal op de menu toets om uw
instellingen op te slaan en terug te keren naar de weergave modus.
Page 86

Optelec FarView
Nederlands Pagina 34
Wanneer u de unit uitschakelt of een ander de beeld selecteert, zullen de instellingen voor
beelduitlijngen verwijderd worden.
Helderheid (live modus en weergave modus) kan worden aangepast met behulp van de cursor
toetsen ‘omhoog’ en ‘omlaag’. Dit submenu telt vier niveaus. Druk de cursor ‘omhoog’ of
‘omlaag’ toets in om de helderheid respectievelijk te verhogen of verlagen. De
helderheidsinstellingen worden automatisch opgeslagen. Zelfs wanneer u de unit uitschakeld.
Het is niet mogelijk de helderheid aan te passen wanneer de FarView is aangesloten op een
externe monitor of PC.
Bescherm (weergave modus). Opgeslagen beelden kunnen worden beschermd tegen
ongewenst verwijderen. Selecteer ‘BESCHERM’ in weergave modus en druk vervolgens de
rechter cursor toets in om uw keuze te bevestigen. Op het scherm zal een icoon verschijnen om
aan te geven dat het beeld beschermd is. Om de bescherming op te heffen, drukt u de cursor
toetsen ‘omhoog’ of ‘omlaag’ in.
Volg deze procedure voor ieder beeld dat u wenst te beschermen.
Piep (live modus en weergave modus) kan ‘AAN’ of ‘UIT, worden geschakeld door middel van
het indrukken van de cursor toetsen ‘omhoog’ en ‘omlaag’. Geluidsinstellingen worden
automatisch opgeslagen. Zelfs wanneer de FarView wordt uitgeschakeld.
Page 87

Optelec FarView
Nederlands Pagina 35
Taal (live modus en weergave modus). Druk de cursor toetsen ‘omhoog’ en ‘omlaag’ in om door
de diverse talen te navigeren. Het submenu ‘TAAL’ telt 7 verschillende talen:
- Japans
- Engels
- Frans
- Duits
- Spaans
- Italiaans
- Nederlands
Taalinstellingen worden automatisch opgeslagen. Zelfs wanneer de unit wordt uitgeschakeld.
De standaard taalinstelling is Engels.
Aantal beelden (live modus). Via deze instelling kunt u het maximum aantal beelden dat kan
worden opgeslagen in het interne geheugen van de FarView wijzigen. U heeft de keuze tussen
30 of 100 beelden. Gebruik de cursor toetsen ‘omhoog’ en ‘omlaag’ om uw keuze te selecteren
en druk vervolgens op de rechter cursor toets om uw keuze te bevestigen. De
standaardinstelling is 30 beelden.
Herstart (live modus en weergave modus) herinstalleert de fabrieksinstellingen. Selecteer deze
optie indien u de terug wilt keren naar de standaardinstellingen voor de submenu’s ‘contrast’,
‘licht, ‘scrollen’, ‘helderheid’ en ‘piep’.
Page 88

Optelec FarView
Nederlands Pagina 36
8. De FarView aansluiten op externe apparatuur
De FarView kan worden aangesloten op een externe VGA monitor of PC, zodat u beelden op
een groter scherm kunt bekijken.
Beelden bekijken op een externe monitor of TV met VGA aansluiting
Verbind de VGA kabel (optioneel verkrijgbaar) aan de VGA out aansluiting aan de bovenzijde
van de unit. Verbind de andere zijde van de VGA kabel met uw externe monitor of PC.
Schakel de FarView uit wanneer u deze aansluit op een externe monitor of PC. Wanneer u de
FarView aansluit op een TV, dient u het externe video kanaal op uw TV te selecteren.
De FarView aansluiten op een PC
Sluit de FarView aan op een computer om beelden op te slaan, af te spelen, te printen en te emailen.
1. Schakel de unit uit en sluit de FarView aan op de AC adapter.
2. Zet de unit aan.
3. Verbind de FarView met een PC via een USB kabel
Page 89

Optelec FarView
Nederlands Pagina 37
Wanneer de FarView is aangesloten op een PC, zal de tekst ‘VRAAGT TOEGANG’ worden
weergegeven op het scherm van de FarView. Wanneer u de USB kabel loskoppelt, zal de
FarView terugkeren in de voorgaande modus.
De FarView driver zal in de folder ‘Deze Computer’ op uw PC worden weergegeven.
Om de PC modus af te sluiten dient u de instructies in de ‘Hardware veilig verwijderen’ dialoog
box in de taakbalk van uw PC.
Page 90
Optelec FarView
Nederlands Pagina 38
9. Overig
Meldingen
MELDING ACTIE
Geen beeld Geen opgeslagen beelden. Neem foto’s en sla
deze op in het interne geheugen.
Onregelmatig beeld Het bestand is beschadigd en kan niet worden
weergegeven. Verwijder het bestand.
AC Adapter aansluiten A.U.B. Gebruik de AC adapter wanneer u het
apparaat via de USB kabel aansluit op een
PC.
Vraagt toegang Koppel de USB kabel of AC adapter niet los
wanneer het apparaat verbinding maakt met
een PC. Opgeslagen beelden kunnen verloren
gaan.
Dit beeld is beschermd Verwijder de beschermingsinstelling alvorens
u het beeld verwijdert of roteert.
Te veel beschermde beelden, zet bescherming
uit
Hef de beschermingsinstellingen op en
verwijder beelden om extra opslagruimte te
Page 91
Optelec FarView
Nederlands Pagina 39
creeëren.
Opslaan onmogelijk Indien meer dan 30 beelden zijn opgeslagen,
kan de functie 30 beelden niet worden
geselecteerd. U kunt het volgende doen:
Verwijder beelden tot het totaal aantal
beelden gelijk aan of lager is dan 30
Selecteer de optie 100 beelden
Niet uitvoerbaar Het beeld is mogelijk beschadigd en kan niet
beschermd of geroteerd worden. Verwijder het
bestand.
Geheugen is vol
Verwijder beelden (hef
beschermingsinstellingen op om
beschermde beelden te verwijderen)
Controleer of het aantal beelden is
ingesteld op 100
Fout in toegang geheugenkaart Schakel het apparaat uit en aan
Camera / Lens fout Schakel het apparaat uit en aan
Communicatie fout Schakel het apparaat uit en aan
Page 92

Optelec FarView
Nederlands Pagina 40
Problemen en Oplossingen
Batterijen en stroomvoorziening
Vragen Antwoorden
Het apparaat geeft geen beeld wanneer deze
is ingeschakeld
Druk de aan-/uit schakelaar in voor
ongeveer 2 seconden
Druk de focus / retour en menu
knoppen tegelijkertijd in gedurende 2
seconden
Batterijen zijn leeg. Laad de batterijen
op
LCD monitor schakelt uit wanner het apparaat
is ingeschakeld
Wanneer het apparaat is verbonden met een
externe monitor, schakelt de verlichting van
het beeldscherm automatisch uit
Het apparaat schakelt automatisch uit Batterijen zijn leeg. Laad de batterijen op
Het apparaat schakelt niet uit Druk de focus / retour en menu knoppen
tegelijkertijd in gedurende 2 seconden.
Foto’s nemen
Vragen Antwoorden
Kan geen foto’s nemen
Controleer of het apparaat in live modus
Page 93
Optelec FarView
Nederlands Pagina 41
is ingesteld
Hef beschermingsinstellingen op
Opgeslagen beelden tonen een witte gloed
Lens is vuil (vingerafdrukken, etc.)
Schakel het apparaat uit en maak de
lens schoon met een zachte, droge doek
Het apparaat stelt niet scherm op het object
Controleer of de juiste modus is
geselecteerd; dichtbij of veraf modus
Object of tekst bevindt zich buiten de
focus range
Het object is bewogen
Controleer of de foto is genomen nadat
de snapshot toets is ingedrukt
Zorg ervoro dat het object niet beweegt
tot dat de foto is genomen en opgeslagen
Lens
Vragen Antwoorden
Foto is niet correct uitgelijnd Foto’s kunnen ietwat scheef uitgelijnd zijn aan
de zijkanten van het beeld.
LCD monitor
Vragen Antwoorden
Page 94
Optelec FarView
Nederlands Pagina 42
De monitor schakelt uit. Wanneer het apparaat gedurende 3 minuten
aangesesloten niet is gebruikt, schakelt deze
autommatisch over naar stand-by modus. Druk
een willekeurige toets, m.u.v. de aan/uit
schakelaar in om terug te keren naar de
voorgaande modus.
Helderheid is instabiel Dit kan worden veroorzaakt door de sluitertijd
en heeft geen effect op genomen foto’s
Monitorbeeld trilt Dit wordt veroorzaakt door vals licht
Zwarte/blauwe/rode/groene puntjes
verschijnen in het scherm.
Dit is geen storing en heeft geen effect op
foto’s
Weergave modus
Vragen Antwoorden
Onmogelijk om beelden te bekijken
Controleer of de weergave modus is
geselecteerd
Er zijn geen beelden opgeslagen op het
interne geheugen
Beeld is te helder of te donker
Controleer of de weergave modus is
geselecteerd
Pas de helderheidsinstellingen aan via
de contrast toets
Page 95

Optelec FarView
Nederlands Pagina 43
Verbindingen met externe monitor of PC
Vragen Antwoorden
Er verschijnt geen beeld of de TV of externe
monitor
Controleer of het apparaat correct is
aangesloten
Wanneer het apparaat is aangesloten
op een TV, dient de externe video
kanaal geselecteerd te worden
Kan geen beelden naar een PC versturen
Controleer of het apparaat correct is
aangesloten
Controleer of de PC het apparaat
herkend
Verbind het apparaat met de AC
adapter
Others
Vragen Antwoorden
Het apparaat is warm Tijdens gebruik of laden kan de unit warm
worden. Dit heeft geen effect op de kwaliteit or
prestaties van het apparaat. Wij raden u aan
de warm geworden delen niet langer dan
nodig aan te raken.
Page 96

Optelec FarView
Nederlands Pagina 44
Bijlage A: Veiligheid
Ga voorzichtig met het apparaat om en laat deze niet vallen om beschadigingen aan interne
componenten, de lens of het beeldscherm te voorkomen.
Gebruik de FarView niet in de omgeving van electromagnetische apparatuur, radio
transmitters of hoogspanningslijnen.
Stel de FarView niet bloot aan grote hitte of direct zonlicht.
Verwijder geen onderdelen van de FarView. Laat reparatie en service over aan door Optelec
geautoriseerd personeel of uw leverancier.
Vermijd contact met vocht, chemicaliën of andere vloeistoffen.
Gebruik de FarView niet in de omgeving van medische apparatuur.
Neem contact op met uw leverancer voor onderhoud of reparatie. Maak het apparaat niet
open, aangezien hiermee de garantie komt te vervallen.
Gebruik een licht vochtige doek om de buitenkant te reinigen. Gebruik in geen geval
oplosmiddelen, zoals alcohol of schoonmaakmiddelen. Deze kunnen het apparaat ernstige
schade toebrengen.
Gebruik enkel de meegeleverde adapter.
Bij gebruik van de FarView anders dan omschreven in deze handleiding vervalt het recht op
garantie.
Page 97

Optelec FarView
Nederlands Pagina 45
Bijlage B: Technische informatie
Vergroting Tot 42 maal
Live modus (dichtbij): 3 – 12 maal
Live modus (veraf): 2.7 – 42 maal
Weergave modus: Tot 14 maal zoom
Leesstanden Kleurenweergave,
Hoog contrast wit op zwart, Hoog contrast zwart op wit,
Hoog contrast blauw op geel, Hoog contrast geel op blauw,
Hoog contrast geel op zwart
Focus Auto-focus
Scherm 4.3” breedbeeld TFT
Batterij Tot 4 uur continu gebruik
Live modus: 2.5 uur
Weergave modus: 4 uur
Laadtijd 4.5 uur
Batterij model Lithium-ion (Li-ion) rechargeable battery
Gewicht 290 gram (incl. batterijen en excl. adapter)
Consumptie DC 5V, 640mA (Live Modus), 440mA(Weergavemodus)
Adapter input 100 – 240V, 50 / 60Hz, 0.33A – 0.16A
Adapter output DC 5V, 2A
Adapter model UMI312-0520
Page 98
Optelec FarView
Nederlands Pagina 46
Opslag- en transportomstandigheden:
Vochtigheid: 5 – 90%, geen condensatie
Temperatuur: -10° – 60 ° C
Luchtdruk: 700 – 1060 hPa
Gebruikersomstandigheden:
Vochtigheid: 10 – 80%, geen condensatie
Temperatuur: 5° – 35 ° C
Luchtdruk: 700 – 1060 hPa
Let op: Gebruikte batterijen dienen te worden ingeleverd op de daarvoor
bestemde locaties.
Over foto bestanden
Opgeslagen data kan beschadigen wanneer het apparaat door incorrect gebruik defect raakt.
Optelec en haar partners kunnen niet verantwoordelijk gesteld worden voor schade toegebracht
door het verlies van opgeslagen data.
WAARSCHUWING: Het gebruik van accessoires en kabels, met uitzondering van de door de
leverancier van de FarView verkregen kabels, kan resulteren in verhoogde emissie of
verminderde immuniteit van de FarView.
-Wanneer u dit symbol ziet-
Page 99
Optelec FarView
Nederlands Pagina 47
Information on Disposal in other Countries outside the
European Union
This symbol is only valid in the European Union.
If you wish to discard this product, please contact your local
authorities or dealer and ask for the correct method of disposal.
TYPE B APPLIED PART
Dit product voldoet aan de bepalingen en EMC standaard van de richtlijnen:
IEC 60601-1;
IEC 60601-1-2
FCC
FCC part 15 Class B
Dit product voldoet aan de richtlijnen en standaarden van de CE en FCC
Page 100

 Loading...