

Optelec EasyLink, EasyLink12 User Manual

Optelec
Page 1 of 66
User manual English
Copyright 2006
Revised November 2006
Optelec, the Netherlands
All rights reserved
Optelec
P.O. Box 399
2990 AJ Barendrecht
The Netherlands
Telephone: +31 (0)88 6783 444
Fax: +31 (0)88 6783 400
E-mail: dealersupport@optelec.com
Internet: http://www.optelec.com

Optelec
Page 2 of 66
INDEX
1. Welcome to EasyLink ____________________________________________ 4
1.1. Introduction ________________________________________________ 4
1.2. Regulatory Notice ____________________________________________ 4
2. The EasyLink ___________________________________________________ 5
2.1. Contents of the Package ______________________________________ 5
2.2. Description of the EasyLink ____________________________________ 5
2.3. Description of the EasyLink12 __________________________________ 6
2.4. Speech Synthesizers _________________________________________ 7
3. The PDA ______________________________________________________ 8
3.1. Description of the PDA ________________________________________ 8
3.2. Synchronization of the PDA with a Desktop Computer _______________ 9
4. Charging the EasyLink Battery ____________________________________ 10
5. Set Up Instructions EasyLink ______________________________________ 12
5.1. The EasyLink Software Program _______________________________ 12
5.2. Installing with the EasyLink SD Installation Card ___________________ 13
5.3. Installing with the EasyLink Installation CD _______________________ 14
6. HP Bluetooth Foldable Keyboard __________________________________ 15
7. Start Using EasyLink ____________________________________________ 17
7.1. Switching EasyLink on, off and reset ____________________________ 17
7.2. EasyLink12 test mode _______________________________________ 18
7.3. Start / Stop the EasyLink software ______________________________ 18
7.4. Connecting with the PDA _____________________________________ 19
8. Start Up ______________________________________________________ 20
8.1. EasyLink Applications _______________________________________ 20
8.2. Operating the EasyLink or EasyLink12 __________________________ 20
8.3. Echo Settings ______________________________________________ 22
8.4. EasyLink Basic Commands ___________________________________ 22
8.5. Working with the PDA Keys ___________________________________ 24
9. EasyWord ____________________________________________________ 25
9.1. EasyWord File Formats ______________________________________ 25
9.2. EasyWord Menu ____________________________________________ 25
9.3. Read a Document __________________________________________ 27
9.4. Write a Document ___________________________________________ 27
9.5. Edit a Document ____________________________________________ 28
9.6. Save a Document ___________________________________________ 28
9.7. Cut, Copy and Paste in EasyWord ______________________________ 28
10. Calendar ___________________________________________________ 29
10.1. Calendar Menu ___________________________________________ 29
10.2. Appointment List __________________________________________ 31
10.3. Create an Appointment _____________________________________ 31
10.4. View or Edit an Appointment_________________________________ 31
10.5. Delete an Appointment _____________________________________ 32
11. Contacts ____________________________________________________ 33
11.1. Contacts Menu ___________________________________________ 33
11.2. Create a Contact __________________________________________ 34
11.3. View or Edit a Contact _____________________________________ 35
11.4. Search Contacts __________________________________________ 35
11.5. Delete a Contact __________________________________________ 35
12. Mailbox ____________________________________________________ 36

Optelec
Page 3 of 66
12.1. Mailbox Menu ____________________________________________ 36
12.2. Read an E-Mail ___________________________________________ 38
12.3. Write an E-Mail ___________________________________________ 39
12.4. Reply to an E-Mail ________________________________________ 39
12.5. Delete, Cut and Copy Messages _____________________________ 39
13. Tasks ______________________________________________________ 40
13.1. Tasks Menu _____________________________________________ 40
13.2. Create a Task ____________________________________________ 42
13.3. Read or Edit a Task _______________________________________ 42
13.4. Task Management ________________________________________ 43
14. Media Player ________________________________________________ 44
14.1. Media Player Menu ________________________________________ 44
14.2. Play a media file __________________________________________ 44
14.3. Search for Media files ______________________________________ 45
14.4. Volume control ___________________________________________ 45
15. Calculator ___________________________________________________ 46
16. Find (Search) ________________________________________________ 47
17. Options (Settings) ____________________________________________ 48
18. Help _______________________________________________________ 50
19. Updating the EasyLink Software _________________________________ 51
20. Shortlist EasyLink Applications __________________________________ 52
Contact Optelec ___________________________________________________ 66
Optelec, previously known as Tieman was founded in 1975 in Rockanje, the
Netherlands. Since 1975 Optelec has been developing and producing innovative
products to assist the blind and visually impaired in their daily activities.
Visit the Optelec website at www.optelec.com for more information about Optelec
products and services. Every effort has been made to ensure that the information
contained in this user manual is correct at the time of issue. Neither Optelec, nor its
agents, assume any responsibility for errors or damages resulting from wrong use of
the information contained in this manual.

Optelec
Page 4 of 66
1. Welcome to EasyLink
1.1. Introduction
Congratulations on the purchase of your EasyLink or EasyLink12, a
Wireless Braille Assistant to be used with your PDA, mobile telephone or
PC, developed by Optelec B.V. EasyLink allows you to read, write, store
and synchronize documents and contact information, synchronize emails, manage appointments and perform quick calculations.
Before you start using your EasyLink or EasyLink12 Braille Assistant, we
advise you to examine the contents of the package and to read the
instructions described in this user manual carefully.
1.2. Regulatory Notice
This equipment has been developed and tested in order to comply with
the EMC and safety requirements of the following directives:
EN 300 328
EN 301 489-1
EN 301 489-1
EN 55022
EN 61000-4-2
EN 61000-4-3
EN 60950-1
EN 60601-1
This device complies with Part 15 of the FCC Rules. Operation is subject
to the following two conditions: (1) this device may not cause harmful
interference, and (2) this device must accept any interference received,
including interference that may cause undesired operation.
This device bears the CE and FCC approval mark.

Optelec
Page 5 of 66
2. The EasyLink
2.1. Contents of the Package
The EasyLink package contains the following:
1 EasyLink or EasyLink12
1 Pair of Earphones;
1 Power Supply Adapter;
1 EasyLink Pouch;
1 EasyLink Belt
1 EasyLink User Manual;
1 Installation CD-ROM;
1 SD Installation Card;
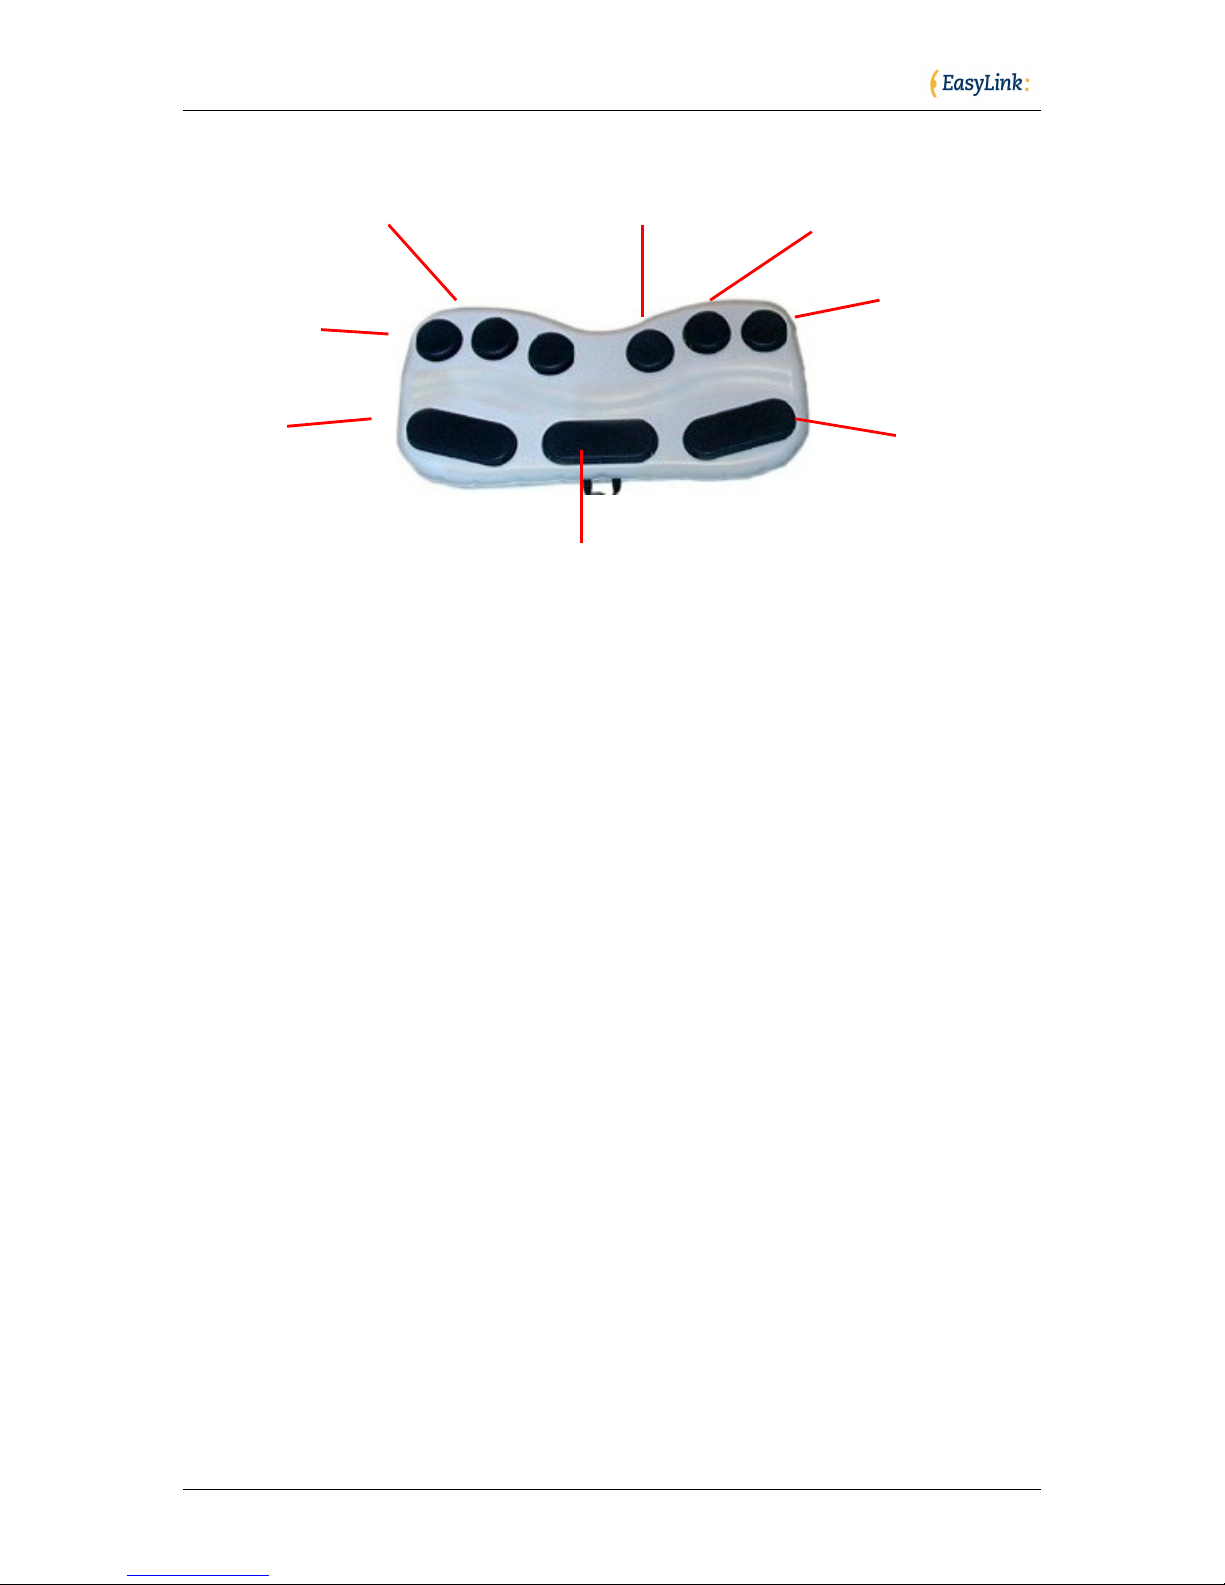
2.2. Description of the EasyLink
The EasyLink keyboard consists of:
Six round-shaped keys, reflecting six Braille dots, located on the
upper part of the keyboard;
Three function keys located on the lower part of the keyboard.
(Please note that the EasyLink is placed correctly in front of you
when the three function keys are closest to you). These three
function keys are designated as follows:
o Shift: located at the lower left of the keyboard;
o Control: located at the lower part right of the keyboard;
o Space: located in the middle of the lower part, between the
shift and control buttons.
A beeper, which informs the user when the keyboard is switched
on or off and notifies the user about current battery level and the
status of the connection with the PDA;
A belt hook, located at the front of the keyboard, below the
function keys. The belt hook should be positioned closest to you
while working with EasyLink.
Optelec
Page 6 of 66
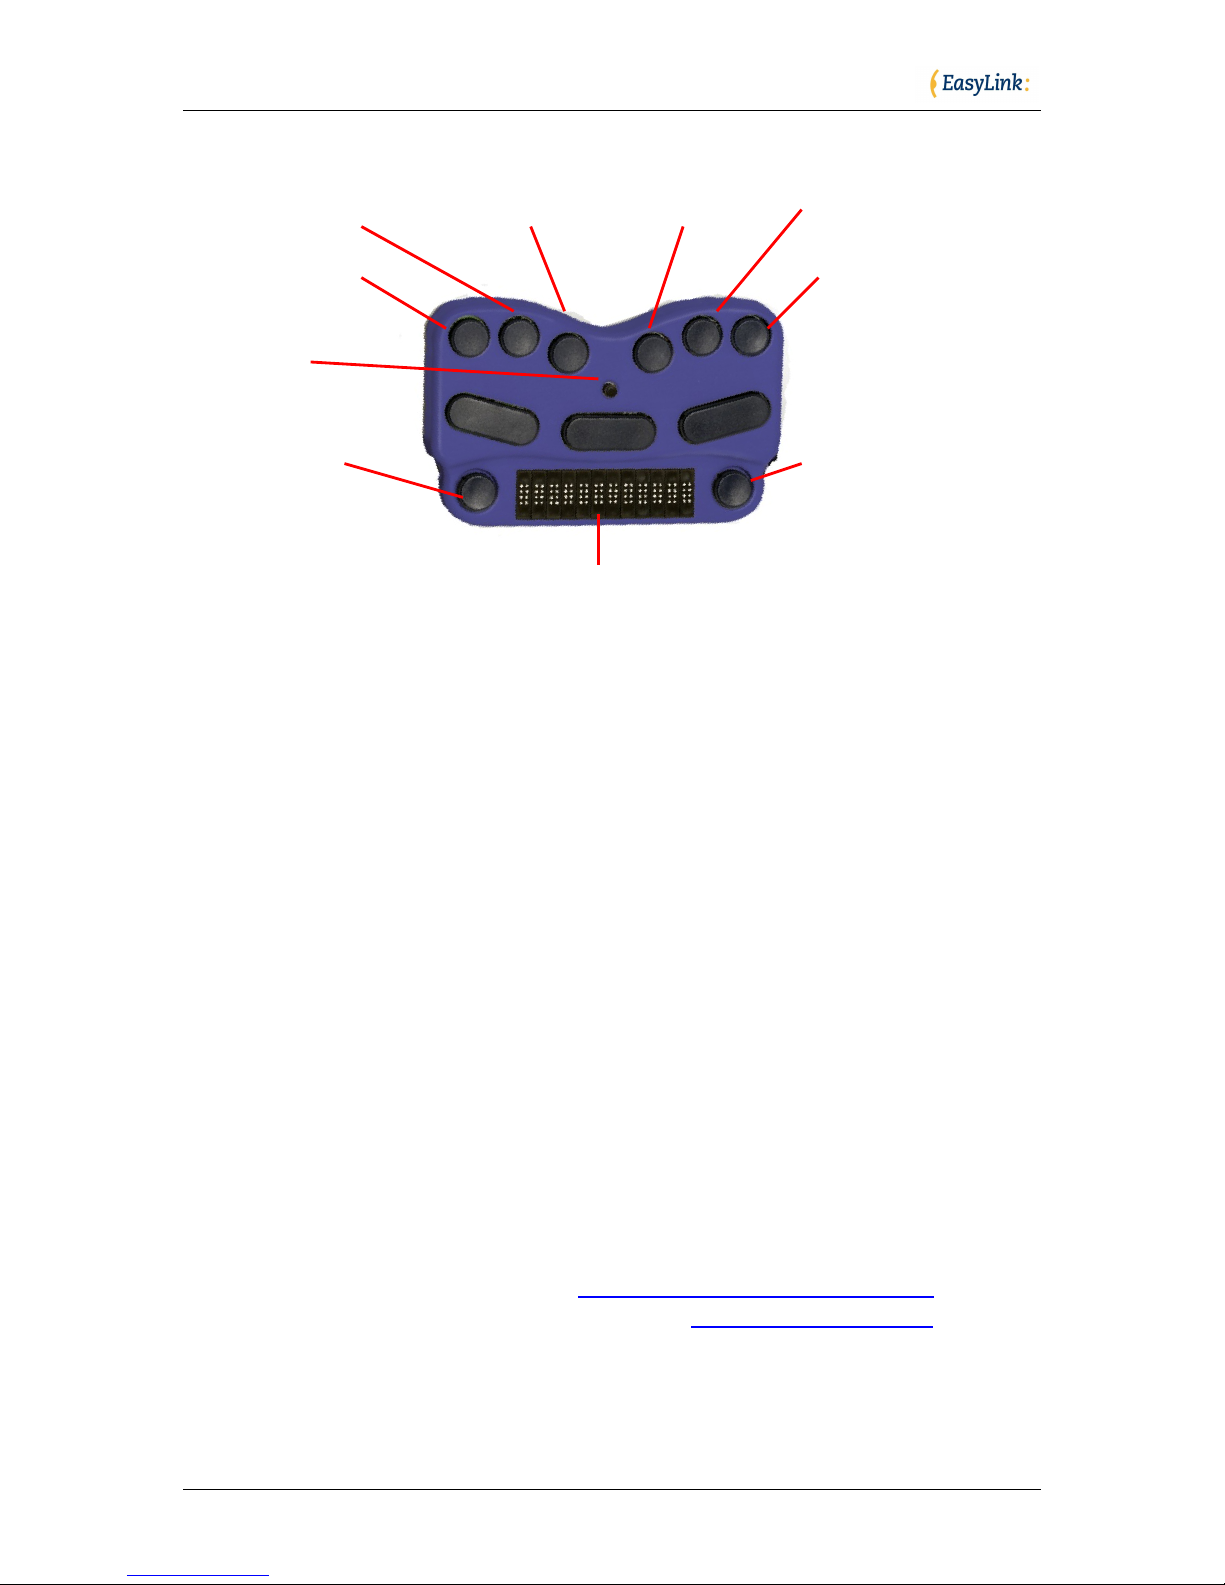
2.3. Description of the EasyLink12
The EasyLink12 consists of:
Six round-shaped keys, reflecting six Braille dots, located on the
upper part of the keyboard;
Three function keys located on the lower part of the keyboard.
(Please note that the EasyLink is placed correctly in front of you
when the three function keys are closest to you). These three
function keys are designated as follows:
o Shift: located at the lower left of the keyboard;
o Control: located at the lower part right of the keyboard;
o Space: located in the middle of the lower part, between the
shift and control buttons.
A beeper, which informs the user when the keyboard is switched
on or off and notifies the user about current battery level and the
status of the connection with the PDA;
12 Braille cells located on the lower part of the unit;
2 Braille navigation keys, located at the right and left of the Braille
line;
1 Navigation joystick, located in the middle of the unit;
2 neck cord hooks, located at the right and left side of the
keyboard, next to the Braille line.
Braille Key 5
Braille Key 6
Braille Key 4
Braille Key 1
Braille Key 2
Braille Key 3
Shift Key
Space Key
Control Key
Optelec
Page 7 of 66
The navigation key located on the left and right of the Braille line are for
scrolling the Braille display. Pressing the left and right Braille navigation
keys simultaneously will move the cursor to the beginning of the Braille
display. The joystick allows you to arrow up, down, left or right. Pressing
the joystick will perform an Enter.
The Braille system used by EasyLink is „Contracted Braille‟ by default or
„Computer Uncontracted Braille‟.
In this manual we will be using Braille dot combinations when describing
commands. Most commands will necessitate pressing keys, which make
up a given Braille letter in combination with either a Shift or a Control
key, such as Ctrl-O.
In cases where a combination of keys does not form a Braille letter, this
manual will simply indicate which Braille dot keys to press (e.g. Spaced46 means that you have to press Space key and dots 4 and 6 together.
2.4. Speech Synthesizers
The speech used by the EasyLink software is provided by Acapela
Mobility from the Acapela Group (http://www.acapela-group.com) or by
Fonix DECtalk from the Fonix Corporation (http://www.fonix.com), and is
available in various languages. Please contact your distributor for more
information.
Braille Key 3
Braille Key 4
Braille Key 1
Braille Key 6
Joystick
Braille Navigation
Key Left
12 Cell Braille Display
Braille Navigation
Key Right
Braille Key 5
Braille Key 3

Optelec
Page 8 of 66
3. The PDA
Please find below some additional information about a PDA. For detailed
information about your PDA, please refer to your PDA‟s user manual.
3.1. Description of the PDA
The PDA consists of:
A touch-screen located on the front.
Power button located at the top front of the PDA (above the
screen).
Four function keys at the bottom front of the PDA, numbered for
the sake of this manual as 1 and 2 (left), and 3 and 4 (right).
An action/cursor key, located at the bottom front in the middle
between keys 1, 2 and 3, 4, offering the following options:
o Moving up, down, left and right.
o Pressing the middle of the key, stands for 'OK‟.
The presence of other keys depends on the PDA model.
A connector on the lower edge – for connecting peripherals, like a
docking station or another desktop computer interface.
An earphone socket on the upper edge.
A stylus placed in a special socket; the stylus is not suitable for
blind users at this stage.
A speaker, in the front or rear of the case, depending on the PDA
model.
A docking station for charging the batteries for the PDA and for
connecting it to a desktop computer and a power adapter for
charging the PDA‟s batteries.
The Windows Mobile operating system is installed on the PDA.
Outlook for Windows software to store and manage data on the
desktop computer, and ActiveSync software for data
synchronization.
When the PDA starts up for the first time (and after each hardware
reset), the screen has to be calibrated, the time and date has to be set
and you have to select your region. We recommend you ask a sighted
person to assist you with these settings. Especially selecting the correct
regional setting is important to be able to synchronize your
appointments, tasks and E-mail correctly with your desktop. If this
procedure is not fulfilled properly before installing EasyLink software onto
your PDA, the described procedure will automatically start after each

Optelec
Page 9 of 66
warm (software) reset.
3.2. Synchronization of the PDA with a Desktop Computer
The synchronization task between the PDA and the Computer is
performed by the ActiveSync program, which comes standard with your
PDA. Synchronization preferences can be set on the desktop computer.
You can decide which data has to be synchronized, if all data has to be
transported to your PDA (mail messages can be cut or copied without
attachments etc.), or if you prefer file format conversion. We recommend
you to set conversion from Word files on the desktop computer to plain
text files on your PDA, which will make your files readable with the
EasyLink software.
The synchronization procedure keeps track of the time changes, both on
the PDA and on the desktop computer. Sometimes it can happen that a
file or another item has been changed on both devices after the last
synchronization. ActiveSync prompts you to resolve this conflict
manually. You will have a chance to decide which version is to be
copied, or you can look at these items and review them before
synchronization.
When EasyLink is connected via ActiveSync, you can browse the PDA
files through Windows Explorer on your desktop computer.
All the details about ActiveSync and its installation are described in the
documentation included in your PDA Package.
Optelec
Page 10 of 66
4. Charging the EasyLink Battery
Both EasyLink and EasyLink12 are powered by rechargeable batteries;
one set in the PDA and one set in the Braille keyboard. Please make
sure the batteries of both your PDA and the EasyLink or EasyLink12
keyboard are fully charged while using the devices for the first time. Use
the dedicated power supply shipped with the EasyLink keyboard to
charge the keyboard‟s battery. The batteries used in the PDA and in the
EasyLink keyboard can be charged as often as you like. However,
please note that even the most modern batteries last longer and have a
larger capacity while charging them when they are fully drained.
Charging the batteries of the EasyLink or EasyLink12 Braille Assistant
will take approximately 4 hours, while they are fully drained.
When the batteries have been fully charged, you can turn the unit on by
pressing Space-d13. When the unit is switched on, the keyboard
produces several beeps. The meaning of these beeps is explained in the
following table:
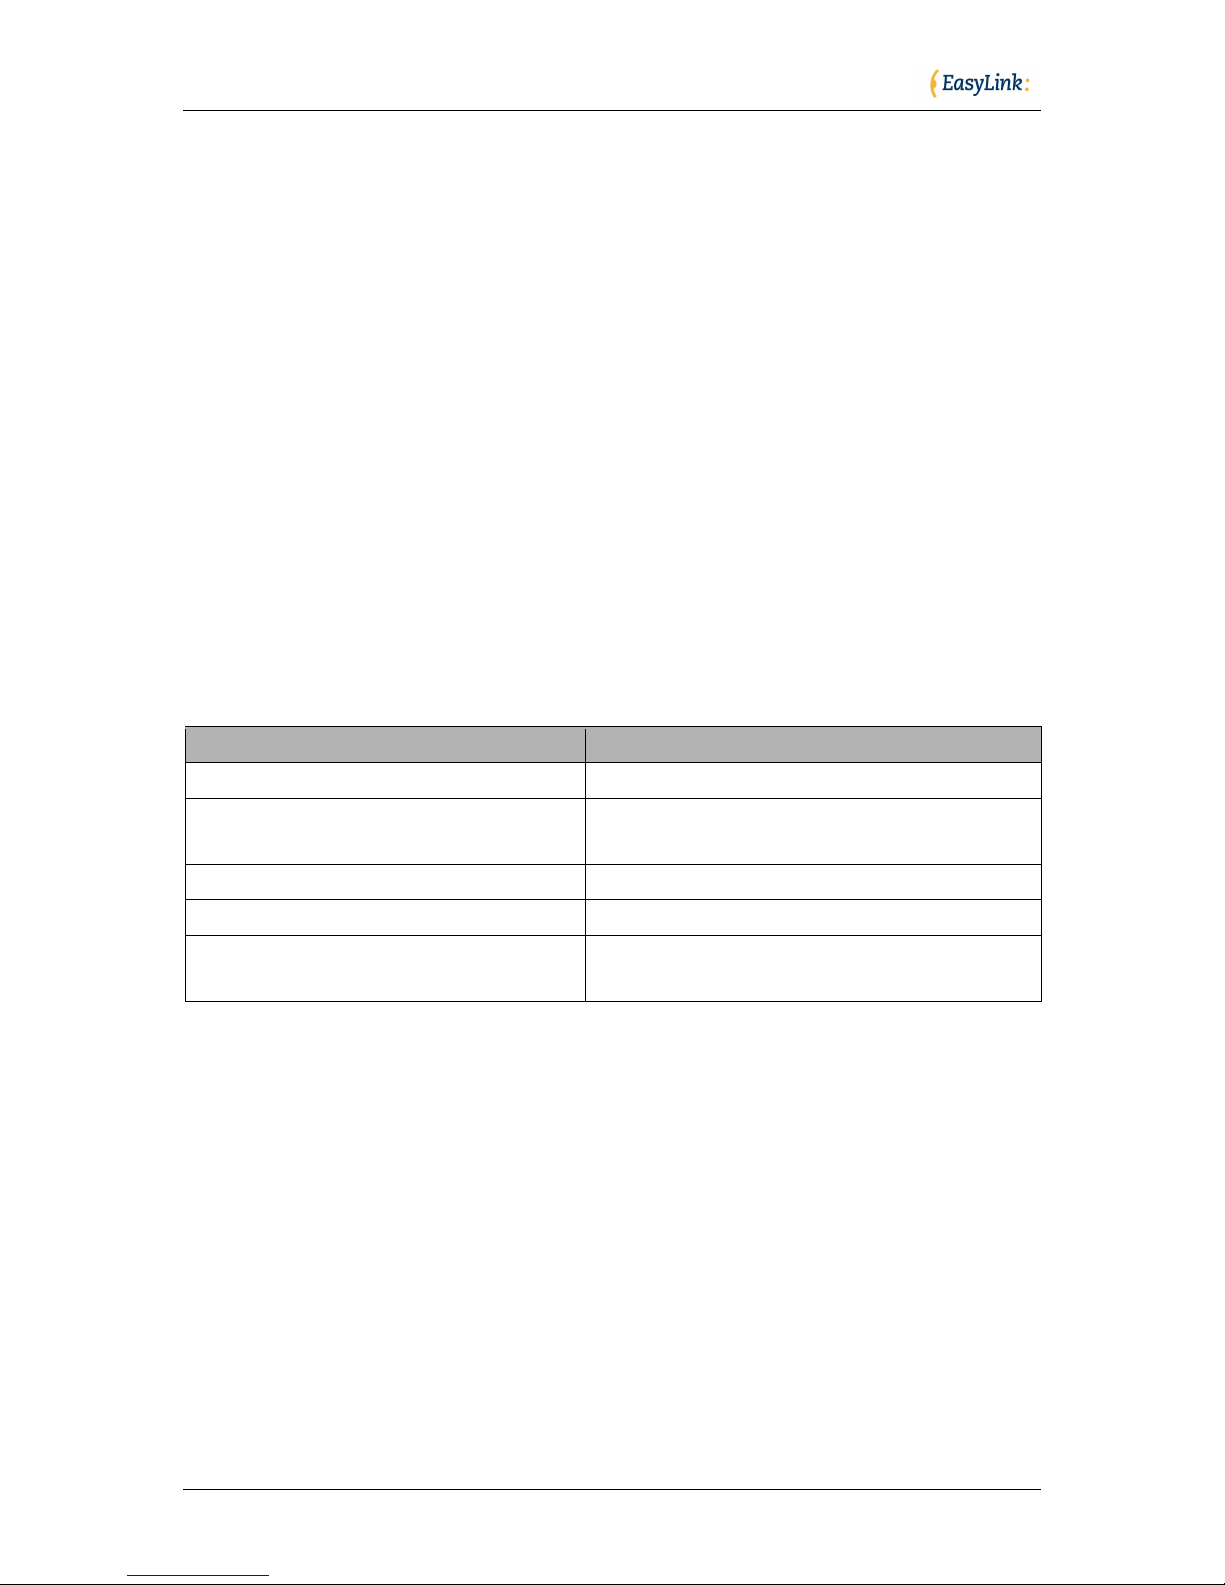
Beeps
Meaning
Long, pause, three short
Batteries fully charged
Long, pause, two short
Batteries charged to half of their
capacity
Long, pause, long
Batteries drained
Two middle
Batteries are charging
Two middle, pause, three short
Batteries are charging and already
fully charged
To prevent the batteries from draining while the unit is not used, the
keyboard automatically switches off after a period of inactivity (i.e. no key
has been pressed). While the keyboard switches off, you will hear a
single „switch-off‟ beep. Time of switch-off depends on version of
firmware in the keyboard. Before the unit is going to switch off you will
hear two very delicate beeps: one beep one minute before and second
half a minute before.
Just like the keyboard, the PDA is also equipped with an automatic
switch-off function. When connection is lost between the PDA and the
EasyLink or EasyLink12, because the keyboard has been switched off or
is at a distance of more than 30 feet/10 meter from the PDA for example,
the PDA will switch off after a certain amount of time. Simply turn both
your PDA and EasyLink or EasyLink12 on to restart.

Optelec
Page 11 of 66
The PDA is equipped with an advanced power management system,
protecting data from being lost if the batteries are fully drained. By
default, the backlight of the PDA‟s screen is off in order to save power.
The backlight can be switched back on, by pressing Space-d123456, if a
sighted person is helping a blind user to troubleshoot or to learn the
system.
To switch of your PDA you can either press the on/off switch on your
PDA or press Ctrl-Shift-d123456 simultaneously. Note that this does not
switch off your EasyLink/ EasyLink12. To switch of your EasyLink or
EasyLink12, press Space-K (dots 1 and 3).
The EasyLink software program will warn you if the battery is low. The
PDA will automatically go in stand-by mode when the main battery is
drained. The back-up battery will save your data. Please refer to your
PDA‟s user manual for more information about this subject. PDA‟s with
Windows Mobile 5 store your data in non-volatile memory to prevent data
loss.
Please note that when the battery level of the PDA is below 10%, the
PDA might disable Bluetooth and disconnect the EasyLink to save
power. To establish the connection again, you will need to charge your
PDA.
Since the PDA‟s auto-off function is suspended while the EasyLink or
EasyLink12 keyboard is wirelessly connected, this connection will be
closed automatically when the PDA‟s battery is critically low (3% of full
charge). This feature prevents the PDA from losing all of its power.

Optelec
Page 12 of 66
5. Set Up Instructions EasyLink
5.1. The EasyLink Software Program
The EasyLink software, installed on the PDA, allows full multitasking,
regardless of whether the keyboard is used, only the keys on the PDA
are used, or an optional full-sized keyboard is used instead. Thanks to
this feature you can:
Switch applications without closing your work, so that if you started
entering text into EasyWord and had to check a phone number
while in the middle of a sentence, you do not have to close your
EasyWord document. In fact, you can simply switch to Contacts,
find the phone number that you want, and switch back to
EasyWord.
Connecting or disconnecting the EasyLink, EasyLink 12 or optional
full-sized keyboard, does not change the state of any application.
While reading text by using the keys of your PDA, you can switch
your keyboard on and make corrections in the text.
Your EasyLink data can be synchronized with data stored in your
desktop computer, using the Active-Sync program, included in the PDA
package. This easy and fast synchronization is very convenient; you will
not have to remember to move data from your PDA to your desktop
computer. All that is required is connecting the PDA to your desktop
computer by placing it in the docking station; then synchronization begins
automatically.
Synchronization allows data from the following applications to move
between devices:
Calendar.
Contacts.
Tasks.
Mailbox (in-and-outbox).
Files (All files placed in the My Documents folder in the PDA are
synchronized with a designated subfolder of the My Documents
folder in the desktop computer).
Any information that you want to move from your desktop computer to
the PDA should either be created in Outlook for Windows or, in the case
of a file, placed in the designated subfolder.
After the first time you connect the PDA to your desktop computer, your
data will be exchanged seamlessly (see Chapter 2.2, “Synchronization
with a Desktop Computer”).

Optelec
Page 13 of 66
ActiveSync can convert files from one format into another. This means
that ActiveSync automatically converts .doc, rtf and other formats into txt
formats, allowing EasyLink users to read the file by using the EasyWord
application.
Installation instructions for the programs included in the PDA package
(i.e. Microsoft ActiveSync and Outlook for Windows) are included in the
materials shipped with these programs. Please remember to install the
ActiveSync program before attempting to connect EasyLink to your
desktop computer through the USB connection.
The EasyLink software is guarded by a watchdog process to keep
working in all circumstances. If the program hangs up, the watchdog
restarts the EasyLink. The EasyLink software saves your data regularly
in a back-up file. When the software restarts you will be asked to restore
the back-up file.
5.2. Installing with the EasyLink SD Installation Card
To install EasyLink software onto your PDA, just insert the SD card into
the SD slot of your PDA. The SD card locks if pressed into the slot. To
get the card out – you will have to press it again. After the card is
inserted, the installation program starts automatically. The first message
instructs the user to press any key in 5 seconds. Not pressing any of the
function keys (keys 1 to 4, action or up/down/left/right, which are located
on the lower side of your PDA device) will cancel the installation. This
protects against an accidental reinstallation.
If you press any key, the installation runs automatically. During
installation process your PDA restarts itself several times. When the
installation is completed, the EasyLink software will automatically start. If
an EasyLink Braille Keyboard is not configured, the system will try to find
a keyboard and register it for future use. Please remember to switch the
keyboard on (with Space-D13– Space-dots 1 and 3). The installation
program will remind you to do so to make sure you switched on your
EasyLink. Please remember, that the software will only register one
keyboard. If there are other keyboards nearby, the system will not
register any of them.

Optelec
Page 14 of 66
5.3. Installing with the EasyLink Installation CD
Before installing the EasyLink software, please check if ActiveSync has
been installed on your Desktop Computer. When ActiveSync has been
installed on your Desktop Computer, you can connect your PDA to your
PC by using the appropriate connections (USB connection through a
docking station) and the Microsoft ActiveSync program. After inserting
the EasyLink Installation CD, the process starts automatically.
When the installation procedure is finished and the operations on the
desktop computer are finished as well, the installation process will shift to
your PDA from where it will follow the same procedure as in paragraph
5.2.
Note: On the EasyLink Installation CD you will find a folder named “\SD”.
The contents of this folder are an exact copy of the EasyLink Installation
SD Card. In case the SD card contents get corrupted or lost, you can
simply copy this folder's contents onto the SD card, which will make this
card the EasyLink Installation SD Card again.
Note: The EasyLink software is copy protected. The software will only
work with the EasyLink or EasyLink12 included in the package. At the
end of the installation you will have to pair the EasyLink or EasyLink12
with your PDA to authorize the software.

Optelec
Page 15 of 66
6. HP Bluetooth Foldable Keyboard
While using the EasyLink software, you can alternatively switch between
the EasyLink, EasyLink12 or external Bluetooth keyboard.
Before using your HP Bluetooth Foldable keyboard, make sure you do
NOT install the driver on the CD included in the HP product package.
Instead, use the EasyLink software to connect your HP keyboard.
Once the EasyLink software has been installed on your PDA, press the
round connect button on the top right of the keyboard to turn the HP
keyboard on. The orange indicator on the top right of the keyboard starts
blinking. Switch your PDA on and press function key 1 several times until
you hear “Option”. Function key 1 is the most left key on the bottom front
of the PDA. Now press function key 4 to enter the list with available
keyboards. Function key 4 is the most right key on the bottom front of the
PDA. Select the HP Bluetooth Keyboard from the list using the cursor
key, located ate the bottom front in the middle between keys 1, 2, 3 and
4. Finally, press the action key to search for the HP Bluetooth keyboard.
The EasyLink software will automatically connect the HP Bluetooth
Foldable Keyboard.
The Bluetooth Foldable keyboard is the same size as a notebook
computer, with a standard 65-key Qwerty layout. The keyboard consists
of 5 rows of keys, of which the two bottom rows of keys require some
special attention. The bottom row of keys consists of the following keys:
CTRL Fn WIN ALT SPACE ALT CursorLeft CursorDown CursorRight
DEL
Please note that the Spacebar is divided into two parts.
The second row from the bottom consists of the following keys:
Shift Z X C V B N M , . CursorUp Shift /
To activate shortcuts on the Qwerty keyboard, the same key
combinations can be pressed as while using the EasyLink or EasyLink12
keyboard. However, the HP keyboard does not recognize shortcuts with
the Spacebar. Combinations with the Fn key can be used instead.

Optelec
Page 16 of 66
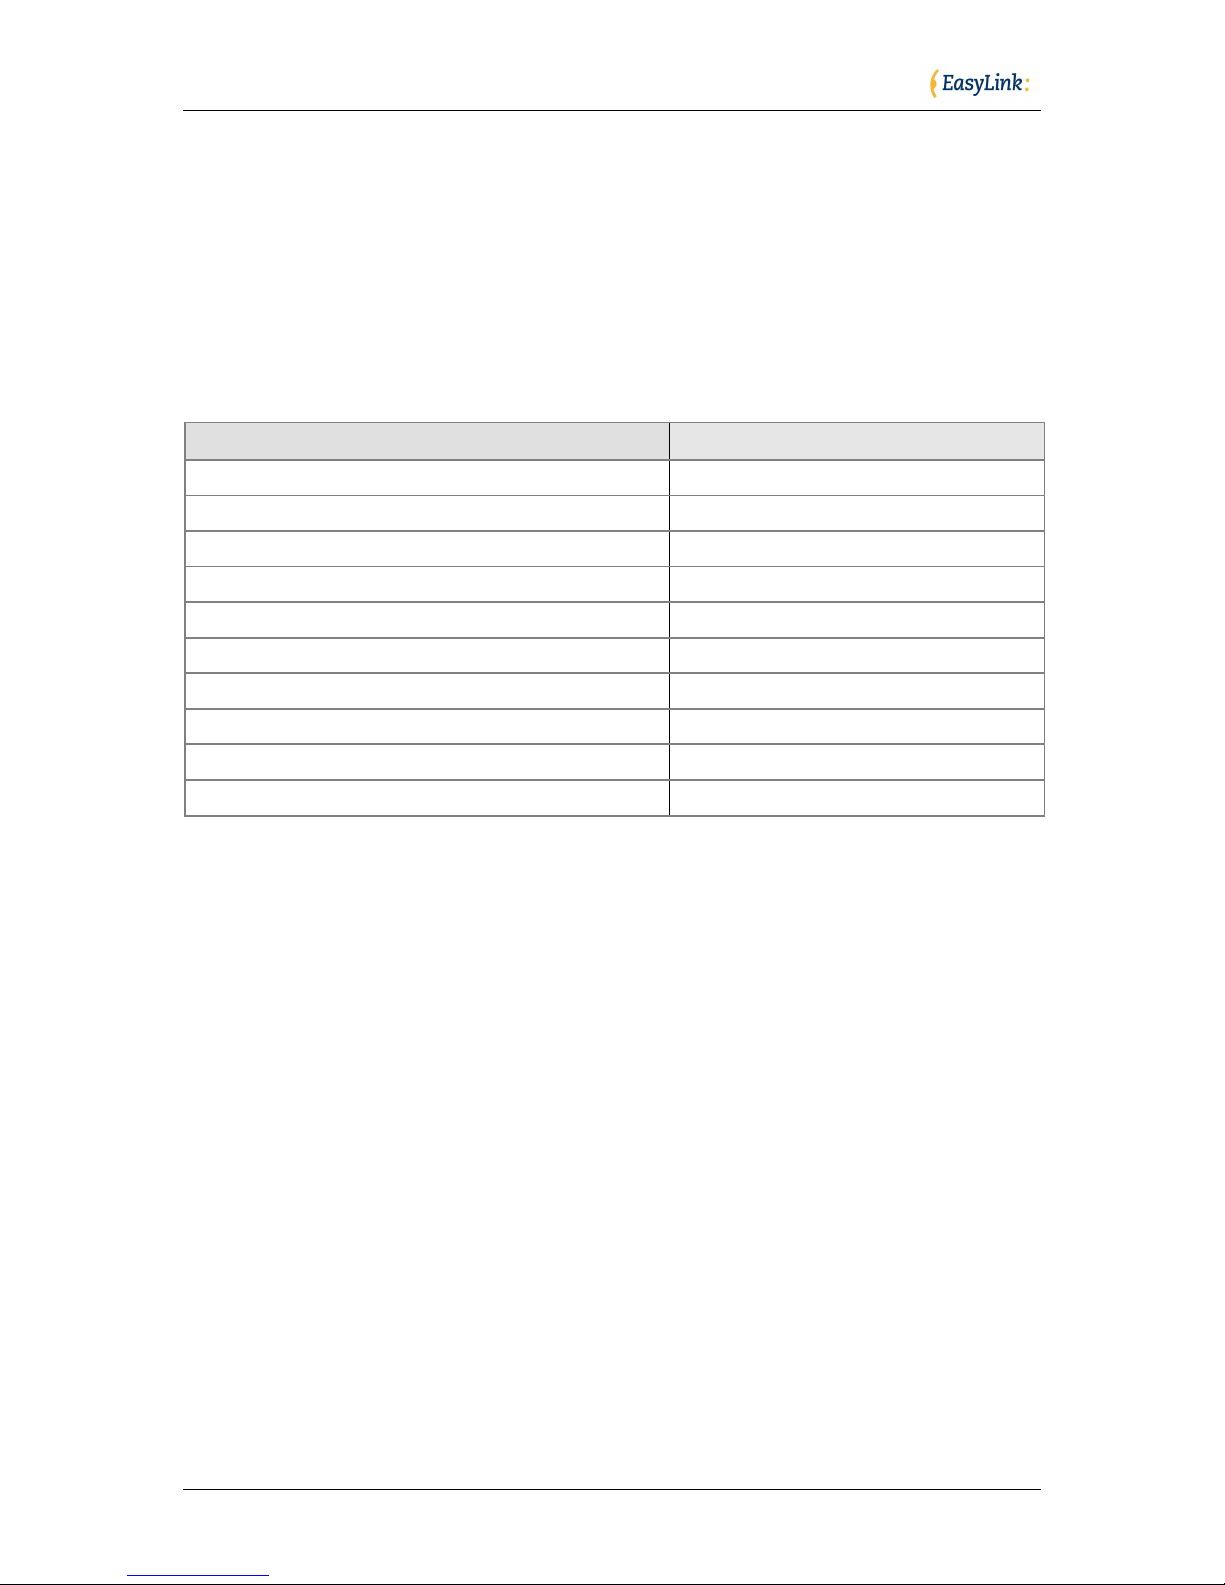
Below is an overview of some special key combinations that are different
from the EasyLink/ EasyLink12 combinations:
Command
Shortcut
Home
Fn key-Cursor Left
End
Fn key-Cursor Right
Move word by word
Ctrl-CursorUp/Down/Left/Right
Previous sentence
Cursor Up
Next sentence
Cursor Down
Previous paragraph
Ctrl-Cursor Up
Next paragraph
Ctrl-Cursor Down
Mute
Fn key-S
Switch between applications
EasyWord
Fn key-E
Contacts
Fn key-C
Calendar
Fn key-A
Mailbox
Fn key-M
Tasks
Fn key-T
Calculator
Fn key-L
Find (Search)
Fn key-F
Options (Settings)
Fn key-O
Help
Fn key-H

Optelec
Page 17 of 66
7. Start Using EasyLink
7.1. Switching EasyLink on, off and reset
Before switching your EasyLink or EasyLink12 keyboard on, make sure
your PDA device is switched on. When your PDA is on, you can switch
the keyboard on or off by pressing Space and dots 1 and 3 (Space-d13)
simultaneously. Pressing additional keys does not switch the keyboard
on or off. This prevents the keyboard from being accidentally switched on
or off if it is jostled during transport. When switching the keyboard on, it
will produce several beeps. These beeps indicate that the unit is
switched on (first long beep), the battery status (one to three short
beeps) and if the keyboard is connecting with your PDA (three very short
beeps). Once the connection is established, you will hear one short
beep. Also, when the connection is broken, EasyLink produces one short
beep.
Please note that in certain circumstances the connection might take up
to 20 seconds after both devices have been switched on. This depends
on the status of the PDA, other applications that are running at that time
and environmental situations.
When encountering problems with the connection, first check if the
keyboard‟s battery is fully charged. Switch it off and on again. When the
keyboard produces only one long beep, after the first middle length beep,
the battery has to be recharged. In very rare situations, it might occur
that the internal processor of the EasyLink is locked up. In this case, you
will have to reset the keyboard. To reset the keyboard, follow the
procedure as described below:
EasyLink keyboard:
Locate the hole with the reset button at the bottom of the EasyLink
in the middle on the left, (Please remember the belt hook should be
facing you);
Use the PDA‟s stylus to gently push the reset button placed in that
hole;
Switch the keyboard on again, by pressing Space-d13
simultaneously.

Optelec
Page 18 of 66
EasyLink12 :
Press the following keys simultaneously: Space + key 1 + key 3 +
Joystick Action;
Wait 5 seconds and release all keys;
Switch the EasyLink12 on again, by pressing Space-d13
simultaneously.
7.2. EasyLink12 test mode
EasyLink 12 has a special test mode that helps identifying any possible
problems. To enter the test mode, press Space-Ctrl (Enter) within one
second after having switched on the EasyLink12. The battery indicator
will be displayed. To step through the different test, press Space-Ctrl. To
exit the test mode, press Space-shift (Escape).
The test procedure consists of:
Battery status in percentages;
Braille cells: This test will check whether all Braille dots function
correctly. First dot 1 will be displayed, to display the next dot press
Space-Ctrl until all 8 dots have been displayed;
Key test: This test allows you to check all keys. The Braille display
will prompt you to press key 1, key 2, key 3, key 4, key 5, key 6,
Space, Shift, Control, joystick action, joystick left, joystick up,
joystick right, joystick down.
Bluetooth chip test: This test will check whether the Bluetooth chip
functions correctly. If the Bluetooth chip functions correctly, the text
"BT test OK" will be displayed.
Once the Bluetooth test has been completed, press Enter to leave the
test mode.
7.3. Start / Stop the EasyLink software
The EasyLink software can be started or stopped by tapping “Start
EasyLink” or “Stop EasyLink” in the Start-menu of your PDA. In the case
where your PDA has been used by a sighted person, the EasyLink
software might be unloaded. To relaunch EasyLink again ask a sighted
person to tap the Start menu button of your PDA and choose „Start
EasyLink”. Alternatively, you can warm-reset your PDA to start the
EasyLink software.

Optelec
Page 19 of 66
7.4. Connecting with the PDA
If the EasyLink or EasyLink12 is switched on, it becomes active and
waits for the PDA to initiate the connection. After the PDA is switched on,
it initiates the connection while searching for the keyboard. It will
continually attempt to connect for a period of approximately two minutes
and then stop in order to save power. If the EasyLink keyboard cannot
be found, the PDA will stop searching. If you want to re-initiate the
connection, you will have to switch the PDA off and on again.
Once the connection is established, both the PDA and EasyLink
keyboard will inform you, by an audible signal, that the connection is
established:
The PDA makes a connection sound (this function can be switched
off by the user);
The EasyLink or EasyLink12 keyboard makes a middle length
beep.
If, for some reason, the connection is lost (e.g. the keyboard is
temporarily switched off or placed beyond its range of 30 feet / 10
meter), the connection will need to be initiated again.
The PDA will try to re-connect for approximately two minutes and then
will stop trying. Losing the connection is acknowledged by both the PDA
and the EasyLink keyboard with an audible signal. To make the PDA
begin searching for the EasyLink keyboard again, it will need to be
switched off and on. However, it is not necessary to switch the EasyLink
keyboard off.
Note that the PDA cannot connect to another EasyLink or EasyLink12
because the keyboard’s unique serial number is registered on the PDA.
Optelec
Page 20 of 66
8. Start Up
8.1. EasyLink Applications
As soon as the connection between the PDA and EasyLink or
EasyLink12 is established, you can choose one of the applications to
work with:
Application
Shortcut
EasyWord
Shift-Ctrl-E
Contacts
Shift-Ctrl-C
Calendar
Shift-Ctrl-A
Mailbox
Shift-Ctrl-M
Media Player
Shift-Ctrl-Y
Tasks
Shift-Ctrl-T
Calculator
Shift-Ctrl-L
Find (Search)
Shift-Ctrl-F
Options (Settings)
Space-O
Help
Shift-Ctrl-H
Alternatively, you can press the first function key on the PDA, which
allows you to switch from one application to another in sequence as
described above. The first time EasyLink is switched on or after a reset,
the system will start in EasyWord, with an open unnamed blank file.
After having chosen an application to work with, you can start entering
and reading data.
8.2. Operating the EasyLink or EasyLink12
To keep the EasyLink and EasyLink12 keyboard similar to a regular
computer keyboard, it has been equipped with a Control and Shift button.
Since the EasyLink software can be optionally used with a computer
keyboard, the device operates under the same terminology as a regular
keyboard.
The Shift and Control keys work exactly as on a desktop PC keyboard,
which means you will have to press them in combination with the letter
keys.
 Loading...