

Page 1
Page 2

Page 3

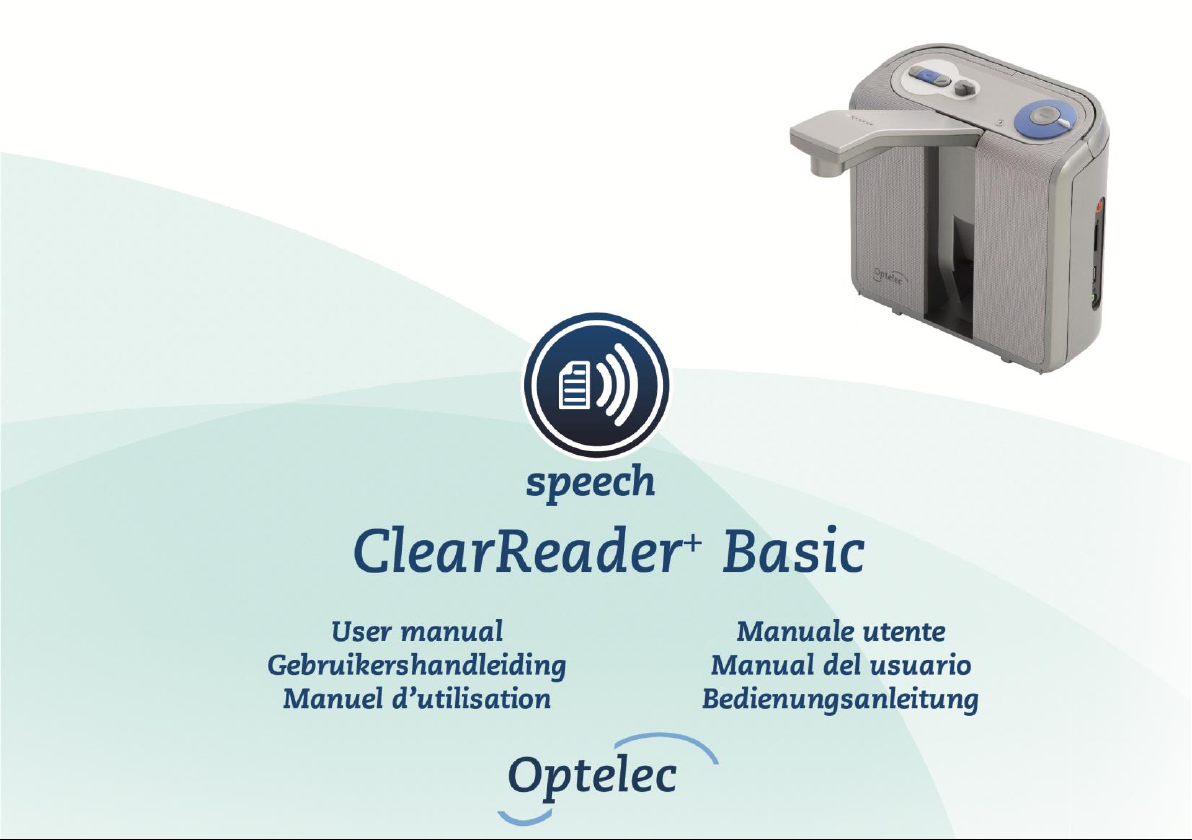
Optelec ClearReader+ Basic
The ClearReader+ Basic will be helpful for low vision and blind people in reading.
WEEE Notice
The directive on Waste Electrical and Electronic Equipment (WEEE), which entered into force as European law on 13th February 2003, resulted
in a major change in the treatment of electrical equipment at end-of-life.
The purpose of this Directive is, as a first priority, the prevention of WEEE, and in addition, to promote the reuse, recycling and other forms of
recovery of such wastes so as to reduce disposal.
RoHS Compliance
This product is in compliance with Directive 2002/95/EC of the European Parliament and of the Council of 27 January 2003, on the restriction of
the use of certain hazardous substances in electrical and electronic equipment (RoHS) and its amendments.
European Union Notice
Products with CE marking comply with the R&TTE Directive (99/5/EC), the EMC Directive (89/336/EEC), and the Low Voltage Directive
(73/23/EEC) issued by the Commission of the European Community.
Compliance with these directives implies conformity to the following international standards:
IEC 60950-1;
IEC 55022
IEC 55024 (IEC61000-4-2 excluded)
FCC
FCC part 15 Class B
The WEEE logo (shown at the left) on the product or its box indicates that this product must not be disposed of or dumped with
your other household waste. You are liable to dispose of all your electronic or electrical waste equipment by relocating over to
the specified collection point for recycling of such hazardous waste. Isolated collection and proper recovery of your electronic
and electrical waste equipment at the time of disposal will allow us to help conserve natural resources. Moreover, proper
recycling of the electronic and electrical waste equipment will ensure safety of human health and the environment. For more
information about electronic and electrical waste equipment disposal, recovery, and collection points, please contact your local
city centre, household waste disposal service, shop from where you purchased the equipment, or manufacturer of the
equipment.
2
Page 4

Optelec ClearReader+ Basic
Contents
1. Introduction ...................................................................................................................... 20
About this manual .......................................................................................................... 20
What’s in the box ............................................................................................................ 21
2. Getting to know your ClearReader+ Basic ..................................................................... 22
The Optelec ClearReader+ Basic layout ......................................................................... 22
Buttons ........................................................................................................................... 24
Connections ................................................................................................................... 25
3. Getting Started ................................................................................................................. 26
Using the ClearReader+ Basic for the first time .............................................................. 26
Opening the camera arm................................................................................................ 26
Positioning a document .................................................................................................. 26
Turning on the ClearReader+ Basic ................................................................................ 27
Standby mode ................................................................................................................ 27
Turning off the ClearReader+ Basic ................................................................................ 27
Reading text ................................................................................................................... 28
Reading tables and spreadsheets .................................................................................. 28
Adjusting the volume ...................................................................................................... 28
Adjusting the reading speed ........................................................................................... 28
Play or pause reading .................................................................................................... 29
Spelling a word ............................................................................................................... 29
Navigate back in the text ................................................................................................ 29
Navigate forward in the text............................................................................................ 29
3
Page 5

Optelec ClearReader+ Basic
Navigate to the beginning of the document .................................................................... 29
Selecting the reading voice or language ........................................................................ 30
4. The ClearReader+ Basic Magnification Feature Pack ................................................... 31
Introduction .................................................................................................................... 31
What’s in the box ............................................................................................................ 31
The ClearReader+ Basic Magnification Feature Pack buttons........................................ 32
Connecting the Magnification Feature Pack to the Optelec ClearReader+ Basic ........... 34
Magnification views ........................................................................................................ 34
Page View ...................................................................................................................... 34
Column View .................................................................................................................. 35
Line View........................................................................................................................ 35
Overview ........................................................................................................................ 35
Reading and navigating with the Magnification Feature Pack ........................................ 36
5. The ClearReader+ Basic Menu ........................................................................................ 37
Activating and closing the menu ..................................................................................... 38
Using the menu .............................................................................................................. 38
Save ................................ ................................ ............................................................... 40
Open .............................................................................................................................. 42
Delete ............................................................................................................................. 44
Voice .............................................................................................................................. 45
View ............................................................................................................................... 46
Color .............................................................................................................................. 47
Contrast.......................................................................................................................... 47
4
Page 6

Optelec ClearReader+ Basic
Highlight ......................................................................................................................... 48
Size ................................................................................................................................ 48
Font ................................................................ ................................................................ 48
Settings .......................................................................................................................... 49
Voice .............................................................................................................................. 50
Options ........................................................................................................................... 51
Automatic language detection ........................................................................................ 52
Column Filter .................................................................................................................. 53
Resolution ...................................................................................................................... 53
Restore defaults ............................................................................................................. 54
About .............................................................................................................................. 54
6. Troubleshooting .............................................................................................................. 55
Appendix A: Safety .................................................................................................................. 56
Appendix B: Technical information ........................................................................................ 57
Contact Information - Optelec Offices Worldwide............................................................... 250
Inhoudsopgave
1. Inleiding ............................................................................................................................ 59
Over de handleiding ....................................................................................................... 60
Inhoud van de verpakking .............................................................................................. 60
2. De ClearReader+ Basic leren kennen ............................................................................. 61
Optelec ClearReader+ Basic .......................................................................................... 61
Knoppenoverzicht .......................................................................................................... 63
5
Page 7

Optelec ClearReader+ Basic
Aansluitingen .................................................................................................................. 64
3. Aan de slag ...................................................................................................................... 65
De ClearReader+ Basic voor het eerst gebruiken ........................................................... 65
De camera-arm openen ................................................................................................. 65
Een document plaatsen ................................................................................................. 65
De ClearReader+ Basic inschakelen .............................................................................. 66
Stand-by stand ............................................................................................................... 66
Uitzetten van de ClearReader+ Basic ............................................................................. 66
Voorlezen van tekst ........................................................................................................ 67
Voorlezen van tabellen, bonnen en bankafschriften ....................................................... 67
Instellen van het volume ................................................................................................ 67
Instellen van de voorleessnelheid .................................................................................. 68
Onderbreken van het voorlezen ..................................................................................... 68
Spellen van een woord ................................................................................................... 68
Terugspoelen in de tekst ................................................................................................ 68
Vooruitspoelen in de tekst .............................................................................................. 69
Naar begin van de tekst gaan ........................................................................................ 69
Selecteren van de stem of taal ....................................................................................... 69
4. ClearReader+ Basic uitbreidingspakket ......................................................................... 70
Introductie ...................................................................................................................... 70
Over deze handleiding ................................................................................................... 70
Inhoud van de verpakking .............................................................................................. 70
Knoppen ......................................................................................................................... 71
6
Page 8

Optelec ClearReader+ Basic
Aansluiten van het uitbreidingspakket op de Optelec ClearReader+ Basic .................... 73
Lezen en navigeren met het uitbreidingspakket ............................................................. 75
5. Het ClearReader+ Basic menu ........................................................................................ 76
Het menu openen en sluiten .......................................................................................... 77
Het menu gebruiken ................................................................................................ ....... 77
Opslaan .......................................................................................................................... 78
Openen .......................................................................................................................... 81
Verwijderen .................................................................................................................... 82
Stem ............................................................................................................................... 83
Weergave ....................................................................................................................... 84
Kleur ............................................................................................................................... 85
Contrast.......................................................................................................................... 85
Markering ....................................................................................................................... 86
Lettergrootte ................................................................................................................... 86
Lettertype ....................................................................................................................... 86
Instellingen ..................................................................................................................... 87
Stem ............................................................................................................................... 88
Opties ............................................................................................................................. 89
Tekstherkennings kwaliteit ............................................................................................. 89
Automatische taaldetectie .............................................................................................. 90
Kolom filter ..................................................................................................................... 91
Resolutie ........................................................................................................................ 91
Instellingen herstellen .................................................................................................... 92
7
Page 9

Optelec ClearReader+ Basic
Info ................................................................................................................................. 92
6. Problemen oplossen ....................................................................................................... 93
Bijlage A: Veiligheid................................................................................................................. 95
Bijlage B: Technische informatie ........................................................................................... 96
Optelec kantoren wereldwijd ................................................................................................ 250
Table des matières
1. Introduction ...................................................................................................................... 98
À propos du manuel ....................................................................................................... 99
Ce que contient la boîte ................................................................................................. 99
2. Connaître votre ClearReader+ Basic ............................................................................ 100
La disposition du ClearReader+ Basic .......................................................................... 100
Les boutons .................................................................................................................. 102
Les connexions ............................................................................................................ 103
3. Pour débuter .................................................................................................................. 104
La première utilisation de votre ClearReader+ Basic .................................................... 104
Ouvrir le bras de la caméra .......................................................................................... 104
Placer un document ................................................................ ................................ ..... 104
Allumer le ClearReader+ Basic ..................................................................................... 105
Mode ‘‘mise en veille’’ .................................................................................................. 105
Éteindre le ClearReader+ Basic .................................................................................... 105
Lecture de texte ........................................................................................................... 106
Lecture de tableaux et feuilles de calcul ...................................................................... 106
8
Page 10

Optelec ClearReader+ Basic
Ajuster le volume .......................................................................................................... 106
Ajuster la vitesse de lecture ......................................................................................... 106
Mise en marche et arrêt de la lecture ................................................................ ........... 107
Épeler un mot ............................................................................................................... 107
Reculer dans le texte ................................................................................................... 107
Revenir au début du document .................................................................................... 108
Sélectionner la voix de lecture et la langue .................................................................. 108
4. Le ClearReader+ Basic Magnification Feature Pack ................................................... 109
Introduction .................................................................................................................. 109
Ce que contient la boîte ............................................................................................... 109
Les boutons du ClearReader+ Basic Magnification Feature Pack ................................ 110
Connecter le Magnification Feature Pack au ClearReader+ Basic ............................... 112
Affichage et grossissement .......................................................................................... 112
Affichage de la page .................................................................................................... 112
Affichage en colonne .................................................................................................... 113
Affichage en rangée ..................................................................................................... 113
Vue d’ensemble ........................................................................................................... 113
Lire et naviguer avec le Magnification Feature Pack .................................................... 114
5. Le Menu du ClearReader+ Basic ................................................................................... 115
Ouvrir et fermer le menu .............................................................................................. 116
Utiliser le menu ............................................................................................................ 116
Sauvegarder ................................................................................................................. 118
Ouvrir .......................................................................................................................... 120
9
Page 11

Optelec ClearReader+ Basic
Supprimer ..................................................................................................................... 121
Audio ............................................................................................................................ 122
Affichage ...................................................................................................................... 123
Couleur......................................................................................................................... 124
Contraste...................................................................................................................... 124
Surbrillance .................................................................................................................. 125
Taille de caractères ...................................................................................................... 125
Police de caractères ..................................................................................................... 125
Réglages ...................................................................................................................... 126
Audio ............................................................................................................................ 127
Options ......................................................................................................................... 128
Qualité de la reconnaissance de texte ......................................................................... 128
Détection automatique de la langue ............................................................................. 129
Filtre de colonne ........................................................................................................... 130
Résolution .................................................................................................................... 130
Restaurer les réglages par défaut ................................................................................ 131
À propos ....................................................................................................................... 131
Résolution de problèmes ...................................................................................................... 132
Annexe A: Mesures de sécurité ............................................................................................ 133
Annexe B: Renseignements techniques .............................................................................. 134
Optelec dans le monde .......................................................................................................... 250
10
Page 12

Optelec ClearReader+ Basic
Sommario
1. Introduzione ................................................................................................................... 136
Il Manuale ..................................................................................................................... 137
Contenuto della confezione .......................................................................................... 137
2. Descrizione di ClearReader+ Basic .............................................................................. 138
Parti di ClearReader+ Basic.......................................................................................... 138
Pulsanti ........................................................................................................................ 140
Connessioni ................................................................................................................. 141
3. Utilizzo di ClearReader+ Basic ...................................................................................... 142
Primo utilizzo ................................................................................................................ 142
Apertura del braccio della telecamera .......................................................................... 142
Posizionamento del documento ................................................................................... 142
Accensione di ClearReader+ Basic .............................................................................. 143
Modalità Standby ......................................................................................................... 143
Spegnimento di ClearReader+ Basic ............................................................................ 143
Lettura del testo ........................................................................................................... 144
Lettura di tabelle e fogli di calcolo ................................................................................ 144
Regolazione del volume ............................................................................................... 144
Regolazione della velocità di lettura ............................................................................. 145
Leggere o interrompere la lettura ................................................................................. 145
Spelling della parola ................................................................................................ ..... 145
Spostarsi all’indietro nel testo ....................................................................................... 145
Spostarsi in avanti nel testo ......................................................................................... 146
11
Page 13

Optelec ClearReader+ Basic
Spostarsi all’inizio del documento ................................................................................ 146
Scelta della voce o della lingua di lettura ..................................................................... 146
4. Feature Pack per ClearReader+ Basic .......................................................................... 147
Introduzione ................................................................................................................. 147
Contenuto della confezione .......................................................................................... 147
Pulsanti del Feature Pack di ClearReader+ Basic......................................................... 148
Collegare il Feature Pack per l’ingrandimento a ClearReader+ Basic .......................... 150
Visualizzazione Ingrandimento ..................................................................................... 150
Visualizza Pagina ......................................................................................................... 150
Visualizza Colonna ....................................................................................................... 151
Visualizza Riga ............................................................................................................. 151
Panoramica Pagina Intera ............................................................................................ 151
Leggere e navigare nel testo con il Feature Pack per l’ingrandimento ......................... 152
5. Il Menu di ClearReader+ Basic ...................................................................................... 153
Attivare e chiudere il menu ........................................................................................... 154
Usare il menu ............................................................................................................... 154
Salva ............................................................................................................................ 155
Apri ............................................................................................................................... 157
Cancella ....................................................................................................................... 158
Voce ................................ ................................ ............................................................. 159
Visualizza ..................................................................................................................... 161
Colore .......................................................................................................................... 162
Contrasto...................................................................................................................... 162
12
Page 14

Optelec ClearReader+ Basic
Evidenziato ................................................................................................................... 163
Dimensione .................................................................................................................. 163
Font - Tipo carattere ..................................................................................................... 163
Impostazioni ................................................................................................................. 164
Voce ................................ ................................ ............................................................. 165
Opzioni ......................................................................................................................... 166
Rilevamento automatico della lingua ............................................................................ 167
Filtro Colonna ............................................................................................................... 168
Ripristina le impostazioni di fabbrica ............................................................................ 169
Info ............................................................................................................................... 169
6. Individuazione dei probemi .......................................................................................... 170
Appendice A: Sicurezza ........................................................................................................ 171
Appendice B: Specifiche tecniche ....................................................................................... 172
Filiali Optelec nel mondo ....................................................................................................... 250
Índicce
1. Introducción ................................................................................................................... 174
Acerca de este manual ................................................................................................ 175
¿Qué contiene la caja? ................................................................................................ 175
2. Conocer el ClearReader+ Basic .................................................................................... 176
Diseño del Optelec ClearReader+ Basic ...................................................................... 176
Botones ........................................................................................................................ 178
Conexiones .................................................................................................................. 179
13
Page 15

Optelec ClearReader+ Basic
3. Funcionamiento ............................................................................................................. 180
Utilizar el ClearReader+ Basic por primera vez ............................................................ 180
Abrir el brazo de la cámara .......................................................................................... 180
Posicionar un documento ............................................................................................. 180
Encender el ClearReader+ Basic .................................................................................. 181
Modo de reposo ........................................................................................................... 181
Apagar el ClearReader+ Basic ..................................................................................... 181
Leer texto ..................................................................................................................... 182
Leer tablas y hojas de cálculo ...................................................................................... 182
Ajustar el volumen ........................................................................................................ 182
Ajustar la velocidad de la lectura .................................................................................. 183
Leer y hacer una pausa en la lectura ........................................................................... 183
Deletrear una palabra .................................................................................................. 183
Navegar hacia atrás en un texto .................................................................................. 183
Navegar hacia adelante en un texto ............................................................................. 184
Navegar al inicio del documento .................................................................................. 184
Seleccionar la voz o el idioma de la lectura ................................................................. 184
4. El módulo de función de amplificación ClearReader+ Basic ..................................... 185
Introducción .................................................................................................................. 185
¿Qué contiene la caja? ................................................................................................ 185
Botones del módulo de función de amplificación ClearReader+ Basic ......................... 186
Conectar el módulo de función de amplificación al Optelec ClearReader+ Basic ......... 188
Modos de visualización ................................................................................................ 188
14
Page 16

Optelec ClearReader+ Basic
Modo página ................................................................................................................ 188
Modo columna .............................................................................................................. 189
Modo línea ................................................................................................................... 189
Modo plena vista .......................................................................................................... 189
Leer y navegar con el módulo de función de amplificación .......................................... 190
5. Menú del ClearReader+ Basic ....................................................................................... 191
Abrir y cerrar el menú ................................................................................................... 192
Utilizar el menú ............................................................................................................ 192
Guardar ........................................................................................................................ 194
Abrir ............................................................................................................................. 195
Borrar ........................................................................................................................... 197
Voz ............................................................................................................................... 198
Ver ............................................................................................................................... 199
Color ............................................................................................................................ 200
Tamaño ........................................................................................................................ 201
Configuraciones ........................................................................................................... 201
Voces ........................................................................................................................... 202
Opciones ...................................................................................................................... 203
Detección automática de idioma .................................................................................. 204
Filtro de columna .......................................................................................................... 205
Resolución ................................................................................................................... 205
Restaurar configuraciones ........................................................................................... 206
Acerca de ..................................................................................................................... 206
15
Page 17

Optelec ClearReader+ Basic
6. Solución de problemas técnicos ...................................................................................... 207
Apéndice A: Seguridad.......................................................................................................... 208
Apéndice B: Especificaciones técnicas ............................................................................... 209
Optelec oficinas por todo el mundo ..................................................................................... 250
Inhalt
1. Einleitung ....................................................................................................................... 211
Über dieses Handbuch ................................................................................................. 212
Lieferumfang ................................................................................................................ 212
2. Wissenswertes über Ihren ClearReader+ Basic .......................................................... 213
Ansicht des ClearReader+ Basic .................................................................................. 213
Bedienungstasten ........................................................................................................ 215
Anschlüsse ................................................................................................................... 216
3. Erste Schritte ................................................................................................................. 217
Inbetriebnahme ............................................................................................................ 217
Ausklappen des Kameraarmes .................................................................................... 217
Positionieren eines Dokumentes .................................................................................. 217
Einschalten des ClearReader+ Basic ........................................................................... 218
Standby-Modus ............................................................................................................ 218
Ausschalten des ClearReader+ Basic .......................................................................... 218
Text lesen ..................................................................................................................... 219
Lesen von Spalten und Tabellen .................................................................................. 219
Lautstärke einstellen .................................................................................................... 219
16
Page 18

Optelec ClearReader+ Basic
Sprechgeschwindigkeit einstellen ................................................................................ 220
Vorlesen anhalten und wieder fortsetzen ..................................................................... 220
Buchstabieren eines Wortes ........................................................................................ 220
Rückwärtsspringen im Text .......................................................................................... 220
Vorwärtsspringen im Text ............................................................................................. 221
Springen zum Textanfang des Dokumentes ................................................................ 221
Auswählen der Vorlesestimme oder Sprache .............................................................. 221
4. ClearReader+ Basic Erweiterung (Zusatztastatur)........................................................ 223
Einleitung ..................................................................................................................... 223
Lieferumfang ................................................................................................................ 223
Die Tasten der ClearReader+ Basic- Erweiterung ........................................................ 224
Anschließen der Erweiterung an Ihren ClearReader+ Basic ......................................... 226
Vergrößerungs-Modi .................................................................................................... 226
Seitenansicht ................................................................................................................ 226
Spaltenansicht .............................................................................................................. 227
Zeilenansicht ................................................................................................................ 227
Ganzseitenübersicht .................................................................................................... 227
Vorlesen und Navigation mit der Erweiterung .............................................................. 228
5. Das ClearReader+ Basic Hauptmenü ............................................................................. 229
Das Hauptmenü öffnen und schließen ......................................................................... 230
Das Hauptmenü anwenden .......................................................................................... 230
Speichern ..................................................................................................................... 232
Öffnen .......................................................................................................................... 234
17
Page 19

Optelec ClearReader+ Basic
Löschen........................................................................................................................ 235
Stimme ......................................................................................................................... 236
Ansicht ......................................................................................................................... 238
Farbe ............................................................................................................................ 238
Kontrast ........................................................................................................................ 239
Markierung ................................................................................................................... 239
Größe ........................................................................................................................... 240
Schriftart ....................................................................................................................... 240
Einstellungen ................................................................................................................ 241
Stimme ......................................................................................................................... 242
Optionen....................................................................................................................... 243
Qualität der Texterkennung .......................................................................................... 243
Automatische Erkennung der Landessprache .............................................................. 244
Spaltenbearbeitung ...................................................................................................... 245
Auflösung ..................................................................................................................... 245
Werkseinstellungen ...................................................................................................... 246
Information (About) ...................................................................................................... 246
6. Fehlerbehebung .............................................................................................................. 247
Anhang A: Sicherheitshinweise ........................................................................................... 248
Anhang B: Technische Informationen ................................................................................. 249
Optelec Zweignierderlassungen Weltweit ........................................................................... 250
18
Page 20
Optelec ClearReader+ Basic
User Manual
Version 1.3
© 2015 Optelec, the Netherlands
All rights reserved
Optelec
P.O. Box 399
2990 AJ Barendrecht
The Netherlands
Phone: +31 (0)88 678 34 44
E-mail: info@optelec.nl
Internet: www.optelec.com
19 English
Page 21

Optelec ClearReader+ Basic
1. Introduction
Congratulations on choosing the ClearReader+ Basic, an intuitive portable reading assistant
developed by Optelec.
The Optelec ClearReader+ Basic combines ease of use with high quality multilingual speech
output and fast text recognition. It can capture any printed material such as letters, newspapers
and books, and reads text aloud using a naturally sounding voice. The built-in speakers provide
high-quality stereo sound.
If you have any questions or suggestions concerning the use of the Optelec ClearReader+ Basic,
please contact your Optelec distributor using the contact information on the last page of this
manual. Your feedback is greatly appreciated and we hope you enjoy using your ClearReader+
Basic.
About this manual
At Optelec, we are constantly improving our products and their functionalities. Therefore, it is
possible that this manual is not the latest version. Please download the most up-to-date manual
on www.optelec.com at the Support section.
This manual will familiarize you with the features and easy operation of the ClearReader+ Basic.
Please read this manual carefully before using your Optelec ClearReader+ Basic.
English 20
Page 22

Optelec ClearReader+ Basic
What’s in the box
The ClearReader+ Basic packaging contains the following:
The Optelec ClearReader+ Basic
A power supply
A power cord
This user manual
If any of these items are missing from your package, please contact your Optelec distributor.
21 English
Page 23
Optelec ClearReader+ Basic
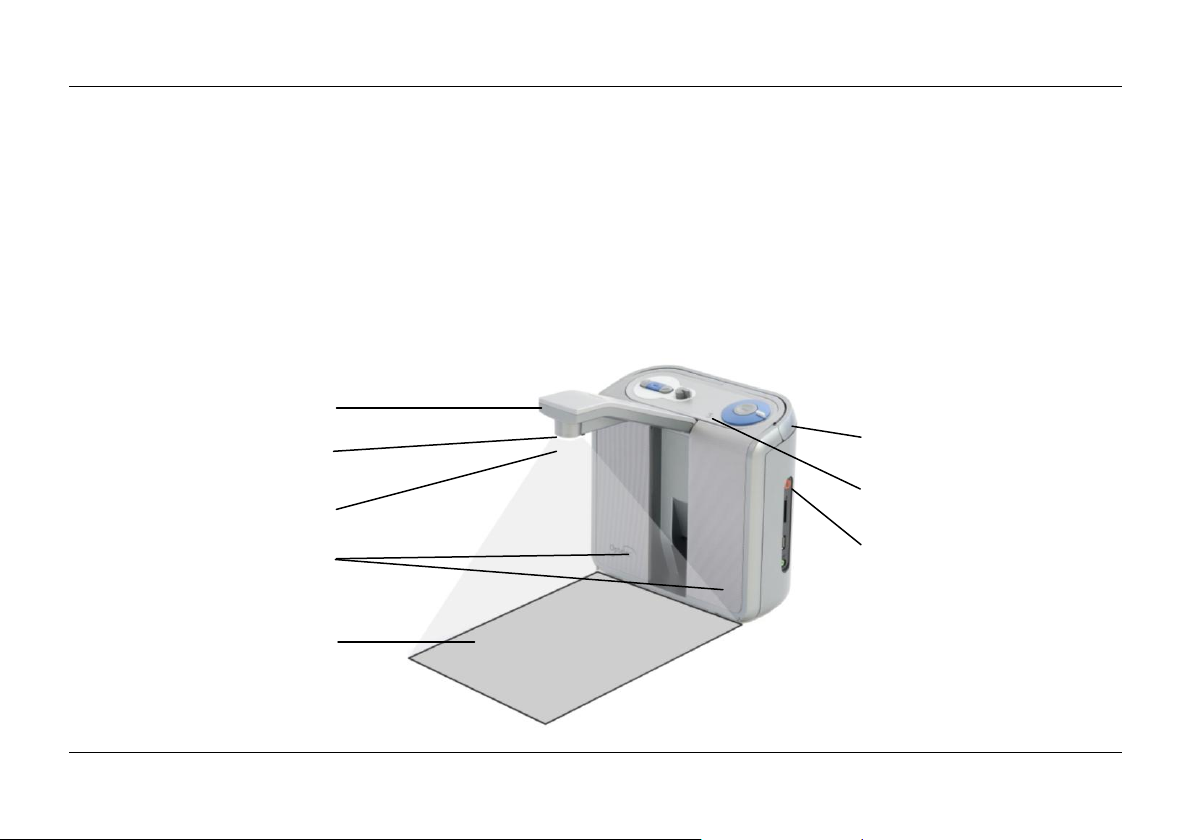
Swing-out camera arm
Camera
Object lighting
Built-in speakers
Capture area
Foldable carrying
handle
Power indicator
Power button
2. Getting to know your ClearReader+ Basic
This chapter will familiarize you with your Optelec ClearReader+ Basic.
The Optelec ClearReader+ Basic layout
English 22
Page 24

Optelec ClearReader+ Basic
Swing-out camera arm Open the arm to capture a document.
Camera To take a snapshot, position the document in front of the ClearReader+
Basic. Use the document positioning indicators on the bottom left and
right of the ClearReader+ Basic to position the document. The document
area is approximately the width of the ClearReader+ Basic and the
length of a regular A4 or letter size page.
Object lighting The ClearReader+ Basic automatically provides sufficient lighting when
taking a snapshot.
Built-in stereo speaker Listen to your letters, newspaper or books.
Foldable carrying handle Open the handle to lift and carry the ClearReader+ Basic comfortably.
Power indicator Light is on when the power is on, blinks in standby mode, and is off
when the power is off.
Power button Press the round button on the right-hand side to turn the ClearReader+
Basic on or off.
23 English
Page 25
Optelec ClearReader+ Basic
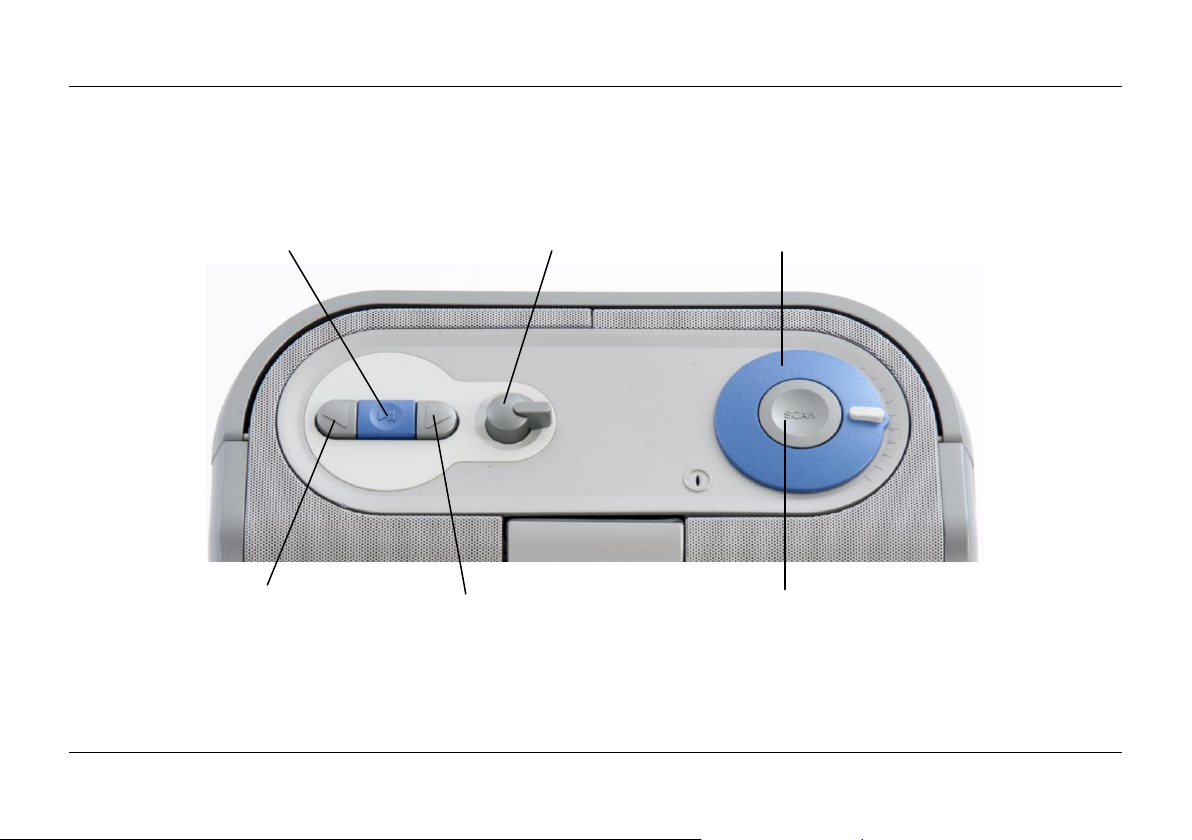
Buttons
Play / Pause button Speed dial Volume dial
Back button Forward button Scan button
English 24
Page 26
Optelec ClearReader+ Basic
Power connector
Headphone out
Connections
Power connector Connect the power supply to your ClearReader+ Basic.
Headphone out Connect headphones if needed.
25 English
Page 27

Optelec ClearReader+ Basic
3. Getting Started
Using the ClearReader+ Basic for the first time
When you use the Optelec ClearReader+ Basic for the first time, connect the
ClearReader+ Basic to a mains power outlet using the ClearReader+ Basic
power supply.
Opening the camera arm
To open the camera, locate the “push” sign on the camera arm at the front
of the ClearReader+ Basic between the speakers. Gently push on the
camera arm until you hear a click. The arm will eject and move towards
you. Close the camera arm in the same way by pushing the end of the arm
back to the closed position until you hear a click.
Positioning a document
The Optelec ClearReader+ Basic camera can capture an area of an A4 or
letter-size page measured from the front side of the ClearReader+ Basic. To
position the document, place it in front of the ClearReader+ Basic between
the two document positioning indicators with the top edge of the document
aligned towards the front of the unit. The orientation of the document will not
influence the recognition of the text.
English 26
Page 28

Optelec ClearReader+ Basic
Turning on the ClearReader+ Basic
To turn on the ClearReader+ Basic, press the round Power button on the righthand side. The start-up process will take approximately 40 seconds. You will
hear a series of beeps to indicate that the ClearReader+ Basic is starting up
followed by the start-up sound. Now the Power indicator is lit up and the
ClearReader+ Basic is ready to use.
Standby mode
The ClearReader+ Basic will go into standby mode by pressing, and holding down the Back button
and Forward button for 2 seconds. The standby sound will be played, the Power indicator will start
blinking and the ClearReader+ Basic will go into standby mode. To wake up the ClearReader
Basic from standby, press the Power button. After 40 hours the ClearReade
r+
Basic will power
+
down. If switching-on the ClearReader+ Basic from the standby mode, the start-up process will
take approximately 5 seconds.
Turning off the ClearReader+ Basic
Press the Power button to power down the ClearReader+ Basic completely. The power down
sound will be played and the Power indicator will turn off.
27 English
Page 29

Optelec ClearReader+ Basic
Reading text
Press the Scan button to capture and start reading a document positioned beneath the camera.
After pressing the Scan button, you will hear the snapshot sound and within a few seconds the
ClearReader+ Basic will begin reading to you.
Reading tables and spreadsheets
To read tables, receipts and bank statements, press and hold the Scan button for more than 2
seconds until you hear a clicking sound. A long press of the Scan button will
enable the Table Reading mode and will disable the automatic column
recognition, making it possible to read across columns. Text will be read from
left to right ignoring column borders.
Adjusting the volume
Turn the Volume dial clockwise and release it to slightly increase the volume of
the reading voice. Alternatively, turn the dial counterclockwise and release it to
slightly decrease the volume. To rapidly adjust the volume, turn and hold the dial
to the end position. When releasing the dial it will always move back to its start
position.
Adjusting the reading speed
Turn the Speed dial clockwise and release it to slightly increase the reading
speed. Alternatively, turn the dial counterclockwise and release it to slightly
decrease the reading speed. To rapidly adjust the reading speed, turn and hold
English 28
Page 30

Optelec ClearReader+ Basic
the dial at the end position. When releasing the dial it will always move back to its start position.
Play or pause reading
The ClearReader+ Basic will automatically start reading after pressing the Scan button. To pause
reading, press the Play / Pause button. Press this button once again to continue reading.
Spelling a word
To spell a word, press and hold the Play / Pause button until you hear a click. Character by
character, the word will be spelled out loud.
Navigate back in the text
Press the Back button to navigate to the previous word. Press and hold the Back button for 2
seconds to navigate to the previous sentence.
Navigate forward in the text
Press the Forward button to navigate to the next word. Press and hold the Forward button for 2
seconds to navigate to the next sentence.
Navigate to the beginning of the document
To navigate to the beginning of the document, Press the Back button and Play / Pause button
simultaneously.
29 English
Page 31

Optelec ClearReader+ Basic
Selecting the reading voice or language
To select your preferred reading voice or reading language, press and hold the Back button while
turning the Speed dial at the same time. The ClearReader+ Basic will switch to the next voice and
announce the name of the newly selected voice and the language. For optimal performance the
reading language and language of the document need to match. If the language of the document
does not match the selected reading language, the text recognition will be of a lower quality and
the recognition will take longer.
Note: In case automatic language detection is enabled, this button only changes between voices
of the detected language. For instance, if the detected language is English this button will only
change between the different English voices. With automatic language detection enabled, you will
not be able to change the language of the menu. To change the menu language, either: 1) disable
automatic language detection, or 2) scan a document in your preferred menu language and
change the voice once in the menu.
English 30
Page 32

Optelec ClearReader+ Basic
4. The ClearReader+ Basic Magnification Feature Pack
Introduction
The ClearReader+ Basic Magnification Feature Pack will add magnification options, as well as
advanced navigation, viewing and reading functionality to your ClearReader+ Basic. Use the
ClearReader+ Basic and the Feature Pack without the monitor to listen to the document captured
on the screen, or with the monitor to magnify it.
What’s in the box
The ClearReader+ Basic Magnification Feature Pack packaging contains the following:
The Optelec ClearReader+ Basic Magnification Feature Pack
If this item is missing from your package, please contact your Optelec distributor.
31 English
Page 33

Optelec ClearReader+ Basic
The ClearReader+ Basic Magnification Feature Pack buttons
The following figure shows the ClearReader+ Basic Magnification Feature Pack buttons:
Left View Up Menu Right
Play / Pause Down
Play / Pause button: Round button in the centre of the remote control to stop and restart
reading. Press and hold down the button for 2 seconds to spell the current
English 32
Page 34

Optelec ClearReader+ Basic
word. Pressing the Play / Pause button within the menu will activate the
button, cycle through the available options, check or uncheck the selection
or enter a submenu.
Left arrow key: Press to navigate to the previous word or to the previous menu item in the
menu. During playback of the text, this button will decrease the reading
speed.
Right arrow key: Press to navigate to the next word or to the next menu item in the menu.
During playback of the text, this button will increase the reading speed.
Up arrow key: Press to navigate a line up in the text, or to move to the previous menu
item in the menu.
Down arrow key: Press to navigate a line down, or to move to the next menu item in the
menu.
View button: Square button on the left half of the remote control. When a monitor is
attached, press to switch between the 4 viewing modes: Column view,
Line view, Page view and Overview mode. Without monitor attached,
press to hear the page orientation.
Menu button: Square button marked with the character “M” on the right half of the
remote control. Press to enter and exit the menu.
33 English
Page 35

Optelec ClearReader+ Basic
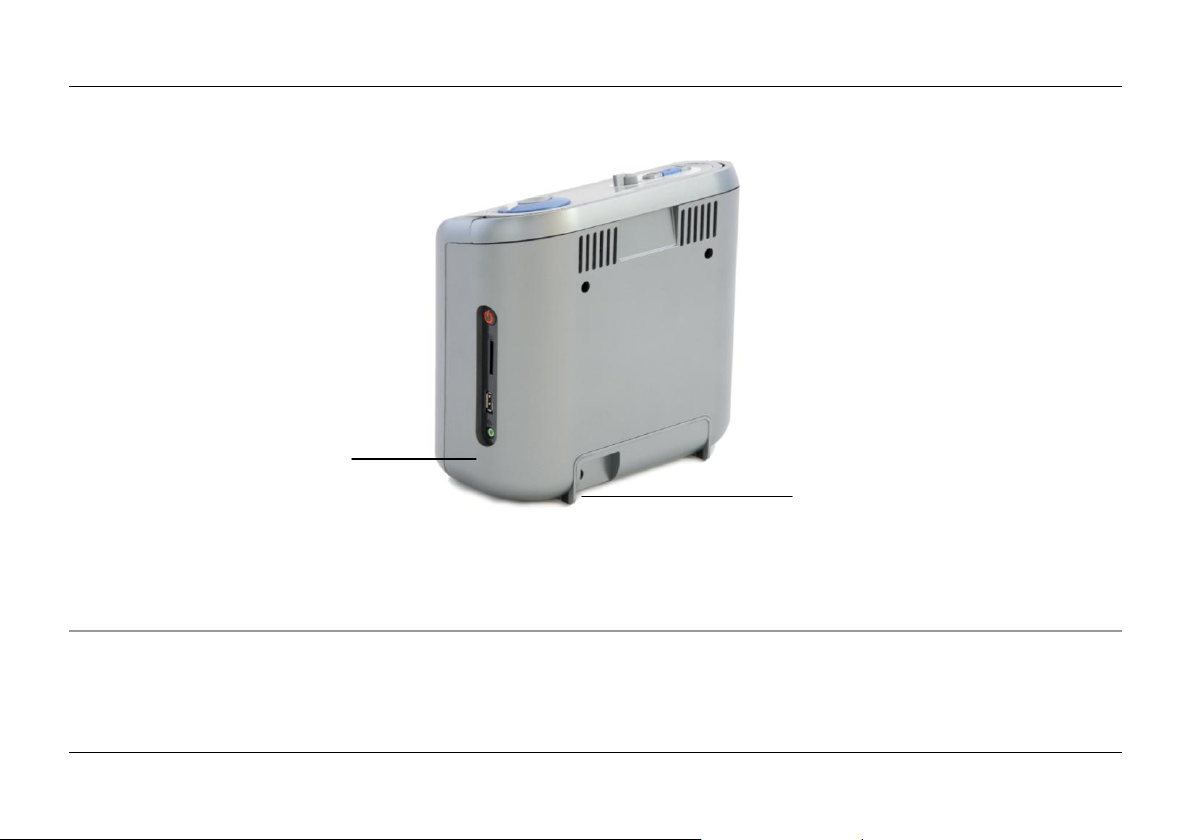
Connecting the Magnification Feature Pack to the Optelec ClearReader+ Basic
Connect the Magnification Feature Pack to the ClearReader+ Basic and optionally, a monitor.
Locate the HDMI connector at the bottom rear side of the ClearReader+ Basic. If the HDMI
connector is not visible, you will need to remove the protection cover which will also reveal two
USB connectors. Use a Philips screwdriver to remove the screw which closes the cover. This
screw is located in the middle of the cover at the bottom side of the ClearReader+ Basic. Connect
the monitor to the ClearReader+ Basic by using a HDMI cable. Adjacent to the HDMI connector,
there are two USB ports. Connect the USB cable of the ClearReader+ Basic Magnification Feature
Pack to one of the two USB ports on the rear side or to the USB port on the right side of the unit.
When the Magnification Feature Pack is connected to the ClearReader+ Basic, switch on the
ClearReader+ Basic and take a snapshot of a document as described in this manual.
Magnification views
With the ClearReader+ Basic Magnification Feature Pack, you can view captured documents in
four different Views: Page view, Column view, Line view and as a full page Overview. To switch
between the different views, press the View button on the Magnification Feature Pack.
Page View
The Page view shows a photograph of the document in its original layout, including the pictures.
English 34
Page 36

Optelec ClearReader+ Basic
Column View
In the Column view the text is reformatted and displayed in a column to fit the width of the screen
regardless of the text size. Pictures are not shown in this view.
Line View
In Line view the text is reformatted and displayed in one continuous line, and the highlighted word
is always displayed at the centre of the screen. Pictures are not shown in this view.
Overview
In the Full page overview, the full page is being shown with blue numbered bullets marking the
detected text zones in the document. The navigation bullets can be used to quickly navigate
through a text. Navigate between the bullets by pressing the Play / Pause button plus the Up
arrow to go to the previous zone and the Down arrow to go to the next zone. The speech will start
reading the selected text zone. The number of the navigation bullets represent the most likely
order of the text. The speech reads the zone with navigation bullet number 1, followed by
navigation bullet number 2, and so on.
In all views, the text can be displayed in high contrast. Options to adjust the appearance of the
text such as size, color, word highlight, or font can be found within the ClearReader+ Basic Menu.
35 English
Page 37

Optelec ClearReader+ Basic
Reading and navigating with the Magnification Feature Pack
You can navigate to the next or previous line of the text by pressing the Up or Down arrow keys.
To move a screen up in a document, press the Play / Pause button together with the Up arrow
key. To move to the next screen, press the Play / Pause button together with the Down arrow key.
In page overview, Play / Pause together with the up or down arrow will navigate to the previous or
next bullet or text zone. To go to the start or end of the document, use the Left plus Up arrow keys
or Right plus Down arrow keys respectively. If you are reading a book press the Play / Pause
button in conjunction with the Right arrow key to go to the next page. To go to the previous page,
press the Play / Pause button with the Left arrow key.
By default the ClearReader+ Basic will recognize columns. If you wish to disable the column
recognition to read tables, press and hold the Play/Pause button and press the View button.
To start or stop reading, press the Play / Pause button. While reading, the text will scroll
automatically. To decrease the reading / scrolling speed, press the Left arrow key. Alternatively,
press the Right arrow key to increase the reading / scrolling speed.
In case no monitor is connected to the ClearReader+ Basic, pressing the View button will
announce the page orientation.
English 36
Page 38

Optelec ClearReader+ Basic
Change
settings
Change viewing
mode
Change
voice
Delete
saved documents
Open
documents
Save
documents
5. The ClearReader+ Basic Menu
This chapter will familiarize you with the ClearReader+ Basic Menu.
37 English
Page 39

Optelec ClearReader+ Basic
Action
ClearReader+ Basic
Feature Pack
Open Menu
Play + Forward
Menu
Close Menu
Play + Forward
Menu
Activating and closing the menu
Without feature pack, to activate the menu, press the Play / Pause button together with the
Forward button on the ClearReader+ Basic. Alternatively, press the square button on the feature
pack marked with the character “M”. To close the menu, press the Play / Pause button together
with the Forward button again, or use the Menu button on the feature pack.
Using the menu
The ClearReader+ Basic menu contains two rows of three large buttons. To activate a button,
navigate to the button using the Back button and Forward button on the ClearReader+ Basic.
Press the Play / Pause button to activate the selected menu button. If you have a feature pack,
use the Up, Down, Left and Right arrows to navigate through the menu. Press the Play / Pause
button to select a menu item. Activating a menu button with the Play / Pause button will either
change a setting, or open a submenu or list. If a button is greyed out, the option is not available.
English 38
Page 40

Optelec ClearReader+ Basic
Action
ClearReader+ Basic
Feature Pack
Next Menu Item
Forward
Arrow Right /
Arrow Down
Previous Menu Item
Back
Arrow Left /
Arrow UP
Select / Activate
Play
Play
The menu contains the following buttons:
Save
Voice
Open
View
Delete
Settings
39 English
Page 41

Optelec ClearReader+ Basic
Save
To be able to save documents, you will need to insert a SD card into the SD slot above the USB
port on the right-hand side of the ClearReader+ Basic. Alternatively, you can use a USB memory
stick to save documents. By default a document will be saved on the SD card. If you wish to save
your document on a USB drive, connect a USB drive to the ClearReader+ Basic. When a USB
drive is connected, the document will always be saved on the USB drive.
To save a document, open the menu and navigate to the blue Save button with the Back and
Forward button on the ClearReader+ Basic or the arrow keys on the feature pack. Activate the
Save button with the Play / Pause button.
First you will be asked if you would like to save your document with a voice label.
English 40
Page 42

Optelec ClearReader+ Basic
If you wish to save a document without a voice label, select “No”. The document will be saved
using the first line of the document as the name of the document. If you would like to add a voice
label, select “Yes”. You will hear a beep after which you have 5 seconds to record a voice label. At
the end of the recording you will hear another beep. The document will be saved with the recorded
voice label.
When the document is saved, the ClearReader+ Basic will ask if you would like to append more
pages to the document.
If you select “No”, the menu will be closed, showing the document again. If you select “Yes”, you
can start appending more pages to the document by pressing the Scan button. To stop appending
pages to the document, press the Menu button marked with the “M” or the Play / Pause key on the
ClearReader+ Basic.
41 English
Page 43

Optelec ClearReader+ Basic
The ClearReader+ Basic will prompt you with the question if the captured pages should be
processed. If “No” is selected, the conversion to text will be done while reading the document. If
“Yes” is selected, all pages will be processed before returning to the document reading mode. This
process may take several minutes, depending on the number of pages of the document.
Open
To open a document, open the menu and navigate to the green Open button with the Back and
Forward button on the ClearReader+ Basic or the arrow keys on the feature pack. Activate the
Open button with the Play / Pause button. Select the “Document” button to see the list of saved
documents, showing the most recently saved document first. To open and view pictures, select the
“Picture” button.
English 42
Page 44

Optelec ClearReader+ Basic
Scroll through the list of documents or pictures using the Back button or Forward button on the
ClearReader+ Basic, or the arrow keys on the feature pack. Open a document by pressing the
Play / Pause button.
In the list with documents or pictures, use the Play / Pause button to open the document or picture
you wish to read or view. The menu will be closed and the document or picture will be opened. It is
also possible to open documents or photos from a USB stick.
43 English
Page 45

Optelec ClearReader+ Basic
Delete
To delete a document, open the menu and navigate to the Delete button with the Back and
Forward button on the ClearReader+ Basic or the arrow keys on the feature pack. Activate the
Delete button with the Play / Pause button. Select the document you wish to delete.
You will be prompted to confirm to delete the document. To delete the document, select “Yes”. To
cancel deleting the document, select “No”. Both choices will return you to the list of documents.
English 44
Page 46

Optelec ClearReader+ Basic
Voice
This menu item lets you select your reading voice and language. To select another reading voice,
open the menu and navigate to the Voice button with the Back and Forward button on the
ClearReader+ Basic or the arrow keys on the feature pack. To change the voice or language, press
the Play / Pause button.
The ClearReader+ Basic will switch to the next configured voice. If adjusting the reading voice
results in a change of language, the menus will automatically change to the same language. To
add or delete voices and languages from the voice selection, please refer to the Settings Menu.
Note: In case automatic language detection is enabled, this button only changes between voices
of the detected language. For instance, if the detected language is English this button will only
change between the different English voices. With automatic language detection enabled, you will
not be able to change the language of the menu. To change the menu language, either: 1) disable
45 English
Page 47

Optelec ClearReader+ Basic
automatic language detection, or 2) scan a document in your preferred menu language and
change the voice once in the menu.
View
The “View” menu item is only available when a monitor is connected. By selecting the “View”
button, the “View” menu will be opened. The “View” menu contains five buttons:
Color
Contrast
Highlight
Size
Font
English 46
Page 48

Optelec ClearReader+ Basic
Color
This option is only available when High Contrast is enabled. To select another color combination,
open the menu and navigate to the View button with the Back and Forward button or the arrow
keys on the feature pack. Open the View menu with the Play / Pause button. Navigate to the Color
button. Press the Play / Pause button again to cycle through the available high contrast text
foreground and background color combinations. The colors that can be selected are:
Black – White
White – Black
Yellow – Black
Black – Yellow
Yellow – Blue
Blue – Yellow
Black – Red
Red – Black
Black – Green
Green – Black
Black – Purple
Purple – Black
Blue – White
White – Blue
Black – Amber
Amber – Black
Contrast
This option lets you enable or disable high contrast text colors. Pictures will always be displayed in
their original colors. Only the text foreground and background colors will be changed. The default
contrast settings are black text on a white background.
47 English
Page 49

Optelec ClearReader+ Basic
Highlight
This option lets you choose a word highlight, line highlight, inverted block highlight, or no highlight.
Both the color of the word and line highlight can be changed from red to yellow. The use of the
inverted block highlight is limited to the Column and Line view. In Page view and Overview the
inverted block highlight will change into an inverted Box highlight. The red word highlight is the
default.
Size
This option lets you change the font size. In Column and Line view the font size is defined in
points, similar to the font size in Microsoft Word. In Page view the font size defined in steps.
Font
This option lets you choose between an Arial, Arial Bold, Verdana or Verdana Bold font for the
Column or Line view. In Page view the original picture and font of the document are displayed.
English 48
Page 50

Optelec ClearReader+ Basic
Settings
Select the “Settings” button to enter the Settings menu. The Settings menu contains five buttons:
Voice
Options
Resolution
Defaults
About
49 English
Page 51

Optelec ClearReader+ Basic
Voice
The Voice button in the settings menu opens a list with all available reading voices and languages.
Selecting this button will open the languages list.
To add or remove a reading voice, select the language from the list by using the Back button or
Forward button on the ClearReader+ Basic or the arrow keys on the feature pack. Press the Play
button to select the language and to view the list with the available voices for that language. To
select or deselect a voice, press the Play / Pause button. A checkmark in front of the voice name
will indicate if it is enabled. When the voice is enabled, it will be available under the “Voice” button
in the main menu. By deselecting a voice, the voice will be removed from the available reading
voices. The languages of which a reading voice is selected, will appear at the top of the list with
languages, and be marked with a checkmark.
English 50
Page 52

Optelec ClearReader+ Basic
Options
The options menu contains the following configuration
settings:
Text recognition quality
Automatic language detection
Column filter
Text recognition quality
This option lets you set the recognition quality. The
“Optimal” setting is the recommended mode and will
offer the best text recognition quality. The “Fast” mode
is for simple documents without columns and pictures.
The “Fast” mode is up to 30% faster than the
“Optimal” mode.
51 English
Page 53

Optelec ClearReader+ Basic
Automatic language detection
When the “Automatic language detection” is enabled,
the ClearReader+ Basic will detect the language of the
text reading zone or paragraph, and automatically
select the correct reading voice. The ClearReader+
Basic is capable of detecting multiple languages in
one page. To enable the language detection, first
enable up to maximum five languages. To do this, go
to the “Voice” selection menu, and enable a language
by selecting at least one voice per language. Do this
for a maximum of 5 languages. Now make sure the
language detection is enabled in the “Options” menu.
Note: In case the ClearReader+ Basic is not able to detect the language, the langage of the menu
is being used. If English is one of the selected languages, the ClearReader+ Basic will use an
English voice and will ignore the menu language.
English 52
Page 54

Optelec ClearReader+ Basic
Column Filter
This option contains two settings:
Ignore incomplete columns
Include incomplete columns
When “Ignore incomplete columns” is enabled, the
OCR algorithms will try to detect if text columns are
cut off at the left or right margin of the picture.
Disabling the filter will include partial columns and will
read all detected text on the page. The “Ignore
incomplete columns” is the recommended and default
setting, offering the most comprehensive text recognition. The “Include incomplete columns” will
try to detect all text on the page, but may result in incomprehensive text at the beginning or end of
the document.
Resolution
This option lets you manually set the monitor resolution. It is recommended to only change the
resolution if the automatic detection fails. After changing the resolution, the ClearReader+ Basic
needs to restart.
53 English
Page 55

Optelec ClearReader+ Basic
Default settings
View
High contrast on
Color
Black on white
Highlight
Word
Restore defaults
If you wish to restore the default settings, select this button. You will be prompted if you are sure
you want to restore the defaults. To restore the defaults, select “Yes”. To cancel restoring the
defaults, select “No”.
About
The About screen shows the version of the Application interface, camera interface, OCR interface
and the mains frequency.
English 54
Page 56

Optelec ClearReader+ Basic
6. Troubleshooting
If the power supply does not power the ClearReader+ Basic.
Check the connections. Make sure that the power supply is firmly connected to the
ClearReader+ Basic and to the power outlet.
If the power supply still does not power the unit, contact your Optelec distributor.
If the text you are reading does not make sense.
Make sure your reading language is the language of your document.
If the text recognition takes unusually long before starting to read your document.
Make sure your reading language corresponds with the language of your document.
If the ClearReader+ Basic does not read the whole line of a document / column / table.
The automatic column recognition may be on. Press and hold the Scan button for 2
If the ClearReader+ Basic does not respond to the Scan button.
seconds to disable the column recognition and to switch to “TableMode”.
Open the camera arm and try it again.
If the Scan button still does not respond, check if the unit is powered.
55 English
Page 57

Optelec ClearReader+ Basic
Appendix A: Safety
Handle the ClearReader+ Basic with care. Rough handling will damage internal
components.
Contact your Optelec distributor to service this equipment if necessary.
Do not open or remove any parts of the ClearReader+ Basic as it will void the warranty.
Do not expose the ClearReader+ Basic to excessive heat or direct sunlight to avoid the
risk of fire.
Do not use the ClearReader+ Basic near inadequately shielded medical devices.
To avoid risk of electrical damage, keep your ClearReader+ Basic away from fluids and
chemicals.
Always unplug the ClearReader+ Basic before cleaning. Use a soft cloth to clean the
exterior. Do not use cleaning agents or abrasive materials as they will damage your unit.
Use of the ClearReader+ Basic other than described in this manual will exclude it from warranty
conditions.
English 56
Page 58

Optelec ClearReader+ Basic
Appendix B: Technical information
Dimensions (W x H x D): 24 x 23 x 10 cm (9.4 x 9.1 x 3.9 inches)
– Depth, camera arm open: 27 cm (10.6 inches)
– Height, camera arm open: 25 cm (9.8 inches)
– Height, handle open: 27 cm (10.6 inches)
Weight: 2.46 kg (5.4 lbs)
Camera: High resolution camera
Earphone connection: 3.5 mm stereo jack
Operation conditions:
Relative humidity: <70%, no condensation
Temperature: 0 to 40 °C
Storage and transport conditions:
Relative humidity: <95%, no condensation
Temperature: -20 °C to 60 °C
This device bears the CE and FCC approval mark
57 English
Page 59

Optelec ClearReader+ Basic
Gebruikershandleiding
Versie 1.3
© 2015 Optelec, Nederland
Alle rechten voorbehouden
Optelec
Postbus 399
2990 AJ Barendrecht
Nederland
Tel: +31 (0)88 678 35 55
E-mail: info@optelec.nl
Internet: www.optelec.nl
Nederlands 58
Page 60

Optelec ClearReader+ Basic
1. Inleiding
Gefeliciteerd met de aankoop van de ClearReader+ Basic, een intuïtieve draagbare leeshulp
ontwikkeld door Optelec.
De Optelec ClearReader+ Basic combineert gebruiksgemak met een hoge kwaliteit van
meertalige spraak en snelle tekstherkenning. Het kan allerlei gedrukte tekst vastleggen,
waaronder brieven, kranten en boeken en leest de tekst hardop voor met een natuurlijk
klinkende stem. De ingebouwde luidsprekers zijn van hoge kwaliteit met stereogeluid.
Als u nog vragen of suggesties heeft over het gebruik van de Optelec ClearReader+ Basic,
neem dan contact op met Optelec. U vindt de contactgegevens op de laatste pagina van deze
handleiding. Uw terugkoppeling wordt zeer gewaardeerd en we hopen dat u veel plezier heeft
van de Optelec ClearReader+ Basic.
59 Nederlands
Page 61

Optelec ClearReader+ Basic
Over de handleiding
Optelec verbetert continue haar producten en de functionaliteit ervan. Het kan daarom
voorkomen dat deze handleiding niet de meest recente versie is. Kijk daarom op onze website
www.optelec.com onder Support om te zien of er een recentere versie beschikbaar is.
Met deze handleiding maakt u kennis met de functies en eenvoudige bediening van de Optelec
ClearReader+ Basic. Lees deze handleiding aandachtig door voor gebruik van de ClearReader+
Basic.
Inhoud van de verpakking
De ClearReader+ Basic verpakking bevat de volgende items:
De Optelec ClearReader+ Basic
Een adapter
Een netsnoer
Deze handleiding
Mocht iets ontbreken, neem dan contact op met uw leverancier.
Nederlands 60
Page 62

Optelec ClearReader+ Basic
Camera-arm
Camera
Verlichting
Luidsprekers
Camerabereik
Breedte-indicatoren
Inklapbare
draaghendel
Indicatielampje
Aan/uit knop
2. De ClearReader+ Basic leren kennen
In dit hoofdstuk maakt u kennis met de Optelec ClearReader+ Basic.
Optelec ClearReader+ Basic
61 Nederlands
Page 63

Optelec ClearReader+ Basic
Camera-arm Open de arm om een document vast te leggen.
Camera Plaats het document voor de ClearReader+ Basic. Gebruik de
indicators aan de onderkant (links en rechts) voor de juiste positie
van het document. Het bereik van de camera is ongeveer de breedte
van de ClearReader+ Basic en de lengte van een gewone A4.
Verlichting De ClearReader+ Basic zorgt automatisch voor voldoende licht bij het
nemen van de momentopname.
Luidsprekers Luister naar uw brieven, kranten of boeken.
Inklapbare draaghendel Gebruik de hendel om de ClearReader+ Basic op te tillen en te
dragen.
Indicatielampje Lampje is aan als het apparaat aangezet is, knippert in stand-by en is
uit wanneer het apparaat uit staat.
Aan/uit knop Druk de ronde knop in aan de rechterzijde om de ClearReader+ Basic
aan en uit te zetten.
Nederlands 62
Page 64

Optelec ClearReader+ Basic
Knoppenoverzicht
Afspelen / Pauze Voorleessnelheid Volume
Terugspoelen Vooruitspoelen Scannen
63 Nederlands
Page 65

Optelec ClearReader+ Basic
Adapteraansluiting
Hoofdtelefoon-
ingang
Aansluitingen
Adapteraansluiting Sluit de adapter aan op de ClearReader+ Basic en stop de stekker in
Hoofdtelefooningang Sluit een hoofdtelefoon aan indien nodig.
Nederlands 64
het stopcontact
Page 66

Optelec ClearReader+ Basic
3. Aan de slag
De ClearReader+ Basic voor het eerst gebruiken
Wanneer u de ClearReader+ Basic voor het eerst gaat gebruiken sluit u de
ClearReader+ Basic op het stopcontact aan met behulp van de
meegeleverde adapter.
De camera-arm openen
Om de camera te openen, drukt u op de inkeping op de arm aan de
voorzijde van de ClearReader+ Basic tussen de luidsprekers. Duw op de
camera-arm totdat u een klik hoort. De arm komt dan naar u toe. Sluit de
camera-arm op dezelfde manier door het uiteinde van de arm naar de
gesloten positie te duwen totdat u een klik hoort.
Een document plaatsen
De ClearReader+ Basic camera kan een gebied registreren ter grootte van
een A4, gemeten vanaf de voorkant van de ClearReader+ Basic. Plaats
het document voor de ClearReader+ Basic tussen de 2 indicatoren met
de bovenrand van het document uitgelijnd in de richting van het apparaat.
De stand (begin van de tekst aan kant van de ClearReader+ Basic of
andersom) van het document heeft geen invloed op de tekstherkenning.
65 Nederlands
Page 67

Optelec ClearReader+ Basic
De ClearReader+ Basic inschakelen
Om de ClearReader+ Basic in te schakelen, drukt u op de oranje Aan/uit
knop aan de rechterzijde van de ClearReader+ Basic. Het opstarten
duurt ongeveer 40 seconden indien het apparaat volledig is
uitgeschakeld. U hoort een reeks pieptonen gedurende het
opstartproces gevolgd door het opstartgeluid. Het indicatielampje is nu
aan en de ClearReader+ Basic is klaar voor gebruik.
Stand-by stand
Door de Terugspoel knop en de Vooruitspoel knop 2 seconden ingedrukt te houden, wordt de
stand-by stand ingeschakeld. U hoort het uitschakelgeluid en het indicatielampje zal knipperen.
In deze stand wordt zeer weinig energie verbruikt. Om de ClearReader+ Basic weer actief te
maken, drukt u op de Aan/uit knop. Het schakelen naar de actieve stand duurt ongeveer 5
seconden en gedurende die tijd zal de ClearReader+ Basic op geen enkele knop reageren. De
ClearReader+ Basic blijft ongeveer 40 uur in stand-by staan, waarna het apparaat wordt
uitgeschakeld.
Uitzetten van de ClearReader+ Basic
Om de ClearReader+ Basic volledig uit te schakelen houdt u de Aan/uit knop ongeveer 6
seconden ingedrukt. U hoort het uitschakel geluid en het indicatielampje zal uit gaan.
Nederlands 66
Page 68

Optelec ClearReader+ Basic
Voorlezen van tekst
Druk op de Scan knop om te beginnen met het inlezen van het document wat u onder de
camera heeft gelegd. Na het indrukken van de Scan knop hoort u een foto geluid en binnen een
paar seconden zal de ClearReader+ Basic beginnen met voorlezen.
Voorlezen van tabellen, bonnen en bankafschriften
Voor het lezen van tabellen, bonnen en bankafschriften houdt u de Scan knop meer dan 2
seconden ingedrukt totdat u een klikgeluid hoort. Door de Scan knop lang ingedrukt te houden,
wordt de tabellezen-modus ingeschakeld. De automatische kolomherkenning wordt
uitgeschakeld. Tekst wordt nu van links naar rechts gelezen en kolomgrenzen worden
genegeerd.
Instellen van het volume
Draai de Volume knop naar rechts en laat deze los voor een lichte toename
van het volume van de voorleesstem. Om het volume te minderen, draait u
de Volume knop naar links. Om snel het volume aan te passen, draait en
houdt u de knop vast in de eindpositie. Bij het loslaten van de Volume knop
keert de knop terug naar de beginpositie.
67 Nederlands
Page 69

Optelec ClearReader+ Basic
Instellen van de voorleessnelheid
Draai de Snelheid knop naar rechts en laat deze los voor een lichte toename
van de snelheid van de voorleesstem. Om de snelheid te minderen, draait u
de Snelheid knop naar links. Om snel de voorleessnelheid aan te passen,
draait en houdt u de knop vast in de eindpositie. Bij het loslaten van de
Snelheid knop keert de knop terug naar de beginpositie.
Onderbreken van het voorlezen
De ClearReader+ Basic zal automatisch beginnen met voorlezen na het indrukken van de
scanknop. Om het voorlezen te onderbreken drukt u op de Play/pauze knop. Druk nogmaals op
de Play/pauze knop om verder te gaan met voorlezen.
Spellen van een woord
Om een woord te spellen, houdt u de Play/pauze knop ingedrukt totdat u een klik hoort. Het
woord wordt dan teken voor teken gespeld.
Terugspoelen in de tekst
Druk de Terugspoel knop in om naar het vorige woord te gaan. Houd de Terugspoel knop
langer dan 2 seconden ingedrukt om naar de vorige zin te gaan.
Nederlands 68
Page 70

Optelec ClearReader+ Basic
Vooruitspoelen in de tekst
Druk de Vooruitspoel knop in om naar het volgende woord te gaan. Houd de Vooruitspoel knop
langer dan 2 seconden ingedrukt om naar de volgende zin te gaan.
Naar begin van de tekst gaan
Om naar het begin van het document te gaan, drukt u tegelijkertijd op de Terugspoel knop en
de Play/pauze toets
Selecteren van de stem of taal
Houd de terugspoelknop ingedrukt en draai tegelijkertijd aan de Snelheid knop om uw favoriete
stem of voorleestaal te selecteren. De ClearReader+ Basic schakelt over naar de volgende stem
en spreekt de naam uit van de nieuw geselecteerde stem en taal. Voor optimale prestaties dient
de voorleestaal gelijk te zijn aan de taal van het voor te lezen document. Als de taal van het
document niet overeenkomt met de voorleestaal, zal de tekstherkenning van lagere kwaliteit zijn
en zal het herkennen van het document langer duren.
Let op: als automatische taalherkinng aan staat, zal er alleen worden gewisseld tussen de
stemmen van de gedetecteerde taal. Als bijvoorbeeld de herkende taal Engels is, dan zal er
alleen geschakeld worden tussen de geselecteerde Engelse stemmen. Met automatisch
taalherkenning aan is het niet moelijk om de taal van het menu te wijzigen. Om de taal van het
menu te wijzigen 1) zet u de automatische taalherkenning uit, 2) leest u een tekst in, in de
gewenste menu taal en kunt u in het menu de stem wijzigen.
69 Nederlands
Page 71

Optelec ClearReader+ Basic
4. ClearReader+ Basic uitbreidingspakket
Introductie
Gefeliciteerd met uw Optelec ClearReader+ Basic uitbreidingspakket, een afstandsbediening om
naar uw ClearReader+ Basic te luisteren, om tekst mee te lezen en om tekst te vergroten.
Het ClearReader+ Basic uitbreidingspakket voegt vergrotingsfunctionaliteit toe, de mogelijkheid te
navigeren in een document, alsook meerdere kijk- en meeleesopties. Gebruik uw ClearReader+
Basic en het uitbreidingspakket in combinatie met of zonder monitor om naar het ingelezen
document te luisteren en/of te vergroten op het scherm.
Over deze handleiding
Deze handleiding laat u kennis maken met de mogelijkheden en de bediening van het
ClearReader+ Basic uitbreidingspakket. Lees deze handleiding zorgvuldig door voordat u het
uitbreidingspakket gaat gebruiken.
Inhoud van de verpakking
Het ClearReader+ Basic uitbreidingspakket bevat de volgende items:
Het Optelec ClearReade
Mocht er iets ontbreken, neem dan contact op met uw leverancier.
r+
Basic uitbreidingspakket
Nederlands 70
Page 72

Optelec ClearReader+ Basic
Knoppen
Het onderstaande plaatje geeft het knoppenoverzicht weer van het ClearReader+ Basic
uitbreidingspakket:
Links Weergave Omhoog Menu Rechts
Play/pauze Omlaag
Bevestigen
Play/pauze knop: ronde knop in het midden van de afstandsbediening om het automatisch
lezen van een document in de tekststand te starten en te stoppen. Door de
knop lang in te drukken, wordt het huidige woord gespeld. In het menu
schakelt de Play/pauze knop tussen de verschillende opties, bevestigt de
huidige keuze of gaat naar het submenu.
71 Nederlands
Page 73

Optelec ClearReader+ Basic
Linker pijl knop: om naar het vorige woord te gaan of naar het vorige menu item in het
menu. Deze knop zal tijdens het voorlezen van de tekst de
afspeelsnelheid langzamer zetten.
Rechter pijl knop: om naar het volgende woord te gaan of naar het volgende menu item in
het menu. Deze knop zal tijdens het voorlezen van de tekst de
afspeelsnelheid sneller zetten.
Pijl omhoog knop: om een regel omhoog te gaan in de tekst of om naar het vorige menu item
in het menu te gaan.
Pijl omlaag knop: om een regel omlaag te gaan in de tekst of om naar het volgende menu
item in het menu te gaan.
Weergave knop: vierkante knop op de linker helft van de afstandsbediening. Indien er een
monitor is aangesloten, dan kan er worden geschakeld tussen 4
leesstanden; kolom, regel, pagina en overzichtstand. Als er geen monitor
is aangesloten hoort u de stand van de pagina.
Menu knop: vierkante knop op de rechter helft van de afstandsbediening, gemarkeerd
met een ‘M’, om het menu te openen of te sluiten.
Nederlands 72
Page 74

Optelec ClearReader+ Basic
Aansluiten van het uitbreidingspakket op de Optelec ClearReader+ Basic
Sluit het uitbreidingspakket aan op de Optelec ClearReader+ Basic en sluit desgewenst de
ClearReader+ Basic op een monitor aan. De HDMI aansluiting zit aan de onderkant van de
achterzijde van de ClearReader+ Basic. Indien deze niet zichtbaar is, dient u het kapje te
verwijderen door het schroefje, wat in het midden zit, met een kruiskop schroevendraaier te
verwijderen. Nu ziet u tevens twee USB aansluitingen. Sluit de monitor aan op de ClearReader
+
Basic met behulp van een HDMI kabel. Naast de HDMI aansluiting bevinden zich twee USB
poorten. Sluit de USB kabel van het uitbreidingspakket aan op een van beide USB poorten of op
de USB poort onder de Aan/uit knop aan de zijkant van het apparaat.
Als het uitbreidingspakket is aangesloten op de ClearReader+ Basic kunt u deze aanzetten en
vervolgens op de Scan knop drukken. Zie hiervoor deze gebruikershandleiding.
Leesstanden
Met het ClearReader+ Basic uitbreidingspakket, kunt u vastgelegde documenten bekijken in 4
verschillende leesstanden; pagina, kolom, regel en hele pagina overzicht. Om te schakelen tussen
de verschillende leesstanden, druk op de Weergave knop op het uitbreidingspakket.
Pagina overzicht
De pagina overzichtsstand toont de foto van het document in zijn originele lay-out, inclusief foto’s
73 Nederlands
Page 75

Optelec ClearReader+ Basic
Kolom overzicht
In de kolom overzichtsstand is de tekst aangepast en te zien in een kolom die zich aanpast aan de
breedte van het scherm. Er zijn geen foto’s te zien in deze leesstand.
Regel overzicht
In de regel overzichtsstand is de tekst aangepast en te zien in één lange regel en het
gemarkeerde woord bevindt zich in het midden van het scherm. Foto’s zijn niet te zien in deze
leesstand.
Overzicht
In het volledige pagina overzicht wordt de volledige pagina weergegeven met blauwe
genummerde rondjes die de waargenomen tekstgedeeltes in het document markeren. De blauwe
navigatie rondjes kunnen worden gebruikt om snel door een tekst te navigeren. Navigeer tussen
de blauwe rondjes door op de Afspeel/pauze knop en de omhoog pijl knop om naar het vorige
gedeelte en de omlaag pijl knop om naar de volgende gedeelte te gaan. Het voorlezen van het
geselecteerde gedeelte zal beginnen. De nummers van de rondjes komen overeen met de
indeling van de tekst, beginnende bij 1, daarna 2 etc.
In alle leesstanden kan de tekst worden weergegeven in hoog contrast. Mogelijkheden om de
instellingen, zoals tekstgrootte, kleur, markering of lettertype vindt u in het ClearReader+ Basic
menu.
Nederlands 74
Page 76

Optelec ClearReader+ Basic
Lezen en navigeren met het uitbreidingspakket
U kunt naar de volgende of vorige regel van de tekst gaan door op de pijl omhoog of pijl omlaag
knop te drukken. Om een scherm omhoog te gaan in het document, druk op de Play/pauze knop
samen met de omhoog pijl knop. Om naar het volgende scherm te gaan, druk op de Play/ pauze
knop samen met de omlaag pijl knop. In de pagina overzicht leesstand zal de Play/ pauze knop
samen met de omhoog of omlaag pijl knop naar het voorgaande of volgende gemarkeerde
tekstgedeelte met het blauwe rondje gaan.
Om naar het begin of eind van het document te gaan, drukt u resp. op de Omhoog en Linker pijl
knop of de Omlaag en Rechts pijl knop. Indien u een boek leest, drukt u op de Play/pauze knop
samen met de Rechter pijl knop om naar de volgende pagina te gaan. Om naar de vorige pagina
te gaan, drukt u op de Play/pauze knop samen met de Linker pijl knop.
De ClearReader+ Basic zal automatisch kolommen herkennen. Indien u dit niet wenst, omdat u
een tabel wilt lezen, druk dan op de Play/pauze knop en houdt deze ingedrukt terwijl u op de
Weergave knop drukt.
Om het voorlezen te starten of te stoppen, druk op de Play/pauze knop. Tijdens het lezen zal de
tekst automatisch verder scrollen. Om de lees/scroll snelheid te verlagen, drukt u op de Linker pijl
knop. Om de snelheid te vergroten, drukt u op de Rechter pijl knop.
In het geval dat er geen monitor is aangesloten, geeft de Weergave knop pagina oriëntatie aan.
75 Nederlands
Page 77

Optelec ClearReader+ Basic
Instellingen
veranderen
Weergave
veranderen
Stem
veranderen
Documenten
verwijderen
Documenten
openen
Documenten
opslaan
5. Het ClearReader+ Basic menu
In dit hoofdstuk laten we u kennis maken met het ClearReader+ Basic menu.
Nederlands 76
Page 78

Optelec ClearReader+ Basic
Actie
ClearReader+ Basic
Uitbreidingspakket
Open Menu
Afspelen + Vooruit spoelen
Menu
Close Menu
Afspelen + Vooruit spoelen
Menu
Het menu openen en sluiten
Zonder het uitbreidingspakket het menu activeren: druk op de Play/pauze knop samen met de
Vooruitspoel knop. Alternatief is op de vierkante knop gemarkeerd met de letter “M” op het
uitbreidingspakket. Om het menu te sluiten, druk nogmaals op de Play/pauze knop en de
Vooruitspoel knop of de Menu knop op het uitbreidingspakket.
Het menu gebruiken
Het ClearReader+ Basic menu bestaat uit twee rijen met drie grote knoppen (indien er een monitor
is aangesloten op de ClearReader+ Basic). U activeert een menu item door er met de Terugspoel
knop of de Vooruitspoel knop naar toe te gaan en vervolgens op de Play/pauze knop te drukken.
Met het uitbreidingspakket gebruikt u de Omhoog-, Omlaag- en Linker – en Rechter pijl knop.
Gebruik de Play/pauze knop om de keuze te bevestigen. Een menu item bevestigen met de
Play/pauze knop zal de verandering bewaren, een submenu openen of een lijst. Wanneer een
menu item grijs is, kan deze niet gebruikt worden.
77 Nederlands
Page 79

Optelec ClearReader+ Basic
Actie
ClearReader+ Basic
Uitbreidingspakket
Volgende Menu Item
Vooruit
Pijl rechts /
Pijl naar beneden
Vorige Menu Item
Terug
Pijl links /
Pijl omhoog
Selecteer / Activeer
Afspelen
Afspelen
Het menu heeft de volgende knoppen:
Opslaan
Stem
Openen
Weergave
Verwijderen
Instellingen
Opslaan
Om een document op te kunnen slaan, moet u een SD kaart in het SD kaart slot doen. U vindt
deze aan de rechter zijkant in het verzonken gedeelte boven de USB poort. Als alternatief kunt u
ook USB memory stick gebruiken om documenten te bewaren. Het document zal standaard
worden opgeslagen op de SD kaart. Indien u een document wenst te bewaren op een USB stick,
dan moet u deze aansluiten op de ClearReader+ Basic. Het document zal dan automatisch op de
USB stick worden opgeslagen.
Nederlands 78
Page 80

Optelec ClearReader+ Basic
Om een document te bewaren, open het menu en ga naar Opslaan met de Terugspoel knop of de
Vooruitspoel knop op de ClearReader+ Basic of met de pijl knoppen op het uitbreidingspakket.
Bevestig uw keuze met de Play/pauze knop. Er zal gevraagd worden of u het document wilt
opslaan met een spraaklabel.
Als u een document wilt opslaan zonder spraaklabel, selecteert u “Nee”. Het document wordt
opgeslagen met als naam de eerste zin van het document. Als u een spraaklabel wilt toevoegen
aan het document, selecteert u “Ja”. Nadat u een piep hoort heeft u 5 seconden om uw spraak
label op te nemen. Aan het einde van de opname hoort u weer een piep. Het document wordt
opgeslagen met het opgenomen spraaklabel.
Wanneer het document is opgeslagen zal de ClearReader+ Basic u vragen of u nog meer pagina’s
wilt toevoegen aan het document.
79 Nederlands
Page 81

Optelec ClearReader+ Basic
Wanneer u “Nee” selecteert, wordt het menu gesloten en bent u terug in het document. Wanneer
u “Ja” selecteert, kunt u meer pagina’s toevoegen aan het document door één voor één pagina’s
in te scannen door op de Scan knop te drukken. Om te stoppen met toevoegen, druk op de
Play/pauze knop of de Menu knop op het uitbreidingspakket.
De ClearReader+ Basic zal u vragen of u de pagina’s tegelijk wilt verwerken, voordat het
voorlezen begint. Als u “Nee” kiest, zullen de pagina’s worden verwerkt terwijl de tekst
voorgelezen wordt. Als u “Ja” kiest, zullen alle pagina’s eerst worden verwerkt voordat u terug
gaat naar de spraak optie. Dit proces kan enkele minuten duren, afhankelijk van de grootte en het
aantal pagina’s.
Nederlands 80
Page 82

Optelec ClearReader+ Basic
Openen
Om een document te openen, open het menu en ga naar “Open” met de Vooruitspoel knop op de
ClearReader+ Basic of de Terugspoel knop of de pijl knoppen op het uitbreidingspakket. Selecteer
“Open” met de Play/pauze knop. Selecteer “Document” om de lijst met opgeslagen documenten te
bekijken, u ziet de meest recent opgeslagen documenten als eerste (indien een monitor is
aangesloten). Zonder monitor gebruikt u de Vooruitspoel knop om naar het volgende opgeslagen
document te gaan. Bevestig met de Play/pauze knop. Om foto’s te openen en bekijken, selecteert
u de “Foto” knop. (alleen als monitor is aangesloten)
Scroll door de lijst met documenten of foto’s met de Terugspoel knop of de Vooruitspoel knop op
de ClearReader+ Basic of de pijltoetsen op het uitbreidingspakket. Open een document door op de
81 Nederlands
Page 83

Optelec ClearReader+ Basic
Play/pauze knop te drukken. Het menu wordt dan afgesloten. Het is ook mogelijk om documenten
en foto’s te openen vanaf een USB stick.
Verwijderen
Om documenten te verwijderen opent u het menu en ga naar “Verwijderen” met de Terugspoel
knop of de Vooruitspoel knop op de ClearReader+ Basic of de pijltoetsen op het
uitbreidingspakket. Activeer “Verwijderen” door op de Play/pauze knop te drukken . Selecteer het
document dat u wilt verwijderen.
Nederlands 82
Page 84

Optelec ClearReader+ Basic
U moet eerst bevestigen dat u het document wilt verwijderen voordat het wordt verwijderd. Om het
document te verwijderen selecteert u “Ja”. Om het verwijderen te annuleren kiest u “Nee”. U zult
vervolgens teruggaan naar de lijst met documenten.
Stem
In dit menu gedeelte kunt u de leesstem en de taal selecteren. Om een andere leesstem te
selecteren, navigeert u met de Terugspoel knop of de Vooruitspoel knop op de ClearReader+
Basic of de pijl knoppen op het uitbreidingspakket naar de “Stem” knop. Om de keuze te
bevestigen, gebruik de Play/pauze knop.
De ClearReader+ Basic zal de volgende stem selecteren, indien beschikbaar. De stemmen
worden gekozen in de instellingen. Als u kiest voor een stem die een andere taal spreekt zullen de
83 Nederlands
Page 85

Optelec ClearReader+ Basic
menu’s automatisch meeveranderen naar deze taal. Voor vragen over stemmen toevoegen of
verwijderen uit de lijst verwijzen we u door naar de paragraaf ‘Instellingen’.
Let op: als automatische taalherkinng aan staat, zal er alleen worden gewisseld tussen de
stemmen van de gedetecteerde taal. Als bijvoorbeeld de herkende taal Engels is, dan zal er alleen
geschakeld worden tussen de geselecteerde Engelse stemmen. Met automatisch taalherkenning
aan is het niet moelijk om de taal van het menu te wijzigen. Om de taal van het menu te wijzigen
1) zet u de automatische taalherkenning uit, of 2) leest u een tekst in, in de gewenste menu taal
en kunt u in het menu de stem wijzigen.
Weergave
Het weergave menu item wordt alleen getoond als er een monitor is aangesloten. Als u de
“Weergave” knop selecteert met de Terugspoel knop of de Vooruitspoel knop op de ClearReader+
Basic of de pijl knoppen op het uitbreidingspakket en vervolgens bevestigt met de Play/pauze
knop, zal het “Weergave” menu openen. Het
“Weergave” menu bestaat uit vijf knoppen:
Kleur
Contrast
Markering
Lettergrootte
Lettertype
Nederlands 84
Page 86

Optelec ClearReader+ Basic
Kleur
Deze optie is alleen beschikbaar wanneer u de Contrast optie heeft aangezet. Ga naar de “Kleur”
knop met de Terugspoel knop of de Vooruitspoel knop op de ClearReader+ Basic of de pijl
knoppen op het uitbreidingspakket om de beschikbare opties te bekijken. Druk de Play/pauze
knop in om het menu te openen. Druk deze knop nogmaals in om door de beschikbare
kleurcombinaties te schakelen. De beschikbare combinaties zijn:
Zwart – Wit
Wit – Zwart
Geel – Zwart
Zwart – Geel
Geel – Blauw
Blauw – Geel
Zwart – Rood
Rood – Zwart
Zwart – Groen
Groen – Zwart
Zwart – Paars
Paars – Zwart
Wit – Blauw
Blauw – Wit
Amber – Zwart
Zwart – Amber
Contrast
Deze optie is om de hoogcontrast weergave beschikbaar te maken. Foto’s zullen vrijwel altijd in
originele kleuren weergegeven worden. Alleen de tekst en achtergrondkleuren kunnen aangepast
worden. Zwarte letters op een witte achtergrond is de standaard instelling.
85 Nederlands
Page 87

Optelec ClearReader+ Basic
Markering
Deze optie geeft u de mogelijkheid om woorden, zinnen of tekstgedeelte / alinea te markeren. De
markering kan ook uitgezet worden. De kleur van de markering is rood of geel. Rode woord
markering is de standaard instelling.
Lettergrootte
Bij deze optie kunt u de lettergrootte kiezen. In de kolommen leesstand of de regel leesstand is de
lettergrootte omschreven in puntgrootte, net als bij de computer in Microsoft Word. In de pagina
overzicht leesstand is de lettergrootte aangeduid in stappen.
Lettertype
Bij deze optie kunt u kiezen uit lettertypes Arial, Arial Vet, Verdana en Verdana Vet bij de
kolommen leesstand of de regel leesstand. Bij de pagina overzicht leesstand wordt de originele
foto en tekst weergegeven
Nederlands 86
Page 88

Optelec ClearReader+ Basic
Instellingen
Selecteer de “Instellingen” knop om naar het instellingen menu te gaan. Het instellingen menu
bevat vijf knoppen:
Stem
Opties
Resolutie
Instellingen herstellen
Info
87 Nederlands
Page 89

Optelec ClearReader+ Basic
Stem
De “Stem” knop in het instellingen menu opent een lijst met alle beschikbare talen.
Om een leesstem in of uit te schakelen, kies eerst een taal met de Terugspoel knop of de
Vooruitspoel knop op de ClearReader+ Basic of de pijl knoppen op het uitbreidingspakket.
Selecteer met de Afspelen knop de taal, waarna de lijst met beschikbare stemmen wordt getoond.
Selecteer of deselecteer met de Play/pauze knop. Een vinkje voor de stem geeft aan dat deze
geactiveerd is. Wanneer u een stem heeft geactiveerd, kunt u deze stem kiezen met de “Stem”
knop in het hoofdmenu. Door een stem te deselecteren zal hij niet beschikbaar zijn in het
hoofdmenu. De geselecteerde stemmen en talen worden altijd als eerste getoond in de lijst en zijn
gemarkeerd.
Nederlands 88
Page 90

Optelec ClearReader+ Basic
Opties
Het opties menu bevat de volgende instellingen:
Tekstherkennings kwaliteit
Automatische taaldetectie
Kolom filter
Tekstherkennings kwaliteit
De “Optimaal” instelling wordt aanbevolen en geeft de
beste tekstherkenning kwaliteit. De “Snel” instelling is
voor tekst met een eenvoudige opmaak, zonder
kolommen en plaatjes en is 30% sneller dan de
“Optimaal” instelling.
89 Nederlands
Page 91

Optelec ClearReader+ Basic
Automatische taaldetectie
Als “Automatische taaldetectie” aan staat wordt de
taal automatisch herkend en wordt de juiste stem
gekozen voor het voorlezen. De ClearReader+ Basic
kan meerdere talen per pagina herkennen. Om de
herkenning te kunnen gebruiken moeten meerdere
talen worden geselecteerd, met een maximum van
vijf. Ga naar het Stem menu en kies een taal door
tenminste één stem van die taal te selecteren. Doe dit
voor maximaal vijf talen. Zorg vervolgens dat de
Automatische taaldetectie (in het Opties menu) op
‘Activeren’ staat.
Let op: Indien de ClearReader+ Basic niet in staat is om de taal te herkennen, dan wordt de taal
van het menu gebruikt. Als Engels één van de geselecteerde talen is, dan zal de Engelse stem
worden gebruikt en de taal van het menu negeren.
Nederlands 90
Page 92

Optelec ClearReader+ Basic
Kolom filter
Deze optie bevat twee instellingen:
Negeer niet complete kolommen
Neem niet complete kolommen mee
Als ‘Negeer niet complete kolommen’ geactiveerd is,
zal de tekstherkennings software proberen te
herkennen of de kolommen rechts of links van de
tabel niet volledig zijn. Als dit filter uit staat zal niet
complete kolommen wel meenemen en alle tekst op
de pagna voorlezen. De ‘Negeer niet complete kolommen’ instelling wordt aanbevolen omdat dit
de meeste uitgebreide tekstherkenning modus is en is de fabrieksinstelling. De ‘Neem niet
complete kolommen mee’ instelling probeert alle tekst op de pagina te herkennen, maar kan
daardoor niet complete tekst aan het begin of eind van het document voor gaan lezen.
Resolutie
Bij deze optie kunt u handmatig de resolutie instellingen van de monitor aanpassen. Het wordt
alleen aanbevolen als de automatische detectie hiervan niet werkt. Na het veranderen van de
resolutie moet de ClearReader+ Basic opnieuw worden opgestart.
91 Nederlands
Page 93

Optelec ClearReader+ Basic
Weergave
Hoog contrast aan
Kleur
Zwart op wit
Highlight
Woorden
Instellingen herstellen
Als u de standaard instellingen wilt terugkrijgen,
selecteert u deze knop. U moet eerst bevestigen
dat u de instellingen wilt herstellen door “Ja” te
bevestigen met de Play/pauze knop. Als u de
instellingen niet wilt herstellen en wilt annuleren
kiest u “Nee”.
Fabrieksinstellingen
Info
Het ‘Info’ scherm toont de versie van de programma interface, camera interface en OCR interface
en de frequentie van de voeding
Nederlands 92
Page 94

Optelec ClearReader+ Basic
6. Problemen oplossen
Als de adapter niet werkt met de ClearReader+ Basic:
Controleer de aansluitingen. Zorg ervoor dat de adapter is aangesloten op de
ClearReader+ Basic en het stopcontact.
Als de adapter nog niet werkt, neem dan contact op met uw leverancier.
Als de tekst die u leest onduidelijk is:
Zorg ervoor dat de voorleestaal overeenkomt met de taal van het document.
Zorg ervoor dat de in te lezen tekst goed vlak ligt.
Zorg ervoor dat de in te lezen tekst niet groter is dan formaat A4.
Draai de tekst en maak opnieuw een foto.
Zorg ervoor dat er geen andere felle lichtbron aanwezig is, zoals de zon of een eetkamer
lamp, zo kan de camera arm een schaduw werpen op de tekst.
Zorg ervoor dat de ondergrond egaal is, bijvoorbeeld een wit A4’tje en geen gewerkt
tafelkleed.
Als de tekstherkenning ongebruikelijk lang duurt voordat u begint met lezen:
Als de ClearReader+ Basic niet de hele regel van een document / kolom / tabel leest:
Zorg ervoor dat de voorleestaal overeenkomt met de taal van het document.
93 Nederlands
Page 95

Optelec ClearReader+ Basic
De automatische kolomherkenning staat standaard aan. Druk en houd de scanknop 2
seconden vast (in plaats van kort indrukken) bij het maken van de scan om de
kolomherkenning uit te schakelen en naar Tabelmodus over te gaan. Na iedere scan
staat de kolomherkenning weer aan.
Als de ClearReader+ Basic niet reageert op de scanknop:
Open de camera-arm en probeer opnieuw.
Als de scanknop nog niet reageert, controleer dan of de stroom aangesloten is.
Nederlands 94
Page 96

Optelec ClearReader+ Basic
Bijlage A: Veiligheid
Behandel de ClearReader+ Basic met zorg. Onzorgvuldige behandeling leidt tot
beschadiging van onderdelen.
Neem contact op met uw leverancier indien serviceonderhoud nodig is.
De ClearReader+ Basic niet openen of onderdelen verwijderen, hiermee vervalt de
garantie.
Stel de ClearReader+ Basic niet bloot aan overmatige hitte of direct zonlicht om het risico
van brand te voorkomen.
Gebruik de ClearReader+ Basic niet in de buurt van onvoldoende afgeschermde
medische hulpmiddelen.
Om elektrische schade te voorkomen, houd de ClearReader+ Basic uit de buurt van
vloeistoffen en chemicaliën.
Haal altijd de stekker uit de ClearReader+ Basic voor het schoonmaken. Gebruik een
zachte, vochtige doek om de buitenkant te reinigen. Gebruik geen schoonmaakmiddelen
of schurende materialen. Dit kan leiden tot schade aan het apparaat.
Gebruik van de ClearReader+ Basic anders dan beschreven in deze handleiding, valt buiten de
garantievoorwaarden.
95 Nederlands
Page 97

Optelec ClearReader+ Basic
Bijlage B: Technische informatie
Afmetingen (B x H x D): 24 x 23 x 10 cm
– Diepte, camera-arm open: 27 cm
– Hoogte, camera-arm open: 25 cm
– Hoogte, hendel omhoog 27 cm
Gewicht: 2,46 kg
Camera: Hoge resolutie-camera
Hoofdtelefoonaansluiting: 3.5 mm stereo
Gebruiksomgeving:
Luchtvochtigheid: <70%, geen condensatie
Temperatuur: 0 to 40 °C
Opslag en transport condities:
Luchtvochtigheid: <95%, geen condensatie
Temperatuur: -20 °C to 60 °C
Nederlands 96
Page 98

Optelec ClearReader+ Basic
Manuel d’utilisation
Version 1.3
© 2015 - Optelec, les Pays-Bas
Tous droits réservés
Optelec
C.P. 399
2990 AJ Barendrecht
Les Pays-Bas
Tél.: +31 (0)88 678 34 44
Courriel: info@optelec.nl
Internet: www.optelec.com
97 Français
Page 99

Optelec ClearReader+ Basic
1. Introduction
Nous vous félicitons d’avoir choisi le ClearReader+ Basic, un assistant de lecture intuitif et
portable développé par Optelec.
Le ClearReader+ Basic combine une utilisation facile et une lecture de haute qualité en
plusieurs langues ainsi qu’une reconnaissance de texte rapide. Il peut capter tout matériel
imprimé : lettres, journaux et livres et lire ce matériel d’une voix agréable et naturelle. Les
haut-parleurs intégrés vous procurent un son stéréo de haute qualité.
Si vous avez des questions ou des suggestions concernant l’utilisation du ClearReader+ Basic
d’Optelec, veuillez contacter votre distributeur Optelec en vous référant aux adresses fournies
à la dernière page de ce manuel. Vos commentaires sont grandement appréciés et nous
espérons que vous aimerez utiliser votre ClearReader+ Basic.
Français 98
Page 100

Optelec ClearReader+ Basic
À propos du manuel
Optelec améliore constamment ses produits ainsi que leurs fonctions. Il est donc possible que
ce manuel ne soit pas à jour. Veuillez vous rendre à la section Support de notre site Internet
www.optelec.com pour télécharger la dernière version de ce manuel.
Ce manuel vous familiarisera avec les caractéristiques et l’utilisation du ClearReader+ Basic.
Veuillez le lire attentivement avant d’utiliser votre ClearReader+ Basic.
Ce que contient la boîte
La boîte du ClearReader+ Basic doit contenir tous les éléments suivants :
Le ClearReader+ Basic d’Optelec
Un câble d’alimentation électrique
Un guide de démarrage rapide
Ce manuel d’utilisation
S’il vous manque l’un ou plusieurs de ces éléments, veuillez en informer votre distributeur
Optelec.
99 Français
 Loading...