

Page 1

OC-500 Wireless GateWay
QuiCk-start Guide
Quick-Start Guide
1 Package Contents 1
2 Installation Instructions 1
Dial-Up Installation . . . . . . . . . . . . . . . . . . . . 1
TCP/IP (High Speed) Physical Installation . . . . . . . . . . 2
Hyosung TCP/IP Setup . . . . . . . . . . . . . . . . . 3
Hantle (Tranax) TCP/IP Setup . . . . . . . . . . . . . . 4
Triton TCP/IP Setup . . . . . . . . . . . . . . . . . . 6
A Appendix A: Troubleshooting 7
If your ATM is unable to complete a transaction... . . . . . . 7
If you are expriencing intermittent problems
completing transactions... . . . . . . . . . . . . . . . . . 8
Common ATM Communication Error Codes . . . . . . . . . 9
B Appendix B: Processors and Phone Numbers 10
C Appendix C: Warranty Information 11
Page 2

1 | Package contents
1
Package Contents
Package Contents
• OC-500 Wireless Gateway
• Antenna, 3db Gain, Magnetic Base
• Power Supply
• CAT5E Ethernet Patch Cable, 7 ft. (to be used only with high-
speed TCP/IP communications on Windows CE ATMs)
• Wireless Gateway Quick-Start Guide
Please verify your package contents. Should any of these items be
missing or damaged, please contact OptConnect immediately at
(877) 678-3343.
Setting up an OptConnect OC-500 Wireless Gateway is as easy as 1 2 3.
STEP 1
• Plug it in. Plug in the power supply to a surge protector or bat-
tery back-up. If no surge protector or battery back-up is available, plug the power supply directly into the wall outlet. Run
the cord to the OC-500 and push into the “POWER” connection
on the back of the Wireless Gateway. Secure the cord by twisting
to the right. The cord will lock in place.
STEP 2
• Attach the antenna. It is recommended that the magnetic an-
tenna be placed on the outside back of the ATM. Uncoil the
antenna cable and attach to the screw thread labeled “Antenna”
on the back of the unit.
2
Installation Instructions
Page 3

WIRELESS GATEWAY QUICKSTART GUIDE | 2
STEP 3
• Plug in the phone line. Plug the ATM phone line into the OC-
500 port labeled “ATM/POS Terminal” on the front of the unit.
As the unit boots, the “Cell On” and “Signal” lights will light and turn
solid. Once solid, your ATM is ready to perform dial-up transactions.
Initialize the ATM and run a balance inquiry. If the balance inquiry
is not successful, refer to Appendix A: Troubleshooting on page 7.
Dial Up Installation
For a list of acceptable processors and phone numbers, please refer to Appendix B: Processors and Phone Numbers on page 10.
TCP/IP Requirements
NOTE: High-speed wireless TCP/IP transactions are only possible with ATMs capable
of communicating via TCP/IP.
The OptConnect OC-500 has the capability of running high-speed
transactions via TCP/IP communication. TCP/IP communication signicantly cuts transaction speeds requiring less time for your customer to complete their transaction.
While running dial-up transactions requires no programming changes to the ATM, running TCP/IP involves programming the ATM for this
specic mode of communication. You must have master-password
access to the ATM programming menus to make the necessary
changes.
Page 4

3 | Installation Instructions: TCP/IP Setup
TCP/IP Setup - Nautilus Hyosung ATMs
Nautilus Hyosung ATMs capable of TCP/IP communications include:
1800CE, MM5000, MM5300CE, MM5100T
Once the physical installation is complete, enter the Operator Menu of
your ATM using the Master Password. If your ATM menus appear dierently than described below, please call OptConnect (877) 678-3343 for
further assistance.
STEP 1
• Change the ATM communication mode from Dial-Up to TCP/IP.
• Customer Setup -> Select Processor -> Communication: TCP/IP
• Cancel to Return
• Customer Setup -> Select Processor -> TCP/IP Type: Standard*
*For Switch Commerce use Visa Framed
SSL: Disabled
2(x) Cancel to Return
• Customer Setup -> Standard 3 Options -> CRC En\Disable: Disable
• 2(x) Cancel to Return
STEP 2
• Dene TCP/IP parameters for the ATM.
• System Setup -> Terminal IP
DHCP: Disable
IP Address: 192.168.1.91
Subnet Mask: 255.255.255.0
Default Gateway: 192.168.1.90
DNS: Leave as is
• 2(x) Cancel to Return
Page 5
WIRELESS GATEWAY QUICKSTART GUIDE | 4
STEP 3
• Dene Host IP Address and Port.
• Host Setup -> Host Address 1 and 2: 192.168.1.90
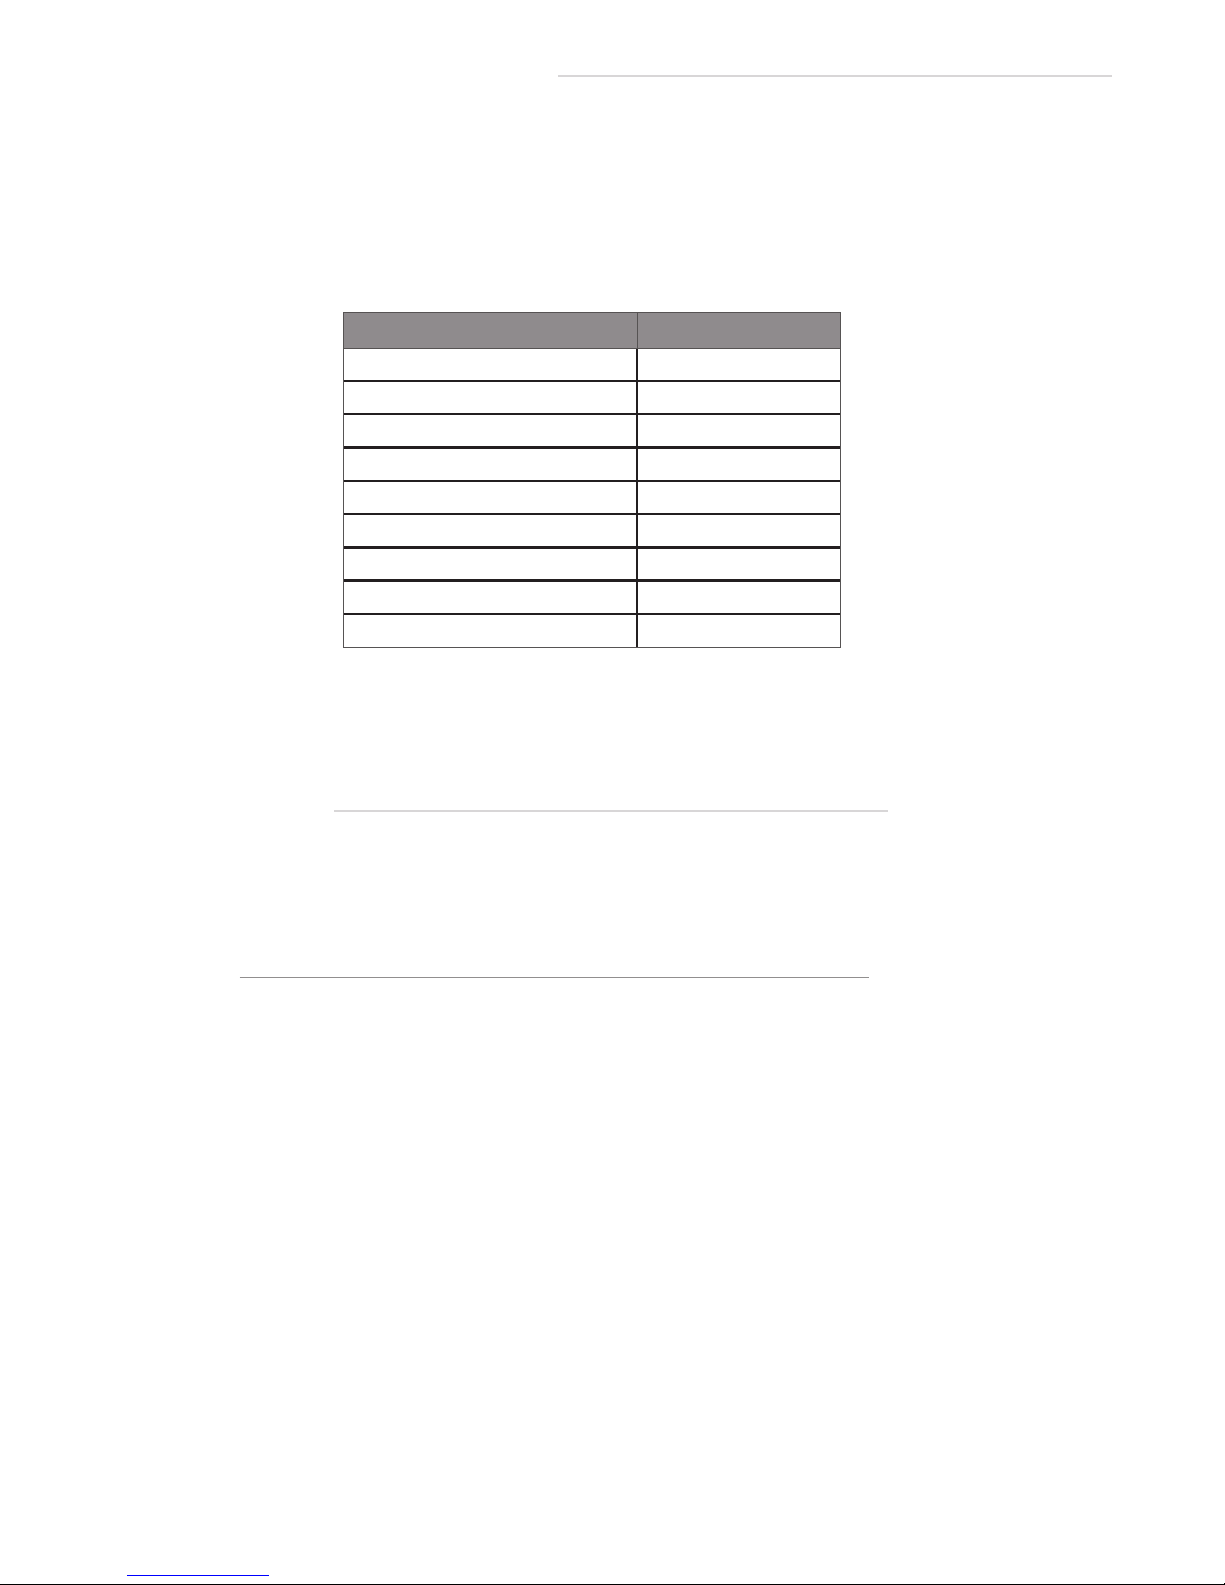
• Host Setup -> Host Port 1 and 2: Consult the following table:
You are ready to initialize your ATM. Once booted, perform a balance inquiry. If this transaction fails, repeat steps 1-3 to verify correct programming settings. If you are still unable to perform a successful balance inquiry, call OptConnect at (877) 678-3343 for assistance.
TCP/IP Setup - Hantle (Tranax) ATMs
Hantle (Tranax) ATMs capable of TCP/IP communications include:
1700W, C4000, X4000, C4010T
Once the physical installation is complete, enter the Operator Menu of
your ATM using the Master Password. If your ATM menus appear dierently than described below, please call OptConnect (877) 678-3343 for
further assistance.
STEP 1
• Change the ATM communication mode from Dial-Up to TCP/IP.
• Customer Setup -> Change Processor -> Communication:
Standard TCP/IP*
*For Switch Commerce use Visa Framed
Processor Host Port
Columbus Data (CDS) 7000
Data Stream (ASAI) 451
DNS (MoneyTree) 561
EFX 446
Elan/Genpass 7002
First Data 9021
Metavante 450
RBS Worldpay (RBS Lynk) 6661
Switch Commerce 7003
Page 6
5 | Installation Instructions: TCP/IP Setup
• Customer Setup -> Change Processor -> Standard 3 Option ->
CRC En\Disable: Disable
• 3(x) Cancel to Return
STEP 2
• Dene TCP/IP parameters for the ATM.
• System Setup -> Device Setup -> ATM TCPIP Setup
Change TCPIP Mode: Static IP
IP Address: 192.168.1.91
Subnet Mask: 255.255.255.0
Default Gateway: 192.168.1.90
******SELECT APPLY******
• 3(x) Cancel to Return
STEP 3
• Dene Host IP Address and Port.
• Host Setup -> Host IP Address: 192.168.1.90
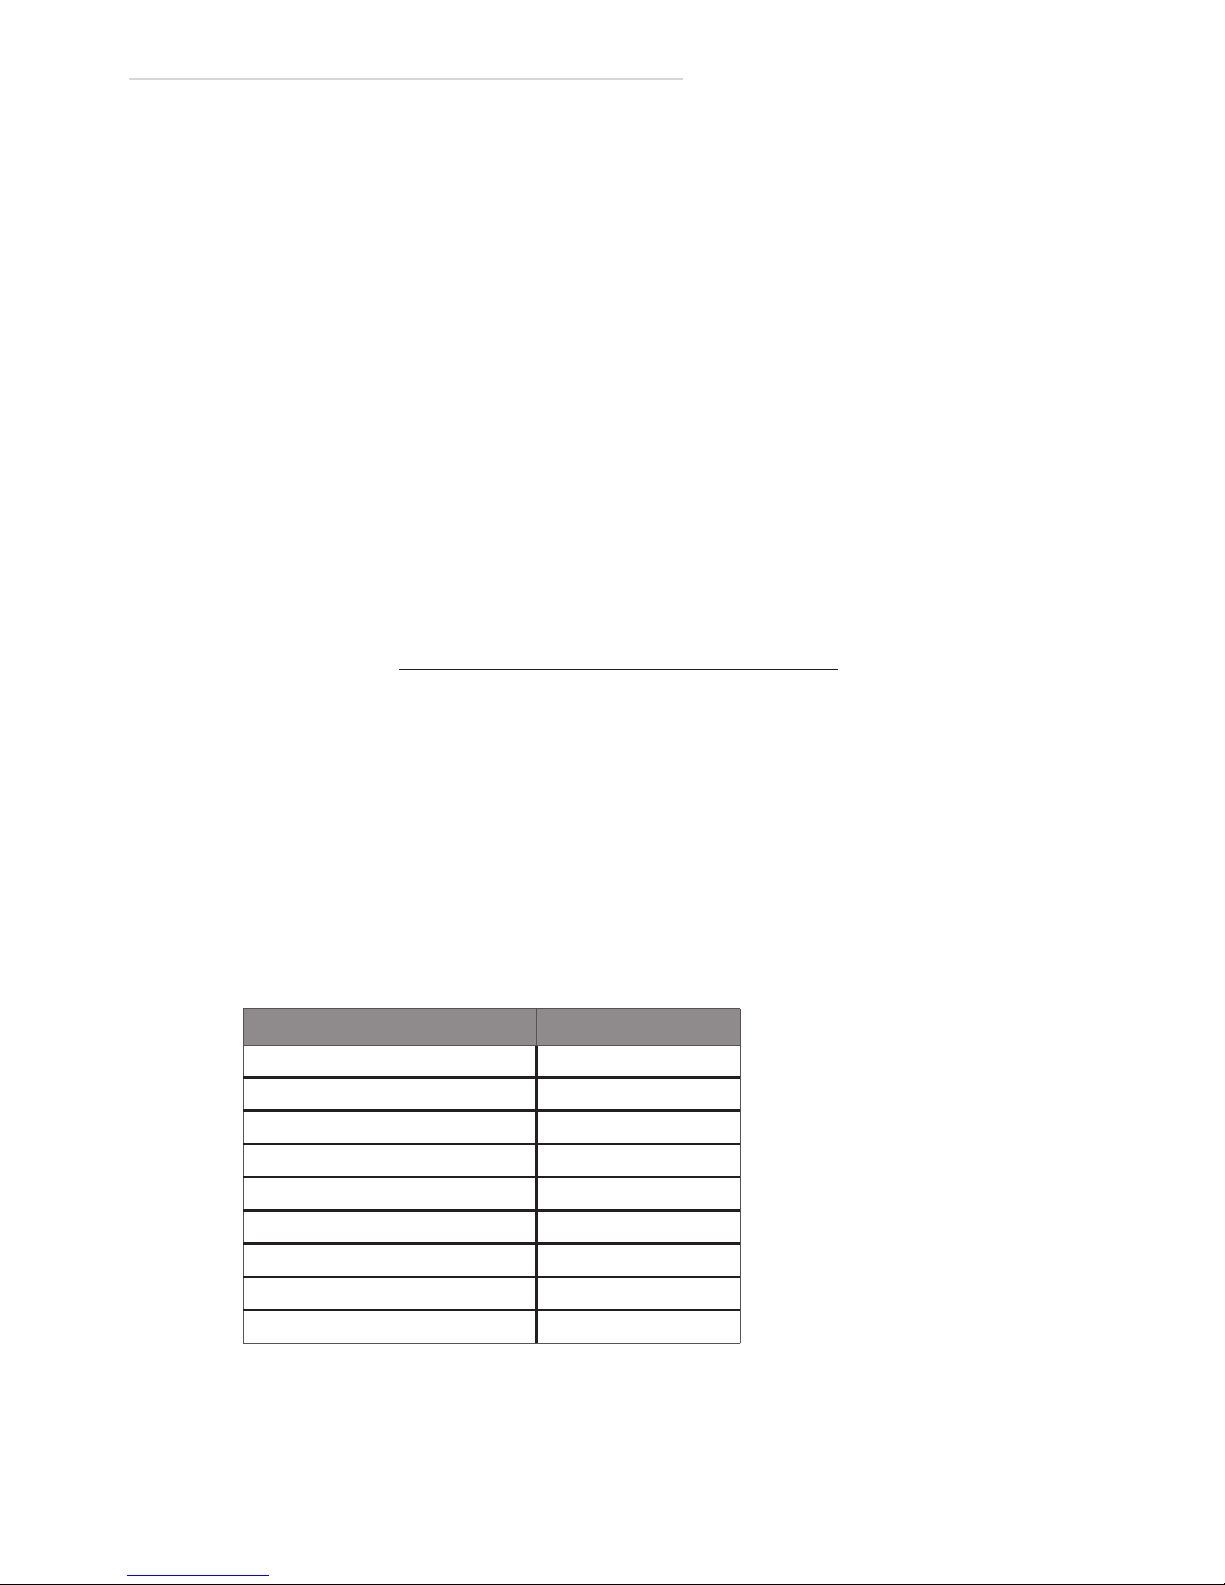
• Host Setup -> Host Port: Consult the following table:
• Host Setup -> Conguration Schedule: Scheduled
You are ready to initialize your ATM. Once booted, perform a balance inquiry. If this transaction fails, repeat steps 1-3 to verify correct
programming settings. If you are still unable to perform a successful balance inquiry, call OptConnect at (877) 678-3343 for assistance.
Processor Host Port
Columbus Data (CDS) 7000
Data Stream (ASAI) 451
DNS (MoneyTree) 561
EFX 446
Elan/Genpass 7002
First Data 9021
Metavante 450
RBS Worldpay (RBS Lynk) 6661
Switch Commerce 7003
Page 7
WIRELESS GATEWAY QUICKSTART GUIDE | 6
TCP/IP Setup - Triton ATMs
Triton ATMs capable of TCP/IP communications include:
RL1600, RL2000, RL5000, RT2000, FT5000
Once the physical installation is complete, enter the Operator Menu of
your ATM using the Master Password. If your ATM menus appear differently than described below, please call OptConnect (877) 678-3343
for further assistance.
STEP 1
• Change the ATM communication mode from Dial-Up to TCP/IP.
• 6. Congure Terminal -> 6. Communication -> 8. Communi-
cation Protocal: TCP/IP Wireless
• 6. Congure Terminal -> 6. Communication -> 9. Communi-
cation Message Format: Triton Standard TCP/IP No CRC*
• 6. Congure Terminal -> 6. Communication -> 3. Permenant
TCP/IP Connection: UNCHECK
• 6. Congure Terminal -> 6. Communication -> 1. Host IP Ad-
dress: 192.168.1.90
• 6. Congure Terminal -> 6. Communication -> 2. Host IP Port:
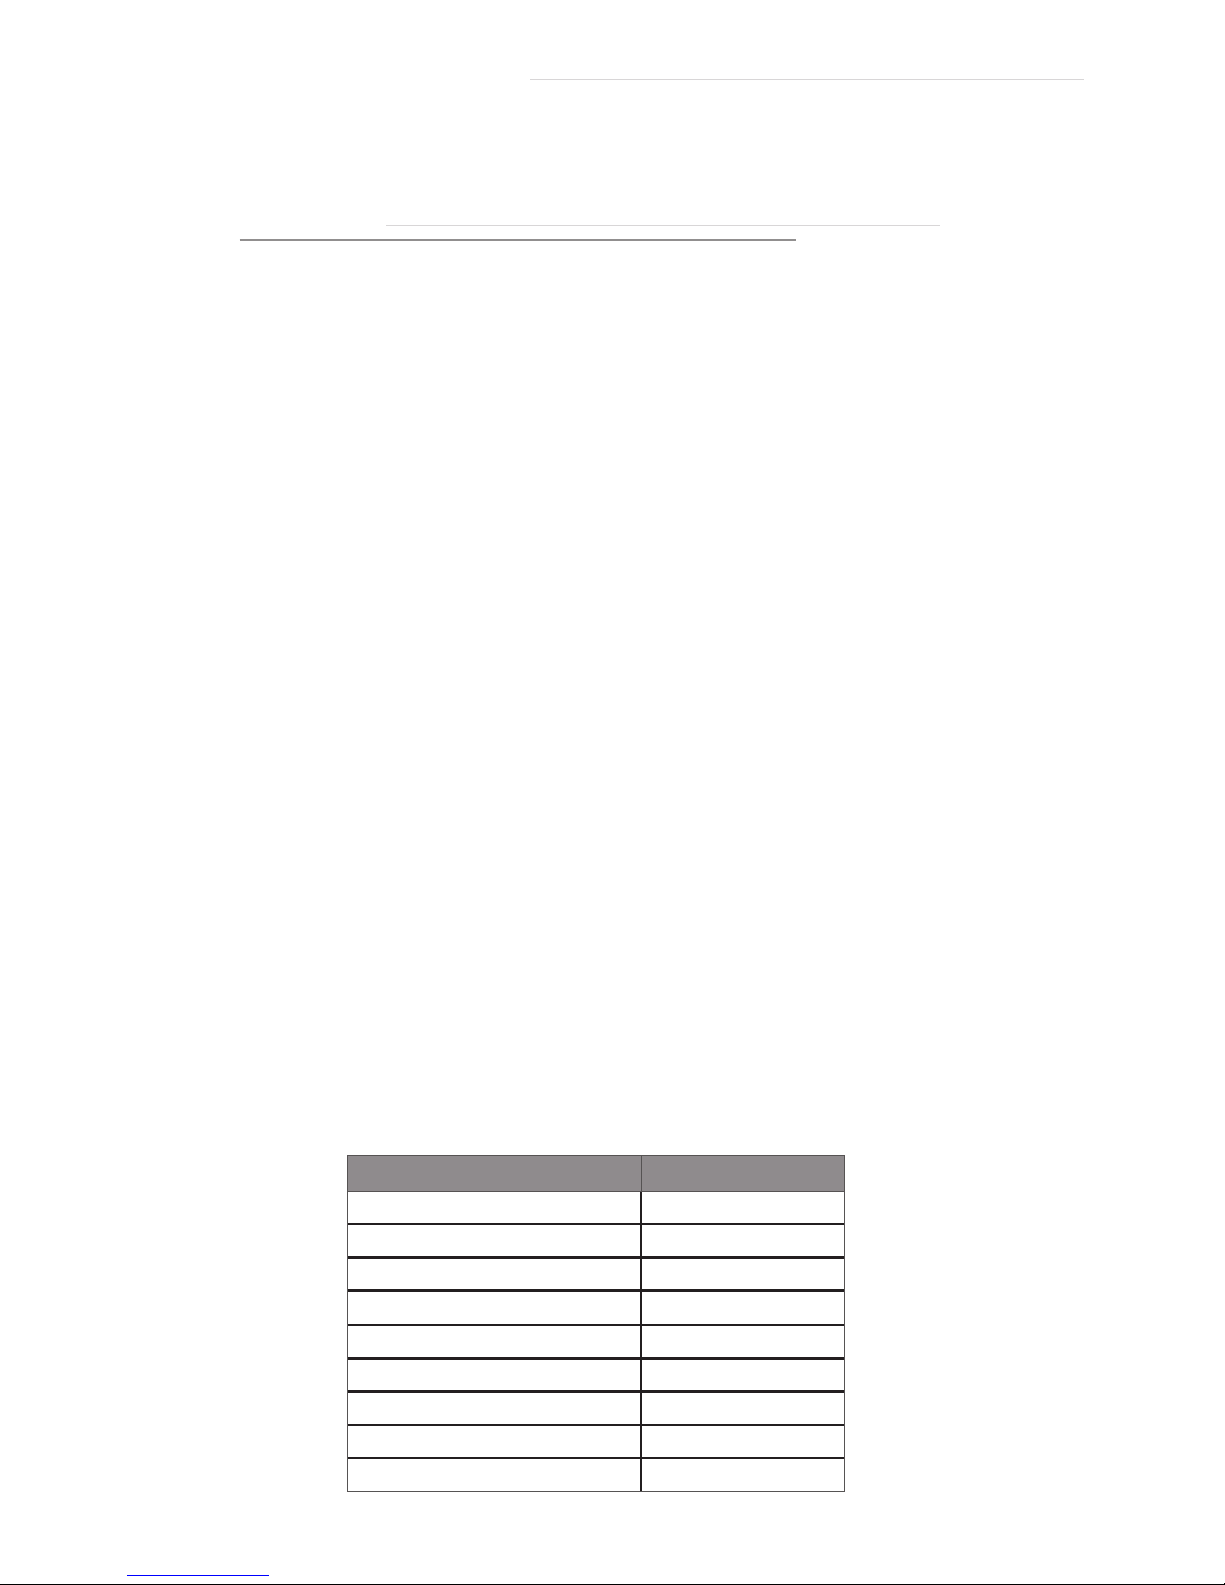
Consult the following table:
2(x) “Enter” to return to main menu.
*For Switch Commerce use Triton Standard
Processor Host Port
Columbus Data (CDS) 7000
Data Stream (ASAI) 451
DNS (MoneyTree) 561
EFX 446
Elan/Genpass 7002
First Data 9021
Metavante 450
RBS Worldpay (RBS Lynk) 6661
Switch Commerce 7003
Page 8

7 | Appendix A: Troubleshooting Helps
STEP 2
• Dene TCP/IP parameters for the ATM.
• 2. Diagnostics -> 7. Modem / Ethernet -> 6. Congure Ether-
net Settings -> 6. Enable DHCP: UNCHECK
• 2. Diagnostics -> 7. Modem / Ethernet -> 6. Congure Ether-
net Settings -> 1. IP Address: 192.168.1.91
• 2. Diagnostics -> 7. Modem / Ethernet -> 6. Congure Ether-
net Settings -> 2. Subnet Mask: 255.255.255.0
• 2. Diagnostics -> 7. Modem / Ethernet -> 6. Congure Ether-
net Settings -> 3. Default Gateway: 192.168.1.90
• 4(x) “Enter” to return to main menu.
• 5. System Parameters -> 5. Restart the Terminal: Enter.
Your ATM is now being restarted. Once booted, perform a balance
inquiry. If this transaction fails, repeat steps 1-2 to verify correct
programming settings. If you are still unable to perform a successful balance inquiry, call OptConnect at (877) 678-3343 for assistance.
OptConnect tests every Wireless Gateway in house before shipping. Each
Wireless Gateway completes a live balance inquiry before being cleared
for shipment. Should you experience problems with your Wireless Gateway, please verify all installation and instructions in this guide, and refer
to the following Troubleshooting when diagnosing any issues that may
arise. If you are still experiencing problems, please contact OptConnect at
(877) 678-3343 for further assistance.
It is helpful in diagnosing any communication problems to disconnect the
Wireless Gateway from the ATM and reconnect using a standard land line.
This helps to determine the source of most problems. Check to see if your
ATM is able to complete a dial-up transaction on a land line, but will not
communicate via the Wireless Gateway. If you are still unable to complete
A
Troubleshooting
Page 9

WIRELESS GATEWAY QUICKSTART GUIDE | 8
a transaction via the land line, verify all ATM programming before reconnecting the Wireless Gateway.
If your ATM is unable to complete a transaction...
• Verify the Wireless Gateway is plugged in and the “Status” light is
ashing.
• For Dial-Up transactions, make sure the phone line is securely
connected to the “Phone” port on your ATM and the “ATM/POS
Terminal” on the Wireless Gateway. For TCP/IP transactions, verify
that the CAT5E Ethernet Patch Cable (included) is connected to an
open Ethernet port on your ATM and the “Ethernet” on the Wireless
Gateway. OptConnect cannot guarantee successful transactions
using an Ethernet cable other than that provided with the Wireless
Gateway.
• Conrm that the ATM is programmed correctly for your processor with
the correct Host Phone Number for dial-up transactions, or the correct
Host IP Address and Host IP Port for TCP/IP transactions.
• Verify the “Cell On” and “Signal” lights. These lights should remain
solid once the Wireless Gateway has nished initializing. This can
take a few minutes. If these lights do not come on or have not
stopped ashing after 5 minutes, disconnect the power from the
Wireless Gateway, wait 15 seconds, and reconnect the power. If
the lights do not come on and remain solid after multiple attempts,
please call OptConnect at (877) 678-3343 for further assistance.
If you are expriencing intermittent problems completing transactions...
• Verify sucient signal strength. If the “Signal” lights indicate low
signal strength (1 to 2 bars), reposition antenna. Allow a minimum
of 5 seconds for the Wireless Gateway to refresh the “Signal” lights
after moving the antenna. If the signal strength is not improved,
it may be necessary to purchase an in-line signal booster. Contact
OptConnect at (877) 678-3343 for details.
• If the “Signal” lights are ashing, disconnect power from the Wire-
less Gateway, wait 15 seconds, then reconnect the power. Allow
Page 10

9 | Appendix A: Troubleshooting Helps
a few minutes for the Wireless Gateway to restart. If the “Signal”
lights do not stop ashing after 5 minutes, please call OptConnect
at (877) 678-3343 for further assistance.
• Check for the presence of any large neon signs, drink coolers, or
ice freezers in the vicinity of the Wireless Gateway. Such machines
may produce interference which can aect the cellular signal. If
such machines are present, reposition ATM and Wireless Gateway
away from these sources of interference.
Common ATM Communication Error Codes
Below is a list of the most common ATM Error Codes associated with Communication to the Host. While this communication is handled solely by
the Wireless Gateway, these errors are most often the result of incorrect
programming in the ATM. After verifying ATM programming and clearing any errors, if you are still experiencing communication problems,
please contact OptConnect at (877) 678-3343 for further assistance.
Common Nautilus Hyosung/Hantle (Tranax) Error
Codes
• D170X “Modem Connection Error”: Verify all programming.
Check phone cord/Ethernet cable for kinks or damage.
• D1800 “No Dial Tone”: Verify phone cord/Ethernet cable is con-
nected properly.
• D25XX “TCP/IP Communication Lost”: Verify all programming.
Check Ethernet cable for kinks or damage.
Common Triton Error Codes
• 185 “Telephone Number Not Congured”: Verify Host Phone
Number 1 and 2 are correct.
• 192 “Communication Error”: Verify all ATM programming.Verify
phone cord/Ethernet cable is connected properly and is not
damaged or kinked.
• 236 “TCP/IP Communication Lost”: Verify all ATM program-
ming. Check Ethernet cable for kinks or damage.
• 237 “TCP/IP Device Failed”: This error occurs when out-going
Page 11
WIRELESS GATEWAY QUICKSTART GUIDE | 10
TCP/IP communication is successful, but return communication of the Host fails. Verify all ATM programming. Check
for presence of large neon signs, drink coolers, or ice freezers which may be causing interference in the celluar signal.
Call OptConnect at (877) 678-3343 for further assistance.
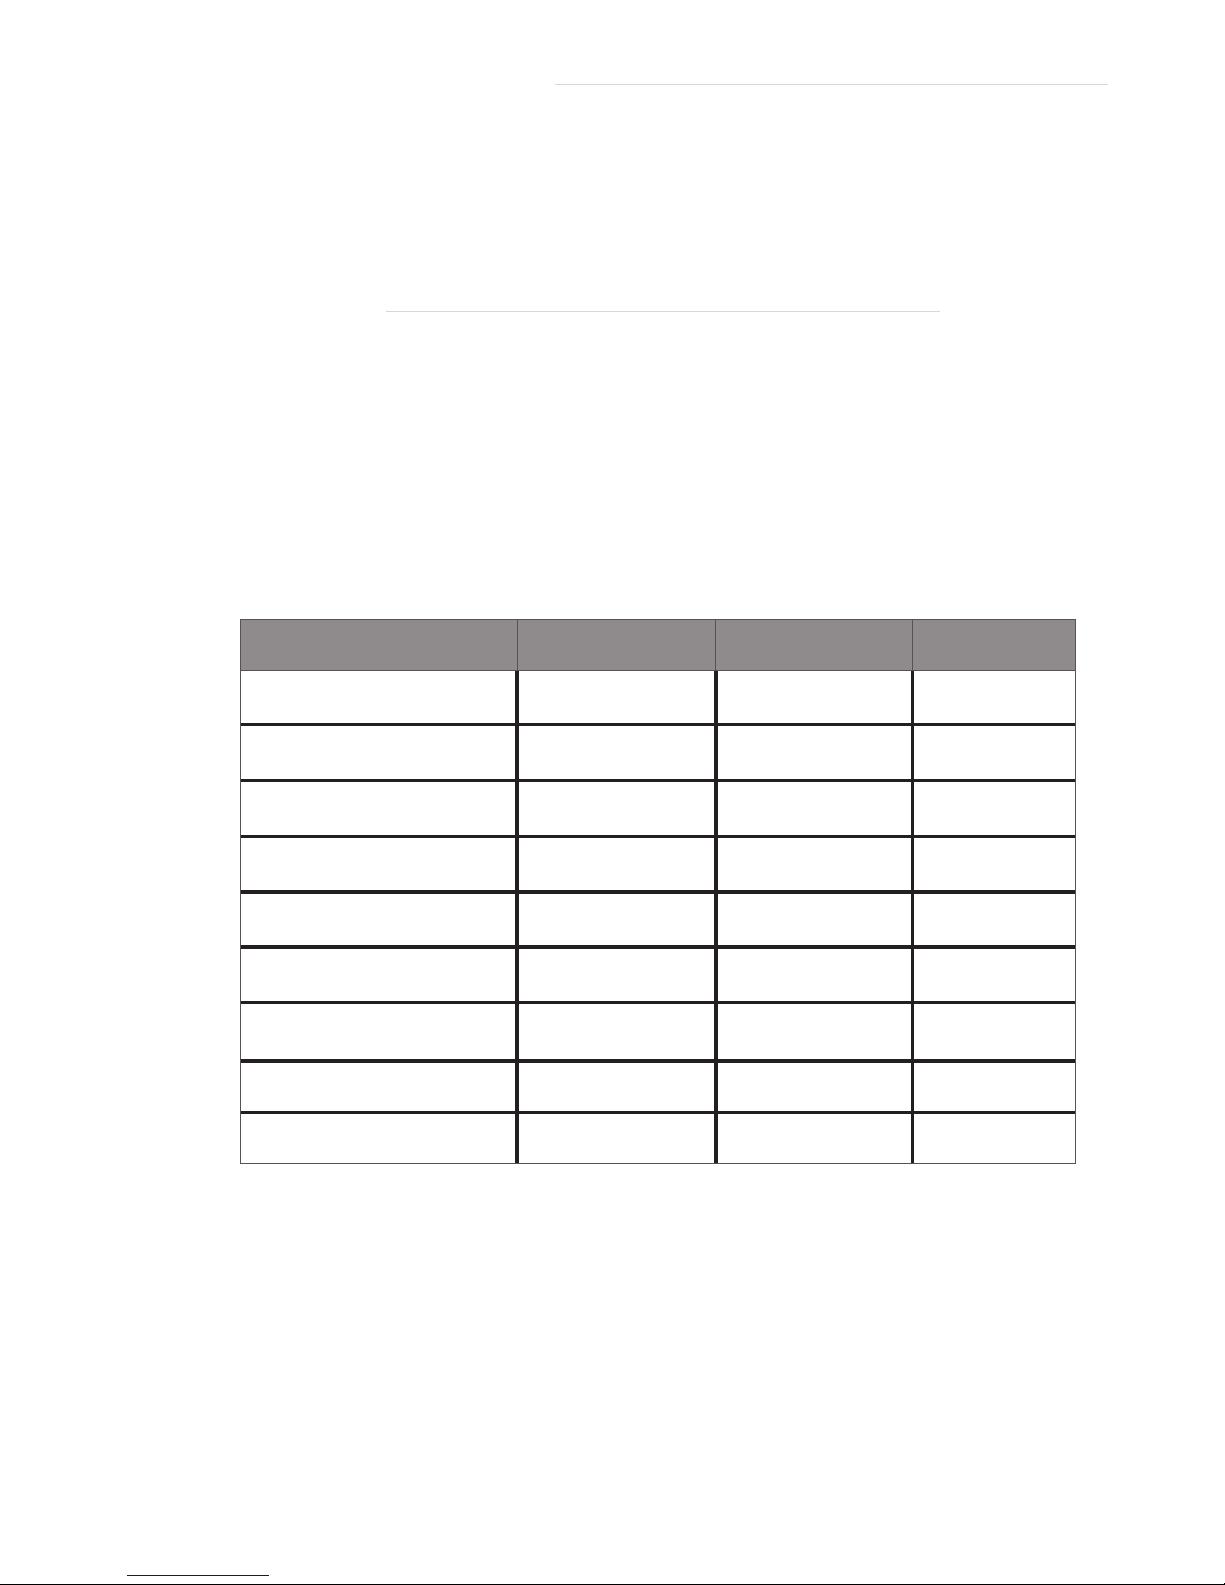
The Wireless Gateway supports communication to the following
processors:
Processor Primary Secondary Alternate
Columbus Data 800-886-1798 888-335-5221 1111/1112
Data Stream/ASAI 877-543-5921 577-543-5922 6666
DNS(Moneytree) 800-816-5409 800-816-5410 -
EFX 866-649-6124 866-649-6125 -
Elan/Genpass 800-472-6210 800-472-6210 2222
First Data 877-999-1309 800-530-4784 -
Metavante 800-883-7723 800-883-7723 5555
RBS Worldpay/Lynk 800-827-5965 800-486-5965 4444
Switch Commerce 800-931-8497 800-931-6030 3333
B
Processors and
Phone Numbers
Page 12

QuiCk-start Guide
Appendix C: Troubleshooting Helps | 11
Lifetime Extended Maintenance Plan
Your Wireless Gateway purchase includes the Lifetime Extended Maintenance Plan. The Lifetime Extended Maintenance Plan provides for a guaranteed replacement of equipment specied above in the event equipment fails. This
Plan remains in eect as long as Customer continues to pay
monthly service charge. Upon notication and diagnosis of
problem, OptConnect will ship a new or refurbished replacement unit to Customer at no cost to Customer using Standard
Overnight shipping. Customer shall be responsible for shipping back faulty equipment to OptConnect in a timely manner using a prepaid shipping label. Customer must return
the faulty equipment to OptConnect within 15 days or will be
charged $400.00 for the non-return of the faulty equipment.
C
Warranty Information
854 West 450 North #4 Kaysville, Utah 84037
(877) 678-3343 fax: 801-991-3006
© OptConnect 2010
 Loading...