

Page 1

Opsytec Dr. Gröbel GmbH
Am Hardtwald 6-8
76275 Ettlingen
Tel.: 07243 / 94783 - 50
Fax: 07243 / 94 83 - 65
info@uv-groebel.de
UVpad E
Manual
Version: 1.1.2
Page 2

1 Content 2
1 Content
1 Content................................................................................................................................. 2
2 Change history ..................................................................................................................... 3
3 Symbols Overview .............................................................................................................. 3
4 Function Overview .............................................................................................................. 4
5 Technical Data ..................................................................................................................... 5
5.1 General technical data ............................................................................................... 5
5.2 Radiometric measurements ....................................................................................... 5
5.3 spectral ranges ........................................................................................................... 5
USB ........................................................................................................................... 6
5.4 / hardware-software-requirements ............................................................................. 6
5.5 Effect related measurements ..................................................................................... 6
6 Intended Use ........................................................................................................................ 7
7 Conventional Use ................................................................................................................ 7
8 Important Information ......................................................................................................... 8
9 Operation ............................................................................................................................. 9
9.1 Switching the device on and off ................................................................................ 9
9.2 Standby Menu ......................................................................................................... 10
9.2.1 Start Measurement ............................................................................................... 11
9.2.2 Start manual dark measurement .......................................................................... 13
9.2.3 Show last Measurement ....................................................................................... 15
9.2.4 Setting integration time during measurements .................................................... 15
9.2.5 Recording time .................................................................................................... 17
9.2.6 Settings ................................................................................................................ 17
9.2.7 Information .......................................................................................................... 17
9.3 Settings .................................................................................................................... 18
9.3.1 Sensitivity ............................................................................................................ 18
9.3.2 Averaging ............................................................................................................ 19
9.3.3 Effective Function* ............................................................................................. 19
9.3.4 Language ............................................................................................................. 21
9.3.5 Date / Time .......................................................................................................... 21
9.3.6 Factory Settings ................................................................................................... 21
10 Data Export / PC-Software ................................................................................................ 22
10.1 Installation ............................................................................................................... 22
10.2 Connecting with the PC ........................................................................................... 22
10.3 Viewer Software ...................................................................................................... 23
10.4 Export of measurements .......................................................................................... 25
10.5 Displaying and comparing Measurements .............................................................. 26
10.6 Displaying the Irradiance profile ............................................................................. 26
10.7 Deleting Measurements ........................................................................................... 27
11 Remote control / Live measurement .................................................................................. 28
12 Notes for optimal measurement results ............................................................................. 31
12.1 The UVpad E displays „MAX“ ............................................................................... 31
12.2 The UVpad E displays too little irradiance values .................................................. 31
12.3 The UVpad E displays too high or too low UVC Values ....................................... 31
12.4 The UVpad E displays “ - “ ..................................................................................... 32
12.5 The measured value is not reproducible .................................................................. 32
13 Cleaning, Maintenance & Troubleshooting....................................................................... 33
13.1 Calibration ............................................................................................................... 33
13.2 Cleaning .................................................................................................................. 33
Page 3
2 Change history 3
Date
Version
Changed by
Comment
01.04.2015
1.0.7
Paravia
first Version
29.09.2015
1.0.8
Paravia
setting “fixed (Res. 0.01)” added
23.03.2017
1.0.9
Uhl
Upgrade measurement time;
UVA/VIS range adjusted
10.11.2017
1.1.0
Paravia
Manual dark measurement
10.01.2018
1.1.1
Uhl
Remote control / LIVE measurement
19.02.2018
1.1.2
Paravia
Editorial modifications
13.3 Battery Change ........................................................................................................ 34
13.4 Troubleshooting ...................................................................................................... 35
14 Declaration of Conformity ................................................................................................. 36
15 Notes .................................................................................................................................. 37
2 Change history
3 Symbols Over view
Meaning:
Failure to observe the mentioned instructions can result in an injury of the user.
Meaning:
Failure to observe the mentioned instructions can result in a damage of the device.
Meaning:
Instructions are to be observed for the regular operation.
*
Optional functions, not available for every UVpad E
Page 4

4 Function Overview 4
4 Function Overview
The UVpad E combines the benefits of the spectral measuring technology with a handheld and
easy to operate radio meter. Use the spect roradiometer UVpad E for an accurate meas urement
of the UV irradiance and for comparisons of different UV lamps and UV LEDs. 512 photodiodes measure the spectrum in the wavelength range of 200 – 440 nm. The categorization in
UVA, UVB and UVC is taken according to international standards and traceable. The calibration to only one light source is omitted.
During the measurement, the spectrum is shown on the graphic display. The irradiances for
UVA, UVB, UVC and VIS are available by the click of a button. In the background, the spectrum is already record ed. Whi le measuri ng, the do se an d the ch ronolo gical i rradian ce seq uence
can additionally be documented. Spectra and measurement data can be exported and evaluated
with the provided software.
The UVpad E offers these functions/features:
Spectral measurements:
• Real-time of the spectrum
• Real-time of irradiance
Radiometric measurements:
• Spectrum at max irradiance
• Irradiance (UVA, UVB, UVC, VIS)
• Profile of irradiance (UVA, UVB, UVC, VIS)
• Dose of irradiance (UVA, UVB, UVC, VIS)
Measurements related to cau se and eff ect s:
• Photo initiator spectrums (optional)
• Sensitivity functions of broadband radiometers (optional)
Page 5

5 Technical Data 5
Size (L x W x H)
160 x 100 x 20 mm³
Weight
~500 g
Power
battery powered, 3 x CR2032
Max. operational temperature
60°C
Display
graphical, 128 x 64 px
Optically active surface
Diameter: 10 mm
Optically active surface position
external sensor
internal memory
50 measurements with export option
Spectral range
200 - 440 nm ±3nm
Spectral bandwidth
~ 2 nm
Irradiance measurement range
2 - 15000 mW/cm²
Irradiance dose measurement range
1 mJ/cm² - 600 J/cm²
Irradiance profile
4 spectral ranges (UVA, UVB, UVC, VIS)
Measurement time
0 to 120 s, adjustable to ~ (rounded)
5 s (100 Hz)
Time resolution
10 ms to 250 ms, adjustable
Sampling rate
10 ms - 1000 ms,
storage rate for export: see time resolution
Averaging
1 - 32
Gain
normal / LowGain for 10 to 30 ms
Cosine correction
yes
Calibration
yes, traceable to PTB / NIST
frequency of recalibration, recommended
12 months
according
CIE
UV-C
240 - 280 nm
UV-B
280 - 315 nm
UV-A
315 - 400 nm
VIS
400 - 480 nm
based customer specification or CIE
optional
5 Technical Data
5.1 General technical data
5.2 Radiometric measurements
5.3 spectral ranges
120 s (4 Hz)
48 s (10 Hz)
24 s (20 Hz)
10 s (50 Hz)
automatically set
Page 6

5 Technical Data 6
USB connector
MiniUSB
PC requirements
min Intel CORE i3, 2 GB Ram, >40 Gb HDD
operating system
Windows 7 with .NET Framework > 4.0
Photoinitiator / Sensitivity curve
optional
5.4 USB / hardware-software-requirements
5.5 Effect related measurements
Page 7
6 Intended Use 7
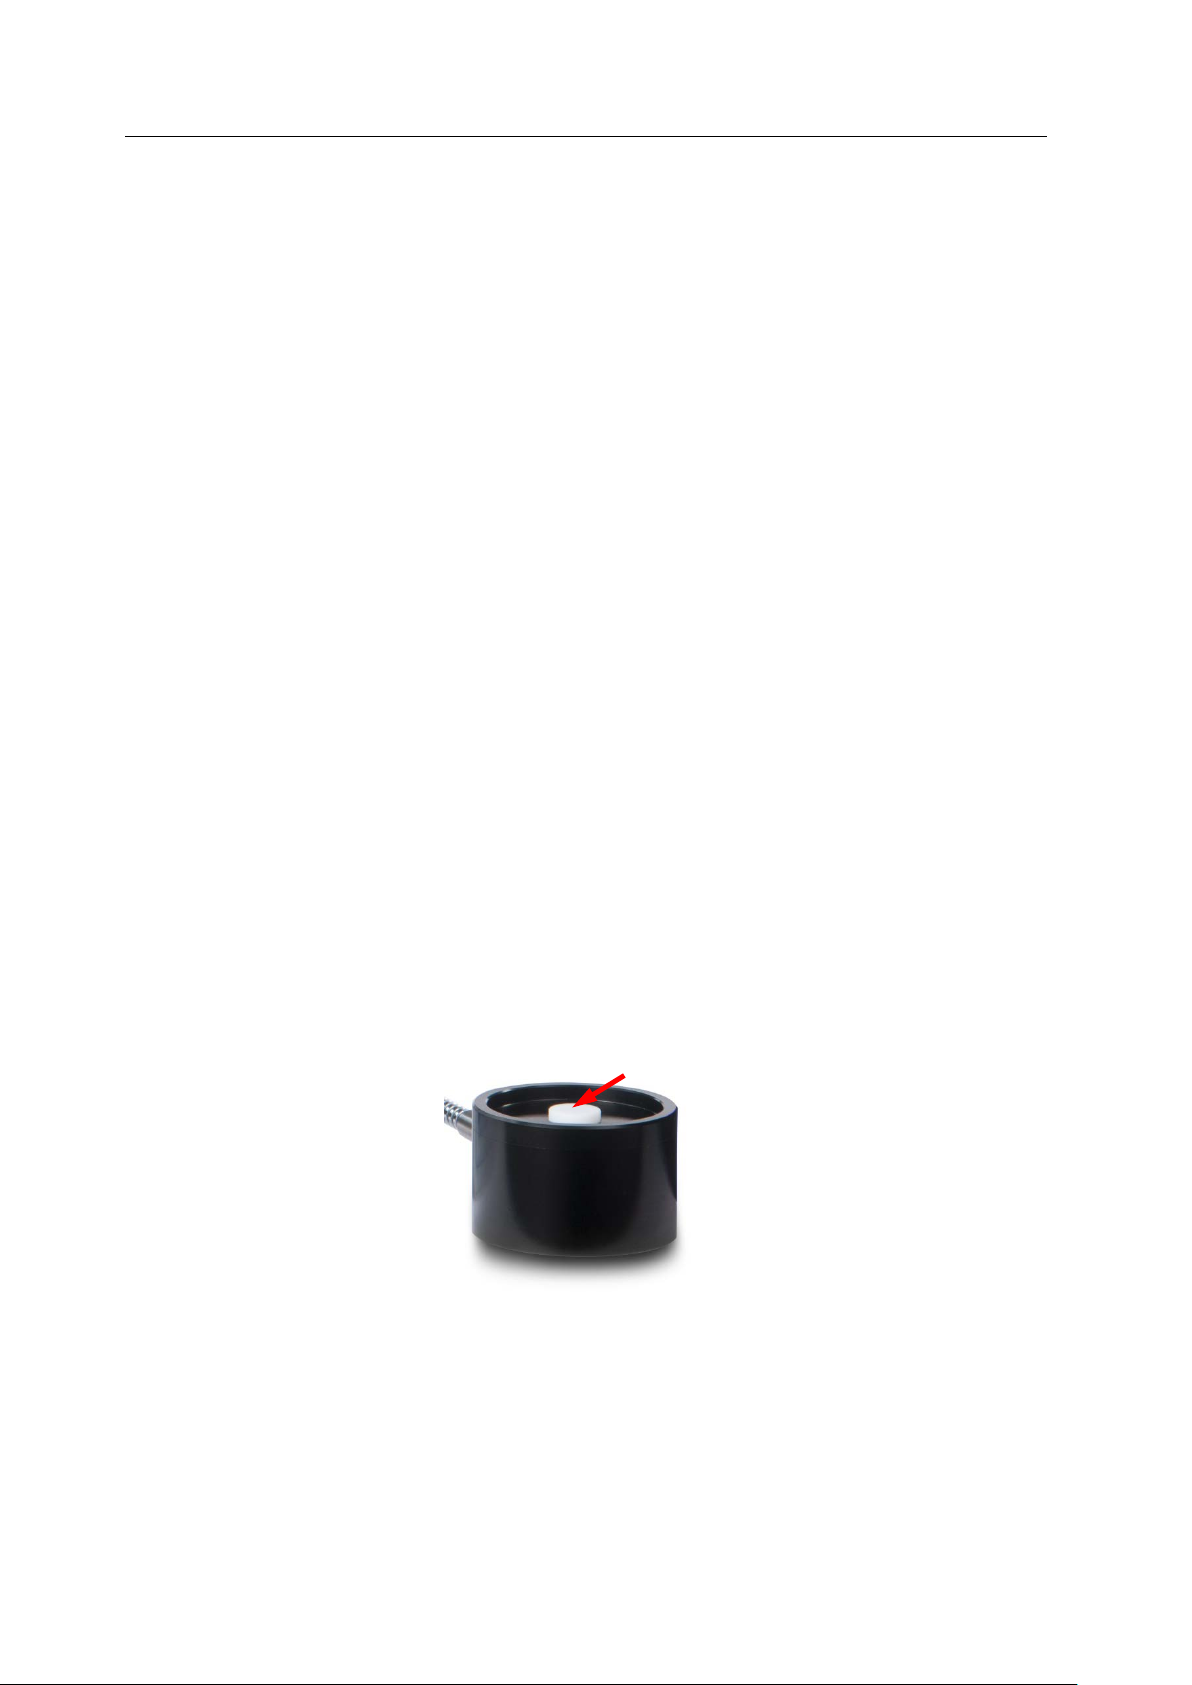
optically active surface
6 Intended Use
The UVpad E determines the irradiance in the UV and VIS spectral range and indicates
these on the integ r ated display. Typic al Applic ati ons:
- Measurement of UV-LEDs and ultraviol et lamps
- UV dose measureme nt s
- Universal irrad iance measurement
- GMP and IQ/OQ docum ent ation
7 Conventional Use
The UVpad E is solely intended for the determination and visualization of irradiances, which are
generated in UV curing systems.
The UVpa d E is battery operated and suitable for usage with lithium batteries, type CR2032. In
case other batteries, than the supplied ones, are used, an operating range of up to 70 °C has to be
observed. Spare batteries are to be obtained from your supplier.
Operation only allowed in dry environments. The assembly position is arbitrary.
When using the UVp ad E, light and UV radiation can be reflected and distributed at the housing.
Appropriate protection measures for the protection against radiation need to be applied, if necessary. Note: The UVpad E itself does not emit any hazardous radiation.
The housing, with the exception of the battery compartment, must not be opened by the user.
The optically active surface must not be touched.
Gloves need to be worn when cleaning the optically active surface.
The UVpad E is a highly sensitive optical measurement device. It must not be exposed to shocks.
Any other usage than the one described above leads to a damage of the product. Furthermore, this
involves risks, such as short-circuits, fire and electric shocks. The entire device must not be modified and/or remodeled! The safety indications are to be observed without fail.
Page 8
8 Important Information 8
Skin oil and contamination are absorbing in the UV spectral range. Finger
are to be avoided. If
ATTENTION: Opening of the housing (except for the battery compartment)
is a highly sensitive optical measurement device. It must not be
to cool
8 Important Information
Please read the instruction manual completely before start-up and operati on.
The latest version of the instruction manual applies.
prints / contamination on the optically active surface
necessary, clean thoroughly with Isopropanol. Use gloves when cleaning.
The UVpad E is calibrated.
leads to a loss of calibration.
Only use batteries, which are suitable for up to 60 °C.
The UVpa d E
exposed to shocks.
When using the UVpad E, light and UV radiation can be reflected and distributed
at the housing. Appropriate protection measures for the protection against radi-
ation need to be applied, if necessary.
The maximum housing temperature of the sensor can re ach > 60 °C and there
is the risk of skin burns on contact. Please allow for the UVpad E
down and use protective gloves to avoid skin burns.
Page 9
9 Operation 9
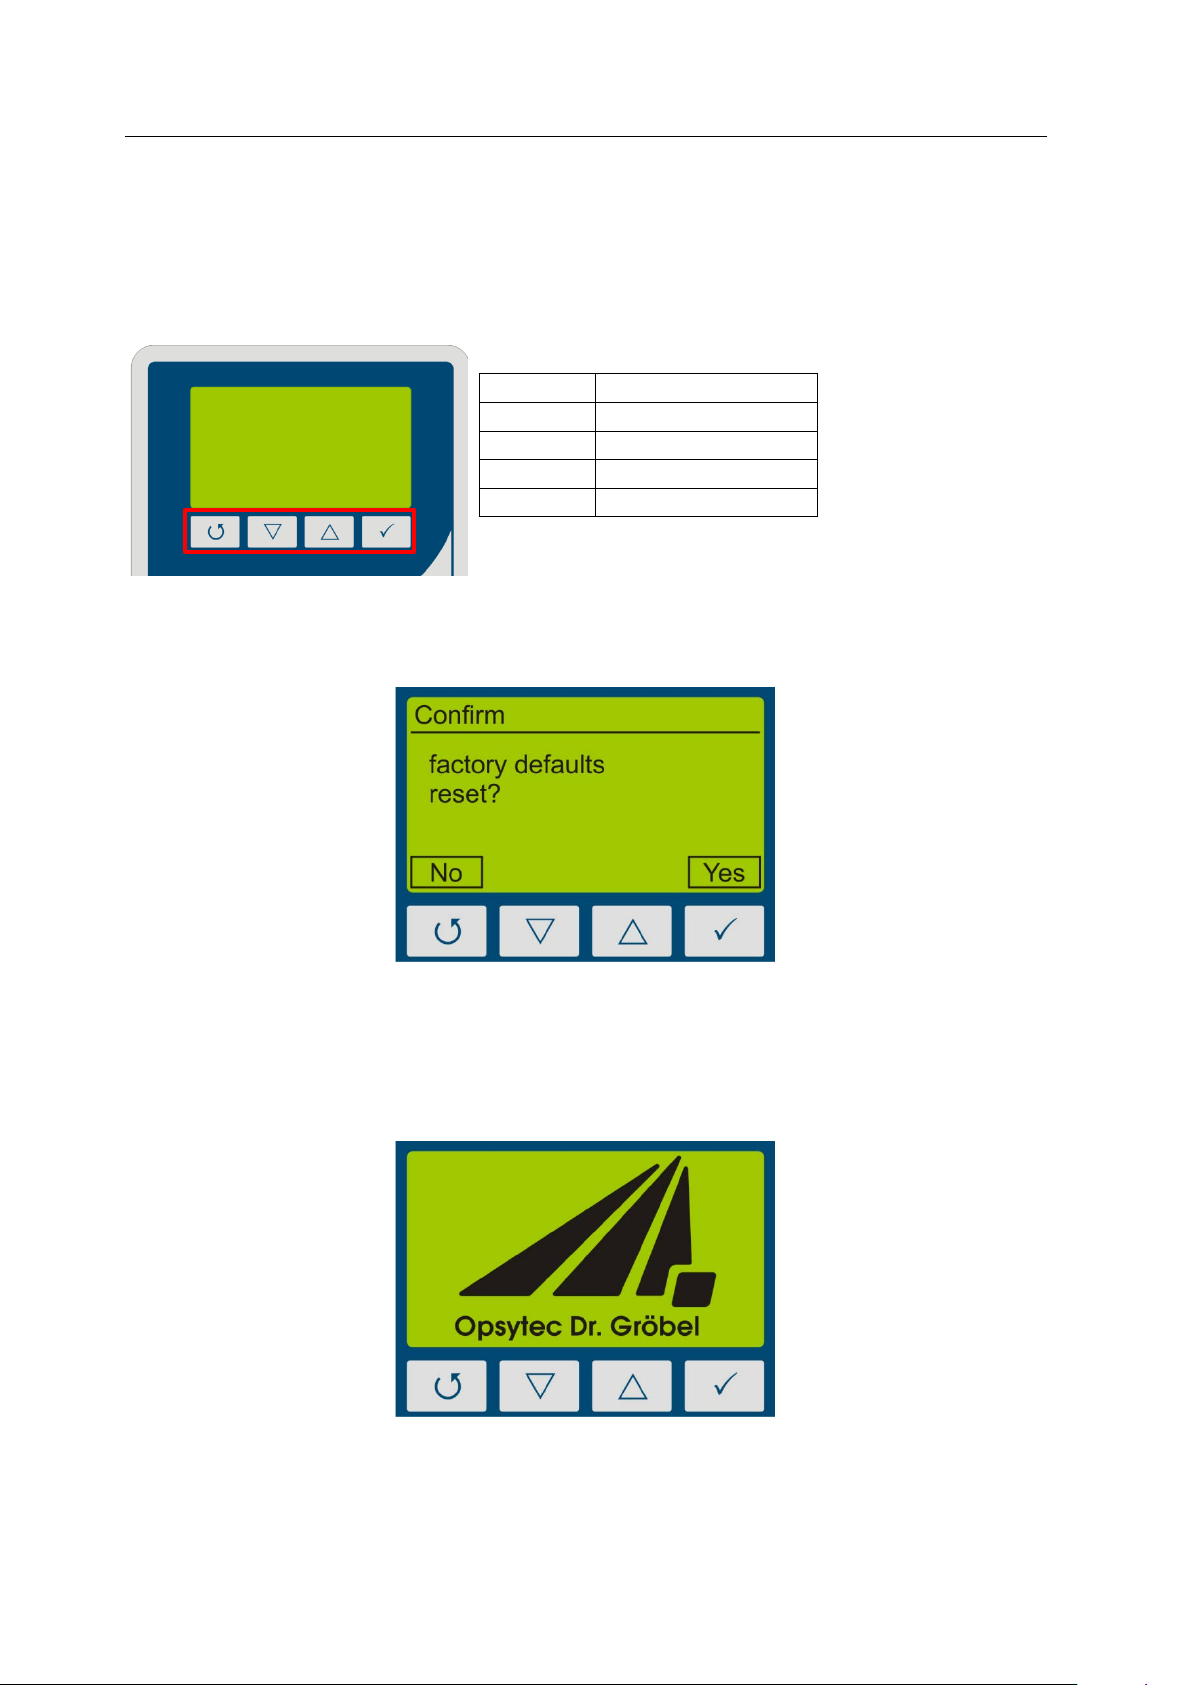
Key
Function
Back / Cancel / Off
Down
Up Confirm / Continue
9 Operation
The UVpad E is operated via four keys. These are arranged on the front panel below the display. The keys and the functions are illustrated as follows:
The keys and are addit ionally available as softke ys. Softkey functions are directly dis-
played above the key. Example:
9.1 Switching the device on and off
The UVpad E is activated via any key. During the initialization (ca. 2s), the welcome screen is
displayed:
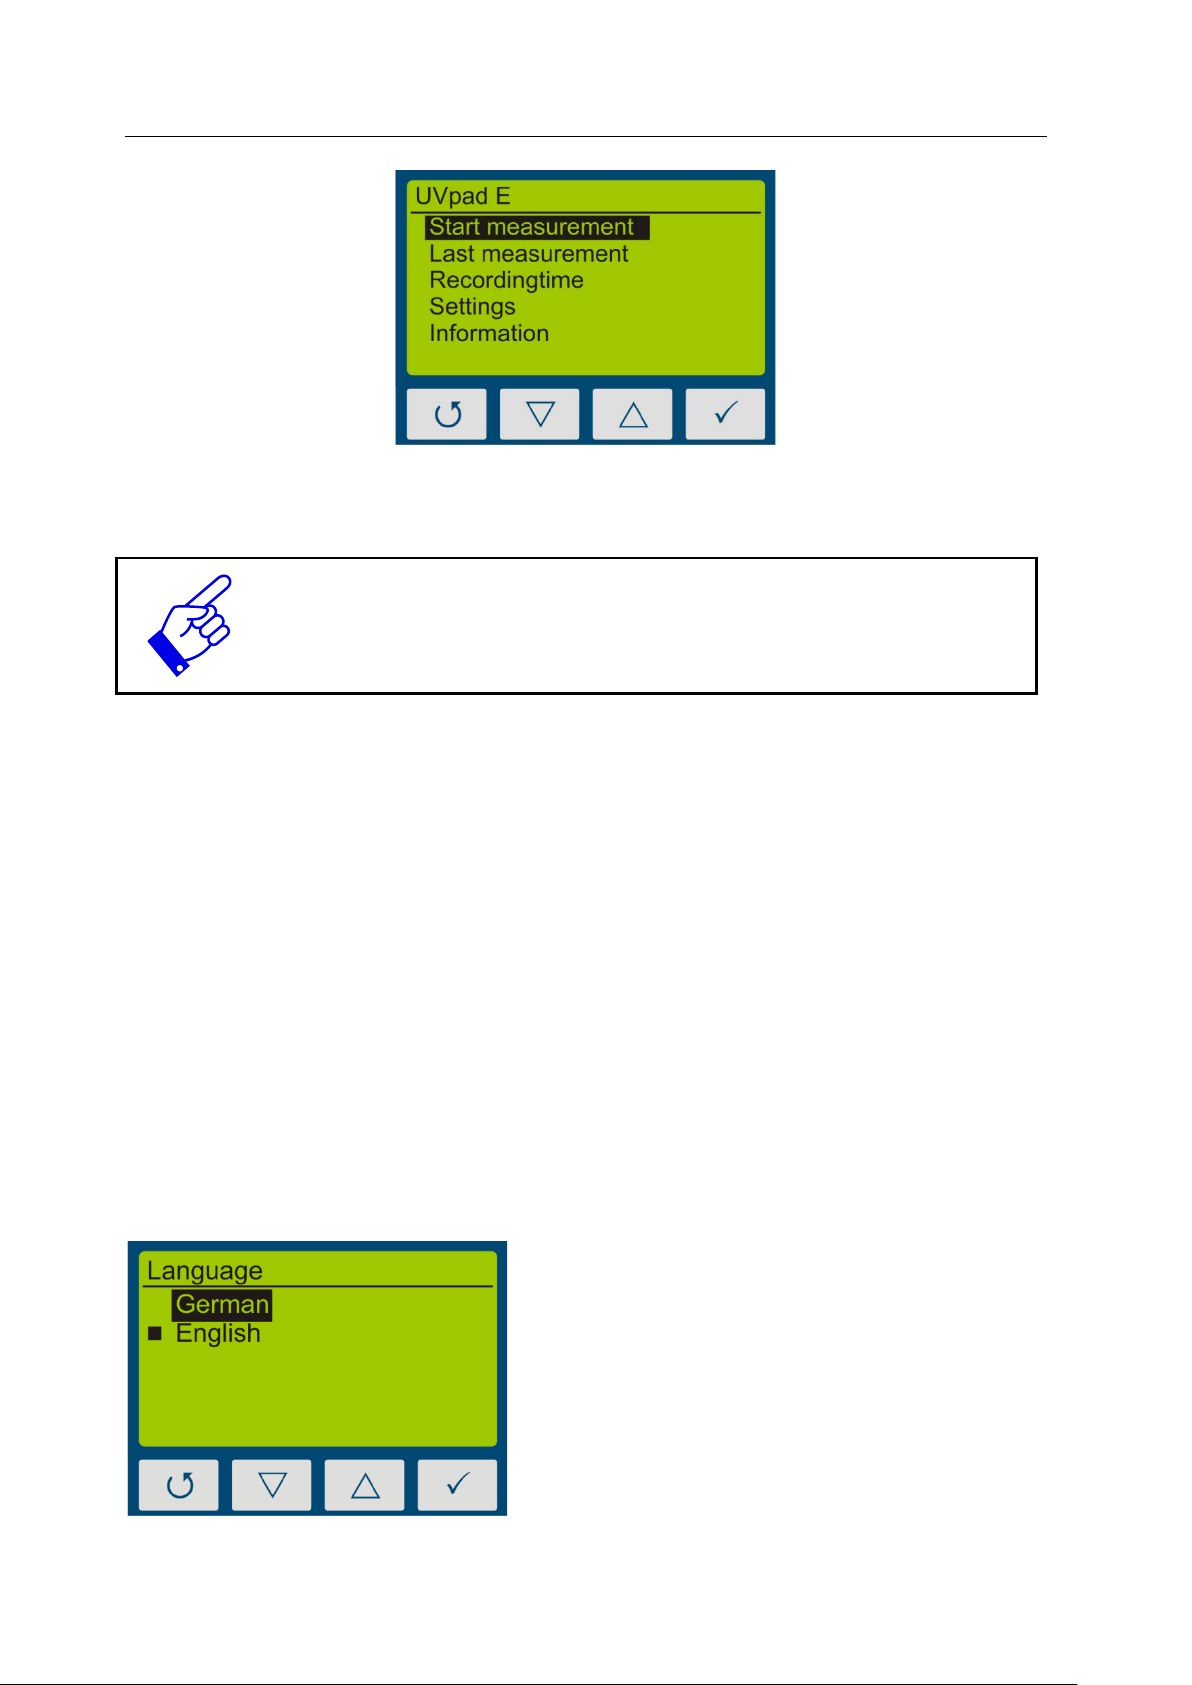
After the initialization, the standby menu is displayed:
Page 10
9 Operation 10
, the device switches off
In this example, the language “English” is set.
In the standby menu, the UVpad E is switched off via the key .
After 2 minutes of not using the UVpad E
automatically.
9.2 Standby Menu
Via the standby menu, all functions of the UVpad E are available for you. These are:
• Start measurement
• Show last measurement
• Scope measurement
• Settings
• Information
In the standby menu and in all other menus, select the active menu item via the keys and .
Confirm the active menu item with the key . With , you return to the previous menu with-
out saving any changes.
The selected menu item is highlighted in black and displayed inverted. If several settings are
selectable, then the selected setting is marked with. Example:
“German” is selected, but not set.
With the key -key, the setting is accepted
and the language is being changed.
Page 11
9 Operation 11
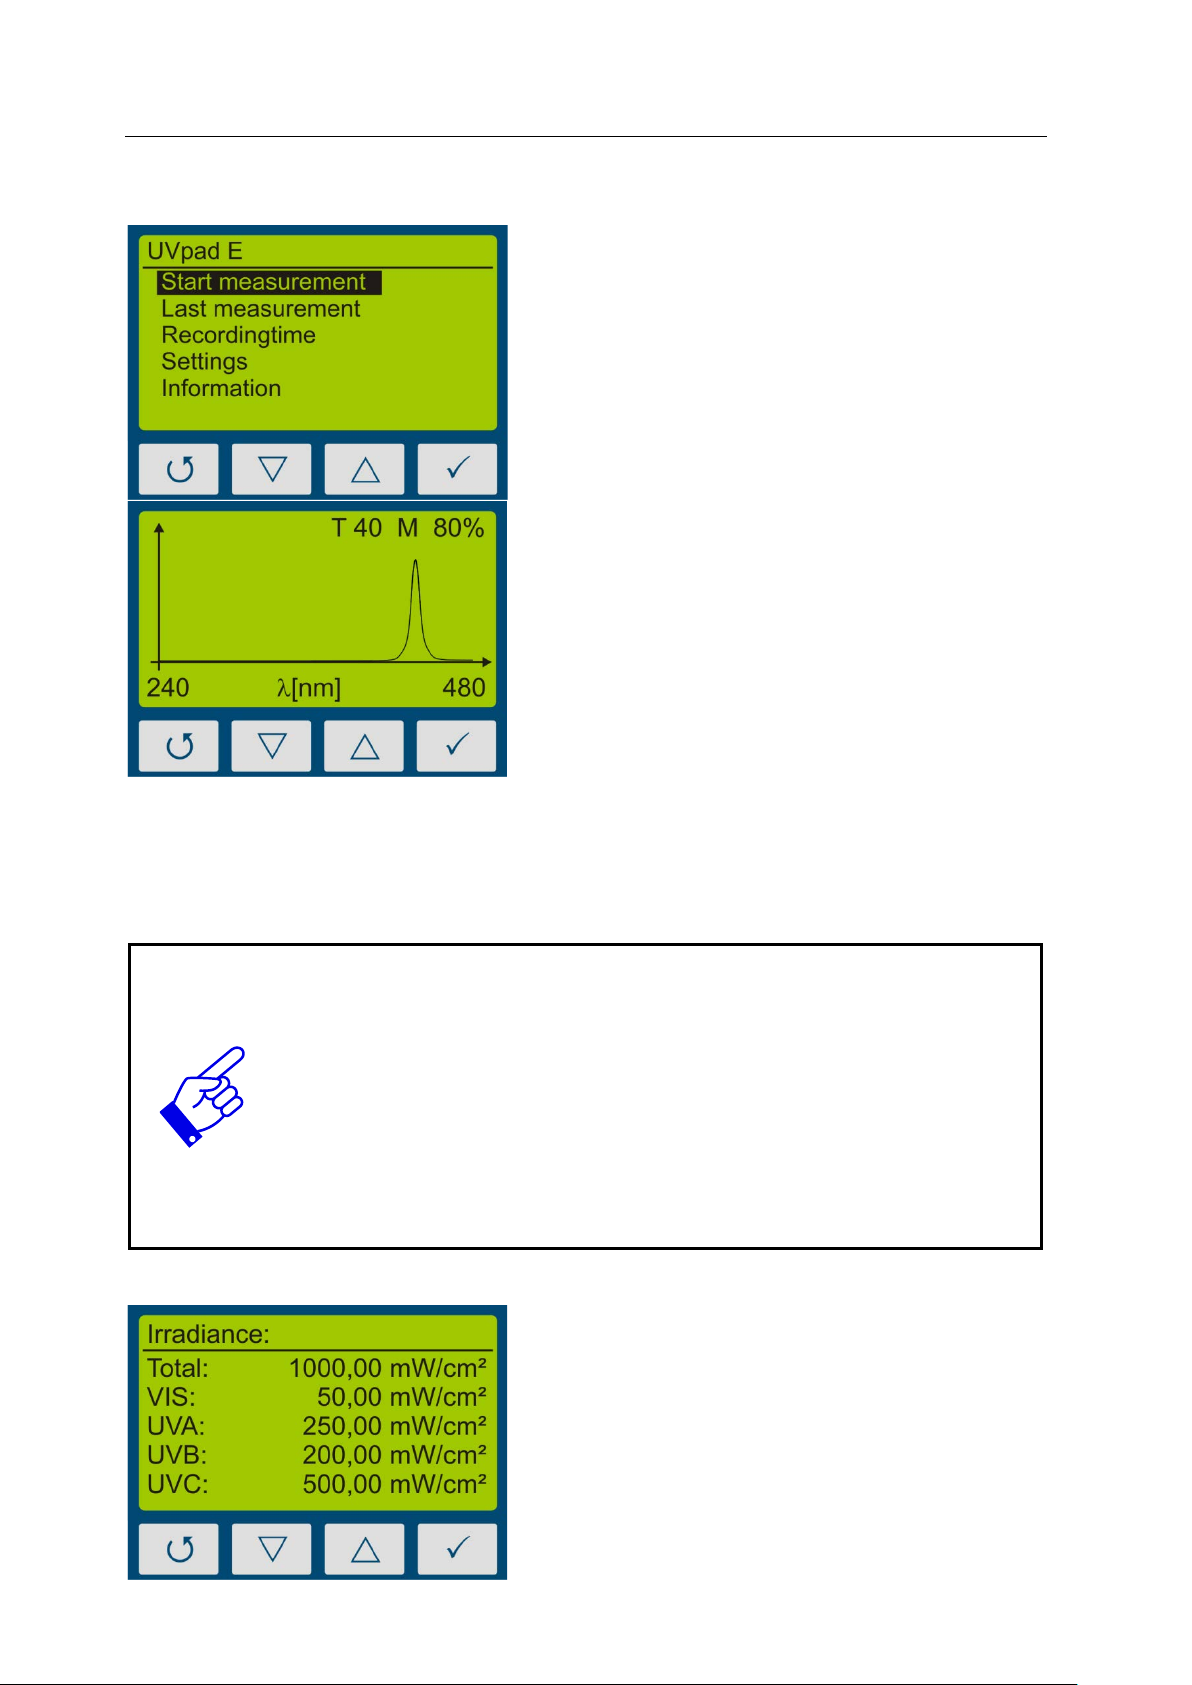
From the standby menu, a measurement is
First, the spectrum is displayed.
Switch between spectral and radiometric view
matically recorded if the radiometric view is
9.2.1 Start Measurement
started with the key .
Use ‘”Auto” mode to get the best integration
time or, in fixed mode use and ke ys to
adjust integration time.
Notes:
The optimal integration time, gain (L/H) and the saturation of the measurement range are displayed at the upper display edge. The integration time is displayed in ms. Example:
T 100: The integration time is 100 ms
Hint:
For optimum measurement results, the measuring range should be fully controlled. Very good measuring results are achieved when the measuring range
is at least 50%.
The modulation is linear to the set integration time. Example:
55/5000
T10 M20%: Measuring range is 20% used => Bad
T40 M80%: Measuring range is 80% used => Very good
by pressing .
If storing measurements is sel ected via menu
„recording time“, the measurement is auto-
shown.
Page 12
9 Operation 12
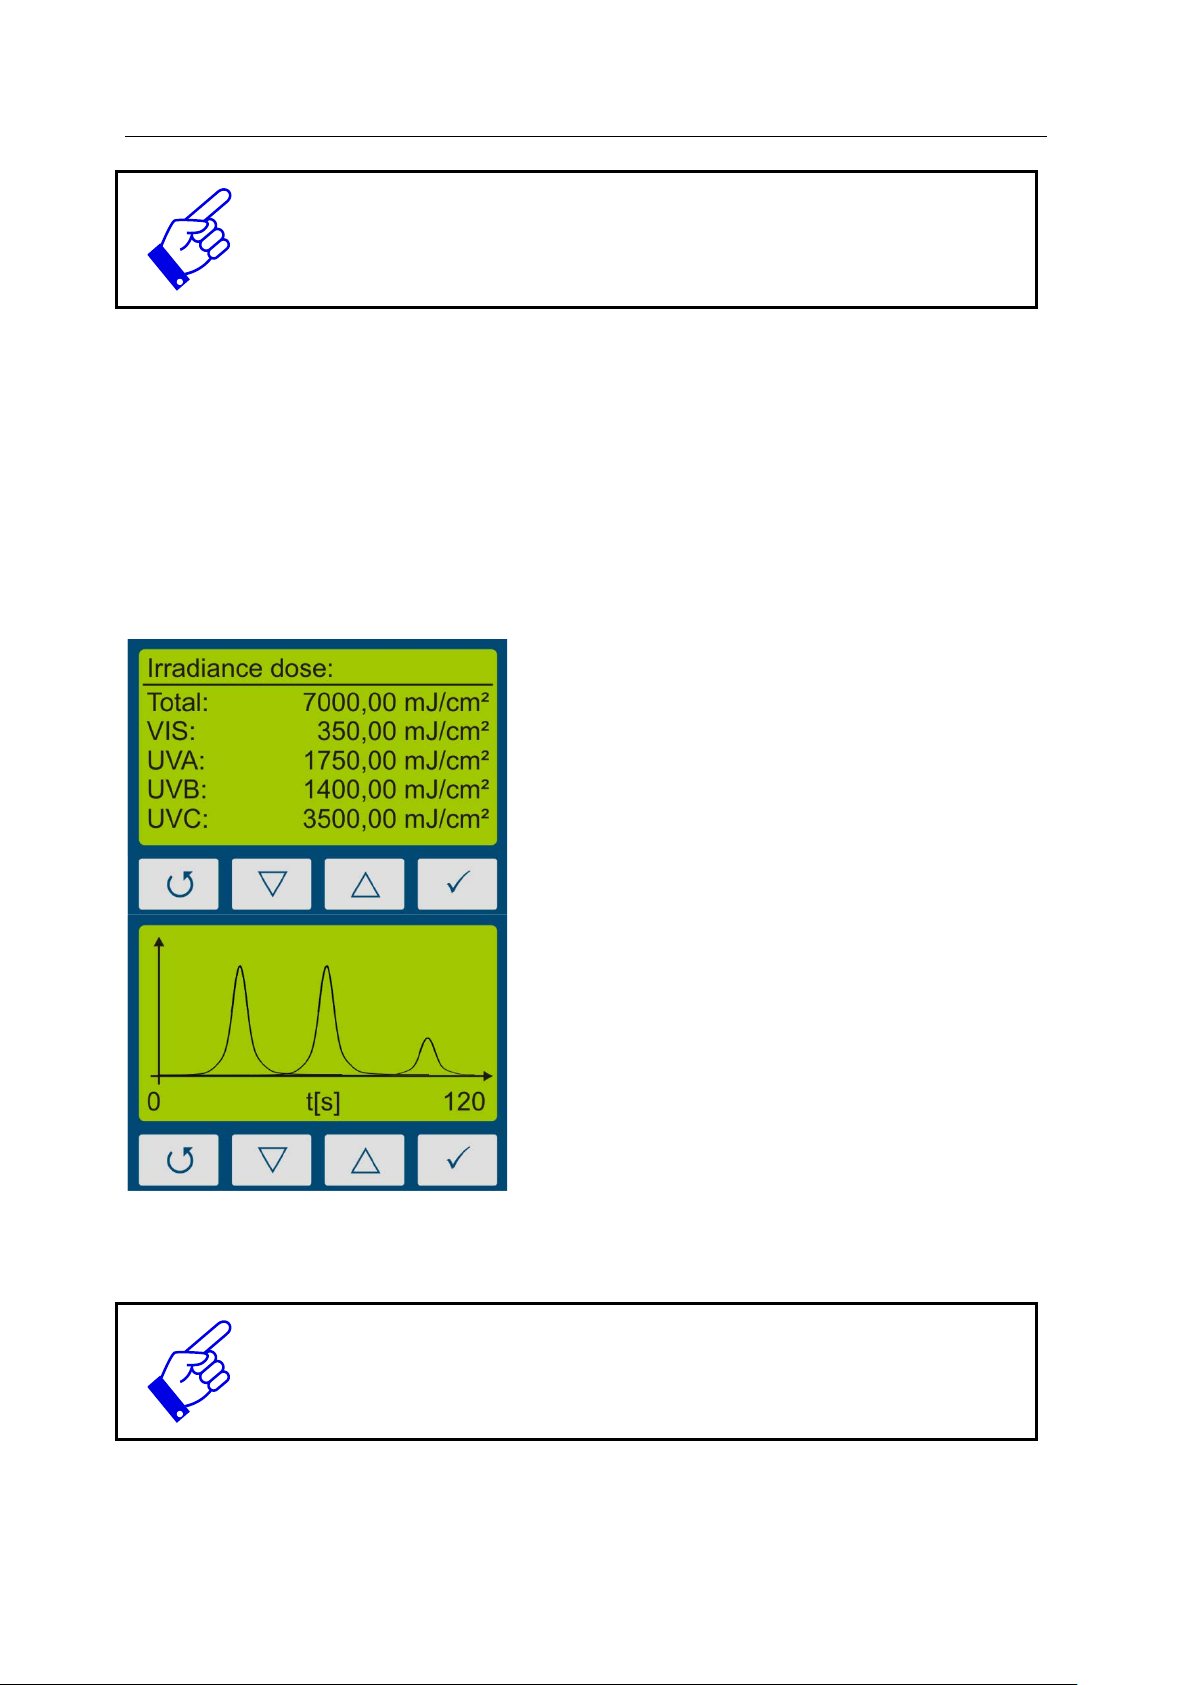
First, the dose of irradiance is displayed.
With the key , the irradiance profile for
Stop the measurement by pressing the key for at least 0.5s.
The measurement results are displayed automatically. For a better overview, these are partitioned to four screens.
1. Irradiance (only when viewing saved measurements)
2. Dose of irradiance (UVA, UVB, UVC, VIS)
3. Spectrum at maximum irradiance (only when viewing saved measurements)
4. Irradiance profile over the duration of the measurement
These can be displayed with the keys or .
With the key , you are respectively being redirected to the previous menu. With the keys
or you can return to the standby screen.
Note:
If the irradiance is too low for the measurement range, then the UVpad E displays no measured values. The irradiance and the dosage values are then di splayed with “-“.
UVA, UVB, UVC, VIS and total are displayed.
Page 13

9 Operation 13
Note:
integration time, the UVpad
1. Set the correct integration time with
3. Cover the sensor, wait 1-2 seconds or
9.2.2 Start manual dark measurement
For manual darkness measurement, select the menu item "dark+radiometric" under Settings,
Measurement mode. If your UVpad E is equipped with several effective functions, manual
dark measurement may be available for further effective functions.
Manual darkness measurement is only active in the sensitivity mode "fixed".
Therefore, set a fixed integration time!
If the darkness measurement is not done for the
E will not displa y any values. In this case th e irradiance and dose val ues are
displayed with "-".
Manual darkness measurement is important if the irradiance at the end of the
short-wave measuring range (e. g. 240 nm) is not "zero", otherwise th e measured values are too low.
For the measurement with manual dark measurement, start the measurement and set the
integration time with the button or .
the button or .
2. Start irradiance display with key or
start dark measurement with key .
3-4 measurements and press to
switch to the irradiance display.
Page 14

9 Operation 14
4. The irradiance is displayed.
Note:
measurement is not done or the integration
5. To save the measurem en t, p ress th e
button for at least two seconds. After
release, the irradi ation values are displayed.
The irradiance is not displayed if the darkness
time has been changed.
The note DARK is displayed.
Note:
The optimum integration time, the gain (L/H) and the control of the measuring range are displayed at the top of the display. The integration time is displayed in ms.
Example: T 100: The integration time is 100 ms
Page 15

9 Operation 15
Select the measurement with the buttons
If 50 measurements have alread y been sav ed, then a no te comes up pri or to a
stating that the memory is full and that the measurement
Confirm with Yes (). Return with or .
9.2.3 Show last Measurement
In the standby menu select the item “Sh ow las t measu remen t” to d ispl ay the l ast m easurem ent.
Select the values from the list of measurements, which you want to display.
The navigation in the display screens is taken out, as described in chapter 9.2.1.
and . Confirm with . Return with .
new measurement,
can be taken out without saving it, or that alternatively, the oldest measurement result is being overwritten.
See Delete all Measurements
See Data Export
Delete all measurements:
The internal mem ory can be deleted directl y on the UVpad E or via a PC. For this purpose,
please select the prior menu item “Clear memory”.
9.2.4 Setting integration time during meas ur ements
If using fixed integration time, during a measurement you can set up the sensitivity of the
UVpad E with the keys and . Select for a lower sensitivity and for a higher sensitivity. The sensitivity is not saved.
Page 16

9 Operation 16
s not fill the
), if single lines of the spectrum are cut on top.
Sensitivity too low
Sensitivity correct
Sensitivity too high
Select a higher sensitivity (), if the spectrum is noisy or doe
display completely.
Select a lower sensitivity (
The measurement range is then exceeded and is shown in the display MAX.
Examples:
Risk of UV radiation.
Protect your skin and eyes during the work at and with UV radiation sources.
Page 17

9 Operation 17
Set recording time via the buttons
With any key, you are being redirected to the
9.2.5 Recording time
If storing measurements is selected via settings (120 s to 5 s), the measurement is automatically recorded if the radiometric view is shown.
and . Confirm with or cancel the s et-
ting with .
9.2.6 Settings
In the menu „Settings“, you can set up the sensitivity, the effective function, the menu language and the date / time. Furthermore, you can reset the UVpad E to the factory settings.
9.2.7 Information
Select the menu item “Information” from the standby menu, to display the serial number, the
firmware version, as well as the date of calibration.
menu.
Page 18

9 Operation 18
In this menu, the following functions are
In the setting „automatically“, the UVpad E
diance is existent. This setting is suitable for
measuring range then is 0 .. 650 mW/cm².
9.3 Settings
By selecting the menu item „Settings“, you are being directed to the settings menu of the
UVpad E.
available:
- Settings of the sensitivity
- Selection of the effective function
- Language settings
- Settings of date and time
- Reset to factory settings
9.3.1 Sensitivity
The UVp ad E adjusts the sensitivity automatically, in order to ensure the optimal signal-noise
ratio. The sensitivity is hereby set via the sampling rate. With high irradiances, the sam pling
rate is increased in ord er to not ex ceed the measurement ran ge. With low irradi ances the sampling rate is dec reased. As a result in belt conveyor s ystems erroneous m easurements may be
recorded. Please follow the instructions on the display and / or set a fixed integration time as
sensitivity. Five pre-defined sensitivities are available.
adjusts the sensitivity, once a minimum irra-
most applications.
In the setting „low“, the sampling rate is always between 10 ms and 100ms. The UVpad
E can measur e UV-systems with a very high
irradiance or significant irradiance modifications (e.g. with shutter operation or with very
high tape speed).
In the setting „high“, the UVpad E measures
with a sampling rate of 1000 ms. This is ideal
for applications with a low irradiance.
In the settings „fixed“ and „fixed (Res 0.01)“,
the integration time is predetermined. The
UVpad E can be used optimally for known
systems with shutters
Note:
In irradiation profile resolution is enhanced
from 1 mW/cm² to 0.01 mW/ m² for the settings "high" and "Fixed (Res. 0.01). The
Page 19
9 Operation 19
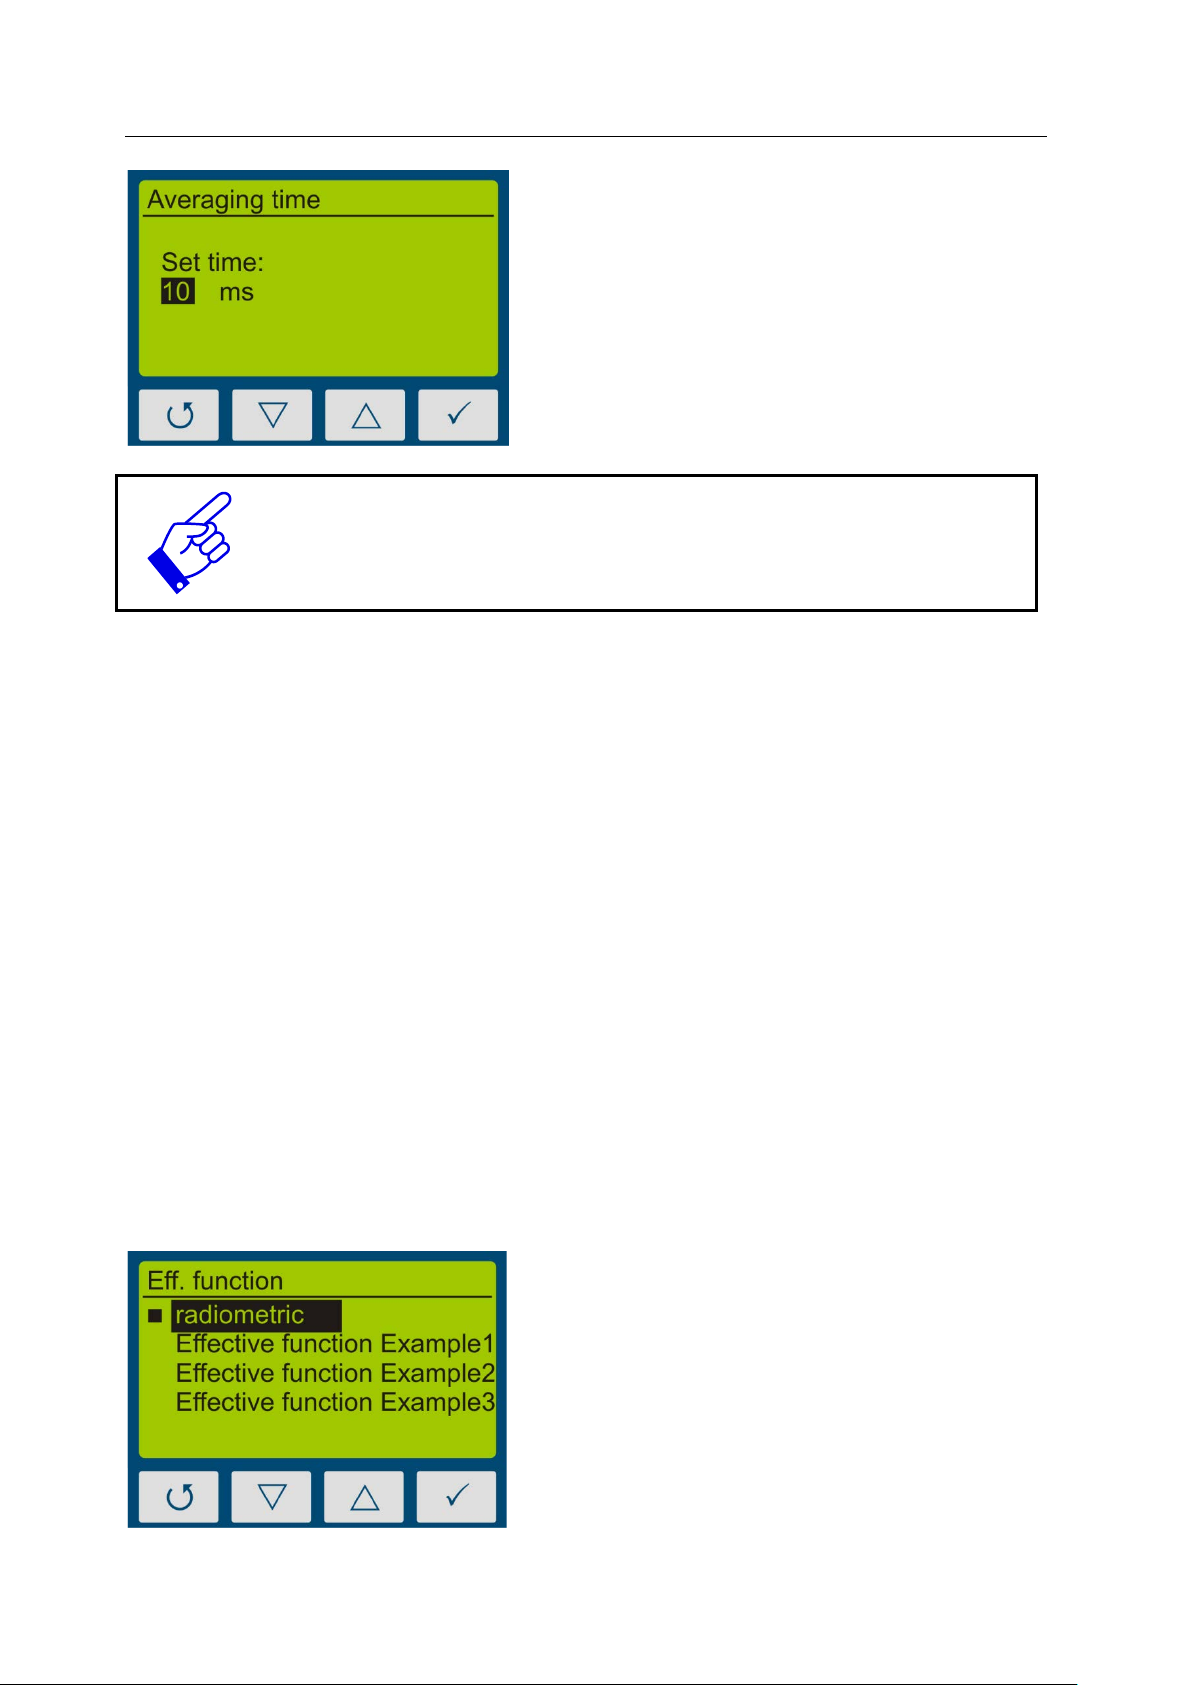
The menu item “Sample rate” is displayed, if
Select „radiometric“, for traceable and inter-
optimization. The international comparability
you have selected a fixed sensitivity.
The integration time is set via the buttons
and . Confirm with or cancel the s et-
ting with .
Pressing on 10 ms setting switches to low sensitivity.
This reduces sensitivity by factor of 5.
9.3.2 Averaging
The UVpad E can calculate the irradiance from the moving average. Hereby are signal-to-noise
ratio, and thus measurement accuracy can be enhanced.
For integration times below 500 ms we recommend averaging over 16-32 measurements, while
for integration times over 500 ms smaller settings may be useful.
9.3.3 Effective Function*
Effective functions serve for the process-oriented measurement. This is often also called effectrelated or actinic measurement.
In that case, effective functions can be for example:
- Absorption spectrums of photo initiators
- Spectral sensitivity function
- Filter function for instrument comparisons
In the Eff. function menu, the desired function can be selected using the -key or -ke y and
confirmed with the -key.
nationally comparable measurements.
Select an effective function for a processoriented measurement and a targeted system
is not given.
Page 20
9 Operation 20
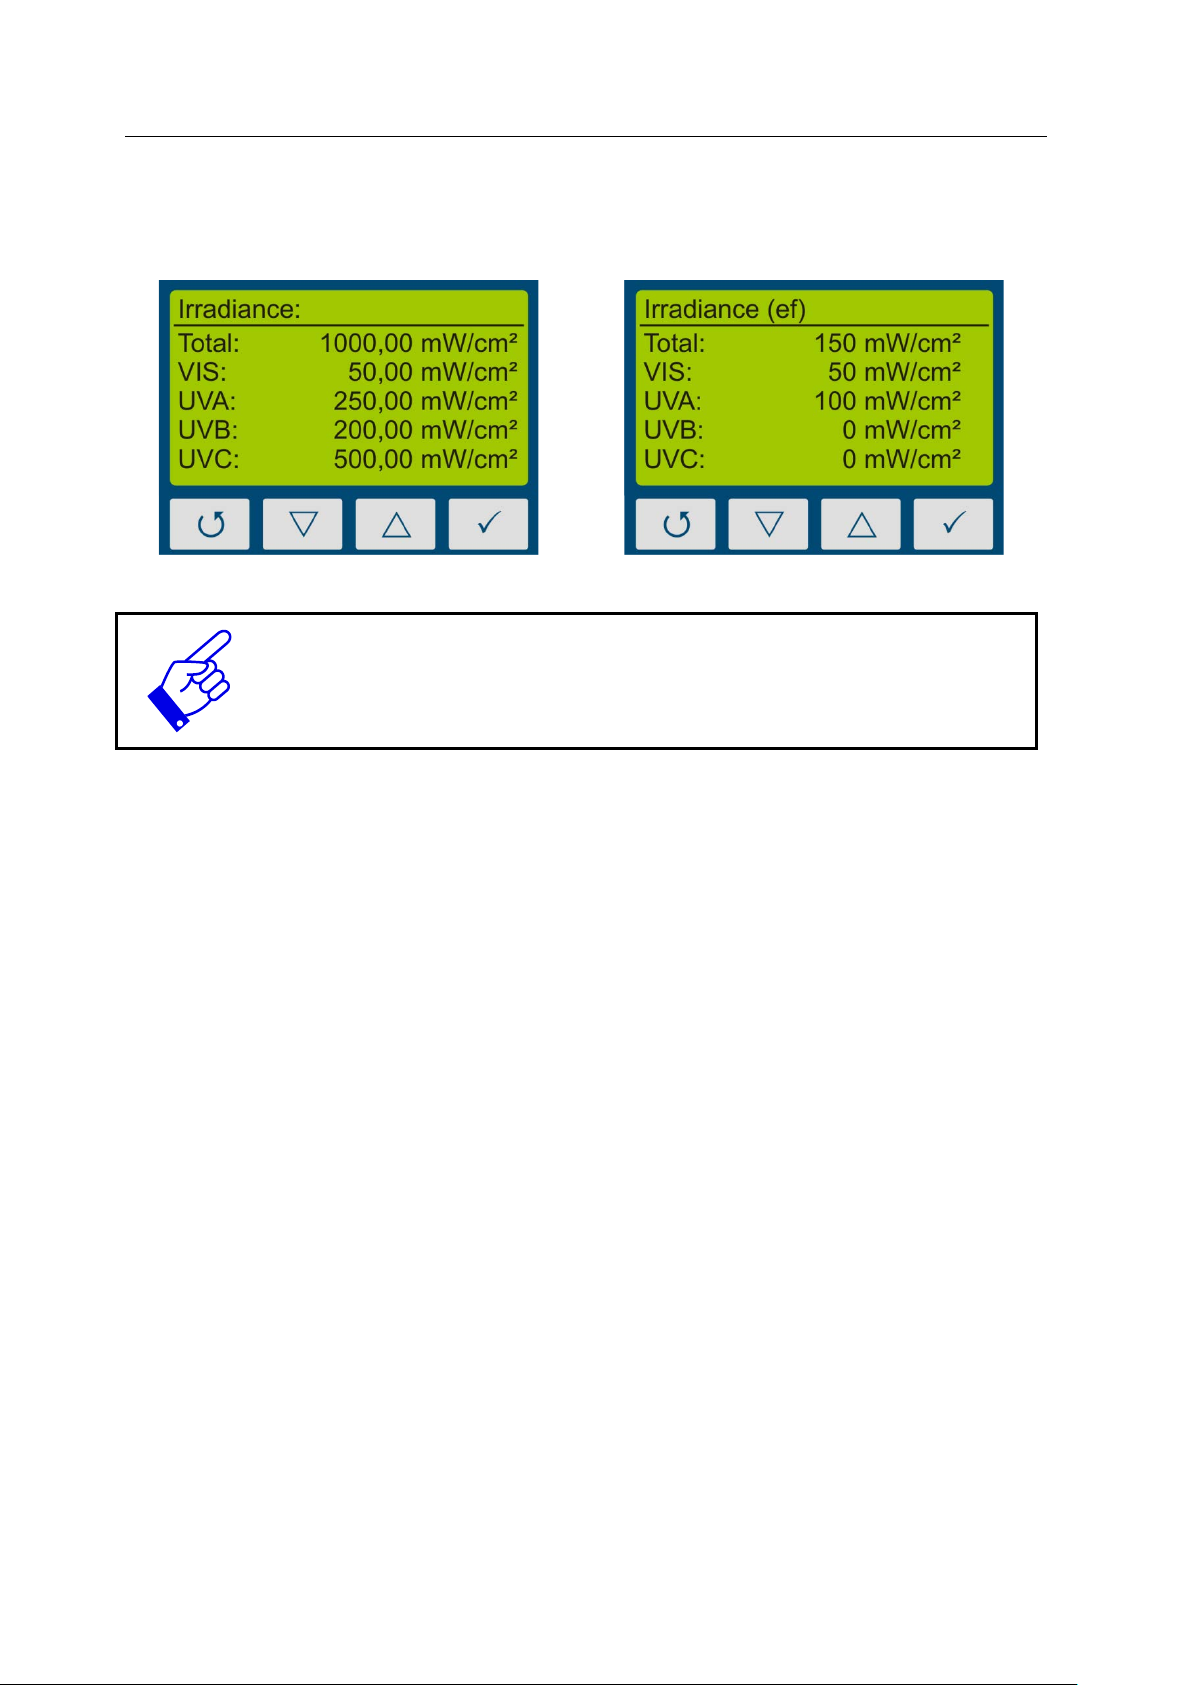
Example: radiometric
Example: with effective function
If measurements are t aken out effect-related, then this i s displayed in the irradiance and in the
dosage display by the addition “(ef)” for “effective”. Rad iometric and effect-r elated measurements are illustrated subsequently.
The function “Effective Function” is only available, if your UVpad E has
been programmed with a customized effective function at factory.
Page 21

9 Operation 21
Select the desired l anguage with the keys
First set the day with the keys and . Se-
Confirm the restoration of the factory settings
9.3.4 Language
The UVpad E comes with a menu in the German and English language.
and and confirm with .
9.3.5 Date / Time
The UVpad E has a real-time clock to check the validity of the calibration.
You can set up the real-time clock in the menu „Date / Time“.
lect for the month, th e year, the hours and
minutes.
Confirm your settings with .
With you can cancel the settings at any
time.
9.3.6 Factory Settings
Reset the UVpad E to the factory settings and confirm.
with .
With you can cancel the restoration of the
factory settings.
Page 22
10 Data Export / PC-Software 22
4.0 or higher is required. This is found on the installation CD or free of
10 Data Export / PC-Software
10.1 Installation
For the installation, please proceed as follows:
1.) If necessary, disconnect the connection of the UVpad E with the PC.
2.) Start the installation with “setup.exe” in th e master data of the Software CD. Follow
the instructions of the installation program.
The driver installation is executed as an independent application TUSB3410.
For the software UVpad E Viewer, the Microsoft .NET Framework Version
charge at: www.microsoft.de.
3.) After completing the inst allation, connect the UVpad E with the PC. The UVpad E is
integrated as a virtual, serial interface. The driver installation is taken out automatically under Windows 7.
10.2 Connecting with the PC
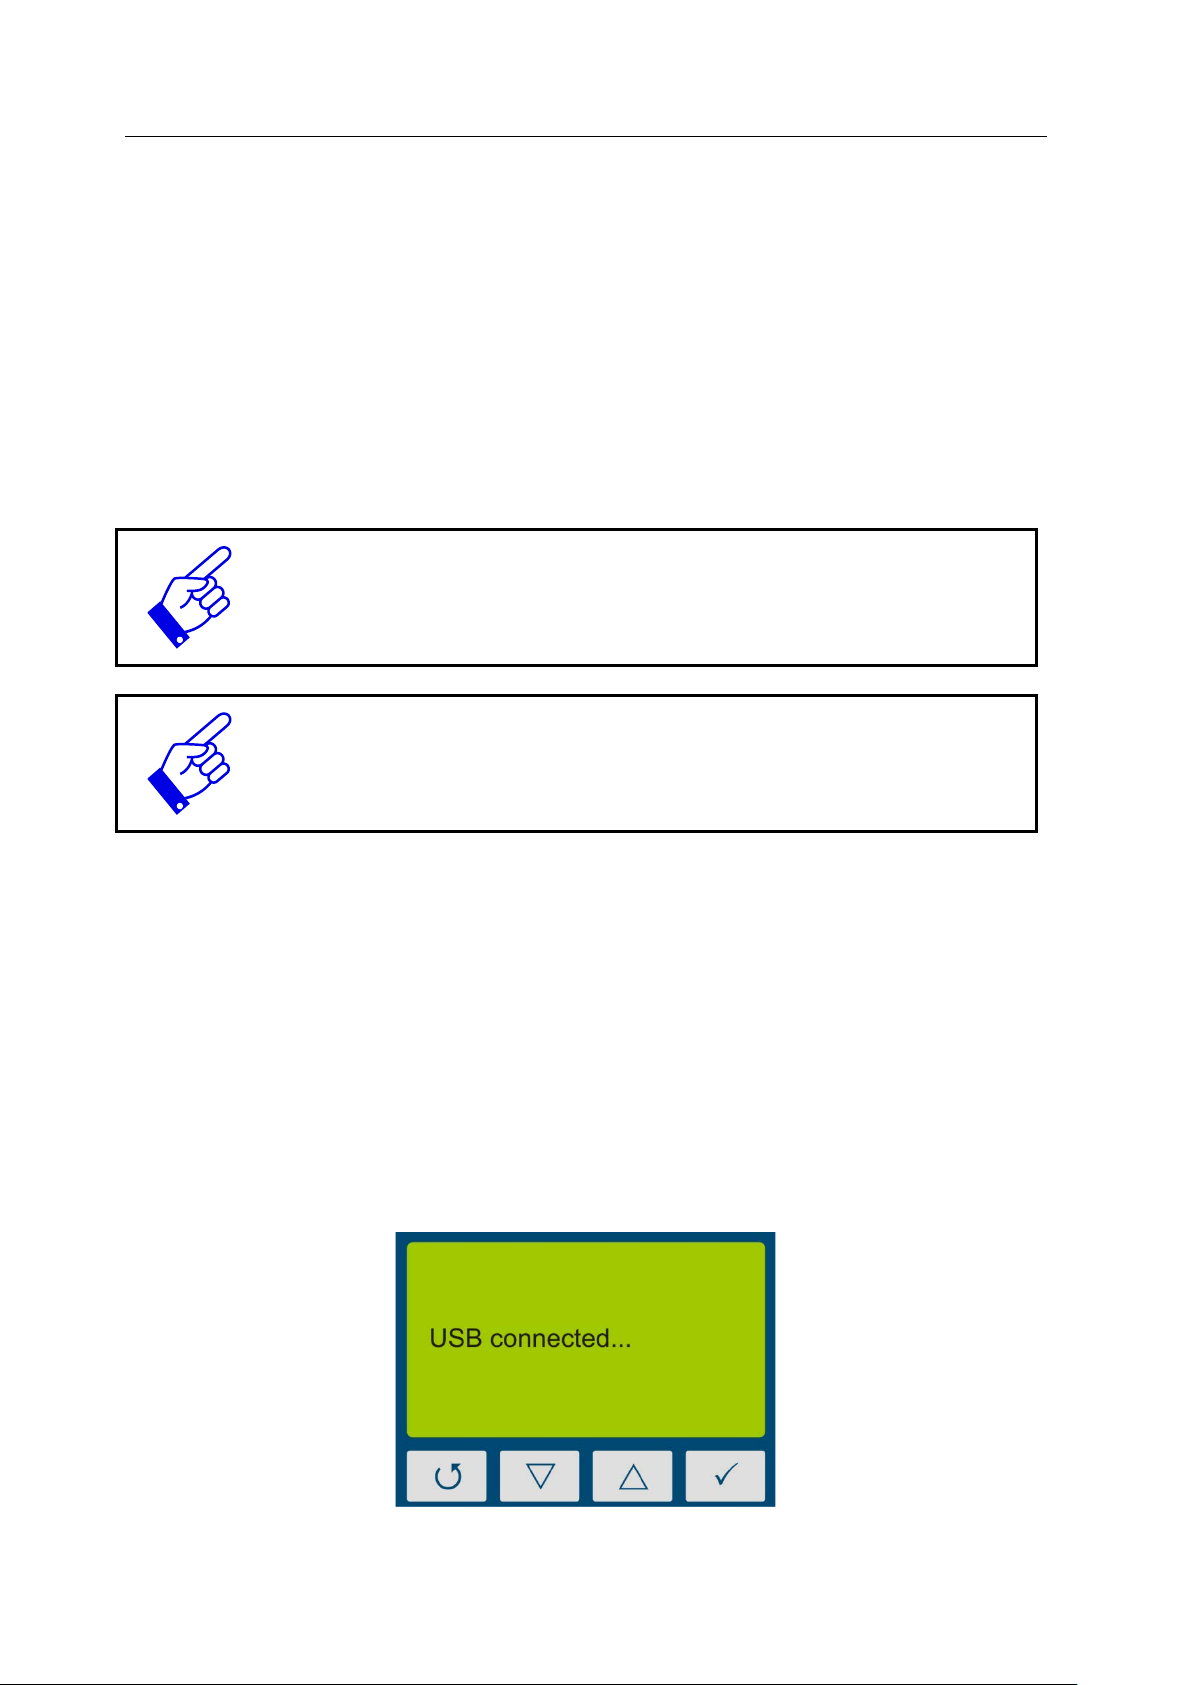
Connect the UVpad E with the PC and switch it on. The screen displays the message “USB
connected”.
Once the UVpad E is connected with the PC, it does not react to any keystroke. Disconnect the
connection with the PC and the UVpad E continues working autonomously.
Page 23
10 Data Export / PC-Software 23
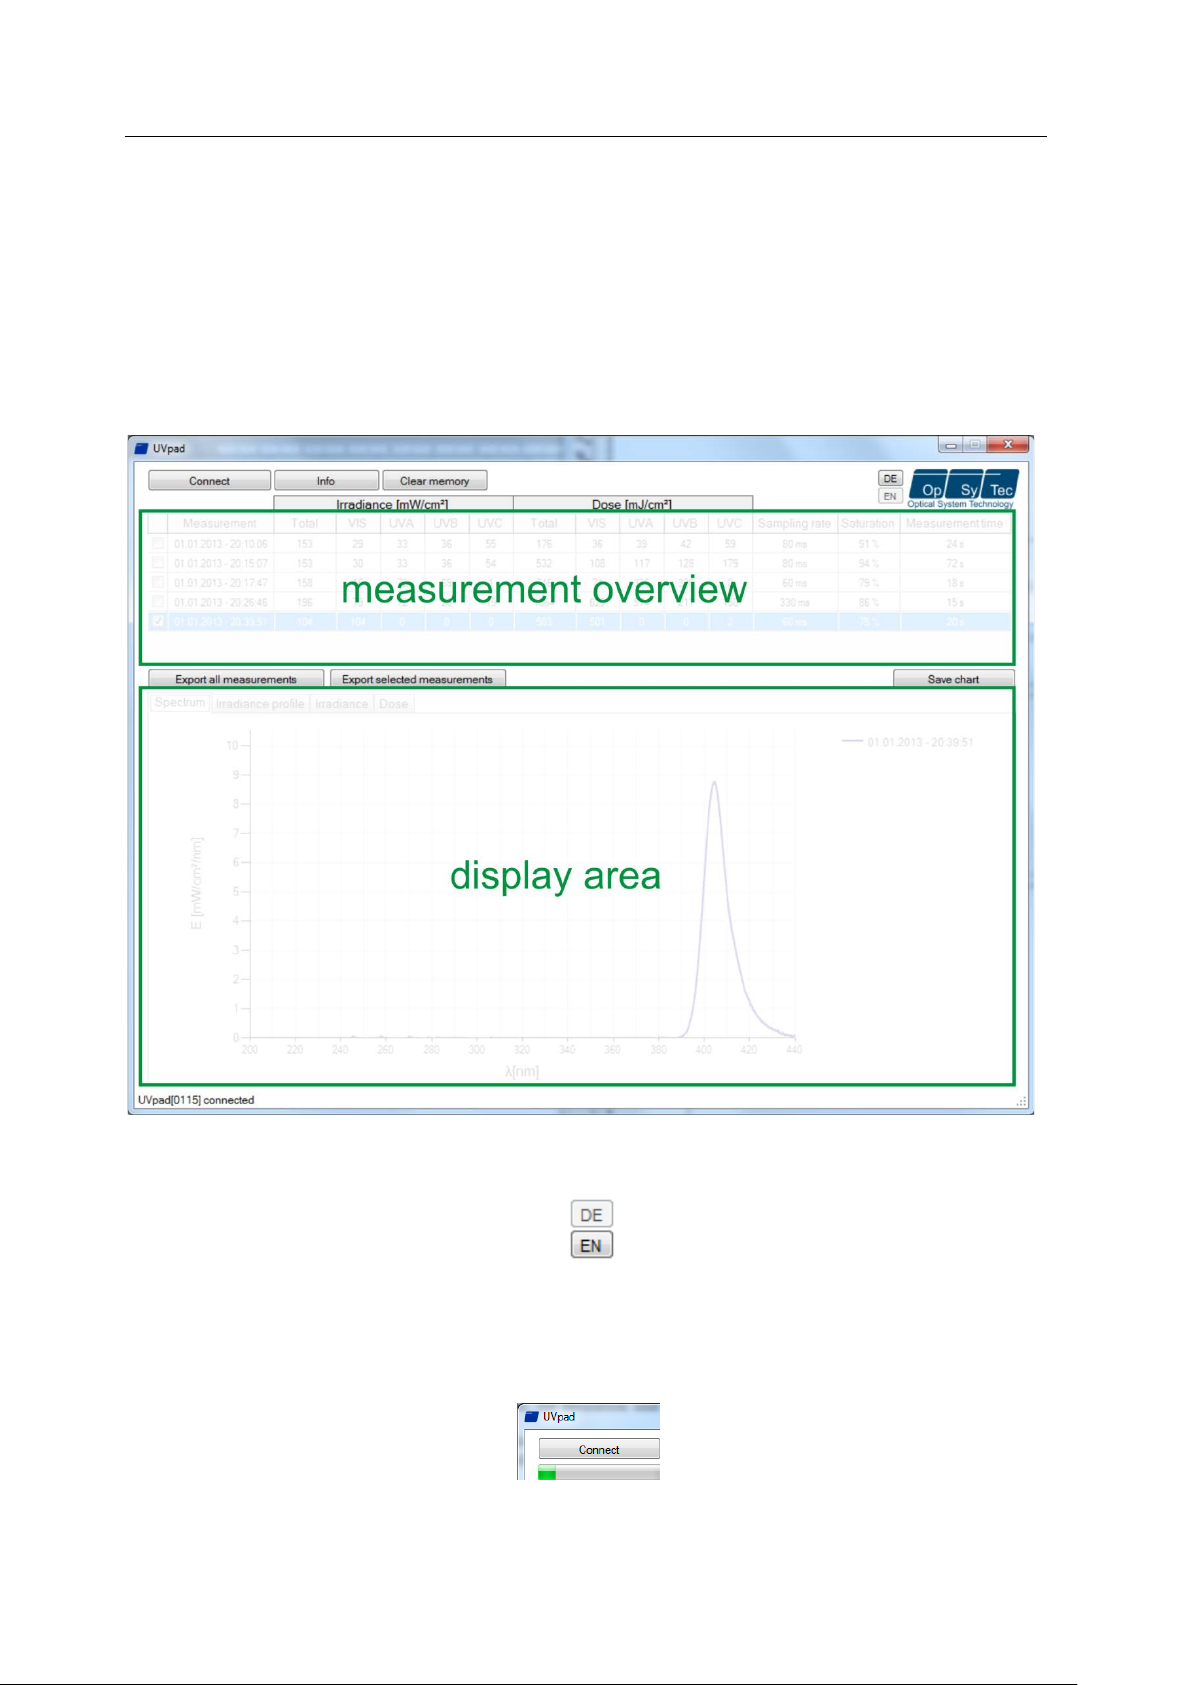
10.3 Viewer Software
The UVpad E software is divided into two areas. The are a measurement overview displays the
executed measurements with date / time, irradiation and dosage, as well as the integration time,
the saturation und the measurement duration.
Individual measurem ents can be com pared in th e di spla y area bas ed on sp ectr a, ir radiance profile or by means of measurement data.
The buttons EN and DE let you change the language (German / English).
When starting the so ftware, the measuremen ts are automaticall y imported, when an UVpad E
is being detected. Importing can take a few seconds. During this time, a progress bar displays
the import:
If the UVpad E is not connected or not ready yet, then an error message pops up. Restart the
import after a few seconds via the button „Connect“.
Page 24

10 Data Export / PC-Software 24
Viewer displays measurement settings and results as
In the spectrum view and the irradiance profile graph, you can zoom with the right mouse button. Use left mouse button to zoom out again. Example:
The max. irradiance and dose will then be calculated in active view (irradiance profile).
Working with different measurements:
You can select and compare d iffer ent measur ement s. You can also add a comm ent in t he table
before exporting data.
Note: The UVpad E
sensitivity, saturation and errors. Use mouse over function in table view this.
Page 25
10 Data Export / PC-Software 25
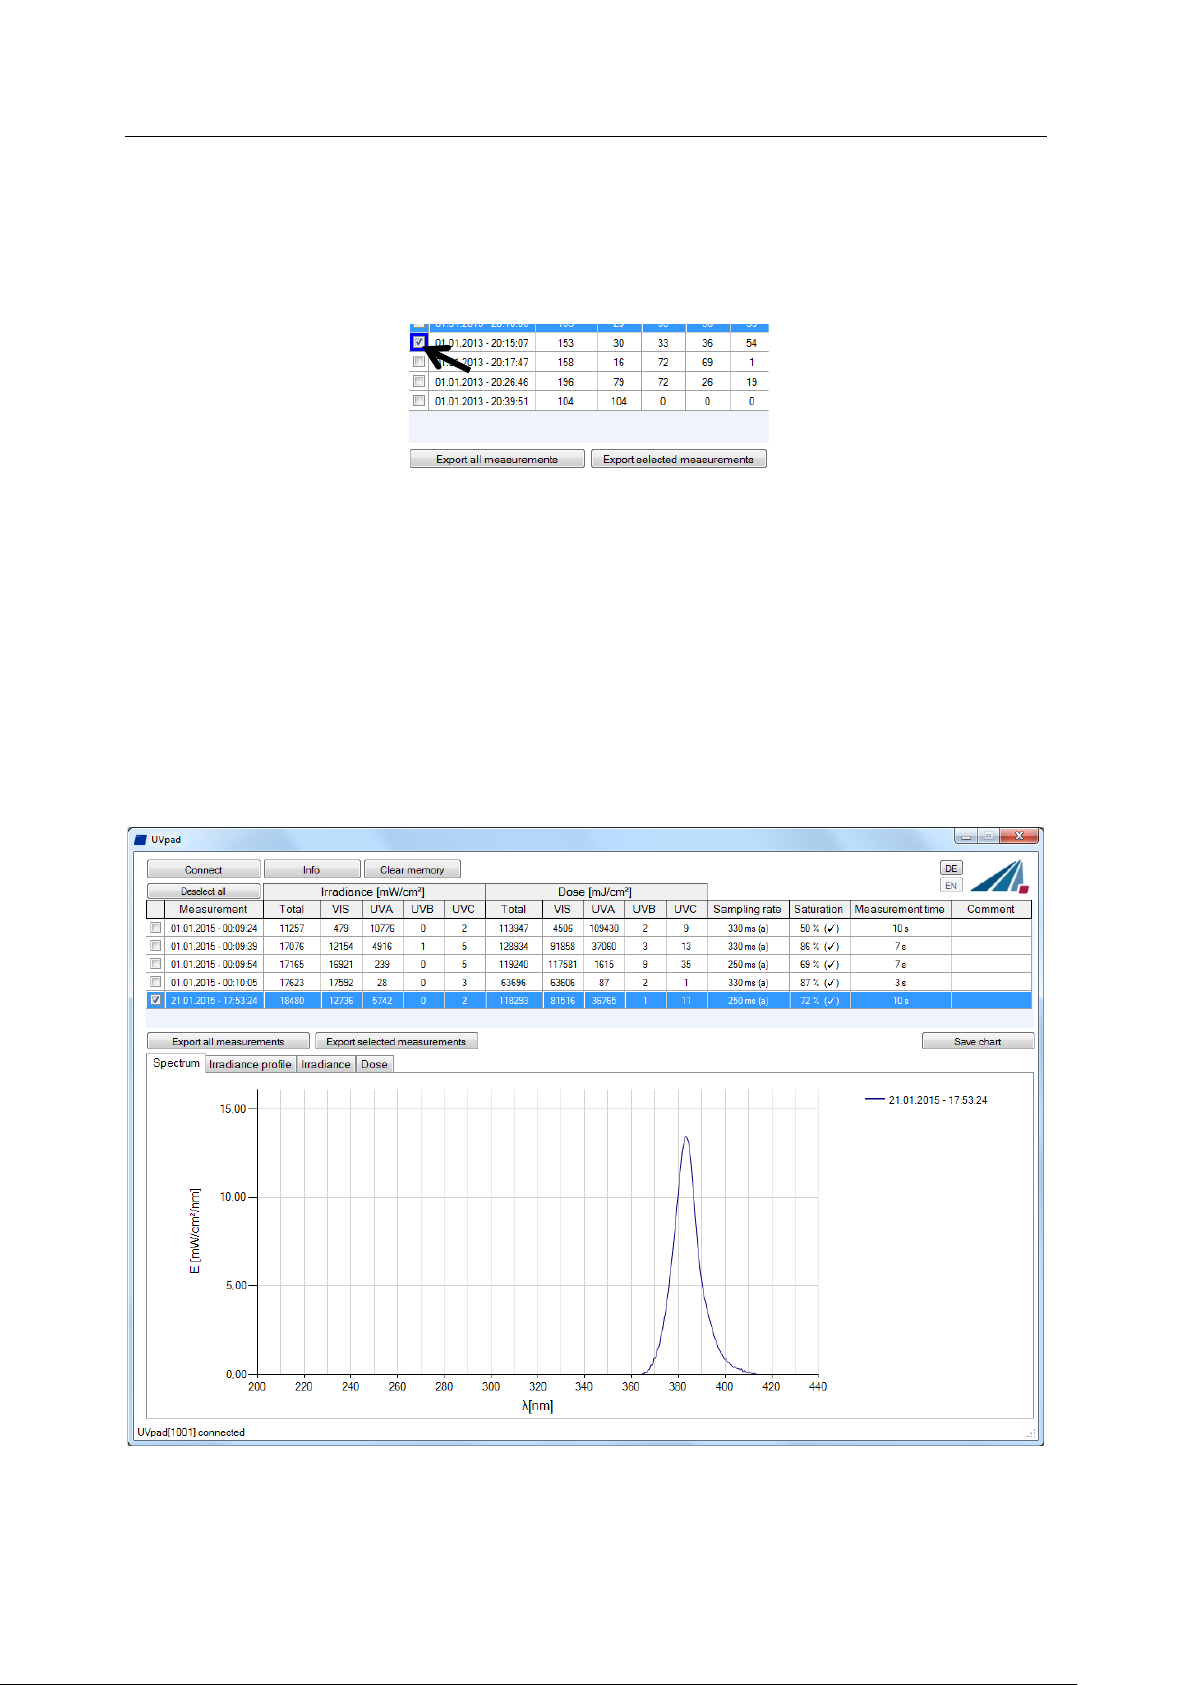
10.4 Export of measurements
Measurements can be exported individually, in a group or completely. For this purpose, mark
up to 10 measurements.
Button „Deselect all“ deselect marked measurements.
Select “Export selected measurements” or “Export all measuremen ts” for the d ata export. The
measurements are ex ported as a text file, separated by a comma, and can thus be import ed to a
table calculation program, such as Microsoft EXCEL.
The exported file contains all information to the measurement, the spectrum and the irradiation
profile.
Marked measurements appear in the display area, as illustrated by the following LED spectrum:
Page 26

10 Data Export / PC-Software 26
10.5 Displaying and compari ng Me a sureme nt s
Select the desired display via the tab:
Below is an example with two irradiance measurements.
Up to 10 measurem ents are s electabl e at t he s am e time an d ar e label ed i n t he dis pla y area wi th
date / time.
Each display can be saved via the button “save chart” as an image file (*.jpg, *.bmp, *.tiff,
*.wmf).
10.6 Displaying the Irradia nc e profile
The irradiance profil es are separately available for all fou r spectral ranges. For this purpose,
mark the desired measurements and select the desired spectral range on the tab “Irradiance
profile”.
The following example illustrates an irradiance profile for all spectral ranges.
The data logging tak es place adju stable b etween 1 0 and 250 ms. With shorter
integration times, the maximum irradiance is being saved.
The calculation of the dosage is taken out independently in real time.
Page 27

10 Data Export / PC-Software 27
, the serial number and the assignment of memory
The screen can be adjusted via the zoom function. For this purpose, change the X and the Y
intercept and confirm with „Zoom Fit“. The maxi mum irradiance Emax and th e dosage D in
the display area are displayed on the right.
10.7 Deleting Measurements
You can delete th e entire memory of t he UVpad E via the button “Delete all measu rements”.
Confirm the confirmation prompt with OK. Individual measurements cannot be deleted.
Tip: Via t he button „Info “
space of the UVpad E are displayed.
Page 28

11 Remote control / Live measurement 28
Export area
11 Remote control / Live measurement
In addition to the export functions, the UVpad E software also has a remote control called
"Live measurement ". Th e button with the s ame n ame takes you to a separ ate user interf ace for
remote control of the UVpad E.
The remote control is available for firmware version 1.2.4 and higher. Ask
for an update if necessary!
The user interface is divided into sections. All measurements received by the UVpad E are
displayed in the dis play area. The paramet ers that must b e adjusted for a measuremen t can be
found in the parameter area. Once a measurement has been completed, the user has the option
of exporting a "Single measuremen t" or "All measuremen ts" in the export ar ea. In contrast to
the single measurement, when exporting all measurements not only the averaged spectrum is
written to a *. csv file. All single dark current or spectra measurements are also written to the
file.
Display area
Parameter area
Page 29

11 Remote control / Live measurement 29
Tip:
Before starting a measurement, integration time, dark current or another effective function can
be set in the parameter area. Basically, two different operating modes are available for one
measurement.
In the calibrated mode, radiometric weighted measured values are displayed.
In the "RAW data" mode, only unweighted count values can be recorded and exported. In contrast to the calibrated mode, there is no automatic dark current correction and calibration.
Three methods are available for the dark current measurement, depending on the selected
mode. In the "Auto" mode a dark current measurement is done directly in the device. In "Auto"
mode, dark current correction is carried out as usual in the UVpad E device.
“Calibration + Auto” mode correspo nds to the measurement result of the
UVpad E.
(All other modes are suitable for special applications and are calculated in the PC.)
In "Manual" mode, an entire dark current spectrum is recorded which is later calculated with
the spectrum. If no dark current correction is to be carried out, select the mode "Without".
After starting a dark measurement or spectrum, the selected number of averages is imported
from the device. The progress of a measurement series is displayed by a progress bar.
For best measurement results, the measuring range should be almost completely controlled. Good measurement results are achieved if the measuring
range is used by at least 50%. The modulation is linear to the set integration
time. Example:
Integration time 10 ms; modulation 20%: Measuring range is used up to 20% Bad
Integration time 40 ms; modulation 80%: Measuring range is used to 80% Very good
After the measurement has been completed, there are two options in the export area (single
measurement / all measurements) for saving the measurement results in a file.
Page 30

11 Remote control / Live measurement 30
Tip:
When exporting all measurements, in addition to the averaged measurement result, all individual measurements as well as the measurement results for irradiance are exported to a *. csv
file. The export of a "single measurement" only provides the averaged measurement result. All
measurement settings are also saved in the export file.
Note:
The subsequent modification of a parameter blocks both export options!
To switch between German and English use the key combination:
Ctrl + Shift + d ~ german
Ctrl + Shift + e ~ english
Page 31

12 Notes for optimal measurement results 31
If the measuring range is over modulated in setting “fixed sensitivity” a hint
12 Notes for optimal measurement results
The UVpad E achieves op ti m al m easu remen t res u l t s, i f t he m easu remen t ran ge is w ell adj us ted
to the irradiance and thus to the UV system. This is generally taken out automatically.
The following notes are there to support you with the setting of the UVpad E, so that optimal
measurement results can be achieved.
12.1 The UVpad E displays „MAX“
The UVpad E saves the maximum irradiance during the measurement. Due to the individual
lines in the spect rum , t he m easu remen t s i gnal c an p artly exceed the measur emen t range. In this
case, the UVpad E displays the message “MAX”.
Select low sensitivity or a fixed integration time. Reduce the lamp power, if this is insufficient.
will be shown after a measurement. Note that measurement dat a will not be
stored.
12.2 The UVpad E displays too little irradiance values
Check if the sensit ivity has been set correctl y. Optimal measurement results are achieved, if
the measurement ran ge is used to at least 50%. After a measurement, the value M should be
higher than 50%.
Select a low or automatic sensitivity or set a short integration time.
When "automatic sensitivity" is set, the spectrum and irradiance will be
stored as the optimal measuring range is automatically found.
In the case of band systems, it may happen that a maximum is recorded prior
to the lamp position and that UVpad E is over modulated below the lamp.
In this case the shown irradiance may be too low. However, the dose is correctly. In this case a fixed integration time may be helpful.
12.3 The UVpad E displays too high or t oo low UV C Values
The UVpad E measures the entire UV spectrum range and divides it standardized into UV
spectrum ranges (UVA, UVB, UVC).
For comparison:
Broadband radiometers possibly only measure a part of this range, if these do not operate with
standardized spectral ranges. Thus, high deviations can arise especially in the UVC.
Furthermore, the UV lamps generally emit visible light and IR radiation apart from the UV
radiation. Both can generate scattered light in the UVpad E, which is then detected. It is also
possible that the UVpad E heats up during the measurement and thus the reading noise in-
Page 32

12 Notes for optimal measurement results 32
Reduce the integration time to 10ms and not saturation. Then set the
creases. Therefore, the UVpad E has an automatic correction function. However, low UVC
values can possibly not be avoided, even if the UV lamp does not emit UVC.
12.4 The UVpad E displays “ - “
Just like each m easuremen t device, t he UVpad E has a fixed meas urement ran ge. If th is range
is fallen below, then the UV radiation cannot be captured correctly. In that case, the UVp ad E
displays “ – “.
Select a higher, lower or automatic sensitivity or set a long integration time.
12.5 The measured value is not reproducible
Measurements are only stored and displayed in UVpad E when the saturation is between 10%
and 100%. This can cause to saturation direct under the light source, however correct measurement may be recorded before or after that. Especi all y UV LEDs ca n le ad to a co rrect measurement switching the LED on within one measurement, while all other are saturated.
Select a fixed integration time.
Note:
highest possible integration time
Page 33
13 Cleaning, Maintenance & Troubleshooting 33
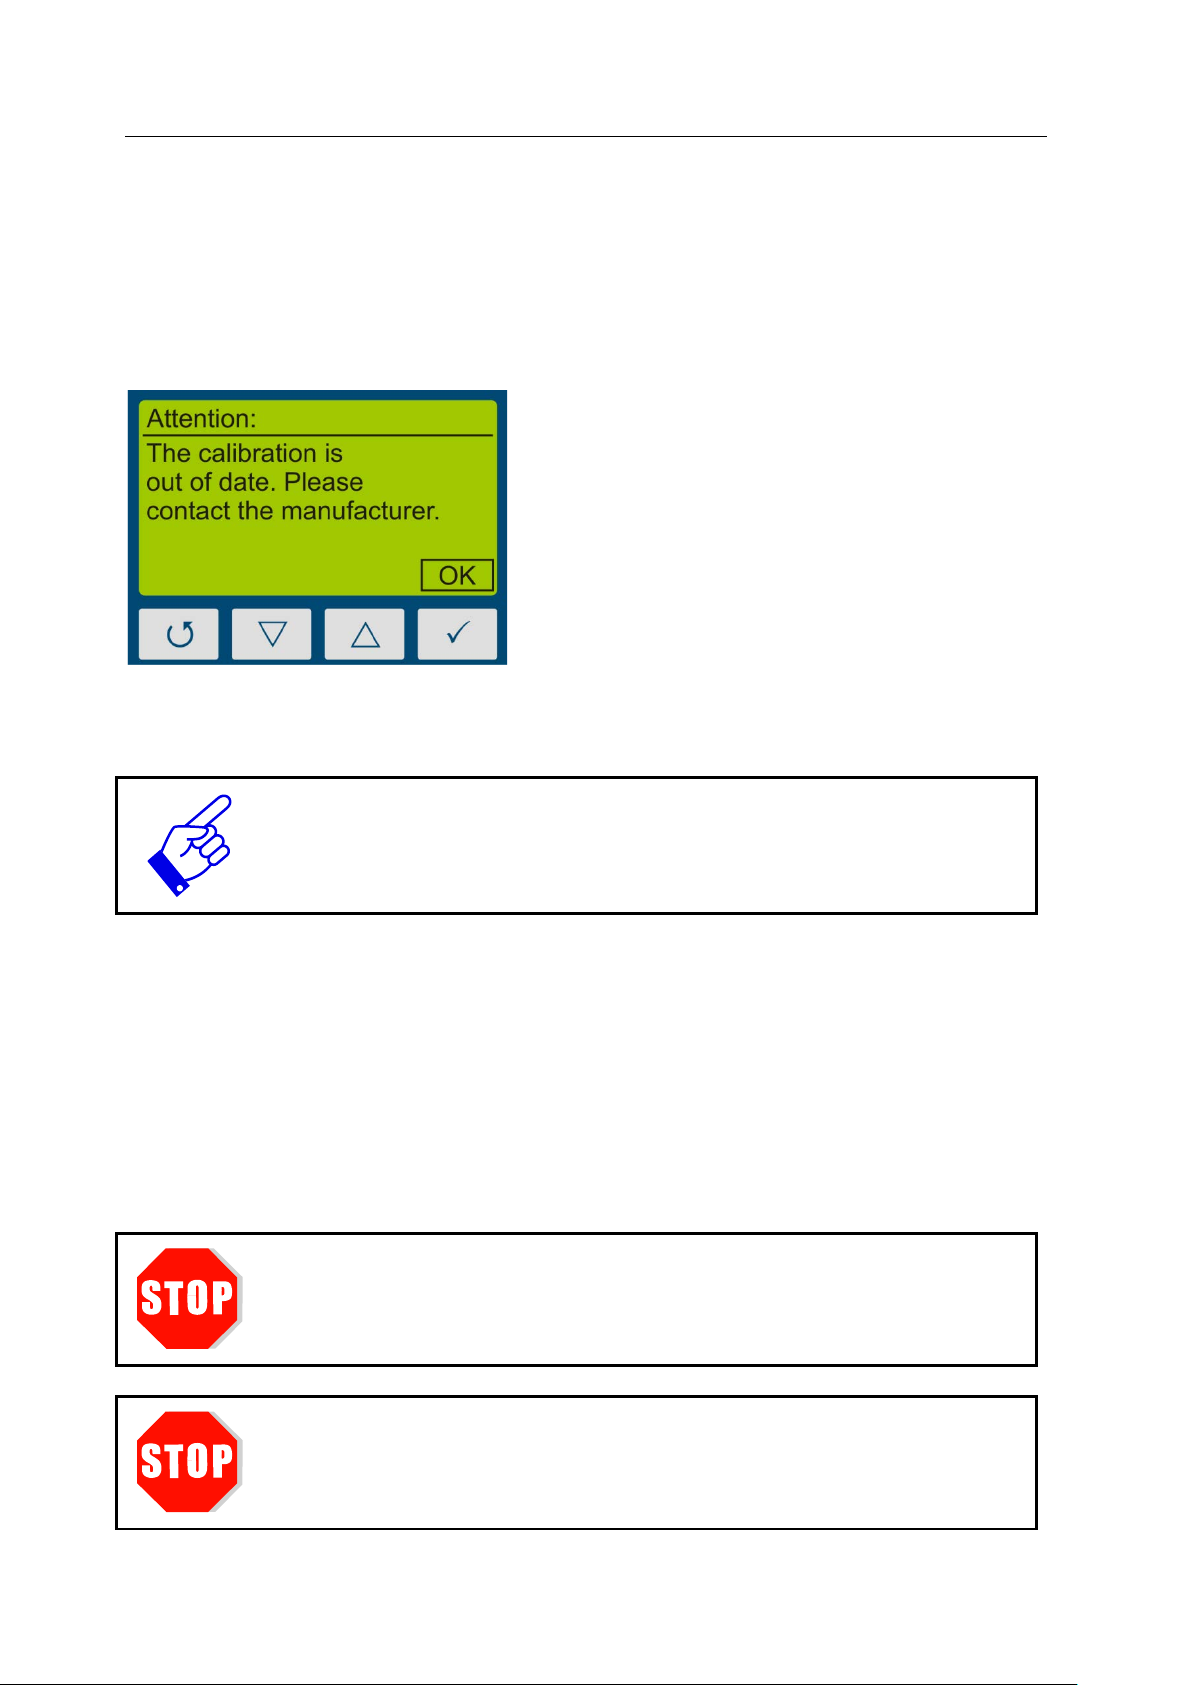
Confirm with the key .
calibration. This can depend on the individual use, the environment and
13 Cleaning, Maintenance & Troubleshooting
13.1 Calibration
The calibration of the UVpad Es is checked during the initialization. If the UVpad E is not
calibrated properly anymore, then this is indicated by a note after the initialization process.
Measurements are also possible at any time with an expired calibration.
The UVpad E can only be maintained and calibrated by the manufacturer. For this purpose,
please consult your supplier.
UV spectroradiometer are in principle subject to a high high-energy load by
UV radiation. This can affect the calibr ation and l ead to an earl y due date for
a rethe radiation sources.
13.2 Cleaning
Skin oil and contamination are abs orbing in the UV spectral range and t hus affect the measurement result. Finger prints or contamination on the optically active entrance opening are
therefore generally to be avoided.
Should a cleaning become necessary, please use a lintless cloth and Isopropanol. Clean the
optically active surf ace with circul ar movements. Avo id a strong force. If n ecessary, leave th e
UVpad E to dry completely after cleaning it.
Please note:
For cleaning the optically active surface, please wear gloves.
Do not use Acetone or other chemical cleaning agents to clean the UVpad E.
Page 34
13 Cleaning, Maintenance & Troubleshooting 34
The housing, with the exception of the battery compartment, is not to be opened
When the batteries are emty a measurement cannot be started and the
The measured data will be stored. Date and time should be adjusted.
except for the battery compartment, must not be opened by the
ATTENTION: Opening of the housing (except for the battery compartment)
by the user.
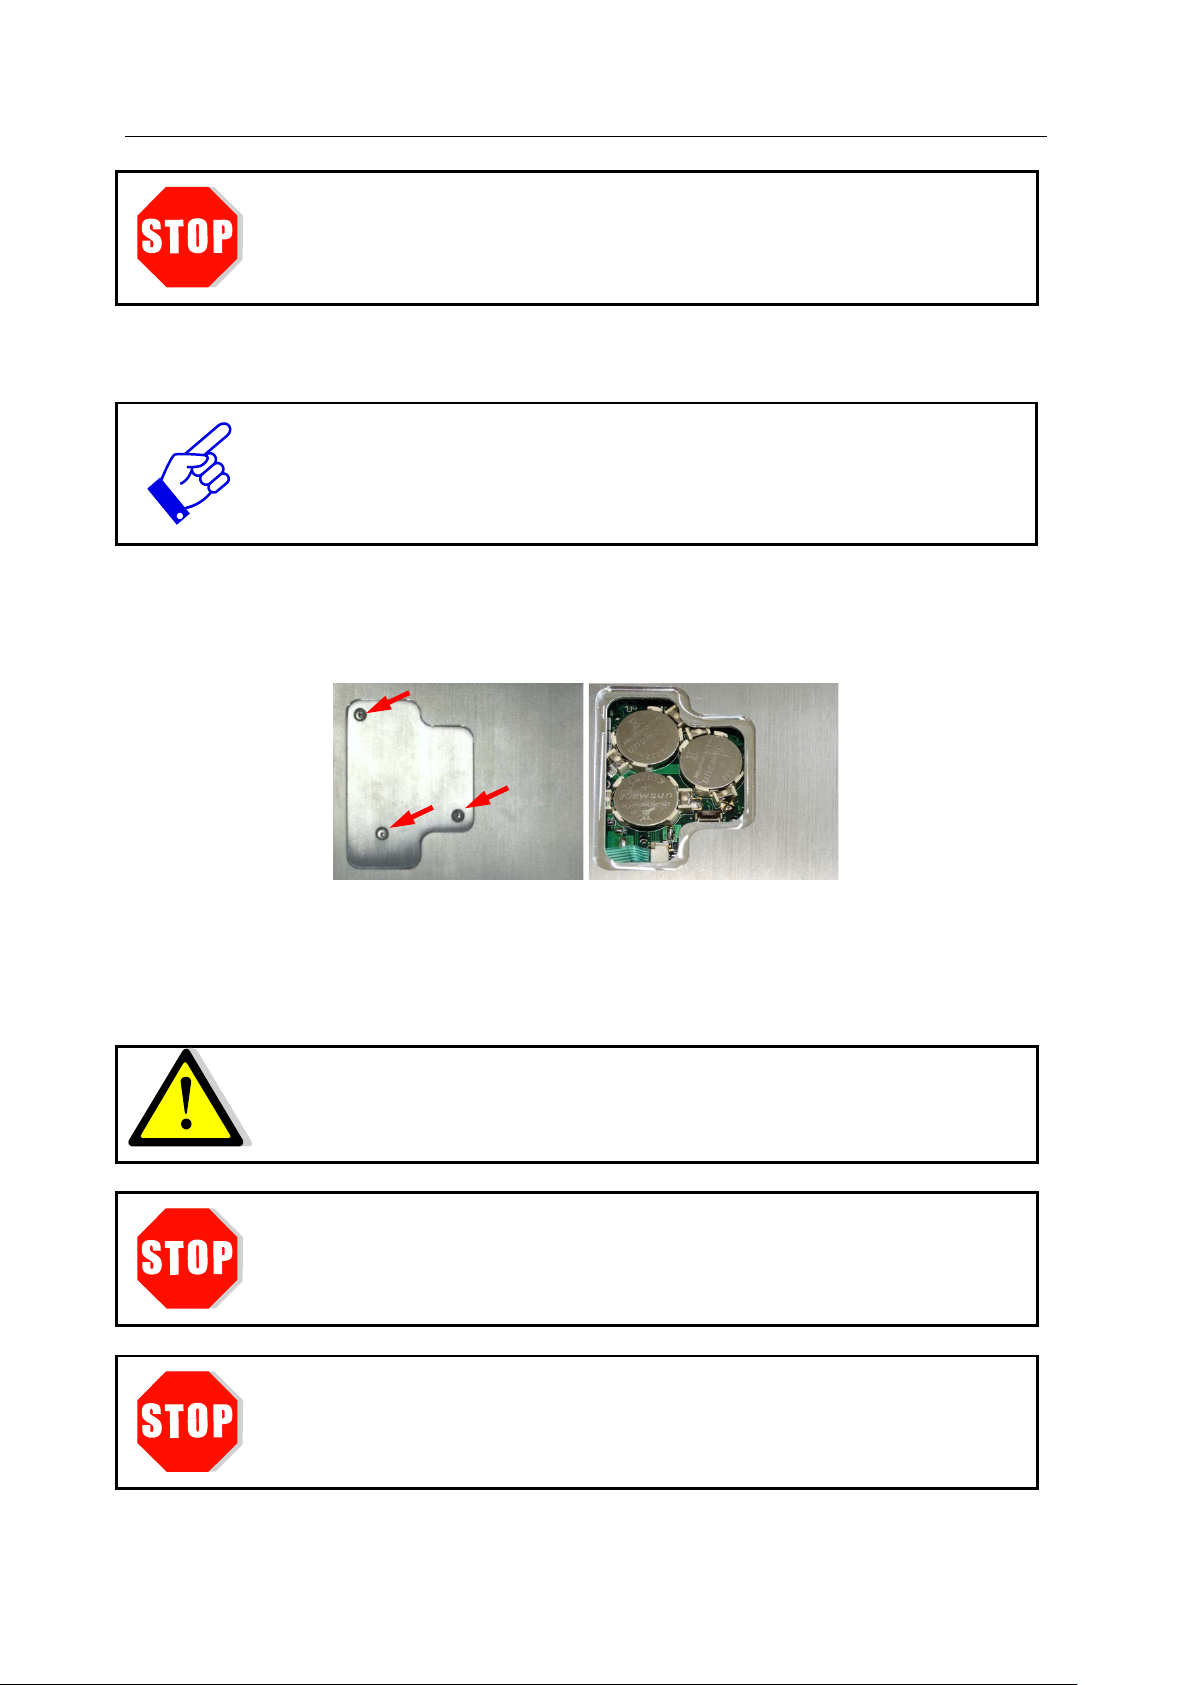
13.3 Battery Change
UVpad E reinitializes. The message "empty battery" is displayed.
Change the batteries.
The UVpad E is operated with lithium batteries. For a battery change, switch the UVpad E off
and turn it with the rear panel facing towards you. Loosen the three marked screws with a
screwdriver (Torx T6) and remove the cover.
Remove the old lithium batteries carefully and replace them by new ones. Close the cover
again and tighten the screws carefully.
Please note:
Only use batteries, which are suitable for up to 70 °C. Appropriate batteri es
can be obtained from your supplier.
The housing,
user.
The UVpad E is calibrated.
leads to a loss of calibration.
Page 35

13 Cleaning, Maintenance & Troubleshooting 35
Error / Error Message
Cause
Remedy
The UVpad E cannot be
The batteries are empty
Change batteries.
delivery status.
The measured value is not
Automatic, low or high sen-
Use fixed sensitivity
The UVpad E displays too
Effect-related measurement
Check the settings for effect-
The UVpad E displays a sat-
Measurement range exce ed ed
Use the sensitivity setting
The UVpad E displays a
Sensitivity too low
Increase the sensitivity to
The calibration is expired
Calibration interval expired
Have the UVpad E re-
The UVpad E is not detected
The UVpad E is switched off
Check USB cable
Switch the UVpad E on and
Use delivered cable.
13.4 Troubleshooting
The subsequent notes and error messages address the user. The information should help to ensure the release and the appropriate operation of the reference spectrometer. For this reason,
possible causes and remedies are listed below:
switched on
reproducible
high / too low results
Interruption
sitivity selected
The optically active surface
is contaminated
The calibration is invalid
wrong settings
Restart the device. For this
purpose, remove all batteries
and replace them after 5
minutes. The UVpad E is in
related measurements.
Clean the optically active
surface.
Have the UVpad E recalibrated.
check integration time
uration “MAX”
strong noise
by the PC
„low“.
„high“.
calibrated.
wait a few seconds for the
initialization.
Page 36

14 Declaration of Conformity 36
14 Declaration of Conformity
Hereby we,
Opsytec Dr. Gröbel GmbH
Am Hardtwald 6-8
76275 Ettlingen
declare that the following product
spectral Radiometer
Type designation:
UVpad E
have been developed, constructed and produced under our sole responsibility and that the
product is conform with the following standard(s) or guideline(s) in this declaration:
2014/35/EU
“Directive of th e European Parliament and of the Council on the harmonization of the
laws of the Member States regarding the provision of electrical equipment for use within
certain voltage limits on the market (Low-Voltage Directive) “.
The conformity of the designated product with the provisions of the directive is verified
by full compliance with the following standards:
DIN EN 60204-1: Safety of machinery - Electrical equipment of machines - Part 1:
General requirements (IEC 60204-1:2005, modified); German version EN 60204-1:2006
Ettlingen, 04.11.2016
Dr. Mark Paravia
Executive Board
Electronically created and valid without signature.
Page 37

15 Notes 37
15 Notes
 Loading...