

Page 1
™
RAC
Operator’s Manual
HEADSET
OM101116-00 REV. C
Compatible with: FAST® Maritime, FAST Ballistic High Cut,
FAST Carbon, and FAST Base Jump Helmets
Page 2

Page 3

RAC HEADSET
Operator’s Manual
Headset Features
Headset Components
Included / Optional Items
Preparing Headset for Use
Installing Batteries
Attaching Headset to Helmet
Attaching Pile Fasteners
Moving the Microphone
Donning and Dofng Helmet with Headset
Understanding Headset Positions
2
4
5
6
7
9
10
11
13
13
Basic Donning
Using Ventilation Mode
Dofng
Using Wireless Earbuds
Headset Functions
Maintenance
Operator Notes
14
16
17
18
20
22
24
1
Page 4
RAC HEADSET
Headset Features
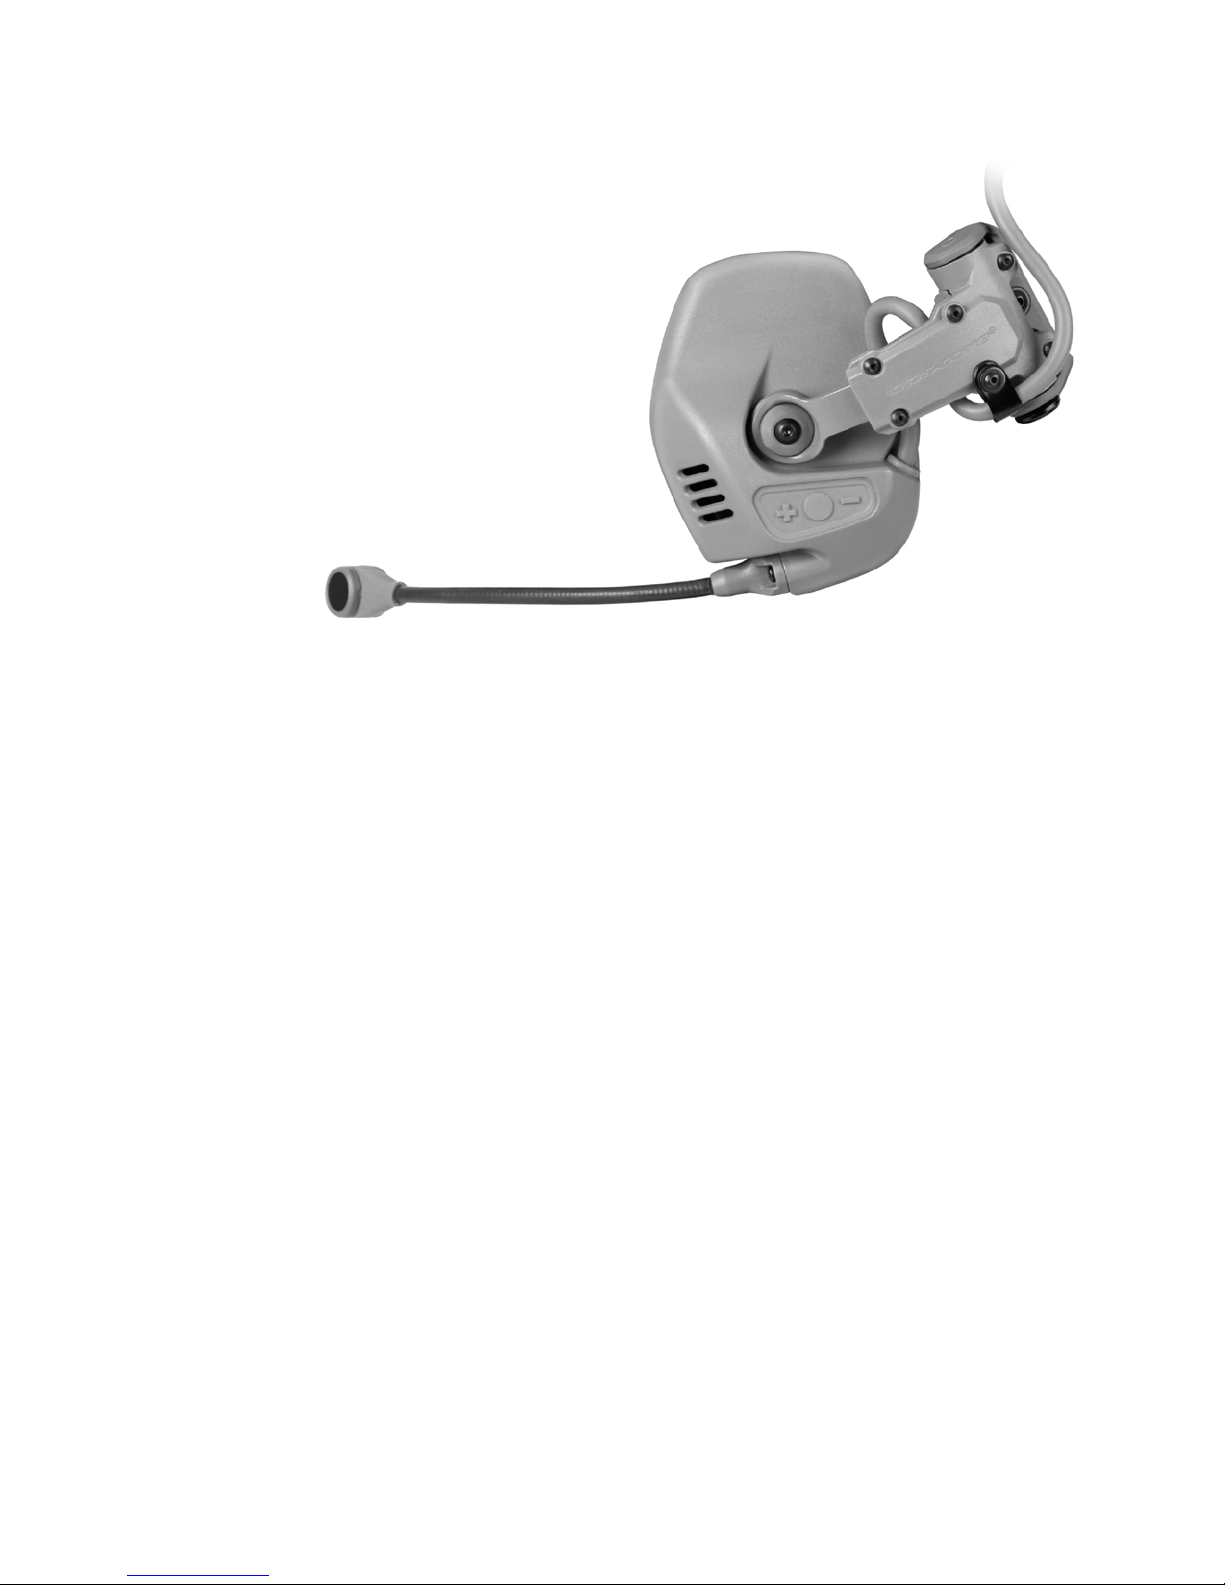
• 3D Hearing Technology (3DHT)
By coupling a patented ear simulator design with binaural audio and advanced audio processing the RAC
Headset delivers hear-through audio that accurately preserves azimuth and elevation cues to provide
situational awareness. Smooth compression algorithms eliminate “clipping.”
• FAST ARC Rail Attachment
The RAC Headset attaches to the rear of the FAST ARC Rails leaving the top portion of the rails free for
mounting accessories, such as lights, cameras, etc.
• Noise-Cancelling Microphone
Mounts to left or right earcup.
• Integrated Microphone Mounting & Connection Point
Accepts mask microphones with U-173/U standard plug.
• Arm Articulation/Latch
Ventilate mode allows the ear cups to be set in ready position, near, but not pressing on the user’s head.
• Single Point Gimbal Attachment
360˚ adjustment instead of conventional adjustment systems.
• On/Off/Volume/Balance Control
Provides operator full control to personalize the listening experience to suit individual needs. Optional
Speaker/Ear Plug Switch used with Inductance Driver System to switch between speaker and earplug.
2
Page 5
• Ear Cushions
High performance to ergonomically t the head geometry, providing a better seal and increased noise
attenuation.
• Streamlined Stowage
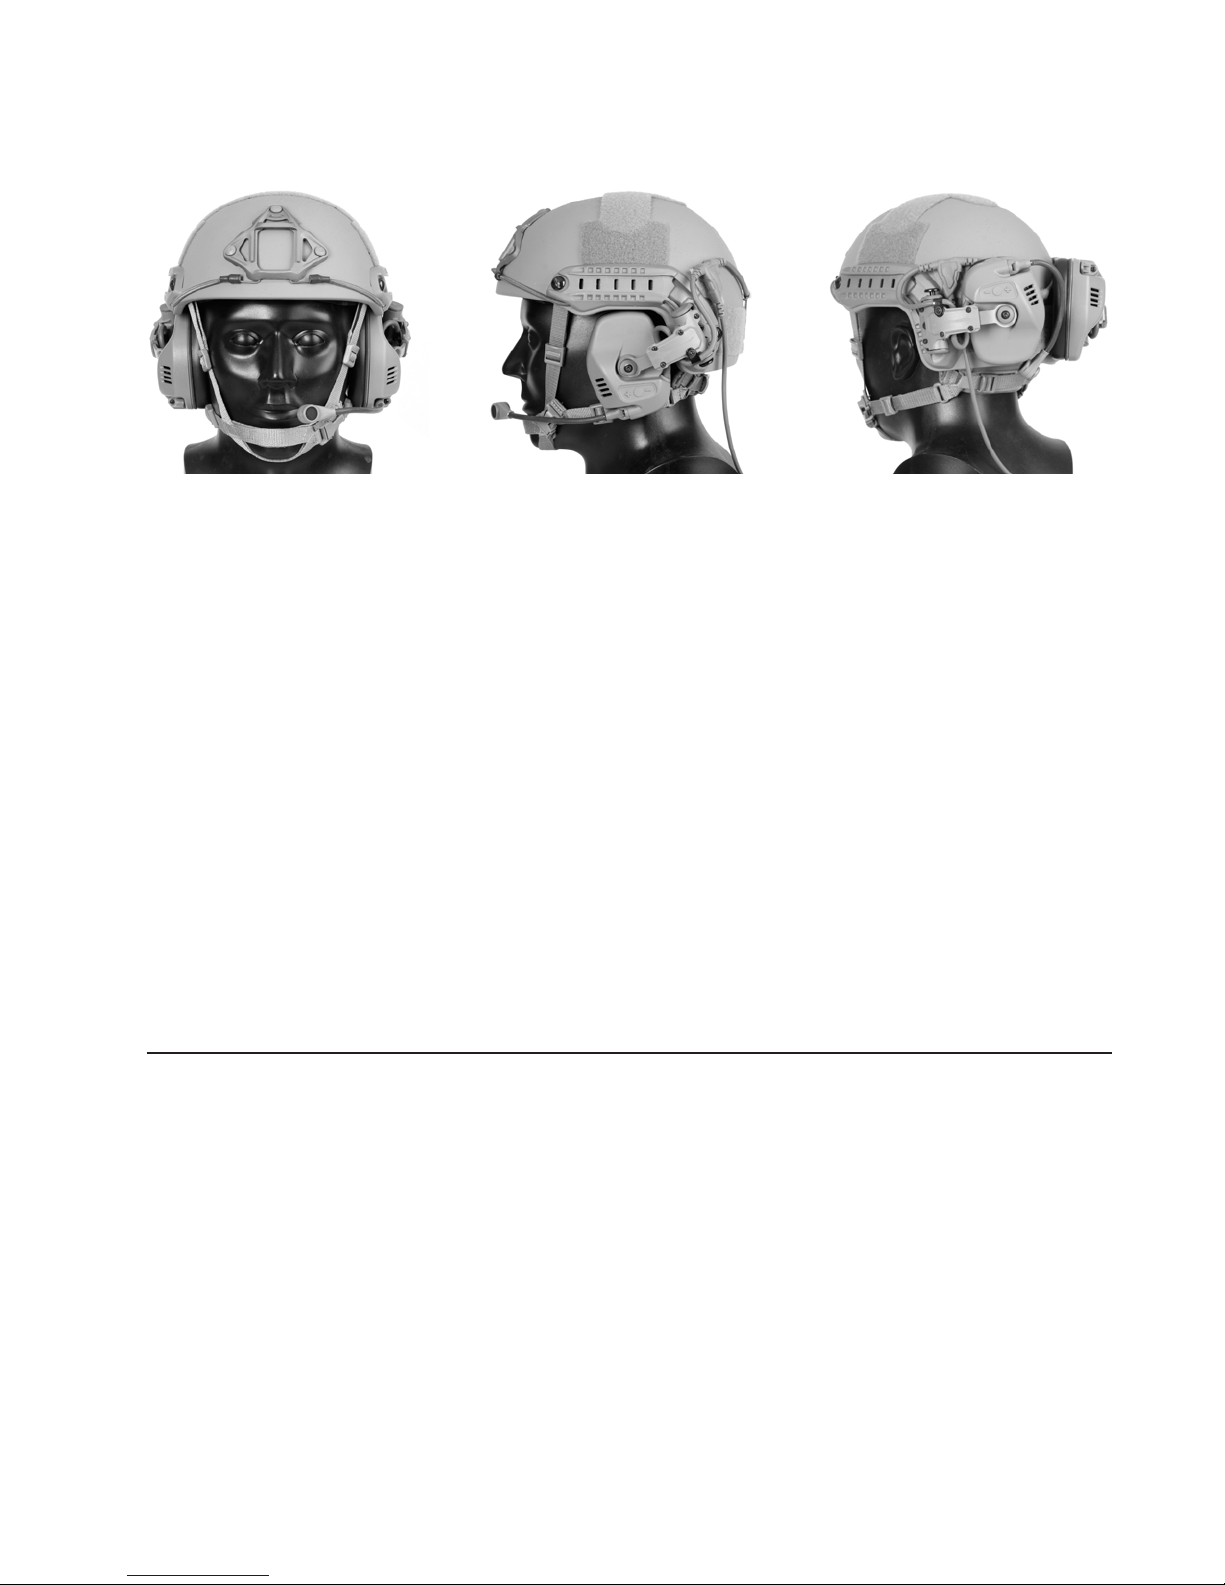
Earcups rotate to the rear of helmet when not in use, creating a very low prole.
• Quick-Release Downlead Connection
Helmet/headset can be disconnected from the downlead, allowing users to easily remove the helmet as
there are no excess cables to consider.
• Inductance Receiver Earplug
Un-tethered double-layer hearing protection provides noise attenuation in excess of typical Active Noise
Reduction (ANR) equipped headsets. Earplugs are battery-free.
• Weight
1.1 lbs (500 g) base version
1.2 lbs (545 g) with earplug option
• Immersible
IP-67 immersible
IP-68 immersible to 3 m for short durations
• Environmental
Tested to MIL-STD-810G
• EMl
Tested to MIL-STD-461E
• Export Classication
EAR-99
• Available Colors
Tan, Black, Green, and Gray
3
Page 6
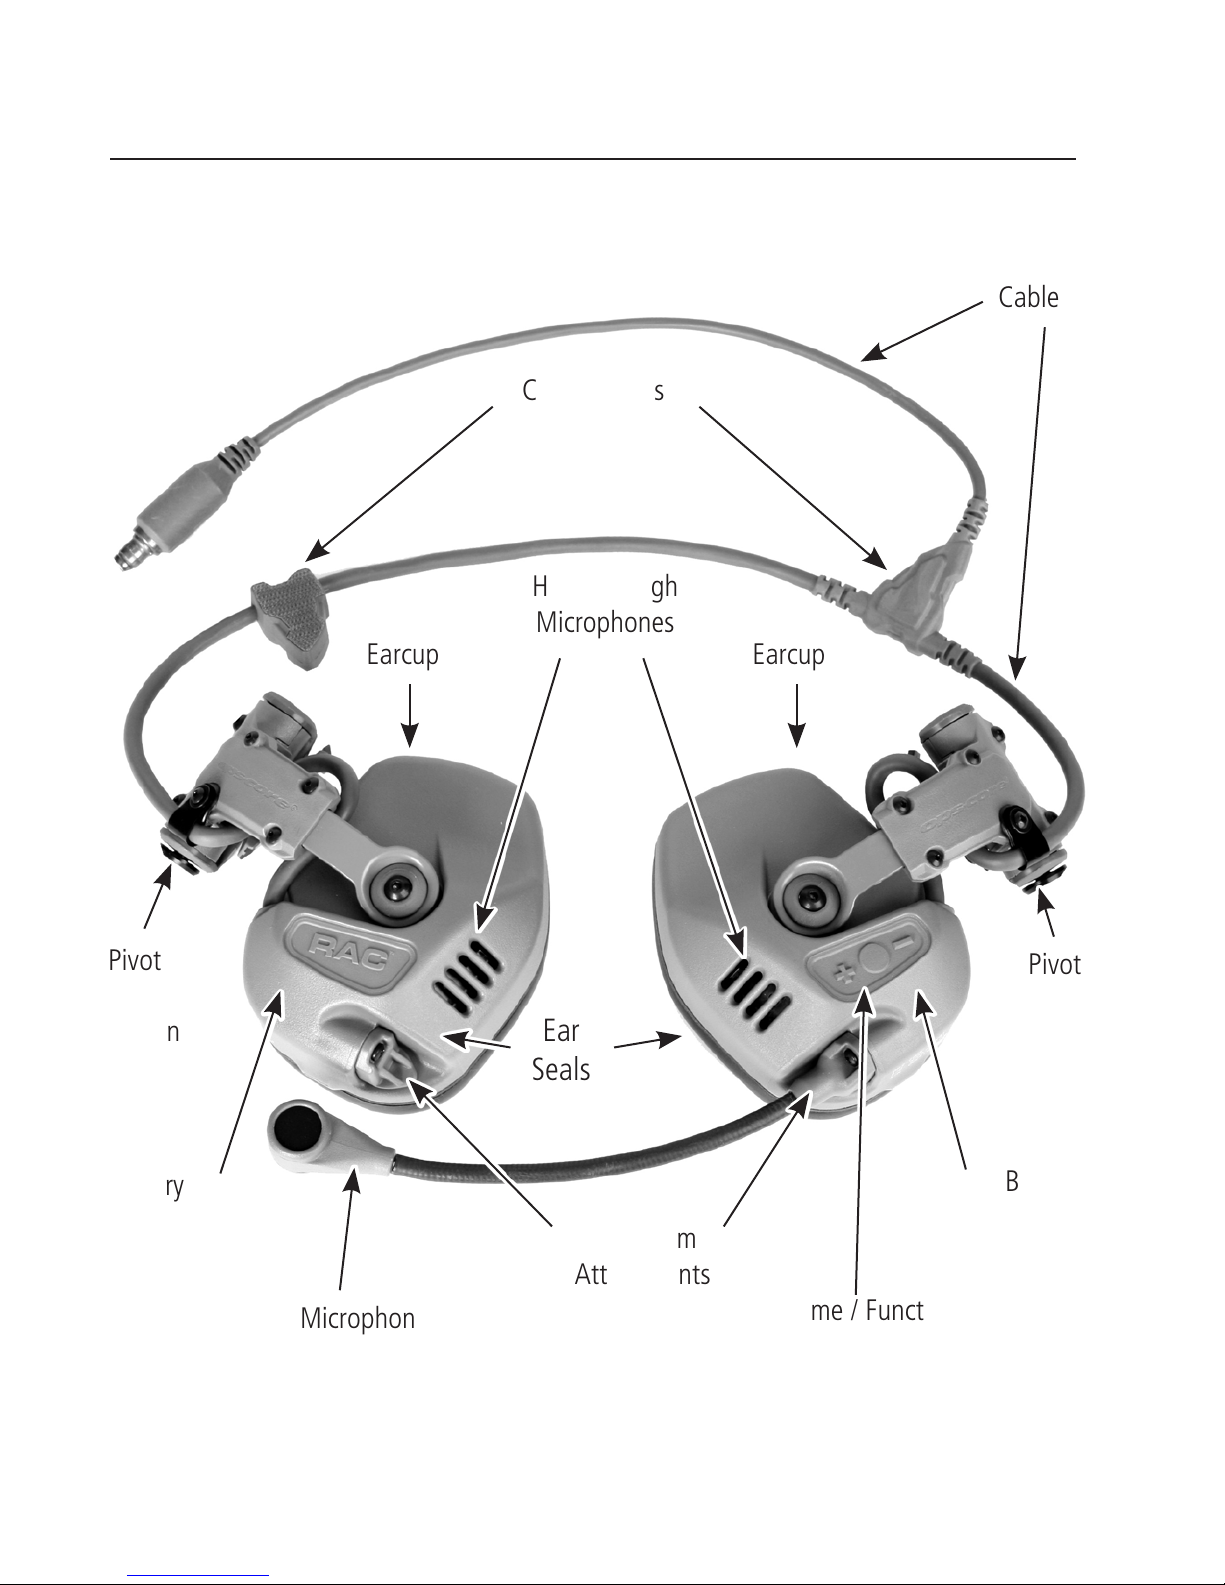
HEADSET COMPONENTS
Cable Guides
Hear-Through
Microphones
Earcup
Earcup
Cable
Pivot
Arm
Button
Battery
Compartment
Boom Microphone
4
Ear
Seals
Mic Boom
Attachments
Points
Pivot
Arm
Button
Battery
Compartment
Volume / Function
Buttons
Page 7
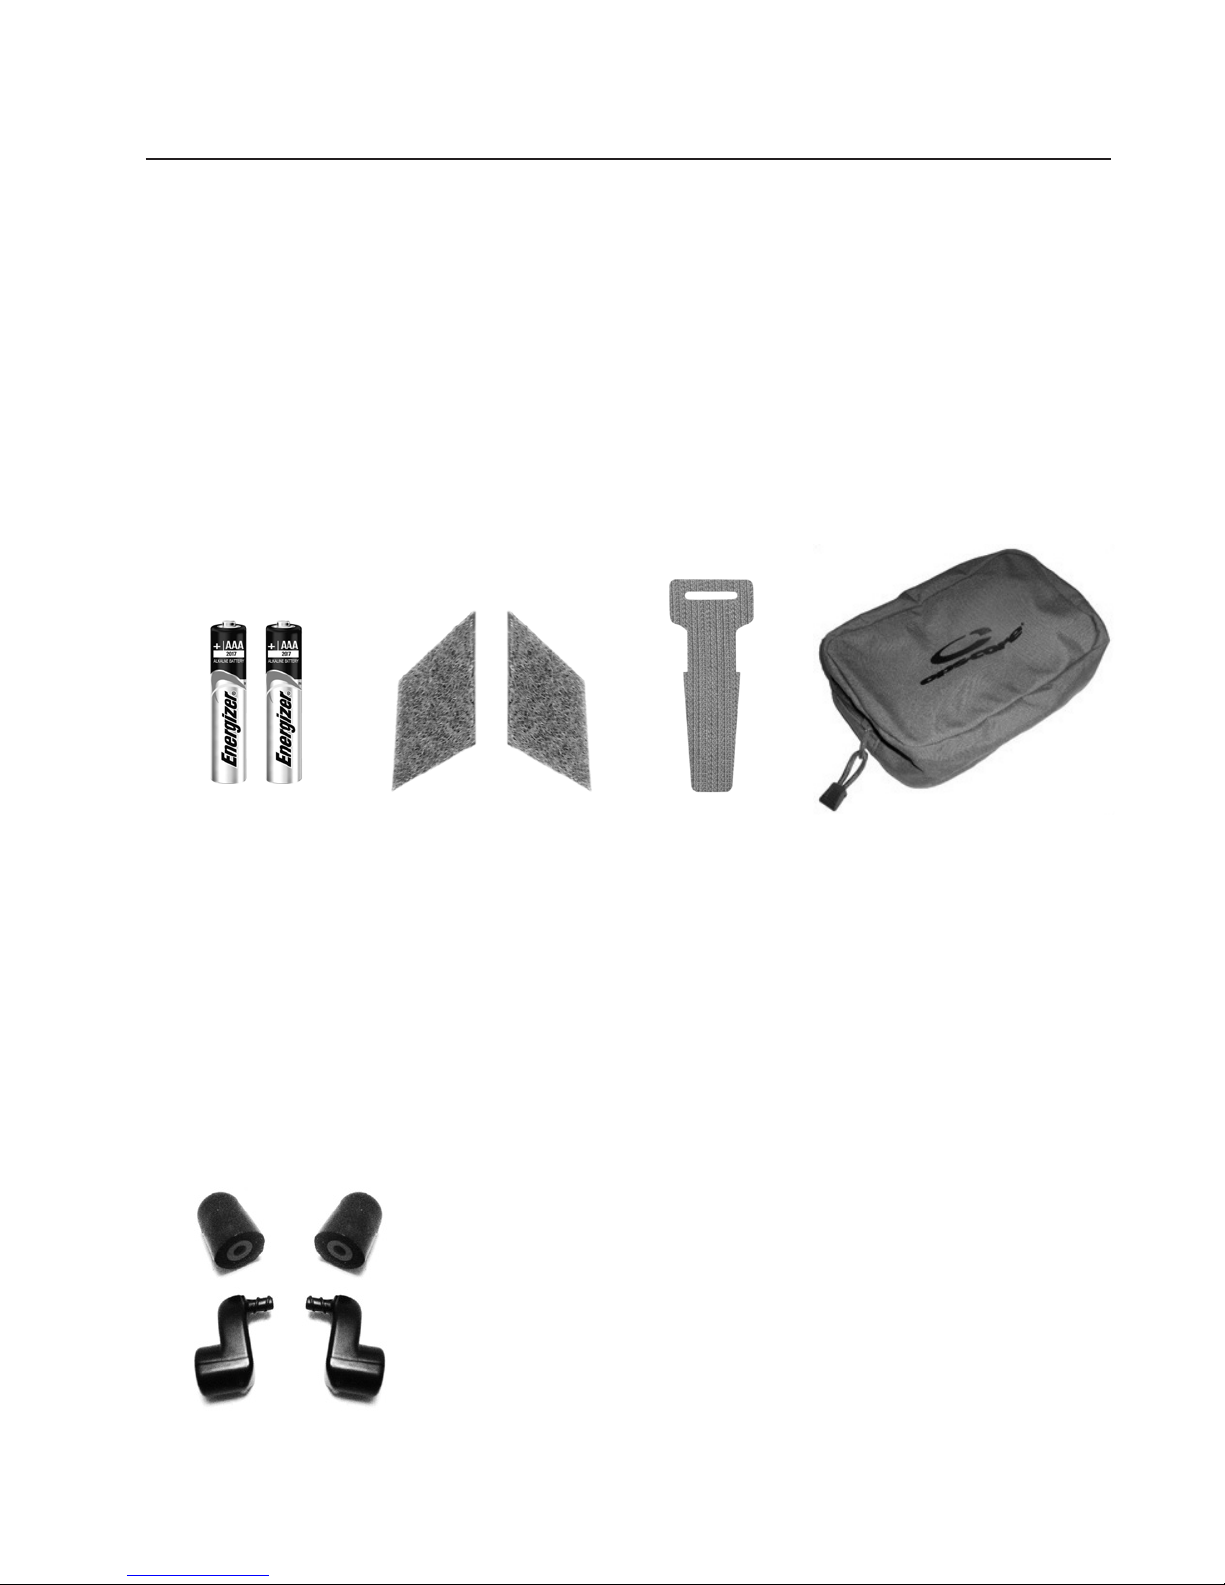
INCLUDED / OPTIONAL ITEMS
Items Included with Headset:
• (2) AAA Batteries (to install into earcups)
• Pile Fasteners (to attach to helmet for cable stowage)
• Cable Loop (for cable stowage)
• Utility Pouch (to store headset)
(2) AAA Batteries Pile Fasteners Cable Loop
Utility Pouch
Optional Items (Specify When Ordering Headset):
• Earbuds (wireless and battery-free)
• Foam tips for use with earbuds (three sizes: Standard, Slim, and Large)
Foam Tips
Earbuds
5
Page 8

PREPARING HEADSET FOR USE
To prepare the headset for use, you will:
1. Install the AAA batteries (one in each earcup)
2. Attach the headset to the ARC Rails on the helmet
3. Attach the pile fasteners to the helmet
4. Move the microphone to the other earcup (if needed)
6
Page 9
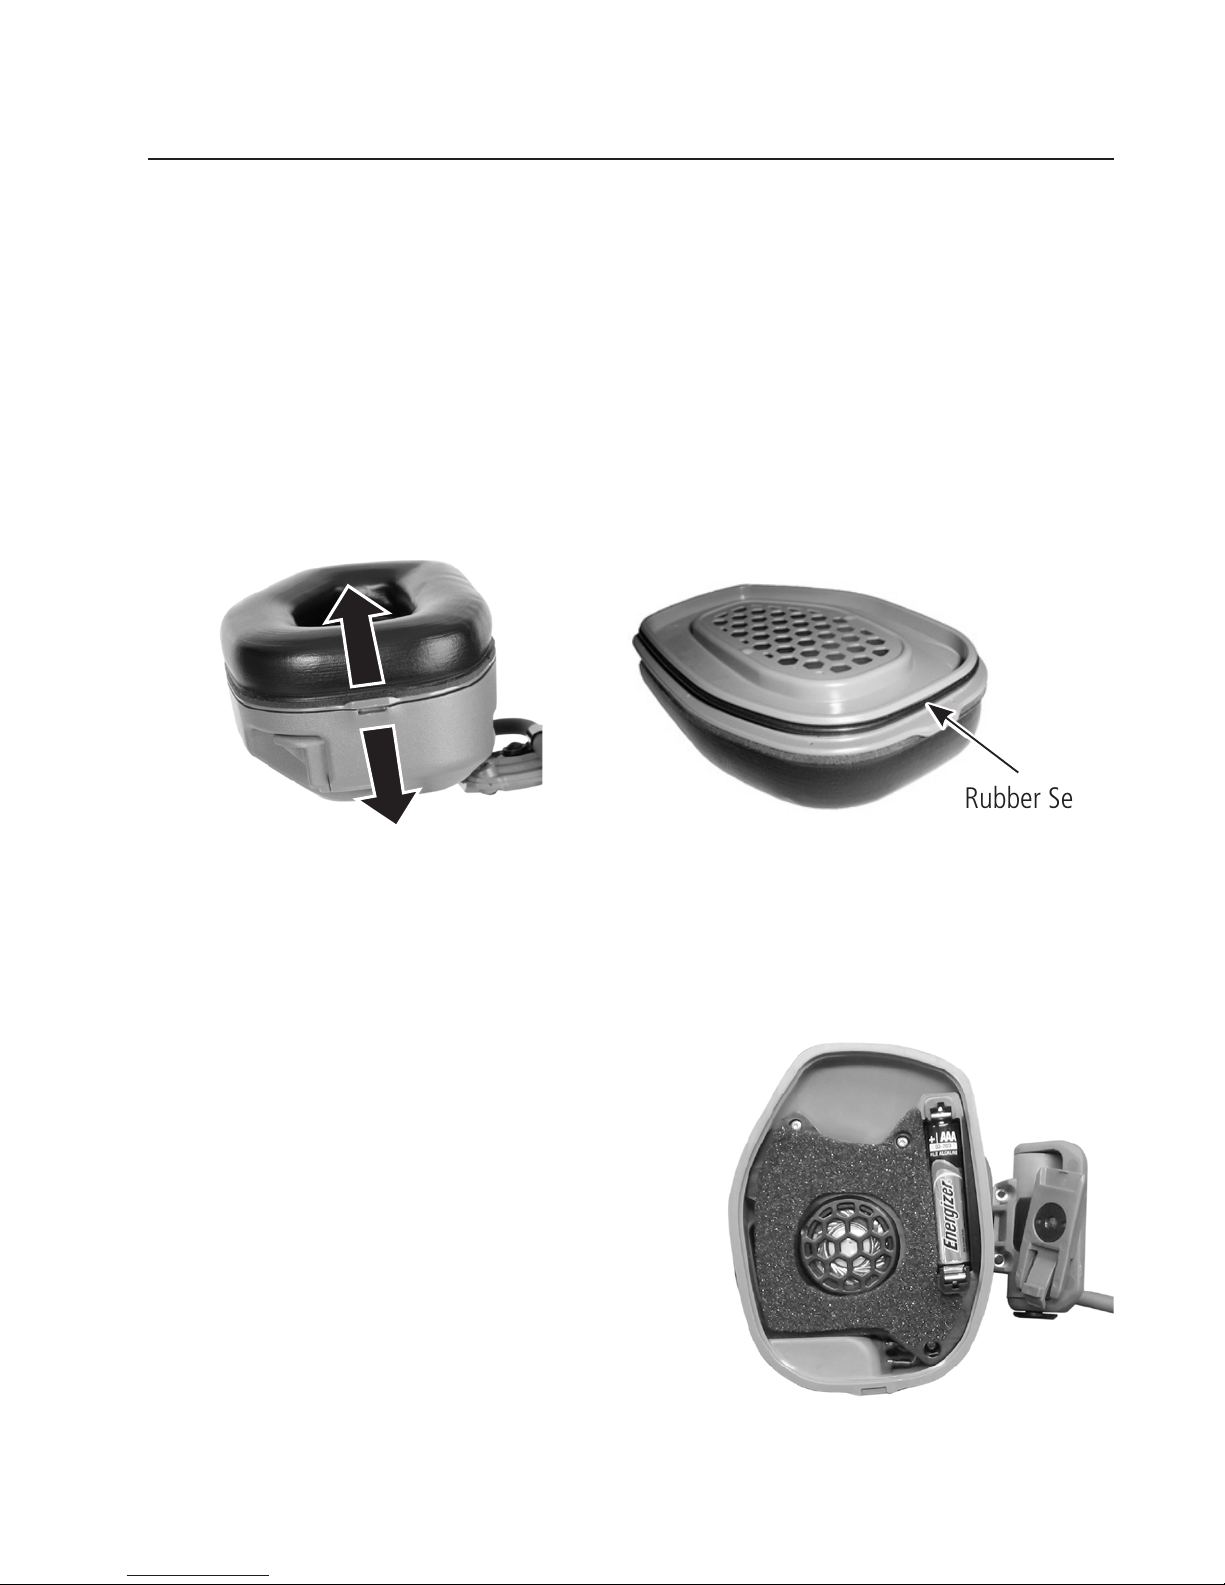
INSTALLING BATTERIES
Installing the Batteries:
NOTE: Also follow the applicable steps below to replace the batteries.
1. Remove the (2) AAA batteries from the packaging.
2. Pry the ear seal away from the earcup by pressing the tab at the bottom.
Rubber Seal
CAUTION: When performing Step 2, be careful not to damage the
rubber seal in the groove on the underside of the earseal.
+
Positive
3. Insert the battery into the battery
compartment making sure to align the
battery so that the polarity marks (+ and -)
on the battery align with the corresponding
markings in the earcup battery
compartment.
NOTE: Always replace batteries
from both earcups as a set, do not
mix-and-match batteries.
-
Negative
7
Page 10
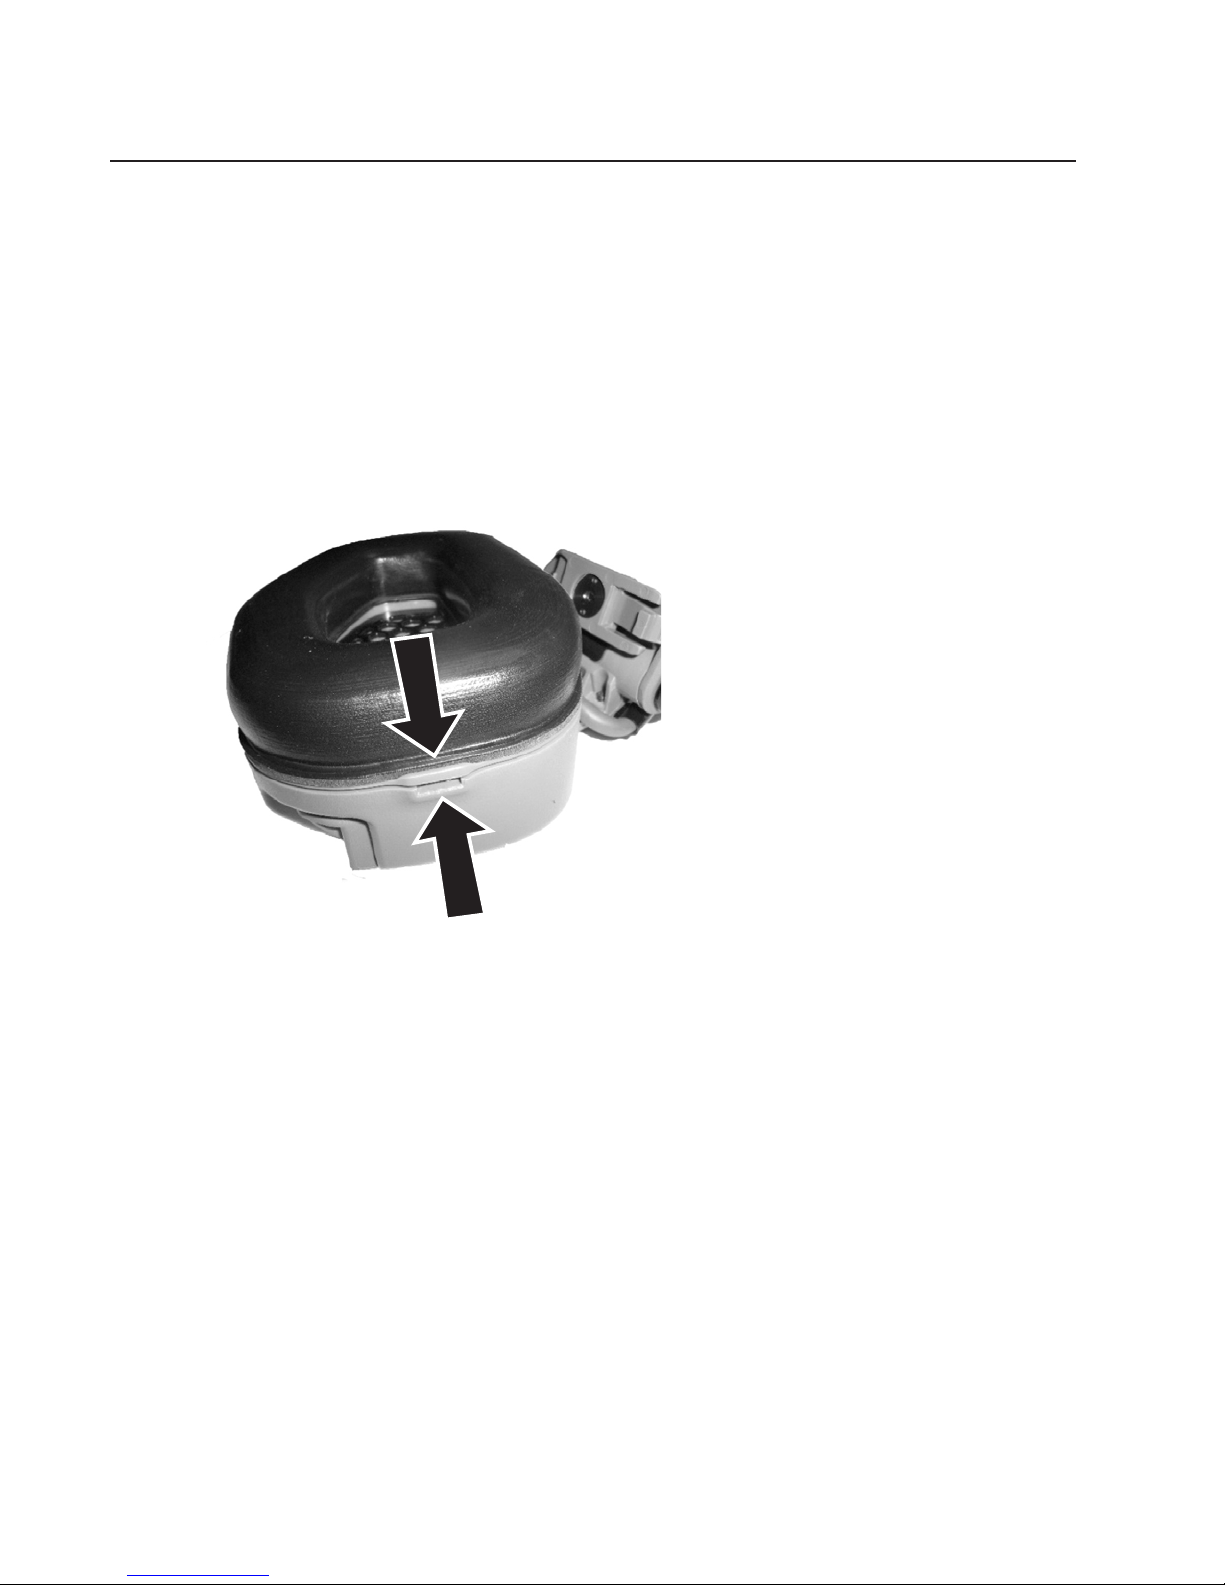
INSTALLING BATTERIES
4. Reinstall the ear seal, ensuring that it is securely snapped to the
earcup all around the edges.
CAUTION: Be careful not to pinch the ear seal in the
groove when snapping it closed.
5. Repeat Steps 2-4 to install the other battery into the other earcup.
NOTE: Remove batteries before storing RAC Headset
for extended periods of time.
8
Page 11
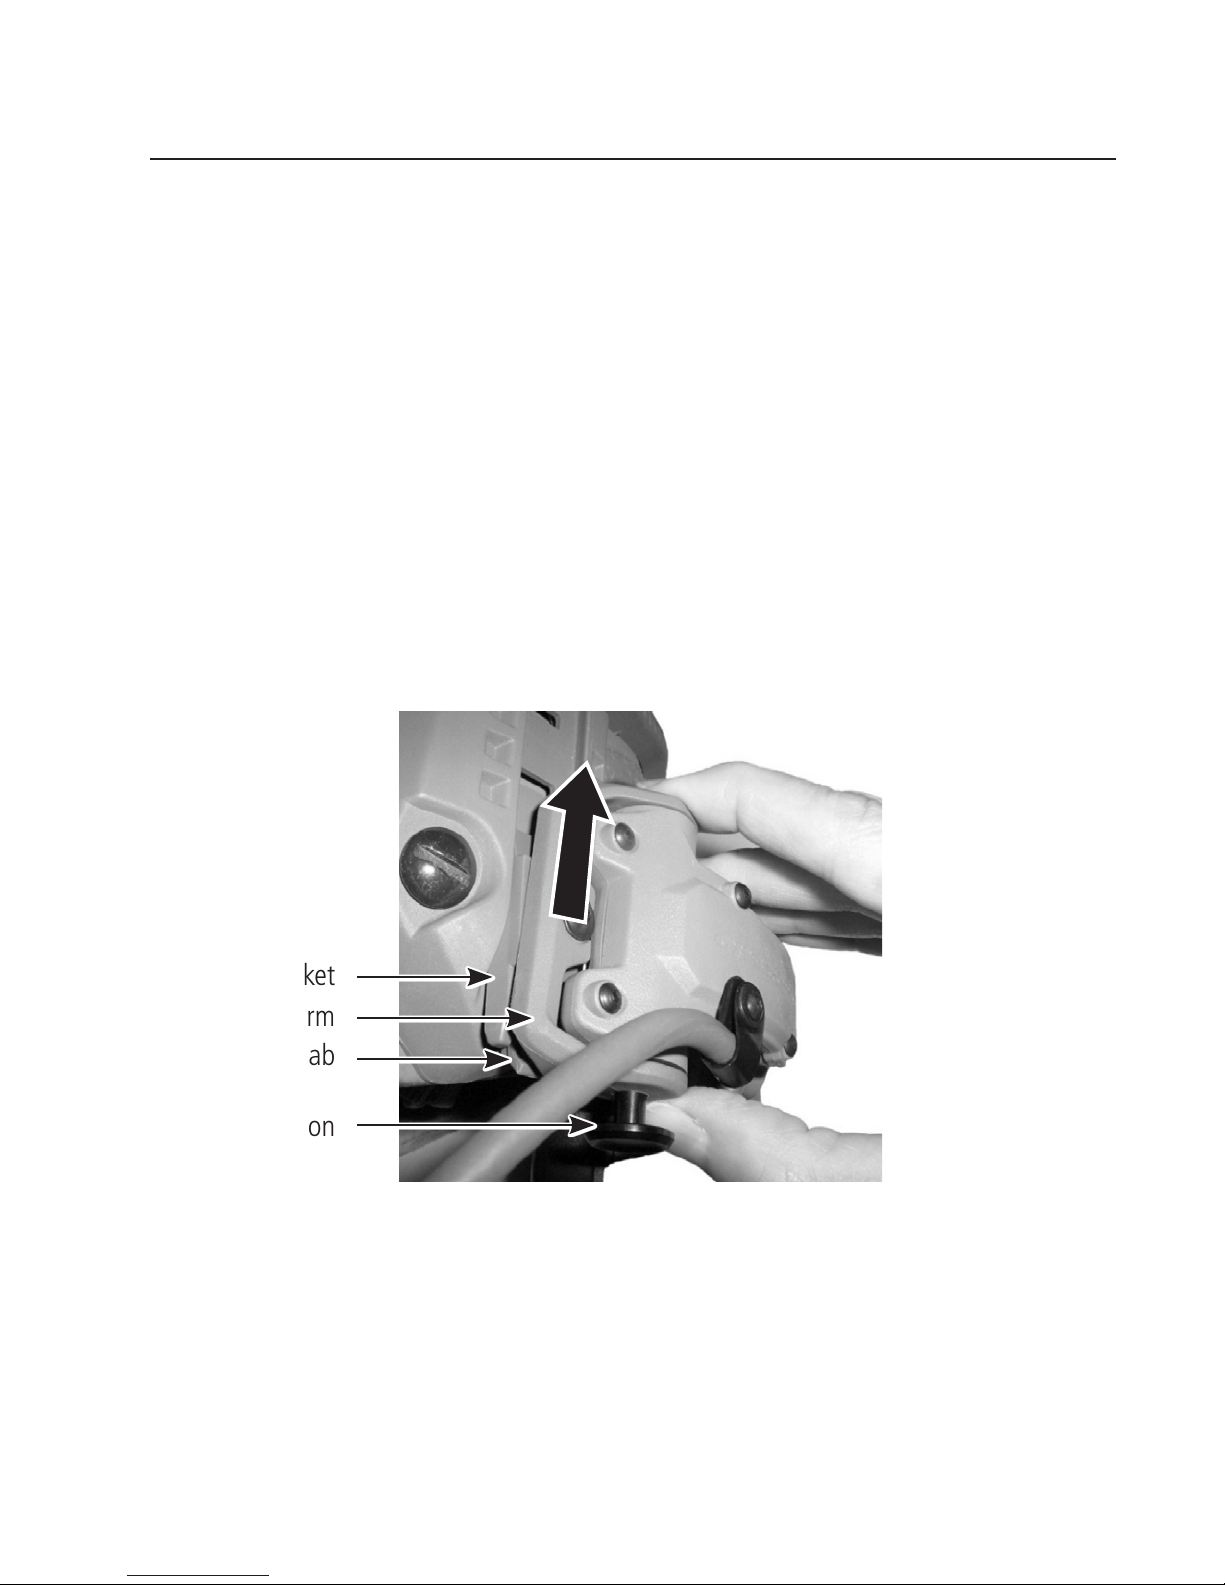
ATTACHING HEADSET TO HELMET
Attaching Headset to ARC Rails on Helmet:
NOTE: Before you begin, ensure that:
• The tab at the bottom of the headset is pointing down.
• The pivot arm button is all the way out (not pushed in) – rotate the pivot arm out to
the second click.
1. On one side of the helmet, align the headset in the rail as shown and slide the
bracket up into the rail until it clicks into the rst slot.
Bracket
Pivot Arm
Pivot Arm Button
Tab
2. Repeat for the other side.
NOTE: To remove the headset from the rails, lift the tab up (using
a at tool if needed) and slide the headset out, moving the pivot arm as
necessary to gain access to the tab.
9
Page 12
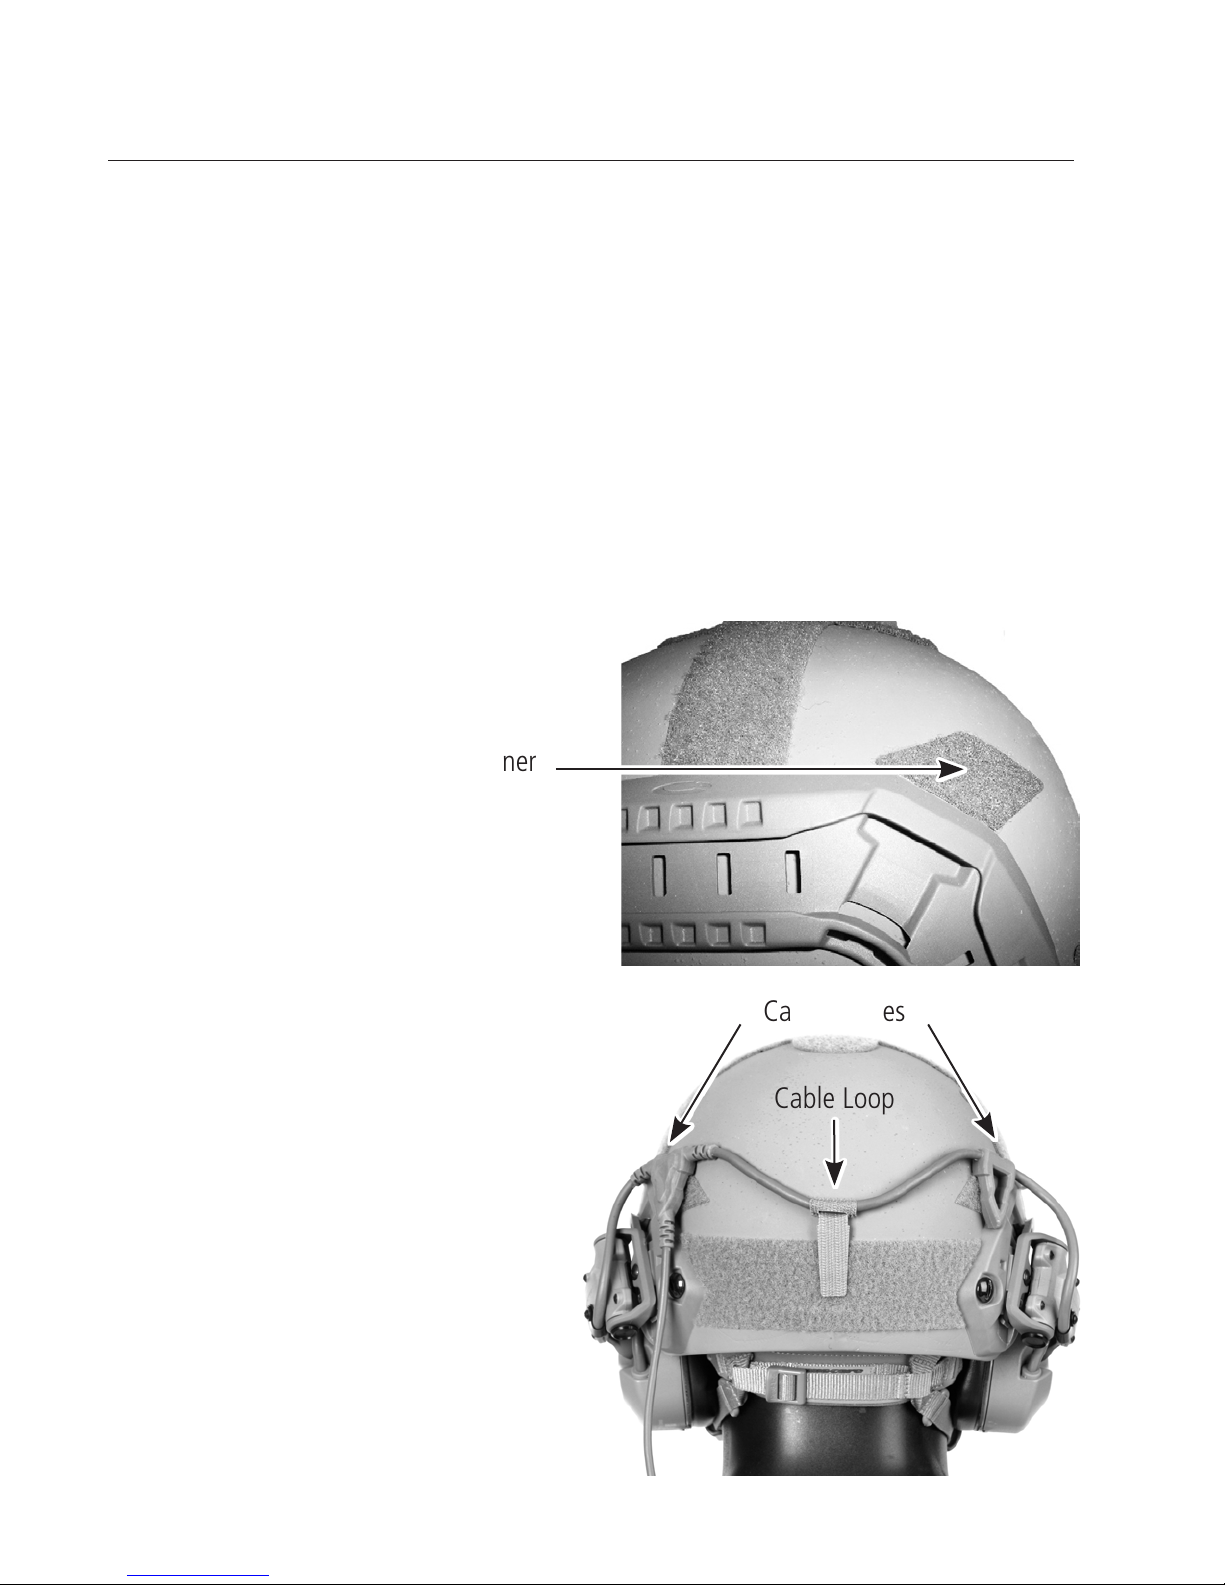
ATTACHING PILE FASTENERS
Attaching Pile Fasteners to Helmet:
Use the pile fastener pieces included with the headset to stow the cable.
NOTE: Use the headset several times to determine the best position for
the pile fasteners. Steps 1 and 2 are provided as a guideline.
1. On both sides of the helmet,
attach the adhesive side of the
fastener to the helmet near the
ARC rail as shown.
Pile Fastener
2. Press the hook side of the cable
guides to the fasteners.
3. Thread cable loop around cable
and attach to the Velcro on the
Cable Guides
Cable Loop
back of the helmet.
10
Page 13
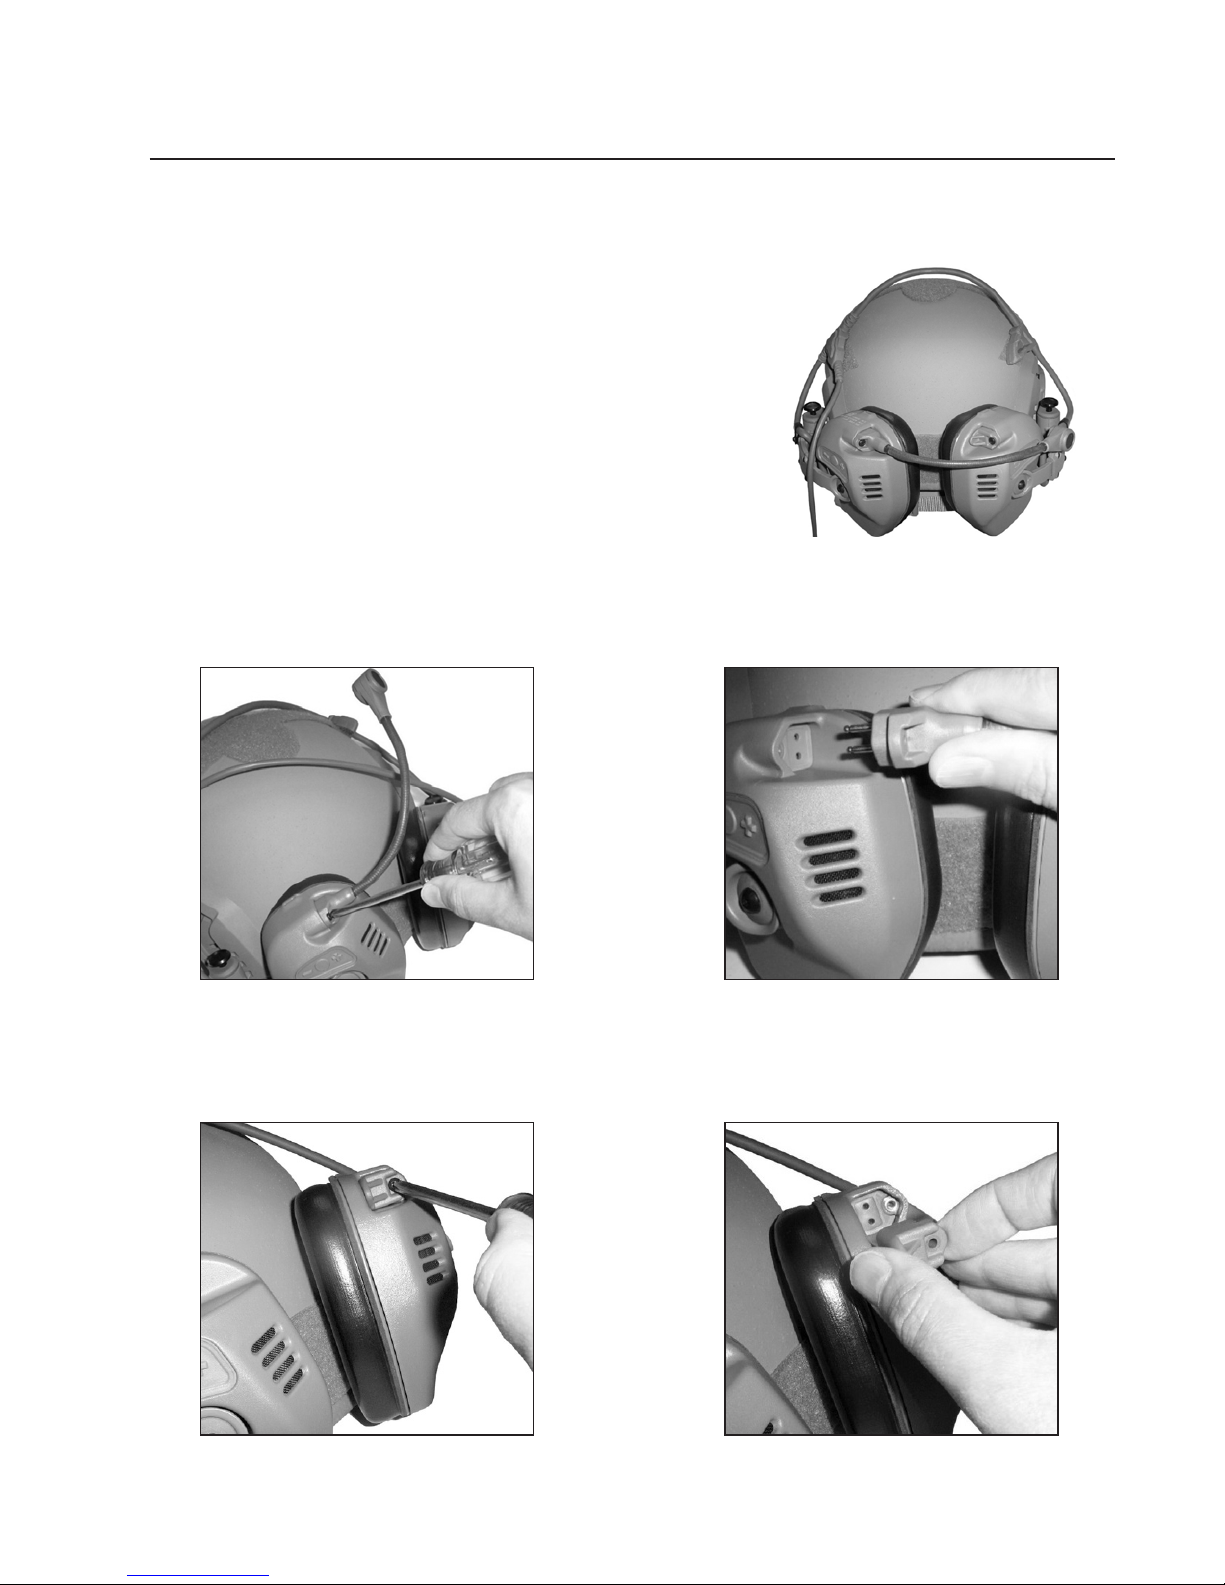
MOVING THE MICROPHONE
Moving Microphone to
Opposite Earcup (Optional):
NOTE: To make this task easier, rotate
the earcups to the stowed position behind the
helmet as shown.
1. Remove the screw that attaches
the microphone to the earcup.
3. Remove the screw that attaches
the cover to the other earcup.
2. Unplug the microphone from
the earcup.
4. Remove the cover.
11
Page 14
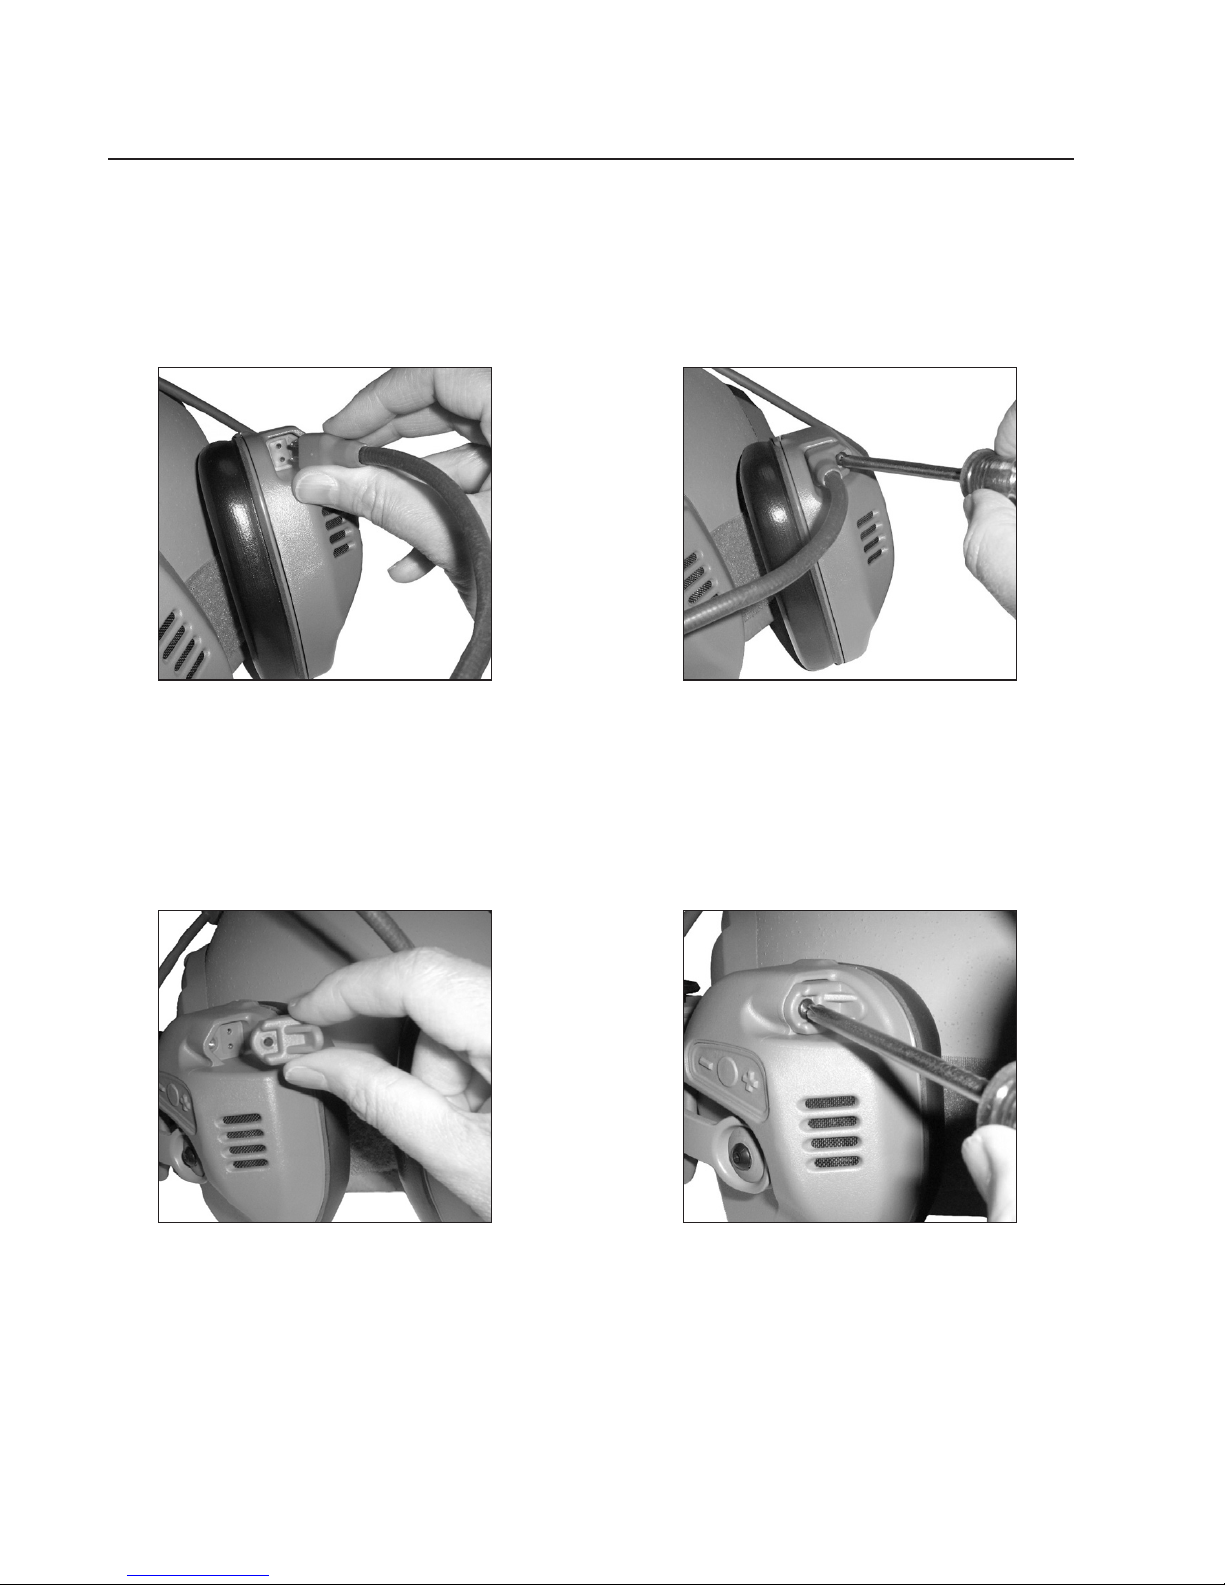
MOVING THE MICROPHONE
5. Plug the microphone into the
other earcup.
7. Place the cover at the attachment
point on the earcup from which
you removed the microphone.
6. Install the screw to attach the
microphone.
8. Install the screw to attach
the cover.
12
Page 15
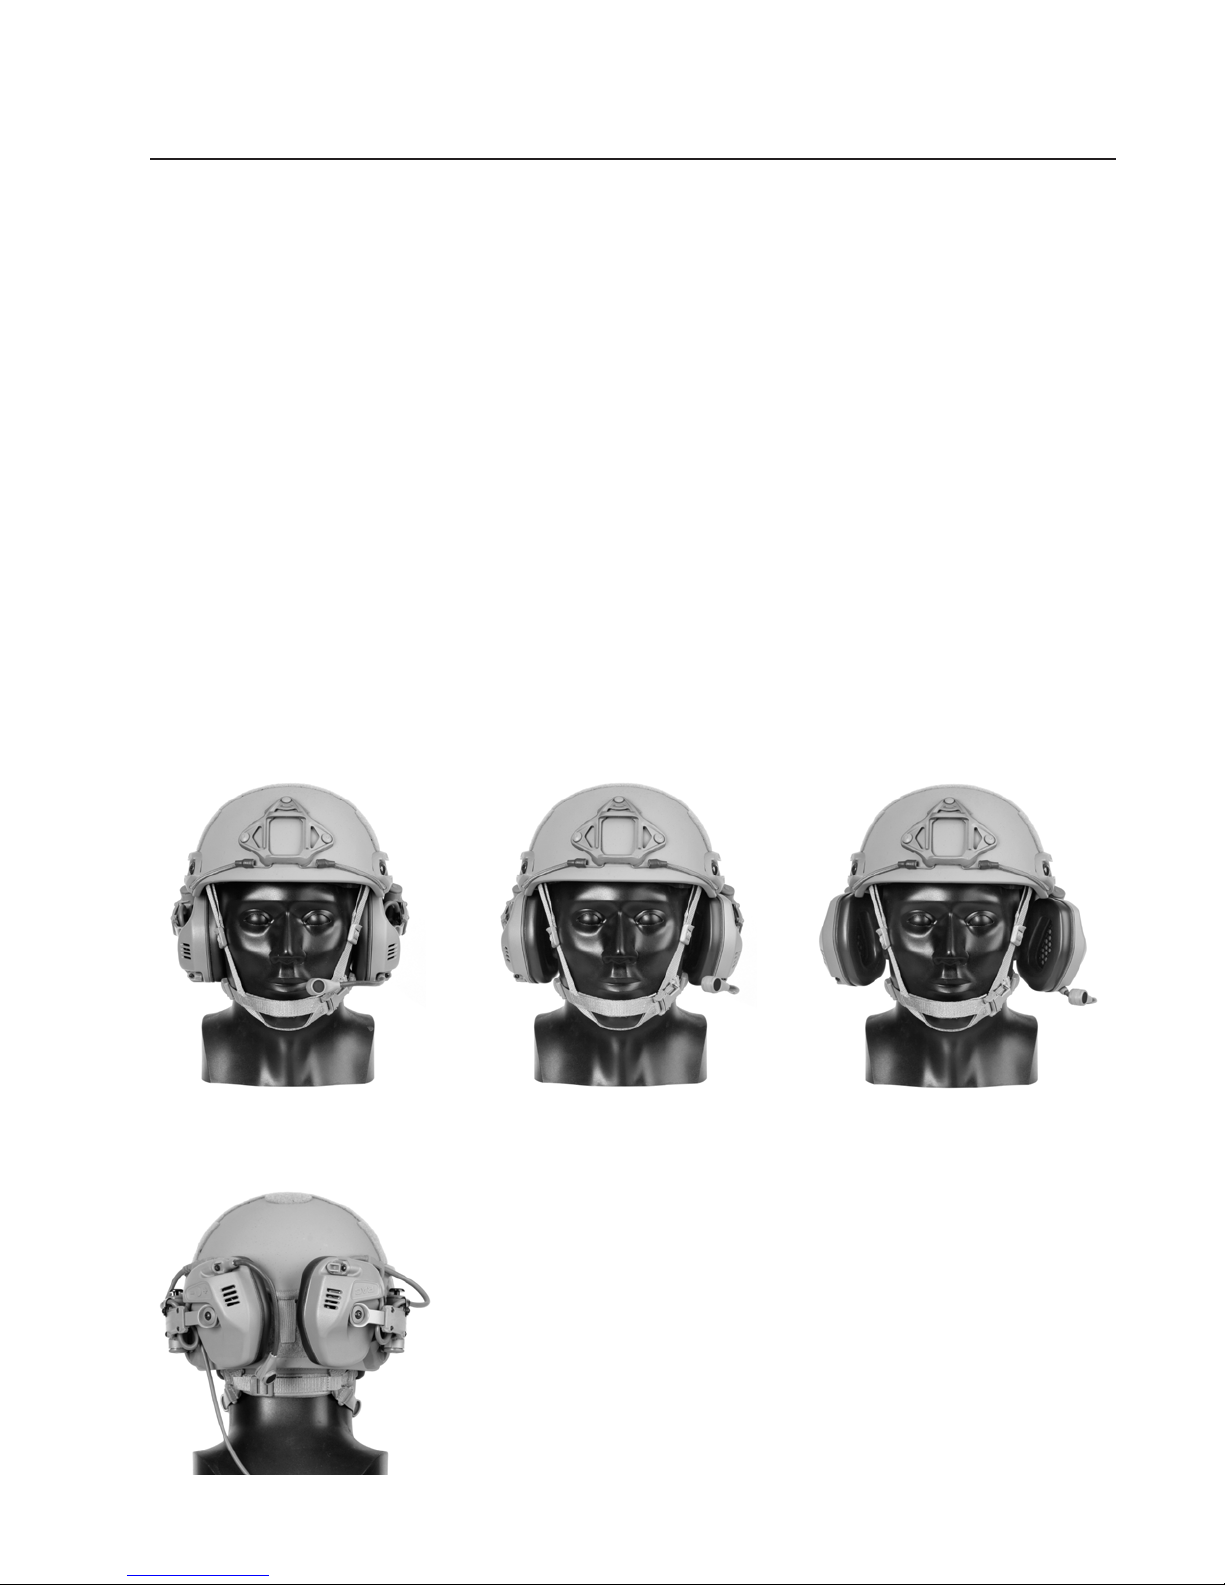
DONNING AND DOFFING
Donning and Dofng Helmet with Headset:
Donning and dofng includes the following tasks:
• Understanding headset positions
• Basic donning
• Using ventilation mode
• Dofng
Understanding Headset Positions
The headset has four positions:
Use Mode
(earcups snug over the ears)
Ventilate Mode
(out one click)
Donning & Dofng
(out two clicks)
Stowed
(out two clicks, then rotated behind the helmet;
can also be used for donning)
13
Page 16
DONNING AND DOFFING
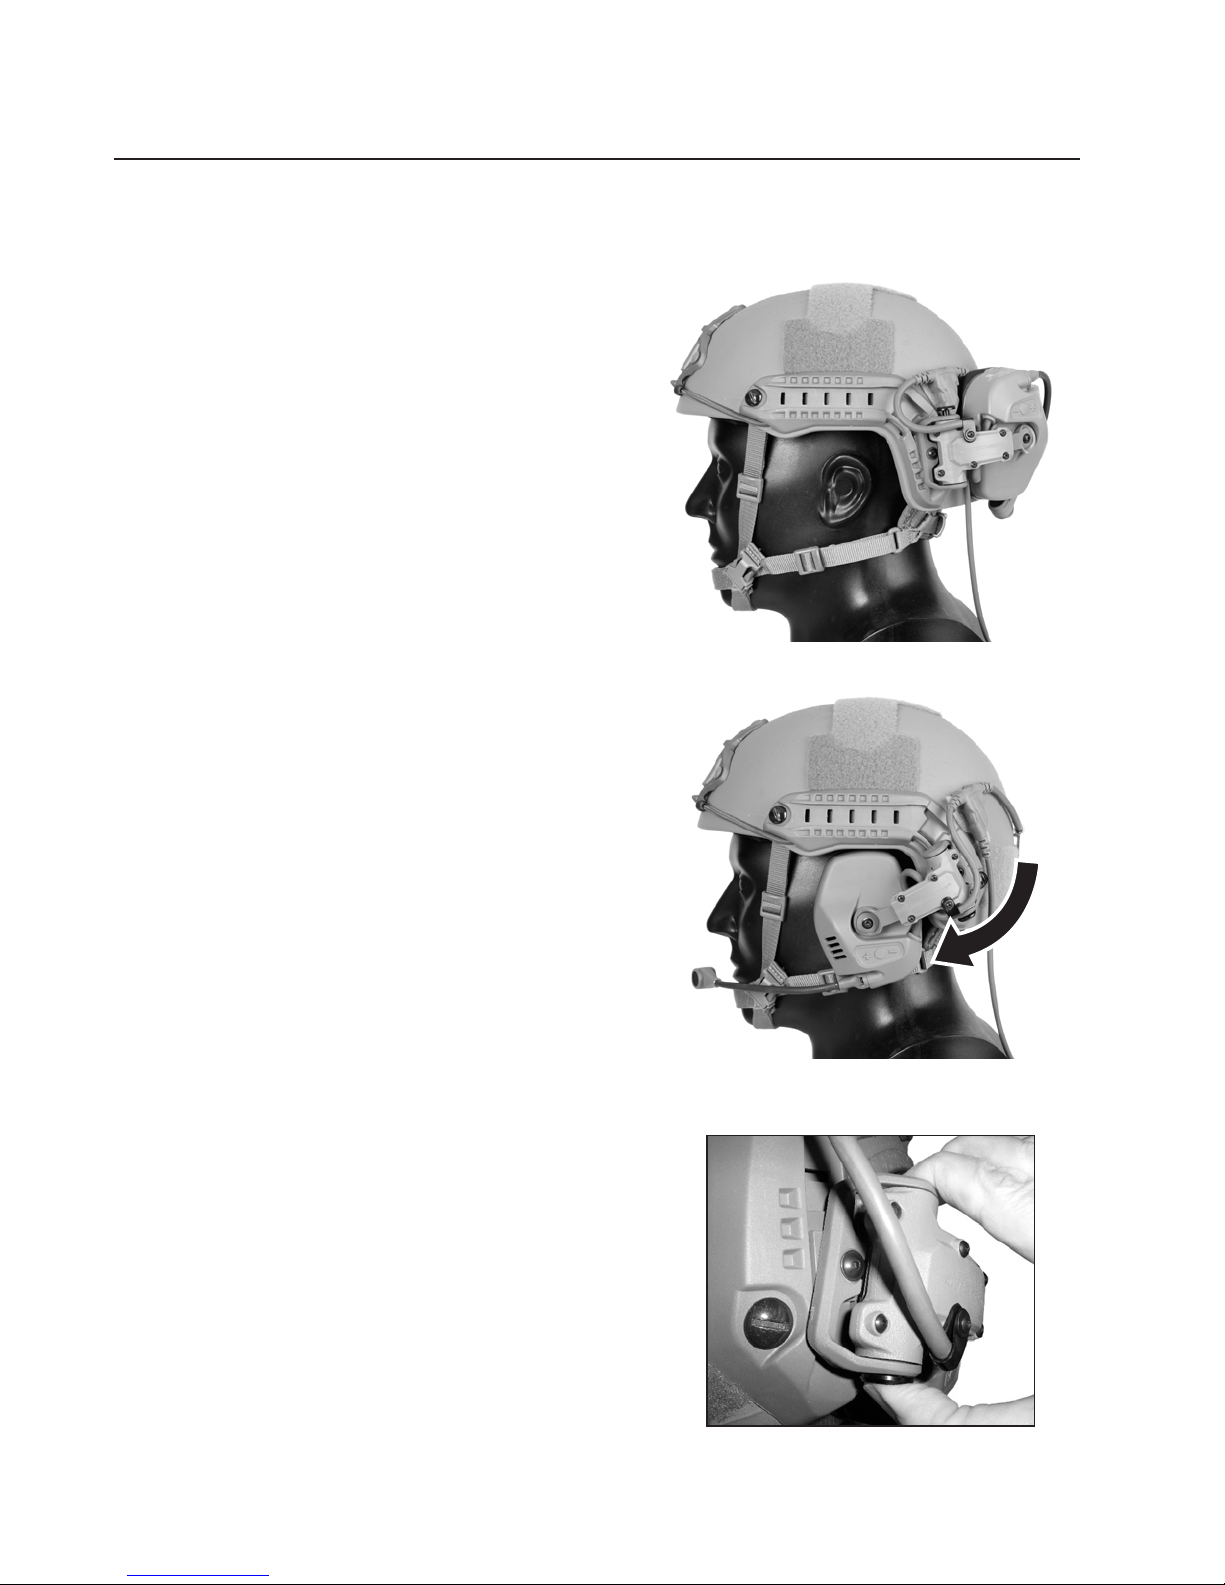
Basic Donning
1. With the headset in the stowed position,
don the helmet, fasten the chin strap, and
tighten all straps.
2. Rotate the headset earcups over the ears.
3. On both sides, press the pivot
arm buttons all the way in so that the
earcups enclose the ears completely and t
snugly against the head.
14
Page 17
DONNING AND DOFFING
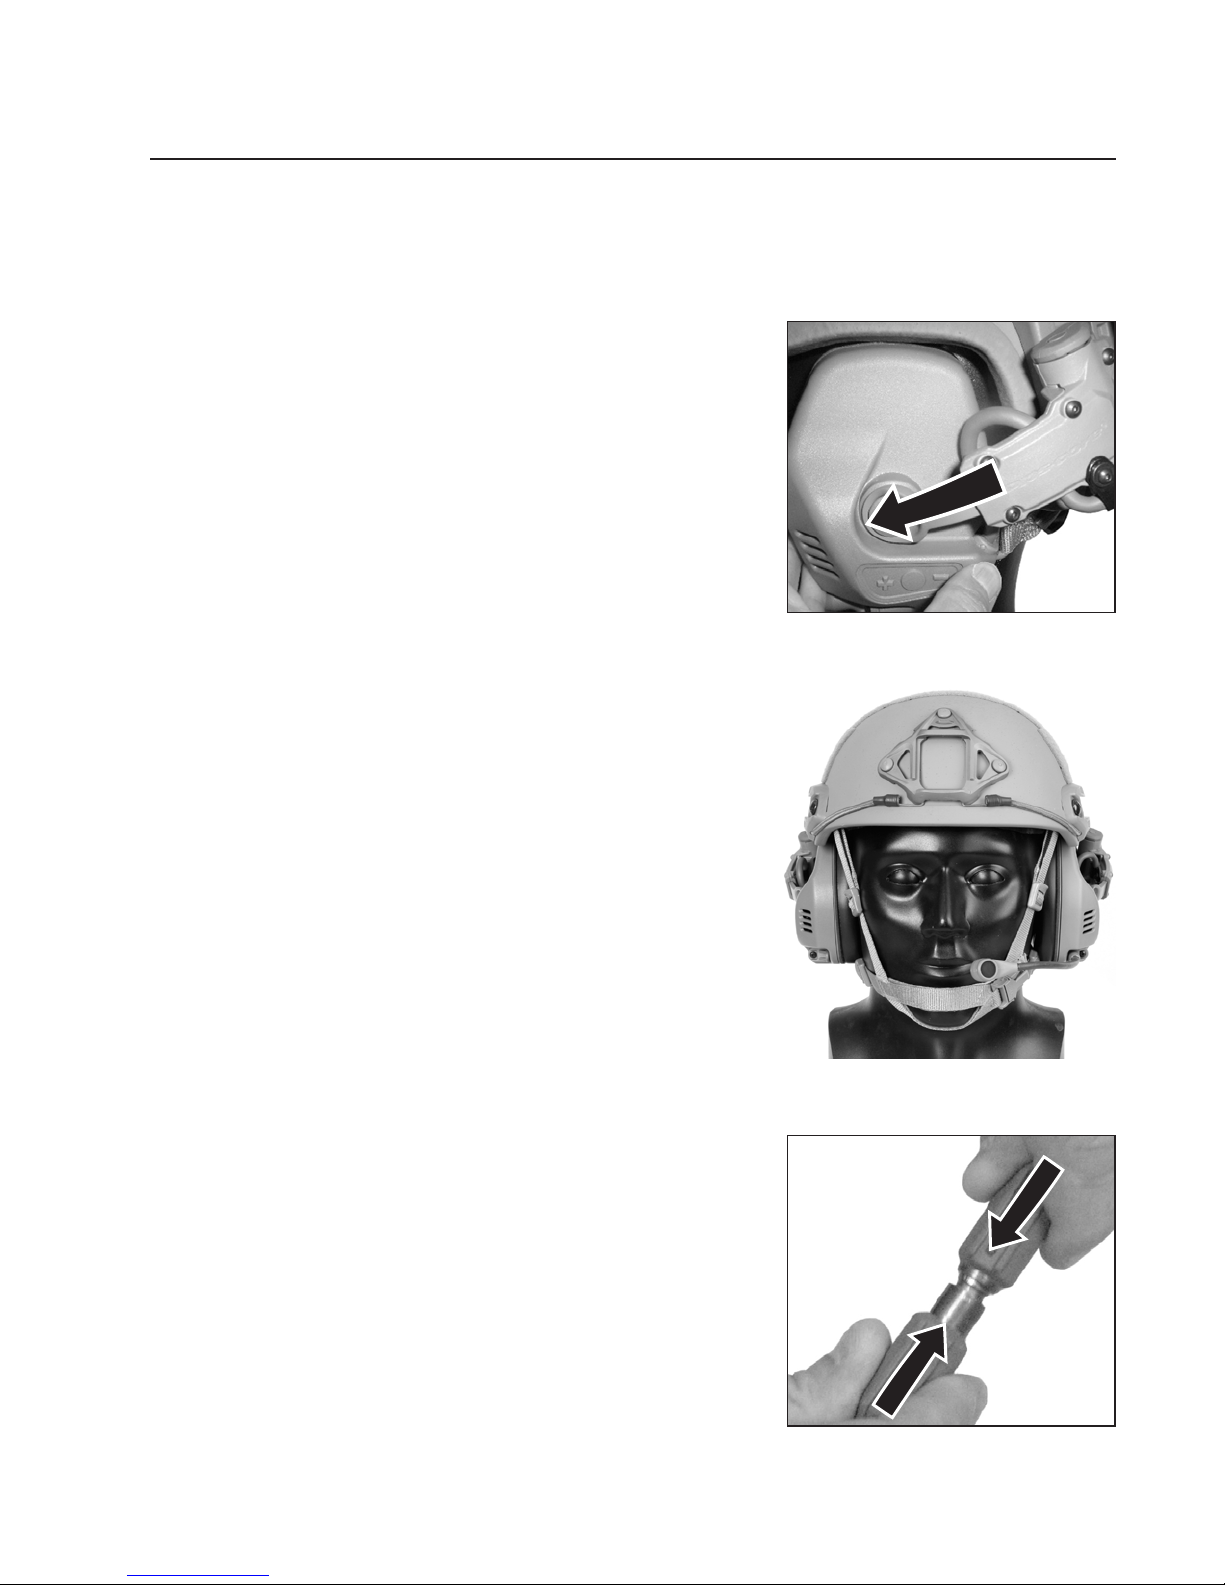
4. Ensure that the ears are centered within the
earcups. If necessary, slide the earcups back
or forward within the pivot arms to adjust the
earcups over the ears.
5. Adjust the microphone over the mouth (within
¼ inch) for optimal performance.
6. Align the headset cable connector to the
matching alignment indicators on the adapter
cable or radio PTT cable and press the
connection together.
NOTE: This quick disconnect is
designed with a break away force of
10lbs to prevent neck injuries in the
event that the cabling becomes snagged.
15
Page 18
DONNING AND DOFFING
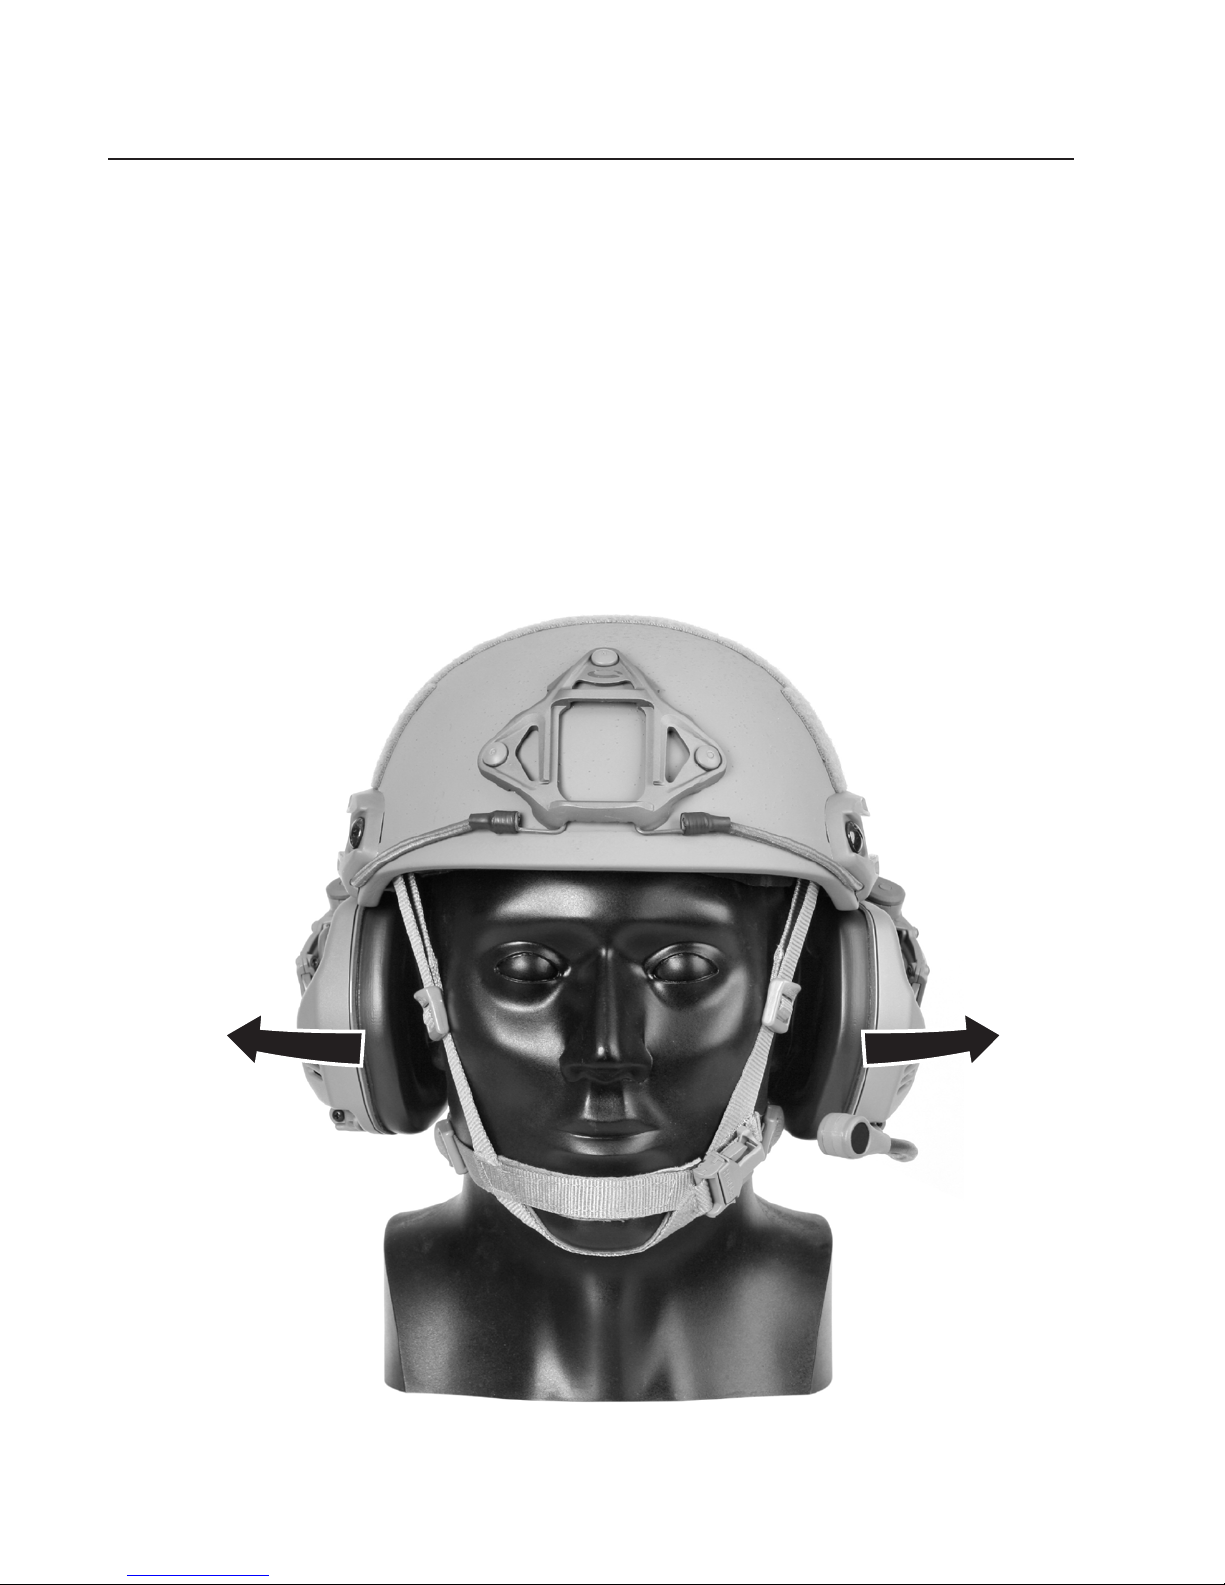
Using Ventilation Mode
If heat buildup occurs around the ears, pull the earcups away from the ears to the
rst click.
• The increased airow will reduce heat buildup.
• The audio will still reach the ears.
16
Out One ClickOut One Click
Page 19
DONNING AND DOFFING
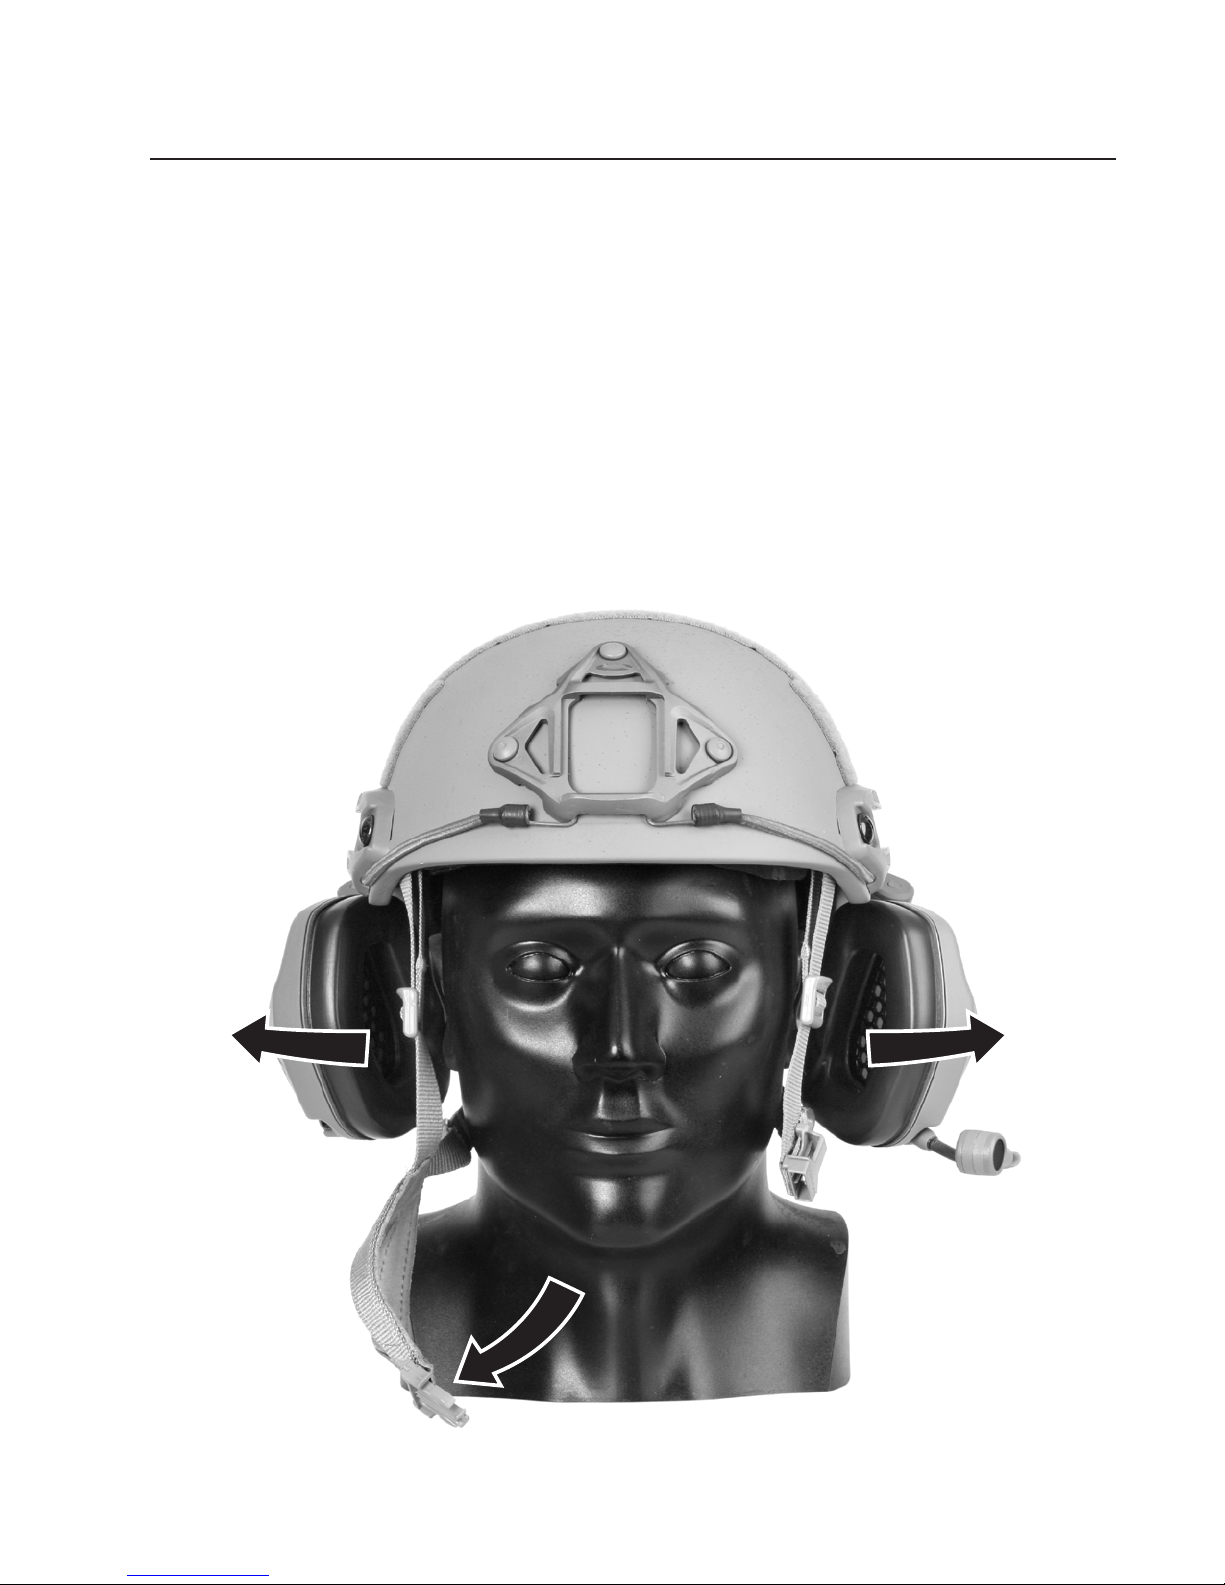
Dofng
To doff the helmet, pull the earcups away from the ears to the second click. Unfasten the
chin strap, and remove the helmet (this position also permits donning).
Out Two ClicksOut Two Clicks
17
Page 20
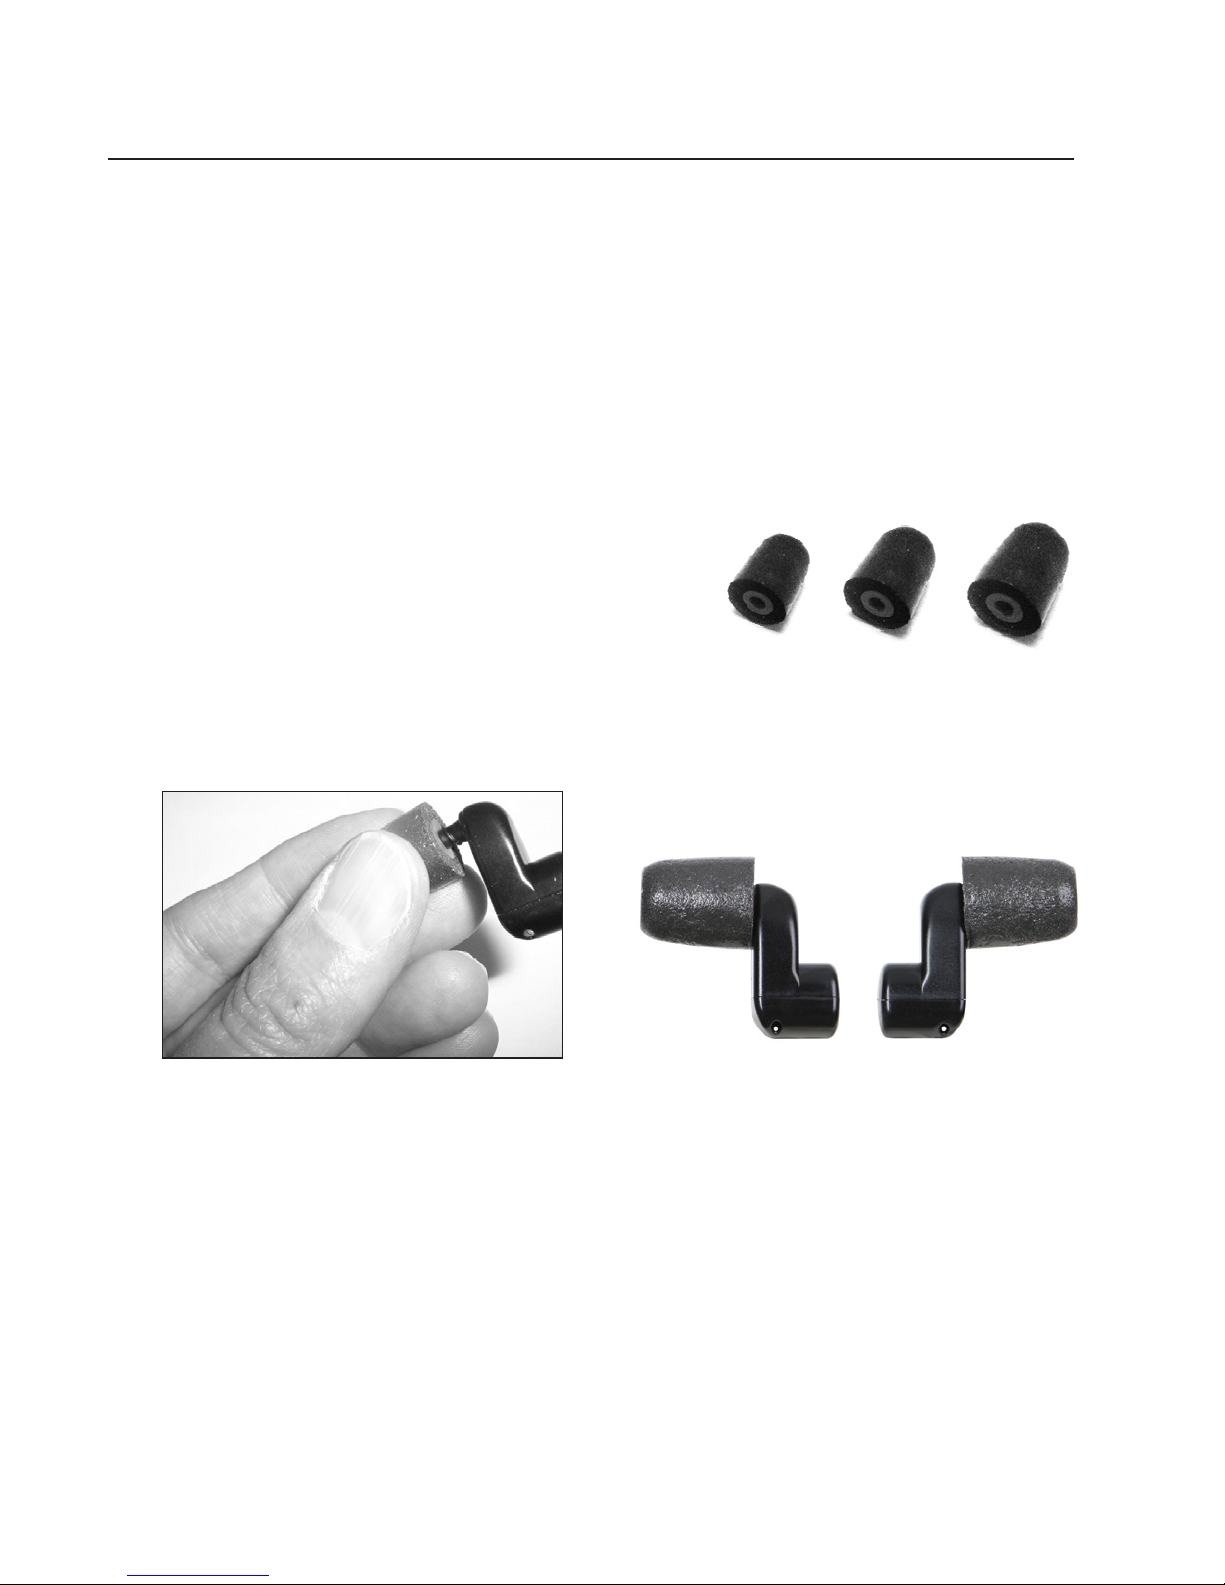
USING WIRELESS EARBUDS
Using Wireless Earbuds with Headset (Optional):
Use the optional earbuds to increase hearing protection. The earbuds function
wirelessly and contain no batteries.
1. Select the largest tips to start and remove
the foam tips from the packaging. Foam tip
sizes are Slim, Standard, and Large (in case of
tting problems, try the next smaller size).
2. Thread the foam tips onto the earbuds.
18
Page 21
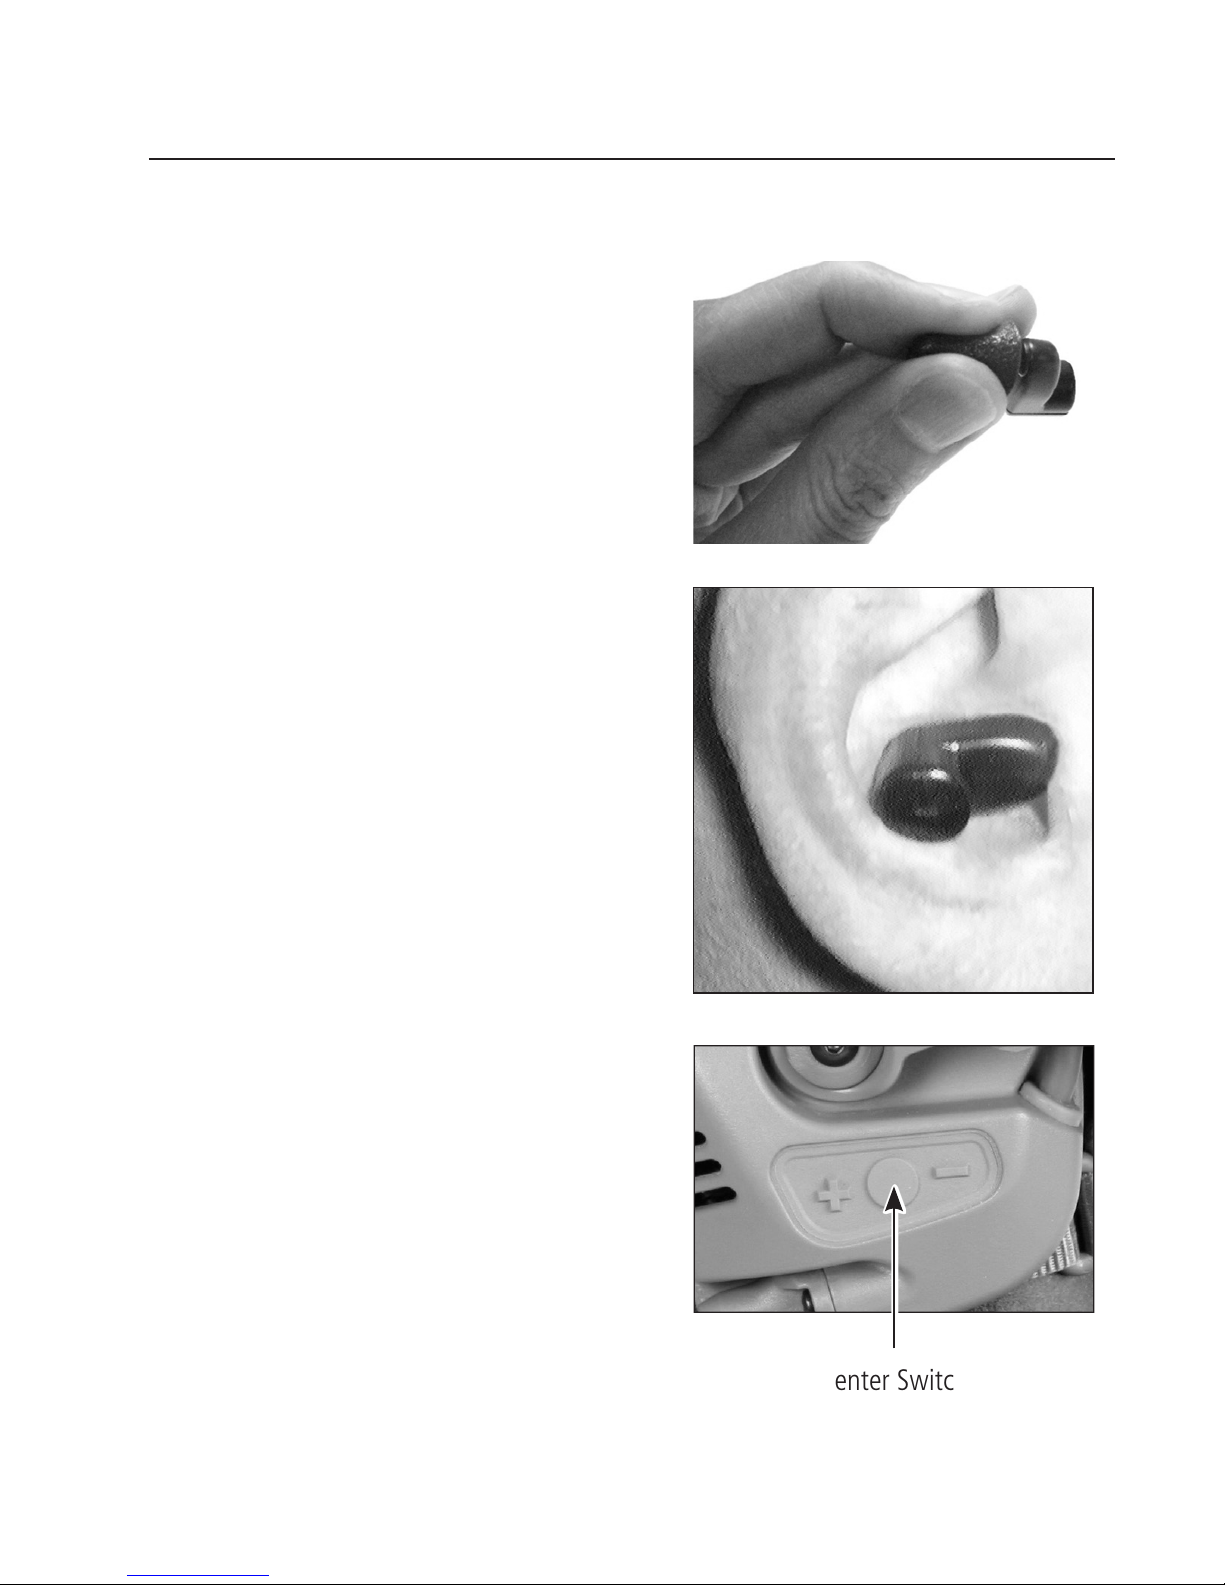
USING WIRELESS EARBUDS
3. Roll the foam tip between your ngers
to compress it.
4. Carefully insert the foam tip into the
ear, ensuring that the earbud is level in
the ear as shown.
5. Repeat Steps 3-4 to insert the other
earbud into the other ear.
6. Don the helmet; adjust and connect
the headset (see Basic Donning on
page 14).
7. Press the center switch on the left
earcup to transfer the audio from the
earphone to the earbud.
NOTE: To transfer the audio
back to the earphone, press the
center switch again.
Center Switch
19
Page 22
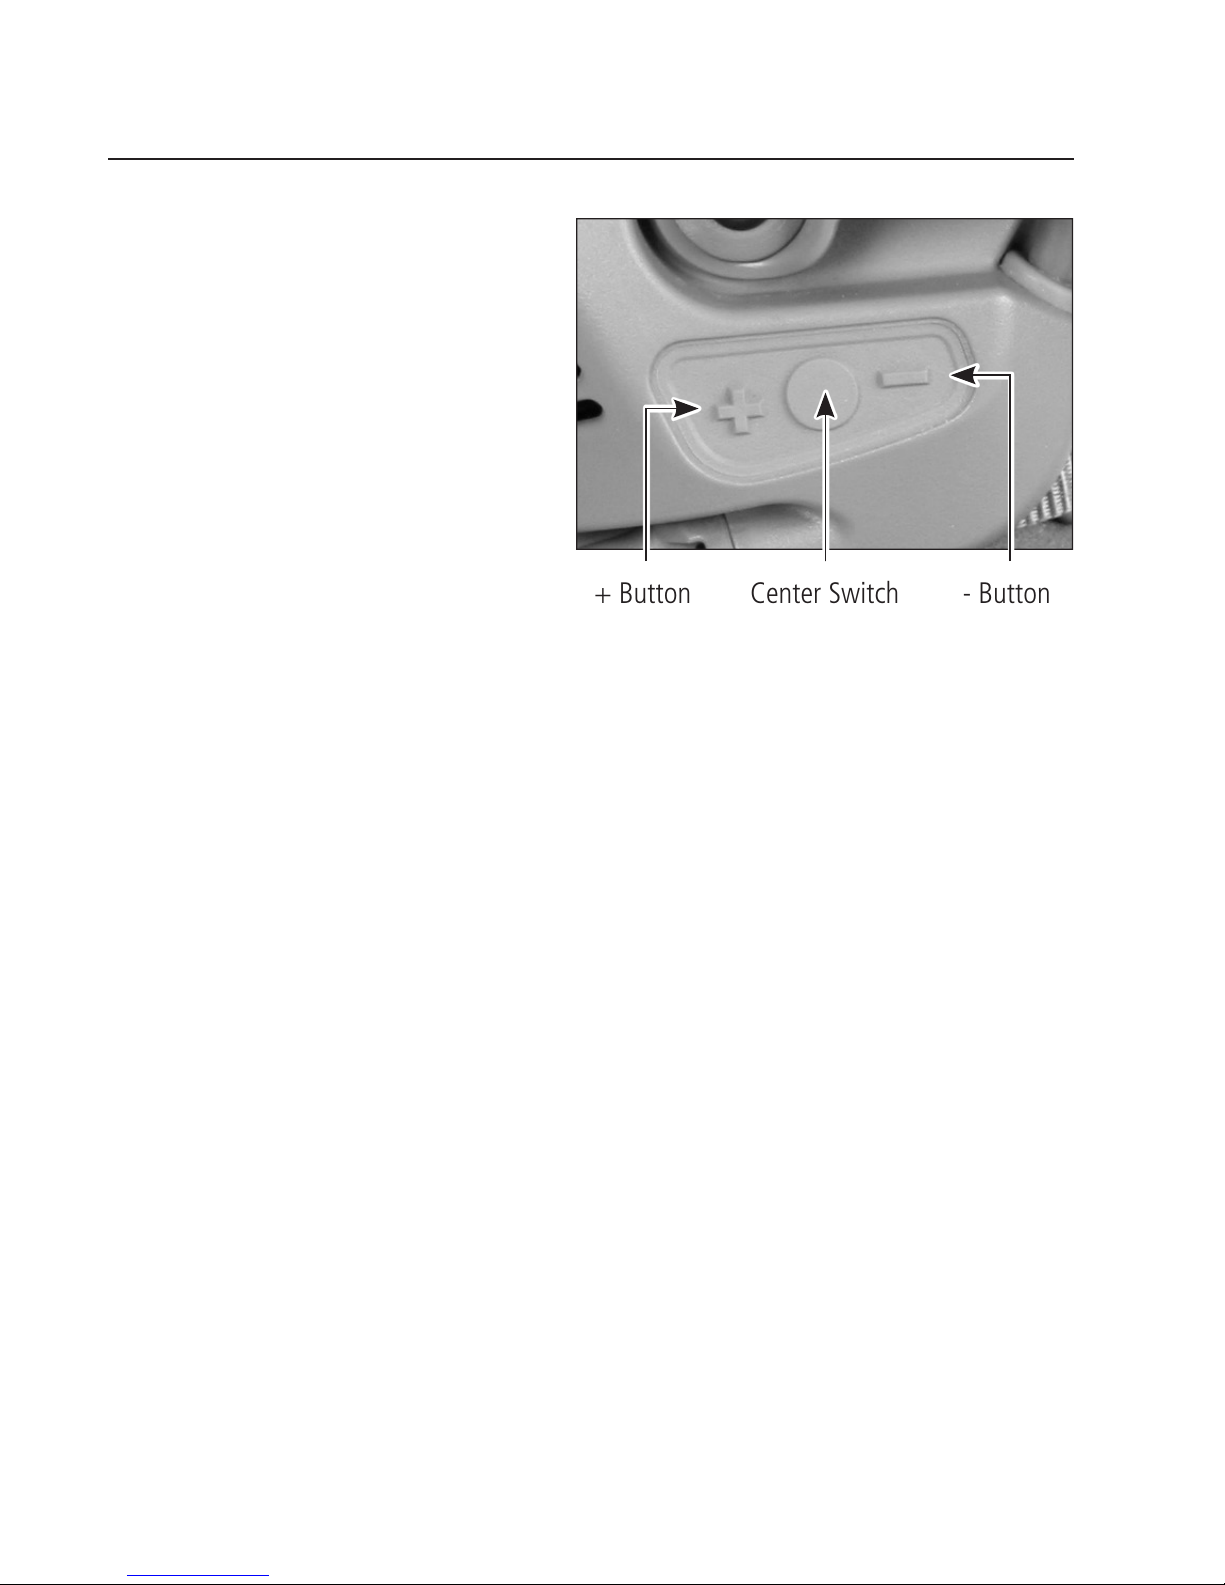
HEADSET FUNCTIONS
Headset Functions:
Headset functions include Hear-Through
3DHT mode and balance mode, which
you can control via the + and – buttons.
You can also toggle the audio between
earphones and earbuds via the center
switch (with wireless earbuds only).
Center Switch+ Button - Button
Hear-Through 3D Hearing Technology (3DHT) Mode
The Hear-Through 3D Hearing Technology (3DHT) function broadcasts ambient sounds through the
earcups for increased situational awareness. The radio/intercom communications function continues
with hear-through turned on or off.
To turn Hear-Through 3DHT ON: Press and hold the + and – buttons together once. The headset
emits three ascending tones, and the hear-through function activates.
To turn Hear-Through 3DHT OFF: Press and hold the + and – buttons together for two seconds.
The headset emits three descending tones, and the hear-through function ceases.
To increase Hear-Through 3DHT volume: Press the + button one or more times. The headset emits
a short tone that gets louder as the volume increases.
To decrease Hear-Through 3DHT volume: Press the – button one or more times. The headset
emits a long tone that gets softer as the volume decreases.
NOTE: After two hours of Hear-Through 3DHT ON operation without any button
presses, the headset emits a shutoff tone, and Hear-Through 3DHT function ceases. To
reset the two-hour counter during the shutoff tone, press the + or – button. Otherwise,
press the + and – buttons together once to return to Hear-Through 3DHT mode.
20
Page 23

HEADSET FUNCTIONS
Balance Mode
Balance mode allows you to personalize the balance between both ears to compensate for differences
in you hearing.
To enter balance mode: While the Hear-Through 3DHT is turned on, press the + and – buttons
together twice. The headset will emit a constant tone that will increase in volume as described below.
To increase volume to left earphone: Press the + button one or more times; volume will increase
with each press.
To increase volume to right earphone: Press the – button one or more times; volume will
increase with each press.
To exit balance mode: Press the + and – buttons together once (or wait approximately ve
seconds without adjusting the balance). The headset will return to Hear-Through 3DHT mode.
Switching Between Earphones and Earbuds
Press the center switch to toggle the headset audio between the earphones and the earbuds.
NOTE: The feature only works with headsets which have been factory congured
for optional wireless earbuds. Headsets without this option cannot by upgraded to
allow the use of the wireless earbuds.
21
Page 24

MAINTENANCE
Maintaining Your RAC Headset:
Simple maintenance will help keep the headset in good operating condition. Complete
the following tasks as necessary.
Inspection
Inspect the ear seals regularly to ensure that they have no cracks, which can lead to
sound leakage.
Cleaning
1. Clean the headset regularly with a soft cloth dampened with soap and water.
2. Dry thoroughly with a clean cloth.
Replacing the Batteries
When the batteries are low, the headset will emit a four-note warning tone. Replace
batteries within two hours. See Installing Batteries for details.
NOTE: When the batteries fail, radio and intercom functions continue to
work, as do the earbuds. However, the hear-through function ceases. Replace
the batteries to restore the hear-through function. Always replace batteries
from both earcups as a set, do not mix-and-match batteries.
Recommended: When replacing batteries, inspect the rubber ring around the earseal
plate, and wipe away any dust or debris around the groove.
22
Page 25

MAINTENANCE
Storage
NOTE: When storing the headset, ensure that the ear seals are not
compressed. Long-term compression can deform the ear seals, causing loss of
sound attenuation.
1. Remove the batteries before you store the headset.
2. Enclose the headset in the pouch.
3. Store the headset in a cool, dry area. Do not store it in an area prone to excessive
heat (for example, near a windshield or a window).
23
Page 26

OPERATOR NOTES
24
Page 27

OPERATOR NOTES
25
Page 28

Copyright © 2016 Ops-Core Inc. Ops-Core and FAST are registered trademarks of Ops-Core Inc., a wholly
owned subsidiary of Gentex Corporation. RAC is a trademark of Gentex Corporation or its afliates.
 Loading...