

Ops-Core Mesh Helmet Cover Installation Manual
INSTALLATION CONTINUED
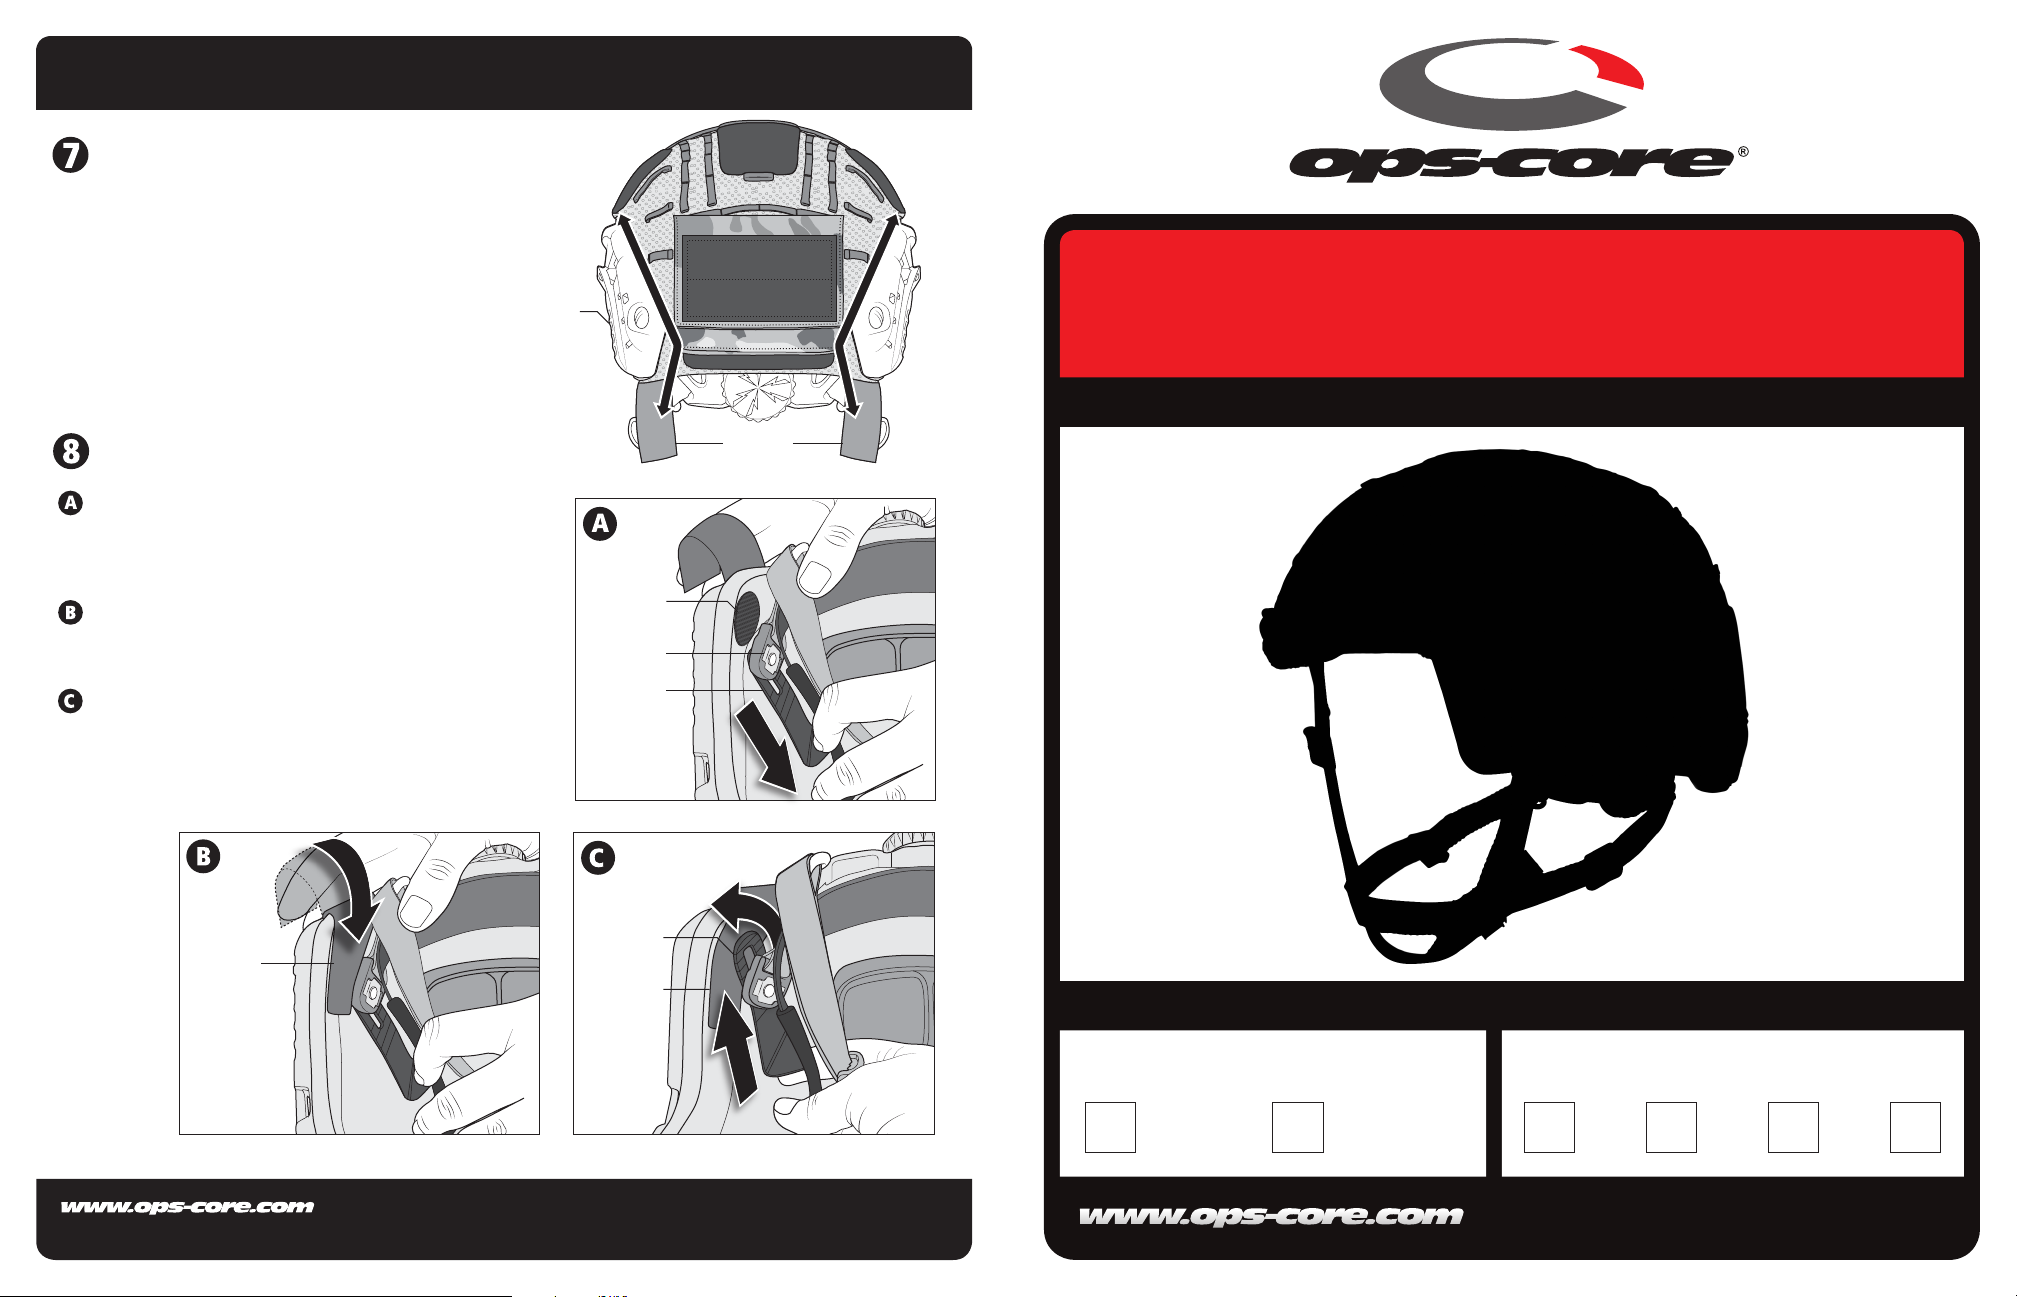
ATTACH BACK OF HELMET COVER
Pull the back of the Mesh Helmet Cover down. Align
both back side edges with the back side edges of the
FAST Side Rails (ARCs) as shown.
FAST Side
Rail (ARC)
SECURE MESH HELMET COVER
Loosen the Rear Chinstrap Anchor T-Nut and slide the Rear
Fitband Tab all the way back so that the corner of the helmet
shell is exposed. Clean area with Rubbing Alcohol, then adhere
a Velcro Circle to the exposed helmet shell corner as shown.
Fold the Mesh Cover’s Rear Velcro Tab over the edge of the
helmet shell and secure it to the newly placed Rear Velcro
Circle. Cut off any excess Velcro on Cover’s Tab.
Push the Rear Fitband Tab up and over the Cover’s
secured Velcro Tab as shown.
Velcro Circle
Anchor T-Nut
Fitband Tab
Location
Rear
Cover
Velcro Tabs
MESH HELMET COVER
FOR FAST HIGH CUT & SUPER HIGH CUT HELMETS
Repeat Steps A-C for the opposite side, then
tighten both Rear Fitband Screws.
Rear Velcro
Tab
Rear Fitband
Tab
Rear Velcro
Tab
HIGH CUT
(FAST XP & LE)
SUPER HIGH CUT
(FAST MT)
SIZEFAST HELMET CUT
M L XL XXL
06-16-000 REV. C
INSTALLATION
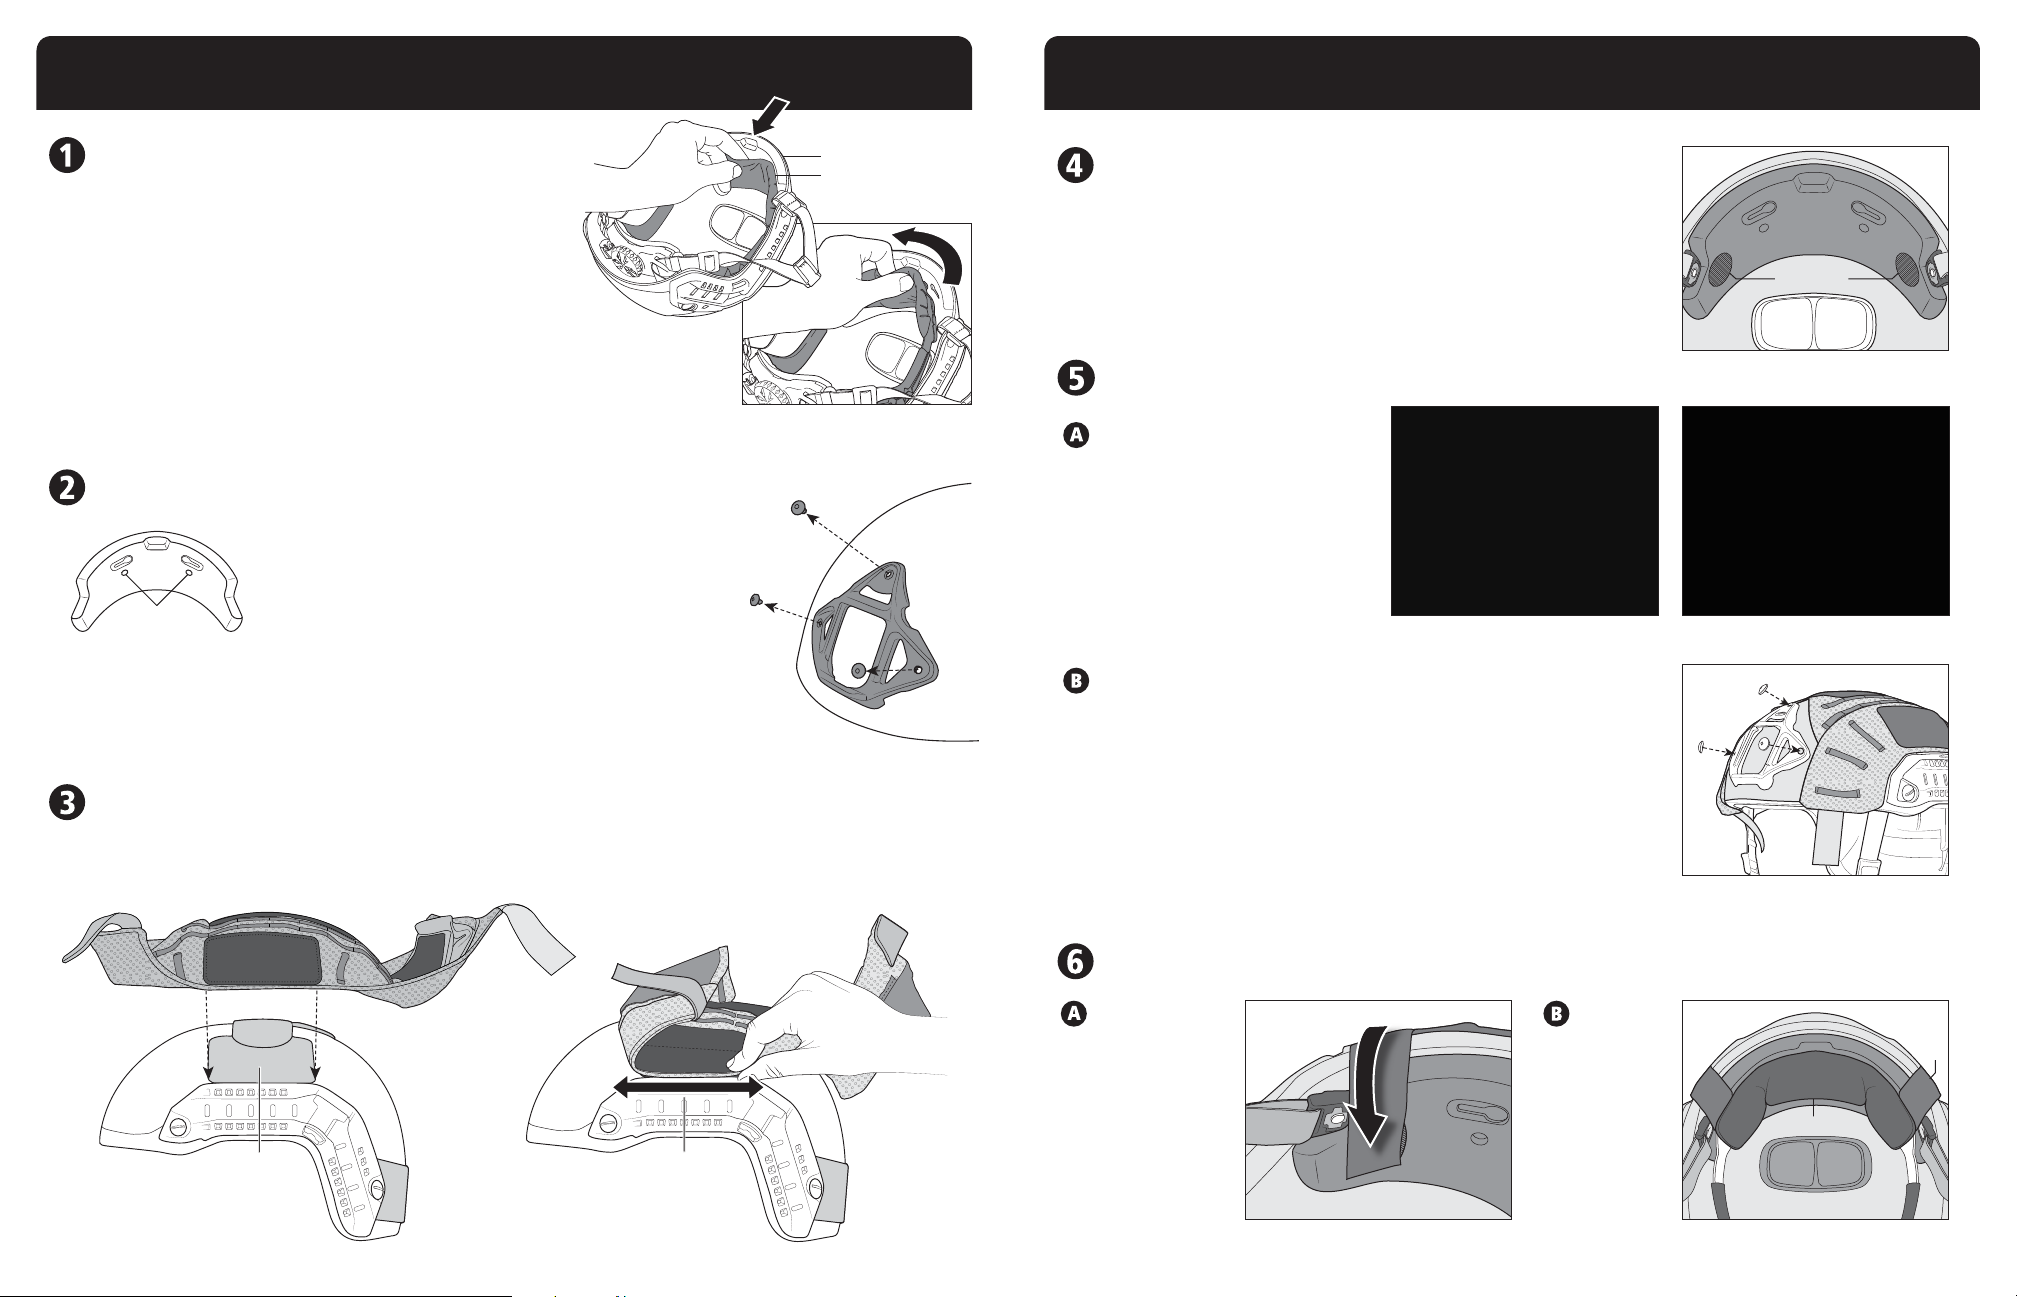
MESH COVER INSTALLATION PREP
DETACH FITBAND
Place your index nger behind the center of the Fitband Comfort
Pad and carefully bend away from the Front EPP Pad as shown.
Pinch the Fitband Comfort Pad and use your thumb to slide the pad
sideways ½” towards the center of the helmet along the Front EPP
Pad. Repeat on both sides until the pad is released from the key slots.
NOTE: DO NOT PULL THE FITBAND COMFORT PAD AWAY FROM THE
FRONT EPP PAD OR YOU MAY BREAK THE FRONT EPP PAD KEY SLOTS.
Front EPP Pad
Fitband Comfort Pad
SHROUD REMOVAL
Front EPP Pad
NOTE: IF YOUR FRONT EPP PAD DOES NOT HAVE SHROUD
SCREW ACCESS HOLES, YOU MUST FIRST DISASSEMBLE THE
FRONT CHINSTRAP HARDWARE AND COMPLETELY REMOVE
Shroud
Screw Access Holes
Make sure the bungees are not attached to the Shroud. Remove the Shroud from your helmet using
a screwdriver. Set aside the Shroud, Washers and T-Nuts. Save the shorter screws for later use
without the Mesh Helmet Cover.
THE FRONT EPP PAD TO ACCESS THE SHROUD SCREWS.
ATTACH SIDES OF HELMET COVER
Attach the sides of the Mesh Helmet Cover by aligning the Side Exterior Velcro of the Cover with the Side Exterior Velcro
on the helmet as shown. Be sure to line up the bottom edges of the Cover with the top edges of the FAST Side Rails
(ARCs). Repeat for both sides.
ATTACH FRONT VELCRO CIRCLES
Clean area with rubbing alcohol, then attach the remaining two Velcro
circles to the target areas on the Front EPP Pad as shown.
Velcro Circles
RE-ATTACH SHROUD
Insert a screw from the inside of your
helmet shell and mark where the hole
should go on the helmet cover. Using
a sharp object, make a small cut on in
the cover where the screw pokes out.
Remove the screw and repeat for the
other two holes.
Align the Shroud with the existing 3-hole pattern on the front of your Helmet
Cover and helmet shell. Insert a T-nut through the Shroud’s top hole from the
front (outside) of the helmet Cover, then helmet shell. Use your ngers to
loosely attach a 1/2” screw from the inside of the helmet shell. Repeat for the
remaining 2 holes. Finish by using a screwdriver to tighten all 3 screws from the
inside of the shell, making sure the Shroud is securely fastened to the helmet.
NOTE: TIGHTEN SCREWS UNTIL SECURED. DO NOT OVER TIGHTEN, THIS WILL
CAUSE DEFORMATION TO HELMET SHELL AND COMPROMISE HELMET’S
BALLISTIC CAPABILITIES.
Side Exterior
Velcro
FAST Side
Rail (ARC)
SECURE FRONT OF COVER AND RE-ATTACH FITBAND
Using the Velcro
tabs on the Mesh
Helmet Cover,
secure them to
the inside of the
Front Pad using
the Velcro Circles
from Step 4.
Re-attach
the Fitband
to the Front
EPP Pad.
Fitband
Velcro
Tab
 Loading...