

Page 1

OPPO Smartphone ColorOS 5.0 User Guide
Content
1. Welcome Page .......................................................................................................................... 6
2. Safety Information .................................................................................................................... 6
3. Get started ................................................................................................................................ 9
3.1. Quick look ........................................................................................................................... 9
3.1.1. ColorOS 5.0 Features ............................................................................................... 9
3.1.2. Sleep/Wake button ............................................................................................. 17
3.1.3. Menu, Home and Return buttons ....................................................................... 19
3.1.4. Volume buttons ................................................................................................... 22
3.1.5. Micro-USB port .................................................................................................... 23
3.1.6. Headset jack ........................................................................................................ 24
3.1.7. SIM and SD cards ................................................................................................. 24
3.1.8. Accessories came with OPPO phone ................................................................... 25
3.1.9. Charging the battery ........................................................................................... 27
3.1.10. Gesture & Motion ............................................................................................... 28
3.1.11. Key combinations ................................................................................................ 32
3.1.12. Status Icons ......................................................................................................... 33
3.2. Configuration Settings ............................................................................................. 35
3.2.1. Fingerprint, Face and Passcode ........................................................................... 35
3.2.2. Set up other mail and calendar accounts ............................................................ 46
3.2.3. Transfer data from the old phone to OPPO smartphone .................................... 47
3.2.4. Date and Time ..................................................................................................... 51
3.2.5. Language and Region .......................................................................................... 52
3.2.6. Connect to the Internet ....................................................................................... 54
4. What's new in ColorOS 5.0 ...................................................................................................... 55
4.2. AI Feature ................................................................................................................ 55
4.1.1. Smart Assistant ...................................................................................................... 55
4.2.1. Smart album search and cleanup ........................................................................ 59
4.2.2. Quick actions menus ........................................................................................... 61
4.3. AI Scene Recognition and AI Beauty ....................................................................... 62
4.4. Assistive Ball ............................................................................................................ 69
4.5. Full Screen Multitasking .......................................................................................... 70
4.6. Quick actions menus ............................................................................................... 72
4.7. Take and edit a screenshot ...................................................................................... 73
4.8. Control Center ......................................................................................................... 76
4.9. New features of Photos ........................................................................................... 78
4.10. New features of Camera.......................................................................................... 82
4.11. Screen Recording ..................................................................................................... 84
4.12. Hide Home screen icon ........................................................................................... 86
4.13. VIP Contacts ............................................................................................................ 88
Page 2

4.14. Tips .......................................................................................................................... 89
4.15. Transfer data from the old phone to OPPO smartphone ........................................ 91
5. Basics ....................................................................................................................................... 93
5.2. Use apps .................................................................................................................. 93
5.3. Share from apps ...................................................................................................... 96
5.4. One-click cleanup .................................................................................................... 97
5.5. Lock the running background apps ......................................................................... 98
5.6. View, zoom in and out ............................................................................................. 99
5.7. Smart & Convenient Operation ............................................................................. 100
5.6.1. Navigation Keys ................................................................................................... 100
5.7.1. Swipe-up Gesture Navigation ............................................................................ 106
5.7.2. Assistive Ball ...................................................................................................... 109
5.7.3. Full Screen Multitasking .................................................................................... 110
5.8. Change the screen orientation .............................................................................. 112
5.9. Split-screen ............................................................................................................ 114
5.10. Take and edit a screenshot .................................................................................... 117
5.11. Control Center, Notification, and Status Bar ......................................................... 119
5.12. Smart Assistant ...................................................................................................... 123
5.13. Search .................................................................................................................... 127
5.14. Test ........................................................................................................................ 128
5.13.1. Add or change keyboard languages .................................................................. 128
5.14.1. Type, edit, and delete text ................................................................................ 129
5.14.2. Prediction .......................................................................................................... 132
5.14.3. Voice typing ....................................................................................................... 134
5.14.4. TouchPal for OPPO ............................................................................................ 136
5.15. Sound, Vibration, and System Feedback ............................................................... 138
5.16. Charge and monitor the battery ........................................................................... 140
5.17. Location Service .................................................................................................... 142
5.18. Use the phone internationally .............................................................................. 143
5.19. Power Saver ........................................................................................................... 144
6. Personalize your OPPO phone............................................................................................... 145
6.2. ColorOS 5.0 device name ...................................................................................... 145
6.3. Personalize the Home screen ................................................................................ 146
6.2.1. Organize the Home screen ................................................................................ 146
6.2.2. Home screen widgets & Transition Effects ........................................................ 148
6.3. Change the wallpaper ........................................................................................... 150
6.4. Lock screen magazine ............................................................................................ 152
6.5. Adjust the screen brightness and color temperature ........................................... 154
6.6. Change auto-lock time .......................................................................................... 155
6.7. Change the font size .............................................................................................. 155
6.8. Keyboard and input method ................................................................................. 156
6.8.1. Customize the look of the keyboard ................................................................. 156
6.8.2. Keyboard Layout ................................................................................................ 157
6.8.3. Trends ................................................................................................................ 160
Page 3

6.8.4. Keyboard general settings ................................................................................. 160
6.9. Set up Startup Manager ........................................................................................ 162
6.10. Clone Apps ............................................................................................................ 163
6.11. Manage Default App ............................................................................................. 164
6.12. Gesture & Motion ................................................................................................. 164
6.13. Preset device on/off time ...................................................................................... 168
6.14. Game Acceleration ................................................................................................ 169
6.15. App display in Full-screen ...................................................................................... 172
7. Apps ...................................................................................................................................... 174
7.1. Phone ............................................................................................................................. 174
7.1.1 Make and Answer Phone Calls ............................................................................. 174
7.1.2. Conference calls .................................................................................................. 179
7.1.3. Block calls ............................................................................................................ 180
7.1.4. Emergency calls ................................................................................................... 181
7.1.5. Carrier’s Call Settings........................................................................................... 182
7.2. Message ................................................................................................................ 183
7.2.1. Send and receive messages ............................................................................... 183
7.2.2. Customize message settings .............................................................................. 186
7.3. Contacts................................................................................................................. 188
7.3.1. Add a contact .................................................................................................... 188
7.3.2. Edit and delete a contact ................................................................................... 190
7.3.3. Import and export contacts ............................................................................... 192
7.3.4. SIM contacts ...................................................................................................... 194
7.3.5. Manage contacts ............................................................................................... 196
7.3.6. Back up your contacts ....................................................................................... 198
7.3.7. VIP Contacts ...................................................................................................... 198
7.4. Phone Manager ..................................................................................................... 199
7.4.1. Scan and optimize the phone ............................................................................ 199
7.4.2. Clean Storage .................................................................................................... 200
7.4.3. Privacy Permissions ........................................................................................... 202
7.4.4. Virus Scan .......................................................................................................... 204
7.4.5. Payment protection ........................................................................................... 204
7.4.6. Frequently Used Functions................................................................................ 205
7.4.7. Common Problems Detection ........................................................................... 208
7.4.8. WeChat Cleaner................................................................................................. 210
7.5. Weather................................................................................................................. 212
7.6. Camera .................................................................................................................. 214
7.6.1. Take photos ....................................................................................................... 214
7.6.2. Take a selfie ....................................................................................................... 218
7.6.3. Shoot video ....................................................................................................... 223
7.6.4. Camera settings ................................................................................................. 224
7.7. Photos ................................................................................................................... 225
7.7.1. Photos overview ................................................................................................ 225
7.7.2. Albums .............................................................................................................. 226
Page 4

7.7.3. Memories .......................................................................................................... 230
7.7.4. People................................................................................................................ 232
7.7.5. View and use photos and videos ....................................................................... 234
7.7.6. Edit photos and videos ...................................................................................... 238
7.8. Music ..................................................................................................................... 241
7.8.1. Music ................................................................................................................. 241
7.8.2. Change sort mode ............................................................................................. 243
7.8.3. Scan local songs ................................................................................................. 243
7.9. Videos .................................................................................................................... 245
7.10. Theme Store .......................................................................................................... 247
7.10.1. Online phone theme ......................................................................................... 247
7.10.2. Online wallpaper ............................................................................................... 247
7.10.3. Manage your downloads ................................................................................... 248
7.11. Clock ...................................................................................................................... 250
7.11.1. Set Alarm Clocks ................................................................................................ 250
7.11.2. Add and view clocks for locations around the world ........................................ 252
7.11.3. Use the stopwatch ............................................................................................. 253
7.11.4. Set the timer ..................................................................................................... 253
7.12. Files ....................................................................................................................... 254
7.12.1. Optimized File management ............................................................................. 254
7.12.2. Fast file browsing ............................................................................................... 257
7.12.3. View and manage files ...................................................................................... 258
7.12.4. Clean Storage .................................................................................................... 260
7.12.5. Remotely Manage Phone Files .......................................................................... 261
7.13. Calculator .............................................................................................................. 262
7.14. Sound Recording ................................................................................................... 264
7.14.1. Recorder ............................................................................................................ 264
7.14.2. Manage recordings ............................................................................................ 265
7.15. Compass ................................................................................................................ 267
7.16. Chrome .................................................................................................................. 268
7.16.1. Search the web .................................................................................................. 268
7.16.2. Browse the web ................................................................................................. 271
7.16.3. Quick accesses ................................................................................................... 274
8. Safety & Privacy ..................................................................................................................... 276
8.1. Device security ............................................................................................................... 276
8.1.1. Lock screen password ....................................................................................... 276
8.1.2. Smart Lock ......................................................................................................... 278
8.1.3. Payment protection ........................................................................................... 279
8.1.4. Set up a SIM card lock ....................................................................................... 280
8.1.5. Virus Scan .......................................................................................................... 281
8.1.6. Pseudo Base Station Blocking............................................................................ 282
8.1.7. Protect Personal Information ............................................................................ 283
8.2. Device administration ........................................................................................... 284
8.2.1. Allow and install apps from unknown sources .................................................. 284
Page 5

8.2.2. App permissions ................................................................................................ 286
8.2.3. Hide Home screen icon ..................................................................................... 287
8.2.4. Kids Space .......................................................................................................... 289
8.2.5. Block unwanted calls and messages ................................................................. 290
8.2.6. Find my device................................................................................................... 291
8.3. Privacy ................................................................................................................... 293
8.3.1. Location Service ................................................................................................ 293
8.3.2. Join User Experience Project ............................................................................. 295
8.3.3. Privacy Protecting and Security Warning .......................................................... 295
8.4. Advanced ............................................................................................................... 296
8.4.1. Screen pinning ................................................................................................... 296
9. Share Internet connection and files ...................................................................................... 297
9.1.1. Tether your phone’s Internet connection .......................................................... 297
9.2. Share Files ............................................................................................................. 300
9.2.1. Wireless file sharing .......................................................................................... 300
9.2.2. Wired file sharing .............................................................................................. 303
9.2.3. Share from apps ................................................................................................ 304
10. Restart, update, reset, and restore ....................................................................................... 305
10.1. Restart the phone.................................................................................................. 305
10.2. Back up and restore the phone ............................................................................. 306
10.2.1. Back up your OPPO phone ................................................................................ 306
10.2.2. Restore data on your phone .............................................................................. 308
10.3. Reset the phone .................................................................................................... 311
10.4. Reset password with fingerprint ........................................................................... 313
11. Barrier-free ............................................................................................................................ 315
11.1. TalkBack ................................................................................................................. 315
11.2. Magnification Gestures ......................................................................................... 317
11.3. Press Power Button to End Call ............................................................................. 319
12. Safety, handling and support ................................................................................................ 319
12.1. Health & Safety ..................................................................................................... 319
12.1.1. Using Environment ............................................................................................ 319
12.1.2. Battery Safety .................................................................................................... 320
12.1.3. Charger Usage Notes ......................................................................................... 321
12.2. Traffic Safety .......................................................................................................... 322
12.3. FCC Compliance Statement ................................................................................... 322
Page 6

1. Welcome Page
2. Safety Information
Read through the following information carefully. Failure to follow these safety
precautions could result in danger or illegal activities.
Safe Startup
Do not switch on the device when phone use is prohibited or when it may cause
interference or danger.
Traffic Safety First
Traffic safety is always of first importance. Use of phones and headphones while
driving a vehicle or riding a bicycle is not recommended and is illegal in some areas.
Page 7

Obey and follow all related local laws.
Switching off Device at Gas Stations
Turn off your phone when in any area with a potentially explosive atmosphere,
such as gas stations or any other fueling area. Sparks in such areas could cause an
explosion or fire, resulting in serious injury or even death.
Switching off Device When On Board an Airplane
Wireless devices might be prohibited while in the air in some countries or regions.
Obey all related local laws and turn off your phone or switch to airplane mode.
Switching off Device near Medical Equipment
Hospitals or healthcare facilities might use radio-frequency-sensitive equipment.
Obey the relevant rules and regulations.
Switching off Device at Blasting Areas
To avoid interfering with blasting operations, turn off your phone when in a
-w
instructions.
Radiation
Nearly every electronic device gives off radiation. Mobile phone use does not
increase the risk of getting brain cancer or other head tumors. Its effect in humans
is negligible.
Interference
Nearly every electronic device is susceptible to interference for external sources if
inadequately shielded or designed. As a result, your phone may cause interference
with other devices.
Temperature
Operate your phone in a place where the temperature is always between 10℃ to
45℃. Using or storing your phone in a too hot or too cold environment might
Page 8
damage the battery, or even cause your phone to short-circuit or burn.
Proper Usage
Use your phone appropriately. Do not touch the antenna area unnecessarily when
the phone is turned on. Do not drop, disassemble, crush, bend, deform, puncture,
incinerate, or insert foreign objects into your phone.
Qualified Maintenance and Service
Never attempt to repair or modify the phone yourself. If your phone has any
hardware or software failure, do not use it until you take it to an authorized service
provider. Do not disassemble or root your phone yourself, otherwise the warranty
service will be terminated immediately.
Batteries, Chargers and other Accessories
Do not dismantle the built-in lithium-ion battery of your device. Use only the
batteries, chargers and other accessories authorized by OPPO, for third-party
accessories might cause damage or danger.
Waterproofness
Your device is not waterproof. Do not use your device in rain, or other wet
locations.
Avoiding Hearing Damage
Permanent hearing loss may occur if the receiver, speakerphone, headphones, or
earpieces are used at high volume. You can adapt over time to a higher volume of
sound that may sound normal but can be damaging to your hearing. Set the
volume to a safe level to protect your hearing.
Avoiding Eyestrain
stimulation to your eyesight. Long-term viewing of your phone in normal or darker
environments will damage your eyesight. When watching video or reading text on
your phone, avoid prolonged use, take breaks and turn on eye protection mode to
prevent eyestrain.
Page 9
Glass Parts
glass. This glass could break if your phone is dropped on a hard surface or receives
a substantial impact. Do not attempt to touch or clean the broken glass. Stop using
your phone until the glass is replaced by an authorized service provider.
Connecting to Other Devices
Before connecting to other devices, carefully read the user manual for more
detailed, accurate and safety instructions. Do not connect to incompatible
products.
Being Aware of Laser Safety
If your phone supports laser focusing, carefully read the user manual before using
it. Failure to follow instructions might lead to harmful radiation exposure. To
prevent direct exposure to laser beam, do not attempt to
shell, or avoid keeping close contact with laser light.
3. Get started
3.1. Quick look
3.1.1. ColorOS 5.0 Features
ColorOS 5.0 Features
With ColorOS 5.0, new designs and capabilities make your phone not only look
beautiful, but work beautifully. The powerful AI chip helps your phone to
understand images and recognize people, objects, and scenes. The new-designed
full screen delivers a more immersive experience. The Smart Assistant lets you get
things done more intuitively and conveniently. ColorOS 5.0 cares what you care,
and let the phone makes sense of your life.
Brand-new visual design
Coloros 5.0 features a slew of interface tweaks and improvements that make the
system feel both faster and more polished. The all-screen design brings a new
visual experience and one-handed usability. The Home screen color is newly
Page 10
redesigned, text is bolder, and most app icons have a brand-new look. Phone apps
are redesigned with smoother dynamic effects. The Control Center is customizable
and there are options to include a wider range of settings.
New Photos and Camera capabilities
Memories. Using the onimages, your phone can combine photos into themed mini-movies complete with
transitions and a soundtrack. It can recognize and bundle together photos the that
feature certain people, or scenes like hiking or the beach, and category categorize
your photos while your phone is plugged and locked. See Memories.
Edit photos and video. You can edit your photos and video in the Photos app
directly using a set of professional editing tools, including cropping, adding text
and filters, and more. See Edit photos and videos.
People. In the Photos app,
uses facial technology to identify the people in the pictures or combine one with
similar facial features, then group pictures of the same people together. See People.
Smart album search and cleanup. You can search your photo library depending on
the date, location, people, and content of the photos on your device. In Phone
Manager, you can also clean up photos in batches such as similar and blurry photos.
See Smart album search and cleanup.
Front 3-HDR. When capturing images in bright sunlight or shade using the front
facing camera, front 3-HDR helps you to adjust the ratio of light to dark in the
photo and make your subject look better. See New features of Camera.
AI Beauty. Personalized AI Beauty provides functionality for precise recognition and
delicate beautification of each individual facial feature. Everyone is unique in the
camera. See New features of Camera.
AR stickers. The Camera app offers many stickers for you to edit and decorate your
selfies. Express yourself daily through fun stickers and add fun to boring
backgrounds. See New features of Camera.
New intelligent features
Smart Assistant. The Smart Assistant aggregates combines information from
Weather, Steps Tracker, and Events, and puts them into an active day summary of
or call someone with only one tap. You can also customize Smart Assistant to better
suit your needs, and to emphasize what you actually care about. See Smart
Assistant.
Page 11

Navigation Gestures. Four kinds of new swipe-up navigation gestures are added to
your phone, and you can choose one that suits you most. See Navigation Gestures.
Assistive Ball. Assistive Ball is a fantastic feature that enables you to fully take
advantage of Multi-Touch features through the touch screen. It doubles as virtual
navigation keys, and even enables you to open notification center, enter One-hand
Mode or take a screenshot. See Assistive Ball.
Full screen multitasking. Full Screen Multitasking can hold app icons or notification
bubbles, so you can still read and reply to messages without interrupting your
games or videos, as they go app-in-app. See Full Screen Multitasking.
Control Center. The Control Center includes a wider range of settings, and is able to
list up to 20 shortcuts. You can select the shortcuts to display, and rearrange them
to better suit your needs. See Control Center.
App display in full screen. The feature makes sure your app looks the best at its
best it can. When turn it on, the system will make some changes in on your app to
accommodate the new screen's size and rounded corners. See App display in
full-screen.
Quick actions menus. Press and hold an app icon to bring up "Quick Actions," which
offers shortcuts to specific features within that app. When the menu appears, click
the shortcut you would like to use, then the app will open directly to that feature.
See Quick actions menus.
Enhanced safety
Hide Home screen icon. Without deleting the app from your phone, you can simply
hide the app icons from view if you want to quickly hand in your phone off to
contained saved within on some apps. See Hide Home screen icon.
Easy-to-use functions
Common problems detection. Phone Manager allows you to quickly diagnose
common problems. It lists all the test results of the system, and intuitively display
the abnormal items. See Common Problems Detection.
Page 12

Models
A9, F7
Appearance
Red / Diamond Black (RAM 6GB Version)
Clone Phone. With Clone Phone, all the contents in on your old phone will be
quickly and easily copied to your new device. You can also select the data to be
cloned, ignoring those that are no longer needed.
Split-screen. The split-screen mode allows you to divide the screen into two areas,
which each area shows a different scene at the same time. Now you can watch a
movie and chat with friends at the same screen. See Split-screen.
Screen recording. With ColorOS 5.0, you can record a 30 minutes video of what
you're doing onscreen. You can even narrate it, too. Save the video, then you can
view, edit, and share the recording using the Camera app. See Screen Recording.
Screenshot editing tool. When you take a screenshot in ColorOS 5.0, you can open
the screenshot right up and edit it with the markup tools, or take a long screenshot.
Using the screenshot editing feature, you can capture what's on the screen of your
phone and then add text, crop, highlight specific areas, and more. See Take and
edit a screenshot.
Volume control. When you press the Volume Button, you can adjust the ringtone,
media and alarm sound simultaneously.
VIP Contacts. When your phone is set not to be disturbed, you can add certain
people to VIP Contacts and allow them to override the phone settings and have
their calls come through. See VIP Contacts.
ColorOS 5.0 is compatible with these devices
Page 13
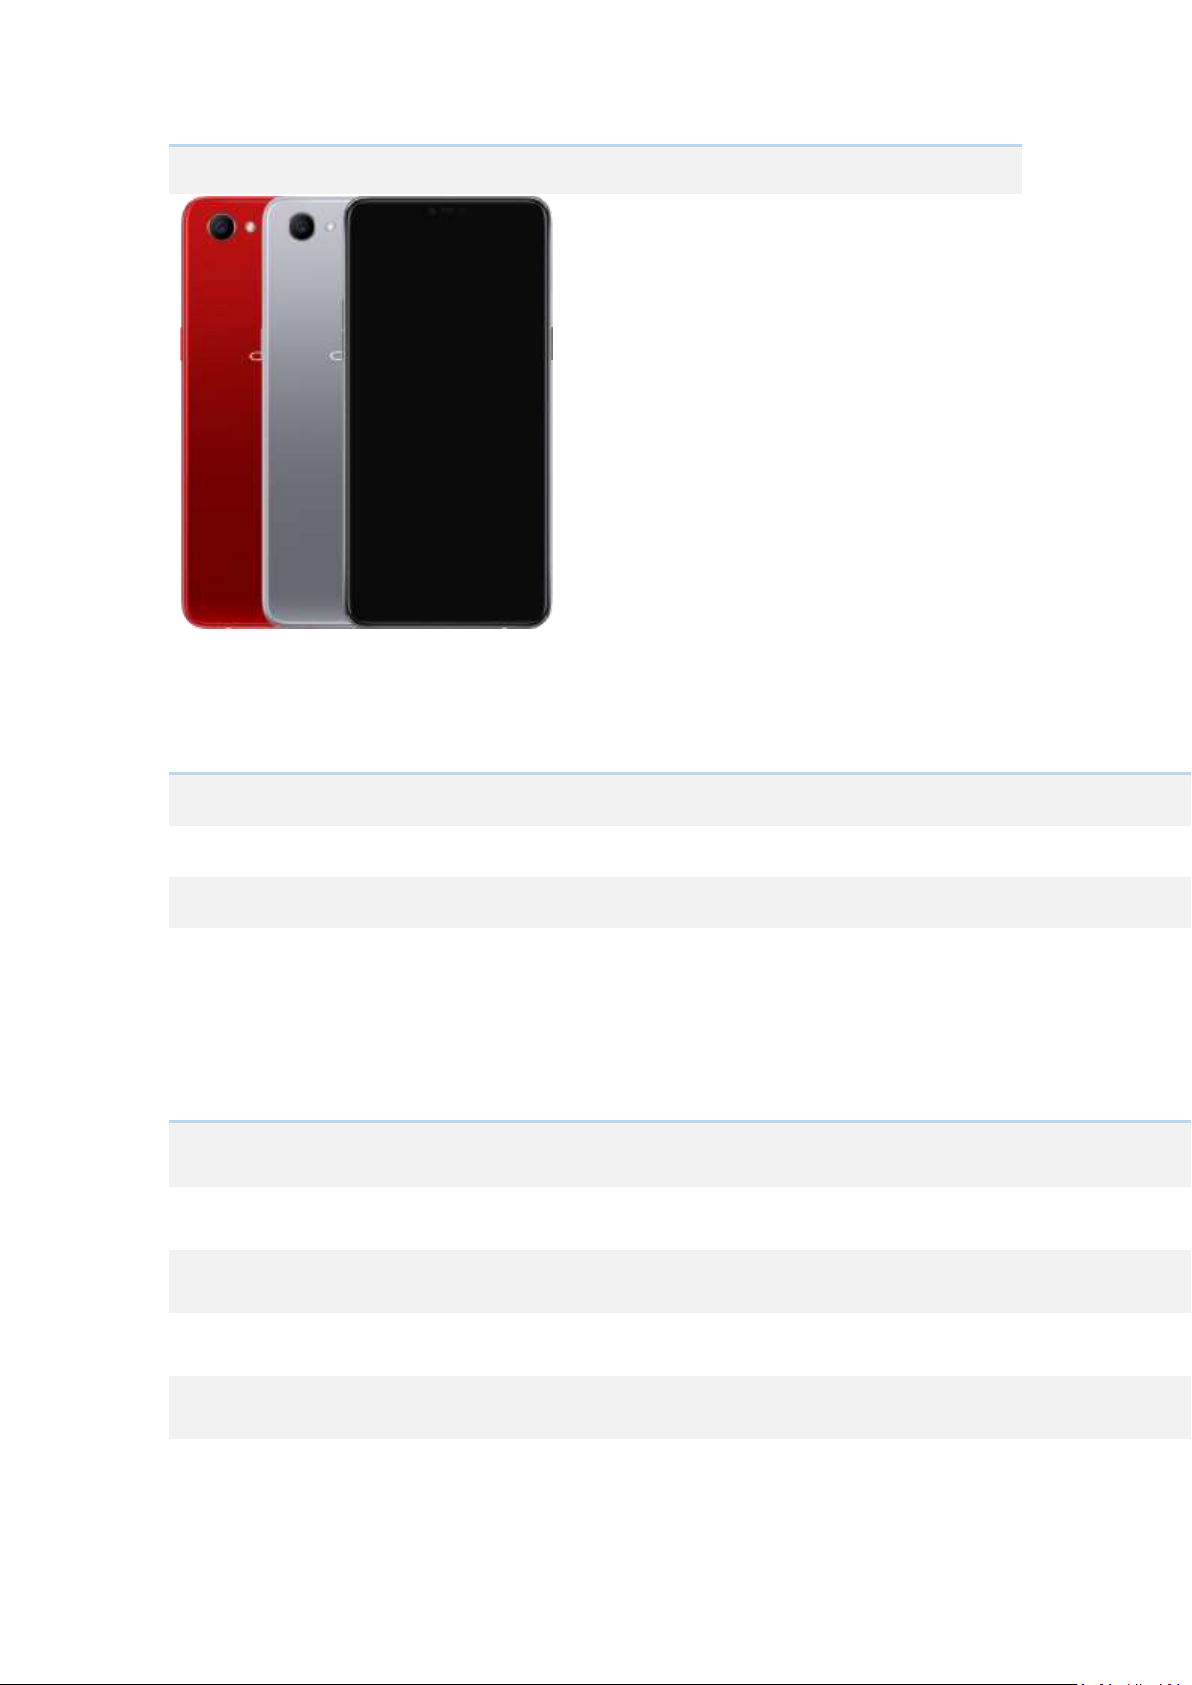
Red / Silver / Diamond Black (RAM 4GB Version)
Size and Weight
Height 156mm
Width 75.3mm
Thickness 7.8mm
Weight 158g with battery
Basic Parameters
Operating System ColorOS 5.0, based on Android 8.1
GPU ARM Mali-G72 MP3 800MHz
RAM 4GB / 6GB
Storage 64GB / 128GB
Battery 3400mAh (TYP) 3300mAh (MIN)
Processor Octa-core MTK P60 2.0GHZ
Page 14

Display
Size 6.23 inches (15.8cm)
Type LTPS IPS TFT
Resolution 2280 by 1080 pixels
Colors 16 million colors
Camera
Rear Sensor 16-megapixel
Front Sensor 25-megapixel
Flash LED Flash
Aperture Rear: f/1.8
Front: f/2.0
Connectivity
Frequencies For 4GB RAM + 64GB Storage A9:
Version 1:
GSM: Bands 2/3/5/8
WCDMA: Bands 1/5/8
FDD-LTE: Bands 1/3/5/8
TD-LTE: Bands 38/40/41
Version 2:
GSM: Bands 2/3/5/8
WCDMA: Bands 1/5/8
FDD-LTE: Bands 1/3/5/7/8
TD-LTE: Bands 38/39/40/41
Version 3:
GSM: Bands 2/3/5/8
WCDMA: Bands 1/2/5/8
FDD-LTE: Bands 1/3/5/7/8/20/28
TD-LTE: Bands 38/39/40/41
Page 15

For 6GB RAM + 128GB Storage A9:
Version 1:
GSM: Bands 2/3/5/8
WCDMA: Bands 1/5/8
FDD-LTE: Bands 1/3/5/8
TD-LTE: Bands 38/40/41
Version 2:
GSM: Bands 2/3/5/8
WCDMA: Bands 1/2/5/8
FDD-LTE: Bands 1/3/5/7/8/20/28
TD-LTE: Bands 38/39/40/41
SIM Card Type Dual Nano-SIM Cards
GPS Supported
Bluetooth 4.2
Wi-Fi 2.4/5GHz 802.11 a/b/g/n/ac
OTG Supported
NFC No
Sensors
Magnetic Induction
Light Sensor
Proximity Sensor
G-sensor/Acceleration Sensor
In the Box
OPPO A9
Adapter
Headset
Micro USB cable
Important Information Booklet with Warranty Card
Quick Guide
SIM Card Tool
Screen Protect Film
Page 16
Case
Product ID
CPH1819/ CPH1821
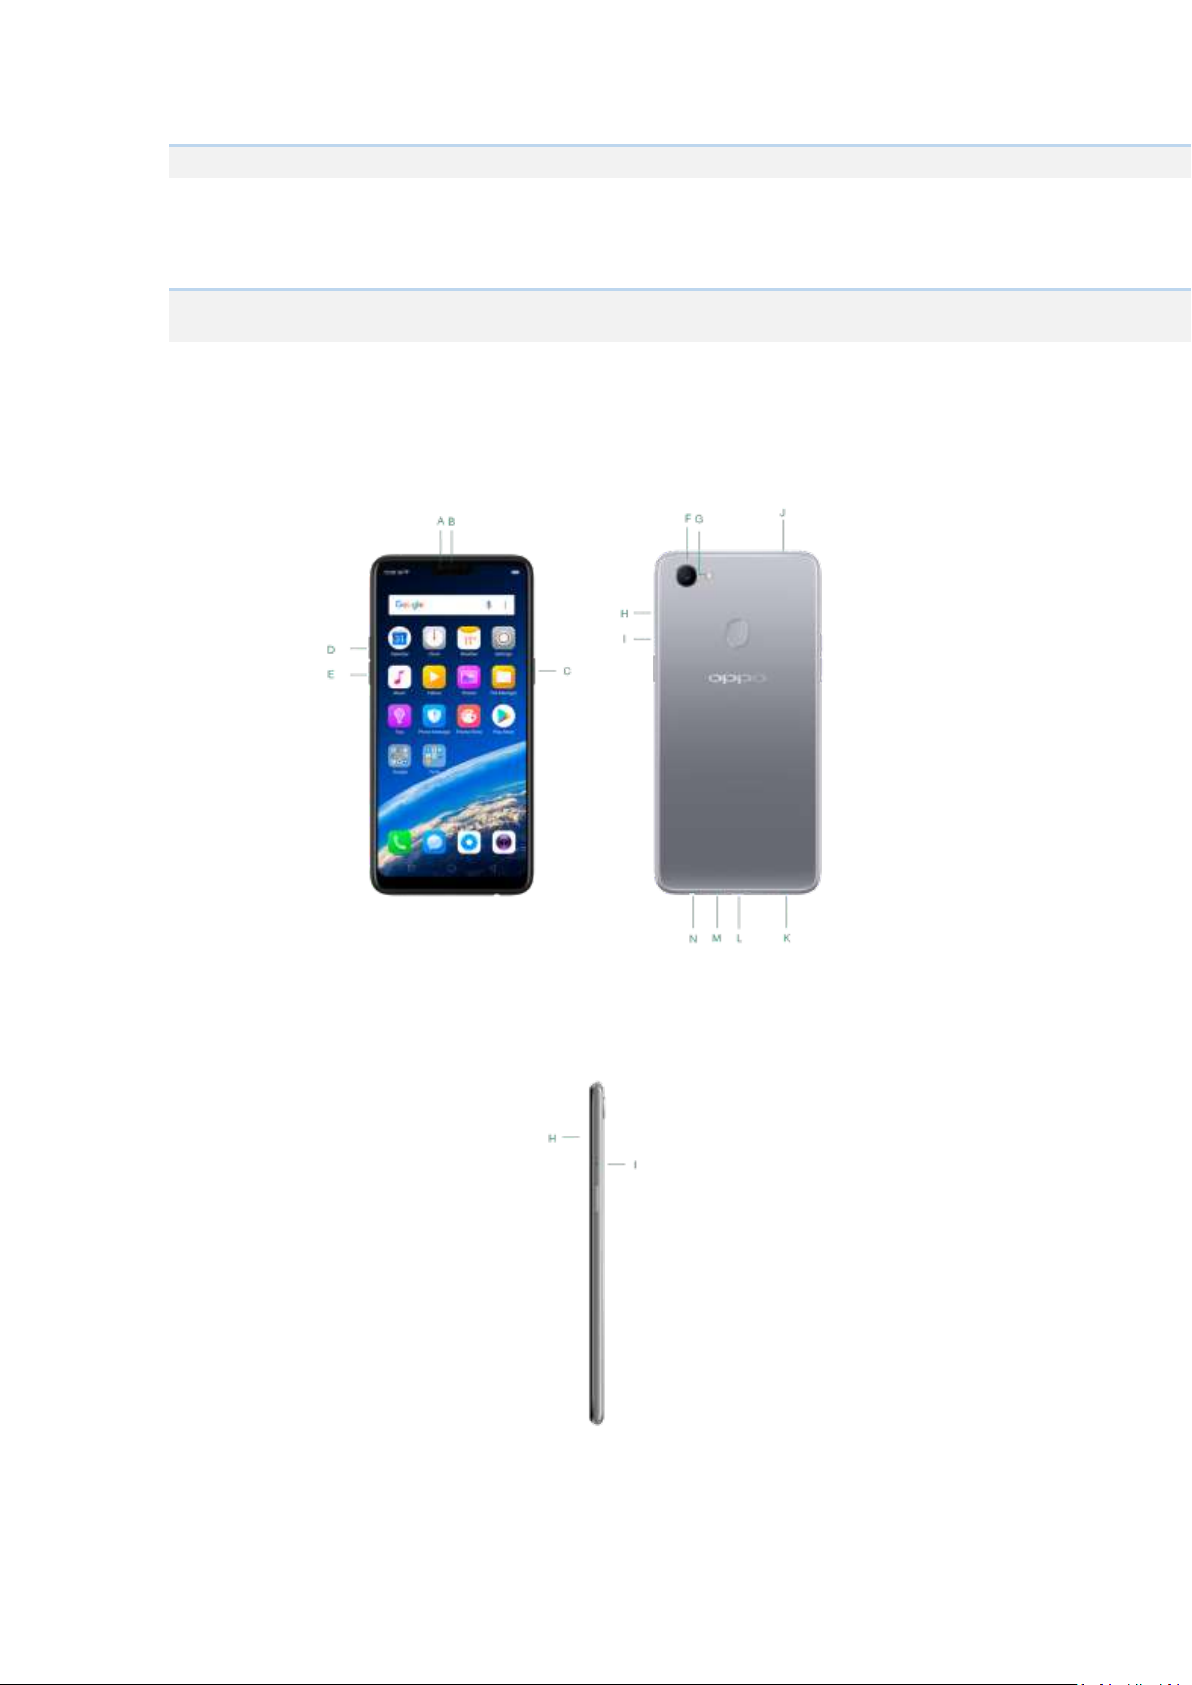
Buttons and components
Page 17

F7 features
A.
Front camera
B.
Receiver
C.
Sleep/Wake button
D.
Volume up button
E.
Volume down button
F.
Rear camera
G.
Flash
H.
SIM card tray
I.
SIM tray hole
J.
Noise cancelling microphone
K.
Speaker
L.
Micro-USB port
M.
Microphone
N.
Headset jack
Functions for buttons and combination keys
To learn more features, see Quick Look at OPPO phone.
The Wake/Sleep button on the right side of your phone has a number of different
uses.
3.1.2. Sleep/Wake button
Page 18
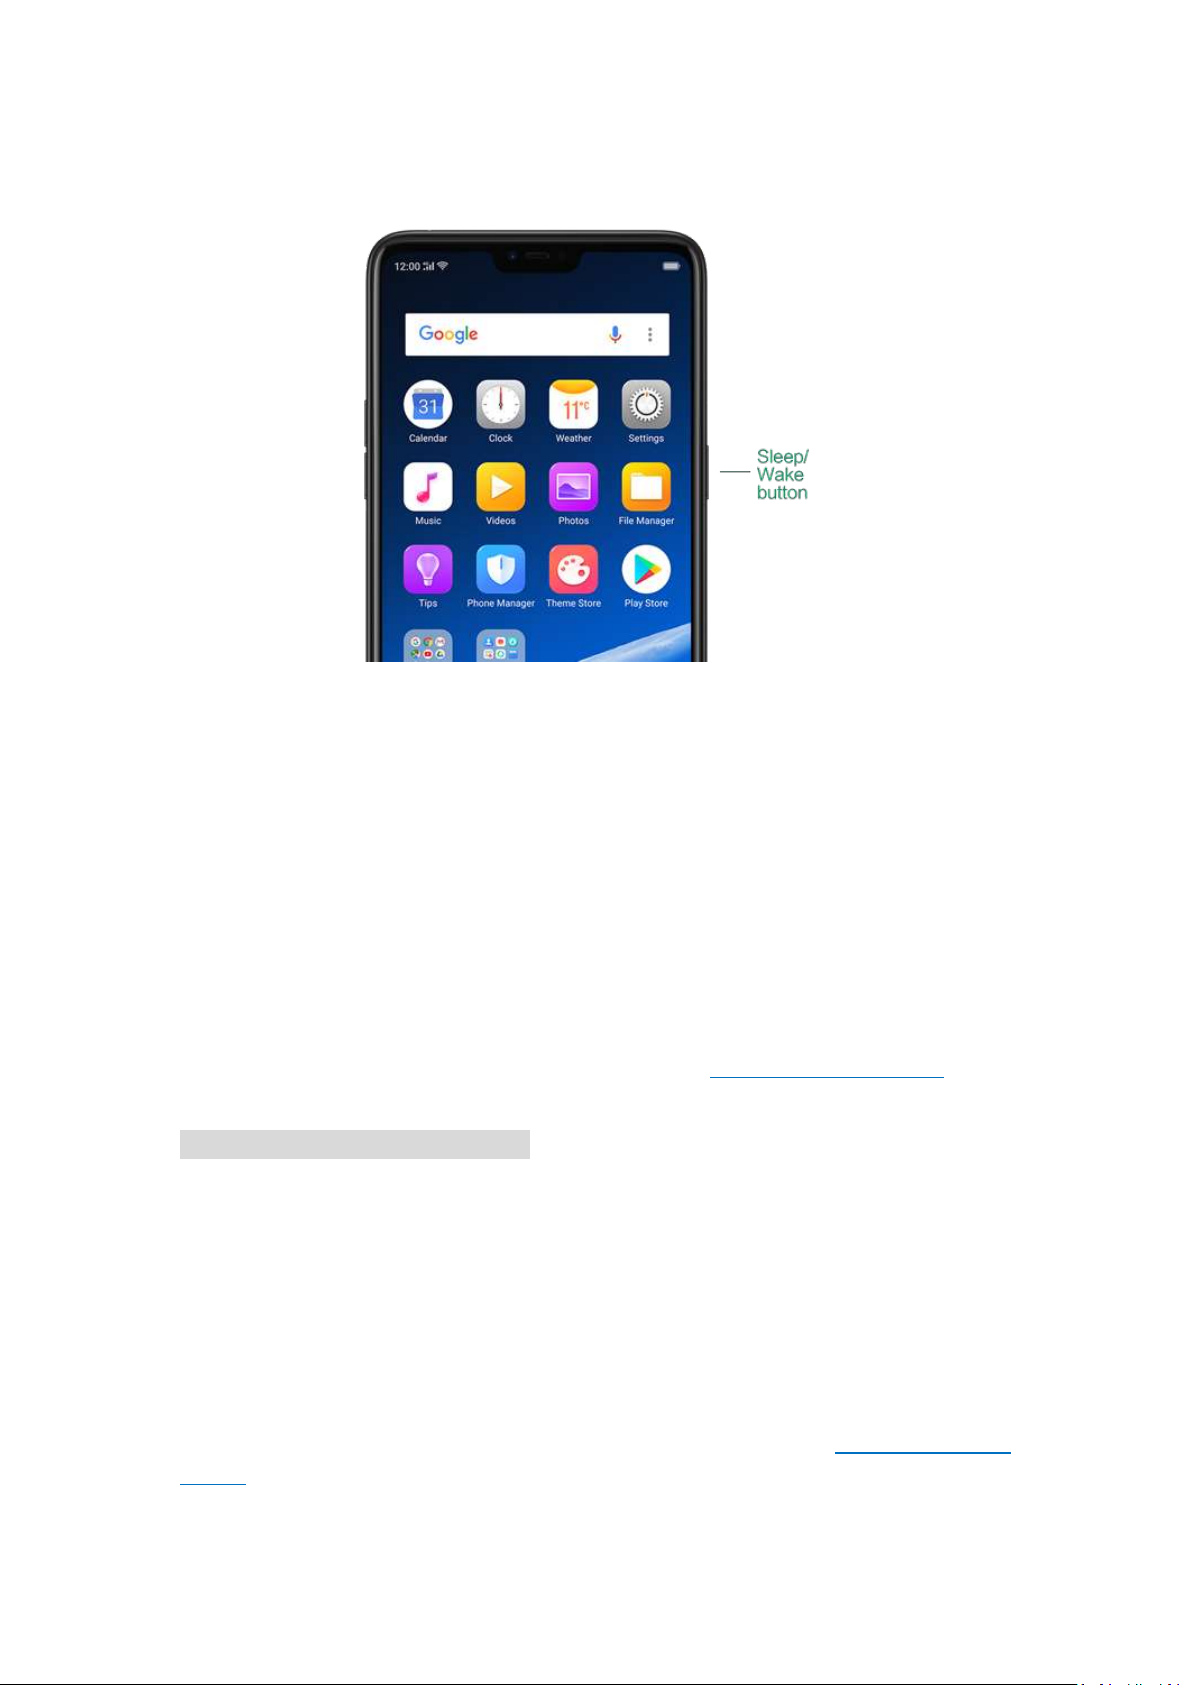
When the phone is on
Wake or lock the screen: With the phone is powered on, press the Wake/Sleep
button once and it will wake the phone up to the point that you can see the lock
screen, like the clock and any notifications that are setup to display there. When
the phone screen is awakened, pressing this button will blacken the screen and
lock the phone.
Take a screenshot: Press and hold the Sleep/Wake and Volume Down buttons at
the same time and your phone will take a picture of whatever is displayed on the
screen. Click the screenshot, and then choose to a take a long screenshot, send,
edit or delete the screenshot. If you save the screenshot, you can view it on Photos.
UM5.0_3.1.2 _Take a screenshot.gif
End a call: Go to [Settings] > [Additional Settings] > [Accessibility] and turn on
[Power Button Ends Call], then you can press the Sleep/Wake button to end
phone calls.
Turn off the phone: Press and hold the Sleep/Wake button for a few seconds,
whether the phone is on the lock screen or home screen, it will ask you to slide
down to power off the device.
Force restart the phone: Press and hold the Sleep/Wake and Volume Up buttons
for about 10 to 12 seconds until your device is turned on. View force restart your
phone.
Page 19
When the phone is off
Turn on the phone: Press and hold the Sleep/Wake button for a few seconds until
you see the OPPO logo.
Force Restart the phone: Press and hold the Sleep/Wake and Volume Up
buttons until your device is turned on. View force restart your phone.
Enter Recovery Mode: Press and hold the Sleep/Wake and Volume Down
buttons at the same time to enter Recovery Mode.
3.1.3. Menu, Home and Return buttons
ColorOS 5.0 replaces the traditional hardware buttons with on-screen virtual
navigation keys, also offers you fast and fluid gestures to operate your phone. You
can change the order of the virtual keys, and set them to appear only when needed
to free space on the screen.
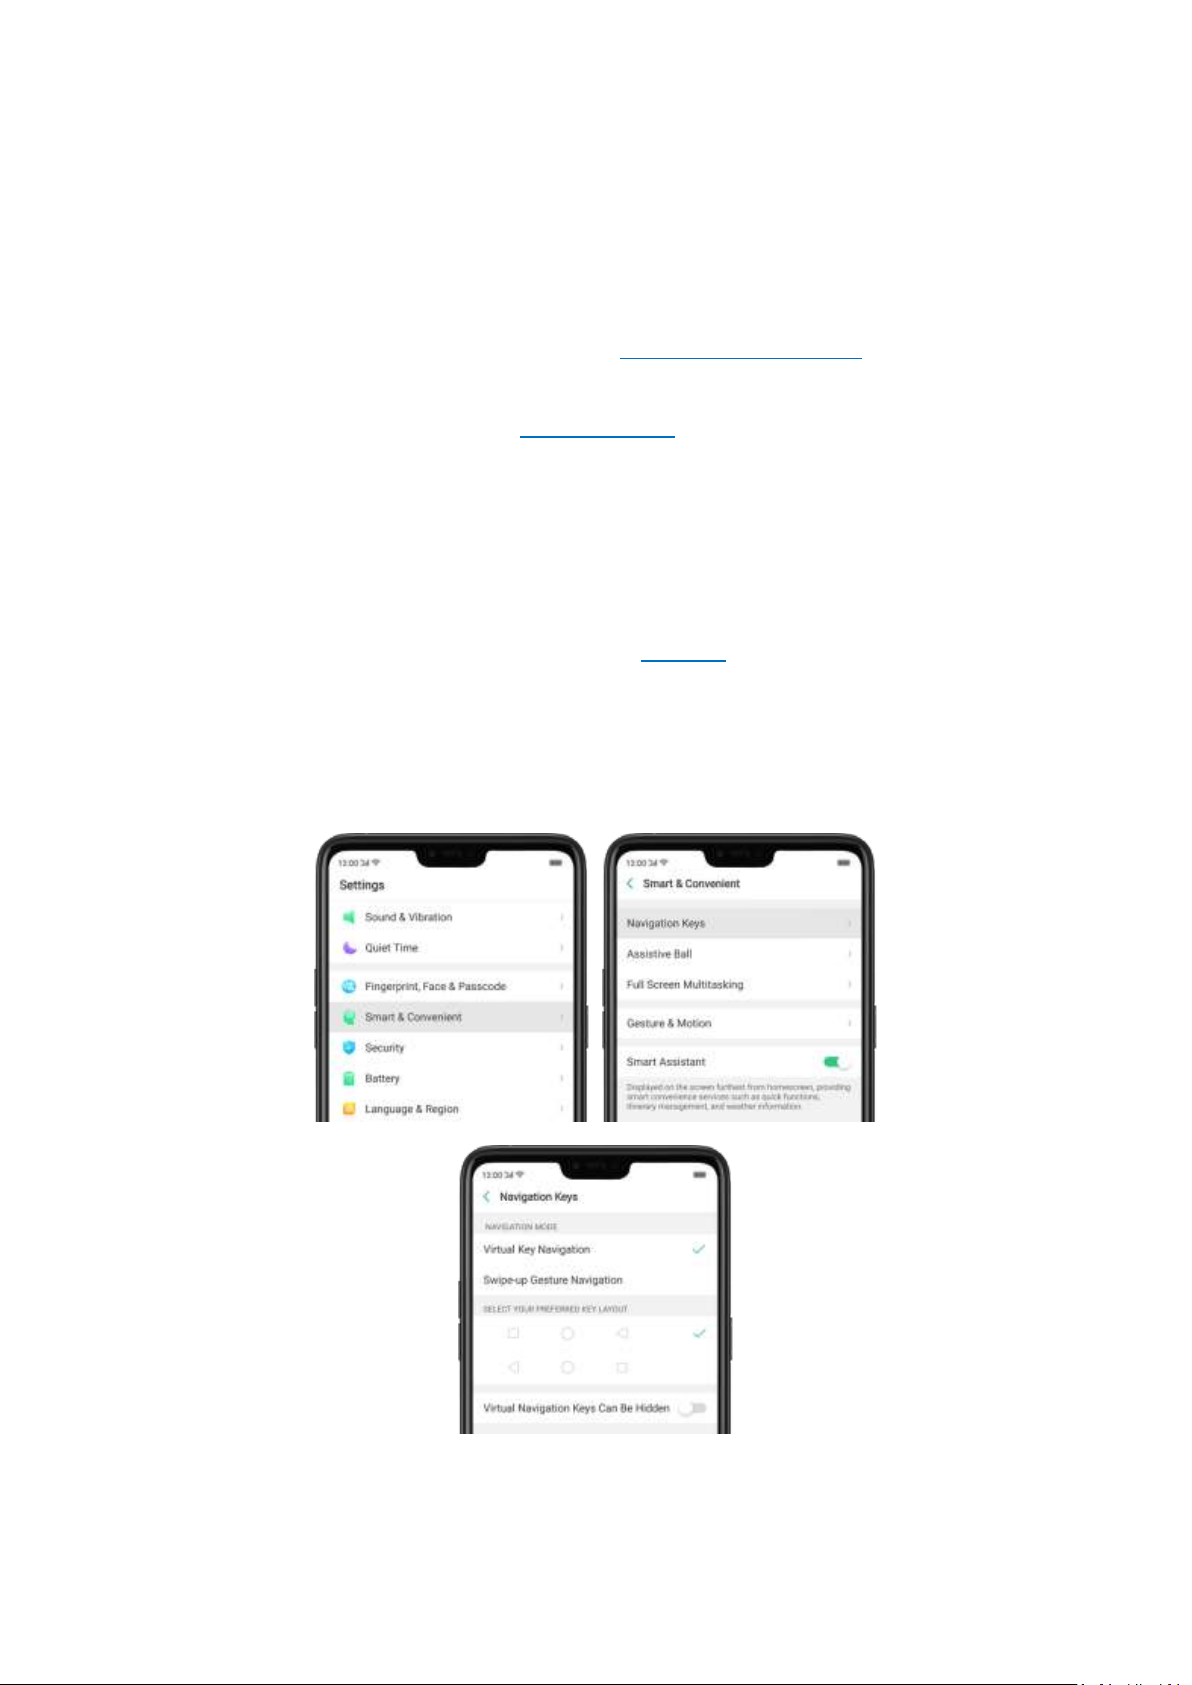
Enable virtual navigation keys. Virtual navigation keys are default on. If you want
to enable them manually, go to [Settings] > [Smart & Convenient] > [Navigation
Keys] and click Virtual Key Navigation.
Change the order of virtual navigation keys. The keys follow the typical order for
OPPO: Menu, Home, and Return from left to right. If you are left-handed, you can
Page 20
change them to the return-home-recent order.
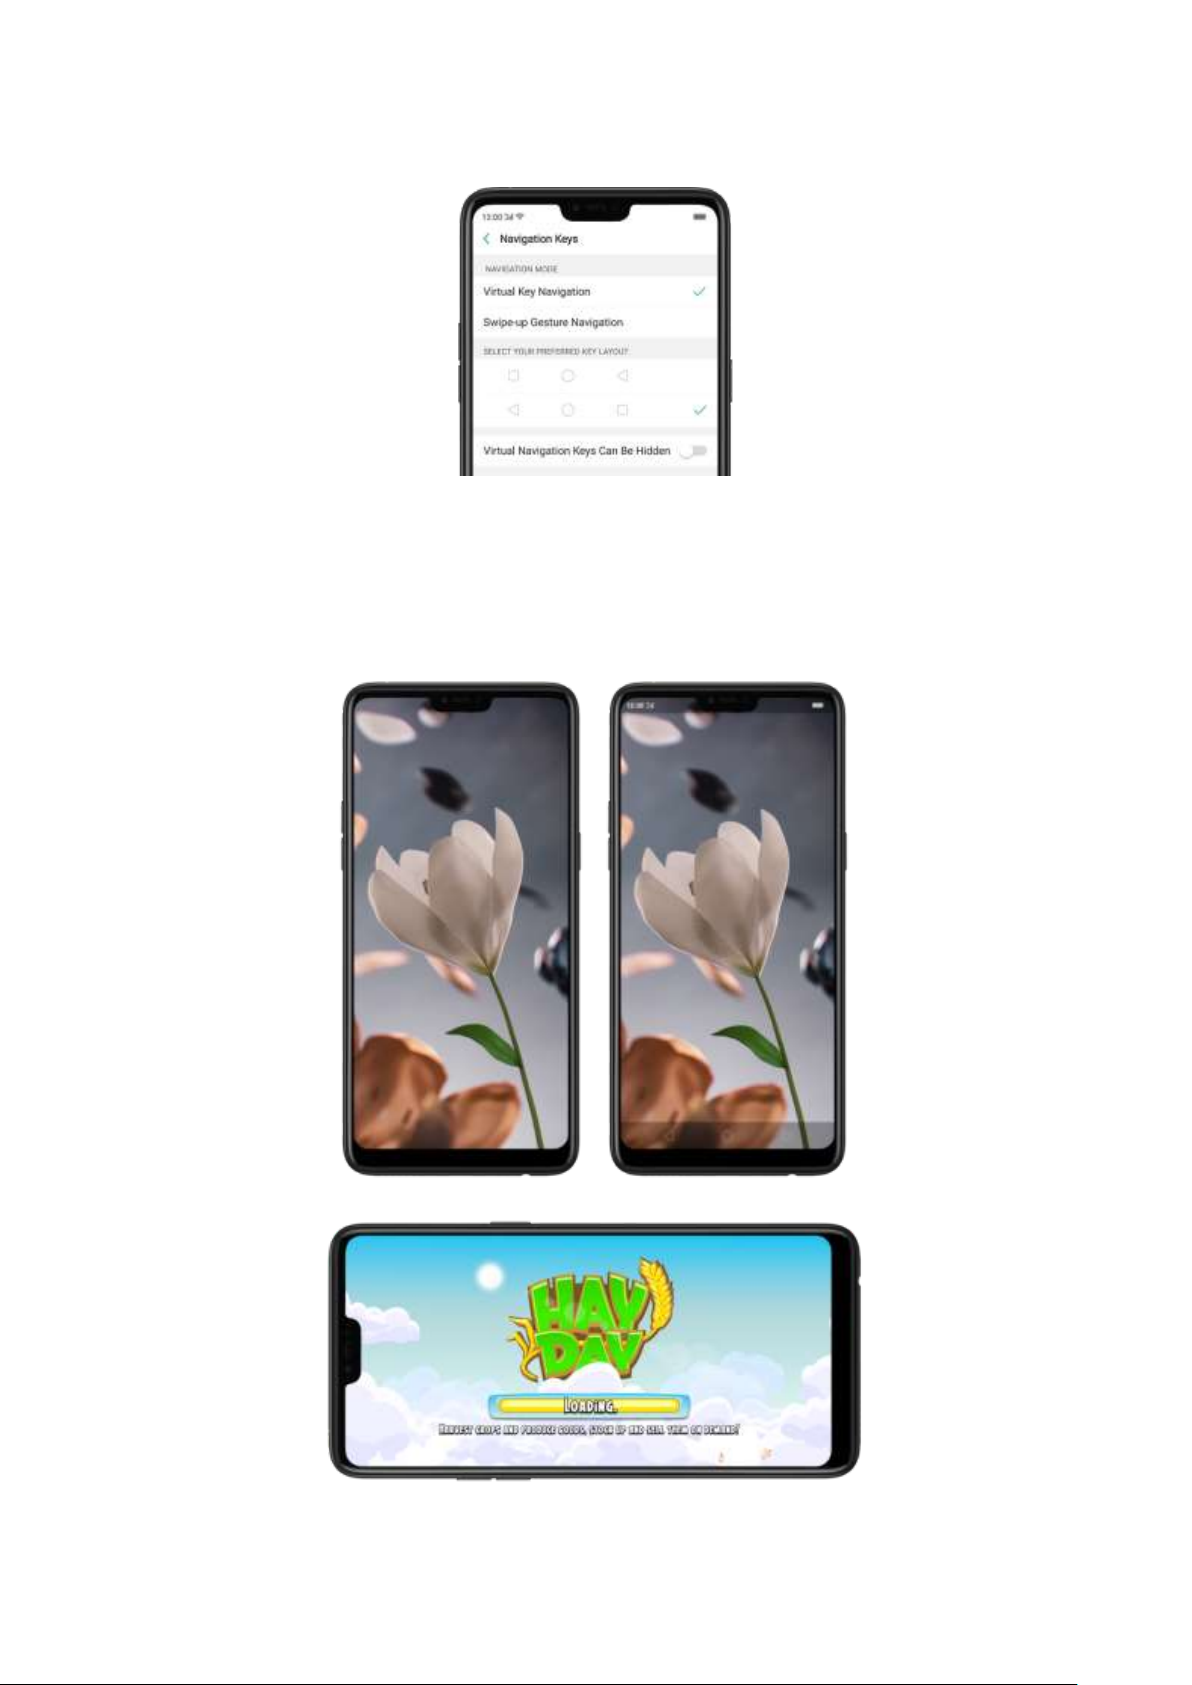
Hide the virtual navigation keys. When you launch a full-screen app, the keys will
automatically hide, and can be brought back with a simple swipe:
When in portrait mode, swipe up from the bottom.
When in landscape mode, swipe from the bottom to the left.
Page 21
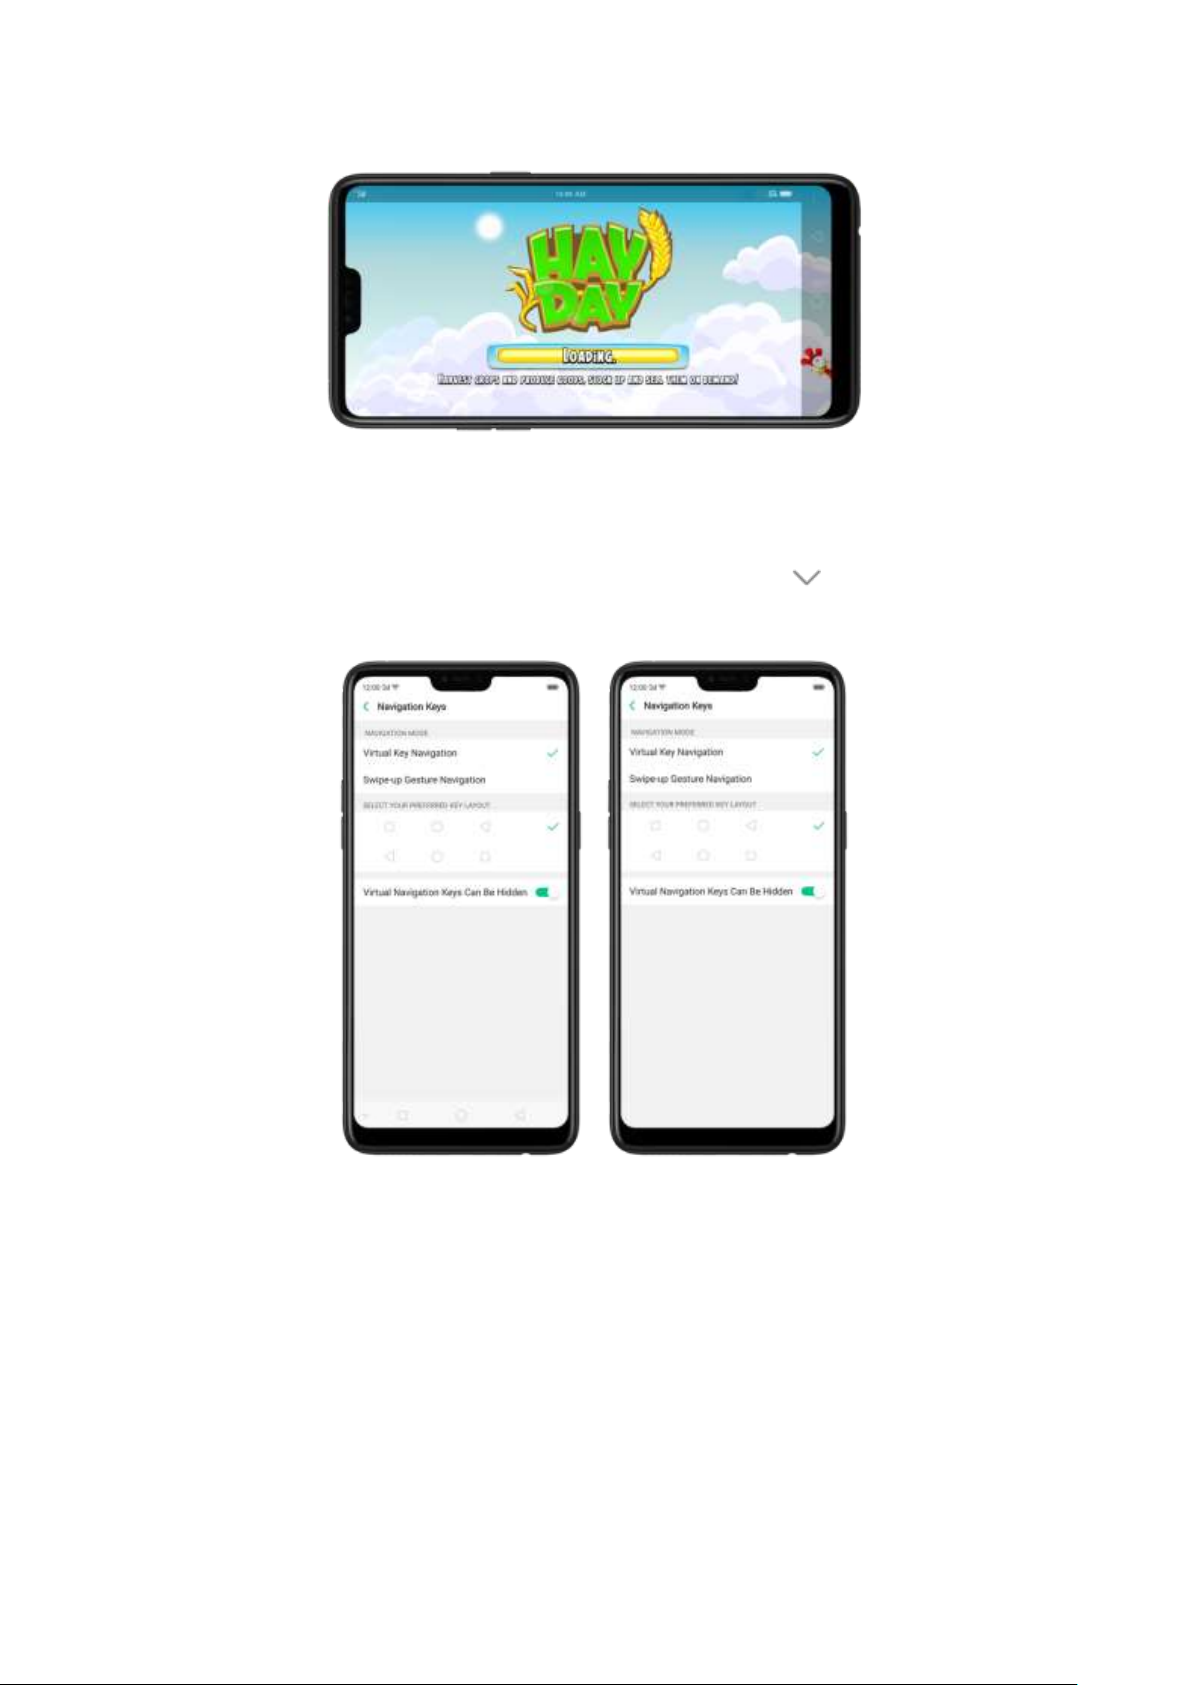
Manually hide the virtual navigation keys. To set the keys to appear only when
needed, go to [Settings] > [Smart & Convenient] > [Navigation Keys] and enable
Virtual Navigation Keys Can Be Hidden. Then you can click on the left-lower
corner of the screen to hide the keys, and swipe from the bottom to reveal them.
Immersive navigation background: The system set multiple colors for the
navigation background to match the color scheme of the popular apps. The
background color is default white, and it will become translucent or immersive
when you open some of the third-party apps.
Page 22
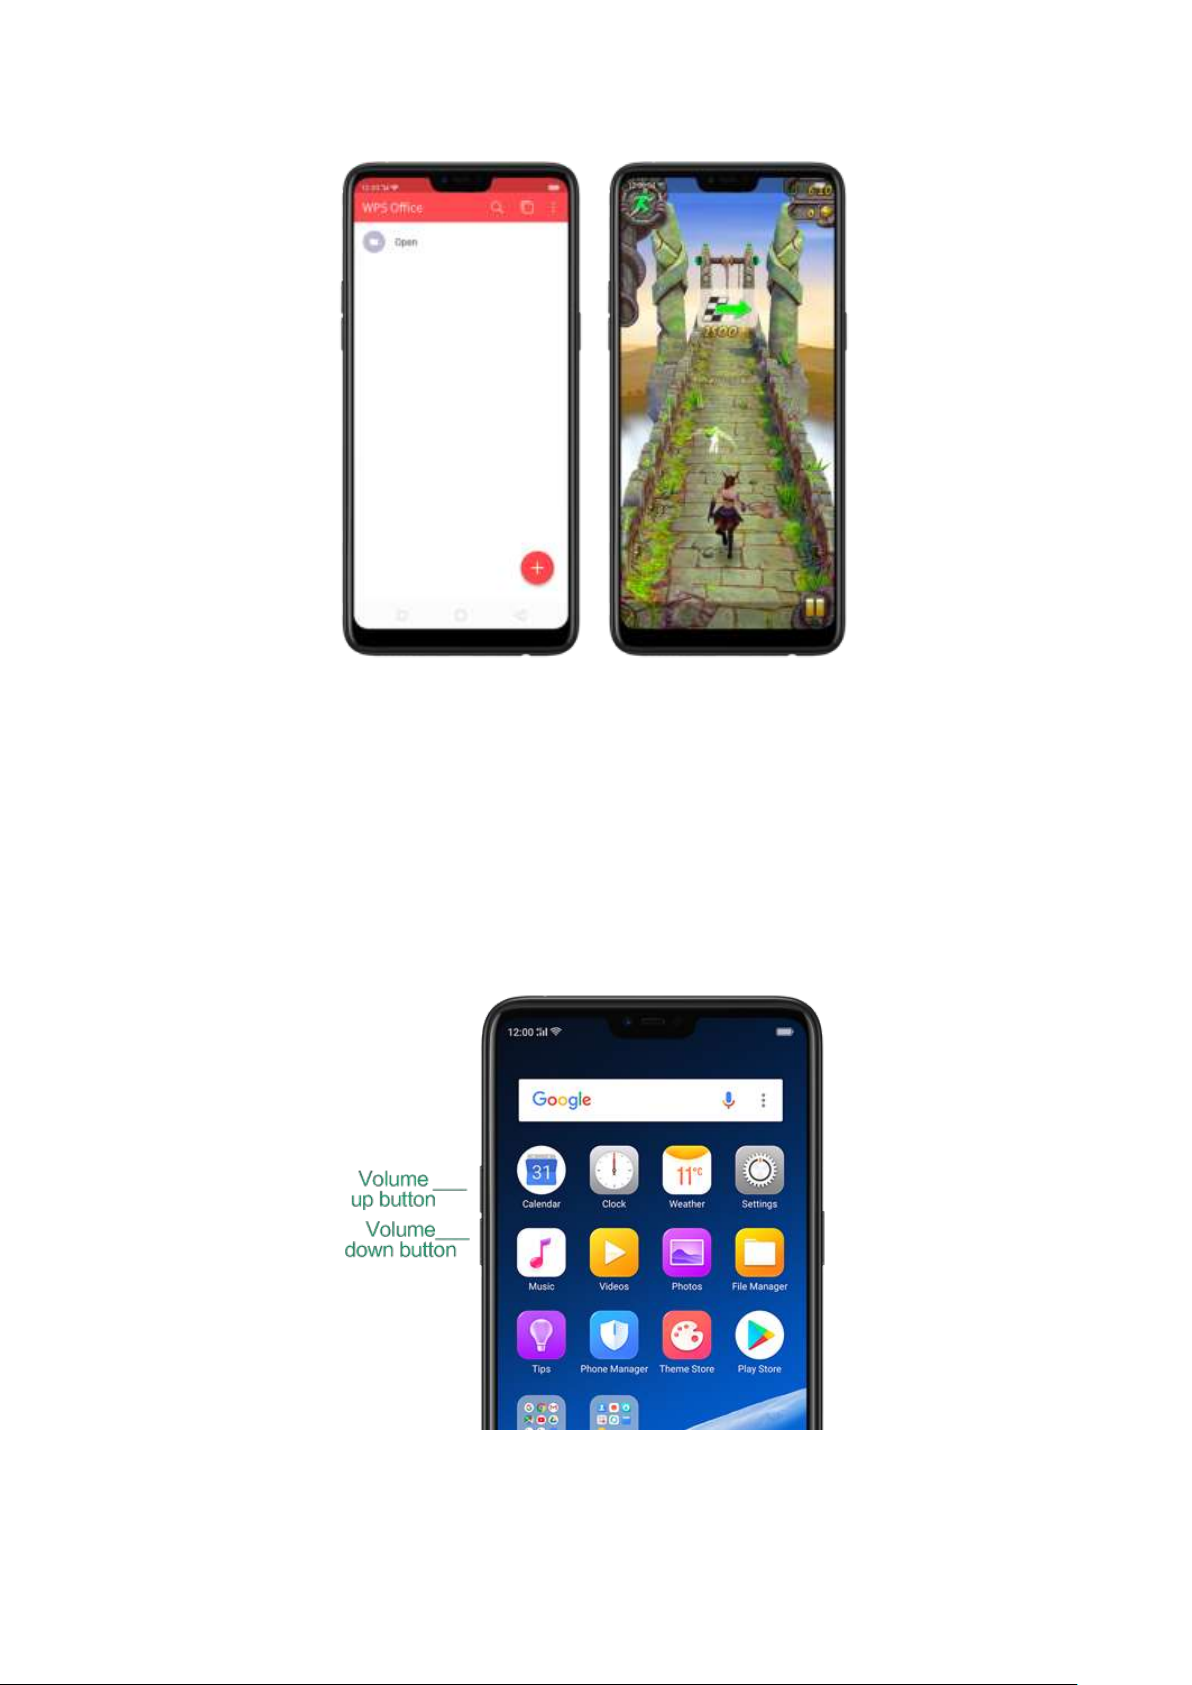
3.1.4. Volume buttons
Volume buttons give you easy access to adapt over time to a proper volume of
sound. It refers not simply ringer or media, the phone also keeps track of the
volume level separately in headphone, microphone and speaker.
Page 23
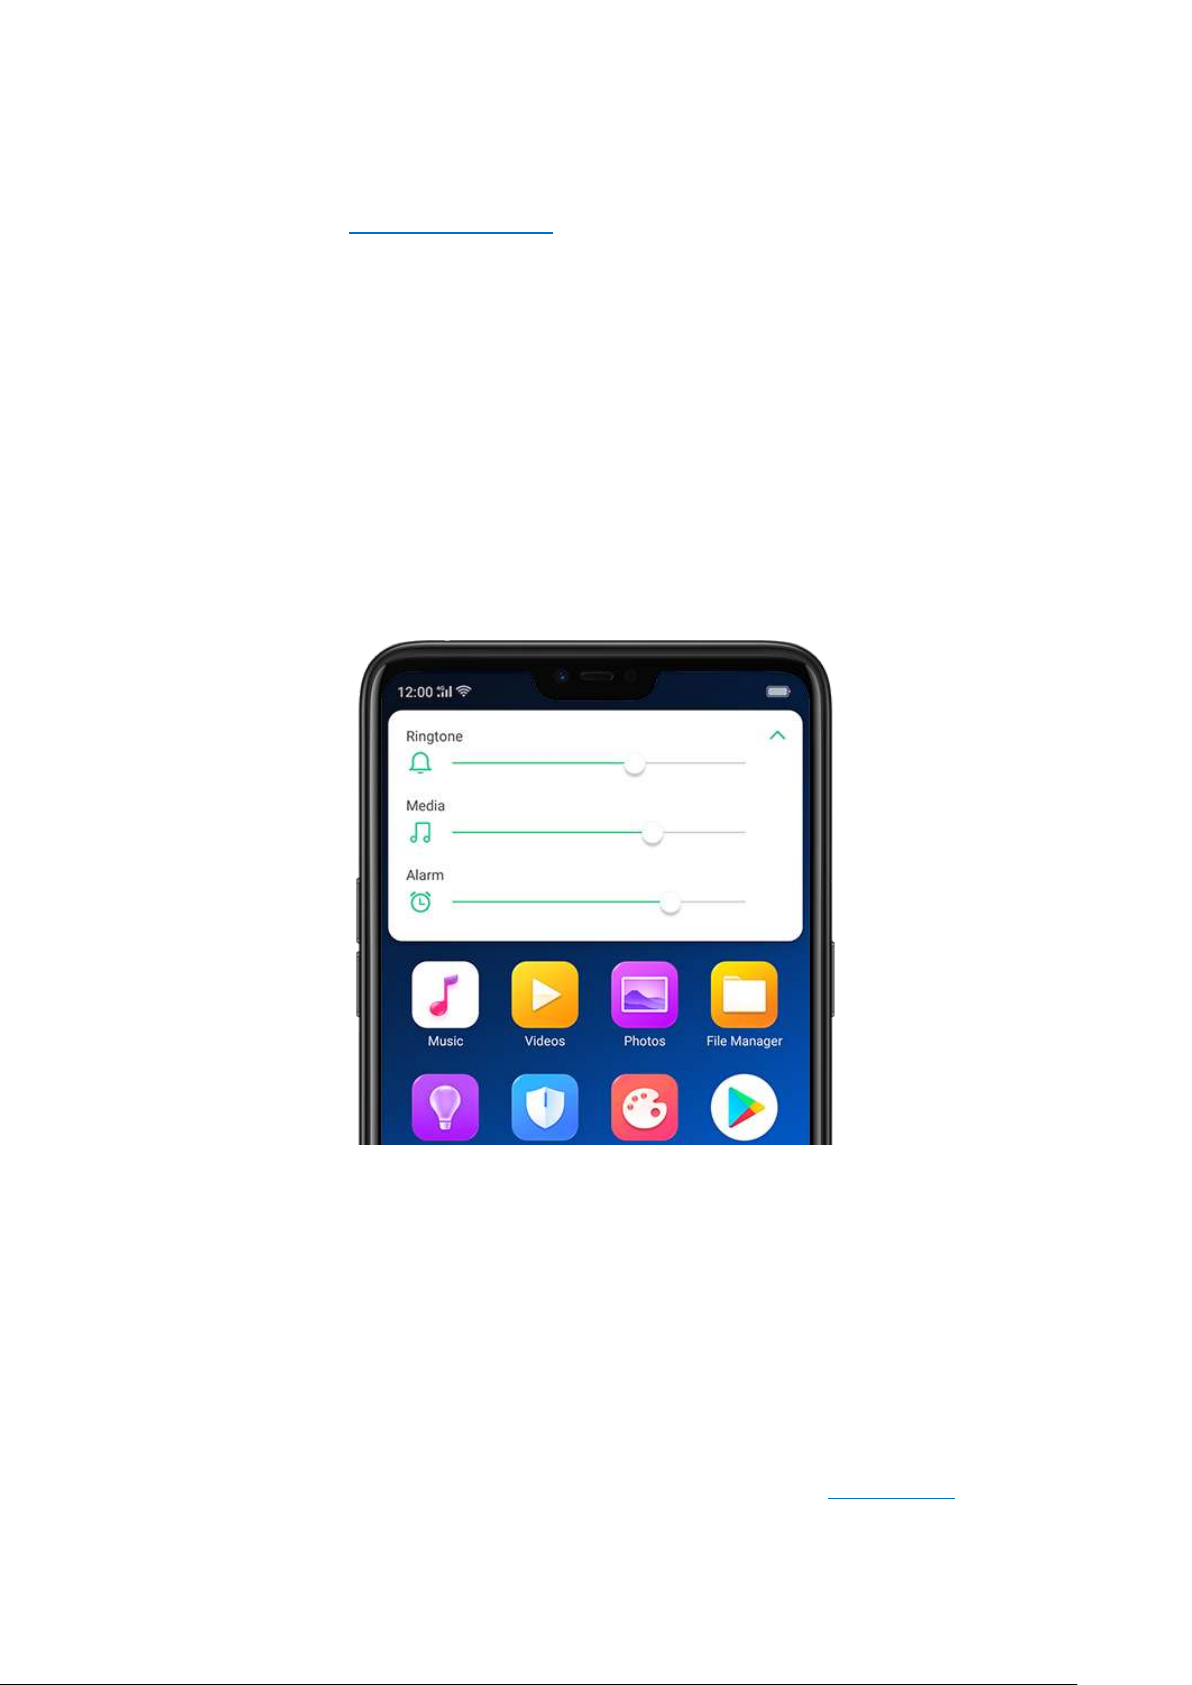
Media volume: When listening to music, videos and phone calls, use the buttons
on the side of the phone to adjust the volume. For information about avoiding
hearing loss, see Security Information.
Ringer volume: Use the Volume buttons to control the volume for the ringer and
alerts. When you press and hold the volume down button, your phone will switch
to silent mode.
Alarm volume: Use the Volume buttons to set the volume for alarm. The alarm still
plays a sound when the phone is in silent mode.
Call volume: When making or receiving phone calls, use the volume buttons to
adjust the volume of the call.
* You can also adjust the volume (except call volume) in [Settings] > [Sound & Vibration].
Controlling the camera: Volume buttons can also be used to control your camera.
Go to [Settings] > [Camera] > [Volume Button] and set up the volume buttons
for Shutter or Zoom.
3.1.5. Micro-USB port
Micro-USB port is the connector on the bottom of your device where your battery
charger connects. It also doubles as the data port, which lets you transfer data to
and from a personal computer or other USB devices. Plug the cable in the port to
Page 24

charge or transfer data.
Notice:
1. Repeated connecting and disconnecting of your cable can cause the port to
wear out, resulting in a poor connection to your cable.
2. Never force a connector into the port, for that might cause damage.
3.1.6. Headset jack
The headset jack is an audio socket that accepts a 3.5mm audio plug. Plug your
headset in the jack to listen to music, videos and phone calls. Do not force a
mismatched headset into the jack for that might cause damage.
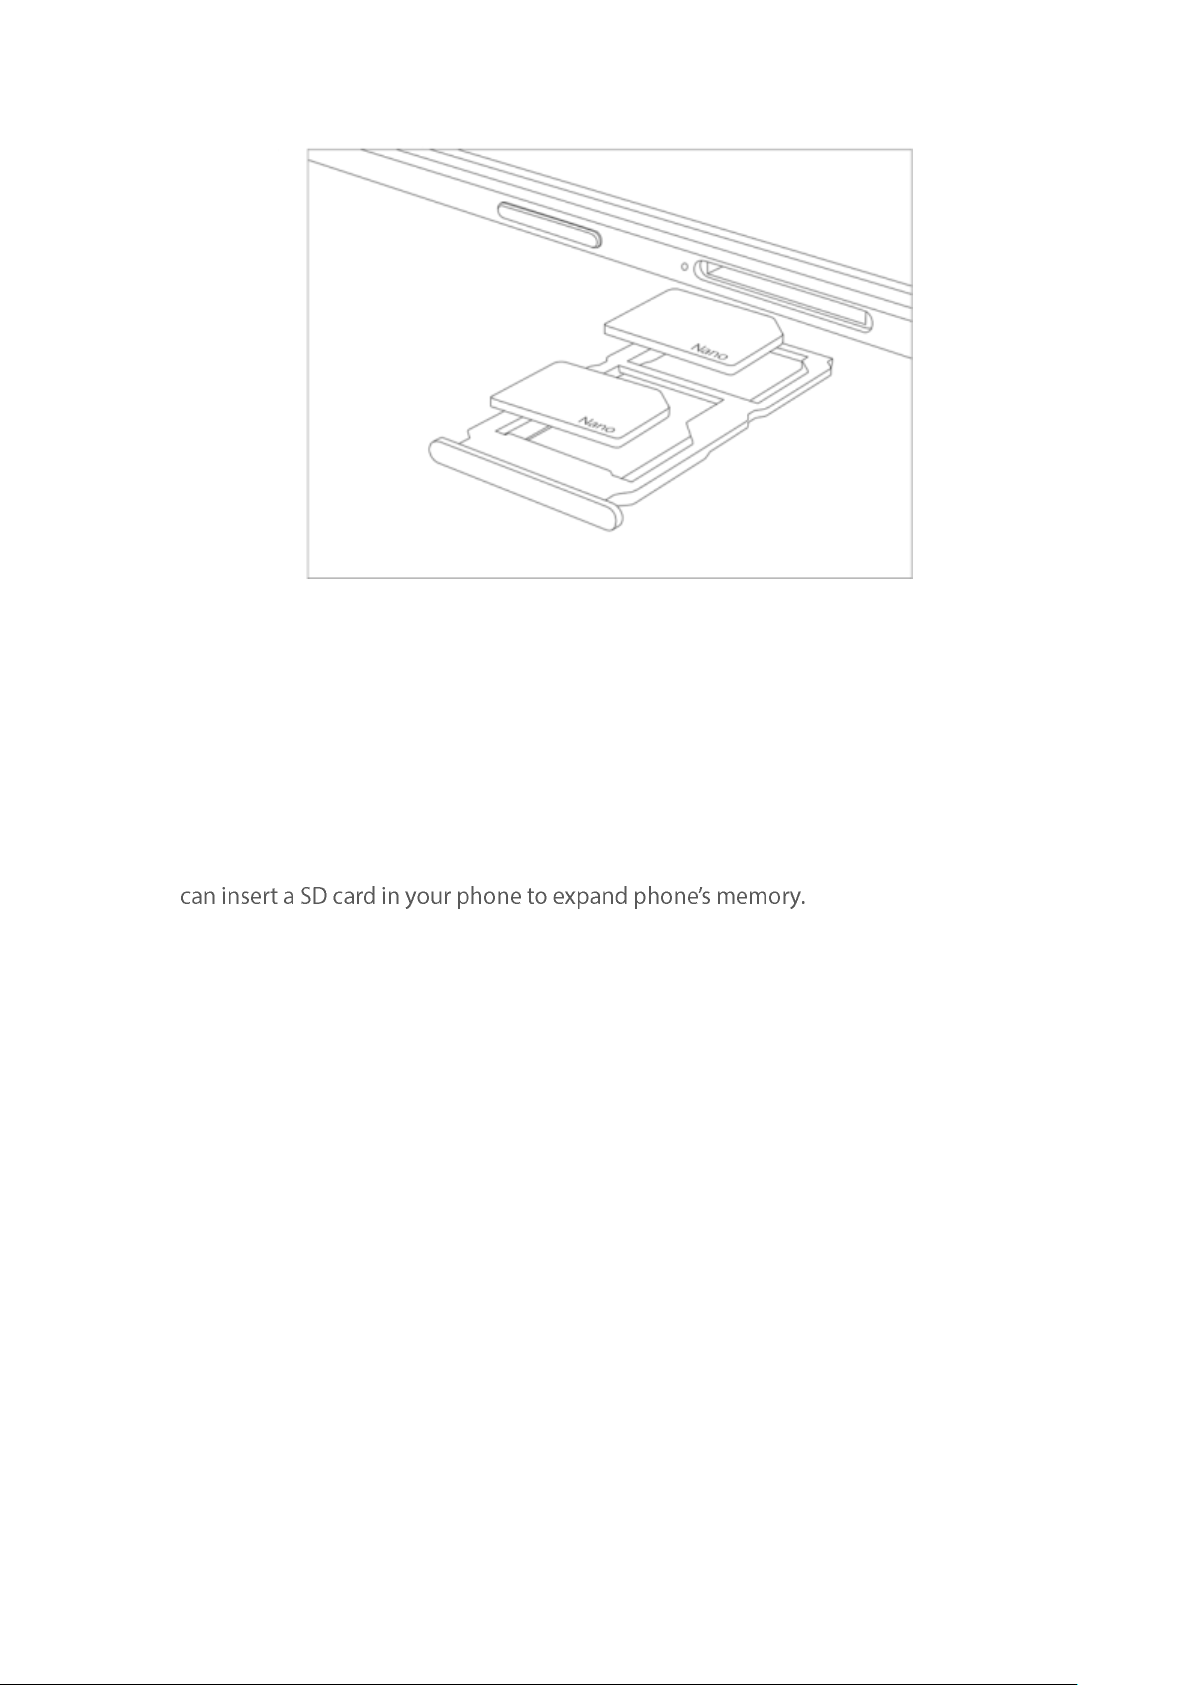
3.1.7. SIM and SD cards
SIM card
* Insert the SIM card before turning on your phone. If you hold a new SIM card, you might
need to wait until it is activated by the carrier before you can use it.
A SIM card is provided by your carrier and is used to activate your phone's mobile
network. Because it has a small amount of memory, the SIM card not only enables
communications between two persons, but stores information such as phone
numbers, security data and more. When using the mobile network, you need to pay
charges. To avoid high charges, you can shop data plans with your carrier, or shop
international data roaming plans when traveling abroad.
Insert the SIM card: Most OPPO Smartphones support Dual SIM. You can choose
to insert one or two.
1. Insert the card needle into the hole outside the card tray to pop it open.
2. Pull out the card tray and place SIM card(s) on it.
3. Put the card tray back in as the same orientation that you removed it.
Page 25
Remove the SIM card: Remove the card(s) in the same way that you insert
it(them).
SD card
The SD card is a way to store and transfer images, music, video and other data. You
SIM1, SIM2 and SD cards share the same card tray. Insert your SD card in the same
way that you insert the SIM card(s).
3.1.8. Accessories came with OPPO phone
Along with the handset, the accessories came with are headset, USB Connecting
cable, Power adapter, SIM card tool and Phone case.
Notice:All photos shown are for illustration purpose ONLY. Actual products may
vary due to product enhancement.
Headset: A standard headset with 3.5 mm headset plug. Use to listen to music,
videos, and phone calls. Use the built-in microphone to talk. When playing the
music or videos, click the button once to pause or play a song or video.
Page 26
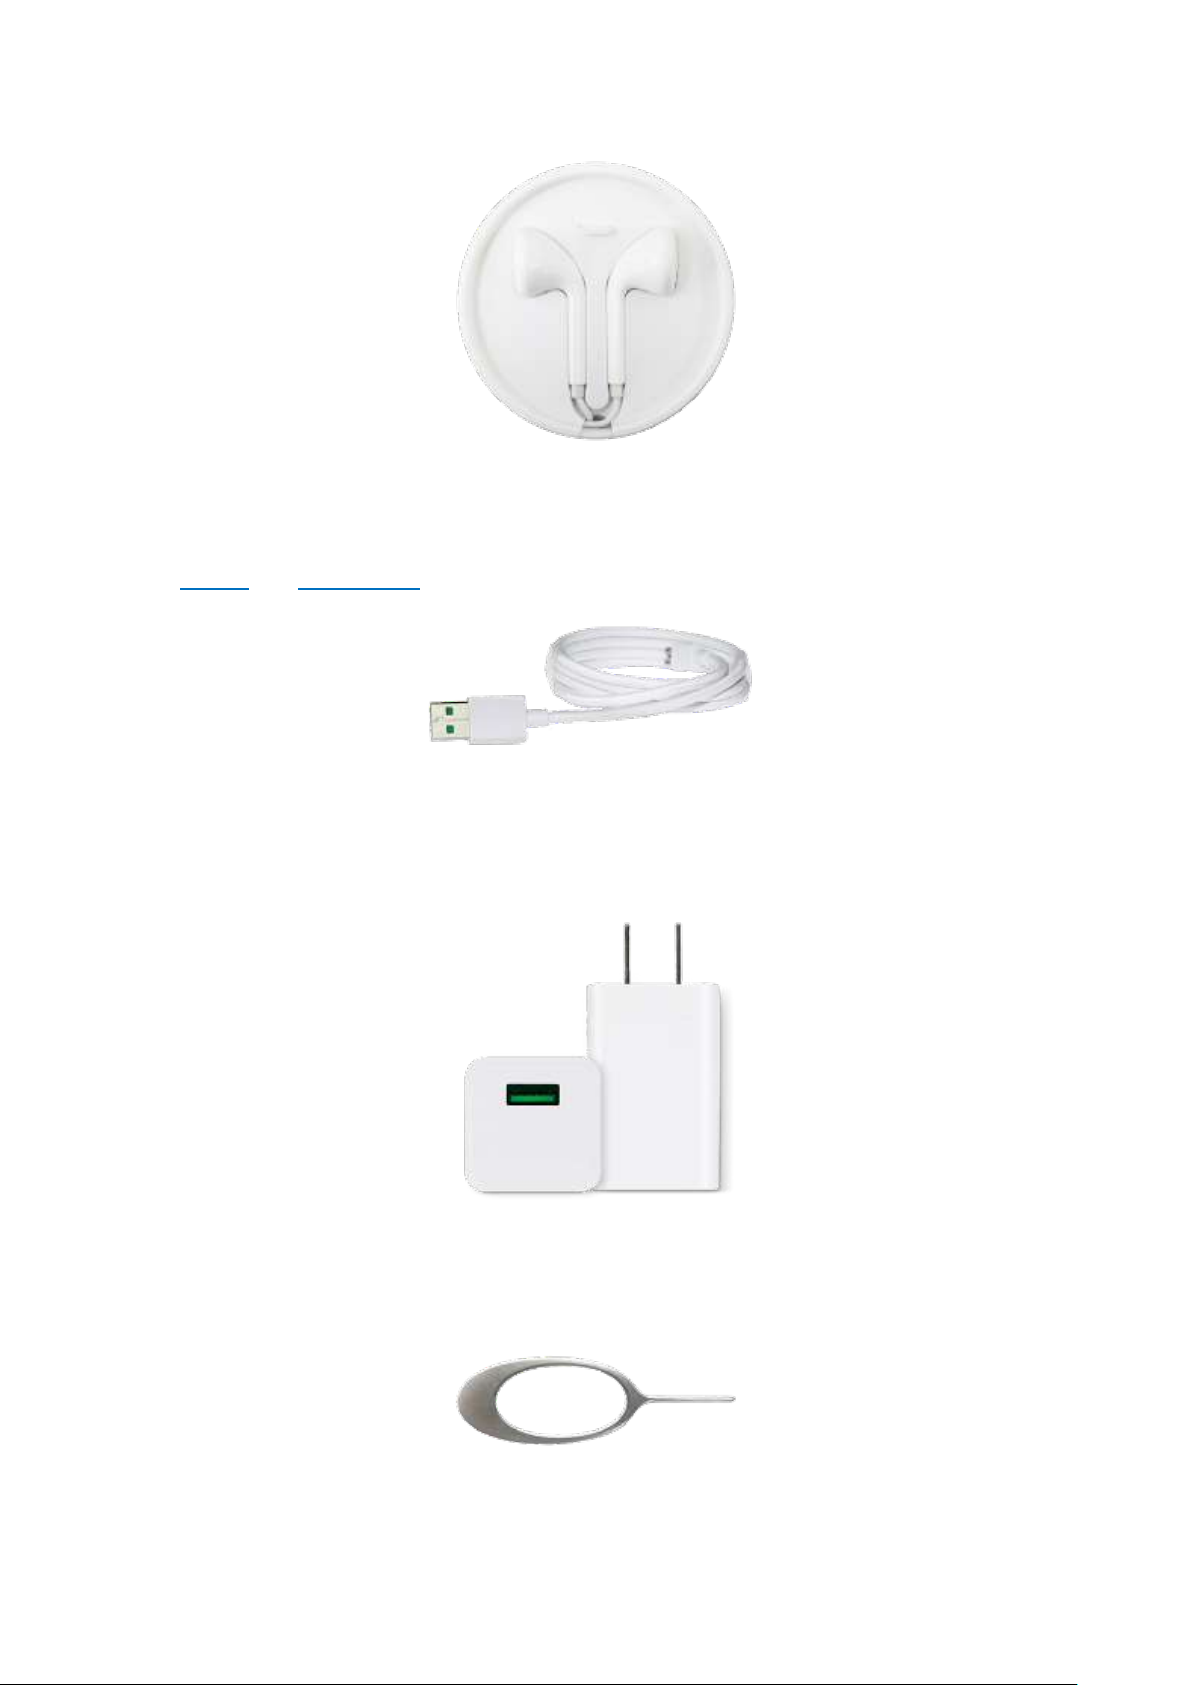
USB Connecting cable: Use the cable to connect your phone to the computer to
charge and transfer files, or use it with the power adapter to charge.
Power adapter: Connect the power adapter to your phone using the included
cable, then plug it into a standard power outlet to charge the phone.
SIM card tool: Use to pop out the SIM card tray.
Page 27
Phone Case: Use to protect against drops and shock damage on the corners and
rear of your phone.
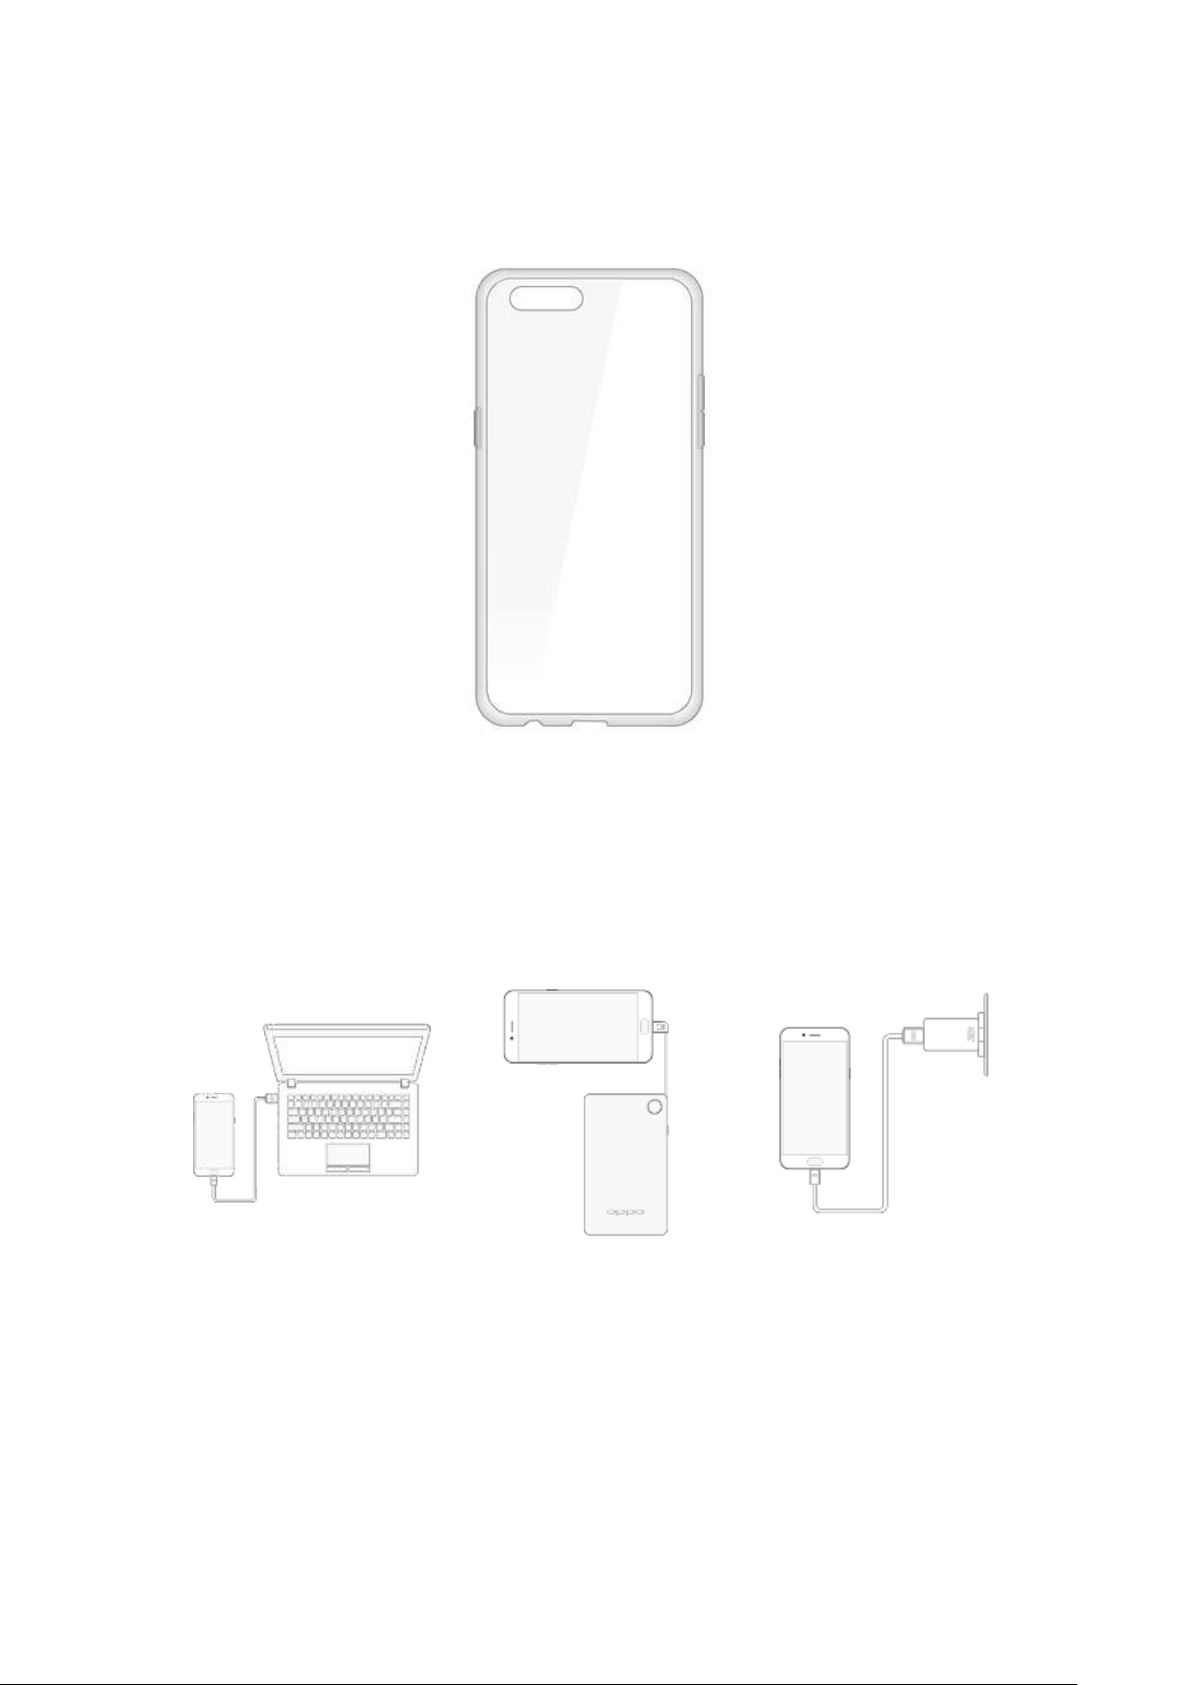
3.1.9. Charging the battery
How to charge the battery:
Notice:All photos shown are for illustration purpose ONLY. Actual products may
vary due to product enhancement.
Charge with the jack: Connect adapter to your phone using the USB cable, then
plug it into a standard power outlet to charge the phone.
Page 28
Connect to a computer to charge: Use the cable to connect your phone to the
computer to charge. Your phone will charge slowly if you connect it to the
computer.
Charge with Power Bank: Connect Power Bank to your phone, and your phone
will be charged wherever you go. It is an absolute necessity if you are a frequent
traveler.
Charging Notice:
1. Charge the phone with the original charging accessories (including adapter,
cable and power bank).
2. It is recommended to charge your phone in a place where the temperature is
between 15° C to 40° C. Extreme ambient temperatures will affect flash charging
system.
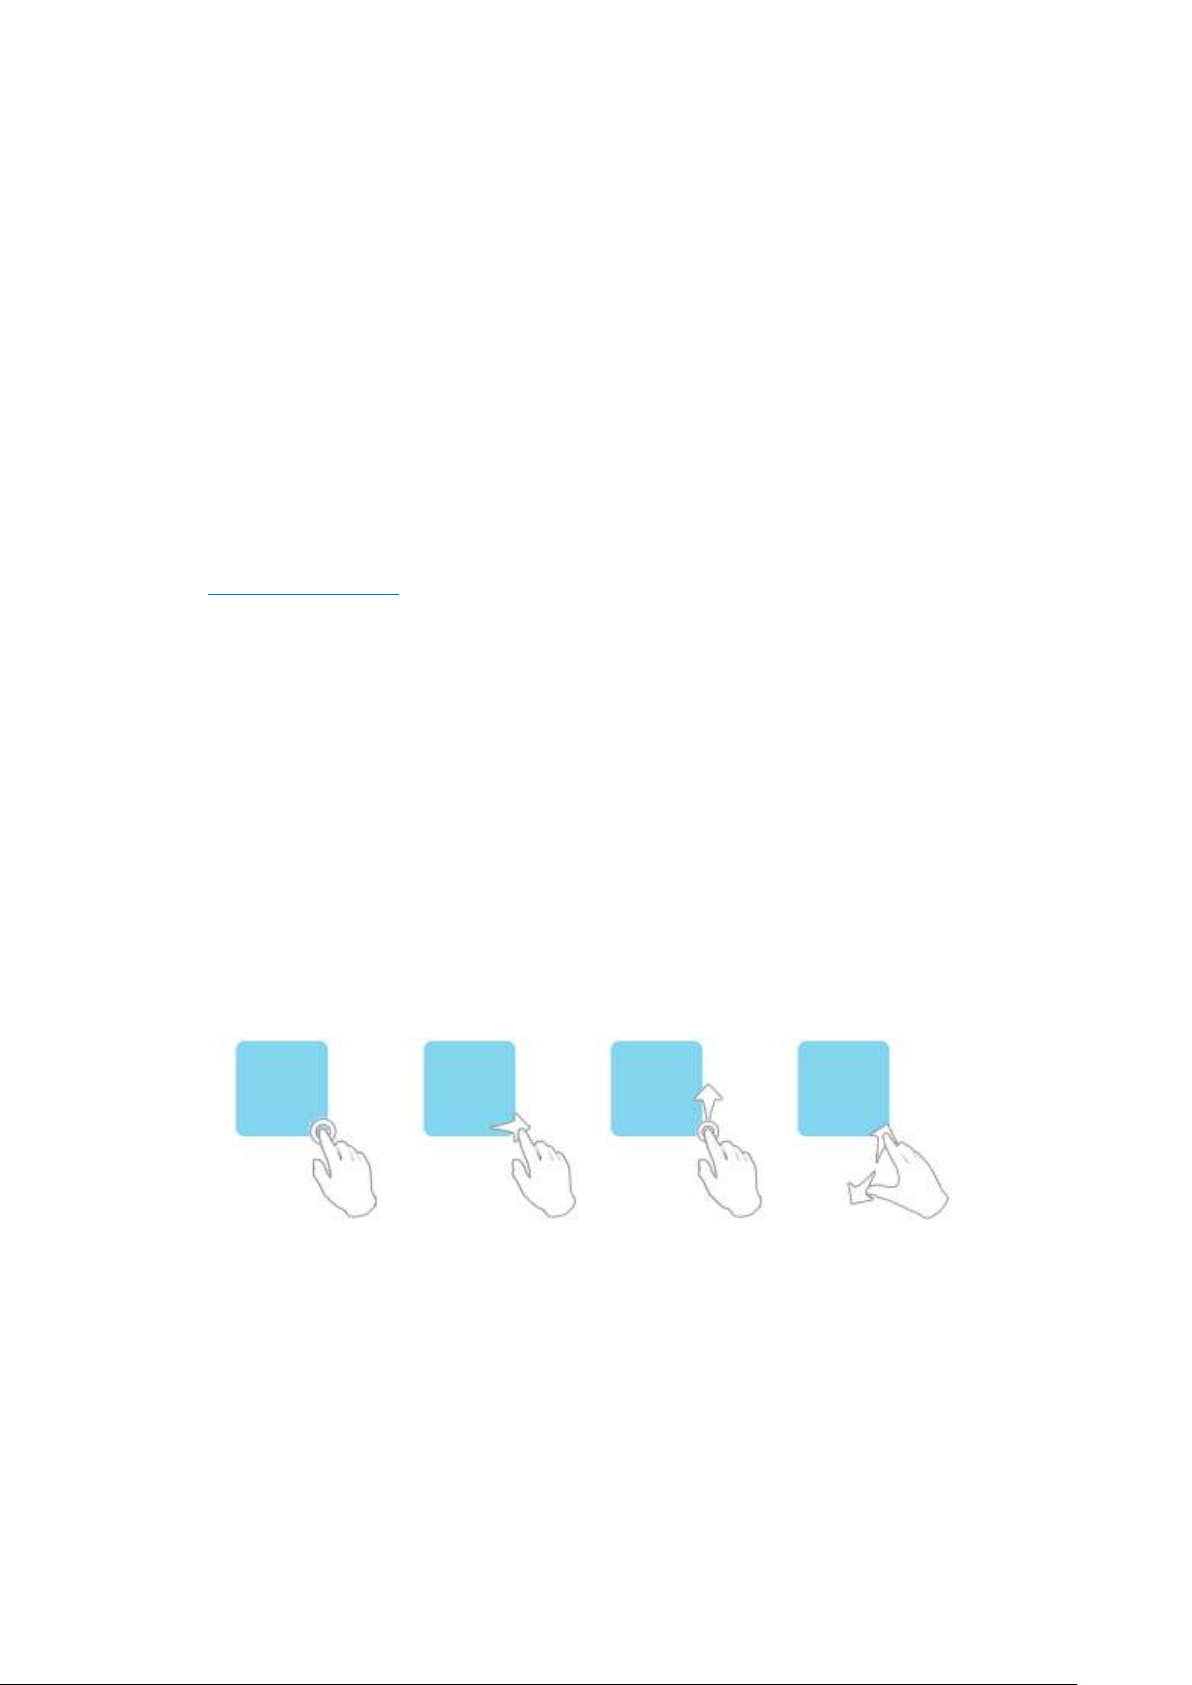
3.1.10.Gesture & Motion
Gestures
OPPO smartphone is designed to understand gestures. You can use gestures such
as tap, swipe, drag and spread to operate your phone.
To set up complex gestures for specific functions, go to [Settings] > [Smart &
Convenient] > [Gesture & Motion].
Page 29

Screen-off Gestures
To set up screen-off gestures, you need to turn it on first.
Double tap to turn screen on: Turn it on to wake up your locked screen with a
double-click on the screen.
Draw O to start camera: When turn it on, you can draw O on the locked screen to
open Camera app.
Draw V to open torchlight: When turn it on, you can draw V on the locked screen
to open the torchlight.
Music control: When turn it on, you can draw ‖ to pause/play a track, or draw <
or > to switch the track when the screen is off.
Add more screen-off gestures: OPPO smartphone of ColorOS 5.0 gives you 7
options, which are Draw ^, Slide up, Slide down, Slide left, Slide right, Draw M
and Draw W. Choose one to unlock the phone, call someone or start an app.
Page 30

3-Finger Gesture
Take a screenshot. Swipe down the screen with three fingers.
Use Split-screen. Under the interface of an app, swipe ups the screen with three
fingers to enter split-screen mode.
Page 31

Motion
The motion-sensing technology is used in OPPO smartphone. Use it to let your
phone response to motion.
Smart call
Auto call when place at the ear: Before you can use auto call, you need to set the
default SIM card for calling. Go to a contact detail, call detail, message conversation
or info interface, put the phone near your ear and your phone will automatically
call that specific person.
Auto answer when near the ear: This function lets your phone to answer any
incoming calls automatically when putting the phone near your ear.
Switch from speaker for calls: Use it to automatically switch from speaker to
receiver when you put the phone near your ear during phone calls.
Flip to mute incoming calls: Use it to silence the ringer by turning the phone over
on a table or other flat surfaces.
Mistouch Prevention Mode
Turn it on to prevent incorrect operations if the lock screen is covered.
Take selfies
Page 32

Open Camera app and switch to the front camera. Click > Gesture on the top
of the screen. Pose the same hand gesture towards the camera, once the camera
captures that, it will take a photo automatically after two seconds. You can change
your pose and expression within this two seconds.
3.1.11.Key combinations
Generally, you can use two buttons of your phone to generate a specific result. The
common key combinations include:
When phone is on
Press and hold the Power and Volume Down buttons: Your phone will take a
screenshot for the current page. To take a long screenshot, click the screenshot,
then click Longshot.
Press and hold the Power and Volume Up buttons
press and hold the button combination for at least eight seconds to force restart
your phone.
Page 33

When phone is off
Status icon
What it means
Mobile network signal
network and can make and receive calls. The
more bars, the stronger the signal.
Airplane Mode
wireless communication abilities are disabled.
Press and hold the Power and Volume Down buttons: Phone will enter Recovery
Mode, which does help to update the system, wipe data, check disk and more.
Press and hold the Power and Volume Up buttons: Phone will be force restarted.
Press and hold the two buttons until your phone is turned on.
3.1.12.Status Icons
The icons in the status bar at the top of the screen give information about your
OPPO smartphone:
Page 34

/
LTE/ LTE A
4G network is available, including LTE and
LTE-A. Your phone can connect to the Internet
over that network.
/
UMTS/WCDMA
3G UMTS network is available. Your phone can
connect to the Internet over that network.
EDGE /GSM
EDGE (GSM) network is available. Your phone
can connect to the Internet over that network.
Wi-Fi
Shows that your phone is connected to a Wi-Fi
network. The more bars, the stronger the
signal. See Connect to Wi-Fi.
Call Forwarding
Call forwarding is turned on.
VPN
Quiet Time
Quiet Time is turned on.
Portrait orientation lock
Phone screen is locked in portrait orientation.
Alarm
An alarm is set up on your phone.
Bluetooth
Bluetooth is on, or your phone is connected to
a Bluetooth device.
Bluetooth
Bluetooth Tethering is on.
Silent
Silent Mode is on.
Vibrate when silent
Phone vibrates when Silent mode is on.
HD Voice
Your phone is on a voice call over VoLTE.
Wireless Display
Wireless projector is connected.
Location Service
Location Service is on.
Page 35

No service
Your phone has no signal.
Power Saving
Power Saving Mode is on.
LOGG-ING
Get a log for testing
Message
Message notification
Voice over LTE
Your
Voice works to make your calls.
Game acceleration
Optimize the game display configuration to
fully utilize hardware resource
International Roaming
Your phone is using International Data
Roaming.
Kids space
Addiction prevention
Payment protection
Payment environment detection
3.2. Configuration Settings
3.2.1. Fingerprint, Face and Passcode
Setting a passcode, face ID and fingerprint on your OPPO phone are security
measures that all users should take. Follow these steps to set a passcode that will
be needed to unlock your phone and access the information stored on it.
Use a passcode on your OPPO phone
Set the passcode
Go to [Settings] > [Fingerprint & Passcode], click [Turn on Passcode].
You'll be prompted to enter a 6-digit numeric code. If you want to use other
passcode types, Click[Other Encryptions].
Page 36

Page 37

Click [Other Encryptions]. You can choose from two types of passcodes:
Click Pattern Code and draw a pattern with at least four dots connected.
Click 4-Digit Numeric Code and set a numbers-only passcode that contains four
characters.
Click 4-16 Digit Numeric Code and set a numbers-only passcode that contains four
to sixteen characters.
Click 4-16 Digit Alphanumeric Code and set a passcode that contains four to
sixteen numbers and/or letters as your preference.
Page 38

Draw your pattern or enter your passcode.
Re-draw or re-enter your pattern or passcode to confirm it and activate it.
Change the passcode
Go to [Settings] > [Fingerprint, Face & Passcode], click [Modify Passcode].
Draw or enter your current pattern or passcode.
Draw or enter your new pattern or passcode. If you want to use other passcode
types, click [Other Encryptions] at the bottom of the screen.
Re-draw or re-enter your pattern or passcode to confirm it and activate it.
Turn off the passcode
Go to [Settings] > [Fingerprint & Passcode], click [Turn off Passcode].
Draw or enter your current pattern or passcode to confirm.
View more details in Set and use a passcode with your OPPO smartphone.
Use a fingerprint on your OPPO phone
Before you can add a fingerprint, you need to create a passcode for your OPPO
phone. You can use fingerprints for:
Unlocking the phone from the lock screen.
Making purchases without entering a passcode.
Encrypting apps
Protecting files
Add a fingerprint
Go to [Settings] > [Fingerprint, Face & Passcode], click [Add a Fingerprint].
Page 39

Follow the on-screen instructions, placing your finger gently on the Home button
until your fingerprint is recorded.
Repeat step 1 and 2 for as many fingers as you like.
Delete or Rename a fingerprint
Go to [Settings] > [Fingerprint & Passcode], click the fingerprint you've added.
Enter a name for your fingerprint, or click [Delete Fingerprint].
Page 40

Use fingerprint to reset passcode
Before you can use the reset feature, you must add at least one fingerprint to your
phone and enabled Fingerprint Unlock.
Reset Passcode methods:
Restart the phone, enter the wrong passord five times and wait 30 seconds. Then
click Use Fingerprint to Reset passcode ,verify your fingerprint and reset the
passcode.
Page 41

When your phone is unlocked, go to [Settings] > [Fingerprint, Face and Passcode],
enter the wrong passcode five times and wait 30 seconds. Then click Reset
Passcode, verify your fingerprint and reset the passcode.
Page 42

Page 43

Enroll a Face on your OPPO phone
Before you can add a fingerprint, you need to create a passcode for your OPPO
phone. You can use fingerprints for:
Unlocking the phone from the lock screen.
Encrypting apps
Protecting files
Enroll a face
Go to [Settings] > [Fingerprint, Face & Passcode], click [Enroll Face].
Page 44

Page 45

Follow the on-screen instructions. To get the ideal effect, keep the phone 20-50cm
away from your face and position your whole face in the circle until the enrollment
is done. Avoid very bright or dim environment when enrolling your face.
Page 46

Delete Enrolled Faces
Go to [Settings] > [Fingerprint, Face & Passcode], click [Delete Enrolled Faces].
Use Face for screen unlocking, App Lock and File Safe. Go
to [Settings] > [Fingerprint, Face& Passcode] >[Use Face to], then turn on the
features you want to use.
View more details in Add and use a fingerprint on your OPPO Smartphone.
3.2.2. Set up other mail and calendar accounts
In addition to the apps that come with your phone, if you want to use other mail
and calendar apps, add the accounts to your phone to let the apps associated with
those accounts sync with your phone.
Set up an account. Go to [Settings] > [Accounts and Sync], then click [Add
Account].
Repeat the steps for as many accounts as you like.
Page 47

3.2.3. Transfer data from the old phone to OPPO
smartphone
You can transfer over all of your data - with no risk or loss of quality, using Clone
Phone. With Clone Phone, you don't need to leave any of your data behind with
your previous device. Take it all with you in three easy steps:From an iPhone to an
OPPO Phone
1. On your OPPO Phone, go to [Tools] > [Clone Phone], then select "This is the new
phone" and "Import From an iPhone". Connect your phone to the Internet when
promoted.
Page 48

2. Sign in the iCloud account of your old iPhone. Enter the Apple ID verification
code you received on your iPhone or in the SMS and start computing cloud data.
Page 49

From an Android Phone to an OPPO Phone
1. On your OPPO phone, go to [Tools] > [Clone Phone], then select "This is the new
phone" and "Import from an Android Phone".
2. On your old phone, click [Clone Phone] from the Home screen, select "This is the
old phone" and scan the QR Code generated by the new phone to start cloning.
Page 50

Page 51

You can also select the data (Personal Data, System Data, Applications, Storage
Data) to be cloned by clicking "Manually Select the Data to be Cloned."
3. Enter the lock screen password to continue.
View more details in Transfer data with Clone Phone.
3.2.4. Date and Time
Knowing the time and date is crucial to keeping on schedule. If you want to set the
date and time display on your OPPO phone, or if you're out of synch or need a time
update, just start with step 1 as below.
1. Go to [Settings] > [Additional Settings] > [Date & Time], click it.
Page 52

2. 24- Hour Format. Switch from 12-hour or a 24-hour format optionally.
3. Automatically Set Date and Time. Enable [Automatically Set Date and Time] if
you want to use the data given by your network provider or your GPS, or you can
set the time yourself if you prefer. See step 4.
4. Set Manually. You can manually set the time and date. To do so,
disable [Automatically Set Date and Time], and then:
Select your time zone. Click [Time Zone] and select the location you would
like to adjust your time to.
Change the date and time. You will see the date and time appear under the
current time zone. Drag your finger across each column to change the date
and time. Scroll wheels will appear to allow you to change the date and time
simultaneously.
View more details in Set up date and time on your OPPO smartphone.
3.2.5. Language and Region
OPPO smartphone offers you an easy access to configure it to display information
Page 53

in another language. If you want to change its language to yours, or if you've
relocated to a new country, you can change language and region by following a
few easy steps.
1. Go to [Settings] > [Language & Region], click it.
2. Find your desired region. Click Region and change the region you want to use.
3. Find your desired language.
Click [Language], you will see a list of languages. Scroll down to find the
language you wish to use.
Page 54

Select your desired language and click "Done." A confirmation message will
appear at the bottom of your screen. Confirm the change by clicking "Change
to ____." Then your OPPO phone will be in the new desired language.
3.2.6. Connect to the Internet
OPPO smartphone connects to the Internet whenever necessary, using a Wi-Fi
connection or mobile network.
Wi-Fi connection
1. Go to [Settings] > [Wi-Fi], or swipe down from the top of your screen to open
Control Center, then tap . The detected Wi-Fi networks will be displayed.
2. Tap the Wi-Fi network you want to connect to.
3. Fill in the password if required.
Mobile data connection
Go to [Settings] > [Dual SIM & Cellular] and enable [Mobile Data], or swipe down
Page 55

from the top of your screen to open Control Center, then tap .
Notice: Enabling the mobile networks connection may result in extra cost. Check
with your mobile network service carrier.
4. What's new in ColorOS 5.0
4.2. AI Feature
4.1.1. Smart Assistant
The Smart Assistant combines information such as Weather, Steps Tracker, and
tap for today. Quick
apps and favorite contacts allow you to open an app or call someone with only one
tap. You can also customize Smart Assistant to better suit your needs, and to
emphasize what you actually care about.
Open Smart Assistant. Go to [Settings] > [Smart & Convenient] and turn on
[Smart Assistant]. Or swipe right from the left edge of the Home screen, then click
Turn on Smart Assistant.
Page 56

Customize Smart Assistant widgets. Scroll to the bottom of Smart Assistant
screen, and then click Edit. Click or to add or remove widgets. To arrange
the order of your information, touch and hold , then drag to a new position.
Page 57

Information you can get from Smart Assistant:
Quick Functions: Provides you with quick access to apps. Click , click Add
More Apps, and then choose an app. You can open the app directly by clicking
its icon in Smart Assistant.
Page 58

Weather: Provides you with weather conditions of your current location.
Steps Tracker: Keeps track of your daily steps and distance covered.
Events: Keeps track of all your events in the Calendar app.
Favorite Contacts: Lets you make call with one tap. Click , then choose a
Page 59

contact. Click the head portrait to call the person.
4.2.1. Smart album search and cleanup
Search the album intelligently. Using the on-device facial recognition and AI
on your images, your phone can now recognize and bundle
together photos with the same facial feature or scenes like hiking or being on the
beach, or more.
To search your photos by categories, click , and then type keywords of what
Photos
will display all the images you have on your library that are a match. It also tells you
exactly how many images match your keyword.
Categories you can search include:
Time. Search for a date, or a festival name. The phone will recognize which
country the image was taken in, and search for festivals in that country, such as
Diwali festival in India.
Place. You can search for a location, specific to a street name.
People. Search the name of a specific people. See People.
Things and scenes. The phone presets 54 labels. You can search a label,
including its synonyms, using multilingual languages.
Page 60

Recent. Click Recent to see images and videos saved in recent the last 7 days.
Content of the image. Search English or Chinese texts that is contain in on
the image, then phone will detect the image which contains the texts.
Clean the albums intelligently. You can quickly clean your duplicate, similar or
blurry photos in [Phone Manager] > [Clean Storage] > [Photo Cleaning].
Page 61

Your phone compares and looks for similarities in different photos and finds
duplicates as well as photos of the same subject, beautified pictures, and blurry
photos. You can also manage your screenshots and recently deleted photos, or go
to Photos directly.
4.2.2. Quick actions menus
Quick Actions let you do the things you do most often, in a faster way and in fewer
steps. Press and hold an app icon to bring up Quick Actions menu, which offers
shortcuts to specific features within that app. When the menu appears, click the
shortcut you would like to use, then the app will open directly to that feature.
To turn the quick actions menu on or off for an app, go to [Settings] >
[Homescreen & Lockscreen Magazine] > [App Shortcut].
Most of applications support this feature. For example, go to your
Home screen and press and hold on the icon for the Twitter app
menu that lets you quickly search in Twitter, share tweets, send messages, scan QR
code, view app info, or delete the app.
When long pressing a quick action of an app, you can add that feature as a shortcut
to the Home screen.
Page 62

4.3. AI Scene Recognition and AI Beauty
With ColorOS 5.0, the camera will tune up camera settings based on the scene it
detects. It intelligently and accurately analyzes the scene and object you're
shooting and pick the best brightness, exposure, color, and contrast for you. Also,
personalized AI Beauty provides functionality for precise recognition and delicate
beautification of each individual facial feature. You can take the best selfie with
ease.
AI Scene Recognition. The camera identifies 16 different scenes when taking
photos, such as a delicacy of dessert or a spectacular sunrise. It allows you to take
great pictures with automatic adjustments made intelligently, heightening the
chances you capture those special moments.
AI Beauty. The Facial Recognition technology can identify up to 296 facial
recognition spots while clicking selfies.
photo with other people, the camera will make different changes for each
individual facial feature, which make the men look more masculine and let the
ladies exude great femininity. Everyone is unique in the camera.
Identifying up to 296 facial recognition spots while clicking selfies.
Providing up to 8 million beauty schemes by identifying race, gender, age, skin
color, and skin quality.
Beautifying up to four people in a photo when taking a photo with others.
Page 63

Swipe-up Gesture Navigation
The four-different swipe-up gestures of ColorOS 5.0, which provides access to the
Home screen, app switcher, and the upper page, are the most intuitive, natural, and
fun interactions when you use the phone. Compared with the previous version, you
have more gesture layouts to choose from. Select one that suits you most and use
it for navigation rather than rely on button clicks alone.
Use swipe-up navigation gestures. Go to [Settings] > [Smart & Convenient] >
[Navigation Keys] and click [Swipe-up Gesture Navigation].
Back at both sides. Swipe up from the left or right bottom to return to upper page,
swipe up from the middle bottom to get to the Home screen, and swipe up from
the middle bottom and pause 1 second to view recent tasks.
Page 64

Simple gestures. Swipe up from the middle bottom to get to the Home screen,
and swipe up from the middle bottom and pause 1 second to view recent tasks.
Back on the right. Swipe up from the left bottom to view recent tasks, swipe up
from the middle bottom to get to the Home screen, and swipe up from the right
bottom to return to upper page.
Page 65

Back on the left. Swipe up from the left bottom to return to upper page, swipe up
from the middle bottom to get to the Home screen, and swipe up from the right
bottom to view recent tasks.
Hide Gesture Guide Bar. Gesture Guide Bar is the translucent line at the bottom of
the screen, which allows you to quickly distinguish the left, middle and right
swipe-up regions. To hide the guide bar, turn on [Hide Gesture Guide Bar].
Prevent mistakenly touching. Turn on [Mistouch Prevention]. To use gesture
navigation when the app is in Landscape Mode, you need to swipe up to bring up
Page 66

the guide bar first, then swipe up again in the same area.
Swipe-up Gesture Navigation
The four-different swipe-up gestures of ColorOS 5.0, which provides access to the
Home screen, app switcher, and the upper page, are the most intuitive, natural, and
fun interactions when you use the phone. Compared with the previous version, you
have more gesture layouts to choose from. Select one that suits you most and use
it for navigation rather than rely on button clicks alone.
Use swipe-up navigation gestures. Go to [Settings] > [Smart & Convenient] >
[Navigation Keys] and click [Swipe-up Gesture Navigation].
Back at both sides. Swipe up from the left or right bottom to return to upper page,
swipe up from the middle bottom to get to the Home screen, and swipe up from
the middle bottom and pause 1 second to view recent tasks.
Page 67

Simple gestures. Swipe up from the middle bottom to get to the Home screen,
and swipe up from the middle bottom and pause 1 second to view recent tasks.
Back on the right. Swipe up from the left bottom to view recent tasks, swipe up
from the middle bottom to get to the Home screen, and swipe up from the right
bottom to return to upper page.
Page 68

Back on the left. Swipe up from the left bottom to return to upper page, swipe up
from the middle bottom to get to the Home screen, and swipe up from the right
bottom to view recent tasks.
Hide Gesture Guide Bar. Gesture Guide Bar is the translucent line at the bottom of
the screen, which allows you to quickly distinguish the left, middle and right
swipe-up regions. To hide the guide bar, turn on [Hide Gesture Guide Bar].
Prevent mistakenly touching. Turn on [Mistouch Prevention]. To use gesture
navigation when the app is in Landscape Mode, you need to swipe up to bring up
Page 69

the guide bar first, then swipe up again in the same area.
4.4. Assistive Ball
Applying the Assistive Ball feature provides options to access several regular phone
features through the touchscreen, rather than the tactile buttons. It enables you to
use the virtual navigation keys with just one finger, and also open the notification
center, take a screenshot, and more. When you perform gestures that are difficult
for you, Assistive Ball can help.
Assistive Ball lets you perform a wide range of features:
Return to upper page
Go to the Home screen
View recent tasks
Open Notification Center
Lock the screen
Enter One-hand Mode
Take a screenshot
To configure the Assistive Ball menu, go to [Settings] > [Smart & Convenient] >
[Assistive Ball], then choose one operation mode:
Gesture Operations. Below Gesture Operations, you can assign different actions to
Page 70

Assistive Ball to go to the Home screen.
Tap Menu. There are five shortcuts for enabling different features in Tap Menu.
Click a shortcut and change the option to the one you preferred. On any screen,
click the Assistive Ball to pop up the shortcut menu.
When Assistive Ball is on, you can hold the floating button and pull it around the
screen to any location to get it out of the way or make it more accessible.
Adjust the transparency of the Assistive Ball when not in use. Go to [Settings] >
[Smart & Convenient] > [Assistive Ball], then drag the slider.
Hide the Assistive Ball automatically in full screen. Go to [Settings] > [Smart &
Convenient] > [Assistive Ball] and turn on [Hide Ball Automatically in Full
screen]. To reveal the Assistive Ball, swipe down from the top of the screen.
4.5. Full Screen Multitasking
When using an app in Landscape mode, you can open a second app while the
other one is in the foreground. Just swipe inwards from the edge of the notched
area
to bring up apps or functions, click an app icon, then you can operate the app
above the other one, in a floating window.
Multitask with the floating mini app. Go to [Settings] > [Smart & Convenient] >
[Full Screen Multitasking] and toggle the slider to green.
Page 71

* When the phone is set to block notifications and you receive new messages from
, while a red spot will display on the app
icons.
quick apps, notifications will be displayed with a banner on the top screen. Click
Reply in Floating to start full screen multitasking.
Page 72

Add and rearrange quick apps. Click Quick Apps, then drag next to the app
up or down. You can add up to 3 apps.
Rearrange quick functions. Click Quick Functions, then drag next to the
function up or down.
Note: The quick app needs to support the floating window feature. If some of its
-screen mode.
4.6. Quick actions menus
Quick Actions let you do the things you do most often, in a faster way and fewer
Page 73

steps. Press and hold an app icon to bring up Quick Actions menu, which offers
shortcuts to specific features within that app. When the menu appears, click the
shortcut you would like to use, then the app will open directly to that feature.
To turn the quick actions menu on or off for an app, go to [Settings] >
[Homescreen & Lockscreen Magazine] > [App Shortcut].
Most of applications support this feature. For example, go to your
Home screen and press and hold on the icon for the Twitter app
menu that lets you quickly search in Twitter, share tweets, send messages, scan QR
code, view app info, or delete the app.
When long pressing a quick action of an app, you can add that feature as a shortcut
to the Home screen.
4.7. Take and edit a screenshot
screen, and take long screenshots
of your conversations on any messenger, or the screenshot of a full web page, or
screenshot of some long pages in apps. Also, you can edit the screenshots directly
on the Photos app using a set of professional editing tools.
Capture the current page
Press and hold the Power and Volume Down buttons for about 2
seconds, the screen will briefly flash white, and you'll hear a shutter sound
if your phone's sound is on.
Page 74

Gesture Screenshot: Go to [Settings] > [Smart & Convenient] >
[Gesture & Motion] and turn on [3-Finger Screenshot]. Then swipe
down the screen with three fingers to take a screenshot.
Capture a long screenshot
With OPPO smartphone, you can easily take longer and scrolling screenshot with
simple clicks.
To capture long screenshots:
1. Press and hold the Power and Volume Down buttons for about 2
seconds, or swipe down the screen with three fingers to take a screenshot
of the current page.
Page 75

2. Click the screenshot, click Long screenshot, then scroll the page up or
down and stop until you have finished capturing all the contents you
want.
3. Click Done to generate a long screenshot. The image is saved on the
Photos app.
Edit a screenshot
After you've taken a screenshot, click it, then click Edit. You can use the fancy new
markup features to optimize it instantly, such as cropping, adding text, light, filters,
and more. Click Done to save your changes.
Page 76

4.8. Control Center
Control Center gives you instant access to the most frequently used features, and
allows you to view recent and earlier notifications with just a swipe. You can open
Control Center from anywhere on your phone from any app or screen, even from
the lock screen.
Page 77

Open Control Center. Swipe down from the very top of any screen (except the
notch at the top center of the display). You'll see the shortcuts listed on top, and
notifications below.
Customize the shortcuts. By default, the phone will list ten shortcuts when you
open Control Center. Click or swipe down the screen to show other shortcuts.
To change or rearrange the shortcuts, click on the top, then hold down and
drag an icon to your preferred position. To save your changes, click .
Control the brightness. Drag the slider to adjust the brightness of the screen.
When you drag the slider, other parts of Control Center will be temporarily hidden.
Page 78

4.9. New features of Photos
With ColorOS 5.0, the Photos app gets amazing updates. Here are some of the ones
you may find most useful.
Memories
Using the on-device facial recog
your phone can combine photos into themed mini-movies complete with
transitions and a soundtrack. It can recognize and bundle together photos the
feature certain people, or scenes like hiking or being on the beach, and category
categorize your photos while your phone is plugged and locked. See Memories.
Page 79

People
facial technology to identify the people in the pictures or combine identifications,
then group pictures of the same people together. See People.
Optimized album management
In addition to the frequently used social apps, images downloaded from
third-party apps will be saved in Rarely-used Album. You can put other albums
into Rarely-used Album by clicking Select > Set as rarely-used.
Page 80

Your photos will be put into sequential order by modification time. In other
words, once an old photo or video has been modified, it will be saved as the
latest photo or video.
blacklist and will not displayed in albums.
Photos and videos editing tool
Edit a photo. Click a photo in Photos, then click Edit. You can use the fancy
new markup features to optimize it instantly, such as cropping, adding text,
light, filters, and more.
Page 81

Edit a video. Click a video in Photos, then click Edit. You can crop the video,
add a filter, soundtrack, text, and watermark to the video. See Edit photos and
videos.
Smart album search and cleanup
You can search your photo library depending on the date, location, people, and
content of the photos on your device. In Phone Manager, you can also clean up
Page 82

photos in batches such as similar and blurry photos. See Smart album search and
cleanup.
4.10. New features of Camera
With ColorOS 5.0, the Photos and Camera app get amazing updates. Here are some
of the ones you may find most useful. Click New features of Photos to view Photos
updates.
Turn Depth Effect on or off for a photo
Click to turn on Depth Effect. A photo that includes a depth effect blurs the
background while keeps the face in the foreground perfectly focused. To ensure
the best results, keep the person within two meters from the lens.
Page 83

Front 3-HDR
When capturing images in bright sunlight or shade using the front facing camera,
front 3-HDR helps you to adjust the ratio of light to dark in the photo and make
your subject look better.
AR stickers
Page 84

The Camera app offers many stickers for you to edit and decorate your selfies.
Open Camera, click STICKER, then click to add an AR sticker. Express yourself
daily through fun stickers and add fun to boring backgrounds.
AI Beauty
The Facial Recognition technology can identify up to 296 facial recognition spots
when clicking selfies. Personalized AI Beauty provides functionality for precise
recognition and delicate beautification of each individual facial feature. Everyone is
unique in the camera.
When you take photos with other people, your phone will beautify up to four
people in a photo.
4.11. Screen Recording
With ColorOS 5.0, you can record a video of what you're doing on the screen. You
can even narrate on the background it, too. Save the video, then you can view, edit,
and share the recording using the Camera app.
Record your screen. Swipe down from the top of the screen to open Control
Center, then click .After a 3-second countdown, the screen recording starts.
Screen recording is limited to a maximum of 30 minutes. To stop the recording,
Page 85

click on the screen and a notification will appear that says "The screen
recording has been saved. Click the notification to open the Photos app and review
your video.
Record with sound. Go to [Settings] > [Screen Recording] and turn on [Allow
sound recording]. Then the audio from your phone's microphone will be captured
in the video recording.
Adjust the video resolution. Go to [Settings] > [Screen Recording], click [Video
Resolution] and choose one from high, medium, or low resolution.
Record with touch points. Go to [Settings] > [Screen Recording] and turn on
[Record screen taps].
Page 86

Tips:
1. If you don't see Screen Recording in Control Center, you need to add the shortcut
first.
2. Screen recording will automatically stop when the screen is turned off, the
phone is powered off, or after 30 minutes.
4.12. Hide Home screen icon
Without deleting the app from your phone, you can simply hide the app icons from
view if you want to quickly hand your phone off
them having access to personal data contained within some apps.
Before you can hide Home screen icons, you must encrypt the apps first.
Hide Home screen icon. After encrypting the apps, do the following:
1. Go to [Settings] > [Security] > [App Lock], then enter the verification passcode
to enter the App Encryption screen.
2. Click an app, turn on [Start Passcode Verification], then turn on [Hide Home
screen icon].
3. A pop-up message will display on the screen to ask you to set an access number.
You can open the hidden applications by dialing the number. This message will
only pop up when you use the hidden feature for the first time. Click Set Access
Number.
4. Set a number contains one to sixteen characters,
then click Done.
Page 87

5. You can also set the hidden app not to display in Recent Tasks, or disable its
notifications.
Open hidden apps. Click Phone, click the keypad to enter your access number,
then the Hidden Apps folder will pop-up.
Page 88

Note:
You can override encryption passcode and open hidden apps directly
by dialing the access number.
losed using the
one-tap cleanup function.
Access number can be set only once when you use the hidden feature
for the first time. If you forgot the number, you need reset the phone
to its factory settings to reset the number.
4.13. VIP Contacts
When you put the phone into Silent mode, or when you set the phone to block calls and
notifications using Quiet Time, Game Acceleration, or Anti-harassment, you can add
certain contacts to VIP Contacts, which will allow them to override the phone settings
and have their calls come through and ring.
Add contacts to VIP Contacts. Go to Contacts, select a contact, then click Add to VIP
Contacts.
Page 89

4.14. Tips
The phone provides you a lot of ColorOS 5.0 tips that you need to know to master
and get the most from the phone.
Get Tips. Open the Tips app. Click ColorOS 5.0 New Features to get the major
highlight of the new features. You can also get specific tips you want from seven
categories
tip, then swipe left or right to view the previous or next one. Click in the
upper-right corner to share the tip.
Page 90

Search a tip. Click the search bar and type the name of a tip (or a part of it), then
click . Tip . Click a tip to access its
description screen.
Page 91

4.15. Transfer data from the old phone to
OPPO smartphone
You can transfer over most of your data - with no risk or loss of quality, using Clone
Phone. With Clone Phone, you don't need to leave any of your data behind with
your previous device. Take it all with you in three easy steps:
From an iPhone to an OPPO Phone
1. On your OPPO Phone, go to [Tools] > [Clone Phone]
when promoted.
Page 92

2. Sign in the iCloud account of your old iPhone. Enter the Apple ID verification
code you received on your iPhone or in the SMS and start computing cloud data.
Please note that only Contacts, Albums (Including photos & videos) will be
transferred.
From an Android Phone to an OPPO Phone
1. On your OPPO phone, go to [Tools] > [Clone Phone], then
f
2. On your old phone, click [Clone Phone] from the Home screen,
Page 93

You can also select the data (Personal Data, System Data, Applications, Storage
Data) to be cloned by clicking
3. Enter the lock screen password to continue.
View more details in Transfer data with Clone Phone.
5. Basics
5.2. Use apps
Open apps
The Home screen shows all the apps on your phone. Click any application icon to
get started.
Apps will show the number of messages pending to be read in red on their Home
screen icon.
Navigation Gestures.
Page 94

Quick Actions
Press and hold an app icon to bring up "Quick Actions," which offers shortcuts to
specific features within that app. When the menu appears, click the shortcut you
would like to use, then the app will open directly to that feature. For example, go to
your Home screen and press and hold on the icon for the Camera app
mini menu that lets you jump straight to a beauty selfie, a sticker selfie, a video, or
the app info page.
Page 95

Switch between apps
Clicking Menu button on the bottom left would bring up a menu for apps that you
were in. Swipe left or right to see more. To switch to another app, click it.
Close apps
Click Menu button on the bottom left, and then:
Close an app: Swipe the app up to the top edge of the screen.
Close all apps: Click to clean up the list.
Page 96

5.3. Share from apps
In addition to sharing your information from the Files app, you can also share from
many other apps on your OPPO smartphone.
Share from apps. In many apps, you can click Send or to choose how to share
multiple sharing options.
Take the Photos app as an example, click options.
Page 97

5.4. One-click cleanup
One-click cleanup option helps you to make your phone perform steadily and
faster.
Stop background apps. Click Menu button > to close all active apps. If you
want to close a specific app, swipe it up.
Page 98

Clean-up & Accelerate. Click Phone Manager on the Home screen, then click
[Clean Storage]. Scan and delete all kinds of junk files. You can also delete the app
data and other unnecessary files, such as photos, audio, videos, and documents.
5.5. Lock the running background apps
You may close the running background apps frequently to make your phone
perform steadily and faster. If you want some apps to be always connected and
reachable, do the following:
Lock an app. Click Menu button to reveal your open apps, then swipe an app
down to the bottom edge of the screen. Notice that a lock appears on the
upper-left corner of the app.
Repeat the action for other apps.
Page 99

5.6. View, zoom in and out
Use the touchscreen to interact directly with what is displayed
screen.
View items. Drag up or down to scroll. You can also drag some screens in any
direction, such as webpages. Flick to scroll quickly. You can wait for the scrolling to
come to a stop, or touch anywhere on the screen to stop it immediately.
Page 100

On some screens such as Settings and Contacts page, double-click the status bar to
quickly scroll to the top.
Zoom in and out. When viewing photos, maps, or web pages, you can zoom in and
out. Pinch your fingers together or apart. For photos and web pages, you can
double-click to zoom in, then double-click again to zoom out. For maps,
double-click to zoom in and click once with two fingers to zoom out.
5.7. Smart & Convenient Operation
5.6.1. Navigation Keys
With ColorOS 5.0, all navigation is handled with the on-screen virtual keys and
gestures. The three virtual navigation keys appear at the bottom of every screen,
and can be hide hidden when not in use. You can also arrange the order of "Back"
and "Recent" placements to depending on your preference how you prefer them.
 Loading...