

Page 1

USER MANUAL
5.7
MUSIC
Page 2

CONTENT
PREFACE 4
ATTENTION AND PRECAUTIONS 4
For Your Safety 4
Security Requirements 5
Maintenance 6
YOUR PHONE 8
GETTING STARTED 9
Installing The Sim Card And The Battery 9
Removing The Battery And The Sim Card 9
Installing The Microsd Card 9
Charging Battery 10
Connecting To Network 10
Power On/off Phone 11
Pin And Puk 11
Phone Lock 12
Locking The Screen 12
Connecting To Network 12
BASIC FUNCTIONS 13
Making A Call 13
Making Domestic Calls 13
Dialing Extension Number Of Fixed-line Telephone 13
1
Page 3

Dialing International Calls 14
Dialing Phone Numbers In The Call Records 14
Emergency Calls 14
Answering A Call 15
Call Records 15
Call Options 15
USING THE MENUS 16
Accessing A Menu Function 16
Exiting A Menu Function 16
Main Menu 16
NETWORK SERVICES 17
WAP 17
Data Account 17
Messaging 18
CALL HISTORY 19
SETTINGS 20
Display Setting 20
Phone Settings 20
Call Settings 22
Network Settings 23
Bluetooth 23
PHONEBOOK 23
GAMES 24
MULTIMEDIA 25
2
Page 4

Music Player 25
Camera 25
Video Player 25
Video Recorder 25
Fm Radio 26
Sound Recorder 26
Image Album 26
TV 26
FUN & GAMES 27
MY FILES 27
USER PROFILES 27
ORGANIZER 28
Alarms 28
Calculator 28
Calendar 28
INPUT METHOD 28
Entering (Abc And Abc) 28
Entering Numbers 29
Entering Symbols 29
CARE AND MAINTENANCE 29
WARRANTY MANUAL 30
3
Page 5
PREFACE
Thank you very much for choosing this product designed by our
company!
The policies and procedures outlined in this user manual will be
applied at the discretion of O+. O+ reserves the right to deviate from the
policies, procedures, benefits, and working conditions described in this
user manual. Furthermore, the Company reserves the right to
withdraw or change the policies, procedures, benefits, and working
conditions described in this user manual at any time, for any reason,
and without prior notice.
ATTENTION AND PRECAUTIONS
For Your Safety
Remember to comply with legal requirements and local
restrictions when using the phone, for example, in aero plane,
petrol stations, hospital or while driving
Always keep your handsfree to operate the vehicle while
driving. Your first consideration while driving should be road
safety. Don’t use handset while driving.
As per the law, phone should not be used at refueling point
near fuel or chemicals.
Mobile phones can interfere with the functioning of medical
devices such as hearing aids or pacemakers. Keep at least 20
cm(9 inches) between the phone and pacemaker. When using
the mobile phone hold it to the ear which is furthest away from
the pacemaker. For more information, consult your doctor.
4
Page 6
All wireless phones may be susceptible to interference, which
could affect performance. The phone may cause interference
in the vicinity of TV sets, radios and PCs.
The mains voltage (V) specified on the power supply unit must not
be exceeded. Otherwise the charging device may be damaged.
The power supply must be plugged into an easily accessible AC
mains power socket when charging the battery. The only way
to turn off the charging device after charging the battery is to
unplug it.
Only qualified personnel may install or repair this product.
When connecting to any other product, read its user guide for
detailed safety instructions. Do not connect incompatible
products.
Use only approved enhancements and batteries. Do not
connect incompatible products.
Security Requirements
Before making or answering a call, you should pay attention to the local
laws about the use of wireless mobile phones and take them into
account in practical use.
Traffic Safety
Pay attention to traffic safety. Do not use your mobile phone while
driving. Park before making or answering a call.
Flight Safety
Please turn off your GSM mobile phone before the airplane takes off in
5
Page 7

order to protect airplane’s communication system from interference.
Using mobile phone before the plane taking off should get aircrew’s
permission according to safety regulations.
Environment Safety
Do not use your mobile phone near precision electronic equipment.
Radio wave interference may cause malfunctioning of such electronic
equipment and other problems.
Operating of mobile phone may interfere with medical devices like
hearing aids and pacemakers.
Do not use your phone in a potentially dangerous atmosphere. Please
strictly observe with the restrictions on the use of wireless devices.
Maintenance
Battery instructions
When the phone automatically turns off or indicates the alarm
information of power shortage, please charge the battery in time.
For the first time use, please charge the battery fully.
When not in use, please separate the battery with power supply.
Overcharging will shorten the life of the battery.
Do not expose your products to extreme high or low temperatures.
Caution
Risk of explosion if battery replaced aced by an incorrect type.
Dispose of used batteries according to the instructions.
Operating temperature range: -10 oC~ +55 oC
6
Page 8

Do not use damaged battery.
Do not expose your mobile phone to direct sunlight or in hot areas.
High temperatures can shorten the life of electronic devices.
Do not expose the battery into fire or throw it away. Return the
wear-out battery to the provider or put it in the appointed recycle place.
Do not put it in familial rubbish.
Follow these guidelines to protect your products.
Keep the products out of children's reach
Keep your product dry. Do not expose it to liquid or moisture.
Do not short-circuit the battery, as this can cause excessive heat to
bring about fire.
Do not expose your mobile phone to direct sunlight or in hot areas.
High temperatures can shorten the life of electronic devices.
Do not attempt to disassemble the mobile phone and battery by
yourself. Non-expert handling of the devices may damage them.
Prevent liquid from leaking into your phone.
Please use original accessories. Using any unauthorized accessories
may affect your mobile phone’s performance.
Note: The performance of your phone depends on your local network
operator’s card and how you actually use it. We are not responsible for
any damages due to inappropriate use.
Please read these brief rules. Violation of these rules might cause
danger or break laws.
7
Page 9
YOUR PHONE
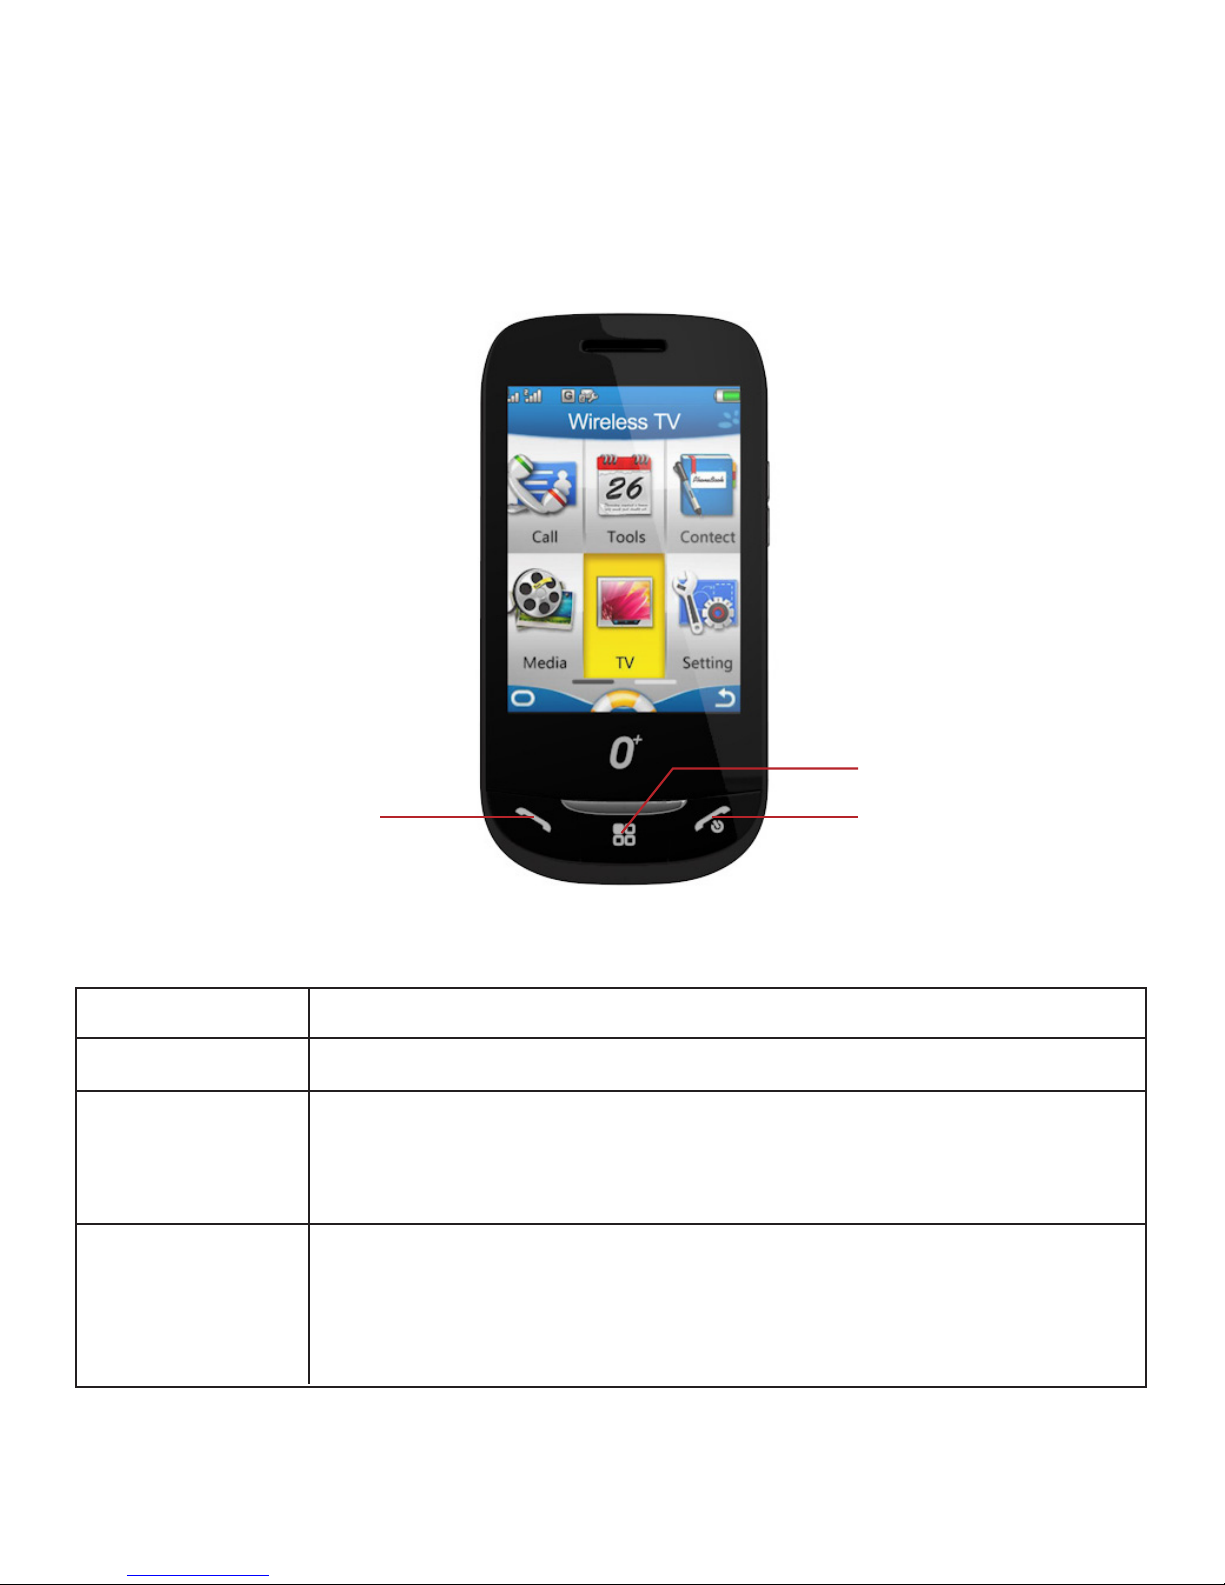
Phone Overview
Key Functions
Keys Description
[Home key] Press this key to back idle screen.
[Dial key] Dial a phone number from SIM1/SIM 2 or answer an
incoming call. When the phone is in idle mode,
press this key to access the call history list of SIM1/SIM 2.
[End key] End a call.
Press this key to lock the screen when the phone
is in idle mode.
Hold down this key to turn on/off your mobile phone.
Dial Key
Home Key
End Key
8
Page 10
GETTING STARTED
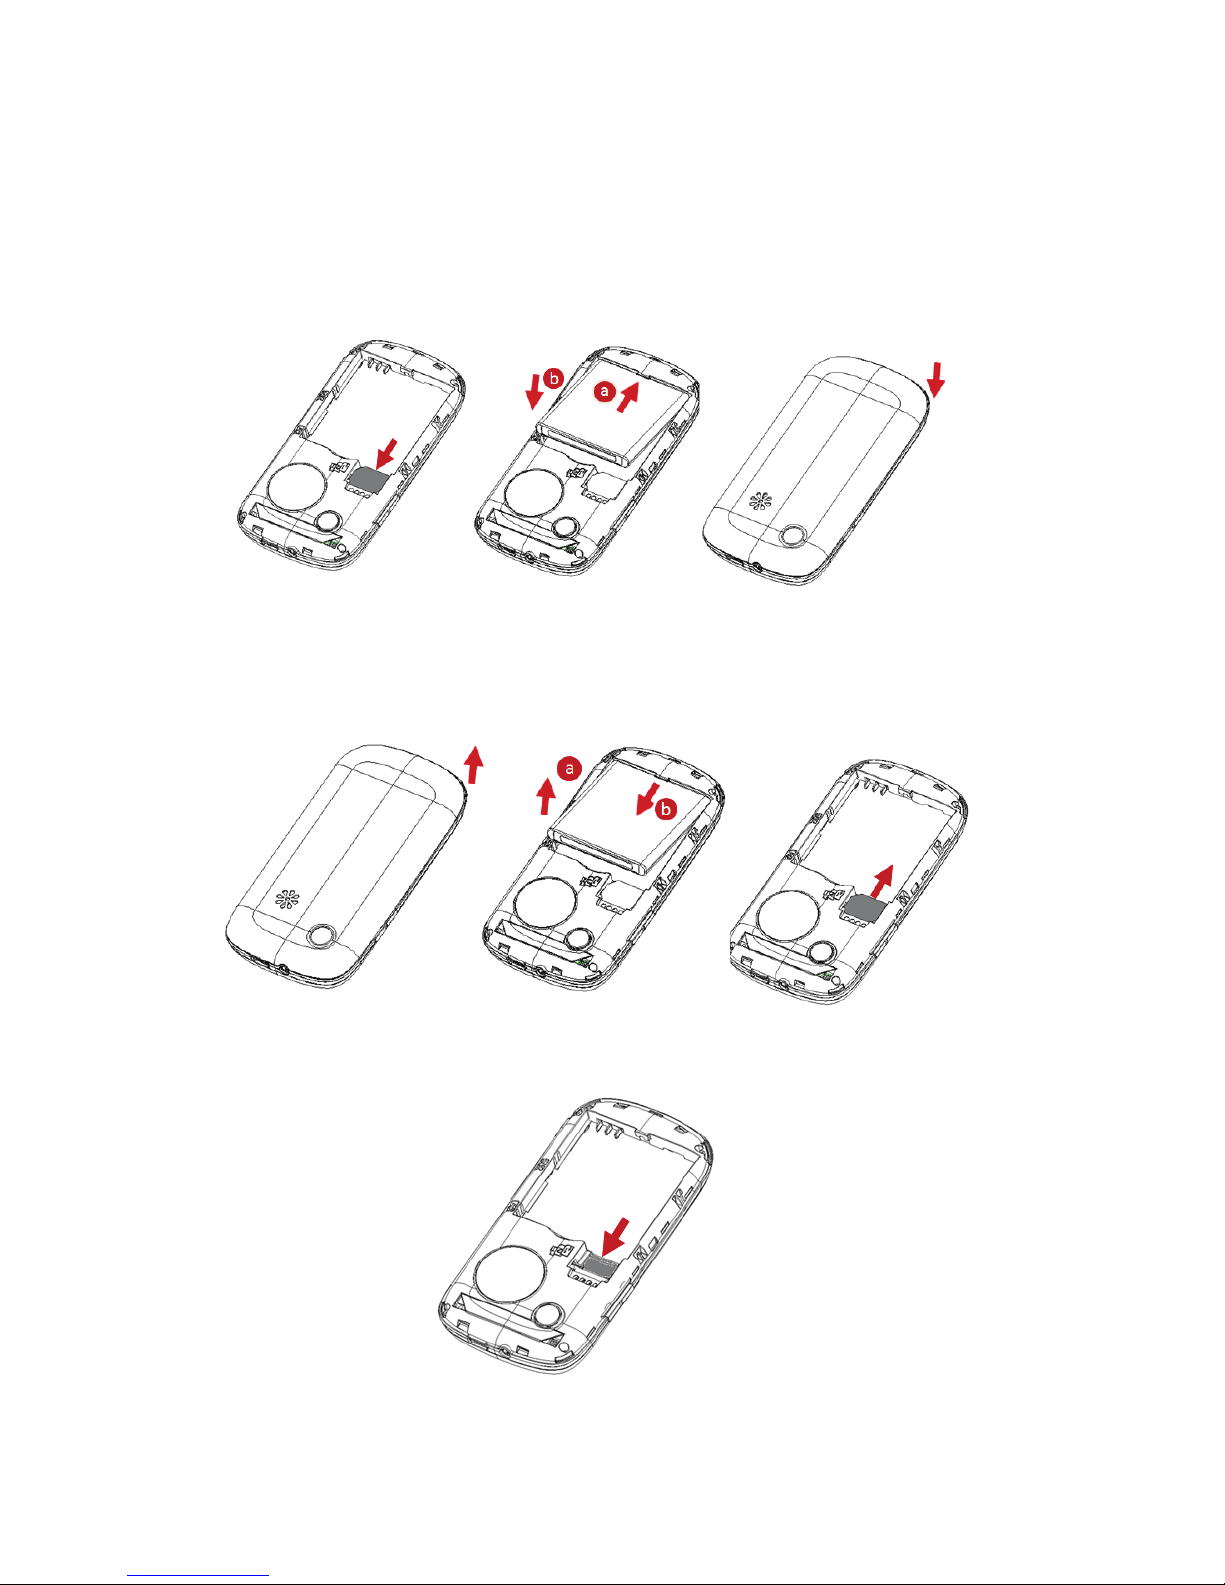
Installing the SIM Card and the Battery
Removing the Battery and the SIM Card
Installing the microSD Card
9
Page 11

Charging Battery
The battery at its initial condition is charged to 50% full, and can be used
after unwrapping.
While charging, the power supply indicator at phone’s screen icon zone
will flash in a rotation manner, if the phone is off while charging, a
charging screen will still appear, indicating that the phone is recharging. If
the phone is still being overused while the power supply is insufficient, the
recharging indicator will appear on the screen after the recharging has
started for a while.
When the power supply indicator at the screen’s icon zone shows full and
stops flashing, it means charging has completed. If it takes place when the
phone is off, the screen will display charging-finished icon. The process
generally takes about 2.5 hours. It is normal that the battery, the phone and
the charger will become hot during the charging process.
Once charging is completed, disconnect the phone and the charger from
the AC power supply.
Note: Battery must be charged in a well ventilated place with surrounding
temperature at -10 oC~ + 55 oC, and it is imperative that a charger provided
by manufacturer is used. Using unauthorized charger might cause danger,
which also violates warranty terms prescribed by the manufacturer. If the
charging temperature is too high or too low, the phone will automatically
give warning and stop charging, so as to prevent damages to battery.
Connecting to Network
SIM Card
A valid SIM (Subscriber Identity Module) card must be inserted in the
phone before using it.
10
Page 12

All information related to making connection to the network are
recorded in the chips of SIM card, including the names, phone numbers
and short messages you have stored in the SIM card Phone book. In
order to prevent loss or damage of the info in the SIM card, it is
necessary to avoid touching metal contact surface, and keep SIM card
far from electricity current and magnet.
Power On/Off Phone
To power on, please press and hold the End key. Then the screen will
display the prompts like Enter phone password, SIM card password in
sequential order as per the setting done by user. Once the appropriate
password is entered, the phone will search for network connection and
latch accordingly to the appropriate network.
To power off, please press and hold the End key.
PIN and PUK
To prevent illegal usage, PIN (Personal Identification Number) code is
adopted to encrypt for protection of your SIM card. Selecting this option
and if having set up PIN code protection, you have to enter PIN code
each time you power on the phone.
Press and hold the Power key to close the phone;
Enter PIN code, use clear to delete input-errors, Tap "OK" key for end.
For instance, if PIN setting is 1234, then enter the following input: 1 2 3 4 "OK".
If there are three consecutive input errors, your SIM card will be locked
up by the network, the phone will inquire PUK code.
Note: Your service provider will set up a standard PIN (4 to 8 digits)
number for your SIM card; you should change it into your private
11
Page 13

password as soon as possible. PUK code will be provided by the network
provider.
Phone Lock
The phone lock protects your phone from unauthorized use. The
default phone lock code is 1234. You can change it into any numeric
string of 4 to 8 digits.
If the phone lock function is enabled, you need to enter the correct
phone lock code when the phone is powered on or in the standby mode.
Locking The Screen
To unlock the screen, slip the unlock icon from left to right.
If the Auto Keypad Lock function is enabled and the phone is idle for a
preset period in standby mode, the keypad is locked automatically.
Note: When the keypad is locked, you can tap Dial icon to answer an
incoming call.
Connecting To Network
After SIM card is successfully unlocked, the phone will automatically
search available network (with searching showing on the screen). Once
the connection is made, the name of the service provider will be
displayed on the screen. At this time your phone has been connected to
the service network.
Note: If the screen prompts "Emergency ", this means you have moved
out of the normal network coverage (service range) or your card has not
passed authentication, but you can still transmit emergency calls based
on signal strength.
12
Page 14

BASIC FUNCTIONS
Making A Call
When the logo of service provider appears on the display screen, you
can dial or receive calls. The info bar at the upper left corner of the
display screen shows network signal strength (when there are 5 info
bars the signal is at its strongest).
The call quality is very likely to be affected by obstructions.
Making Domestic Calls
Enter phone number, and then Tap Dial icon to make the call. If the
user needs to change phone number, tap "Clear" back and delete
numbers. Dialing animation will be displayed on the screen during
dialing. Call state info will be shown on the screen after the called party
ends the call
You can enter and dial domestic call following the order:
(Area code) (Phone number) (Dial)
Dialing Extension Number Of Fixed-line Telephone
Some extension numbers of fixed-line telephone cannot be connected
directly, you must dial the power board phone number, then Tap “*”
icon to switch continually, until the screen displays "P", then dial
extension number.
You can dial extension numbers of fixed-line telephone in the following
order:
(Area code) (Phone number) P (Extension number) Send key
13
Page 15

Dialing International Calls
To make an international call, you may Tap “*” icon to switch
continually, till the screen displays the pre-digit symbol “+” for
international long distance call, which will enable you to make a call
from any country without knowing the local international access code.
You can enter numbers in the following sequence to make an
international call:
(+) (Country code) (complete phone number) (Send key)
After inputting prefix number, input the code and the complete phone
number of the wanted country. The country code follows usual practice,
such as Germany 49, UK 44, Sweden 46, India 91 etc.
Like making an international call, the "0" before city code number
should be dropped.
Dialing Phone Numbers In The Call Records
Every phone number you have dialed or received will be stored in the
list of phone call records. The latest dialed, received and missed
numbers will be listed, according to their types, in the respective menu
of dialed calls, received calls and missed calls. When call record list is
full, the old numbers will automatically be deleted. To view the list, do
the followings:
In standby state tap to view the record for all calls.
All phone numbers in the list can be dialed directly by Tap dial icon.
Emergency Calls
As long as in the network service range (which can be confirmed by
checking the signal strength bars on the top left corner of the screen),
14
Page 16

you can always call emergency service. If your network supplier does
not provide roaming service in your area, the screen will display
"Emergency", to inform you that only emergency call is permitted. If
you are within the network service range, you can also make
emergency calls even without the SIM card.
Answering A Call
An incoming call can be accepted with the single tap “Answer”. If
earphone has been connected, use the button on the earphone to
answer a call.
Call Records
Your phone can also store call records of the latest missed calls,
received calls, dialed calls, the time of last call as well as total amount
of received calls and total dialed calls for you.
Call Options
In call connected state, Tap “Options” can enter call option, or tap
"H-Free" to activate speaker, under activated-hands free condition, tap
“Normal” to power off speaker.
This call options can only be viewed during call process, moreover, the
functions of call waiting, call holding, and conference calls need
service support, please contact your service provider for details.
Conference*: Enter multiple party conference call state. By following the
prompts, you can have the following functions: receive waiting calls, add
them into multiple party call, maintain the multiple party call, talk
privately with one party of the conference while maintaining all other
callers, connect one party in the call conference with another party while
exiting the multiple party call oneself, maintain one party of the multiple
15
Page 17
party call and end current call and all other maintained calls.
Note: The menu marked * items will only appear in special
circumstances. For conference function, it is necessary to apply for
service supply to corresponding service operator.
USING THE MENUS
The phone offers a range of functions that allow you to tailor it to your needs.
These functions are arranged in menus and submenus which can be
accessed by scrolling or using the appropriate shortcut.
Accessing A Menu Function
1. Press Home key in standby mode.
2. Tap an application icon to enter the submenu.
Exiting A Menu Function
You can return to the previous menu level by press Home back key.
MAIN MENU
Menu guides you to the various applications, features and utilities
available in your device.
The Menu structure as follow:
Network services Messaging Call history
Settings Phonebook Game
Multimedia TV Fun &Games
My Files User Profiles Organizer
16
Page 18

NETWORK SERVICES
WAP
This service is support by OPERATOR, if you do not know whether your
SIM card supports, please connect with the OPERATOR for more
information.
Enter this service menu, you can choose:
1. Homepage – to enter the homepage via WAP web.
2. Bookmarks – to list all the book marks, you can edit them or enter
them directly.
3. Enter address – to enter the address you enter directly
4. Recent pages – to view recent pages
5. Settings – to set the WAP parameters, including Homepage,Select
profile,Data account,View options, Preference setup
Data Account
This sub-menu will give a list of GPRS access account data of the current
WAP setting file, by selecting one certain setup file, you can edit the
following contents of the GPRS access account data in the setting file:
Proxy Name: This enables editing and setup the name of account data file.
Access point of GPRS: Enter APN,
User Name: User identity of APN server, default is empty.
Password: Password necessary for APN server to recognize your
identity, the default value is empty.
Auth. Type: Selecting Normal or Secure by pressing right and left keys,
you can finish setting, thus setting up the authentication method
adopted in the WAP identity authentication.
17
Page 19

Messaging
1. Write Message
SMS
1. Enter Messaging>Write message>SMS.
2. Write text message.
3. Tap the [Options] and select the required items, including Send to,
Input method,Insert template,Advanced options and Save to Drafts.
4. After finishing,Tap the [Options] and select send to.
MMS
1. Enter Messaging>Write message>MMS.
2. Edit the content.
3. Tap the [Options] and select the items you want to send, including
Send to, Input method, Add picture/audio/video/subject and so on.
4. Tap the [Options] and select Send to.
2. Inbox
View received messages in Inbox sub-menu.
3. Outbox
Outbox save the records of Sending fail SMS/MMS.
4. Drafts
Drafts stores SMS/MMS unprepared for sending for future revision and sending.
5 Sent Message
The messages that you send successfully are all stored in the sent message.
18
Page 20

6. SMS Backup
You can backup text messages what you want.
7. Delete Message
Can choose delete meseeages from Inbox, Drafts, Outbox, Sent
messages or All messages.
8. Broadcast Message
Tap (Ok) to enter this menu, and to set the parameter according to
the menu hints.
This function needs support from the OPERATER, please connect
with them to activate this service.
9. Templates
You can edit some templates,when you edit a sms,you can insert a
template.
10. Message Setting
You can set SMS, MMS and Service message settings.
CALL HISTORY
No matter a call was incoming or you dialed, whether it was answered,
it will record in the corresponding list. For every call list, tap the
“Options” view the details (including Type, Phone number, Call
timestamp and Call times), there are other option menus you can
choose: View, Call, Send SMS,Send MMS, Save to phonebook,Add to
Blacklist, Edit before call, Delete and Delete all.
19
Page 21

SETTINGS
You can configure your cellular phone to best suit your usage
preferences.
Display Setting
1.1. Wallpaper – Set the wall paper image.
1.2. Screen saver – Set the screen saver status, waiting
1.3. Power on/off display – Change the power on /off display animation.
1.4. Show date / time – Show/hide date / time in standby mode.
1.5.Show owner number –Show/hide owner number in standy mode
1.6. Display Operator name – Show/hide SIM1/SIM2 operator name.
Phone Settings
2.1. Dual SIM Settings
Set the SIM card open or closed,there are three choices you can select,
there are Dual SIM open , Only SIM1 open and Only SIM2 open
2.2. Security Settings
2.2.1 SIM1 Security:
PIN lock The SIM1 card is protected against misuse
by the PIN code. SIM1 card lock may be
set after you enter the PIN code correctly.
Change PIN Set a new PIN code for SIM 1
Change PIN2 code Set new passwords, including SIM1 PIN
and SIM1 PIN2.
20
Page 22

2.2.2 SIM2 Security: For the detailed information of SIM2 security,
please refer to the contents in "SIM1 security ".
2.2.3.Phone Security
Phone Lock: When activated, this feature requires you to enter a
pre-set password everytime you switch on / power on your handset. It
protects your phone from unauthorized access.
Change password: Reset a new phone lock
Notes: The default password is 1234, please change it as soon as
possible after you get your mobile phone
2.2.4.Auto Keypad Lock
This allows you to setup an automatic keypad lock with delayed timer
options of off, 5 seconds, 30sec ,1min and 3min. When your phone is in idle
state for the chosen time period, the keypad will automatically be locked.
To unlock the keypad,you can sliding the phone idle screen lock.
2.3.Time And Date
You can set the home city, current time and date, and the format to show.
2.4. Schedule Power On/Off
To set the power on/power off as you like.
2.5. Language
To change the system language as you like.
2.6. Pref. Input Methods
To set the input method when you write messages, or edit character
strings, sometimes you also can change the method during editing via
‘input method’, but the preferred one is the default.
21
Page 23

2.7. LCD Settings
Set LCD brightness and backlight time.
2.8. Restore Factory Settings
This function allows you to reset the most of the phone setting to the
original setting when it is produced. The phone password is needed to
access this function. The default password is “1234”
2.9.Touch-Screen Calibration
Touch the screen to calibrate
2.10.Touch –Screen Vibration
To On/Off the touch vibration.
Call Settings
1. SIM 1/SIM 2 settings
To set the call parameter for SIM 1/SIM 2, you can see
Call waiting – Activate, Close or Query status
Call divert – Set the condition for divert
Call barring – set the condition for barring, and the password
2. Reply by SMS
set on/off
3. Low Battery Protect
set on/off
4. Advance settings
Blacklist --- set on/off
22
Page 24

Auto redial --- set on/off
Call time reminder---To set the reminder time as none, single or
periodic, when select periodic, you should enter the period (from 30
to 60 seconds).
Answer mode--- Set answer mode.
Network Settings
This feature allows you to automatically or manually choose your
network operator.
Bluetooth
Activate Bluetooth:on/off Bluetooth function.when the Bluetooth is on,
main LCD interface status bar will display the Bluetooth icon.
This devices is visible: whether the device can be searcher.
Search for Bluetooth device: show the devices which had matched with
my device.
Search hands-free device: show the devices which is hands-free.
Host device name: Show device name.
Advanced options: Include the following
Set audio path: set up voice to transfer path for Bluetooth headset or
remain in the machine.
Storage: set up the storage,such as phone, memory card,or always ask.
Bluetooth device address: show my address.
PHONEBOOK
The contact list should be shown in a list, the first line is (Add new
23
Page 25

contact), tap (Options) should be:
1. Select
Add new contact,you can add a new number record to SIM card or
phone in Phonebook.
2. Phonebook settings
The options such as memory status, or preferred storage are available.
Display phonebook: can choose SIM1/2 , Cell-phone or all.
Speed dial:Set on/off and speed dail number.
My card:edit my card,or send my card.
Other numbers:set SIM1/SIM2 owner number and fixed dail.
Memory status: can inquiry a local or the SIM card for the phone
book of records as well as storage space has been occupied
Copy phonebook: can choose from phone or SIM1/2.
Move phonebook: can choose from phone or SIM1/2.
Delete phonebook: can choose from phone or SIM1/2.
Phonebook Backup:Backup you contacts to the phone or memory card
Note: When phone number records are stored in SIM card, only record the
info of name and phone number.
GAMES
There is one build-in game in you mobile,It is named Puzzle.before you
enjoy it,you can set the background music whether or not to open and
set the volume.
24
Page 26

MULTIMEDIA
Music Player
1. Select Menu >Multimedia >Music player
2. Tap play key to play music; Forward or rewind key to switch songs.
Tap + for volume up & - for volume down.
Tap Back key to return to the main menu.
Camera
1. Select Menu > Multimedia > Camera
2. Tap camera icon to take photos.Tap (Back) to save the photo and to
take another photos.
3. In camera preview state, Tap (Options) to do some settings, such as
Image Album, Camera settings, Image settings, White balance, etc.
Video Player
1. Select Menu > Multimedia > Video player.
2. Select a video file,tap this video for play.
3. You can do as follows when the video is being played:
Tap + key for volume up & - key for volume down.
Tap stop icon to pause/continue.
Forward or rewind key to switch to fast forward or rewind.
4. Tap (Back) to stop playing the video.
Video Recorder
1. Select Menu > Multimedia >Video recorder
2. Tap dot icon to film or pause a video, tap (stop) to stop filming.After
filming,it will inquire whehter need to save, choose “Yes” for save.
25
Page 27

3. Tap (Options), and select Camcorder settings, Video settings, Effect
settings, Storage and so on.
FM Radio
1. Select Menu > Multimedia > FM radio
2. Please plug in the earphone.After loading, the phone plays a
program.
3. On the FM Radio screen, you can do as follows:
Tap + for volume up & - for volume down.
Tap icon to ON/OFF the radio.
Slip icon to adjust the search.
FM recording: Tap dot icon to recording.
Tap dot icon again to pause.
Tap Back key to return to the main menu.
Sound Recorder
1. Select Menu > Multimedia > Sound recorder.
2. Tap dot icon to record. Tap dot icon again to pause/continue.
Image Album
1. Select Menu > Multimedia > Image Album.
2. Tap (Options) and select view, browse style,send, use as,
rename,delete,sort by and so on.
TV
When you first time to enter the TV,maybe you need to set the location
then search the channel.
In the TV play interface,you can select the option.
26
Page 28

To video player:Enter the video player
Location select:To select you location
Search: search the channel
Storage: to select the storage location of recording the TV files.
Mute:to set the TV whether mute.
Backlight set:set the TV backlight.
FUN & GAMES
To open the SkyBuddy ,then you can download some applications you like.
MY FILES
To view the file folders in system storage (phone or memory card), In
every folder, Press OK Key and select Open, New folder, Rename,
Delete and Sort by.
USER PROFILES
There are 5 profiles for you to select one as current profile:
General / Meeting / Outdoor / Silent mode /5 My style
In every profile item, press (Options) to enter Activate, Customize and Reset.
In Customize, you can choose:Alert type,Ring type,SIM1/ SIM2
incoming,Ringtone volume,SIM1/SIM2 message, Message volume,
Keypad, Keytone volume, Power on/off and System alert.
27
Page 29

ORGANIZER
Alarms
You can set five types of alarm clock time if required. Then the alarm
icon will be displayed on the idle screen.
Scroll to an alarm and select Edit for settings. You can set whether to
enable the alarm, the ring time, ring mode, alarm tone, snooze
minutes and alert type
Calculator
The handset is provided with a calculator with basic functions. You can
carry out the operation for plus, minus, multiply, and divide by pressing
the keypad.
Calendar
In the calendar interface, point the finger touched the day, you can
touch the arrow above, jump to a different year or month.
Jump to date Enter a specific date to be located and
the cursor will jump to the date quickly.
Go to today Enter the system current time period
INPUT METHOD
Entering (ABC and abc)
In the "ABC" or "abc" input mode, you can press a key labeled the
desired letters once to enter the first letter on the key, twice to enter
the second letter on the key, and so on.
28
Page 30

Entering Numbers
In the "123" input mode, press a key labeled the desired number.
In the "ABC" or "abc" input mode, press a numeric key repeatedly until
the desired number appears on the screen.
Entering Symbols
To any input modes, press * key to display a symbol list.
CARE AND MAINTENANCE
Your device is a product of superior design and craftsmanship and
should be treated with care. The suggestions below will help you
protect your warranty coverage and enjoy your device for many years.
Do not use or store the device in dusty, dirty areas.
Do not store the device in hot/cold areas.
Do not contact the device with wet hands while charging. The electric
current may strike and damage it.
Do not attempt to open the device other than as instructed in this guide.
Do not drop, knock, or shake the device. Rough handling can break
internal circuit boards and fine mechanics.
Do not use harsh chemicals, cleaning solvents, or strong detergents to
clean the device.
Do not paint the device.
If the device is not working properly, take it to the nearest authorized
service facility for service.
29
Page 31

WARRANTY MANUAL
One-Year Repair Warranty for O+ Mobile Phone
O+ warrants that this mobile phone (‘Product”) is free from defects in
material and workmanship that result in Product failure during normal
usage, according to the following terms and conditions:
1. One-Year Repair Warranty is give to the consumer for this product
and starts on the date it was purchased.
2. The One-Year Repair Warranty extends only to the original
purchaser of the Product (Consumer”) and is not transferable or
assignable to any subsequent purchaser or end-user.
3. During the One-Year Repair Warranty, O+ will repair or replace
device base on O+ diagnosis. O+ will also repair or replace parts
that do not function properly for their intended use because of
product failure or malfunction during normal usage.
4. Defects in appearance, cosmetic, decorative or structural
(Framing/Housing) and any non-operative parts are not covered by
the One-Year Repair Warranty.
5. O+ shall not be liable for any other losses or damages. These remedies
are the Consumer’s exclusive remedies for breach of warranty.
6. Consumer must be able to provide the dated bill of sale or dated
itemized receipt together with the warranty card once requested by O+.
7. The Consumer shall have no coverage or benefits under this One-Year
Repair Warranty if any of the following conditions are applicable:
a) The Product has been damaged by external causes such as
collision with an object, or from fire, flooding, sand, dirt,
windstorm, lightning, earthquake or damage from exposure to
weather conditions, Act of Nature, or battery leakage, theft,
30
Page 32

blown fuse, or improper use of any electrical source, or damage
caused by the connection to other products not recommended
for interconnection by O+.
b) The Product has been subject to abnormal use, abnormal
conditions, improper storage, exposure to moisture or
dampness, unauthorized modifications, unauthorized
connections, unauthorized repair, misuse, neglect, abuse,
accident, alteration, improper installation, or other acts which
are not initiated by O+, including damage caused by shipping.
c) The defect or damage was caused by the defective function of
the cellular system or by inadequate signal reception by the
external antenna.
d) The Product’s Warranty Seal, Serial number sticker has been
removed, defaced or altered.
9. Consumer shall take the following step-by-step procedure if a
problem occurs during the One-Year Repair Warranty:
a) Consumer shall have 2 options, 1st return the Product (“Mobile
Phone”) to the Dealer and 2nd Call the Service Center for repair
or replacement processing. The number is found in the leaflet
inside the box.
b) The Consumer will be billed for any parts or labor charges not
covered by the One-Year Repair Warranty. The Consumer will be
responsible for any expenses related to reinstallation of the Product.
c) If the Product is returned to O+ during the Repair warranty
period, but the problem with the Product is not covered under
the terms and conditions of the One-Year Repair Warranty, the
Consumer will be notified and given an estimate for the charges.
Once the consumer agreed to the given amount, only then O+
31
Page 33

will proceed with the repair. If the Product is returned to O+ after
the expiration of the Repair warranty period, O+ normal service
policies shall apply and the Consumer will be responsible for all
charges.
10. Any implied warranty of merchantability, or fitness for a particular
purpose or use, shall be Repair to the duration of the foregoing
Repair written warranty. Otherwise, the foregoing Repair warranty
is the Consumer’s sole and exclusive remedy and is in lieu of all
other warranties, express or implied. O+ shall not be liable for
special, incidental or consequential damages, including but not
Repair to, loss of anticipated benefits or profits, loss of savings or
revenue, punitive damages, loss of the product or any associated
equipment or facilities, downtime, the claims of any third parties,
including customers, and injury to property, resulting from the
purchase or use of the product or arising from breach of the
warranty, breach of contract, negligence, strict tort, or any other
legal or equitable theory, even if O+ knew of the likelihood of such
damages. O+ shall not be liable for delay in rendering service
under the One-Year Repair Warranty or loss of use during the
period that the product is being repaired.
11. O+ neither assumes nor authorizes any authorized service center
or any other person or entity to assume for any other obligation or
liability beyond that which is expressly provided for in this Repair
warranty including the provider or seller of any extended warranty
or service agreement.
12. This is the entire warranty between O+ and the Consumer, and
supersedes all prior and contemporaneous agreements or
understandings, oral or written, and all communications relating to
the Product, and no representation, promise or condition not
contained herein shall modify these terms.
32
Page 34

13. Questions concerning this Repair warranty may be directed to O+
Service Hotlines.
14. O+ reserves the right to withdraw or change the policies and
procedures, written in the Warranty Manual at any time, for any
reason, and without prior notice.
33
Page 35

 Loading...