

Page 1
USER MANUAL
Page 2

CONTENTS
PREFACE 4
ATTENTIONANDPRECAUTIONS 4
For your Safety 4
Security Requirements 6
Maintenance 8
SPECIFICATIONS 11
KEYSANDPARTS 11
GETTINGSTARTED 13
Battery 13
Removing and Inserting Battery 13
Charging the battery 15
Connecting to Network 16
SIM Card 16
Inserting and Removing the SIM Card 16
Inserting and Removing the Memory Card 17
Switch ON/OFF 18
Unlock SIM card 18
LINKINGTOTHENETWORKSANDDEVICES 20
Connecting to Mobile networks 20
Connecting to Wi-Fi networks 20
Connecting to Bluetooth devices 21
Connecting to a Computer via USB 22
BASICFUNCTIONS 22
1
Page 3

2
Making Calls 22
Making Domestic Calls 23
Making International Calls 23
Emergency Calls 24
Answering Calls 24
FUNCTIONMENUINSTRUCTION 24
Browser 24
Calculator 25
Calendar 25
Camera 26
Clock 26
Contacts 27
E-mail 28
File Manager 29
FM Radio 29
Gallery 29
Gmail 30
Google+ 30
Google Search 30
Notes 31
Messaging 31
Messenger 32
Movies 32
Music 32
Phone 33
Play Store 33
Page 4

3
Settings 33
SIM Management 34
Wireless & networks 34
Call Settings 34
Audio proles 34
Display 35
Security 35
Applications 35
Accounts & sync 35
Privacy 36
Storage 36
Language & keyboard 36
Accessibility 36
Date & time 37
Shedule power on/off 37
About phone 37
SIM Toolkit 37
Sound Recorder 38
Talk 38
Voice Search 38
Facebook 38
INPUTTEXT 39
WARRANTYMANUAL 39
Page 5
4
PREFACE
Thank you very much for choosing this product!
The policies and procedures outlined in this
user manual will be applied at the discretion
of O+. O+ reserves the right to deviate from
the policies, procedures, benets, and
working conditions described in this user
manual. Furthermore, the Company reserves
the right to withdraw or change the policies,
procedures, benets, and working conditions
described in this user manual at any time, for
any reason, and without prior notice.
ATTENTIONANDPRECAUTIONS
Foryoursafety
Remember to comply with legal
requirements and local restrictions
when using the phone, for example,
in aircraft, petrol stations, in hospitals
or near medical equipments. Obey all
instructions in restricted areas.
Always keep your hands free to operate
the vehicle while driving. Your rst
consideration while driving should be
Page 6
5
road safety. Don’t use handset while
driving.
As per the law, phone should not be
used at refueling point, near fuel,
chemicals, or blasting area.
Mobile phones can interfere with the
functioning of medical devices such
as hearing aids or pacemakers. Keep
at least 20 cm. (9 inches) between the
phone and pacemaker. When using the
mobile phone hold it to the ear which is
furthest away from the pacemaker. For
more information, consult your doctor.
All wireless phones may be susceptible
to interference, which could affect
performance. The phone may cause
interference in the vicinity of TV sets,
radios and PCs.
The main voltage (V) specied on
the power supply unit must not be
exceeded. Otherwise the charging
device may be damaged.
Page 7
6
The power supply must be plugged
into an easily accessible AC main
power socket when charging the
battery. The only way to turn off the
charging device after charging the
battery is to unplug it.
Only qualied personnel may install or
repair this product.
Your device is not water-resistant.
Keep it dry.
When connecting to any other product,
read its user guide for detailed
safety instructions. Do not connect
incompatible products.
Use only approved enhancements and
batteries. Do not connect incompatible
products.
SecurityRequirements
Before making or answering a call, you should
Page 8

7
pay attention to the local laws about the use
of wireless mobile phones and take them into
account in practical use.
Trafficsafety
Pay attention to trafc safety. Do not use your
mobile phone while driving.
Park your vehicle before making or answering
a call.
FlightSafety
Please turn off your GSM mobile phone before
the airplane takes off in order to protect
airplane’s communication system from
interference.
Using mobile phone before the plane taking off
should get aircrew’s permission according to
safety regulations.
EnvironmentSafety
Do not use your mobile phone near precision
electronic equipment. Radio wave interference
may cause malfunctioning of such electronic
equipment and other problems.
Page 9

8
Operating of mobile phone may interfere
with medical devices like hearing aids and
pacemakers.
Do not use your phone in a potentially
dangerous atmosphere. Please strictly
observe with the restrictions on the use of
wireless devices.
Maintenance
Batteryinstructions
When the phone automatically turns off or
indicates the alarm information of power
shortage, please charge the battery in time.
For the rst few times, please charge the
battery fully.
When not in use, please separate the battery
with power supply. Overcharging may shorten
the life cycle of the battery. If left unused, a fully
charged battery will lose its charge over time.
Do not expose your products to extreme high
or low temperatures. Extreme temperatures
Page 10

9
reduce the capacity and lifetime of the battery.
A device with a hot or cold battery may not
work temporarily.
Caution:
Risk of explosion if battery replaced by an
incorrect type.
Dispose of used batteries according to the
instructions.
Operating temperature range: -10 ºC ~ +55 ºC.
Do not use damaged battery.
Do not expose your mobile phone to direct
sunlight or in hot areas.
High temperatures can shorten the life of
electronic devices.
Do not expose the battery into re or throw
it away. Return the wear-out battery to the
provider or recycle when possible. Do not
dispose as household waste.
Page 11

10
Follow these guidelines to protect your
products:
Keep the products out of reach of small
children.
Keep your product dry. Do not expose it to
liquid or moisture.
Do not short-circuit the battery, as this can
cause excessive heat as it may explode.
Do not expose your mobile phone to direct
sunlight or in hot areas. High temperatures
can shorten the life of electronic devices.
Do not attempt to disassemble the mobile
phone and battery by yourself. Non-expert
handling of the devices may damage them.
Never use a damaged battery or charger. Only
use the charger indoors.
Page 12
11
SPECIFICATIONS
Display: 3.5” HVGA, 320*480 Resolution
Capacitive Touch Screen
CPU: Single Core 1GHz
RAM: 256MB
Internal Storage: NAND 512MB+256 MB DDR
Expansion Memory: up to 16GB
Built-In Wireless: 802.11b/g/n
KEYSANDPARTS
Page 13
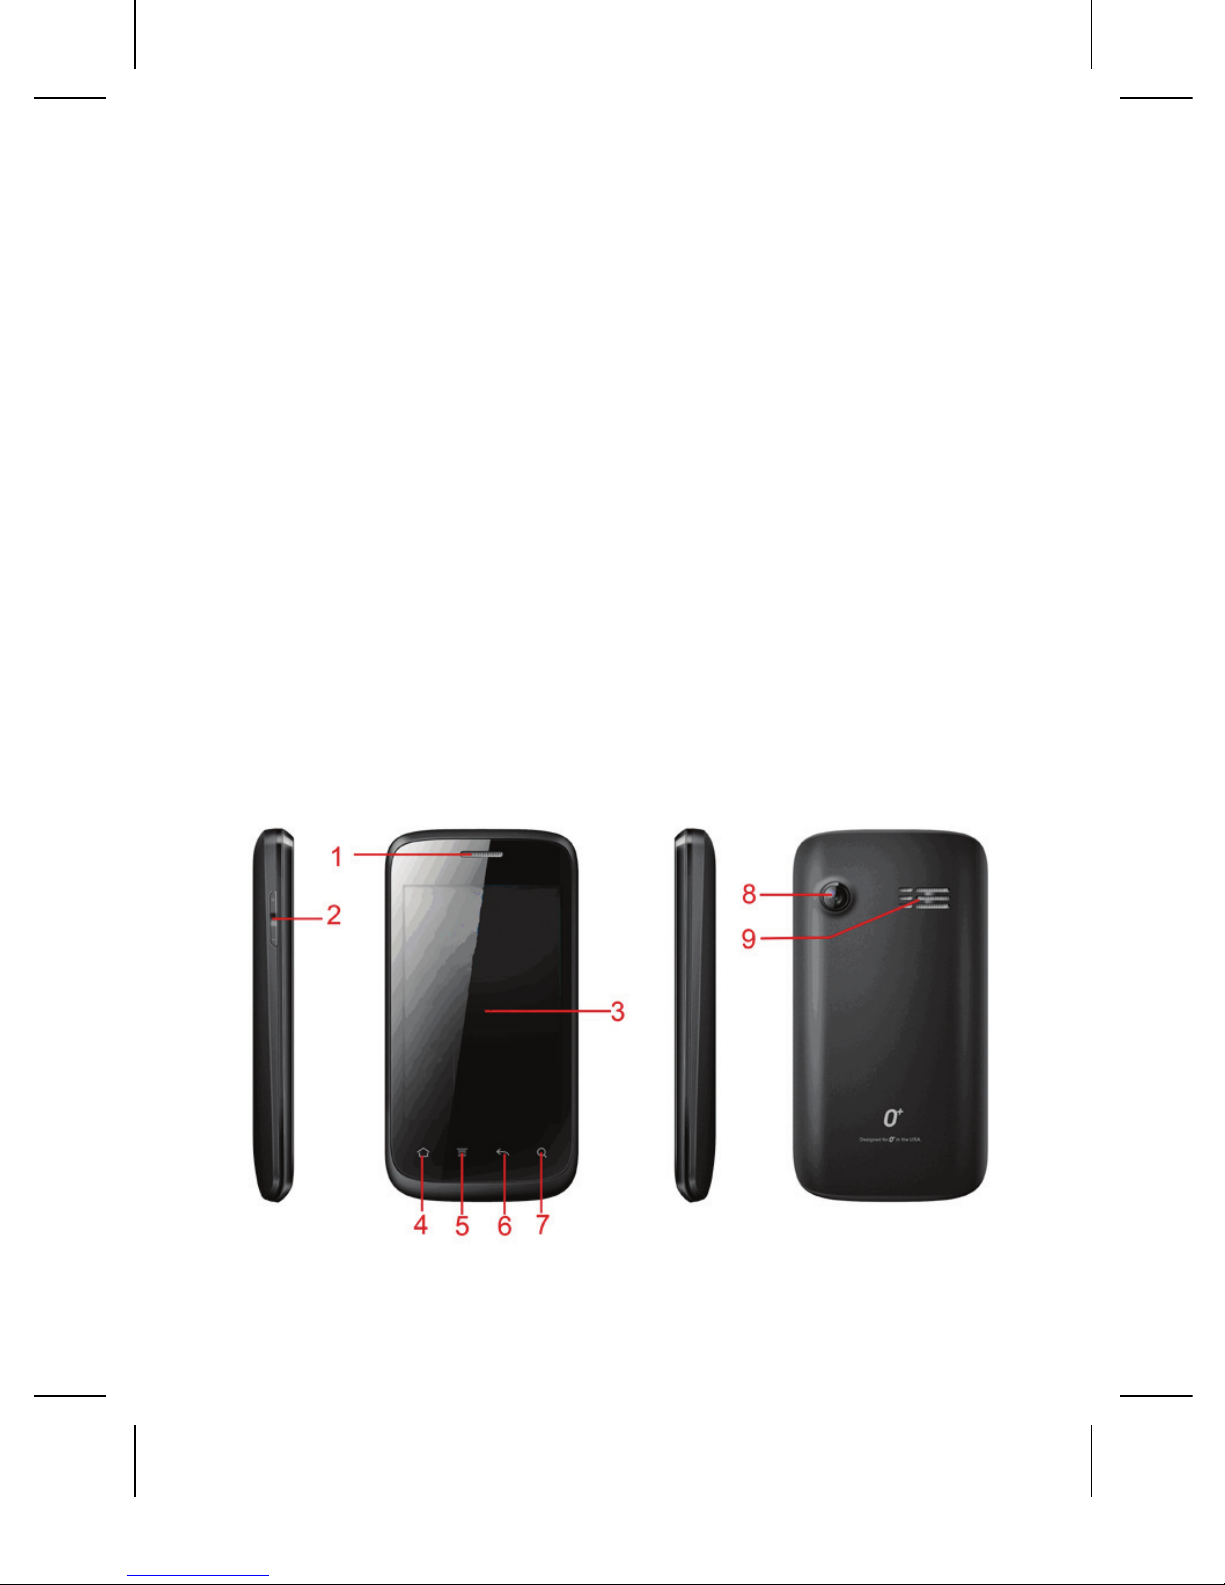
12
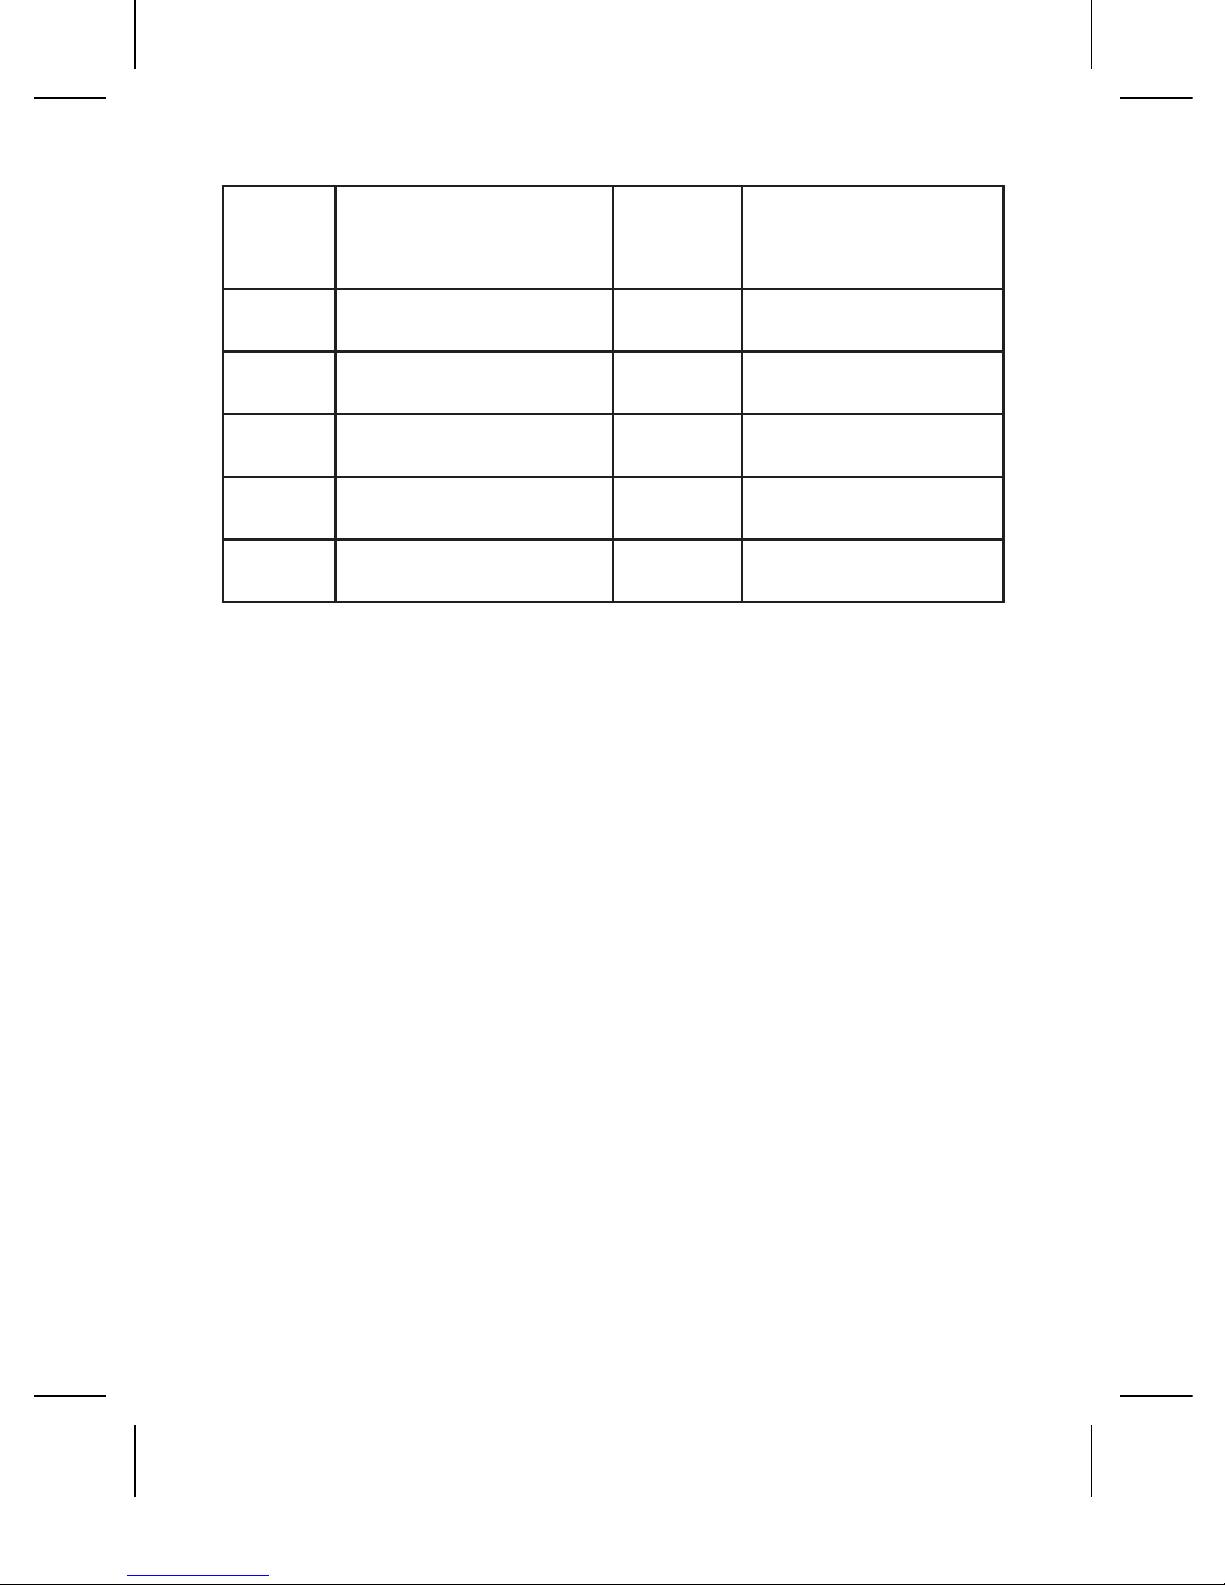
No. Key Description No. Key
Description
1 Earpiece 6 Back key
2 Volume +/- key 7 Search key
3 Screen 8 Camera
4 Home key 9 Speaker
5 Menu key
Power Key - To power on/off phone, press
and hold power key for a few seconds on top
of your phone. When phone is ON, press the
power key once to activate or deactivate the
screen.
Volume+/-keys- Press Volume Up/Down key
to change the volume.
Home key - Touch the key to return to the
home screen. In idle screen, touch and hold
the key to view recently accessed features.
Menu Key - In standby mode, touch the key
to set Wallpaper, Manage apps and access to
Page 14

13
System. Press menu key to view menu options.
BackKey- Press back key to open the previous
screen you were working on.
Search Key - In standby mode, tap to open
search page. In many applications, it activates
a search box to search within the application.
GETTINGSTARTED
Battery
RemovingandInsertingtheBattery
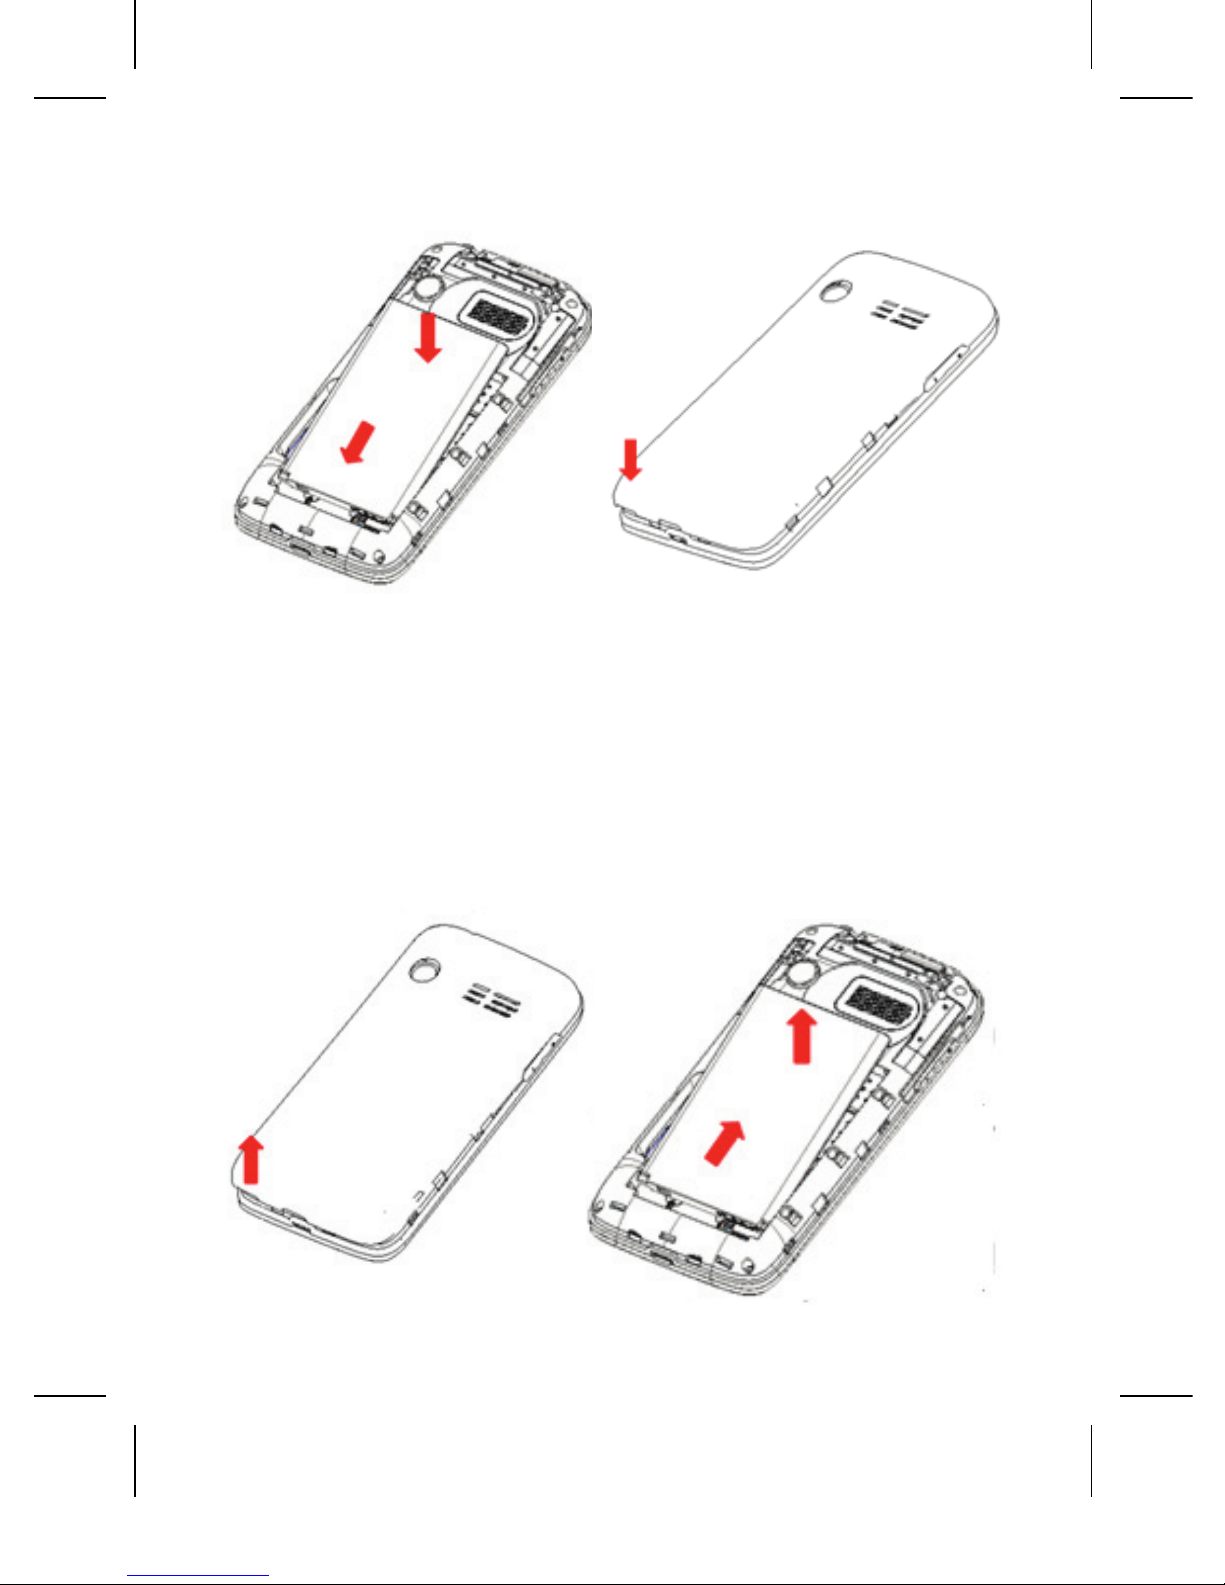
Followthefollowingstepstoinsertthebattery:
1. Open the battery cover on the back of your
phone.
2. Align the battery’s contact points with
those of the phone and gently press the
battery down into place.
3. Close the back cover.
Page 15
14
Inserting the battery Closing the Back Cover
Followthefollowingstepstoremovethebattery:
1. Switch off your phone.
2. Open the battery cover.
3. Lift the battery up.
Open the Back Cover Removing the Battery
Page 16

15
ChargingtheBattery
During charging, the battery indicator on the
phone is a thunder icon. If the device is switched
off during the charge, there will still be a charge
indication on the screen that shows the phone
is still being charged. If the device is overused
when the battery is low, it might take some time
to appear the charging icon.
When the battery indicator on the screen
says ‘fully charged’, then thunder icon will
disappear, which means the completion of
charging. If the phone is switched off during
charging, the screen will have a ‘fully charged’
scene. It generally takes 4 hours to charge
the battery. During charging, the battery, the
device and the charger will get hot. This is
normal.
Unplug the charger from the electrical outlet
and disconnect the wiring between the phone
and the charger after charging.
Attention: Charge the phone in a well
ventilated place in which the temperature
Page 17

16
is from-10oC to +55 oC. Use the charger
provided by the manufacturer only. The use of
unconrmed charger may lead to dangers and
violate the manufacturer’s warranty clause. If
the temperature is too high or too low during
the charge, the device will automatically send
a warning and stop charging to avoid damage
to the battery or any danger.
ConnectingtoNetwork
SIMCard
Insert valid SIM card (Subscriber Identity
Module) before using the device.
All information related to the reach of the
network is recorded in the chip of SIM card,
including the name, phone number and
messages stored in the SIM card contacts.
In case of losing or damaging SIM card
information, users should avoid touching the
metal touching side and keep SIM card away
from electrical and magnetic eld.
InsertingandRemovingtheSIMCard
Switch off the device, and remove the battery
and other external power supply.
Page 18
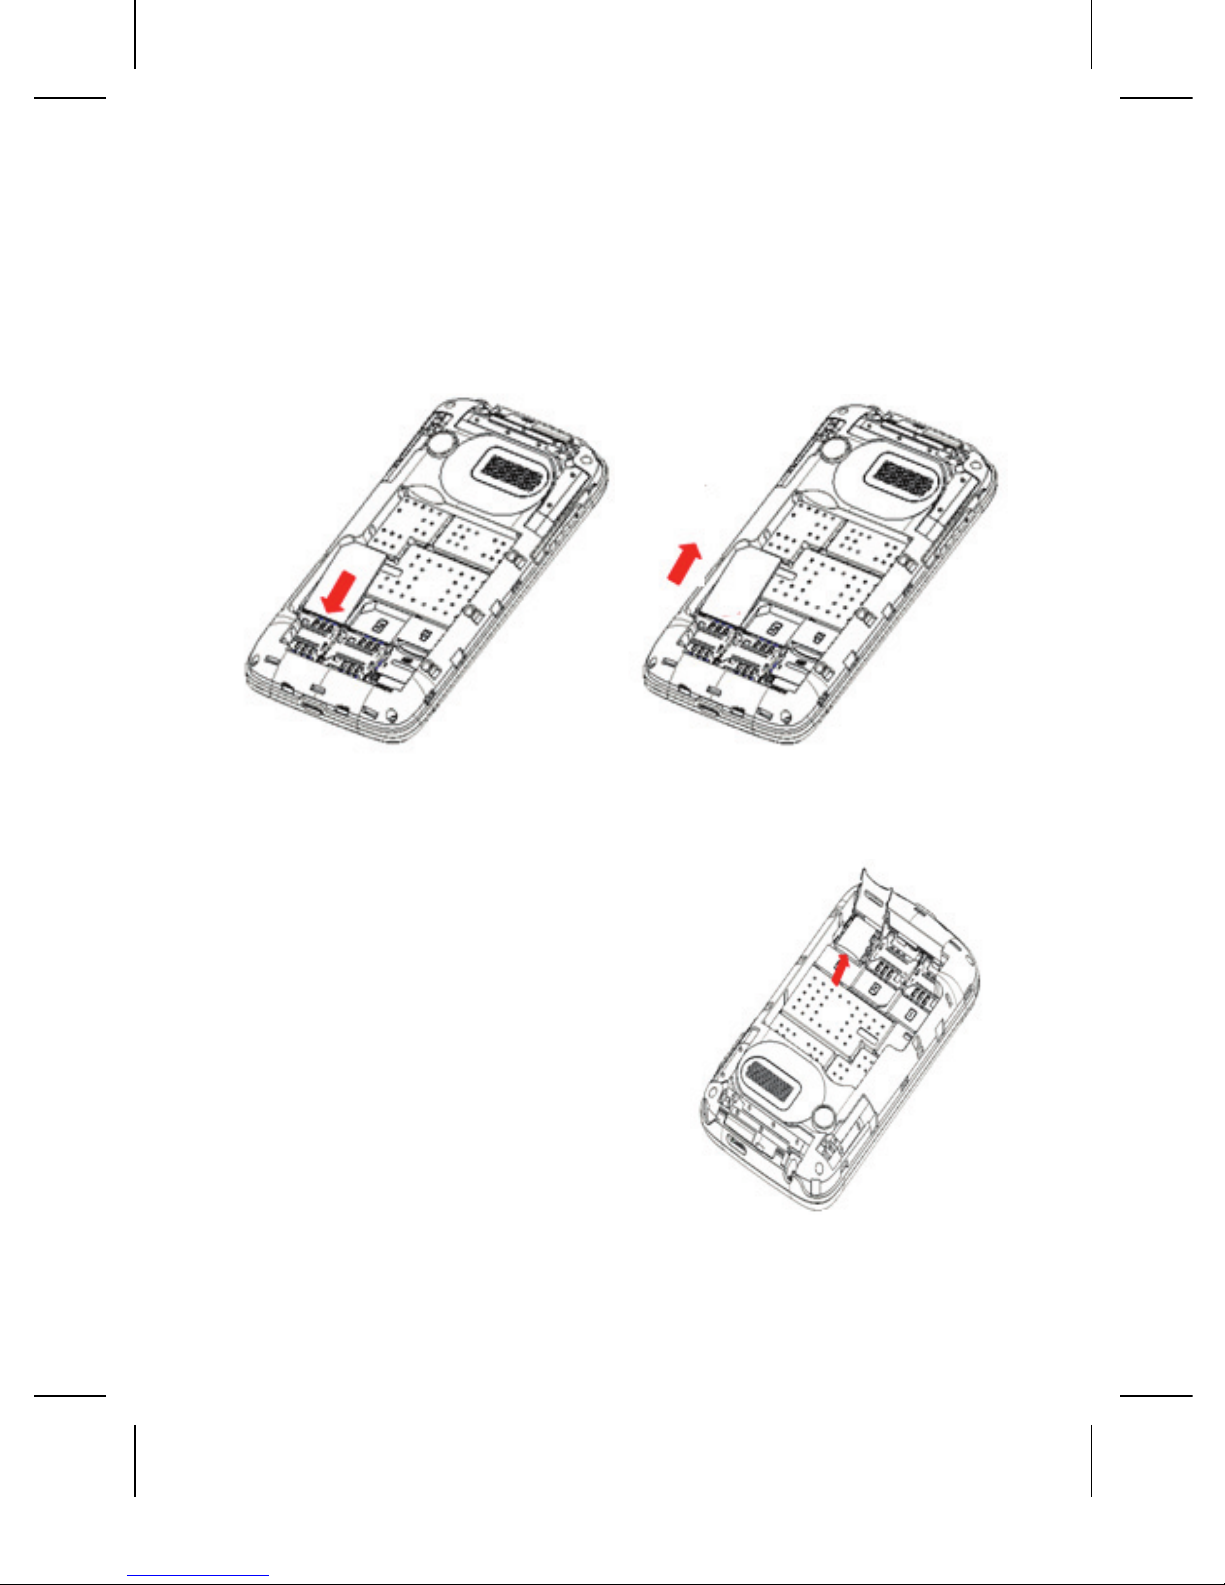
Insert the SIM card into the card slot.
Please switch off the phone and remove the
battery before removing the SIM card.
Inserting the SIM card Removing the SIM card
InsertingandRemovingtheMemoryCard
Switch off the handset.
Remove the battery cover.
Slide up the memory
card holder to unlock it.
Inserting and Removing
the Memory Card
Lift the memory card holder to open the slot.
Insert the memory card into the slot.
17
Page 19

18
Attention: This handset doesn’t support the
hot-swap of memory card. When you want to
remove the inserted memory card, you need
to switch off the device rst. Otherwise, it may
damage your memory card.
SwitchON/OFF
Do a long press the Switch on/off key to switch
on/off the phone.
If inserting the SIM card, the screen will show
the notes in the following order when the
phone is switched on:
Type in PIN— if you have already set the SIM code.
Search— the handset will be searching for
proper network connection.
UnlockSIMCard
To avoid illegal use, the SIM card is enciphered
with PIN (Personal Identication Number) as
a protection. When this function is ON and you
have already set a PIN code, you need to type in
PIN code every time, the handset is switched on
in order to unlock SIM card and use the handset.
Page 20

19
You can turn off the SIM PIN code. Yet in this
situation, the SIM card can’t prevent illegal use.
Input PIN code, press arrowhead icon to erase
typing error and press OK to end typing. For
example, if the PIN code is set as 1234, then
type “1234” then press OK.
The SIM card will be locked if you type in wrong
code. The handset will inform you to type in
PUK code.
Attention: Your network provider will set a
standard PIN code (four to eight numbers)
for your SIM card. It is recommended that you
change the code into a personal code as soon
as possible.
When the SIM card is successfully unlocked,
the handset will automatically search for
available network (the lock screen shows
searching). The handset will show the
information of the network provider; the
status bar will show the signal strength and
the network condition once the handset is
successfully connected to a network.
Page 21

20
LINKING TO THE NETWORKS AND
DEVICES
Your phone can connect to a variety of
networks and devices, including mobile
networks for voice and data transmission, WiFi data networks, and Bluetooth devices. You
can also connect your phone to a computer, to
transfer les from your phone memory card
and share your phone mobile data connection
via USB.
ConnectingtoMobilenetworks
When you assemble your phone with a SIM
card, your phone is congured to use your
provider’s mobile networks for voice calls and
for transmitting data.
ConnectingtoWi-Finetworks
Wi-Fi is a wireless networking technology
that can provide Internet access at distances
of up to 100 meters, depending on the Wi-Fi
router and your surroundings. Touch Settings
> Wireless & networks > Wi-Fi settings.
Check Wi-Fi to turn it on. The phone scans
for available Wi-Fi networks and displays the
Page 22

21
names of those it nds. Secured networks are
indicated with a Lock icon.
Note: If the phone nds a network that you
connected to previously, it connects to it.
Touch a network to connect to it. If the
network is open, you are prompted to conrm
that you want to connect to that network by
touching Connect. If the network is secured,
you’re prompted to enter a password or other
credentials.
ConnectingtoBluetoothdevices
Bluetooth is a short-range wireless
communications technology that devices can
use to exchange information over a distance of
about 8 meters. The most common Bluetooth
devices are headphones for making calls or
listening to music, hands-free kits for cars,
and other portable devices, including laptops
and cell phones. Touch Settings > Wireless
& networks > Bluetooth settings. Check
Bluetooth to turn it on.
You must pair your phone with a device before
Page 23

22
you can connect to it. Once you pair your phone
with a device, they stay paired unless you
unpair them.
Your phone scans and displays the IDs of all
available Bluetooth devices in range. If the
device you want to pair was not in the list,
make it discoverable.
ConnectingtoaComputerviaUSB
You can connect your phone to a computer
with a USB cable, to transfer music, pictures,
and other les between your phone memory
card and computer.
BASICFUNCTIONS
MakingCalls
When the network provider icon appears on
the standby screen, you can call out or answer
calls. The indicator on the upper right part
shall show the signal strength.
Quality of connection will be greatly inuenced
by obstructions. So movement in a small range
may effectively improve the quality of connection.
Page 24

23
MakingDomesticCalls
Use virtual keyboard to enter phone numbers
and then press Dial icon to call. If you need to
change the phone number, please press the
delete key on the touch screen to delete. When
the call is answered, the screen shall show the
connection status.
MakingInternationalCalls
If you need to make an international call,
do a long press on the 0 key on the virtual
keyboard until there appears the sign “+” for
international call prex, which helps you call
from any country even if you don’t know the
international call prex of that country.
You can make an international call according
to the following typing order: + > country code
> complete phone number > Dialing icon (type
in the prex code, and then enter the country
code and complete phone number). Country
code usually follows conventional practice:
German is 49, Britain 44, Sweden 46 and so on.
When making international phone calls, the
“0” in the city code should be emitted.
Page 25

24
EmergencyCalls
You can call for emergency service as long as
you are in the network coverage (check the
signal strength indication bar on the upper
right side of the handset screen). If your
network provider doesn’t provide roaming
service in this area, there will be “Emergency
Calls” on the lock screen. If you are in the
network coverage, you can have emergency
calls even without a SIM card.
AnsweringCalls
Slide to the right to answer an incoming call.
FUNCTIONMENUINSTRUCTION
Select
to enter the main menu.
This also allows you to view a list of features
available in your phone.
Browser
Your mobile phone comes with a browser. You
can use Browser to access and browse the
Internet.
Page 26

25
Calculator
The handset is provided with a calculator
with basic functions. Use the calculator to
solve simple arithmetic problems or use its
advanced operators to solve more complex
equations.
Touch Calculator to open the application.
Switching to the advanced panel on the
Calculator screen, slide the screen to the right
or left to switch between advanced panel and
basic panel.
In the calculator screen, you can touch menu
icon to clear history or access advanced panel.
Attention: the accuracy is limited and roundoff error may occur.
Calendar
Use Calendar to create and manage events,
meetings, and appointments. Depending on
your synchronization settings, the calendar on
your phone stays in synchronization with your
calendar on the web.
Page 27

26
Press the touch screen to browse date and the
calendar information on the screen shall be
correspondingly updated.
Camera
Camera is a combination of camera and
camcorder that you use to shoot and share
pictures and videos.
Touch the Camera icon in the main menu
interface or on the home screen. In this mode,
you can drag the middle-bottom icon towards
left or right to switch between camera and
video mode. Touch the left-bottom icon to take
a picture.
The phone provides you with three setting icons
for you to tune camera related parameters to
achieve better capture effect.
Note: you can also touch menu icon to pop out
an option box. There, you can switch to video
mode and access gallery.
Clock
Enter the clock menu and touch the alarm icon
to enter the alarm list interface. When adding
Page 28

27
a new alarm, set alarm time. Press alarm of
list to edit Time, Repeat, Ringtone, Vibrate and
label, choose “DONE” to nish the setting.
Alarms- You can set an alarm by modifying an
existing alarm or by adding a new one.
Note: Alarms that are set are underlined in
green.
Contacts
Record the contacts saved on phone and SIM
card.
In the contacts screen, touch menu icon and
you can perform the following operations:
Search-Start entering the name of the contact
you’re searching for. As you type, contacts with
matching names appear below the search box.
And then you can touch a matching contact in
the list to perform further operations.
Newcontact- Select this function to add new
contact to contacts list.
Page 29

28
Delete contact - Select this function, then
you can select contact group. To delete all
contacts, you just need to touch all at the top
of contacts screen. Last, touch OK to delete
contacts.
Groups - You can assign contacts to several
caller groups.
Speed dial - allows the user to program a
button from the alphanumeric keypad to
automatically dial a custom phone number
upon a longer press.
More- Through this function, you can perform
following operations: Import/Export, Display
options, Accounts, Share visible contacts.
Favorites - You can add contacts you
communicated with most frequently to favorites.
E-mail
When using the Email application for the rst
time, you must congure your email account.
The Email setup wizard helps you set up your
account for many popular email systems.
Page 30

29
Using the Email, you can send or receive
emails from other email accounts.
FileManager
You can manage les, including music, videos,
documents and other formats les. Enter the
le manager, you can choose Phone storage
or Memory card, and touch the icons of the
lower screen to do some operations.
FMRadio
FM Radio lets you listen to FM radio stations
on your mobile phone. Be reminded that
your mobile phone uses wired headset or
earphone as the antenna, connect the headset
or earphone rst to the audio jack of your
phone before you open the application. The FM
supports air shufe, you can use your hand to
switch channel.
Gallery
In the gallery interface, there are different
folders.
Select a folder and press to enter it.
Page 31

30
Press image or video to view pictures or videos.
When viewing the picture, if you touch the
screen, you will see the slideshow and menu
icon. Touch menu icon and you will see share,
delete and more icon.
Touch share icon to send the le through
Bluetooth or via message or touch delete icon
to delete the picture and more to see details,
set as, crop, rotate left and rotate right.
Gmail
Gmail also known as Google Mail is a free
email service.
You can log on Gmail through this function.
Google+
Google Plus is a SNS social networking site,
through your Gmail account, and in the social
networking sites you can share something
funny with the different interest friend.
GoogleSearch
Google Search is a web search engine owned
Page 32

31
by Google Inc. you can search the world’s
information, including web pages, images,
videos and more.
Notes
Touch the “+” icon at the upper right side of
the screen to add notes.
Press the menu key to select ‘new note’ and
‘new folder.
When there is already a note, press the menu
key to select ‘new note’, ‘new folder’, ‘delete’,
‘delete all’ and ‘export’.
Messaging
Messaging allows you to view messages, sent
& received as a thread and also folder view.
Touch ‘Compose new message’ to start
composing a new text or multimedia message.
Enter number, or press add contact icon and
select stored contact number from Contacts.
Input contents into the typing frame on the
touch screen.
Page 33

32
Touch the menu key to see add subject, attach,
discard and all threads icon.
Press menu key to Add subject, Attach,
Discard, and All threads.
After editing, press send icon to send the text.
MessageSettings
Include storage settings, message signature
settings, notication settings, forwarding
setting, font setting and other.
Messenger
It is a Real-time chat tool provided by Google,
you can create or log-in to your Gmail account
to chat with your friends
Movies
Play video. Enter the video list to browse and
choose the le you want to play.
Music
Use the Music player to play music les.
The songs saved in your Memory Card can be
played using the Music Player of the device.
Page 34

33
The songs are categorized by Artist, Albums
and Songs.
You can make your favorite playlist by long
pressing on a song and selecting Add to
Playlist. While listening to the music, you can
choose among the various sound effects.
Phone
Touch the phone icon on the Home screen or
in the main menu interface, and you can nd
a dialpad screen where you can input phone
number to originate a call.
PlayStore
Play Store is dedicated to establishing the
latest, fastest and most comprehensive thirdparty application store that makes Android
system simpler. You can pick software and
games to your taste from more than 10,000
applications anywhere and anytime.
Settings
The Settings application contains most of the
tools for customizing and conguring your
phone.
Page 35

34
SIMManagement
Through this function, you can activate or
deactivate SIM1 and/or SIM2 as per your need.
Wireless&networks
You can use Wireless & Network settings to
congure and manage connections to networks
and devices by using Wi-Fi, Bluetooth and mobile
networks. You also can use Wireless & Network
settings to congure connections between your
phone and virtual private networks (VPNs), to
connect your computer to the Internet using
your phone, and to turn off all radios with
Airplane mode, etc.
Callsettings
Use Call settings to congure phone call settings,
such as call forwarding, call waiting, and other
special features offered by your carrier. You can
also use Call settings to congure the phone so
that it can place outgoing calls only to a xed set
of phone numbers.
AudioProfiles
Through this function, you can set phone
ringtone, notication ringtone, etc.
Page 36

Display
You can use the Display settings to congure
brightness, auto-rotate screen, animation,
and screen timeout of the phone.
Security
Use the Security settings to set your
preferences for using and sharing your
location when your search for information. You
can also congure settings that help secure
your phone and its data.
Note: You can delete all credentials and reset
credential storage password by choosing
Security > Clear storage.
Applications
You can use the Applications settings to view details
about the applications installed on your phone, to
manage their data and force them to stop, to view
and control currently running services, and to view
the storage used by applications, etc.
Accounts&sync
Backgrounddata
Check to permit applications to synchronize
35
Page 37

data in the background, whether or not you are
actively working in them. Uncheck this setting
can save battery power and lowers (but does
not eliminate) data use.
Auto-sync
Activate this function to permit applications to
synchronize data on their own schedule.
Privacy
You can use the Privacy settings to manage
your personal information and select to reset
your phone.
Storage
Use the Storage settings to monitor the used
and available space on your phone and on your
memory card and to manage your memory card.
Language&keyboard
Use the Language & Keyboard settings to
select the language for the text on your phone
and for conguring the onscreen keyboard.
Accessibility
You use the Accessibility settings to congure
36
Page 38

any accessibility plug-ins you have installed
on your phone. You can also manage your air
shufe of your phone.
Date&time
You can use Date & Time settings to set your
preferences for how dates are displayed. You
can also use these settings to set your own
time and time zone, rather than obtaining the
current time from the mobile network, etc.
Schedulepoweron/off
You can set the time for ON/OFF, which include
setting time and repeated date.
Aboutphone
This function enables you to view some phone
related information.
SimToolkit
SIM toolkit service is the tool kit of SIM card.
This phone supports the service function .The
specic items are depended by SIM card and
network. Service menu will be auto added to
the phone menu when supported by network
and SIM card.
37
Page 39

SoundRecorder
Use this function to record audio les. Three
function icons at the bottom of the Recorder
screen are corresponding to start recording,
review record le and stop recording.
Talk
Talk is a freeware voice over Internet protocol
client application offered by Google Inc.
VoiceSearch
Search the web and your phone by voice and
control your phone with Voice Actions Quickly
search your phone, the web, and nearby
locations by speaking, instead of typing. Call
your contacts, get directions, and control your
phone with Voice Actions.
Facebook
Facebook is a social utility that connects
people with friends and others who work, study
and live around them. People use Facebook to
keep up with friends, Colleagues, schoolmate.
38
Page 40
INPUTTEXT
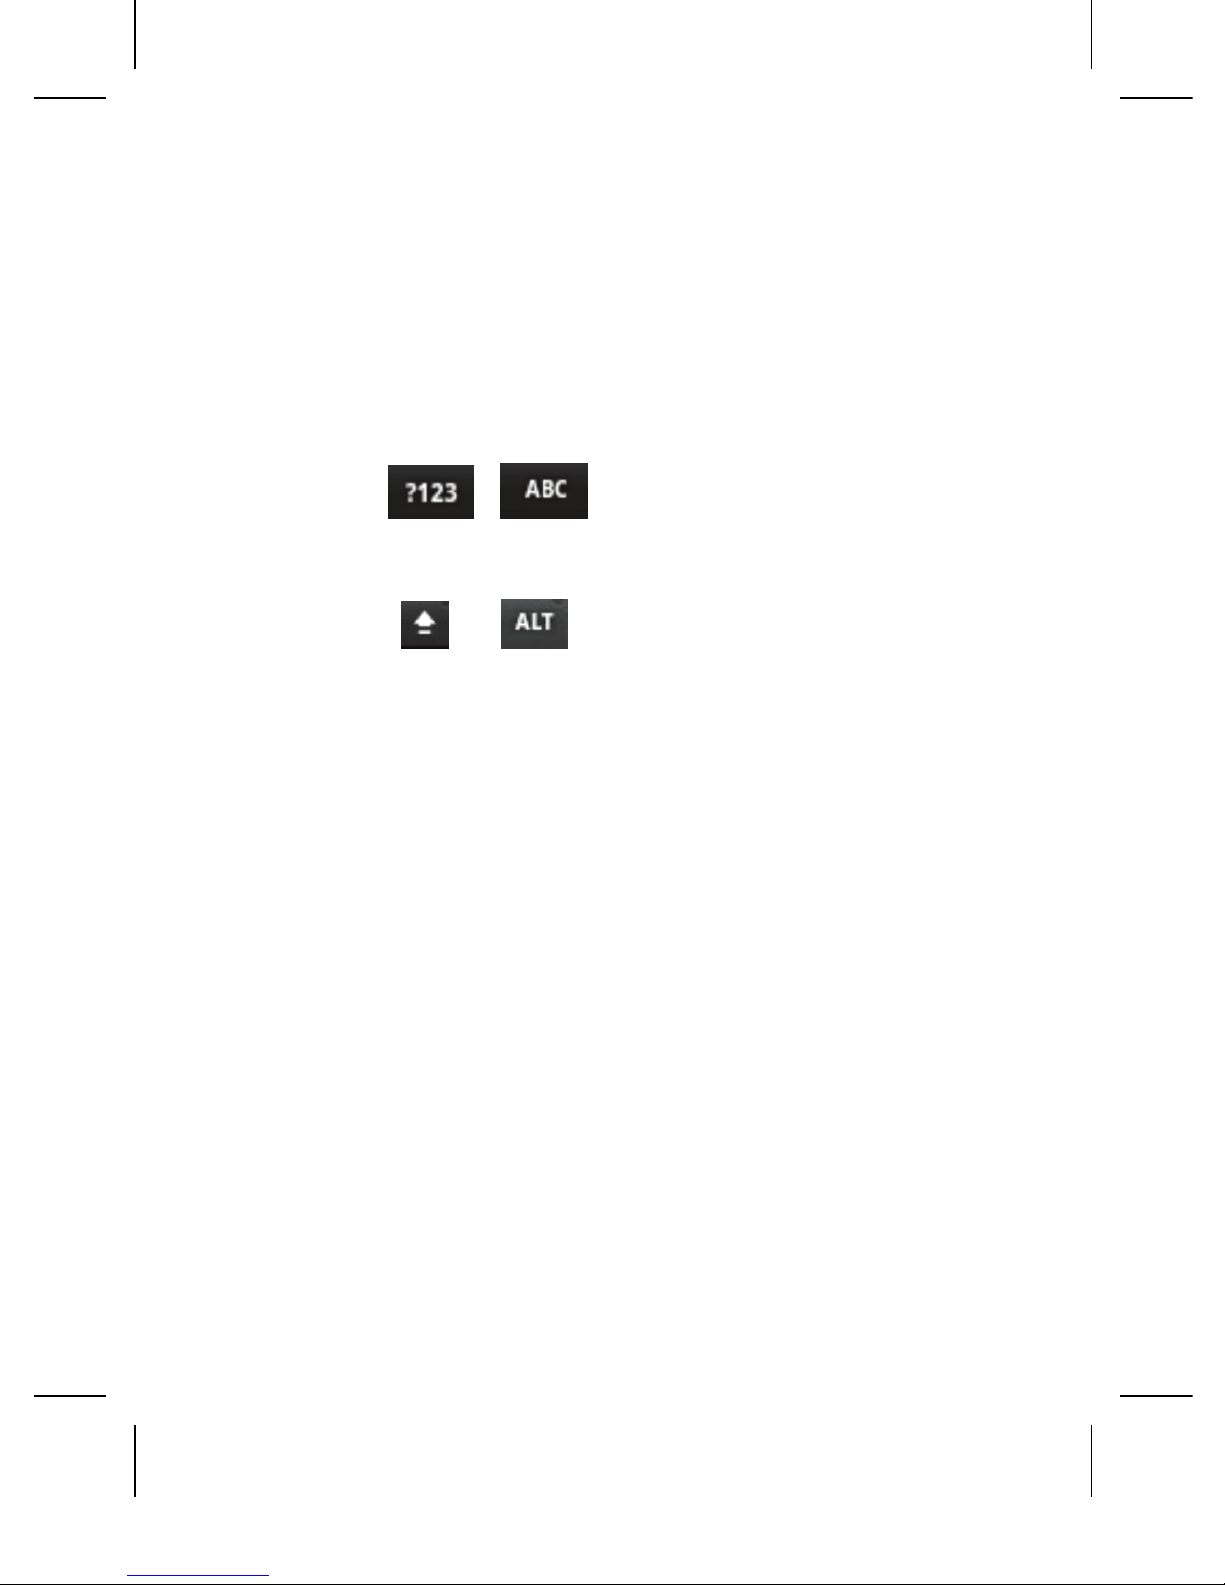
1. Click the editing frame and a input option
menu will pop out which include uppercase letters, lower-case letters and
number mode.
2. Press / to switch freely between
English and Number typing.
3. Press /
to change character or
symbols
WARRANTYMANUAL
One (1) year Limited Warranty is given to
the person who purchased the product(s)
and starts on the date of Product’s original
purchase.
O+ warrants that this mobile phone
(“Product”) is free from defects in material
and workmanship that result in Product
failure during normal usage, according to the
following terms and conditions:
39
Page 41

1. The one (1) year Limited Warranty extends
only to the original purchaser of the Product
(“Consumer”) and is not transferable or
assignable to any subsequent purchaser
or end-user.
2. During the one (1) year Limited Warranty,
O+ will repair or, should O+ in its absolute
discretion deem it necessary, replacing the
Product in accordance with this Limited
Warranty. Any parts that do not function
properly for their intended use because
of product failure or malfunction during
normal usage will not be charged to the
consumer. O+ will also pay for the labor
charges incurred during the repairing or
replacing the defective parts.
3. O+ shall not be liable for any other losses or
damages. These remedies are the Consumer’s
exclusive remedies for breach of warranty.
4. To claim the warranty service, consumer
must provide the dated bill of sale or
dated itemized receipt together with the
warranty card.
40
Page 42

WarrantyPeriod:
The Product may consist of several different
parts and different parts may be covered by
a different warranty period. The different
Warranty Periods are:
1. one (1) year for the mobile device;
2. six (6) months for battery and
3. three (3) months for charger and headset/
earphones.
Repaired part(s) will be warranted for the
remainder of the original Warranty Period.
The following are not covered under this
warranty:
a) O+ Limited Warranty does not cover user
manuals or any third party software,
settings, content, data or links, whether
included/downloaded in the Product,
whether included during installment,
assembly, shipping or at any other time in
the delivery chain or otherwise and in any
way acquired by you.
41
Page 43

b) The Product that has been damaged
by external causes such as collision
with an object, or from re, ood, sand,
dirt, windstorm, lightning, earthquake
or damage from exposure to weather
conditions, acts of nature, or battery
leakage, theft, blown fuse, or improper use
of any electrical source, or damage caused
by the connection to other products not
recommended for interconnection by O+.
c) The Product that has been subject to
abnormal use, abnormal conditions,
improper storage, exposure to moisture
or dampness, unauthorized modications,
unauthorized connections, unauthorized
repair, misuse, neglect, abuse, accident,
alteration, improper installation, or other
acts which are not initiated by O+, including
damage caused by shipping. Defect caused
by rough handling (including, without
limitation, defects caused by sharp items,
by bending, compressing or dropping, etc.)
and/or other acts beyond the reasonable
control of O+.
42
Page 44

d) This Limited Warranty does not cover
normal wear and tear (including, without
limitation, wear and tear of camera
lenses, batteries or displays), defects
in appearance, cosmetic, decorative or
structural (Framing/Housing) and any
non-operative parts. Transport costs,
scratches and damage to the outer surface
areas and externally exposed parts that
are due to normal customer use.
e) If any part or parts of the unit are replaced
with a part or parts not supplied or
approved by O+ or the unit has been
dismantled or repaired by any person
other than O+ authorized technician.
f) The defect or damage was caused by the
defective function of the cellular system
or by inadequate signal reception by the
external antenna.
g) The Product serial number plate or the
accessory data code has been erased,
removed, defaced or altered.
43
Page 45

Consumer shall take the following step-bystep procedure if a problem occurs during the
one (1) year Limited Warranty:
1. Consumer shall return the Product to
the Service Center along with the legible
warranty card and proof of purchase
before the expiry of the Warranty period.
2. O+ will repair or authorize the repair of the
Product under the limited warranty within
30 days after receipt of the Product by O+
or an O+ authorized service center. If O+
cannot perform repair covered under this
limited warranty within 30 days, or after a
reasonable number of attempts to repair the
same defect, O+ on its absolute discretion
deem it necessary, replacing the Product in
accordance with this Limited Warranty.
3. The Consumer will be billed for any parts
or labor charges not covered by the one (1)
year Limited Warranty. The Consumer will
be responsible for any expenses related to
reinstallation of the Product.
44
Page 46

4. If the Product is returned to O+ during the
Limited Warranty period, but the problem
with the Product is not covered under the
terms and conditions of the one (1) year
Limited Warranty, the Consumer will
be notied and given an estimate of the
charges and the Consumer must pay to
have the Product repaired. If the Product
is returned to O+ after the expiration of the
limited warranty period, O+ normal service
policies shall apply and the Consumer will
be responsible for all charges.
ImportantNotes:
Please remember to make back-up copies or
keep written records of all important content
and data stored in your Product, because
content and data may be lost during repair or
replacement of the Product.
Your Product is a sophisticated electronic
device. O+ strongly encourages you to
familiarize yourself with the user manual and
instructions provided with and for the Product.
O+ Notice of Liability:
45
Page 47

Any implied warranty of merchantability, or
tness for a particular purpose or use, shall be
limited to the duration of the foregoing limited
written warranty. Otherwise, the foregoing
limited warranty is the Consumer’s sole and
exclusive remedy and is in lieu of all other
warranties, express or implied. O+ shall not
be liable for loss of or damage to or corruption
of data, special, incidental or consequential
damages, including but not limited to, loss of
anticipated benets or prots, loss of savings
or revenue, increased costs or expenses
or for any indirect loss or damage, punitive
damages, loss of the product or any associated
equipment or facilities, downtime, the claims
of any third parties, including customers, and
injury to property, resulting from the purchase
or use of the product or arising from breach of
the warranty, breach of contract, negligence,
strict tort, or any other legal or equitable
theory, even if O+ knew of the likelihood of
such damages. O+ shall not be liable for delay
in rendering service under the one (1) year
Limited Warranty, or loss of use during the
period that the product is being repaired.
46
Page 48

O+ neither assumes nor authorizes any
authorized service center or any other person
or entity to assume for any other obligation
or liability beyond that which is expressly
provided for in this limited warranty including
the provider or seller of any extended warranty
or service agreement.
This is the entire warranty between O+
and the Consumer, and supersedes all
prior and contemporaneous agreements
or understandings, oral or written, and all
communications relating to the Product, and
no representation, promise or condition not
contained herein shall modify these terms.
This limited warranty allocates the risk
of failure of the Product between O+ and
Consumer. The allocation is recognized by the
Consumer and is reected in the purchase
price of the Product.
All warranty information, product features and
specications are subject to change without
prior notice.
47
Page 49

Page 50

 Loading...