

OPHIR ORION User Manual
ORION
ORION
ORION
LASER POWER METER
USER MANUAL
OPHIR OPTRONICS
www.ophiropt.com/photonics

Table of Contents
Chapter 1 Introduction: How to Use This Manual ................... 2
Chapter 2 Quick Reference ...........................................................3
2.1 Getting Started............................................................................3
2.2 Orion TH - Thermal Heads .......................................................5
2.3 Photodiode Heads .....................................................................6
2.4 Pyroelectric and Photodiode Energy Heads.......................9
Chapter 3 The Orion Display Unit ............................................... 13
3.1 General Description ............................................................... 13
3.2 Smart Connectors and Multihead Operation................... 13
3.3 Soft Keys and Rightmost Button ......................................... 14
3.4 Power Up and Shut Down .................................................... 16
3.5 Orion Functions which are independent of Head........... 16
3.6 Backlight.................................................................................... 18
3.7 Kickstand................................................................................... 18
3.8 Charging .................................................................................... 18
3.9 Chart Recording....................................................................... 19
Chapter 4 Orion TH Operation with Thermopile Heads................ 20
4.1 Thermopile Absorber Heads................................................ 20
4.2 Selecting Settings from the Orion TH Screen.................. 21
4.3 Power Measurement............................................................. 22
4.4 BC20 Heads for Scanned Beams........................................ 24
Chapter 5 Orion PD Operation with Photodiode Heads.............. 27
5.1 Photodiode Heads .................................................................. 27
5.2 Setting up PD300 to display user chosen wavelengths.. 28
5.3 Selecting Settings from the Orion PD Screen ................. 29
5.4 Special Photodiode Heads ................................................... 34
Chapter 6 Using the Orion PE with Energy Heads........ 35
6.1 Pyroelectric and Photodiode Energy Heads .................. 35
6.2 Selecting Settings and Saving Defaults............................ 36

6.3 Energy Measurement ............................................................ 41
6.4 Measuring Repeating Pulses of High Energy.................. 43
6.5 Energy Log ................................................................................ 44
Chapter 7 Circuit Description...................................................... 46
Chapter 8 Calibration, Maintenance and Troubleshooting... 48
8.1 Calibration of Thermopile Heads......................................... 48
8.2 Calibration of Photodiode type Heads............................... 53
8.3 Calibration of Pyroelectric and Photodiode Heads.......... 55
8.4 Error Messages....................................................................... 58
8.5 Troubleshooting....................................................................... 58
Chapter 9 Orion Specifications................................................... 60
9.1 System/Display Specifications............................................ 60
9.2 Head Specifications ............................................................... 61
1

Chapter 1 Introduction: How to Use
This Manual
The Ophir Orion is a microprocessor-based Laser
Power/Energy Meter for measuring laser power or energy
with Ophir measuring heads. It uses smart connector
technology where just connecting the head configures and
calibrates the instrument.
This manual tells you what you need to know to make full
use of the Orion for all your laser measurement needs. It
includes a "Quick Reference", (Chapter 2) to allow you to
perform basic measurements immediately, without reading
the whole manual.
The main measurement sections, Chapters 3 through 6
include a general description and a section detailing
operating options.
2

Chapter 2 Quick Reference
2.1 Getting Started
The Orion is equipped with "soft keys." That is, the functions
of the keys change as indicated by the legend above each
key. (See Figure 2).
When the Orion is first switched on, the first screen usually
has a digital display with a bargraph at the bottom. In order
to access the soft keys, press the rightmost button, located
on the right of the panel. Pressing the button again will
access more functions. Pressing it yet again will bring you
back in a cyclical manner to the original bargraph screen.
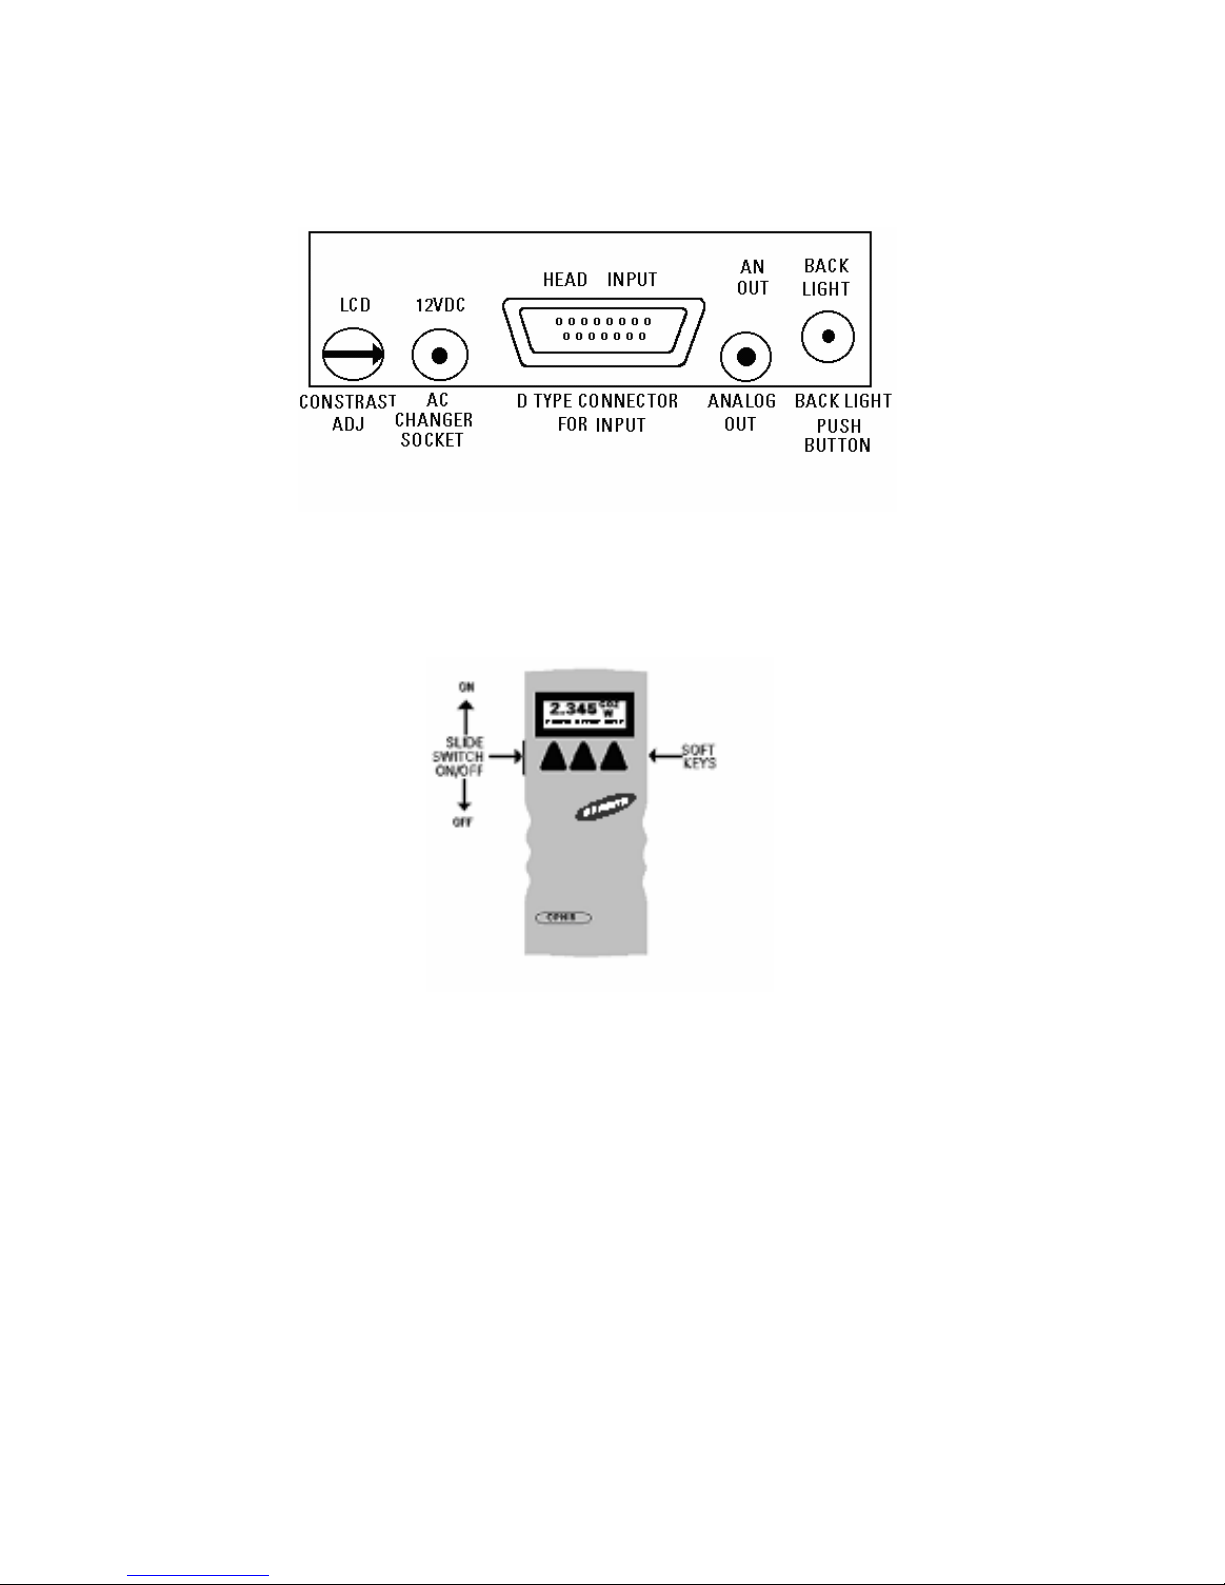
To connect head to the Orion Display
Insert the D type connector of the measuring head cable
into the socket marked "Head Input" on the rear panel of the
Orion display. (See Figure 1)
Figure 1
Orion Rear Panel View
To switch the Orion on:
1. Push up the slide switch on the left side of the Orion
display. (See Figure 2).
3
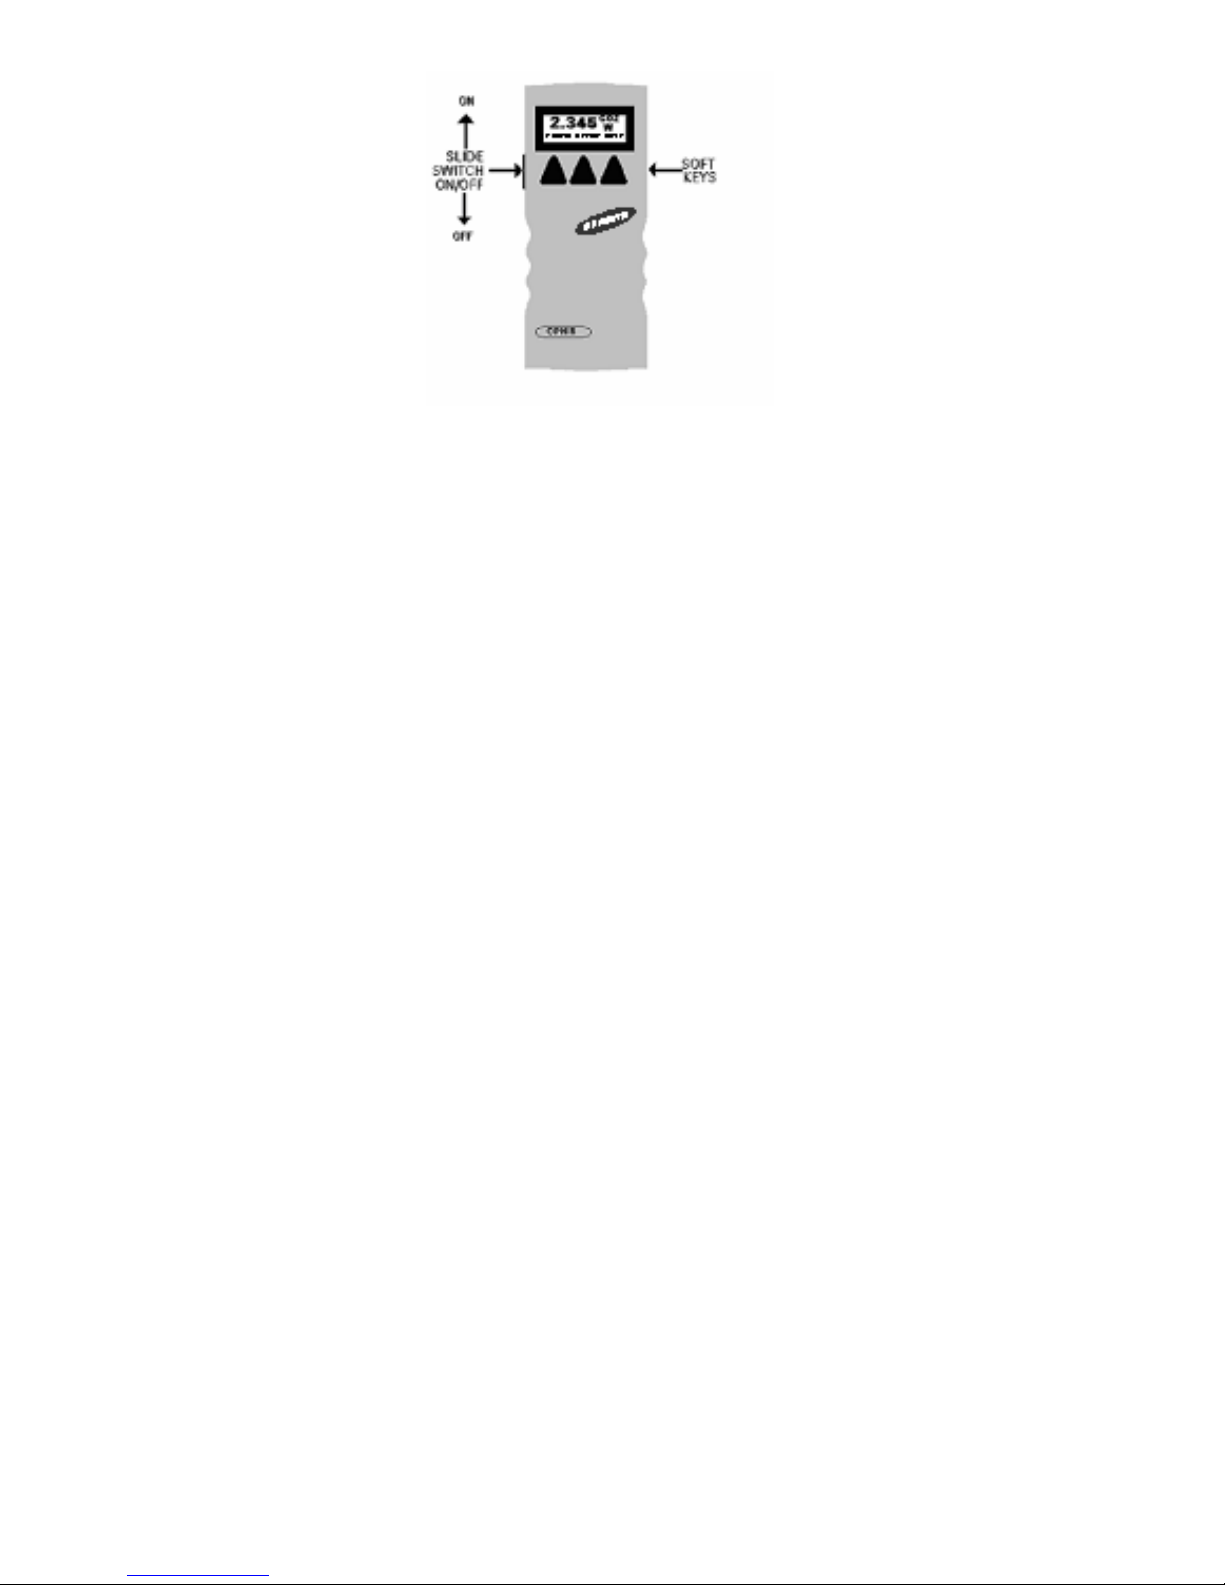
Figure 2.
Orion Top View
The unit will switch on, and the display will appear. Note
that the head must be plugged in before the unit is switched
on.
To switch the Orion off:
1. Return the slide switch to its original position.
2. If you wish to save the current Orion configuration, use
the "config" function before switching off. Refer to the
main body of the manual for details.
To set the line frequency:
1. Disconnect the head and switch off then on again. "No
Head Connected" will appear.
2. Press "select" until "line freq" is highlighted.
3. Press "go" then change to correct frequency.
4. Press "exit" and change will be saved.
4

To zero instrument
1. Disconnect the head, turn off then on again. "No Head
Connected" will be displayed.
2. Press "select" until "zero" is highlighted.
3. Press "go".
4. Make sure instrument is not in an electrically noisy
environment and is undisturbed. Press "go" and wait for
message, "zeroing completed". Press "exit".
5. For thermal heads, zeroing with the head may also be
necessary. See section 3.5.2.
2.2 Orion TH - Thermal Heads
2.2.1 Use of the Orion TH with thermal type
heads
To set to the type of laser being used:
1. While the Orion TH is off, plug in the head then switch it
on again.
2. From bargraph measurement screen, press the leftmost
button and press "config".
3. Press “value” to choose the desired laser wavelength
then press “exit”.
4. Press “yes” or “no” depending if you want the
wavelength chosen to be the startup default or not.
2.2.2 To choose manual or automatic
ranging in power measurement:
1. From the bargraph measurement screen, press the
leftmost button and press "config".
2. Press “select” then “value” to choose the desired
power range then press “exit”.
3. Press “yes” or “no” depending if you want the
wavelength chosen to be the startup default or not.
5

2.2.3 Power Measurement
Warning:
Do not exceed maximum head limits for power, energy,
power density and energy density as listed in tables 6
and 7 in section 9.2. Otherwise, there is a risk of
damaging the absorber.
To subtract background and set current reading to zero:
1. From the bargraph power measurement screen press
the rightmost button then press "offset". Press the
“next” twice to return to the bargraph screen.
2. Press "offset" again to cancel. See Section 4.4.2.1. for
full details.
To use the Orion TH to fine tune Laser power:
1. From the bargraph power measurement screen press
the rightmost button twice then press "tune".
2. Set the percentage range of the power scale to be
displayed by repeatedly pressing the left key.
3. Set the horizontal sweep time using the middle soft key
See Section 4.4.2.2. for full details.
2.3 Photodiode Heads
2.3.1 Use of the Orion PD with photodiode
type heads
To set type of laser being used:
1. From the bargraph power measurement screen, press
the rightmost button once and press "config".
2. Press “value” and “select” to choose the laser
wavelength. Press “exit”. If you want the choice to be
saved permanently as the startup default, press “yes”,
otherwise press “no”.
6

2.3.2 To choose manual or automatic
ranging or dBm
1. From the bargraph measurement screen, press the
rightmost button then press “config”.
2. Select RANGE: and with “value” choose the
appropriate manual range, autorange or dBm
(logarithmic scale).
3. Press "exit" and then press “yes” if you want the choice
to be the startup default or “no” if not.
2.3.3 Selecting Chosen Wavelengths
1. From the power measurement mode with the bargraph
display, press the rightmost button twice and then
press “wvlnth”
2. Press "select" until the wavelength you wish to change
is highlighted. Press "change".
3. Press "up" and "down" to change the wavelength. Press
"done". Repeat step 2 for other wavelengths desired.
When finished press exit and the new values will be
saved.
2.3.4 Choosing Wavelength Used
1. From the bargraph measurement screen, press the
rightmost button twice and press "wvlnth". Press
“select” until the correct laser type or wavelength is
displayed.
2. Press “exit” to return to the bargraph screen. (If the
wavelength you want is not among the 6 choices see
section 2.3.3).
2.3.5 Choosing Measurement Range and
Filter Setting
1. From the bargraph measurement screen, press the
rightmost button once and press “config”.
2. Press "select" and then choose the appropriate manual
power range, autorange or dBm by pressing the "up" or
"down" buttons.
3. Press “select” again and choose the desired setting,
filter IN or OUT.
7

4 Press "exit" and then press the “yes” if you want the
choice to be the default startup. Press “no” if you only
want the choice until the instrument is turned off.
2.3.6 Power Measurement
Warning:
Do not exceed maximum head limits for power, energy,
power density and energy density as listed in tables 6
and 7 section 9.2 Head Specifications. Otherwise, there
is a risk of damaging the absorber.
To offset current reading and set to zero:
1. From the bargraph power measurement screen press
the rightmost button, press "offset" then press “next”
twice to return to the bargraph screen.
2. Press "offset" again to cancel. See Section 4.4.2.1 for
more details.
To use the Orion PD to fine tune laser power:
1. From the bargraph power measurement screen press
the rightmost button twice then press "tune".
2. To set the power expansion scale to ±50% ,±120% or
±20% as desired, press the left hand soft key several
times. The default value is ±50%. If the laser power will
change a lot, use a large value; if a little, use a small
value.
3. Set the horizontal sweep time to the rate desired, using
the middle soft key. The default value is 1 minute.
4. Press “tune” to return to the measurement screen.
Measure the power of the laser and adjust the laser
until you determine that the power has reached a
maximum.
8

2.4 Pyroelectric and Photodiode Energy Heads
2.4.1 Selecting Chosen Wavelengths
(not applicable to BB heads)
1. From the bargraph display, press the rightmost button
twice, press “more” then press “wavelength” then
“go”.
2. Press "select", "change" then "up" and "down" to change
the first wavelength desired. Press "done". Repeat for
other wavelengths desired up to 6. Now press exit. The
change will be saved. For details see section 6.2.1
2.4.2 To set type of laser being used:
1. From bargraph measurement screen, press the
rightmost button and press "config". Press “value” until
the correct laser type or wavelength is displayed and
press “exit”.
2. If you want the value saved as the startup default, press
“yes”. Otherwise press “no”.
2.4.3 To set Laser Pulse Width and Average
1. From the bargraph measurement screen,
press the rightmost button twice and
press "setup".
2. Now press "value" to select proper
setting for your laser pulse width. If your
laser pulses are longer than the short
pulse setting, then the long pulse setting
should be selected and if shorter, then
the short pulse setting should be
selected.
3. Now press "select" until "average over" is
highlighted. Now press "value" until the
time period you wish to average over is
displayed. If you do not want to
average, but collect individual pulses
then select "none".
4. Press "exit". If you wish to save the new
settings, then after the above changes,
from the bargraph screen press the
9

rightmost button, press “config”, press
“exit” and “yes”.
10

Warning:
Incorrect readings will result if pulse width is not set up
correctly.
Note:
Some heads have only one time setting for all pulse
widths. In that case “N.A.” appears.
2.4.4 Setting Configuration
1. After you have set up the pulse width and average
settings (see section 2.4.3.) from the bargraph
measurement screen press the rightmost button and
press “config”.
2. Press "select" until the laser wavelength is highlighted.
Now press value to select the laser wavelength you
want to be the default. The Orion PE will now be
correctly calibrated for the absorption of the detector at
the wavelength of the laser type selected.
3. Press "select" and "value" to choose the default energy
range. Now press “select” and value again to see if you
want to be in the display or scope mode.
4. Now press exit when all selections have been made.
Now press "yes" if you want to save all current settings
(including those selected previously in the setup
screen), or "no" if you want to save the settings only
until the instrument is turned off.
2.4.5 Setting up PE-DIF diffuser heads to
diffuser IN or OUT setting
1. Press the rightmost button twice and press “setup”.
2. Press “select” until the diffuser setting is highlighted
and select “IN” or “OUT” as desired. With “select” and
“value” choose the correct pulse width setting.
3. Press “exit” and press the rightmost button then
“config”. Choose the correct wavelength setting. Note
that only wavelengths compatible with the diffuser
setting are visible.
11

4. If you wish to save these settings as the defaults, from
the main display, press the rightmost button then press
“config”. Press “exit” and “yes” to save all present
settings including diffuser IN or OUT and pulse width
setting.
2.4.6 Energy Measurement
Warning:
Do not exceed maximum head limits for power, energy,
power density and energy density as listed in tables 6
and 7 section 9.2 Head Specifications. Otherwise, there
is a risk of damaging the absorber.
With the pyroelectric head, you have been supplied a test
slide with the same coating as on your pyroelectric
detector. You can also obtain this slide from your dealer.
You should use this slide to test the damage threshold with
your laser pulses. If the slide is damaged, then either
enlarge your beam or lower the laser energy until damage
is no longer seen.
To use the Orion PE to measure Laser Energy
Press the rightmost button once then press "config" then
“select” until RANGE is highlighted. Press “value” to
choose the correct energy range, then press exit. If you
wish to save this value as the default, press “yes”,
otherwise “no”.
Note:
The correct energy scale is the lowest one which is
higher than the maximum energy measured. If the
energy measured is lower than 10% of full scale,
choose the next lower scale. Otherwise the readings
will not be accurate.
12

Chapter 3 The Orion Display Unit
3.1 General Description
The model Orion laser power/energy meter represents a
new level of sophistication, sensitivity, compactness and
accuracy, coupled with ease of operation. It can operate
with all Ophir thermal heads. It has smart connector
technology. Simply plugging in the head configures and
calibrates the Orion to operate with that head.
The Orion displays power or energy measurements in both
digital and analog form at the same time. It will also
autorange, so you do not have to set scales; or it can
manual range if you wish. It will remember what mode you
were using before you turned it off and will return to that
mode when turned on. You can subtract background. You
can also zero the Orion at the touch of a button.
The main instructions are clearly shown on the screen so
you should not have to refer to this manual very often.
Above all, the Orion has advanced circuitry and digital
signal processing for excellent sensitivity, signal to noise
ratio, accuracy, and response time. It also has special
circuitry to reject electromagnetic interference.
3.2 Smart Connectors and Multihead Operation
The Orion display is very compact and can operate with
either any Ophir laser measuring head compatible with the
Orion model you have chosen. The Orion TH is compatible
with all Ophir thermal heads, the Orion PD is compatible
with all Ophir photodiode heads and the Orion PE is
compatible with all Ophir pyroelectric heads. If you need to
work with several heads of different types, you should
choose the Ophir Nova display which is compatible with all
types. The head configuration and calibration information
is stored in an EEROM in the head connector plug. This
means that when the head is plugged in, the Orion
automatically identifies the head type, calibration and
configuration. The user does not have to adjust anything.
13

Note:
The Orion automatically loads the head information
when first turned on, so when changing heads, the
display should be turned off, the new head plugged in
and then be turned on again.
When no head is plugged in and the Orion is turned on, the
display indicates "No Head Connected" and gives the user
the opportunity to change the power line frequency or
rezero the instrument. See section 3.5.
3.3 Soft Keys and Rightmost Button
3.3.1 Rightmost Button
The Orion is equipped with "soft keys". That is, the functions
of the keys change as indicated by the legend above each
key. (See Figure 4).
When the Orion is first switched on, the first screen usually
has a digital display with a bargraph along the bottom. In
order to access the soft keys, press the rightmost button,
located on the right of the panel. Pressing the rightmost
button again will access more functions. Pressing it yet
again will bring it back in a cyclical manner to the original
bargraph screen.
Note:
The first set of menu choices can be accessed without
pressing the right hand key. Simply pressing the
appropriate key from the bargraph screen will operate
that key even though the label is not visible. So if you
remember the position of the key you can take a
shortcut. If the soft key is an alternating "toggle" type,
the label will be visible while the key is being pressed.
3.3.2 Soft Keys
The soft keys accessed by the rightmost button have
functions defined by the legend above the key. The legend
usually indicates what will happen when pressing the key.
For example, if "config" appears above a key, pressing that
key will change the Orion into the configuration mode.
14
Some functions operate when the key is pressed and are
canceled when the key is pressed again. The keys show
reverse highlighting when operational. Pressing the same
key again cancels the operation and the highlighting.
Figure 3
Orion Rear Panel View
Figure 4.
Orion Top View
15

3.4 Power Up and Shut Down
To turn the Orion on:
1. Push up the slide switch on the left side of the Orion
display. (See Figure 4)
2. The unit will switch on, and the display will appear. If
no head is connected, a display showing "No Head
Connected" will appear. If a head is connected, the
appropriate default measurement screen will appear.
To switch the Orion off:
1. Return the Switch to its original position.
2. If you wish to save the current Orion configuration, use
the "config" function before switching off. For
measurements of the same type, the Orion does not
need to be set up each time. See section 4.2
3.5 Orion Functions which are independent of Head
Type
When no head is connected to the Orion and it is turned on,
the message "No Head Connected" appears. In this mode,
the user can adjust either the power line frequency so the
instrument can be adjusted for minimum interference at the
power line frequency, or the user can zero the instrument to
eliminate any offsets.
3.5.1 Line Frequency
The Orion is factory set for 50 Hz. If your country uses 60 Hz
you must reset the line frequency.
To reset the line frequency:
1. Turn on the Orion while the head is disconnected.
2. Press "select" until "line frequency" is highlighted.
3. Press "go" then change to select the correct line
frequency.
4. Press "exit" to save the new value and exit.
16

3.5.2 Zero Adjustments
In the Orion, all adjustments, including zeroing internal
circuits, are done from the software. This ensures simple
and accurate realignment. It is recommended to rezero
the Orion every 2 months for best performance. The simple
zeroing procedure follows.
1. If a head is connected, disconnect the head, turn off the
instrument then back on again so the Orion can identify
that no head is connected. "No Head Connected" will
be displayed.
2. Turn on the Orion, and let it run for at least 30 seconds
before performing zero adjustment.
3. Press "go".
4. Make sure the instrument is not in an electrically noisy
environment and is undisturbed. Press "go" and wait for
message, "zeroing completed". Now press "exit" and
"saved" will be exhibited, indicating that the zero
configuration has been saved.
Note:
For best results using the Orion TH with thermal heads,
it may be necessary to do the procedure once with the
head disconnected then afterwards again with the
head connected.
After completing steps 1 - 4 above, Connect the head
and make sure it is at room temperature and well
shielded from any stray thermal power. It may be best
advised to lay the head with the absorber face down on
the table.
5. Switch the instrument off then on again with the head
connected.
6. Press the rightmost button twice then "zero".
7. Now press “go”. Zeroing completed will appear when
the zeroing is finished. Press “exit”.
3.5.3 Baud Rate
If your Orion is equipped with the RS232 feature, the
baud rate can be set by selecting “baud rate”, pressing
“go”, and selecting the appropriate rate. For most
purposes, the default of 9600 Baud will suffice.
17

3.6 Backlight
The backlight illuminates the display from the rear and is
operated by a push button on the back panel (See Figure 3).
Since the backlight consumes considerable power, it is
operable only when the charger is plugged in. The
electroluminescent backlight does have a finite lifetime of
about 10,000 hours. Therefore, it is recommended only to
use it when necessary. To turn on the backlight, push the
push button while the charger is connected. To turn off the
backlight, push the button again.
3.7 Kickstand
The Orion is equipped with a kickstand on the underside of
the case so the display can be tilted for easy viewing. The
kickstand folds away in a recessed slot when not in use.
When the Orion is folded flat, it is only 203 x 95 x 35 mm, the
most compact unit of this type on the market.
3.8 Charging
The Orion is operated by a rechargeable battery. To charge
the battery, plug the charger into the jack labeled “12VDC”
on the back panel, (Figure 3). Note the polarity of the
charger. The Orion will charge the batteries at about the
same rate whether it is on or off and whether the backlight
is on or off – it fully charges in about 14 hours. However, it
will charge more slowly while operating a pyroelectric type
head. It is not recommended to leave the charger plugged
in for much longer than 14 hours, in order to preserve the
battery lifetime. The unit will operate about 18 hours from
one battery charge. When the battery is low, "BAT" flashes
on and off indicating that the battery needs recharging.
However, even with “BAT” displayed, the unit will operate
properly for about one hour before its accuracy will be
impaired.
18
 Loading...