

OPERATOR MANUAL
NOVEMBER 2007

Copyright © 2007 OPEX
®
Corporation
All rights reserved. Printed in the United States of America.
No portion of this manual may be reproduced in any form or by any means, or stored in a database
or retrieval system, without the express, written permission of OPEX
®
Corporation.
To request permission, contact:
®
OPEX
Corporation
ATTN: Legal Department
305 Commerce Dr.
Moorestown, NJ 08057-4234

About this manual...
The Mail Matrix Operator Manual uses the following conventions when describing
certain procedures and situations. Please be aware of these conventions when
reading the manual and operating the machine:
The DANGER notation is used to bring specific attention to a part of the machine or a step in
DANGER!
a procedure that, if not followed carefully, can result in fatal or serious personal injury to the
operator. Be very careful to follow any guidelines established within the DANGER notations
to ensure your own safety as well as the safety of other people in your area.
The CAUTION notation is used to alert the reader to something that could cause damage to the
CAUTION
machine and/or minor injury to the operator. Be aware of the information provided in the CAUTION
notations to avoid damaging the machine and the possibliity of harming yourself and/or other people
in your area.
This symbol indicates a potential pinch hazard. The pinch hazard symbols are placed throughout the
machine in places where there is the potential for the operator to get a finger or other article squeezed
between two devices. Exercise caution when working in these areas.
NOTE: Notes often include extra information that is pertinent to the current topic.
These notations can often help you avoid minor problems and use the
machine more efficiently.


Table of Contents
Table of Contents
Chapter 1
Introduction
System Overview ................................................................................................................ 1-1
Specifications ............................................................................................................... 1-2
Safety Precautions ............................................................................................................. 1-4
Options and Configurations ................................................................................................ 1-6
How Mail Matrix Works ..................................................................................................... 1-12
Workflow .................................................................................................................... 1-14
Chapter 2
Operation
Overview ............................................................................................................................. 2-1
Turning the power on/off .............................................................................................. 2-2
Logging in to the Host software .................................................................................... 2-3
Navigating the Host software ....................................................................................... 2-4
Running Jobs ...................................................................................................................... 2-5
Selecting a job .............................................................................................................. 2-5
Setting up your run ....................................................................................................... 2-6
Processing mail ............................................................................................................ 2-8
Chapter 3
Operational Maintenance
Cleaning the System .......................................................................................................... 3-1
iBOT Maintenance .............................................................................................................. 3-2
Removing/Replacing iBOTs ......................................................................................... 3-3
Shift Maintenance ............................................................................................................... 3-6
Appendix A
Statistics
Statistics ............................................................................................................................. A-1
Glossary
Index
iiiMail Matrix Operator Manual

Table of Contents
iv Mail Matrix Operator Manual

Operator Manual
Chapter
Introduction
1
System Overview............................................................................ 1-1
Specifications ............................................................................ 1-2
Safety Precautions ......................................................................... 1-4
Options and Configurations ............................................................ 1-6
How Mail Matrix Works................................................................. 1-12
Workflow.................................................................................. 1-14
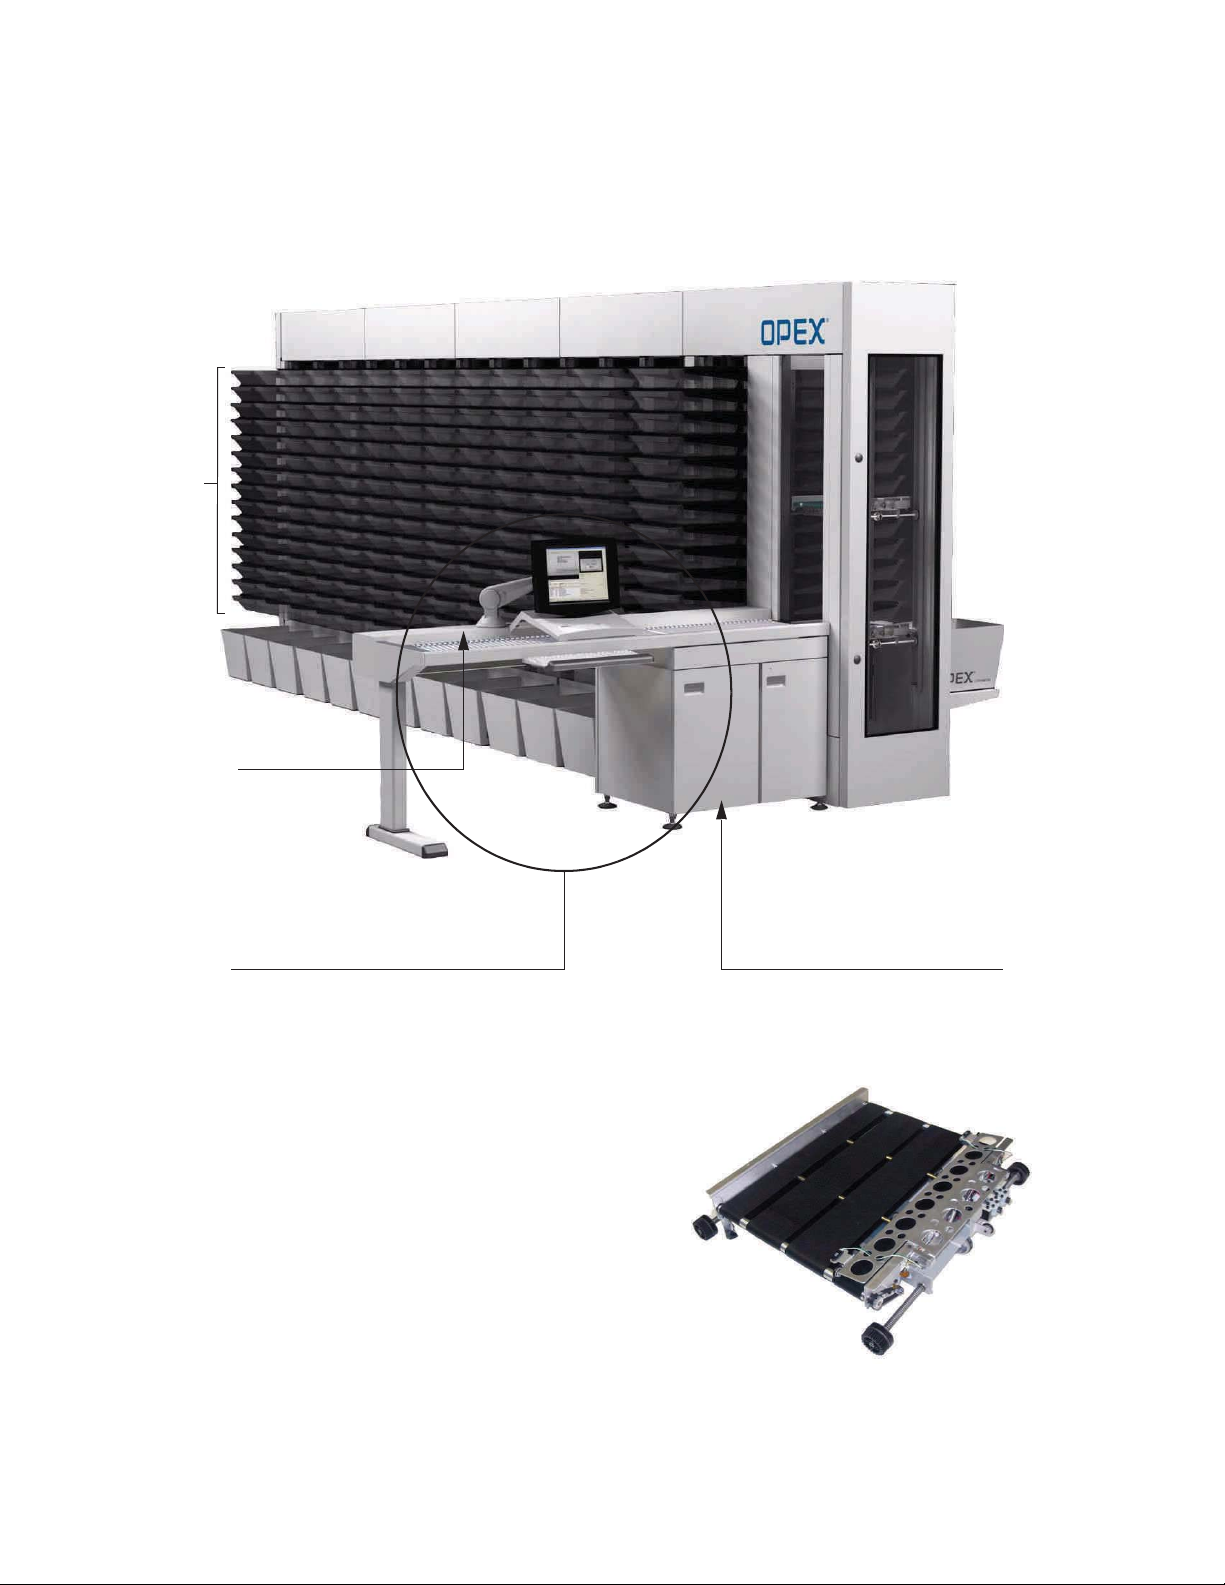
Delivery bins
Feeder/Conveyor
iBOT loading
area
Operator station
PC/UPS
iBOT

System Overview
The OPEX Mail Matrix is a mixed mail sorting system that streamlines the sorting
process. The Mail Matrix system can process up to 25,000 pieces per shift, into as
many as 1,020 destinations, and can easily sort the widest range of media and
address formats ever – from letters, flats, magazines and newspapers to small
parcels and interoffice mail – all in a single pass.
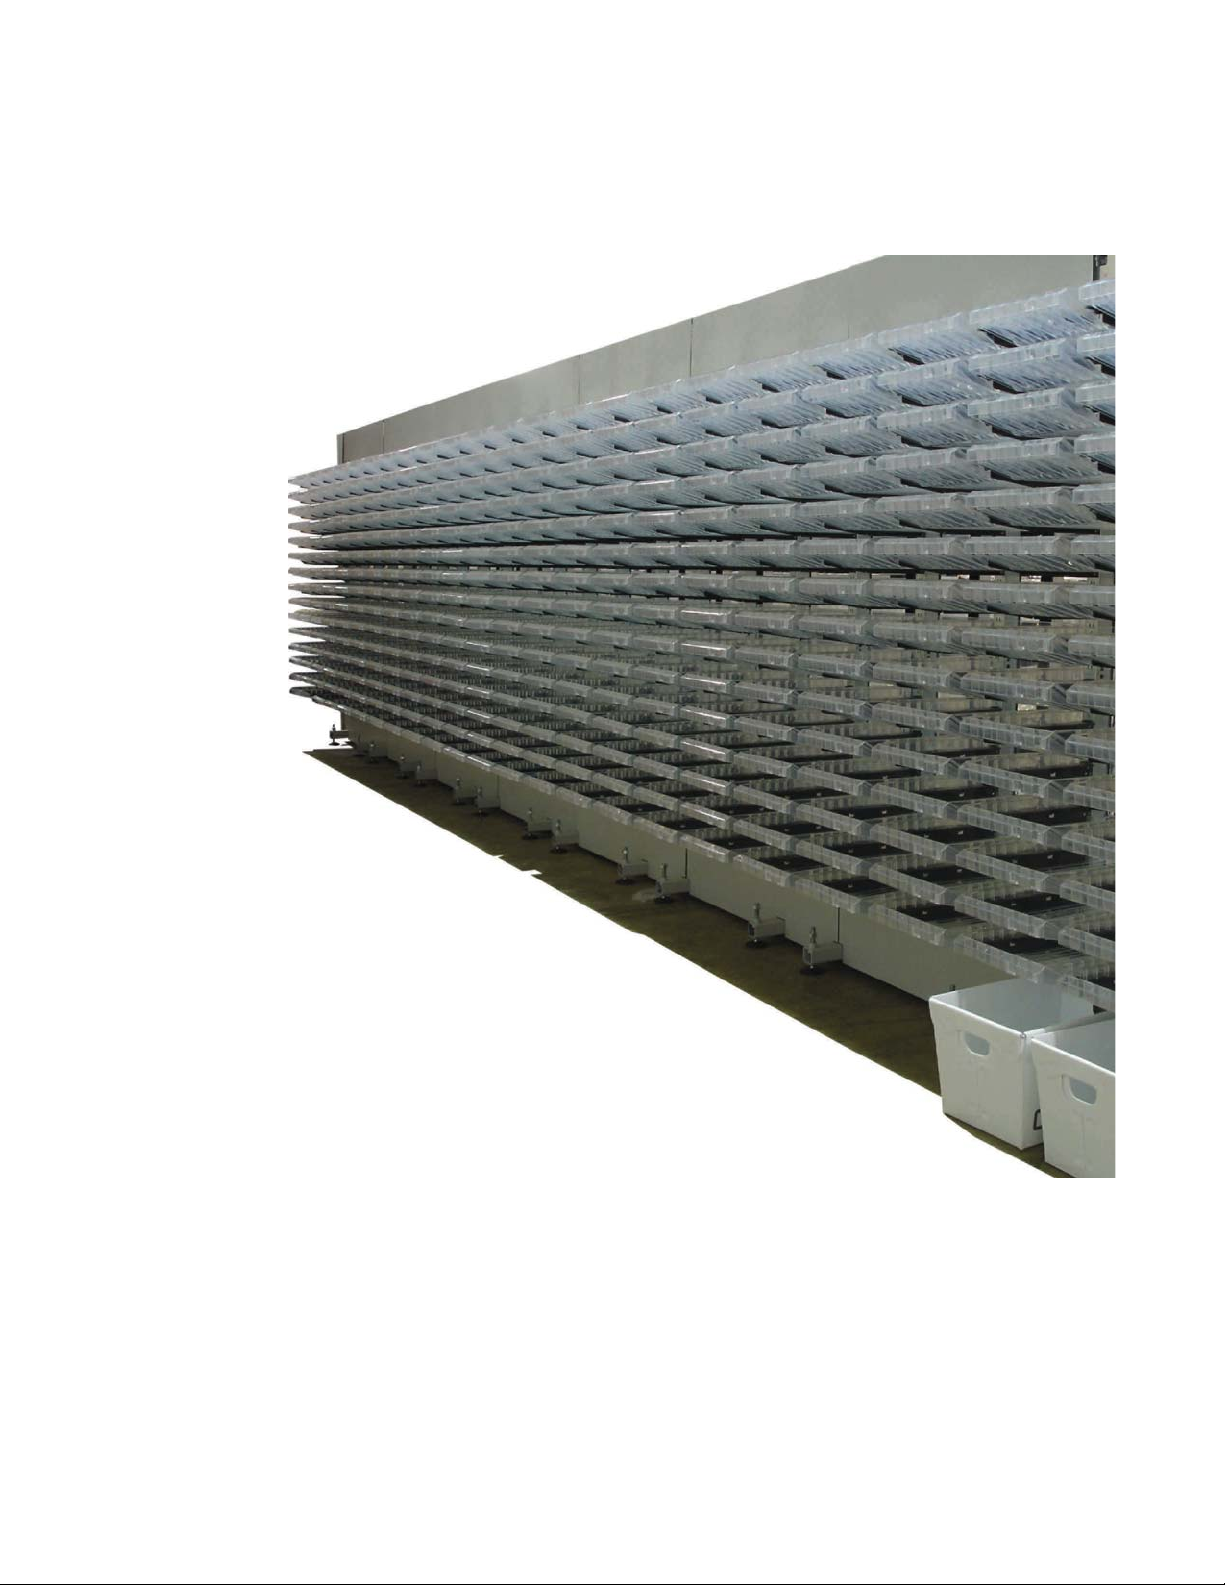
Unlike traditional inline machines which use pulleys, belts, and conveyors for transporting the mail piece to its destination, Mail Matrix uses iBOTs (intelligent robotic
wireless vehicles). Delivery bins are installed on both sides of the stacker section,
reducing the amount of space required.
Mail Matrix can be configured for three different modes depending on the desired
throughput and options purchased. These modes are manual feed without image Key from Paper (KFP), manual feed with Key from Image (KFI), and fully automated
with Key from Image (KFI). Fully automated incorporates an optional auto-feeder and
imaging. Depending on the desired throughput, up to 36 iBOTs can be installed on a
machine.
Mail Matrix features include:
1 Introduction
• Scalable feed rate: 600–3600 pieces/hour (1 piece/second)
• Expandable delivery bins (30–1020) and iBOT configurations for growth
• Capable of sorting mail into compact front and rear delivery bins
• Unmatched mixed media handling and single pass sorting
• User-friendly Microsoft Windows interface that allows the operator to independently set up sorting jobs as well as modify, update, and maintain a database
• Wide range of options for sorting by name, department, P.O. Box, building,
division, mail stop, and more
• Ability to import organizational databases in various formats into the job setup
and execute sorting rules
• Easily sorts mail into delivery bins that simplify removal by mailroom sweepers
• Low maintenance
• Operable in such working environments as warehouses and lockbox operations
1-1Mail Matrix Operator Manual

1 Introduction
Specifications
Performance specifications
Maximum
throughput
Physical specifications
Length
Width
Height
Power requirements
Envelope/Document size
Mixed media
Length
Width
Maximum weight per
piece
3600 pieces/hour (1 piece/second)
60 inches (add 44.5 inches for each 90-bin expansion module)
143 inches
88 inches
• 120/208 VAC, single phase
• 60 Hz, 3 wire system
•24amps
Letters, flats, magazines, newspapers
5.0–15 inches
2.75–12 inches
32 ounces
Thickness
0.007–1.0 inch
Environmental specifications
Agency approvals
Sound level
Temperat u r e
Humidity
UL, CE
80 dB Maximum
50° to 90° F
5% to 95% RH
1-2 Mail Matrix Operator Manual

1 Introduction
1-3Mail Matrix Operator Manual
FCC / Industry Canada Statement
The Mail Matrix system incorporates wireless devices:
Transceiver, 2033210
This device complies with Part 15 of the FCC Rules. Operation is subject to the
following two conditions:
1 This device may not cause harmful interference, and
2 This device must accept any interference received, including interference that may
cause undesired operation.
iBOT, 2032610
! "#$%"&#
This device complies with Part 15 of the FCC Rules. Operation is subject to the
following two conditions:
1 This device may not cause harmful interference, and
2 This device must accept any interference received, including interference that may
cause undesired operation.
Any changes/modifications to the wireless devices not approved by OPEX
Corporation could void the user's authority to operate the system.

1 Introduction
Safety Precautions
Follow these safety precautions to avoid injury when operating the Mail Matrix.
Failure to follow these precautions may result in severe personal injury or damage to
the machine.
Charging rail. Hands should be kept clear of the charging rails when the doors are
closed. Shorting of the charging rails with either a watch or ring may result in
electrical shock or death.
Be careful when removing/replacing iBOTs. In order to increase the iBOTs payload
capacity, the iBOT was designed to be as light as possible. As a consequence the
iBOTs are not indestructible. Care should be taken when removing or installing the
iBOTs.
Keep loose objects away from any exposed, moving parts of the machine. The
moving parts of the Mail Matrix, such as the conveyor, can become jammed and/or
damaged by foreign objects. Also, keep hands, hair, loose clothing or jewelry away
from the moving parts.
Do not attempt to clean the machine while it is running. A cloth (or similar material)
should never be used to clean moving parts such as belts or rollers. The use of such
material on moving mechanisms can result in damage to the machine or severe
personal injury. If a belt, roller, gate or similar part needs to be cleaned, hand-crank
the part during cleaning or clean it while stationary.
Do not use flammable, high pressure, “canned air” to clean paper scraps and dust from
the machine.
Familiarize yourself with the location of machine Emergency Stop Switches. The e-
stop is installed on the input conveyor. An e-stop is also installed on the optional
auto feeder. E-Stop switches enable a quick stop of all motors in the machine in the
event of an emergency involving potential personnel injury.
1-4 Mail Matrix Operator Manual
1 Introduction
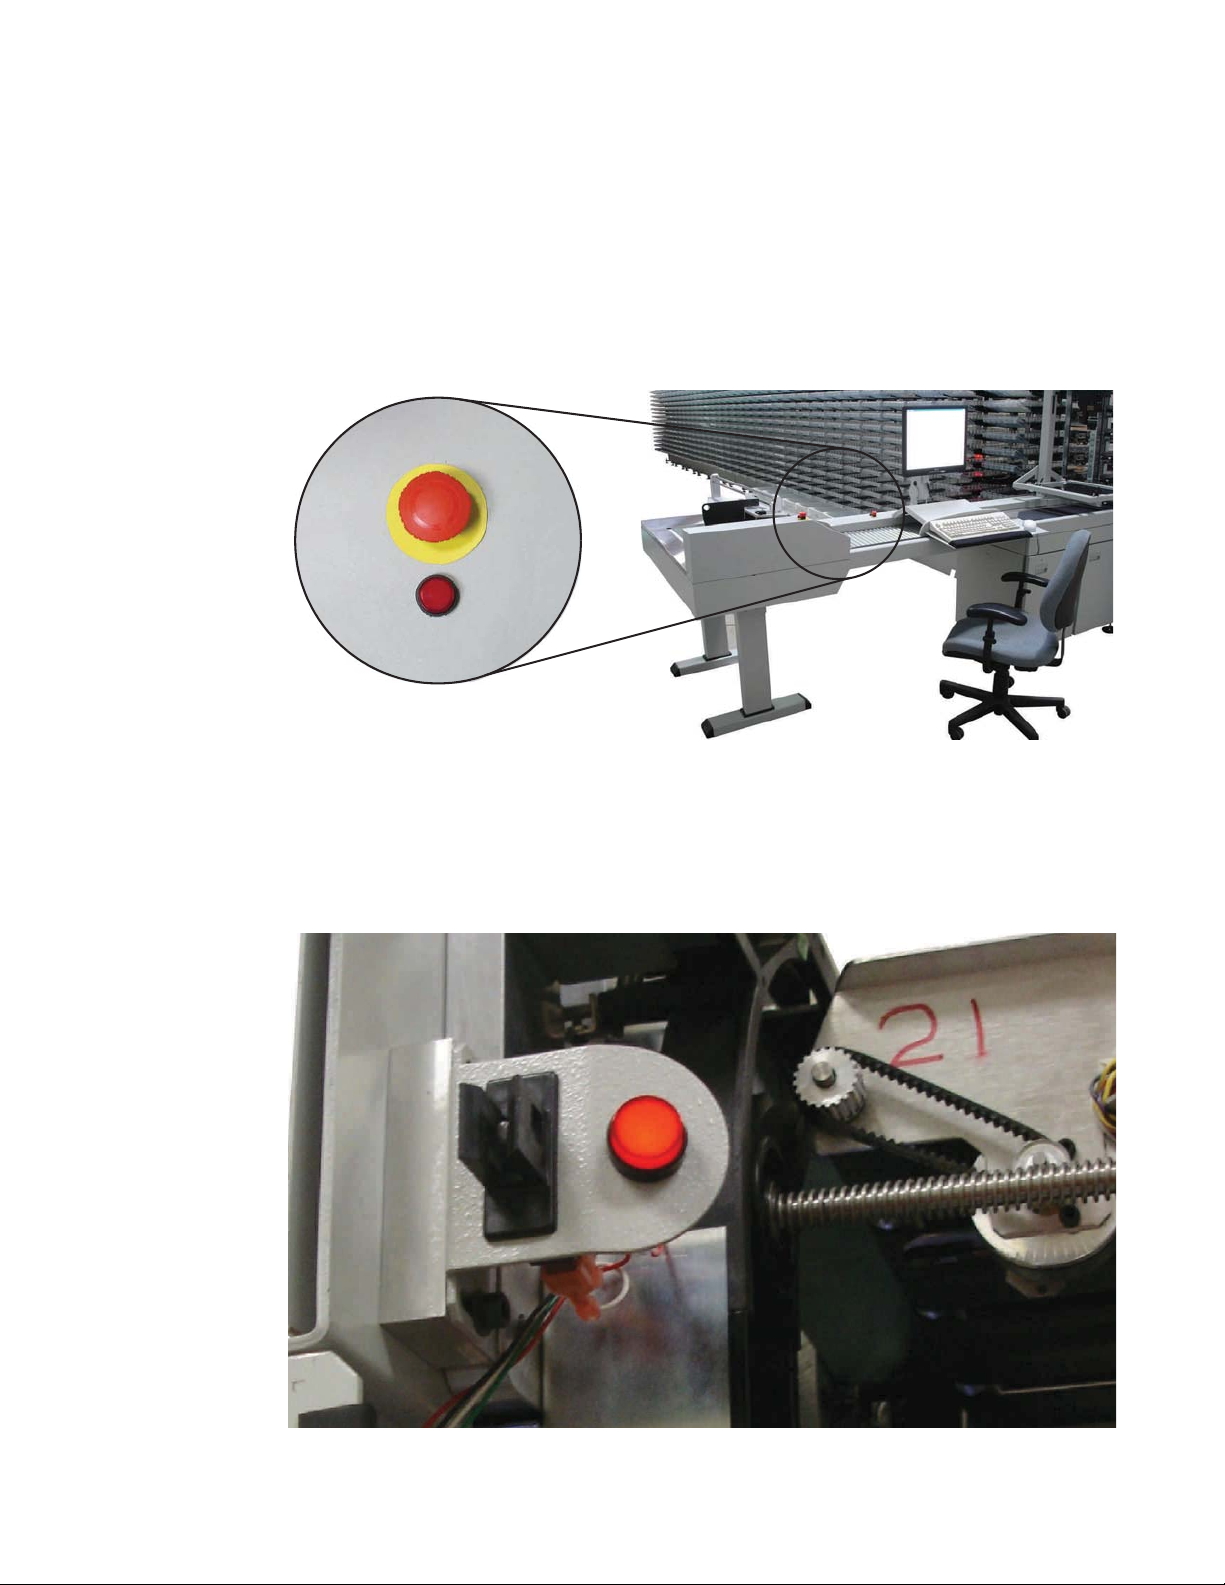
The Mail Matrix system incorporates emergency-stop buttons and door interlocks to
help keep the operator safe.
Emergency stop buttons
The big, red, mushroom-shaped emergency stop (e-stop) buttons can be used to stop
the machine in an emergency. If necessary, push one of the e-stops and the machine
will stop immediately. To restart the machine, twist the knob clockwise, clear the
machine, and restart the machine from the Run screen.
Interlock system
When the machine is running, the rapidly-moving iBOTs can pose a safety hazard for
the operator. For your safety, magnetic interlocks have been installed on the front
and rear doors of the Mail Matrix machine. The interlock system will shut the
machine down whenever a door is opened.
1-5Mail Matrix Operator Manual
1 Introduction
Options and Configurations
The Mail Matrix base system includes:
• Key from Paper (KFP) Module with one integrated key-and-drop station
• OPEX DRS (Directory Retrieval System)
• 30 delivery bins
• 3 iBOTs
• 2 large mail tubs
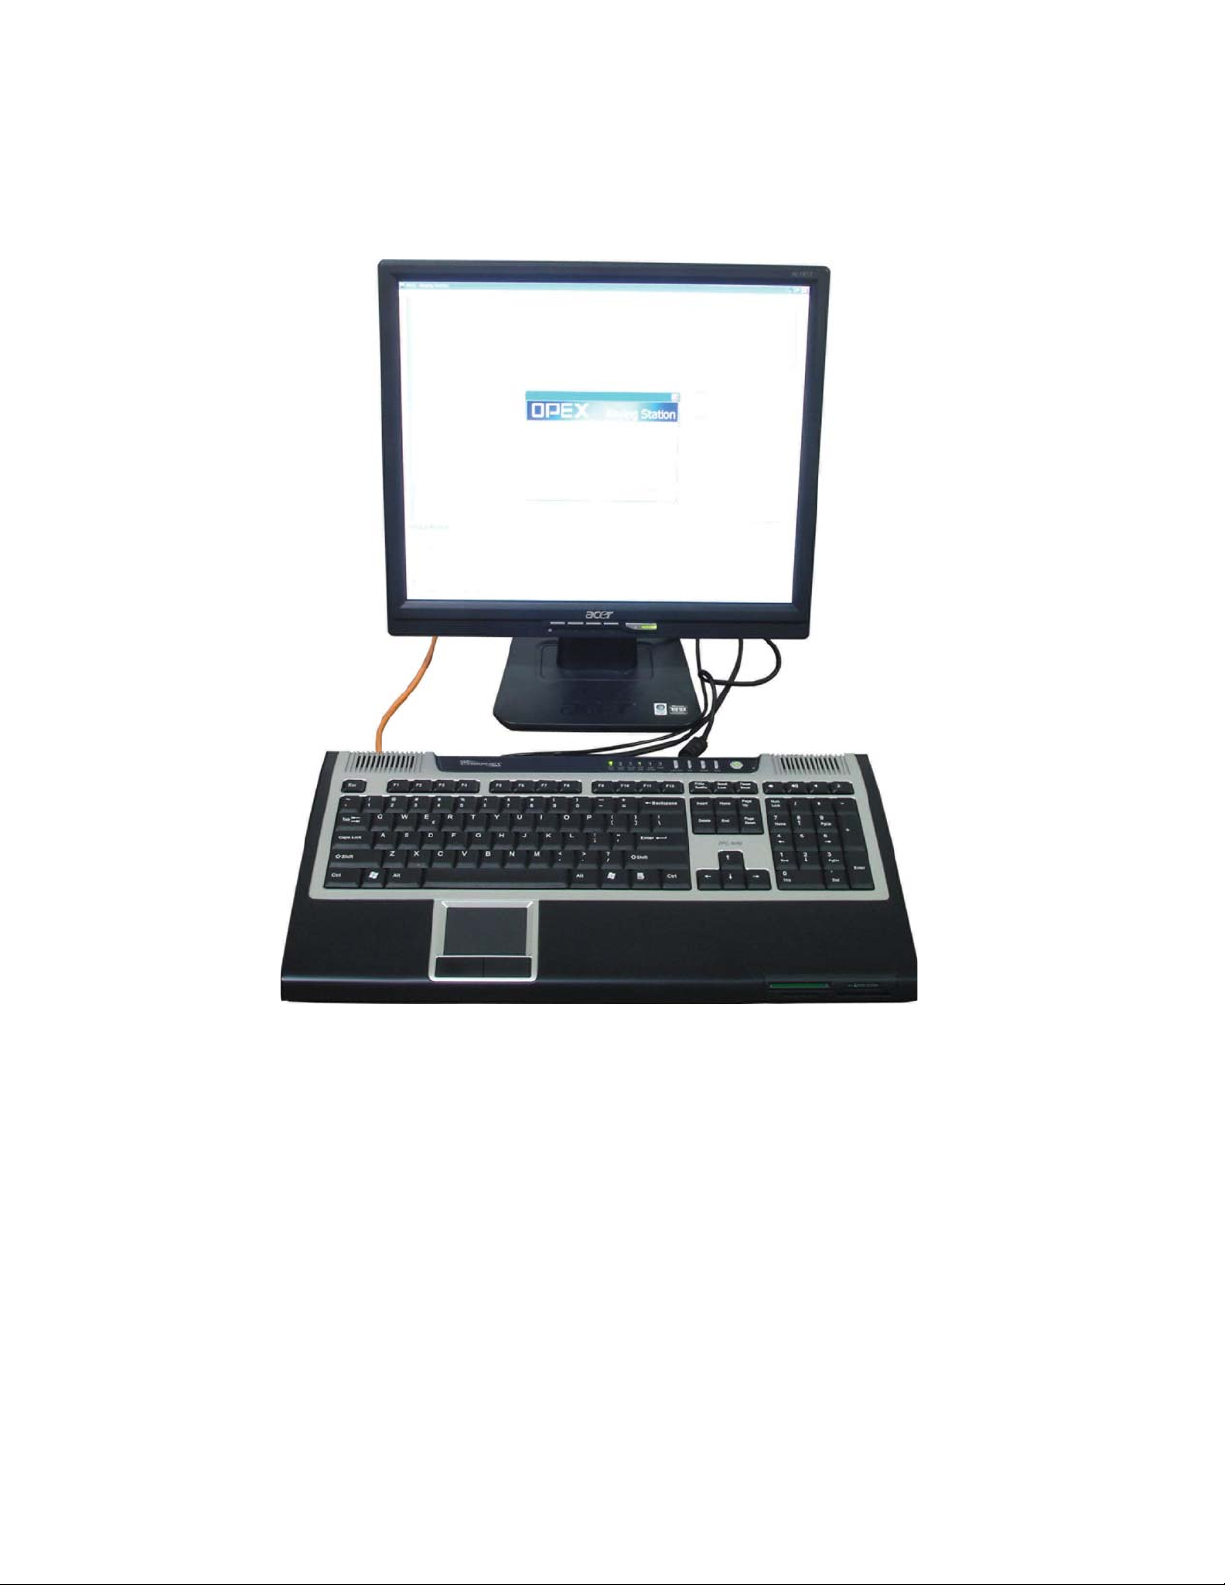
• Host PC with Microsoft Windows® XP
FIGURE 1: Mail Matrix base system
1-6 Mail Matrix Operator Manual
1 Introduction
Optional enhancements include:
• Delivery-bin expansion modules Up to 11 additional expansion modules (90 bins
each) can be installed to increase the bin capacity to 1020 bins.
1-7Mail Matrix Operator Manual
1 Introduction
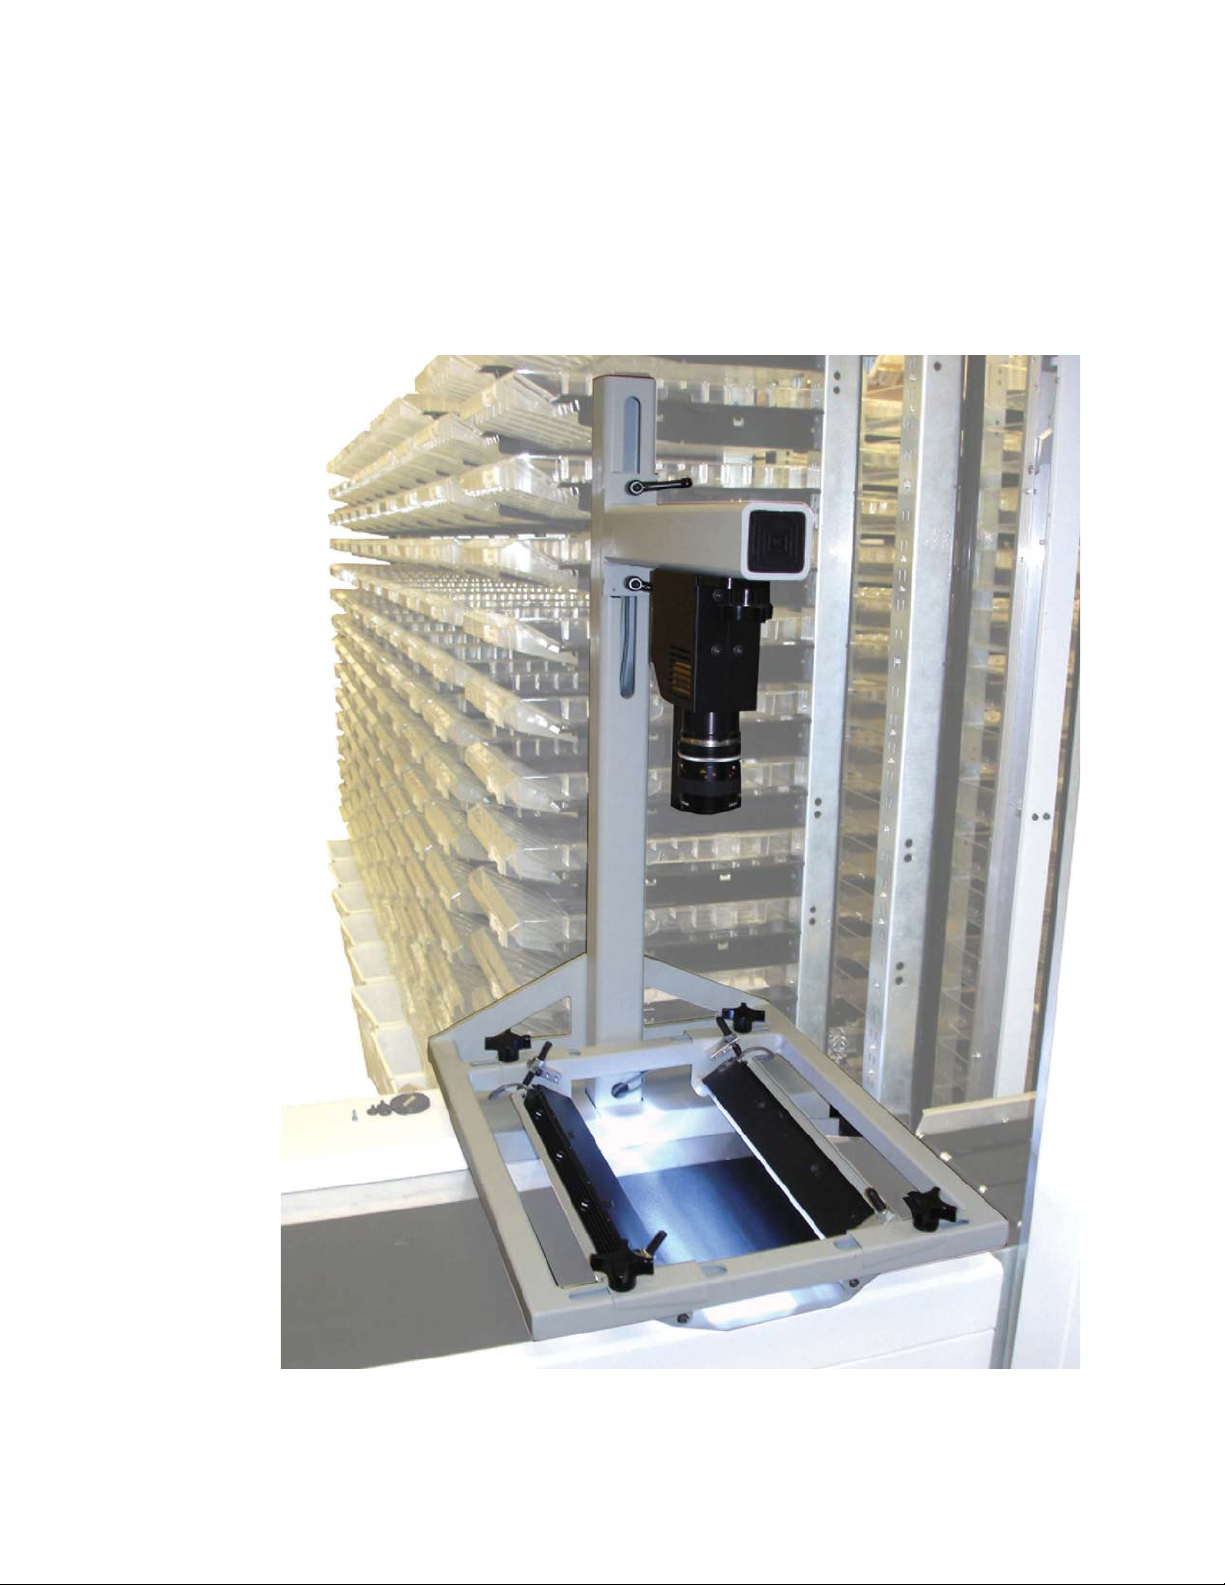
• Image capture/MLOCR (Multi-Line Optical Character Recognition) The image
capture/ MLOCR option captures images of mail pieces and automatically
determines bin destination. This enhancement is made up of a camera and light
arrangement to capture the image of the piece, as well as the MLOCR software,
which can interpret the images from the camera and send the necessary
addressee information along to the DRS for bin assignment. The image capture/
MLOCR option eliminates the need for the operator to identify the recipient and
enter the information for each piece manually.
1-8 Mail Matrix Operator Manual
1 Introduction
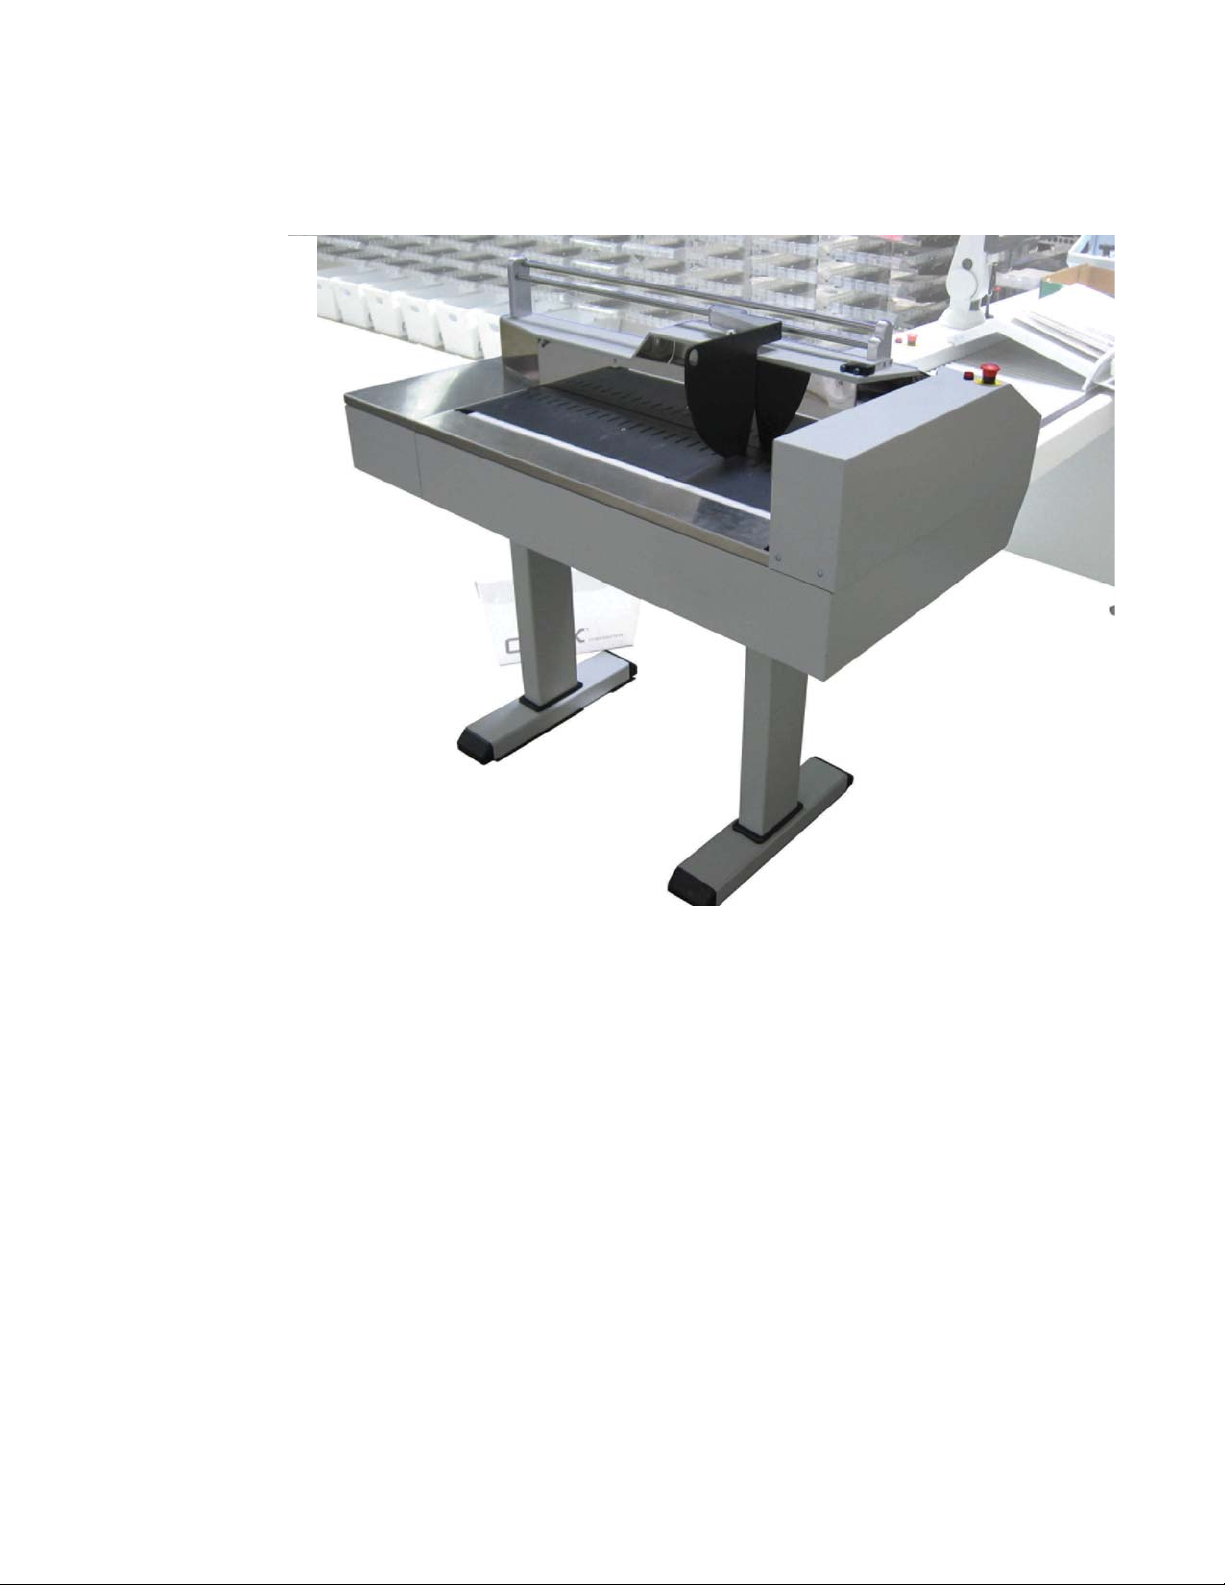
• Auto-Feeder an installed auto-feeder provides automated mail feed to the mail
input module. The auto-feeder (along with additional iBOTs) can increase the
throughput up to 3600 pieces/hr. (MLOCR required).
1-9Mail Matrix Operator Manual
1 Introduction
• Key From Image (KFI) Module Additional keying stations can be used in
conjunction with the image capture/MLOCR option. These KFI (Key From Image)
modules allow additional operators to identify pieces that could not be identified
by the MLOCR and DRS.
1-10 Mail Matrix Operator Manual
• Additional iBOTs Mail Matrix can support a total of 36 iBOTs.
1 Introduction
•Mail Cart(s)Mail carts are available to aid in the process of sweeping the bins.
1-11Mail Matrix Operator Manual
1 Introduction
How Mail Matrix Works
The Mail Matrix system uses three software applications to control and run the
system: the Host software, the OPEX Directory Retrieval System (DRS), and the
Keying Station application.
Mail is input in to the system by either the operator or an installed auto-feeder,
which can automatically place mail onto the conveyor. The operator can either look
at each piece and use a Keying Station to identify the intended recipient in the site’s
database, or an installed camera can take an image of each piece and the Mail Matrix
can use software to sort it.
Host software
The Mail Matrix Host software provides the operator’s main interface with the
system’s controls. Use the Host software to select and run jobs and view statistical
reports on the machine.
Directory Retrieval System (DRS)
The OPEX Directory Retrieval System (DRS) references a database containing
recipient names and bin assignments. The DRS attempts to find a matching recipient
for each piece keyed in by the operator (or identified by the image capture/MLOCR
system, if installed), then assigns the mail to the bin specified for that recipient.
1-12 Mail Matrix Operator Manual
1 Introduction
Keying Station
Use the Keying Station application to enter the names of mail recipients. After the
recipient has been identified by the Keying Station, drop the piece onto the conveyor
which will the piece to an available iBOT.
The Keying Station software is found on the Host PC (at the operator station), as well
as any installed KFI (Key From Image) modules, where remote operators can identify
recipients for pieces that the MLOCR software was not able to identify.
1-13Mail Matrix Operator Manual

1 Introduction
Workflow
The Mail Matrix workflow depends greatly on the options you have installed on your
machine. The following pages describe the step-by-step methods the Mail Matrix
system uses to properly sort your mail.
The first section below provides an overview of what takes place in the basic,
“barebones” configuration of the Mail Matrix system, and is followed by the
workflows of a fully-configured Mail Matrix.
NOTE: These workflows are intended to give you a better understanding of how the
machine works. The operator’s role is described in more detail in Chapter 2.
Basic configuration
The basic Mail Matrix system functions as shown in Figure 2 and described in the
following pages:
123 45 6
Keyed by
operator
FIGURE 2: Mail Matrix workflow (basic configuration)
DRS
assigns bin
Dropped
on conveyor
Load an
iBOT
Travel to
bin
1 At the operator station, the operator uses the Keying Station application to
identify the recipient of a piece.
Repeat
1-14 Mail Matrix Operator Manual

1 Introduction
2 The OPEX Directory Retrieval System (DRS) determines a bin assignment for the
piece, and the software notifies the iBOT of the delivery bin.
3 The operator drops the piece onto the conveyor
4 The conveyor carries the piece to the awaiting iBOT.
1-15Mail Matrix Operator Manual

1 Introduction
5 The iBOT carries the piece to its destination, releases the piece to the bin, and
heads back to the loading column.
6 The operator keys in the name of the next recipient, and the process repeats.
NOTE: Keep in mind that the operator does not have to wait until the iBOT returns
to drop the next piece. The operator can continue to drop documents as fast
as he/she can key them, assuming there are enough iBOTs to deliver the
mail.
1-16 Mail Matrix Operator Manual

1 Introduction
Fully-configured machine
The Mail Matrix workflow changes according to the options installed. Figure 3 shows
the possible workflows of a machine with an auto-feeder and image capture/MLOCR
options installed.
1a
Keyed from
Paper
1b
1c
Manual
Drop
Auto Feed
START
FINISH
23 4
5a6
Yes
MLOCR to DRS
(KFI module, if
necessary)
Travel to
destination
bin
Bin
assigned
?
No
Yes
5b
Load on
iBOT
Bin
assigned
?
Wait in 2
column
No
nd
Image
Capture
Mail piece
delivered
Travel up
loading
column
FIGURE 3: Mail Matrix workflow (auto-feeder and image capture/MLOCR installed)
1 At a fully-configured machine, a piece of mail can enter the system in one of three
ways:
a. The operator can look at the piece and enter it’s recipient into the Keying
Station software at the operator station. This is the simplest way to input the
piece. After keying the recipient, the operator will manually place the piece on
the conveyor. The DRS will assign the bin, and the piece will travel to an
awaiting iBOT (skip to step 4).
b. The operator can simply drop the piece on the conveyor and let the MLOCR
and DRS software determine the recipient and the bin assignment. This
method can only be used on machines that have the image capture/MLOCR
option installed.
c. An installed auto-feeder can automatically feed stacks of mail onto the
conveyor.
2 Pieces that entered the system without being identified by the operator will have
their picture taken by the camera.
1-17Mail Matrix Operator Manual

1 Introduction
3 The image of the piece captured in step 2 is analyzed by the MLOCR software,
which reports the characters it found to the DRS software. If the MLOCR and DRS
cannot determine a match, the image is sent to an available Keying Station for
operator identification.
4 The conveyor carries the piece to the awaiting iBOT.
5 The next step depends on whether or not the DRS has assigned a bin for the piece
on the iBOT:
a. If a bin has been assigned for the mail piece, the iBOT will exit the loading
column and deliver the piece to the assigned bin.
b. If a bin has not been assigned, the iBOT will wait in the
first delivery column
for its bin assignment. Once the destination has been assigned, the iBOT will
deliver the piece.
NOTE: If the iBOT does not receive the bin assignment in 30 seconds, the piece
will be sent to the reject bin/tub.
6 The iBOT carries the piece to the delivery bin, releases the piece to the bin, and
heads back to the loading column.
1-18 Mail Matrix Operator Manual

Operator Manual
Chapter
Operation
2
Overview......................................................................................... 2-1
Turning the power on/off ........................................................... 2-2
Logging in to the Host software................................................. 2-3
Navigating the Host software .................................................... 2-4
Running Jobs.................................................................................. 2-5
Selecting a job........................................................................... 2-5
Setting up your run.................................................................... 2-6
Processing mail......................................................................... 2-8


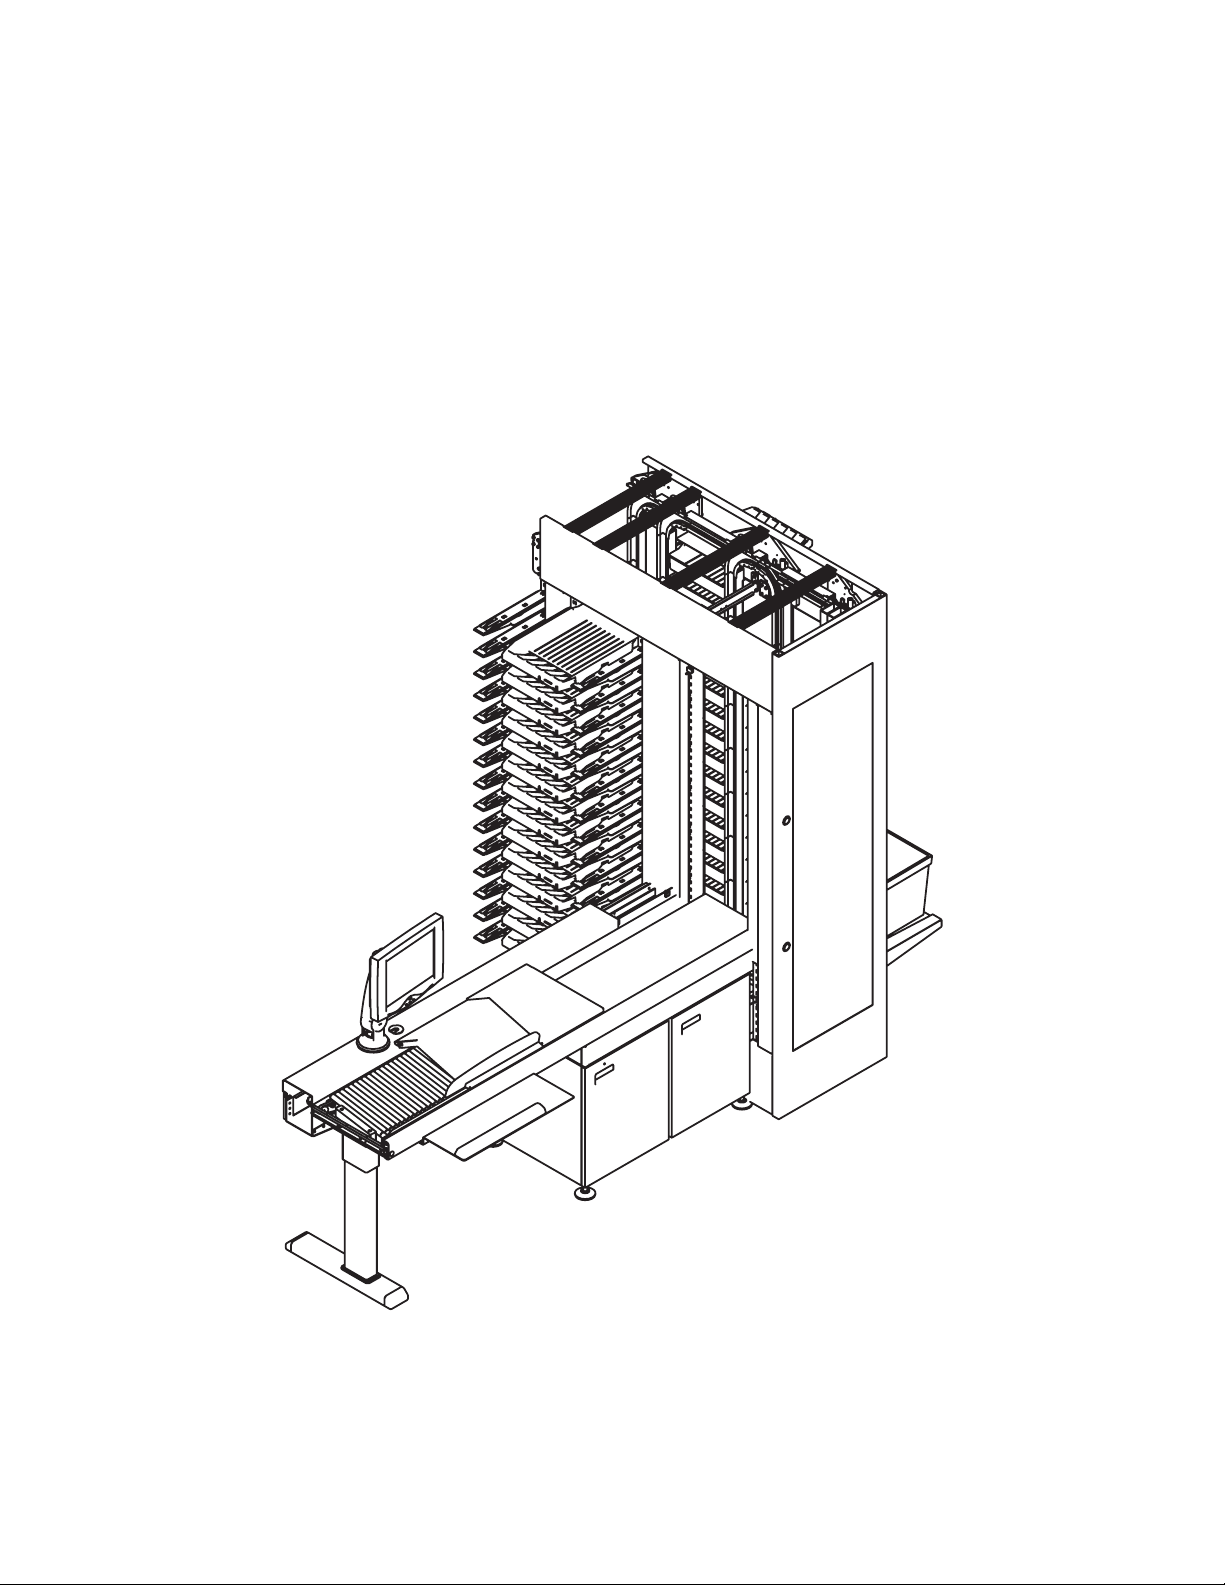
Overview
Most functions of the Mail Matrix system are accessible from the operator station,
where the operator is within easy reach of the touch-screen monitor, keyboard and
mouse, and the conveyor. The touch-screen monitor provides the operator’s main
interface with the Mail Matrix software, which controls the system.
2 Operation
Touch-screen monitor
Conveyor
PC/UPSKeyboard/Mouse
FIGURE 4: Operator station (auto feeder and imaging upgrades installed)
2-1Mail Matrix Operator Manual

2 Operation
Turning the power on/off
Power up the machine
1 Turn the main power switch to the On (up) position.
Main power switch
PCUPS
FIGURE 5: PC/UPS/Main power switch locations
2 Press the Power button on the front of the UPS. The PC should start with the UPS.
If not, press the power button on the front of the PC.
3 Log in to Windows with the keyboard and mouse at the operator station.
Turn the machine off
1 Shut down the PC.
2 Press the Power button on the UPS.
3 Turn the main power switch to the Off position.
2-2 Mail Matrix Operator Manual

Logging in to the Host software
The Mail Matrix Host PC will launch the Host software as part of the system’s
start-up routine. If you mistakenly close the Host software or, for some reason, the
Host software does not start with the machine, you can start it manually.
1 If the Host software is not already running, double-click on the Mail Matrix icon
on the desktop OR click Start > Programs >
screen will appear.
2 Operation
OPEX > Mail Matrix to open it. The Login
FIGURE 6: Login screen
2 Select your username from the dropdown list.
3 Enter your password in the appropriate field.
4 Click Login. The Host software displays the Job Select screen.
2-3Mail Matrix Operator Manual

2 Operation
Navigating the Host software
The Mail Matrix Host software provides the operator’s main interface with the
system’s controls. Use the Host software to select and run jobs and view statistical
reports on the machine.
The Host software interface consists of:
Menu bar The vertical menu bar provides access to the main system functions.
Select a category from the menu bar and make selections from the main window or
the menu options bar.
Menu options The menu options provide sub-categories for the selections in the
menu bar. The menu options bar will change based on the current menu bar
selection.
Main window View and adjust settings and make selections in the main window.
Menu bar
Menu options
FIGURE 7: Host software interface
Main
window
2-4 Mail Matrix Operator Manual

Running Jobs
The main components involved in running jobs on the Mail Matrix are the Run
screen and the Keying Station application.
Selecting a job
The first step to sorting your mail on the Mail Matrix is to choose the “job” you want
to run. A job is a collection of the settings and methods the system will use to
process your mail in a similar fashion from run to run. The jobs on your machine
should be set up ahead of time, either by an OPEX technician or your site supervisor
or IT department.
Highlight the job you want to run from the Job Select screen and click the
Go to Run Screen button. This will take you to the Run screen, where you can manage
your run (described on page 2-6).
2 Operation
FIGURE 8: Job Select screen
2-5Mail Matrix Operator Manual

2 Operation
Setting up your run
Once you have selected a job, the Run screen appears. Use the Run screen to:
• Select the input mode (Key From Paper, Key From Image, MLOCR)
• Start and stop the job
• View vital system information about the current job as the machine is running
• View information about jams
• Access the Event Log
• Access the Keying Station application
There are 3 main compnents to the Run screen: the main controls, the main status
area, and the information tabs.
Press this button
(or F12 on the keyboard) to switch
to the Keying Station application
View the
Event Log
FIGURE 9: Run screen (iBOT status tab)
Exit the Run screen and return
to the Job Select screen
2-6 Mail Matrix Operator Manual

2 Operation
The next step in running your job is to select the options you want to use for the run.
The Run screen’s System Modes tab establish how you plan to run the job.
1 Select the desired Auto Feeder mode, if you have an auto feeder installed:
- Select AUTO to have the feeder send pieces onto the conveyor automatically.
- Select OFF to turn the auto feeder off and drop pieces manually.
2 Select a Keying mode. The keying mode establishes whether or not the operator
will key in the recipients or if the installed image capture/MLOCR system will
determine the recipient. The options available depend on whether or not you have
the image capture/MLOCR option installed and whether or not you chose to use
the auto feeder in step 1. Select:
- No Keyer if you have image capture/MLOCR installed and do not wish to have an
operator identify recipients.
- From Paper to key in the recipients at the operator station before dropping the
piece.
- From Image to identify recipients based on the image provided by the installed
camera setup.
3 Turn the OCR Assist ON or OFF. This activates the MLOCR function for analyzing
the piece for the recipient information. OCR Assist must be turned ON if the
Keying Mode is set to No Keyer.
2-7Mail Matrix Operator Manual

2 Operation
Processing mail
Once you have decided how you want to run your job, it’s time to start processing
mail. Below you will find two procedures: the first is for operators with the basic
Mail Matrix configuration, who will key in the recipient and manually drop mail, the
second is for machines with auto-feeder and image capture/MLOCR options
installed.
Basic, Key From Paper mode
The basic procedure involves the operator identifying the recipient of each piece and
dropping the mail onto the conveyor. This procedure can be used on any Mail Matrix
machine.
1 After selecting the job and choosing the From Paper keying option, press F12 on the
keyboard to switch to the Keying Station application on the Host PC (or click on
the F12 - Switch to Keying button on the bottom of the Run screen).
2-8 Mail Matrix Operator Manual

2 Operation
2 Press F12 on the keyboard to switch to the Keying Station application on the Host
PC. A miniature version of the Run screen will appear in the lower right corner of
the screen.
3 Enter you username and password into the appropriate fields and click the Login
4 Press START on the miniature Run screen to start the machine.
DANGER!
button to log in to the Keying Station application.
Pressing START will send the machine into its startup routine, which includes positioning the
iBOTs in the loading column and starting the conveyor. The moving parts of the Mail Matrix
can become jammed and/or damaged by foreign objects, so make sure the conveyor and
iBOT loading areas are clear before you press START. Also make sure to keep hands, hair,
loose clothing and/or jewelery away from the moving parts.
2-9Mail Matrix Operator Manual

2 Operation
Y
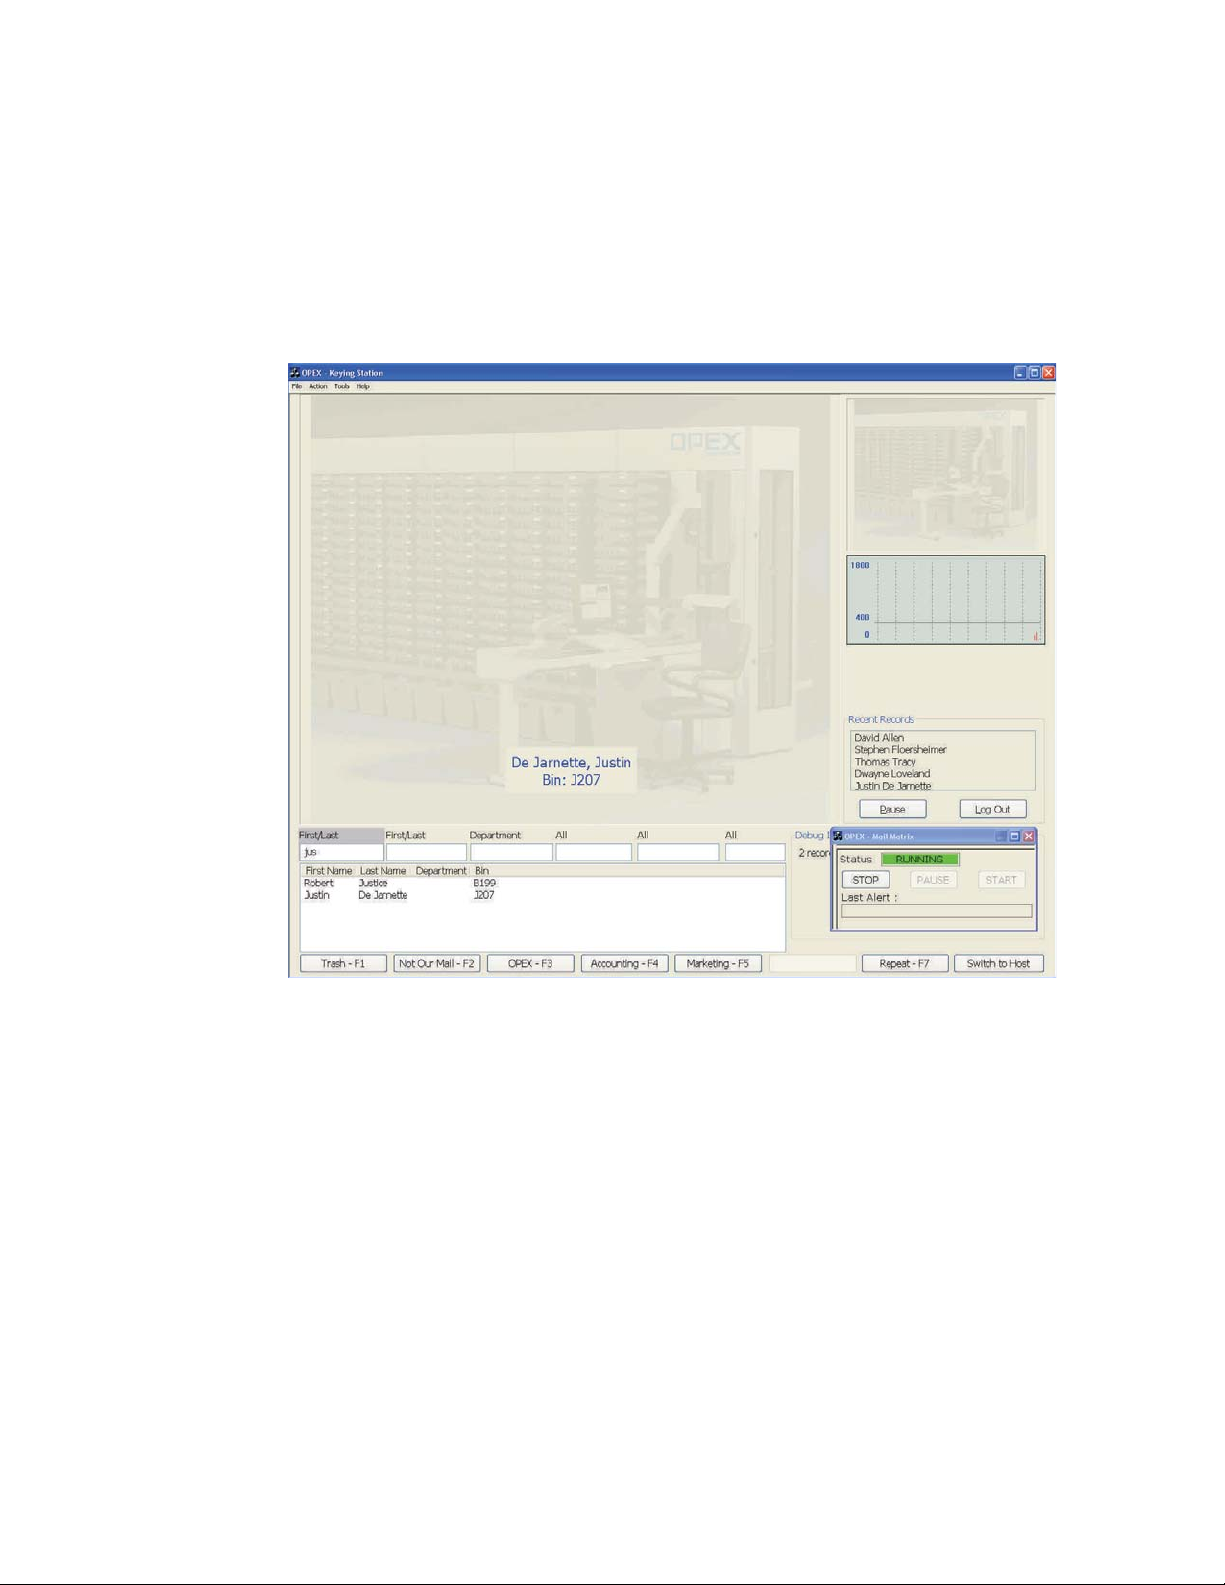
5 Enter the intended recipient of your first piece of mail into the Keying Station
application.
Enter the first or last name of the recipient in the first of
the First/Last fields. As you type, the database entries
that match your input will appear in the window. In this
example we have a piece of mail for James Smith. As
we begin to type “sm” for “Smith,” all the database
entries that have either a first or last name that have
“sm” in them appear as a possible match.
NOTE: If you see your intended recipient in the window
at any point, you can use the down arrow and press
enter to select the recpient at any time.
Press Tab on the keyboard to move to the next First/Last
field (or move the cursor with the mouse). For this
example, we type “ja” for the first name of our recipient,
James, our intended recipient is the only one than
matches and In this case, press Enter on the keyboard
to make the match.
ou can also use the Quick Buttons at the bottom of the Keying Station
to identify the recipient instantly. These buttons are best used for mail that
was addressed improperly or mail that is going to a specific department
for which you have a Quick Button assigned.
Repeat the last match“Department” mailRejects
2-10 Mail Matrix Operator Manual

2 Operation
6 Drop the piece onto the conveyor. The conveyor will carry the piece to the iBOT,
which will then deliver the piece to the appropriate bin.
DANGER!
7 Repeat the process for all the mail you want to process.
Be especially careful not to let loose clothing, hair, and jewelry away from the conveyor when
dropping pieces. Loose articles of these sort can get caught in the conveyor and cause
damage to the machine and/or could injure the operator.
2-11Mail Matrix Operator Manual

2 Operation
Key From Image mode
Fully-configured machines can run in different modes which use installed options to
minimize the role of the operator in the process. These modes are only available if the
image capture/MLOCR and/or auto-feeder options are installed.
Key From Image mode sends images for mail pieces that could not be identified by
the image capture/MLOCR setup to an available keying station. Key From Image
mode can be used with or without the auto-feeder.
1 After selecting the job and choosing the From Image keying option, choose from the
other options as desired:
• Select the OCR Assist mode. Turn OCR Assist ON if you have the image
capture/MLOCR option installed and you want the software to attempt to
determine the recipient.
• Select AUTO for the Auto Feeder mode if you want to use the installed auto
feeder to feed your mail. Select OFF to feed the mail manually.
• Select a Piece Orientation. Usually, you will want to set this to Normal.
2 Once you have your run set up the way you want, decide whether or not to use
the Host PC as a Keying Station. If you have other KFI modules installed and
active, you can have the images of unrecognized mail sent to those stations and
2-12 Mail Matrix Operator Manual

2 Operation
just control the run from the Host PC. If you do choose to use the Host PC as a
Keying Station:
a. Press F12 on the keyboard to switch to the Keying Station application on the
Host PC. A miniature version of the Run screen will appear in the lower right
corner of the screen.
b. Enter you username and password into the appropriate fields and click the
Login button to log in to the Keying Station application.
2-13Mail Matrix Operator Manual

2 Operation
3 If you are using the auto-feeder, load it with mail as described here. If not,
proceed to step 4:
a. Stack mail in the auto-feeder face forward, right-side up.
4 Press START on the Run screen. If you activated the auto-feeder, it will begin
DANGER!
5 The conveyor will carry your mail past the camera and to an awaiting iBOT. The
6 The iBOT delivers the mail piece to the appropriate bin.
b. Hold the mail stack in place with the cleaver, which fits into the grooves on the
feeder belt.
Be careful not to get fingers caught in the feed mechanism or under the cleaver.
feeding mail onto the conveyor. If you did not activate the auto-feeder (or do not
have one installed), drop the mail onto the conveyor yourself.
Pressing START will send the machine into its startup routine, which includes positioning the
iBOTs in the loading column and starting the conveyor. The moving parts of the Mail Matrix
can become jammed and/or damaged by foreign objects, so make sure the conveyor and
iBOT loading areas are clear before you press START. Also make sure to keep hands, hair,
loose clothing and/or jewelery away from the moving parts.
camera will capture the image, the MLOCR software will interpret the text, and
the DRS will attempt to assign a bin.
• If the software cannot determine the recipient, the image will be sent to an
available Keying Station, either at the operator station or at an installed, active
KFI module.
• If the piece is not identified in a certain amount of time
the reject bin.
, the piece will be sent to
2-14 Mail Matrix Operator Manual

2 Operation
No Keyer mode
The No Keyer mode uses the auto-feeder to place mail onto the conveyor. Any pieces
that are not identified by the image capture/MLOCR system are rejected.
1 Select a job and choose the No Keyer keying option. press F12 on the keyboard to
switch to the Keying Station application on the Host PC (or click on the F12 - Switch
to Keying button on the bottom of the Run screen).
2-15Mail Matrix Operator Manual

2 Operation
2 Stack mail in the auto-feeder face forward, right-side up.
3 Hold the mail stack in place with the cleaver, which fits into the grooves on the
4 Press START on the Run screen. The auto-feeder will begin feeding mail onto the
DANGER!
5 The conveyor will carry your mail past the camera and to an awaiting iBOT. The
6 The iBOT delivers the mail piece to the appropriate bin.
feeder belt.
Be careful not to get fingers caught in the feed mechanism or under the cleaver.
conveyor. If you did not activate the auto-feeder (or do not have one installed),
drop the mail onto the conveyor yourself.
Pressing START will send the machine into its startup routine, which includes positioning the
iBOTs in the loading column and starting the conveyor. The moving parts of the Mail Matrix
can become jammed and/or damaged by foreign objects, so make sure the conveyor and
iBOT loading areas are clear before you press START. Also make sure to keep hands, hair,
loose clothing and/or jewelry away from the moving parts.
camera will capture the image, the MLOCR software will interpret the text, and
the DRS will attempt to assign a bin. If the software cannot determine a match,
the piece will be rejected.
2-16 Mail Matrix Operator Manual

2 Operation
Information tabs
The information tabs on the right side of the Run screen provide information about
the machine and its performance during the run.
Overview tab
The Overview tab provides information about the current run.
Run time
Idle time
Jam time
Jam count
iBOT jammed
Pieces input
Pieces delivered
Pieces rejected
Feed rate
MLOCR attempts
MLOCR successes
Pieces sent to keying
Keying successes
Total time spent processing mail.
Time the operator spent with the Run screen open without a job running.
Total time the system was halted for a jam.
Reports occasions when run was halted due to a paper jam or a processing
problem that was machine related.
Jams due to failed delivery by an iBOT.
Total number of pieces fed into the system.
Number of pieces that were successfully delivered to a bin.
Number of pieces rejected.
Total number of pieces fed into the system, per hour.
Number of pieces the MLOCR attempted to read.
Number of pieces the MLOCR positively identified.
Number of pieces sent to a keying station for identification.
Number of pieces positively identified by an active keying station.
2-17Mail Matrix Operator Manual

2 Operation
Modules tab
The Modules tab provides information about installed components, such as keying
stations and auto feeders
.
Use the dropdown list to view information for
installed modules
iBOTs tab
The iBOTs tab provides information about each active iBOT. The tab includes a
status report for each iBOT, including its power level and destination bin, as well as
a graphical display.
About the display:
The graphical display at the bottom of the iBOTs tab
shows exactly where in the system each active iBOT
is at any time during the run. The green column on the
far right represents the loading column.
The color of each iBOT indicates its current status:
(Green) The iBOT is sufficiently charged
(Yellow) The iBOT is low on power
(Red) The iBOT has jammed
The white rectangle on top of an iBOT indicates that
the iBOT is carrying a piece of mail.
2-18 Mail Matrix Operator Manual

Operational Maintenance
Cleaning the System ...................................................................... 3-1
iBOT Maintenance.......................................................................... 3-2
Removing/Replacing iBOTs ...................................................... 3-3
Shift Maintenance........................................................................... 3-6
Operator Manual
Chapter
3


Cleaning the System
Do not clean any parts of the machine while it is running. This can result in severe personal injury and
CAUTION
costly equipment damage. If a belt, roller, gate, etc., needs to be cleaned, hand-crank the component or
clean it while stationary.
Acetone
Acetone is a powerful solvent and degreaser. Only use it on metal objects or surfaces
when your intention is to remove all of the grease or lubricant from the object or
surface being cleaned.
Exercise care when using acetone near any type of bearing. Flooding the bearing with
acetone removes the lubricant from the bearing. This can result in severe
degradation of the materials in a short period of time.
Alcohol
Alcohol is a degreaser, but less powerful than acetone. Use it in place of acetone for
shafts or bearings when your intention is to remove grease or lubricant from them.
3 Operational Maintenance
Use only isopropyl or rubbing alcohol on the Mail Matrix. Denatured alcohol is much
stronger and more hazardous. Do not use denatured alcohol for any reason.
Exercise care when using alcohol on bearings. Flooding the bearing with alcohol
removes the lubricant from the bearing, and can result in degradation of the
materials over time.
Detergent-based cleaners
A detergent-based cleaner, such as Formula 409, is less powerful than acetone or
alcohol. Use it to clean the glass and plastic surfaces of the Mail Matrix. Detergentbased cleaners do not cause component degradation.
If you use a detergent-based cleaner on a feed or singulator mechanism, remove any
residue left by the cleaner by wiping down the mechanism with a cloth moistened
with water.
3-1Mail Matrix Operator Manual

3 Operational Maintenance
iBOT Maintenance
Each iBOT has a control panel, which houses the on/off switch, a brake button, and
red and green status lights. The green light indicates that the iBOT is charged and
ready to go, and the red light indicates that the iBOT is in need of attention.
Manual brake (in the “parked” position)
“Powered” brake buttonOn/off
Status indicators
FIGURE 10: iBOT components
The “powered” brake button on the iBOT control panel releases the iBOT brake for as
long as it is pushed and held in. This button will only work, however, when the iBOT
has sufficient power. In the event that the iBOT requires assistance but does not
have sufficient power for the brake button to work, you can release the iBOT brake
by pushing the manual brake to the left.
Be careful then using the brakes. Releasing the “powered” brake button wil engage the brake
DANGER!
again, so as to make sure it will not fall when stuck in high places in the delivery columns. If you
need to release the manual brake, however, be prepared for it to fall immediately. The iBOTs are
fairly lightweight, but still heavy enough to injure an operator if it falls from above.
3-2 Mail Matrix Operator Manual

3 Operational Maintenance
The iBOTs tab on the Run screen will display the status of all the iBOTs in the
system as well. Use the iBOTs tab to monitor and maintain your iBOTs. The tab
includes a status report for each iBOT, including its power level and destination bin,
as well as a graphical display.
About the display:
The graphical display at the bottom of the iBOTs tab
shows exactly where in the system each active iBOT
is at any time during the run. The green column on the
far right represents the loading column.
The color of each iBOT indicates its current status:
(Green) The iBOT is sufficiently charged
(Yellow) The iBOT is low on power
(Red) The iBOT has jammed
The white rectangle on top of an iBOT indicates that
the iBOT is carrying a piece of mail. Click on an iBOT
in the display to see its status information in the top
window.
FIGURE 11: Run screen iBOT status tab
Removing/Replacing iBOTs
In the event that an iBOT should require maintenance, it can be quickly and easily
removed from the system. The iBOT in need of repair can be swapped for another
and returned to OPEX for service.
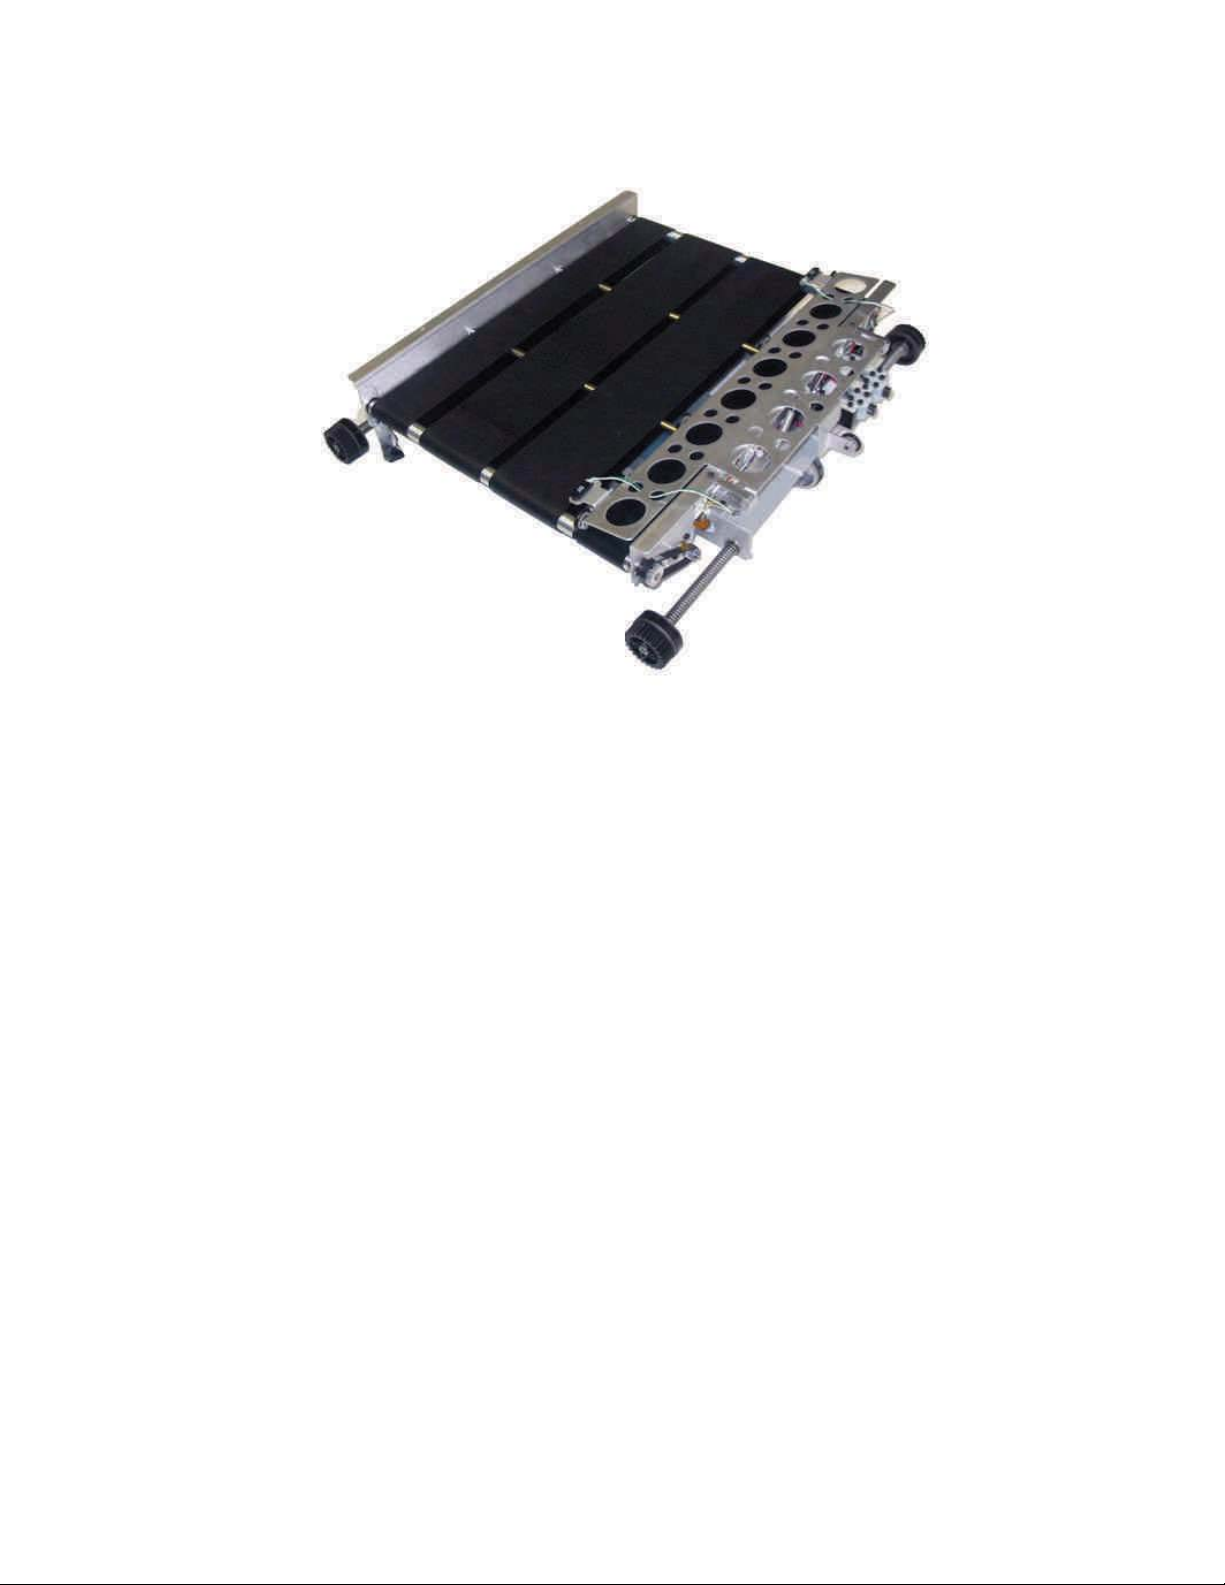
The drawer in the bottom of the stacker column is used to help remove and insert
iBOTs into the system so that the gears align properly for tracking purposes.
To remove an iBOT from the loading assembly
1 Move the iBOT into the loading assembly.
2 Open the access door.
3 Press and hold the brake button to release the brake on the iBOT.
4 Move the iBOT away from the track towards the front of the iBOT loading
assembly.
3-3Mail Matrix Operator Manual

3 Operational Maintenance
5 Lift the handle which causes the left and right clamps to grip the wheels of the
iBOT, and slide the loading assembly out of the stacker assembly.
FIGURE 12: Car loader assembly with iBOT
Right clamp
Wheel of iBOT
Lift handle
6 Remove the iBOT from the loading assembly.
7 Slide the empty loading assembly back into the stacker and close the access door.
To insert an iBot at the loading assembly
1 Open the access door.
2 Slide the loading assembly out.
3 Put the iBOT into place and align it so that the back wheels are beneath the left
and right wheel clamps.
4 Lift the handle, and slide the loading assembly back.
5 Close the access door.
3-4 Mail Matrix Operator Manual

3 Operational Maintenance
To remove an iBOT from a delivery column:
Sometimes an iBOT will get stuck in a delivery column, too far away to remove it
from the loading assembly. In this case, you must either remove all the bins in the
area or the go inside the machine to remove the iBOT.
3-5Mail Matrix Operator Manual

3 Operational Maintenance
Shift Maintenance
Shift operators should perform the following duties:
• Vacuum all areas of the paper path. Pay special attention to:
- Conveyor area
- iBOT loading area
3-6 Mail Matrix Operator Manual

Operator Manual
Appendix
Statistics
A
Individual reports ........................................................................... A-1
Summary reports ........................................................................... A-2


Statistics
A Statistics
The Mail Matrix statistics provide information on the jobs run on the system. Create
statistics reports on a per-run basis (Individual Report), or as a summary of several runs
over a designated period of time (Summary Report).
Individual reports
An individual report is created for each run made on the machine, regardless of job
or operator. To view an individual report, select Statistics > Individual.
Individual report buttons
Print the selected report.
Export the current report to the hard drive. The .txt file will be saved to the
default directory:
View the first saved run report.
Open the report for the run previous to the one you are viewing.
View the report for the next run.
View the most recent run report.
C:/OPEX/MailMatrix/Data/Stats.
A-1Mail Matrix Operator Manual

A Statistics
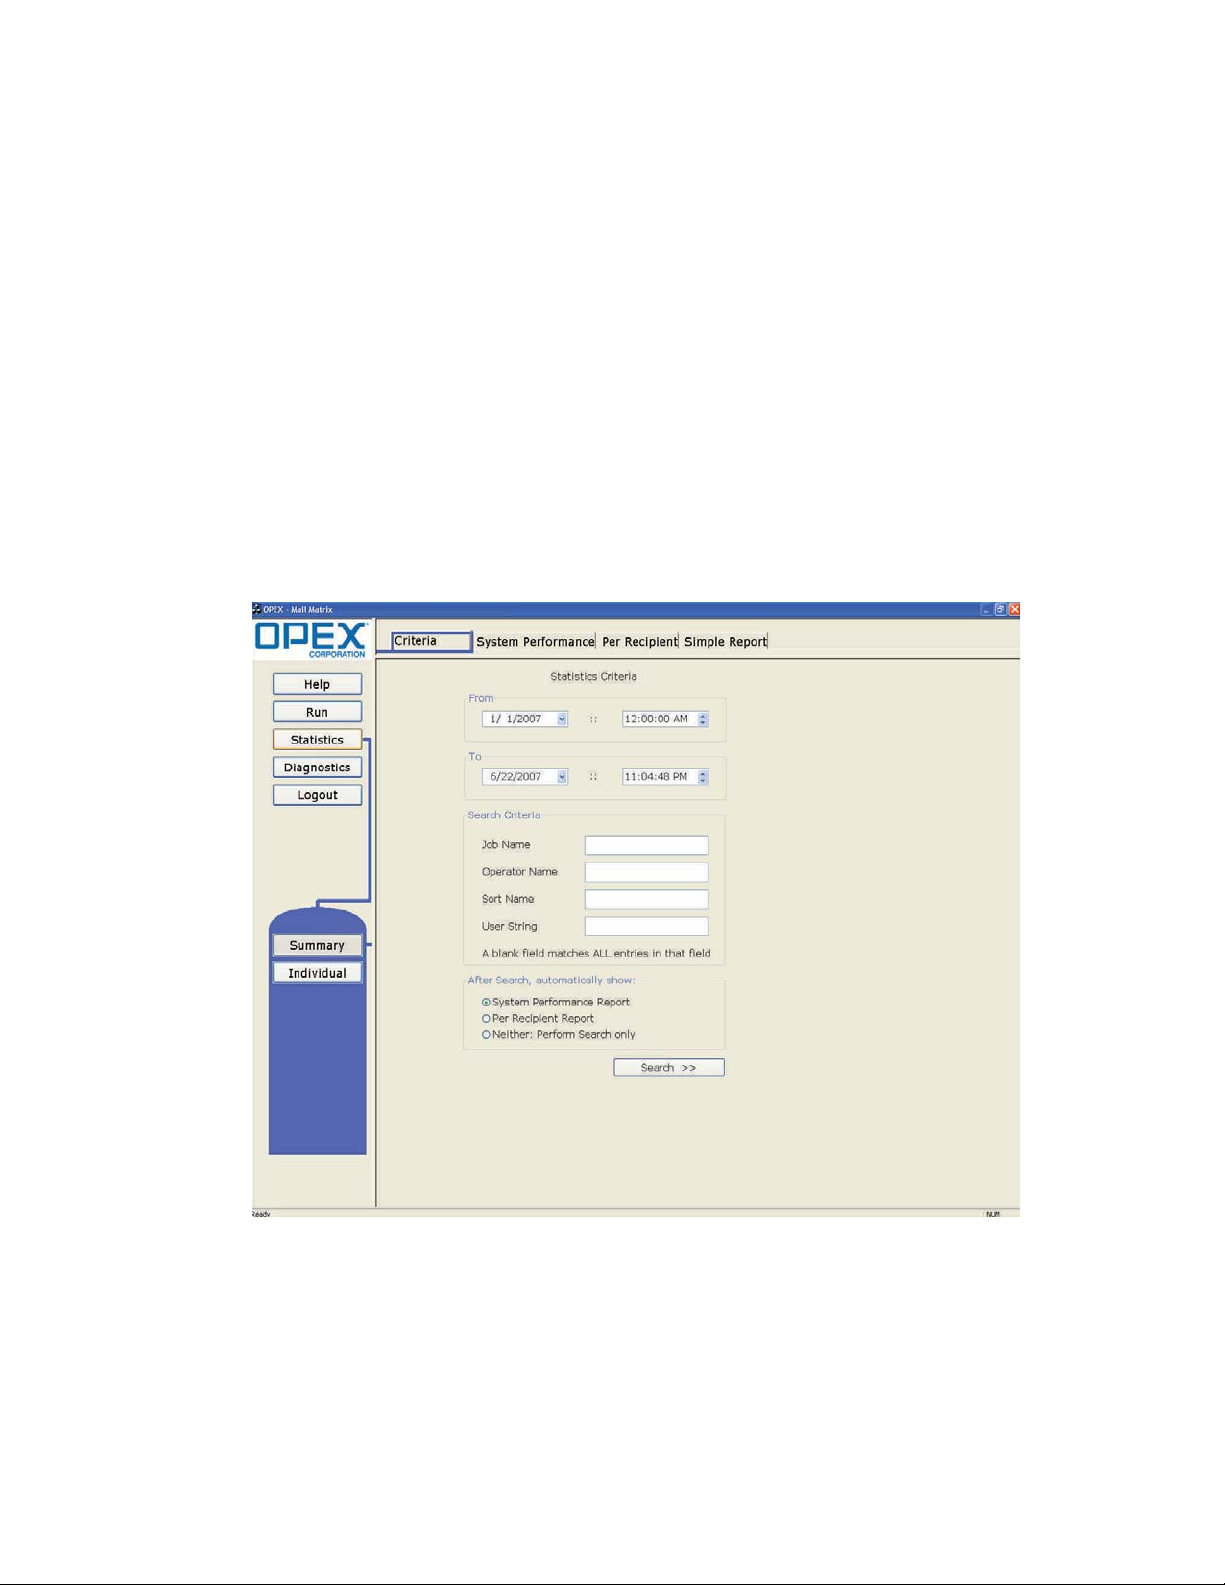
Summary reports
A Summary report is based on the Report Criteria you set up. The Report Criteria
establishes which jobs, operators and dates will make up the Summary report.
There are 3 different types of summary report:
•The System Performance report provides information relative to the machine’s
performance such as run time, throughput, MLOCR rates, etc.
•The Per Recipient report details how many pieces of mail were delivered to each
recipient during the specified period of time.
•
The Simple Report gives the criteria for the current search, as well as the total
number of data records for the specified time period.
Creating a summary report:
1 Select Statistics > Summary > Criteria. These are the items that will be included in your
reports.
FIGURE 13: Summary report criteria
A-2 Mail Matrix Operator Manual

A Statistics
2 Enter the date and time range for the report in the Date section.
FIGURE 14: Date range settings
3 Enter the names of the jobs, operators, sort names, and user string fields that
you want to include in the report. Leave the fields blank to select all the jobs,
operators, etc. run on the machine during the specified time period.
FIGURE 15: Search criteria fields
4 Select which report, or none at all, to show when the search is complete.
A-3Mail Matrix Operator Manual

A Statistics
NOTE: Individual and summary reports are very similar. The following tables define
the terms you find in both of these reports.
Overall System Performance Measures
Input
Outsorts
Output
Jam Rate
Run Type
Feed Rate
Output Rate
Number of envelopes to enter the paper path via the feeder module.
Number of envelopes deemed unsuitable for processing.The statistic report
contains a list of counts for each outsort category. Each envelope that is
directed to the Outsort Bin will only increase one category on the list. If a
piece has the potential to increase multiple categories, only the first category
in the list is increased. See Appendix A: “Outsorts, Reunites and Rejects” for
more information.
Transactions that have passed through the Extract module and have been
sent to either the reunite bin or one of the stacker bins.
Number of jams per run. The formula for the Jam Rate is:
Shows how much of the job was run on the Mail Matrix and how much of the
job was run from the IEM refeeders.
Number of envelopes per hour the Mail Matrix is currently feeding. The
formula for the Feed Rate is:
(seconds per hour)
Number of envelopes per hour the Mail Matrix is processing. The formula for
the Output Rate is:
Average time the Mail Matrix was halted while the operator was clearing a
jam. The formula for the Jam Clear Time is:
Jam Clear Time
This calculation approximates the feed rate if jams are cleared in the time
Reference Feed
designated by the Reference Jam Clear time:
Rate
This calculation approximates the machine output rate if jams are cleared in
the time designated by the Reference Jam Clear time:
Reference Output
Rate
Estimated time it takes to clear a jam. This is set at 20 seconds by default,
Reference Jam
Clear Time
but most sites have set it to
used to calculate Reference Feed and Reference Output Rates, which are
intended to provide the rates the machine would achieve if the operator
cleared jams within a certain period of time.
30 seconds. The Reference Jam Clear Time is
A-4 Mail Matrix Operator Manual

Performance Details
Amount of time the Mail Matrix was either actively running or halted due to a
jam. Active Job Time is further broken down into:
Active Job Time
Run Time: the time spent processing mail
Jam Time: the total time the system was halted for a jam
A Statistics
Idle Time
Outsorts
Output
Overall Jam Data
Jams
Jam Index
Stops
Stop Index
Time the operator spent with the Run screen open without a job running.
The Outsorts section of the Performance Details lists the number of
envelopes that the Mail Matrix could not process and the reasons why. These
reasons are defined in Appendix A: “Outsorts, Reunites and Rejects.”
The Output section of the Performance Details lists the number of transactions that were processed by the machine. Keep in mind that in addition to
clean mail and rejects, “Output” also includes reunites and jamsorts. The
items in the Output section are defined in Appendix A: “Outsorts, Reunites
and Rejects.”
Reports occasions when run was halted due to a paper jam or a processing
problem that was machine related.
Any time the Mail Matrix is halted due to a problem which could have been
avoided by the operator (i.e., feed empty, no bin available, etc.).
Jam/Stop Information
Reorder Gate 2
Sensor Missing
Jam
Stops
Reports occasions when run was halted due to a paper jam or a processing
problem that was machine related.
Any time the Mail Matrix is halted due to a problem which could have been
avoided by the operator (i.e., feed empty, no bin available, etc.).
A-5Mail Matrix Operator Manual

A Statistics
A-6 Mail Matrix Operator Manual

Glossary
Operator Manual
G


Glossary
Barcode A series of bars and spaces arranged in a
predetermined pattern to represent elements of data.
E-Stop Emergency Stop. A button used to stop the
machine in case of emergency.
Menu bar Vertical series of menus on the left side of
the screen. Use the Menu Bar to navigate through
the various system parameters and utilities.
Host Operator's main interface with the machine. The
Host PC interfaces with the system’s controller to
manage the system's non machine-related functions.
Job A profile of parameter settings you use for
processing documents. When you run mail through
the Mail Matrix, you must specify which job to run.
Jobs allow you to process pieces in a similar manner
from run to run.
MLOCR Multi-Line Optical Character Recognition.
Used by the scanner to identify letters, numbers, and
symbols on documents.
Operator The person running the machine.
UPS Uninterruptible Power Source.
G-1Mail Matrix Operator Manual

Glossary
G-2 Mail Matrix Operator Manual

Index
Operator Manual
I


Index
A
auto-feeder 1-9
B
base system 1-6
C
charging rail 1-4
cleaners
3-1
D
DRS 1-12
E
emergency stop buttons 1-5
e-stop
1-5
expansion modules
1-7
H
Host software 1-12
navigating
2-4
opening
2-3
I
Information tabs 2-17
interlocks
1-5
J
jamsorts A-5
jobs
processing mail
selecting
setting up the run
2-8
2-5
2-6
K
Key From Image 1-10, 2-12
Key From Paper
Keying Station
2-6, 2-8
1-13, 2-6
M
menu bar 2-4
MLOCR
1-8, 2-6
N
No Keyer 2-15
P
power
turn machine on/off
S
shift maintenance 3-6
solvents
3-1
System Modes
2-7
W
workflow
basic
1-14
fully-configured
1-17
2-2
I-1Mail Matrix Operator Manual

Index
I-2 Mail Matrix Operator Manual
 Loading...