

Page 1

WAX ENGINE
USER GUIDE
The CONSONANCE WAX ENGINE turntable tonearm combination is built to
precision engineering standards. These instructions have been compiled to cover
assembly adjustment and installation procedures. Please read carefully as you
proceed.
CONTENTS
Partlist p.2
Assembling the Turntable p.3 – p.5
Real Panel illustration p.5
Fitting the Cartridge, Tonearm Alignment and Counterweight p.6 – p.7
Bias adjustment (Anti-skate) p.7
Connecting to the amplifier p.8
Technical specification p.9
Appendix p.9
Warranty p.9
Registration p.10
1
Page 2
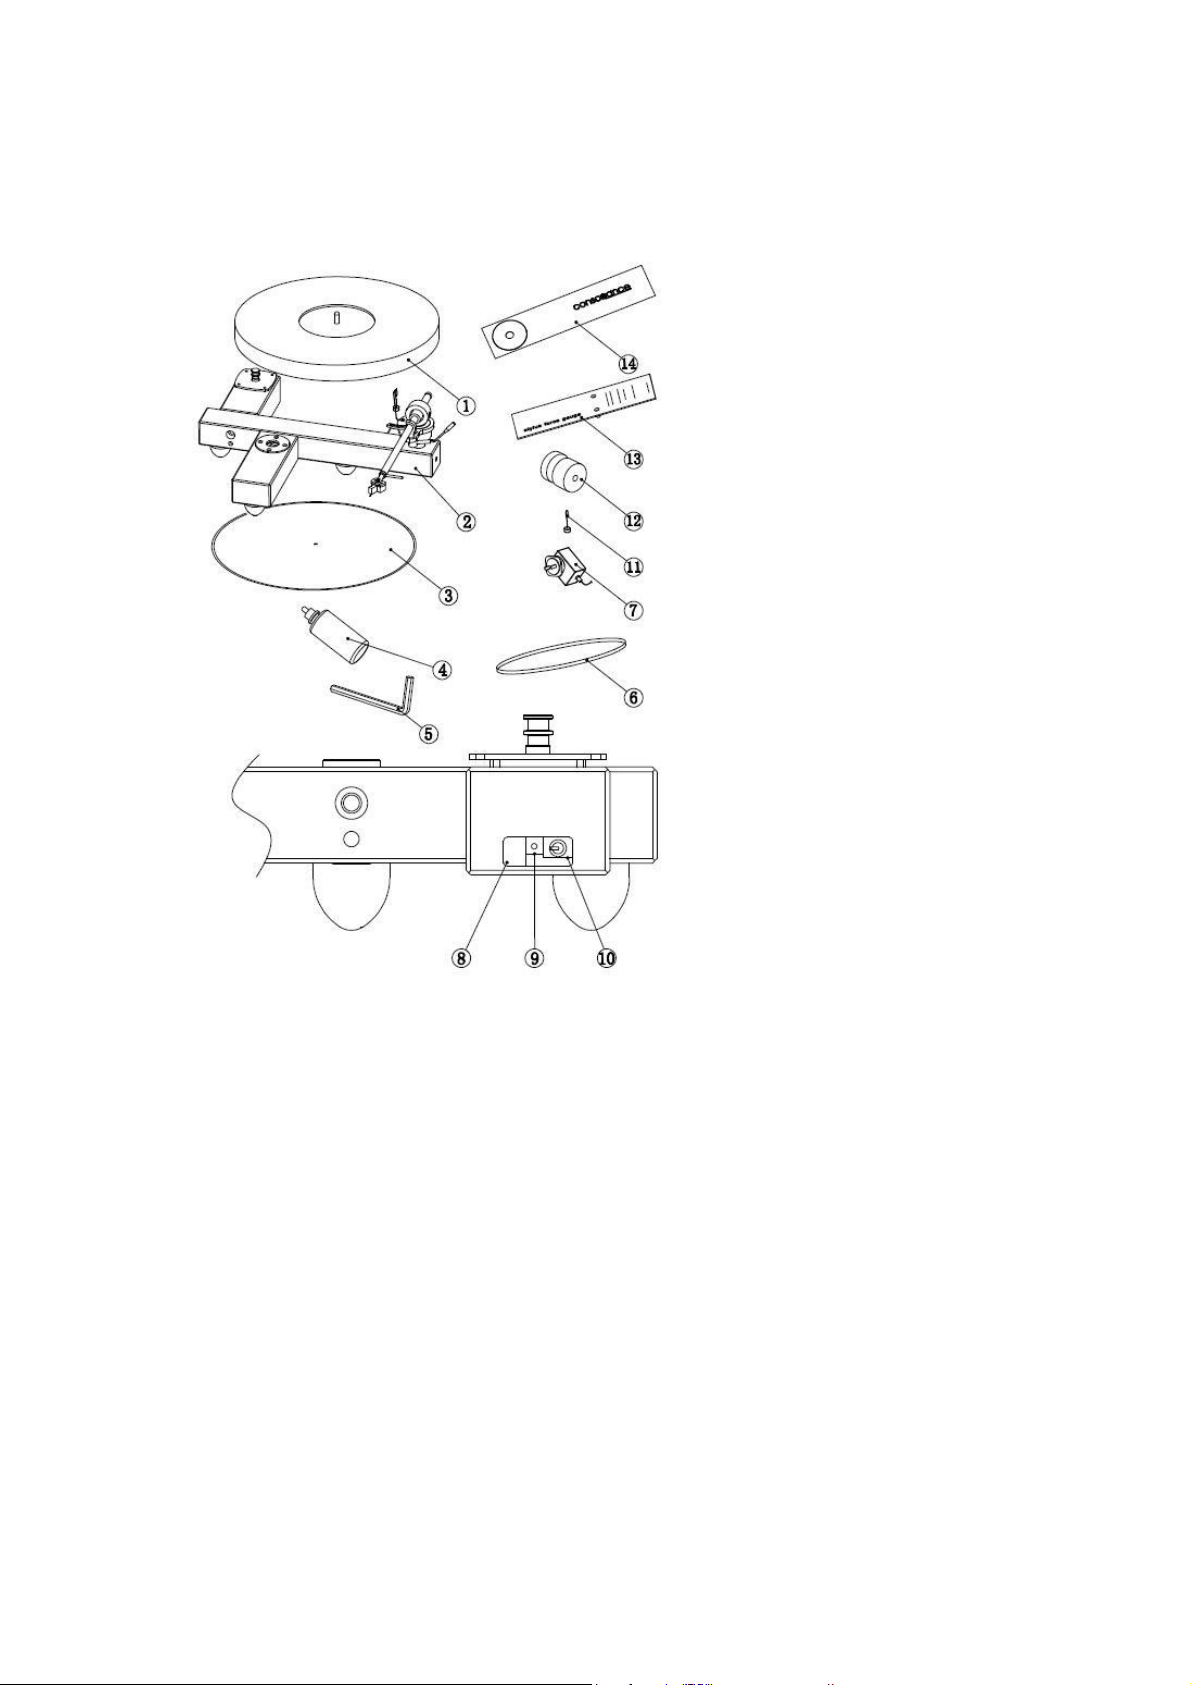
PART LIST
1. Platter
2. Base plate and tonearm
3. Strobe disc
4. Lubrication oil
5. 5mm socket wrench
6. Belt
7. Power switch
8. Power supply socket
9. Speed adjustment
potentiometer
10. On/Off switch
11. Anti-skate weight
12. Counterweight
13. Stylus pressure gauge
14. Tonearm ruler
2
Page 3
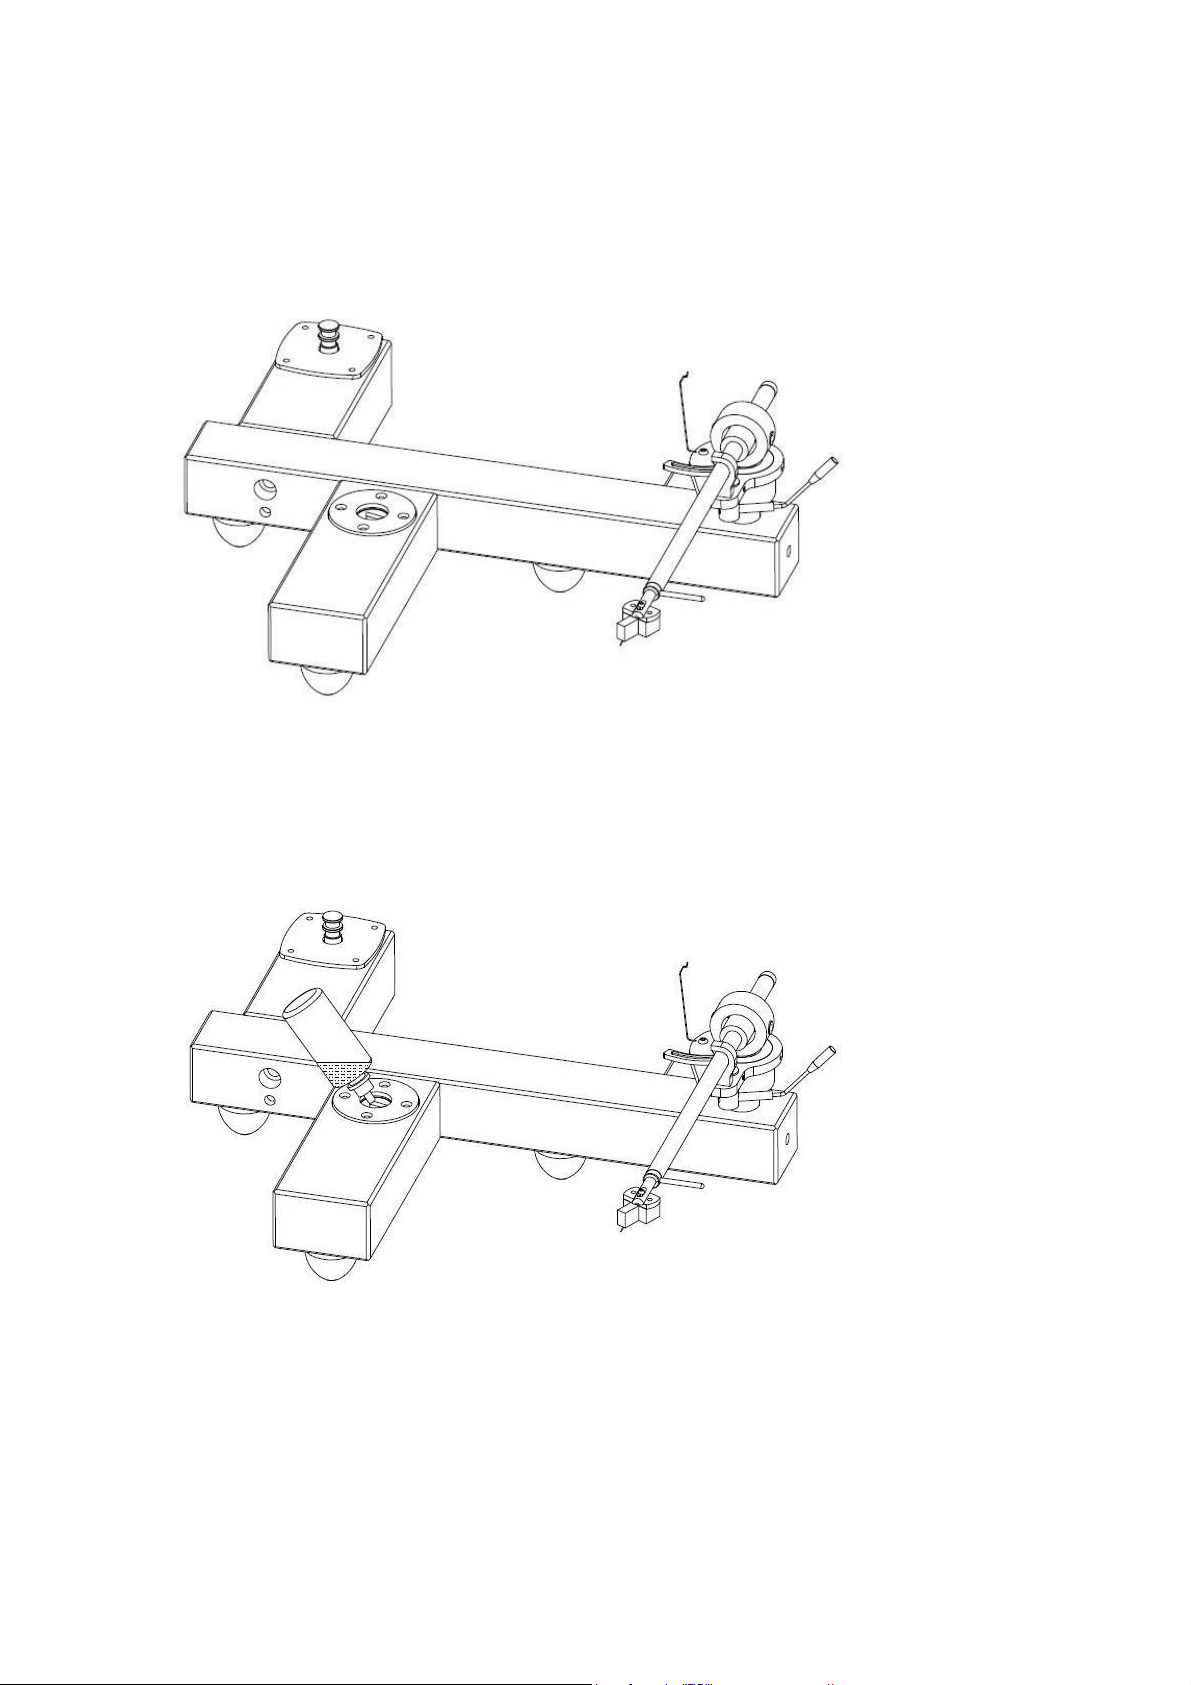
ASSEMBLING THE TURNTABLE
1. Remove Base plate and tonearm (Part no. 2) from carton.
2. Fill two drops lubrication oil (Part no. 4) to the bottom bearing housing.
3
Page 4
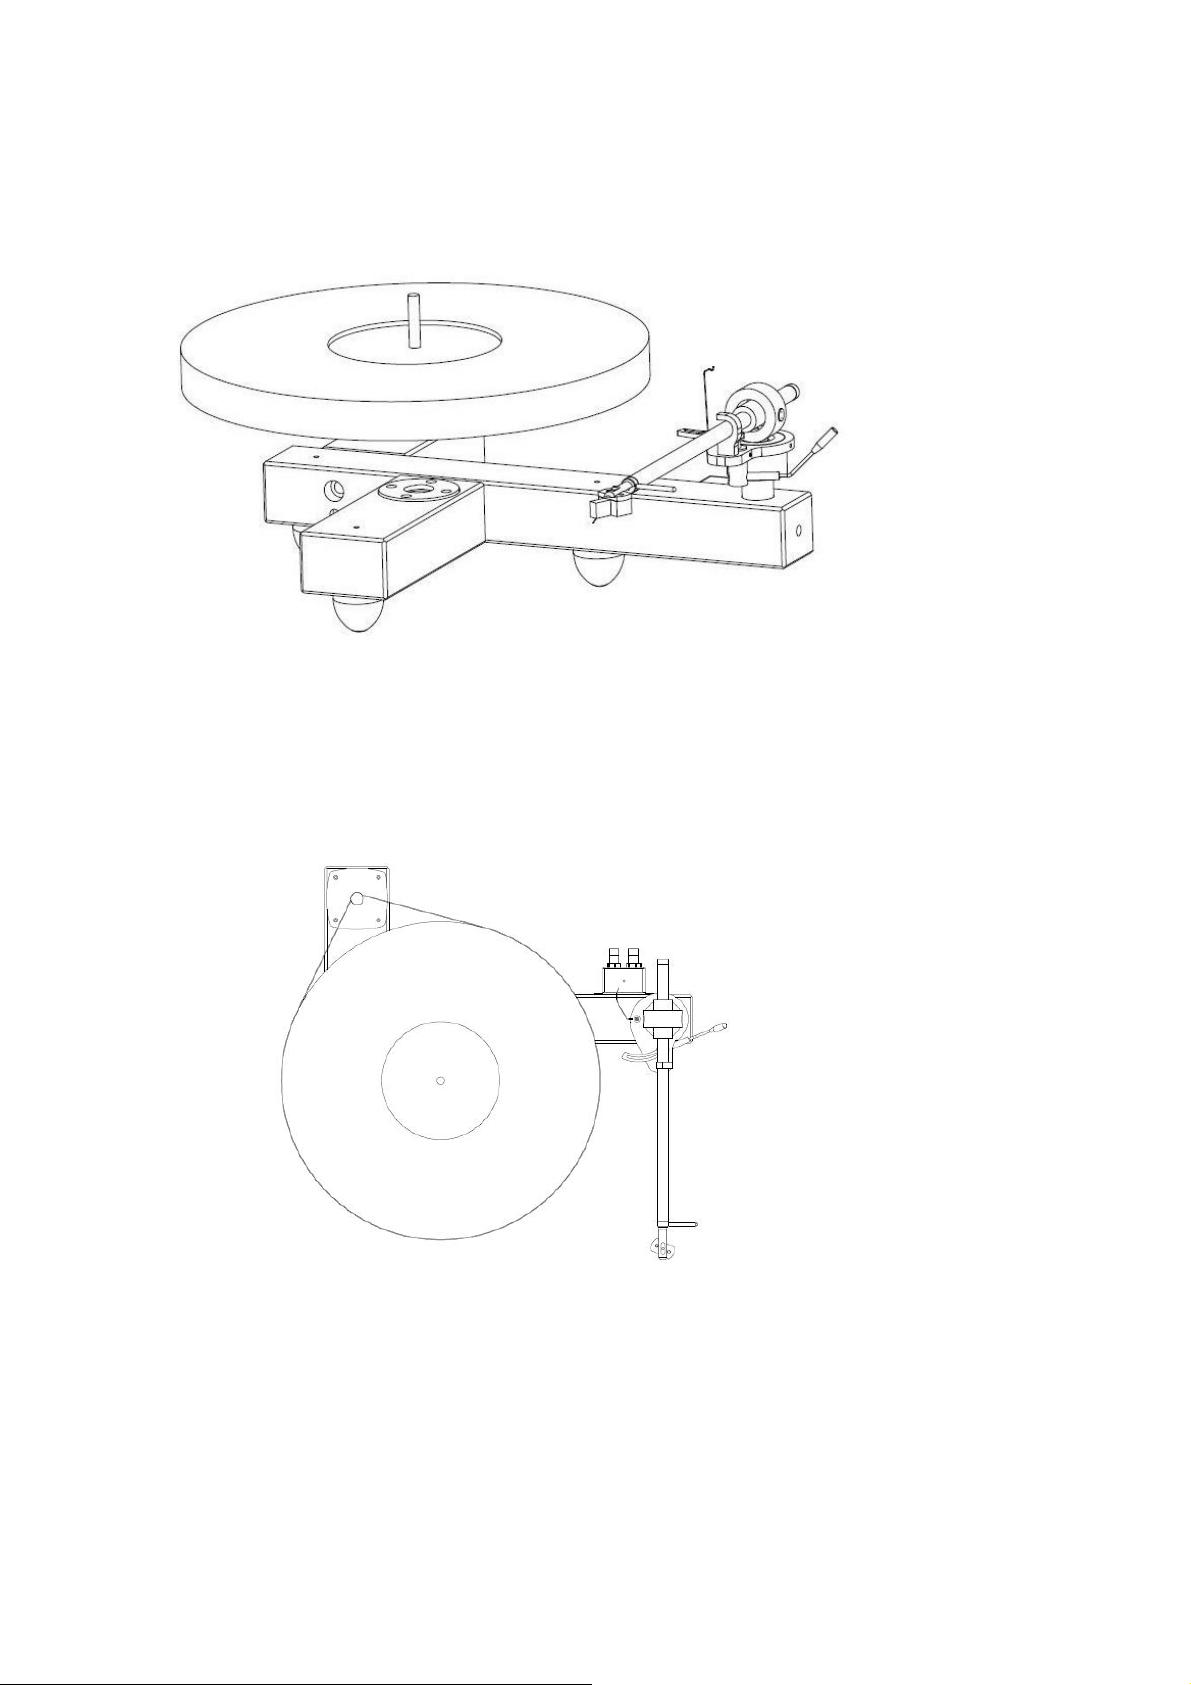
3. Hold platter (Part no. 1) level over the bearing housing, locate it carefully and
gently lower it into the bearing housing.
4. Installing the belt: Start with the belt (Part no. 6) around the motor pulley, take care
the other end clears the centre spindle and rotate the platter (Part no. 1), the belt will
track around the platter. We recommend a ½ twist be applied to the belt on the motor
pulley:
5. There are two grooves on the motor pulley for different speeds. The above groove
is for 45 rpm, and the lower groove is for 33.3 rpm. Speed is factory adjusted. If you
wish to check the speed place the strobe disc on the platter and using a suitable
filament light (Lamp) gently adjust speed potentiometer (Part no. 9) to achieve correct
speed.
4
Page 5
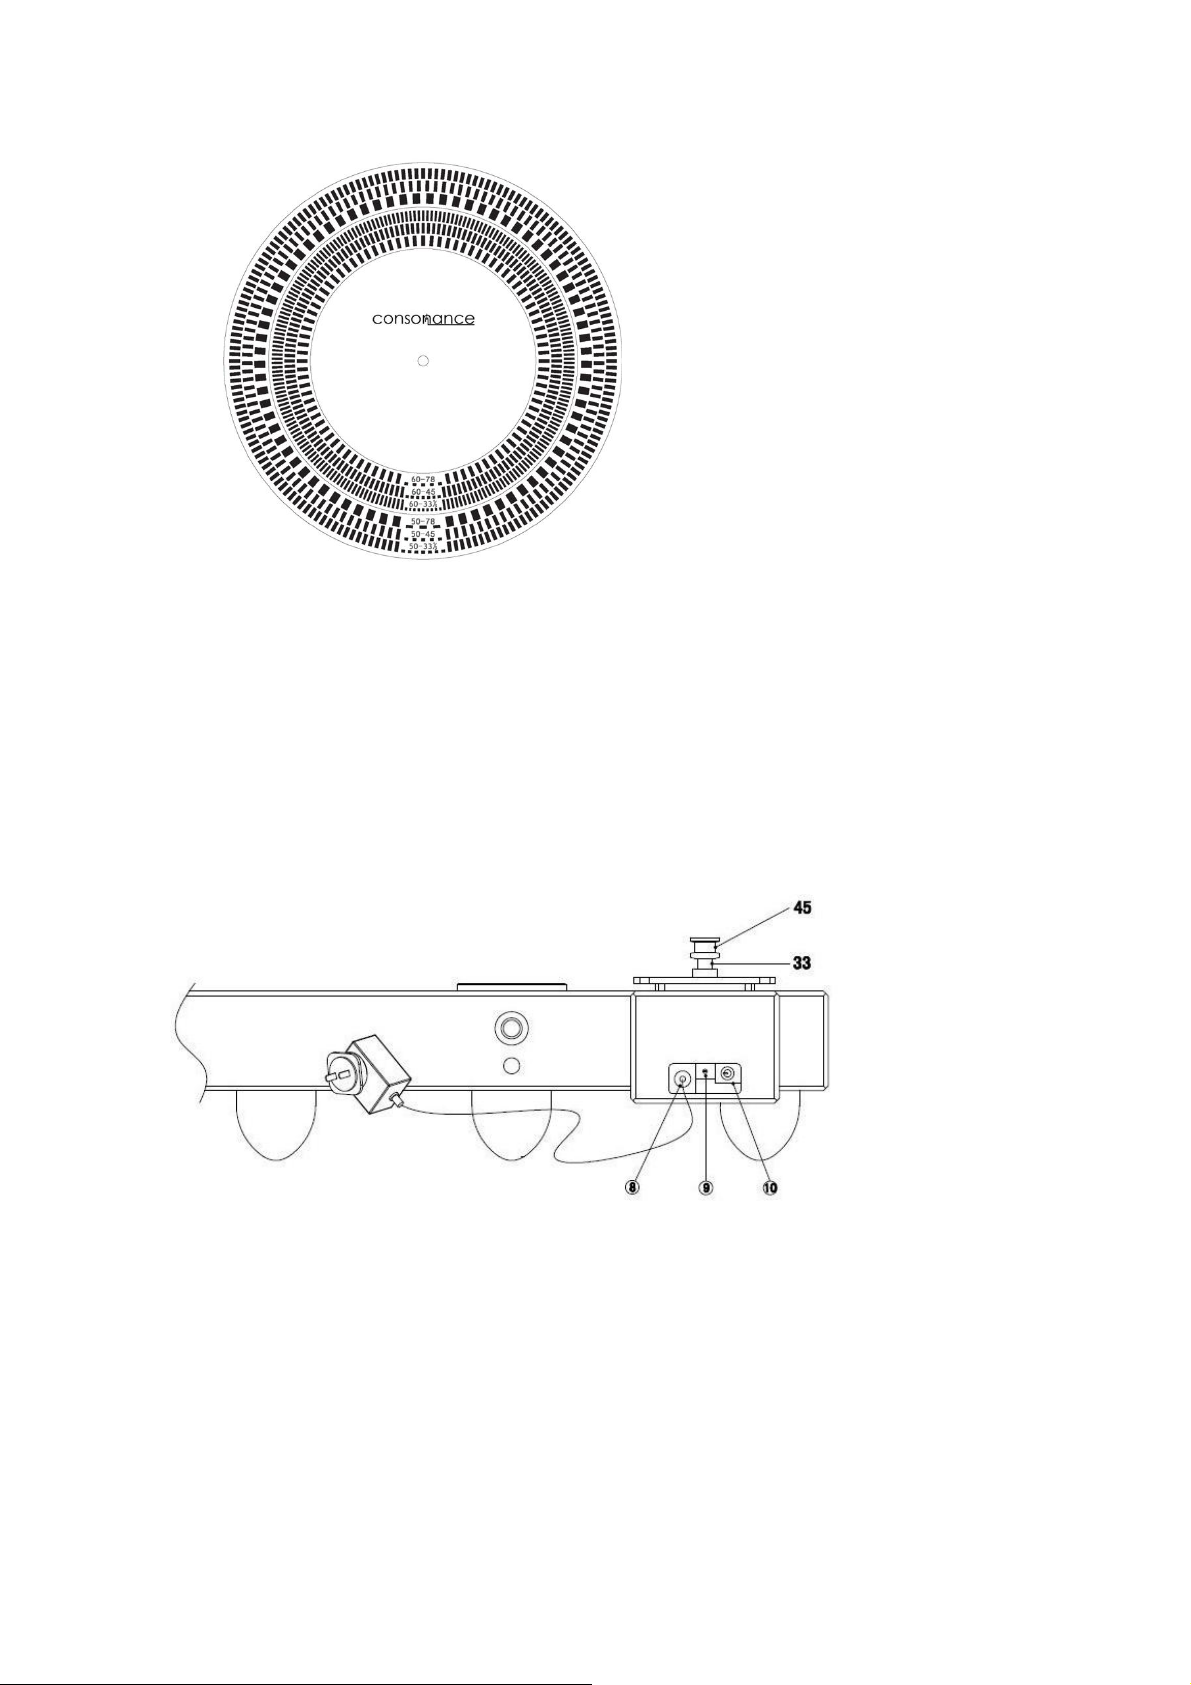
Strobe disc
REAR PANEL ILLUSTRATION
Part no. 8 – Power supply socket
Part no. 9 – Speed adjustment potentiometer
Part no. 10 – On/Off switch
5
Page 6
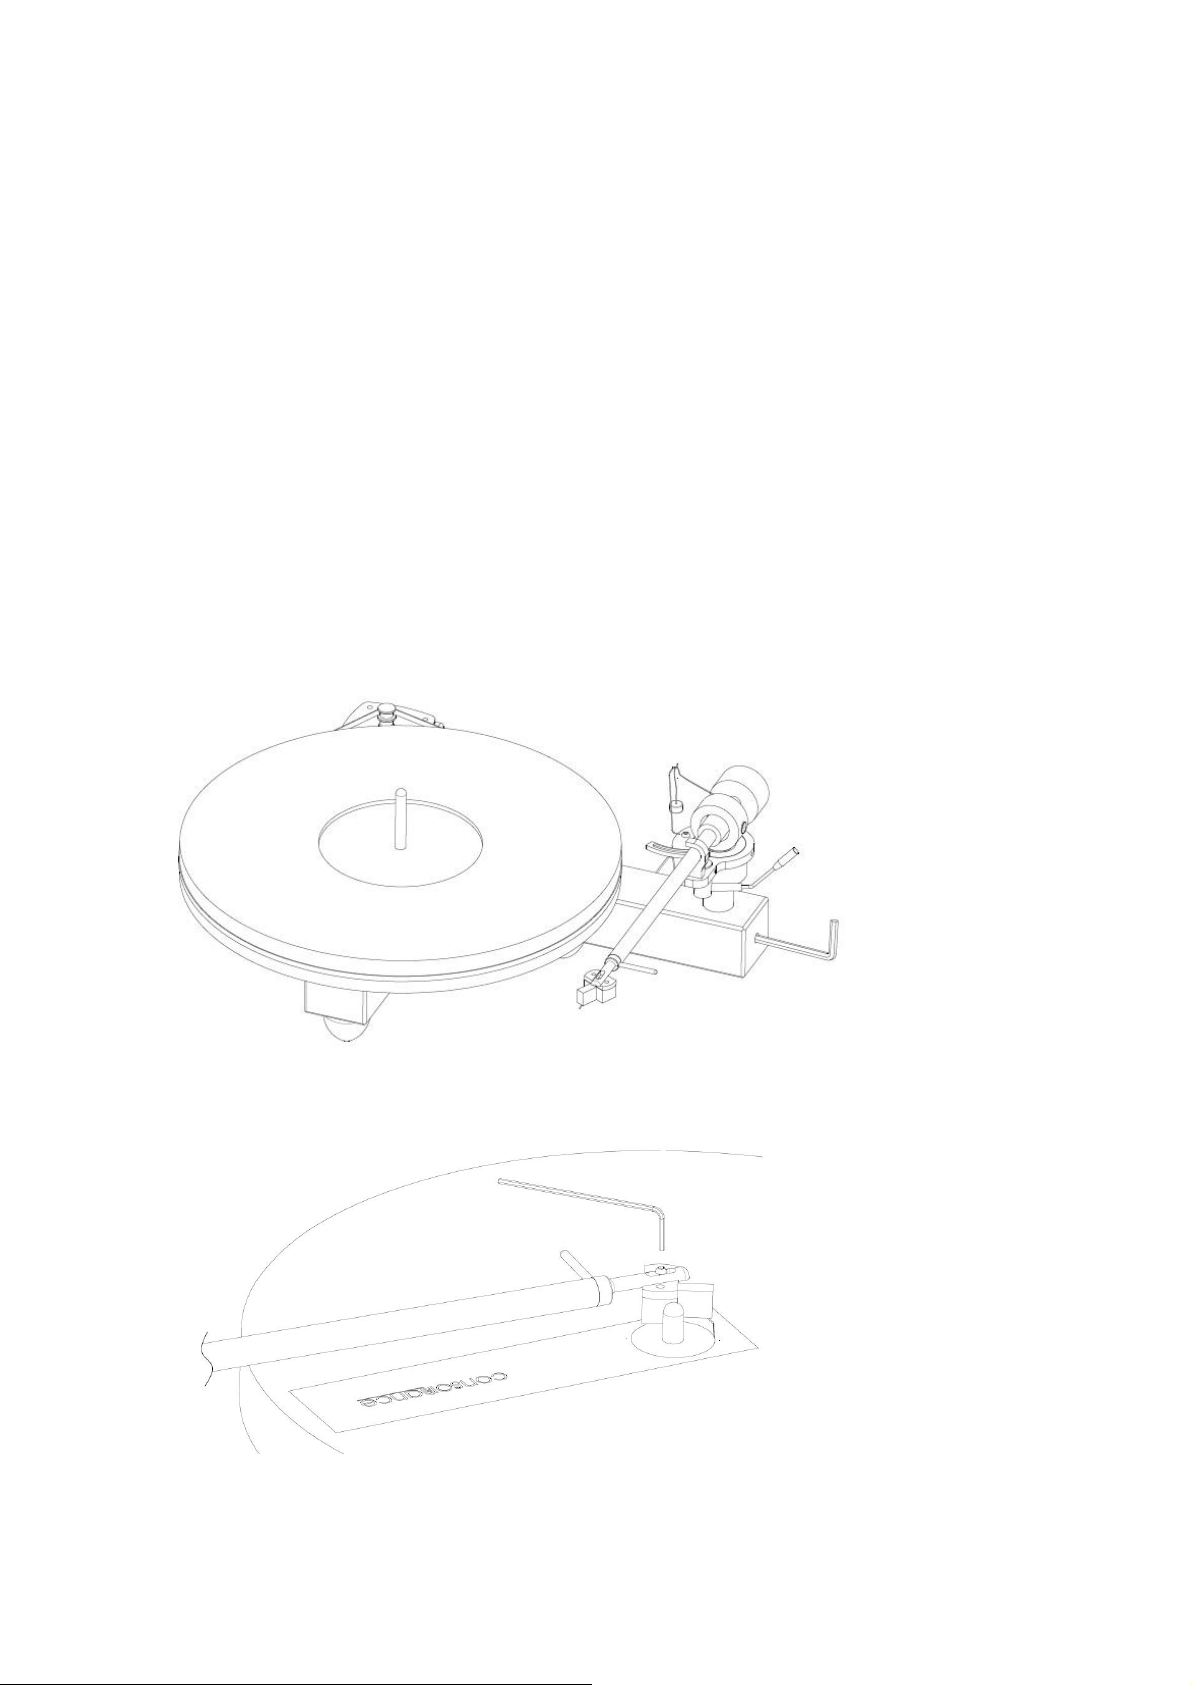
FITTINGTHE CARTRIDGE, TONEARM ALIGNMENTAND COUNTERWEIGHT
1. Install the cartridge onto the headshell using the colour coded terminals as to the
cartridge manufacturers recommendation.
2. Align the cartridge in headshell, set angle with protractor provided. And make sure
the overhang is 16mm.
3. Install the counterweight on the rear of the tonearm. Set the tracking force by gently
rotating the counterweight to apply the correct tracking force as to the cartridges
manufacturers recommendation using stylus tracking force gauge as supplied.
4. VTA (Vertical tracking angle) can be set by raising or lowering tonearm in base only
gentle force is required to adjust socket head screw.
6
Page 7
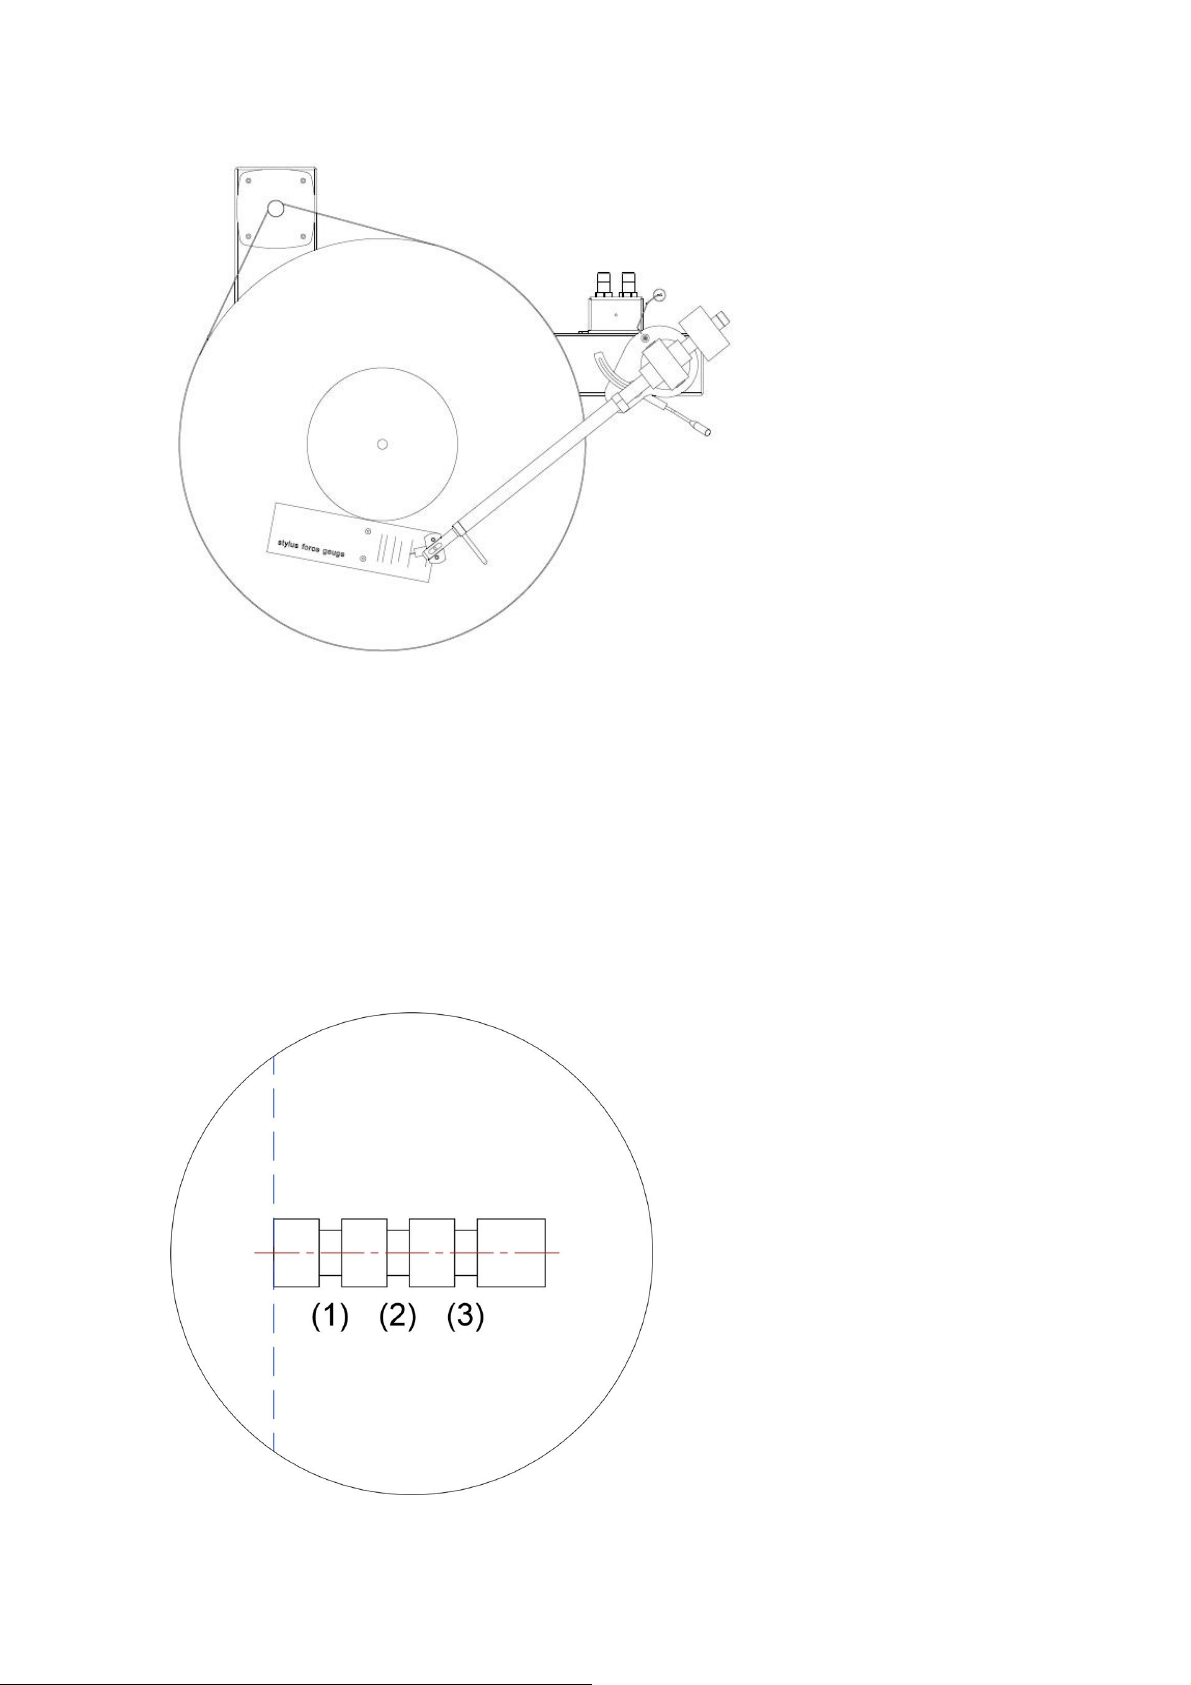
BIAS ADJUSTMENT (ANTI-SKATE)
This adjustment is achieved according to the tracking force of the cartridge.
- 1.0g to 1.4g is the groove closest to the pivot point.
- 1.4g to 1.9g is the 2nd groove from the pivot point.
- 1.9g and above is the 3rd groove from the pivot point.
7
Page 8
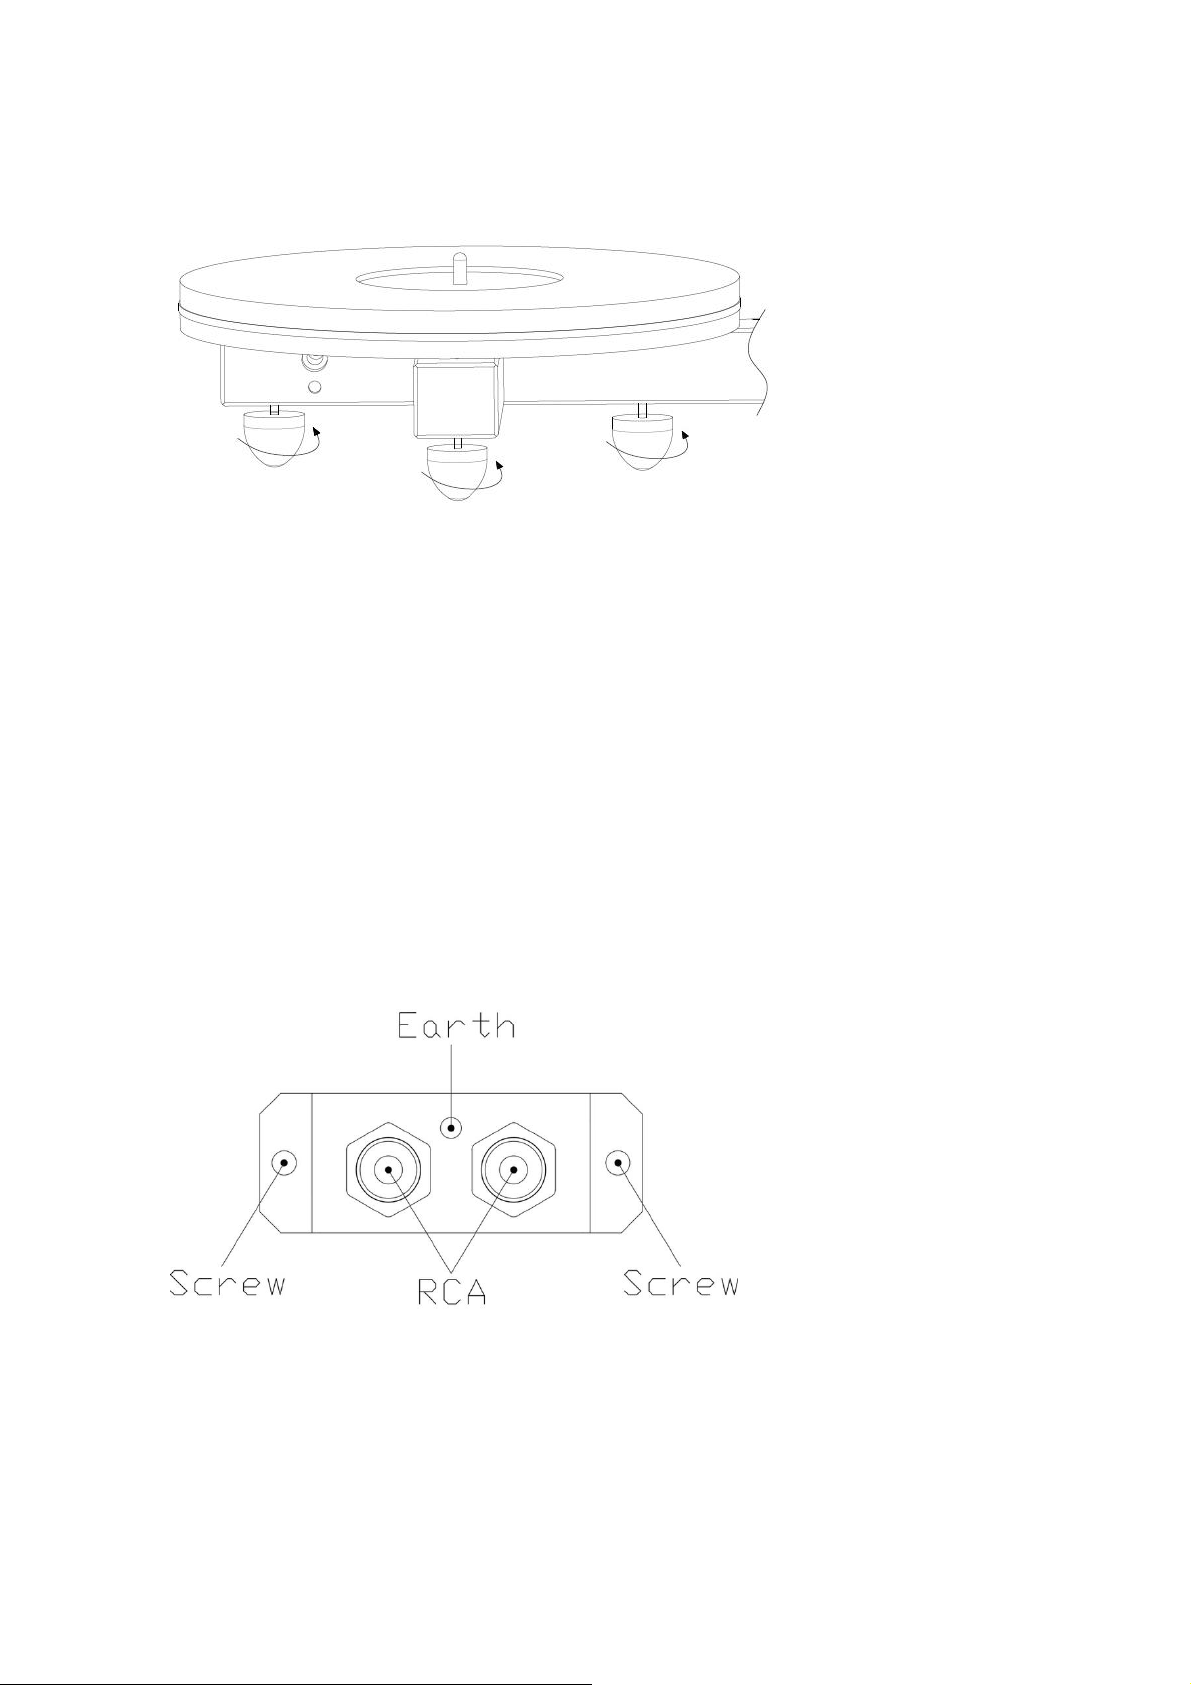
THE THREE RUBBER FEET ARE ADJUSTABLE
CONNECTING TO THE AMPLIFIER
Please use quality screened interconnect cable and connect to the amplifier
maintaining the correct channel identification denoted by the red and black colour
coding on the RCA sockets at the rear of the tonearm connection block.
Note: This product must be earthed.
Use black cable attached to the tonearm connection block to attach to a suitable earth
terminal or point on the amplifier.
8
Page 9

TECHNICAL SPECIFICATION
- Voltage: 12VDC, 1A adaptor
- Tonearm: 9” effective length
- Speed accuracy: Within 0.01%
- Motor power supply: 12VDC, 1A
- Dimensions (H x W x D): 145 x 385 x 345mm
- Weight: 5.65kg
APPENDIX
We hope these instructions have helped in the assembly of your turntable and
tonearm. Care for it will benefit the long life of the product and ease of use.
Always place on a clean and level surface. Do not use any other lubricant than
supplied. Do not attempt to remove any screws or parts than directed in this user
guide! Doing so will void warranty. Keep the turntable clean by dusting with due care
for the safety of the cartridge and stylus. A small silk or similar cover can be used as a
dust cover but again special care must be take not to damage cartridge or stylus.
9
Page 10
WARRANTY
Name
Address
City
State
Zip
Email
Telephone
Model
Serial
Number
Purchase
Date
Dealer
Opera audio guarantees each product manufactured by us to be free from defects in
materials and workmanship under normal use. Our obligation under this warranty is
limited to making good at our factory any part or parts thereof which shall, within 1
year after delivery to the original purchaser, be returned to us with transportation
charges prepaid, and which an examination shall disclose to have been thus defective;
this warranty being expressly in lieu of all other warranties expressed or implied and
of all other obligations or liabilities on our part. This warranty shall not apply to any
Opera audio product which shall have been repaired or altered outside of our factory
in any way so as to affect its stability, nor which has been subject to misuse,
negligence or accident. Warranties of the vacuum tubes are by the respective
manufacturers, usually 90 days.
Please mail or e-mail the Registration Card to the address as follows:
The Opera Audio Co., Ltd.
No.2 JiuXianQiao Road
ChaoYang District
Beijing, China
Tel: 86 10 59789461
Fax: 86 10 59789265
[email protected]
www.opera-consonance.com
Registration Card
10
 Loading...