

Opentec RPT 8X-I, Openfire RPT 8X-M User Manual

Series 5 RPT 8 User Guide (April 2008)
Covers the following Rugged Portable Tablet models:
RPT 8X-I
Openfire RPT 8X-M
(industrial/commercial model)
(Mil-spec model)

Copyright Notices
Revision Date: April 8, 2008
The following are registered trademarks of Opentec Solutions Pty Ltd:
- ‘RPC’ Rugged Portable Computer
- Openfire RPC’ Mil-Spec Rugged Portable Computer
- ‘RPT’ Rugged Portable Ta ble t
- ‘Openfire RPT’ Mil-Spec Rugged Po rt able Tablet
- ‘Jackaroo RPT’ Rugged Portable Tablet
- ‘RPDA’ Rugged Personal Data Assistant
- ‘Openfire RPDA’ Mil-Spec Rugged Personal Data Assistant
- ‘Jillaroo’ Rugged Personal Data Assistant
- ‘Perente’ Portable Tablet
No part of this publication may be processed; such as reproduced, transmitted, transcribed, stored in a retrieval
system, translated into any computer language in any form, or by any means of electronic, mechanical, magnetic,
optical, chemical, or others without the prior written permission of the manufacturer.
Trademark Acknowledgments
Windows is registered trademarks of Microsoft Corp.
Intel® Core™2 Duo processor is the registered trademark of Intel Corp.
All product and company names, trade names or trademarks are the property of their respective owners.
Disclaimer
Due to on-going product development, product specifications, features, performance, specifications, etc, might
vary from those published here. Always check with Opentec or your authorised Opentec Agent to establish
product specifications when evaluating our products, and before ordering.
The manufacturer reserves the right to revise this publication and to make changes to the contents here of
without obligation to notify any person of such revision or changes.
The manufacturer makes no representations or warranties, either expressed or implied, about the contents and
specifically disclaims any warranties as to merchantability or fitness for any particular purpose. Any of the
software described in this manual is sold or licensed "as is". Should the programs prove defective following
purchase, the buyer (and not the manufacturer, its distributor, or its dealer) assumes the entire cost of all
necessary servicing, repair and any incidental or consequential damages resulting from any software defects.
Copyright © 2008 Opentec Solutions Pty Limited. All rights reserved.

EMC and Safety Notices
CE
Products with the CE Marking comply with both the EMC Directive (89/336/EEC) and the Low Voltage Directive
(73/23/EEC) issued by the Commission of the European Community. Compliance with these directives implies
conformity to the following European Norms:
EN55022 (CISPR 22) Radio Frequency Interference
EN55024 (EN61000-4-2, EN61000-4-3, EN61000-4-4, EN61000-4-5, EN61000-4-6, EN61000-4-8,
EN61000-4-11, EN61000-3-2, EN61000-3-3) Generic Immunity Standard
EN60950 (IEC950) Product Safety
R&TTE (CE) Manual Regulatory Requirement (WLAN - IEEE 802.11b/g)
802.11b/g Restrictions:
European standards dictate maximum radiated transmit power of 100mW EIRP and frequency range 2.400-
2.4835 GHz. In France, the equipment must be restricted to the 2.4465-2.4835 GHz frequency range and must be
restricted to indoor use.
CE Declaration of Conformity
Is herewith confirmed to comply with the requirements set out in the Council Directive on the approximation of the
laws of the member states relating to Electromagnetic Compatibility (89/336/EEC), Low-voltage Directive
(73/23/EEC) and the Amendment Directive (93/68/EEC), the procedures given in European Council Directive
99/5/EC and 89/3360EEC.
The equipment was passed. The test was performed according to the following European standards.
EN 300 328 V.1.4.1 (2003-04)
EN 301 489-1 V.1.4.1 (2002-04)/EN 301 489-17 V.1.2.1 (2002-04)
EN 50371:2002
EN 60950:2000
FCC Regulations:
This device has been tested and found to comply with the limits for a Class B digital device, pursuant to Part 15 of
the FCC Rules. These limits are designed to provide reasonable protection against harmful interference in a
residential installation. Operation is subject to the following two conditions:
(1) This device may not cause harmful interference.
(2) This device must accept any interference received, including interference that may cause undesired operation.
This equipment generates, uses and can radiate radio frequency energy and, if not installed and used in
accordance with the instructions, may cause harmful interference to radio communications. However, there is no
guarantee that interference will not occur in a particular installation. If this equipment does cause harmful
interference to radio or television reception, which can be determined by turning the equipment off and on, the
user is encouraged to try to correct the interference by one or more of the following measures:
- Re-orient or relocate the receiving antenna.
- Increase the separation between the equipment and receiver.
- Connect the equipment into an outlet on a circuit different from that to which the receiver is connected.
- Consult the dealer or an experienced radio/TV technician for help.

Changes or modifications not expressly approved by the party responsible for compliance could void the user‘s
authority to operate the equipment.
This device complies with FCC radiation exposure limits set forth for an uncontrolled environment. In order to
avoid the possibility of exceeding the FCC radio frequency exposure limits, human proximity to the antenna shall
not be less than 20cm (8 inches) during normal operation.
RF Exposure Information (SAR)
This device meets the government’s requirements for exposure to radio waves. This device is designed and
manufactured not to exceed the emission limits for exposure to radio frequency (RF) energy set by the Federal
Communications Commission of the U.S. Government.
The exposure standard employs a unit of measurement known as the Specific Absorption Rate, or SAR. The SAR
limit set by the FCC is 1.6W/kg. Tests for SAR are conducted using standard operating positions accepted by the
FCC with the EUT transmitting at the specified power level in different channels.
The highest SAR value for the device as reported to the FCC is 0.789 W/kg when placed next to the body.
The FCC has granted an Equipment Authorisation for this device with all reported SAR levels evaluated as in
compliance with the FCC RF exposure guidelines. SAR information on this device is on file with the FCC and can
be found under the Display Grant section of http://www.fcc.gov/oet/fccid
after searching on FCC ID:
IR5DR886EX.
Regulatory Information/Disclaimers
Installation and use of this computer must be in strict accordance with the instructions included in the user
documentation provided with the product. Any changes or modifications (including the antennas) made to this
device that are not expressly approved by the manufacturer may void the user’s authority to operate the
equipment.
The manufacturer is not responsible for any radio or television interference caused by unauthorised modification
of this device, or the substitution of the connecting cables and equipment other than manufacturer specified. It is
the responsibility of the user to correct any interference caused by such unauthorised modification, substitution or
attachment. Manufacturer and its authorised resellers or distributors will assume no liability for any damage or
violation of government regulations arising from failing to comply with these guidelines.

Important Note
FCC RF Radiation Exposure Statement:
This equipment complies with FCC RF radiation exposure limits set forth for an uncontrolled environment. This
device and its antenna must not be co-located or operated with any other antenna or transmitter.
UL, TÜV
AC Adapter (TÜV includes EN60950 LVD)
Power Conservation
This computer consumes much less power than conventional computers. However, power consumption may be
reduced by properly configuring the Power Management Setup. It is recommended the power saving functions be
enabled even when not running on battery power. Please read the power saving features and the setting
procedures described in this manual for setting your computer.
Environmental Information, Material Safety and Recycling
Caution: Risk of explosion if battery is replaced by an incorrect type.
Dispose of used batteries according to the instructions.
All materials used in the construction of this equipment are recyclable or environmentally friendly.
Please recycle the packing materials, and at the end of the product's life, all other materials by local regulations.
Please refer “Material and Recycling” for the contents of the materials.
- The equipment may still contain tiny amount of hazardous substances for health and environment, though
those are below control level.
- To avoid spreading such substances into the eco system, and to minimise the pressure on the natural, you
are encouraged to use the appropriate take-back. Those will reuse or recycle most of the materials in a
sound way after end life.
- The crossed bin symbol indicates proper disposal is required.
- For more information on collection, reuse and recycling, please consult local or regional waste administration.
- You can also contact the dealer for more information on the environmental details of the equipment.

CONTENTS
GETTING STARTED ........................................................................................... 2
UNPACKING ................ ................................. ................................. ................................... ................................. ............. .......... 2
QUICK CHECK ....................... ................ ................. .................. ................. ................ ................. .................. ............. ............ .. 3
CONTROLS AND INDICATORS ................................... .......................... ........................... ........................... ............................. .. 4
COMPONENTS AND OPERATIONS ............................................................... 8
LOCATION ................................................................................................................................................................................ 8
RUGGEDNESS ............................... ...... ...... ...... ......... ...... ...... ........ ....... ...... ...... ........ ...... ...... ....... ........ ............ ............. ............ 8
OPERATING SYSTEMS ................................................................................................................................................... .......... 8
AC ADAPTER ........................................................................................................................................ ............ ............... ........ 8
BATTERY ........................ ..... .... ...... .... .... .... ...... ..... .... .... ...... .... .... .... ....... .... .... ...... .... .... .... ...... ............. ............ ............. ............ 9
BOOT UP AND POST ............................................................................................................................................ .............. .. 10
TIMEOUT/STANDBY/WAKE UP ......................................................................................................................................... ...... 10
SHUTDOWN ............ .......... ............. .......... ........... .......... ............ ........... .......... .......... ............ ........... ............ ............... ............ 11
RTC ....................... ............. ............ .............. ............. ............ ............. .............. ............ ............. .............. ............ ............. .... 11
SAFE GUARD THE COMPUTER ......................................... ............................................. ............................................ ............ 11
REPLACING MODULES ............................................. ...... ...... ........ ....... ...... ...... ........ ...... ...... ......... ...... ...... ........ ............. ........ 12
HARD DISK DRIVE ................................................................................................................................................ ............. .... 12
TOUCH SCREEN ............................ ........................... ........................ ......................... ............................................................ 13
PCMCIA CARD .................................................................................................................................................. ............. ...... 13
EXPRESS CARD .................................................................................................................................. ............ ............... ........ 13
EXTERNAL BACKLIGHT KEYBOARD (OPTION) ....................................................................................................................... 13
DOCKLIGHT (OPTION) ..................... ............................. ........................... .......................... ........................... ............... .......... 14
STAND UNIT (OPTION) ........................ ................................. ............................... ............................... ................................. .. 15
HEATER .................... ................................... ..................................... ................................... ............. .............. ............. .......... 15
RF DEVICE ................... .............................................. ............................................. .............................................................. 15
OPTIONAL DEVICES ........................................................................................ 16
MEMORY CARD ............................. ......................... .......................... ......................... ......................... .............. ............. ........ 16
ND
2
BATTERY ........................... .. .... .. .. .. .... .. .. .. .... ... .. .... .. .. .. .... .. .. .. .... .. .. ... .... .. .. .... .. .. .. .... .. .. .. ..... .. .. .... ............ ............. .............. 16
WIRELESS LAN CARD .................. ................ ................... ................ ................. ................ ................... ................ ............... .. 16
MDC MODEM CARD ......................... .............. ............... .............. ............... ................ ............... .............. .............. ............. .. 16
VEHICLE ADAPTER ......... .................................... ................................... ..................................... ..................................... ...... 16
DUAL BATTERY CHARGER ........................ ......................... ......................... ........................... ........................ ....................... 16
DOCKLIGHT ........................... .... .. .. .... .. .. .. .... .. .. ... .... .. .. .. .... .. .. .. .... .. .. ..... .. .. .. .... .. .. .. .... .. .. .. .... .. .. ..... ............ ............ ............... .... 16
STAND UNIT ................. ....... ...... ...... ........ ...... ....... ...... ........ ...... ...... ....... ........ ...... ...... ........ ....... ............................................. 16
RF DEVICE ................... .............................................. ............................................. .............................................................. 16
SPECIFICATIONS ............................................................................................. 17
CPU ................... ............................. ............................... ............................. ............................. .............. ............ ............. ...... 17
MEMORY ......................................................................................................................................... .............. ............. ............ 17
DISPLAY .................................................................................................................................... .............. ............ ............. ...... 17
LCD .............................................................................................................................................. .............. ............. ............ .. 17
HARD DISK DRIVE ................................................................................................................................................ ............. .... 17
TOUCH SCREEN ............................ ........................... ........................ ......................... ............................................................ 17
I/O PORTS ........................... ...................................................................... ............................................. ............ ............... .... 18
DIMENSIONS AND WEIGHT ............ ........................................... ......................................... .......................................... .......... 18
AC ADAPTER ........................................................................................................................................ ............ ............... ...... 18
BATTERY ........................ ..... .... ...... .... .... .... ...... ..... .... .... ...... .... .... .... ....... .... .... ...... .... .... .... ...... ............. ............ ............... ........ 18
KEYPAD/KEYBOARD ..... .......................................... ......................................... ........................................... ............. .............. 18
VEHICLE ADAPTER (OPTION) .............................................................................................................................................. .. 18
DOCKLIGHT DL-8I/DL-8M (OPTION).................................................................................................................................... 19
STAND UNIT (OPTION) ........................ ................................. ............................... ............................... ................................. .. 19
MATERIALS AND RECYCLING .......................... ......... ...... ...... ...... ........ ....... ...... ...... ........ ...... ....... ...... ........ ...... ..... ...... ............ 20
ENVIRONMENTAL ..................................................................................................................................................... ............ .. 20
BIOS SETUP ....................................................................................................... 20
MAIN MENU ........................... ..................................... ..................................... ..................................... .............. ............. ...... 20
IDE CHANNEL 0 MASTER SUB-MENU ............................... ........................... ............................. .......................... ................. 22
IDE CHANNEL 0 SLAVE SUB-MENU .......................... ................ ................... ................ ................. ................ ....................... 23

CHANNEL 1 MASTER SUB-MENU ............................. ........................... ............................. .......................... ................... 24
IDE
IDE CHANNEL 1 SLAVE SUB-MENU .......................... ................ ................... ................ ................. ................ ....................... 25
ADVANCED MENU...................................................................................................................................................... ............ 26
SIO SMC227 CONFIGURATION SUB-MENU ........................................ ................................... ................................... .......... 28
SECURITY MENU .............. ............................... ............................. ............................. ............................. .............. ............. .... 30
RF SECURITY CONTROL SUB-MENU .................................................................................................................................... 32
TPM STATE MENU ............................................................................................................................... ............ ............... ...... 33
BOOT MENU .................... ........................ ......................... ......................... ........................... ................................................. 34
EXIT MENU ..................... ................................. ................................. ................................... .................................................. 35
UTILITIES AND DRIVERS ............................................................................... 35
CHIPSET ................. ....................... ....................... ........................ ....................... ....................... .............. ............ ............. .... 35
VGA UTILITY ............................. ...................................................................... ............................................. ............. ............ 36
AUDIO DRIVER .................................................................................................................................. ............ ............. ............ 36
USB 2.0 ............... ........................................... ............................................ ............................................. ............ ............. .... 36
TOUCH SCREEN DRIVER ............................................................................................................................................... ........ 37
PCMCIA DRIVER .................................................................................................................................................................. 37
MINI PCI 1G AX92200 LAN .................................................................................................................................. ............ .. 37
MINI PCI INT8100 LAN ............................................................................................................................................... ........ 37
MINI PCI-E 1G RTL8111B LAN ....... ......................................... ............................................ ............................................. 37
MINI PCI-E INTEL 3945ABG WLAN ......... ............................. ............................... ............................. ................................. 37
FAX/MODEM CARD DRIVER ................ ..................................... ................................... ................................... ....................... 37
WIRELESS MANAGER ............................................................................................................................... ............. .............. .. 37
INPUT MANAGEMENT SERVICES ............. ............................... ............................... ............................... ................................. 38
MAINTENANCE/SERVICE ............................................................................... 44
CLEANING .............................................................................................................................................................................. 44
TROUBLESHOOTING ................................ ....................... ....................... ...................... ......................... ......................... ........ 44
RMA SERVICE ................ ............ .......... .......... ........... ............ .......... ........... .......... ............ ........... ......................................... 44

Getting Started
GETTING STARTED
Unpacking
The following components come with your computer. If anything is missing or damaged,
please notify the dealer immediately.
- Computer unit
- AC Adapter
- AC Power Cord
- Utility CD
- User's Guide
2

Getting Started
Quick Check
- Insert the battery into compartment; fix the screw till battery is in position.
- Attach the AC adapter and charge battery for at least 10 minutes.
Turn ON the computer by pressing the power button momentarily.
Notice:
- When ambient temperature is under 0℃, the system may not boot up immediately. System will
beep with charge light flashing while heater working. After 13~15 minutes, the system will boot up
automatically
-
- Under emergency situation, to skip heating and boot up system immediately by pressing power
button for >10 seconds. (But can not guarantee all devices on the computer work properly)
-
- Turn OFF the computer using either one of the following procedures:
1. Press power button momentarily to “Standby”* or “Hibernate”* dependent on operating system
(OS) and power scheme settings.
2. Press power button for 4 seconds to have a “Hard” power off.
System shuts down without saving any data or parameters.
*: Some operating systems may not support these functions.
3. Click Start → Shut Down in Windows to Turn OFF.
or application software installation may be necessary for further operation.
Driver
3
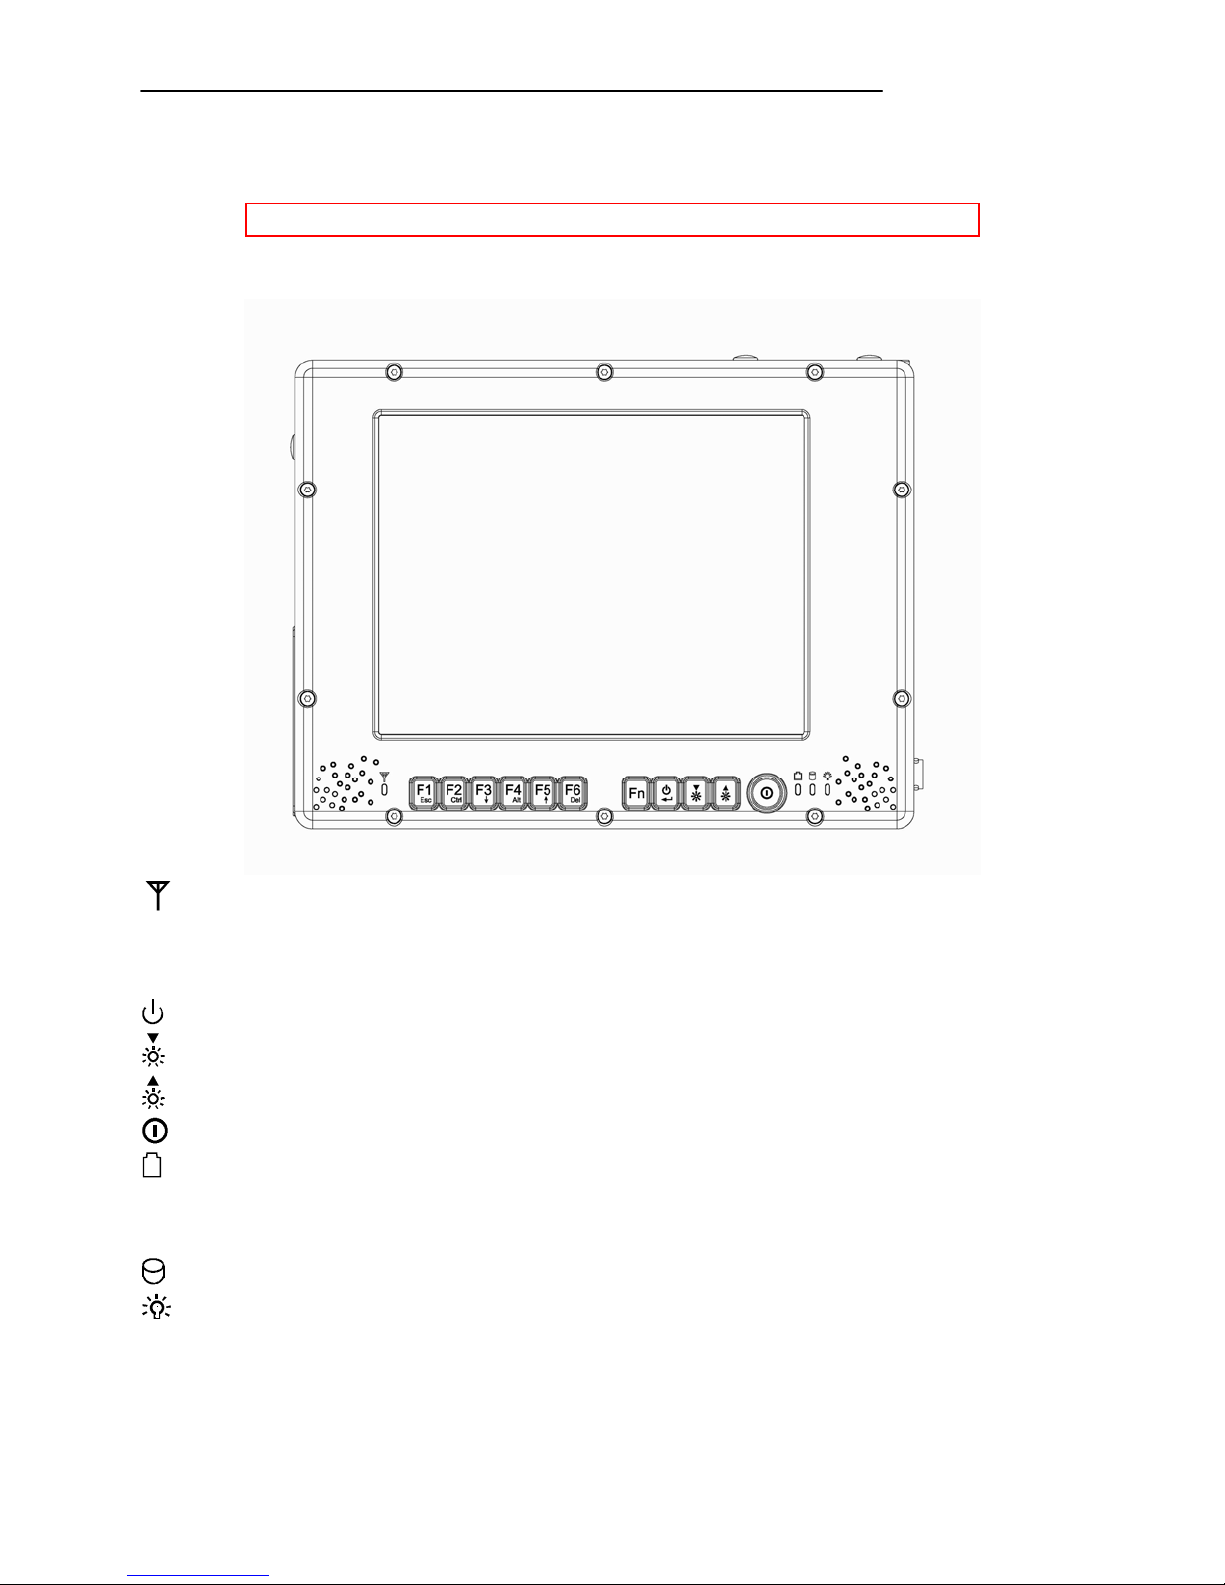
Controls and Indicators
Note: Some of the functions are optional.
Top
Getting Started
: RF device indicator
F1~F6: Function keys, blue font are alternative functions enabled by pressing Fn and the key
simultaneously
Fn: To enable alternative function keys
: Sleep button (Refer “Timeout/Standby/Wake up”)
: Display brightness decrease
: Display brightness increase
: Power button (Refer “Timeout/Standby/Wake up”)
: Battery charge/heater activity indicator
ON: Charging
OFF: Battery full (Also applies when battery is removed)
Flash: Heater active (Heater is an optional device)
: HDD (Hard Disk Drive) activity indicator
: Power indicator
4
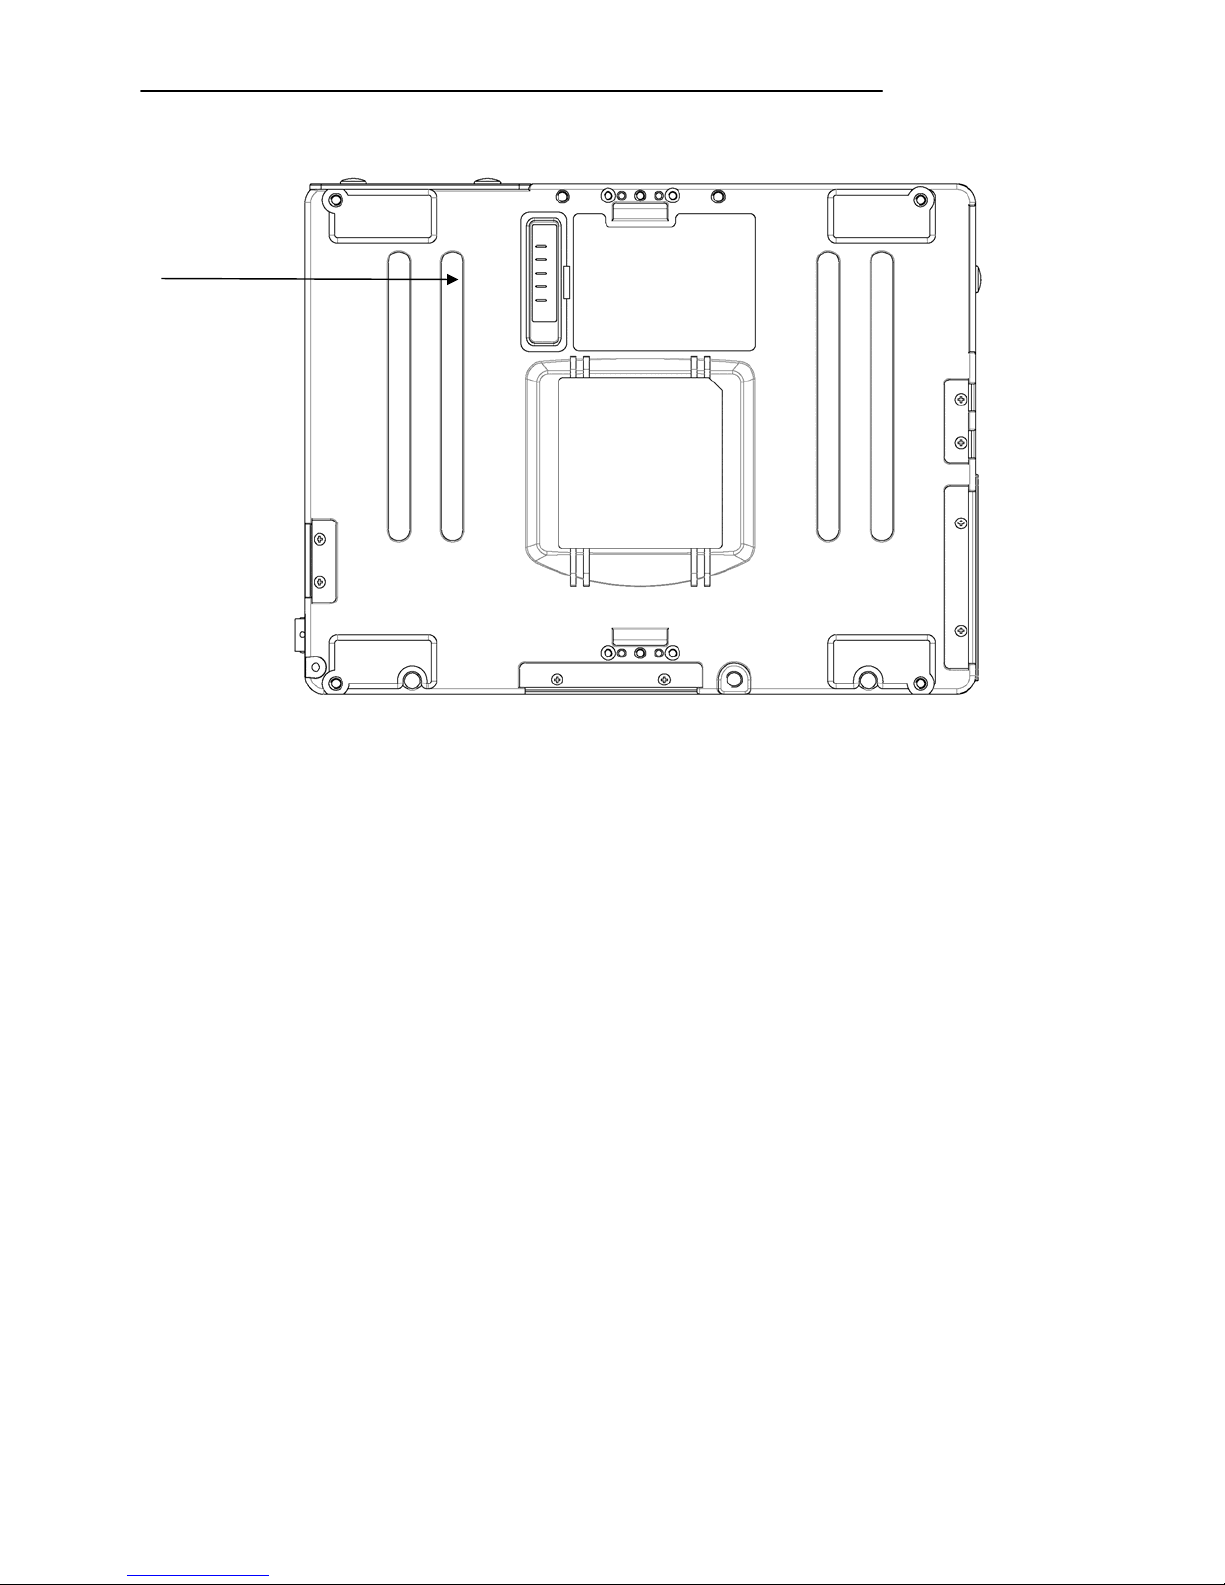
Rear
1
Getting Started
1. Secondary battery connector
5

Left
1 2 3 4
Battery
1.
2. LAN
3. USB (Universal Serial Bus)
4. PCMCIA slots or Express Card
Right
Getting Started
1 2
DC jack (2 pin for RPT 8-I, 3 pin for RPT 8-M)
1.
2. Serial port (COM1)
6
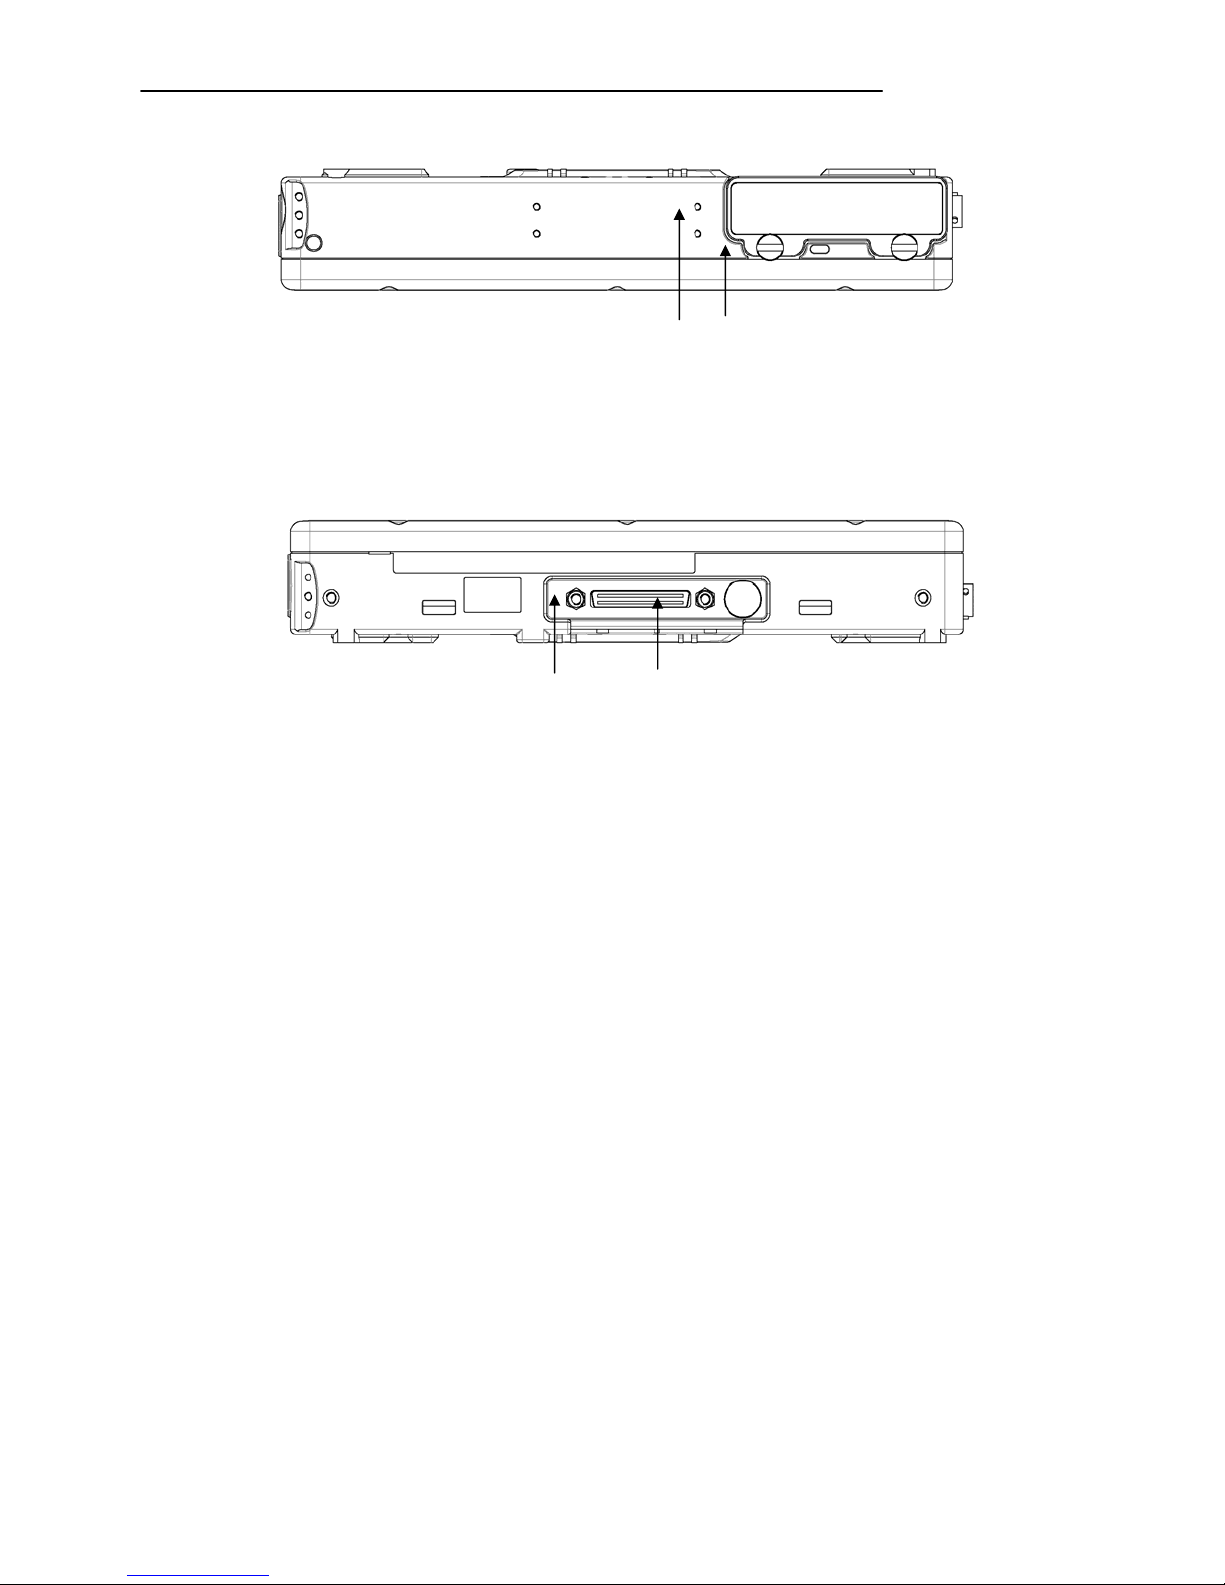
Top
1 2
1. HDD
2. Kensington lock slot
Bottom
1 2
1. Docking connector
2. External antenna jack (Option)
Getting Started
7

Components and Operations
COMPONENTS AND OPERATIONS
Location
A clean and moisture-free environment is preferred. Make room for air circulation. Avoid areas with:
- Sudden or extreme changes in temperature.
- Extreme heat.
- Strong electromagnetic fields (near television set, motor rotation area, etc.).
- Dust or high humidity.
If it is necessary to work in a hostile environment, please regularly maintain your computer by cleaning
dust, water, etc. and keep it in optimal condition.
Ruggedness
The computer is designed with rugged features such as vibration, shock, dust, and rain/water
protection. However, it is still necessary to provide appropriate protection while operating in harsh
environments.
NEVER immerse the computer in water. Doing so may cause permanent damages. Drop may cause
parts break or permanent damages.
The D-sub connector cap is for dust and shock protection only. The connector itself is sealed
internally. Other I/O ports and devices must have caps tightly closed or cable inlets sealed while
exposed to water or dust.
All connectors will corrode if exposed to water or moisture. Corrosion is accelerated if the power is ON.
Please take proper measures in cable connection to avoid water entering into connectors.
The DC jack and cables are sealed and may be operated with water splashing while attached. All port
covers should be in place when no cable is attached.
Operating Systems
The computer is compatible with most operating systems (OS). However, not all functions are 100%
compatible. For example, ACPI, APM, Smart Battery, etc. are not available on DOS, Windows NT, and
other non-Microsoft OS. Consequently “Standby”, “Hibernation”, “Battery Gauge” etc. would not work
under such operating systems.
ACPI: Advanced Configurations and Power Inter f ace
APM: Advanced Power Management
AC Adapter
The AC adapter performs two functions:
- It powers the computer from an external AC source.
- It charges the computer battery.
The adapter automatically detects the AC line voltage (110V or 220V) and adjusts accordingly.
The following are recommended when using the AC adapter:
- Use a properly grounded AC outlet.
- Use one AC outlet exclusively for the computer. Having other appliances on the same line may
cause interference.
- Use a power strip with built-in surge protection.
8

Components and Operations
Connect the AC adapter:
- Plug the AC cord to the adapter.
- Plug the other end of the AC cord into the wall outlet. Make sure the green LED on the adapter
turns on.
- Attach the DC plug into the power jack of the computer; turn the lock ring clockwise to secure it.
AC Adapter Indicator
The green LED indicates that AC power is ready.
Battery
The computer will automatically switch to battery when the external power source (AC adapter or
optional vehicle adapter) is disconnected.
Battery Power Saving Tips
The computer comes with an intelligent power-saving feature. You may extend the battery life by:
- Setup power saving functions in Operating System Power Management options (e.g. Windows
Power Options).
- Setup power saving functions in BIOS “Power Management Setup” (mainly for non-ACPI/APM
operating systems).
- Lower the intensity of the display by brightness control.
- Turn the computer into standby (by Sleep or Power button) when it is temporarily not in use.
- Shut down the computer when it will not be in use for longer period of time.
Battery Low
When the battery is nearly exhausted, the computer gives the following “Battery Low” warnings:
- Windows battery low warning.
- The power LED flashes.
Once the “Battery Low” warning occurs, please:
- Save and close the files you are currently working on then shut down the computer.
- Plug in AC or vehicle adapter to recharge the battery.
9
Components and Operations
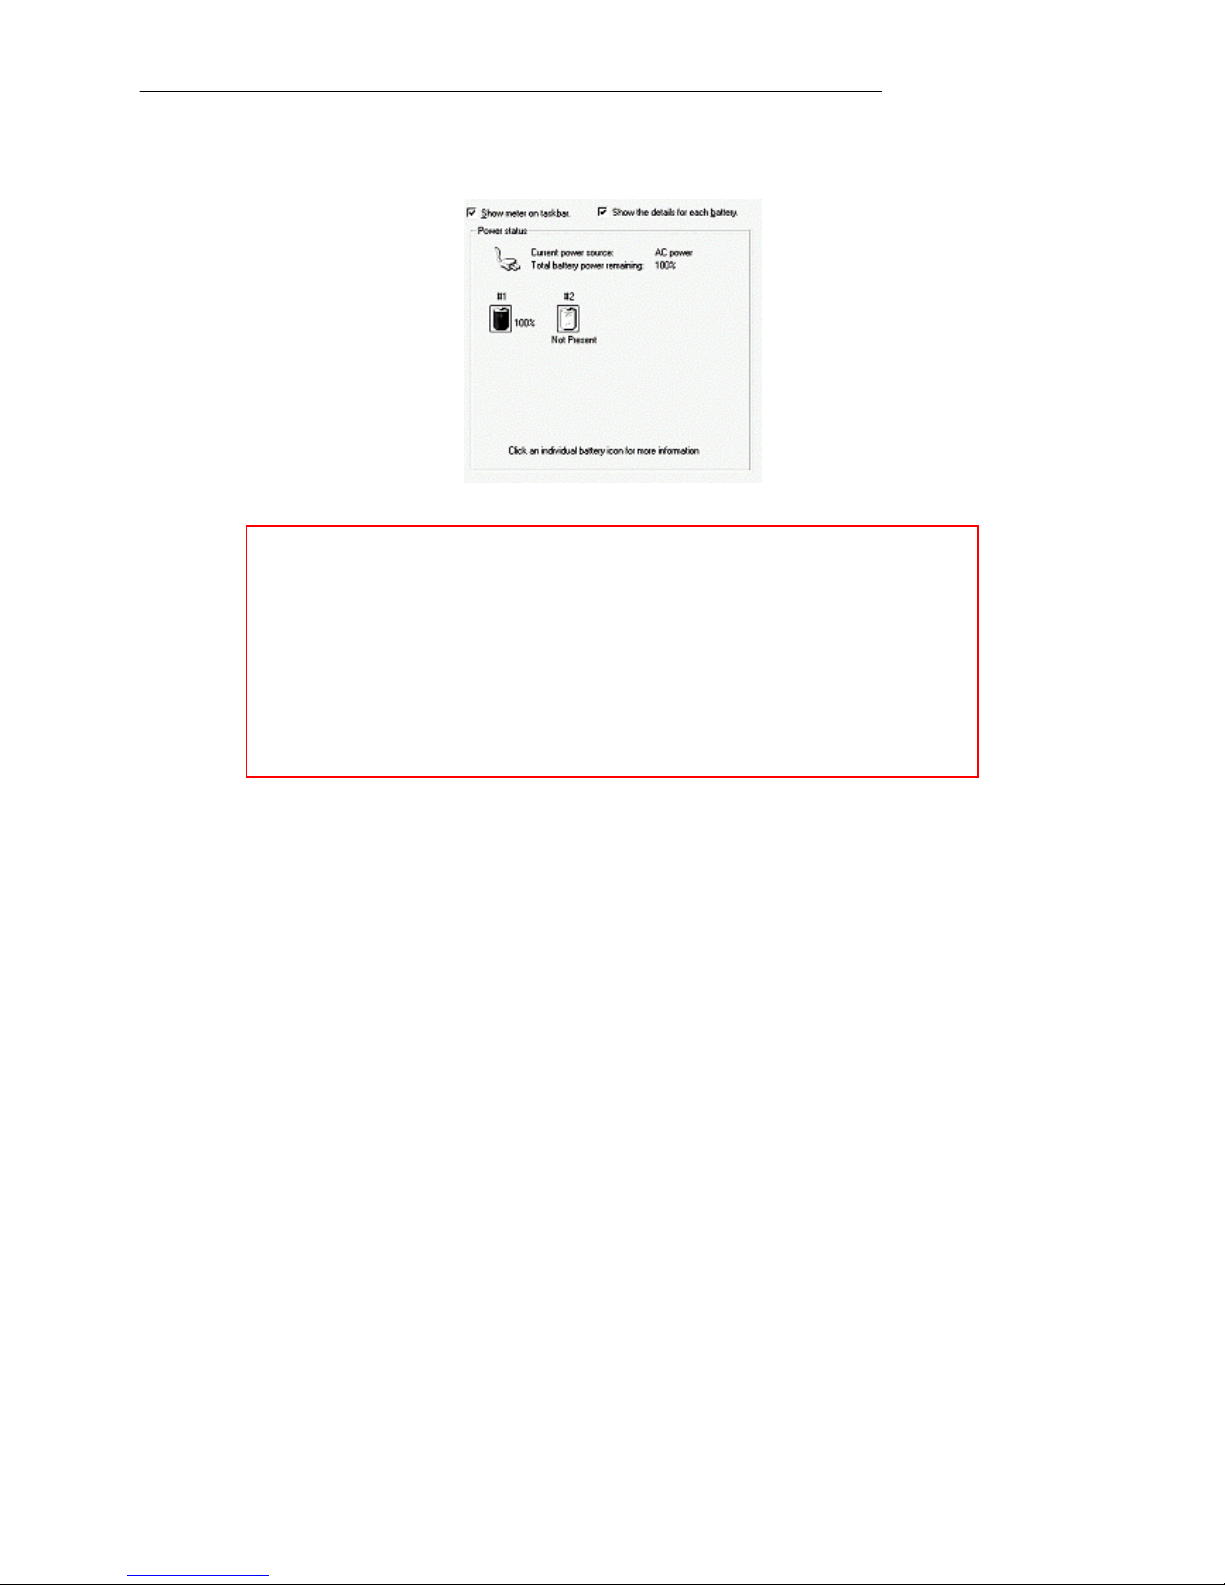
Battery Gauge
You may check battery status from battery gauge in Windows. Click the power/battery icon to reveal
the battery gauge window.
Note: Battery characteristic varies depen ding o n factors such as
ambient temperature, charging method, load cu r rent, aging, etc.
For example, the chemicals of the battery are more inactive at
low temperature, thus decreases the output power.
The battery gauge should only be used as a referenc e. Ple ase
do not expect it to show the exact amount of the power
remaining. There is no memory effect on Lithium Ion battery
cells. However, discharge the battery to nearly empty every
month will help calibrating the internal gauge
Charging the Battery
Plug in the AC adapter or vehicle adapter to start the battery charging. If the battery is already
full, the sense circuitry will stop high current charge within several minutes.
The LED Indicator turns ON when the battery is charging and turns OFF when the battery
charge is completed.
To charge the Secondary Battery, simply install it into the computer and attach the AC
adapter. The internal charger will charge the Primary and Secondary batteries simultaneously.
Optional Dual Battery Charger can charge Primary and Secondary batteries externally.
Boot Up and POST
The computer turns ON and loads the operating system (such as Windows) into the system memory.
This start-up procedure is called “boot up”.
The ROM BIOS Power On Self-Test (POST)
Each time the computer powers on, it automatically performs a self-test of its memory and hardware
devices.
Timeout/Standby/Wake up
In Windows Control Panel Power Options you may set preferred options. If timeouts are set, the
sequences of function are as follows:
-
Normal → Timeout (Monitor, HDD) → Touch screen or any key → Wake up (Normal)
-
Normal → Timeout (Standby, Hibernate) → Power button → Wake up (Normal)
Directly press sleep button or power button the functions are as follows:
10
 Loading...