

OpenSky Receiver Kit Quick Setup Manual
5
7
B
LAN cable (not included)
4
3
F
H
H
H
G
A
E
A
C D
1 2
3
4
Page 1
6
5
7
8
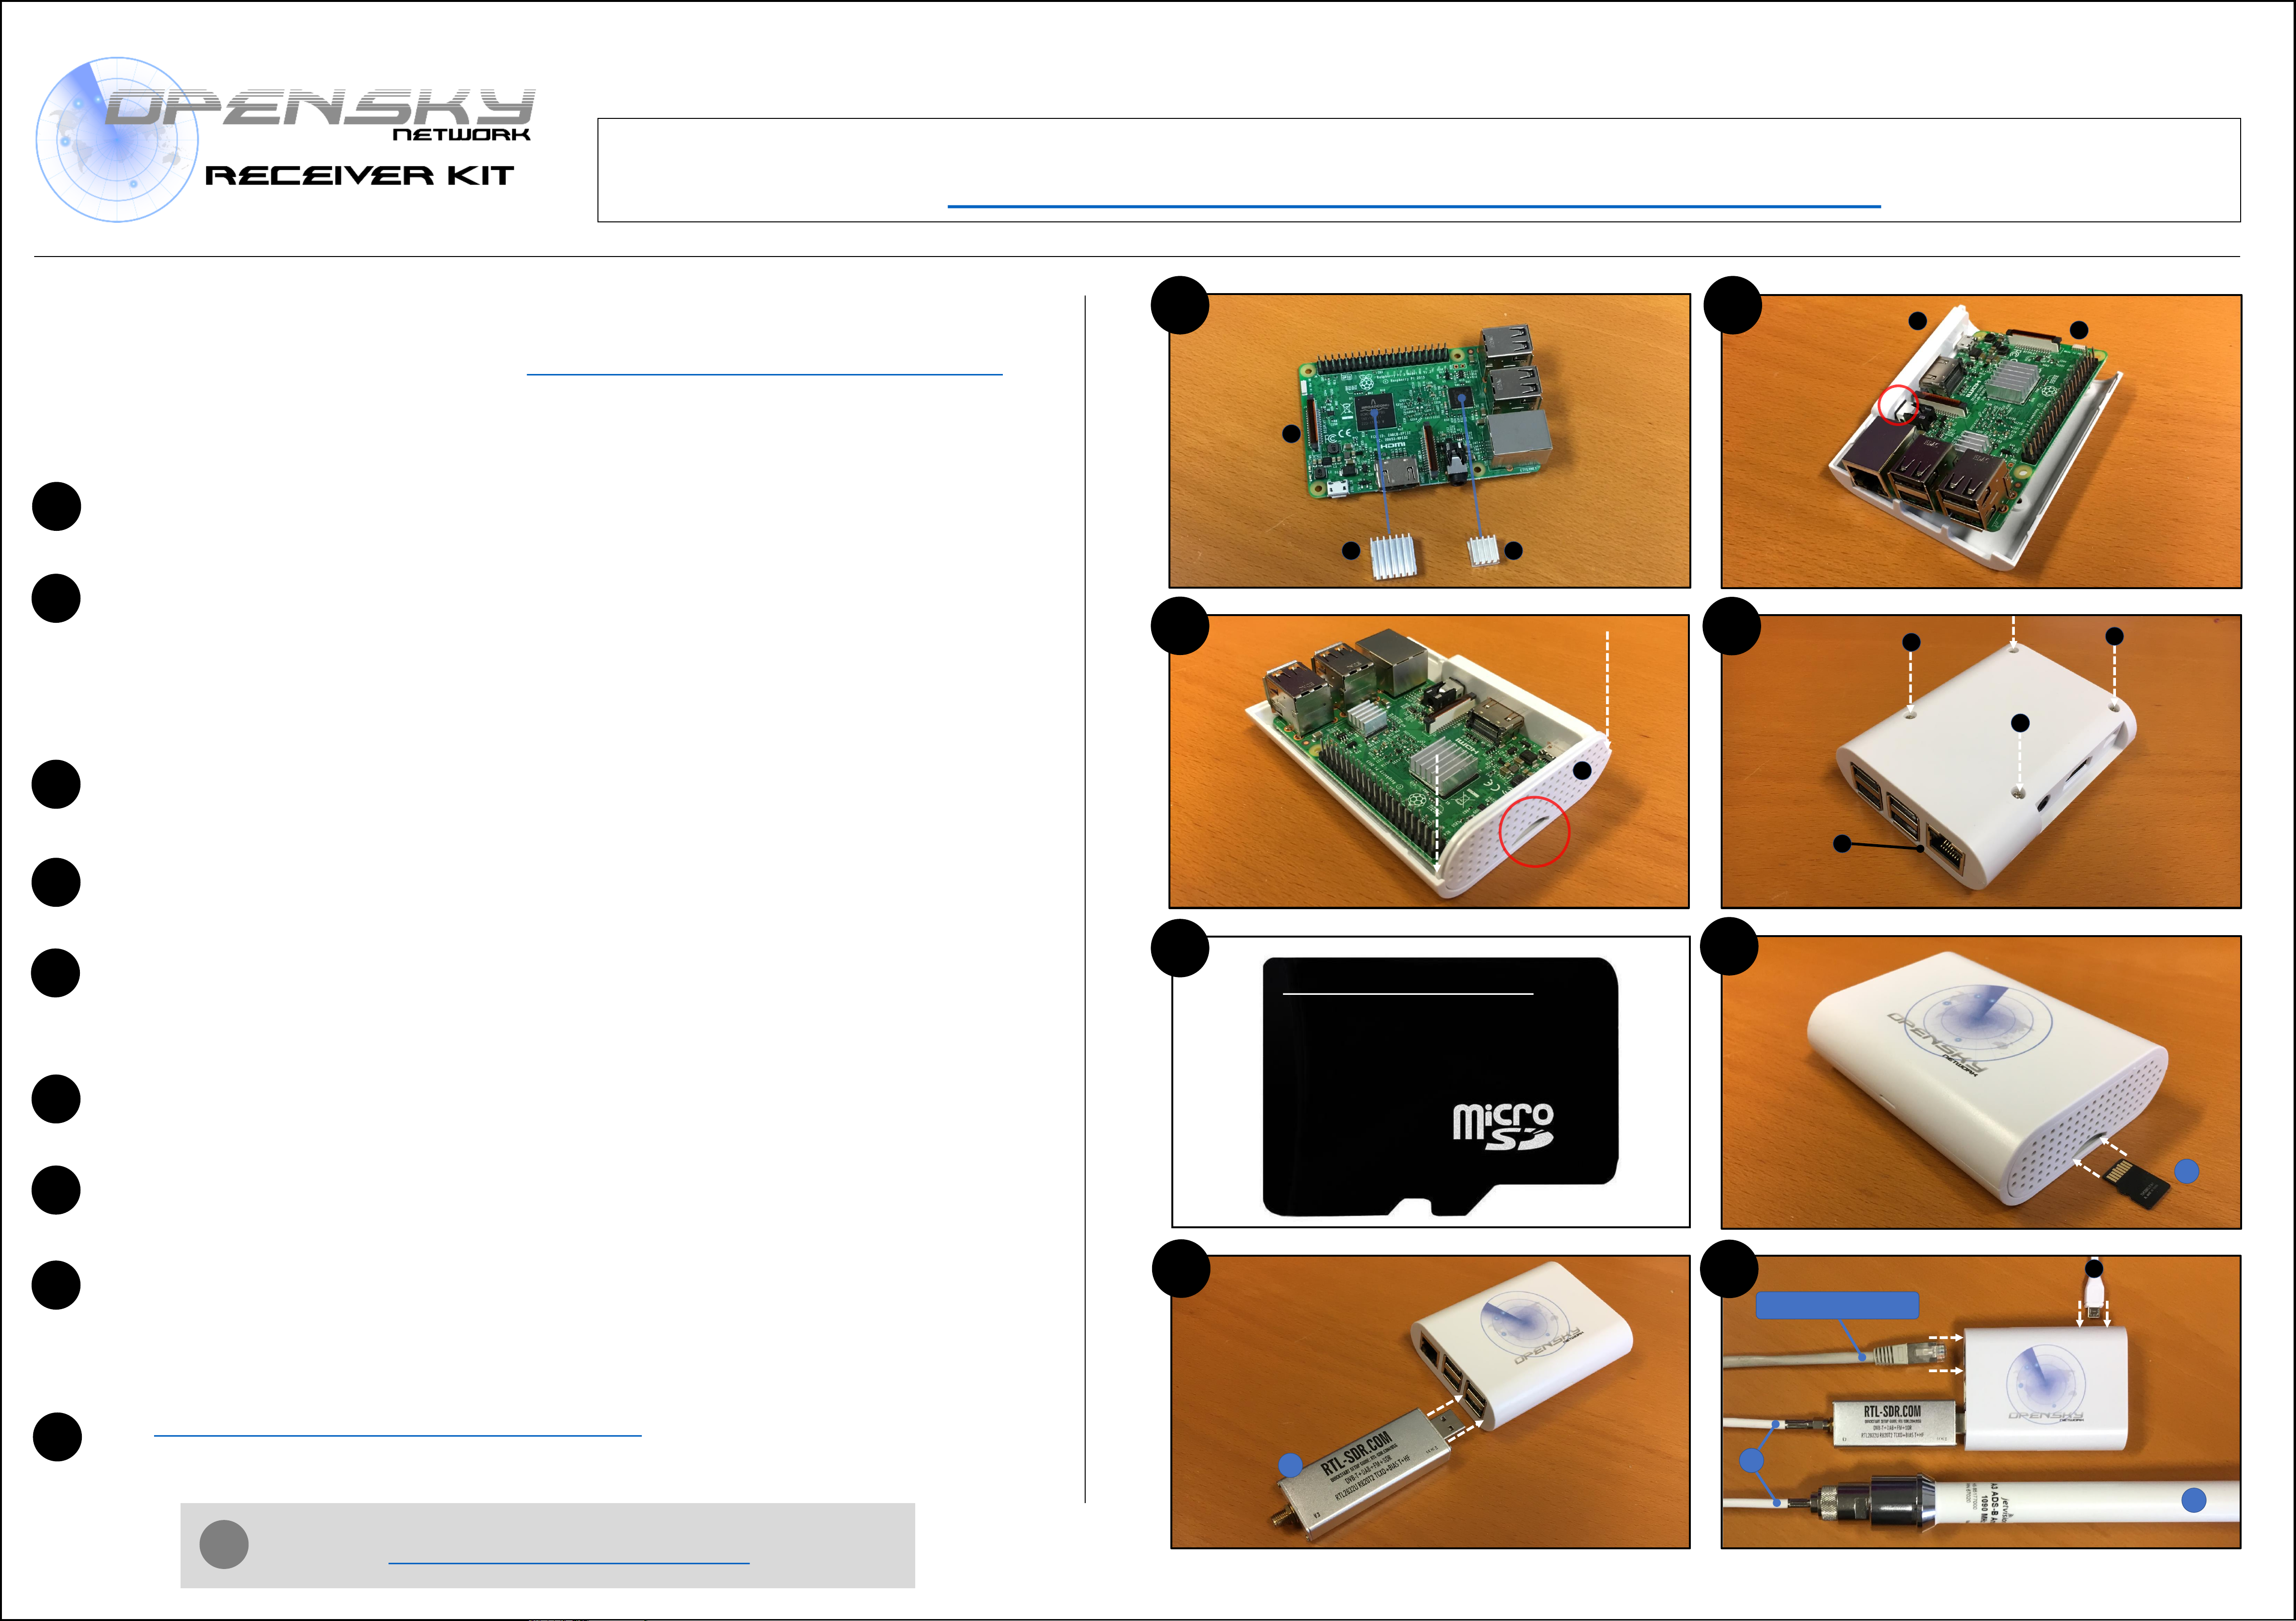
Prepare the SD Card
Please refer to the details
on Page 2 of this guide.
After editing the configuration file, eject the SD card from your computer and
insert it into the RPi.
6
Remove the plastic caps from the RTL-SDR dongle (4) and plug it into one of
the USB ports on the RPi.
7
Connect the coax cable (7), the power supply (B) and your local network via a
LAN cable to the RPi. The LAN cable is not included in the OpenSky kit. As soon
as you connect the power cable the device boots automatically (the LED behind
the rear panel (G) should start blinking)
8
Remove the protection cardboard from the bottom of the coolers (C) and (D)
and place them onto the chips of the RaspberryPi (RPi) (A)
Take the RPi (A) and place it onto the bottom part of the case (E). You will
notice that the four screw holes of the RPi will be aligned with the screw holes
in (E). The best way to insert the RPi is to push the 3.5 mm audio jack into the
designated hole in the case (see the red circle in the image on the right) and
then push down the RPi, until it sits perfectly.
Gently push the rear panel (G) of the case into position and make sure the SD
card slot is on the bottom (see the red circle in the image on the right).
Place the top part of the case (F) onto the RPi and insert the screws (H) through
the holes on the bottom.
1
2
3
4
Before powering up your receiver for the first time you have to edit the
configuration files on the SD card in order to specify the antenna position
and your OpenSky user name. Please refer to page 2 of this guide for details.
5
Congratulations to your new OpenSky Network Receiver Kit! This quick setup guide
provides you with a brief overview on the necessary steps to get your kit up and
running. Please refer to the detailed guide (https://opensky-network.org/receiver-kit)
for details on how to enable ssh, setup the build-in wifi, update the firmware image,
and much more.
For a more detailed setup guide, visit:
Version 1.0
Visit https://opensky-network.org/my-opensky. You should now see your new
receiver listed in the “Receivers” section.
9
If you encounter any problems, contact us by email at
contact@opensky-network.org
?
Quick Setup Guide
https://opensky-network.org/receiver-kit
Page 2
Preparing the SD Card
Before inserting the SD card (3) and powering up your receiver for the first time, you should
edit the configuration file and set the correct antenna position, as well as your OpenSky
Network user name. The SD card contains a partition with the label "boot“, which is
formatted with FAT32. So you can access it with any common operating system. Please refer
to the full guide on the website (https://opensky-network.org/receiver-kit) for details on
how to mount the SD card with your operating system.
1. Use your computer to access the “boot” partition on the SD card
2. Open the file /opensky/config.txt in the opensky directory with your favorite text
editor. The file looks like this:
# Please fill in the following parameters /before/
# you boot the device for the first time. Latitude
# and longitude are in decimal degrees. Altitude is
# in meters. Use your smart phone or Google Maps to
# estimate the location of your antenna with an
# accuracy of about 4 decimal points.
[GPS]
Latitude=0
Longitude=0
Altitude=0
# Enter your OpenSky username here. If you don't have
# an account yet, register on http://opensky-network.org.
# This receiver will be _automatically_ added to your
# profile once you enter your username here.
# Note: remove the '#' character before 'Username’
[IDENT]
#Username = [your username goes here]
Config - OpenSky Network User Name
Also, in order to make sure that your receiver will get assigned to your user account when it
connects to the OpenSky Network for the first time, you have to set your user name at the
bottom of the same file (/opensky/config.txt ). Don't forget to remove the # at the
beginning of the line. After editing the lines they should look like this (replace
yourusername with your own username):
[IDENT]
Username = yourusername
Config - Antenna Position
You can use Google Maps (https://maps.google.com) to determine the latitude and
longitude of the antenna. Latitude and longitude values with at least 4 fractional digits
are preferable. So Google Maps definitely provides sufficient accuracy if the correct
location is selected. The online tool https://www.daftlogic.com/sandbox-google-
maps-find-altitude.htm uses the Google Maps API to determine the altitude. Use this
to determine the altitude of your antenna in meters. Don't forget to take the height of
the building into account, if you mount your antenna on a roof. Instead of using
different online tools you can also download Google
Earth (https://www.google.de/intl/de/earth/) and use the 3D mode to determine the exact
coordinates of your antenna, already including the height of the building. You can also use
the GPS of your smartphone.
Enabling SSH
SSH can easily be activated by creating a file named ssh in the root directory of the “boot”
partition on the SD card. Please refer to the full guide on the website (url on Page 1) for
details on how to mount the SD card and create the file with your operating system.
Antenna Positioning
ADS-B and Mode S signal reception is very much influenced by obstacles such as walls,
buildings or terrain. Mounting your antenna at an appropriate location is essential for
achieving good results. Please refer to the full guide on the website (url on Page 1) for
details on how your antenna should be mounted.
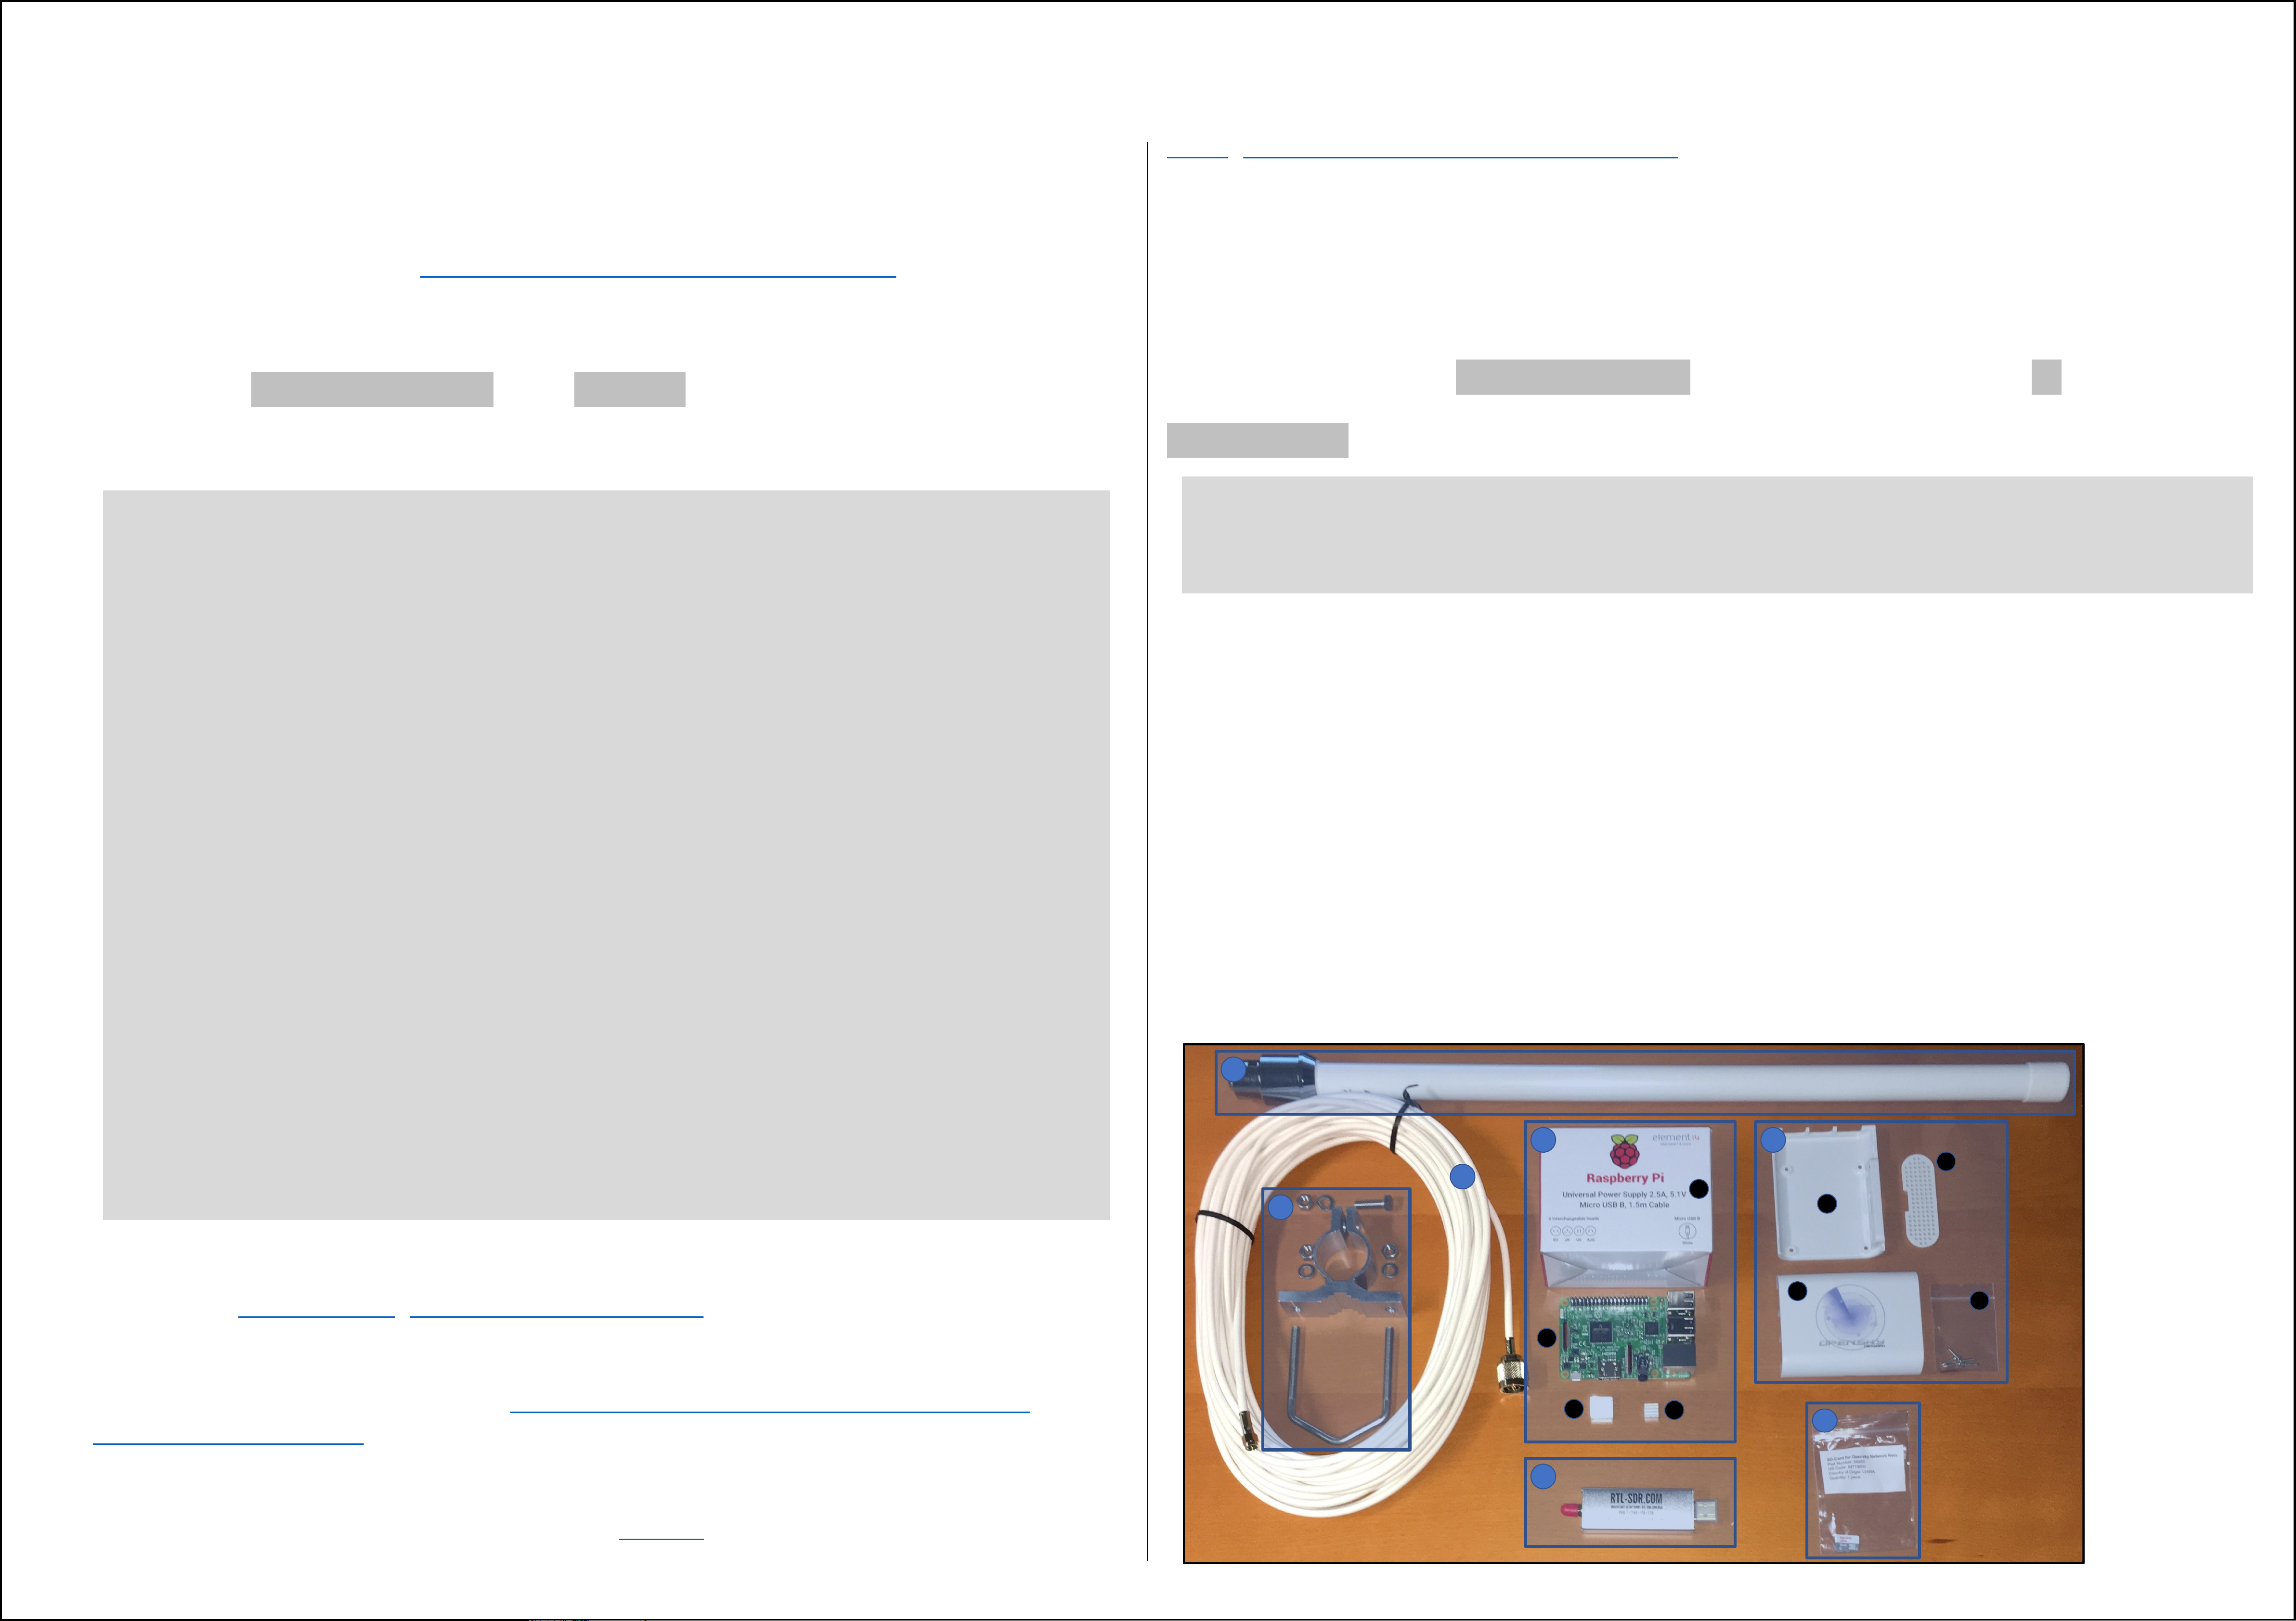
Parts Overview
4
1 2
3
5
6
7
A
B
C
D
E
F
G
H
 Loading...