

Page 1
CoverPage
Page 2

Page 3
IMPORTANT NOTICE
■ Safety Precaution and Warning
To reduce the risk of electric shock, do not remove cover and do not expose this
appliance to rain or moisture.
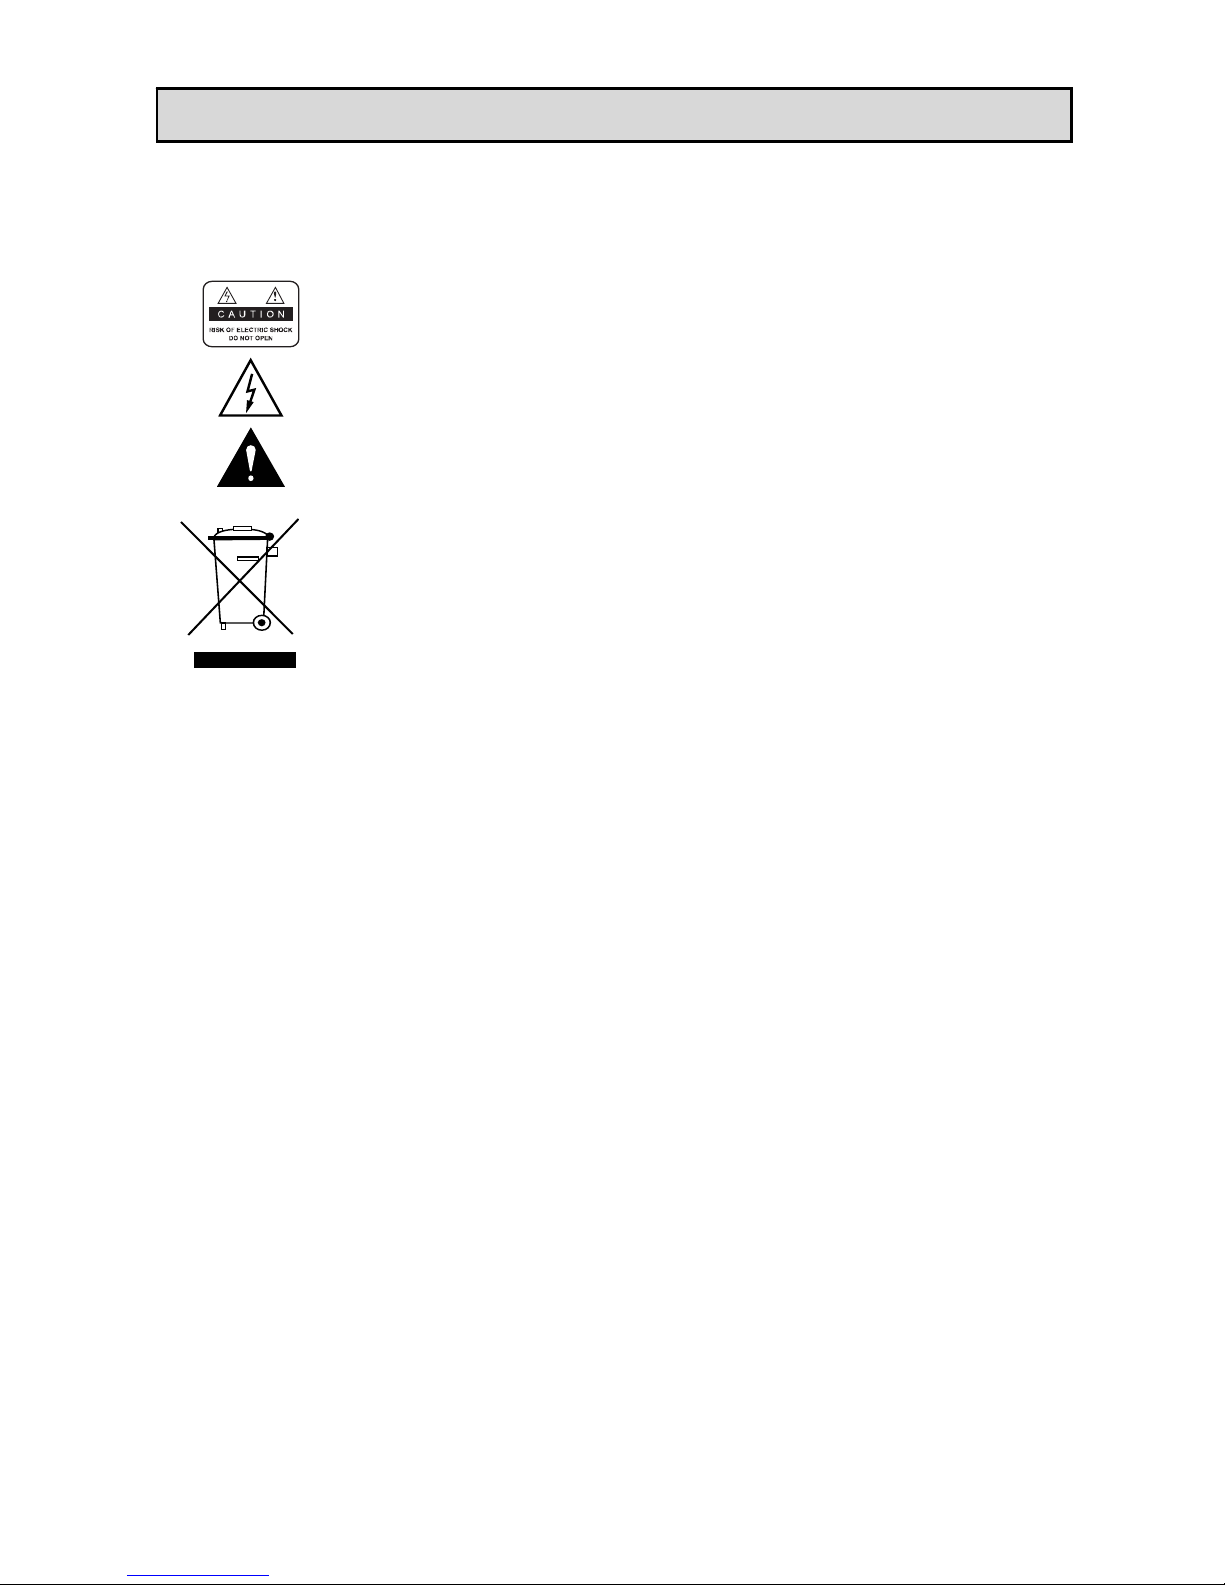
This symbol indicates dangerous voltage inside the product and there’s a risk of
electric shock or personal injury.
This symbol indicates important instructions accompanying the product.
Disposal of old Electrical & Electronic Equipment (Applicable in the European Union
and other European countries with separate collection system)
This symbol on the product or on its packaging indicates that this product shall not
be treated as household waste. Instead it shall be handed over to the applicable
collection point for the recycling of electrical and electronic equipment. By ensuring
this product is disposed of correctly, you will help prevent potential negative
consequences for the environment and human health, which could otherwise be
caused by inappropriate waste handling of this product. The recycling of materials
will help to conserve natural resources. For more detailed information about
recycling of this product, please contact your local city office, your household
waste disposal service or the shop where you purchased the product.
1. POWER SUPPLY
AC 100V-250V, 50/60Hz
• Operate this product only from the type of power supply indicated on the marking label. If you are not
sure of it, consult your local power company.
• Disconnect the product from the power before you start any maintenance.
2. OVERLOADING
• Do not overload a wall outlet, extension cord as this may result in electric fire or shock.
3. LIQUID
• The product should not be exposed to any kind of liquid. In addition, no objects filled with liquid should
be placed on this product.
4. CLEANING
• Disconnect the product from the wall outlet before cleaning.
• Use a light damp cloth (no solvents) to dust the product.
5. VENTILATION
• The slots on top of the product must be left uncovered to allow proper airflow.
Page 4

IMPORTANT NOTICE
• Do not stand the product on soft furnishings or carpets.
• Do not stack electronic equipments on top of the product.
6. ATTACHMENTS
• Do not use any unsupported attachments as these may be hazardous or cause damage to the product.
7. CONNECTION TO THE SATELLITE DISH LNB
• Disconnect the product from the power before connecting or disconnecting the cable from the satellite
dish. Failure to do so can damage the LNB.
8. CONNECTION TO THE TV
• Disconnect the product from the power before connecting or disconnecting the cable from the TV.
Failure to do so can damage the TV.
9. EARTHING
• The LNB cable must be earthed to the system earth for the satellite dish.
10. LOCATION
• Place the product indoors to avoid exposing it to rain or sun.
• Do not place it near a radiator or heat generator.
• Make sure it has more than 10 cm clearance from any appliances that has electromagnetic influences,
such as a TV or a VCR.
• Do not block the openings with any object, and do not place the product on a bed, sofa, rug, or other
similar surface.
• If you place the product on a rack or a bookcase, ensure that there is adequate ventilation and that you
have followed the manufacturer’s instructions for mounting.
• A falling product can cause serious injury to a child or adult, and serious damage to the appliance.
11. LIGHTNING, STORM OR NOT IN USE
• Unplug the product from the wall outlet and disconnect the antenna during a thunderstorm or when left
unattended and unused for long periods of time. This will prevent damage to the unit due to lightning
and power-surges.
12. EXTRANEOUS OBJECTS
• Do not insert anything through the openings in the unit, where they can touch dangerous voltage
points or damage parts.
13. REPLACEMENT OF PARTS
• When replacement of parts is required, be sure the service technician uses replacement parts specified
by the manufacturer or those that have the same characteristics as the original part.
• Unauthorized substitution may result in additional damage to the unit.
Page 5

CONTENTS
5
1. Getting started
1.1 Features
1.2 Front panel
1.3 Rear panel
1.4 Remote control
1.5 Connecting TV, VCR
1.6 Connecting audio system
2. Installation
2.1 Antenna setup
2.2 Advance search
2.3 Motor setup
2.4 Multisat search
2.5 Blind search
2.6 Fastscan
2.7 Factory reset
3. Channel manager
3.1 Channel edit
3.2 Favorite edit
3.3 Satellite/TP edit
4. System setup
4.1 Langauge setup
4.2 OSD setup
4.3 A/V setup
4.4 Time setup
4.5 Parental lock
4.6 Information
5. CAS
5.1 Smartcard
5.2 Common interface
5.3 RS-232C
6. Multimedia
6.1 PVR
6.2 USB
File filter
MP3 playback
JPEG view
DivX playback
Software update / backup
DB backup / restore
Recording
Background recording
Time shift
Playback
Playback & recording
6.3 Calendar
7. Game
8. Timer
9. Live menu
9.1 Electronic Program Guide
9.2 Channel List
9.3 Infobar
9.4 Teletext
9.5 AV Mode
9.6 Option
10. Specifications
Page 6

GETTING STARTED
6
1.1 Features
- Fully compliant with MPEG-4 HD / H.264 (DVB-S/DVB-S2)
- SCPC/MCPC Receivable from C /Ku-Band Satellites
- Smartcard reader
- 2 Common Interface
- 8000 channels programmable
- DivX file playback
- Electronic Program Guide for multi channel & single channel
- Subtitle & Teletext supported
- Blind scan / Fastscan / Unicable supported
- DiSEqC 1.0 / 1.1 / 1.2 / USALS support
- Multifeed function for selected channel
- Vacuum Fluorescent Display
- Optical Digital Audio output (S/PDIF) and AC-3 bitstream out
- MP3 playback
- JPEG picture view
- USB 2.0 interface for USB storage device
- Powerful trick mode support
Seek (jump), Fast forward/Rewind upto 32X, Slow playback upto 1/4X
- Time shift
- Background recording & playback while recording function
- USB device management
- Backup / Restore function for software and channel data
- Easy software update through USB interface
- Easy Timer management
- Video resolution upto 1080i
- Various video output (HDMI, YPbPr, Scart, CVBS)
- Fast Ethernet RJ-45 interface (10/100M)
- Customized parental lock function
- Hi-color graphic user interface
- Channel manager support (favorite / move / delete / lock / rename)
- Support multiple OSD language
- Brilliant User Friendly OSD
- Advanced channel search option
Page 7
GETTING STARTED
7
1.2 Front panel
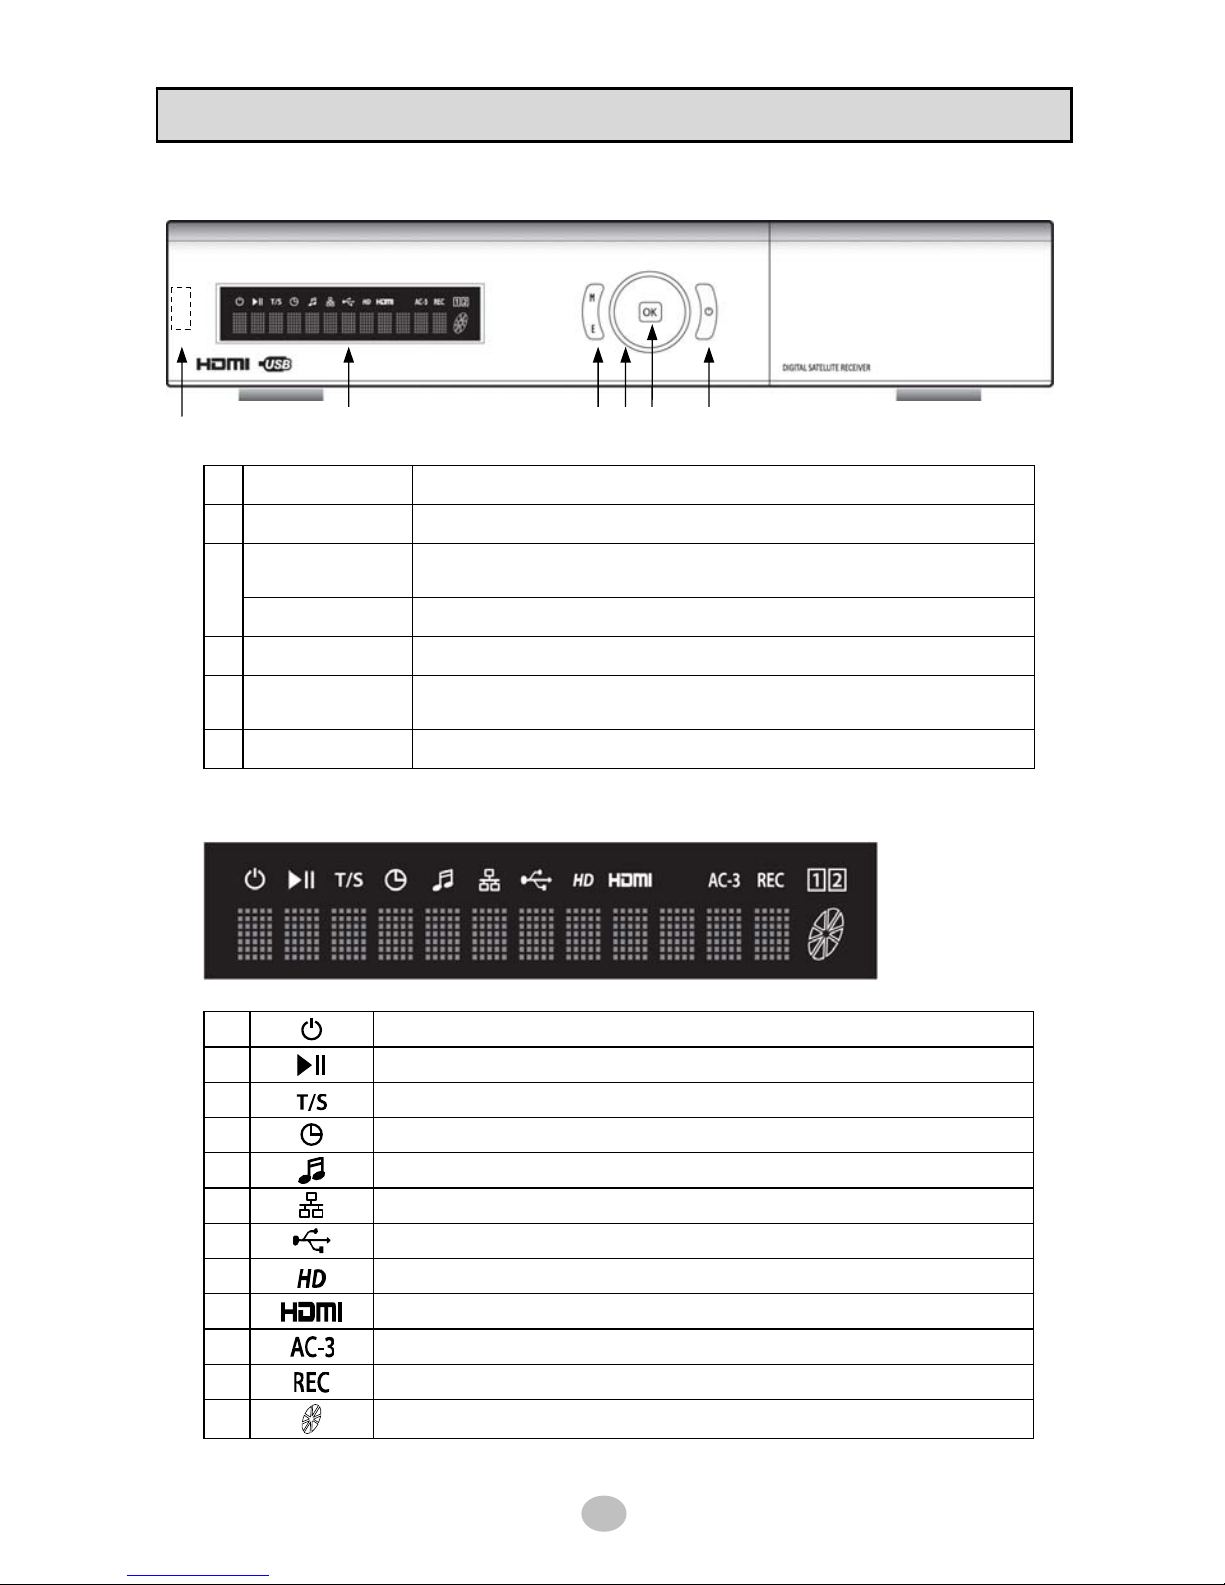
1 USB USB 2.0 Interface
2 VFD DISPLAY Vaccum Fluorescent Display
MENU
Normal mode : Display the main menu
Menu mode : Exit menu mode
3
EXIT Return to previous menu
4 NAVIGATION Up/Dn : Channel change, Left/Right : Volume control
5 OK
Normal mode : Display channel list
Menu mode : Select menu item
6 STAND BY Stand by mode [ON/OFF]
※ VFD icon description
1
Turned on in stand by mode
2
Indicates PLAY / PAUSE in playback mode
3
Turned on when Time shift is activated
4
Turned on when Timer setting is stored
5
Turned on in MP3 play mode
6
Turned on as Ethernet connection is established
7
Turned on as USB device is connected
8
Indicates that current channel is High Definition
9
Turned on when HDMI connection is established to TV
10
Indicates that current channel has DOLBY DIGITAL Audio
11
Turned on while in recording
12
Turned on in playback mode
1 2 3 4 5 6
Page 8

GETTING STARTED
8
1.3 Rear panel
LNB IN Connect satellite antenna cable
1
LOOP OUT Connect to another STB (LNB IN)
2 RS-232C Connect to PC for S/W update
3 HDMI Connect to TV
4 RJ-45 Connect ethernet cable
5 S/PDIF Optical digital audio output
VIDEO Composite video output
6
AUDIO (L/R) Stereo audio output
7 YPbPr Component output. Connect to TV
TV SCART Connect to TV
8
VCR SCART Connect to VCR
9 POWER SWITCH AC Power ON/OFF switch
1 2
3 4 5 6 7 8 9
Page 9
GETTING STARTED
9
1.4 Remote Control Unit
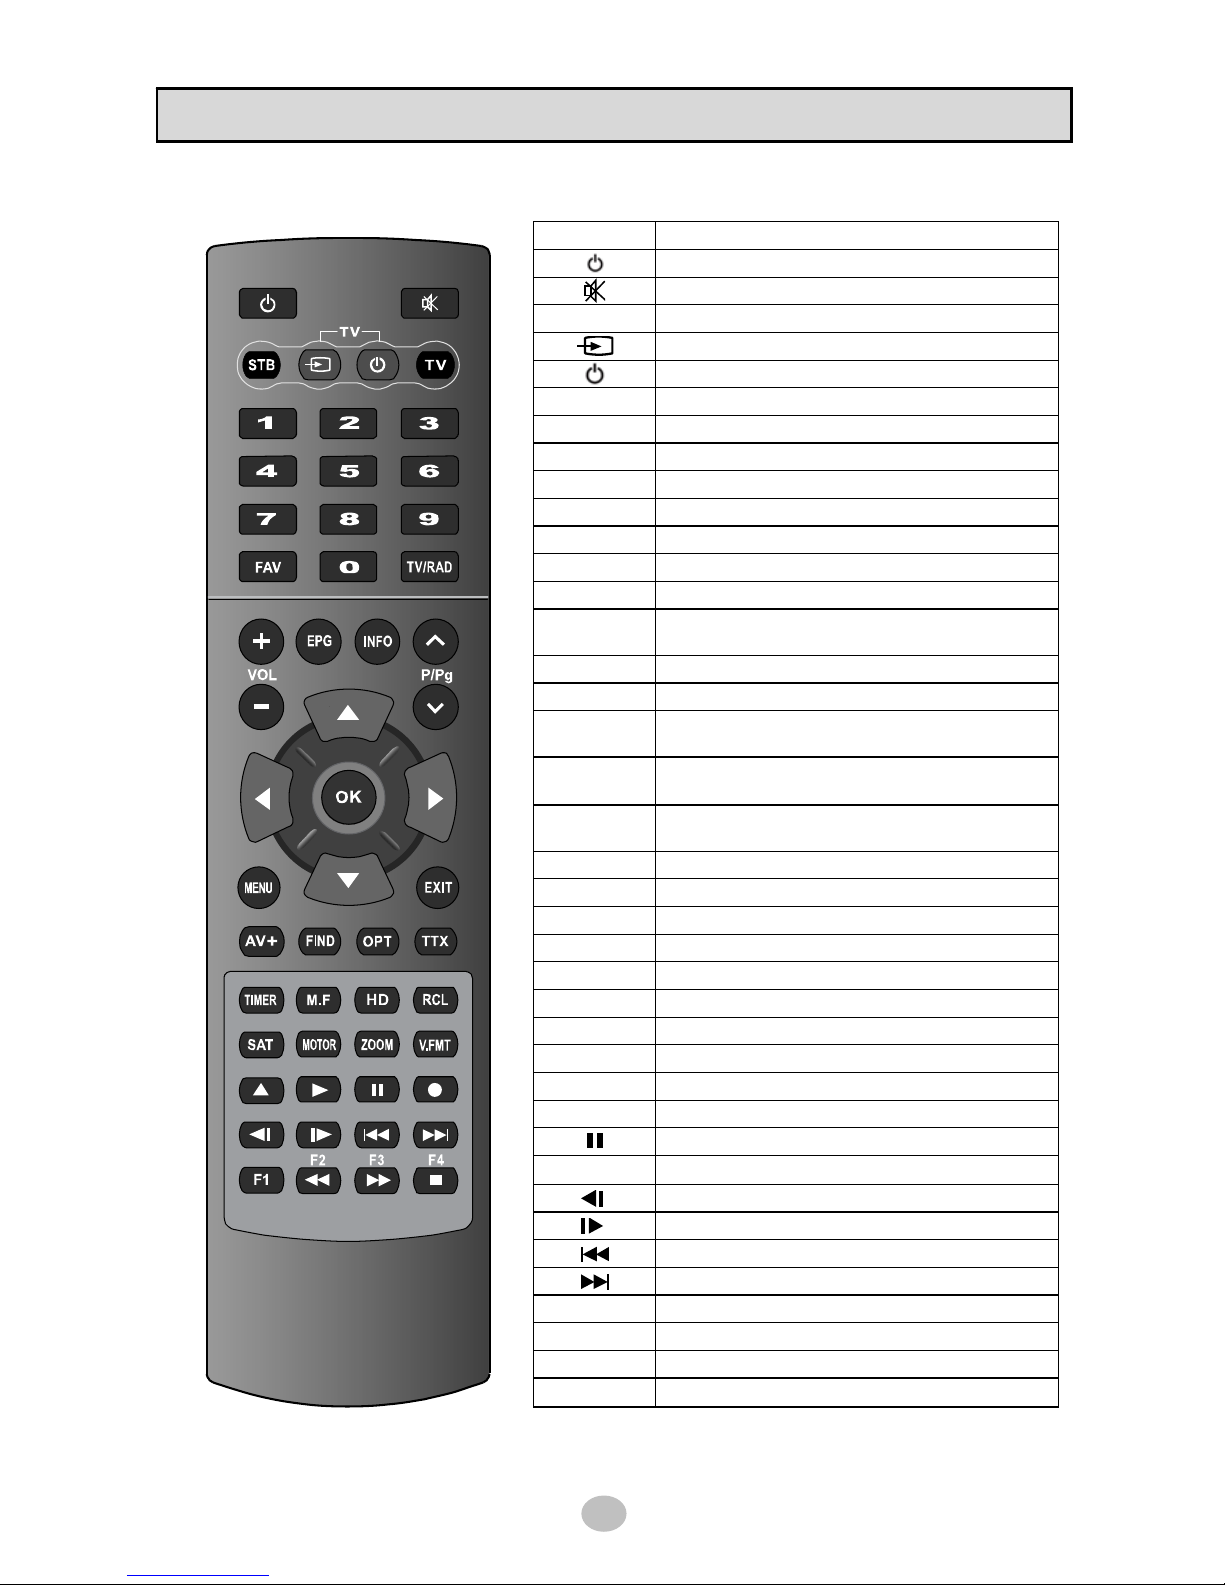
KEY FUNCTION
Stand by mode [ON/OFF]
Mute the sound
STB Set RCU work with STB
Select AV source of TV
power ON/OFF of TV
TV Set RCU work with TV
MOTOR Display DiseqC 1.2 setup menu
TIMER Display Timer reservation list
V.FMT Set screen format
M.F Display multifeed channels
EPG Show the Electronic Program Guide
INFO Show the current channel information
SAT Display satellite list scanned
MENU
Normal Mode : Show the main menu
Menu Mode : Exit menu mode
EXIT Return to previous menu
ZOOM Display Zoom function
CH
▲▼
Normal Mode : Change channel
Menu Mode : Move menu item
VOL
◀▶
Normal Mode : Adjust the volume
Menu Mode : Change menu item
OK
Normal Mode : Display channel list
Menu Mode: Execute the select item
HD Display HD channel list
RCL Go back to previous channel
AV+ Display audio mode / video mode menu
FIND Display find-window to search channel
OPT Display subtitle / audio language menu
TTX Display Teletext
FAV Show Favorite Channel List
TV/RAD Switch TV/Radio mode
▲
Display USB file browser
▶
Play recorded file / MP3
Pause play / Time shift
●
Start recording
Slow play backward
Slow play forward
Seek backward
Seek forward
F1 Reserved for future use
◀◀
Rewind
▶▶
Fast forward
■
Stop
Page 10
GETTING STARTED
10
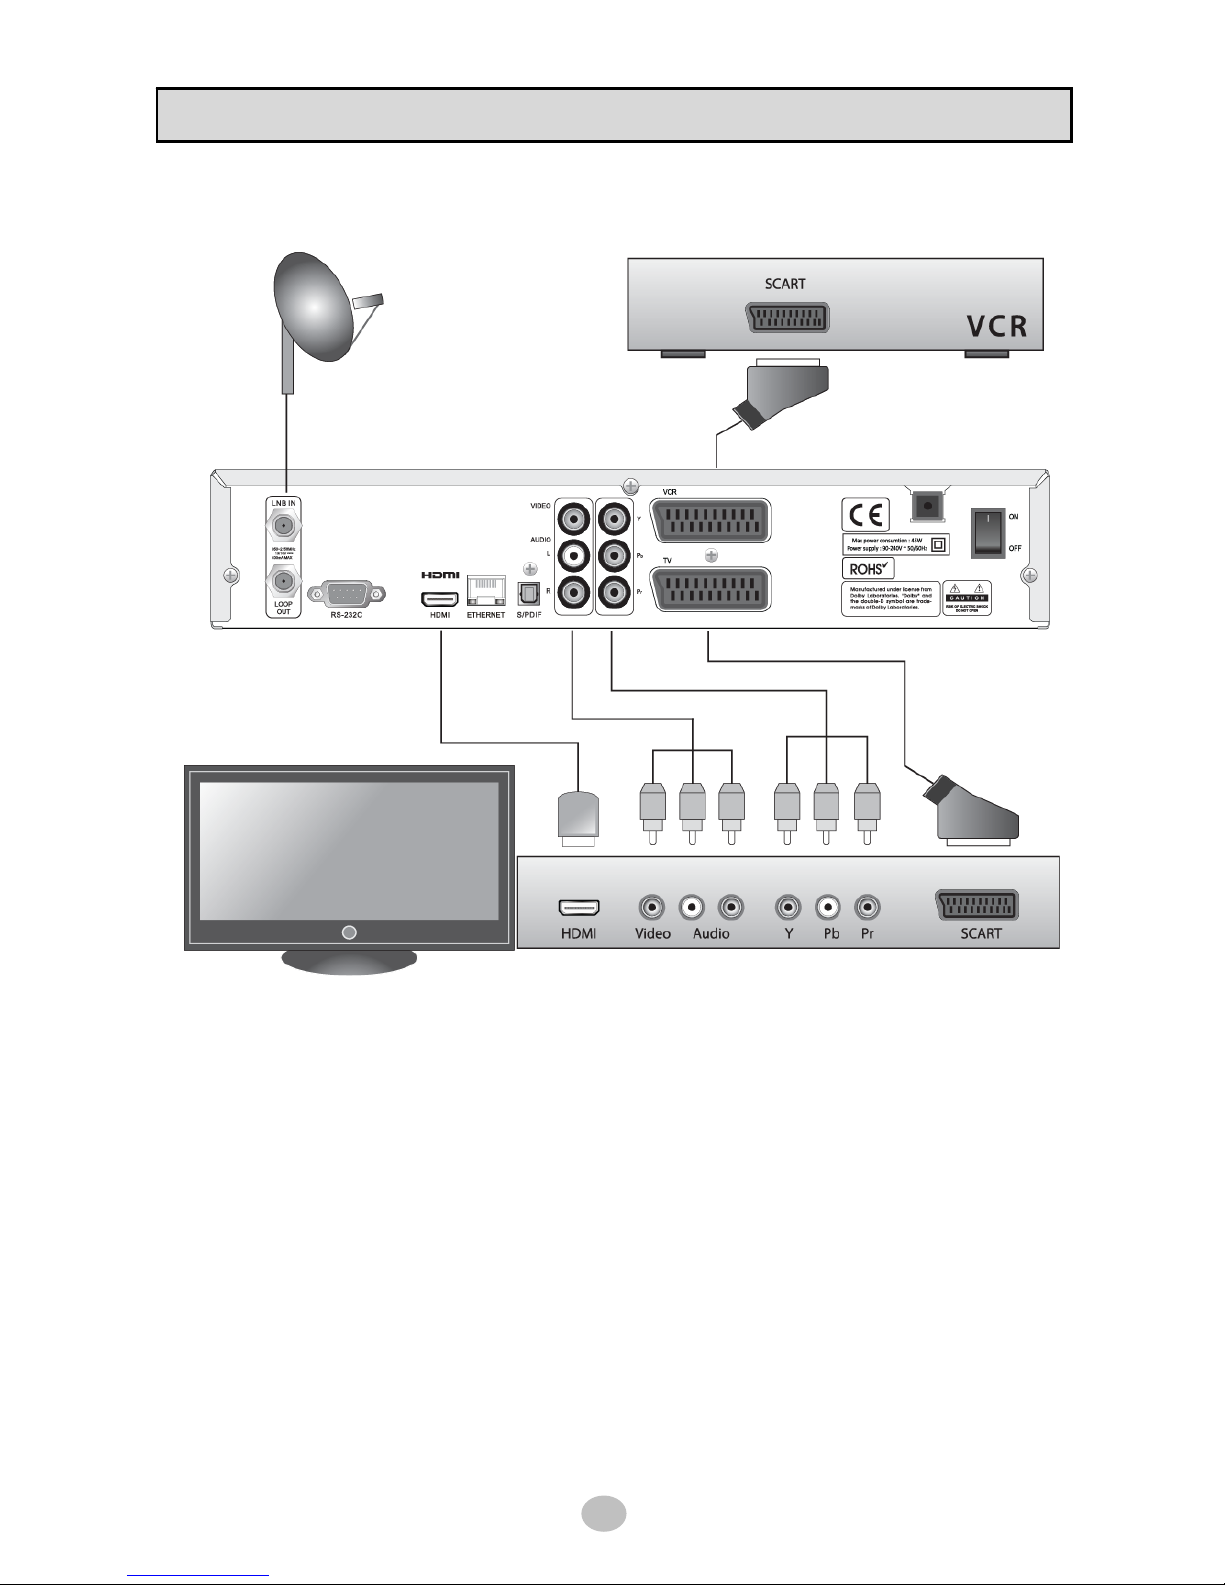
1.5 Connecting TV, VCR
1) Connecting with HDMI cable
Use HDMI cable as above connection illustration. HDMI has both audio and video therefore you
don’t need additional connection.
2) Connecting with Cinch cable
Use 3-RCA cable consisted of video and stereo audio (left, right).
3) Connecting with Component cable
Use 3-RCA cable (YPbPr). This connection serve only video.
4) Connecting with SCART cable
Use SCART cable and this serve both audio and video.
5) Connecting VCR
Use SCART cable as above illustration.
6) Connecting Antenna
Connect coaxial cable from outside antenna to LNB IN port.
Page 11
GETTING STARTED
11
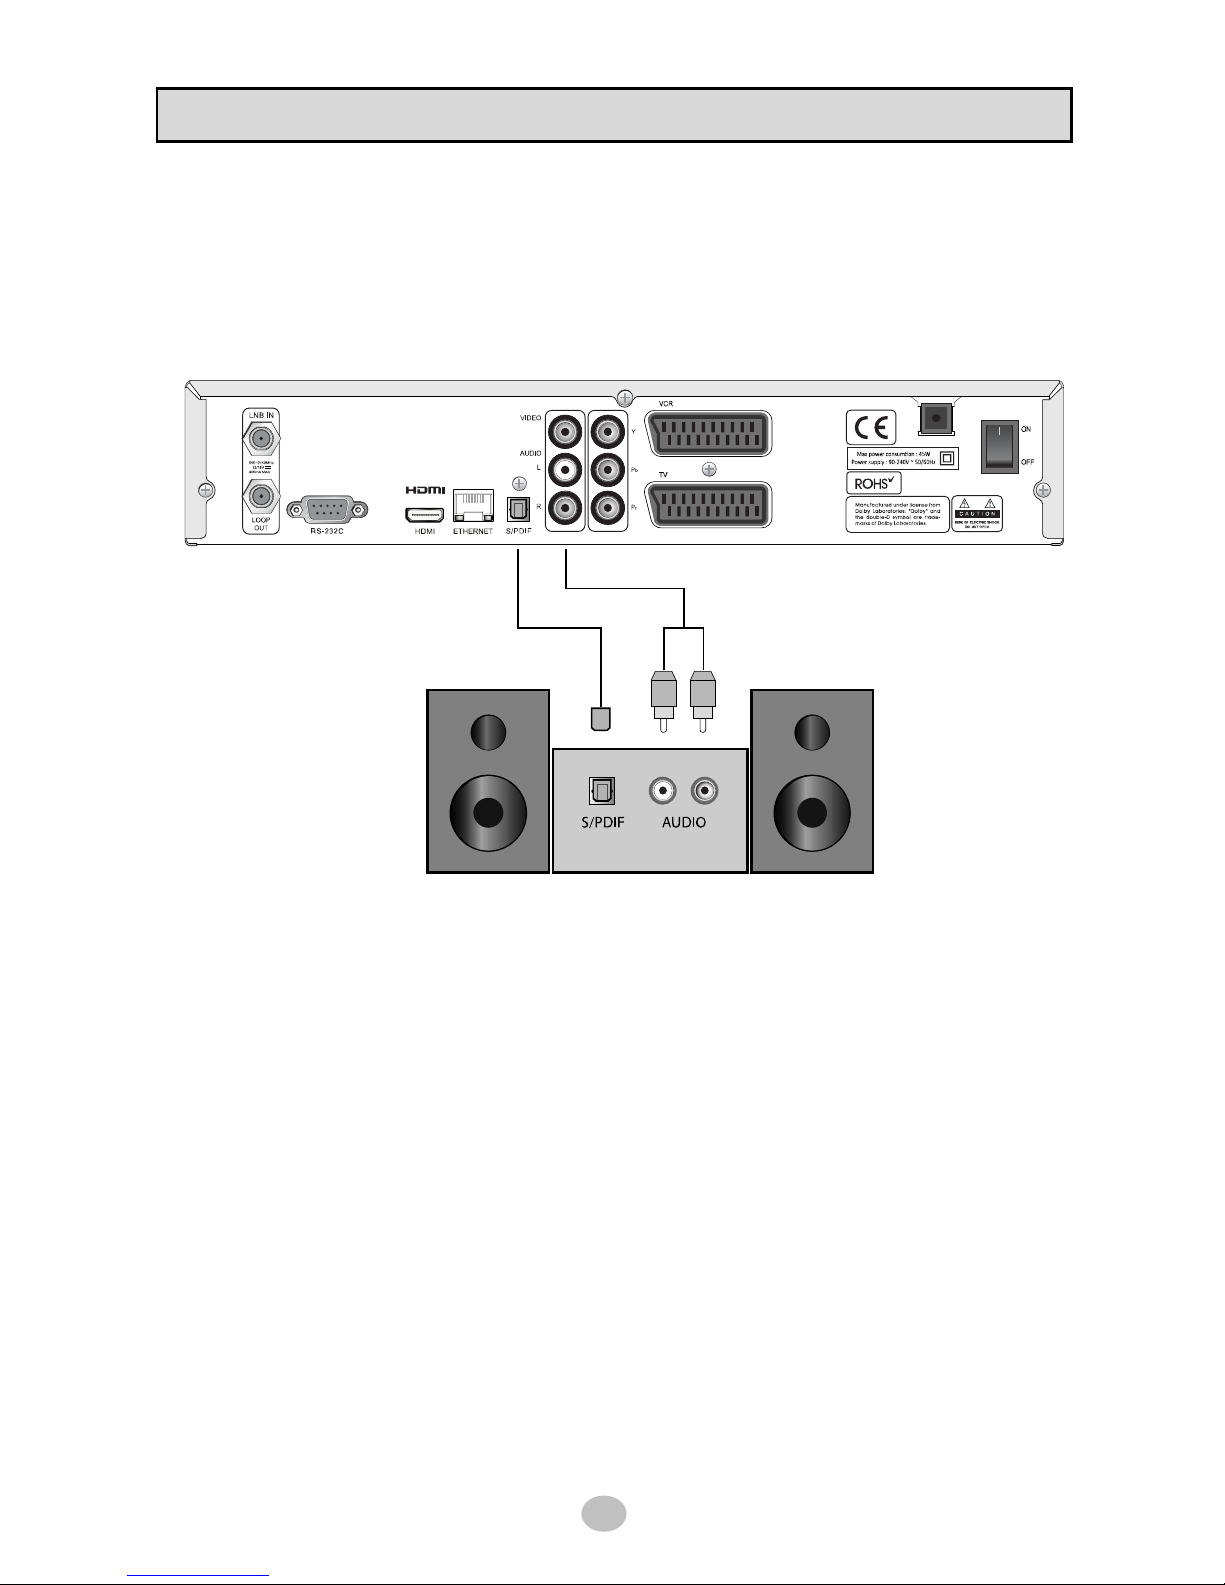
1.6 Connecting audio system
If you have external audio system like home theater, you can enjoy better and powerful audio as below
connection illustration.
- Dolby digital (optical) : Use S/PDIF optical cable into Dolby digital decoder
- Stereo : Use 2-RCA cable for Audio L/R
Page 12
SYSTEM SETUP
12
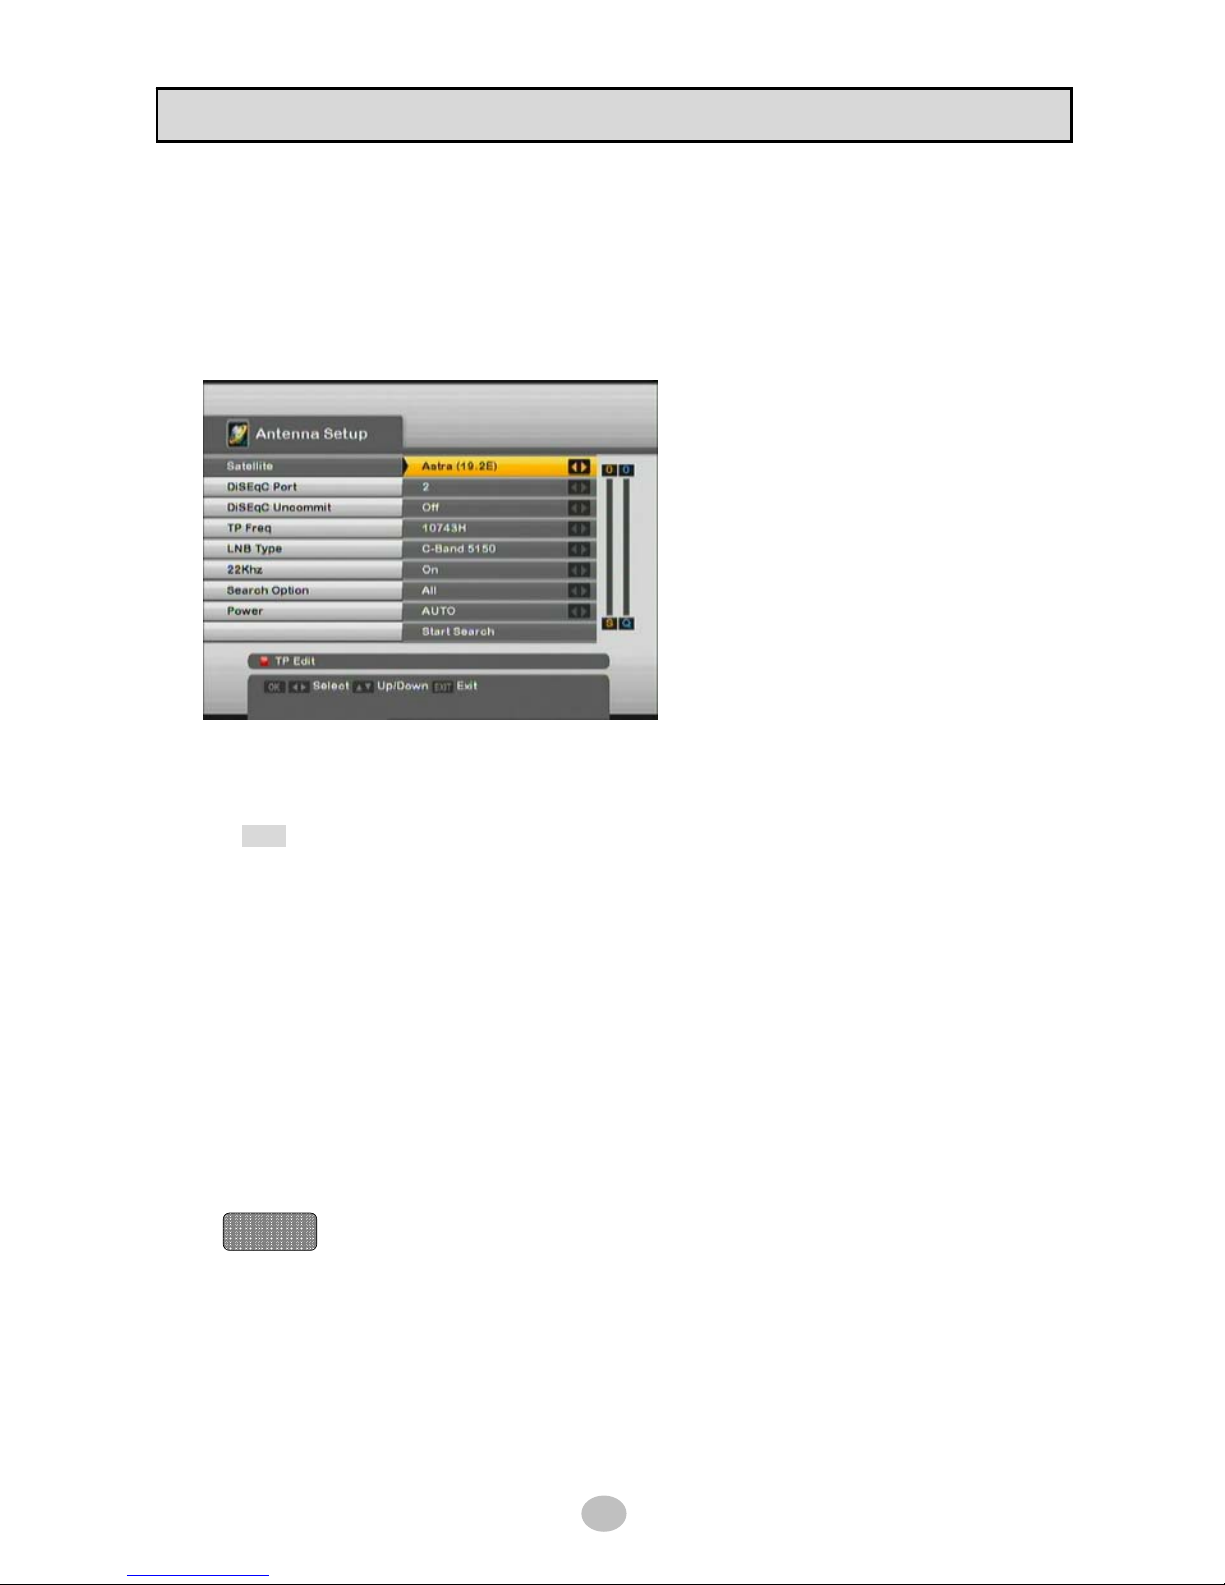
2.1 Antenna Setup
Select [INSTALLATION] > [ANTENNA SETUP] menu to setup your satellite antenna with appropriate
value and search channels as below pictures.
You may need to enter PIN code to enter [ANTENNA SETUP]. Default PIN code is 0000 and you can
change this code in [PARENTAL LOCK] menu later.
Satellite – select satellite to setup.
Press OK to open satellite list box or use Left/Right button.
* TIP : Left/Right button display selected satelites only for your convenience
DiSEqC Port – select correct DiSEqC port number if you are using DiSEqC switch
DiSEqC Uncommit – select if you are using DiSEqC 1.2 switch
TP Freq – enter TP frequency for checking signal strength
LNB Type – enter correct LNB type installed
22KHz – select ON/OFF if you are using 22KHz switch
Search Option – you can select either ALL/One TP/Free Only/Network Scan
Power – select either OFF/13V/18V/Auto
S/Q – signal strength / quality strength
Start Search – Press OK to start channel searching
TP Edit – Press RED button on RCU to perform [ADVANCED SCAN] to ADD, DELETE,
EDIT TP.
Help !!!
Page 13
SYSTEM SETUP
13
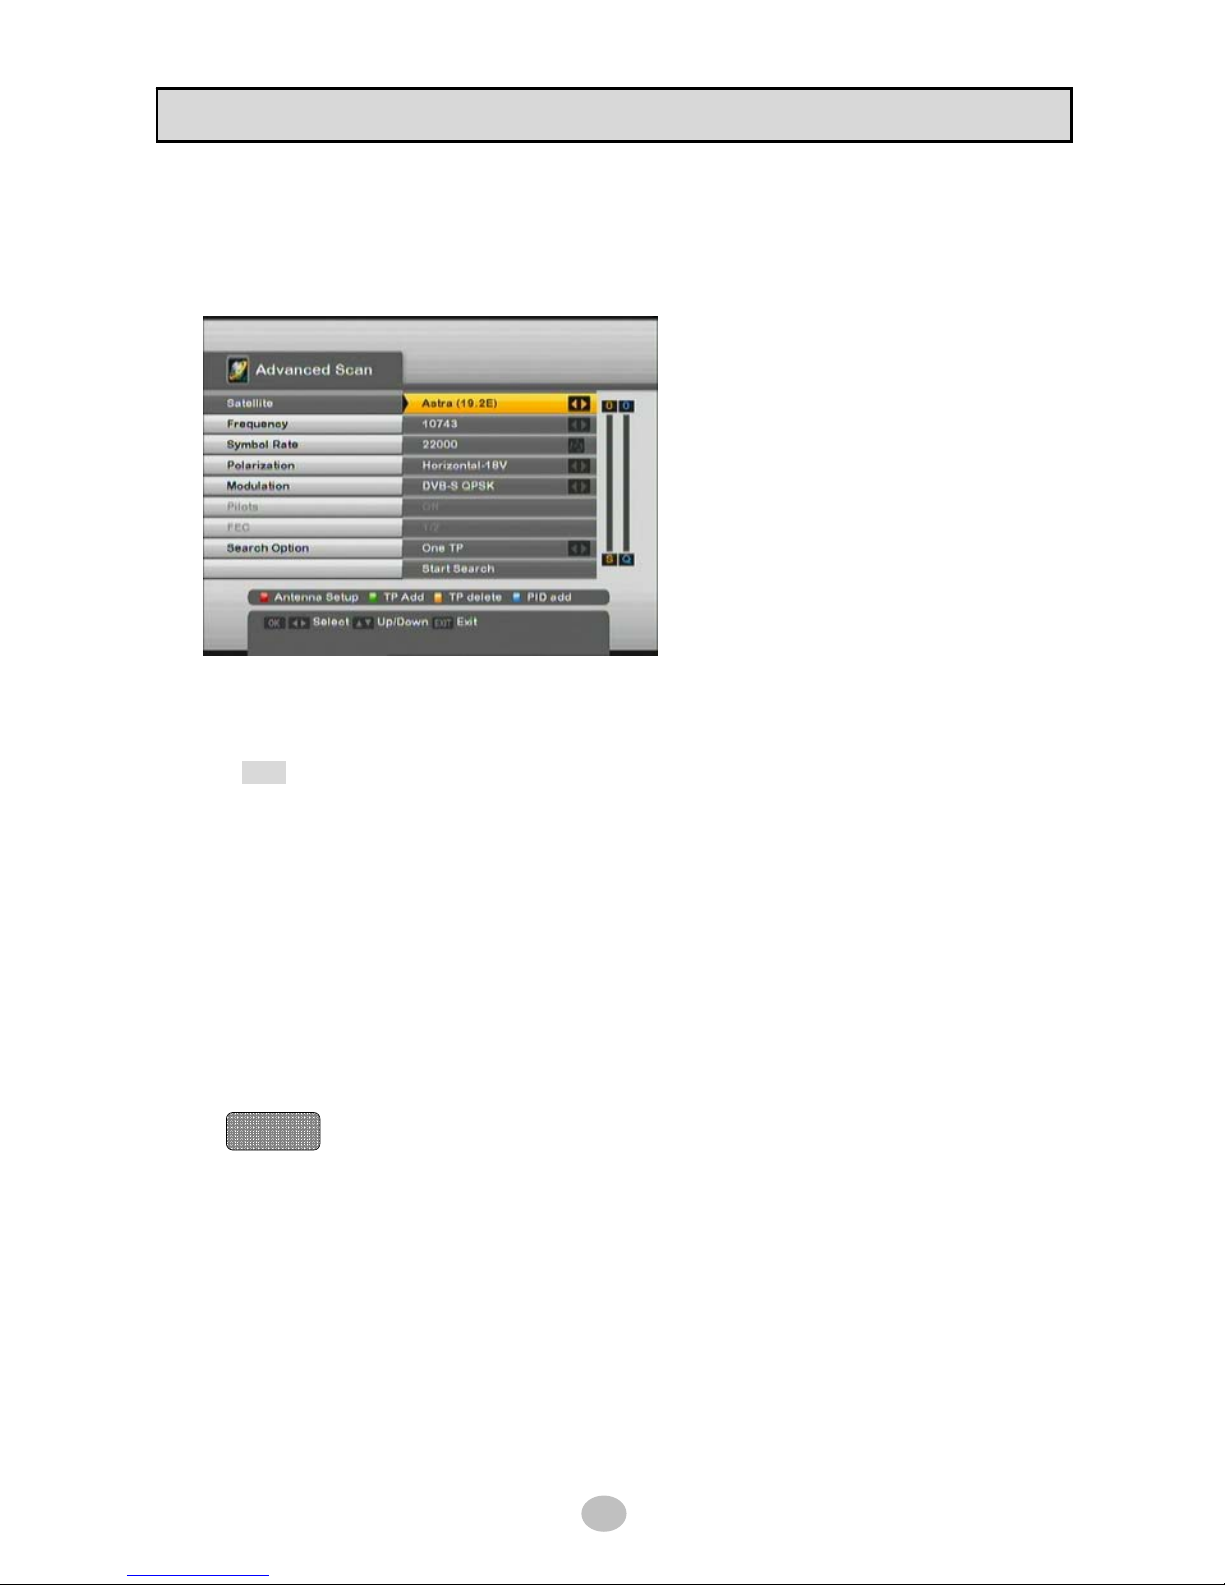
2.2 Advanced scan
Select [INSTALLATION] > [ADVANCED SCAN] menu to search channels manipulating TP value as
below pictures.
Satellite – select satellite to setup.
Press OK to open satellite list box or use Left/Right button.
* TIP : Left/Right button display selected satelites only for your convenience
Frequency – select TP frequency what you want to search
Symbol rate – enter correct value for TP you selected
Polarization – select either Horizontal (18V)/Vertical (13V)
Modulation – select either DVB-QPSK/DVB-S2 QPSK/DVB-S2 8PSK
Pilots – this will be enabled when you select DVB-S2 modulation
FEC – this will be enabled when you select DVB-S2 modulation
Search Option – you can select either ALL/One TP/Free Only/Network Scan
Start Search – Press OK to start searching
TP Add – enter new TP information by entering new value
TP Delete – delete current TP
PID add – Press BLUE button on RCU to perform [CHANNEL ADD] to add channel
in manual mode.
Help !!!
Page 14
SYSTEM SETUP
14
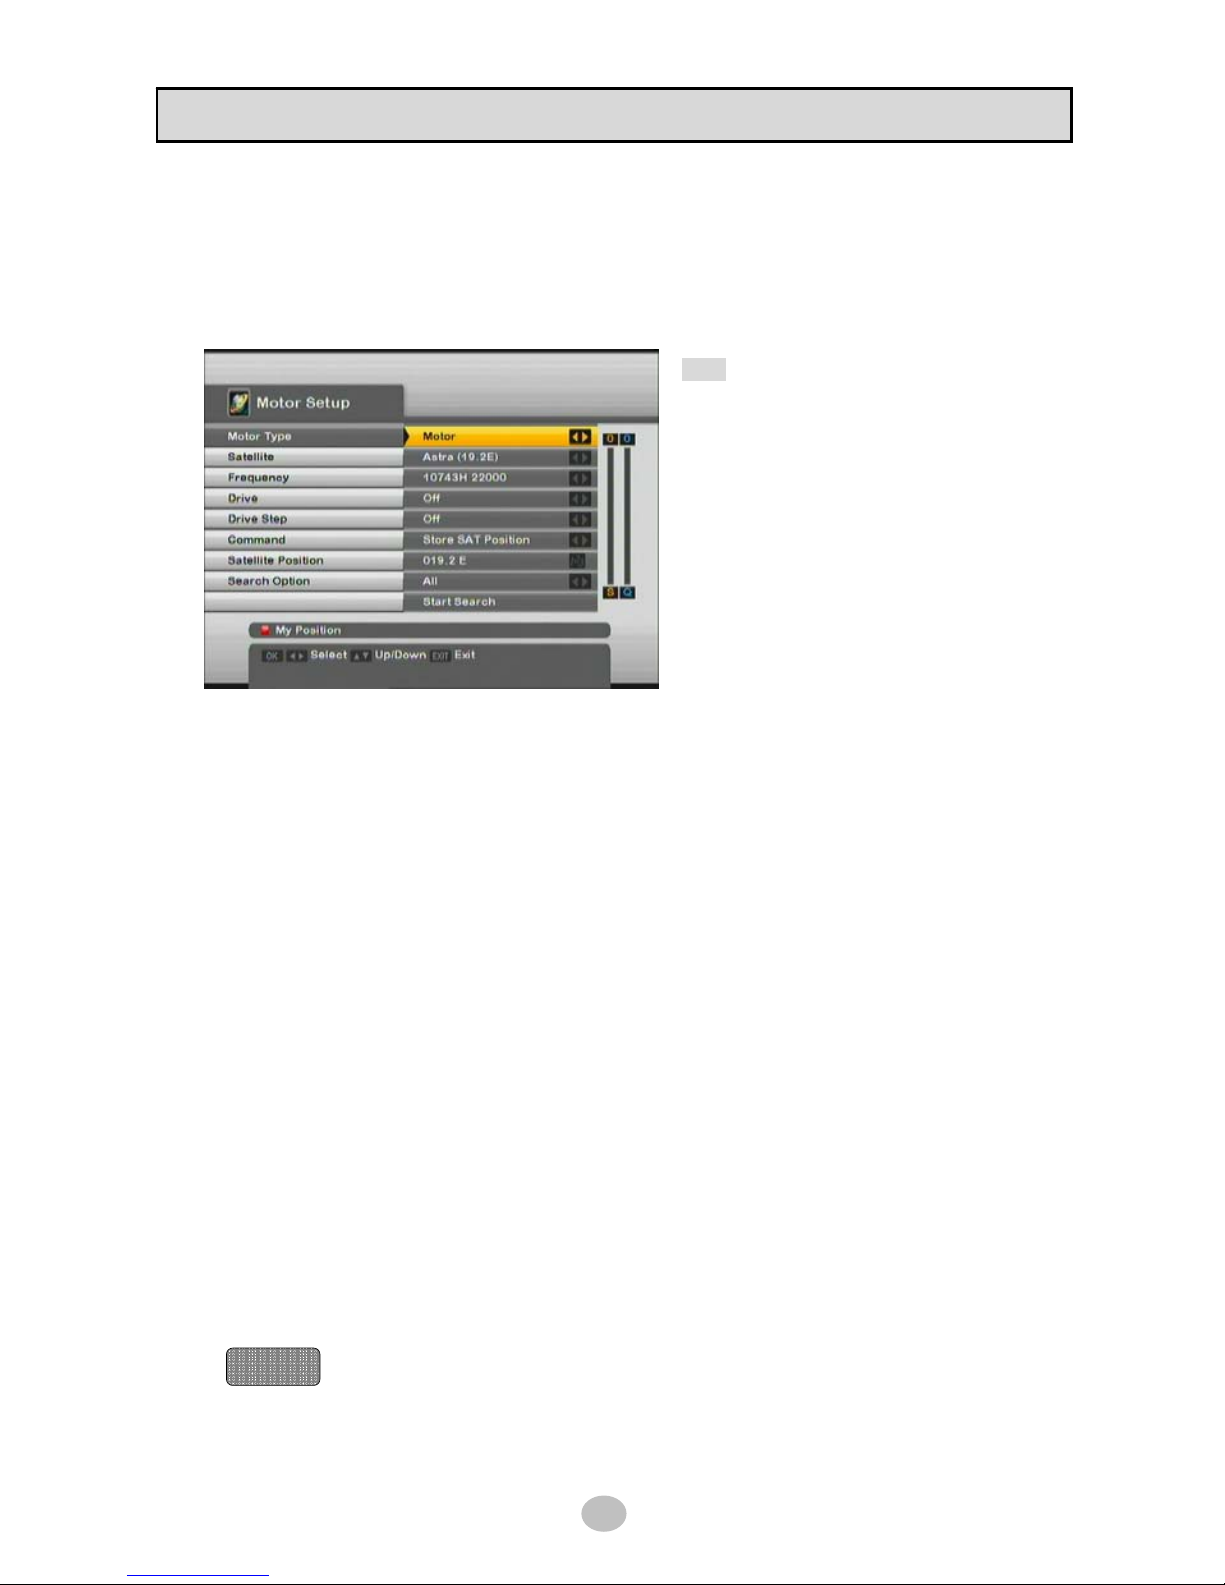
2.3 Motor Setup
If you have DiSEqC 1.2 Motor box installed with your antenna, enable it in this menu to it setup as below
picture.
USALS function also located in this menu.
* TIP : USALS is very convenient motorized
DiSEqC system that support DiSEqC 1.3
command. With the help of this function, you
can get the satellite position automatically if
you know your location.
Motor type – select either Motor/USALS/OFF
Satellite – select satellite to setup
Frequency – select TP frequency what you want to search
Drive – press Left/Right button to move motor in each direction
Motor moves continously until stop it by pressing OK button
Drive step – press Left/Right button to move motor in each direction
Motor moves only one step to locate satellite in precise position
Command
Store SAT Position : save satellite position with current setting value
Goto SAT Position : move saved position
Goto Center : move center position
Limit Off : delete existing limit value
Set East Limit/West Limit : set moving range of motor from east to west
Recalculate Position : recalculate position when you entered new value
Satellite Position – enter satellite position in degree
Search Option – you can select either ALL/One TP/Free Only/Network Scan
Start Search – Press OK to start searching
My Position – enter your antenna position in Longitude/Latitude degree. This value is
for calculating origin/displacement of dish and satellite.
Help !!!
Page 15
SYSTEM SETUP
15
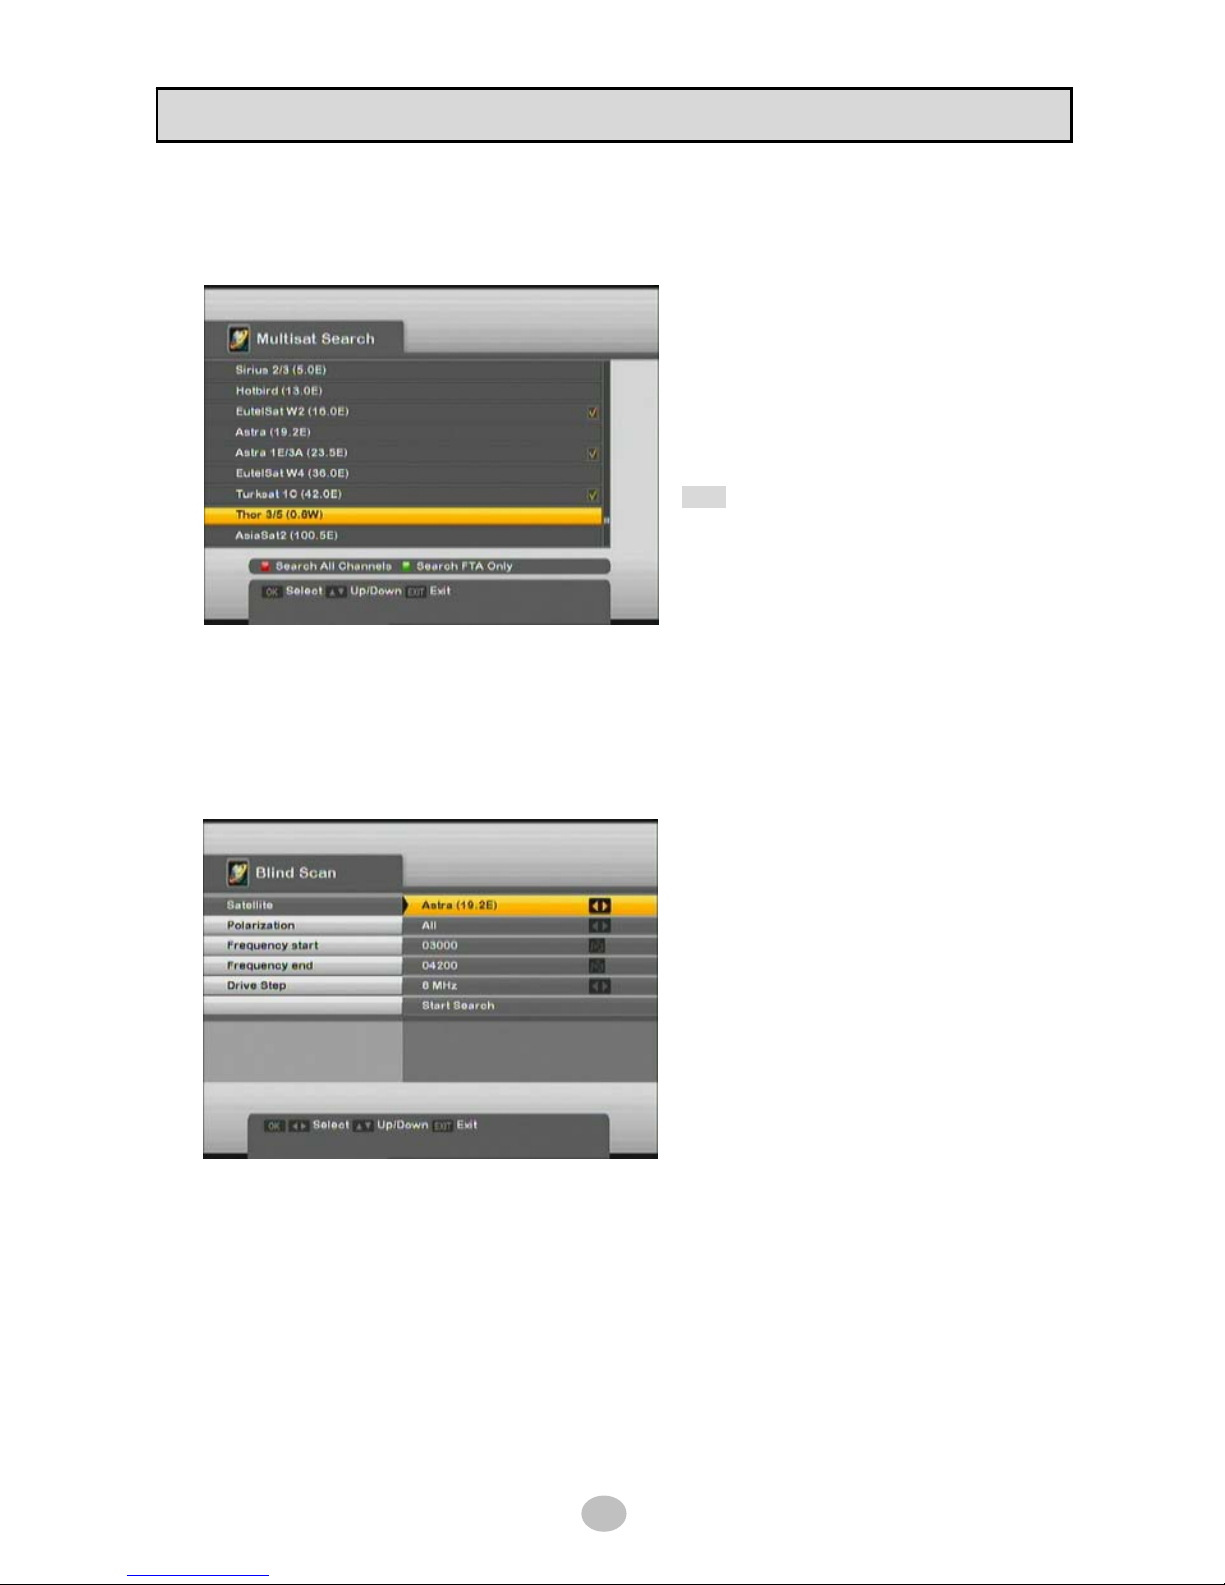
2.4 Multisat search
This menu perform batch work of channel searching for selected satellites.
Select satellite to search by pressing OK
button and press RED button/GREEN button.
RED : search for all kinds of channels
GREEN : search for FTA channels only
* TIP : If there’s no satellite you want to
search, then configure satellite first in
antenna setup menu.
2.5 Blind search
This menu perform scrutinized channel search by checking all frequency point.
Satellite – select satellite to search
Polarization – select either Horizontal (18V)/Vertical (13V)
Frequency start – enter start frequency
Frequency end – enter end frequency
Drive step – select frequency step either 2/4/6/8/10MHz
Start Search – Press OK to start blind searching
Page 16
SYSTEM SETUP
16
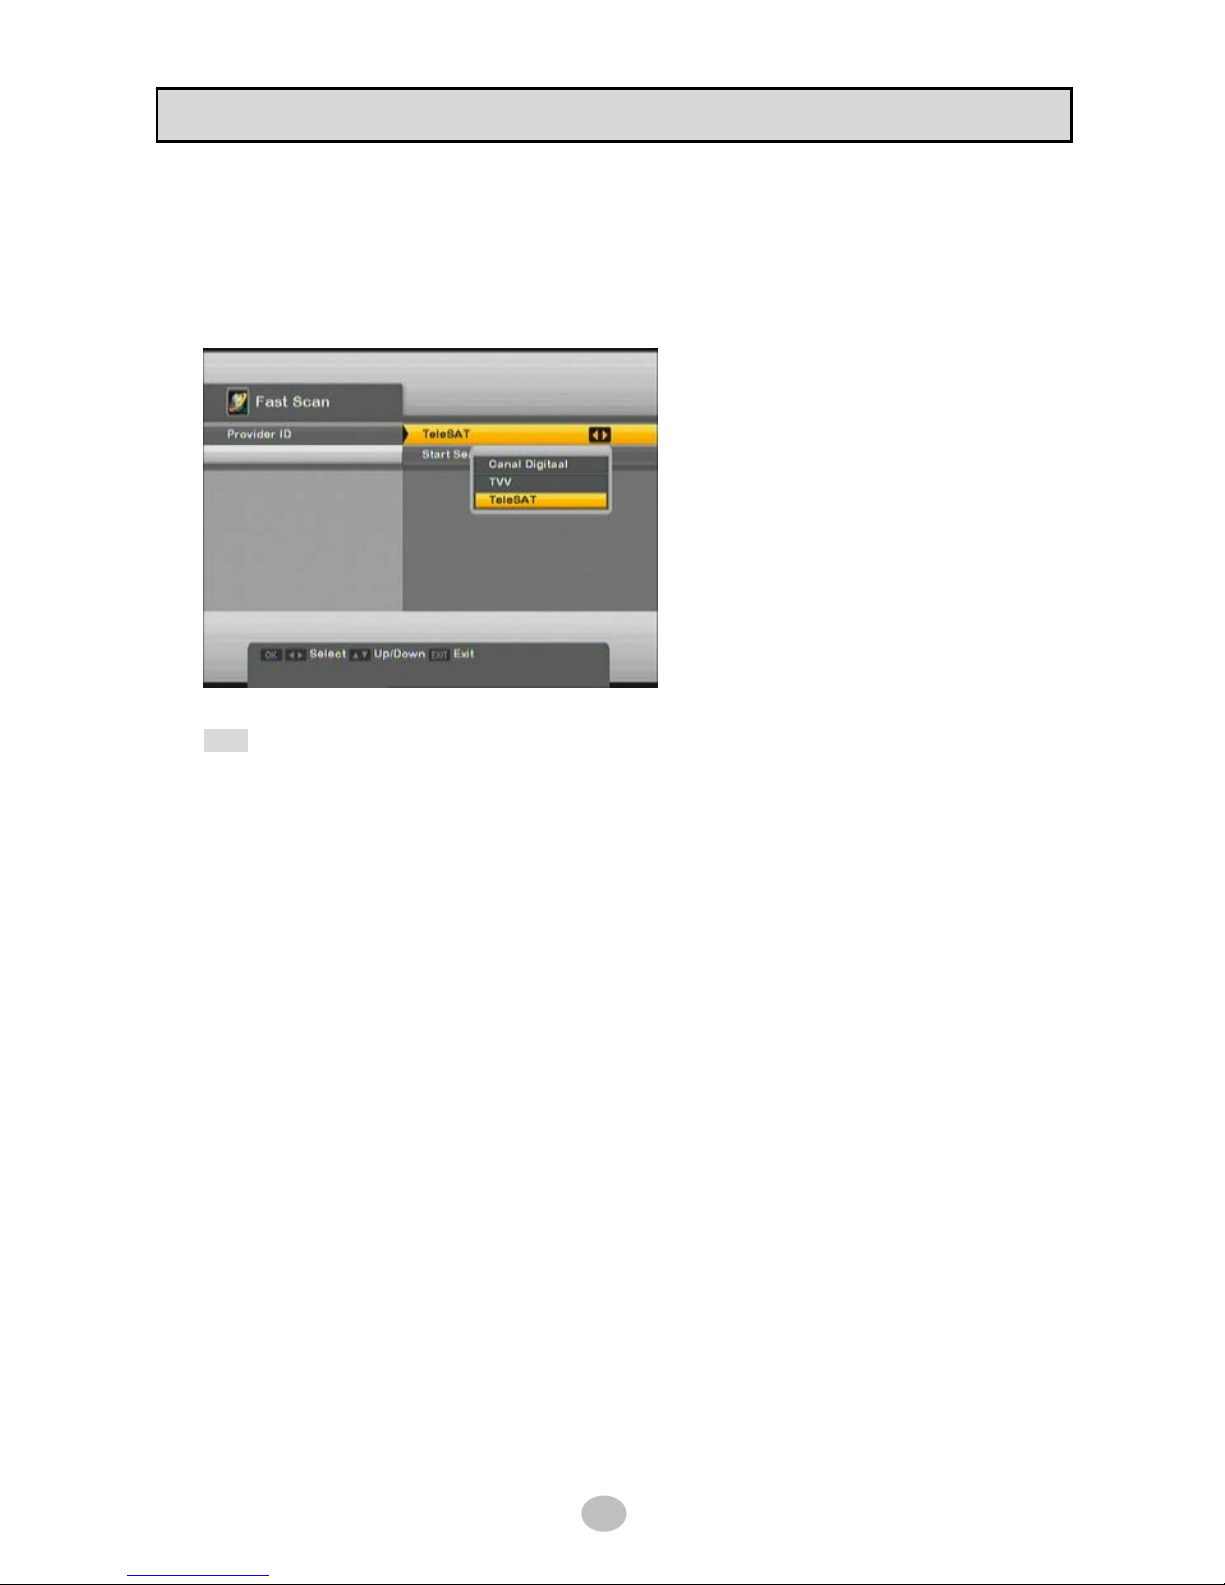
2.6 Fast scan
This is a kind of network search and you can simply scan specific channels from providers.
Supported packages are Canal Digitaal/TVV/TeleSAT from Astra (19.2E) satellite.
Simply select package and Start Search.
* TIP : Astra satellite should be configured prior to this scan.
2.7 Factory reset
This will return all the user setting to factory default value including channel data.
You may need to enter PIN code [Default PIN code is 0000] and you can change this code in
[PARENTAL LOCK] menu.
※ Caution : All Channel data will be deleted !!!
Page 17
17
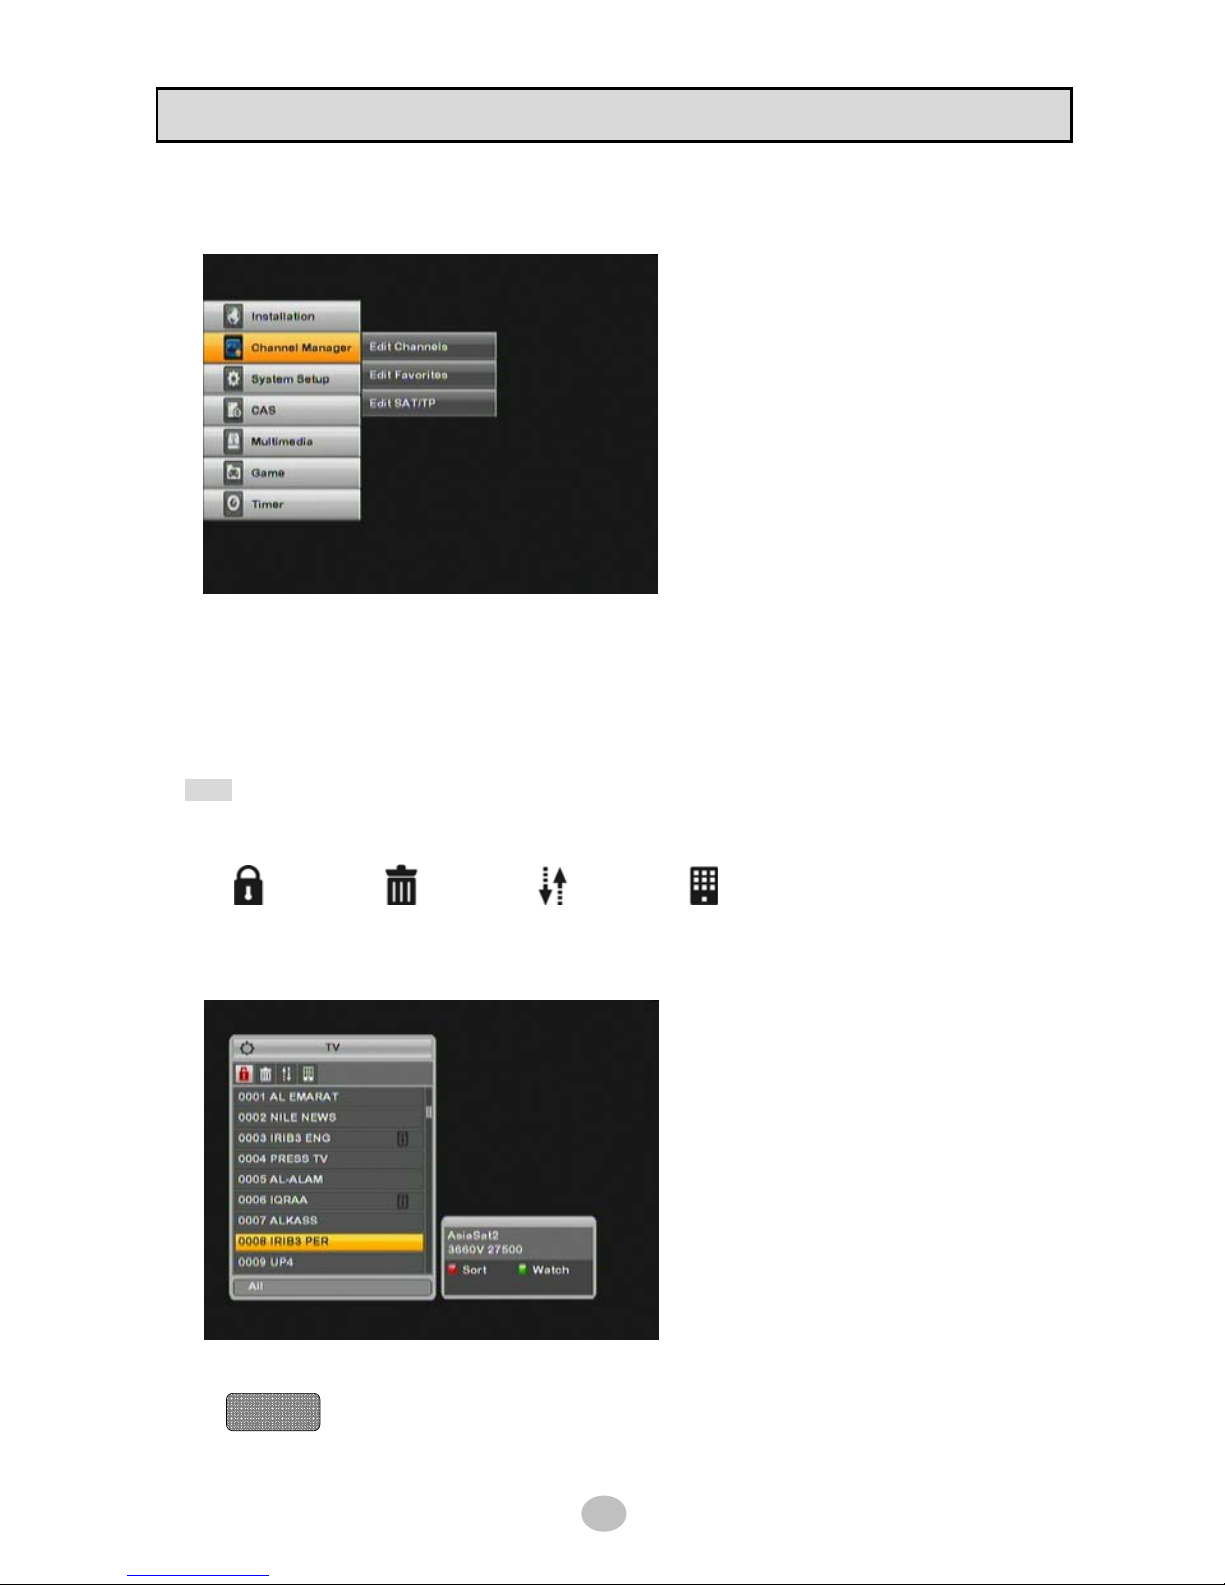
CHANNEL MANAGER
Select [MAIN MENU] > [CHANNEL MANAGER] to perform edit channels, favorite list and satellite/TP
as below picture.
3.1 Channel edit
Edit channels using Lock/Move/Delete/Rename functions.
* Tip You can select each categories by Left/Right button.
Press TV/RAD button on RCU to switch from TV channels to Radio channels.
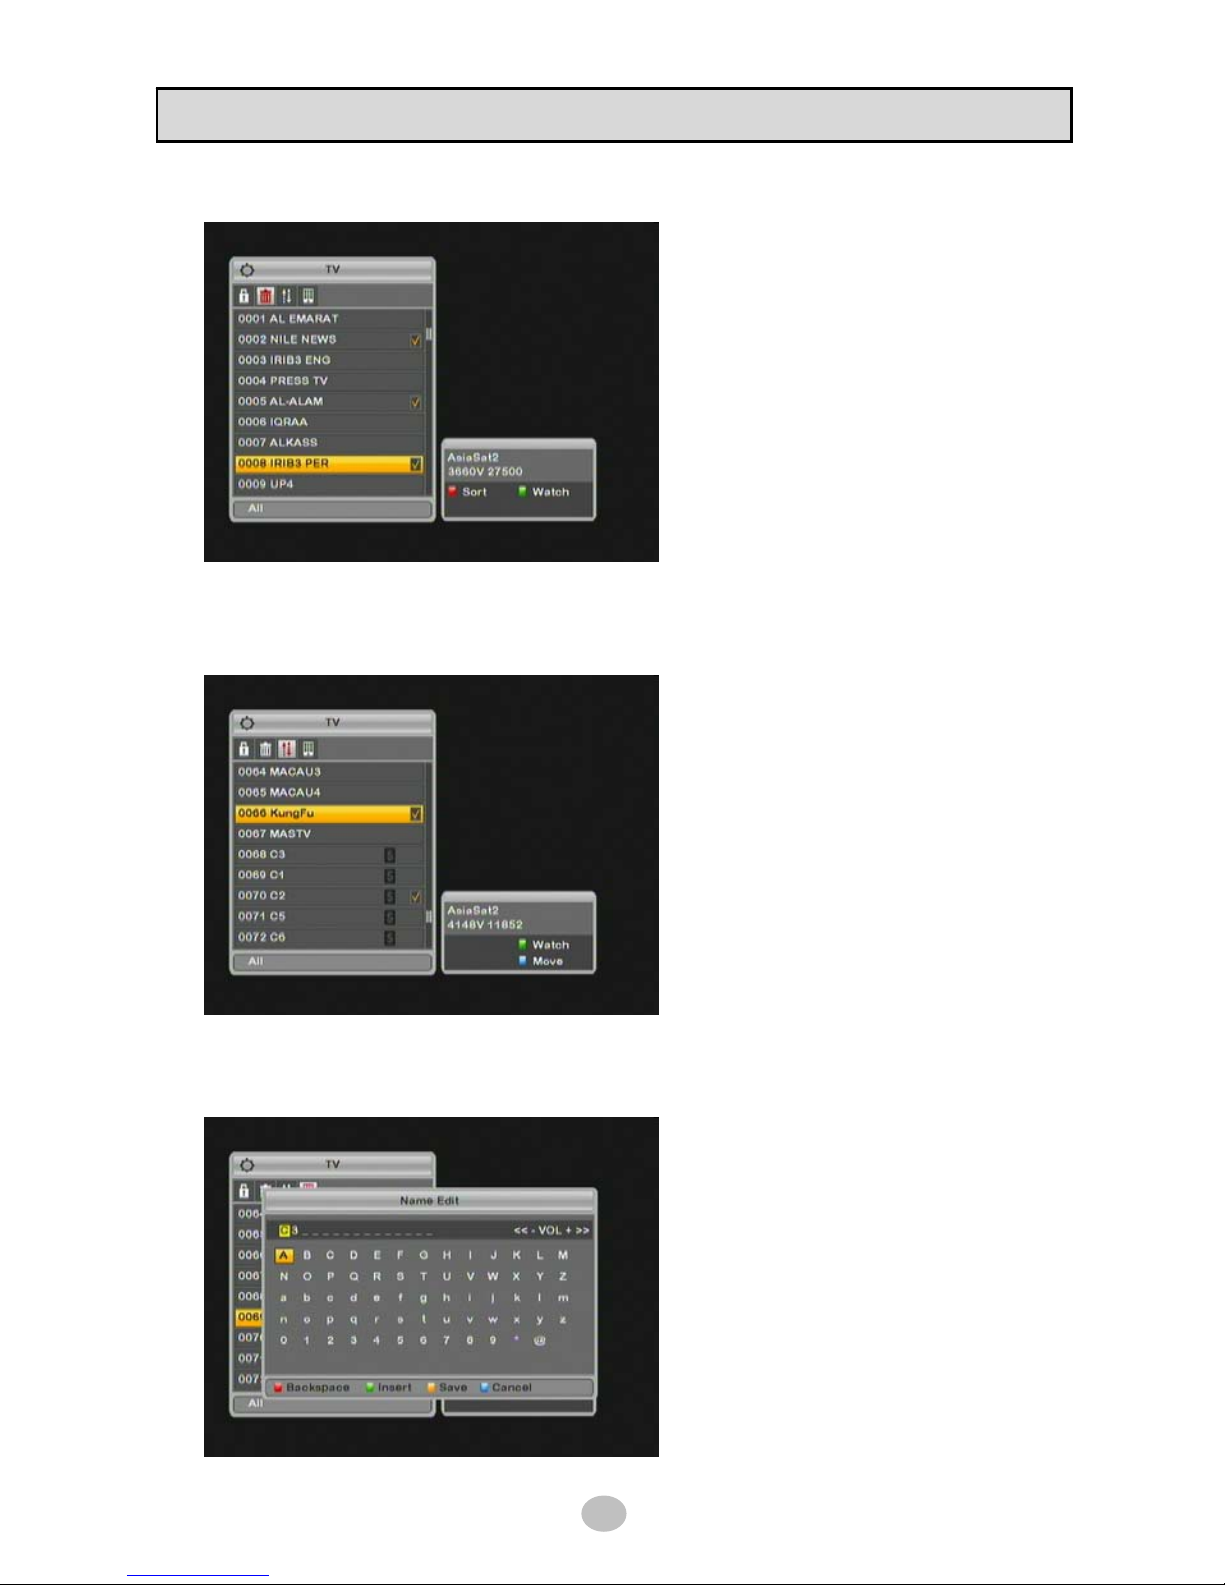
Lock
Delete Move Rename
3.1.1 Lock
Press OK on the channel you want to lock,
then LOCK icon will be displayed. Multiple
selection is possible for one time operation.
When you complete checking, press MENU
button or Left/Right button then message
box will ask for your final confirmation.
Locked channel ask for PIN code before
playing video/audio.
Sort : you can change channel list order by NAME/CAS/TP
Watch : you can watch selected channel for identification
Help !!!
Page 18
18
CHANNEL MANAGER
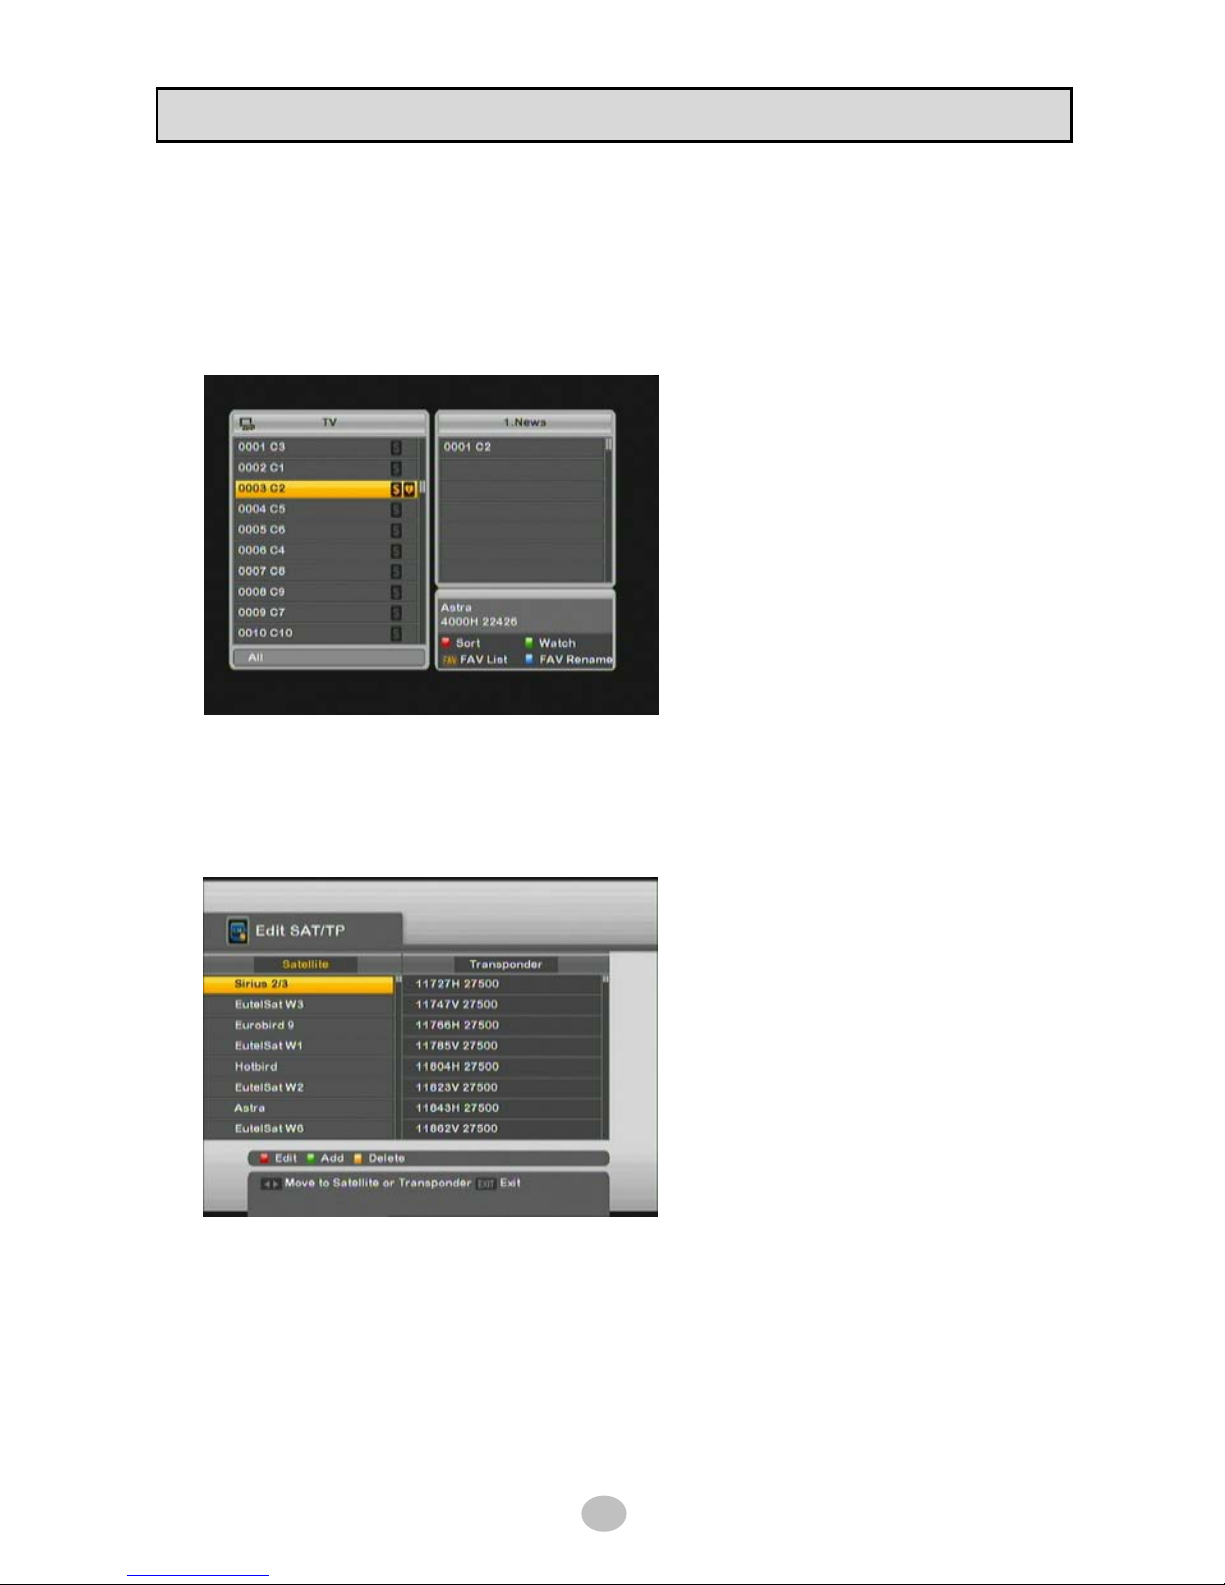
3.1.2 Delete
Press OK on the channel you want to delete,
then CHECK icon will be displayed. Multiple
selection is possible for one time operation.
When you complete checking, press MENU
button or Left/Right button then message
box will ask for your final confirmation.
3.1.3 Move
Press OK on the channel you want to move,
then CHECK icon will be displayed. Multiple
selection is possible for one time operation.
When you complete checking, locate cursor
to the point you want to put moved channels
and press BLUE button.
Press MENU or Left/Right button then
message box will ask for your final
confirmation.
3.1.4 Rename
Press OK on the channel you want to rename,
then Key box will be displayed. Change name
using HELP buttons including VOL button.
When complete, press YELLOW button to
save.
Press MENU or Left/Right button then
message box will ask for your final
confirmation.
Page 19
19
CHANNEL MANAGER
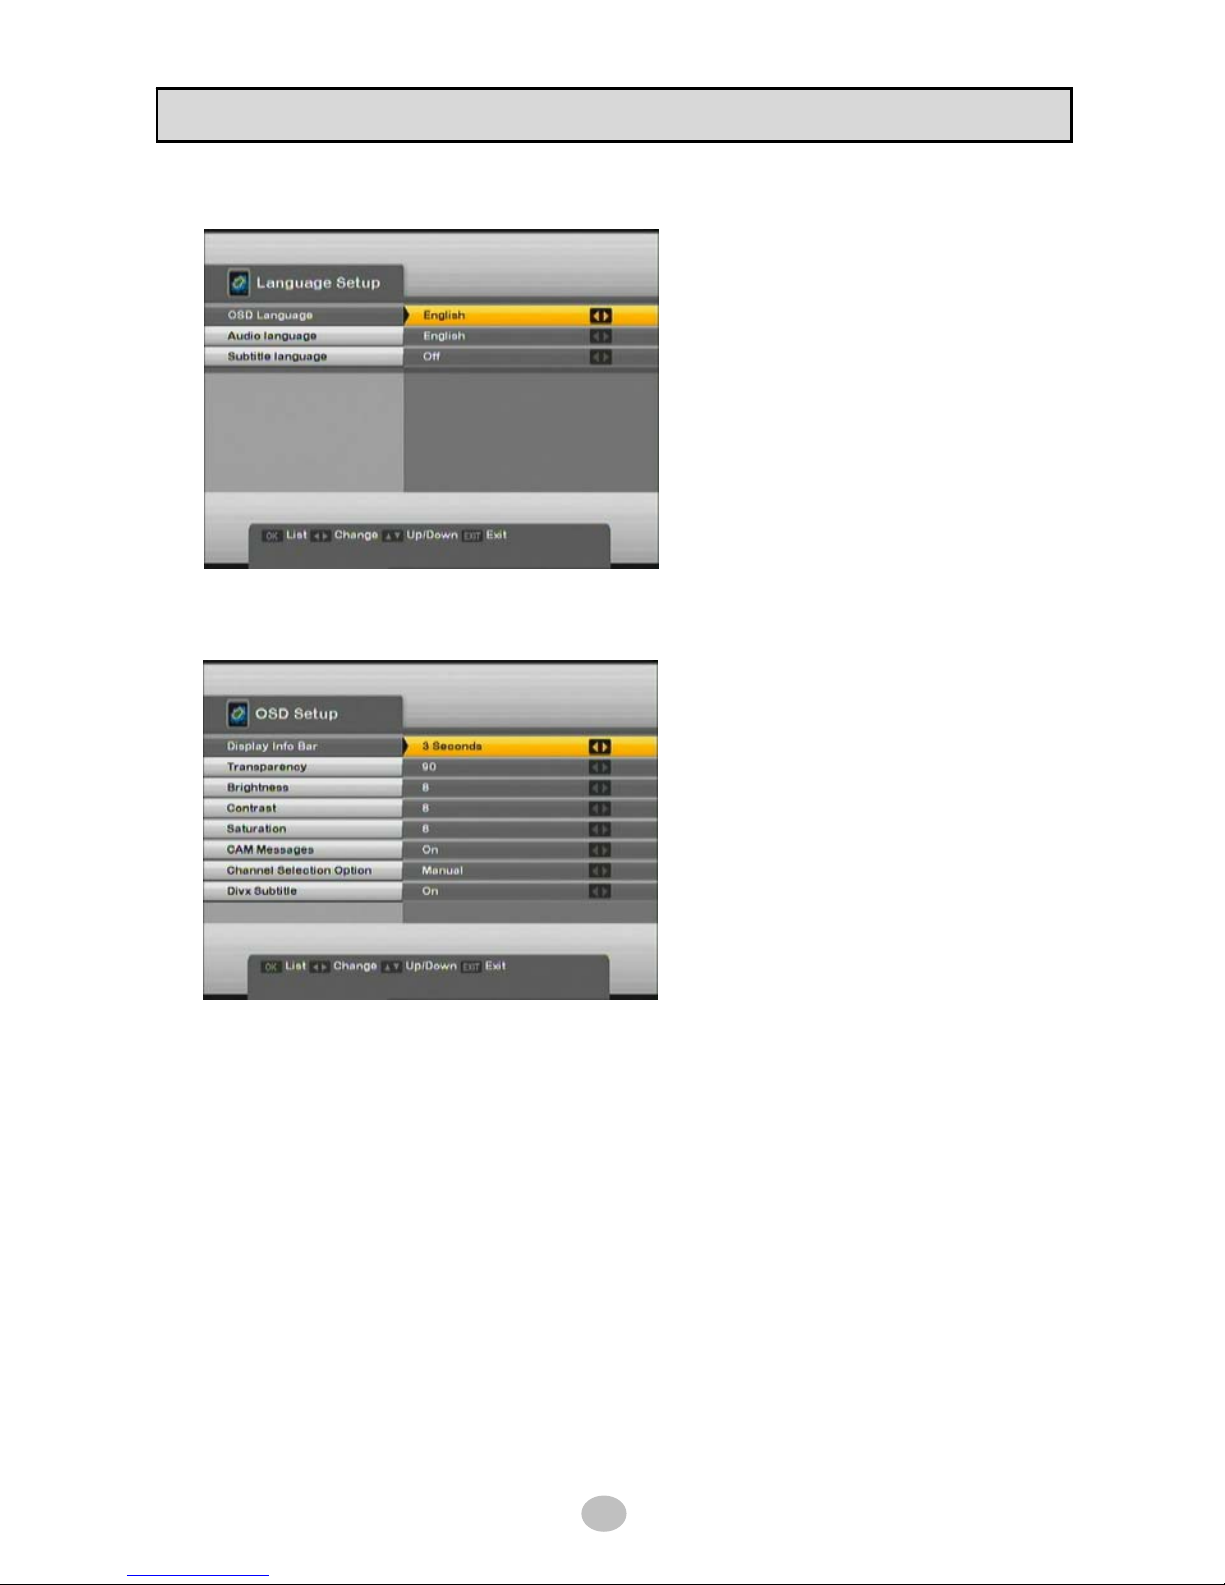
3.2 Favorite edit
Available favorite categories are NEWS/DRAMA, MOVIE/SPORTS/CHILDREN/CULTURE/MUSIC/SHOW,
GAME/ETC.
These categories names are changeable by pressing BLUE button.
Press FAV button to set category on the right
list box then select channel on the left list
box by pressing OK button.
HEART icon will be displayed on the left list
box and channel name will be on the right
list box.
Press MENU or EXIT button then message
box will ask for your final confirmation.
3.3 Satellite/TP edit
This menu offer EDIT(rename, change values)/ADD/DELETE functions for satellite and TP.
EDIT – Satellite : change name or position
Transponder : change frequency, symbol rate, polarization and modulation
ADD – add new satellite or transponder
DELETE – delete existing satellite or transponder
※ Caution : deleting satellite or transponder will cause deleting channels belonged to the satellite or TP.
Page 20
20
SYSTEM SETUP
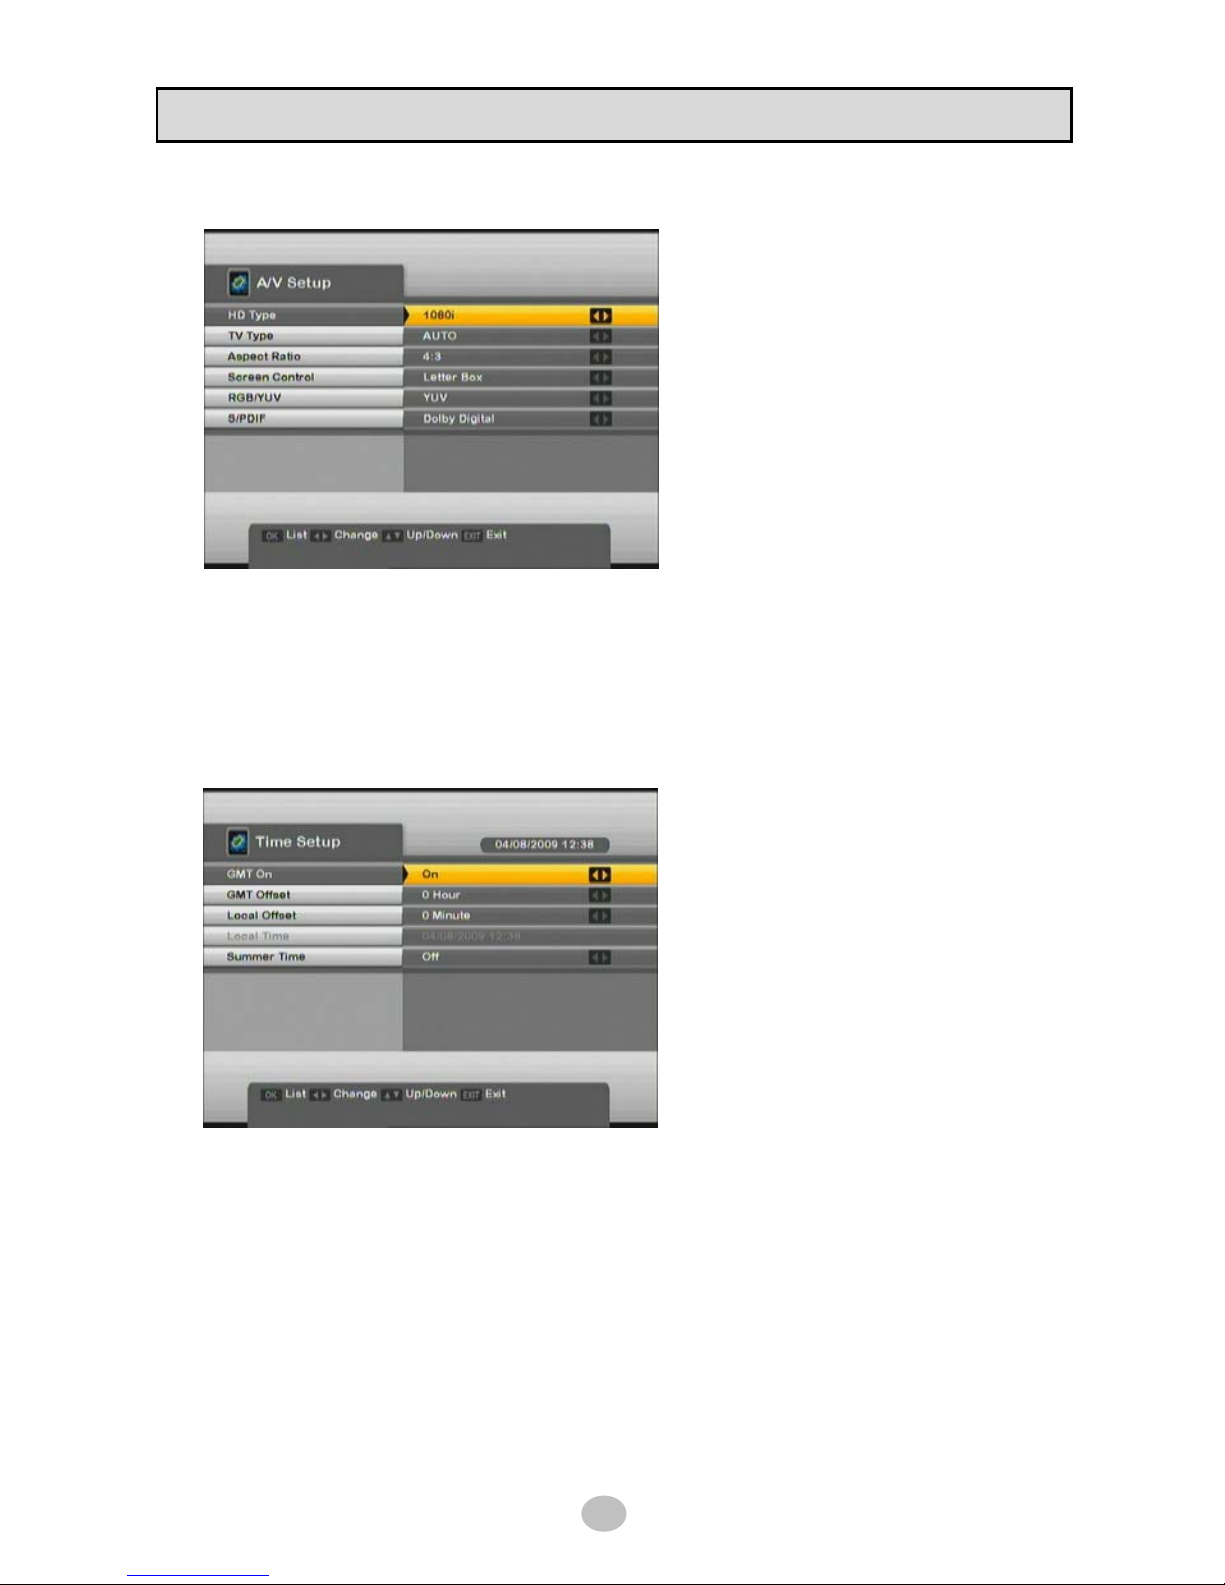
4.1 Language setup
Select OSD language/Audio language by
pressing OK button or Left/Right button.
Set subtitle language ON to display subtuitle
on supported channel.
4.2 OSD setup
Display Info Bar – select either 2/3/5/10 seconds or Always ON/Always OFF
Transparency – select either 0~100. The less value the more transparent. 100 is opaque.
Brightness/Contrast/Saturation – Adjust color environment of video.
This function doesn’t work with digital connection.
CAM Message – ON : display CAM message on live video overlapped when needed
OFF : no message from CAM
Channel Selection Option – This function give you option to select channel in OK list box.
Manual : channel changed only when you press OK button
Automatic : as you move cursor, channel change without pressing OK button.
STB will display channel where the cursor located
Divx Subtitle : Set ON to display subtitle when you play Divx video file.
[*.Srt file or *.sub file are supported to display]
Page 21
21
SYSTEM SETUP
4.3 A/V setup
◆ HD Type
Select either 576p/720p/1080i for video
resolution of HD channels.
◆ TV Type
Select either AUTO/PAL/NTSC according to
your TV
◆ Aspect Ratio
Select either 4:3/16:9
Screen control - Select either Letter Box/PanScan/Ignore
RGB/YUV - Select either RGB/YUV for video output
S/PDIF – Dolby Digital : 5.1 CH AC-3 digital output for external decoder
PCM : 2 CH down-mix digital output
4.4 Time setup
GMT On – Select ON to set time automatically.
Select OFF to enter time manually.
GMT Offset – Enter time offset from GMT based on your location.
Local Offset – Enter time offset for accurate time if your location has time difference.
Local Time : Set GMT OFF to enter time manually.
Summer Time : Select either On/Off
Page 22
22
SYSTEM SETUP
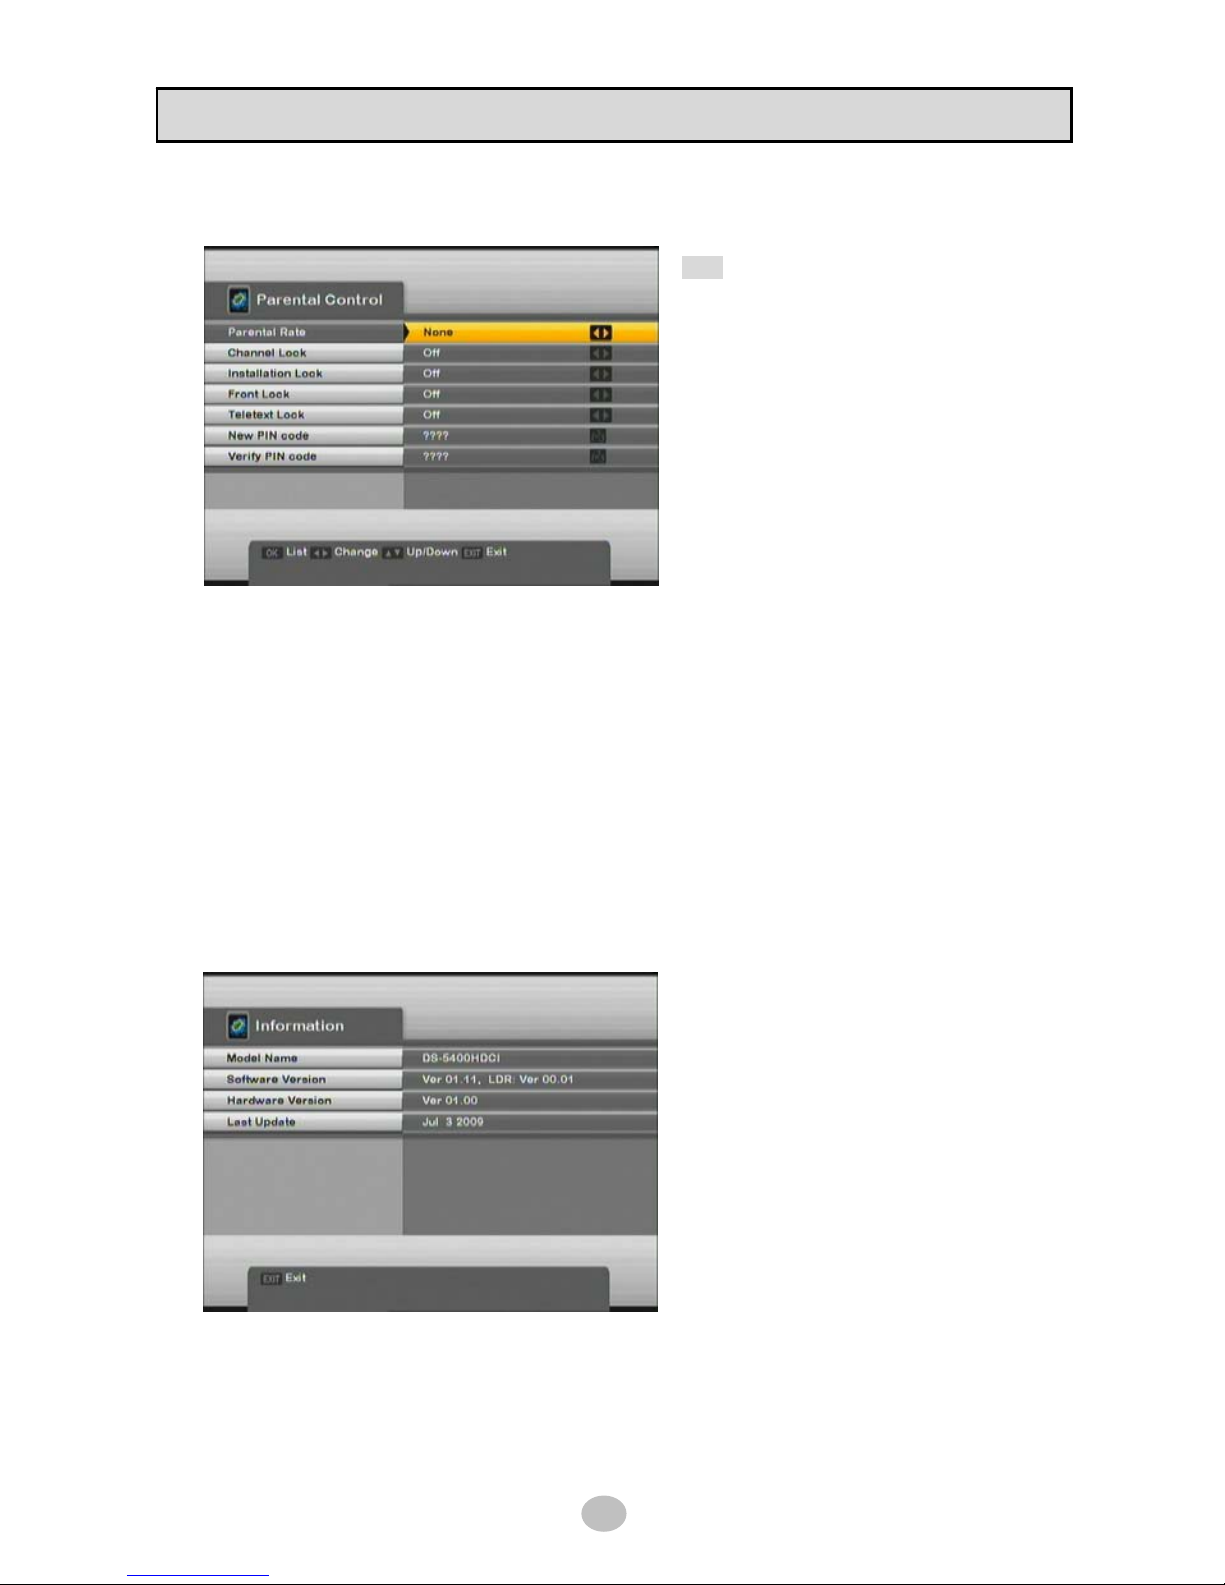
4.5 Parental lock
* Tip : You may need to enter PIN code to
proceed this menu.
Default PIN code is 0000.
Parental Rate – Select age limit either 12/16/18.
PIN code is required when you watch higher rated contents than set here.
Channel Lock – When set On, PIN code is required to enter [CHANNEL MANAGER] menu.
Installation Lock – When set On, PIN code is required to enter [INSTALLATION] menu.
Front Lock – When set On, PIN code is required to use front panel buttons.
Teletext Lock – When set On, PIN code is required to use teletext service.
New PIN code – Enter new PIN code to change.
Verify PIN code – Enter new PIN code once again.
4.6 Information
Page 23
CAS
23
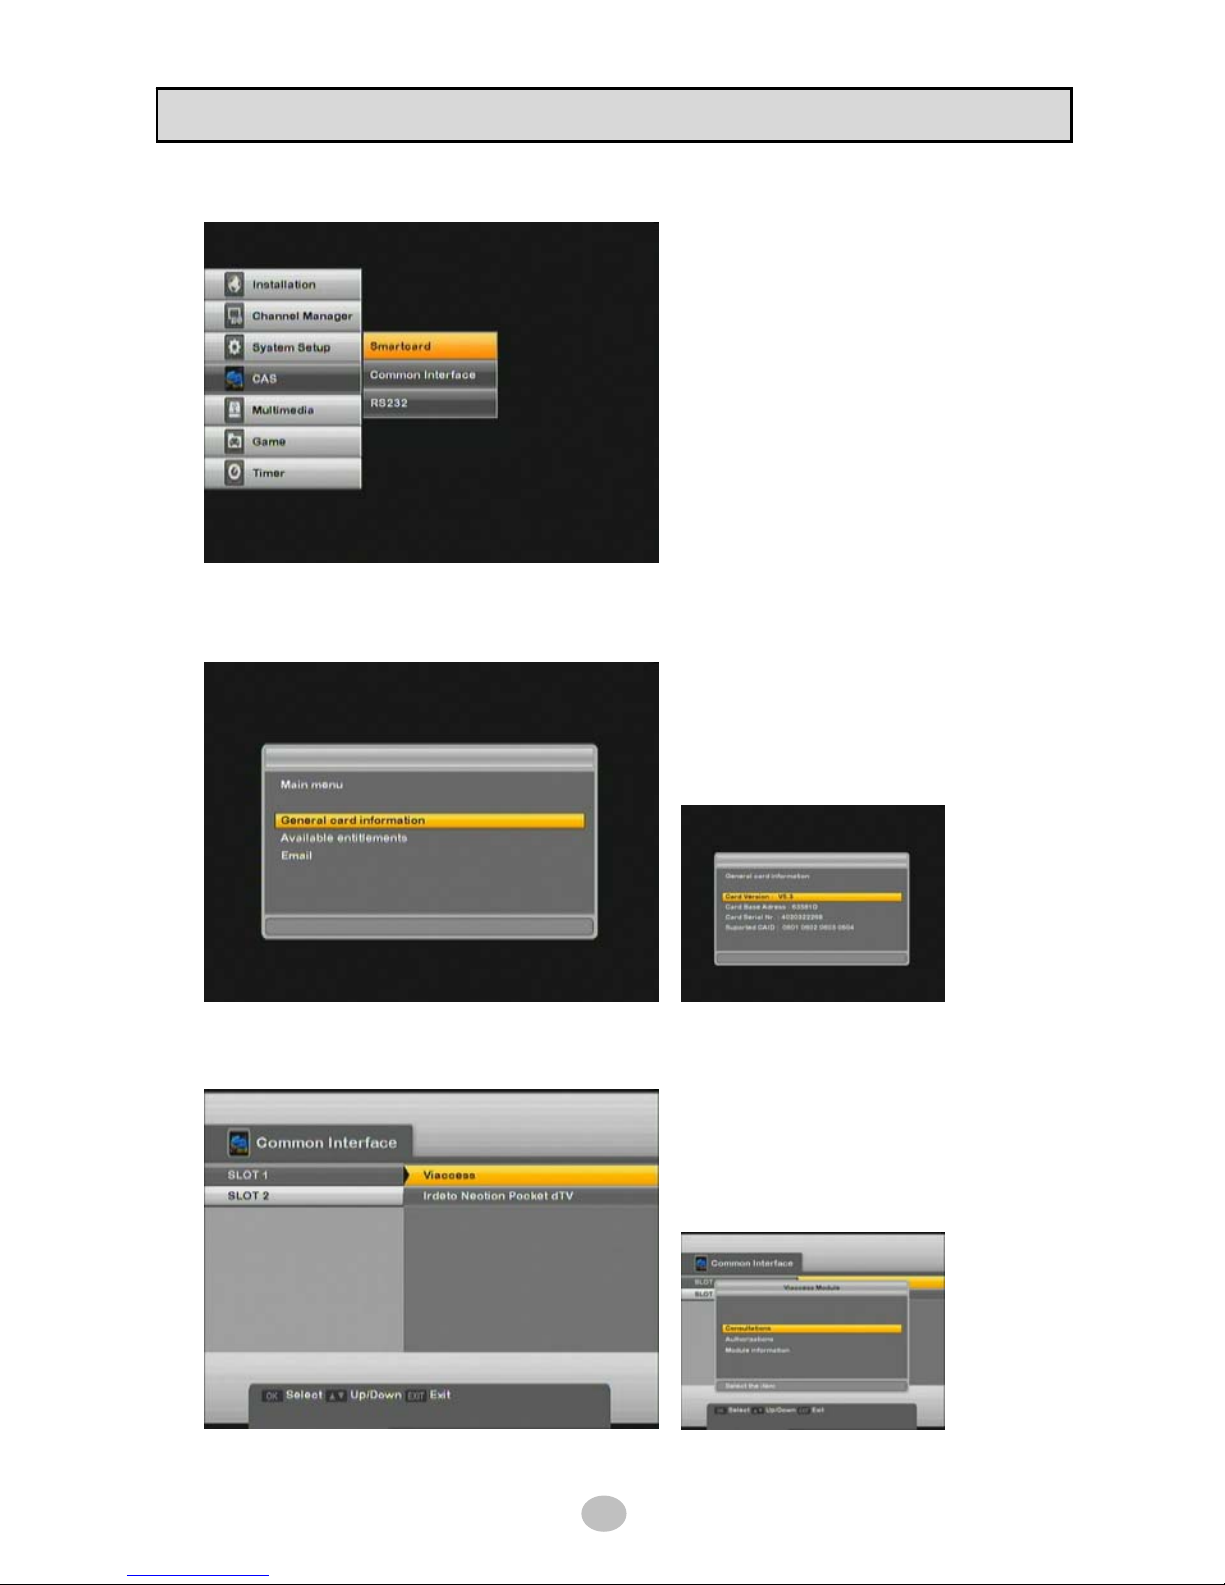
Select [INSTALLATION] > [CAS] menu as below picture.
This menu provide you with detailed
information about smartcard and common
interface module like version, serial number,
authorization, etc.
5.1 Smartcard
General information, Available entitlements
and E-mail addess is possible in this menu.
General Card Information menu.
5.2 Common Interface
Select OK among SLOT 1 / SLOT 2 to see the
information.
CAM Information
Page 24
CAS
24
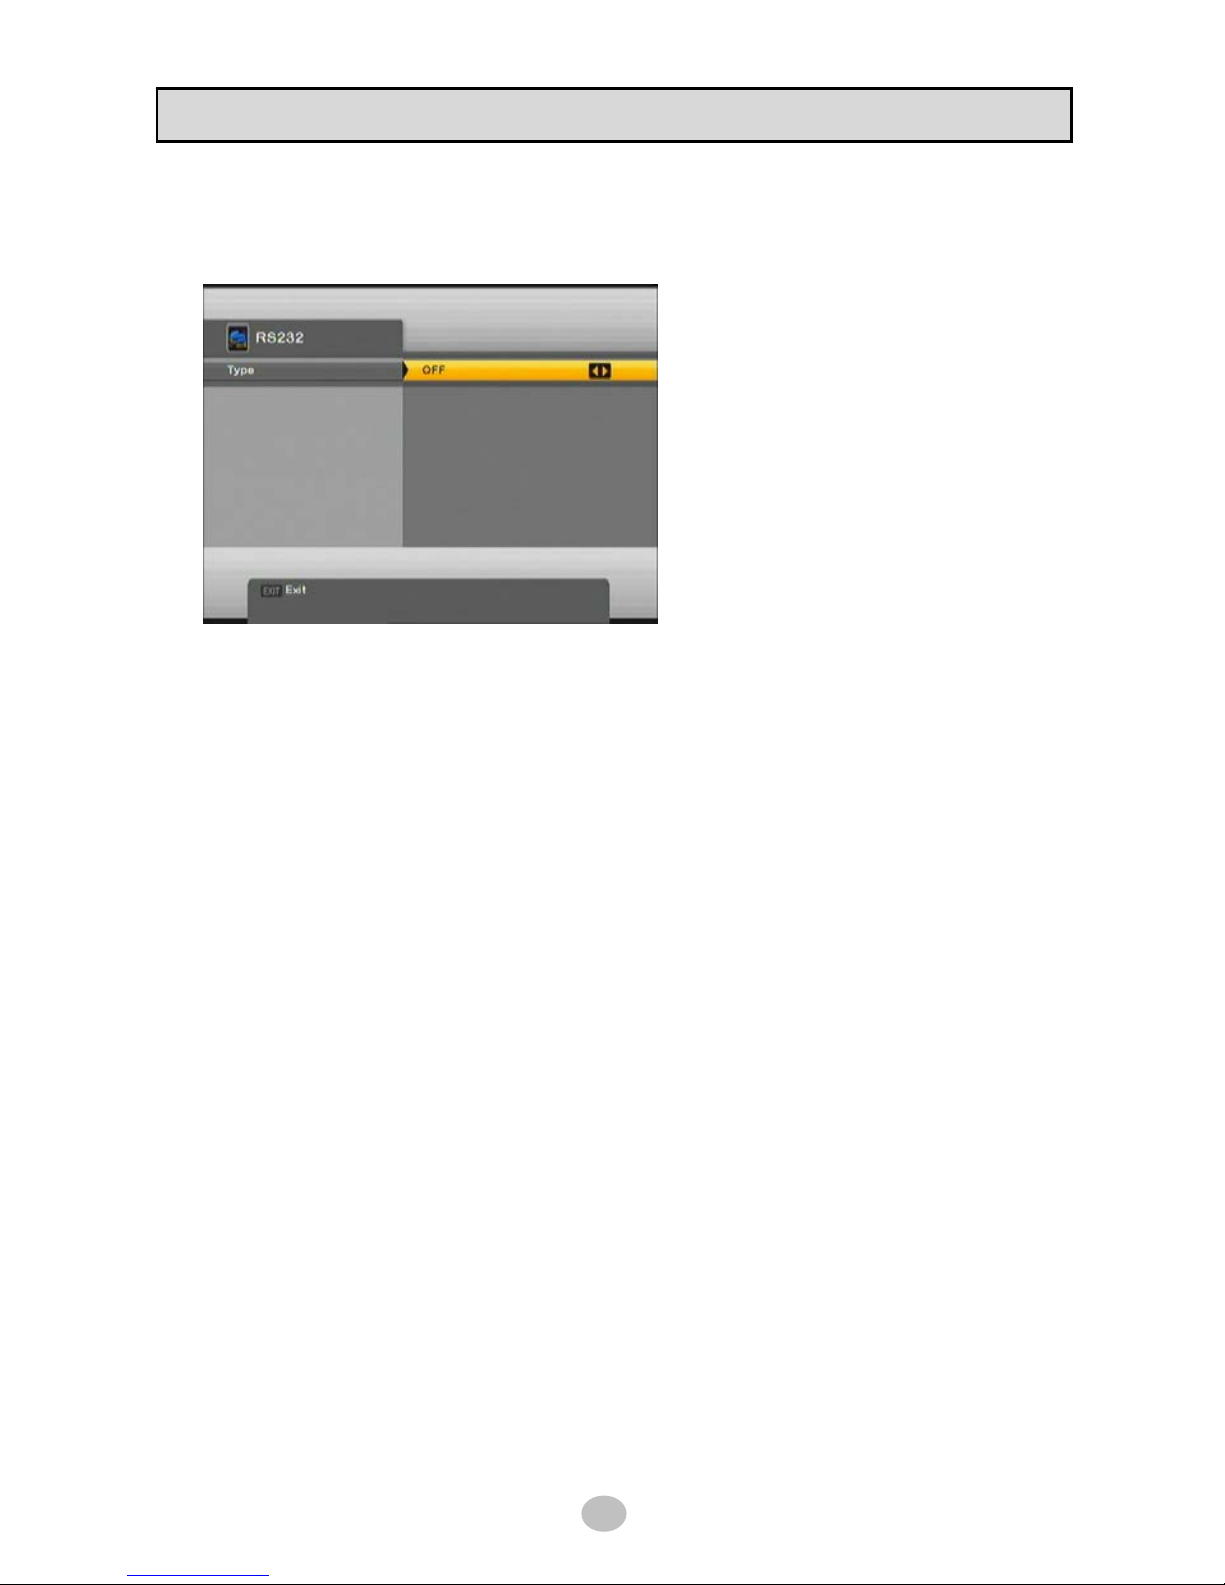
5.3 RS-232
This menu is provision for future use.
Page 25
MULTIMEDIA
25
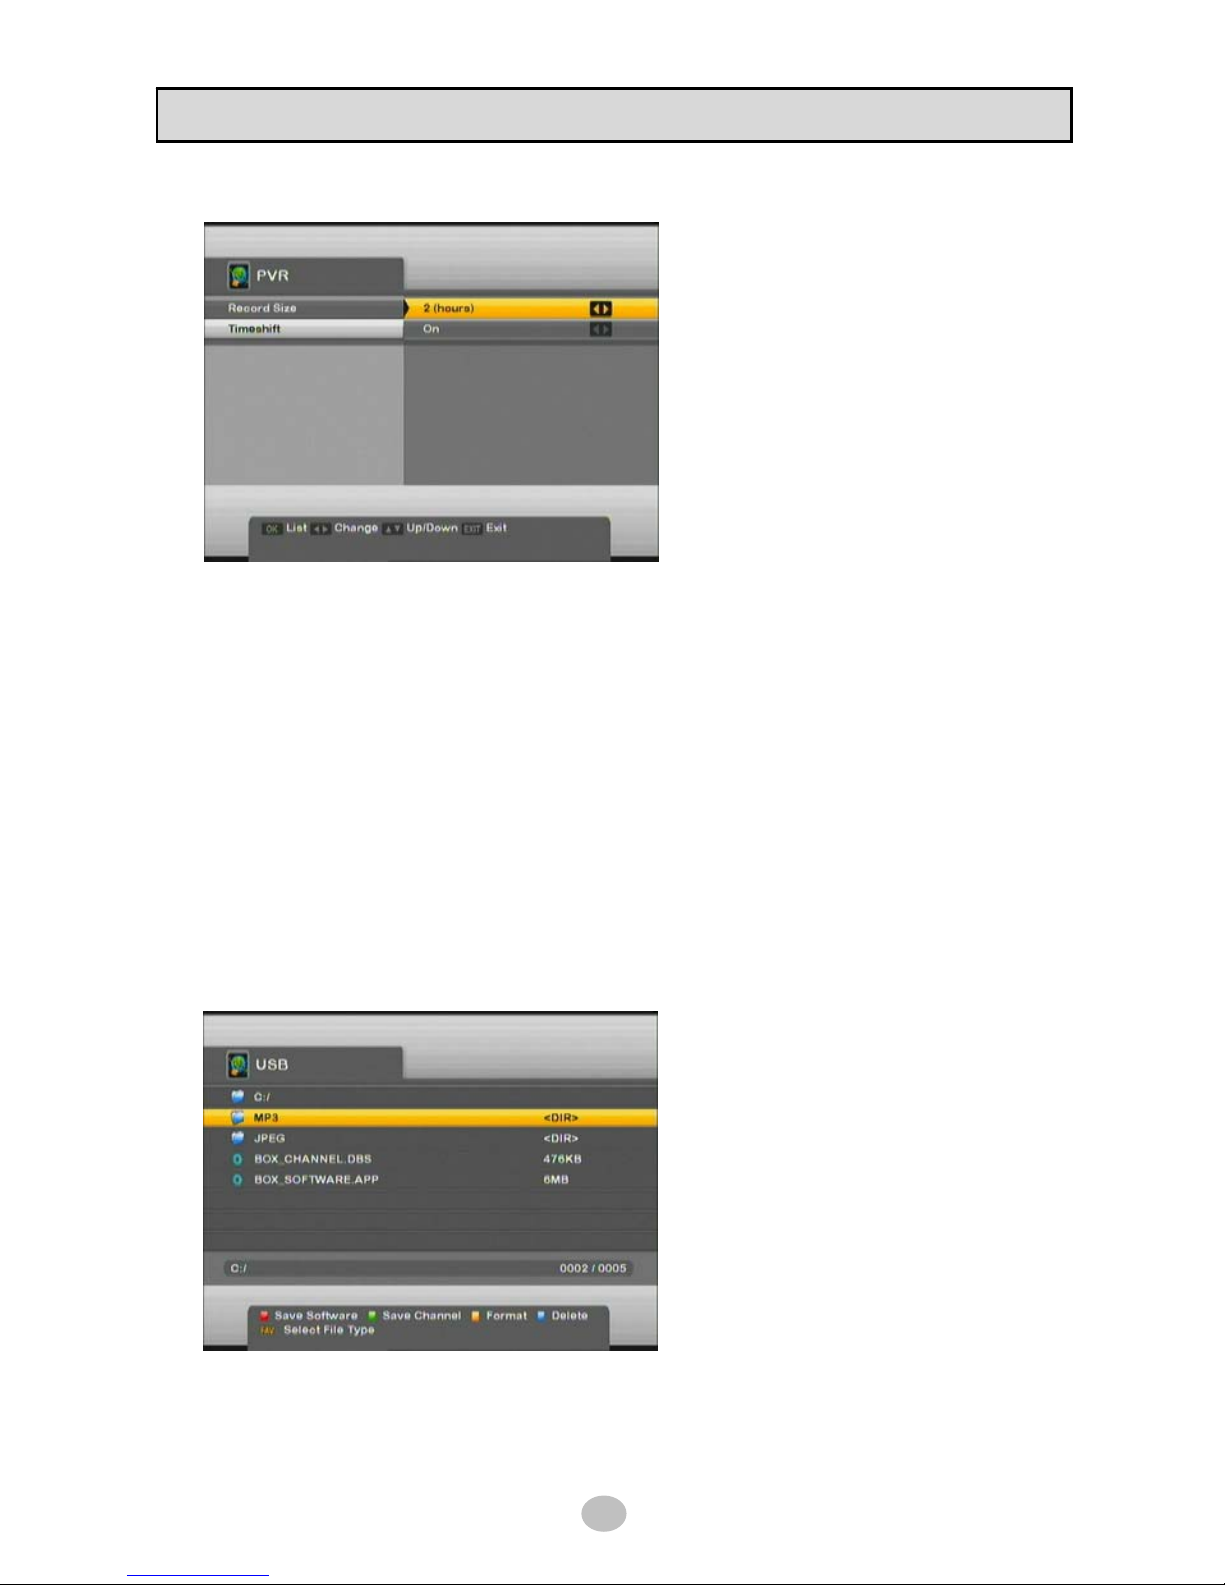
6.1 PVR
◆ Record Size
Select either 1 ~ 12 hours.
This is continous recording time when end
time is not set.
◆ Timeshift
Select either On/Off.
Set it On to enable timeshift function.
6.2 USB
Attach USB device [memory stick or USB Hard disk] into USB port on the side of front panel to use
multimedia functions like software update, MP3 playback, JPEG picture view, DivX playback, recording,
playback with various trick mode, etc…
Supported file system of USB device is FAT32.
Select [MAIN MENU] > [MULTIMEDIA] > [USB] or press [▲] button on RCU after connecting USB
memory or HDD, then USB manager displayed as below picture.
In case of no USB device connected, no list is available.
For unformatted USB device, format function is ready in this menu.
Page 26
MULTIMEDIA
26
■ File filter
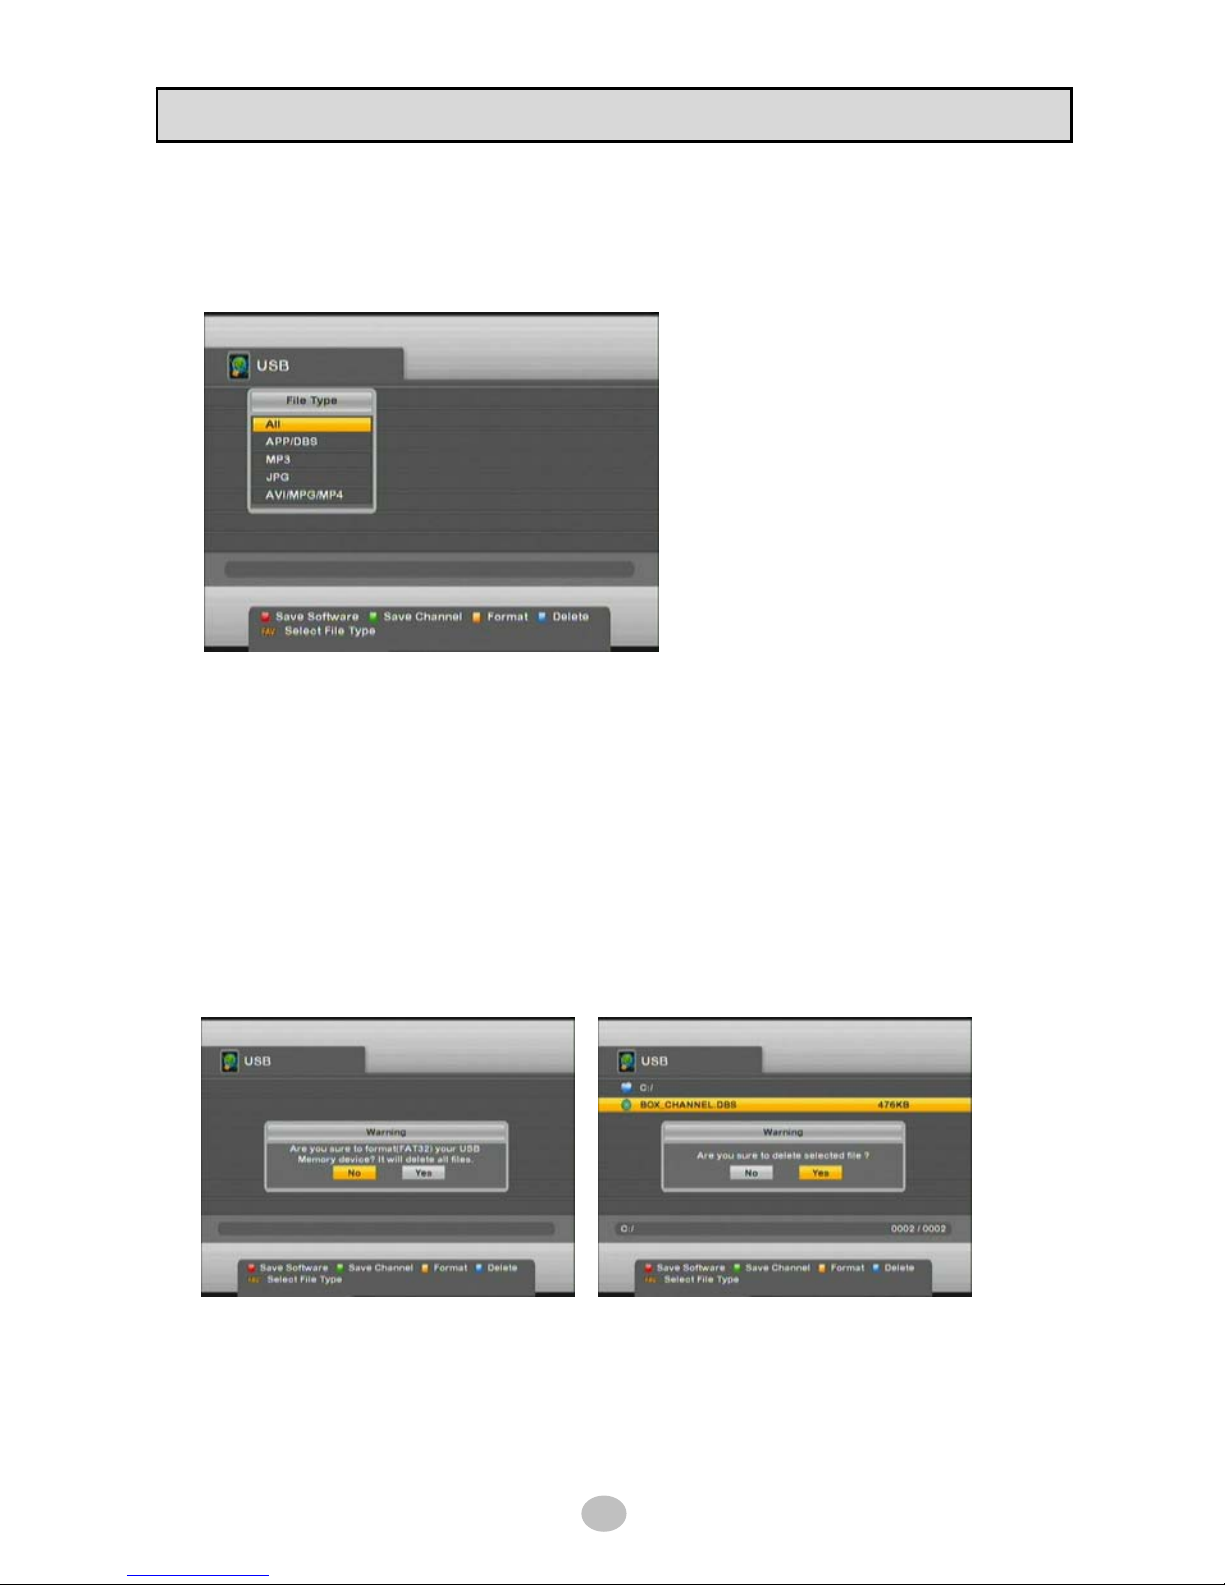
Press [FAV] button on RCU to display files in filter according to there file type as ALL, APP/DBS, MP3,
JPG, AVI/MPG/MP4.
◆ All : display all types of file
◆ APP/DBS : APP file is software and DBS
file is database (channel, TP, etc.) file type.
◆ MP3 : Mpeg Layer-3 audio file type
◆ JPG : JPEG picture file type
◆ AVI/MPG/MP4 : DivX video file type
■ Format
Press [YELLOW] button to initialize new USB device or format USB device.
※ Caution : all data will be deleted in USB device
File system of USB device will be FAT32 after formatting and this is compatible with PC
■ Delete
Press [BLUE] button to delete file or directory in USB device.
※ Caution : directory should be empty
Page 27
MULTIMEDIA
27
■ MP3 playback
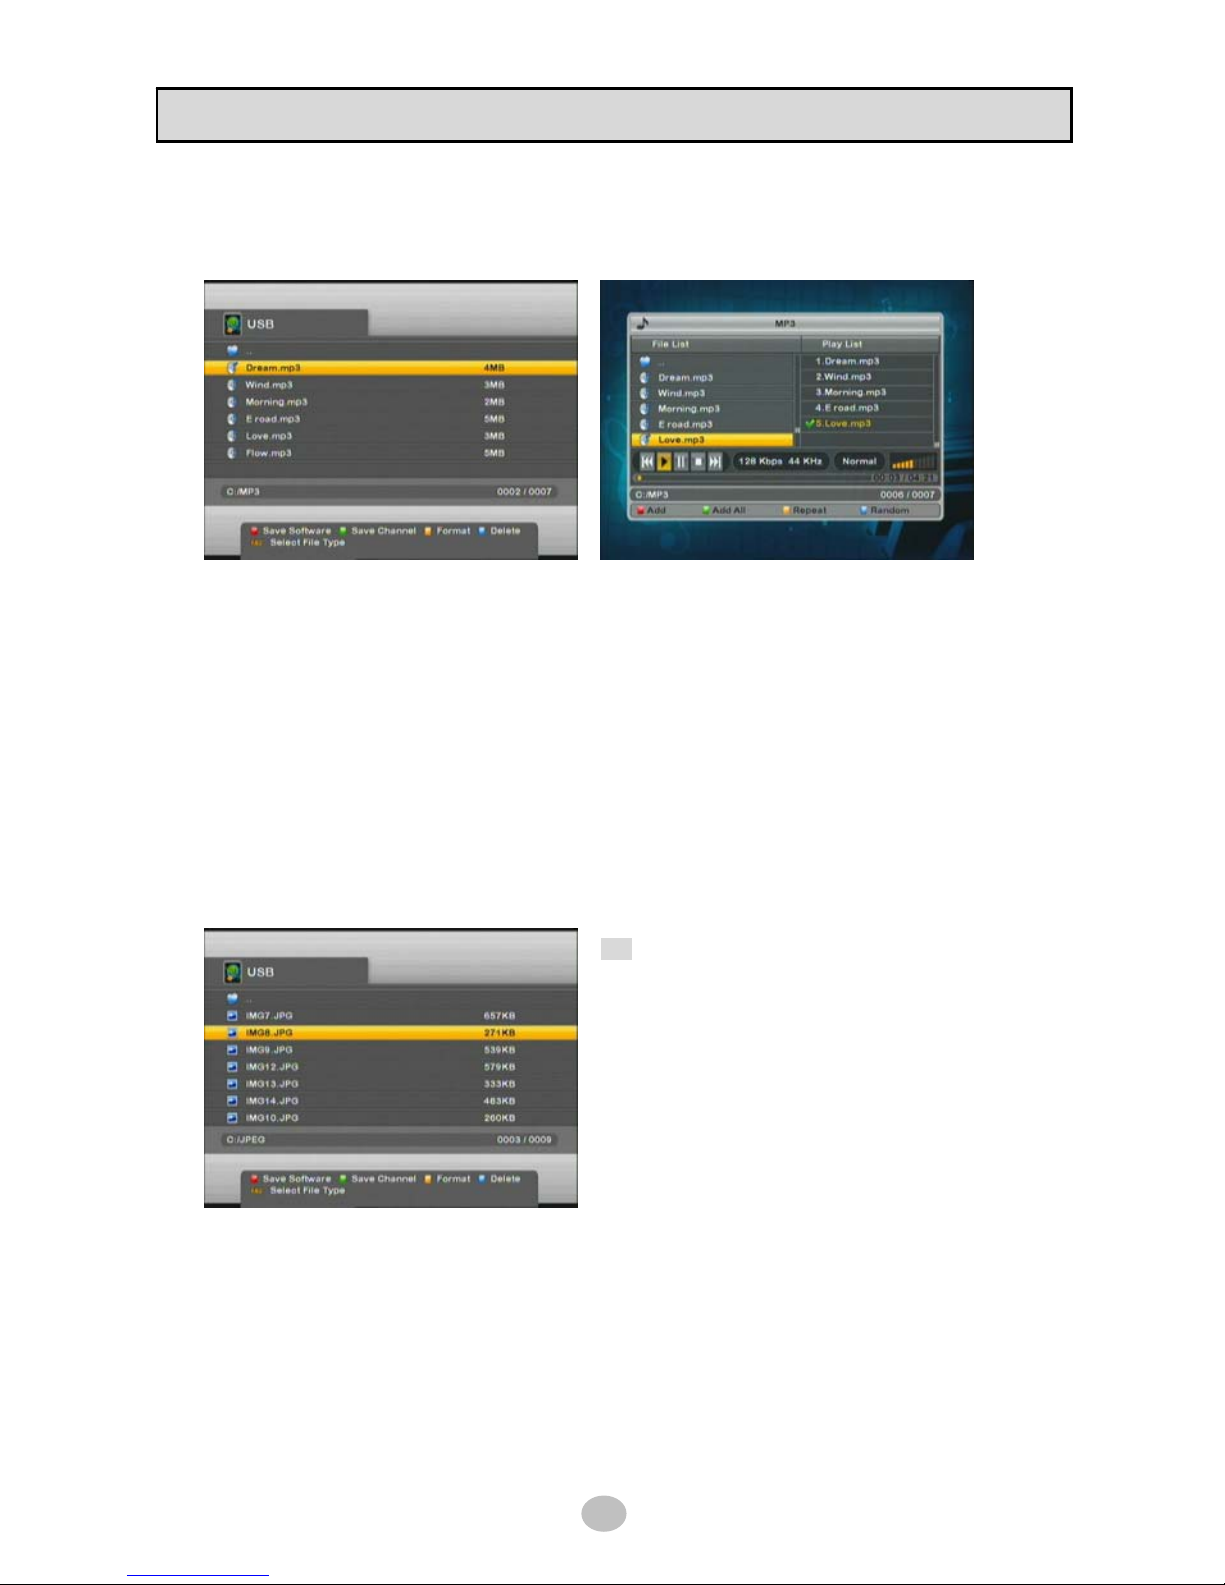
Select MP3 file in USB manager and press OK to play with visual player program as below picture.
File list on the left window shows MP3 files in USB device while right window shows play list and currently
playing file.
◆ ADD/ADD all : add selected MP3 file into play list queue
◆ Repeat : play currently playing file repeatedly
◆ Random : play MP3 file in play list in random selection
■ JPEG view
Select JPG file in USB manager and press OK to display it as below picture.
Tip while watching picture in full screen, press
left/right button on RCU [◀▶] to rotate picture in
anticlockwise or clockwise.
■ DivX playback
Select AVI/MPG/MP4 file in USB manager and press OK to play.
Supported video codec is Mpeg-1, Mpeg-2, Mpeg-4 DivX-5 with maximum resolution 720x576.
For displaying subtitle along with DivX file, simply put *.srt or *.sub file in the same directory as DivX.
Page 28
MULTIMEDIA
28
■ Software update / backup
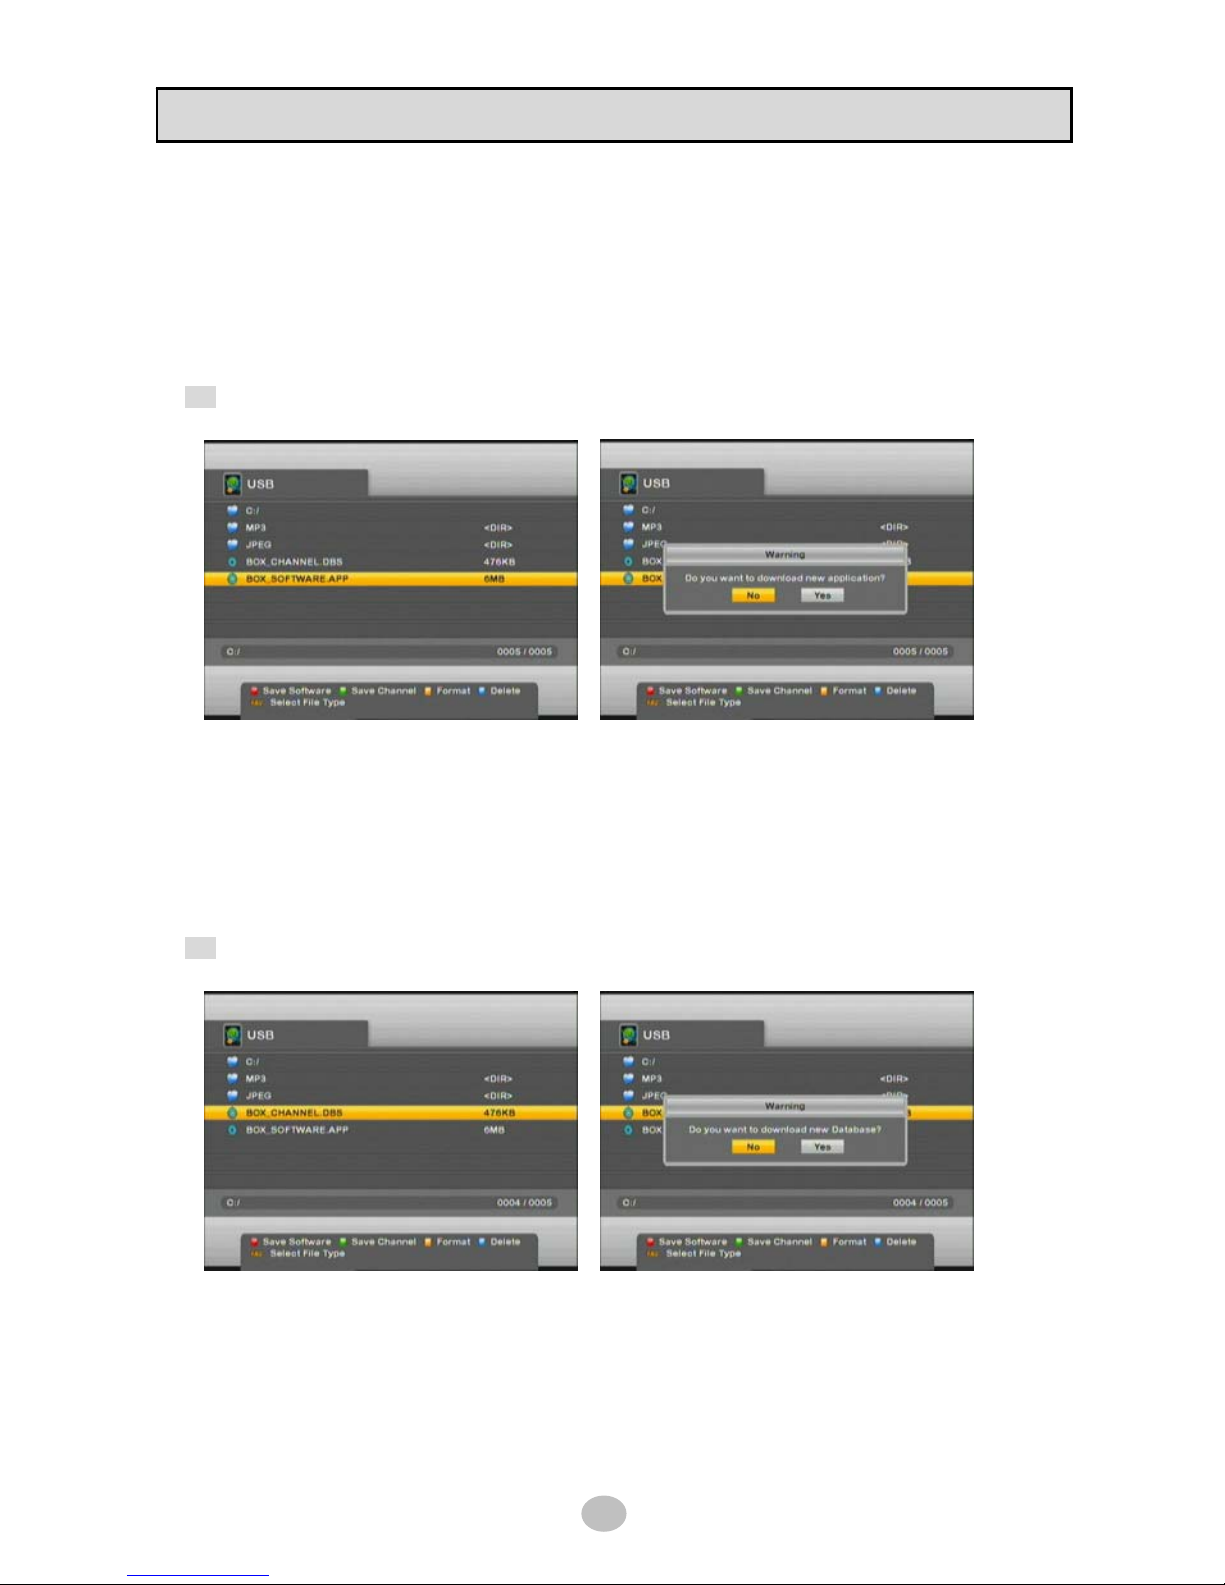
Select APP file in USB manager and press OK to update software of STB.
STB will be automatically rebooted after updating software.
To save or backup current system software, press [RED] button then BOX_SOFTWARE.APP file will be
created in USB device.
Tip keep the saved file in safe storage device for future use
■ DB backup / restore
To save or backup current database (channel list, TP, etc.), press [GREEN] button then
BOX_CHANNEL.DBS file will be created in USB device.
For restoring it, simply select file and press OK as below picture.
Tip keep the saved file in safe storage device for future use
Page 29
MULTIMEDIA
29
■ Recording
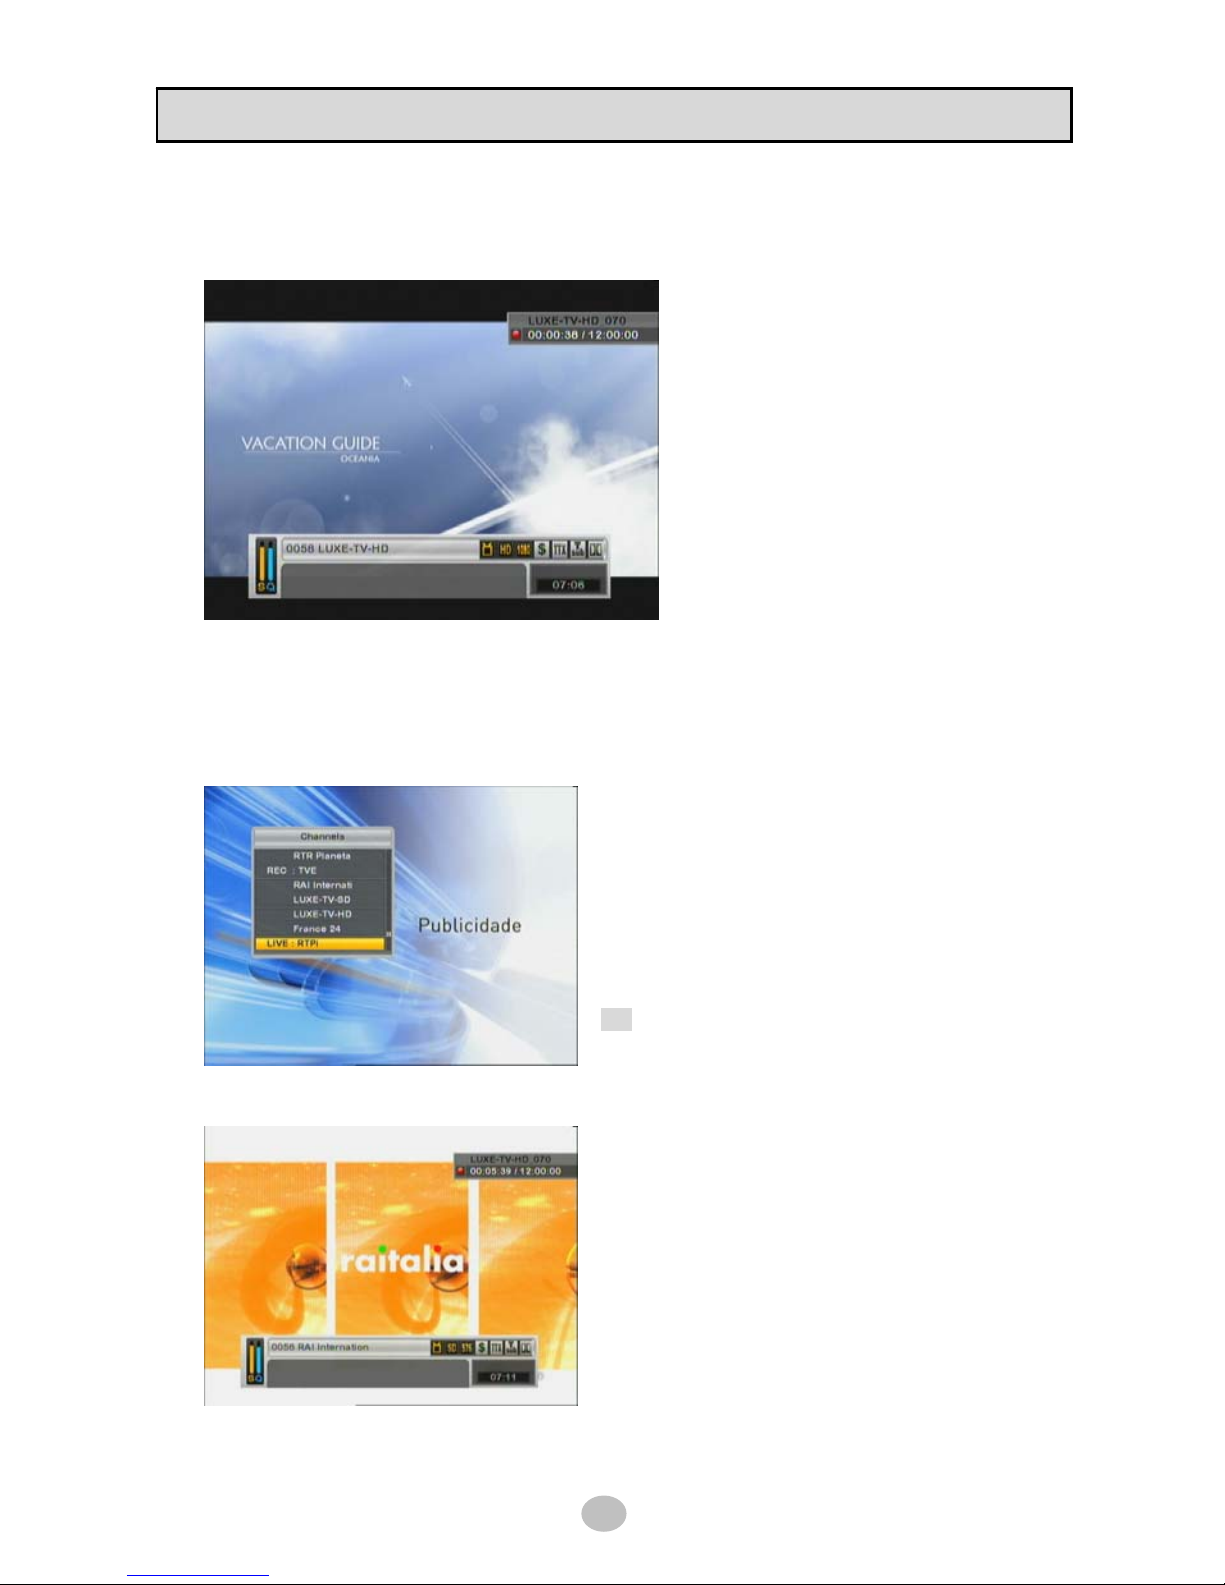
To record current watching channel, press [●] button on RCU then recording will be immediately started.
Small message box on the upper right corner
show channel name and recording time.
To stop recording, press STOP [■] button.
■ Background Recordin g
While recording one channel in background, you can watch another channel at the same time.
Press [OK] button on RCU then available channel list
box appeared.
REC : recording channel in background
LIVE : watching channel
Tip this channel list box is available only in
same TP as recording channel belongs
This picture shows background recording function;
Recording channel : LUXE-TV-HD
Watching channel : RAI International
Page 30
MULTIMEDIA
30
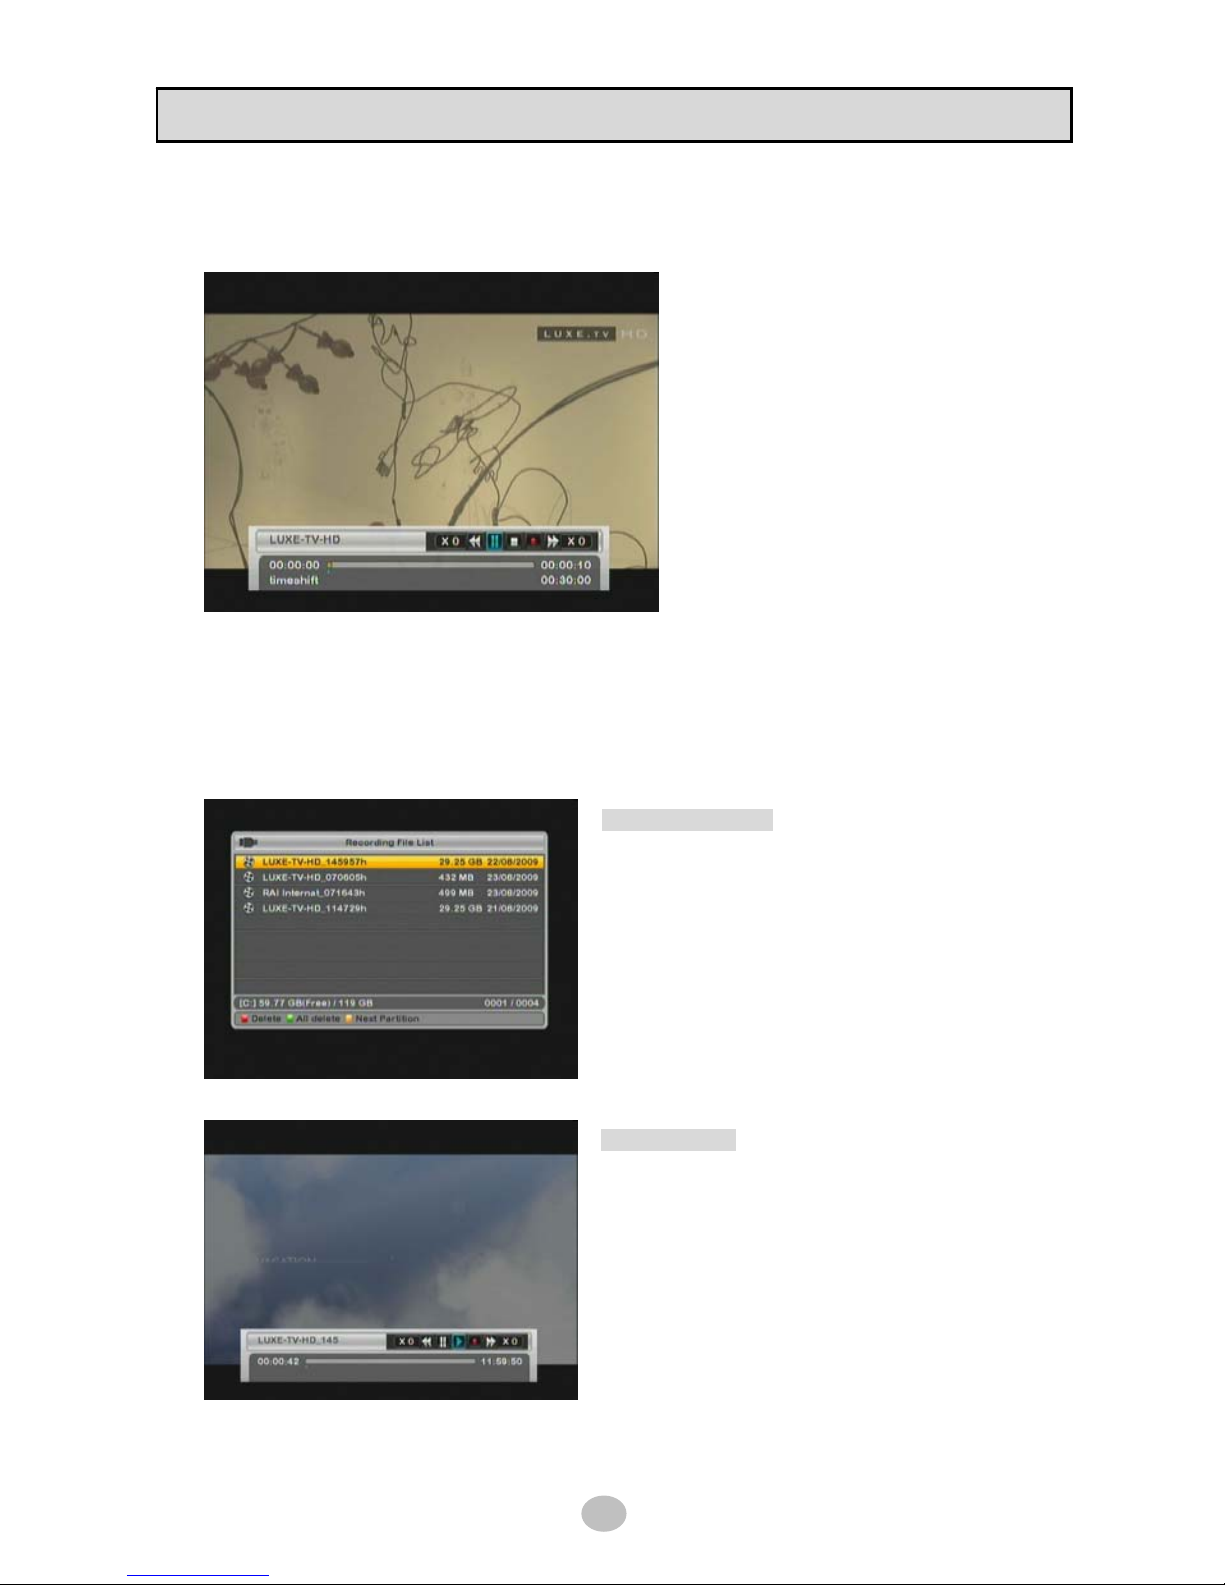
■ Time shift
While watching channel, press [PAUSE] button on RCU then time shift immediately started.
While time shift is working, trick modes are
supported like Play/Pause/Seek/FF/REW as
well as slow playback in both direction.
Refer to RCU picture in page 8 in this manual
for trick mode key operation.
Press [●] button on RCU to switch recording.
■ Playback
To play recorded file in USB device, press [▶] button on RCU then recorded file list box appeared as
below picture.
Recorded file list box
◆ Delete : delete a selected file
◆ All delete : delete all files
◆ Next Partition : switch to next partition if
USB device have more than one partition.
Simple select file and press OK to play.
Playback infobar
While playback, trick modes are supported like
Play/Pause/Seek/FF/REW as well as slow playback in
both direction.
Refer to RCU picture in page 8 in this manual for trick
mode key operation.
Page 31
MULTIMEDIA
31
■ Background Recordi ng & playback
While recording one channel in background, you can playback recorded file at the same time.
Simply start recording and press [▶] button on RCU to select file to playback.
Press [■] button to stop playback first and then you can stop recording.
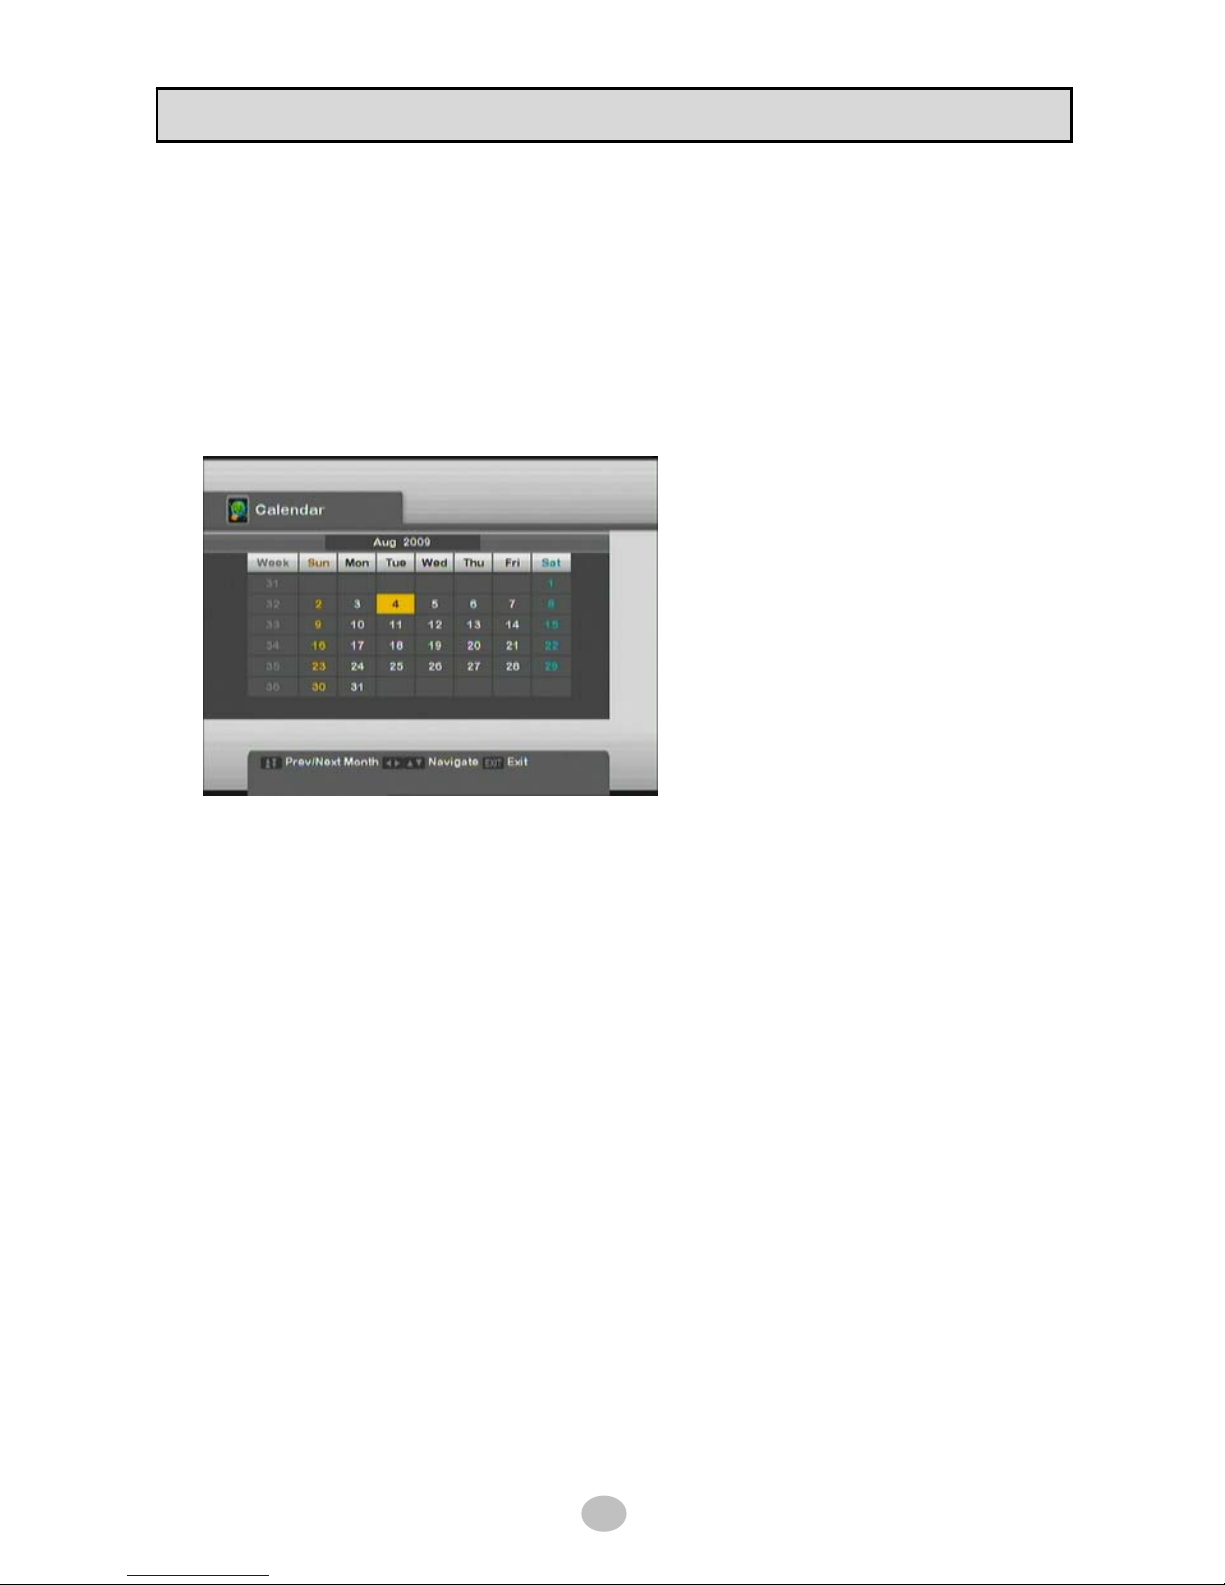
6.3 Calendar
Page 32
GAME
32
7.1 Tetris
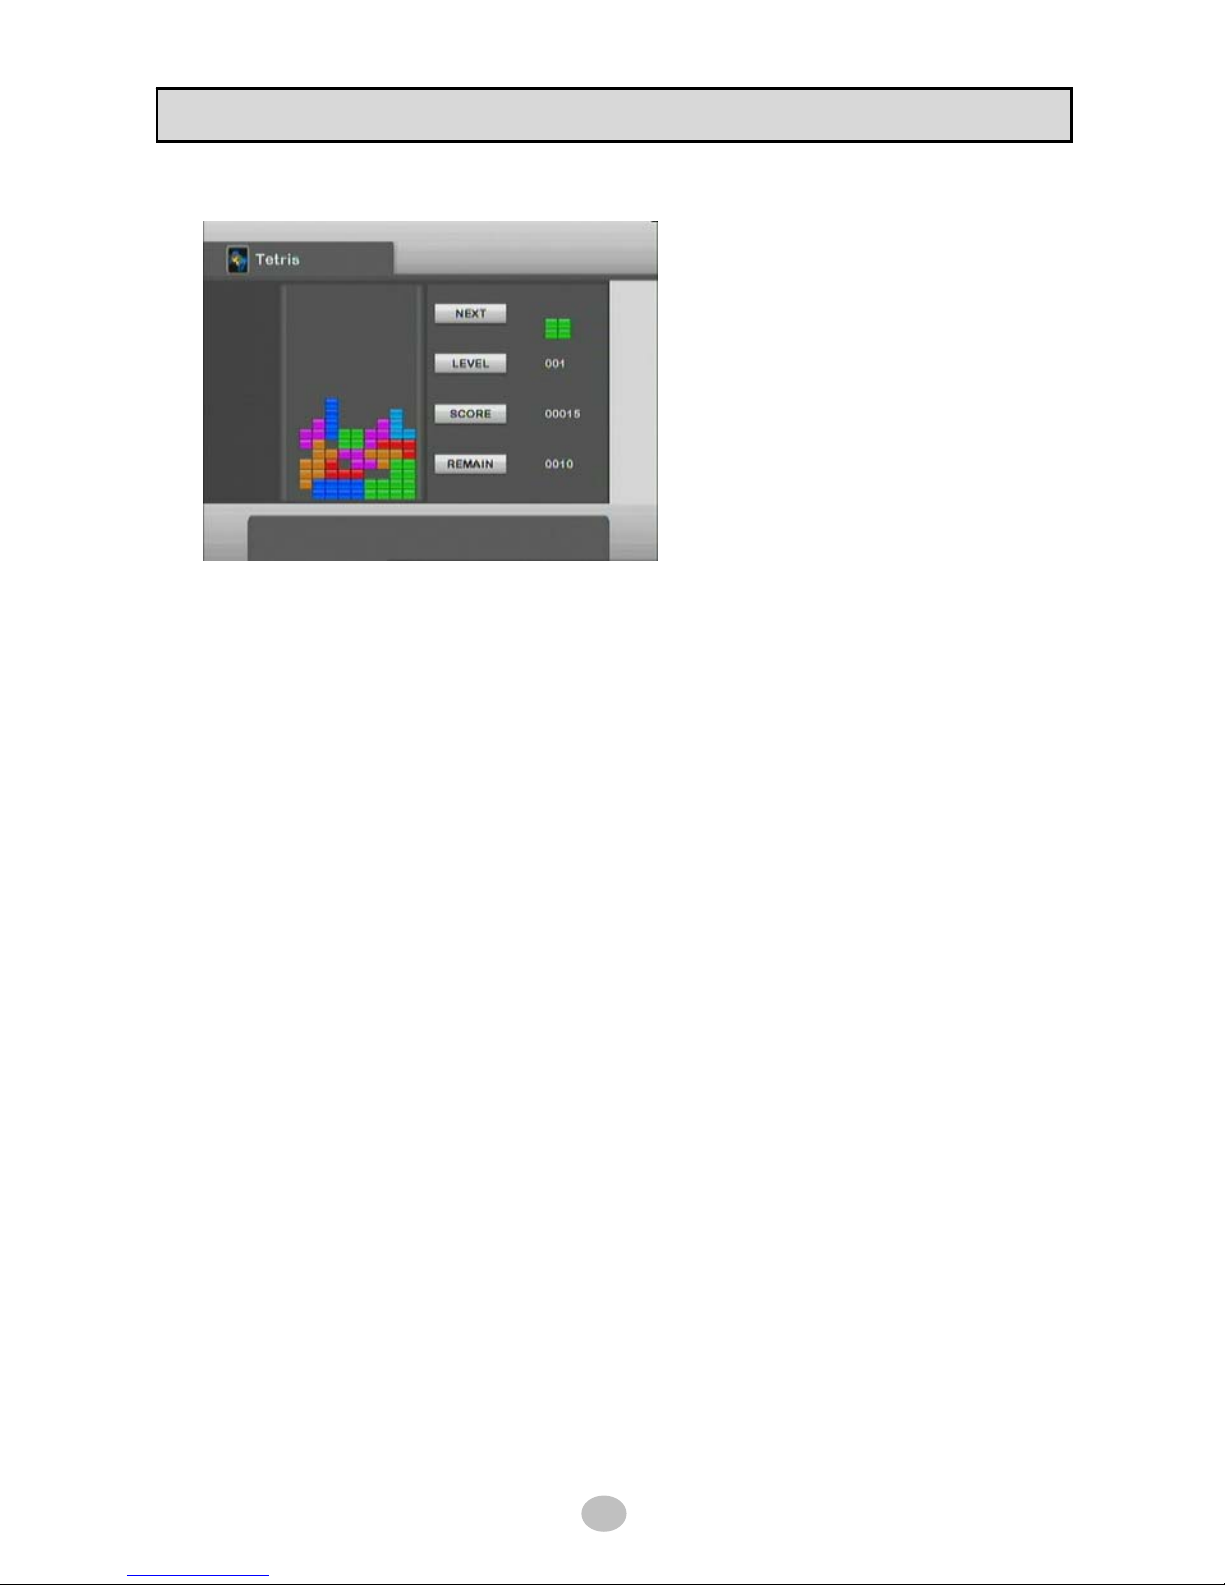
Key Operation
OK - rotate
Down – Move down
Left/Right – Move Left/Right
Page 33
TIMER
33
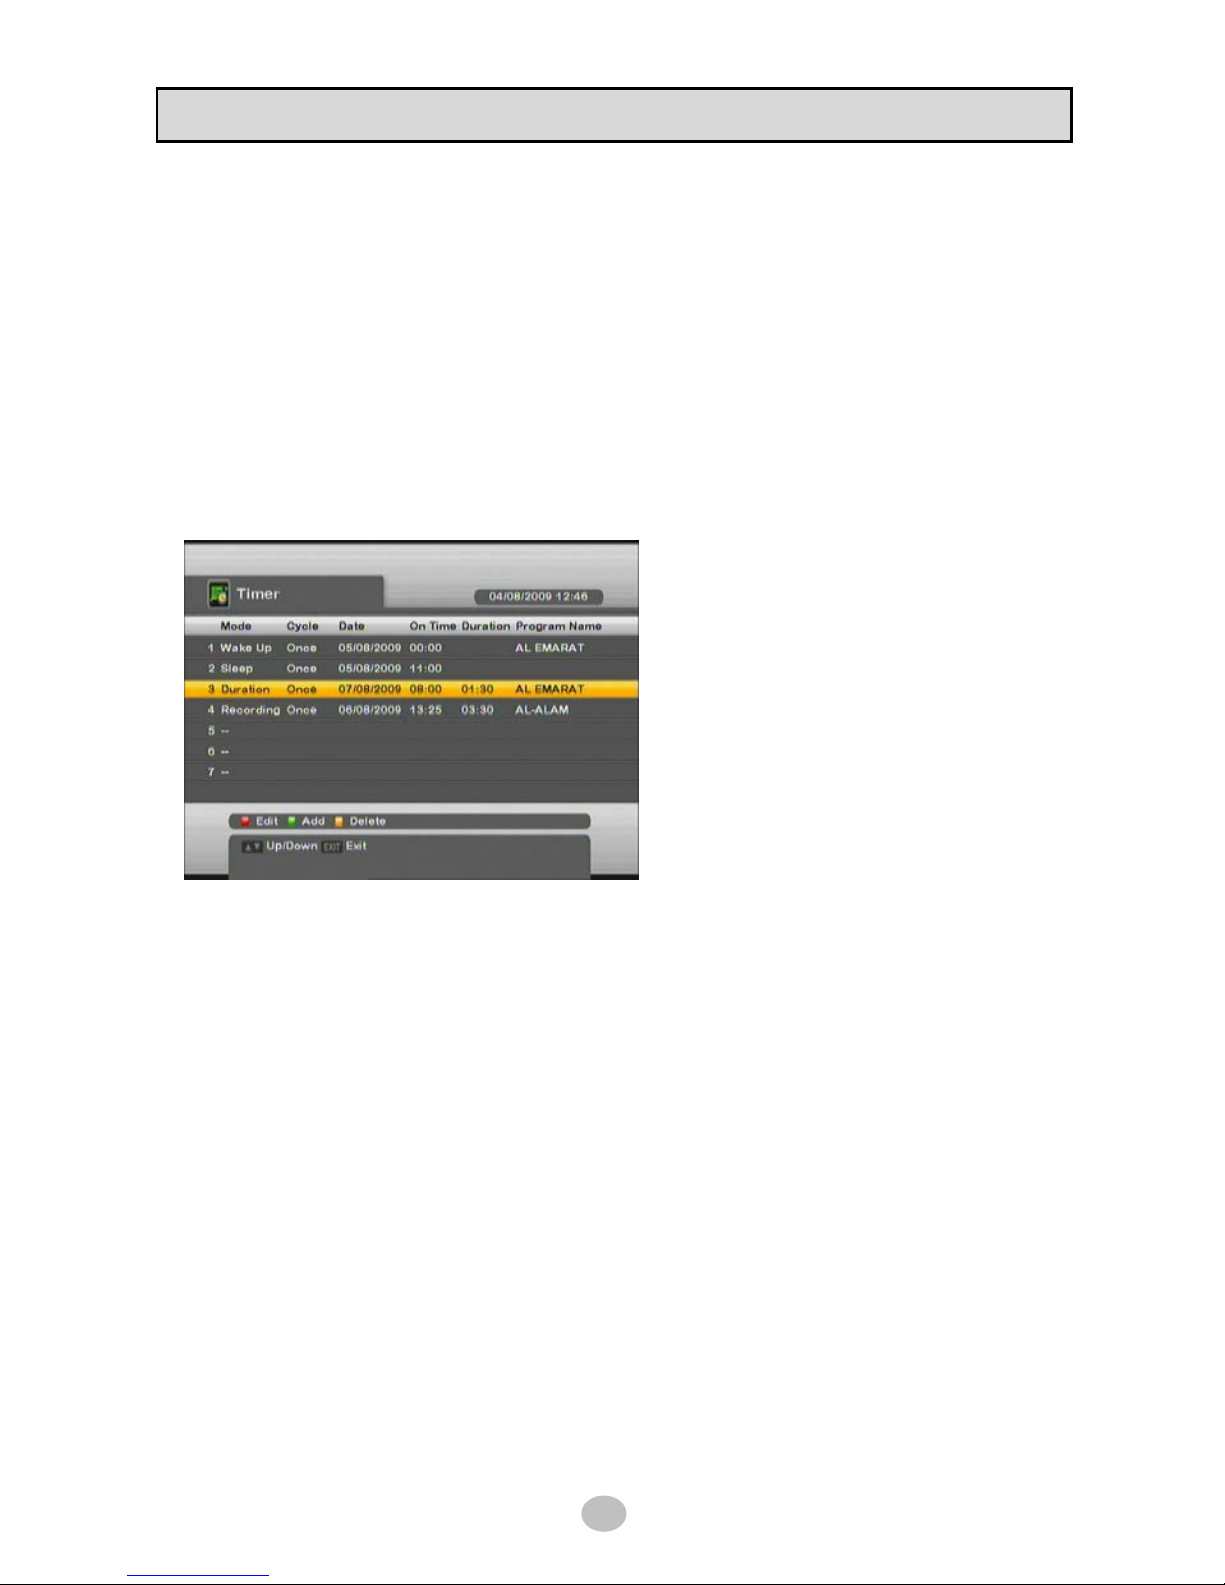
8.1 Menu description
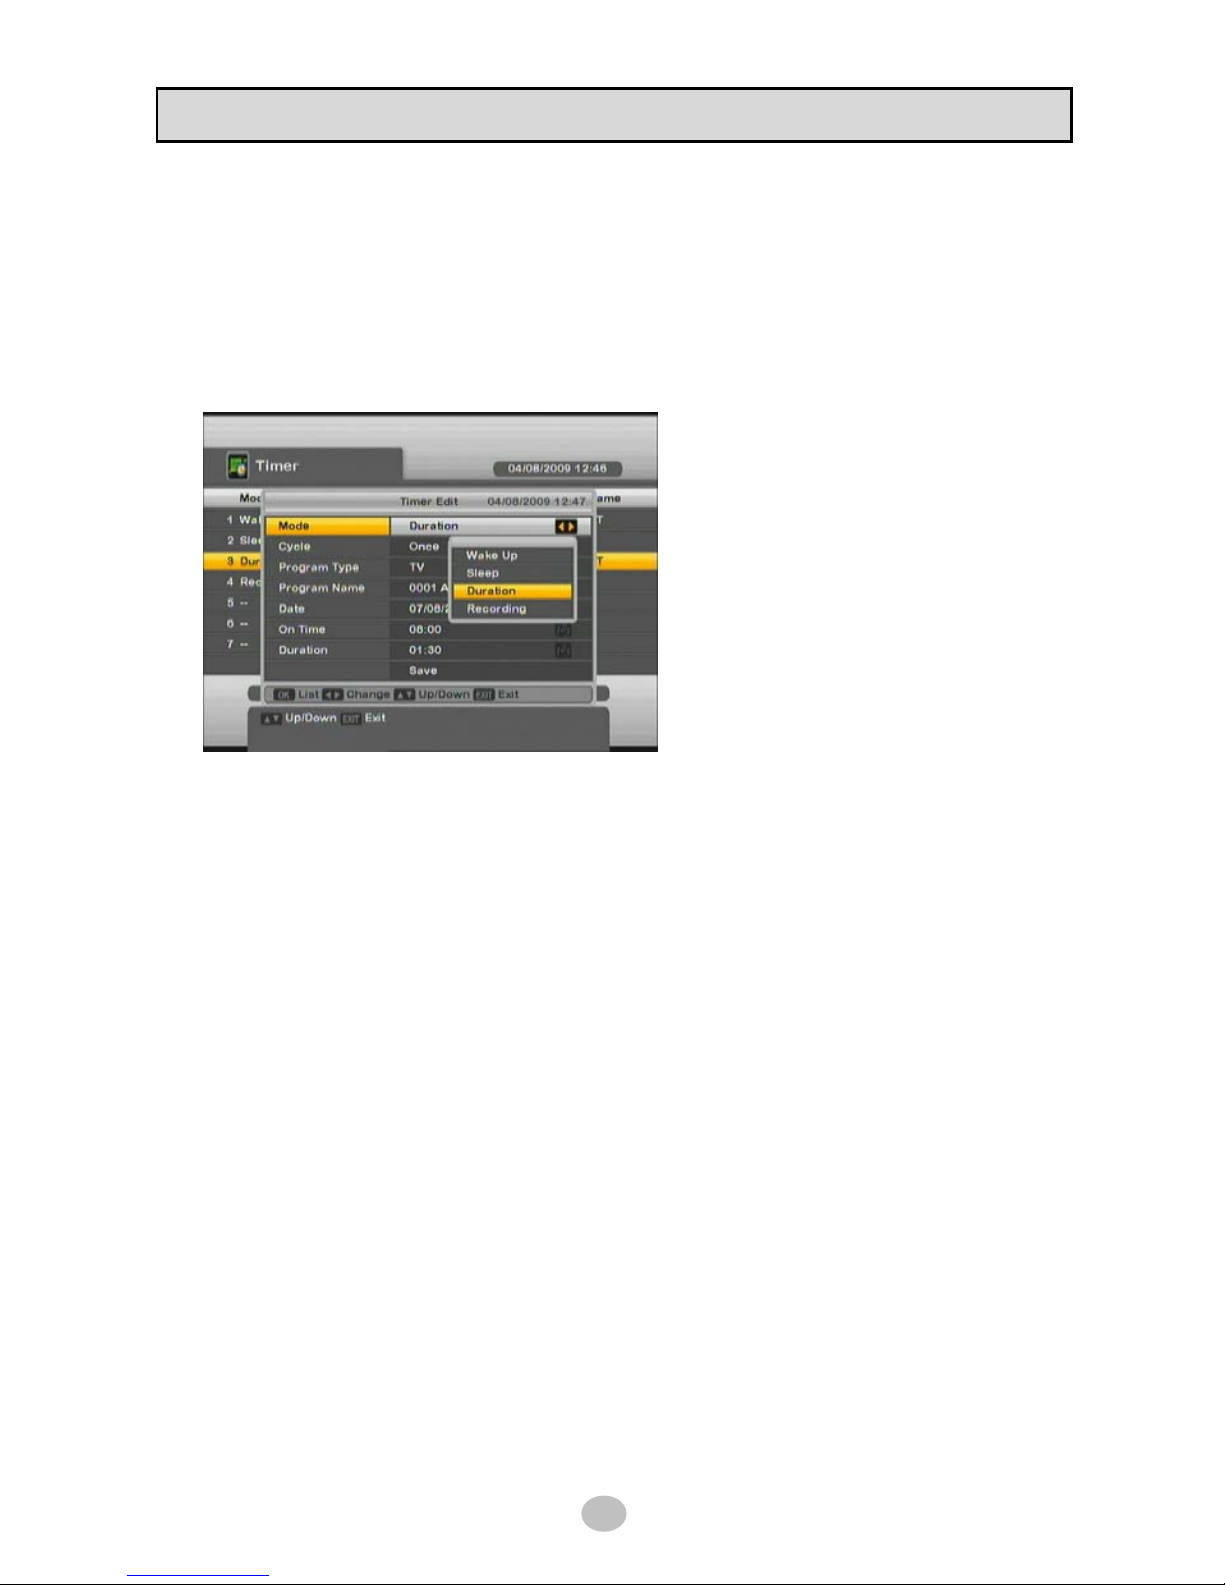
1. Mode
Available categories are Wake Up/Sleep/Duration/Recording.
Wake Up : STB will be turned on at designated time and keep it on.
Sleep : STB will be turned off at designated time.
Duration : STB will be turned on at designated time and turned off after designated duration.
Recording : STB will start recording at designated time and stop it after designated duration.
※ USB storage device like memory stick or HDD should be connected to STB for recording event.
2. Cycle
Once – Event perform one time and deleted from Timer event list.
Daily – Event perform every day at designated time.
To stop this event, delete it from event list
Weekly – Event perform designated week day and designated time.
To stop this event, delete it from event list
3. Date/On Time/Duration/Pro gram Name
Date – Set event date.
On Time – Set event starting time.
Duration – Set event duration time.
Program name – Set TV/Radio channel for event.
Page 34
TIMER
34
8.2 Operation
Available event list is 7 regardless of Mode.
EDIT – Change/Edit existing event.
ADD – Add new event.
DELETE – Delete existing event.
Page 35
LIVE MENU
35
9.1 Electronic Program Guide
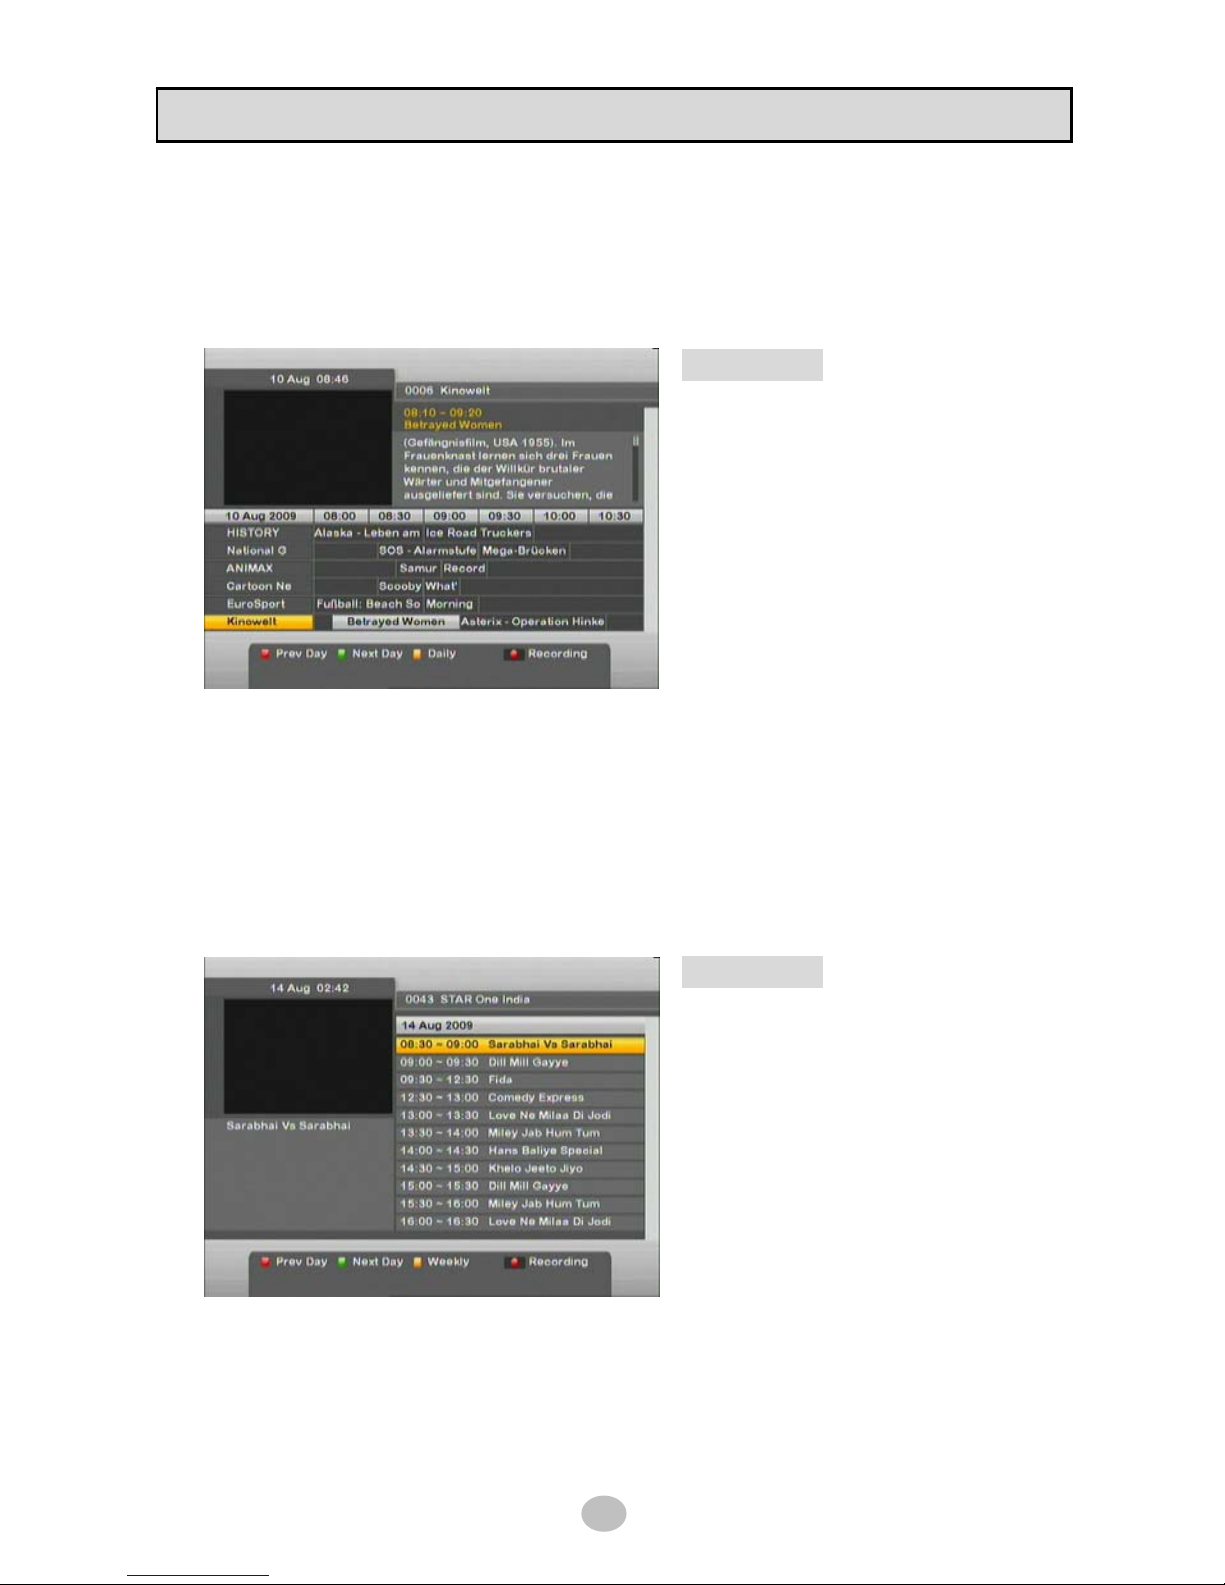
To display program guide (current and next program) for currently viewing channel, press [EPG] button
on RCU then you will see below picture.
Seven days EPG is available.
◆ Key Operation
▲▼ Button : Change channel
◀▶ Button : Change time table
OK Button : Watch channel in PIG
RED Button : Change date to previous day
GREEN Button : Change date to next day
RECORD Button : Reservation for recording
When recording reservation is made, ● icon will be added to selected program and this reservation
will be listed in [TIMER] menu.
※ USB Memory or HDD should be connected before recording started.
To display EPG in Daily category, press YELLOW Button and you will get below picture.
This menu shows more detailed program description for selected channel from 00:00 to 24:00.
To return Weekly EPG menu, press YELLOW button.
◆ Key Operation
▲▼ Button : Change time table
◀▶ Button : Change Channel
OK Button : Display description of program
RED Button : Change date to previous day
GREEN Button : Change date to next day
RECORD Button : Reservation for recording
Page 36
LIVE MENU
36
9.2 Channel list
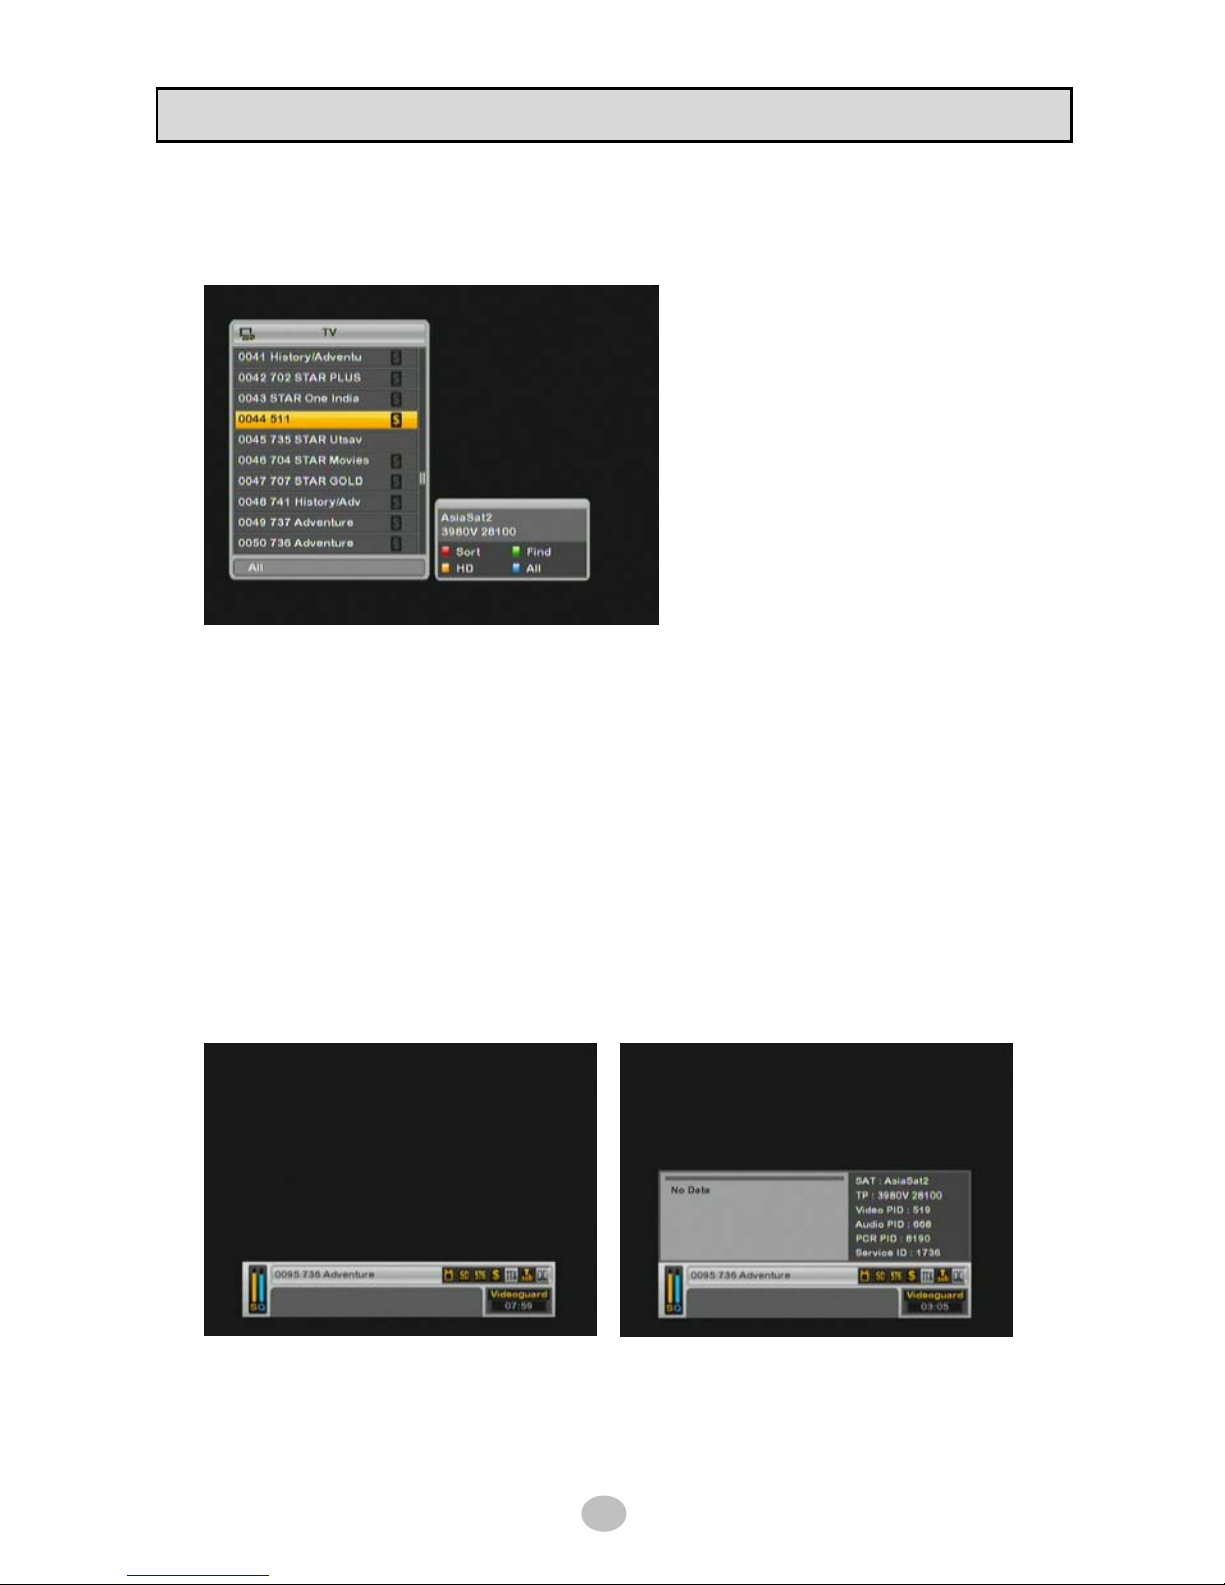
Press OK button in live screen then channel list box will be available as below picture.
Press TV/Rad button to switch TV channel
list to Radio channel list, vice versa.
Press FAV button to show your favorite
channel list.
※ Favorite channel list should be configured
prior to use.
Press SAT button to show only channels that
are belonged to satellite you selected.
SORT – Change channel order by name, CAS or TP Frequency.
To return all channel list, press BLUE button.
FIND – Find channel by entering name in screen keypad, this is shortcut to find channel quickly.
HD – Display only HD channels.
To return all channel list, press BLUE button or press HD button once again.
9.3 Infobar
Press INFO button while you’re in live screen then infobox will give you detailed information on watching
channel.
This function toggles as [normal mode] > [extended mode] > [off] by the number you press INFO button.
Extended mode provide you with more information like full EPG, satellite, TP, PID info and service ID
than normal mode.
Page 37
LIVE MENU
37
9.4 Teletext
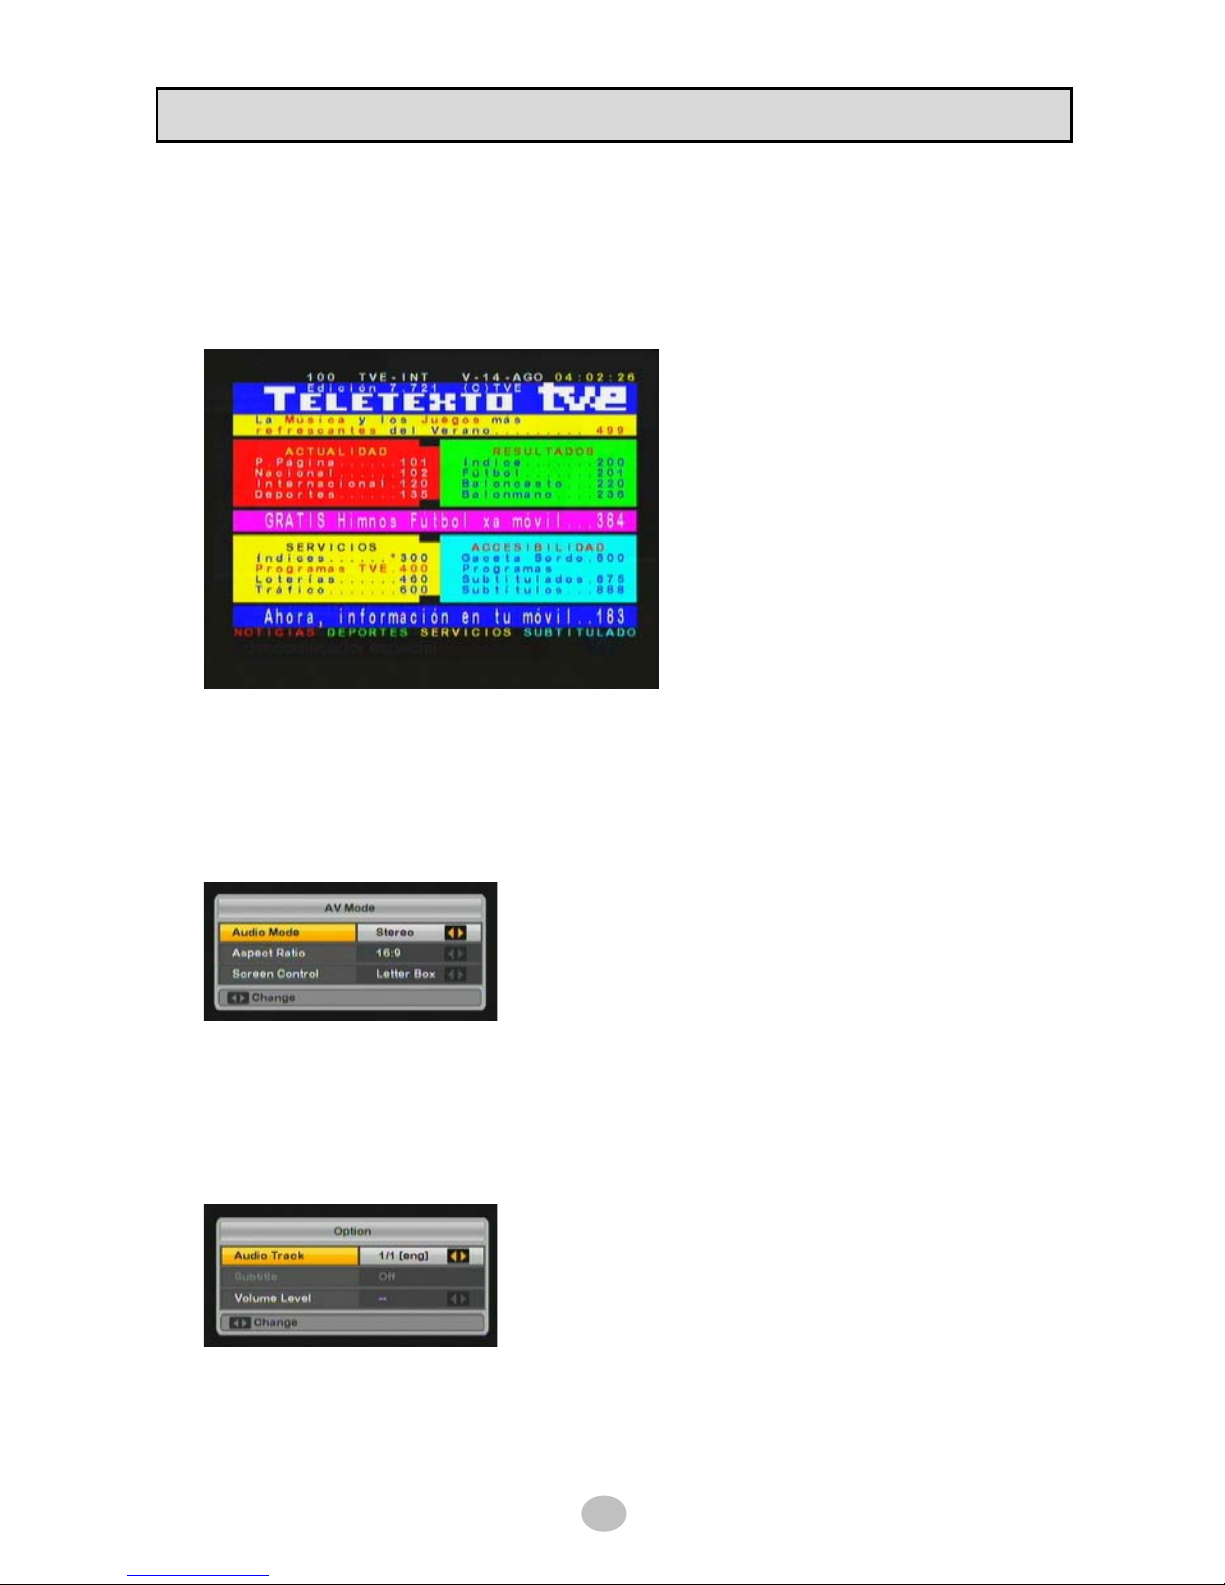
Press TTX button on RCU to invoke teletext information. This service is available only with the channel
that serve teletext.
You may need to enter PIN code if you set teletext lock option ON in [PARENTAL LOCK] menu.
To browse detailed information on teletext,
enter numbers with RCU as seen on category
screen.
9.5 AV Mode
Press AV+ button on RCU to set Audio Mode [Stereo/Left/Right] and Aspect Ratio of screen [16:9/4:3]
and Screen Control [Letter Box/PanScan/Ignore]
9.6 Option
Press OPT button on RCU to set Audio Track and subtitle and volume. Supported audio track and
subtitles are varied on the channels.
Page 38

SPECIFICATIONS
38
Tuner & Decoder
Tuner DVB-S + DVB-S2
Frequency range 950 ~ 2150 MHz
DISEqC 1.0/1.1/1.2/USALS
LNB 13/18V, 22 KHz Tone, DiSeqC 1.2 support
Demodulation QPSK, 8PSK
Symbol rate 1 ~ 45 MS/s 10 ~ 31 MS/s
MPEG Transport Stream A/V Decoding
Transport stream MPEG-2 ISO/IEC 13818-1
Profile level MPEG-2 MP@HL, MPEG-4 AVC [email protected],
DivX
Audio decoding MPEG-1 Layer1,2&3(MP3), MPEG-2 layer2,
MPEG-2 AAC
MPEG-4 AAC LC, MPEG-4 AAC+SBR2
Dolby Digital, 6 to 2 Channel Downmixing
Video resolution 1080i, 720p, 480p/576p, 480i/576i
Audio mode Stereo L/R, Dolby Digital
Main system
Main CPU STi710x
Memory System: DDR 128Mbyte
Video: DDR 64Mbyte
Flash Memory 8M byte
Front panel
Control buttons Up, Down, Left, Right, Ok, Menu, Exit, Power
Display 12-Digit clear VFD
USB 1 X USB 2.0
Smartcard 1 slot Compliance to IS7816
Common interface 2 slots Compliance to EN50221
A/V & Data interface
RCA A/V CVBS, Audio L/R
Component Y, Pb, Pr
S/PDIF Dolby AC-3 or PCM output (Optical)
SCART Dual (TV, VCR)
USB Type-A USB 2.0
HDMI Support HDMI 1.1
RJ-45 10/100M
RS-232C 9 pin D-sub
Power Supply
Type SMPS
Input range AC 100V-240V
Power Consumption Max 45W
Page 39

Page 40

 Loading...