

Page 1
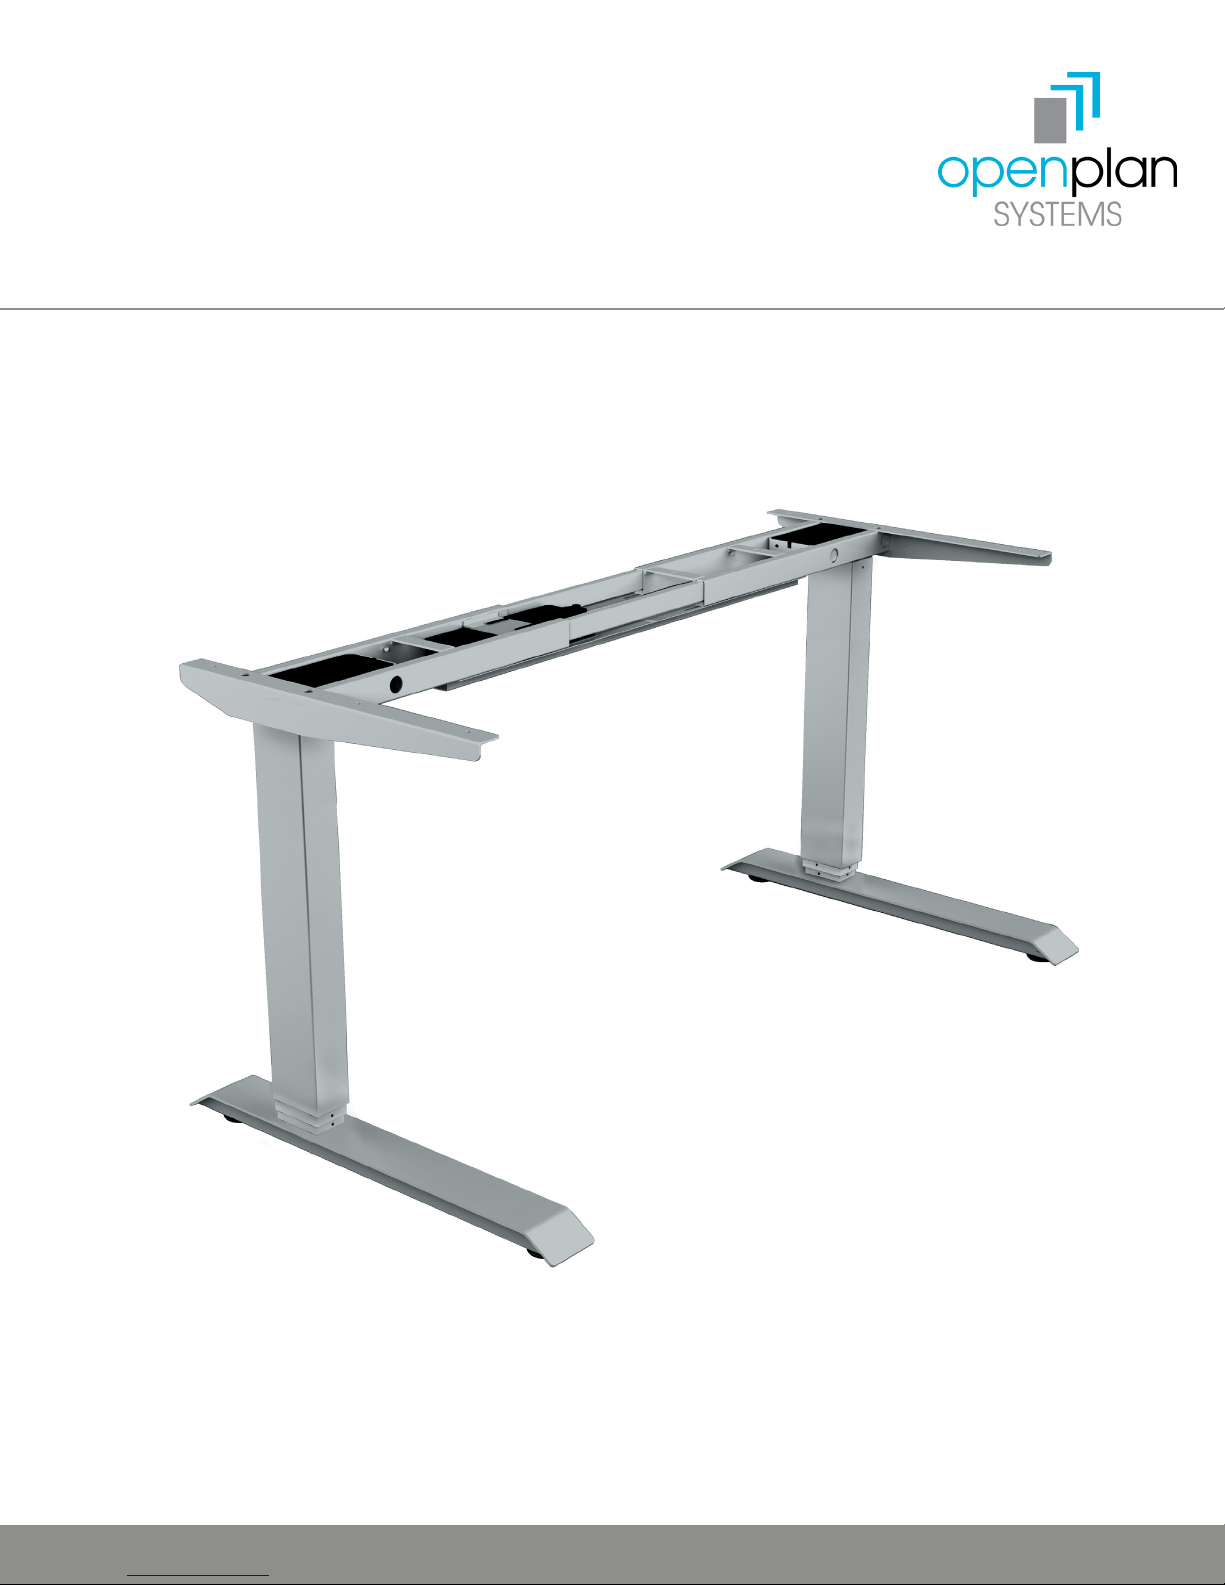
C-LEG GRADE 1 BASE
POWERED ADJUSTABLE HEIGHT TABLE
ASSEMBLY & USE
www.openplan.com | 844.OPS.OPS1 | [email protected] | REV 09.12.17
1
Page 2
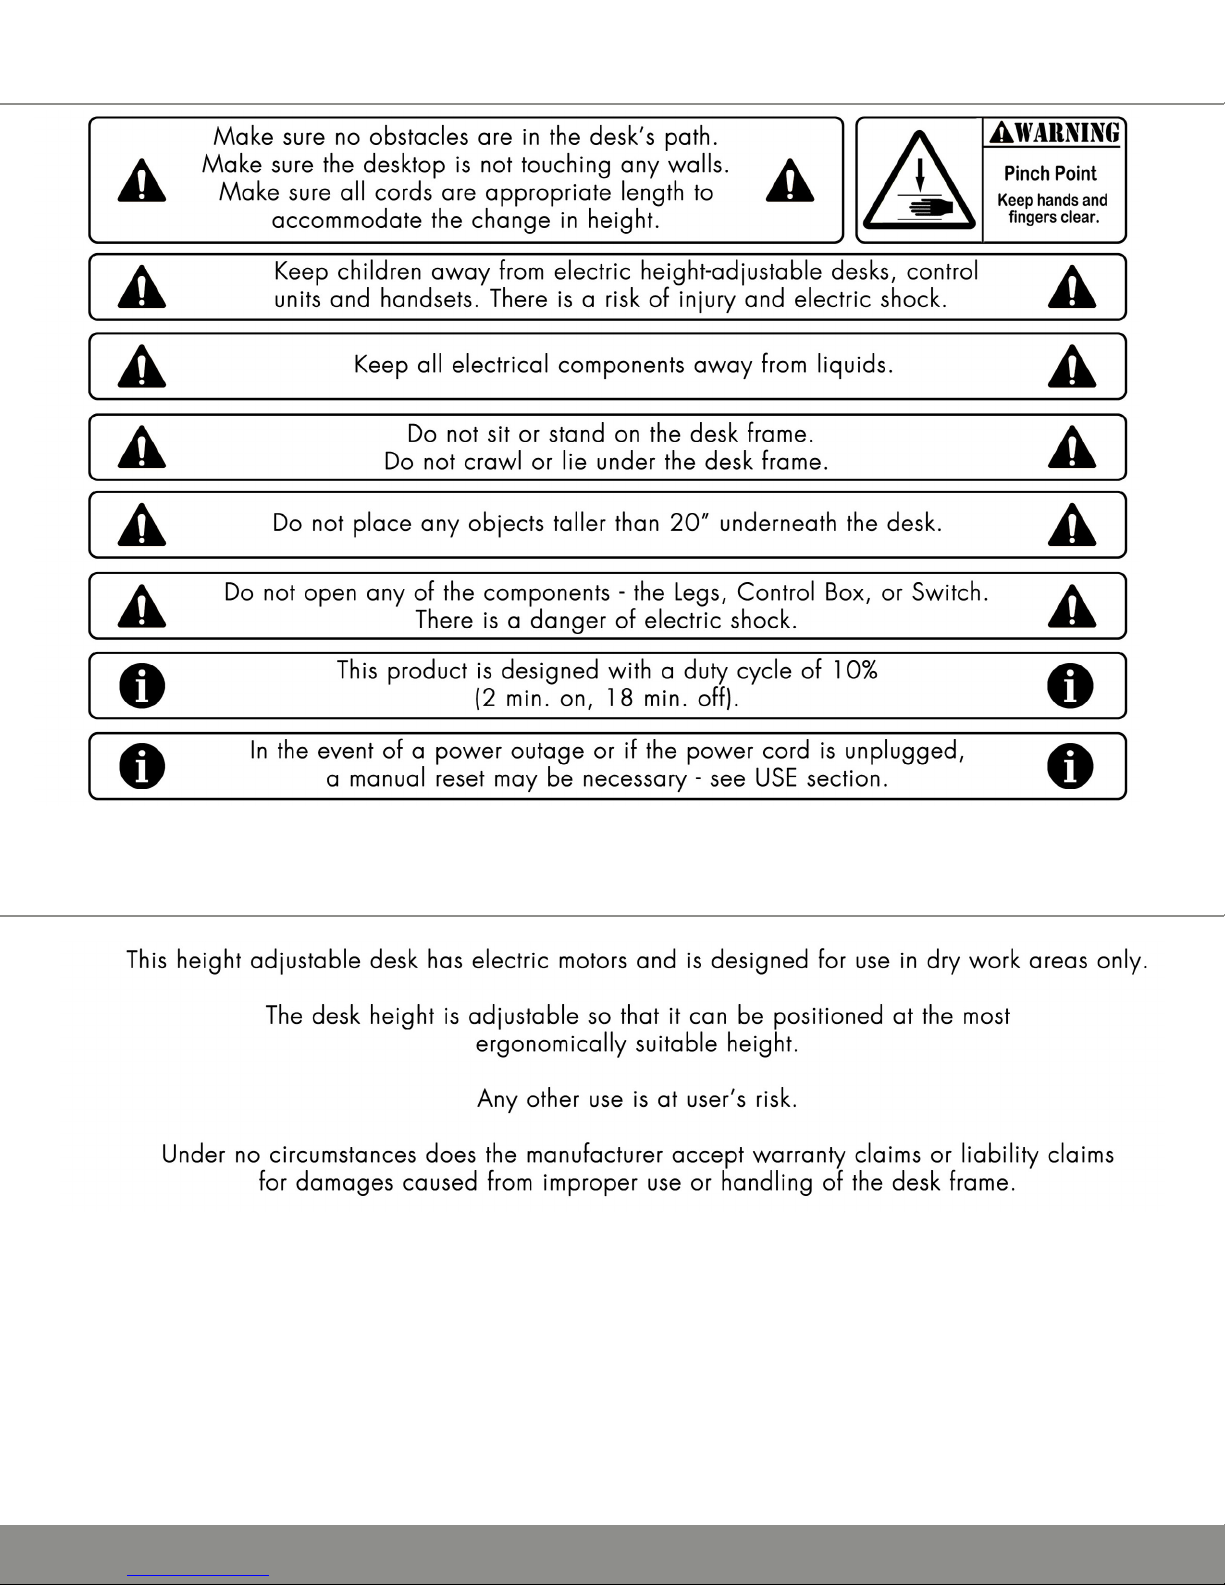
SAFETY INFORMATION
USE & LIABILITY
www.openplan.com | 844.OPS.OPS1 | [email protected] | REV 09.12.17
2
Page 3
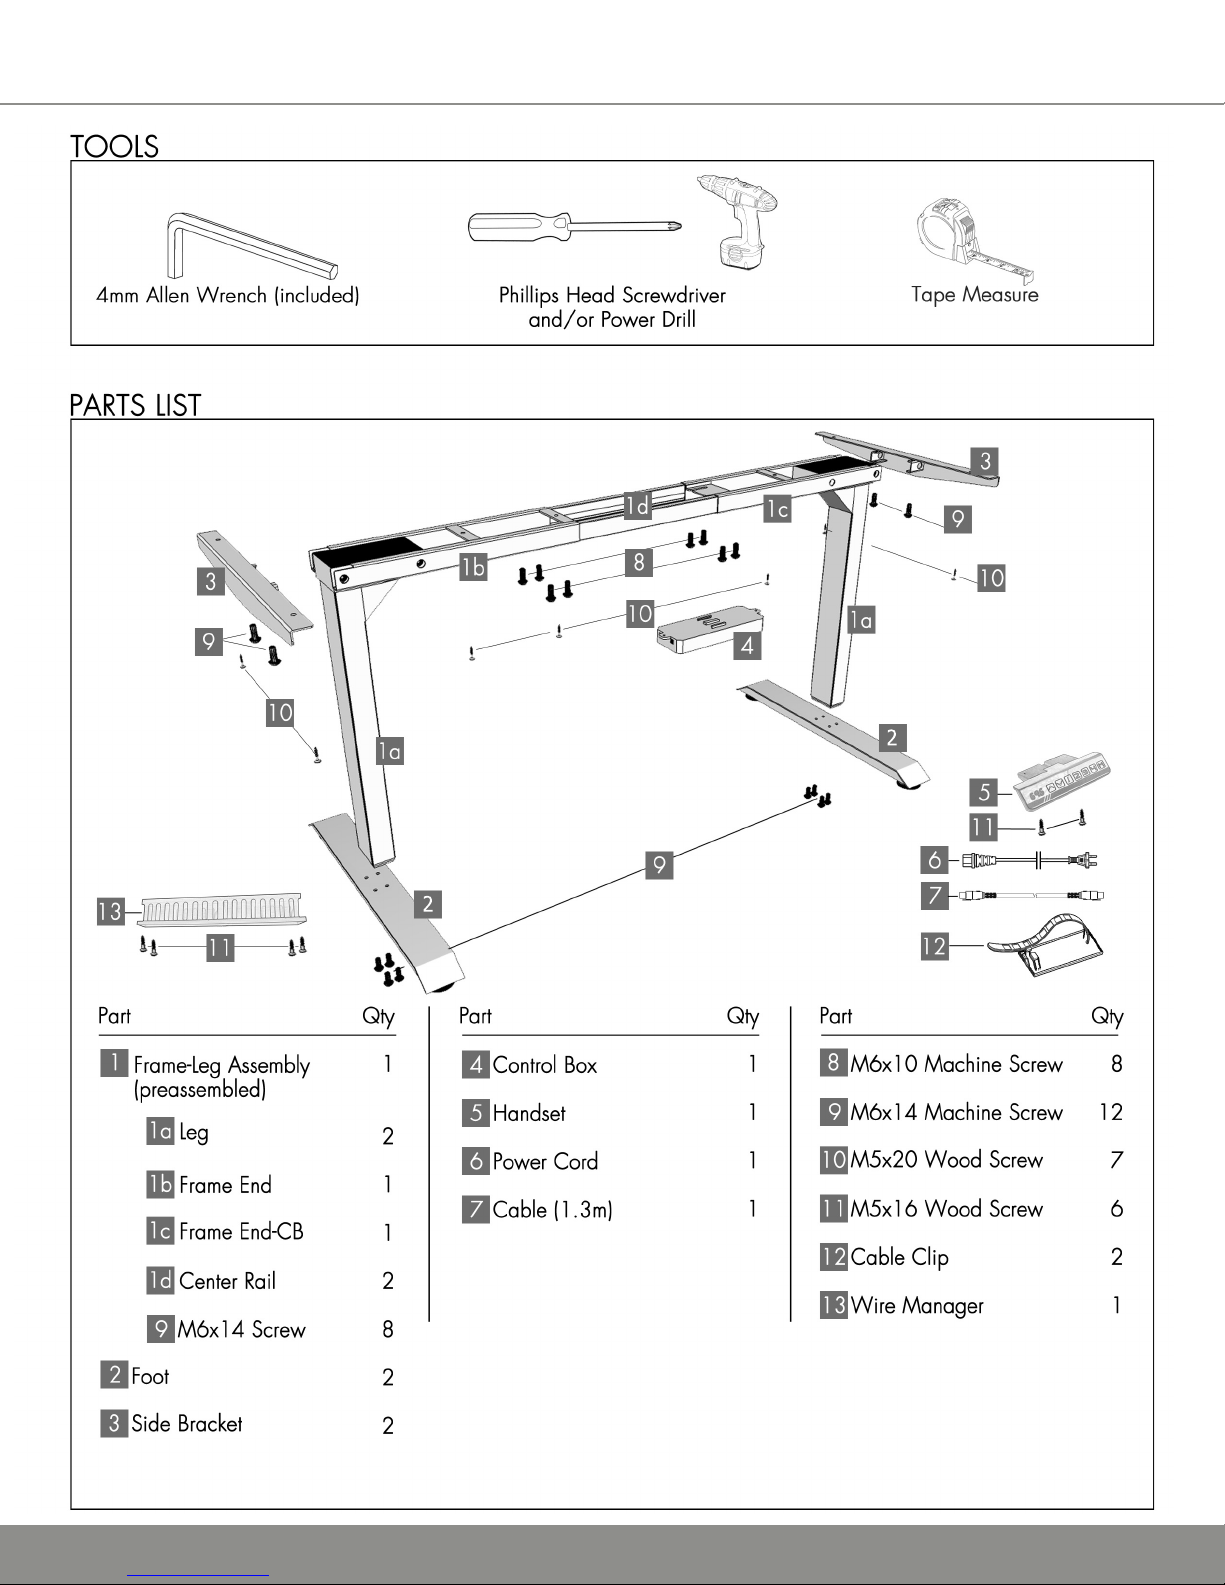
ASSEMBLY
Note: Instruction diagrams show a T-Leg style instead
of the standard C-Leg style for the Deluxe Base.
www.openplan.com | 844.OPS.OPS1 | [email protected] | REV 09.12.17
3
Page 4
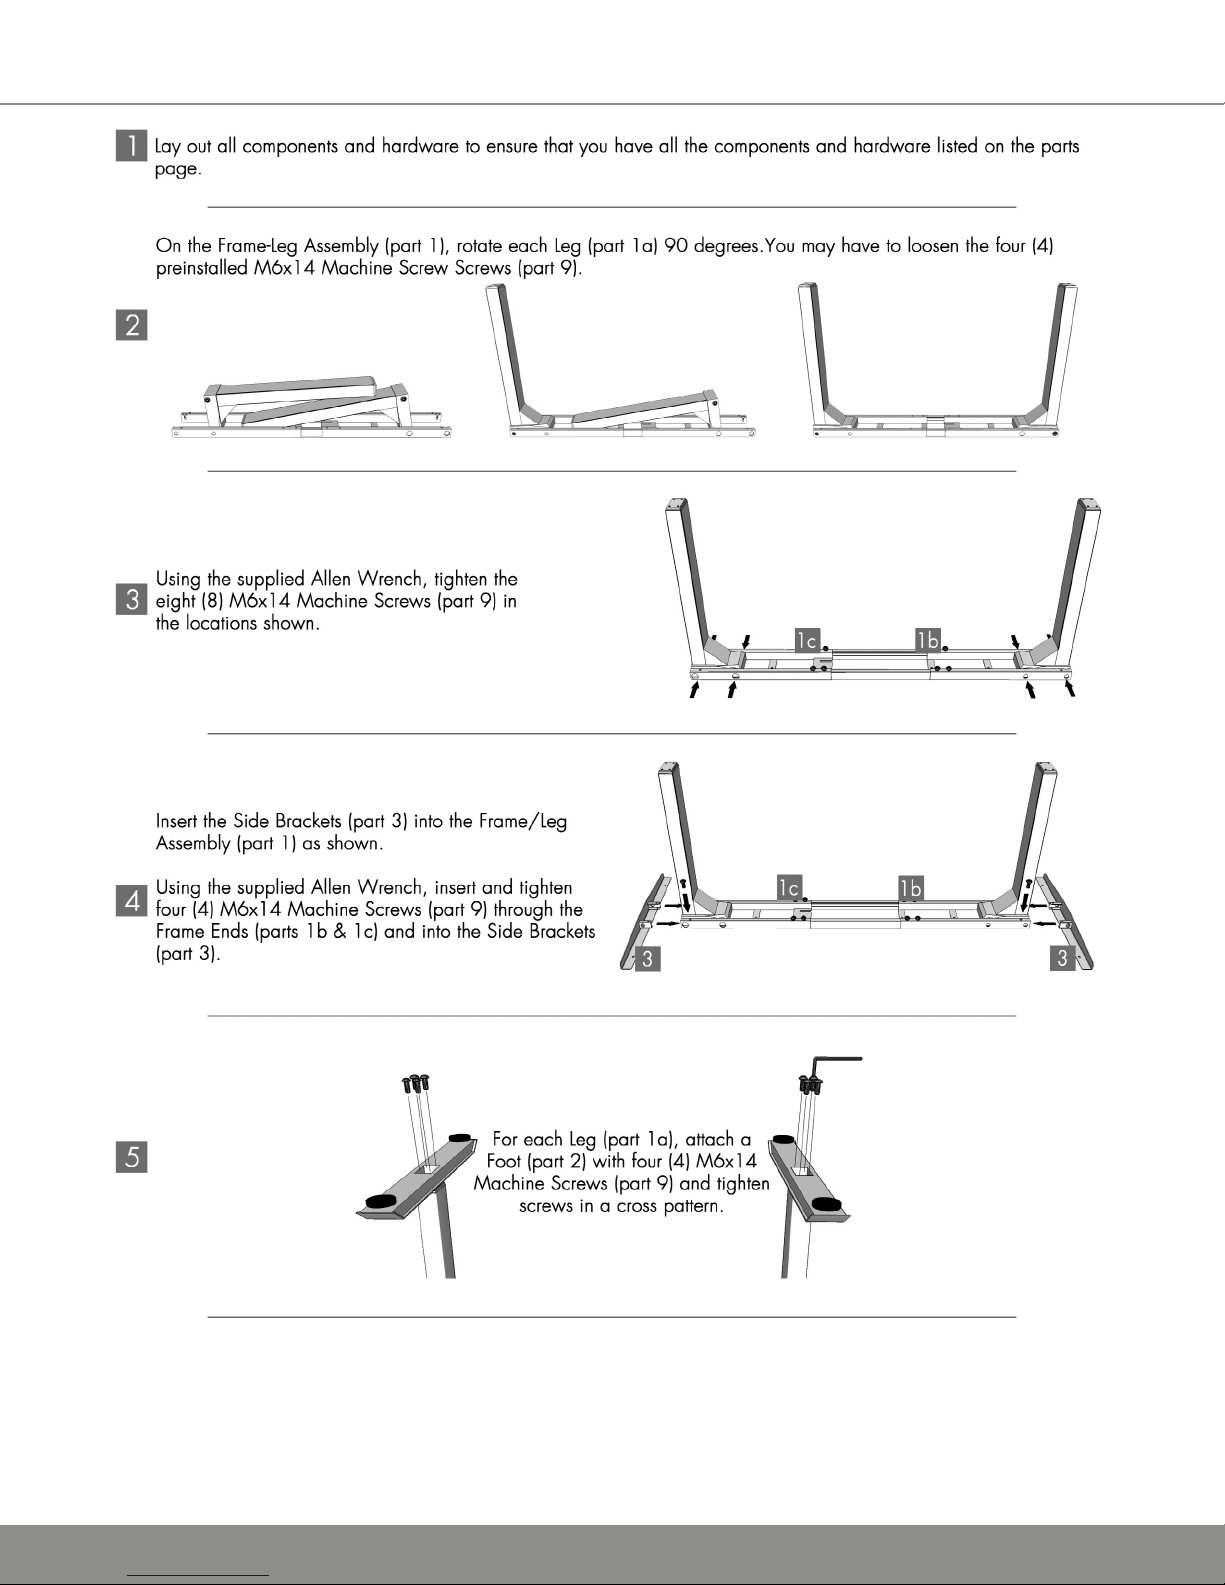
ASSEMBLY
Note: Instruction diagrams show a T-Leg style instead
of the standard C-Leg style for the Deluxe Base.
www.openplan.com | 844.OPS.OPS1 | [email protected] | REV 09.12.17
4
Page 5
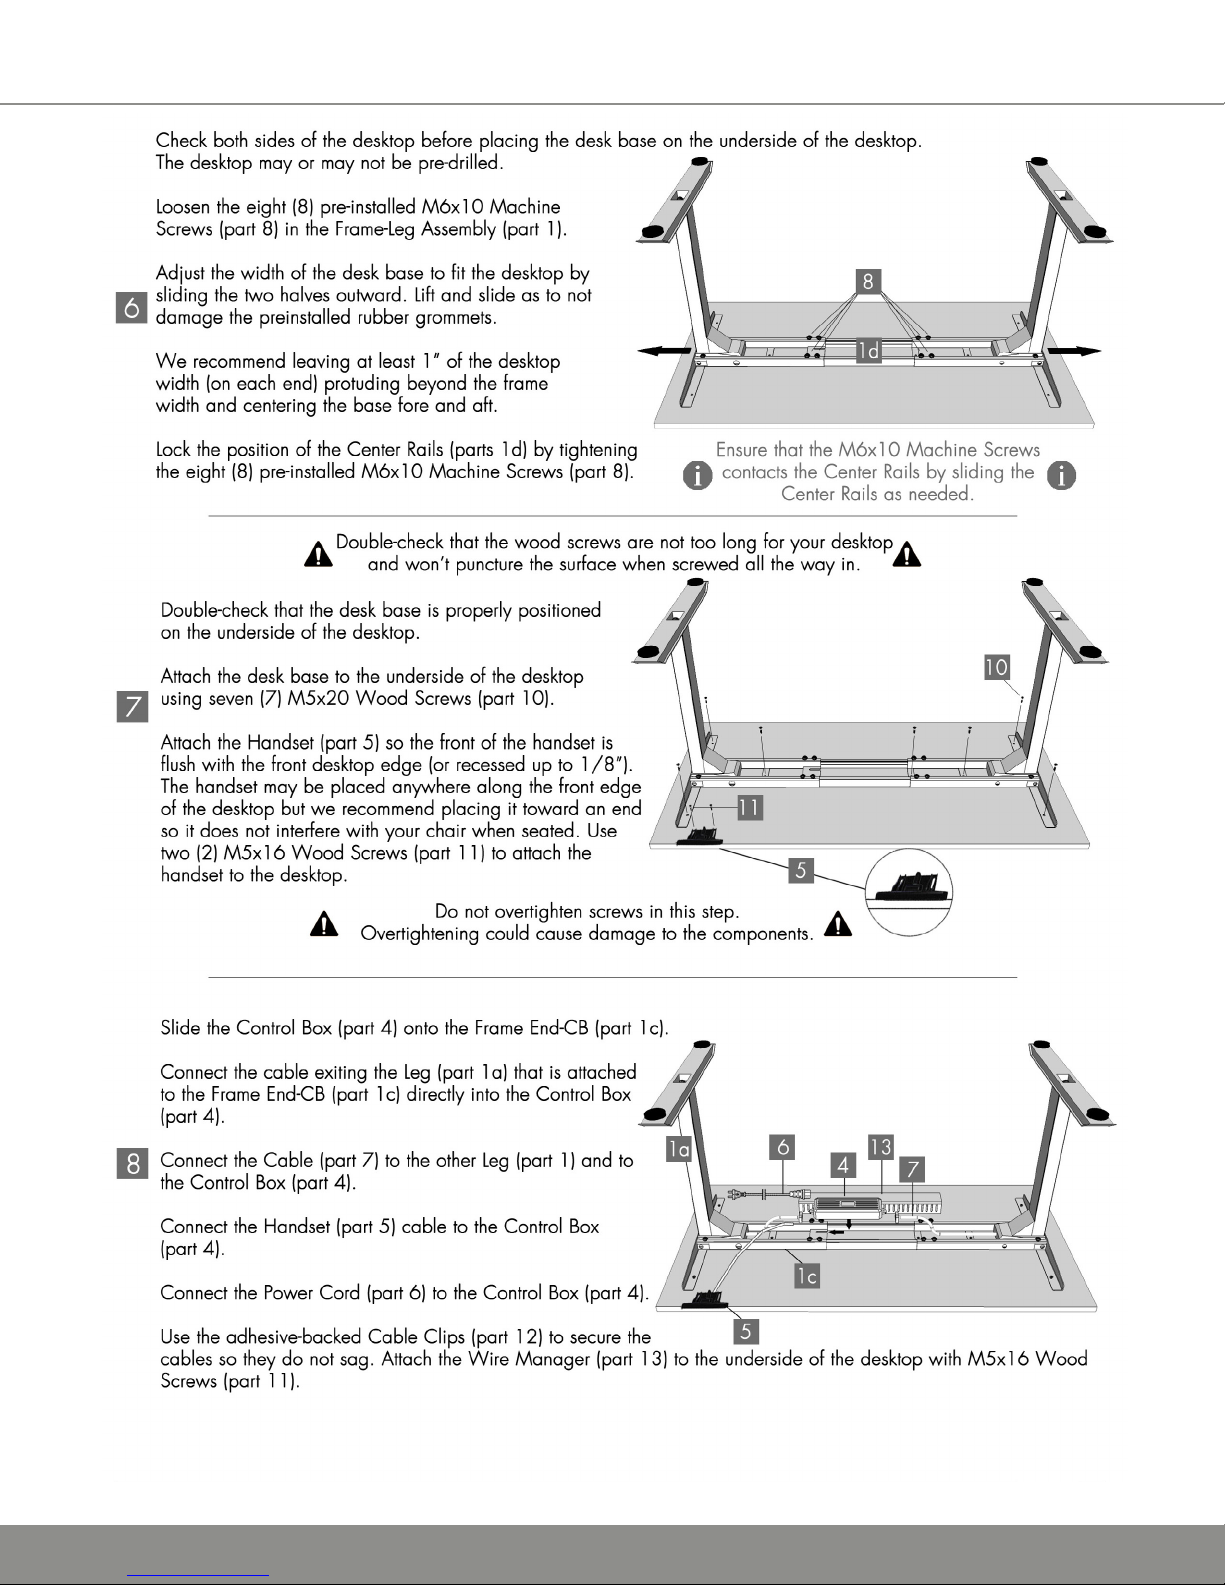
ASSEMBLY
Note: Instruction diagrams show a T-Leg style instead
of the standard C-Leg style for the Deluxe Base.
www.openplan.com | 844.OPS.OPS1 | [email protected] | REV 09.12.17
5
Page 6
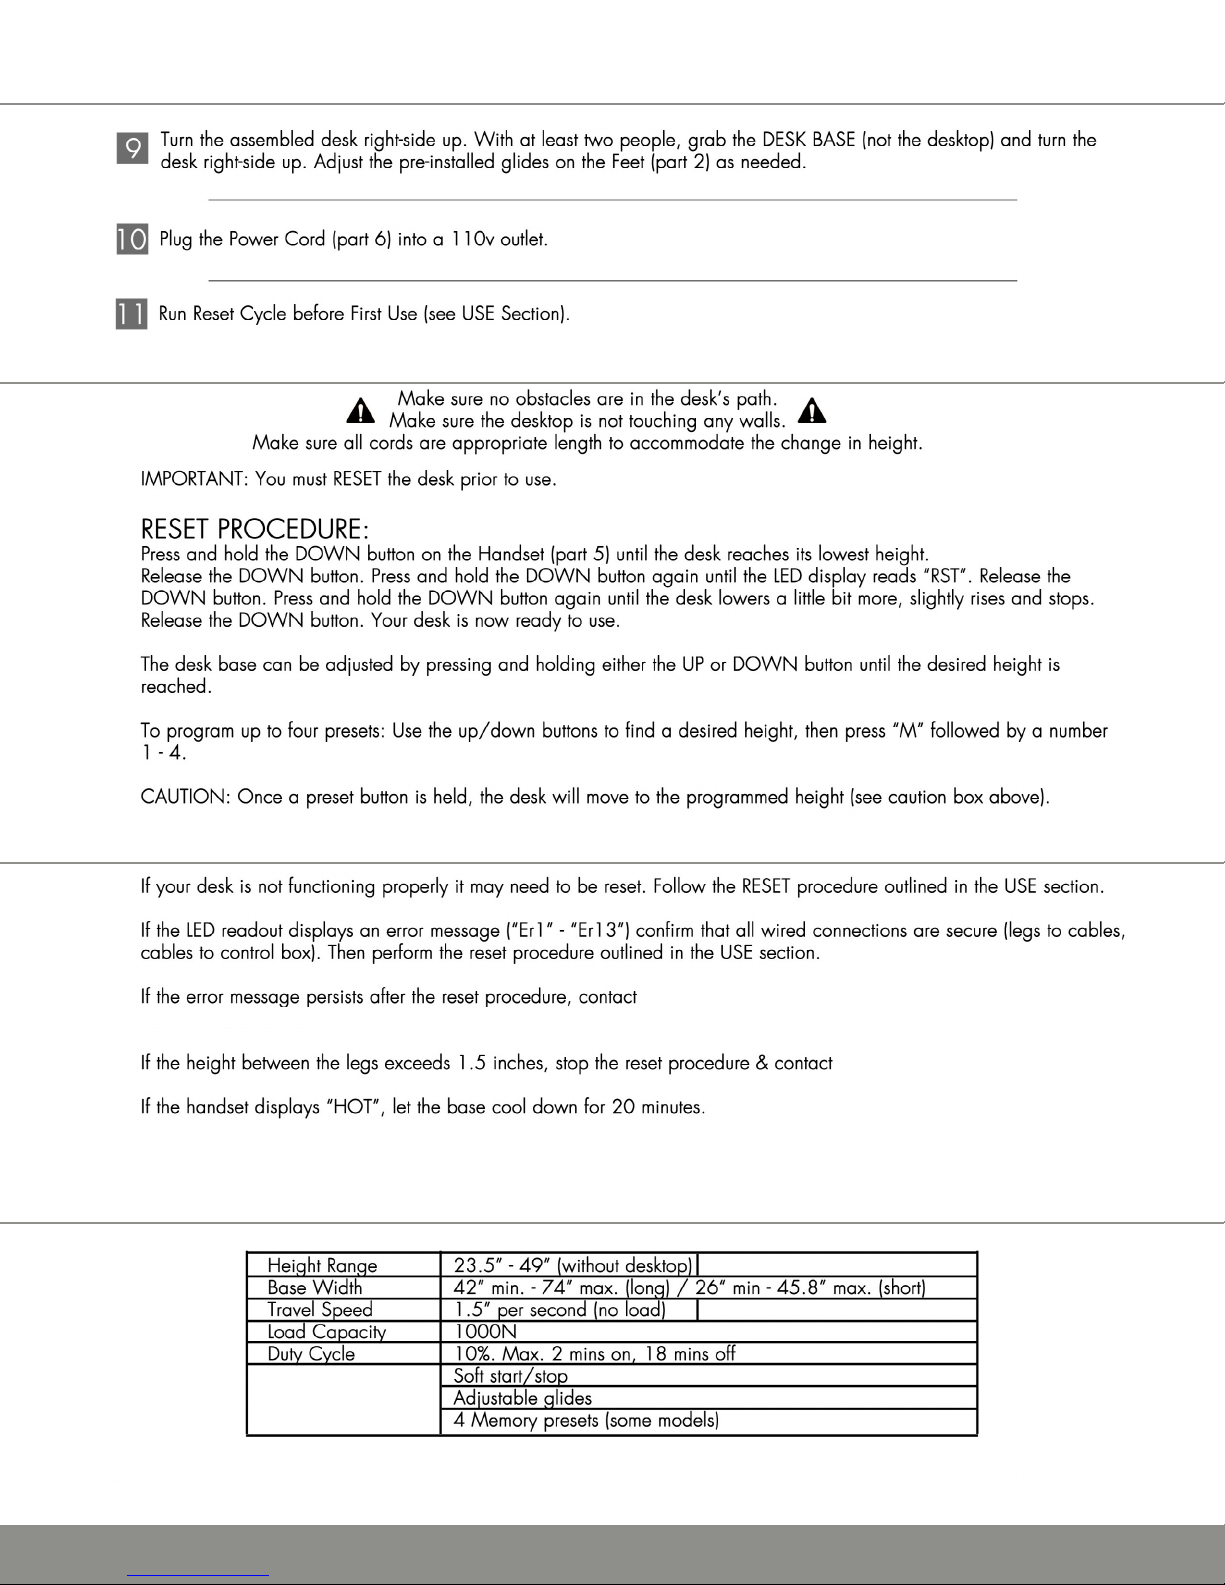
ASSEMBLY
USE
TROUBLESHOOTING
SPECIFICATIONS
Open Plan Systems at 844.OPS.OPS1 or by email
Open Plan Systems
www.openplan.com | 844.OPS.OPS1 | [email protected] | REV 09.12.17
6
Page 7

Setting the upper/lower limitS
The base is designed to go to its minimum and maximum heights, allowing for the widest possible
range. If you prefer to change the settings to a more narrow range, follow these steps:
Make sure the power is ON and a number reads in the LED display (if no number appears, please
follow the Reset procedure.)
To Set the Upper-Limit Position:
Use the UP/DOWN buttons to move the base to the desired maximum height position. Press and
hold the “M” button until the LED display flashes “S -” once and let go of the button. Then press the
UP button once and the LED display will change to “999” then auto matically return to the selected
height. The new upper limit is now set.
To Set the Lower-Limit Position:
Use the UP/DOWN buttons to move the base to the desired minimum height position. Press and
hold the “M” button until the LED display flashes “S -” once and let go of the button. Then press
the DOWN button once and the LED display will change to “000” then auto matically return to the
selected height. The new upper limit is now set.
To Remove the Upper/Lower Limit Positions:
Use the UP or DOWN button to move the desk to any new position. Press and hold the “M” button
until the LED display flashes “S -” once and let go of the button. Within 5 seconds, press the “M”
button again and hold for 2 seconds. The LED will display “555”, then automatically will return to the
height display. The upper and lower limits are now removed.
Note: After the upper and lower limits are set, the previous memory positions (1, 2, 3, 4) may be
outside the new range of movement. If so, simply reset the memory positions.
Note: A Reset procedure requires the desk base to fully retract (beyond any lower limit set). Please
ensure that you have the proper clearance below the desk base.
Note: If you attempt to revise a previously set upper or lower limit and it is outside of the existing
range, you will need to remove the previously set upper/lower limits first.
www.openplan.com | 844.OPS.OPS1 | [email protected] | REV 09.12.17
7
Page 8
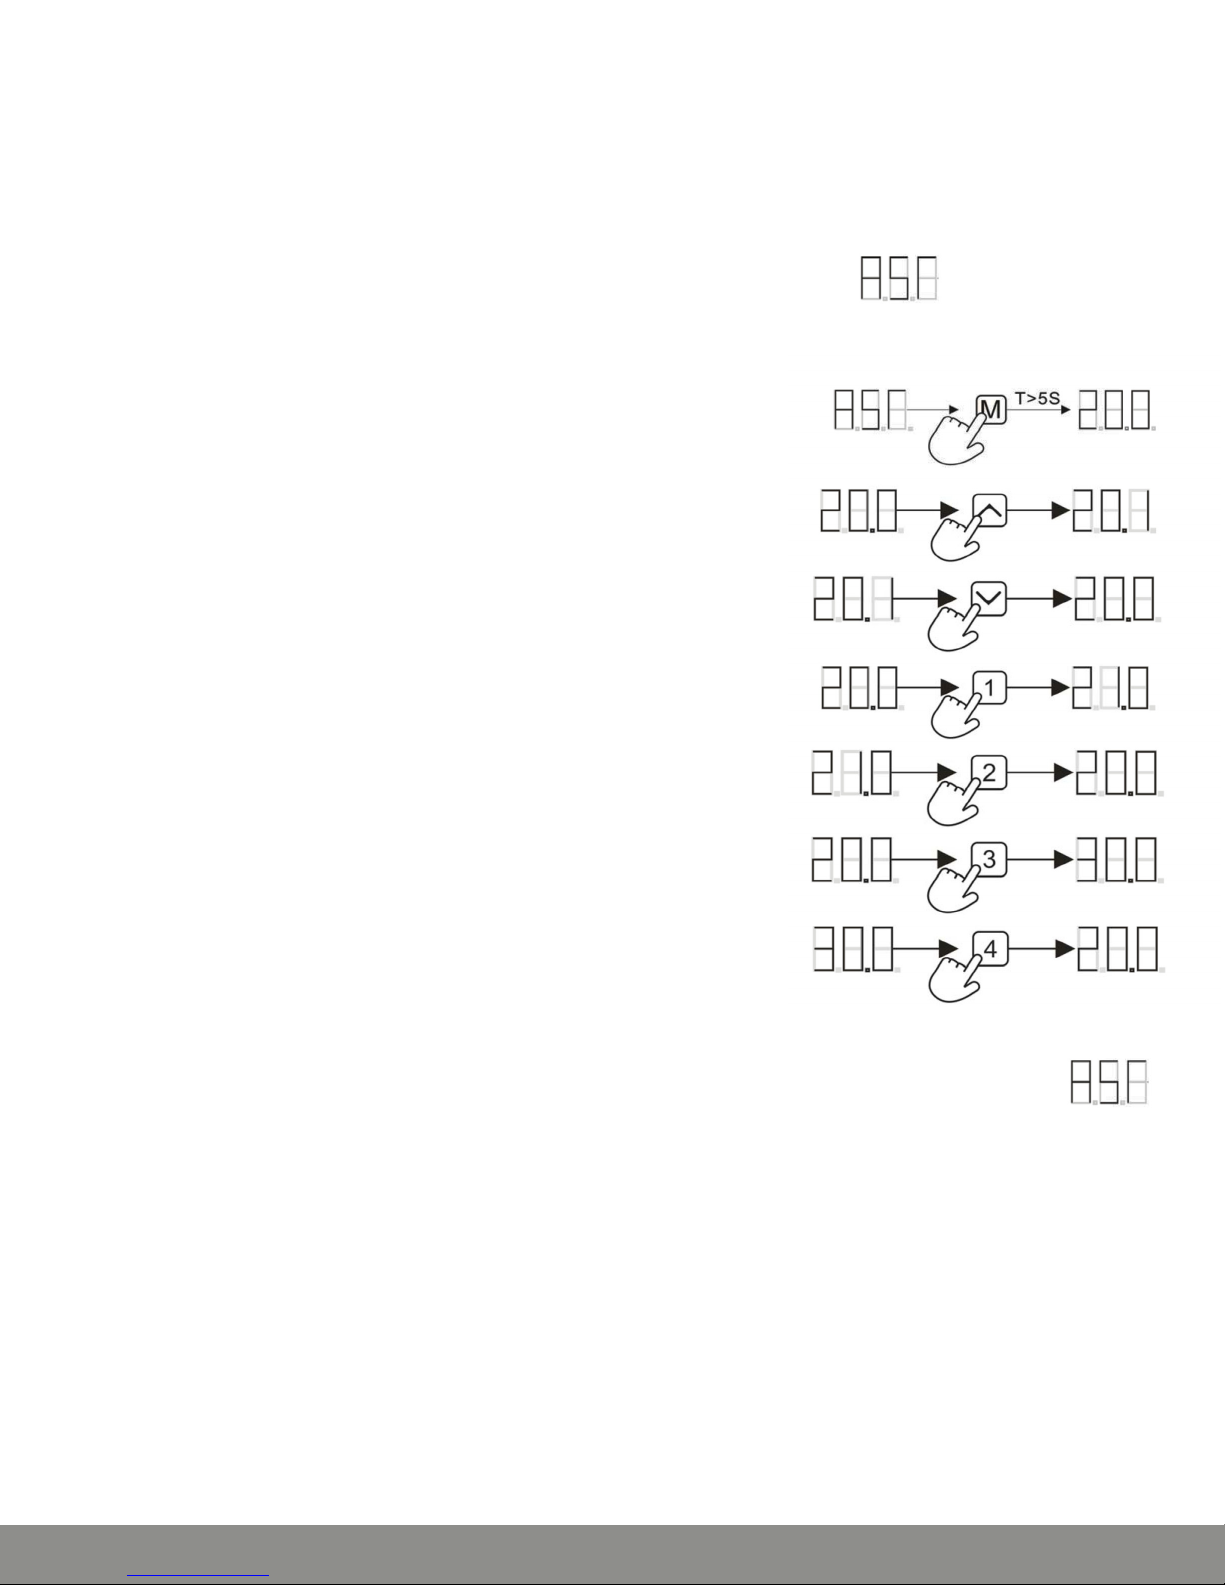
Setting the led diSplay retracted height
Press the DOWN button on the Switch until the base reaches its lowest position. Measure the
height of the base from the floor and if the number on the LED display does NOT match your
measurement, follow these steps:
Press and hold the DOWN button again until the LED display reads “RST”.
Press and hold the “M” button (about 5 seconds) until the LED
displays the Hashing starting height. (If the display returns to “RST”
before the next step is taken, repeat this step.)
To change the value of the starting height:
Increase by 0.1 s, press the UP button --------------------------------------
Decrease by 0.1, press the DOWN button --------------------------------
Increase by 1 s, press the “1” button ---------------------------------------
Decrease by 1 s, press the “2” button --------------------------------------
Increase by 10s, press the “3” button --------------------------------------
Decrease by 10s, press the “4” button -------------------------------------
Once the new value is displayed, wait about 5 seconds and the display will return to “RST”.
Finish the reset process by pressing and holding the DOWN button again until the desk lowers a little
bit more, slightly rises and stops. Release the DOWN button. The new starting height value is saved
and your desk is now ready to use.
Note: the LED display has a ±0.1 tolerance.
www.openplan.com | 844.OPS.OPS1 | [email protected] | REV 09.12.17
8
 Loading...