

Page 1
MiKo™ LXD keyboard production station (Gen5)
Open Labs MiKo LXD Production Station Manual 1
MiKo™ LXD
Operation Manual
Page 2

The information in this manual is believed to be correct at the time of publishing. However, Open
Labs reserves the rights to make changes to the specifications at any time without notice or
obligation to update existing units. The software described by this document is subject to a License
Agreement and may not be copied to other media. No part of this manual may be copied,
reproduced, or otherwise transmitted or recorded, for any purpose, without prior written
permission by Open Labs Inc.
Users Manual written by: James Edwin Rhone Jr.
Editors: Ed Ablan, Christopher Brown, Steve Miller
Super special thanks to the Open Labs Development Team for your efforts and meticulous
attention to detail. You have truly made this a great product.
© Open Labs Inc. 2008. All rights reserved
Open Labs MiKo LXD Production Station Manual 2
OPEN LABS Inc.
4020 South Industrial Drive
Suite 100
Austin TX, 78744
USA
sales@openlabs.com
www.openlabs.com
Page 3
Using the MiKo LXD safely
Before using the MiKo LXD, it is extremely important that you thoroughly read the following
instructions. This will provide you with the information needed for safe operation of your MiKo LXD.
Please continue reading the rest of this manual for specific information on the use of this unit.
Warning
To avoid permanent health damage, always adhere to these important safety advies:
• The MiKo LXD, in combination with headphones or speakers, is capable of producing sound levels
that can cause permanent hearing loss. Do not submit your ears to long periods of high
volumes. If you experience any hearing loss or ringing in the ears, you should consult an
audiologist.
• Do not open the MiKo LXD or attempt to disassemble or modify the internal parts without prior
guidance and/or instructions from an Open Labs Technician. If the Miko LXD does not seem to
function properly, contact Open Labs technical support.
Caution
To ensure that the MiKo LXD or any device connected to it is not damaged during usage or
maintenance, it is important to adhere to the following instructions.
• Do not expose the MiKo LXD to inclement weather conditions such as heavy rain, or use the unit
in damp or wet conditions. It is unwise to place open containers of liquids near the unit, these
could spill onto the unit. Do not allow any objects or liquids to penetrate the unit.
• Never use or store the MiKo LXD in conditions that are subject to extreme temperatures. This
mostly includes closed in environments where lots of heat and direct sunlight are present
(example, enclosed vehicle).
• Do not place the MiKo LXD in unsuitable locations where the chance of falling could happen.
• Before connecting the MiKo LXD to other electronic components, turn off the power for all
components. Before turning the power on or off for all components, set all volume levels to
minimum. Gradually raise the volume control while playing the Miko LXD to set the desired
listening level.
• Before moving the MiKo LXD, disconnect all cables.
• Be careful not to exert too much pressure on the knobs, faders, or touchscreen,.
• When cleaning the MiKo LXD:
▪ Use a soft, dry cloth.
▪ To clean the touchscreen, use a lint free cloth or soft paper towel, with a small amount of
light window cleaner sprayed onto the cloth or paper towel.
• Do not use paint thinners, solvents, cleaning fluids, or chemical based wiping cloths.
Open Labs MiKo LXD Production Station Manual 3
Page 4

Table of Contents
Preface..........................................................................................................10
Chapter 1 – Introduction...............................................................................11
Open Labs Production Station Components.......................................................................12
Chapter 2 - Getting Started...........................................................................14
Unpacking and Setting up your Open Labs Production Station..............................................14
Rear Panel Layout...............................................................................................14
Audio & MIDI Connections...........................................................................................14
Rear Panel I/O:..................................................................................................15
Front Panel Audio Interface..................................................................................15
Connecting the Cables................................................................................................16
Basic Connection Diagrams..................................................................................19
Turning on an Open Labs production station..................................................................21
About the BIOS..........................................................................................................21
About the Open Labs GUI............................................................................................21
Chapter 3 – First Time ..................................................................................22
The Open Labs GUI In Detail...........................................................................................22
About the MIDI Controllers..............................................................................................25
Mix Edit Panel............................................................................................................25
DJ/VJ Controller.........................................................................................................26
Bump MP .................................................................................................................26
The Track Pad................................................................................................................27
Using USB Devices.........................................................................................................27
Using the DVD/CD-RW Drive...........................................................................................27
Using the Internet..........................................................................................................28
Adding Software to your Open Labs Production Station.......................................................28
New Software Installation Considerations......................................................................29
Chapter 4 – Quickstart...................................................................................30
Steps to Playing Sounds on an Open Labs Production Station..............................................30
Chapter 5 - Playing Sounds - Riff...................................................................33
Before you Begin...........................................................................................................33
Setting up the Audio......................................................................................................34
Setting up the MIDI.......................................................................................................35
Setting up Your Plug-ins.................................................................................................36
Setting up General and Keyboard Options.........................................................................37
General....................................................................................................................37
Keyboard..................................................................................................................38
5a– Riff Architecture.....................................................................................39
A Performance Environment............................................................................................39
Set List Window ........................................................................................................39
Sound Browser (Default View)..............................................................................40
Sound Browser (Advanced View)..........................................................................41
Signal Chain..............................................................................................................43
Instrument Editor.......................................................................................................44
Live Controls.............................................................................................................45
5b– Understanding Riff..................................................................................46
Launch Riff...................................................................................................................46
Set List.........................................................................................................................46
Song........................................................................................................................47
Title Bar....................................................................................................................47
Menu Bar...........................................................................................................47
Title Bar Controls.......................................................................................................49
Open Labs MiKo LXD Production Station Manual 4
Page 5

Learn ...............................................................................................................49
Edit Mode/Live Mode ..........................................................................................49
Minimize...................................................................................................................49
Close........................................................................................................................49
Play Button...............................................................................................................49
BPM .................................................................................................................49
This is the control for the global tempo. (BPM = Beats Per Minute) Pressing The box
under “BPM” brings up the BPM input window. .......................................................49
Main - Volume Knob ..................................................................................................49
Lower Section Controls...............................................................................................50
Previous and Next Song......................................................................................50
Pick Color..........................................................................................................50
Rename.............................................................................................................50
Status Bar.................................................................................................................50
Tooltips.............................................................................................................50
Audio VU Meter..................................................................................................50
MIDI Indicator....................................................................................................50
CPU..................................................................................................................50
MEM.................................................................................................................50
Signal Chain..................................................................................................................51
Upper Bar Controls.....................................................................................................52
Input........................................................................................................................52
Input Column Controls........................................................................................52
Signal Chain..............................................................................................................53
Signal Chain Column Controls..............................................................................54
Stream Processor.......................................................................................................54
Effect Column Controls........................................................................................56
Instrument Editor..........................................................................................................57
Instrument Parameters...............................................................................................58
Exporting and Importing User Patches..........................................................................58
Live Controls.................................................................................................................59
Knob Properties/ Horizontal Slider Properties/ Vertical Slider Properties.............................60
Button Properties.......................................................................................................61
XY Pad Properties.......................................................................................................61
Text Properties..........................................................................................................61
5c– Using Riff: Tutorials................................................................................62
Using the Song Grid.......................................................................................................62
Creating a New Set and Adding an Instrument...............................................................62
About the Sound Browser....................................................................................64
Saving a Set..............................................................................................................67
Rename a Song.........................................................................................................67
Importing Racks, Signal Chains, Songs, Inputs..............................................................67
Exporting Racks, Signal Chains, Songs, Inputs...............................................................67
Using the Signal Chain...................................................................................................68
Adding an Additional Instrument to a Song....................................................................68
Creating Keyboard Splits in a Song (Signal Chain)..................................................69
Adding Effects to an Input or Signal Chain.....................................................................71
Adding MIDI FX..................................................................................................73
Creating and using Audio Inputs...........................................................................75
Edit Mode vs. Live Mode.................................................................................................76
MIDI Learning Hardware Controllers.................................................................................76
Learn Relative...........................................................................................................79
Creating and Using Live Controls.....................................................................................80
Create a New Live Control...........................................................................................81
Using Oscillators with Knobs/Sliders.............................................................................84
Open Labs MiKo LXD Production Station Manual 5
Page 6

Mapping Live Controls to the Lower Control Section........................................................85
Saving and Exporting Live Controls..............................................................................86
Using Multi-timbral Instruments / Sharing Instruments.......................................................87
Sharing Instruments...................................................................................................88
Song Grid and the Multi-timbral Instrument...................................................................89
Creating Keyboard Splits with Multi-timbral Instruments.................................................95
Advanced Multi-timbral Instruments / Signal Chain.......................................................100
MIDI Input I/O Options Window.................................................................................103
Using Different Preset Sounds with a Shared Instrument...............................................104
5d - Using Bump MP, the Mix Edit Panel with Riff and Guru........................106
Bump MP Assignments..................................................................................................106
Mix Edit Panel Assignments...........................................................................................106
Importing the Bump MP/Guru Song Template .................................................................107
GURU Quickstart: Engines, Pads, Patterns and Graphs .....................................................111
Engines ..................................................................................................................111
Pads ......................................................................................................................111
Patterns .................................................................................................................111
Slicer..........................................................................................................................112
Overview of the GURU Interface ....................................................................................113
GURU LCD...............................................................................................................113
GURU Toolbar..........................................................................................................114
Browser......................................................................................................................115
MIDI Pads...................................................................................................................116
Pattern Keys................................................................................................................117
Sequencer Master........................................................................................................117
Control Conventions and Keyboard Shortcuts...............................................................117
The UNDO button..............................................................................................117
Loading and Saving in GURU.........................................................................................118
Load/Save with Riff..................................................................................................118
Load/Save a Bundle file.............................................................................................118
Load/Save Kits.........................................................................................................118
Load/Save Pattern/Pattern Set...................................................................................118
Creating Beats with GURU: The Basics............................................................................119
Recording Patterns...................................................................................................119
Record-arming..................................................................................................119
Record mode....................................................................................................120
Commit/Undo...................................................................................................120
Patterns and Graphs: GURU’s step-sequencing system......................................................121
Patterns..................................................................................................................121
Graphs....................................................................................................................122
Graph Types ....................................................................................................123
Chapter 6 - Playing Sounds - Karsyn...........................................................124
Key Features...............................................................................................................124
Karsyn’s Control Module................................................................................................125
Output Busses.........................................................................................................125
Adding and Deleting Output Busses............................................................................126
Instrument Modules..................................................................................................126
Adding and Deleting Instrument Modules........................................................................126
Instrument Console..................................................................................................126
Docking and Floating the Instrument Console..............................................................126
Adding and Removing Effects.....................................................................................127
Working with Audio Inputs............................................................................................127
Advanced Performance Recovery....................................................................................127
Preferences.................................................................................................................127
MIDI Input Ports......................................................................................................127
Open Labs MiKo LXD Production Station Manual 6
Page 7

Remapping or Disabling MIDI Program Changes...........................................................127
Key Range and Transpose..........................................................................................128
Channel Map............................................................................................................128
Continuous Controller Map.........................................................................................129
Toggle Mode............................................................................................................129
Saving and Loading MIDI Configurations.....................................................................129
Setting a Default MIDI Configuration...........................................................................129
Insert Manager............................................................................................................130
Showing Effects Consoles..............................................................................................130
Using Effect Presets......................................................................................................130
MIDI Routing to Effects.................................................................................................130
Insert Effect Automation using MIDI Continuous Controllers..............................................130
Working with Presets....................................................................................................131
Creating Presets.......................................................................................................131
Changing Presets from the Control Module...................................................................131
Changing Presets from a QWERTY Keyboard................................................................131
Presets Tempo.........................................................................................................131
Chapter 7 – Recording - REAPER.................................................................132
Recording with an Open Labs Production Station..............................................................132
New to Recording? ......................................................................................................132
Opening REAPER for the First Time.................................................................................133
Inserting and Using a VSTi ...........................................................................................134
Setting VSTi Preferences ..........................................................................................134
VST Plug-in Settings ................................................................................................135
Setting up a Virtual Instrument......................................................................................137
Setting up Recording....................................................................................................139
Setting up Track Input..................................................................................................140
Recording in REAPER with a VSTi...................................................................................144
Master Panel Layout and Assignments for REAPER........................................................144
DJ Control Panel Layout and Assignments for REAPER...................................................145
Recording................................................................................................................146
Enable Metronome....................................................................................................147
Looping...................................................................................................................148
Mixing ....................................................................................................................151
Importing Existing Tracks..........................................................................................151
Rendering ..............................................................................................................151
Exporting Tracks......................................................................................................152
Chapter 8 – MimiK Users Guide....................................................................156
What is MimiK?............................................................................................................156
MimiK Suggested Usage................................................................................................156
What is a Preset and a Bank?........................................................................................156
SFZ Format.................................................................................................................156
How to Physically Set Up MimiK.....................................................................................157
Wiring Diagram........................................................................................................157
Setting up MimiK.........................................................................................................158
MimiK Features Guide...................................................................................................160
Options Window.......................................................................................................161
MimiK Tutorial (Quick Start)..........................................................................................164
How to Playback a Sound after using MimiK.................................................................164
Chapter 9 – System Restore, Backup...........................................................166
Chapter 10 – Hardware Maintenance...........................................................167
Please Read.................................................................................................................167
New Hardware Installation Considerations.......................................................................167
Opening your Open Labs Production Station....................................................................167
Open Labs MiKo LXD Production Station Manual 7
Page 8

Appendix A Pro Audio Primer.......................................................................168
Appendix B - Sound Presets.........................................................................178
VST Instruments / MIDI FX / VST FX Descriptions............................................................178
Appendix C - Audio Interface Control Panel.................................................182
Appenidix D - Making Adjustments .............................................................188
Adding a Second Display...............................................................................................188
Accessing the Intel® Graphics Properties Window........................................................189
Calibrating the Touchscreen...........................................................................................193
Adding a New Program to Launch from the Open Labs Shell..............................................196
Limited Warranty Information.....................................................................197
LIMITED WARRANTY COVERAGE ...................................................................................197
OBTAINING WARRANTY SERVICE ..................................................................................197
ASSIGNMENTS AND SEVERABILITY ............................................................................198
EXCLUSIONS AND LIMITATIONS ................................................................................198
Policies........................................................................................................200
Payment.....................................................................................................................200
Secure Transaction ......................................................................................................200
Shipping ....................................................................................................................200
Damaged Shipments ................................................................................................200
Warranty Returns or Exchanges ....................................................................................201
Backorders .................................................................................................................201
Used Items ................................................................................................................201
Support........................................................................................................202
Product Registration.....................................................................................................202
Contacting Tech Support...........................................................................................202
About Our Support.......................................................................................................202
Online User Forums and Support....................................................................................203
Additional Support for Third-Party Software/Hardware......................................................203
Platinum Services – Year 1..........................................................................204
Product Registration.................................................................................................204
Contacting Tech Support...........................................................................................204
1 Hour “Get to Know Your Open Labs System Training” ................................................204
7 “How To & Usage Training” Sessions (Limit 1 Hr. Each) ..............................................204
Limited 3rd Party Software Support ...........................................................................204
Plus Access to Technical Support on Saturday .............................................................205
Service Description: Open Labs Platinum Services Legal Terms..................206
Terms and Conditions...................................................................................................206
Service Overview.........................................................................................................206
1 Hour “Get to Know Your Open Labs System Training”.................................................206
“How To & Usage Training” Sessions...........................................................................206
Platinum Service How To & Usage Training Sessions .....................................................207
Limited 3rd Party Software Support............................................................................207
Plus Access to Technical Support on Saturday..............................................................207
Refunds..................................................................................................................208
Cancellation.............................................................................................................208
Legal............................................................................................................209
Why we collect personal information ..........................................................................209
What personal information ........................................................................................209
How we collect personal information ..........................................................................209
When we disclose personal information ......................................................................209
How we protect your personal information ..................................................................209
Access to your personal information ...........................................................................210
Collecting other Personal Information .........................................................................210
Open Labs' commitment to children's privacy ..............................................................210
Open Labs MiKo LXD Production Station Manual 8
Page 9

Third-Party Sites .....................................................................................................210
International Transfers .............................................................................................210
Notices........................................................................................................211
Typographical Errors ....................................................................................................211
Proprietary Notice .......................................................................................................211
WAIVER .....................................................................................................................211
POLICIES ...................................................................................................................211
LEGAL .......................................................................................................................211
SUPPORT ...................................................................................................................211
PLATINUM SERVICE .....................................................................................................211
PRODUCT REGISTRATION.............................................................................................211
Open Labs MiKo LXD Production Station Manual 9
Page 10

P r e f a c e
P r e f a c e
This Product Manual gives information about the Open Labs Miko LXD production station, as per
Generation 5 specifications.
Manual Organization
The chapters in this User Manual are arranged as follows:
• Introduction: information and overviews of an Open Labs production station.
• Getting Started: information on preparing your Open Labs production station for use.
• First time: instructions on what to expect from the software and hardware environment of your
Open Labs production station.
• Playing Sounds: instructions on how to use Riff and Karsyn to play sounds with your Open Labs
production station.
• Recording: instructions on how to use the DAW REAPER with your Open Labs Production Station.
• MIDI Mapping: information about mFusion, and using mFusion to create MIDI controller
assignments.
• MimiK Manual: instructions on how to mimik keyboards and MIDI sound modules.
• Hardware Maintenance: information regarding the need to make hardware changes.
• Appendix: information about preinstalled software, audio hardware. As well as an appendix for
learning the basics of professional audio.
Useful Suggestions
This manual has a fair amount of information, however, from time to time you may not find what
you need to know in this manual. Every application that comes with an Open Labs production
station has a manual. These are usually in either a .PDF format or HELP file format, and can be
located in their “c:\Program Files\Product Name” folder.
Also, Google or Wikipedia are both great resources for finding more detailed information on the
application you require assistance with.
Open Labs MiKo LXD Production Station Manual 10
Page 11

1
C h a p t e r 1 – I n t r o d u c t i o n
C h a p t e r 1 – I n t r o d u c t i o n
Welcome to the Open Labs MiKo LXD. Please read this manual thoroughly in order to familiarize
yourself with the unit. Please keep this manual in a safe place for further reference.
Open Labs creates the ultimate performance and studio instruments. Based on the OpenSynth™
platform, Open Labs production stations free you from frustrating limitations imposed by closed,
proprietary systems, while still maintaining the virtues of an all in one keyboard instrument.
Open Sounds: Open Labs production stations can emulate almost any instrument ever invented
by hosting industry standard VSTi software synthesizers, samplers, and audio processing plug-ins.
Open System: Open Labs production stations utilize industry standard motherboards and
processors that allow you to run standard operating systems (such as Microsoft Windows), and use
standard PC-compatible hardware.
All in One: Open Labs production stations all in one design eliminates the clutter and confusion of
traditional desktop computer systems, so you can focus on your music.
User Friendly: Open Labs production stations enable you to change settings and access programs
through an easy-to-use interface that shields you from the complexities of the operating system.
Power to Rock: Open Labs production stations can accommodate the fastest processors
available, more RAM, and more storage than any other music workstation.
Low Latency: Open Labs production stations give you near-zero latency even under high
processor loads.
Versatility: Open Labs production stations are so versatile, that they can run virtually any plug-in
or application designed for the Windows XP operating system, including products from Steinberg,
Native Instruments, IK Multimedia and many others!
Bring It!: Equipped with PCI/PCI-E slots that can accept up to full size cards, Open Labs
production stations can accommodate your favorite Creamware. TC, and, Universal Audio cards,
providing unsurpassed power. Open Labs production stations also features PCI-Express (PCIEX1)
slots, offering even greater expansion potential.
Modern Art: With a sleek, modern design incorporating an aluminum chassis, Open Labs
production stations are as beautiful as they are powerful.
Surfboard: An ethernet port allows you to directly access the Internet, and to quickly and easily
download upgrades, sounds, and applications.
The versatility to grow and adapt to every musician’s needs is why Open Labs production stations
are unique. Extreme care should be taken when installing new hardware and software. Installing
the wrong components could cause great instability to your Open Labs production station. Please
contact support@openlabs.com before hardware changes.
Open Labs MiKo LXD Production Station Manual 11
Page 12

Open Labs Production Station Components
DVD/CDRW Drive
Open Labs production stations come standard with a DVD/CD-writer, so that you may use it as a
backup device, or to create audio CDs of your music. The DVD/CDRW drive can also be used to
play CDs, DVDs, or install software.
Hard Drive
The hard drive is the main physical storage device for all your data and applications. Because hard
drives are delicate devices, always treat them with care.
Power Button/Reset Button
The power switch and reset button are located in the recessed area on the right side of the
keyboard.
Audio Interface
Open Labs production stations include a mutichannel audio interface. Please refer to Chapter 2 for
information about the specific audio input/output features of your Open Labs production station.
USB Ports (2)
Two rear USB ports allow connections to USB devices.
Internal USB Port
All Open Labs production stations have at least one unused USB port located inside the chassis.
This is ideal for USB software protection devices.
External Monitor Port
The monitor port allows you to connect any monitor with a standard VGA connector to your Open
Labs production station.
Ethernet 10/1000
The Ethernet port will accept a single high-speed cable connection. This will allow you to share
files, print, and access the Internet.
DIMM Expansion Slots
If your Open Labs production station is currently fitted with less than 4GB of RAM, you can install
additional memory. Open Labs production stations support 240-pin, DDR2 DIMMs. Call technical
support for details about expanding an Open Labs production station’s memory capacity.
PCI/PCI-E Expansion Slots
PCI and PCI-Express slots are for adding additional hardware boards such as I/O cards, DSP cards,
or additional graphics boards. Add-in boards should all be Microsoft Windows XP compatible. If you
are unsure, please call Open Labs technical support.
Performance Controllers
An Open Labs production station’s top panel contains a variety of faders, knobs, buttons, DJ A/B
fader and drum pads. All of these may be mapped to control the functions of various applications,
instruments, sequencing software, etc.
Touchscreen Monitor
Open Labs production stations comes with a touchscreen monitor. The touchscreen can be
accessed using your fingertips, or a plastic stylus. The touchscreen provides an alternative method
of inputting commands. It can be used by itself as the sole source of command input, or it can be
used in conjunction with the built-in keyboard and track pad, or a standard keyboard and mouse.
Open Labs MiKo LXD Production Station Manual 12
Page 13

About the Touchscreen Monitor
Here are a few techniques that will help you get the most out of the touchscreen:
• Rather than using the flat portion of your finger, use your fingernail. By using your nail, you
make contact with a smaller portion of your finger and get greater accuracy.
• To have a “right-click” effect with your finger, tap and hold down on the screen with your
finger. In a moment, the right-click options will pop up for you.
• For fine details, use the supplied touchpad. Either use a finger on the touchpad with a
thumb on the left button for clicking, or use two hands.
Open Labs MiKo LXD Production Station Manual 13
Page 14
2
C h a p t e r 2 - G e t t i n g S t a r t e d
C h a p t e r 2 - G e t t i n g S t a r t e d
Unpacking and Setting up your Open Labs Production Station
The first time you open the box, you should ensure that all the parts are enclosed. Because each
Open Labs production station may be customized with different options, you should validate its
contents with your order. Ensure that all components are included and that none of them were
damaged during shipping.
Select a flat tabletop near a stable power source, preferably one that is surge-protected, or an
uninterrupted power supply (UPS) to unpack your Open Labs production station. Network
availability is also a plus, especially if you plan to transfer work through a local area network
(LAN).
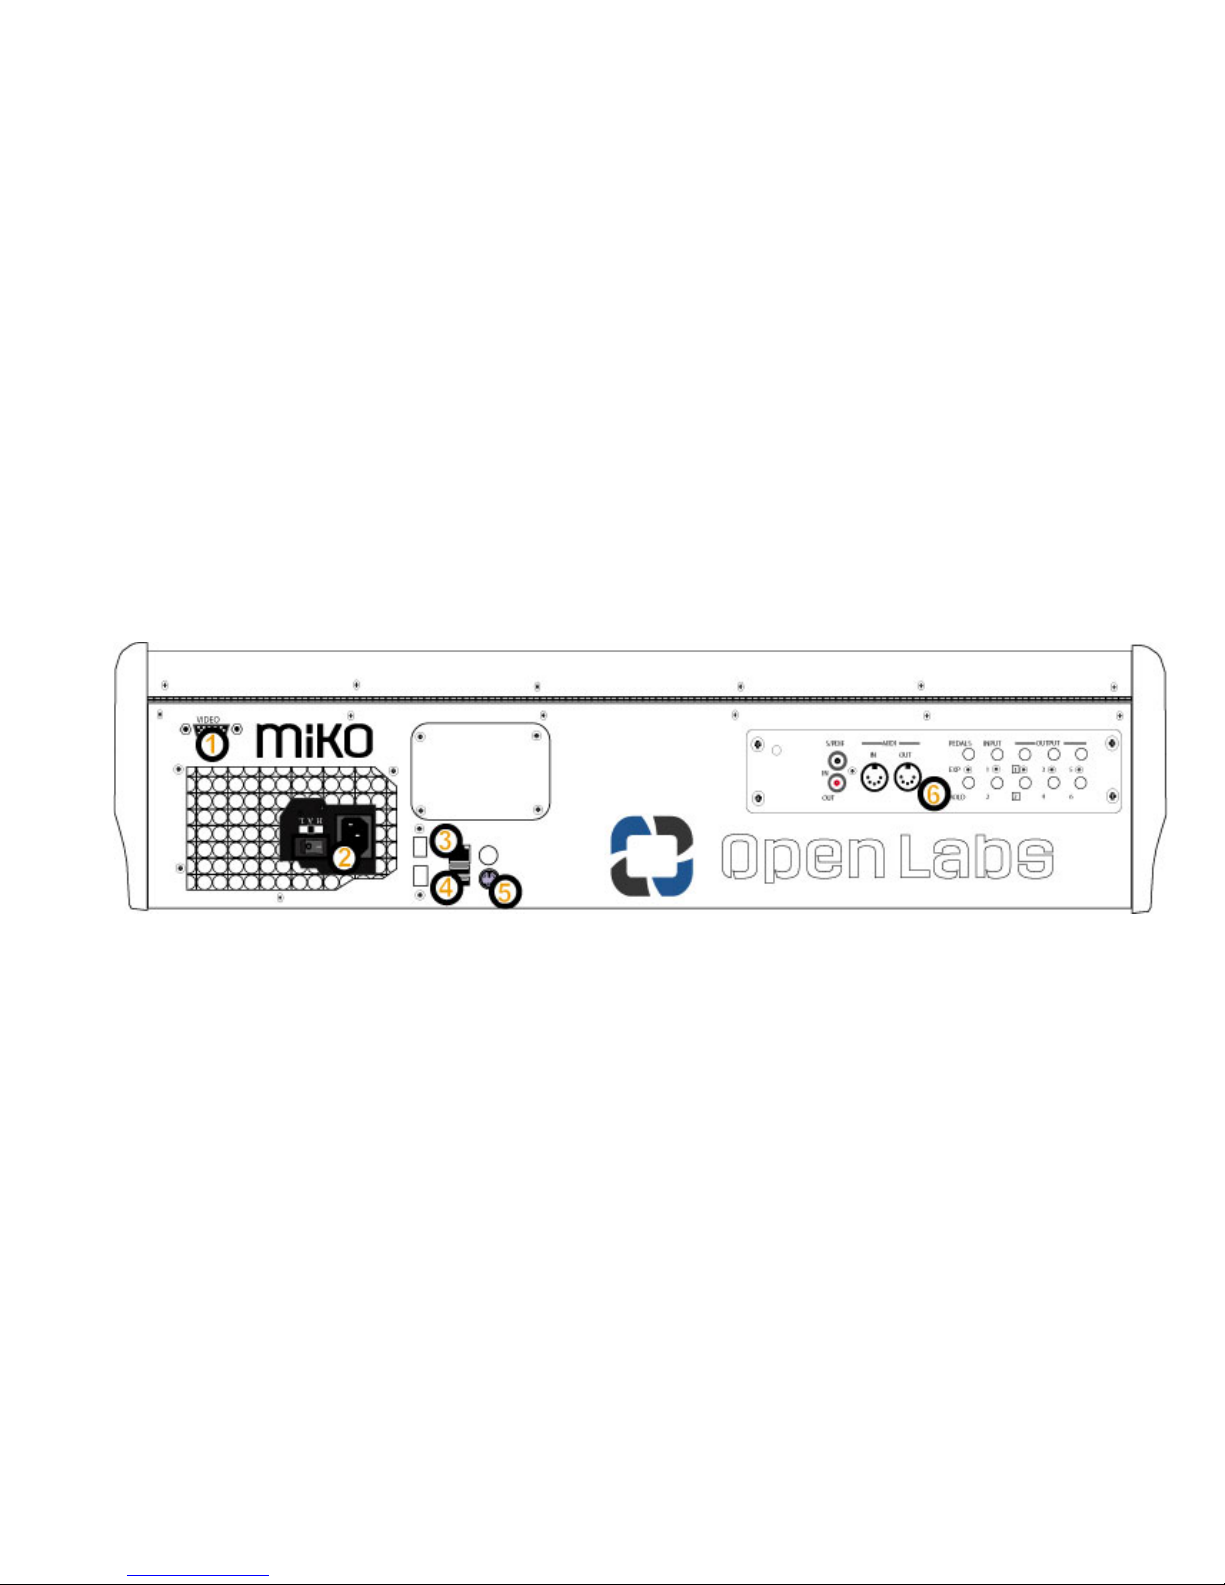
Rear Panel Layout
On an Open Labs production station’s back panel you will find:
1. VGA monitor out port
2. Auto voltage switching power supply
3. Firewire 400 port
4. Ethernet (10/100/1000)
5. Two USB ports
6. PS/2 keyboard connector
7. Audio/MIDI I/O panel
Audio & MIDI Connections
Open Labs production station’s back panel provides six analog outputs, two analog inputs, stereo
S/PDIF digital I/O, and MIDI I/O. An additional coaxial digital output is located to the left of the
stereo S/PDIF I/O connectors. This output can be used to send stereo or multi-channel (up to 7.1)
audio to an external decoder, typically the digital audio inputs of a home theater system.
Open Labs MiKo LXD Production Station Manual 14
Page 15
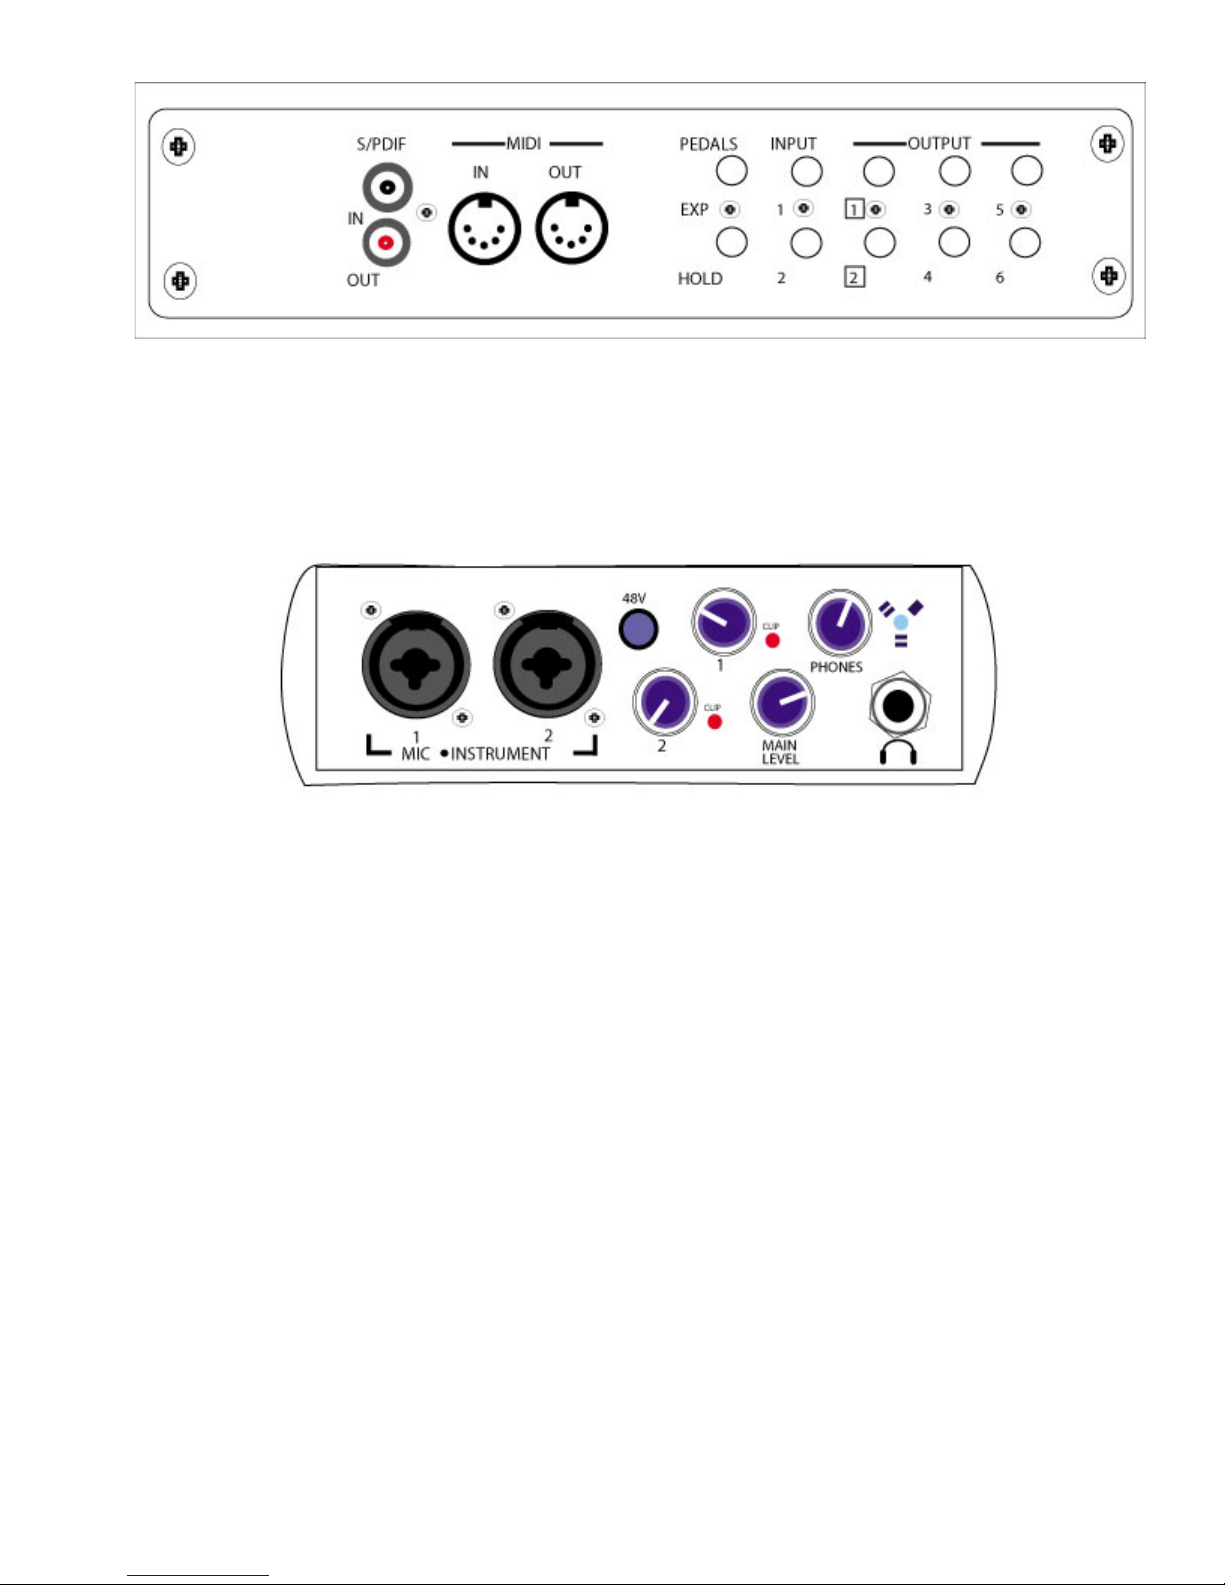
Rear Panel I/O:
See the end of this chapter for examples of connections to the various inputs and outputs.
Front Panel Audio Interface
There is also an audio interface located on the front of Open Labs production station, providing two
more audio inputs and an output for headphones.
The two inputs on this panel serve as preamps for either microphones or instruments (as opposed
to the rear panel inputs, which are appropriate for line-level signals). Phantom power may be
turned on for use with condensor mics.
Both of the inputs utilize the Neutrik Combo connector, which lets you use either 1/4” phone or
XLR connectors.
The 1/4” connectors are for use with an instrument (guitar, bass, etc.). When an instrument is
plugged into the instrument input, the microphone preamplifier is bypassed and the interface
becomes an active instrument preamplifier.
Note: Active instruments are those that have an internal preamp or a line level output. Active
instruments should be plugged into a line input (located on the back) rather than into an
instrument input. In other words, don’t plug an active instrument into the combo jacks on
channels 1 or 2.
48-volt Phantom Power
Pressing this button will send phantom power to the mic inputs. When on, the button will light up.
Input Gain Control
Each channel has an input gain control knob and associated clip light. The following gain structure
is provided for each channel:
Microphone Input XLR: 45dB of variable gain (+14dB to +55dB)
Instrument HiZ Input TS 1/4”: 45dB variable gain (+8dB to +50dB)
Open Labs MiKo LXD Production Station Manual 15
Page 16
Clip Indicator: The clip indicator will light up if your input signal from the XLR (Mic) or ¼” (line)
reaches +18dBu (0dBfs). At this level, your mic preamp/line trim signal may not exhibit signs of
clipping such as distortion. However, this level will cause the A/D (analog to digital) converters to
clip. Therefore, it is highly recommended that you do not allow your converters to clip (the clip
indicators to light up) as the sound quality will not be desirable.
Main Level: This knob allows control over the output level. It has a range of -80db to +10dB.
Headphone ¼” Jack: This is where you connect your headphones.
Phones Knob: The phones knob controls the amount of volume going to the headphone output on
the front of the unit. Notice the volume indicator goes to 11 (loud). Use this setting with caution.
Red-Blue Power/Sync Light: This light is a clock (sync) indicator. It lets you know if your unit is
receiving wordclock correctly. Wordclock is the manner by which digital devices sync frame rates.
Proper wordclock sync prevents digital devices from having pops, clicks, or distortion in the audio
signal (due to mismatched digital audio transmission).
• Blue – solid sync
• Red – sync not present.
• Flashing Red and Blue – external sync not present
Please note:
1. Open Labs production stations have cooling vents on the back panel and on the underneath
the chassis. Make sure that none of these vents are obstructed.
2. There should be ample room on the left side of your Open Labs production stations to allow
for the DVD/CD-ROM tray to eject without obstruction.
Connecting the Cables
Open Labs production stations contain all the common interfaces you would find on a computer
workstation. On the back panel you will find two USB ports, one VGA-monitor port, Ethernet port
(10/1000), Firewire 400, PS/2 keyboard, the audio I/O connectors, MIDI I/O and pedal inputs.
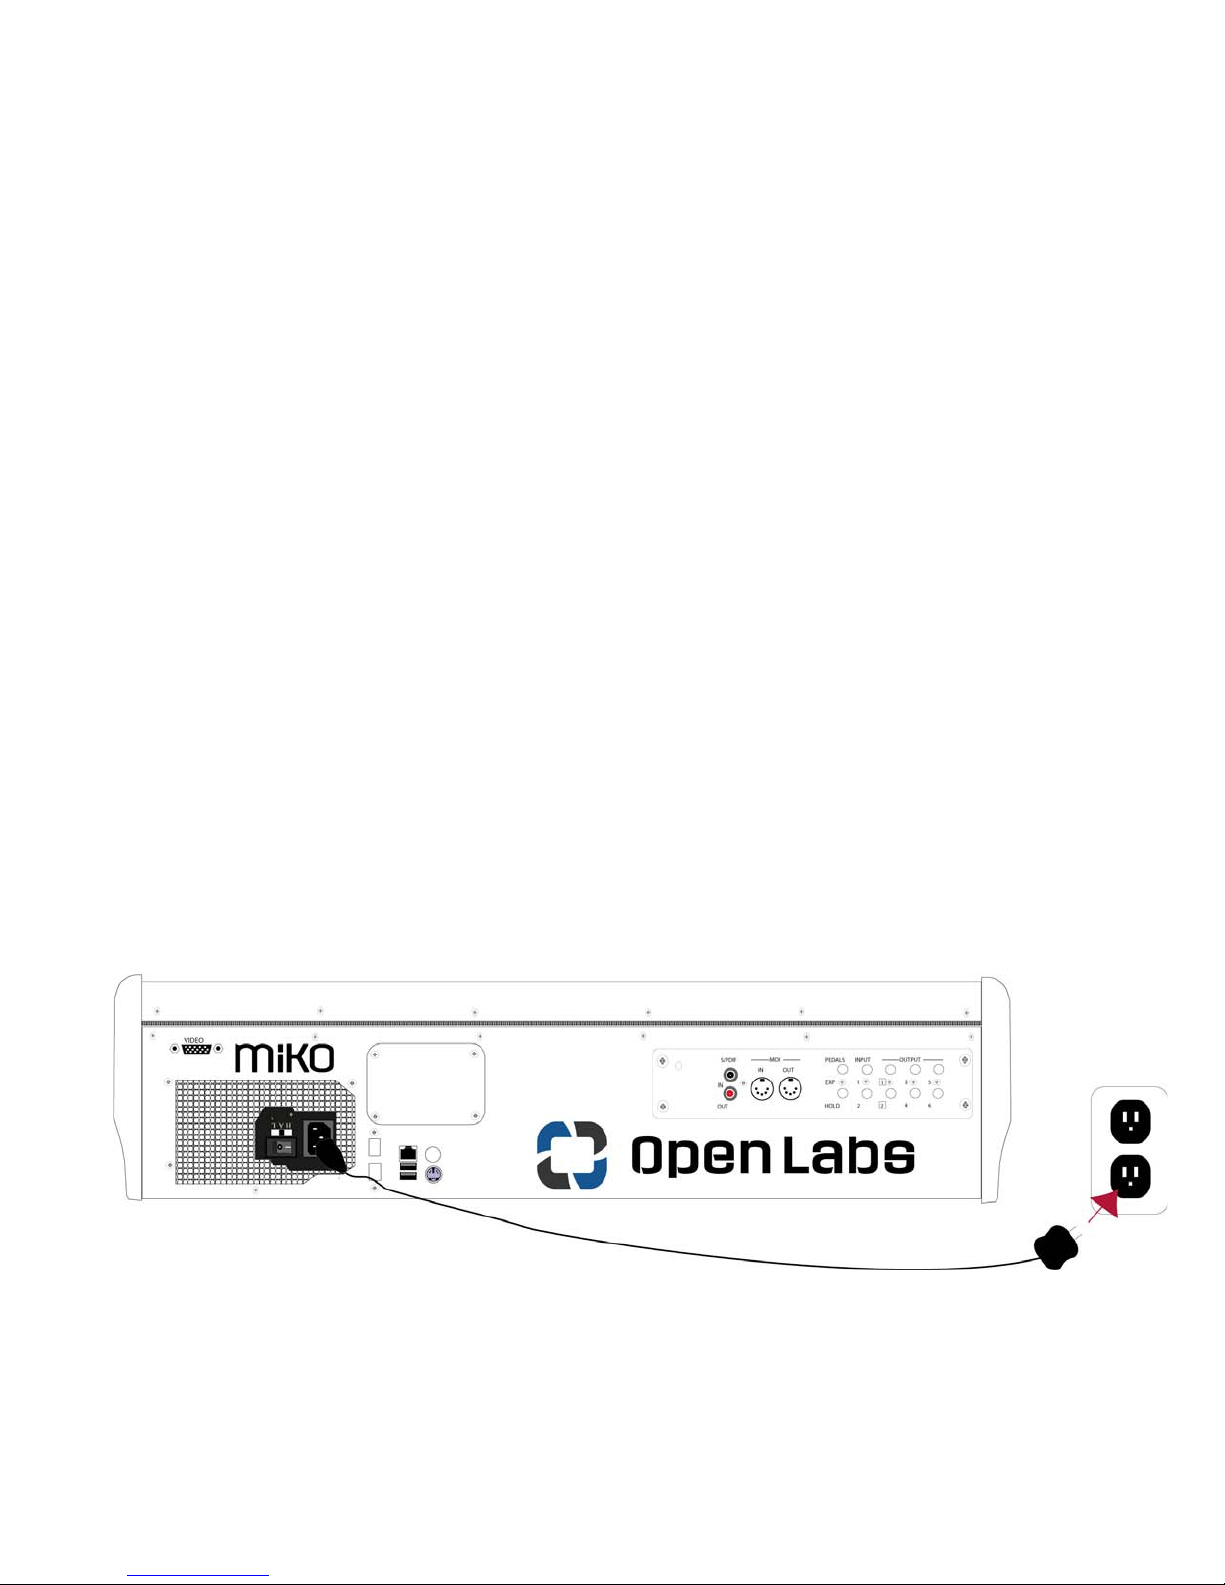
Before powering the Open Labs production station:
Connect the system to an uninterrupted power supply. The MiKo LXD has an auto voltage
switching powersupply.
Open Labs MiKo LXD Production Station Manual 16
Page 17
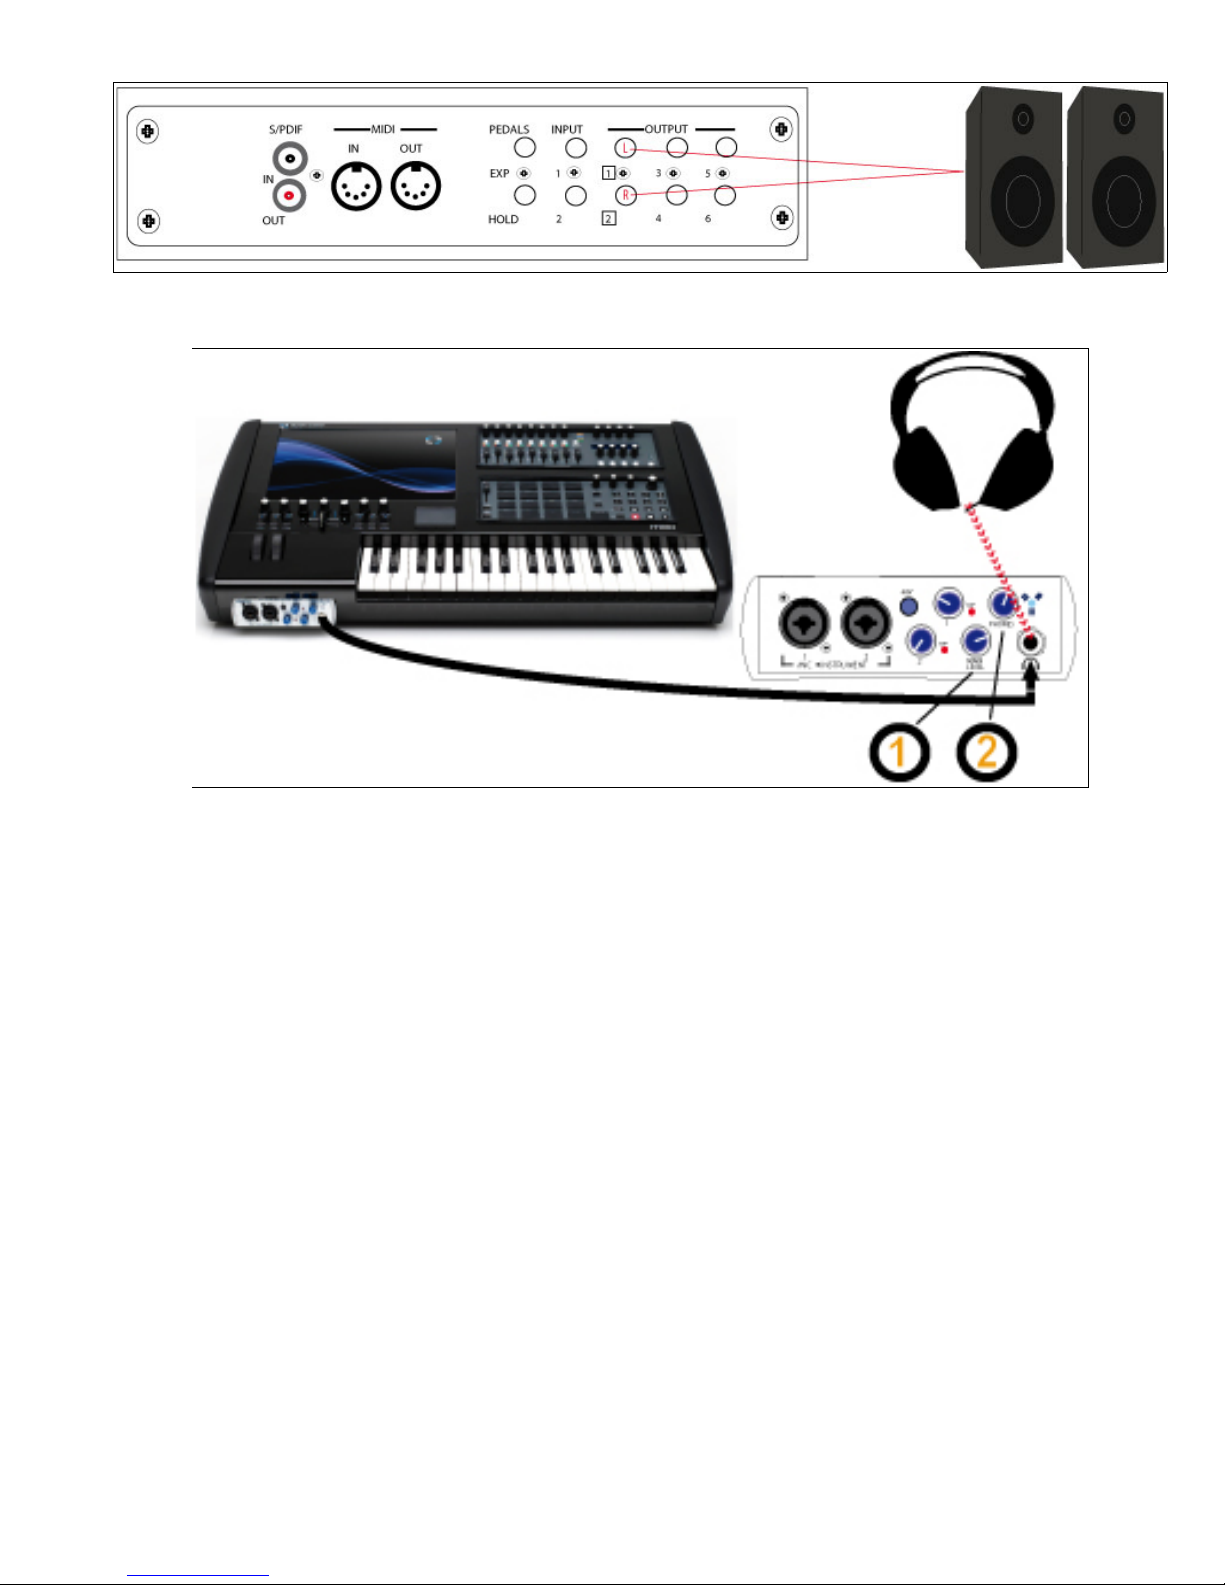
Connect your Open Labs production station’s audio outputs to your monitoring system.
-or-
1. Main Volume Control
2. Headphone volume
Open Labs MiKo LXD Production Station Manual 17
Page 18
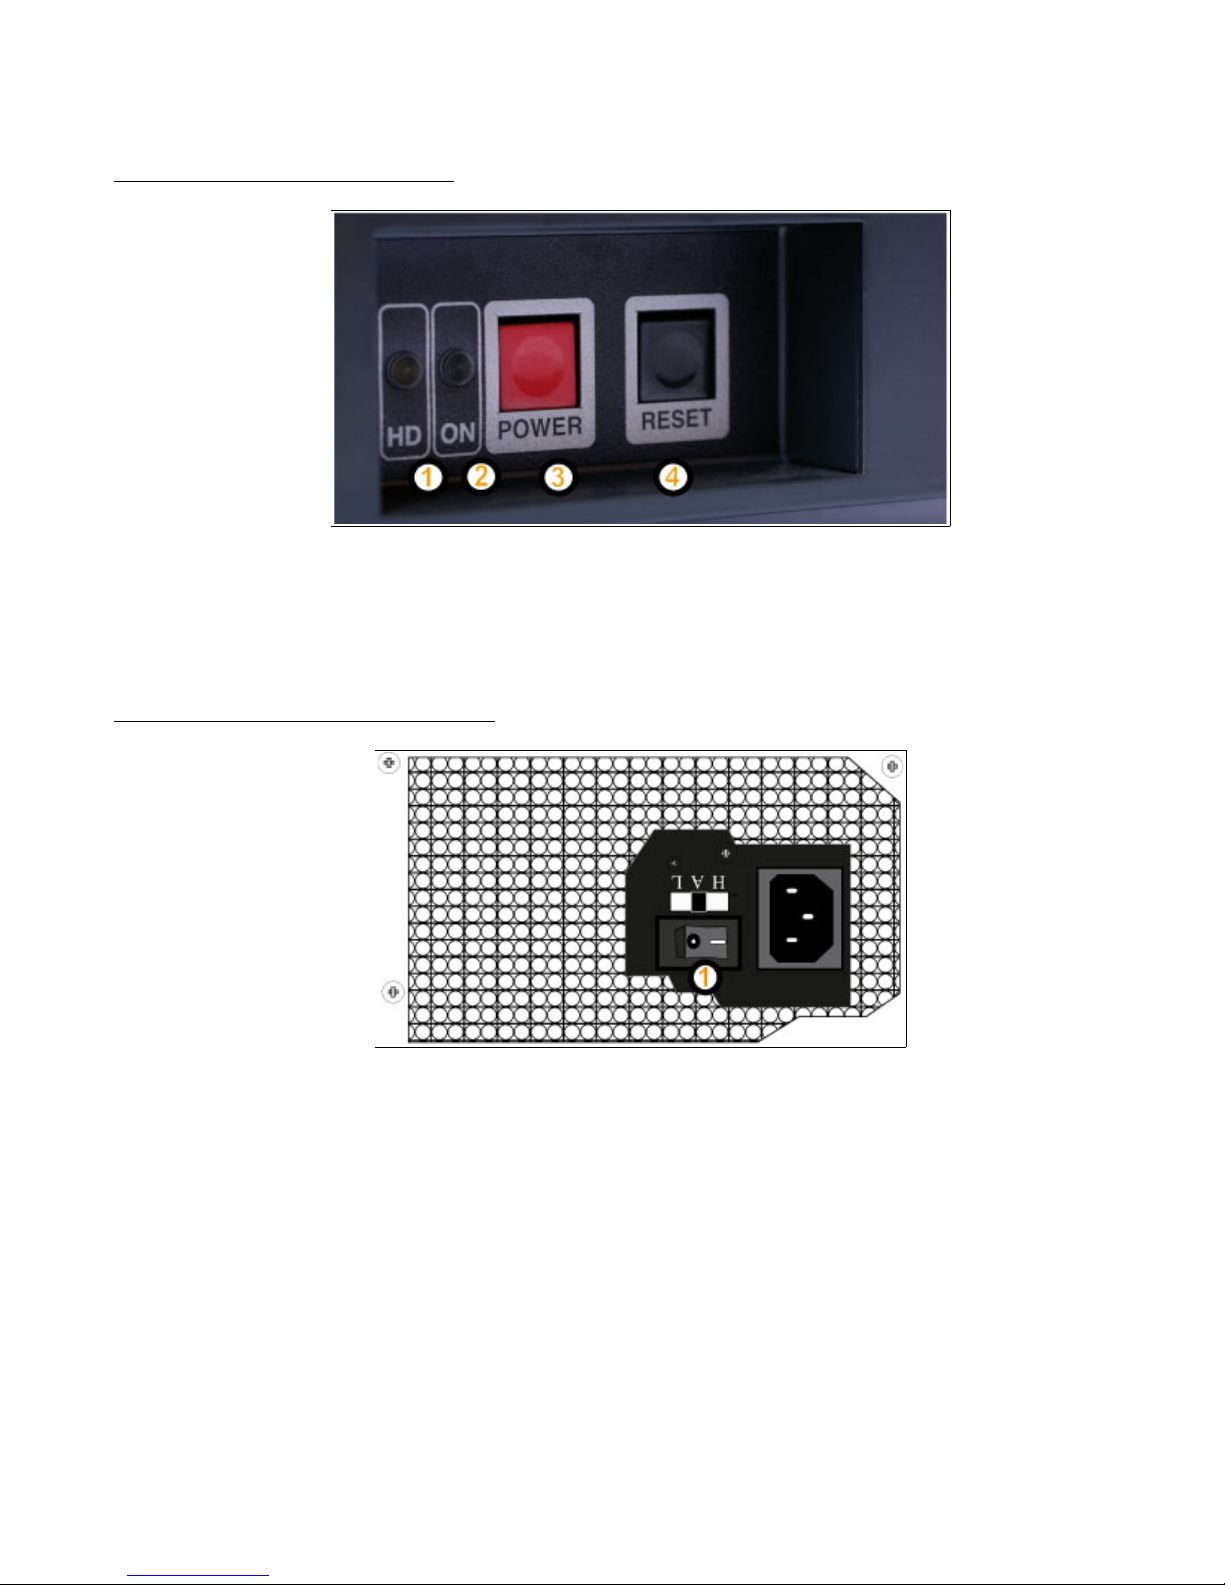
There are two power switches on the MiKo LXD. One is located on the power supply in the rear,
and the other power switch is located on the right side end bell within the recessed area. The
MiKo LXD has an auto switching powersupply.
The main power button diagram
1. Hard Drive Activity Light
2. System Power Indicator - Shows a green light when the unit is powered on.
3. Main Power Button - Use this button to start the Miko. Holding this button down will force the
system to shut down.
4. Power Reset Button - Pressing this will perform a hard reset of the system.
Power supply power button diagram
1. This is the switch that turns on the power supply, it is necessary to have this in the "ON" position
before the machine will power up. The button itself has two symbols upon it, a circle and a
straight line, the circle is "OFF", the line represents "ON".
Connect to your Open Labs production station any external items you plan to use, such as USB
devices, an external video monitor, additional MIDI-equipped devices, sustain pedal, etc.
Open Labs MiKo LXD Production Station Manual 18
Page 19
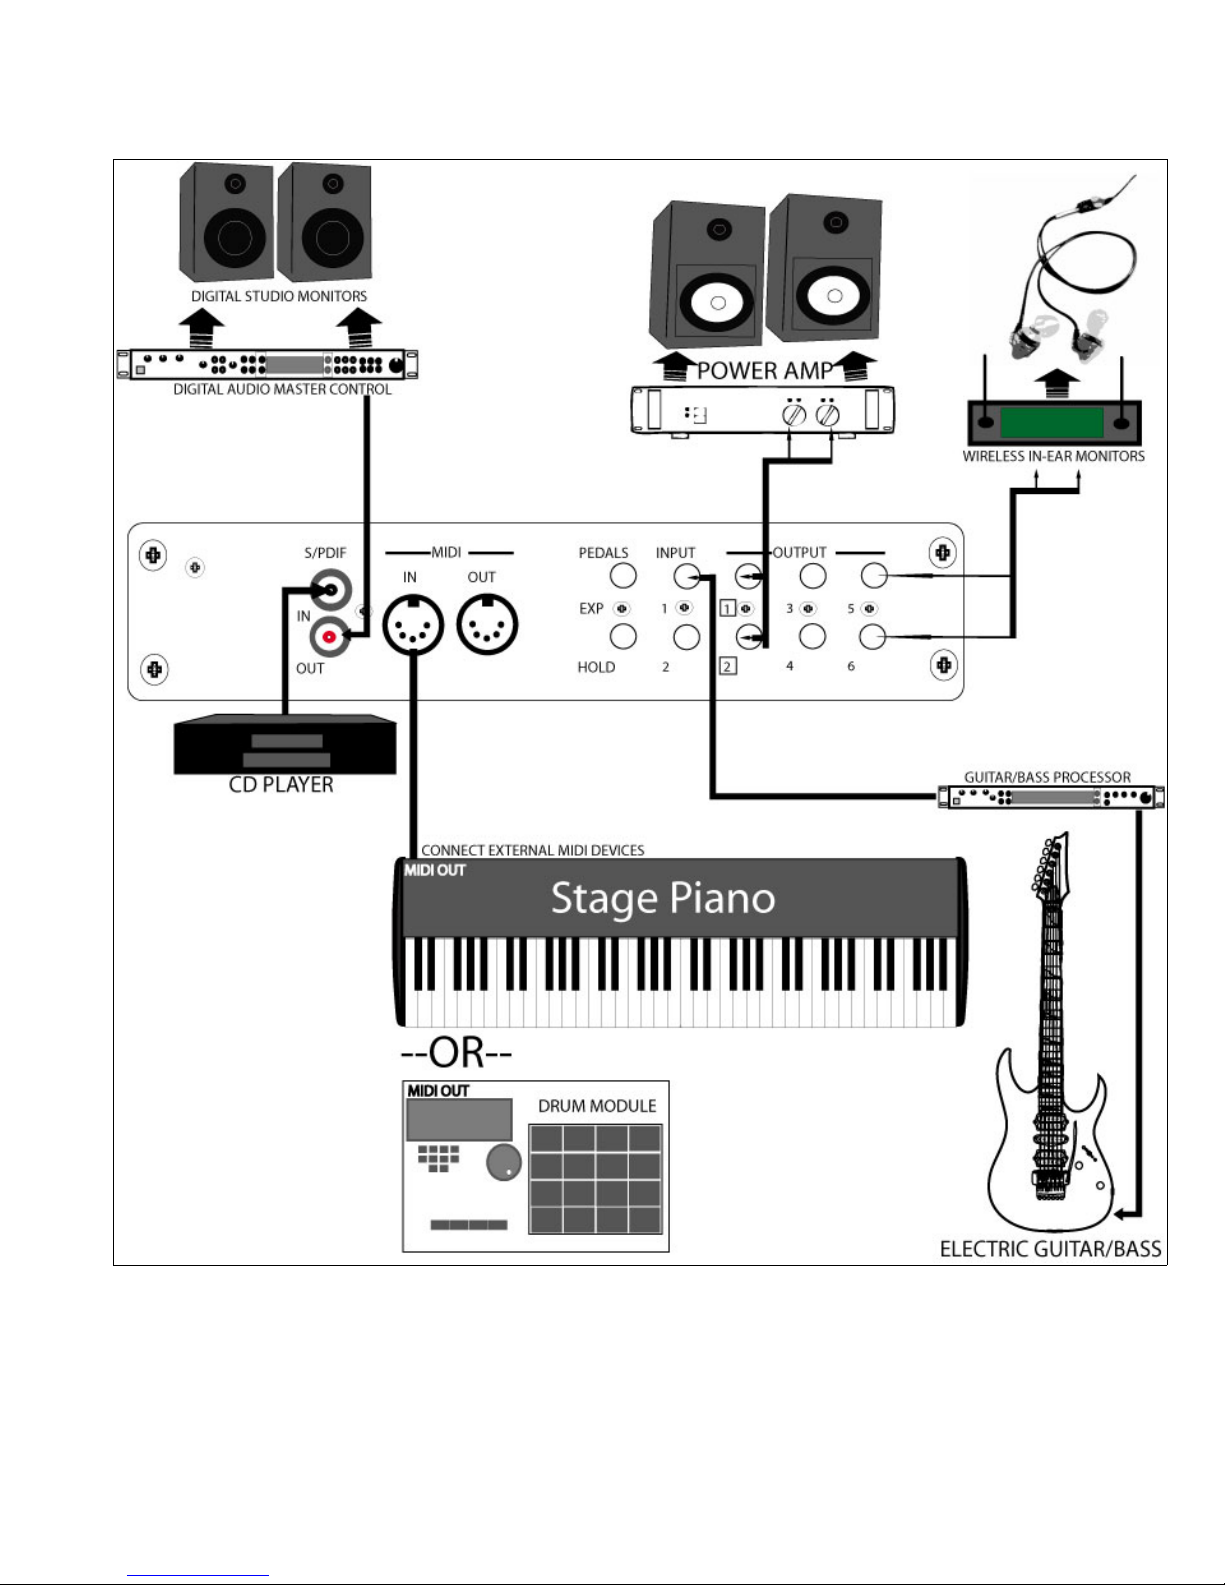
Basic Connection Diagrams
The following picture shows examples of the rear audio and MIDI connections.
Open Labs MiKo LXD Production Station Manual 19
Page 20
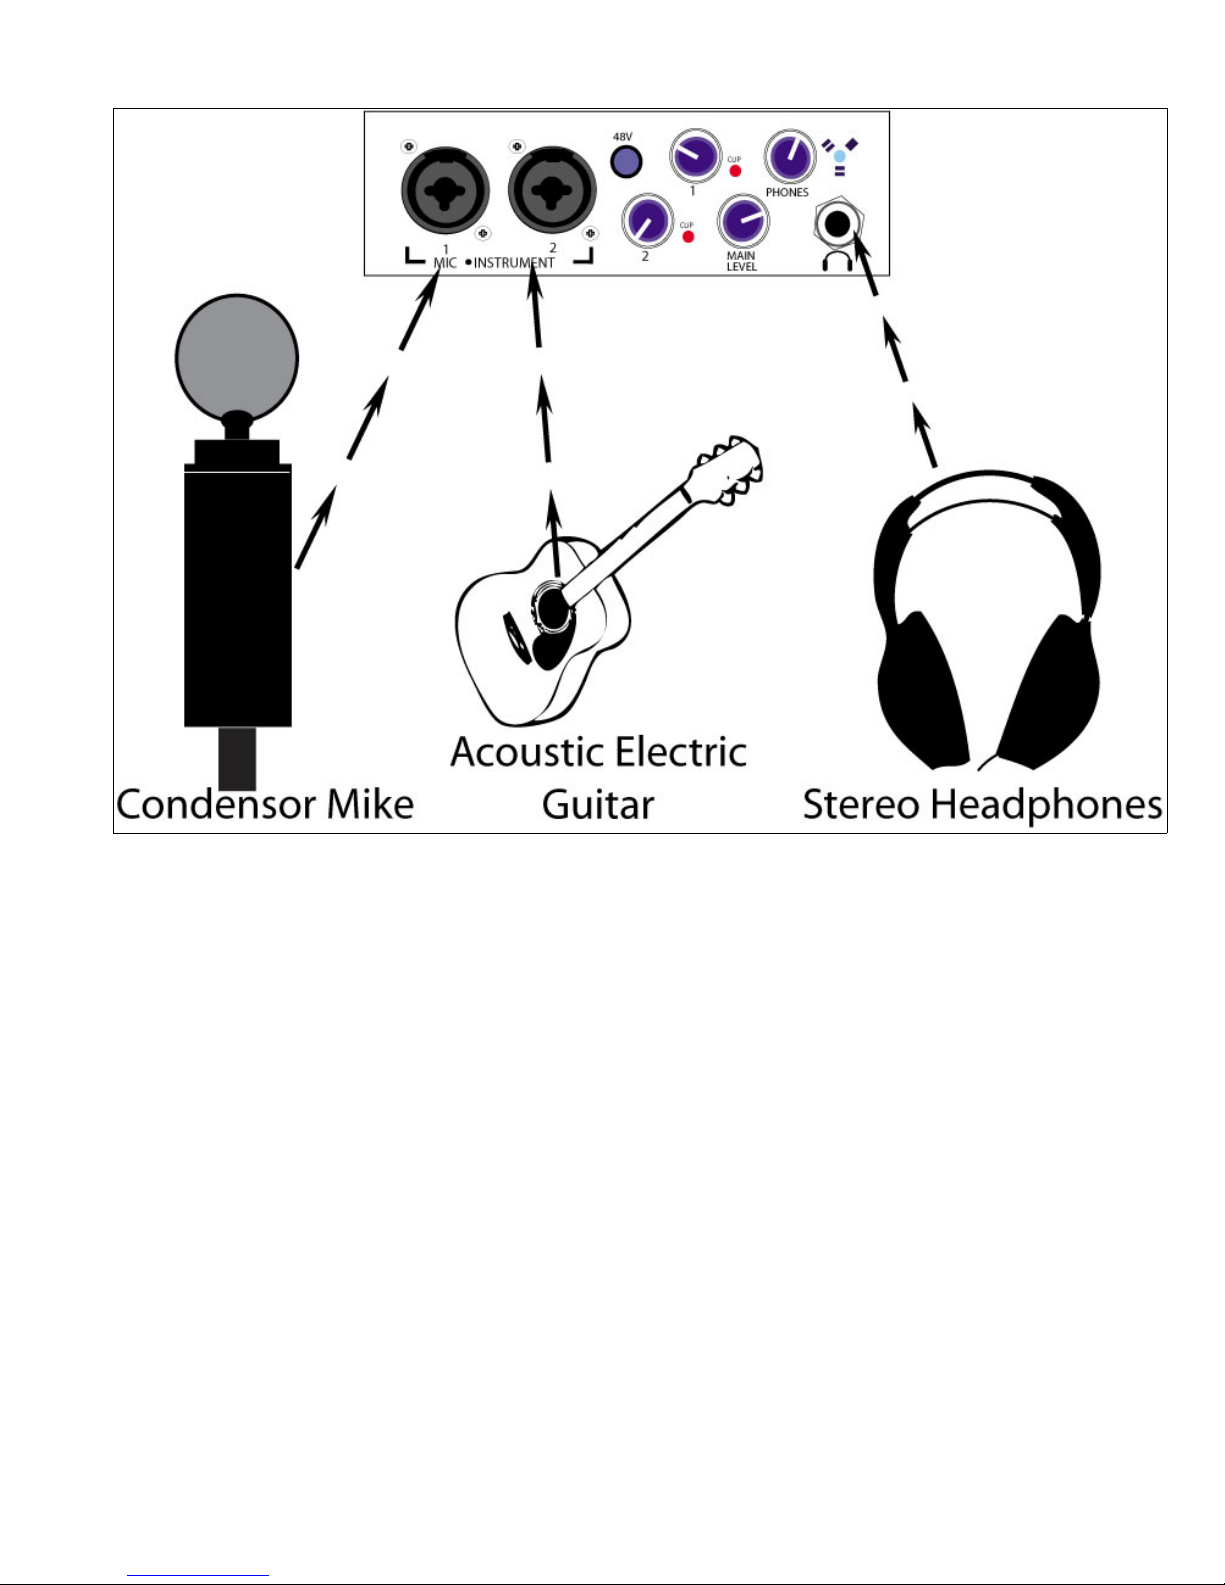
The following picture shows examples of the front audio connections.
Open Labs MiKo LXD Production Station Manual 20
Page 21

Turning on an Open Labs production station
There are two power switches on an Open Labs production station. One is located on back of the
power supply and the main power switch is located on the right side of the Open Labs production
station within the end bezel.
Please note carefully:
The Open Labs production station's power supply is an auto voltage switching power supply.
The power supply also has a switch labeled “H” for High, “L” for Low, and “A” for Auto. This switch
will adjust the fan speeds of the power supply. As a default it should be set to Auto.
Upon powering up, the Open Labs production station will boot up in two phases: The first phase is
the BIOS phase, or the pre-Microsoft Windows phase. This is when the hardware validates that all
systems are functional within acceptable parameters.
PCI devices, onboard memory, and other system devices run through a short diagnostic routine,
and then the system will begin to load the operating system—Microsoft Windows XP. It is normal
for the BIOS screen to load upside down on your display. Once Windows XP loads, the screen will
rotate to the correct orientation.
Unless you plan to make immediate hardware changes, there is no need to access any of the BIOS
configuration menus. If you do plan to make some BIOS modifications, you can access the BIOS by
hitting the DELETE key when your Open Labs production station first boots.
About the BIOS
System BIOS is a menu where you can configure your hardware settings. The settings pertain to
hardware only, and will sometimes affect your software programs if configured incorrectly. If you
plan to make modifications to the BIOS, it is recommended that you contact Open Labs technical
support.
The second phase loads Microsoft Windows XP. This is an optimized installation of Windows XP,
meaning that it contains all the tweaks that will enhance system performance.
Since this is the “Full Version” rather than the “Embedded” version of the Windows package, your
Open Labs production station has all the potential to be your most powerful sound production
appliance without any hindrance to any computer-driven applications.
Any software supported under the Microsoft Windows XP platform will be supported by your Open
Labs production station. After the system is fully booted, you should be in the Open Labs Graphical
User Interface (GUI).
About the Open Labs GUI
The Open Labs GUI is not a standard part of Microsoft Windows XP. It is a customizable overlay to
the standard Microsoft XP work environment. You can toggle between the two modes by clicking on
the Open Labs icon (located in the lower left-hand corner of the screen), select Quit, and then
select Go To Windows. You can always reinstate the Open Labs GUI by accessing the shortcut
(named “Open Labs Shell”) provided on the desktop.
For more information about the Open Labs GUI, see chapter 3.
Open Labs MiKo LXD Production Station Manual 21
Page 22

3
C h a p t e r 3 – F i r s t T i m e
C h a p t e r 3 – F i r s t T i m e
The first time you power up your Open Labs MiKo LXD it loads directly to Riff, once you close Riff,
you may realize that the screen looks nothing like Microsoft Windows XP. The look is the Open Labs
Graphical User Interface that will enhance your productivity, especially in combination with the
touchscreen.
The Open Labs GUI In Detail
The GUI, or graphical user interface, is a customizable shell that allows the launching of
applications from a single location. This GUI is optimized for use with a touchscreen and for
musical performance. Traditionally, within the Microsoft Windows environment, you would have to
make shortcuts for applications you use most often, and arrange them on your desktop or system
tray for easy access. Because these items are often masked by open applications and windows,
you may have to reposition your windows every time you wish to initiate a new application.
Starting programs via the ‘Start’ button is also not ideal, because the program groups contain all
installed programs, rather than just those few applications you use the most.
The Open Labs GUI is designed to allow access to the programs and tasks that you will use most
frequently with your Open Labs production station. After powering up your Open Labs production
station, Windows XP will launch, followed by the Open Labs GUI. You will notice right away how the
GUI organizes and simplifies the tasks associated with making music.
Currently active applications will appear on the taskbar. If there are more applications open than
will fit in the taskbar at once, you can scroll left and right using the arrows in the lower right-hand
corner of the screen.
Clicking on the Open Labs icon in the lower left-hand corner will reveal shortcuts to a variety of
applications and files.
The picture below shows the GUI screen, and the first level of buttons displayed when you click the
Open Labs icon.
Open Labs MiKo LXD Production Station Manual 22
Page 23
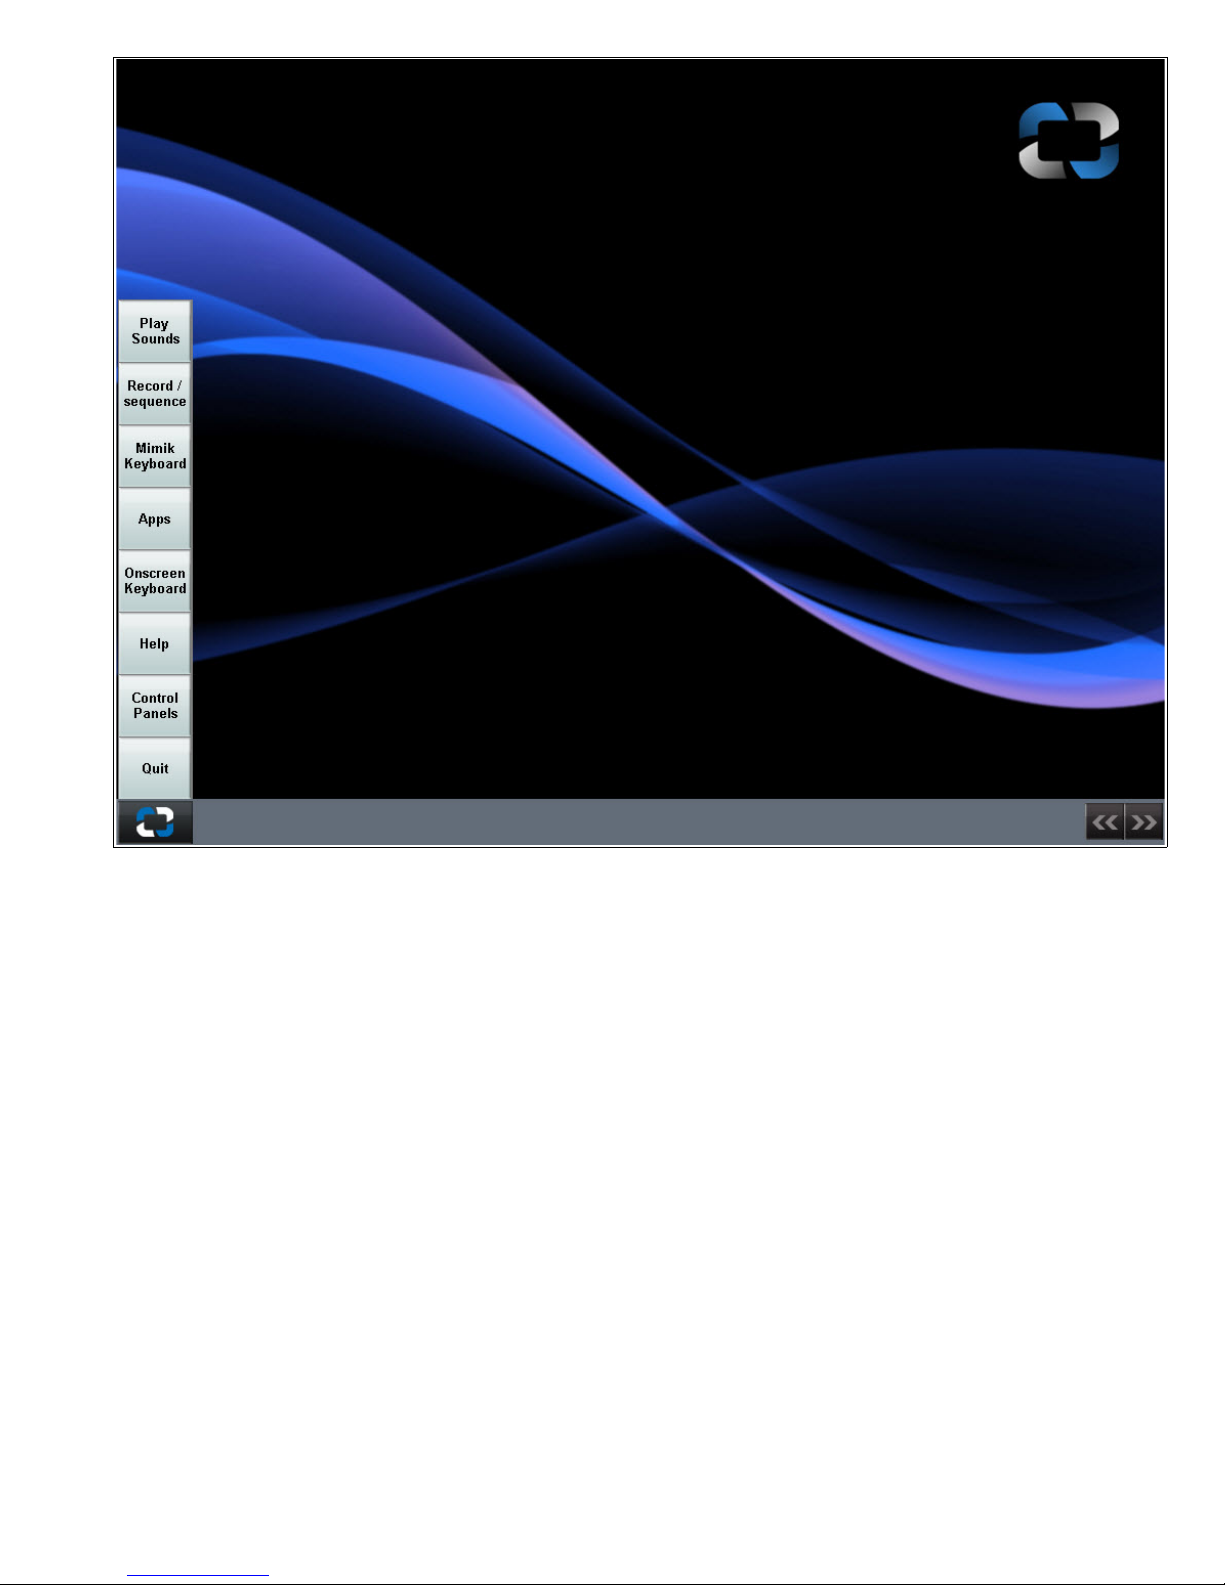
Starting from the bottom, the icons will be explained.
QUIT
Clicking on this button will give you the following options:
• Go To Windows: This button will close the Open Labs GUI and take you to the standard
Windows XP desktop.
• Shut Down: Use this to turn your Open Labs production station off
• Restart: Use this to restart your Open Labs production station.
CONTROL PANELS
The Control Panels button provides access to utilities that you might need while working on your
Open Labs production station. When you click on the Util button, you will see the following options:
• Audio: The Audio button directs the controls for your sound card. When you click the Audio
button you will see the following options:
▪ Control Panel: Launches the sound card control panel, from here you can adjust latency,
sample rate, and boost input volume.
▪ Mixer: This button launches the sound card mixer panel.
• MIDI: Launches the mFusion Control Panel. See Chapter 6 for information about using mFusion.
• Touchscreen: Use to calibrate your touchscreen and display settings.
• System Backup:
Open Labs MiKo LXD Production Station Manual 23
Page 24

HELP
The Help button gives you access to various forms of information regarding your Open Labs
production station. When you click the Help button you will see the following options:
• Tutorial Videos: You will find video tutorials that will help you make recordings and play
sounds.
• Manuals: Will take you to a folder containing user guides and manuals.
• Open Labs Forum (Requires an Internet connection): To gain access to the Open Labs on
line community, and technical support forums use this link: (http://forum.openlabs.com).
• Forum access requires registration.
ONSCREEN KEYBOARD
The Onscreen Keyboard button will display a graphical representation of a standard computer
keyboard for touchscreen entry of alphanumeric input.
APPS
The Apps button is a way to access various programs installed on your Open Labs production
station. When you click the Apps button you will see the following options:
• Burn CD-DVD: Launches a CD/DVD burning program.
• Play Media: This button launches Windows Media Player, for the playback of media files.
• Translator: Launches a file conversion program.
• Internet: Launches the Firefox browser for gaining access to web pages.
MIMIK KEYBOARD
Launches the MimiK keyboard cloning software. For information on using MimiK, refer to Chapter 8.
RECORD/SEQUENCE
This button will launch the MIDI/audio sequencer bundled with your Open Labs production station,
which is REAPER. For information about using Reaper see Chapter 7.
PLAY SOUNDS
You can use this button to launch either Riff, or Karsyn. The programs are VSTi hosts, and allow
you to play sounds on your Open Labs production station.
• Information on using Riff can be found in Chapter 5.
• Information on using Karsyn can be found in Chapter 6.
Open Labs MiKo LXD Production Station Manual 24
Page 25
About the MIDI Controllers
Open Labs production stations offer the following control surfaces:
• Mix Edit Panel (faders, rotary knobs and buttons)
• DJ/VJ Controller (A/B crossfader, knobs, buttons)
• Bump MP
Both of these are actually programmable MIDI control surfaces. Open Labs production stations ship
with MIDI control maps for use with the installed applications (Karsyn, REAPER, and so on), but
you can also create your own custom maps to use with any MIDI application.
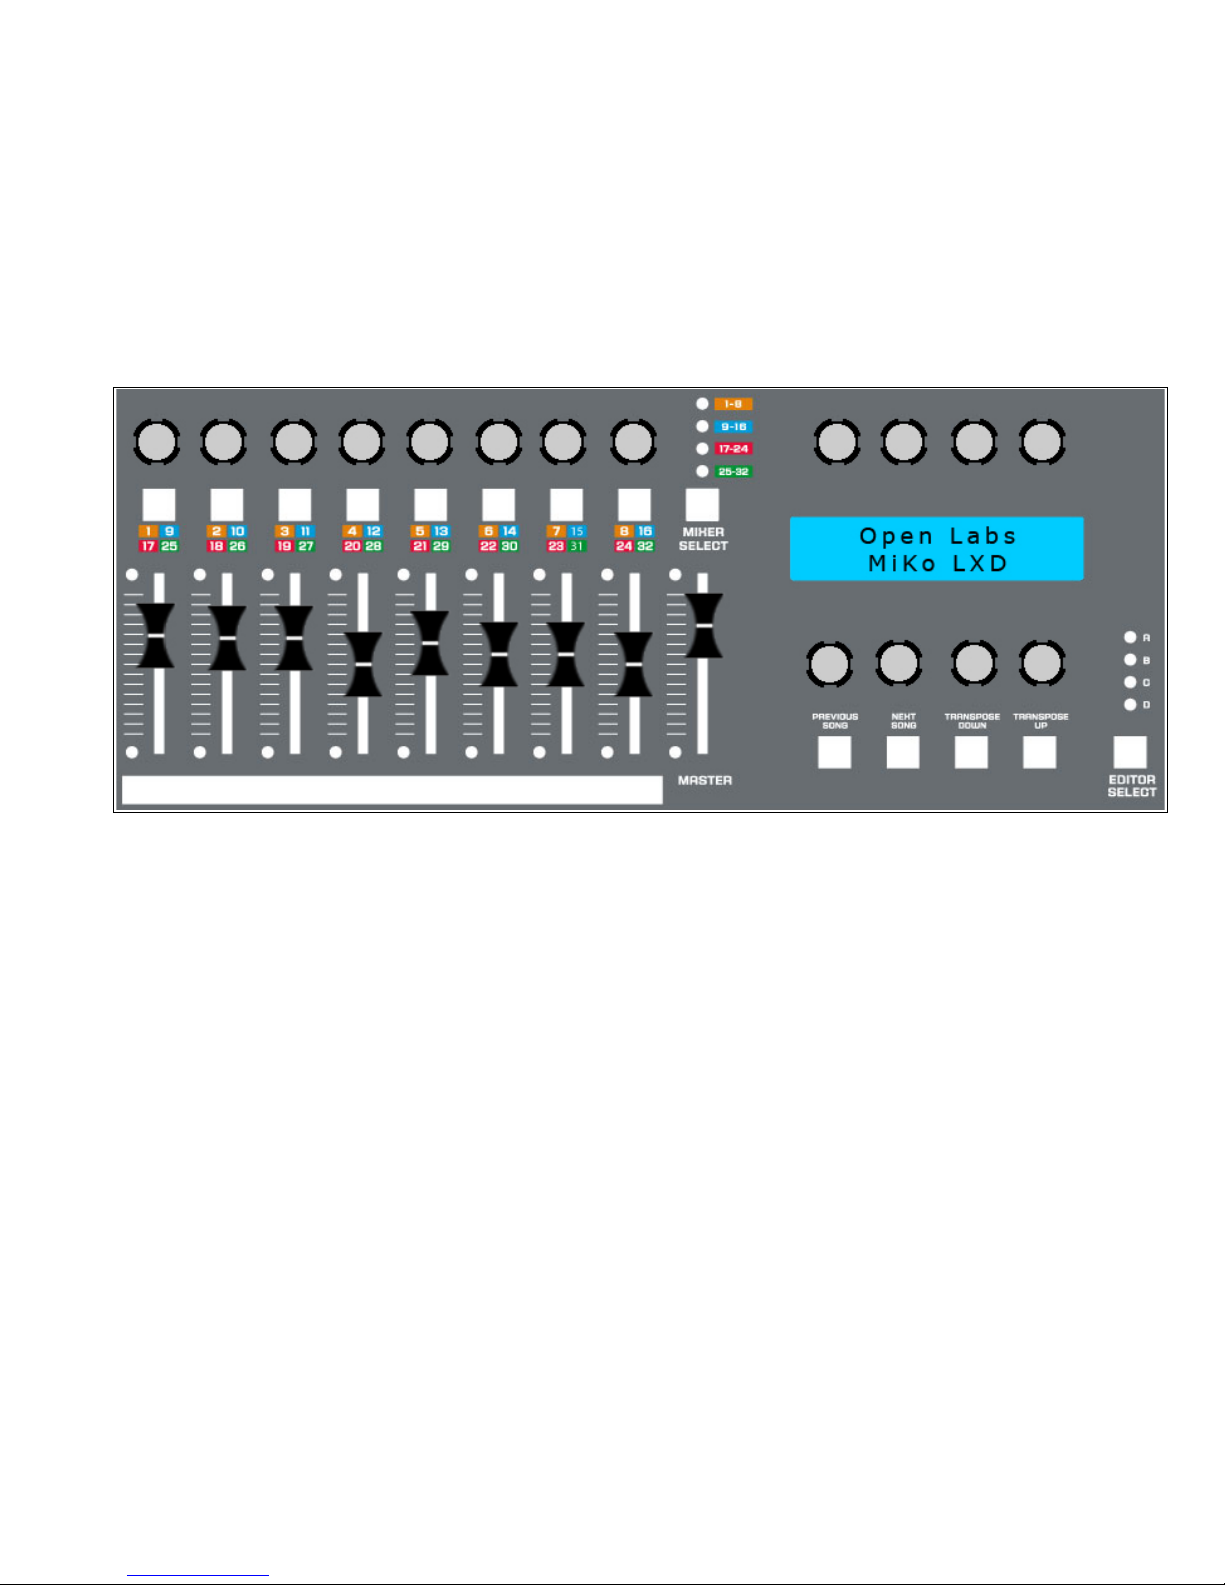
Mix Edit Panel
The Open Labs Mix/Edit Panel features two sections of controls:
1. The Mixer Section is designed for mixing, and is laid out like most common third party DAW
controllers. It features eight channel strips, each with a knob for panning, a button for muting,
and a fader for volume control. Plus one fader dedicated to the master bus. Also, the mixer
section features a bank button for quick access to four banks. This gives you 32 channels of
control in Reaper, or any other MIDI mappable DAW you wish to use.
Feedback is provided in two ways. For each bank on the Mixer section (A, B, C, and D) there is
an LED light indicating what bank is selected, plus each bank is labeled 1-8, 9-16, 17-24, 25-32
in a color code. Above each fader is the track numbers listed in color code. This gives the user a
visual display on what track channel they are about to adjust. The other method for feedback is
the white scribble strip below the controllers. This will be made material supporting dry erase
markers and lets the user write on the panel. This is useful in a studio environment and live.
For example, some keyboardists like to use faders for draw bar control. With the scribble strip
they can write which draw bars are being controlled.
2. The other section is known as the Edit Section. The Edit section features eight rotary encoders,
four back lit buttons, a four-way bank button (like the Mixer section) and a 40 (8x5) character
LCD display to give you feedback on what you are controlling. You can change the text on the
LCD via Mfusion, and label it as you wish, along with assigning the encoders to a desired
parameter. In the studio, this section will function as a channel strip, giving you access to the
most common used functions such as volume, pan, mute, solo etc. With the push of the Edit
Panels' [Bank] button, the LCD and encoders change to control your selected tracks Gate,
another push of the bank button changes the above to control your tracks EQ, and another bank
button push to control your selected tracks Compressor.
Open Labs MiKo LXD Production Station Manual 25
Page 26
DJ/VJ Controller
The DJ/VJ controller contains 12 buttons, one A-B crossfader, and seven knobs. The buttons are all
freely assignable, but have been designed and labeled to support specific system operations and
software function.
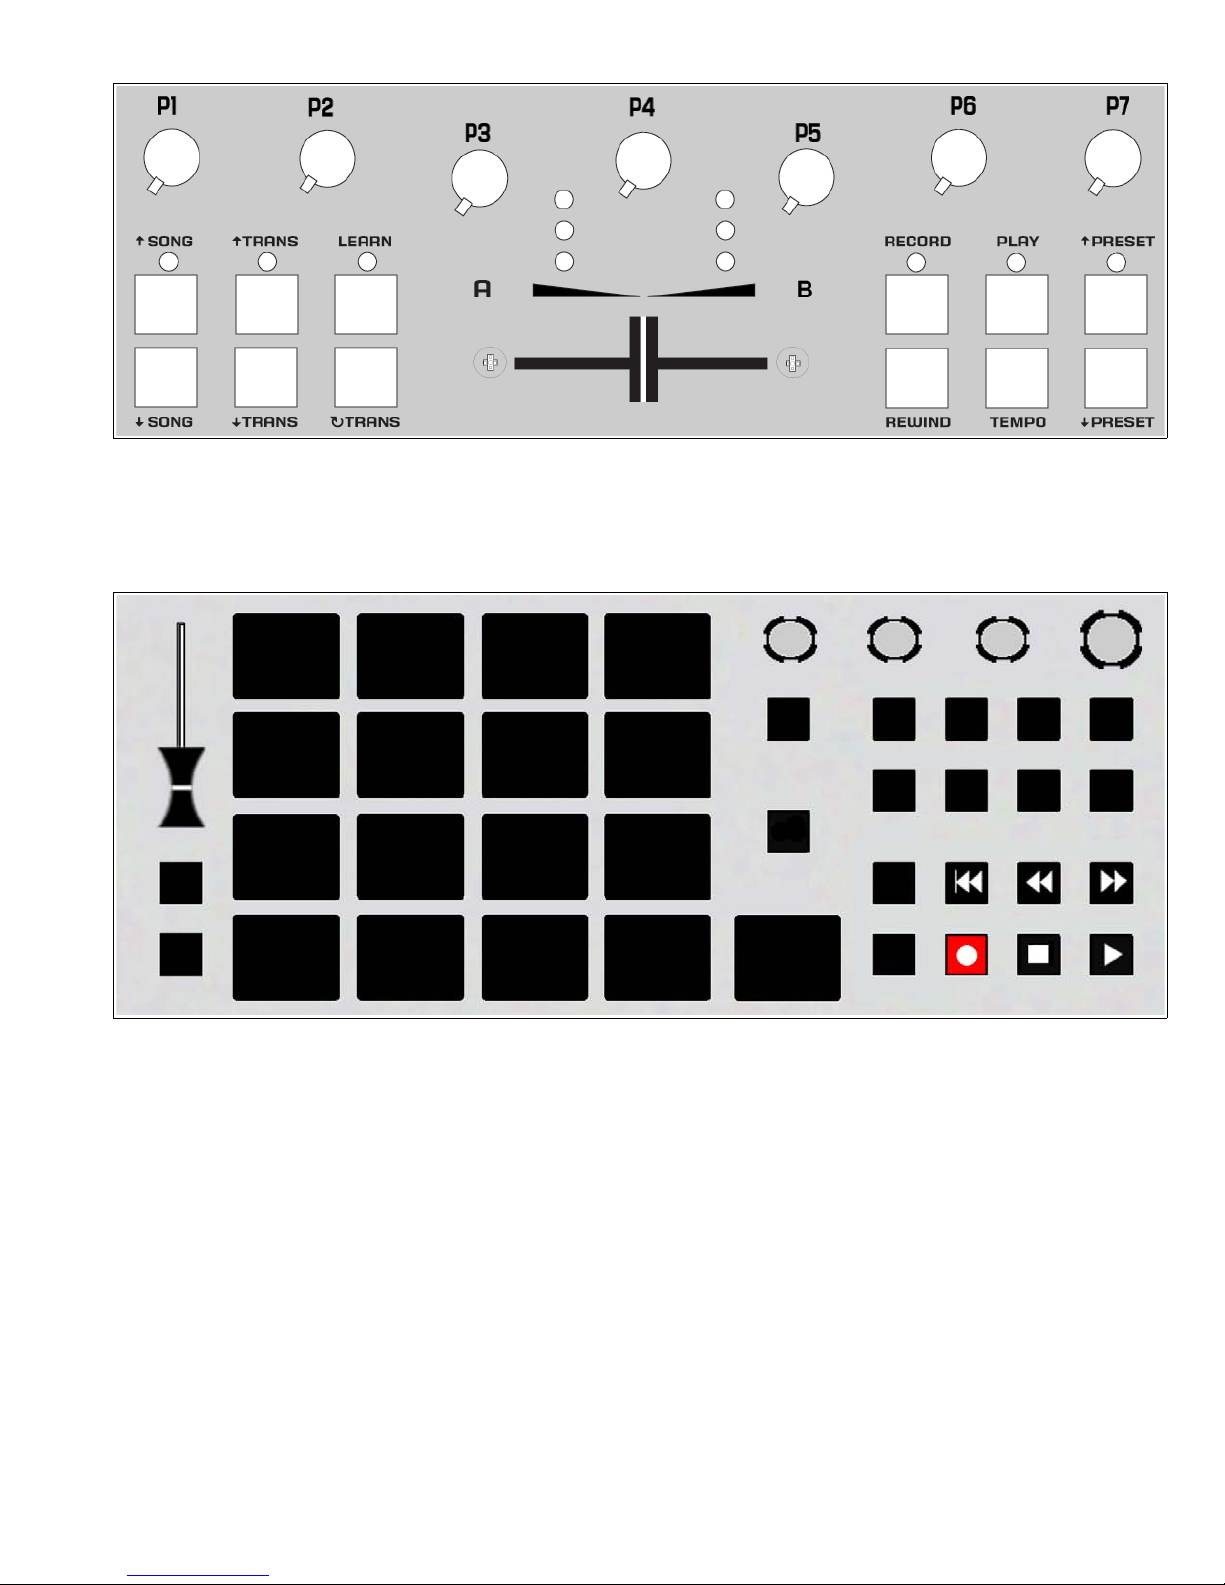
Bump MP
The MiKo LXD offers a new controller, the Bump MP. This controller offers tons of features to give
you a drum machine style experience. Here are some of the features of this fine controller.
• Fixed Level controls
• Note repeat button with quantize knob
• 17 individual drum pads, with the 17th pad being "last pad"
• Chromatic button
• Hold button
• Eight engines that hold 24 patterns, with eight engine buttons to select
• Commit button
• Undo button
• Transport controls
Please refer to Chapter 5d for more information on using the Bump MP.
Open Labs MiKo LXD Production Station Manual 26
Page 27

The Track Pad
Your track pad has two main buttons: left and right. The left track pad button is mostly used to
select objects, or to launch programs. The right track pad button is used to call up auxiliary menus
and properties of objects.
In general, to access or launch an application, double-click the left track pad button while the track
pad pointer is hovering over the desired icon.
To move an object from one folder to another, or to reposition onscreen icons, you can move these
objects by dragging. To drag an object, position your track pad pointer over the icon, press and
hold down the left mouse button, then move the object to its new location. When you release the
left track pad button, your object or icon will be placed in its new location. Dragging does not
always work, and it may be disabled by the program that you are using.
You can also select multiple items by grouping them using the left track pad button. When you
position the pointer over an empty area on your desktop, you can hold down the left track pad
button and proceed to drag a rectangle over several objects. Releasing the left track pad button
will highlight all objects or icons within the area of the rectangle created by dragging the pointer.
Selecting multiple objects allows you to move and assign attributes to all the objects at once
rather than doing each one individually. For example, you may wish to delete four files in your
music folder. You can use this method to select the four items and then hit the DELETE key on your
keyboard to send these items to the recycle bin.
Using USB Devices
The Open Labs production station comes with two USB ports on the back panel. If you require
more USB ports, you can purchase a USB hub. Typically, USB devices also require you to have
Windows XP USB drivers in order for the device to work properly in Microsoft Windows. The drivers
are provided by your USB device manufacturer, and can be downloaded from their support site on
the Internet.
Using the DVD/CD-RW Drive
The DVD/CD-RW drive can be opened by pressing the release button located below the ejection
tray. Because Microsoft Windows supports bootable CDs, it is important that you do not leave any
CDs that are bootable in the DVD/CD-RW drive so that you will not boot the CD accidentally.
Adding CDs into the CD-RW Drive while the Open Labs production station is running will sometimes
initiate pop-up menus. This depends on how the CD was written. For example, typical software
installation CDs have pop-up menus to assist in installation of its software when the CD is first
inserted into the DVD/CD-RW drive. Alternatively, inserting an audio CD into the DVD/CD-RW drive
will initiate CD-Player to play.
The CD drive can be used to burn files onto blank recordable CDs. Recordable CDs are sold at most
computer stores and provide an inexpensive method of backing up your critical files.
You may use any number of programs to burn CDs with your DVD/CD-RW drive. Microsoft
Windows XP will author CDs as well. To use the Microsoft tool, navigate to the “Start” button, and
then double-click on My Computer.
Double-clicking on My Computer will open a window showing all your storage devices. Insert a
black recordable CD (CD-R) into your DVD/CD-RW drive and your DVD/CD-RW drive icon should
change to indicate the presence of a CD-R disc.
Double-clicking on this icon will open an empty window that is empty except for a legend to the
left.
Open Labs MiKo LXD Production Station Manual 27
Page 28

Using the drag-and-drop method, you can place multiple files into the empty area within the right
pane of this window. Files should start to populate this empty area. Keep in mind that the
maximum amount of data you can store on a single CD-R is approximately 700 MB, or 80 minutes
of audio wav files.
When you are done, select: “Write these files to CD”.
Another pop-up will appear and will provide a walk-through with step-by-step instructions to
complete your CD. These step-by-step pop-ups are called wizards. Microsoft loves to use wizards,
and you will encounter many wizards while using Windows XP.
Simply follow the Wizard to the end and your CD will be finished.
Using the Internet
The network adapter allows you to connect a high-speed network to your Open Labs production
station. Depending on your setup, the network could be local area only (just connects to other
computers around you) or to the Internet. Open Labs production stations will support a 10 Mbits or
1000 Mbits network.
Anytime you connect to the Internet, it is vital that you use the same precautions as you would
use with a normal computer. It is recommended that you keep Internet activities to a minimum to
reduce risks of computer viruses, hackers, pop-ups, and other vulnerabilities inherent on the
Internet.
Internet use for the Open Labs production station should be restricted to the following:
• Connection to Microsoft to run updates of service packs. (Please check with Open Labs
support for compatibility of Microsoft updates).
• Technical support with Open Labs.
• Updating virus definitions for your anti-virus protection.
• Collaboration with other musicians in sharing of music.
• Network printing and local file sharing.
Adding Software to your Open Labs Production Station
Adding new software to your Open Labs production station is not unlike adding software to your
home computer. The process still requires that you have the software, either on a CD ROM or
resident on your hard drive from an Internet download. System requirements of your Open Labs
production station should meet that of your software, or installation will fail. For example, you
cannot install Macintosh software in a Open Labs production station, or install Windows 98
compliant software. Your Open Labs production station runs Microsoft Windows XP, and will only
accept software that works on this platform.
As a guideline, most current software sold at your music supplier will work on a Open Labs
production station. It is only with older software applications that you should practice caution
during installation. If you are uncertain whether software applications will work in the Microsoft
Windows XP environment, please contact your software manufacturer.
Instructions for installing software are provided in the software package you wish to install. Please
read the software’s user guide for step-by-step instructions, or visit its website for support.
Be aware that there may be compatibility issues with some third party software. Your Open Labs
production station is extremely stable with the software installed as shipped. Open Labs does not
recommend installing untested freeware, shareware or firmware to your Open Labs production
station. For questions about particular software products, please contact Open Labs support, or the
software manufacturer.
Open Labs MiKo LXD Production Station Manual 28
Page 29

New Software Installation Considerations
If you plan to add your own software, be sure you meet all the following criteria:
• The software you wish to install is compatible with Microsoft Windows XP.
• The software does not conflict with software that is already on your system. An example of
this is having two brands of anti-virus software running at the same time.
• The software you are installing has support. Open Labs does not support software that is
not part of the factory installation.
• Your Open Labs production station meets or exceeds the recommended system
requirements of the software you wish to install.
• Also ensure that you have the necessary disk space needed to install the program.
• System Recovery
• Should you install an incompatible program that compromises the stability of your Open
Labs production station, a hidden recovery partition has been set up for a complete system
recovery. Call or email an Open Labs technician before attempting a system recovery. An
Open Labs technician can be reached by calling (512) 444-6222, or by emailing
support@openlabs.com.
Open Labs MiKo LXD Production Station Manual 29
Page 30
4
C h a p t e r 4 – Q u i c k s t a r t
C h a p t e r 4 – Q u i c k s t a r t
Steps to Playing Sounds on an Open Labs Production Station
1. Make sure the power and audio connections are setup.
2. Check to make sure the powersupply power switch is in the on position.
3. Boot up the Open Labs Production station.
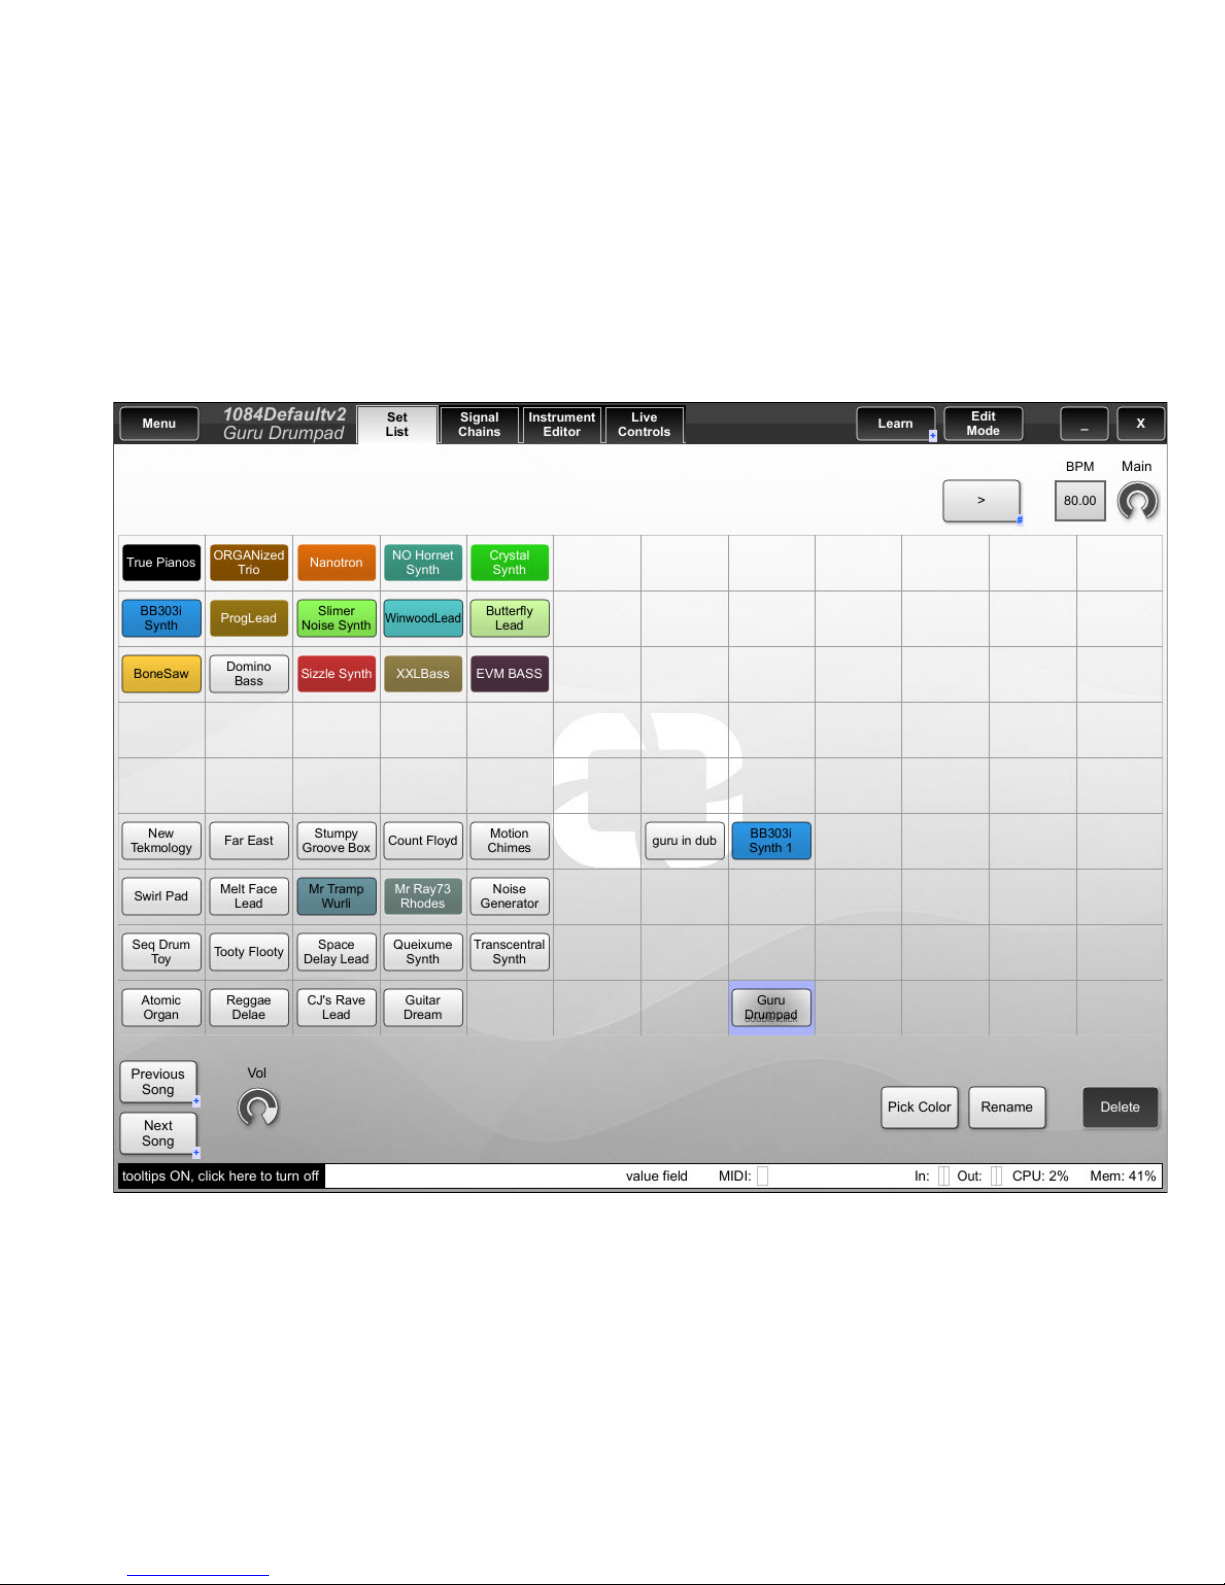
Once the system loads up, you will see Riff.
The opening Setlist of Riff has already been preloaded with instruments for you to play. Each
"chicklet" is called a Song, select a Song by touching the Song, or use the [Previous/Next] buttons.
Read Chapter 5 for the complete Riff manual.
Open Labs MiKo LXD Production Station Manual 30
Page 31

Here are the Mix Edit Panel control assignments for Riff.
Edit Panel Controls
1. Vol - This controls the selected Signal Chain Volume.
2. Pan - This controls the selected Signal Chain Pan.
3. FX - This controls the selected Signal Chain's selected FX mix knob.
4. SngVol - This controls the overall Song Volume.
5. Low - Controls the lowest value of Live Control Oscillation.
6. High - Contrls the highest value of Live Control Osclillation.
7. Time - Controls the speed of Live Control Oscillation.
8. Offst - Controls the timing of the speed of a Live Controls Oscillation.
9. Press this button to select Bank A. This activates the correct map for the Mix Edit Panel for
Riff.
Mixer Panel
The Mixer Panel is not used in this particular setup.
Open Labs MiKo LXD Production Station Manual 31
Page 32

Here are the surface controls of the DJ panel for Riff.
1. Previous and Next song control - If there is more than one Song on the Setlist you can use these
buttons to advance or go back one Sone at a time.
2. Tranpose Up/Down - Allows you to transpose the keyboard up or down one octave at a time.
3. Learn - This button allows you to MIDI learn various controls in Riff.
4. Transpose Reset - If you have transposed the keyboard, this button will reset the transpose to
zero.
5. Record - Not assigned for Riff.
6. Rewind - Not assigned for Riff.
7. Play - If you have a plugin that has a "transport for play back" this button will start it, and it will
be synched to the tempo of Riff.
8. Tempo - You can use this button to tap the tempo of Riff.
9. Preset Up/Down - If you are using an Instrument that has MIDI program change, these buttons
will allow you to scroll through the preset programs.
Open Labs MiKo LXD Production Station Manual 32
Page 33

5
C h a p t e r 5 - P l a y i n g S o u n d s -
C h a p t e r 5 - P l a y i n g S o u n d s -
R i f f
R i f f
Riff is a multi-effect and multi-instrument rack for musicians and sound designers. It is also a VST
host that runs as a standalone application.
Riff allows a user to stream the ASIO or VST input signal through chains of individual VST effects
so you can use your PC/Open Labs Production Station as a real-time multi-effect processor.
It enables a user to play several VST instruments at the same time. You can layer several
instruments to create complex sounds. Or, users may play instruments on different MIDI channels:
It turns a computer into a multi-timbral sound generator.
To achieve very low latencies, the standalone version supports ASIO 2.0-compatible sound cards.
It will enable users to use VST effects and instruments almost like real hardware devices.
The parameters of Riff and also parameters of the loaded VST plug-ins can be controlled through
MIDI control change messages or VST automation.
Before you Begin
You should have a good working knowledge of an Open Labs workstation and a computer's
operating system. For example, you will need know how to use the touch screen, touchpad,
standard menus and commands. You should also know how to cut, copy, paste, open, save, and
close files.
If this is your first time using any type of recording system, you may want to research the basics
of Pro Audio, producing music, and MIDI recording. A good place to start is KVR Audio.
(http://www.kvraudio.com/wiki/).
Also, be sure to register on the Open Labs user forum. (http://forum.openlabs.com). You can also
refer to the Pro Audio Primer located in Appendix A.
Open Labs MiKo LXD Production Station Manual 33
Page 34

This next section will explain to you how to setup Riff after manually installing it. If Riff came stock
on your Open Labs production station, you can skip this section as it will already be configured.
However, if you have custom plug-in folders, you will want to read the “Setting up your Plug-ins”
section on this page.
Setting up the Audio
To establish a connection between Riff and your audio output hardware, you will need to select the
correct software driver.
1. Select the Audio Options from the Menu>Options>Audio Options tab.
2. In the Audio Device section of this window select your ASIO sound driver (if not already
selected). This is the setting that allows Riff to communicate with your audio driver.
3. Hit “Apply”, then “OK” to commit the changes and exit.
• Audio Device: Use this to select the primary ASIO sound driver.
• Audio Input: Use this to select your sound card's audio input. This application supports multiple
audio input sources.
• Audio Output: Use this to select your sound card's audio output. This application supports
multiple audio output sources.
Open Labs MiKo LXD Production Station Manual 34
Page 35
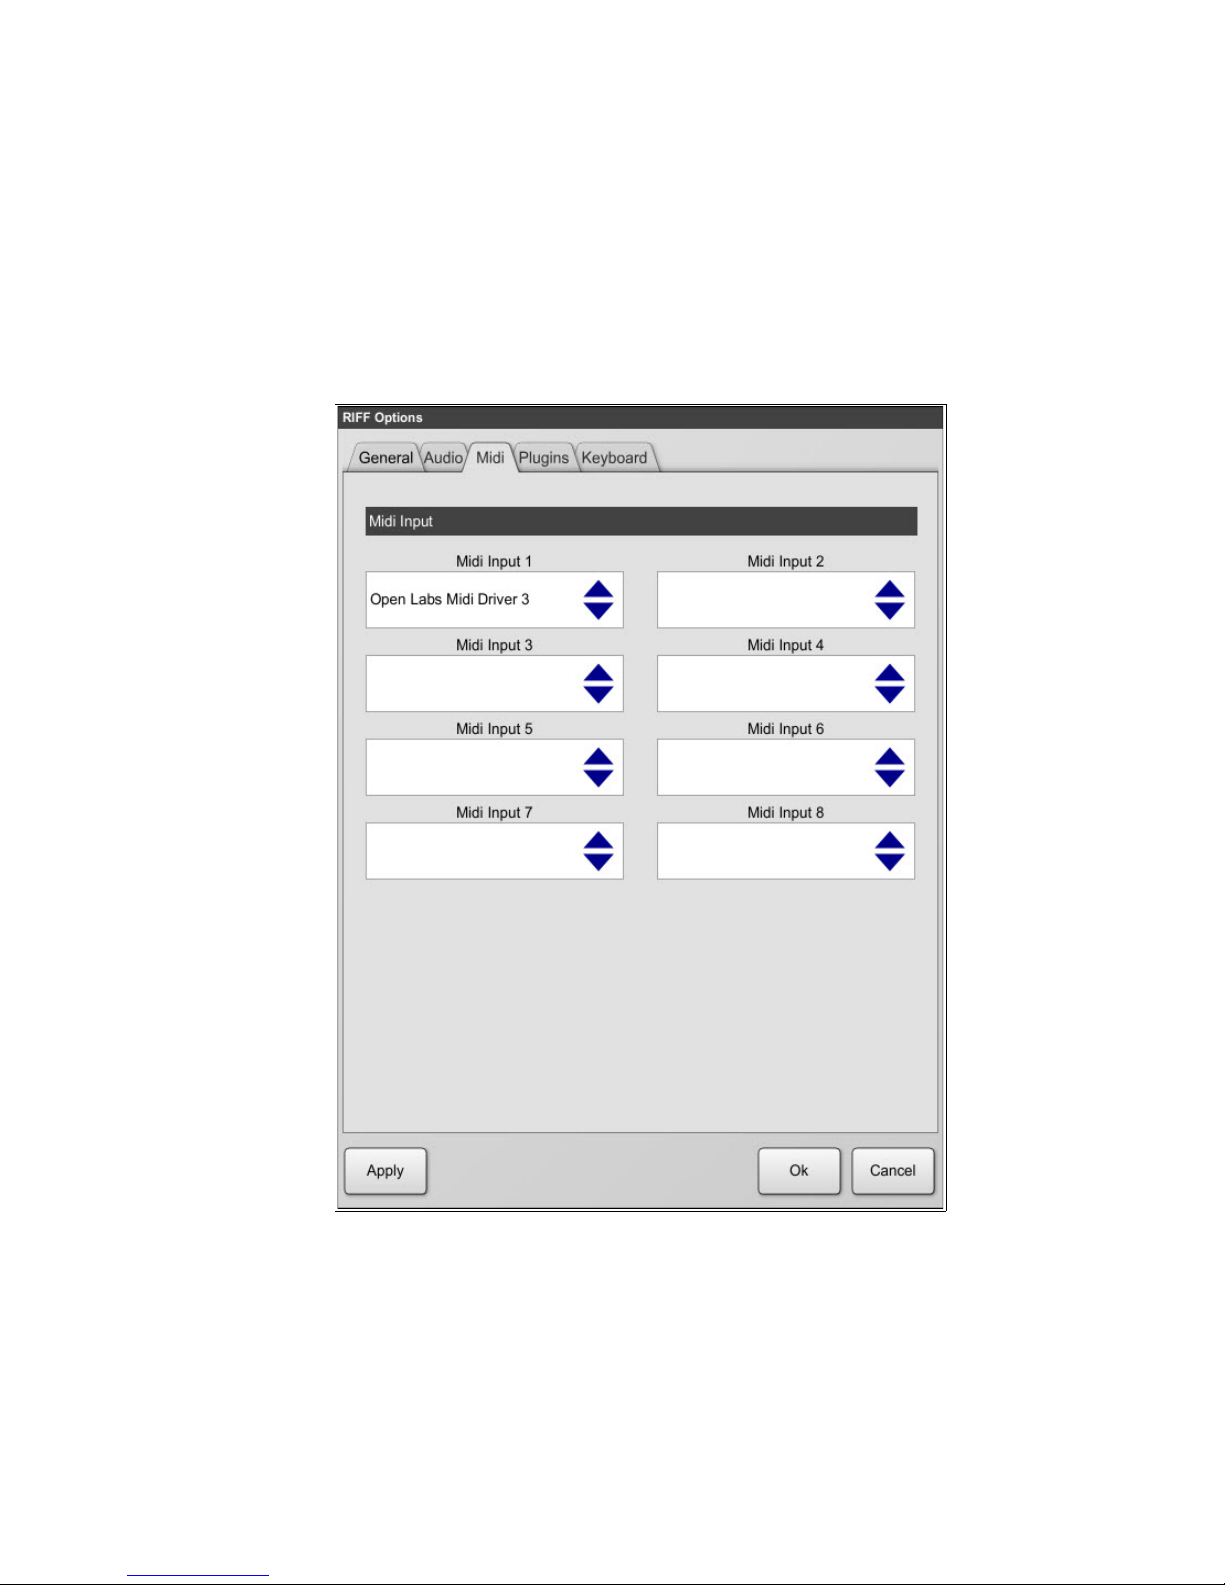
Setting up the MIDI
To establish a connection between Riff and your MIDI driver, you will need to select the correct
MIDI port. Riff allows you to select multiple MIDI-in and MIDI-out ports.
1. Select the MIDI Options from the Menu>Options>MIDI Options tab.
2. There are four MIDI input boxes. Use the “MIDI Input 1” box to select your MIDI hardware
driver.
3. If your system has more MIDI ports available, use MIDI input boxes two, three and four to select
those MIDI-in drivers. If you have an 88-key controller for instance, you can select the MIDI
driver that device is connected to.
4. If you intend to send MIDI to an external device, use “MIDI output” 1 to select that external
MIDI hardware driver.
5. Hit “Apply”, then “OK” to commit the changes and exit.
• MIDI Input: Use “MIDI input 1” to select your primary MIDI driver. The application also allows
you to select three additional MIDI drivers.
• MIDI Output: Use this to select an available MIDI driver to send MIDI to an external source.
Open Labs MiKo LXD Production Station Manual 35
Page 36

Setting up Your Plug-ins
By default, all Open Labs production station's plug-ins are located in “C:\Program Files\Open Labs
System (do not delete) Plugins”. With Riff, you can add three more additional locations for plugs.
When you install your own plug-ins, please install them to "c:\plugins\". Then tell Riff where this
folder is. To add a new plug-in folder:
1. Select the Plug-in options from Menu>Options>Plugins tab.
1. Click on the open space or directory to browse.
2. Browse to the folder where your plug-ins are located, and select it. The default plug-in folder is
“c:\plugins”.
3. Now press the “Rescan All” button. Hit “OK”.
• VST Plugin directory: Use this window to select your main VST plug-in directory. Use the “Clear”
button to reset this window. Also, we have provided you three more locations to use as VST
directories.
• VST Plugin Scan: After adding a VST plug-in directory or directories, use either “Scan for New”
or “Rescan All” to have Riff scan the folders you have added. All new plug-ins will be available
after scanning. There is no need to relaunch the program.
Open Labs MiKo LXD Production Station Manual 36
Page 37

Setting up General and Keyboard Options
The Options window contains a variety of important user-definable preferences used to configure
Riff for your audio/MIDI hardware, plug-in locations, and to customize the way you work.
General
Select Options from the Menu>Options>General Options>General tab.
• Library Directory: Use the “Dir” button to browse over and select a directory to be used as the
default save folder for Riff.
• Start Up Set: Click in this window to choose a project to be the default project that starts up
with Riff.
Open Labs MiKo LXD Production Station Manual 37
Page 38

Keyboard
To configure the Keyboard Range, select Keyboard from the Menu>Options>Keyboard
Options>Keyboard tab.
• Keyboard Low Range: Allows you to select the low range of your keyboard. The range is 0-144.
• Keyboard High Range: Allows you to select the high range of your keyboard. The range is 0-144.
Open Labs MiKo LXD Production Station Manual 38
Page 39
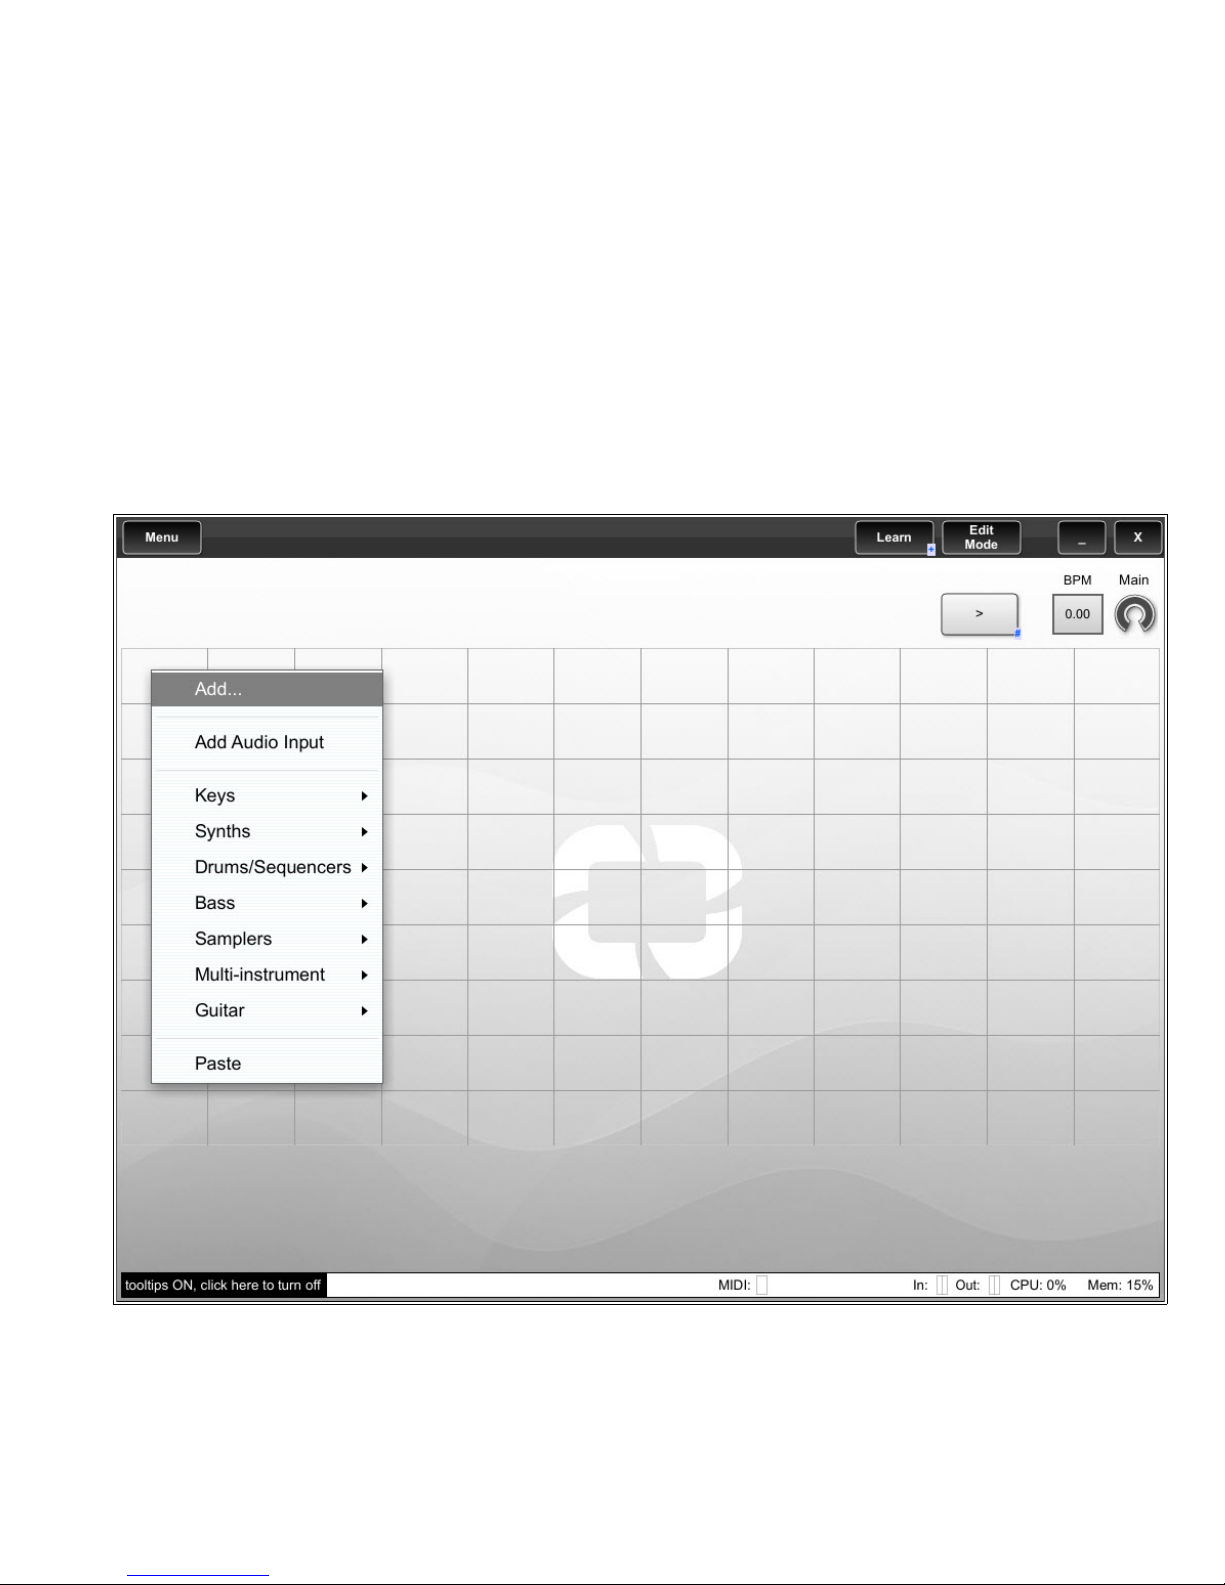
5 a – R i f f A r c h i t e c t u r e
5 a – R i f f A r c h i t e c t u r e
This section contains important information about the layout and organization of the various
elements of Riff. This chapter contains no hands-on tutorials. However, the information here is vital
to your understanding of this awesome application. The tutorials start in Chapter 4.
A Performance Environment
Riff is an environment to organize collections of VST sound modules, effects, and performance
sets. You can think of Riff as a virtual live performance rack that allows you to create songs, set
lists, signal chains, effect chains, and virtual live controls. By reading this section, you will gain
knowledge of the Riff hierarchy starting with the Set List.
Set List Window
The Set List window is where you start, allowing you to add instruments. Once you right-click and
press “Add” you will see the following windows. Each square of a Set List is called a Song.
Open Labs MiKo LXD Production Station Manual 39
Page 40
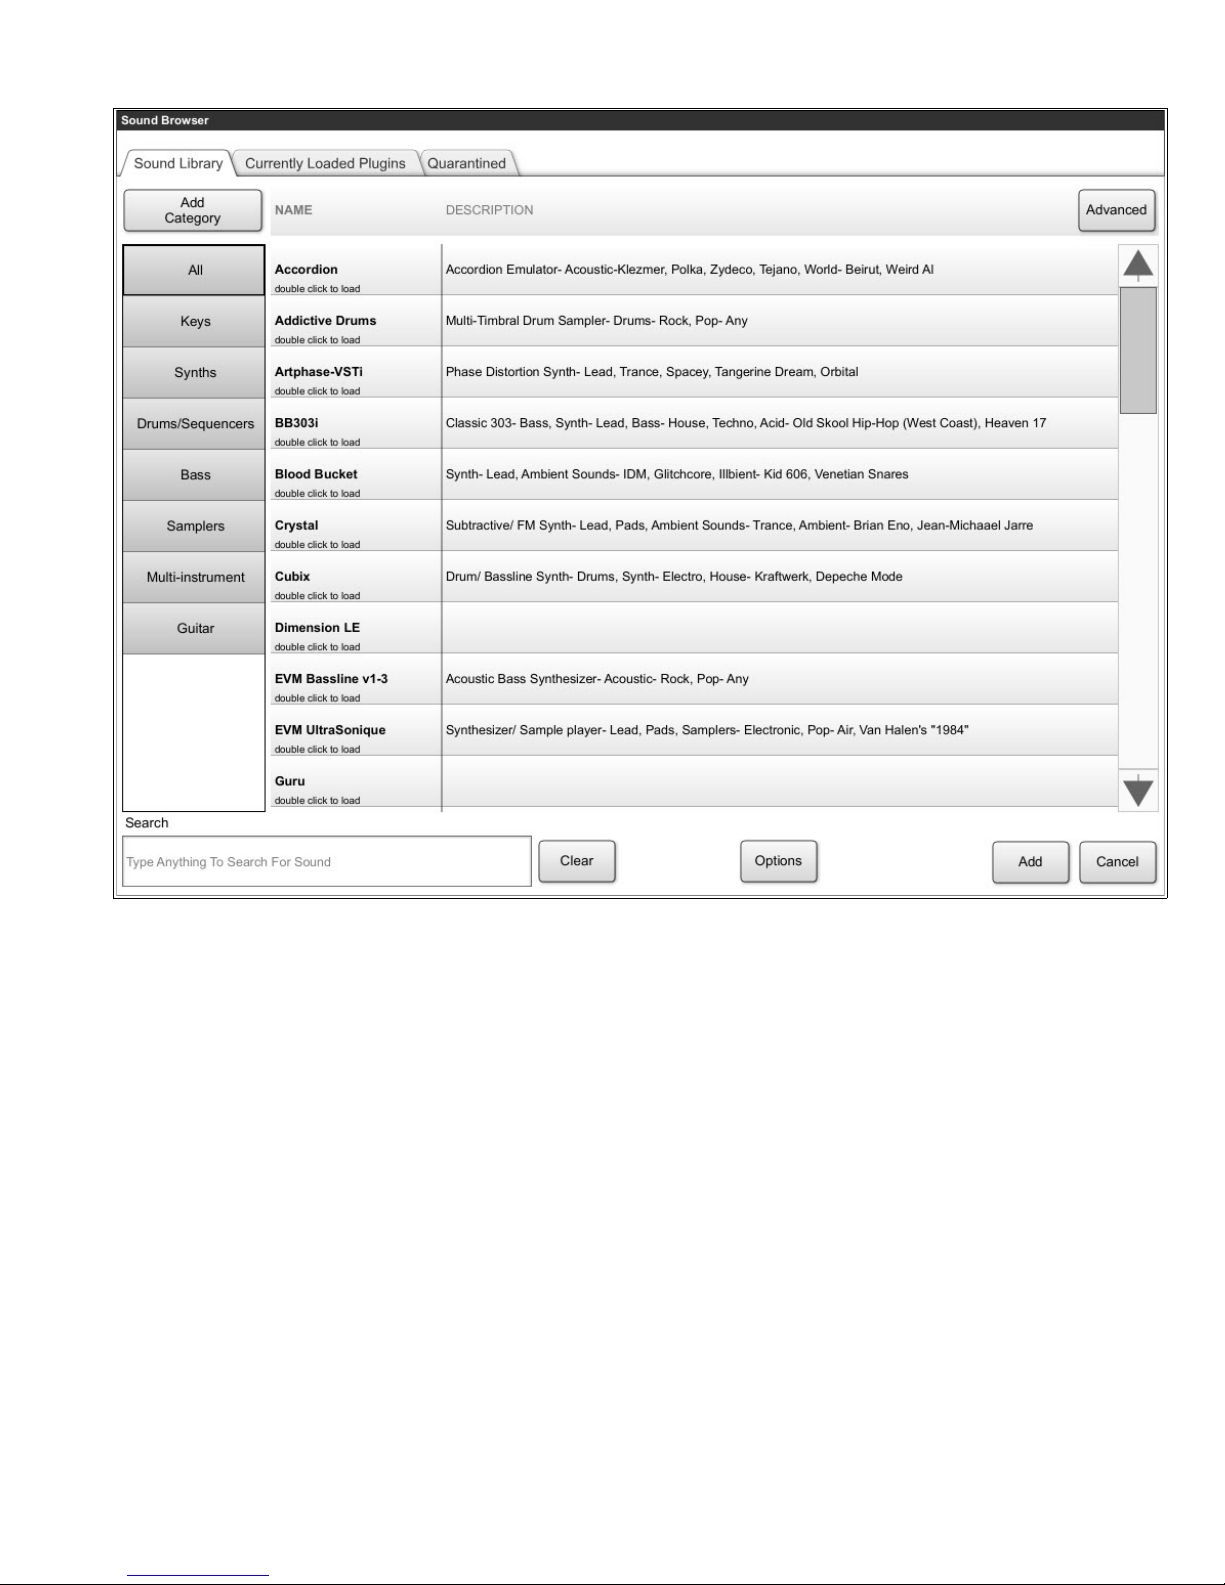
Sound Browser (Default View)
If you would like to see more details about each instrument, click the [Advanced] button in the
upper left corner.
Open Labs MiKo LXD Production Station Manual 40
Page 41
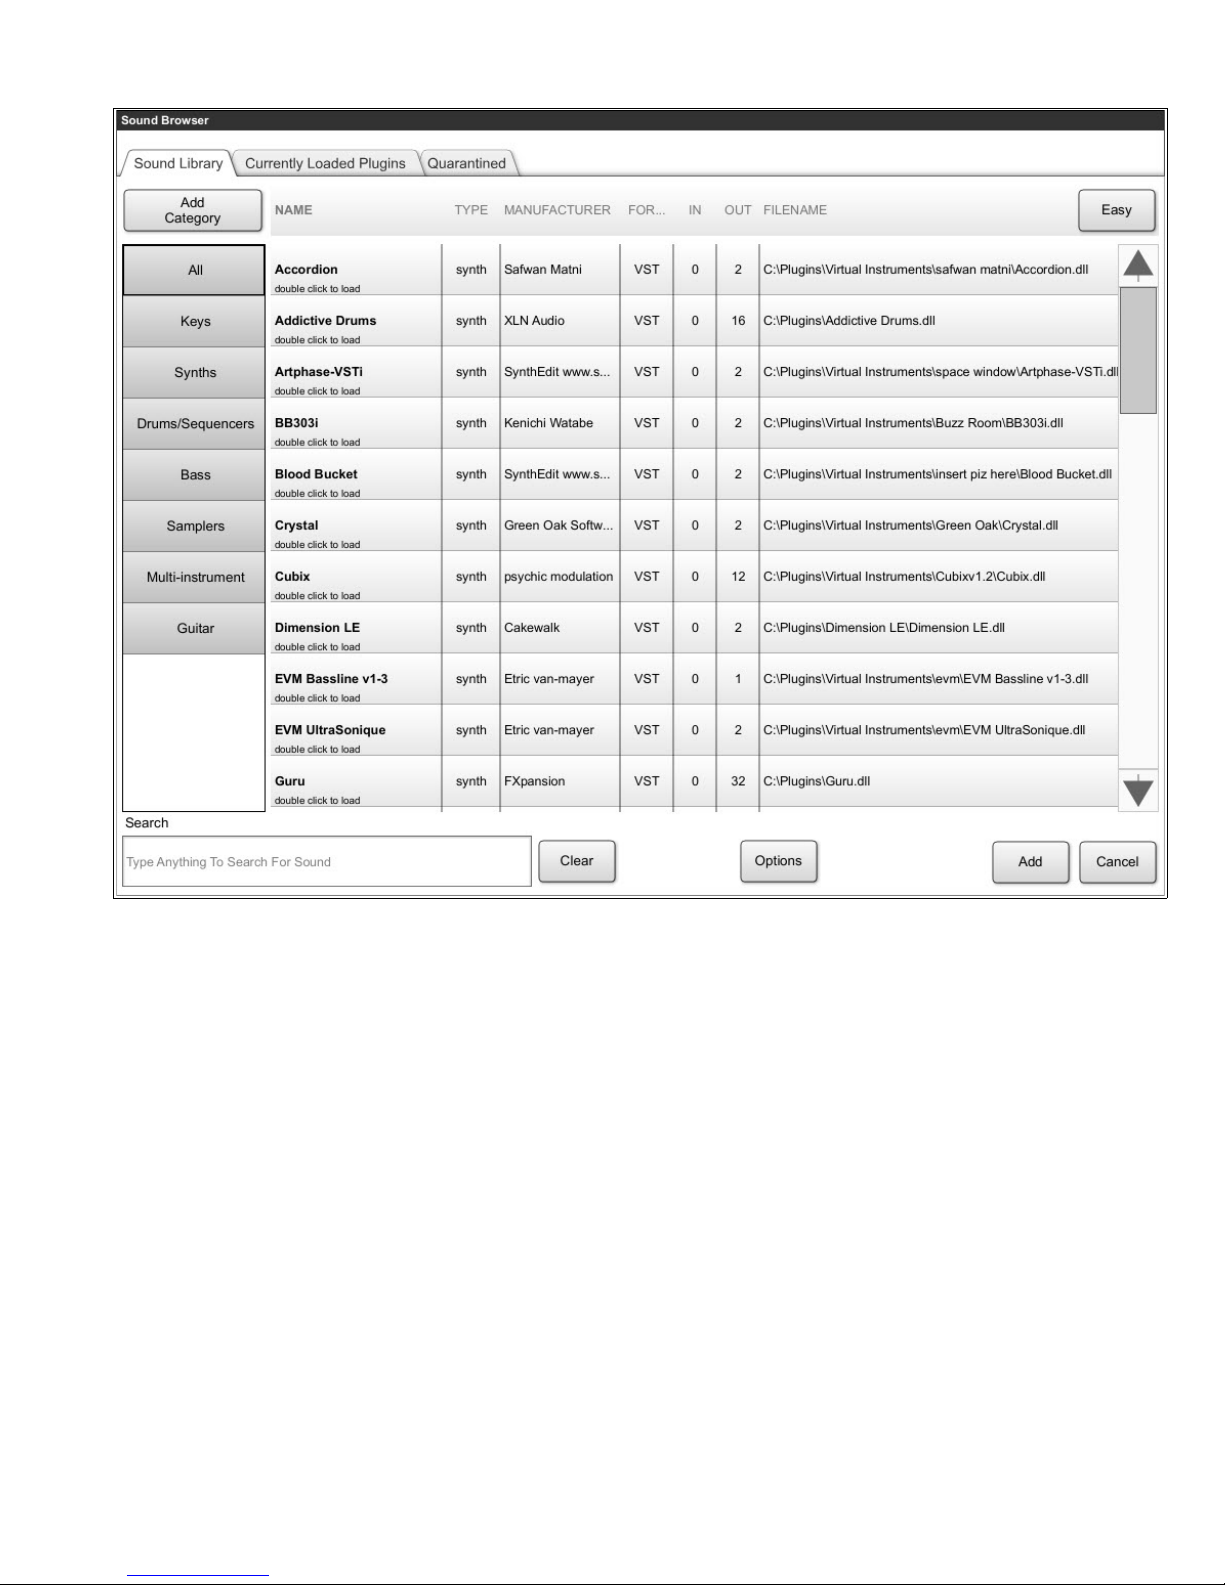
Sound Browser (Advanced View)
The Sound Browser is explained more in Chapter 5a.
Open Labs MiKo LXD Production Station Manual 41
Page 42

Before you can play a sound with Riff, you need to add a sound to the Set List. The Set List is gridbased and allows you to switch between Songs. You can easily see the status bar along the
bottom.
There are VU meters along that bottom showing the following:
• Audio levels for input and output signal
• Meters that display the overall CPU and Memory usage of the ENTIRE system.
• MIDI activity light.
Since this window is scroll-free, you can literally play an entire show with this screen. Refer to
Chapter 4 for more information on using the Set List.
Open Labs MiKo LXD Production Station Manual 42
Page 43
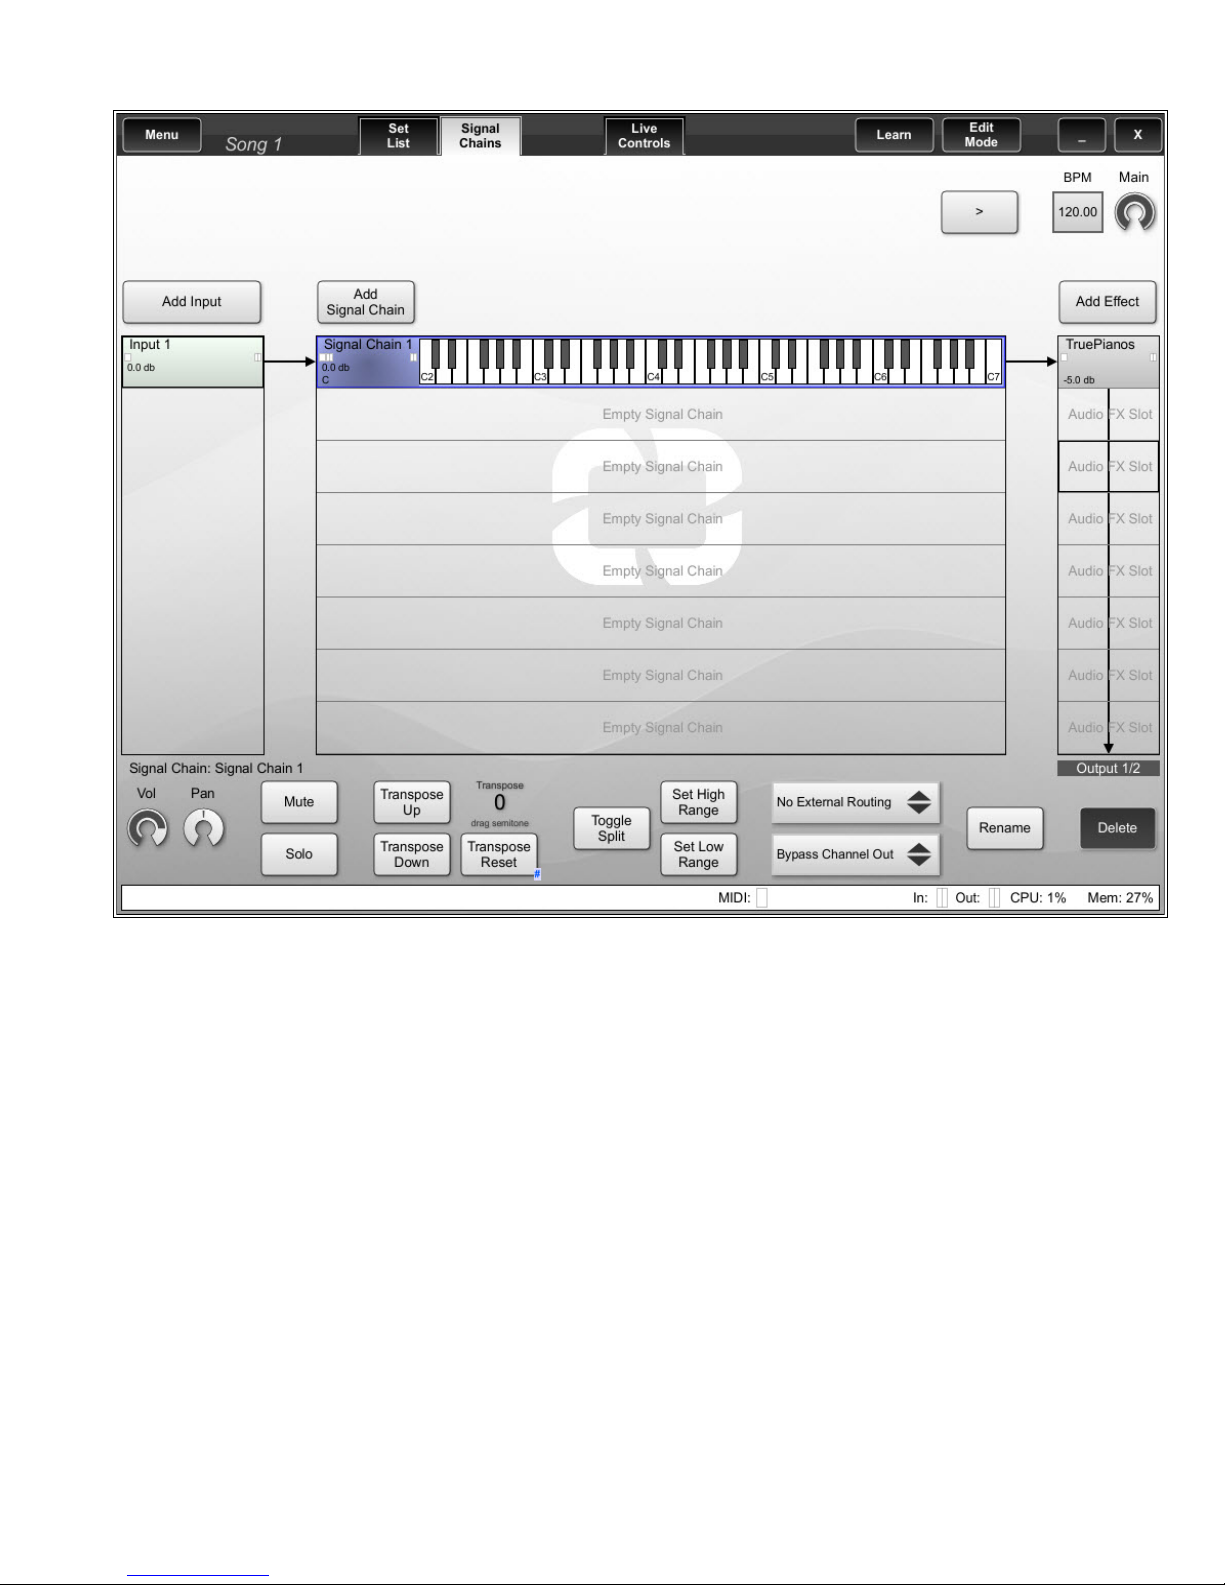
Signal Chain
The Signal Chain is a collection of plug-ins that start with an audio input stream and end with an
audio output stream. This is explained more in Chapter 5a.
Open Labs MiKo LXD Production Station Manual 43
Page 44

Instrument Editor
The Instrument Editor allows you access to a selected instrument/plug-in's graphical user interface
(GUI). You can also reach the Instrument Editor screen by double-clicking the instrument in the
Instrument Rack or in the Signal Chain. This is explained more in Chapter 5a.
Open Labs MiKo LXD Production Station Manual 44
Page 45

Live Controls
This is one of the most powerful features of Riff. On the Live Controls screen, you can build a
custom set of MIDI controllers that can be linked to any instrument, effect, or signal chain control
contained within a Song. Live controls for a Song are saved within that Song and can be easily
recalled, imported or exported. This is explained more in Chapter 3.
Open Labs MiKo LXD Production Station Manual 45
Page 46

5 b – U n d e r s t a n d i n g R i f f
5 b – U n d e r s t a n d i n g R i f f
This section will begin to familiarize you with navigating around Riff. Initially, don't worry about
being unsure with the controls - all will be explained.
Launch Riff
When you first launch Riff, the screen shown below appears. This Setlist is loaded with a default
set. Other defaults will have different looks.
Set List
This screen is called the “Set List”. The Song Grid, Title Bar, Title Bar Controls, Status Bar,
and Lower Section Controls make up this screen. This window allows you to add and switch
between virtual instruments. Each square of the grid is called a “Song”.
Open Labs MiKo LXD Production Station Manual 46
Page 47

Song
Use each square of the grid to create a song. A song can either be one square, or it can be a group of
squares to create all the parts for the song you are playing. As shown in the example below, using the
song grid you can arrange songs into a structure, rename and color code them for easy organization.
Each song is not just limited to one instrument. Once you go into the signal chain of each song
square, you have tons of options, like creating keyboard splits and adding VST effects. Refer to the
section regarding the Signal Chain for more information.
Title Bar
The Title Bar is the area of Riff that contains the program's control menu items. Items include:
Menu, Set List, Signal Chain, Instrument Editor, and Live Controls.
Menu Bar
• File
▪ New Set
• Creates a new Set from scratch.
• Launches a confirmation dialog, because creating a new Set will eliminate current
one.
• If you want to make a new Set, the current Set will be replaced with the new Set.
▪ Open Set
• Opens the Set List Browser.
▪ Open Recent Set
• Lists recently accessed Sets. Selecting from here will launch the selected set.
Open Labs MiKo LXD Production Station Manual 47
Page 48

▪ Open Set in Safemode.....
• Safemode is a simple way of diagnosing a
problematic Set. You can choose whether or
not to allow an instrument or effect to load.
▪ Save Set
• If no changes have been made to a Set, this
is grayed out.
▪ Save Set As...
• Choose this to save your Set with a custom name.
▪ Import – Allows the importing of the following items to a currently opened project.
• Import Song
• Import Input
• Import Rack
• Import Signal Chain
• Import Live Controls
• Import FXP (Program)
• Import FXB (Bank)
▪ Export – Allows the exporting of the following items.
• Export Song
• Export Input
• Export Rack
• Export Signal Chain
• Export Live Controls
• Export FXP (Program)
• Export FXB (Bank)
▪ Exit - Exits Riff
• Edit
▪ Cut, Copy, & Paste items to and from the clipboard
• Options
▪ General, Audio, MIDI, Plugin, and Keyboard options.
• Help
▪ Open Help
▪ About
• Opens the Riff Help File.
• Displays the information regarding the build version of Riff.
Open Labs MiKo LXD Production Station Manual 48
Page 49

Title Bar Controls
Learn
Switches the host into MIDI Learn Mode. Here, you
can latch live controls to VSTi's. There are two types
of Learn available in the host. See Chapter 4 for more
information.
• Learn – Ties knob to a specific controller.
• Learn Relative – Enables you to map a controller
to a common parameter, like the volume knob of multiple songs or signal chains.
Edit Mode/Live Mode
In Edit Mode a user can move around the Presets, arrange them, set the properties of the Banks
and create tabs. A user can still select Presets in Live Mode. It is just a way for the user to lock
down the interface.
When in Edit Mode here are a few things you can do:
• Create a new Song
• Import/Export sets
• Build a Signal Chain
• Create and Map Live Controls
When in Live Mode the following restrictions apply:
• No editing of live controls parameters except setting low and high
• No right-click menus anywhere
• No adding or removing Banks
• No adding or removing Instruments / Signal Chains
Minimize
Minimizes Riff
Close
Exits Riff
Play Button
This button toggles between play and stop. This is for
instruments that have built in sequencers (Guru, Stylus RMX, or
Reaktor for instance) and effects that are tempo synced.
BPM
This is the control for the global tempo. (BPM = Beats Per
Minute) Pressing The box under “BPM” brings up the BPM input
window.
Main - Volume Knob
Overall Master output volume knob of the host
• Can be dragged up or down to change value
• Ctrl + Left-click restores default (This applies to all knobs in Riff)
• Right-clicking here only brings up “Learn” mode
Open Labs MiKo LXD Production Station Manual 49
Page 50

Lower Section Controls
Previous and Next Song
When you have more than one song on your setlist, the Previous and Next song buttons will
appear. These allow you to go to the next song of your set. They can be MIDI learned to a surface
control.
Vol(Volume)
This volume knob controls the volume for the individually selected song. It is independent from the
Main Volume control.
• Right-clicking on the volume knob brings up Learn Mode.
• Learn – Ties the Vol knob to a specific controller
• Learn Relative – Ties the Vol knob to a controller but stays latched to the control volume on the
selected preset. Whatever preset is in focus will have its volume controlled.
Pick Color
Brings up the Color Picker dialog box. Here, the user can select the color choice for the preset.
Rename
This button allows you to rename the preset.
Status Bar
Tooltips
Tooltips will display info on what is being selected. Also, tooltips will show the numerical value of a
changed parameter, as well as the name and brief description of the controls as they are mousedover.
Audio VU Meter
The Audio VU meter shows the signal for the master output bus. By default, this will show outputs
one and two. This can be changed to show whatever outputs you are using.
MIDI Indicator
The MIDI Indicator shows whether Riff is receiving MIDI from any MIDI controllers. It also displays
the note/MIDI value.
CPU
CPU monitors the current processor usage of the entire system. Not just the program.
• Displays the usage in percentages.
MEM
MEM displays the physical memory usage of the entire computer system.
Open Labs MiKo LXD Production Station Manual 50
Page 51

Signal Chain
This is the main window where instrument racks and effect chains are created and managed.
These are the components that comprise the Presets from the Song/Set grid pages. Each of the
Song buttons on the Song/Set Grid page has a Signal Chain. Moving from left to right, each Track
is composed of up to 8 instruments. Each Instrument can have up to seven effects added to it.
Preset > Inputs > 8 Instruments > 1 Signal Chain > 1 Plug-in + 7 Effects
Open Labs MiKo LXD Production Station Manual 51
Page 52
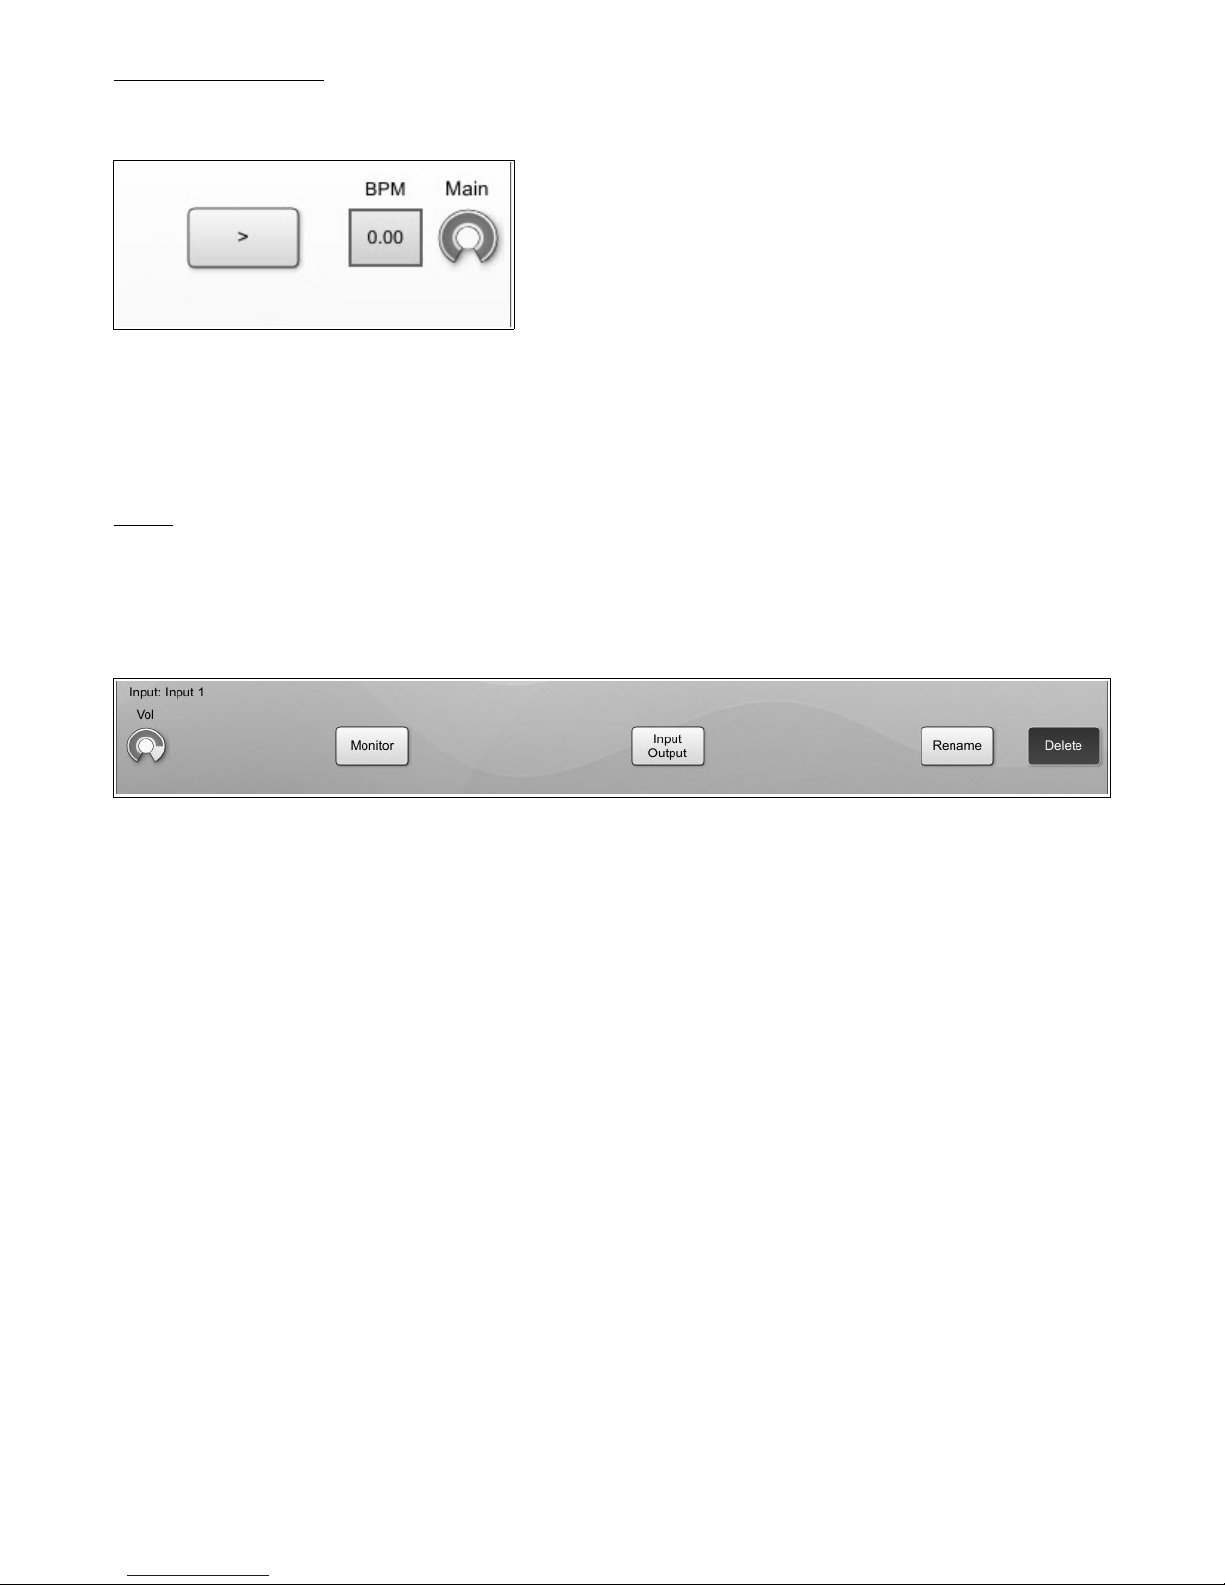
Upper Bar Controls
The Upper Controls are located above the Stream Processor and below the Title Bar.
• Play Button – This button toggles between play and stop. This is for instruments that have built
in sequencers (Stylus RMX, or Reaktor for instance) and effects that are tempo synced.
• BPM – This is the control for the global tempo. (BPM = Beats Per Minute) Pressing The box under
“BPM” brings up the BPM input window. As shown in the window on page 21.
• Main – Master output volume knob of Riff.
Input
• Add Input – This allows for an Input to be created with a signal chain containing a VSTi, or an
empty signal chain with no VST. In order to use the VSTi's and play them, an Input must be
selected with the desired plug-in.
Input Column Controls
The lower section of the screen shows the controls for the Input Column. Those controls are:
▪ Vol – Volume control for the Input. All instruments and their signal will be affected.
▪ Monitor – Allows you to monitor the Open Labs Keyboard, pad module, or external MIDI
device.
▪ Input / Output - Brings up the MIDI I/O window.
▪ Rename – Renames the currently selected Input
▪ Delete - Deletes the currently selected Input
Open Labs MiKo LXD Production Station Manual 52
Page 53

The lower section of the screen shows the controls for the Rack Column. Those controls are:
▪ Vol – Volume control for the Rack. All instruments and their signal will be affected.
▪ Mute – Mutes the Rack. All instruments and their signal chains will be affected.
▪ Solo - Solos the Rack and mutes all other Racks.
▪ Audio Output - Allows you to route a rack to a particular separate output.
▪ Rename – Renames the currently selected Rack.
▪ Delete - Deletes the currently selected Rack.
Signal Chain
• Add Signal Chain – Accesses the Sound Browser, where you can select a plug-in and add it to the
Instrument rack. Up to eight instruments can be added per Track.
Open Labs MiKo LXD Production Station Manual 53
Page 54

Signal Chain Column Controls
The lower section of the screen shows the controls for the Signal Chain Column. Those controls
are:
▪ Vol – Volume control for the Signal Chain. All instruments and their signal will be
affected.
▪ Pan – Pan control for the Signal Chain. All instruments and their signal chains will be
affected.
▪ Mute – Mutes the selected Signal Chain. All instruments and their signal chains will be
affected.
▪ Solo - Solos the Signal Chains and mutes all other Signal Chains
▪ Transpose Up - Transposes notes sent by one octave up.
▪ Transpose Down - Transposes notes sent by one octave down.
▪ Transpose Reset - Resets any transposed notes back to zero.
▪ Toggle Split – Allows you to open or close any keyboard splits you have created.
▪ Set High Range - Selecting this button brings up the Learn High Range dialog box
prompting the user to select the MIDI note that will be the highest note sent to the
instrument. The user hits the key on the Ivory keyboard and the high ceiling is set. The
change will immediately be seen on the keyboard layout on the Instrument rack.
▪ Set Low Range - Selecting this button brings up the Learn Low Range dialog box
prompting the user to select the MIDI note that will be the lowest note sent to the
instrument. The user hits the key on the Ivory keyboard and the low is set. The change
will immediately be seen on the keyboard layout on the Instrument rack.
▪ Signal Chain Router (External Routing) – Quickly allows you to change MIDI channels and
to inter-route between other Signal Chains. It also creates multiple key splits from one
multi-timbral instrument.
▪ MIDI channel selector (Channel Out) – Use this to create a MIDI channel output for the
selected signal chain. This is used when working with multi-timbral synths and external
MIDI devices.
▪ Rename – Renames the currently selected Signal Chain.
▪ Delete – Deletes the currently selected Signal Chain.
Stream Processor
• Add Effect – Brings up the plug-in browser, where you can select an effect to add to the signal
chain. Audio is processed from top to bottom, and effects can be switched around in order to
change their routing. Typically, the first slot is used for an instrument, while the plug-ins that are
below it affect its sound. The user can also load MIDI effect. These are plug-ins that output MIDI
rather than audio. These are placed above the sound generating plug-in so that it can pass MIDI.
Riff will not allow illogical configurations, (e.g. Sound generating plug-in, followed by a MIDI VST,
followed by an effect followed by another sound generator).
Once you add an effect, you will get a new tab on the Title Bar called “Effect Editor”.
Open Labs MiKo LXD Production Station Manual 54
Page 55

Selecting the “Effect Editor” will bring up the GUI of that effect:
If an instrument or plug-in is selected, you can access the list of the parameters for the plug-in by
clicking the “Show Params” tab on the Instrument Editor lower control screen. The last touched
control on the plug-in will be highlighted on the Params page. This is helpful for locating hard-todistinguish parameters.
This is a list of the raw parameters of an effect. This will also display parameters that might not be
accessible from the plug-in GUI.
Open Labs MiKo LXD Production Station Manual 55
Page 56

Effect Column Controls
The lower section of the screen shows the controls for the Effect Column. Those controls are:
• Pre – Pre control: Controls the input into the selected Audio FX.
• Vol – Controls the output of the selected Audio FX.
• FX Mix – Controls the wet/dry mix.
• Bypass - Bypasses the output of the effect.
• Presets - A drop-down box that allows you to quickly browse through preset sounds. Displays
the list of the Presets contained within the synth. Touching the Preset name will expand the list
into a scrollable list where a new preset can be selected
• Previous Preset – Selects the previous preset in the list.
• Next Preset – Selects the next preset in the list.
• Show Params – Shows all the VST parameters without the GUI making it easier to find and
change certain parameters. You can switch between a GUI and non-GUI.
• Make Default – Locks user created parameters as the default setting. This only applies to the
selected Song. Loading another instance of the VSTi will not load with this as the default setting.
The only exception to this of course is "Shared Instruments".
Open Labs MiKo LXD Production Station Manual 56
Page 57

Instrument Editor
If an instrument or plug-in is selected, you can access the GUI by clicking the Instrument Editor
tab on the Title Bar. Also, you can reach the Instrument Editor screen by double-clicking the
instrument in the Instrument Rack or in the Signal Chain.
Instrument GUIs larger than 1021x727 will display horizontal and vertical scroll bars. The controls
along the bottom are very similar to the controls seen on the Signal Chain tab. Any MIDI settings
learned here will be the same as the ones set on the Signal Chain tab.
• Vol – The volume here basically controls the amount of output that is sent to the next effect in
the Signal Chain. It is independent of the Vol control for the Instrument in the Instrument Rack
• Transpose Up/Transpose Down – Transposes notes sent by one octave up or one octave down.
• Presets – Displays the list of the Presets contained within the synth. Touching the Preset name
will expand the list into a scrollable list where a new preset can be selected.
• Prev Preset/Next Preset – Navigates through the Preset list. Can be Learned or Relative Learned.
• Show Params – This button brings up the parameters view of the current plug-in. Clicking it
again switches back to the plug-in's GUI. Refer to the next page for an example.
• Make Default - Locks user created parameters as the default setting for the selected song.
Open Labs MiKo LXD Production Station Manual 57
Page 58

Instrument Parameters
If an instrument or plug-in is selected, you can access the list of the parameters for the plug-in by
clicking the Show Params tab on the Instrument Editor lower control screen. The last touched
control on the plug-in will be highlighted on the Params page. This is helpful for locating hard-todistinguish parameters.
This is a list of the raw parameters of an Instrument. This will also display parameters that might
not be accessible from the plug-in GUI. The Lower control section is the same as the Instrument
Editor tab.
• Show Editor – Pressing this button will take you back to the Instrument Editor screen.
Exporting and Importing User Patches
If you tweak out a patch in an instrument, you can export that setting by going to
Menu>File>Export>Export FXP (Program). This also applies to Banks. Except you would pick
Export FXP(Bank) instead.
Open Labs MiKo LXD Production Station Manual 58
Page 59
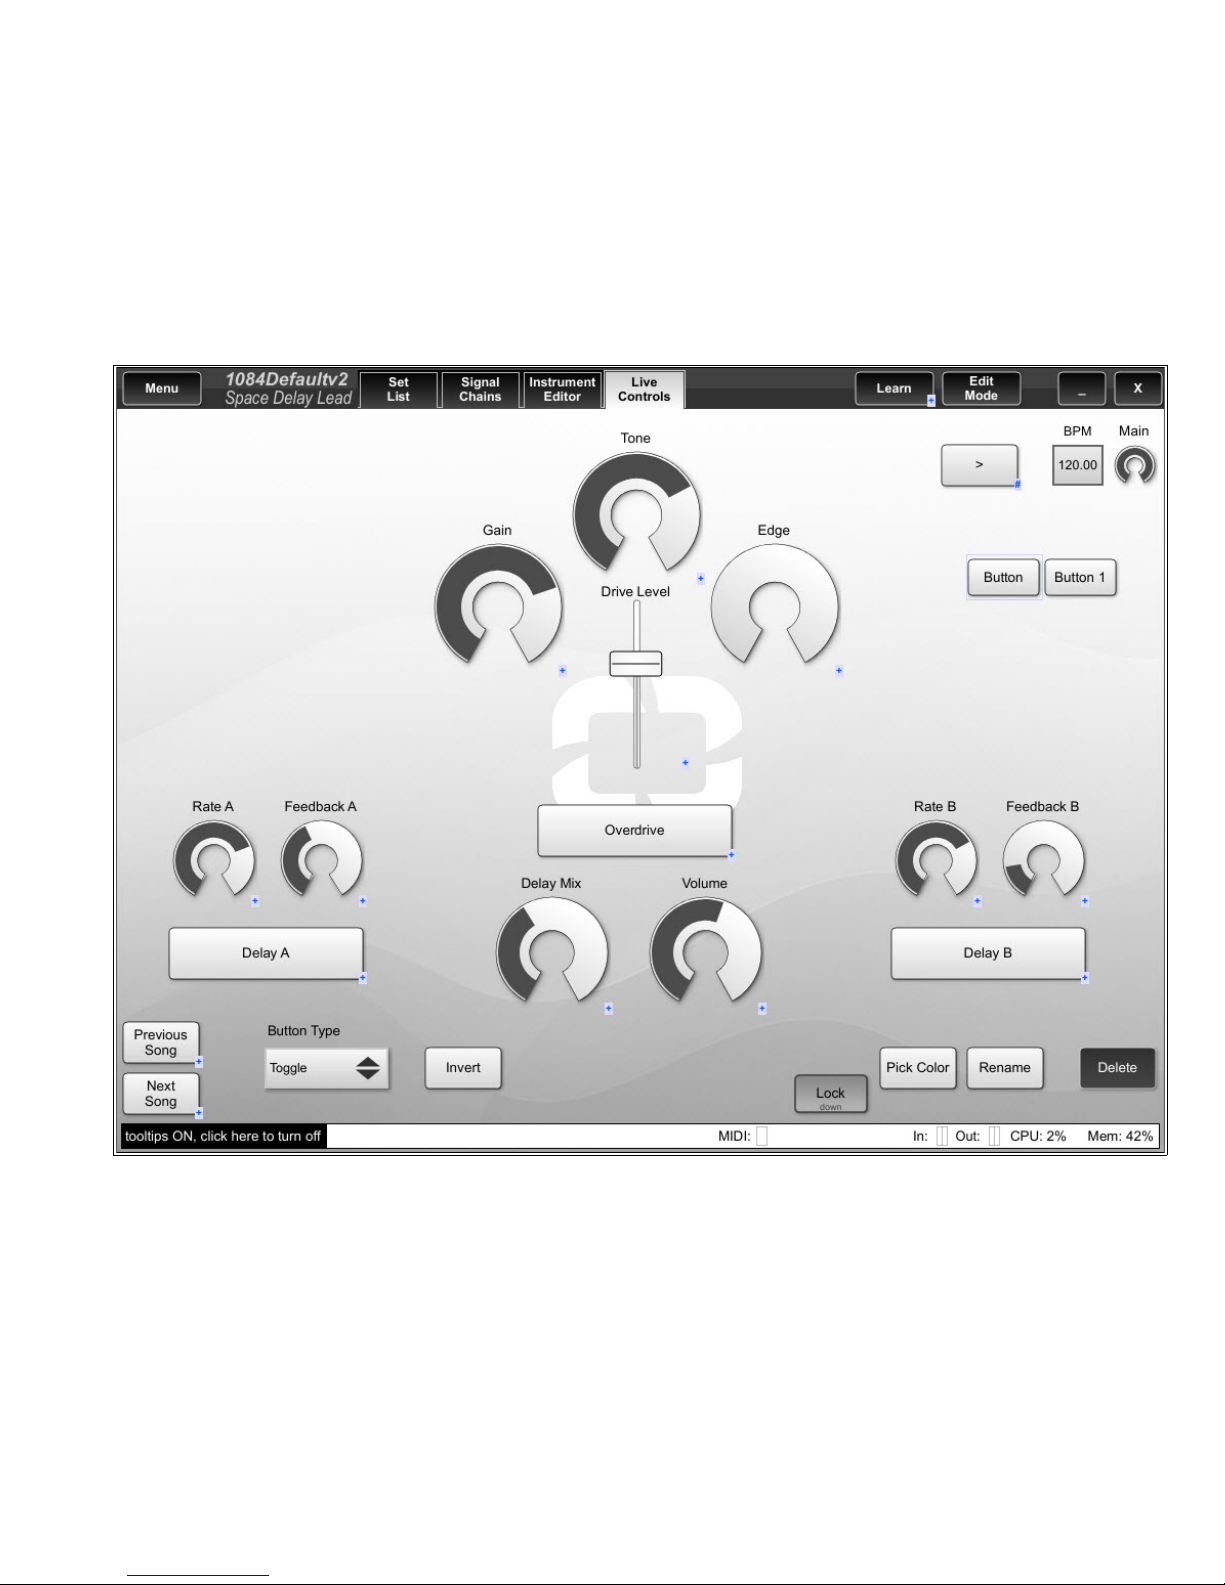
Live Controls
This is one of the most powerful features of Riff. On this screen you can build a custom set of MIDI
controllers that can be linked to any Instrument, Effect, or Signal Chain Control contained within a
Preset from the Song Grid. Live controls for a preset are saved within that preset and can be easily
recalled.
The Edit Mode toggle button toggles the Live Control screen between Edit mode and Live mode. In
Edit mode a user can add, remove, resize and edit the properties of the Live Control. Each Live
Control can be mapped to a plug-in parameter, just like a real hardware control. In Live Mode a
user cannot add, remove, resize and edit the properties of the Live Control.
A left-click, right-click or a touch via the touchscreen on an empty space will bring up the “Add”
menu. You can add a Knob, Button, Horizontal Slider, Vertical Slider, XY Pad, and a Text
Editor.
Open Labs MiKo LXD Production Station Manual 59
Page 60

Knob Properties/ Horizontal Slider Properties/ Vertical Slider Properties
• Invert – This option allows you to invert the Virtual Live Control function. This comes in handy
when working with VST's that have reversed buttons to bypass.
• Low – Sets the low boundary of a knob or slider.
• High – Sets the high boundary of a knob or slider.
• Oscillator Type - The knob can be made to self oscillate. Below is a listing of the Oscillator types.
▪ Sine - A sine wave is often thought of as
the most simple or pure wave because it
possess only one harmonic and is a
smooth wave.
▪ Triangle – A triangle waveform that rises
quickly to a particular amplitude, then
quickly drops.
▪ Saw - The sawtooth wave (or saw wave) is
named a sawtooth based on its
resemblance to the teeth on the blade of a
saw. Sawtooth waves ramps upward as
time goes by and then sharply drops.
However, there are also sawtooth waves
in which the wave ramps downward and
then sharply rises.
▪ Inverted Saw – Inverts the Sawtooth wave
type. Inverted Saw waves ramps
downward and then sharply rises.
▪ Square - The square wave alternates
quickly between two levels.
▪ Random - This randomly selects oscillator
parameter values.
• Time – Choose the rate of oscillation by adjusting this knob.
• Offset - Offsets the starting point of the oscillation dependent on the clock of the host. This is
used to make knobs/sliders hit their high/low ranges on different beats. Like on a 16th or 8th or
any desired beat.
• Use BPM - This button allows you to sync the knob/slider with Riff's BPM.
• Use Sequence - You can latch the oscillators to start with the play button of the host and any
other sequencer that has been synced to the host. When you hit play the oscillators start
oscillating along with a sequencer (if you have put it to sync with the host). This only applies to
the selected live control.
• Snap – Snap live controls to a grid.
• Lock – This will lock down all the live controls making them operable. This is similar to live-mode
but still allows you to edit the live controls, with the exception of resizing them.
Open Labs MiKo LXD Production Station Manual 60
Page 61

Button Properties
• Button Type - The options are Toggle (On/Off) and Momentary(Trigger)
▪ Toggle – When set to toggle, a button remains on until you press it again. Hence On/Off.
▪ Momentary – When set to Momentary, a button triggers when pushed and releases the
trigger when released.
• Invert – This option allows you to invert the button function. This comes in handy when working
with VST's that have reversed buttons to bypass.
• Snap – Snap live controls to a grid.
• Lock – This will lock down all the live controls making them operable. This is similar to live-mode
but still allows you to edit the live controls, with the exception of resizing them.
XY Pad Properties
• Low X/ High X – Sets the low and high ranges for the X axis on the XY pad.
• High Y/ High Y – Sets the low and high ranges for the Y axis on the XY pad.
Text Properties
Creates a box the user can use for typing notes, text or labeling in. For instance, the name of the
song or special tricks for that individual song.
• Edit Text – This allows you to input the actual text to be displayed when in live mode.
• Lock – This will lock down all the live controls making them operable. This is similar to the live-
mode but still allows you to edit the live controls, with exception of resizing them.
• Pick Color – Brings up the Color Picker dialog box. Here, the user can select the color choice for
the text.
• Delete – Deletes the currently.
Open Labs MiKo LXD Production Station Manual 61
Page 62
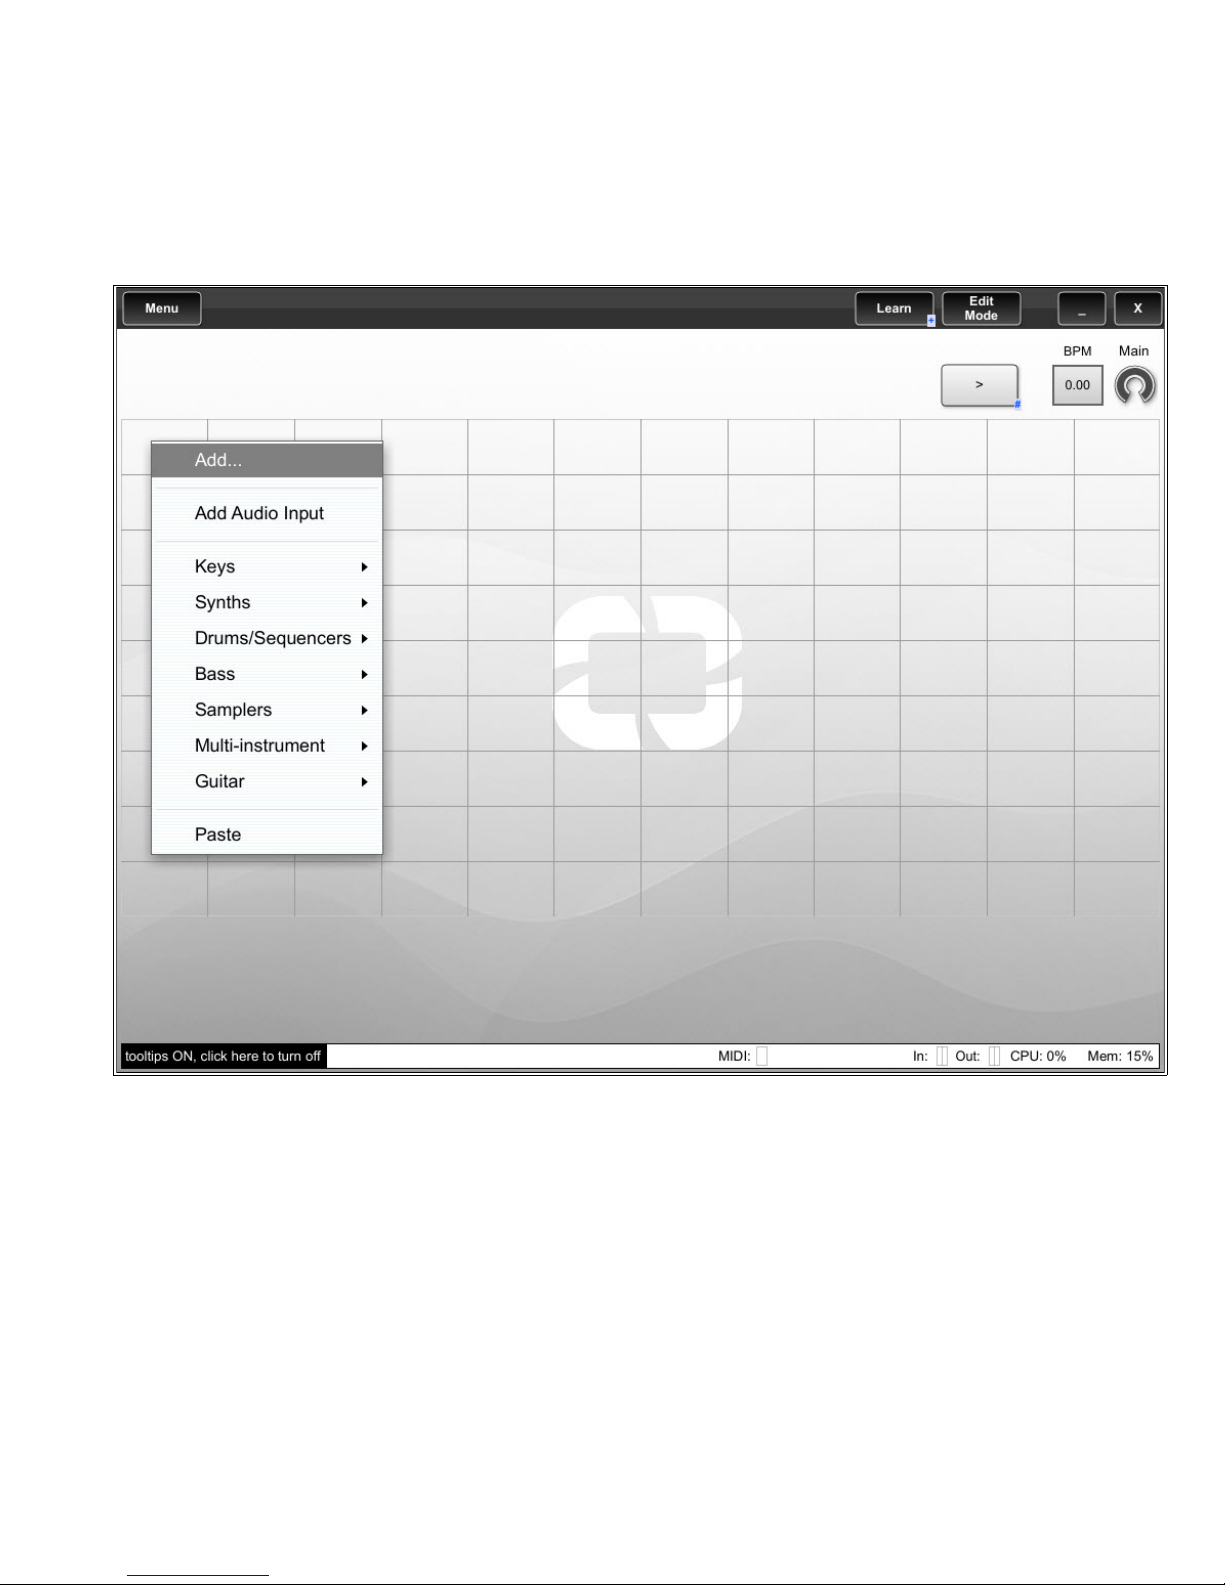
5 c – U s i n g R i f f : T u t o r i a l s
5 c – U s i n g R i f f : T u t o r i a l s
Using the Song Grid
Creating a New Set and Adding an Instrument
To create a new Song; First, right-click in a grid square and select “Add”.
After right-clicking, you can choose from “Add...”, or you can choose from an instrument category.
The instrument categories are: KEYS, SYNTHS, DRUMS&SEQUENCERS, BASS, SAMPLERS, MULTIINSTRUMENT, and GUITAR. Refer to Appendix B for a list of instruments.
Open Labs MiKo LXD Production Station Manual 62
Page 63

If you click “Add” you will see the Sound Browser. Pick an instrument from the list and press the [Add]
button. This will insert this instrument into the Song grid for you to play.
Open Labs MiKo LXD Production Station Manual 63
Page 64
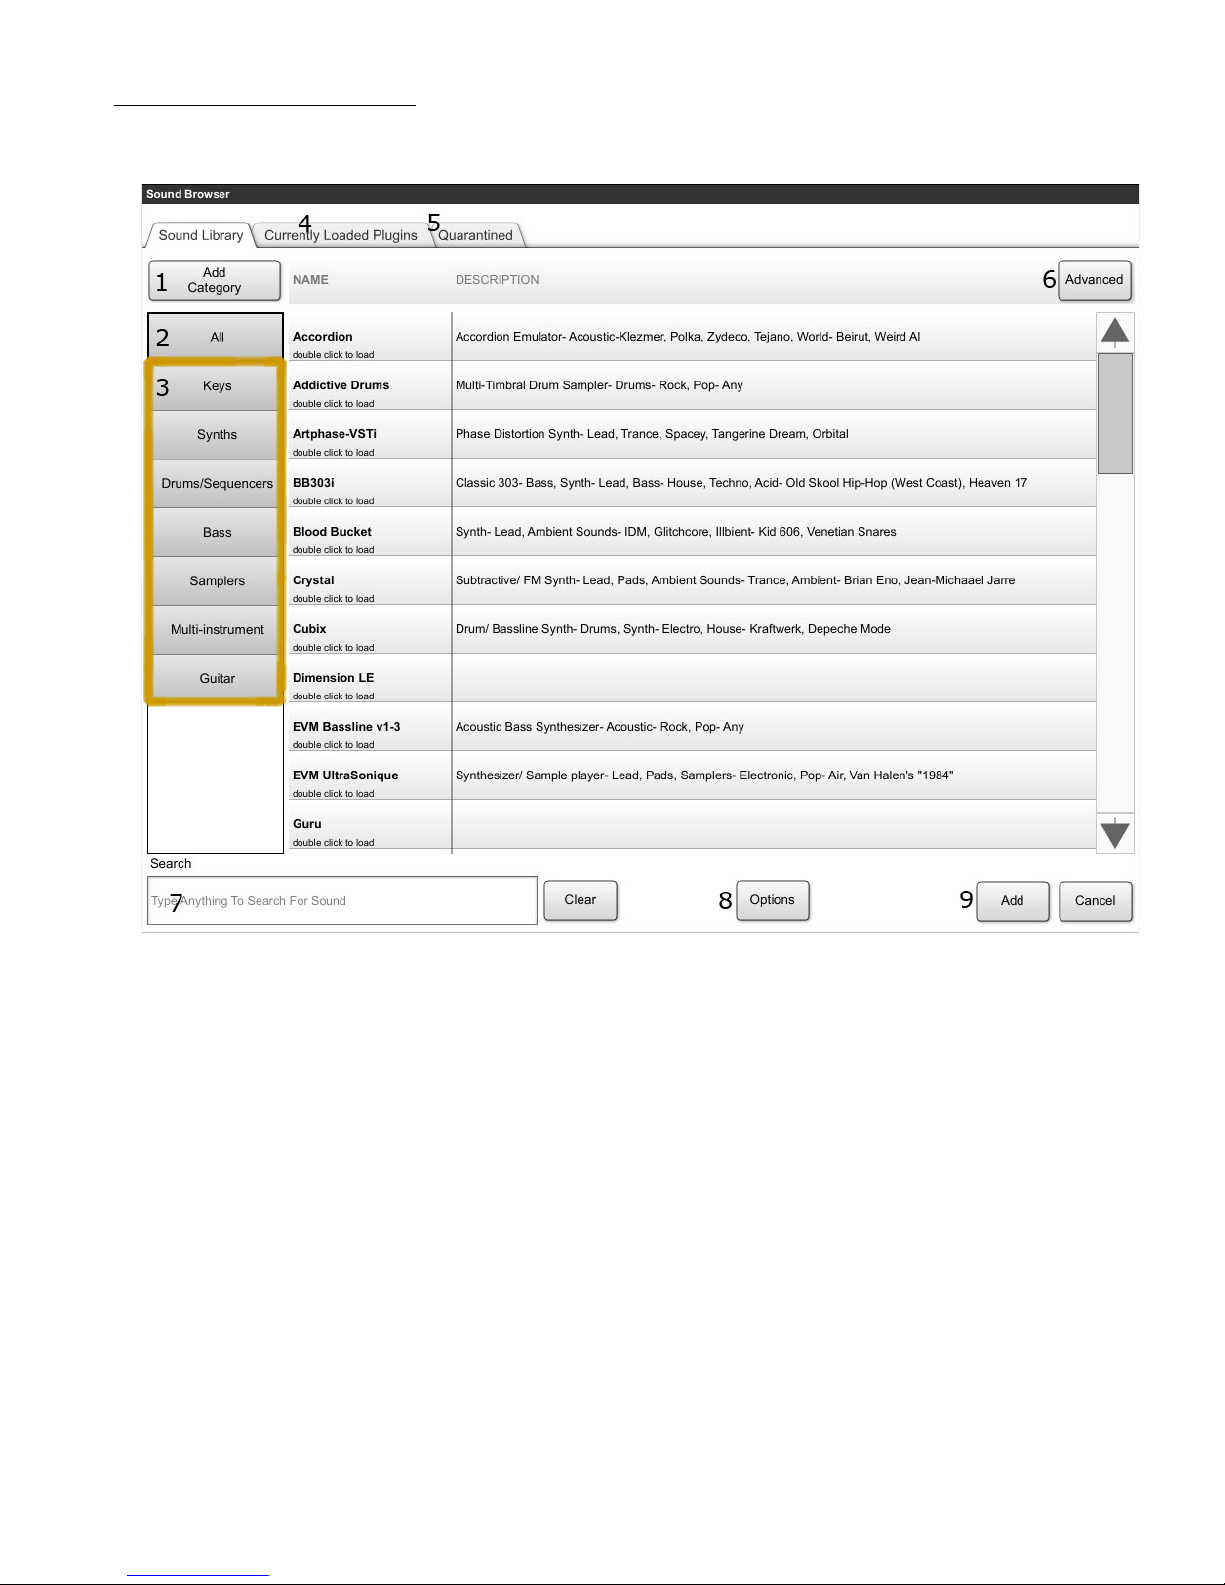
About the Sound Browser
The following will give you a run down of the Sound Browser.
1. Add Category – Adds a new custom category to the category column. Instruments can be
drag -n-dropped into a category. A Category can also be renamed to describe the type of
instruments it contains.
2. All – This list contains all the instruments profiled by your assigned plug-ins folder.
3. Categories – Instruments are arranged by their category. You can also create categories.
Right-click and select “Add”. Then drag a plug-in to this new category.
4. Shared Instruments – Lists all the instruments you have enabled for sharing.
5. Quarantined – If an instrument does not work properly with Riff, you can right-click it and
have it sent to the quarantine list.
6. Advanced – Switches the sound browser over to the advanced view. Selecting the advanced
view will become the default Sound Browser view until you press it again. Refer to the
image on the next page.
Open Labs MiKo LXD Production Station Manual 64
Page 65

The advanced window shows you the type of instrument, manufacturer, format (VST/dx), in/out,
and file path.
7. Search – Type in the name of an instrument then hit “Enter” on the keyboard to locate it.
Use the [Clear] button
8. Options – This launches Riff's options page as detailed in Chapter 2 “Plug-in Options”.
9. Add/Cancel – When you select an instrument in the list, press the [Add] button to add it to
the song.
Open Labs MiKo LXD Production Station Manual 65
Page 66
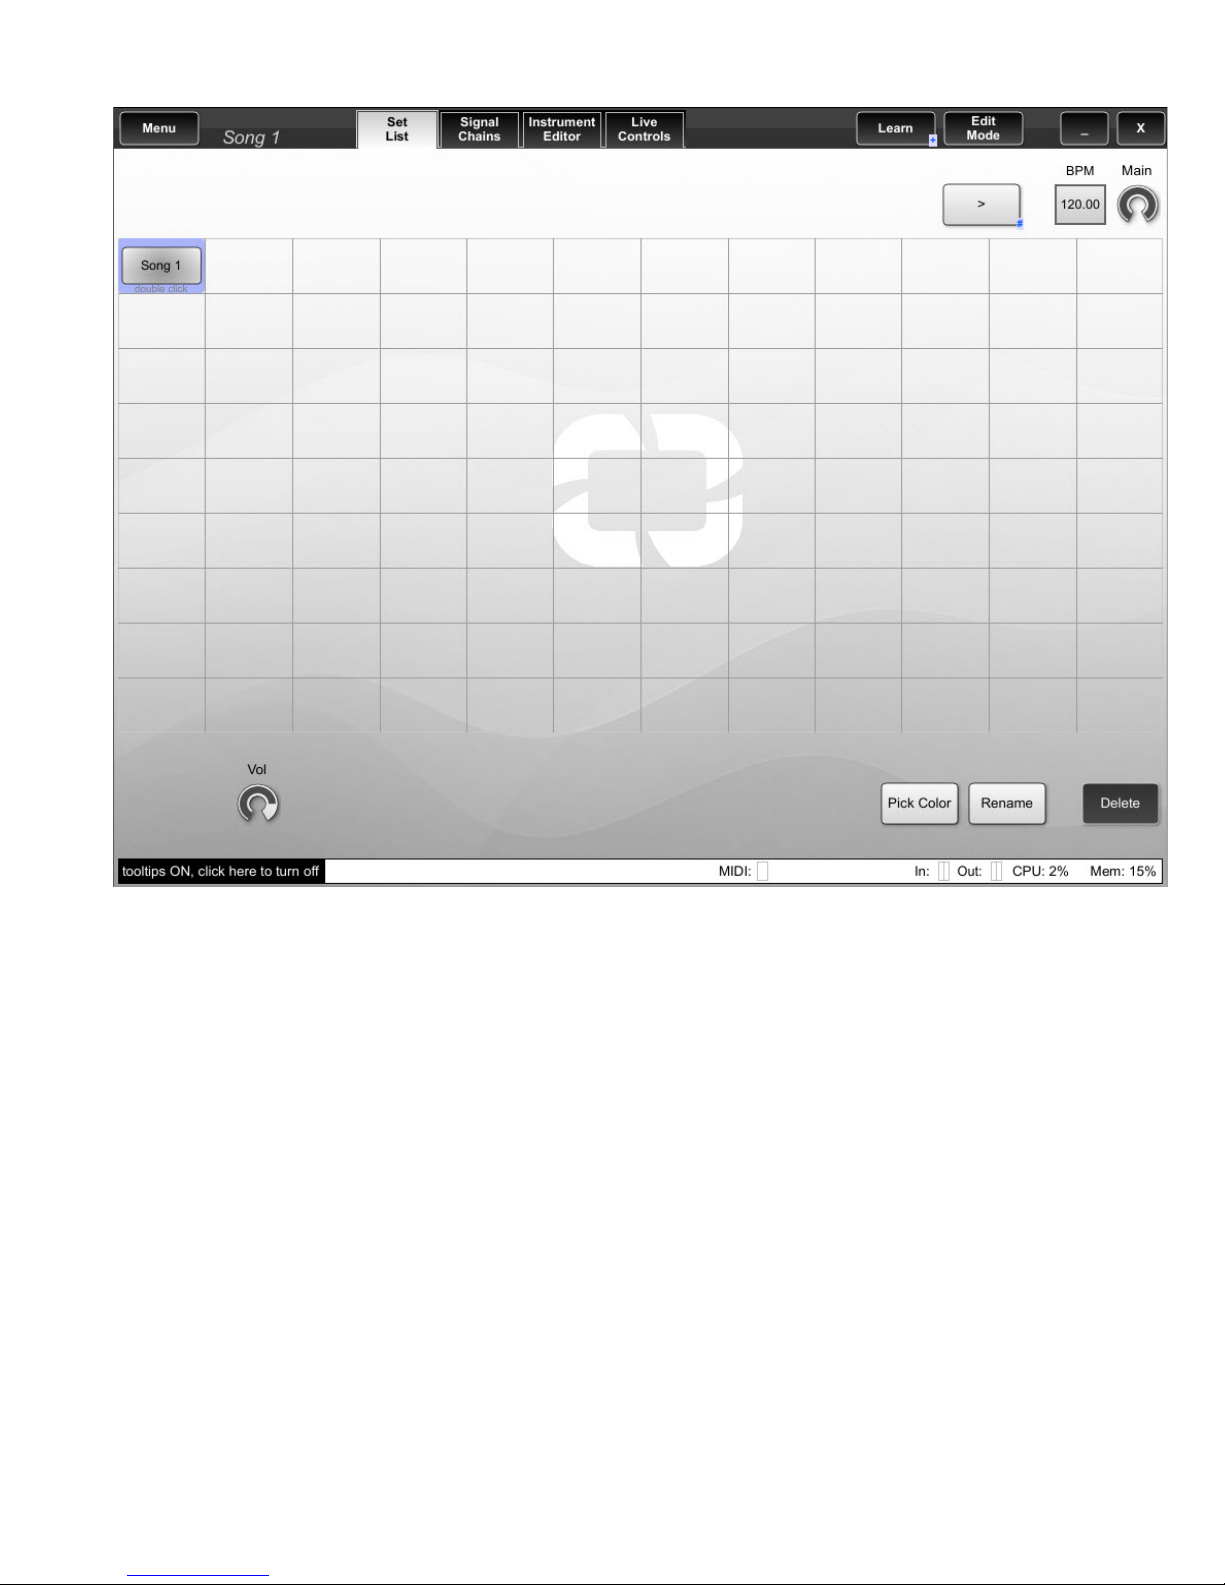
Once an instrument is added to the Setlist, this is what you will see.
You can now play this sound with the ivory keys.
If you want to adjust the settings of the instrument in the first song, click the [Instrument Editor]
tab, which is located on the Title Bar.
Open Labs MiKo LXD Production Station Manual 66
Page 67
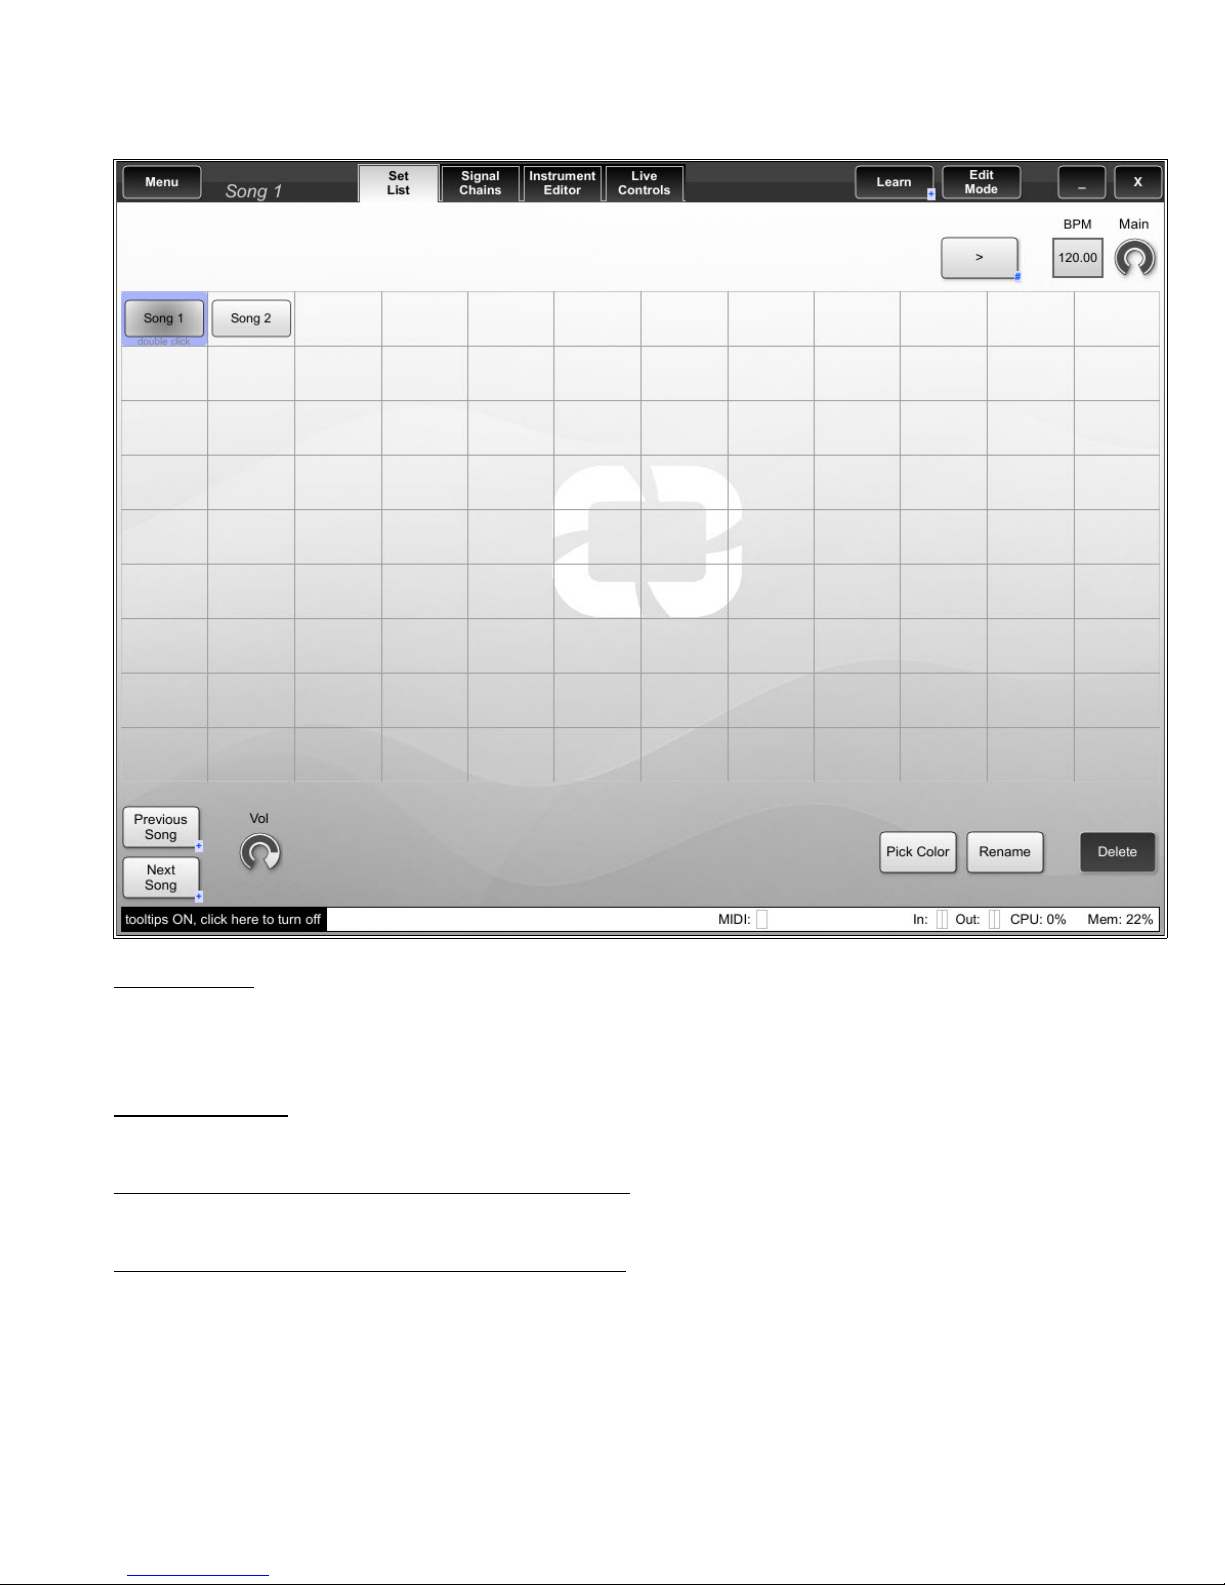
If you add another Song to the Set List, the [Previous Song] and [Next Song] buttons appear.
These two buttons will be in the lower left corner of the screen. And, will allow you to move to the
next song in the Set List.
Saving a Set
To save the current Set List, go to Menu>File>Save Set As....
When the window pops up, type in a name and hit [OK].
Rename a Song
Right-click a Song, then choose "Rename" and finally type in a name.
Importing Racks, Signal Chains, Songs, Inputs
Go to Menu>Import> here you will see the various import options.
Exporting Racks, Signal Chains, Songs, Inputs
Go to Menu>Export> here you will see the various export options. Make sure to have the item you
want to export selected.
Open Labs MiKo LXD Production Station Manual 67
Page 68

Using the Signal Chain
Adding an Additional Instrument to a Song
As stated in Chapter 3, a Song can contain multiple instruments in one song square. To add
multiple instruments to one Song, select the Signal Chain Tab at the top of the screen.
[Add Input] - This allows for an Input to be created with a signal chain containing a VSTi, or an empty
signal chain with no VST. In order to use the VSTi's and play them, an Input must be selected with the
desired plug-in.
[Add Signal Chain] – Use this button to create a new signal chain with a VSTi, or create an empty
signal chain for unique key splits. Touching the screen on a blank signal chain will give you the same
add option.
To add that additional sound to this song go ahead and press the [Add Input] button. Again, you
can decide to pick a sound by the category, or by using the Sound Browser.
The next image shows you that there are now two inputs in this song. Clicking on each input will
play (solo) that sound.
Open Labs MiKo LXD Production Station Manual 68
Page 69

Creating Keyboard Splits in a Song (Signal Chain)
Creating keyboard splits are now easier than ever! Select the input you want to create a split on.
Now click the [Add Signal Chain] button. Select a new instrument. For this tutorial, True Piano is in
the first signal chain, and Purity is in the second.
The above image shows that the second input now has two items in the Signal Chain. To adjust the
settings of a Signal chain instrument, select it in the signal chain then either select the
[Instrument Editor] tab, or double left-click the instrument to the right in the “Stream Processor”
section. Pick a sound for each Signal Chain instrument.
There are a couple ways to create splits. You can use the mouse and arrow pointer to create the
split. Or you can use the touch screen. Select the signal chain instrument that you want to split
and either touch screen/left-click and drag from the right or left of the keyboard. While you are
dragging, the ranges will split. The other way is to use the “Set Range” buttons.
If you are not satisfied with a split and want to revert, select the Signal Chain instrument and
press the [Toggle Split] button. This will spread the keyboard back to full range with no split.
Now let's create that split using the “Set Range” buttons:
Select the first signal chain. Press the [Set High Range] or [Low Range] buttons. These are located
at the bottom of the screen.
Pressing the [High Range] button brings up the following dialogue window.
Open Labs MiKo LXD Production Station Manual 69
Page 70
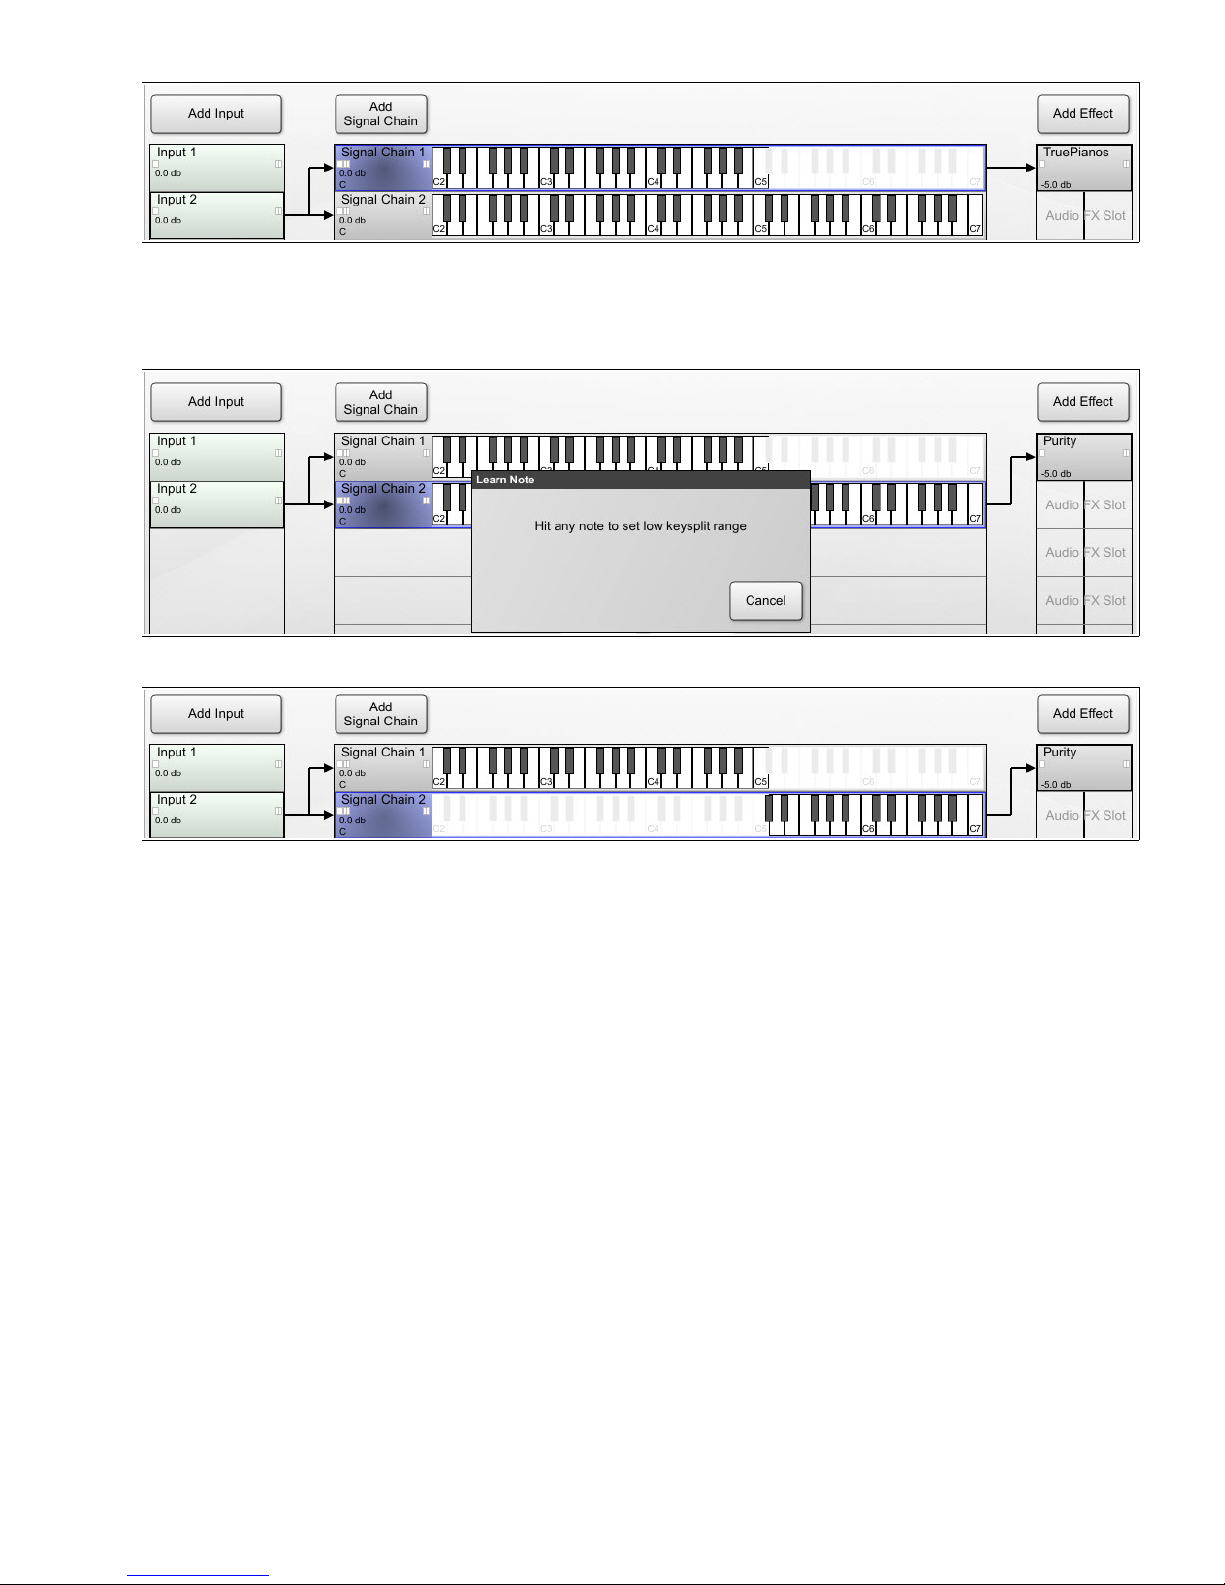
Press the “C3” key on the MiKo/NeKo ivories.
All notes above “C3” are now split off.
Now, select the second Signal Chain. And press the [Set Low Range] button. You will see the
following:
Press the “C#3” key on the MiKo/NeKo ivories.
As you can see you now have the lower section of True Pianos split from C3 down, and Purity split
from “C#3” up.
Open Labs MiKo LXD Production Station Manual 70
Page 71

Adding Effects to an Input or Signal Chain
You can add a VST effect or MIDI effect to the desired signal chain. A maximum of seven audios,
or seven MIDI effects can be chostn per signal chain. More information regarding the Stream
Processor (effects column) can be found in Chapter 3.
Audio FX Slot: This is where all the audio effects are stored for the chostn signal chain. To add an
effect, use the [Add Effect] button located above or simply touch the screen on a blank slot under.
Pressing [Add Effect] will bring up an effects browser very similar in workings as the Sound
Browser.
You may find it simpler to just touch the Audio FX area, then you will see the following:
You can choose an effect by the category.
The next screen shot shows that there is an effect (in the Stream Processor) under True Pianos.
Open Labs MiKo LXD Production Station Manual 71
Page 72

When the effect is selected the “Effect Editor” will be present in the title bar.
Open Labs MiKo LXD Production Station Manual 72
Page 73

Adding MIDI FX
To add a MIDI FX, left-click and drag the VSTi down by one slot, and this will open up the MIDI FX
slot. If there is already an instrument and an audio effect already present, you will have to move
each effect down one slot to open up the MIDI FX slot.
Right-click the "MIDI FX Slot" and select [Add MIDI Effect..].
A screen similar to the sound browser will appear, here you choose the MIDI effect. The type of
MIDI effects you can expect to find here in Riff are arpeggiators, MIDI note repeaters, basic MIDI step
sequencers, humanizers, etc.
Open Labs MiKo LXD Production Station Manual 73
Page 74

The next screen shot shows the MIDI effect "Sequencer Baby" has been added to the MIDI FX slot.
Just like regular audio effects, a MIDI effects parameters can be edited via the effect editor.
Open Labs MiKo LXD Production Station Manual 74
Page 75
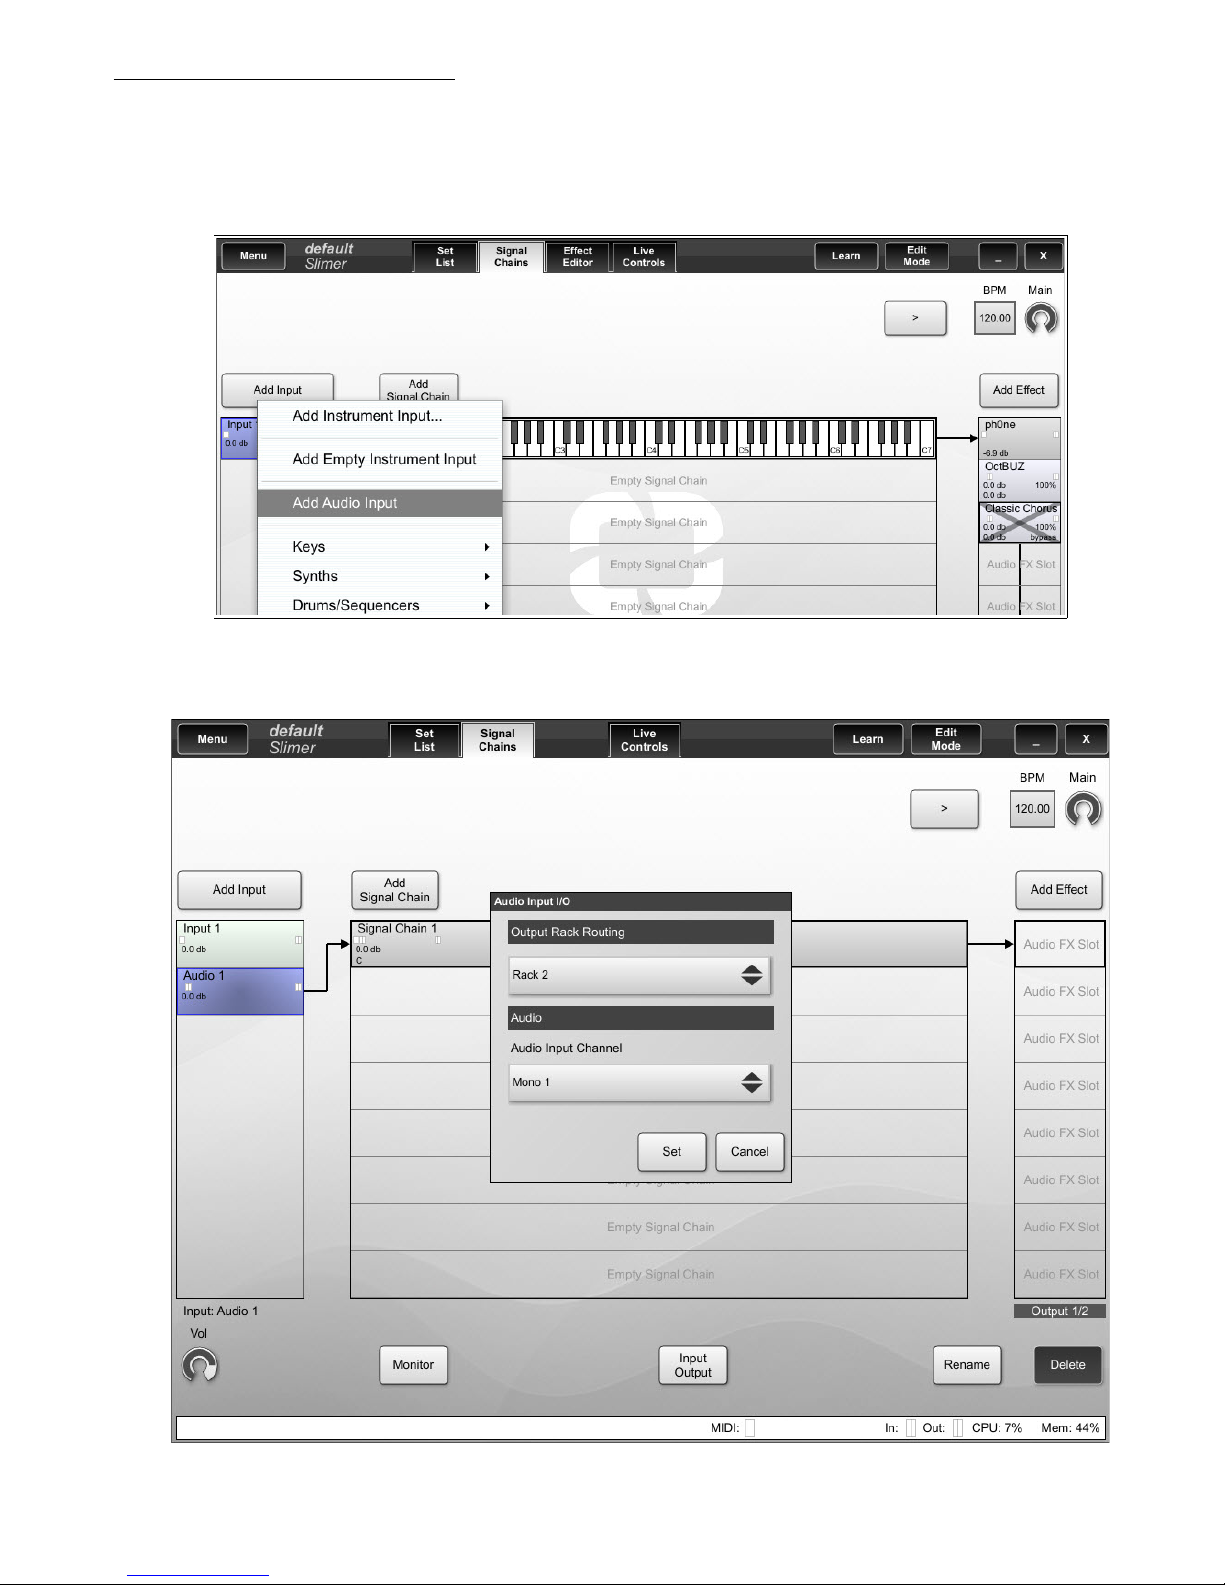
Creating and using Audio Inputs
Riff allows you to feed the signal chain a signal from a live input device, such as a guitar, bass, or
microphone. Refer to Chapter 1 for audio device setup options.
Click on the [Add Audio Input] button to insert the audio input to the signal chain.
Once the input is inserted, click the [Input Output] button in the center of the lower control
section. Use this to configure your audio input source.
Open Labs MiKo LXD Production Station Manual 75
Page 76

Edit Mode vs. Live Mode
Edit Mode: Changes can be made to a song's parameters.
Live Mode: Locks down many of the parameters associated with songs.
MIDI Learning Hardware Controllers
Most parameters in Riff can be MIDI "Learned”.
The first tutorial will show you how to MIDI learn an Riff button to a hardware button on the MiKo/
NeKo.
First off, return to the Set List and add a couple of Songs. This will show you how to MIDI learn
hardware buttons to control the Previous and Next Song command.
Right-click on the [Previous Song] button.
These are the items you can see in this window.
1. Learn – MIDI learn maps host buttons to MIDI controllers, virtual live controls to VST's, and
virtual live controls to MIDI controllers.
Open Labs MiKo LXD Production Station Manual 76
Page 77

Once you select “Learn” the screen will turn red which means Riff is waiting for you to press a
button on the MiKo/NeKo. If you look at the Title Bar you will see the [Learn] button now says
“Learning”. To cancel learning, press the "Learning" button.
Select a button on the MiKo/Neko, once you do this the control will be latched. The following
picture shows a small icon in the lower right corner of the [Previous Song] button. This represents
that this control has been latched to a controller.
The [ + ] sign is for something that has been learned, the [ # ] sign represents that a control has
been learned relative.
Open Labs MiKo LXD Production Station Manual 77
Page 78

Right-clicking a control that has been MIDI learned will yield new options.
1. Learn – MIDI learn maps host buttons to MIDI controllers, virtual live controls to VST's, and
virtual live controls to MIDI controllers.
2. Unlearn Hardware – Use this to release a mapped item from it's MIDI controller. This option is
only available when you have an item mapped.
3. Learn Properties – The following image shows the options in learn properties. This option is only
available when you have an item mapped.
Info: this section will tell you the MIDI CC number, and the MIDI channel a particular control
has been mapped to.
Properties:
• Soft Takeover: Allows the user to realign a latched hardware controller to the
corresponding VST parameter smoothly.
• Invert: Reverses the high/low or on/off settings of a Live Control.
• Low/High: Refers to the minimum and maximum value of a parameter's range.
Hardware Type:
• Encoder: Informs Riff that an encoder hardware control is being used to perform as a
regular knob. Instead of sending +/-1 it will scale from 1 to 127.
• Sensitivity: Will change the rate at which the value is increased or decreased. It's
similar to the "touchy" knob in live controls.
Open Labs MiKo LXD Production Station Manual 78
Page 79

Learn Relative
Various controls in Riff can be set to MIDI "Learn Relative".
Learning a parameter to "Learn Relative", keeps that mapping for all songs. For example, if you learn
relative the signal chain mute:
It will mute the highlighted signal of any song (not just the particular one you are in). As long as you
save this set, when you close Riff and reopen it, the learn realative mute will still function the same
across all songs.
Here are some controls that can be learned relative:
• Setlist lower section Volume
• Setlist lower section play button
• Signal Chain page lower section volume
• Signal Chain page lower section Monitor button
• Signal Chain page upper control play button
• BPM Tap tempo button
• BPM +1/-1 buttons
• Signal Chain instrument lower section volume
• Signal Chain instrument lower section pan
• Signal Chain instrument lower section mute
• Signal Chain instrument lower section transpose up/down
• Signal Chain instrument lower section transpose reset
• Instrument editor lower section volume
• Instrument editor lower section transpose up/down
• Instrument editor lower section transpose reset
• Instrument editor lower section previous/next preset buttons
• Live controls lower section low/high knobs (all live controls Virtual Live Controls)
• Live controls lower section knob/horizontal properties time and offset knobs
Open Labs MiKo LXD Production Station Manual 79
Page 80

Creating and Using Live Controls
The Live Controls are where virtual knobs, sliders, buttons and XY pads can be created, and
mapped to MIDI controllers on VSTi plug-in parameters. You can also create Live Controls for VST
effect plug-ins.
Here is an example of a Live Control set made for a VSTi.
These controls can be directly linked to the parameters of a VSTi or VST.
Hovering over a latched Live Control like the volume for instance, will allow you to see what
parameter a Live Control is latched to. Not all VST plug-ins will give such detailed information.
Open Labs MiKo LXD Production Station Manual 80
Page 81

Create a New Live Control
To create and use a Live Control with an instrument, try the next tutorial.
First, create a new Song. For this tutorial insert the plug-in called “MrRay22”. Click on a grid, go to
the “Keys” category and select “MrRay22”.
Click on the instrument editor tab to show the GUI of Mr. Ray.
The first Live Controls will be for the “Strength”, “Stiffness”, “Rel”, and “Kbd” knobs in the Mallets
section.
Open Labs MiKo LXD Production Station Manual 81
Page 82

Click on the “Live Controls” tab. And add a Knob to the grid.
Repeat this step three more times for a total of four Knobs.
Select the first Knob, right-click it and select “Learn”.
Once you do this, the entire grid will turn red indicating a control ready for “Learning”.
When Riff is in Learning mode, the program awaits for you to select a parameter to latch this knob
to.
Open Labs MiKo LXD Production Station Manual 82
Page 83

Click the “Instrument Editor” tab to get back to the GUI of Mr. Ray. Touch the "Strength" knob
using either the touchscreen or the touchpad.
This screen will turn back to the default color and this control learned to the Live Control. Click on
the “Live Controls” tab once again.
Switch Riff over to “Live” mode, play notes on your keyboard, and use the touchscreen to move
the first knob.
Hovering over the first knob shows it to be mapped to Mr. Ray, Param 23 which is Mallets:
Strength.
To rename or change the color of a Live Control, switch back to “Edit Mode” select the Live Control
and press the [Pick Color] or [Rename] button.
Go ahead and learn the other three knobs to the controls of the Mallets section of Mr. Ray.
Open Labs MiKo LXD Production Station Manual 83
Page 84

Using Oscillators with Knobs/Sliders
Knobs and sliders can have an oscillator added to them.
First off, setup a knob in your Live Controls. For this tutorial, I am going to use the same Live
Controls made in the last tutorial with Mr. Ray.
Click on the knob, then select the "Oscillator Type". Pick the type of osciallater type you would like
to use. Once you do this the oscillator will take control over the knob.
• You can sync the oscillater to the BPM of the current song by clicking on the [Use BPM] button.
Also, you can sync to the sequencer host by using the [Use Seq] button.
• You can latch the oscillators to start with the play button of the host and any other sequencer
that has been synced to the host. When you hit play the oscillators start oscillating along with a
sequencer (if you have put it to sync with the host). This only applies to the selected live
control.
Open Labs MiKo LXD Production Station Manual 84
Page 85

Mapping Live Controls to the Lower Control Section
If you have an oscillator latched to a Live Control knob, you can have that oscillator control the
volume or pan control of a signal chain. The following tutorial will show you how to MIDI learn a
Live Control Oscillator to the volume knob of a signal chain.
Create a new Song and add any instrument.
1. Go to the [Live Controls]
tab and add a new knob.
Select the new knob and add
an oscillator.
2. Select the [Learn] button,
then select the Knob.
3. Select the [Signal Chains] tab and select the volume knob in the Lower Controls.
Open Labs MiKo LXD Production Station Manual 85
Page 86

Saving and Exporting Live Controls
Saving the Live Controls with the instrument will ensure that every time you open this Set this
instrument will have these same live controls, and they are ready to use.
If you create a complete Live Control set for an instrument or Song, and want to save just the
control array, you can Export this out of Riff for use with another song. Keep in mind, no mappings
will be kept in this type of export. To export, go to Menu>File>Export>Export Live Controls, type
in a name and hit [OK].
Open Labs MiKo LXD Production Station Manual 86
Page 87

Using Multi-timbral Instruments / Sharing Instruments
This section of the tutorial will focus on using Multi-timbral instruments in Riff, but will also give
you some insight on using the "Shared Instrument feature". We will you show you two ways to use
a multi-timbral instrument.
A multi-timbral instrument is a VSTi that can use up to 16 MIDI channels at once. Purity is an
instrument that falls into this category, and is also preinstalled on an Open Labs production station.
If you are using an Instrument like Purity, which is multi-timbral and a sample player, the benefits
are crucial.
Using the "Currently Loaded Instrument" option allows you to use one instance of an instrument in
multiple songs. This will save you tons of system performance and allow you to achieve far more
complex instrument arrangements.
Anytime you are using big libraries it's a good idea to set an instrument to shared.
Shared instruments are not limited to an instrument having to be multi-timbral. You can set any
instrument to be shared. Some normal instruments like True Pianos can be shared. True Pianos is
known to use more system resources than other similar instruments. Instruments that sound
better generally use more resources.
Open Labs MiKo LXD Production Station Manual 87
Page 88

Sharing Instruments
To help save system resources, Riff has a great solution. This solution is called sharing
instruments. For instance if you are planning to use the instrument "Purity" on more than one
Song, normally you would have to load a new instance of Purity on each Song.
Every time you add a new instance of that instrument you use more system resources.
Riff allows you to use a "Currently Loaded Instrument" multiple times. Hence, this instrument
becomes a "Shared" instrument.
To Share an instrument, first create a new Song, and add Purity to it. After doing that, go to a new
grid of the Setlist, select [Add], the sound browser appears. However, this time instead of adding a
new instance of Purity, select the [Currently Loaded Plugins] tab.
Here you will see your list of Currently Loaded Plugins. Instead of loading a new instance of an
instrument, select the currently loaded instance of Purity and either press the [Add] button or double
left-click the instrument. This is how you share an instrument in Riff.
The next part tutorial will show you how to use this shared instance of Purity as a multitimbral
instrument.
Open Labs MiKo LXD Production Station Manual 88
Page 89
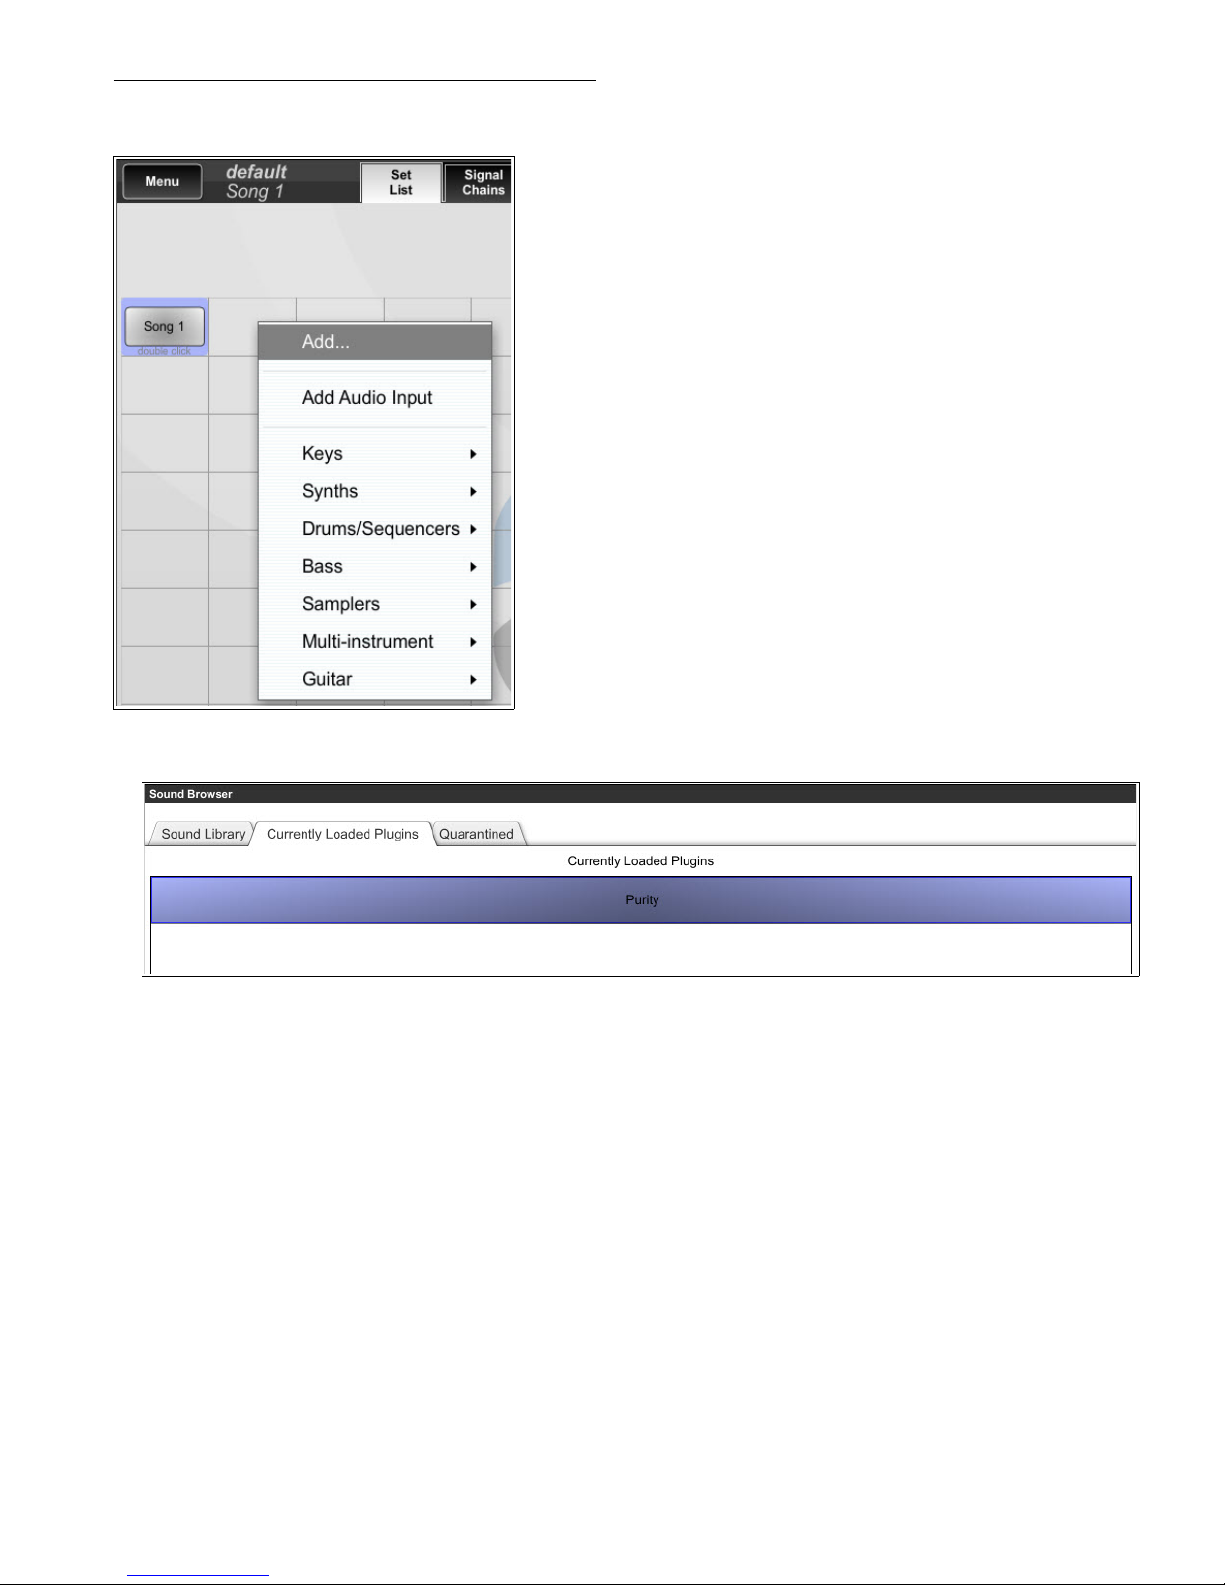
Song Grid and the Multi-timbral Instrument
1. Start a new Song and select [Add].
2. Select the [Currently Loaded Plugins] tab and add the currently loaded (shared) version of "Purity".
After [Add] has been pressed, a new Song is created with this "shared" instance of Purity as the
instrument.
Open Labs MiKo LXD Production Station Manual 89
Page 90

3. Go to the [Signal Chains] tab. Look at the Stream Processor, Purity is now yellow and the word
"SHARED" is present in the tab. This confrms this instrument is indeed shared.
Time to set up Purity for multi-timbral use. Purity is just the example for this tutorial, however
many multi-timbral instruments work similar.
The goal here is to have one instance of Purity running, utilizing its multi-timbral interface having
sounds loaded on separate Songs.
For this tutorial, only four Purity MIDI channels and sounds will be used.
Open Labs MiKo LXD Production Station Manual 90
Page 91
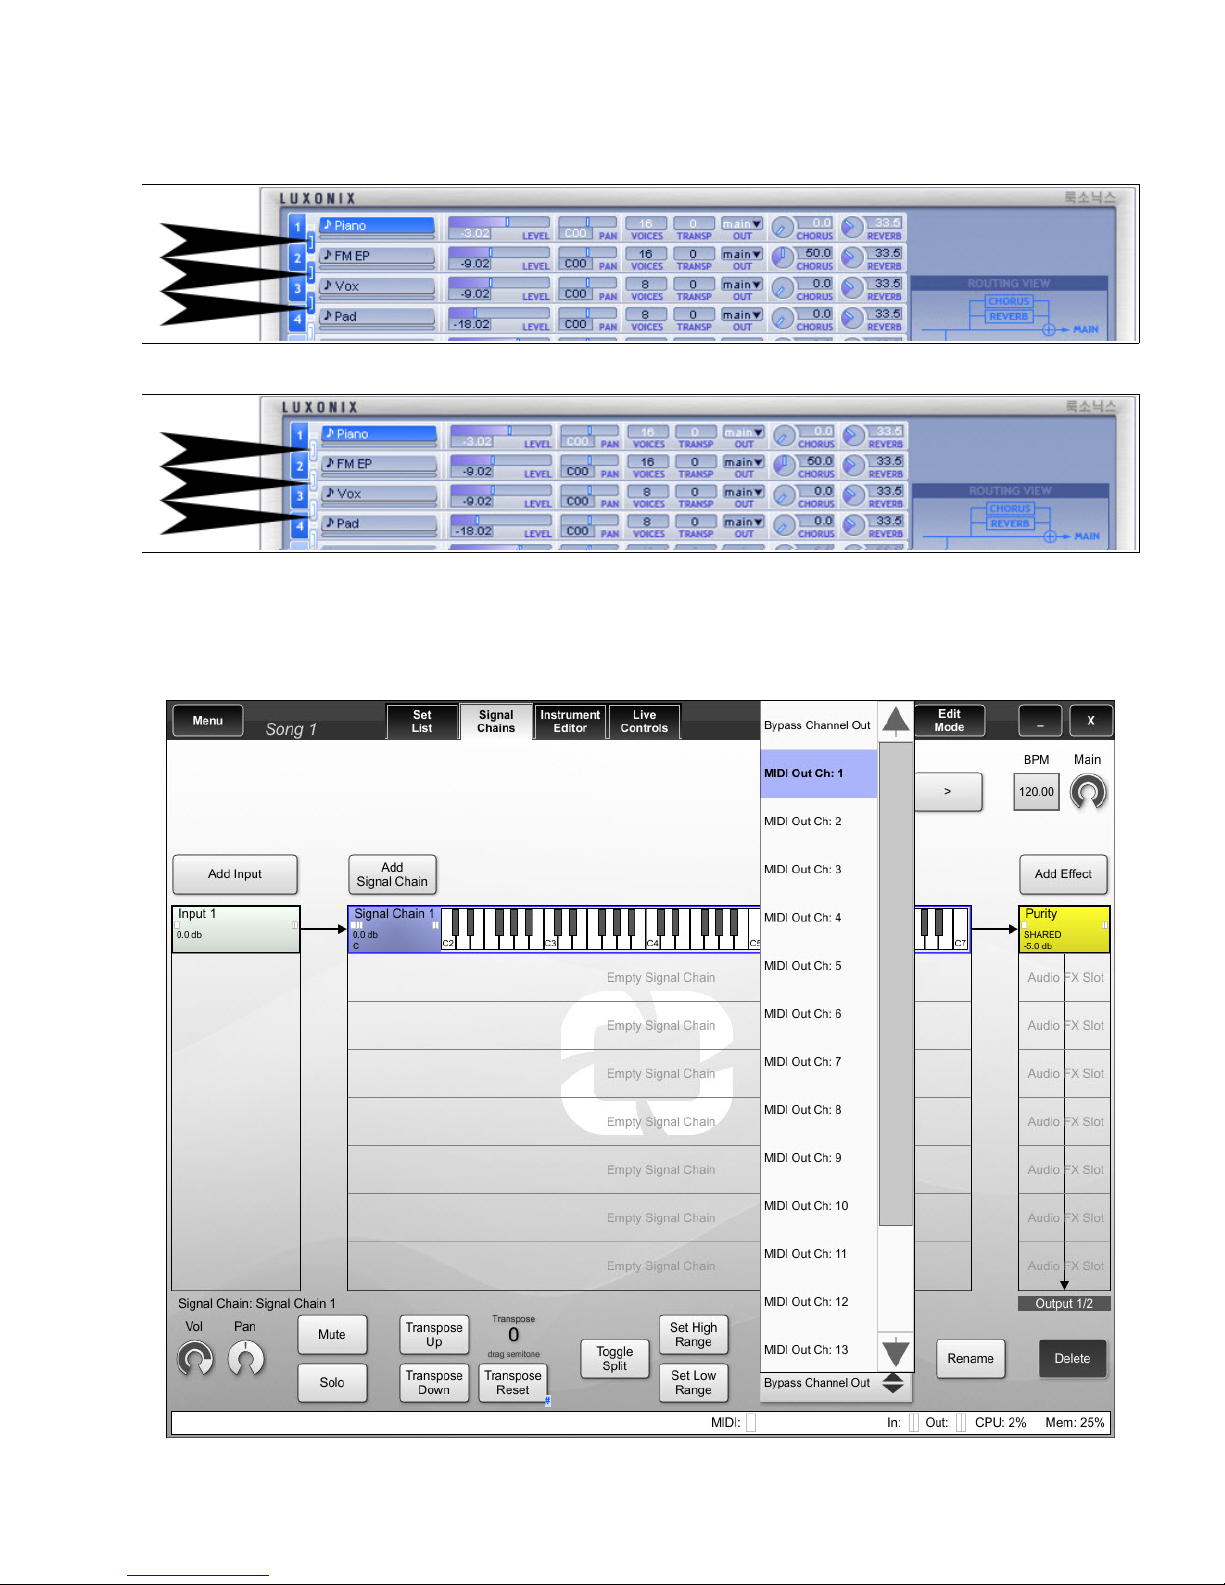
Go back to the Setlist page, select "Song 1" then select the [Instrument Editor] tab, click on the
channel link icons in Purity. If this is not done, each pair of MIDI channels will remain linked
together.
Before the links are unchecked
After the links have been unchecked
Other VSTi's will have dfferent sets of rules, however the basic principles will relate. Purity can use 16
instruments at once over a spread of 16 MIDI channels. Select sounds for the one through four slots of
Purity. These channels will also represent the corresponding MIDI channels.
Go back to the Signal Chain.
Open Labs MiKo LXD Production Station Manual 91
Page 92

Song 1 should only use MIDI Channel 1. On the Signal Chain page click the [Bypass Channel Out]
button in the lower controls and select MIDI channel 1. (See the previous image)
You can see this signal chain is using MIDI channel 1. And will only trigger the sound in MIDI channel
1 of Purity.
Now let us add a second item to the grid that will trigger the sound you have in MIDI channel two
of Purity. Also, doing this will allow us to utilize the shared instrument we prepared.
Select a spot directly beside the first Song on your Setlist and click "Add".
Open Labs MiKo LXD Production Station Manual 92
Page 93

Go to the Signal chain of Song 2. Remember this Song is using a "Currently Loaded" shared
version of Purity.
We want this Song and Signal Chain to only use MIDI Channel 2. On the Signal Chain page click the
[Bypass Channel Out] button in the lower controls and select MIDI channel 2.
Open Labs MiKo LXD Production Station Manual 93
Page 94
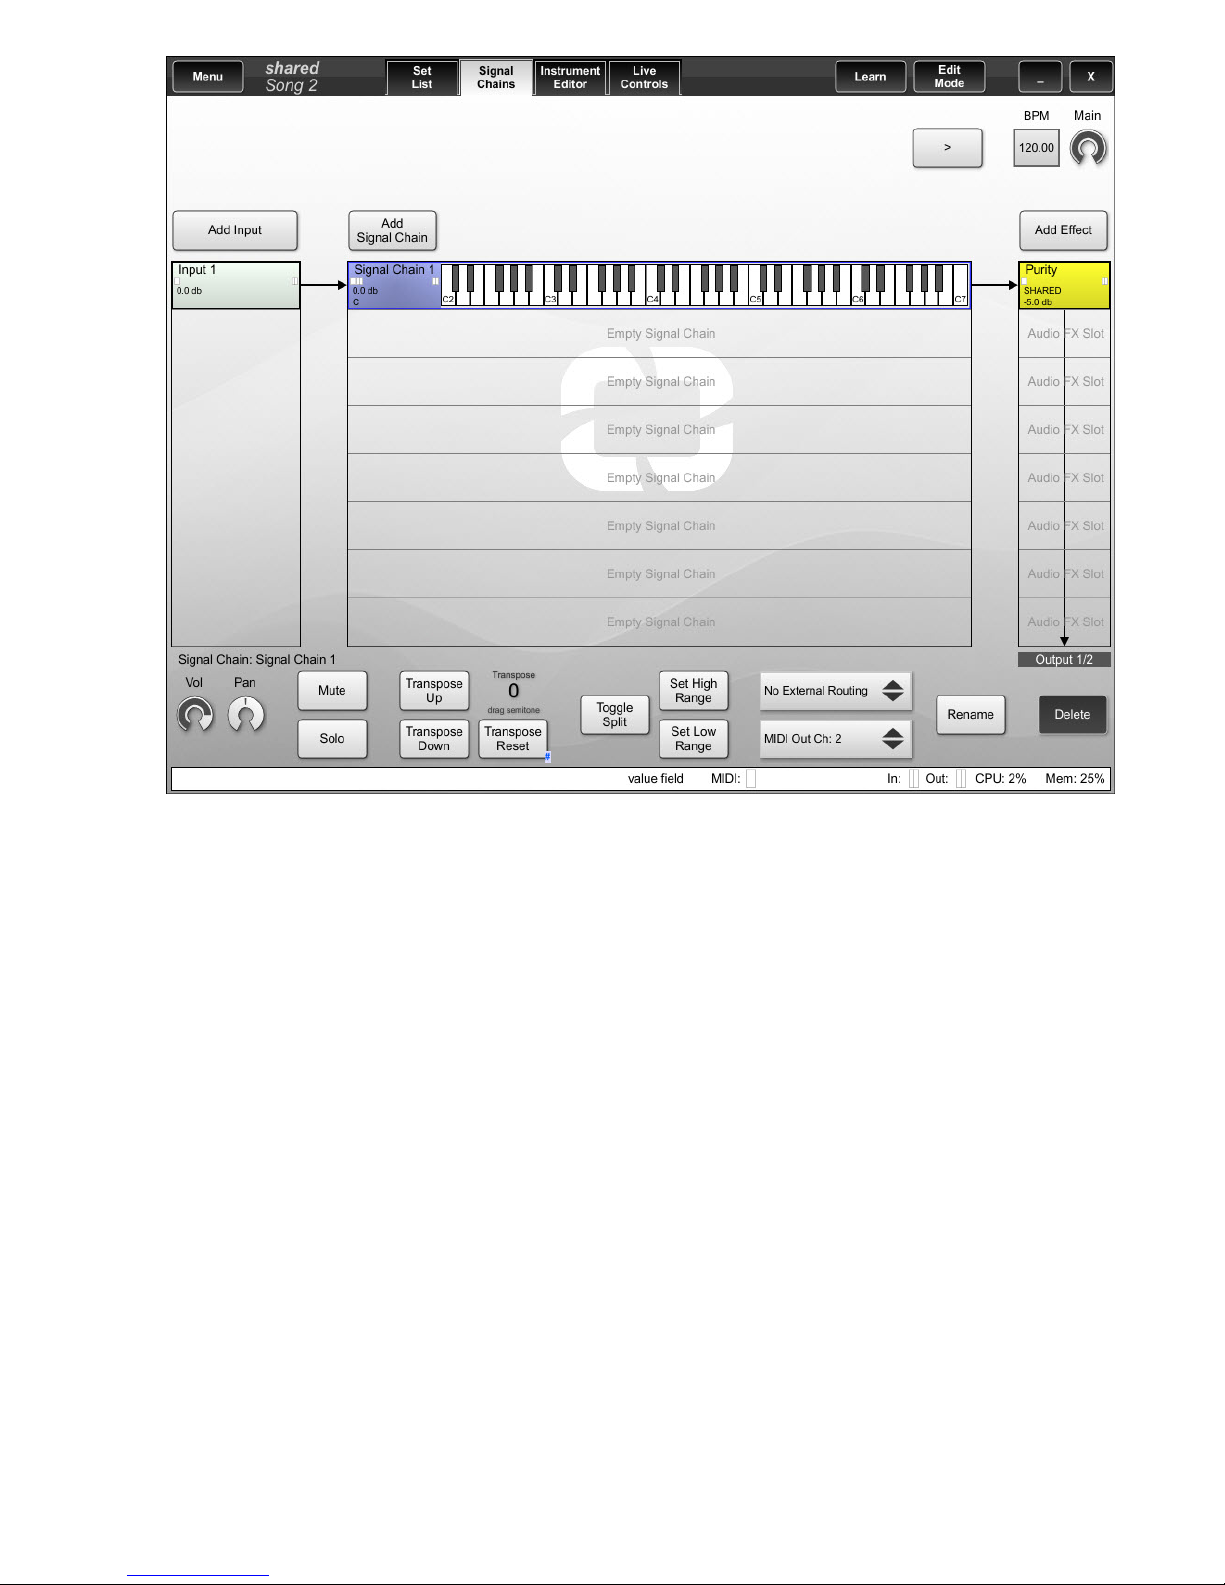
You can see this signal chain is using MIDI channel 2.
Using a multi-timbral instrument this way saves system performance and memory.
Now go back to the Setlist and [Add] another Song (Song 3), as before use a "Currently Loaded"
version of Purity. Go to the [Signal Chains] tab of this Song and set it to MIDI channel 3. This will
trigger whatever sound you selected for the third slot of Purity.
For the fourth Song, go back to the Setlist and [Add] another Song (Song 4), as before use a "Currently
Loaded" version of Purity. Go to the [Signal Chains] tab of this Song and set it to MIDI channel 4. This
will trigger whatever sound you selected for the fourth slot of Purity.
Now, when you switch Songs on the Setlist, the selected Song will trigger the adjacent channels in
Purity or whatever multi-timbral instrument you are using.
Open Labs MiKo LXD Production Station Manual 94
Page 95

Creating Keyboard Splits with Multi-timbral Instruments
For this tutorial, Purity will be used. Create a Song and add Purity as the instrument.
Select the [Instrument Editor] tab then click on the channel link icons in Purity. If this is not done,
each pair of MIDI channels will remained linked together.
Before the links are unchecked
After the links have been unchecked
Other VSTi's will have dfferent sets of rules, however the basic principles will relate. Purity can use 16
instruments at once over a spread of 16 MIDI channels. Go ahead and select sounds for the one
through four slots of Purity. These channels represent MIDI channels.
For this tutorial the instruments in the first four MIDI channels of Purity are
1. Piano MIDI channel 1
2. FM - EP MIDI channel 2
3. Vox MIDI channel 3
4. Pad MIDI channel 4
We will create splits in the signal chain to match these sounds and MIDI channels.
Go back to the Signal Chain and add three "Empty Signal Chains". Refer to the instructions and images
on the next page.
Open Labs MiKo LXD Production Station Manual 95
Page 96

To add an empty signal chain, click in the first empty signal chain slot. From the menu select [Add
Empty Signal Chain]. Add three empty signal chains below "Signal Chain 1".
As you can see in the following image, there are three additional signal chains stemming from Signal
chain 1.
Open Labs MiKo LXD Production Station Manual 96
Page 97

Next, the Signal Chains need to be routed to the proper MIDI channels. And the splits set up for
the four chains.
Go ahead and set an array of splits similiar to this. Of course if you are on a Miko, you will need to
make your splits closer together, or just use the transpose buttons to reach those octaves.
Each split needs to be set to an individual MIDI channel. Signal chains two, three, and four need to be
routed to the first signal chain. Since two through four are empty signal chains they need to be routed
to Signal Chain 1, this gives them access to the sounds in Purity.
Click [Bypass Channel Out] in the lower controls section and set Signal Chain 1 to MIDI out Ch: 1.
Next, signal chains two, three, and four, need to be routed through Signal Chain 1 which
contains the instance of Purity.
Open Labs MiKo LXD Production Station Manual 97
Page 98

Select Signal Chain 2. Click [No External Routing] in the lower controls section and select "Signal Chain
1". And while you are there, go ahead and set the channel out to MIDI channel 2.
Once the routing has been assigned, you will see that Signal Chain 2 is routed directly through Signal
Chain 1.
In the lower controls section of Signal Chain 2 you will also see that the routing and MIDI channel out
options are properly set.
Go ahead and route signal chains three and four to Signal Chain 1, and MIDI outs to channels three and
four respectively.
This will complete this multi-timbral setup, each split should be triggering the patch that you have in
the corresponding channel of Purity. Follow the same procedure that was used to set Signal Chain 2.
Open Labs MiKo LXD Production Station Manual 98
Page 99

Signal Chain 3 routed to Signal Chain 1 containing Purity.
Signal Chain 3 lower controls, MIDI channel out set to channel three.
Signal Chain 4 routed to Signal Chain 1 containing Purity.
Signal Chain 4 lower controls, MIDI channel out set to channel four.
This will complete this multi-timbral setup, each split should be triggering the patch that you have in
the corresponding channel of Purity.
Open Labs MiKo LXD Production Station Manual 99
Page 100
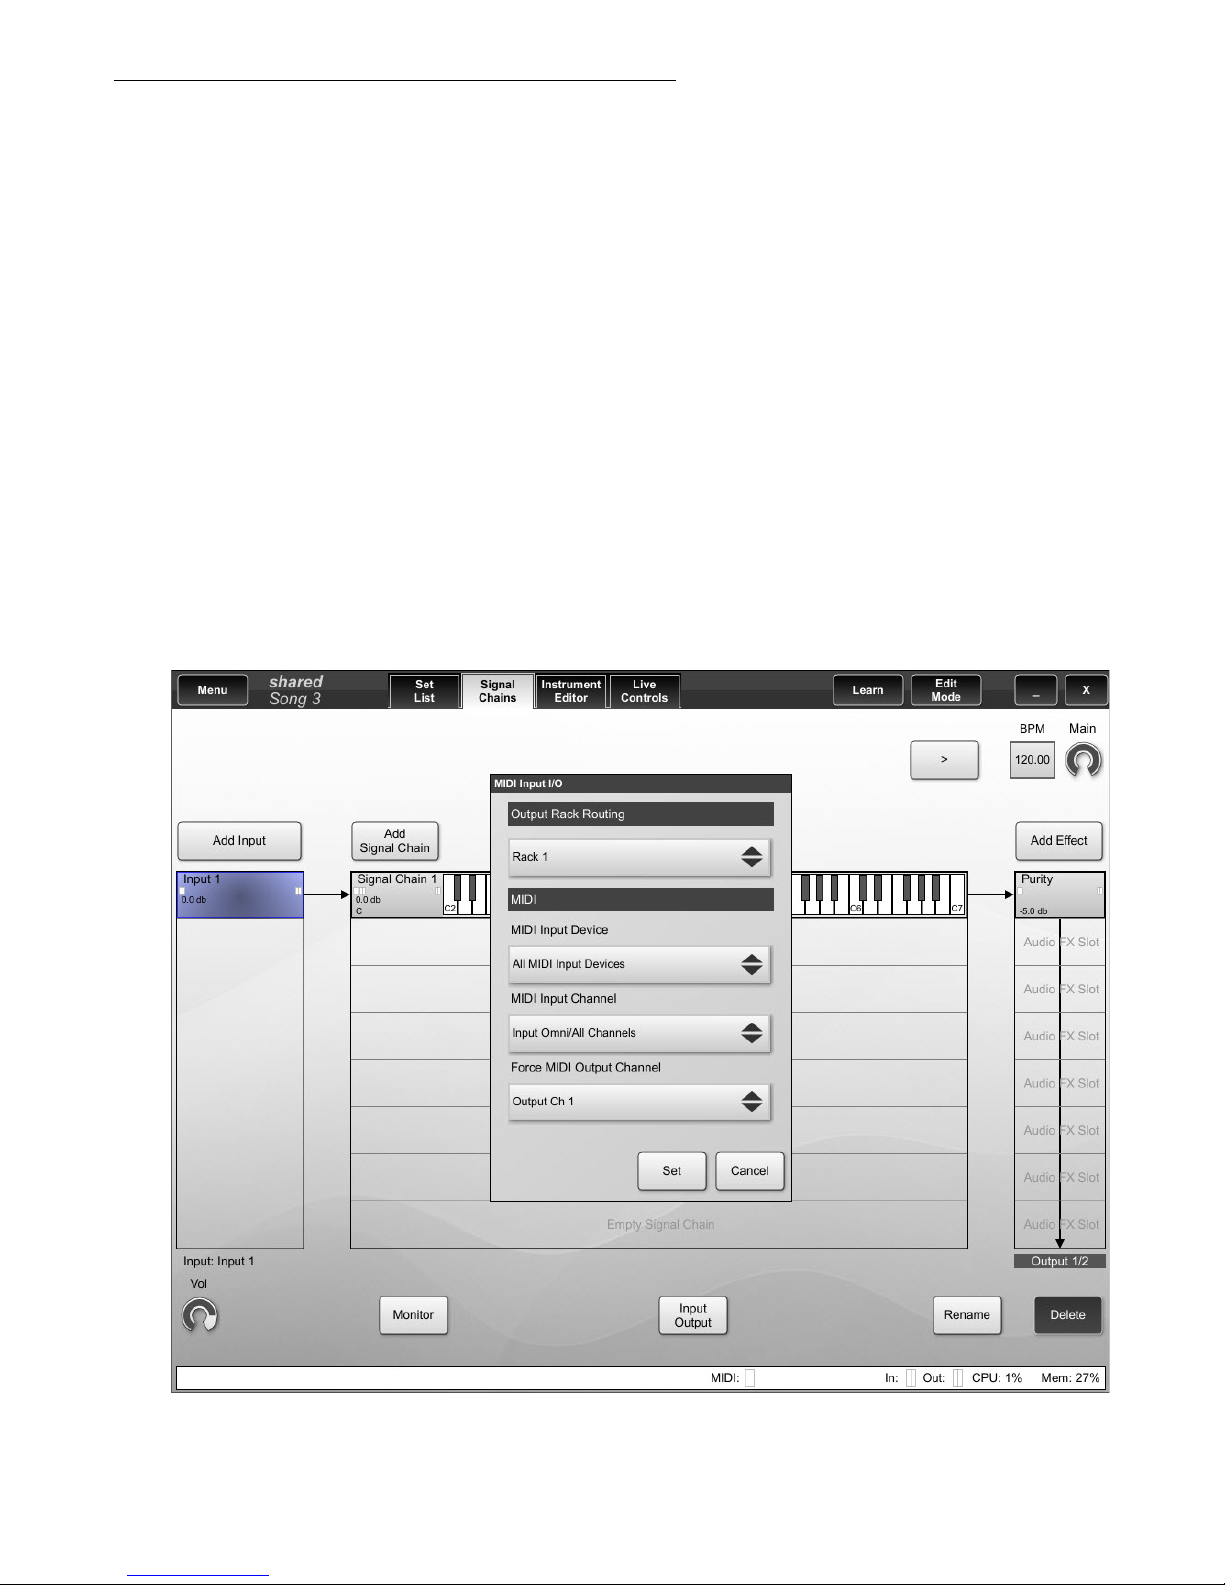
Advanced Multi-timbral Instruments / Signal Chain
Now that you have a good idea of how to use multi-timbral instruments, it is time to learn an
advanced way to setup Riff to work with your multi-timbral instruments.
As you can see in the Signal Chain, there are only eight slots . Plus, the signal chains are made for
layering sounds, and creating keyboard splits.
Let's say you wanted to use all 16 MIDI channels of a multi-timbral instrument in one Song, as
opposed to setting up 16 songs each using a different MIDI channel.
The earlier tutorial explained how to do it that way. However, it is good to know the different ways
to setup instruments in Riff.
Setup a new Song, and again, add Purity to the Song.
Remember to unlink the MIDI channels in Purity. Go head and assign sounds to some channels.
Go to the signal chain, select the "Input" for Signal Chain 1. This Input needs to only use MIDI
channel 1. The input can be forced to use a particular MIDI channel by pressing the [Input Output]
button located in the lower controls section. Do this and the "MIDI Input I/O" option box appears.
Set "Force MIDI Output Channel" to "Output Ch 1".
Then press [Set].
This forces the input to only use MIDI channel 1.
Open Labs MiKo LXD Production Station Manual 100
 Loading...