

Page 1
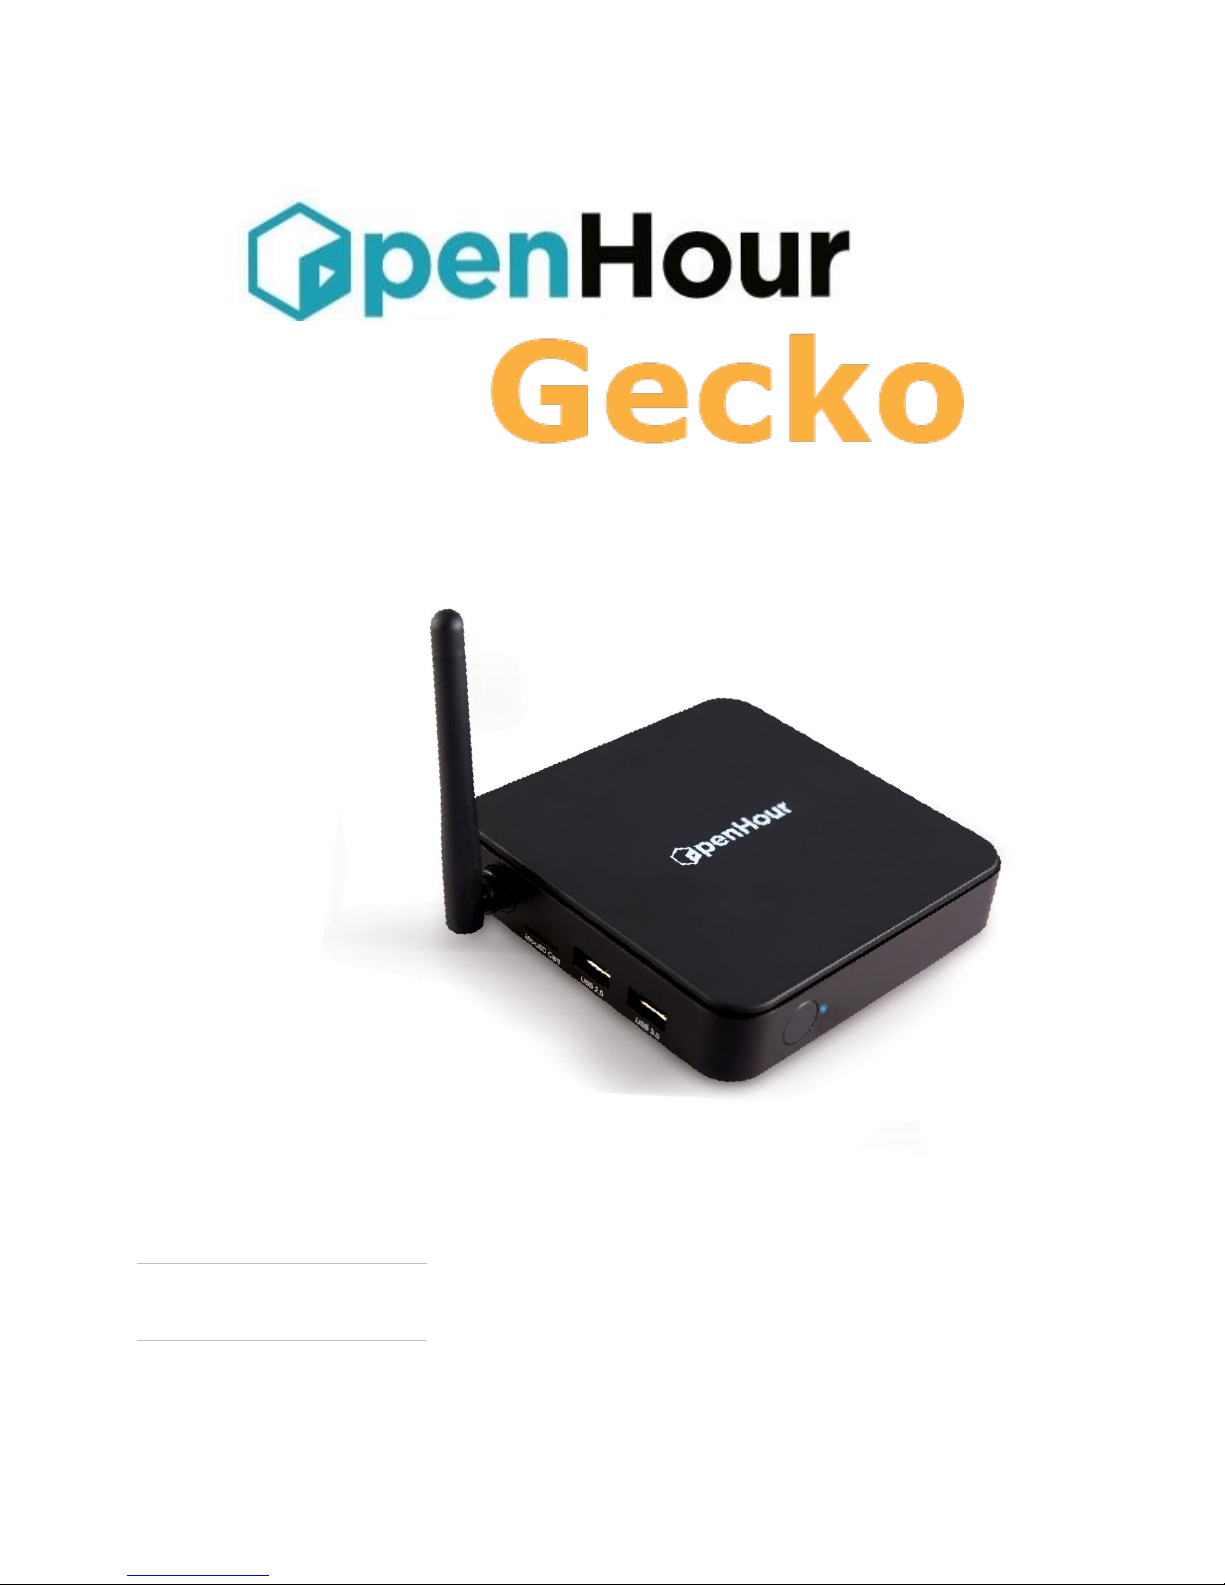
4K Android Player with Optimized KODI 15
EN User Manual
1
Page 2

Table of Content
1. Introduction……………………………………………………………….4
2. Package Content…………………………………………………………..5
3. Safety Notes………………………………………………………………6
4. Technical Specification…………………………………………………..7
5. Getting Started
5.1 Open Hour Gecko Overview………………………………………….8
5.2 Connecting to TV via HDMI…………………………………..……..8
6. Installation of KODI…………………………………………………….11
7. Network Share via SAMBA / NFS
7.1 Network Share by Media Center …………………………..………...13
7.2 Network Share by KODI…………………………………………......15
8. Scan Content via SAMBA……………………………………………….17
9. Installation of KODI Add-On……………………………………………19
10. Download Subtitle from KODI………………………………………….22
11. Settings
11.1 Wi-Fi Set-Up………………………………………………………..23
12. Play Store ……………………………………………………………….26
13. File Explorer
13.1 Video……………………………………………………………….31
13.2 Music……………………………………………………………….32
2
Page 3

14. Package Installer…………………………………………………………..34
15. All Apps
15.1 To uninstall an app…………………………………………………..39
16. Application’s Shortcut
16.1 Add application shortcut………………………………………….....41
16.2 Using Miracast………………………………………………………42
16.3 Delete application shortcut………………………………………….46
17. Clean Up Memory…………………………………………………….….47
3
Page 4
1. Introduction
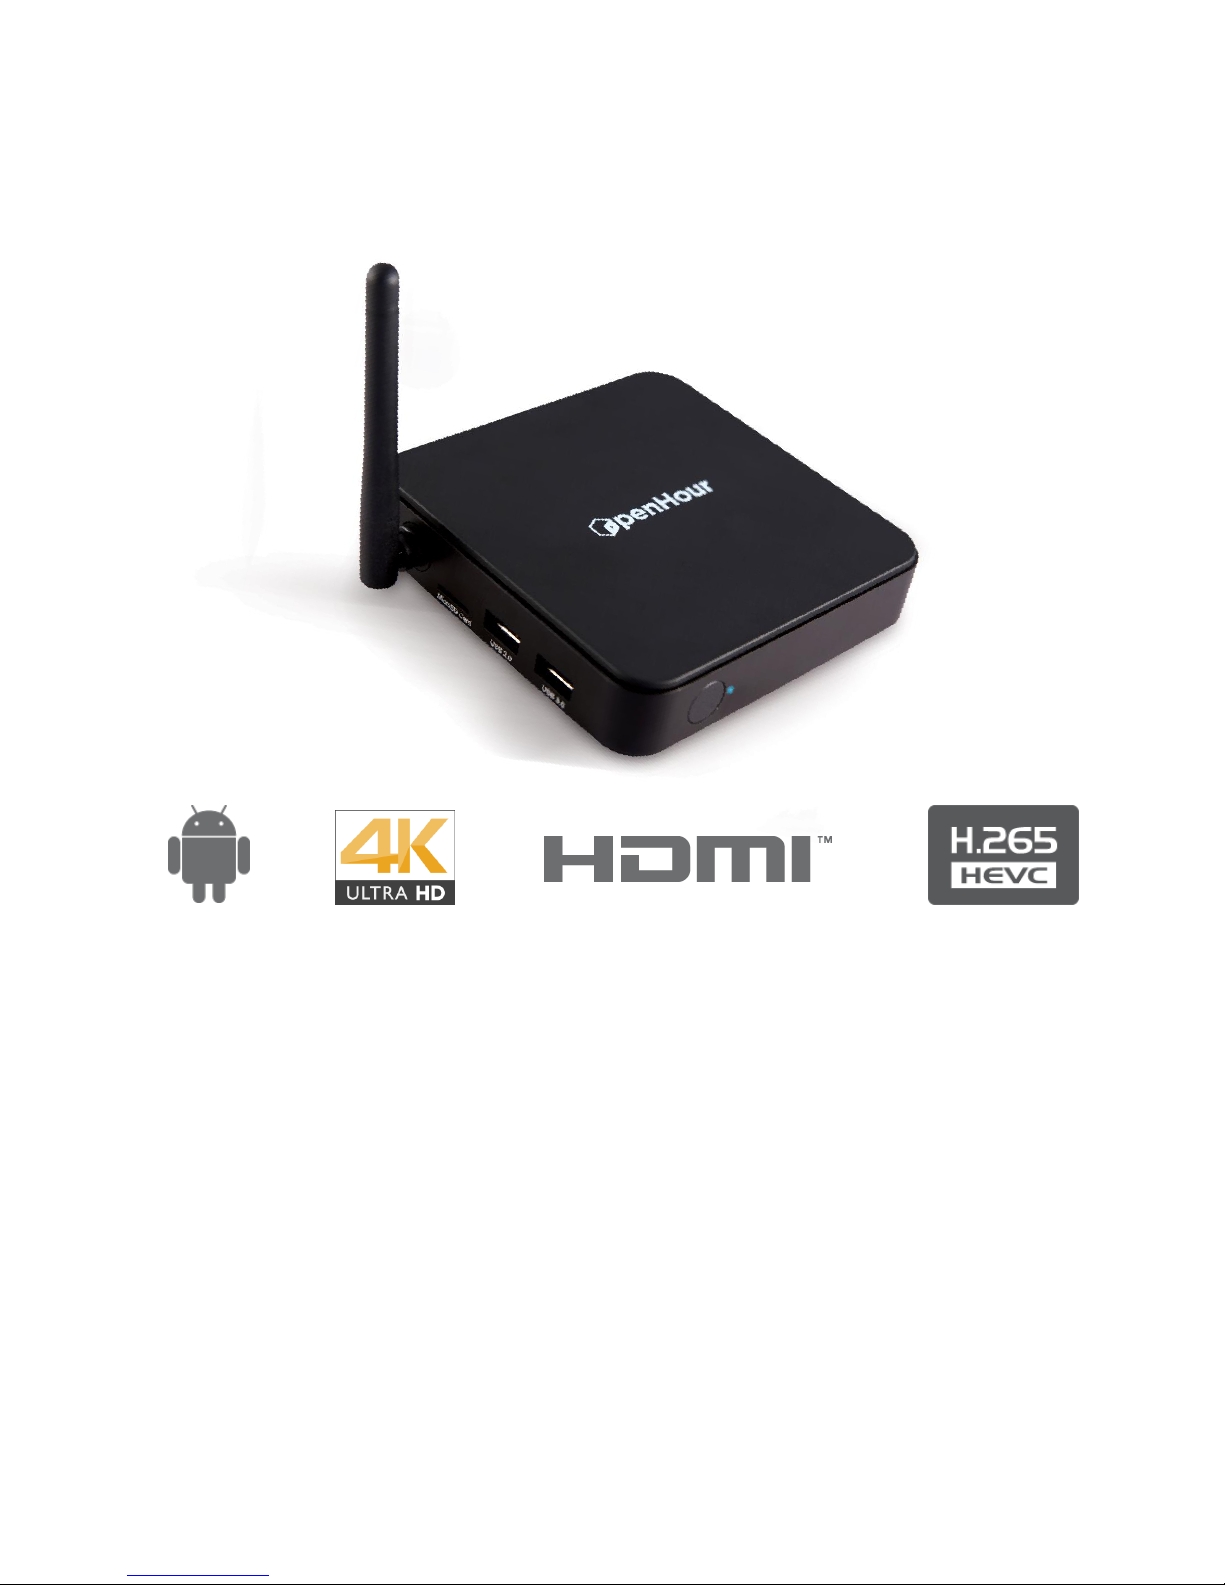
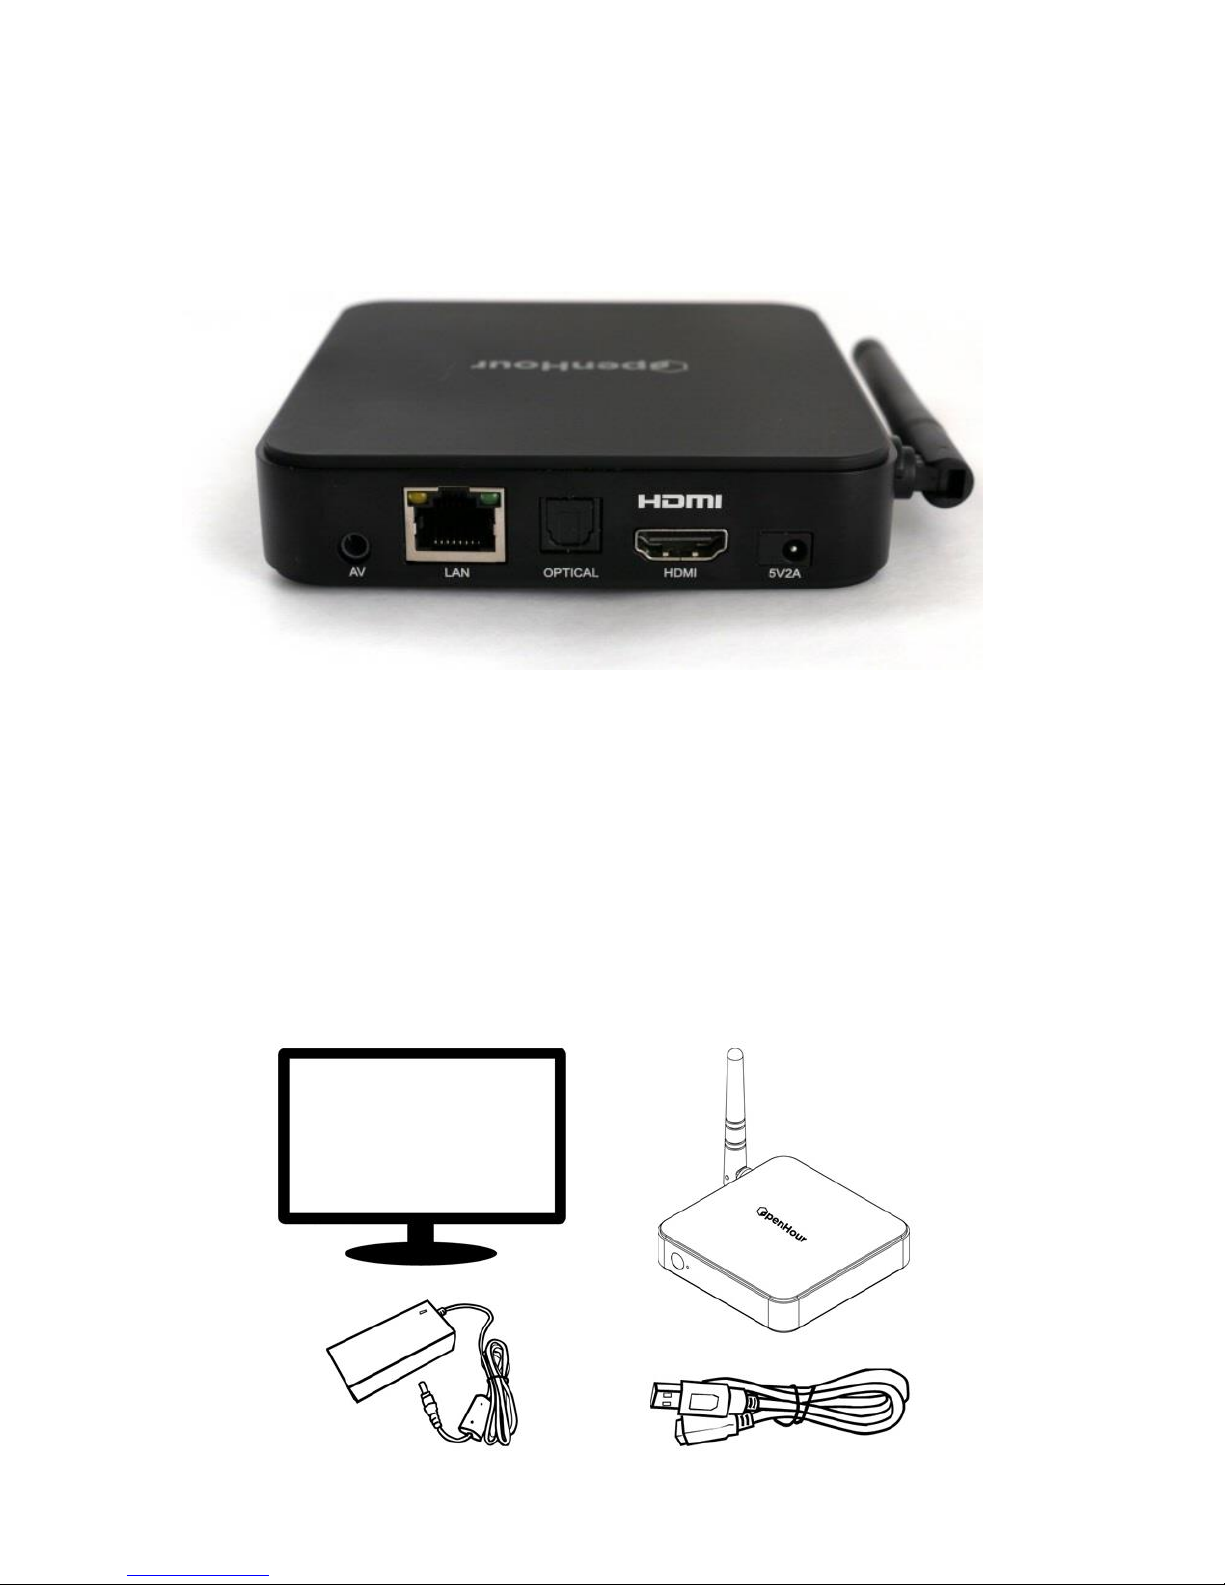
Figure 1: Open Hour Gecko
Thank you for purchasing Open Hour Gecko. Open Hour Gecko is a 4K Android Player with
Optimized KODI 15:
i. HD Audio Passthrough
ii. Framerate Sync
iii. 3D BDISO
iv. 4K H.264 / 265
v. SAMBA / NFS
4
Page 5
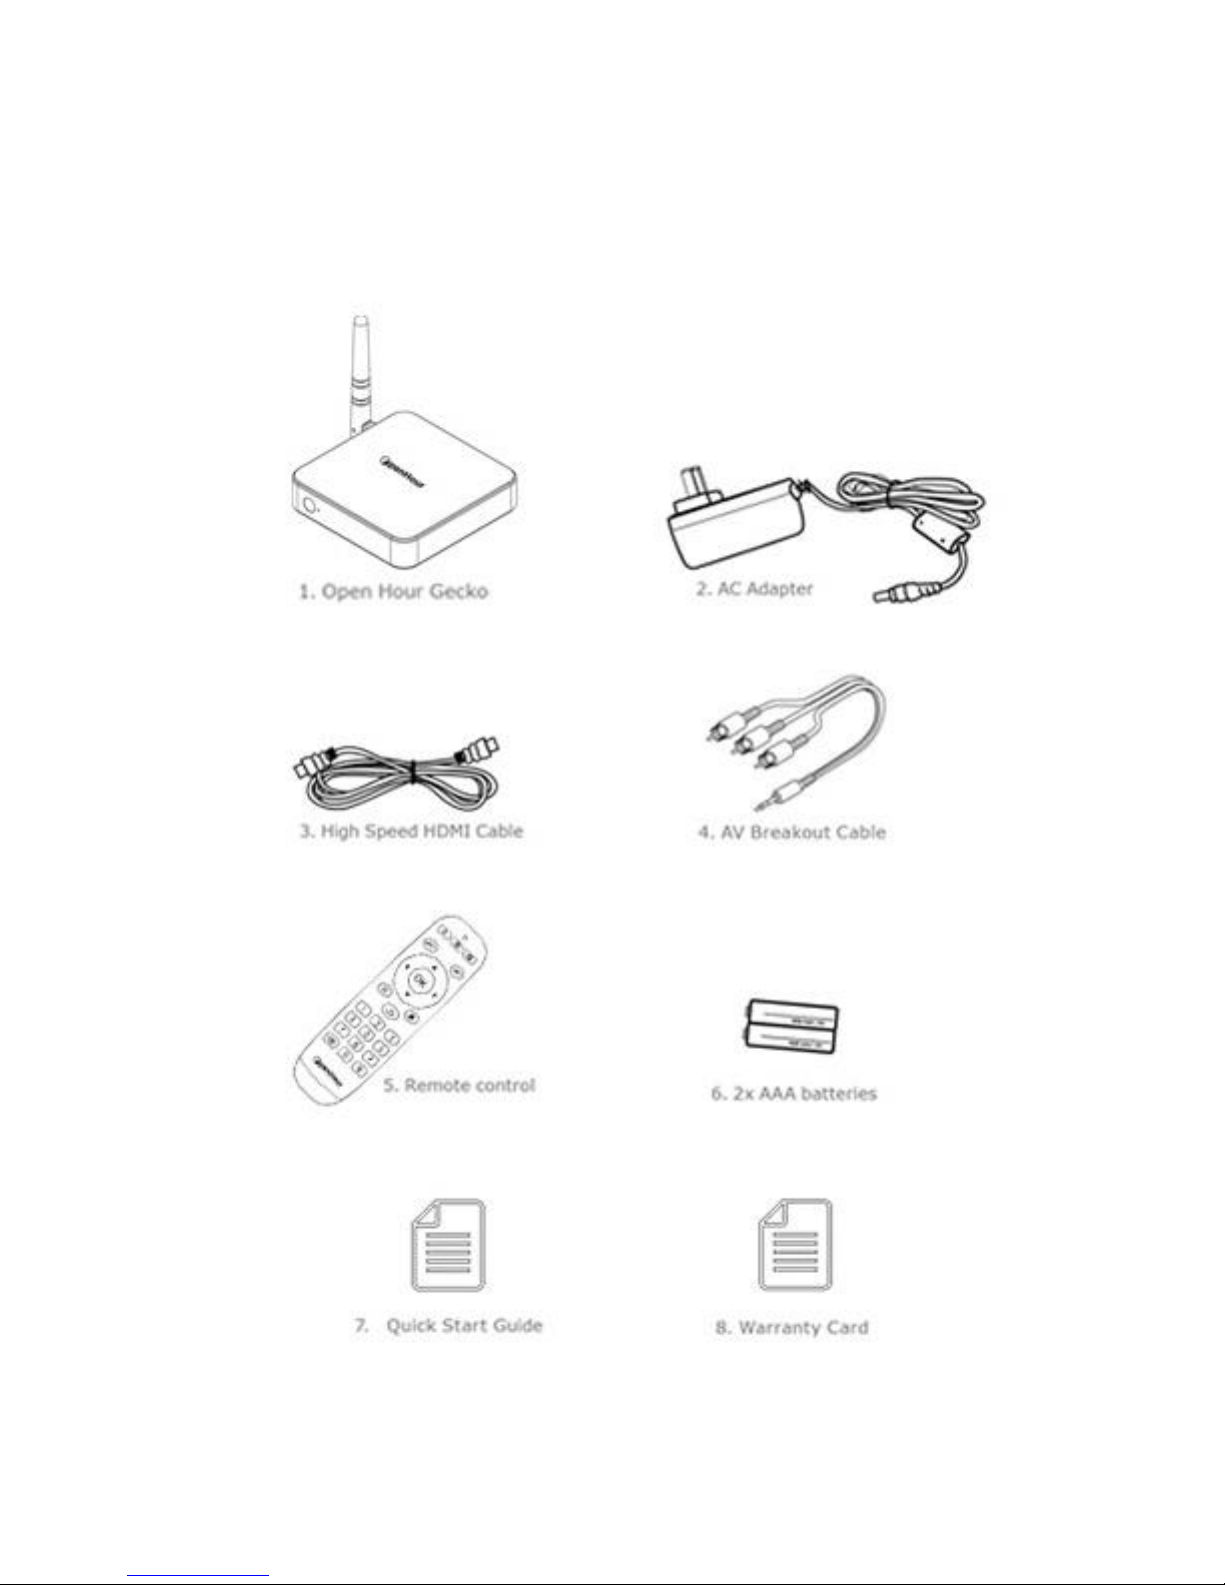
2. Package Content
5
Page 6
3. Safety Notes
WARNING:
TO REDUCE THE RISK OF FIRE, ELECTRIC SHOCK OR PROUCT DAMAGE:
1. DO NOT EXPOSE THIS APPARATUS TO MOISTURE OF ANY TYPER AND
ENSURE THAT NO OBJECTS FILLED WITH LIQUID SUCH AS CUPS OR VASES
ARE PLACED ON THE APPARATUS
2. ONLY USE RECOMMENDED ACCESSORIES
3. DO NOT REMOVE THE COVER (OR BACK). THERE ARE NO USER SERVICEABLE
PARTS INSIDE. REFER SERVICING TO QUALIFIED SERVICE PERSONNEL
CAUTION!
DO NOT INSTALL OR PLACE THIS UNIT IN A BOOKCASE, BUILT-IN CABINET OR IN
ANOTHER CONFINED SPACE. ENSURE THE UNIT IS WEL VENTILATED. TO PREVENT
RISK OF ELECTRIC SHOCK OR FIRE HAZARD DUE TO OVERHEATING, ENSURE THAT
CURTAINS AND ANY OTHER MATERIALS DO NOT OBSTRUCT THE VENTILATION
Read these operating instructions carefully before using the unit. Follow the safety instructions
on the unit and the applicable safety instructions liste below. Keep these operating instructions
handy for future references.
1. Keep these instructions
2. Heed all warnings
3. Do not use this device near water
4. Clean only with a dry cloth
5. Do not block any ventilation openings. Install in accordance with manufacturer’s
instructions.
6. Do not install near any heat sources such as radiators, heat registers, stoves, or other
apparatus (including amplifiers) that produce heat
7. Do not defeat the safety purpose of the polarize or grounding-type plug. A polarized plug
has two blades with one wider than the other. A grounding-type plug has two blandes and
a third grounding prong. The wide blade or the third plong are provied for your safety. If
the provided plug does not fit into your outlet, consult an electricin for replacement of the
obsolete outlet
8. Protect the power cord from being stepped on or pinched particularly at plus, convince
receptacles and the point where they exit from apparatus
9. Only use attachments / accessories specified by the manufacturer
10. Unplug this device during lightning storms or when unused for a long period of time
11. Refer all servicing to qualified service personnel. Servicing is required when the
apparatus has been damages in any way, such as power-supply cord or plug is damaged,
liquid has been spilled or objects have fallen into the apparatus, the apparatus has been
exposed to rain or moisture, does not operate normally or has been dropped.
6
Page 7
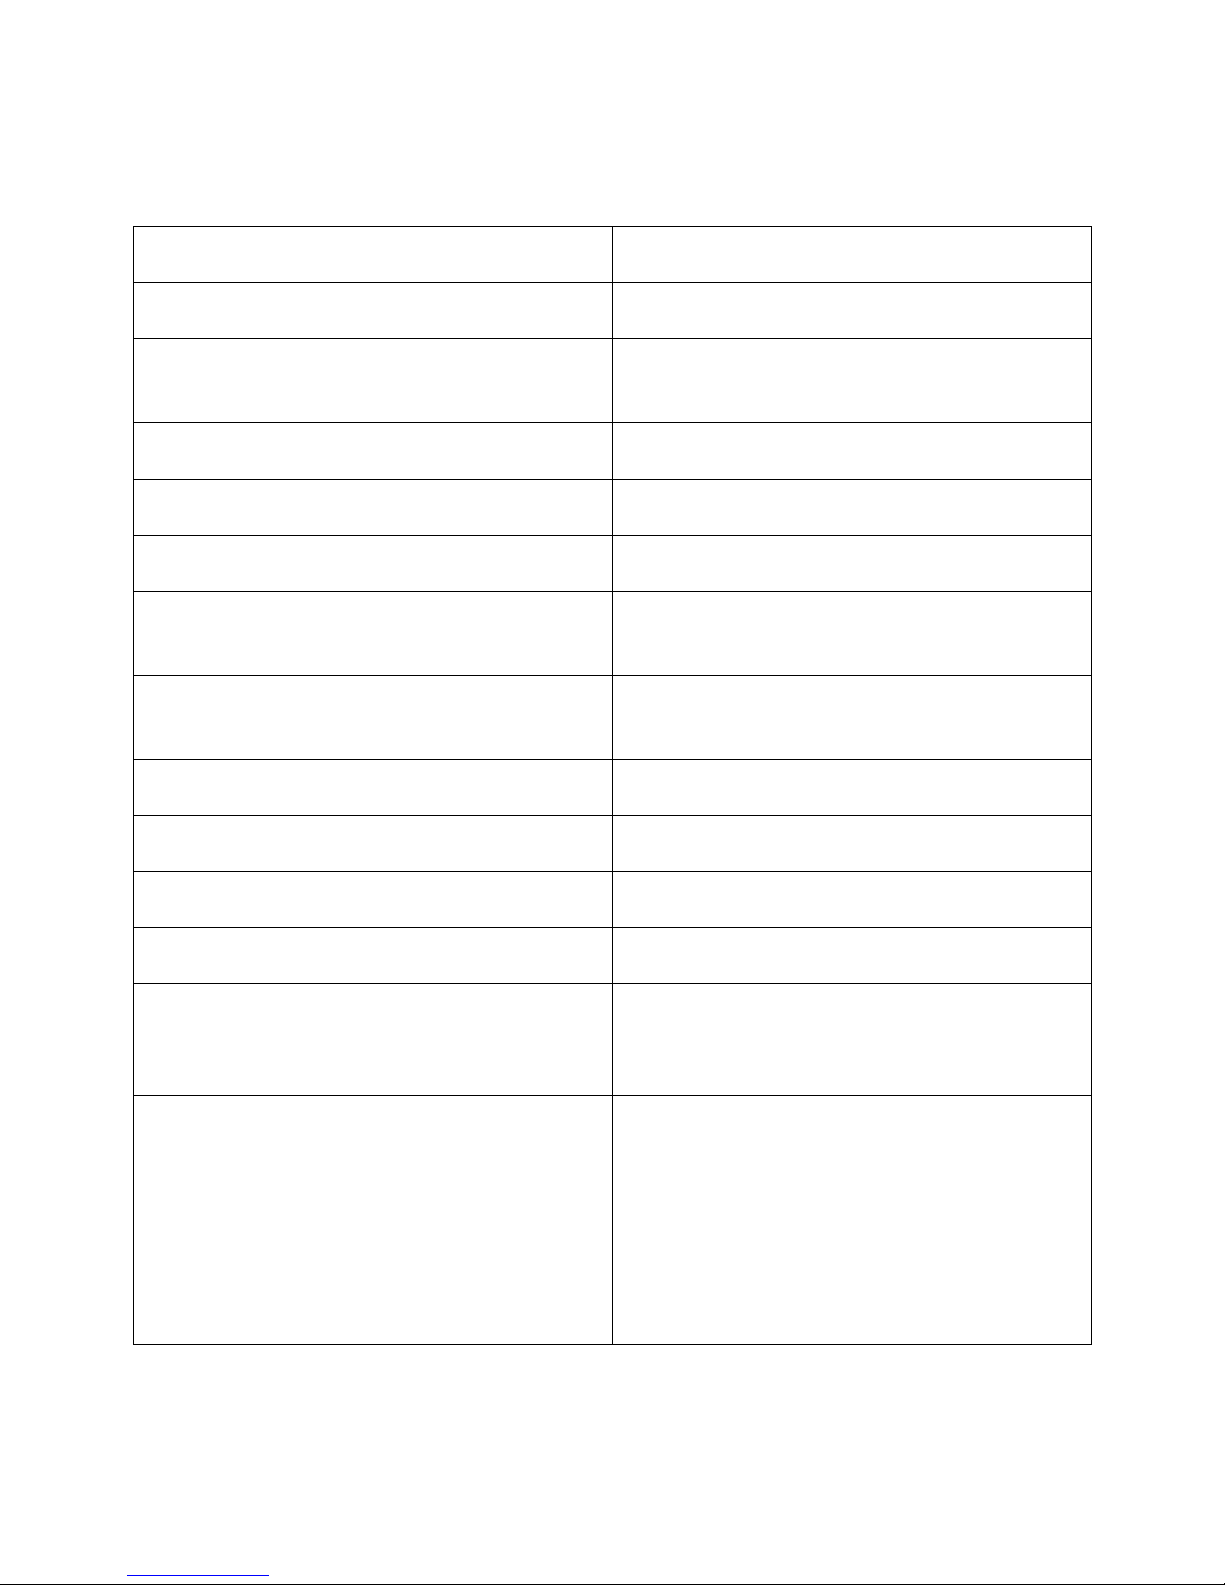
4. Technical Specifications
OS
Android
Chipset
Hisilicon 3798M
CPU
QuadCore ARM Cortex A7, 1.5GHz
QuadCore GPU Mali450
RAM
1GB DDR3
NAND Flash
8GB NAND Flash
Storage Extension
MicroSD (TF) Card
Network
10/100Mbps
802.11 b/g/n Wi-Fi with External Antenna
Display Output
HDMI up to 2160P30Hz
Composite (required AV breakout cable)
Remote Control
IR Remote
Video Decoding
H. 264 4K, H.265 4K
Audio Support
HD Audio Passthrough
Other Formats
3D BDISO, Framerate Sync
Ports
1 x USB 2.0
1 x USB 3.0
1 x HDMI up to 2160P30HZ
Package Content
1 x Open Hour Gecko
1 x AC Adapter
1 x High Speed HDMI Cable
1 x AV Breakout Cable
1 x Remote Control
1 x AAA Batteries
1 x Quick Start Guide
1 x Warranty Card
7
Page 8
5. Getting Started
5.1 Open Hour Gecko Overview
5.2 Connecting to TV via HDMI
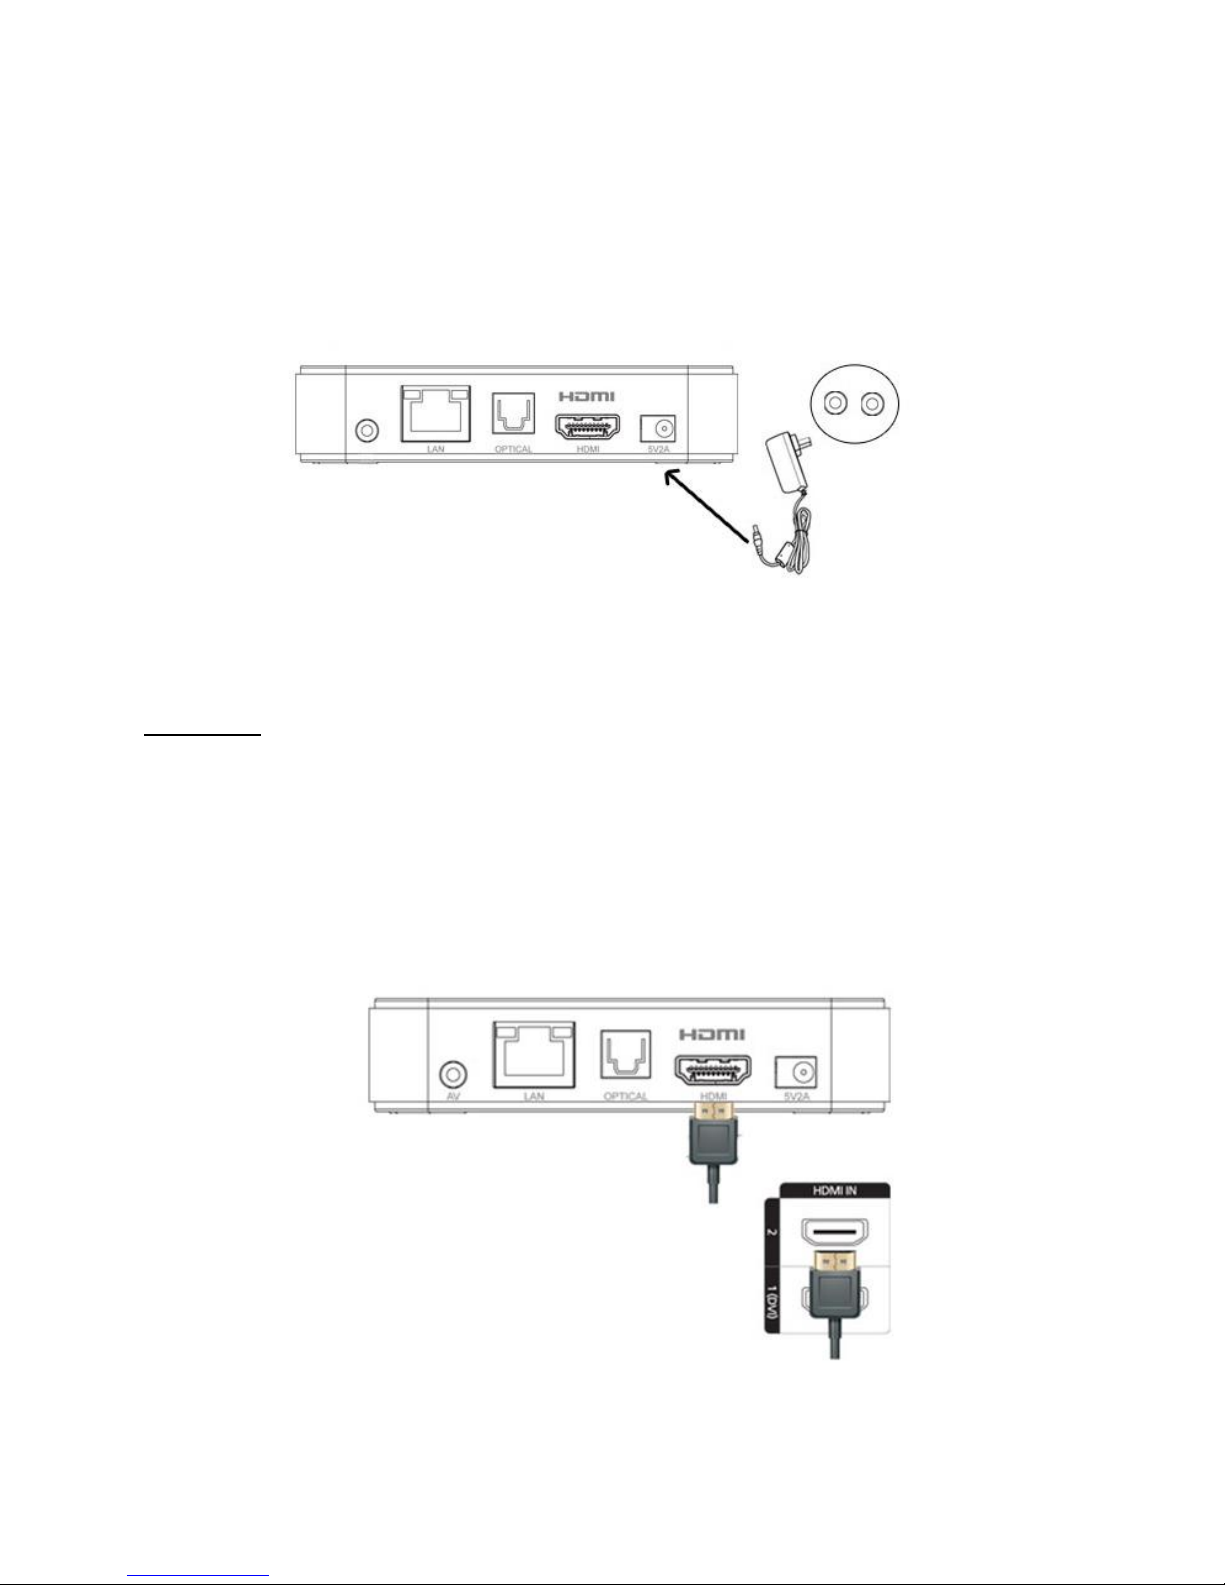
What you need:
Open Hour Gecko
Power Supply
HDMI Cable
TV with HDMI terminal
8
Page 9
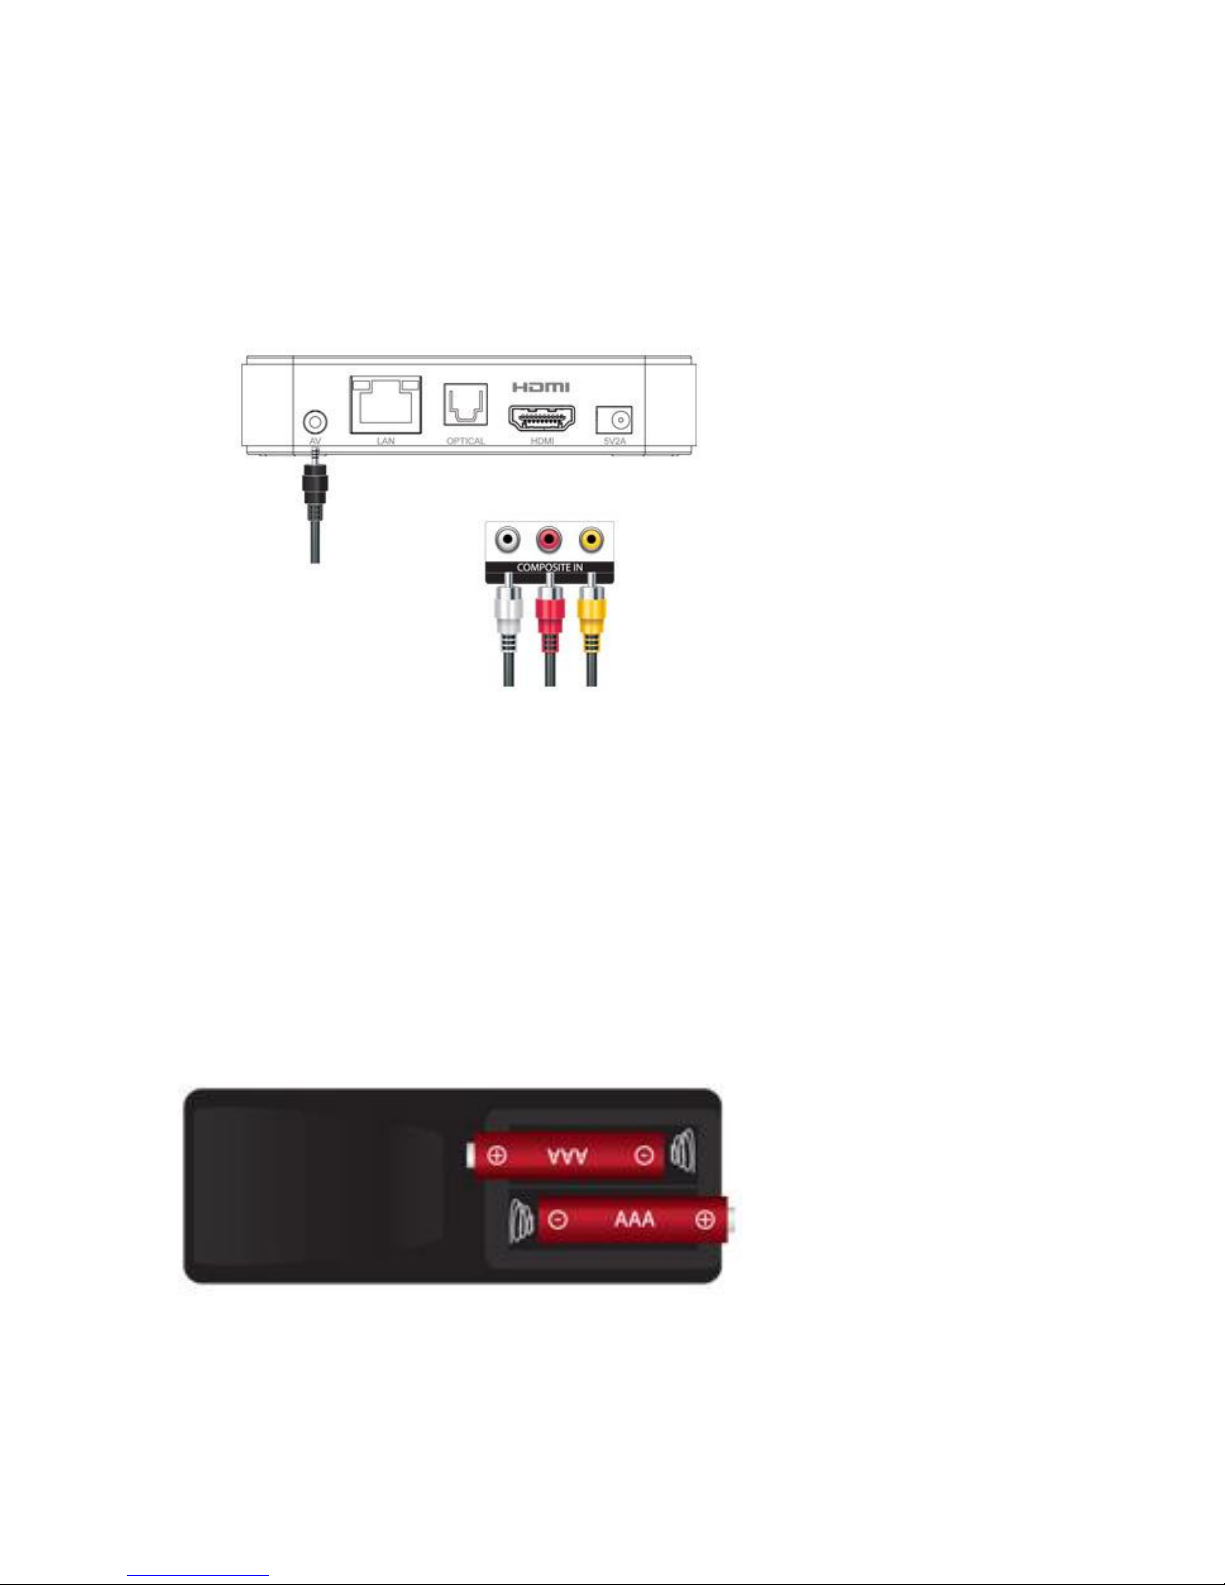
Step 1
AV
Connect the AC power cord to the AC power adapter. Then plug the power cord into wall socket
and connect the power lead to Open Hour Gecko.
Step 2
TV Display
Method 1:
Connect the HDMI cable to the TV HDMI terminal and the other end to Open Hour Gecko
Note: Some HDMI TVs have input and output HDMI terminals.
Please make sure the HDMI terminal is connected to input rather than output.
9
Page 10
Method 2:
Connect the composite cable to the TV composite output and the other end to Open Hour
Gecko AV output.
Your Open Hour Gecko is booting up now, check your TV for further instructions.
Step 3:
Insert batteries into remote and you can now access to your Open Hour Gecko
10
Page 11
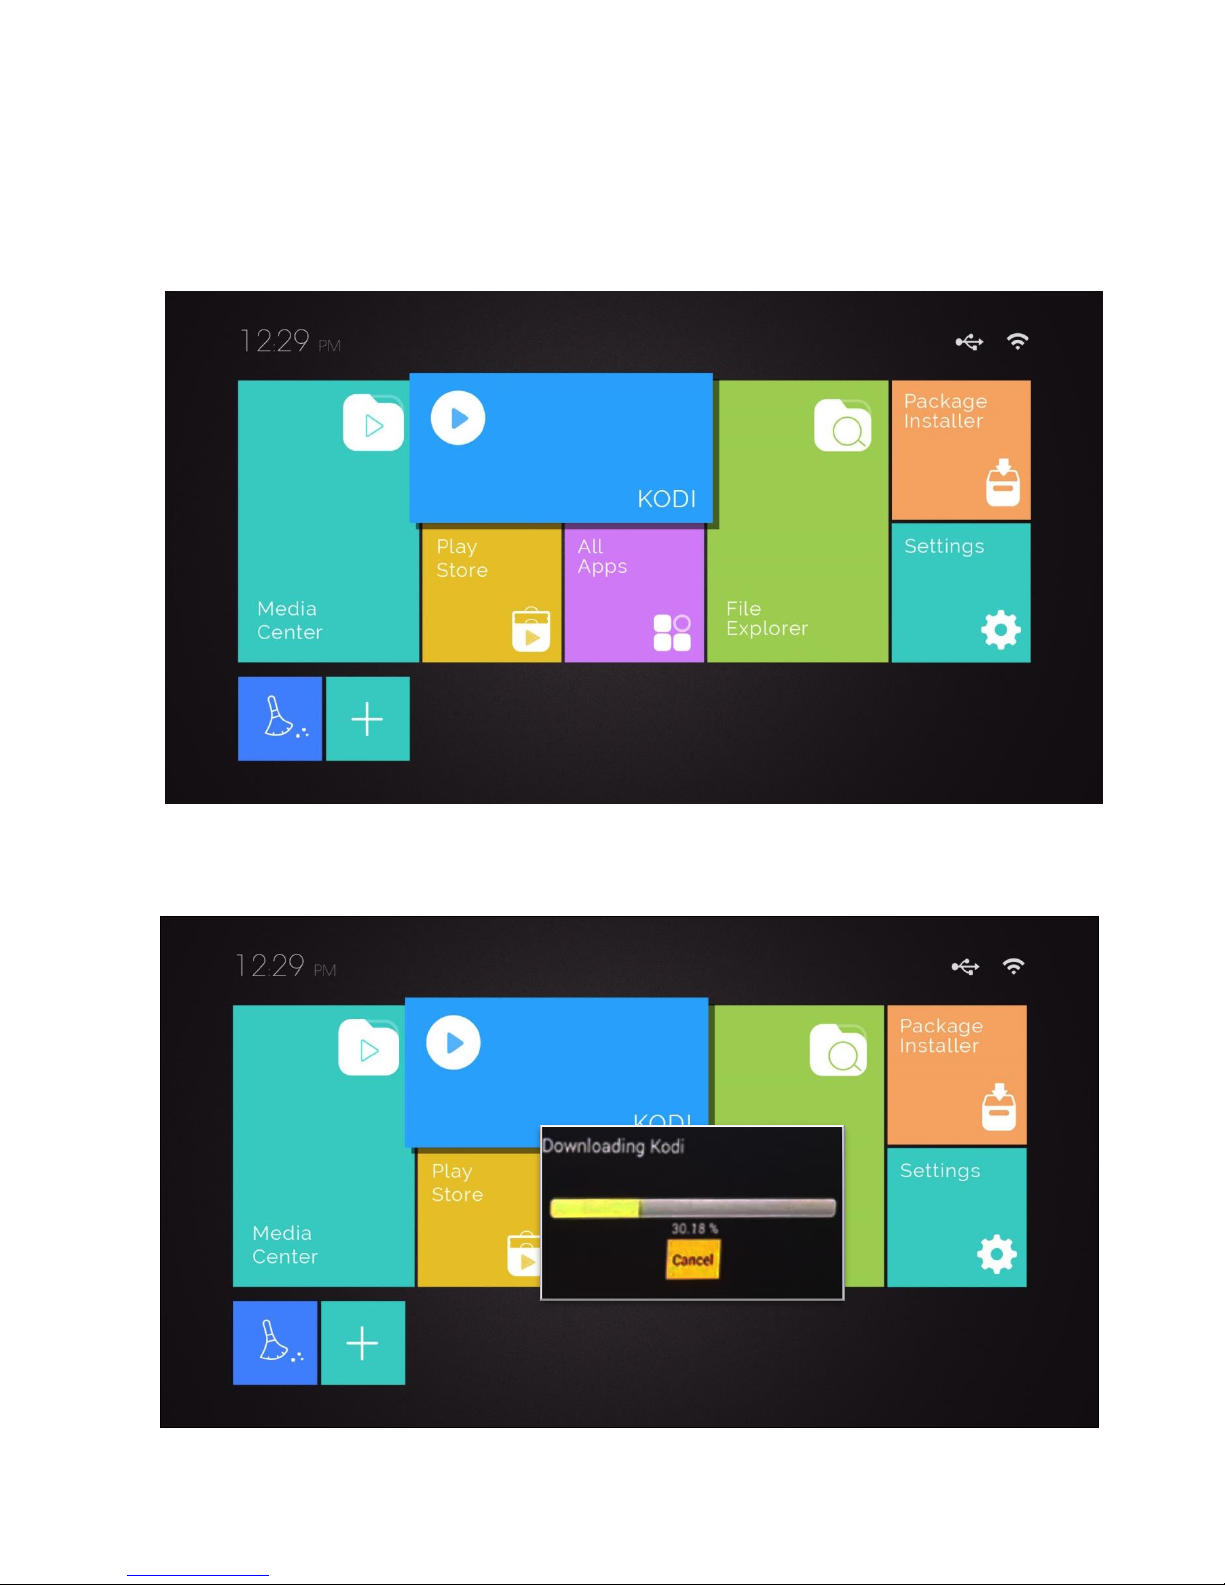
6. Installation of KODI
Installation of KODI is easy. Using your remote control, navigate to the KODI icon on
your home screen and press ENTER.
Then, wait for the KODI and its configuration files to download.
11
Page 12
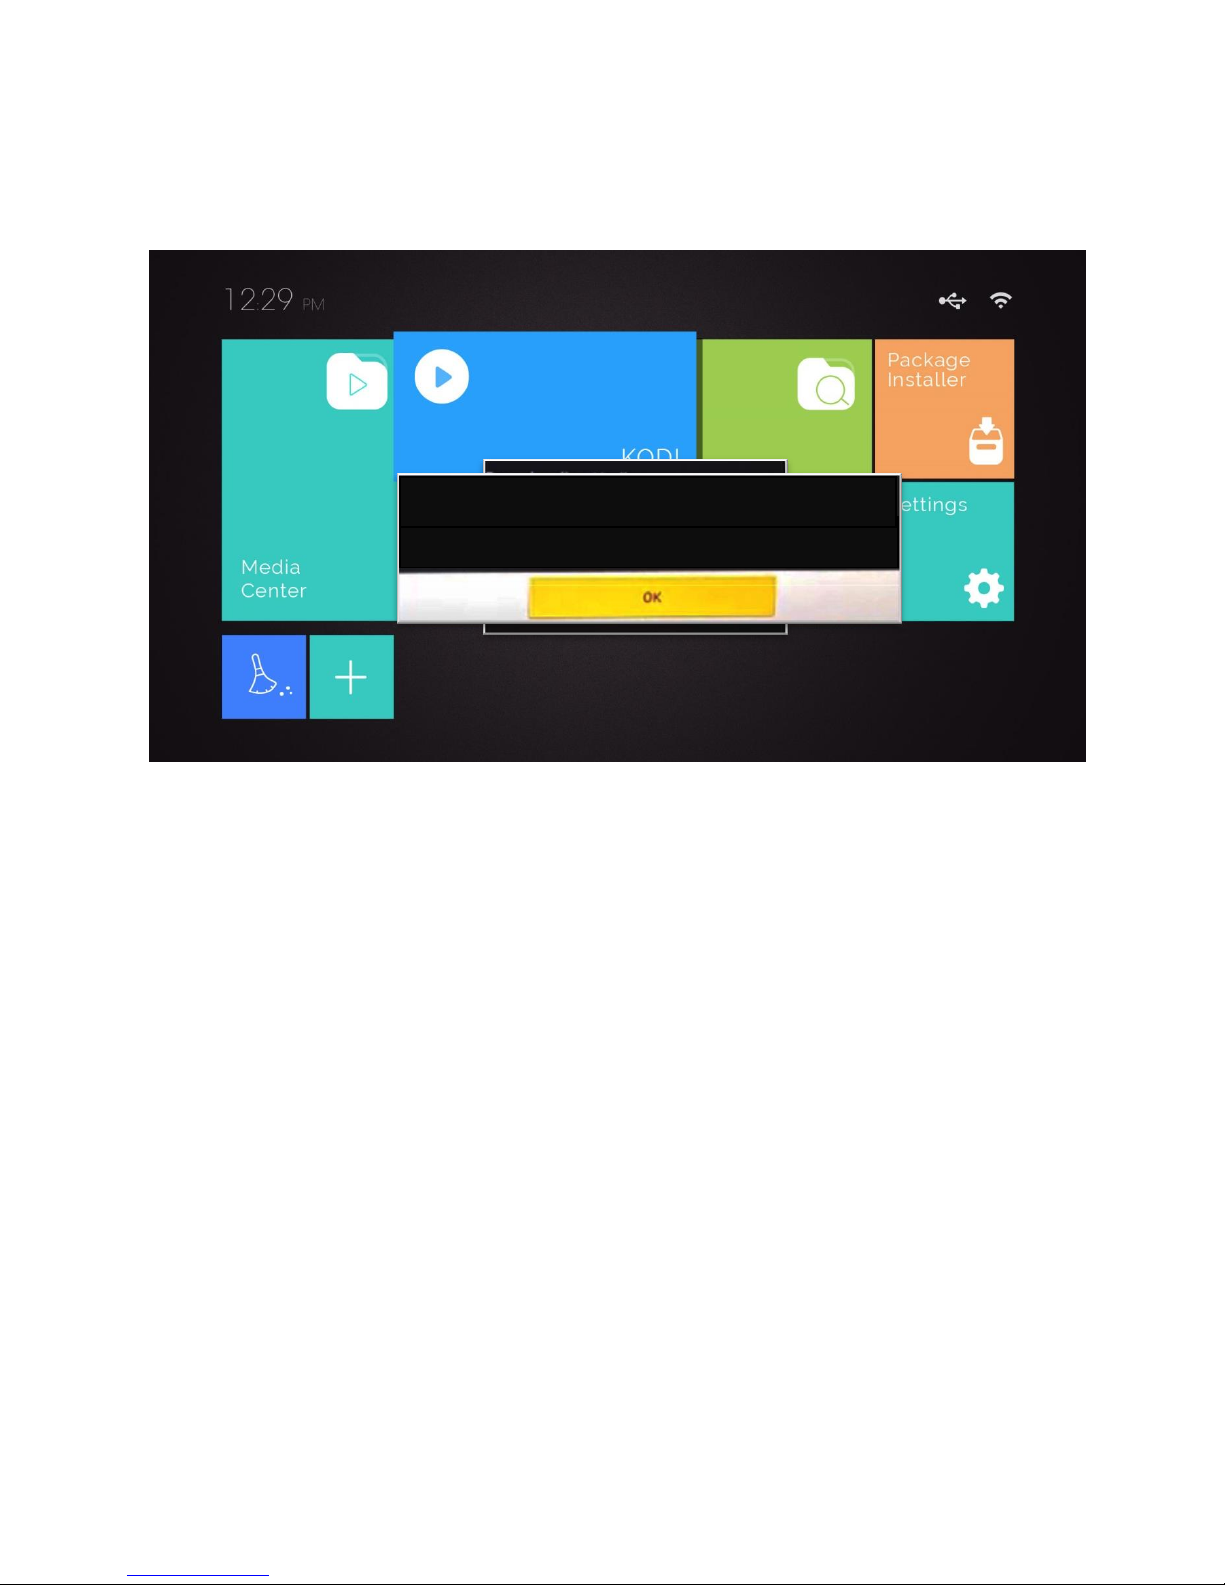
Press OK to restart your Open Hour Gecko once you have done downloading KODI and
Please restart the device in order to use Kodi for the first time.
Restart
you can now access to KODI
12
Page 13
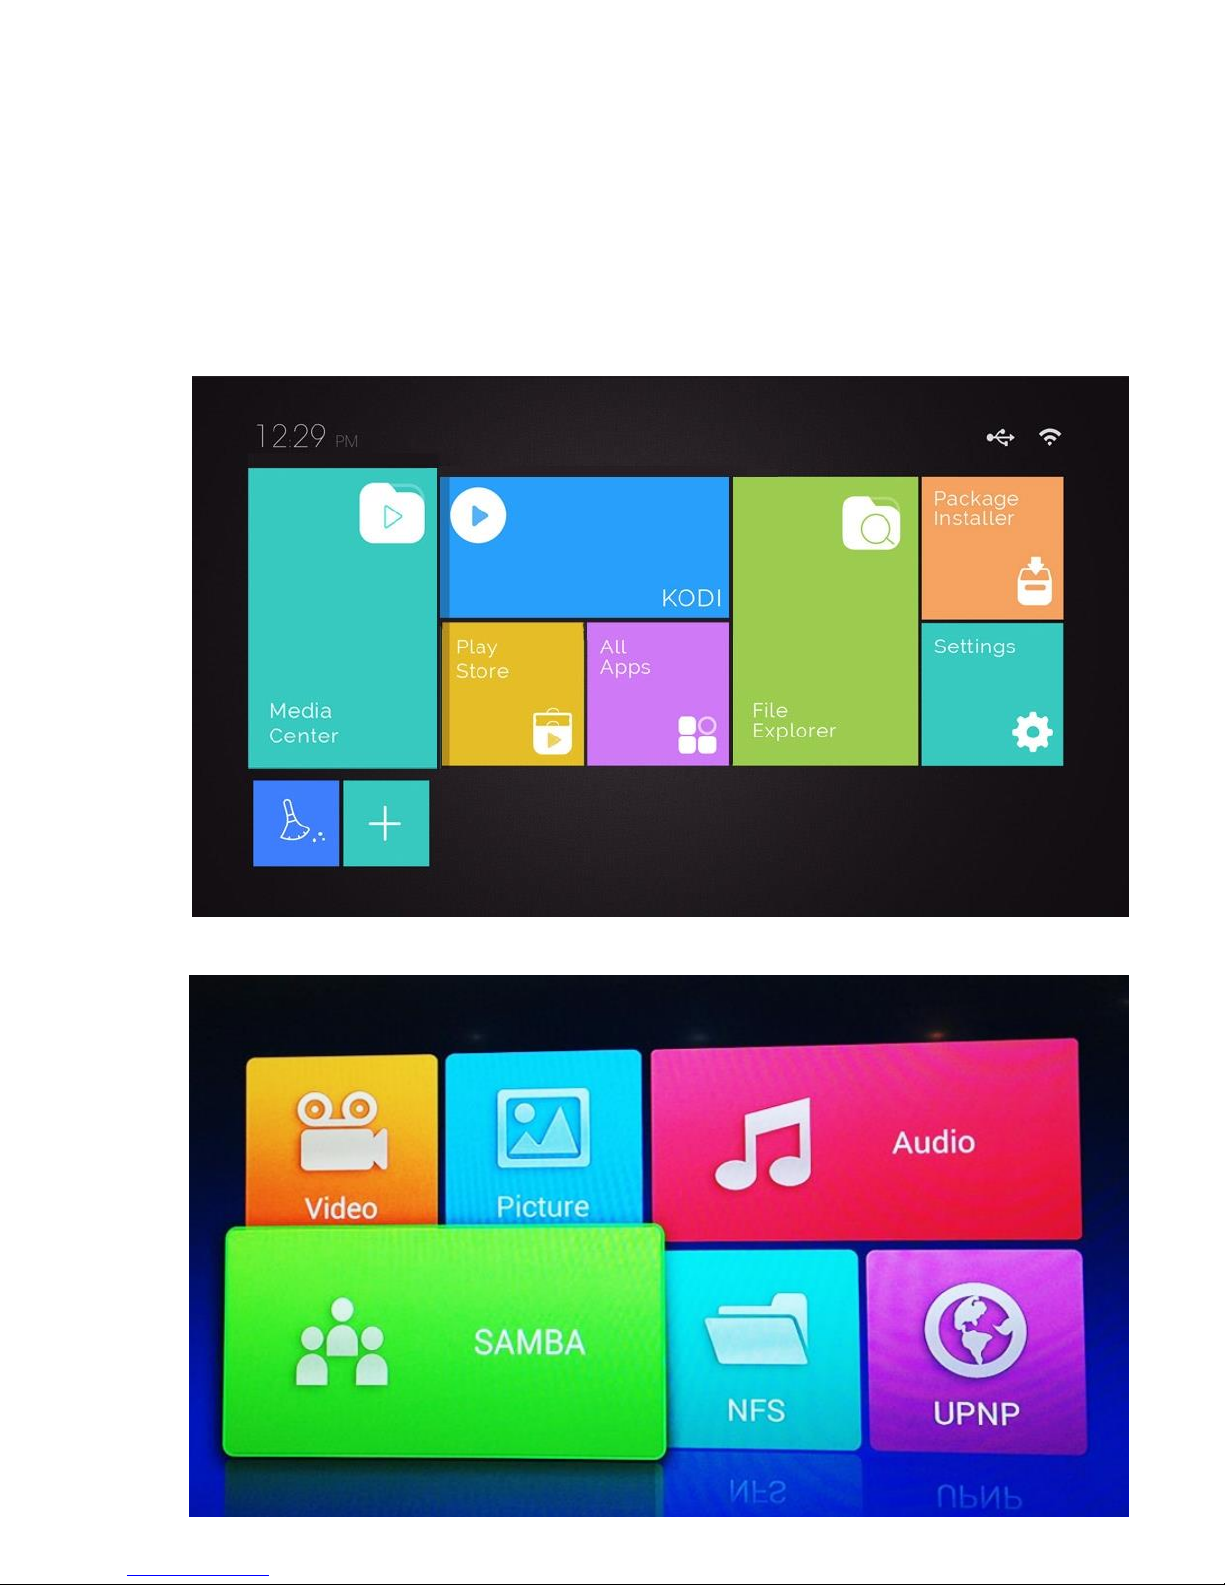
7. Network Share via SAMBA / NFS
7.1 Network Share by Media Center
Using your remote control, navigate to the Media Center icon on your home screen and
press ENTER.
Select either SAMBA or NFS
13
Page 14
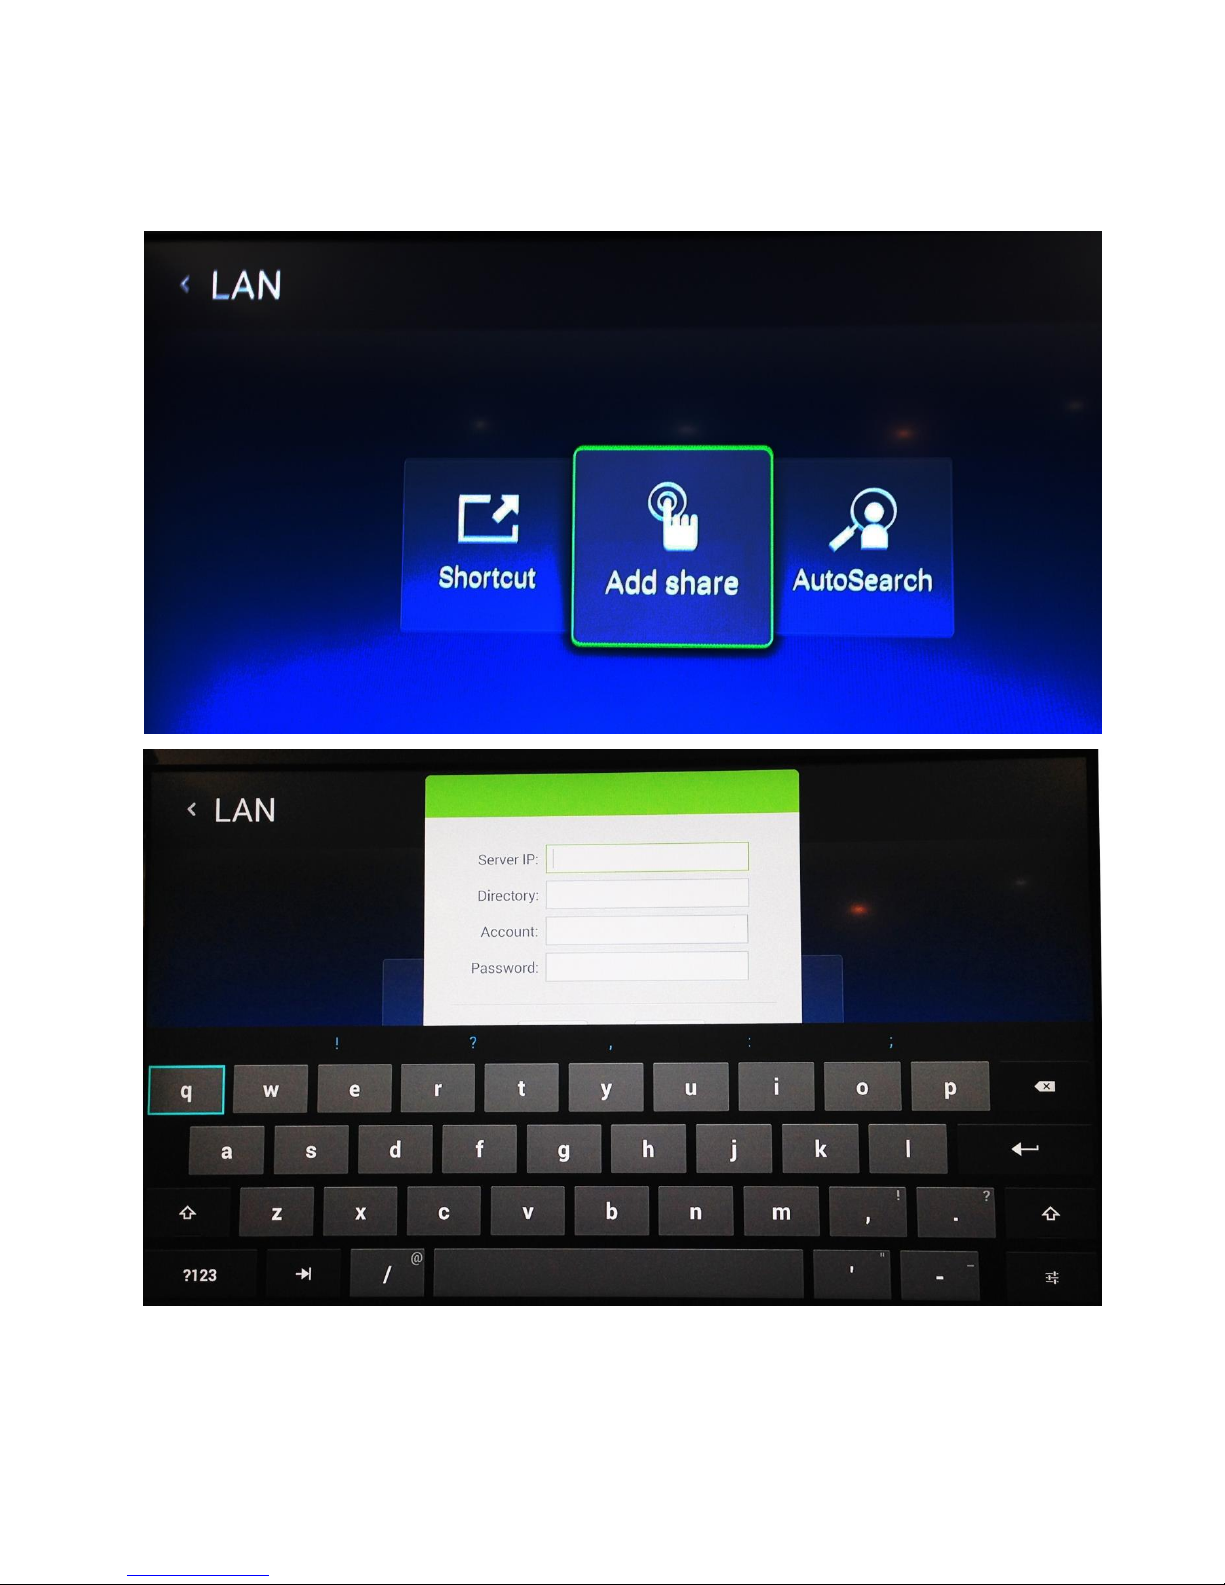
Then, you can either select “Auto Search” followed by “search the user” OR “add share”
followed by keying in all the details requested and press OK
14
Page 15
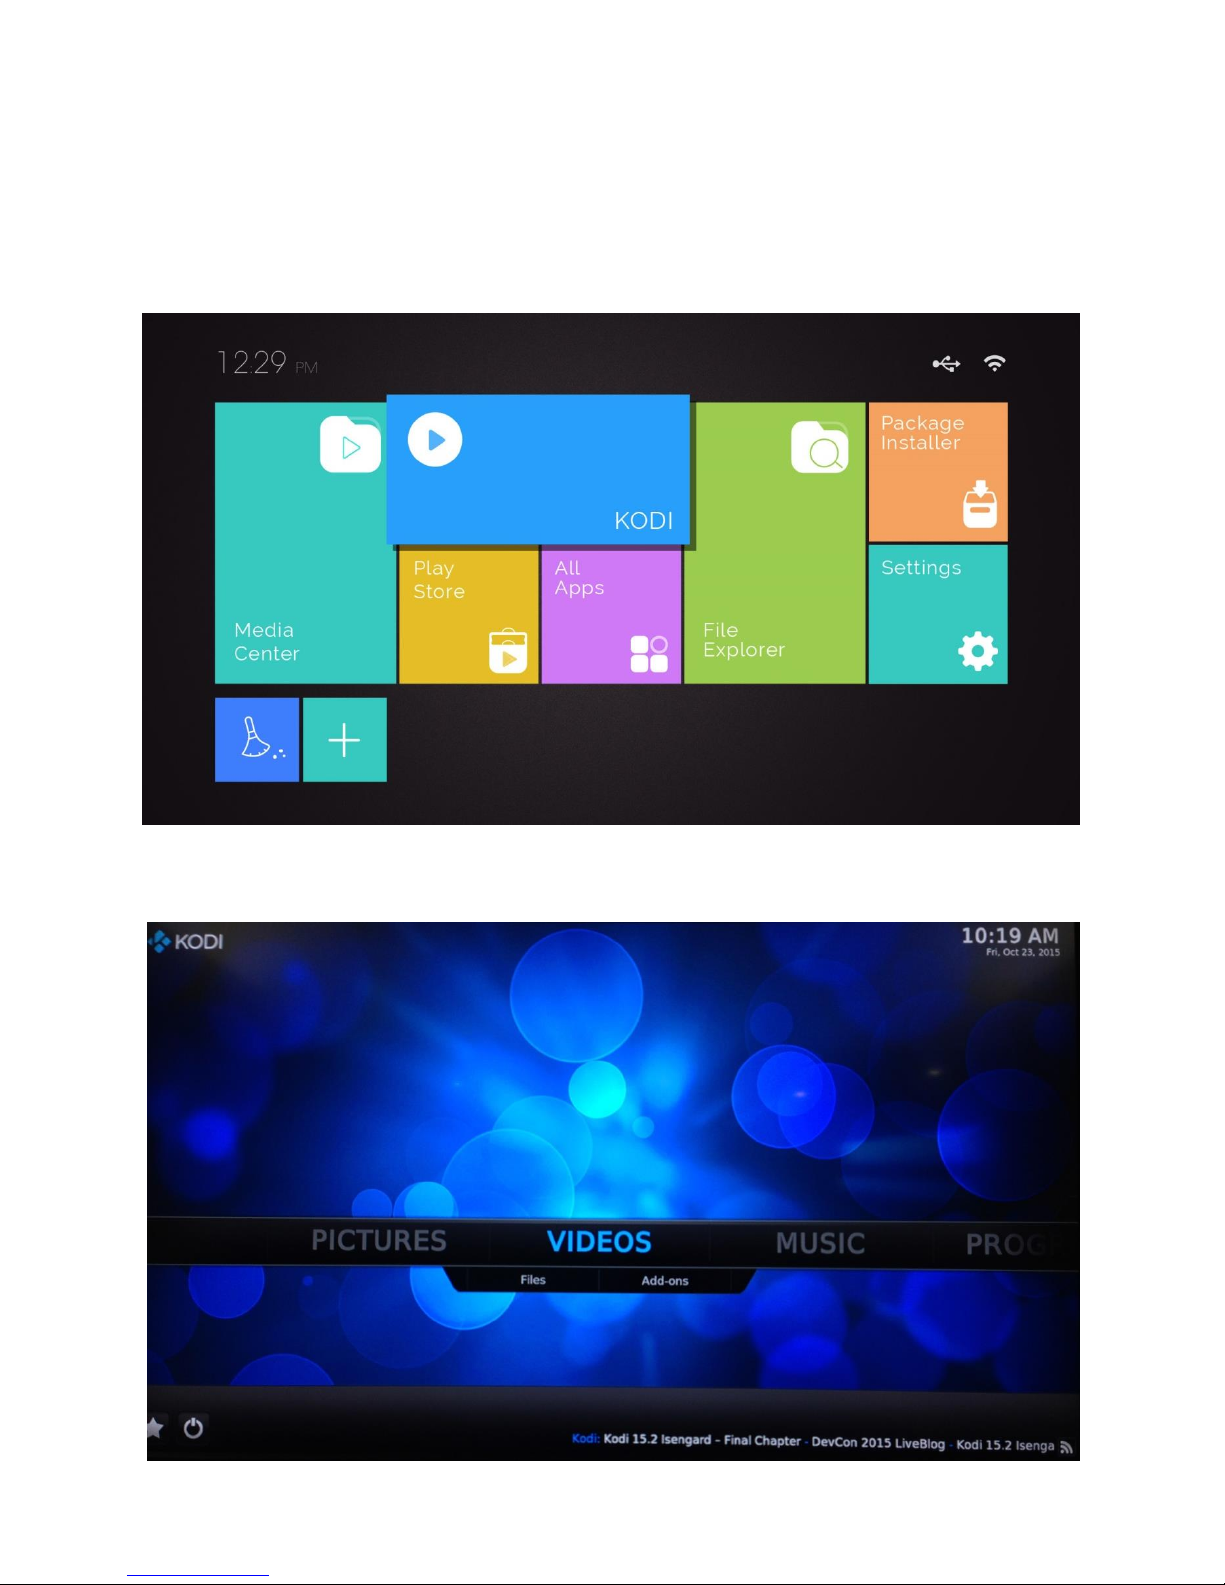
7.2 Network Share by KODI
Using your remote control, navigate to the KODI icon on your home screen and press
ENTER.
Then, select “Videos” followed by “Files”
15
Page 16
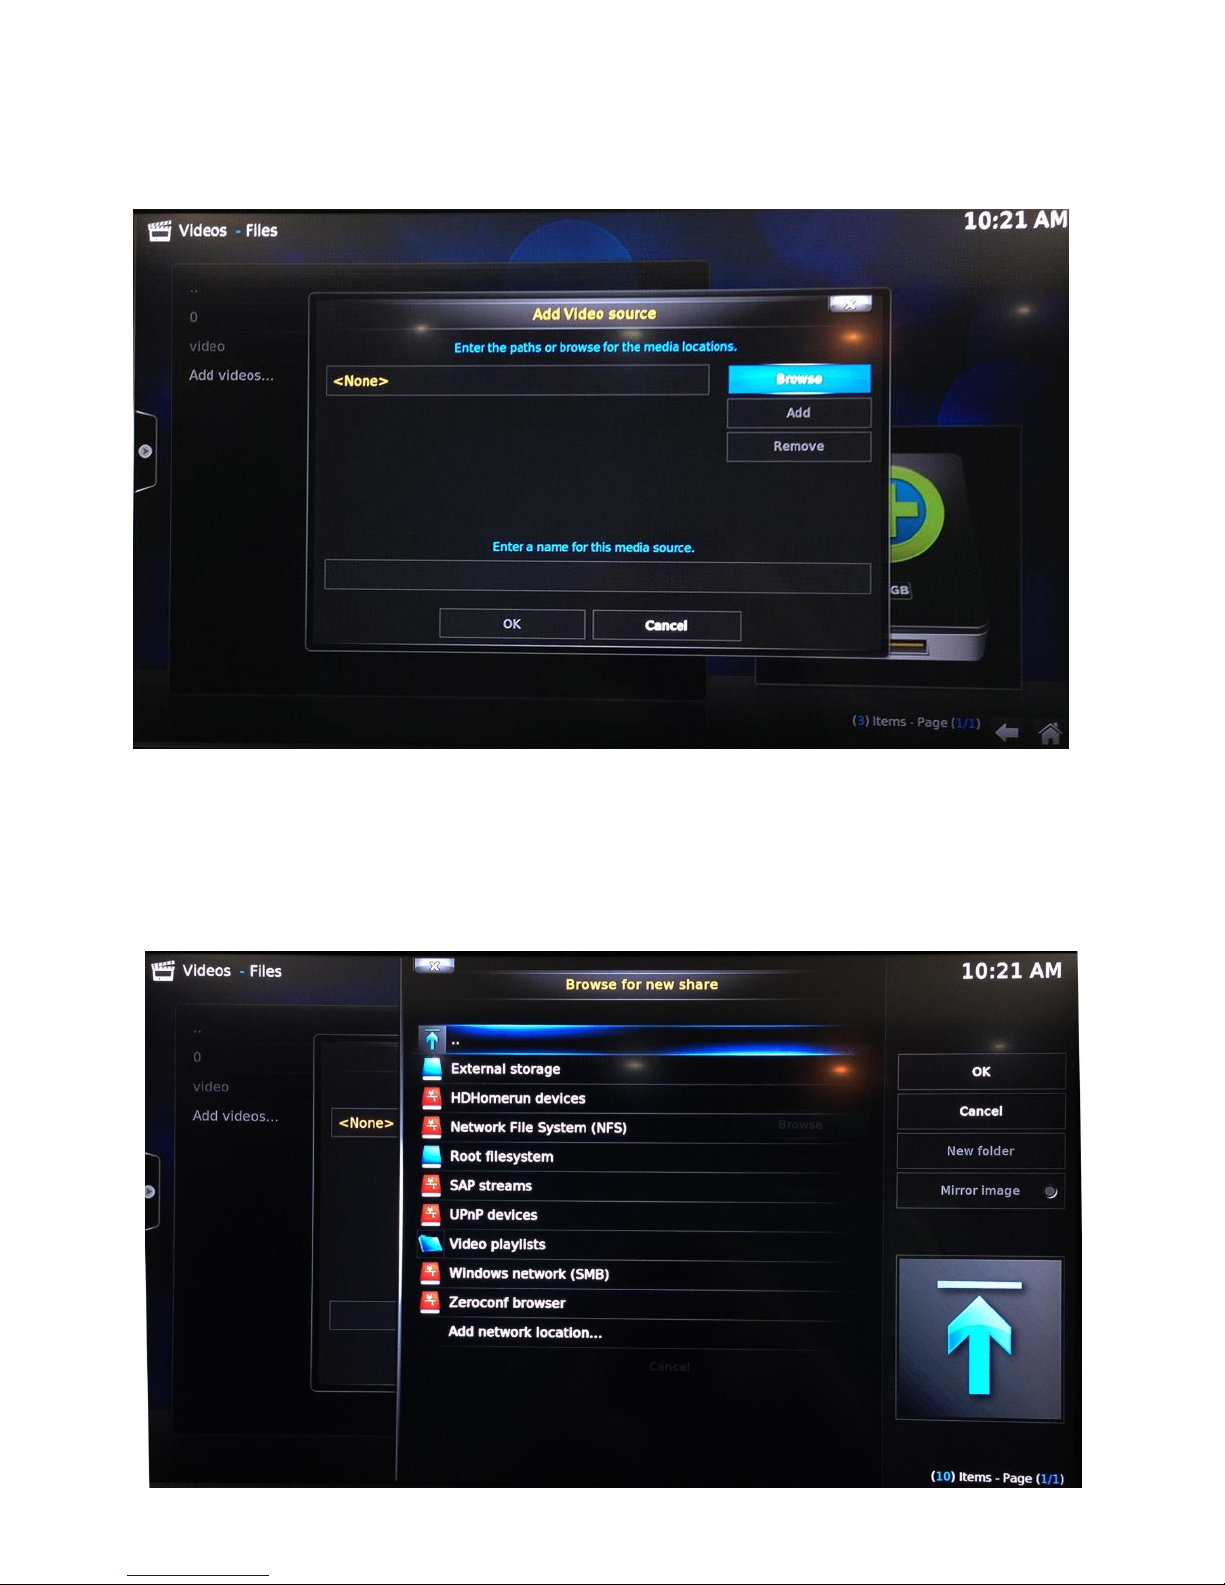
After selecting “Add Videos”, select “Browse”
Under Browse, select either “SAMBA or “NFS” followed by the user you would like to share.
Last but not least, press OK.
16
Page 17
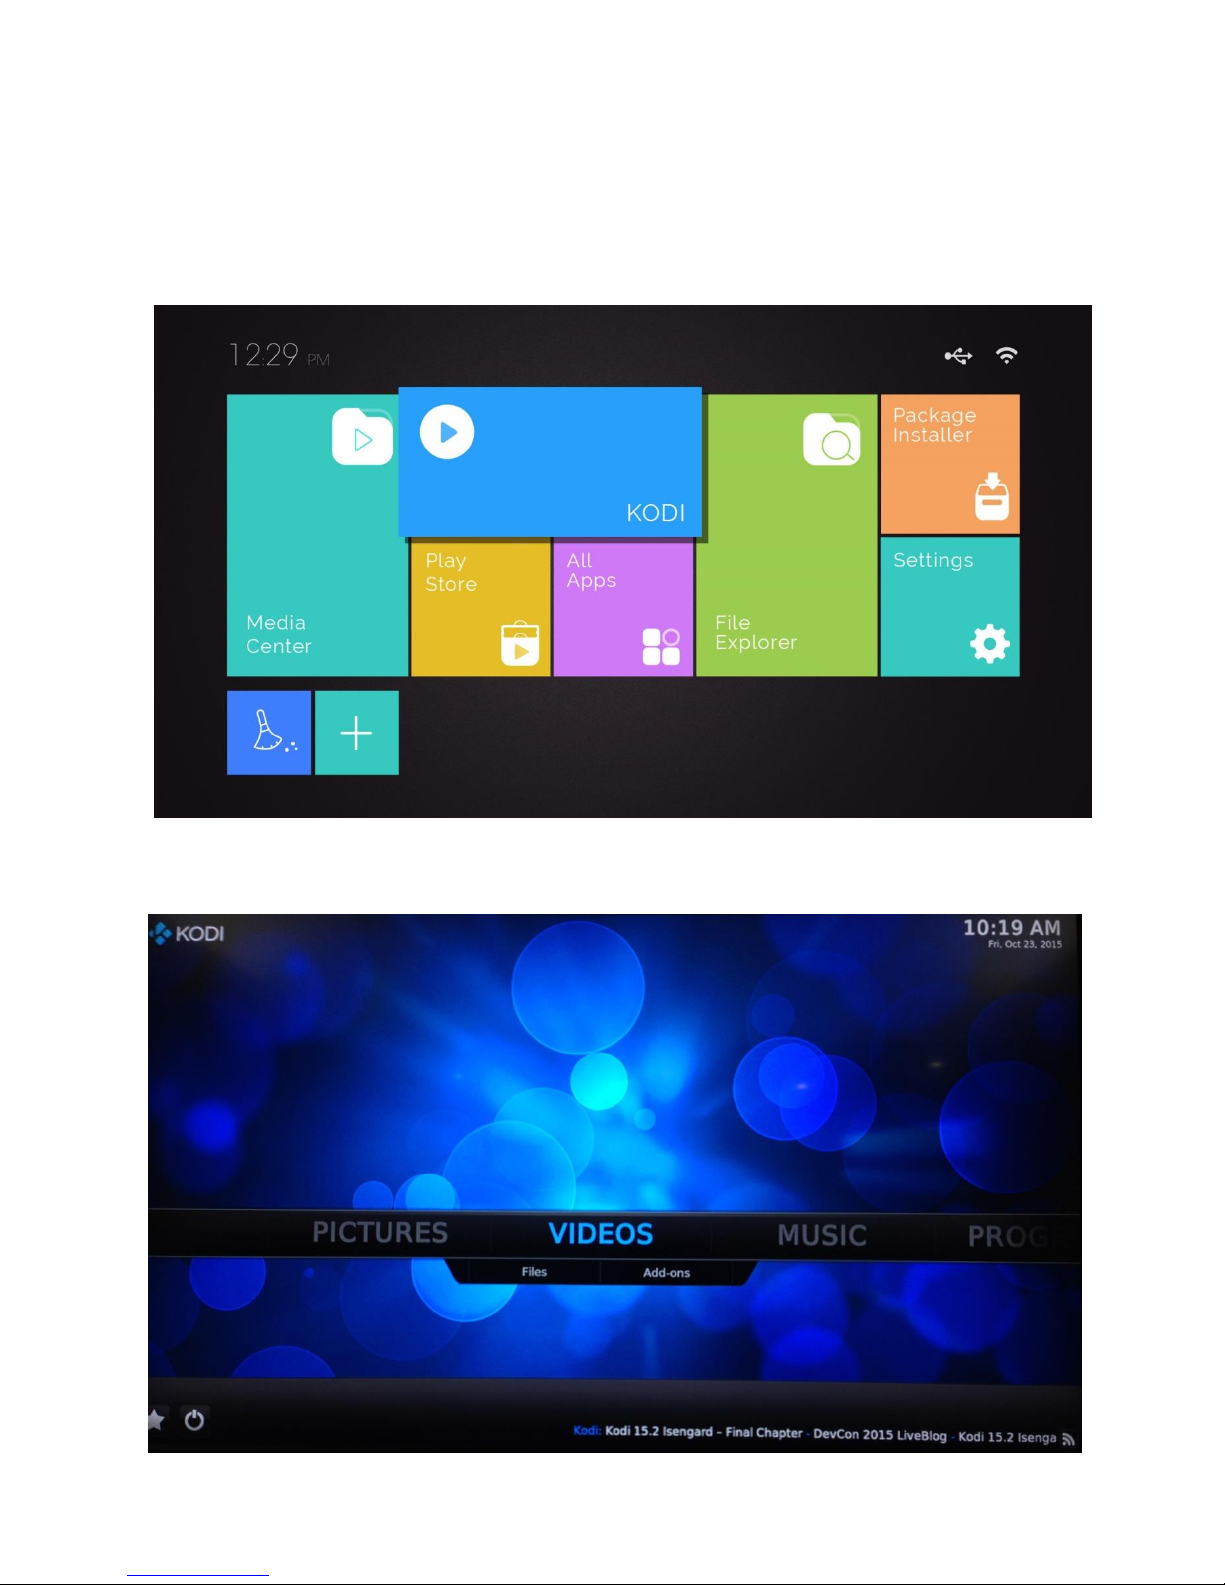
8. Scan Content via SAMBA
Using your remote control, navigate to the KODI icon on your home screen and press
ENTER.
Then, select “Videos” followed by “Files”
17
Page 18
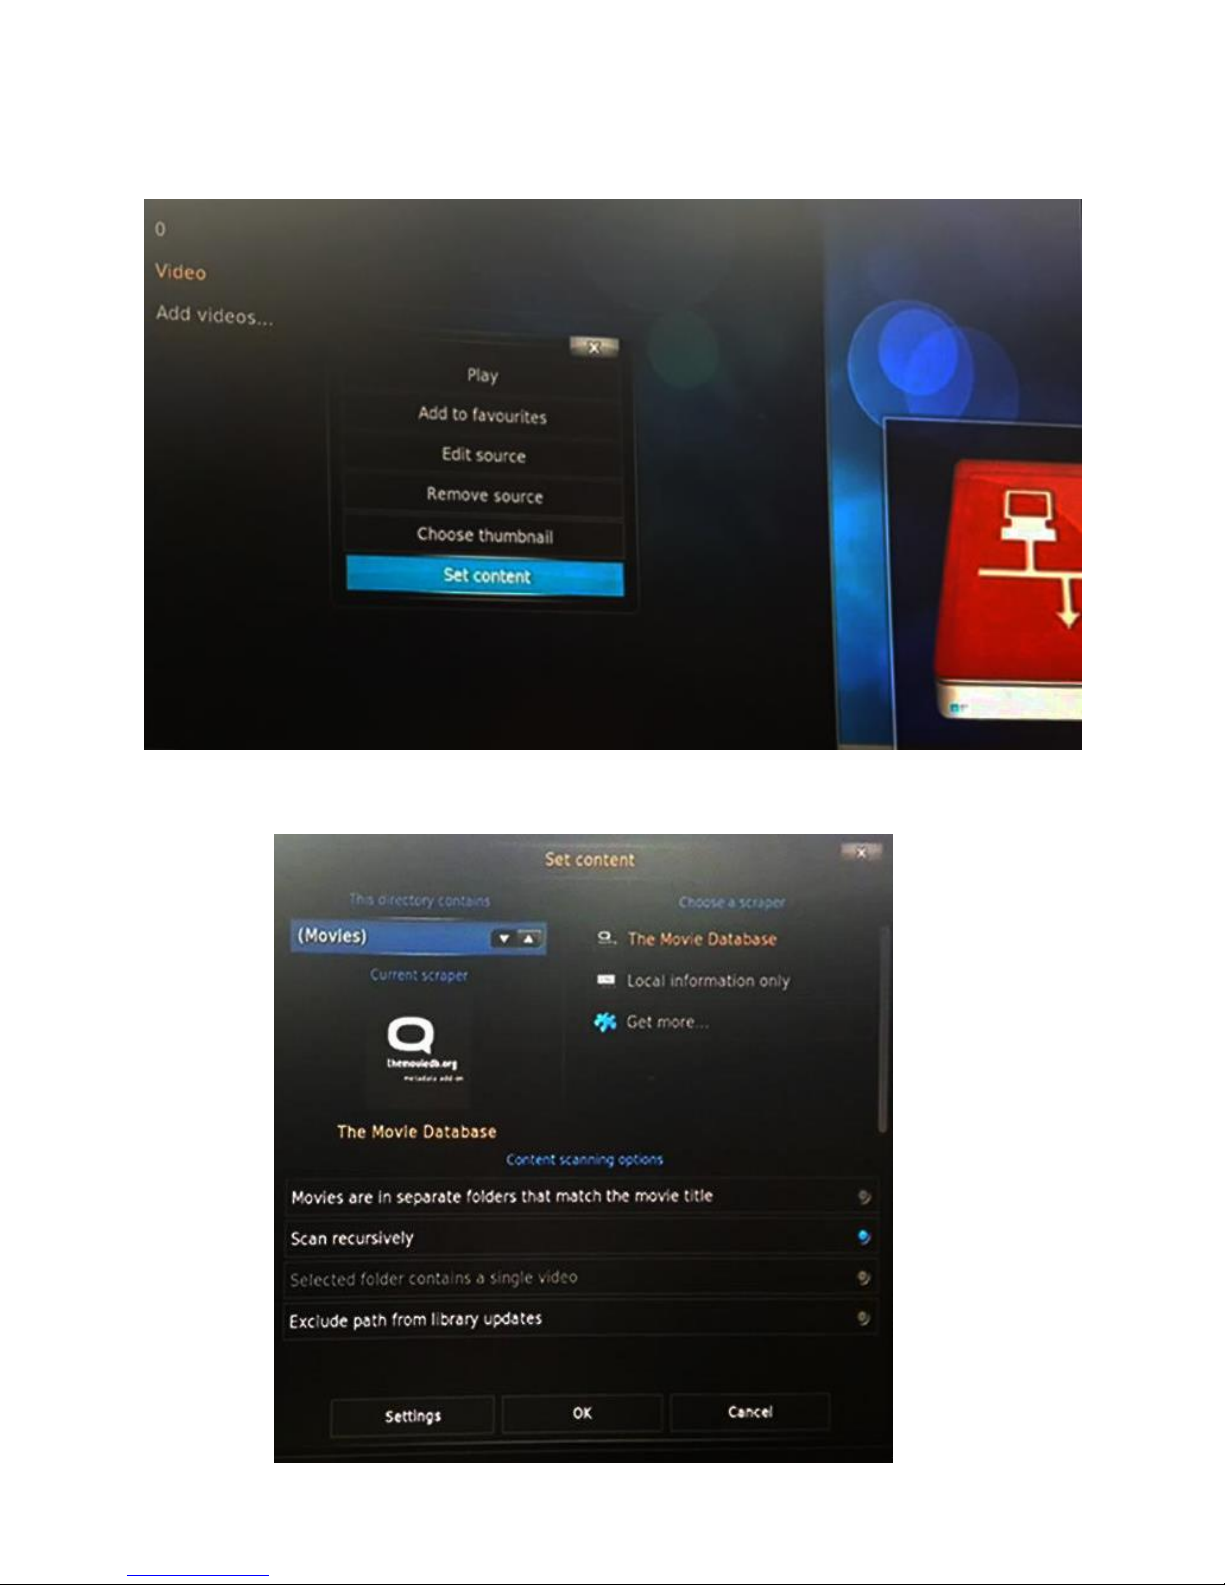
Under “Video”, select “Set Content”
After choosing your desired directory, click OK
18
Page 19

On the window pops out asking if you want to refresh information for all items within this path,
choose “YES”. Wait for minutes and observe the changes on the KODI home screen
9. Installation of KODI Add-On
Using your remote control, on the home screen of KODI, navigate to the System icon
then Settings.
19
Page 20
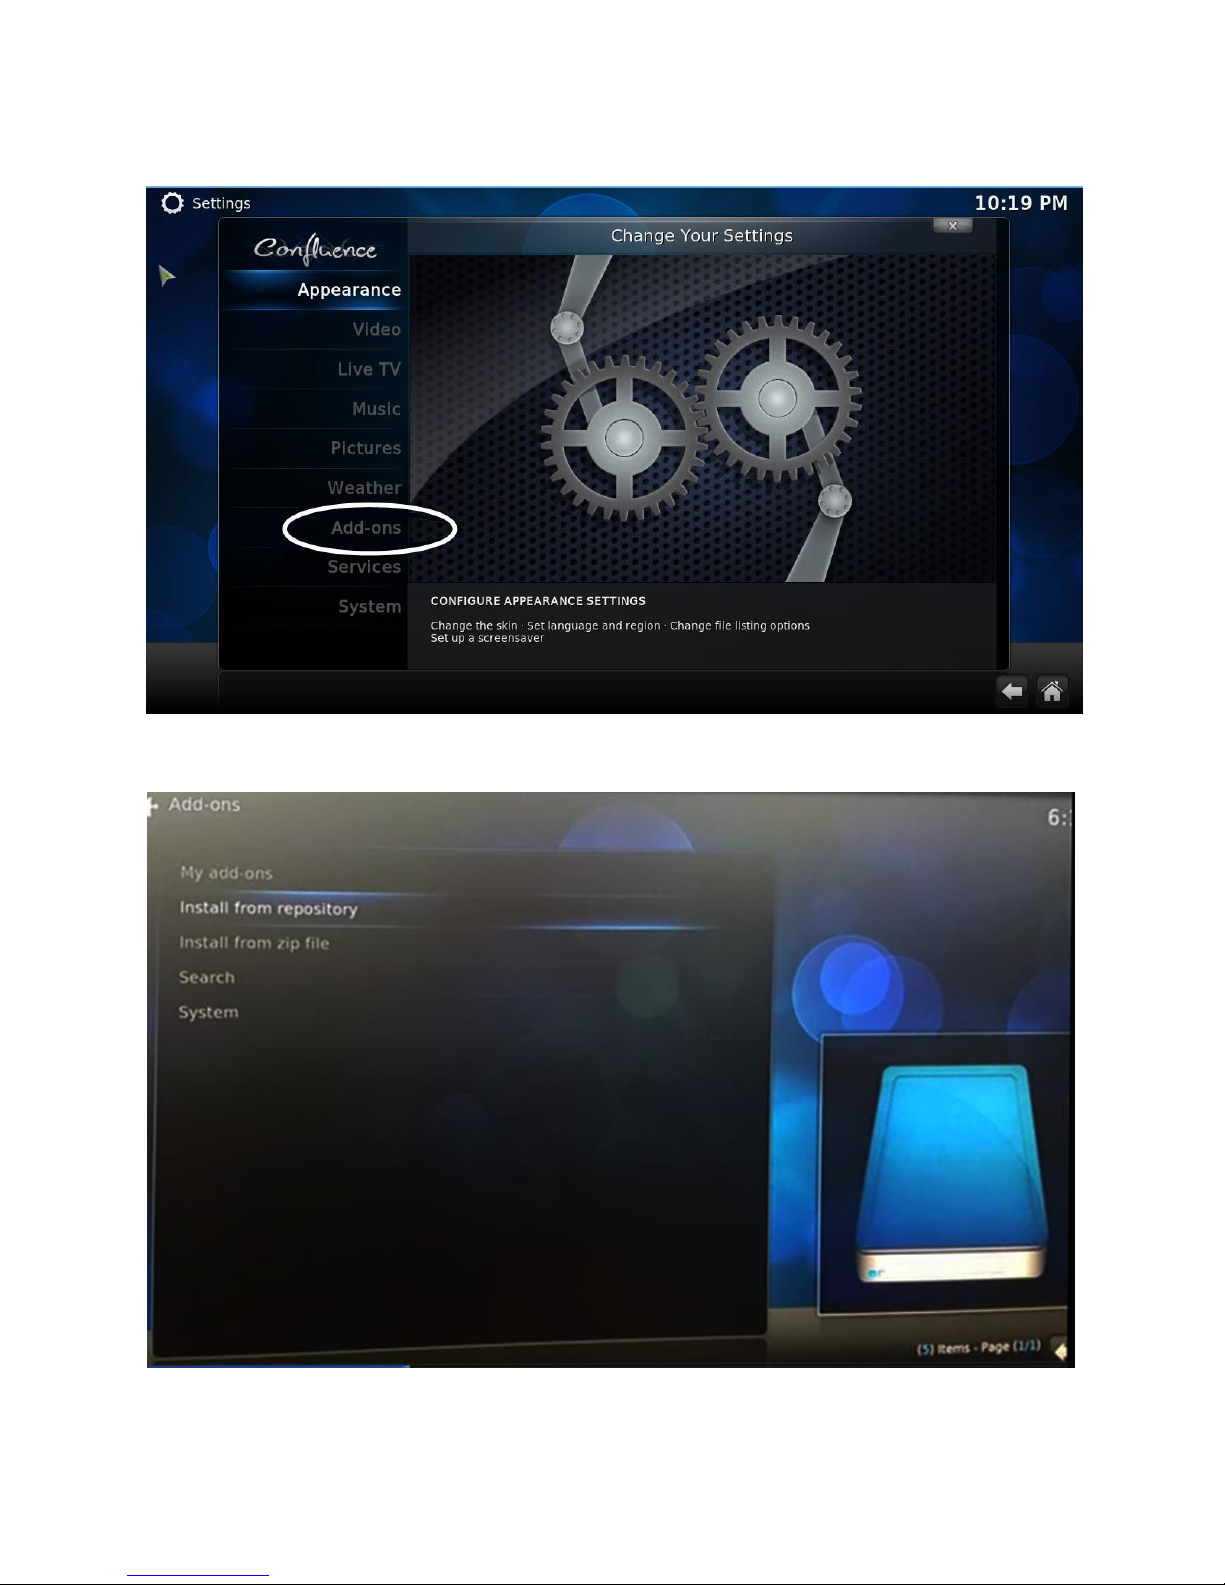
Then, click “Add-ons”.
Under Add-ons, select “Install from repository”
20
Page 21
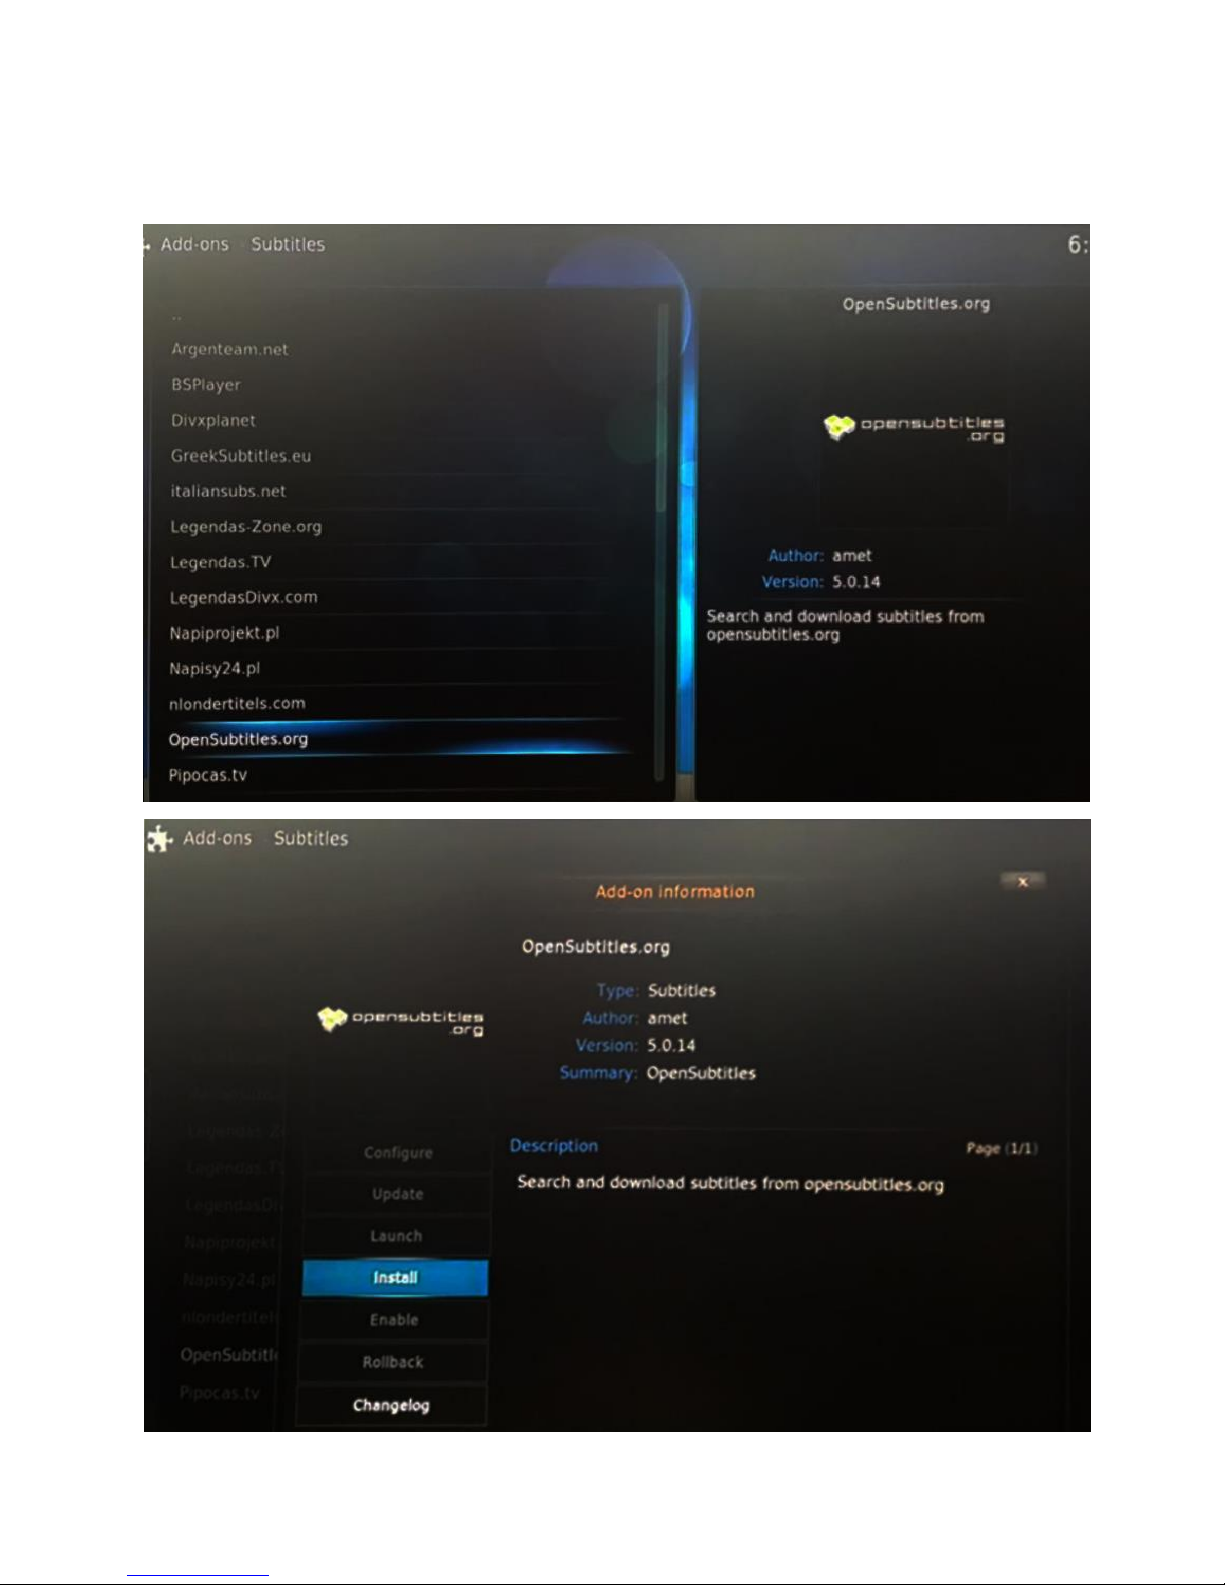
Choose the add-on you would like to add and click “Install”. Wait for a moment until the add-on
is installed.
21
Page 22
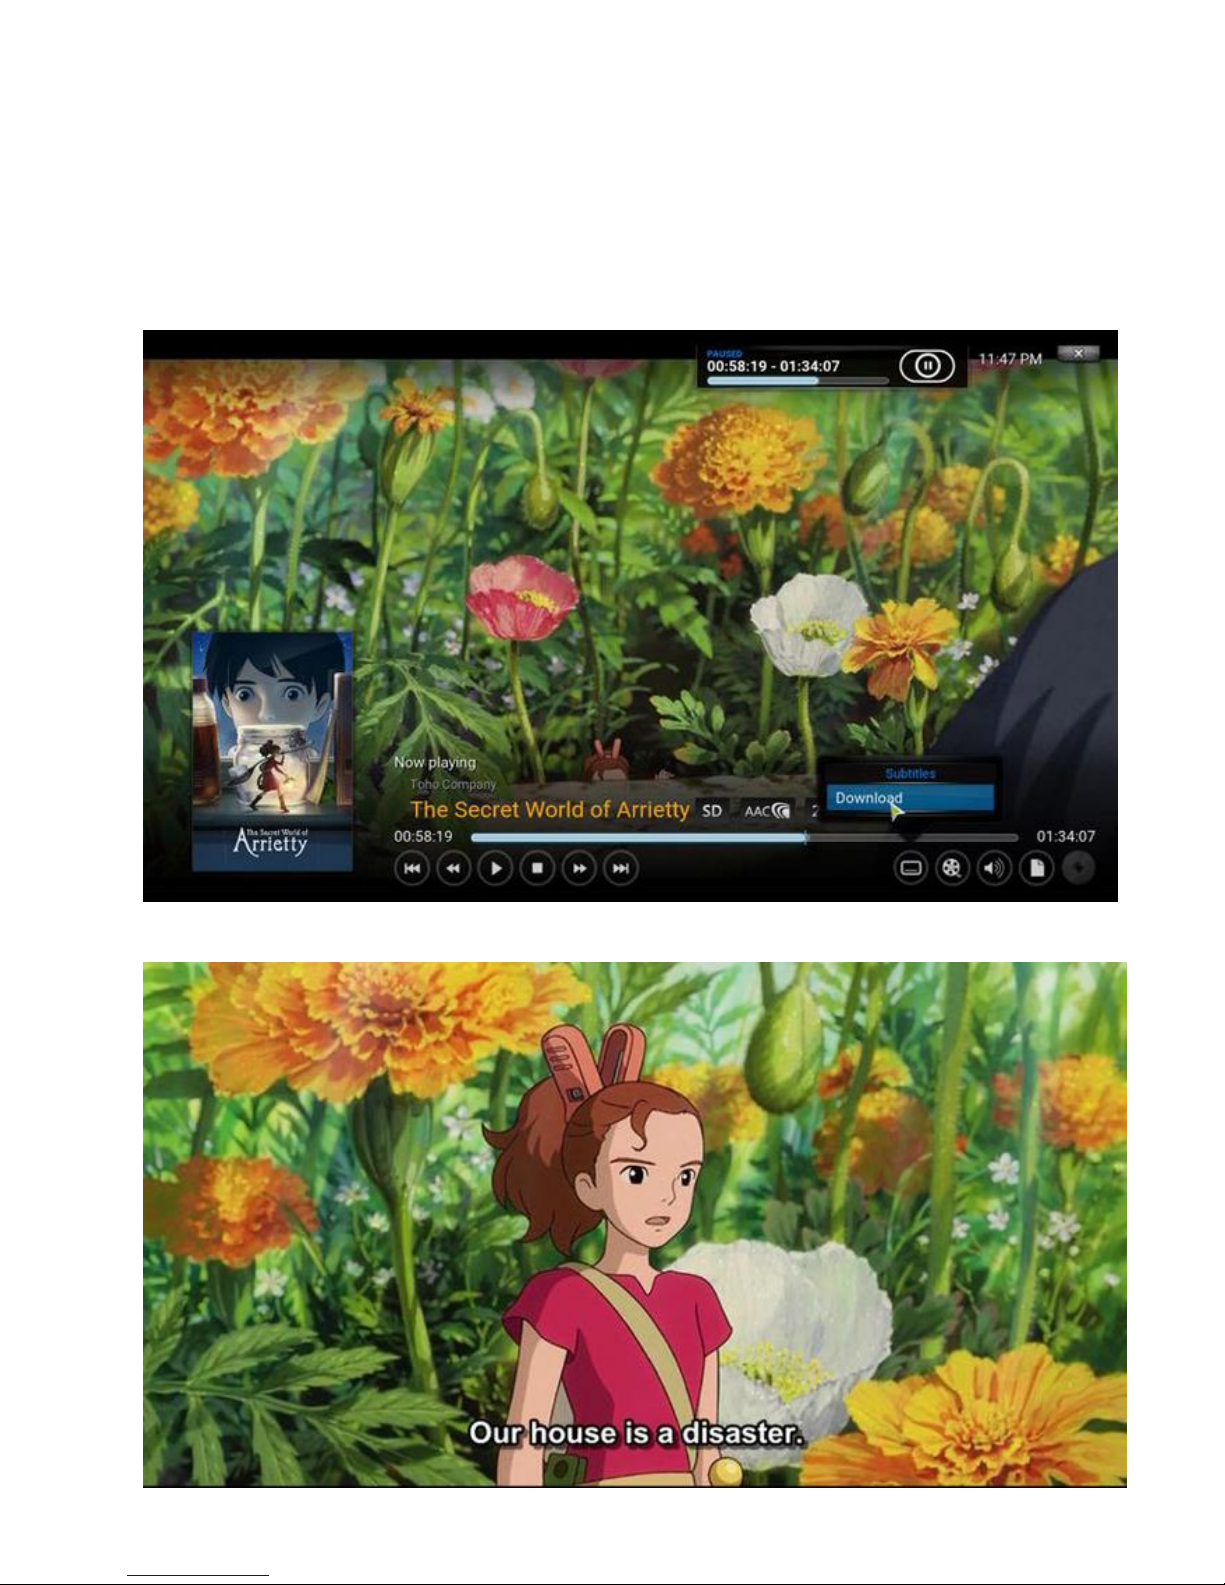
10. Download Subtitle from KODI
To download subtitle from KODI, use your remote control and navigate to the subtitle icon
on the right bottom of the screen, then press Download.
22
Page 23
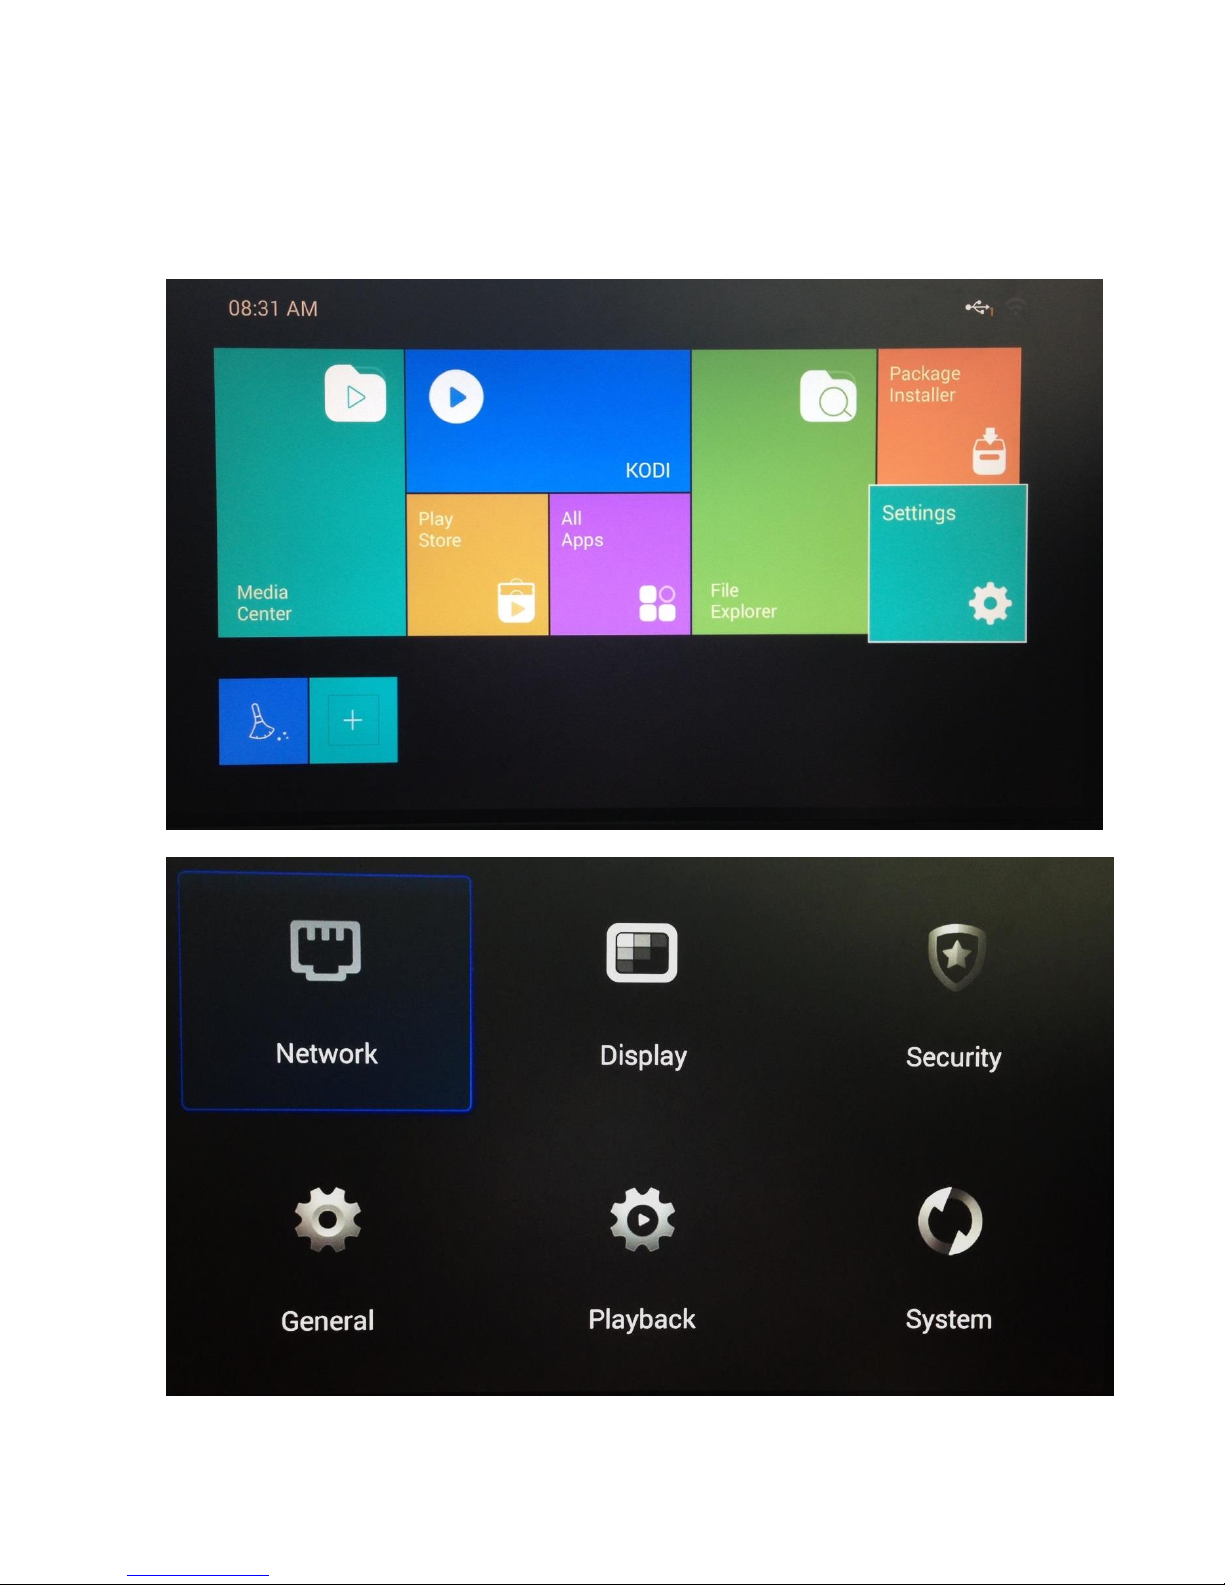
11. Settings
Using your remote control, navigate to the Settings icon and you can access to any
features that you want.
23
Page 24
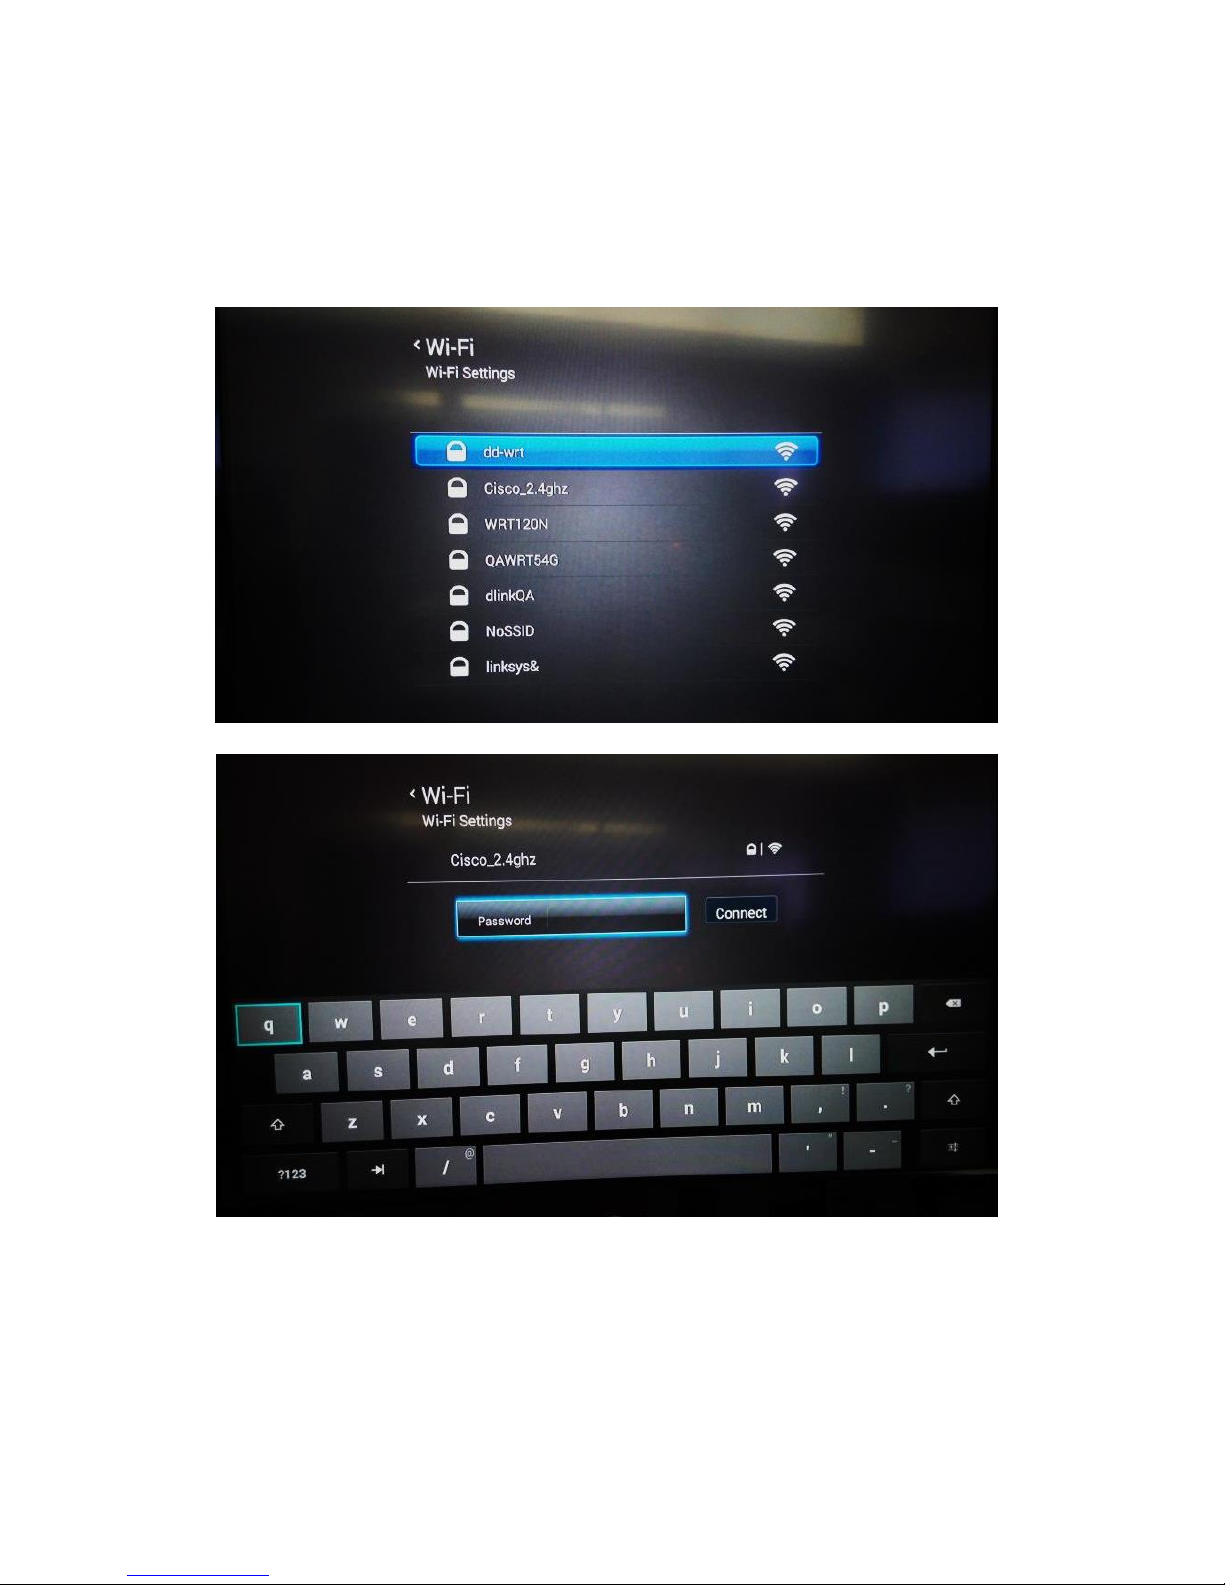
11.1. Wi-Fi Set-Up
In order to connect to Wi-Fi, go to Settings followed by General then Advanced Setting.
Next, choose the user name you are likely to connect.
24
Page 25
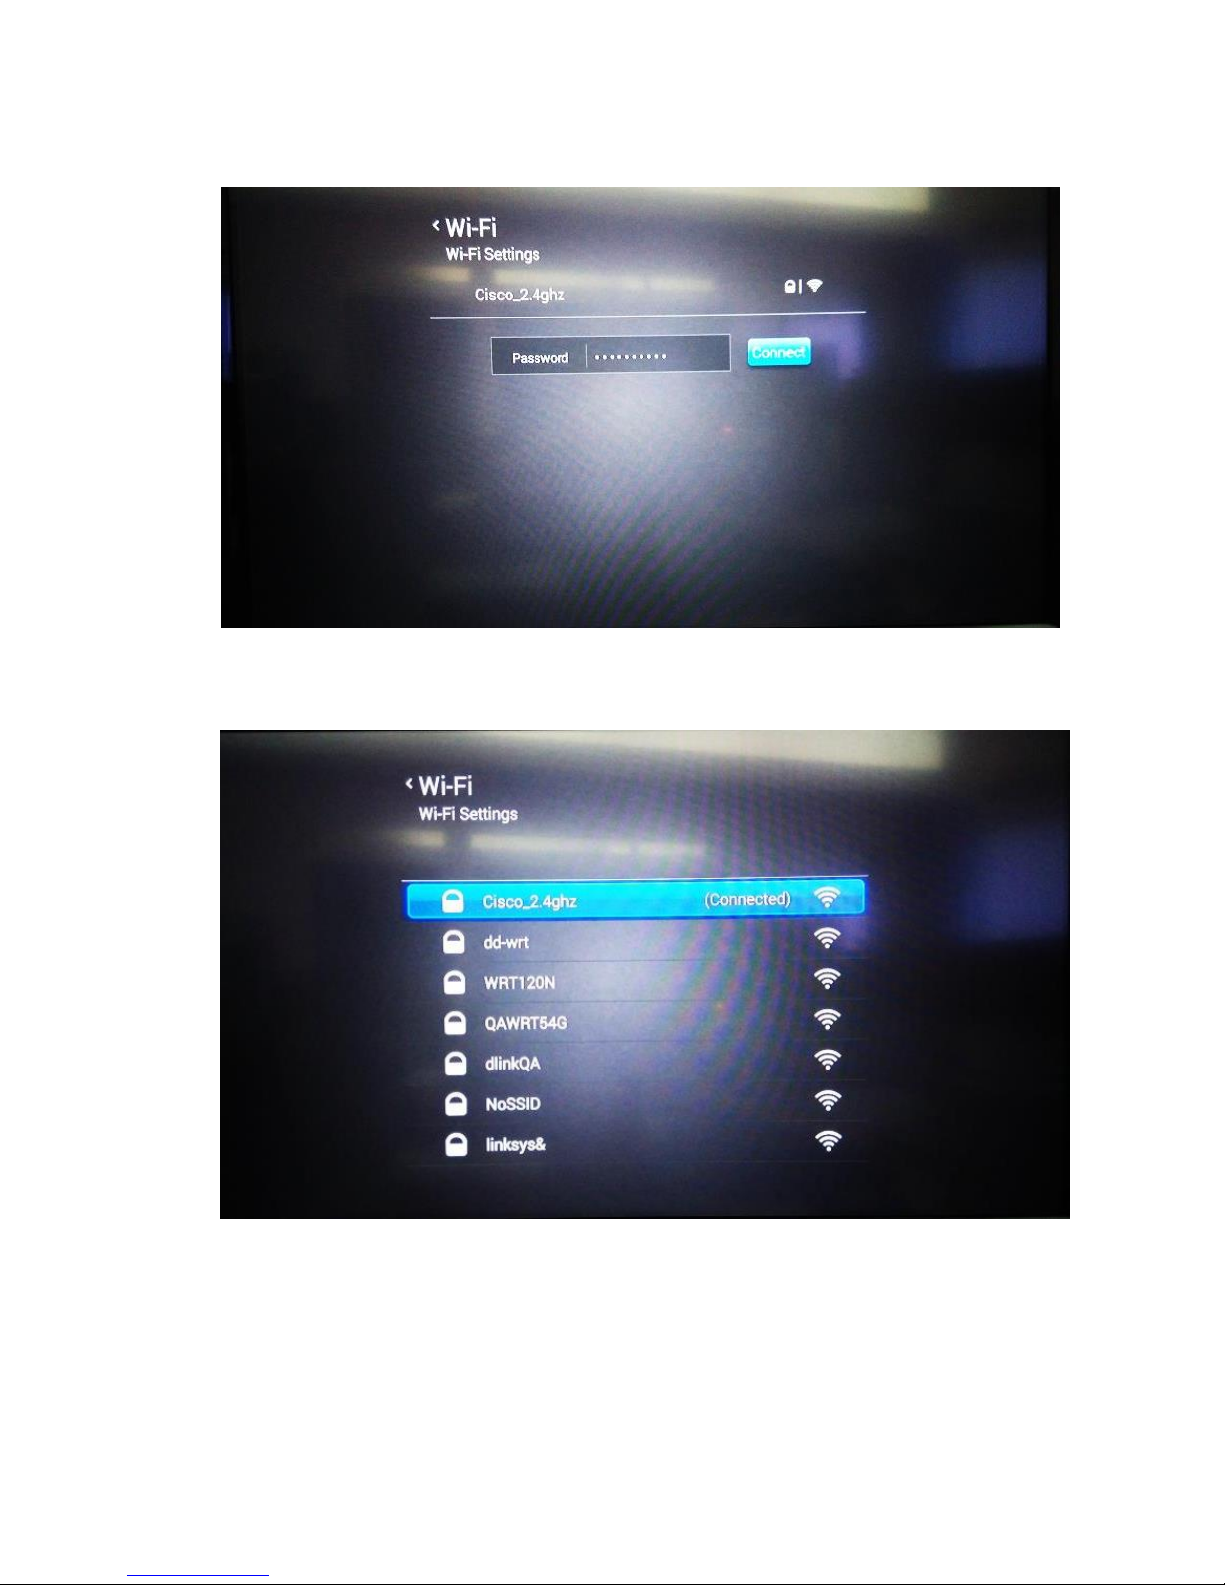
Key in your password and click Connect. Now, you are connected to the WiFi.
25
Page 26
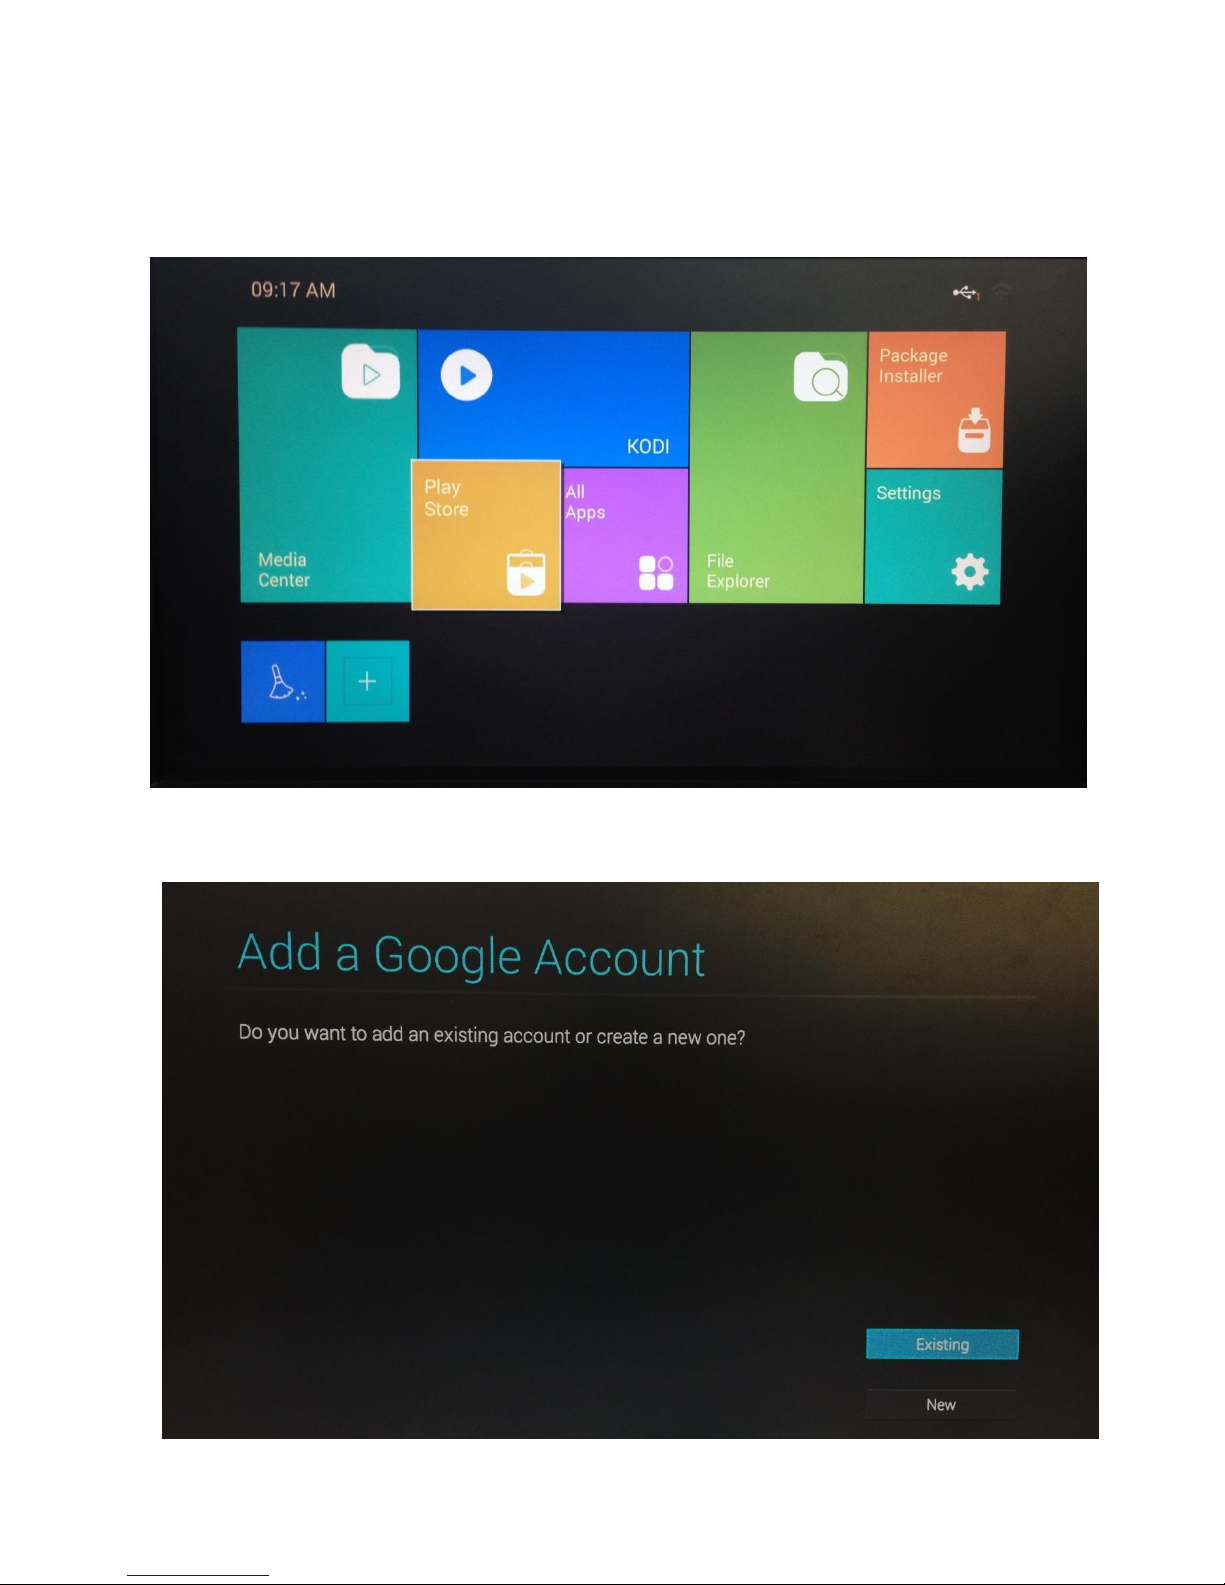
12. Play Store
Using your remote control, navigate to the Play Store icon.
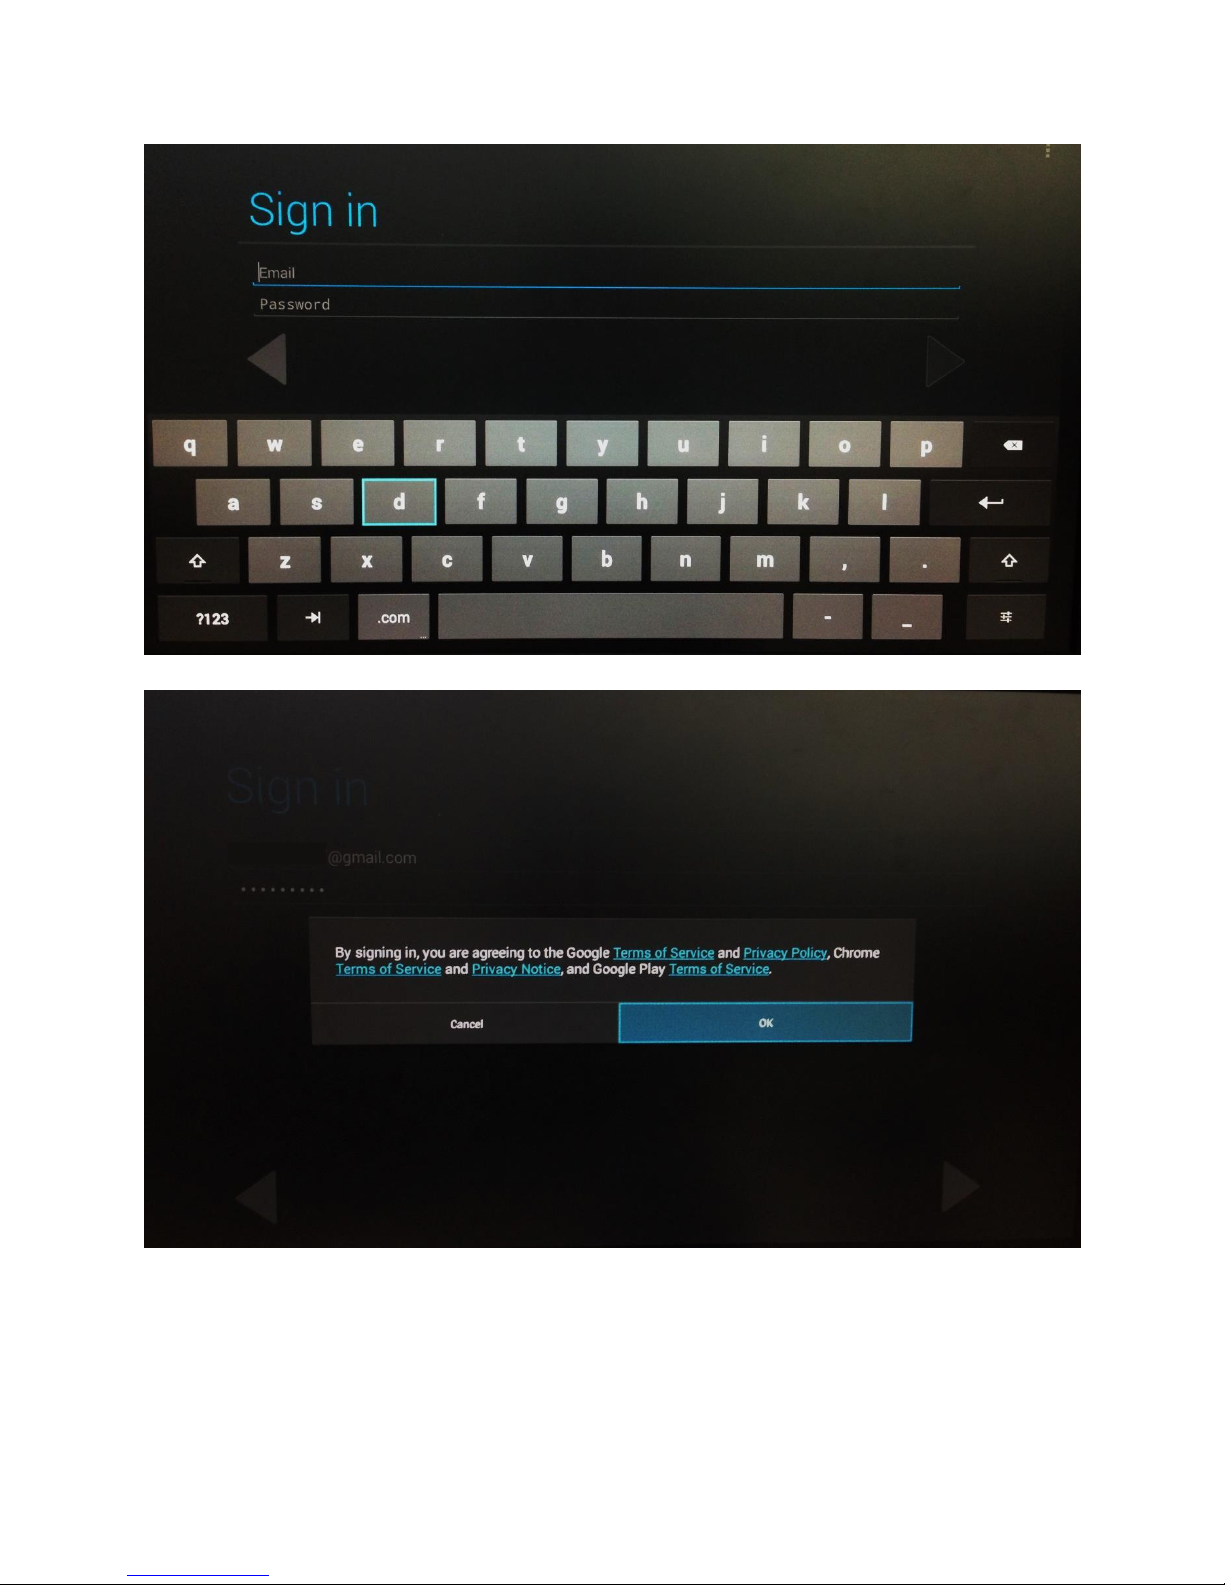
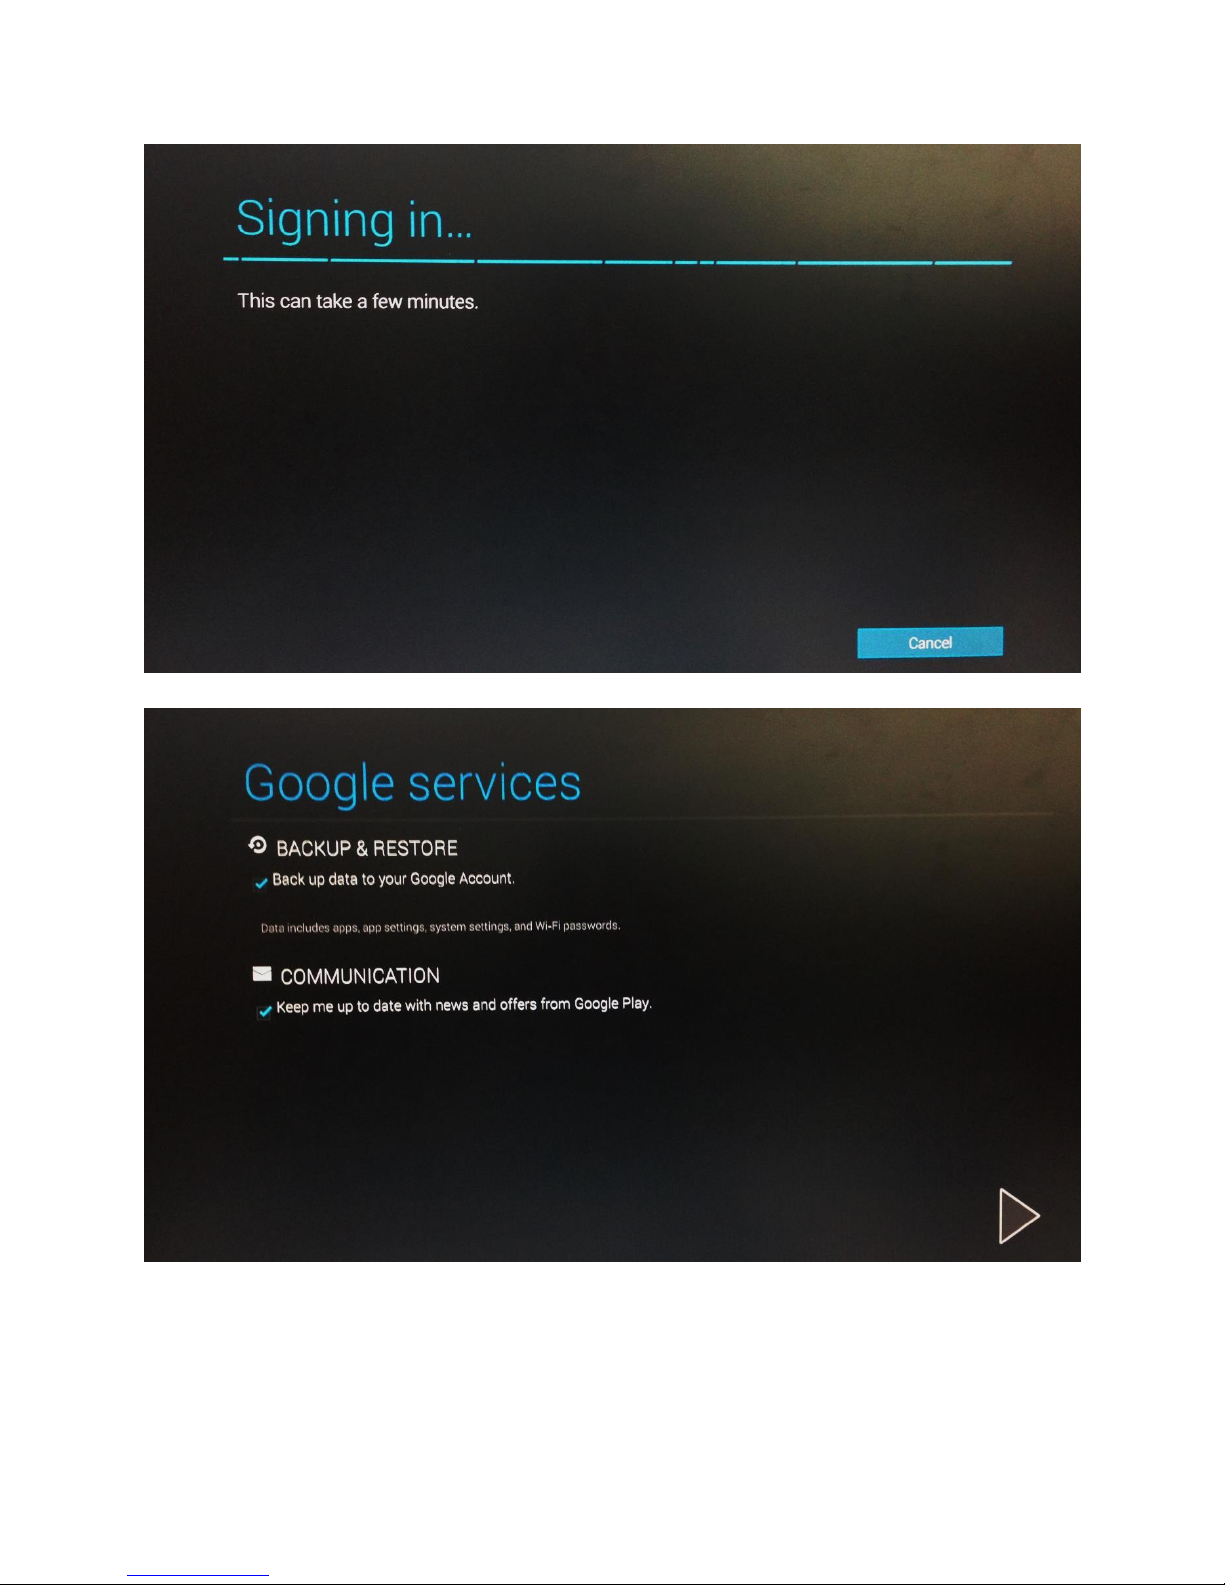
Sign In to your Google Account or if not, create one.
26
Page 27
27
Page 28
28
Page 29
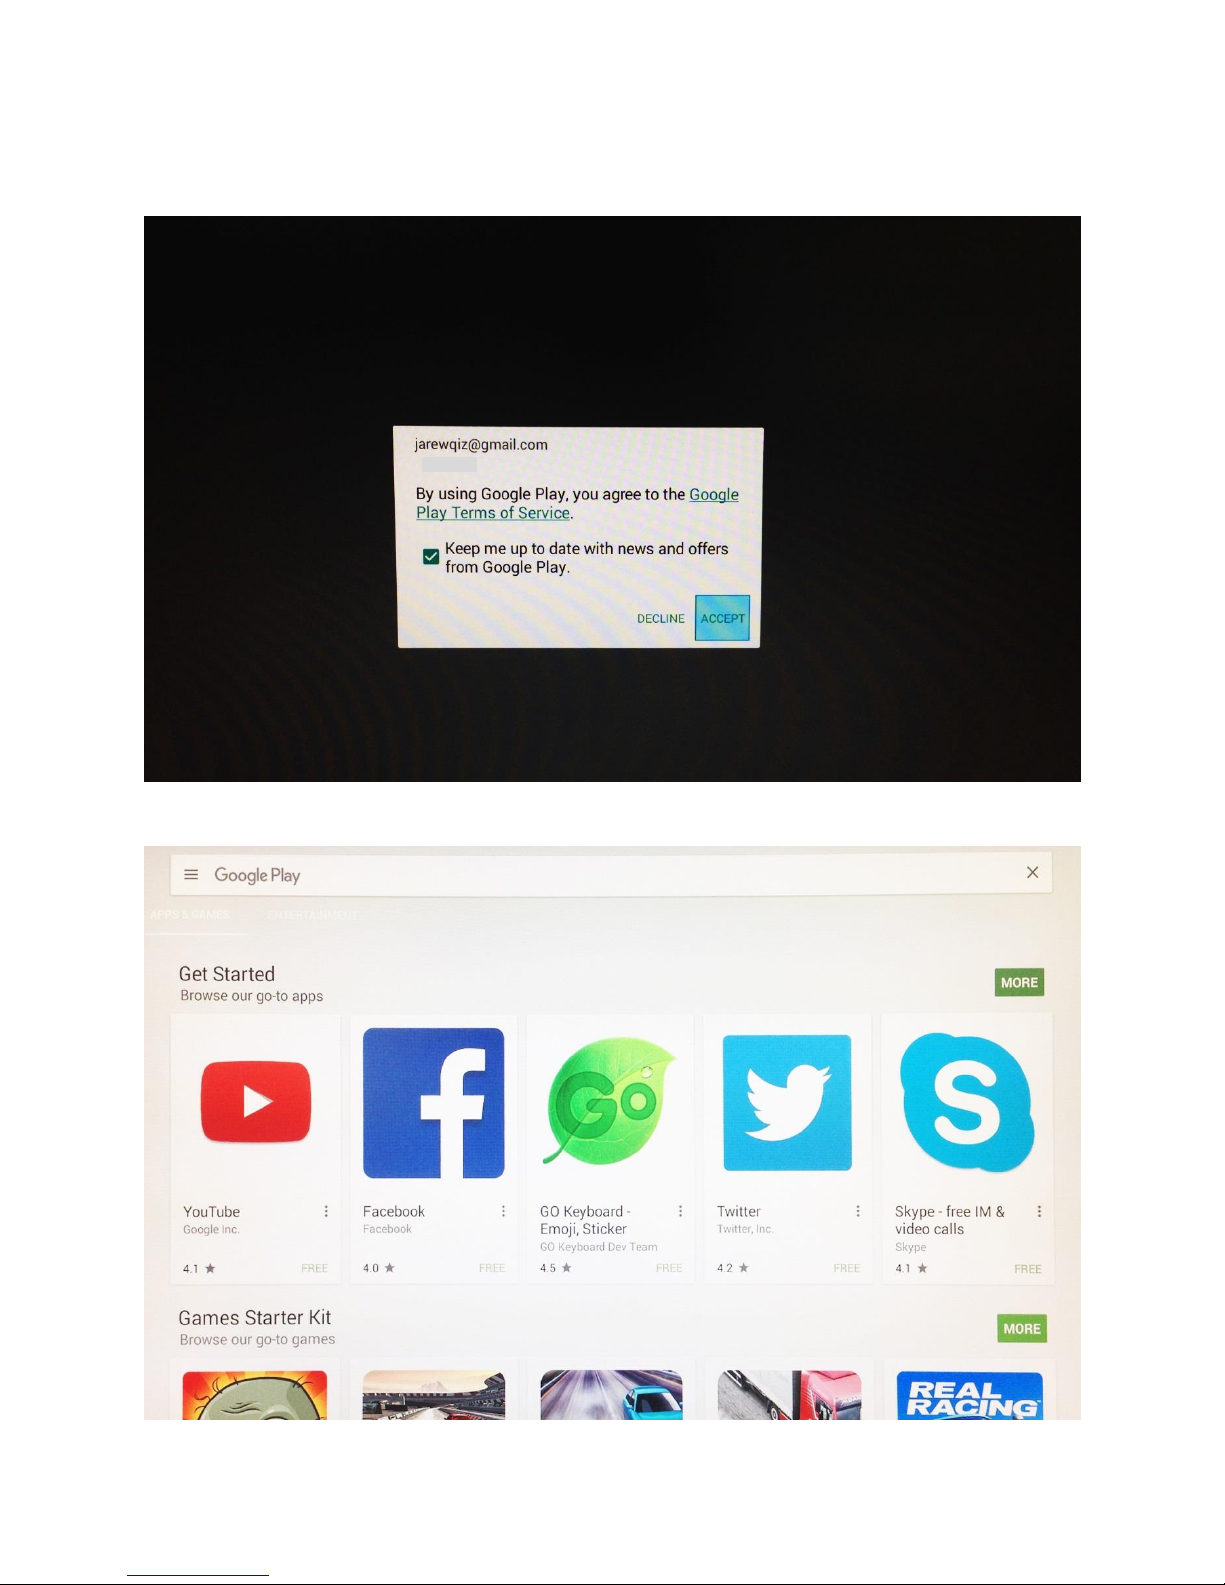
By clicking Accept, you agree to obey to Google Play Terms of Service which will then prompt
you to Google Play Store.
29
Page 30
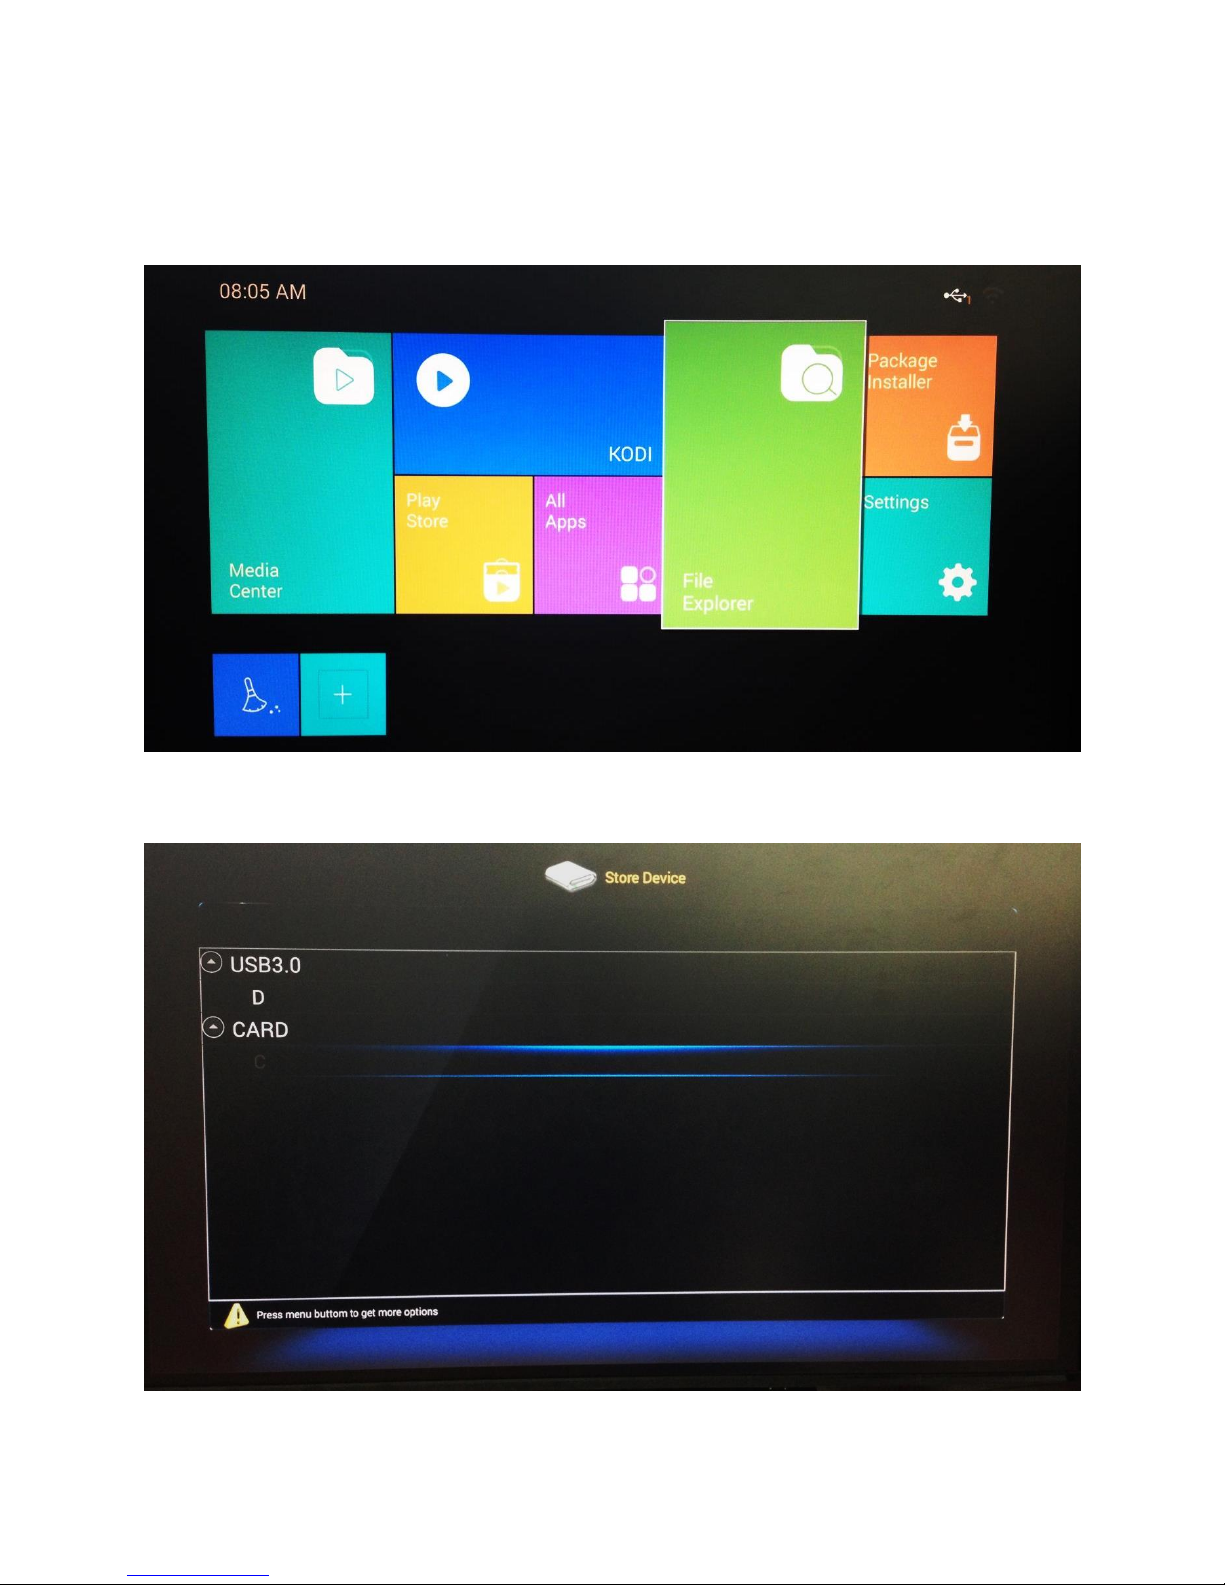
13. File Explorer
Using your remote control, navigate to the Play Store icon.
Next, choose files in either internal drive or your external USB drive that you are likely to access.
30
Page 31
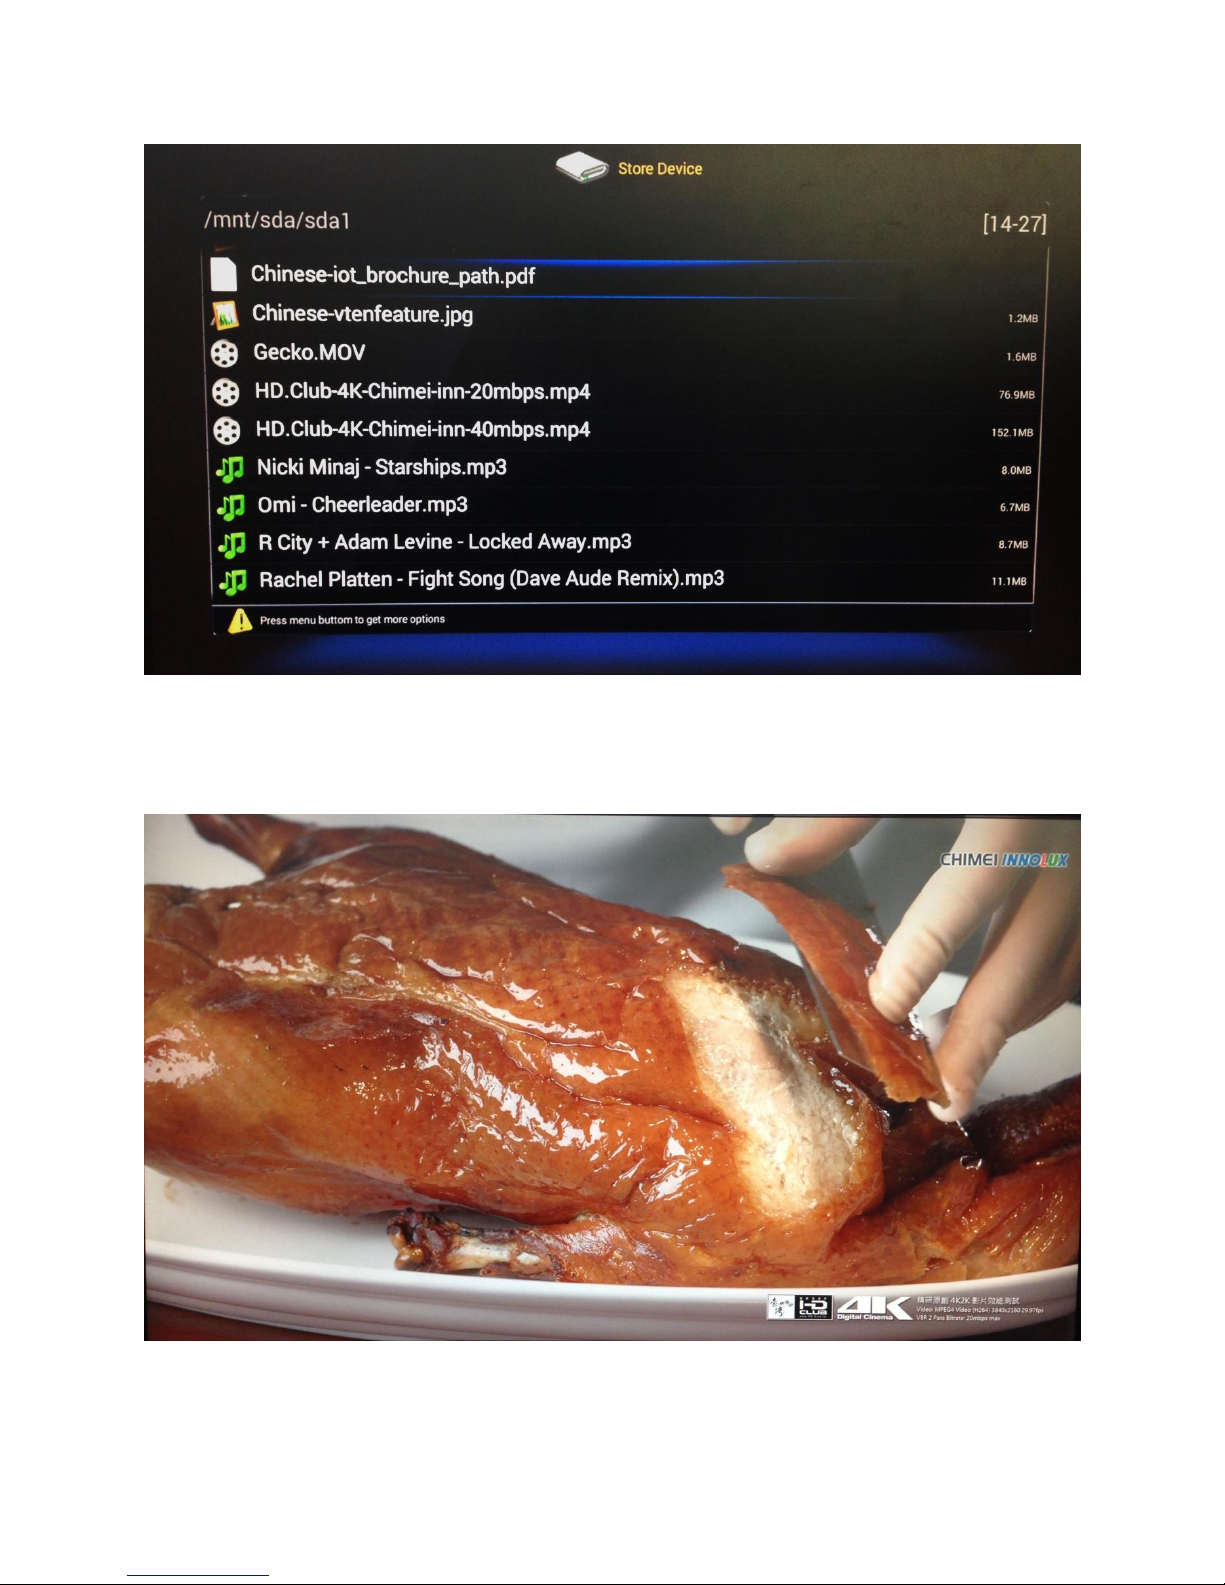
13.1 Video
Choose your favorite movie and watch it in 4K UHD!
31
Page 32
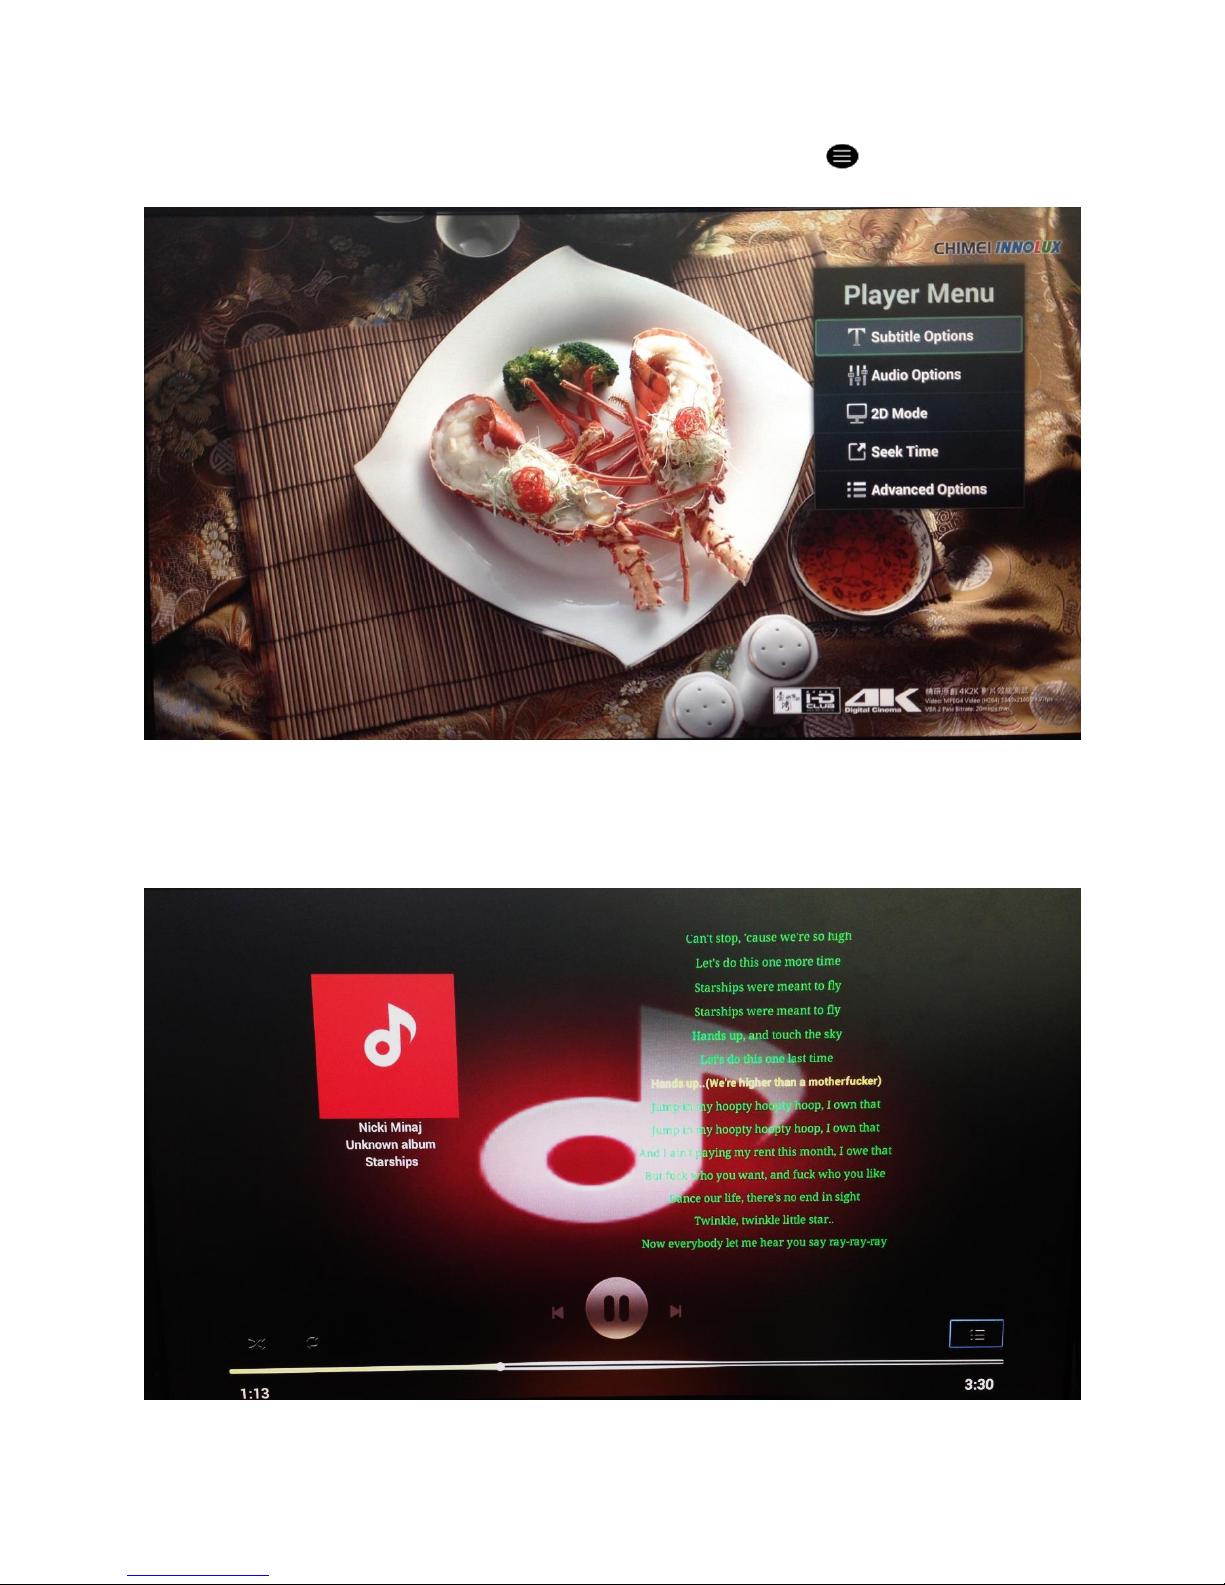
You may access to the Player Menu for settings by pressing the button on your remote control.
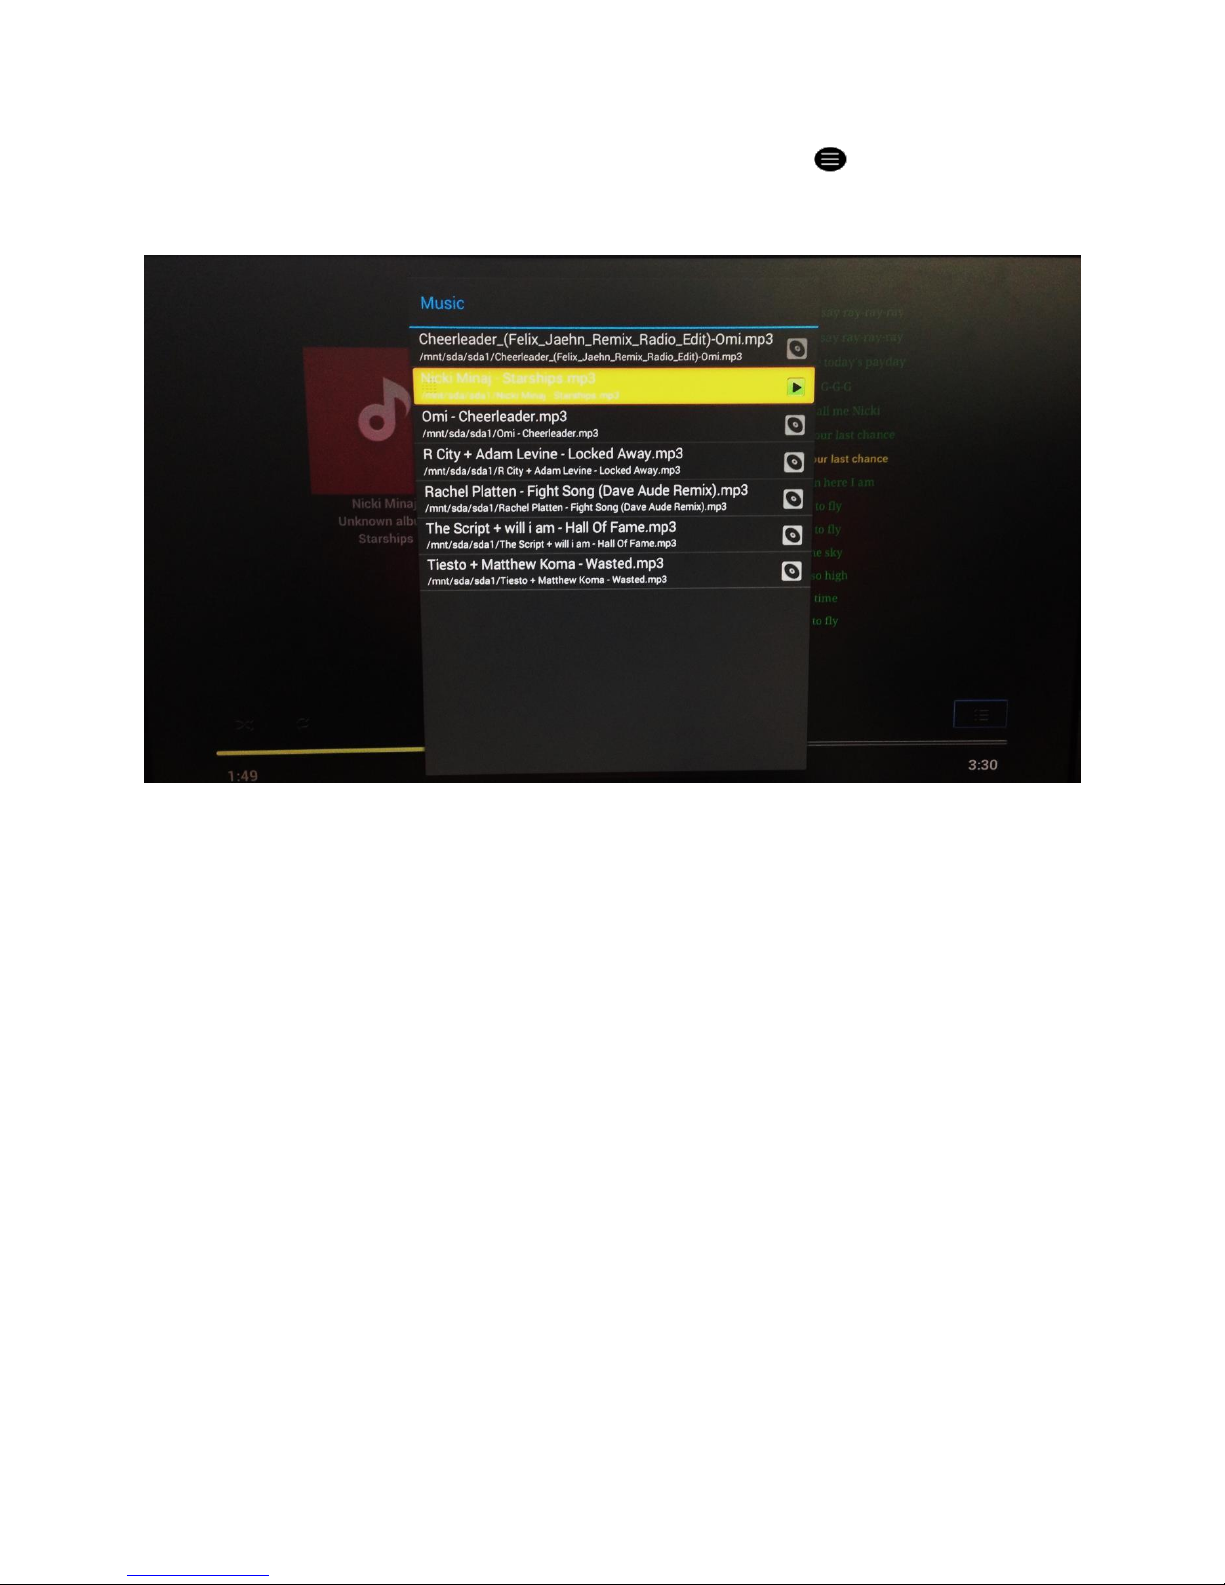
13.2 Music
You may also play your music in your file explorer.
32
Page 33
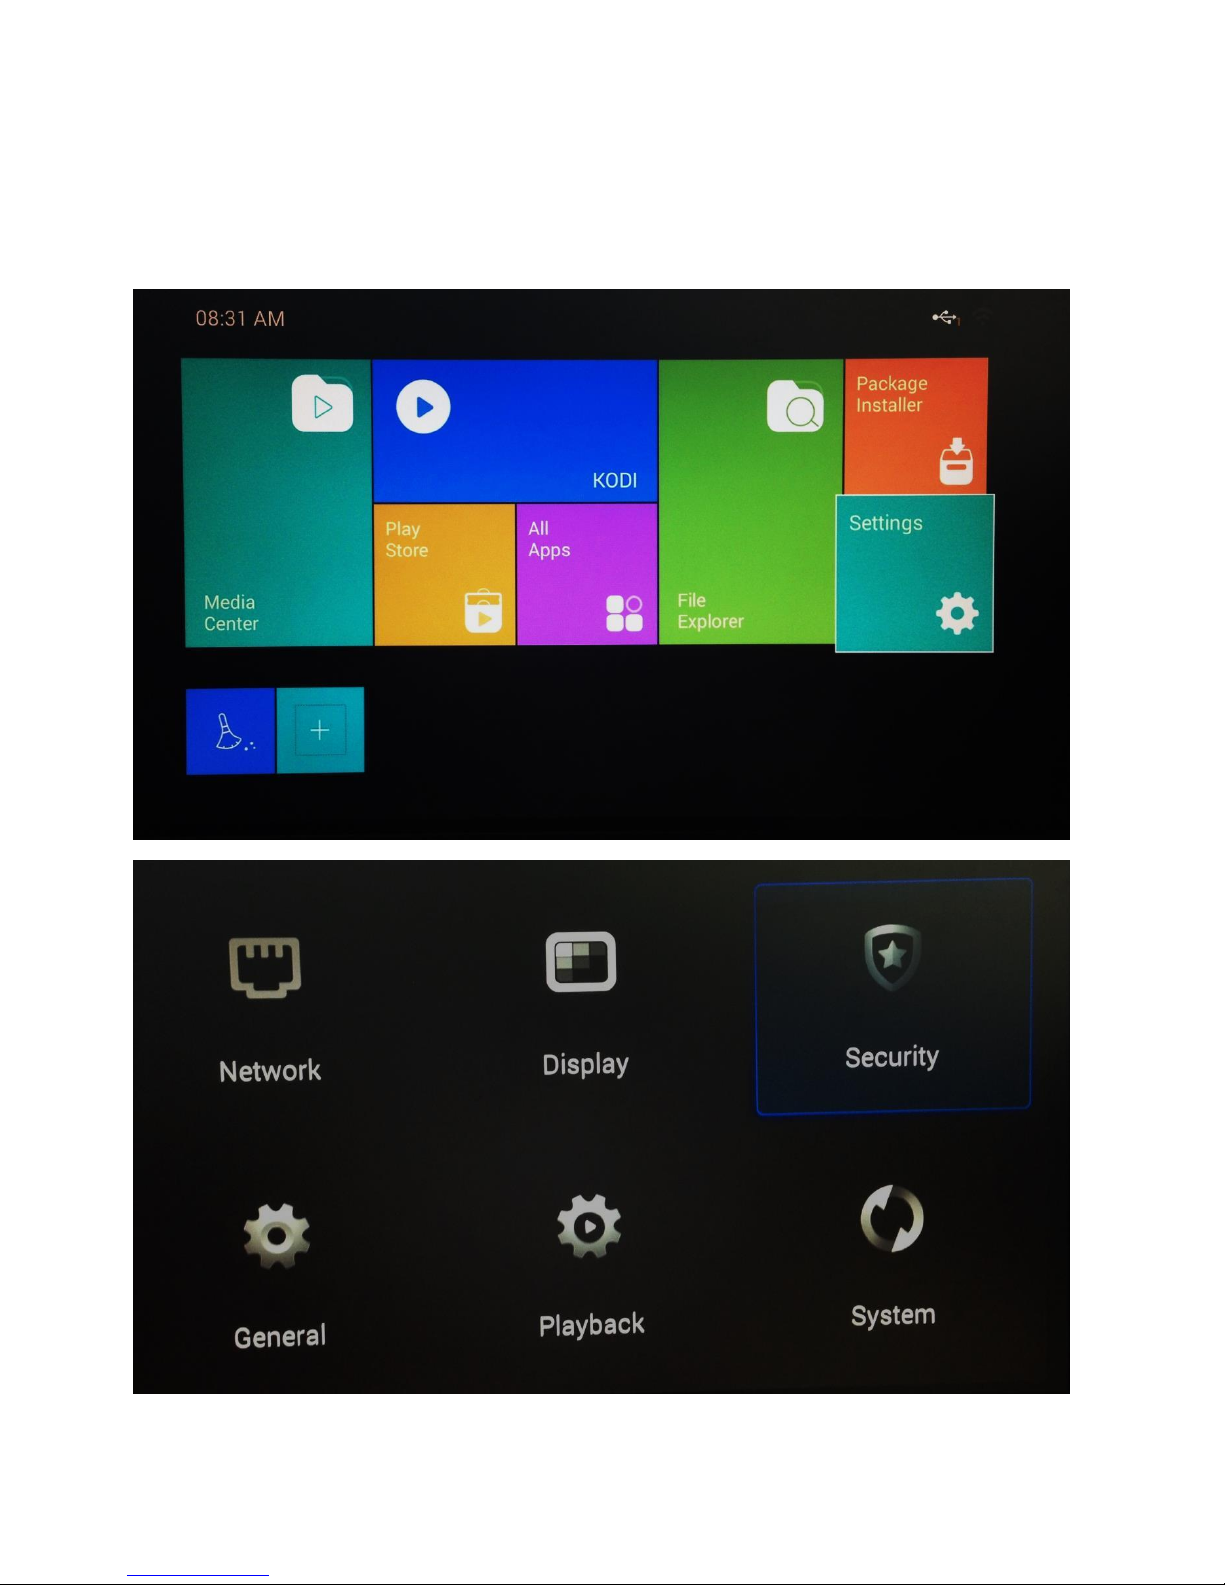
If you wish to access to the music playlist, press the shortcut key - button on your remote
control to get accessed to the music playlist.
33
Page 34
14. Package Installer
Before installing package or app, go to Settings, followed by Security and choose Allow for
Unknown Sources.
34
Page 35
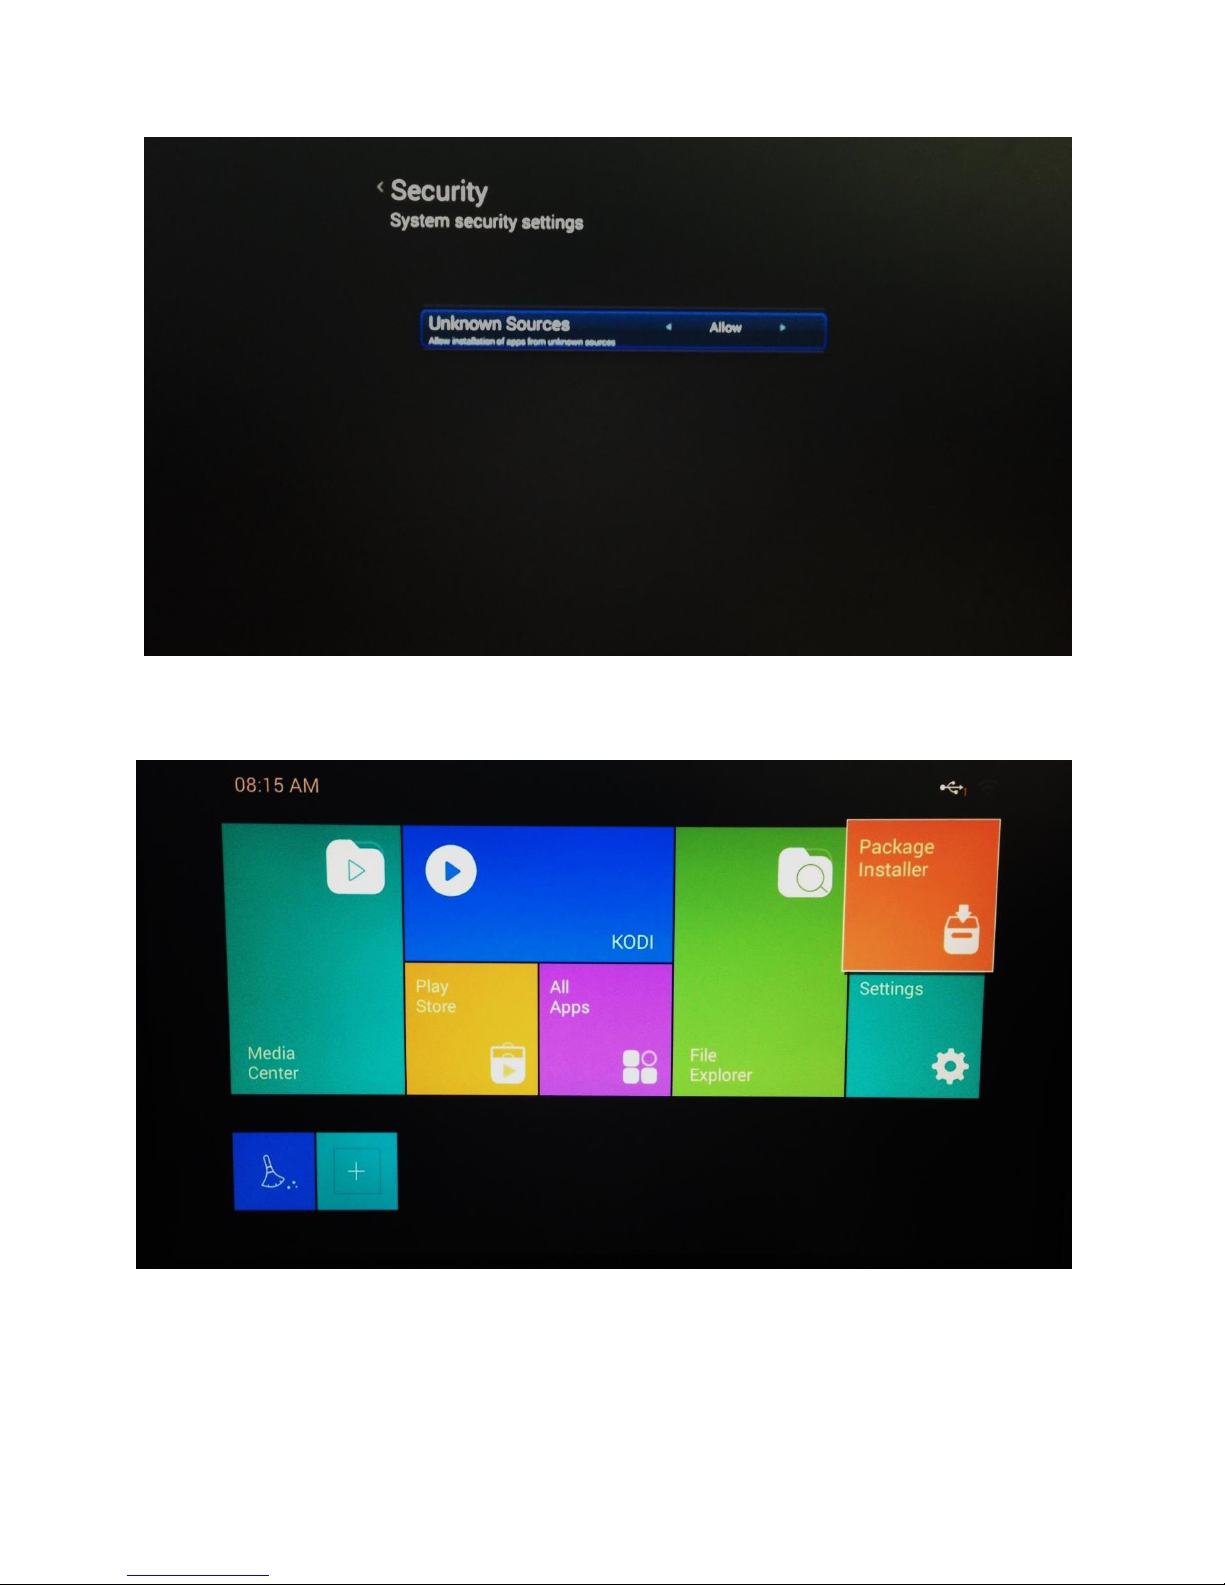
Then, use your remote control; navigate to the Package Installer icon.
35
Page 36
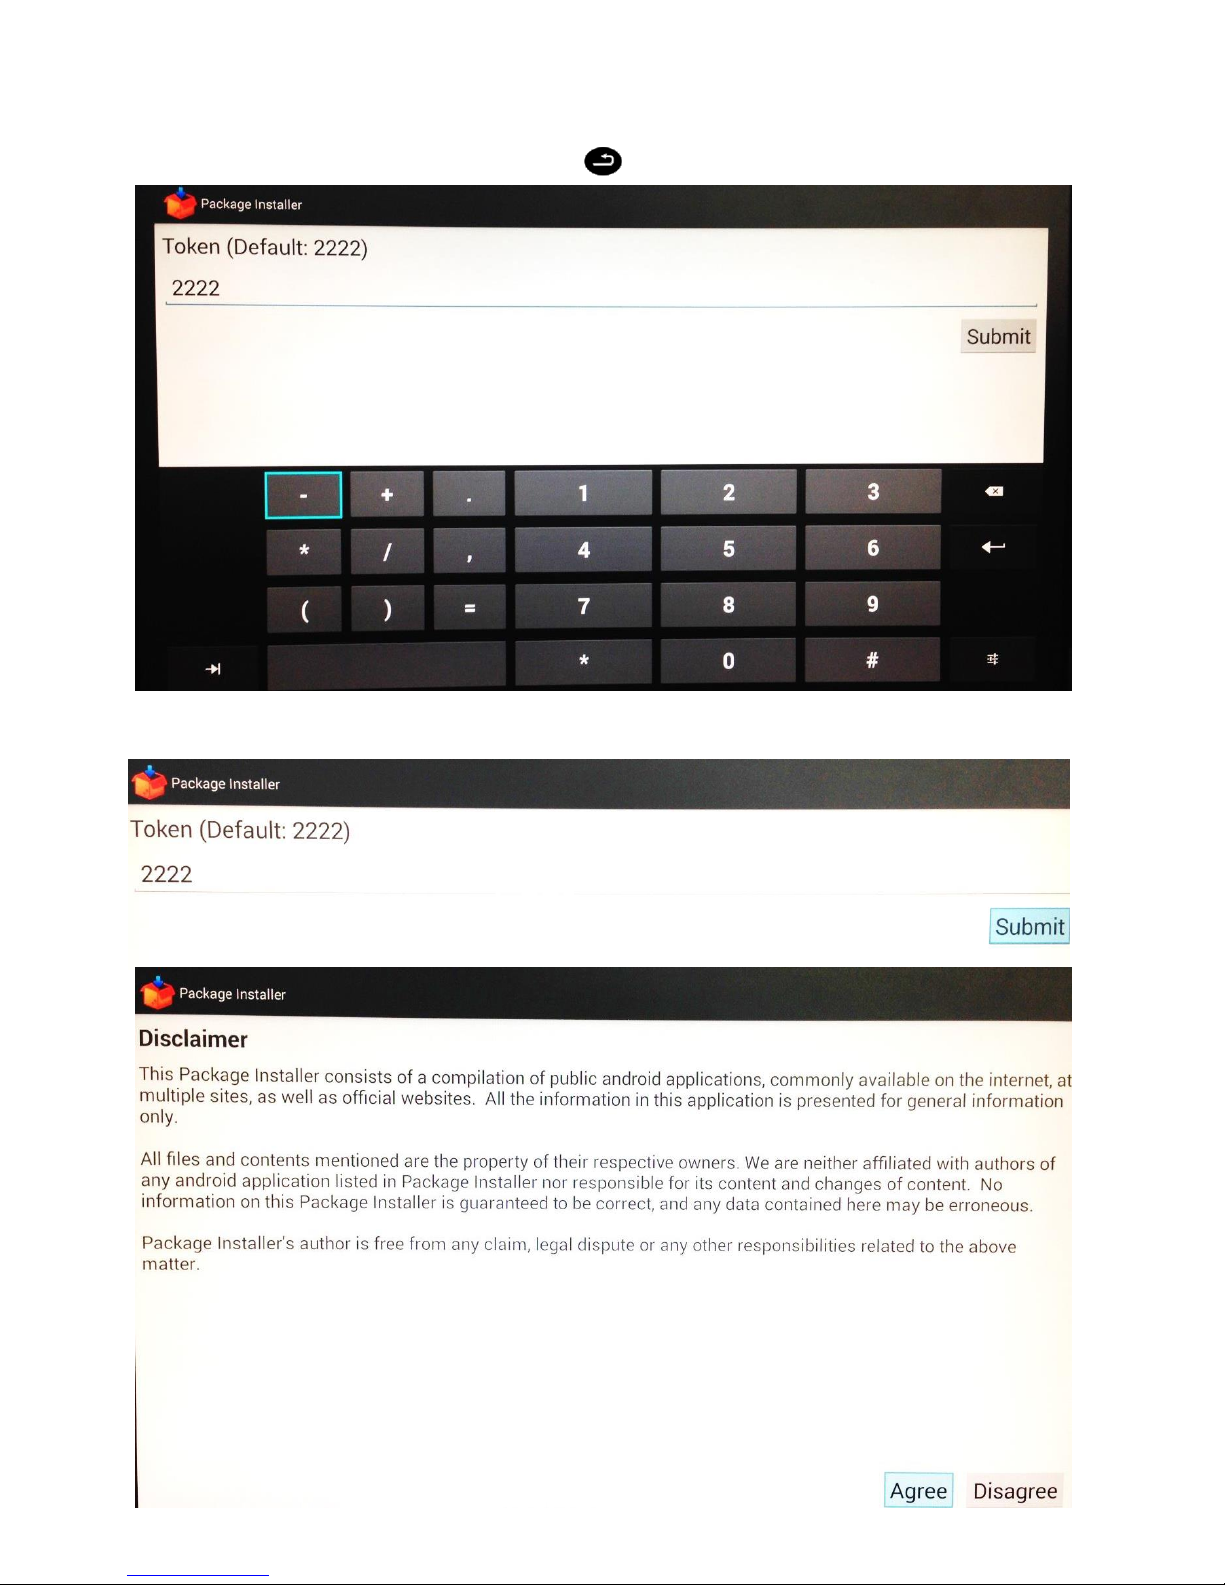
After keying in the default token 2222, press and then press Submit
In the Disclaimer, press Agree.
36
Page 37
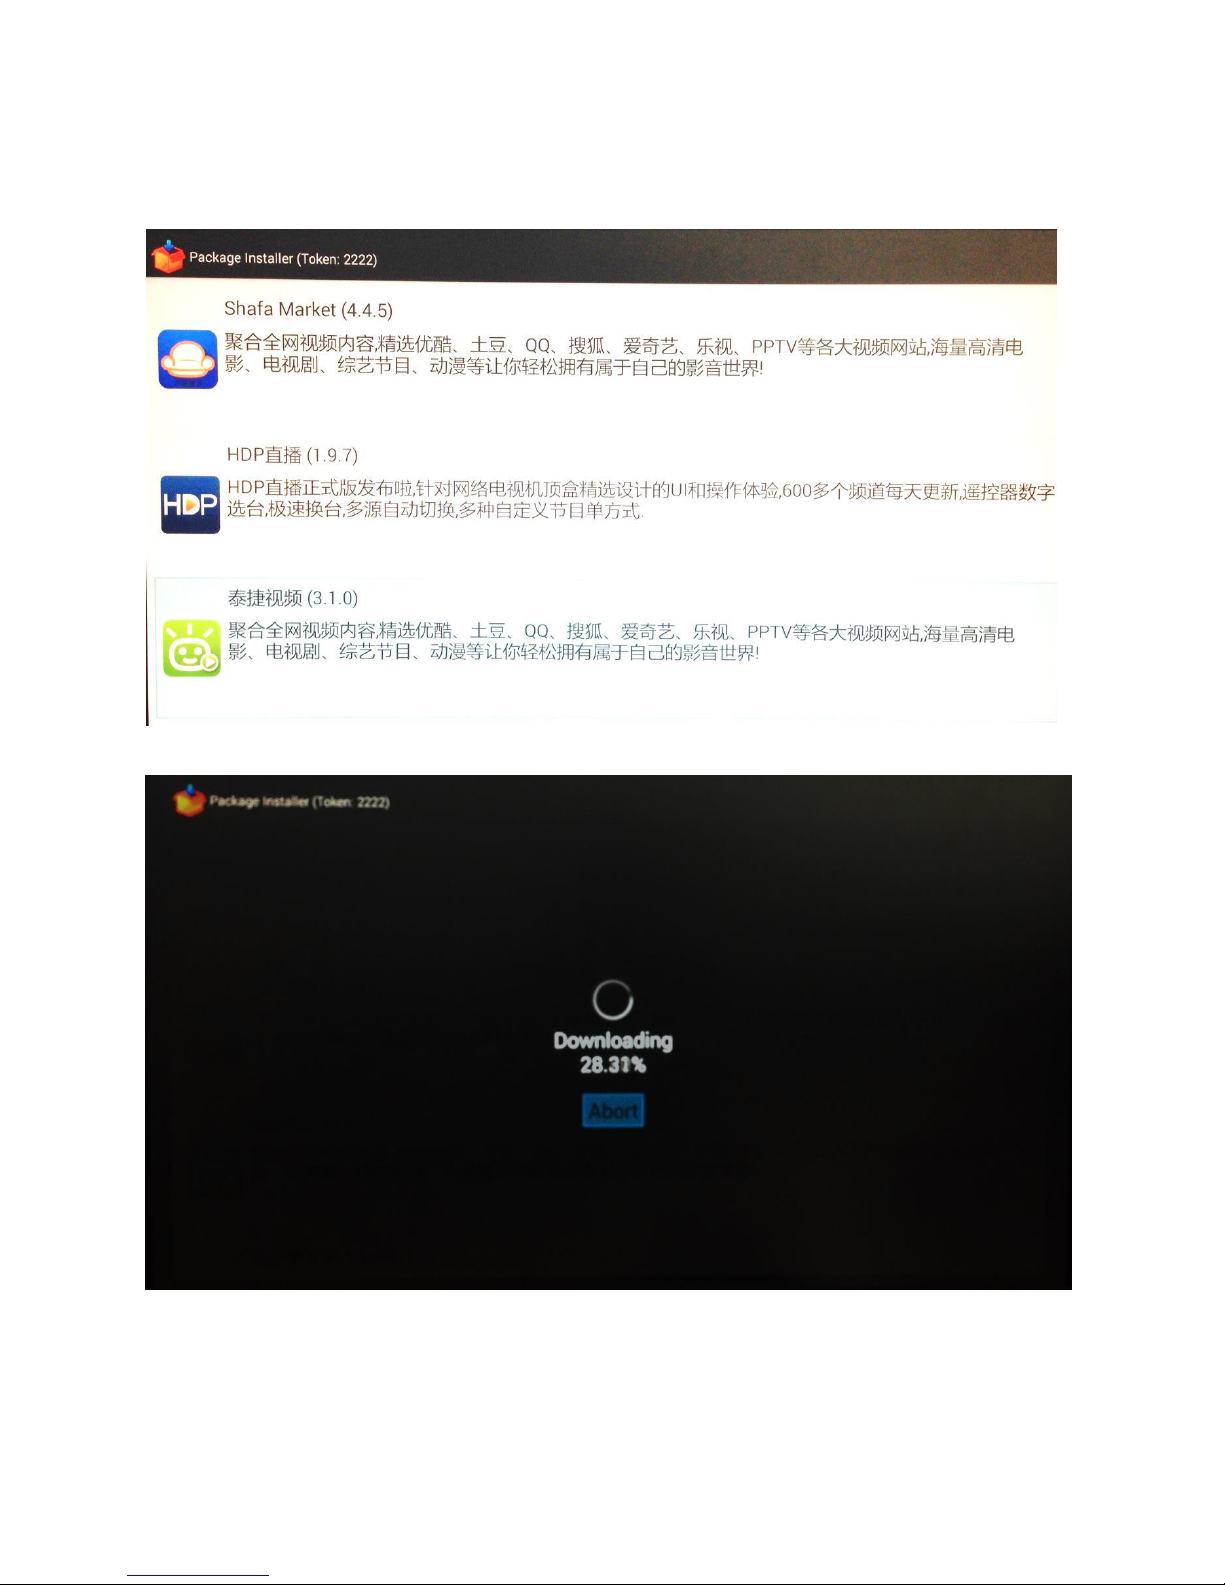
Then, choose the package you would like to install and press OK on your remote control and
wait for it to install.
37
Page 38
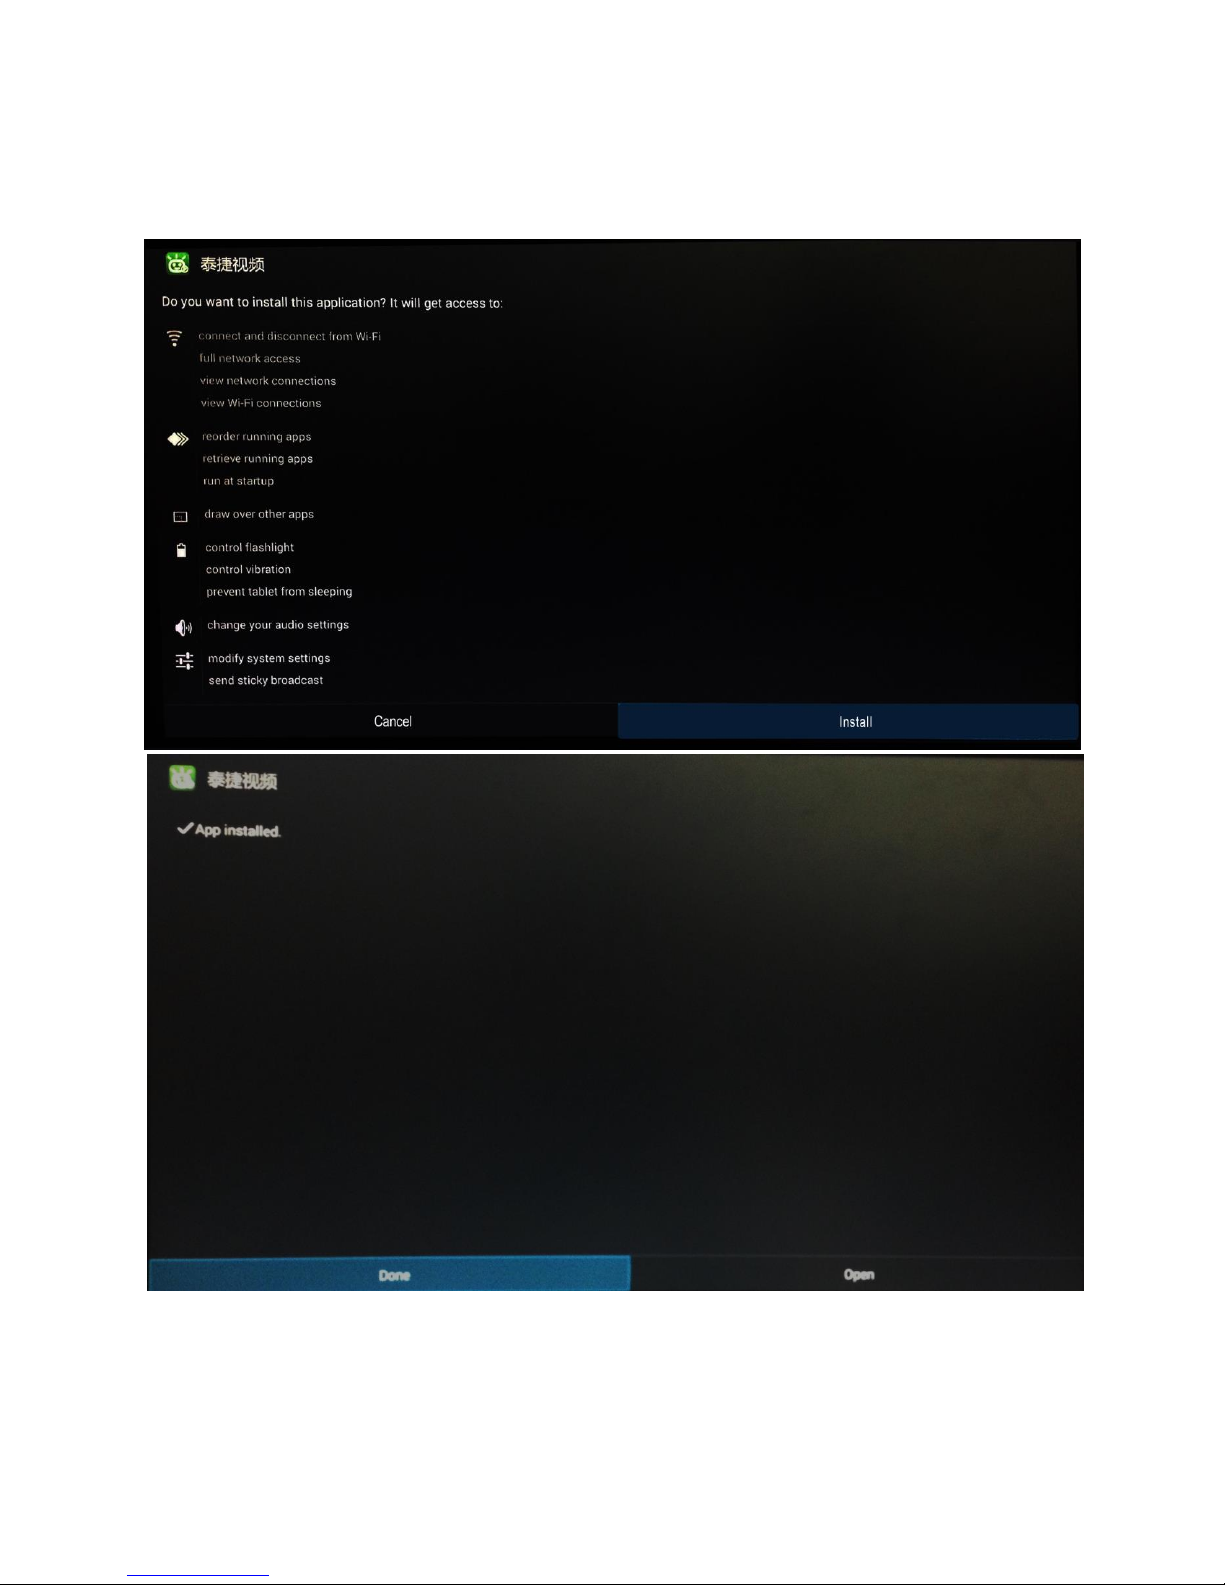
To install the application of your selected package, click Install until the app is completely
installed.
38
Page 39
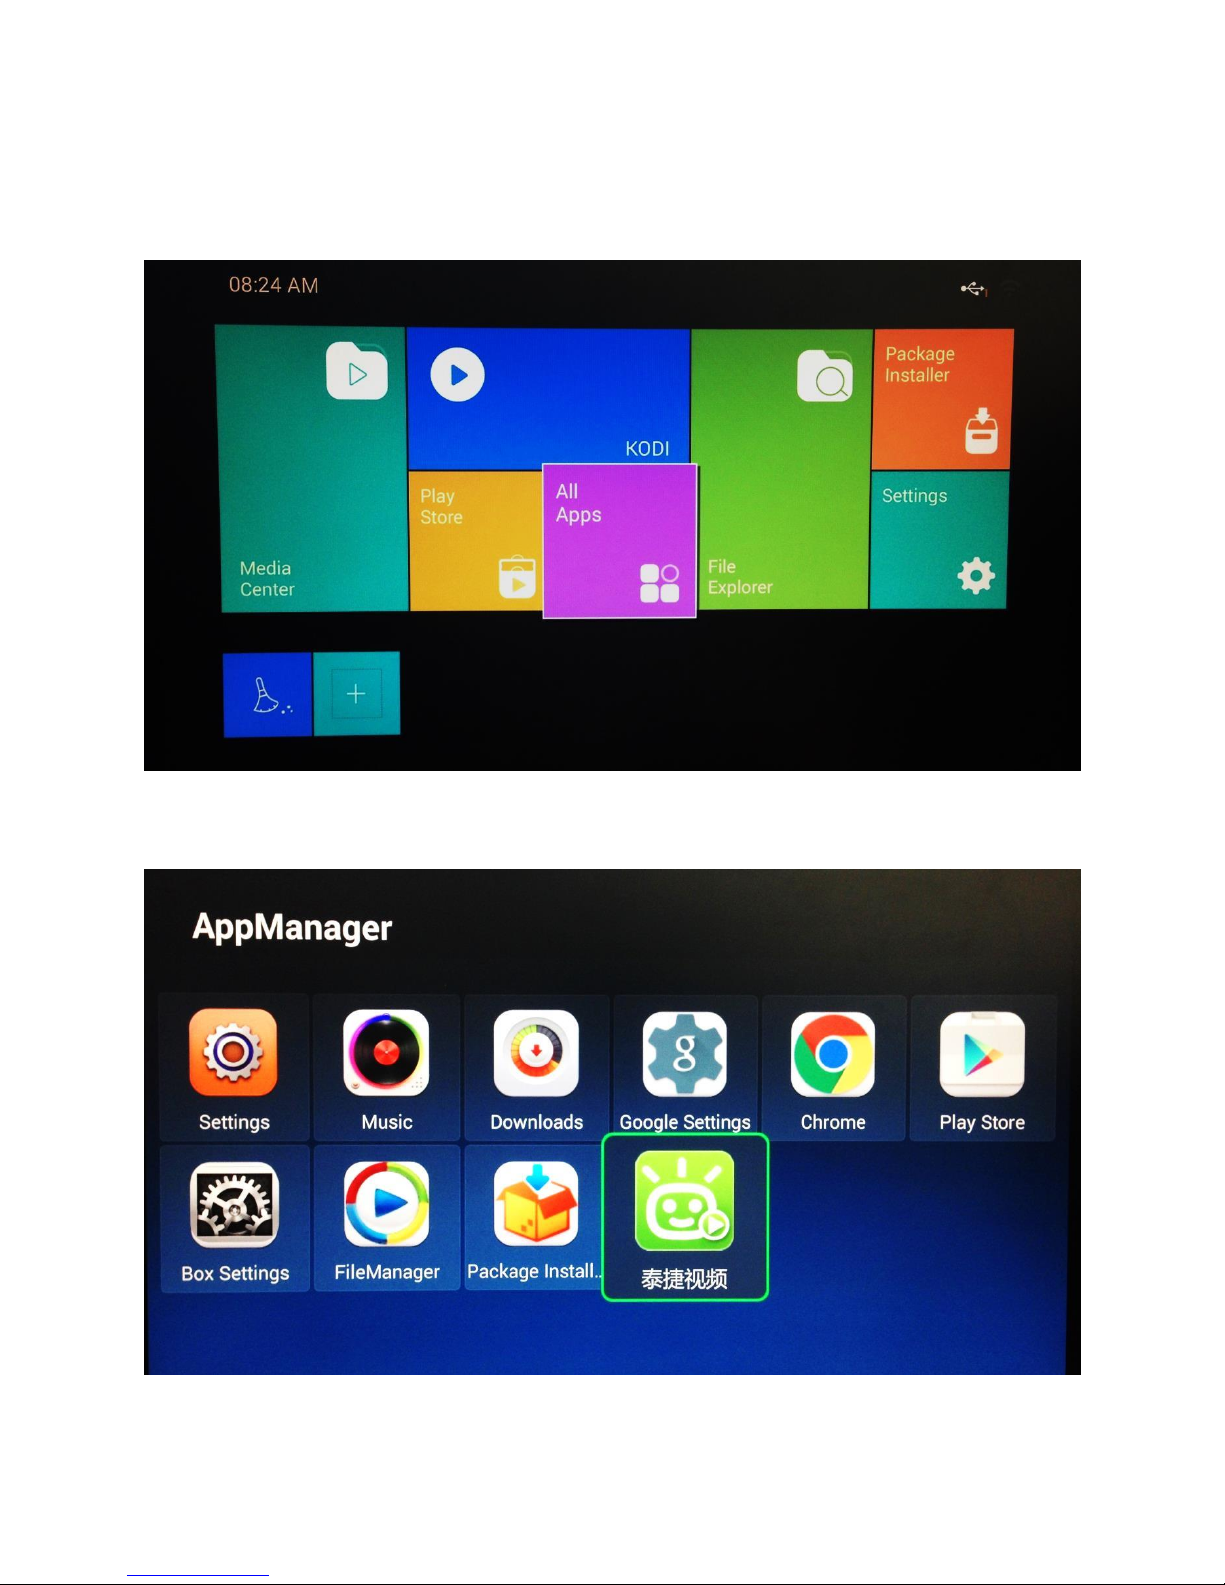
15. All Apps
Using your remote control, navigate to the All Apps icon.
Just click on the app that you have installed and you can now access to the app
39
Page 40
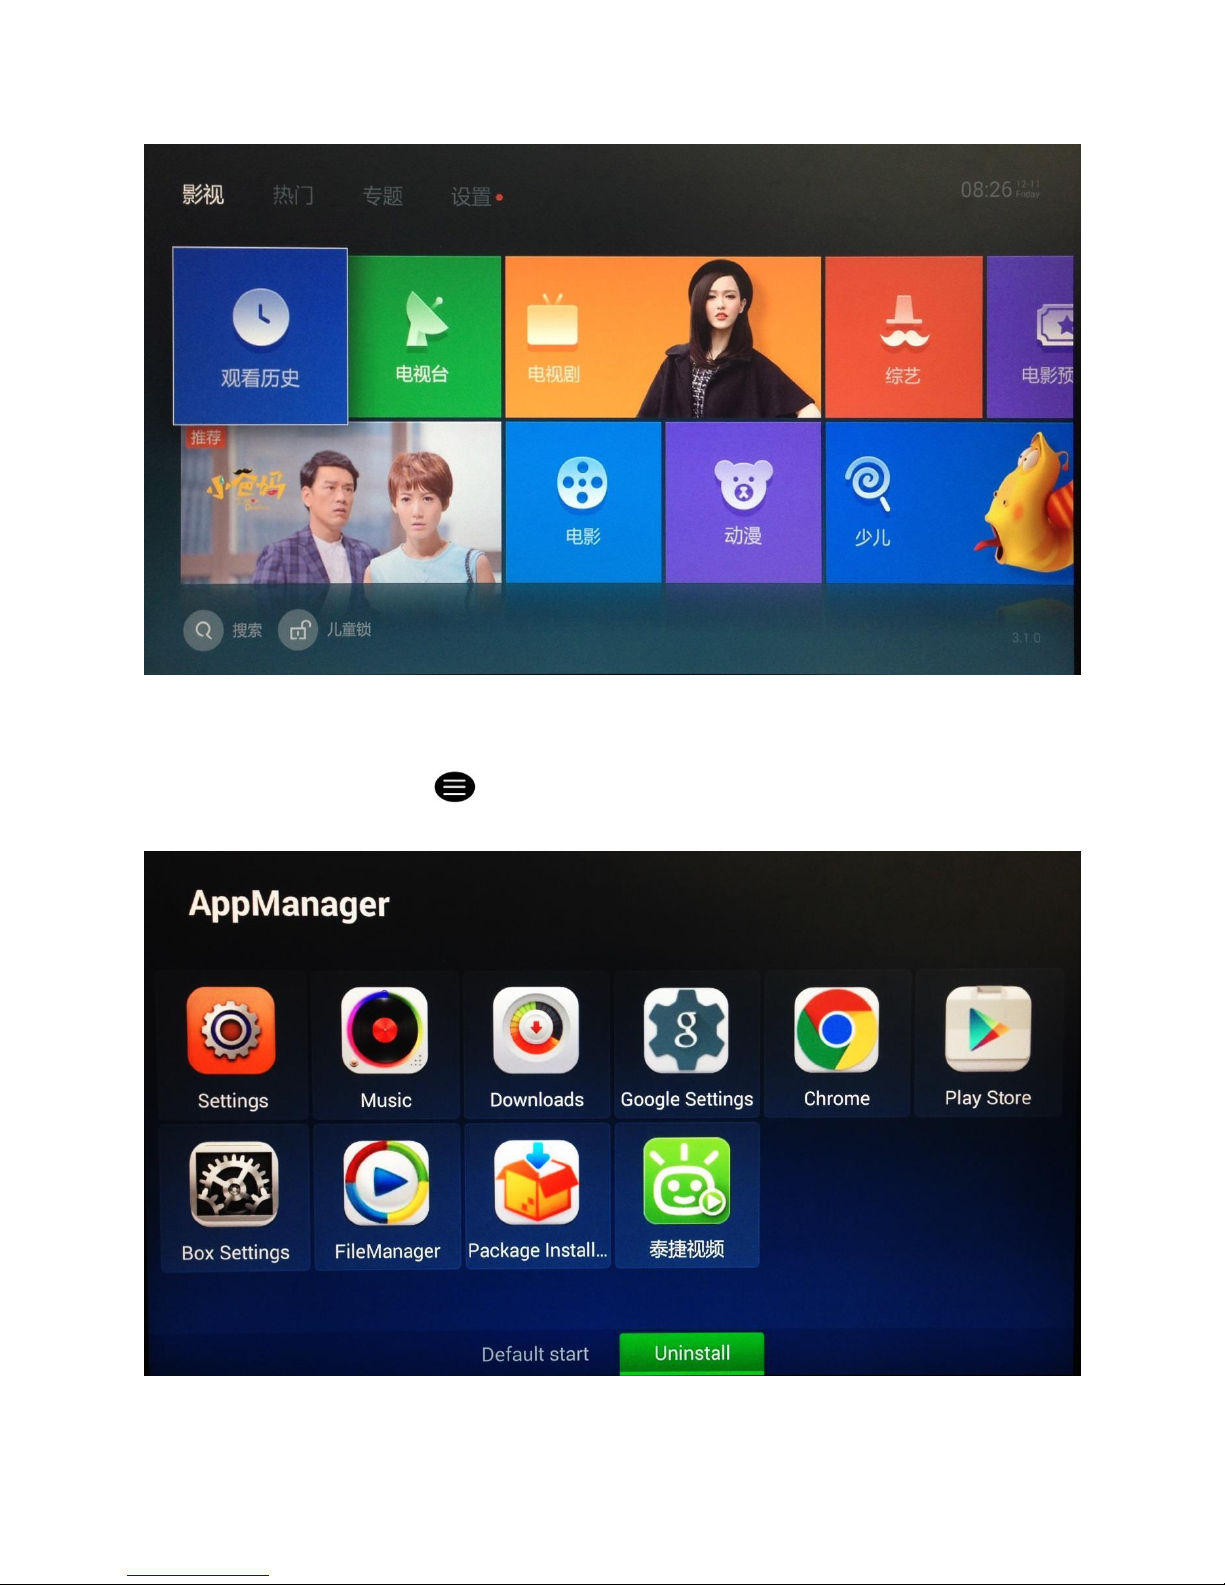
15.1 To uninstall an app
To uninstall an app, press on your remote control and just click on the uninstall icon on
your screen
40
Page 41
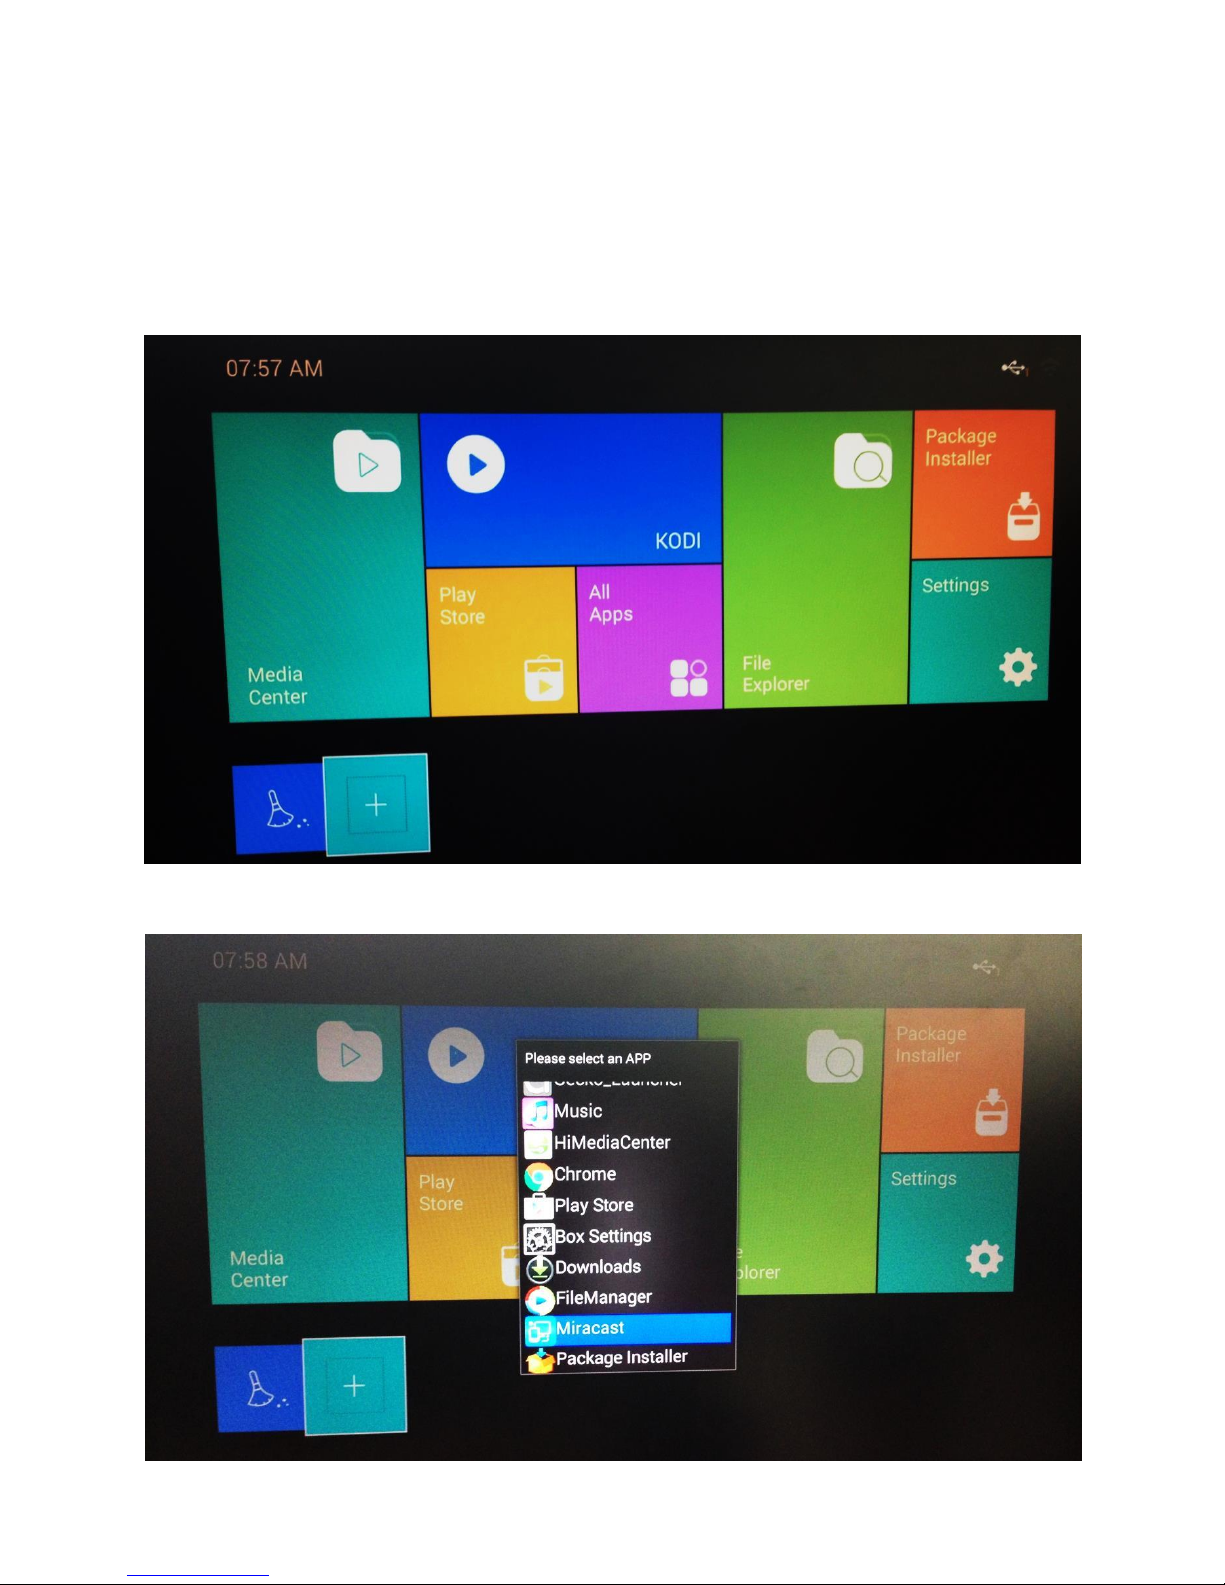
16. Application’s Shortcut
16.1 Add Application’s Shortcuts
To create an application’s shortcut on the home screen, use remote control to navigate to
the plus icon at the bottom of the home screen and press OK
Select an application that you would like it to be on your Home screen and press OK
41
Page 42
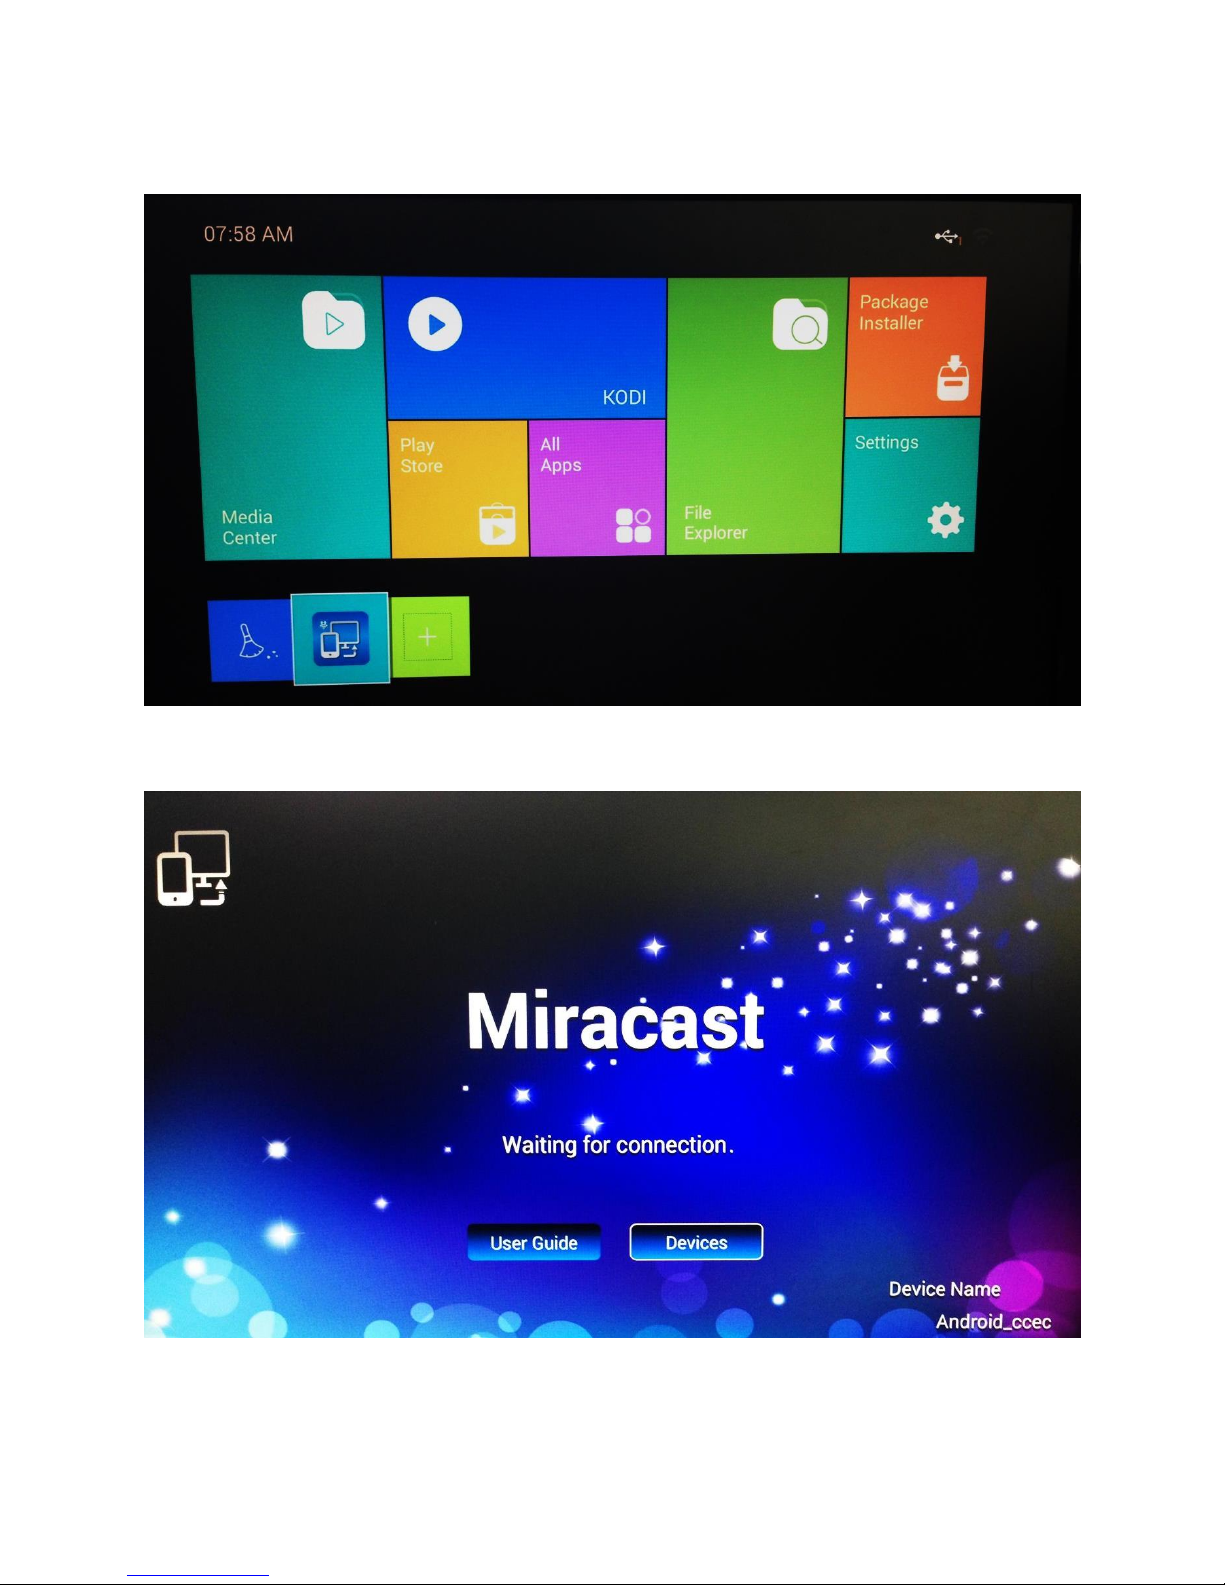
Now, you can go directly from your home screen to screens within an app with the shortcuts!
16.2 Using Miracast
42
Page 43

To use Miracast, follows the steps as followed:
Step 1: Turn on Wi-Fi and enter Display
Step 2: Enter Wireless Display
43
Page 44
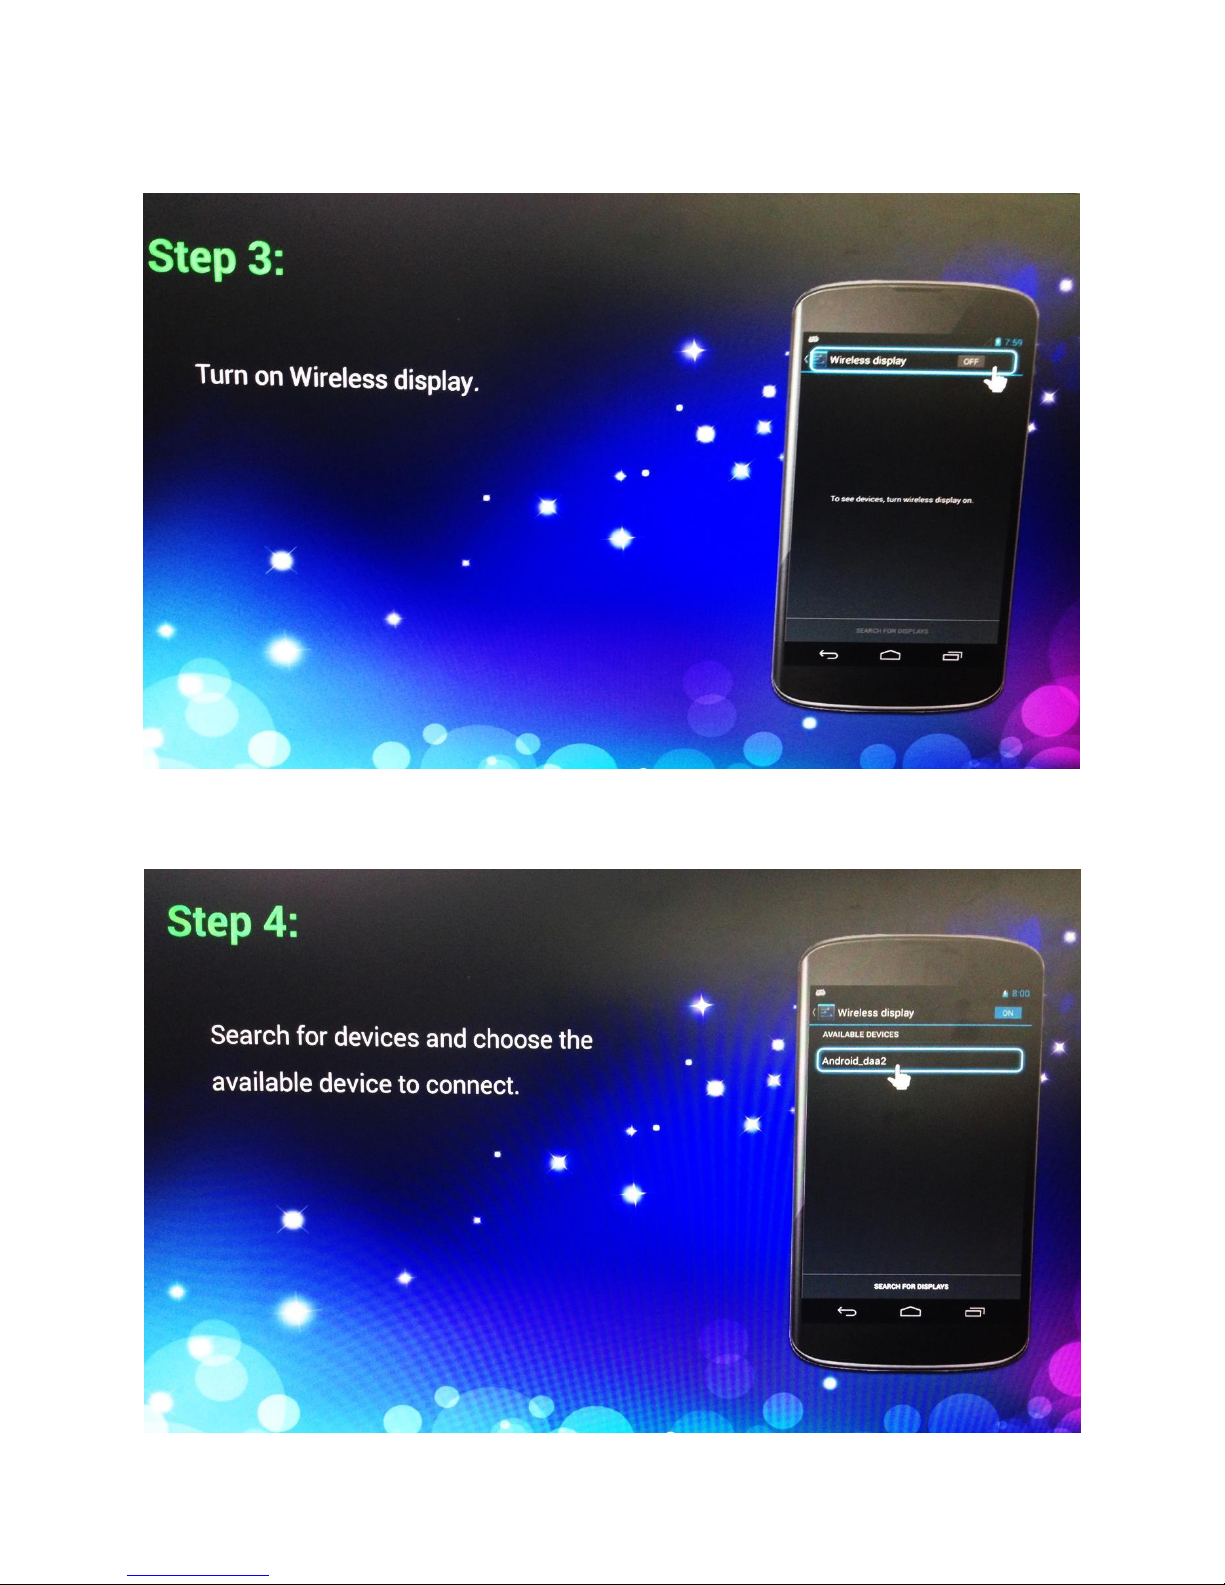
Step 3: Turn on Wireless Display
Step 4: Search for the devices and choose the available device to connect
44
Page 45
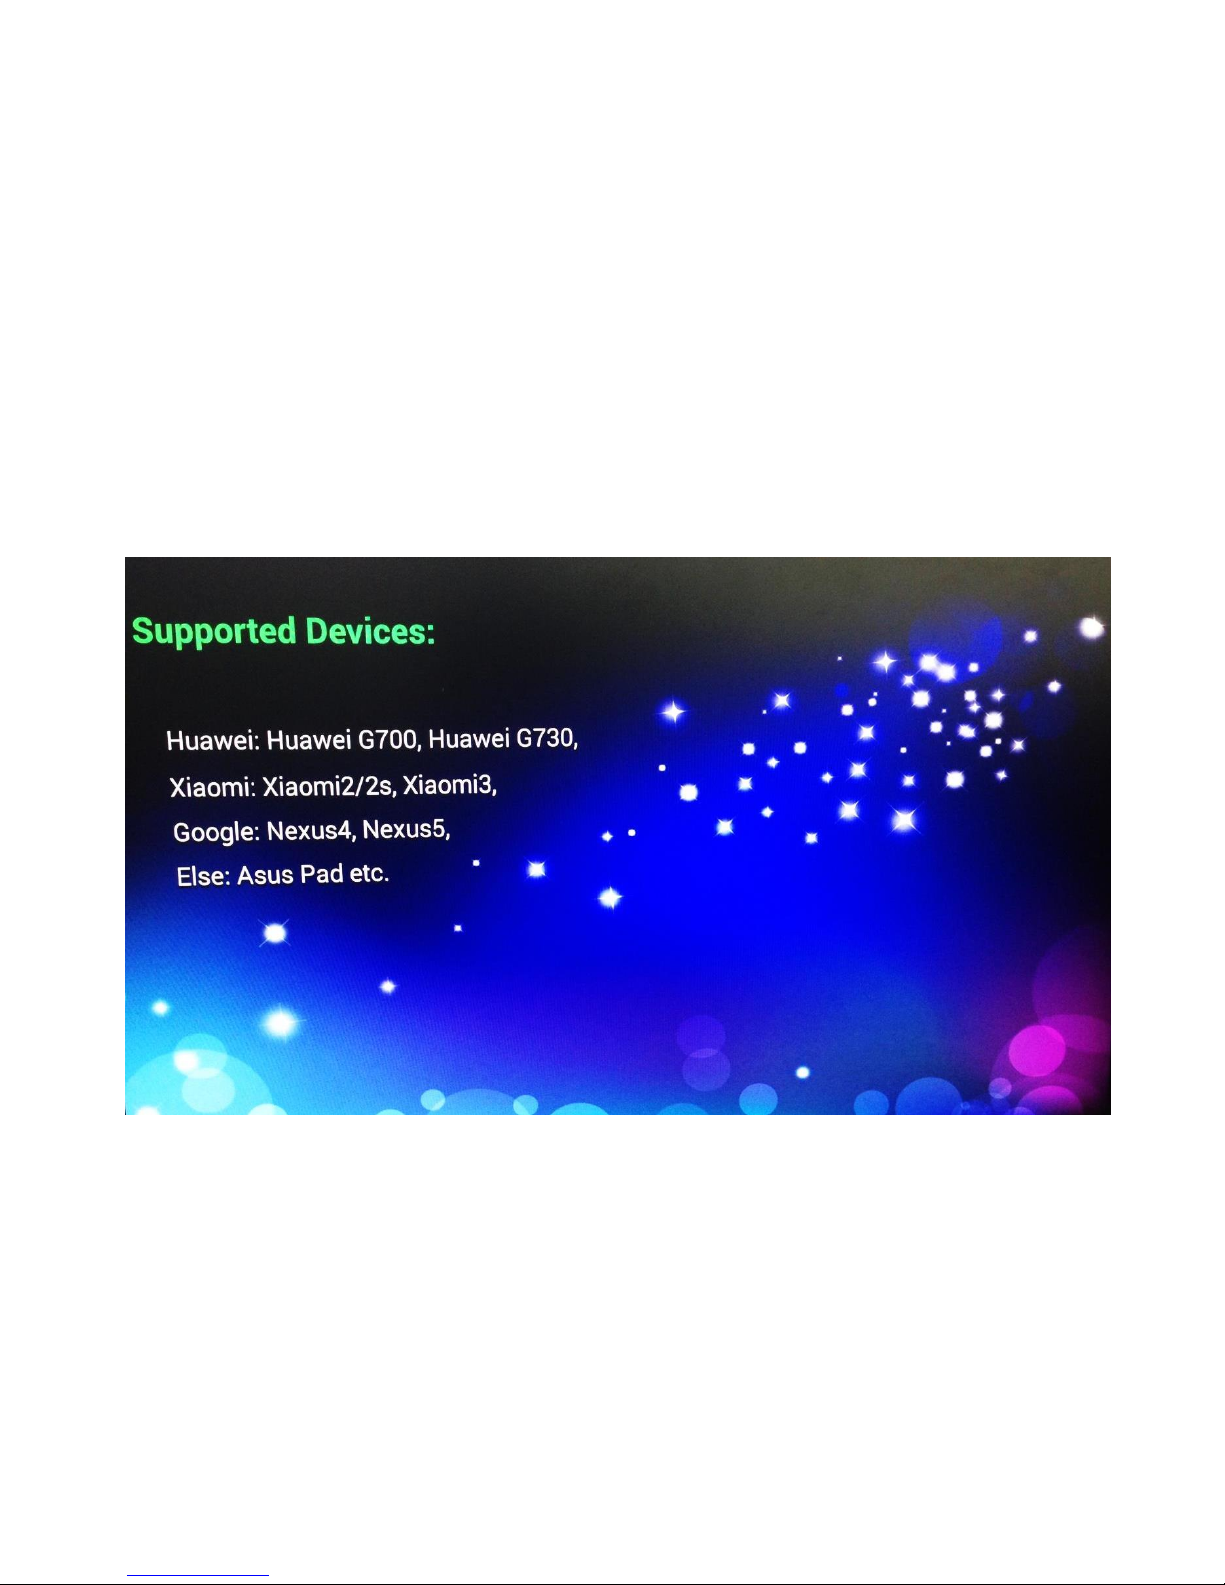
Please note that the supported devices of Miracast are:
1. Huawei
a. Huawei G700
b. Huaiwei G730
2. Xiaomi
a. Xiaomi2/2s
b. Xiaomi3
3. Google
a. Nexus 4
b. Nexus 5
4. Else
a. Asus Pad etc.
45
Page 46
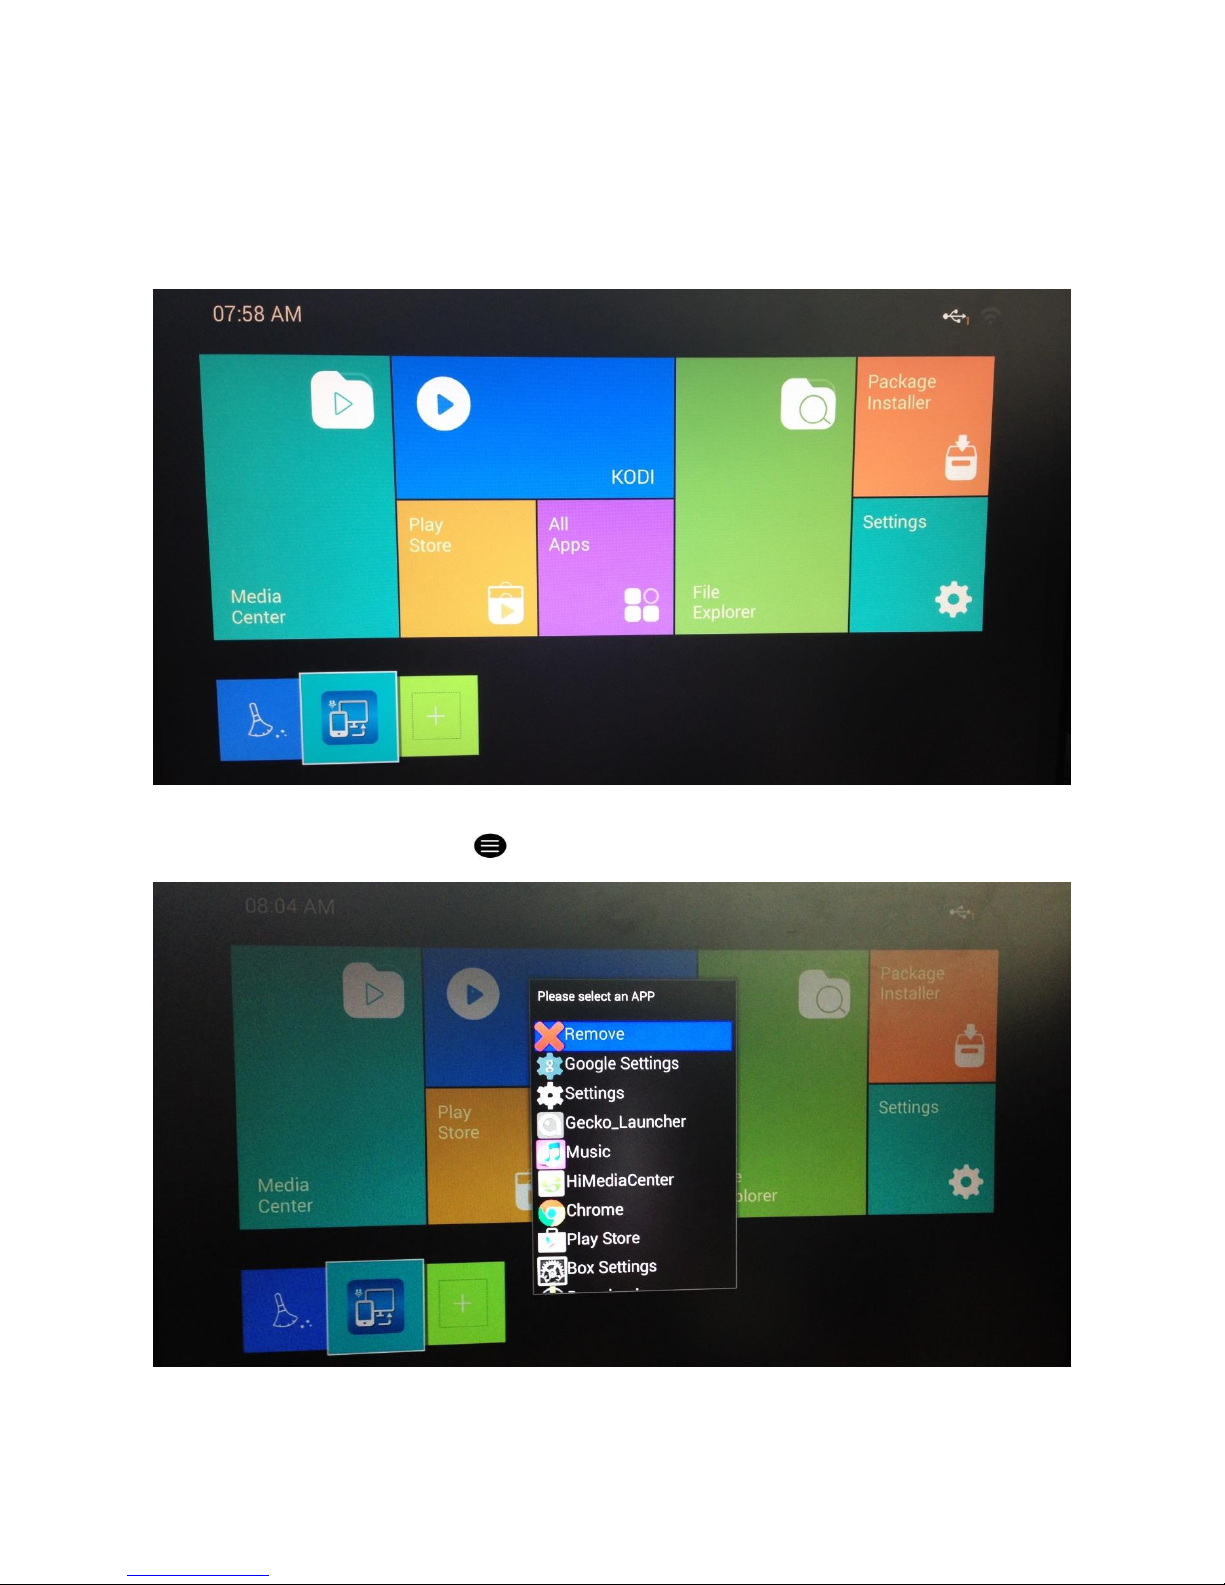
16.3 Delete Application’s Shortcut
To delete application’s shortcut from home screen, use your remote control and navigate to the
application’s shortcut icon in image below refers to Miracast icon.
On your remote control, press the button and click Remove.
46
Page 47
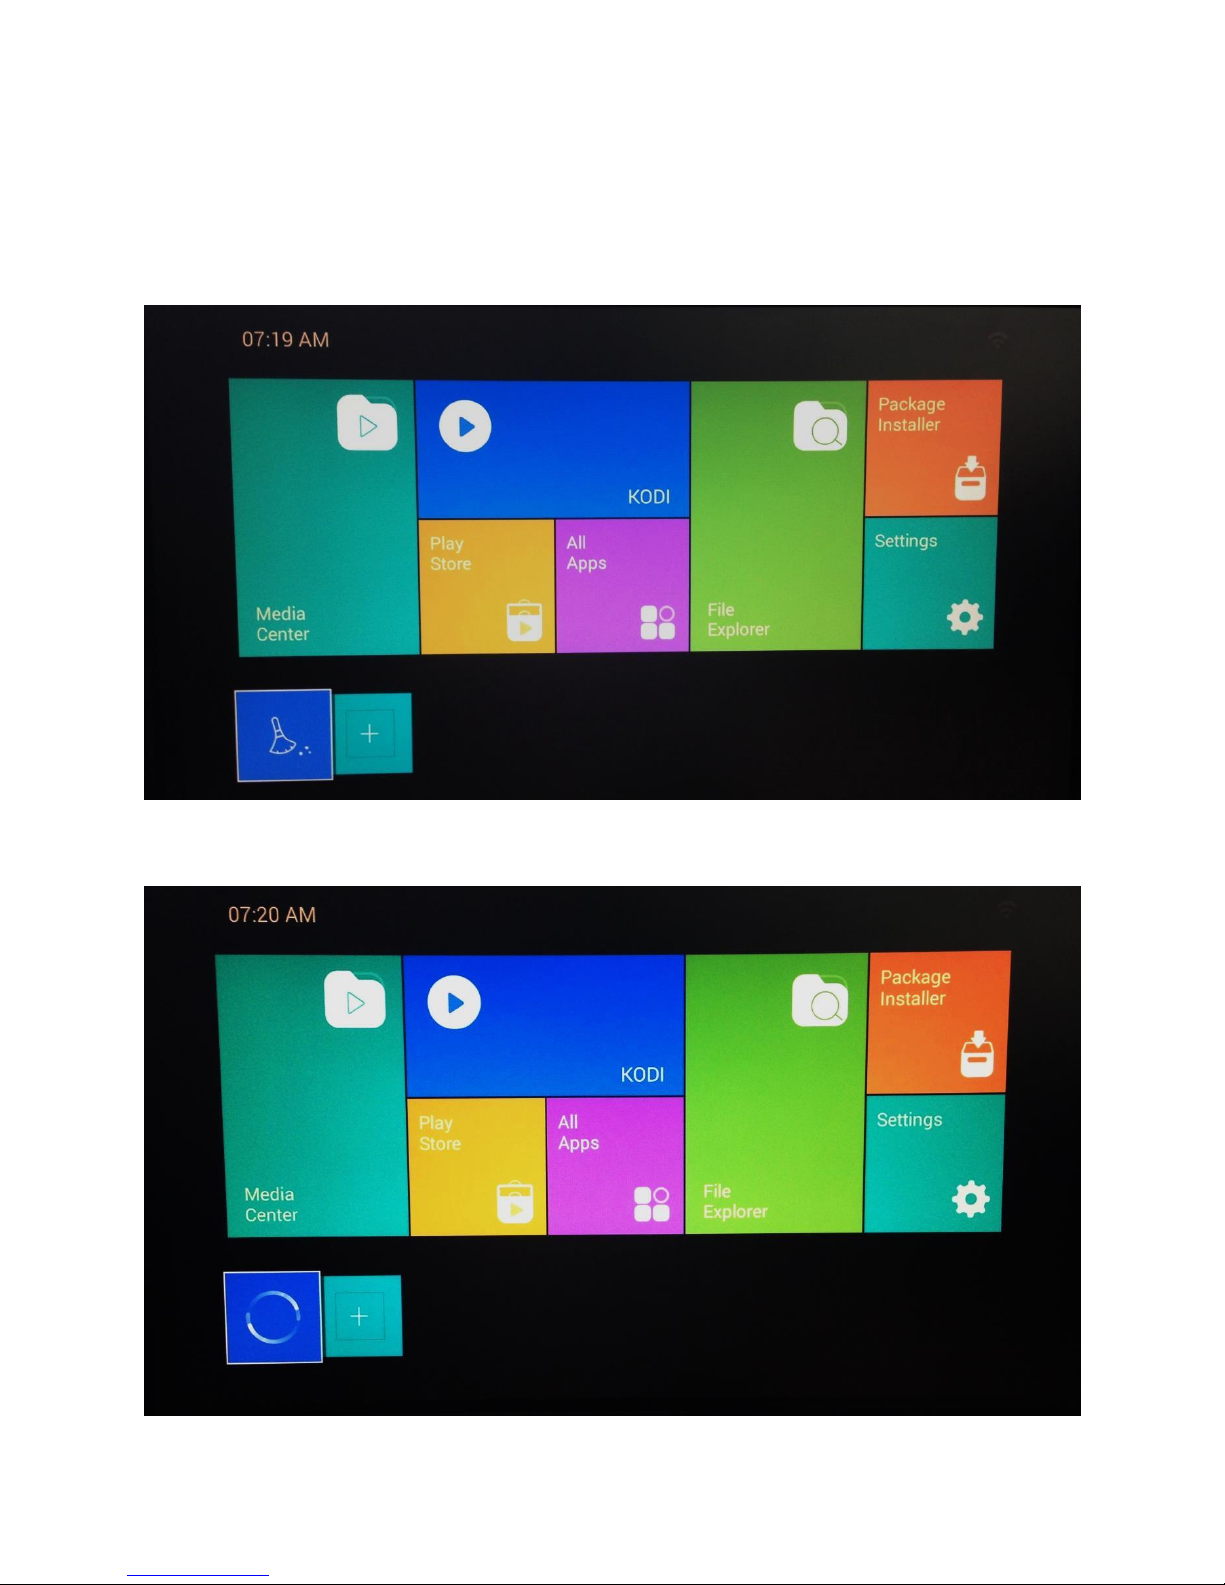
17. Clean Up Memory
To free up the memory by cleaning background running applications, use your remote control
and navigate to the Broom icon at the bottom left of the home screen
Then, press OK to start the cleaning process
47
Page 48
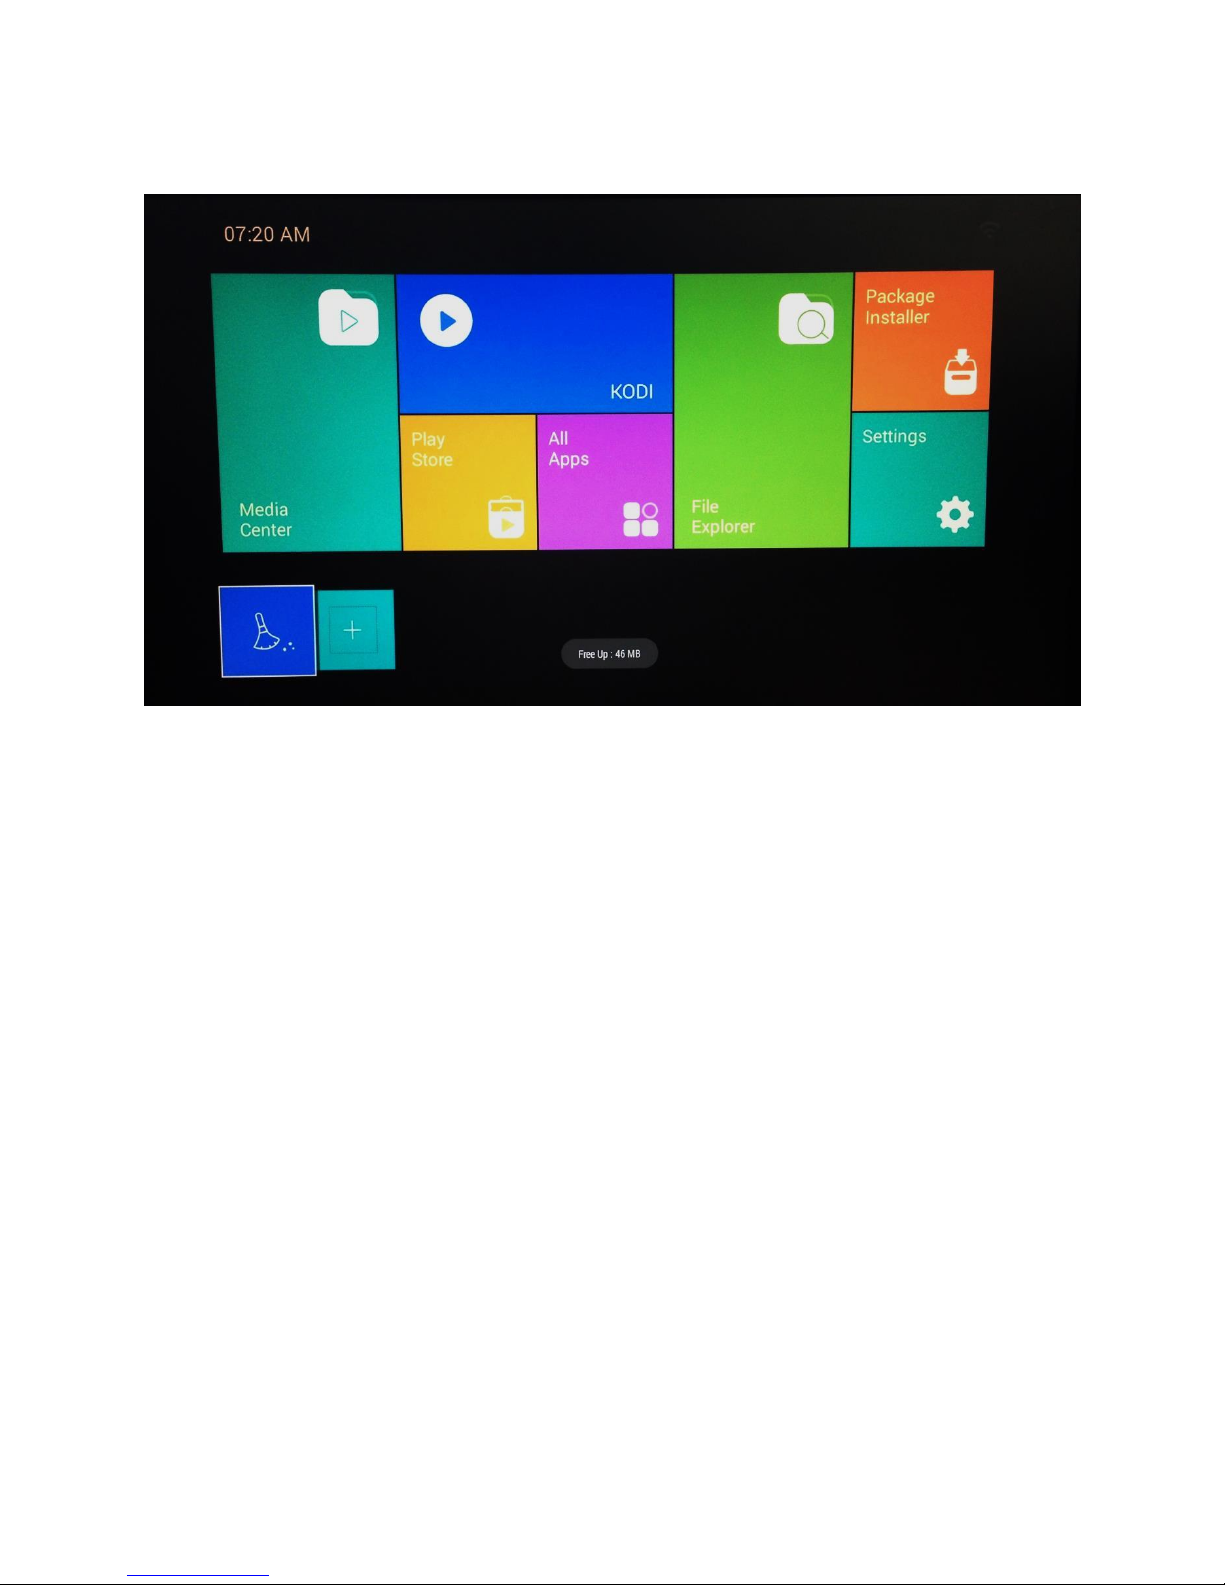
After cleaning up, you can see a status showing the space that has freed up
48
Page 49

© 2001 – 2015 Cloud Media. All Rights Reserved
49
 Loading...