

Page 1
Go to openh.io/build for assembly videos.
Spare or replacement parts are available at
shop.openh.io
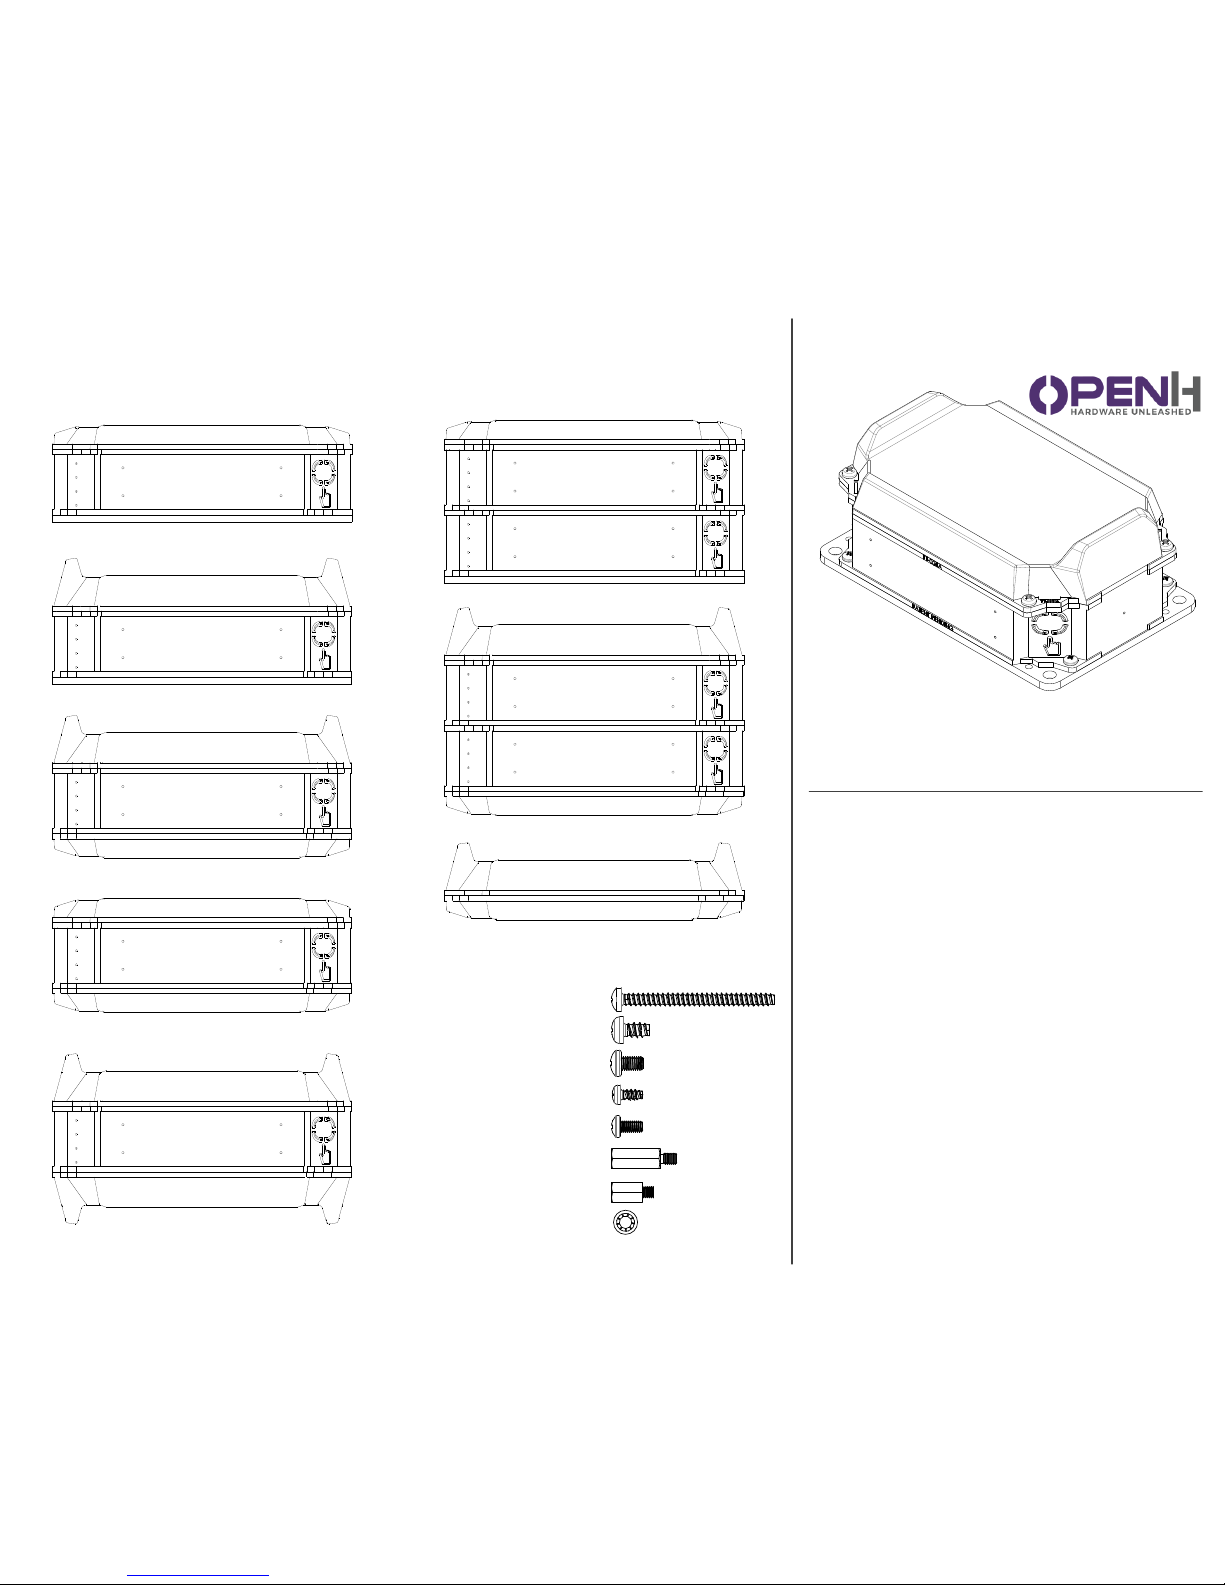
Starter Kit Contents:
· 1 x Shell (11-001A)
· 2 x Cover (11-004A)
· 1 x Base plate (12-001A-N)
· 1 x Gasket Kit (87-001A)
· 1 x Stacking Screws Kit (18-006A-K4)
· 1 x Board Stacking Standoff Kit (87-012A-116B)
· 1 x Board Mounting Standoff Kit (87-012A-
072B)
· 1 x Rubicon Shell Screw Pack (87-003A)
Congratulations on your purchase of the Rubicon
Starter Kit! Use this quick start guide to get up
and running as fast as possible.
RUBICON QUICKSTART GUIDE
Open Hardware Industries, LLC. 2017 Rev 05L
HARDWARE INCLUDED
M3 L35 TF x4
M3.5 L6 TF x4
M3 L5 x4
M2.5 L6 TF x4
M2.5 L5 x8
11 MM STANDOFF x4
7 MM STANDOFF x4
STAR WASHER x16
ASSEMBLY COMBINATIONS
Additional parts may be required and are available at shop.openh.io
Stacking Kit (88-002A) shown
Page 2
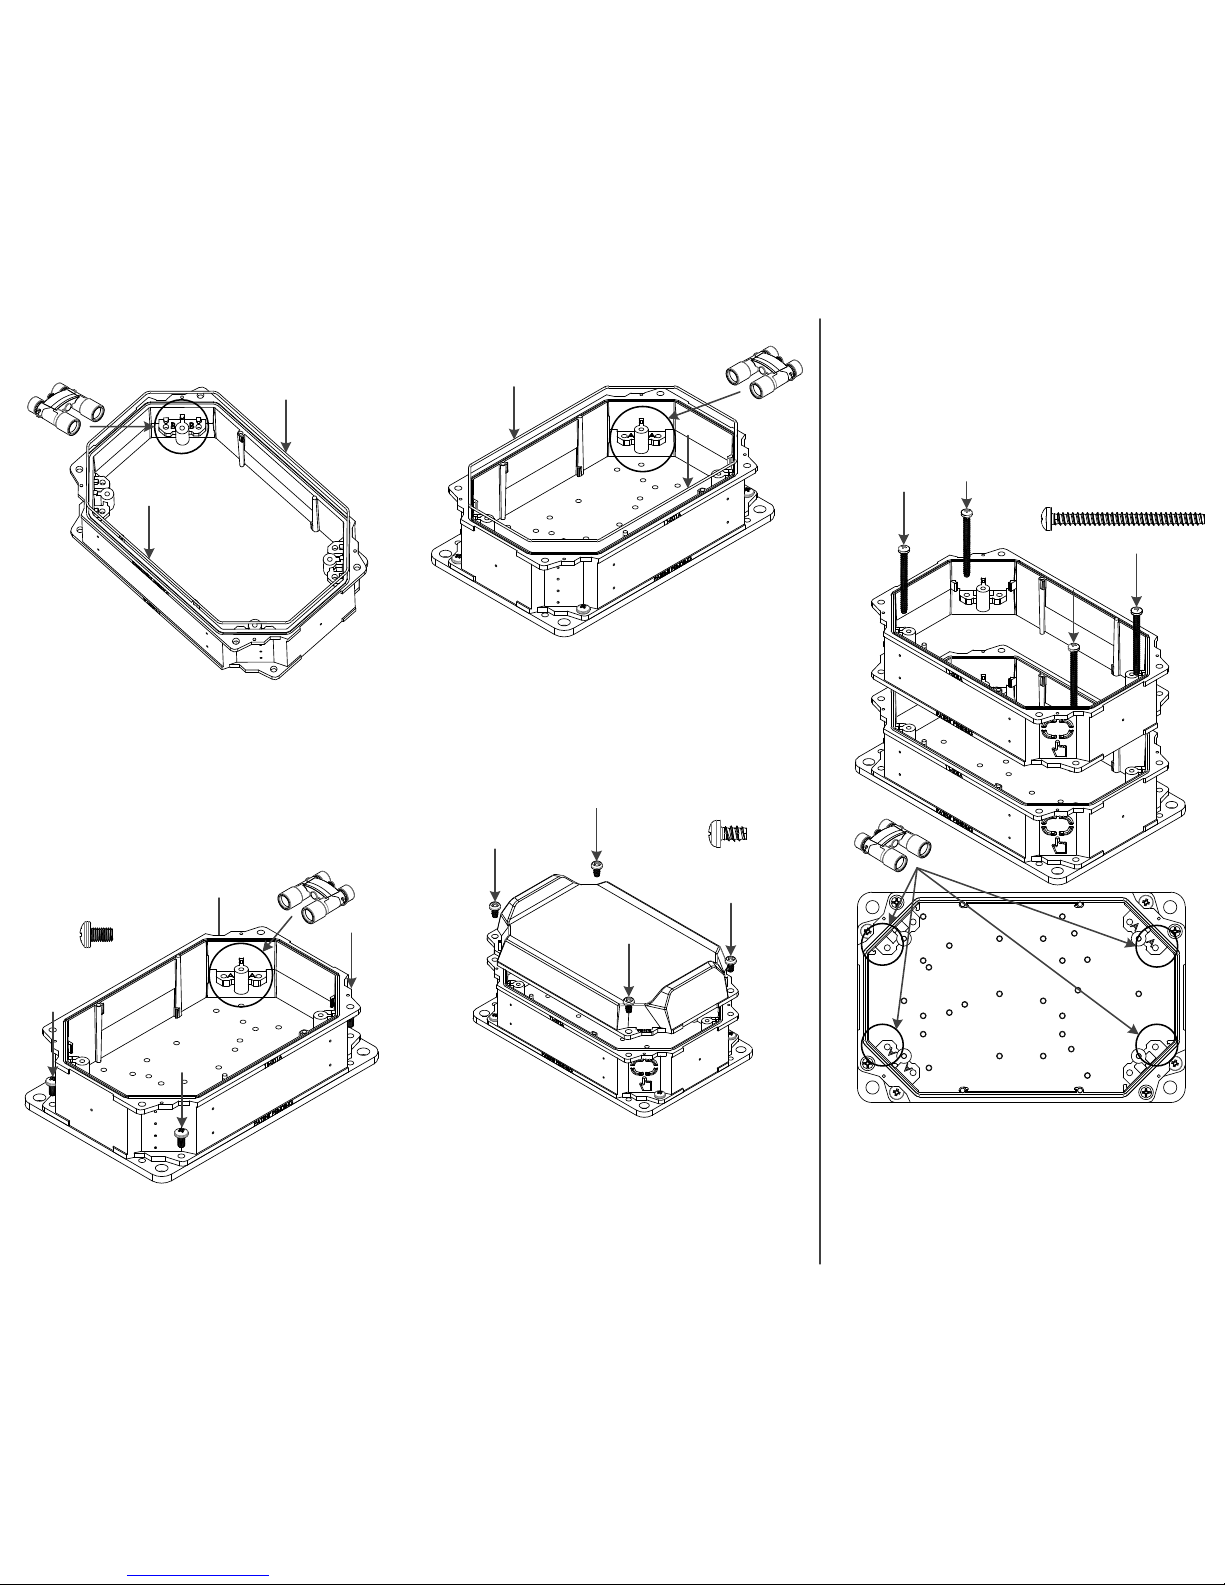
1. (Optional for IP67) There are two different
sized gaskets in the Gasket Kit. Place the large
gasket into the groove on the shell with side B
facing towards you.
2. If using a SBC (Raspberry Pi, etc.), mount to
appropriate 7 mm standoffs with M2.5 L5
screws or shell mounting bosses with M2.5 L6 TF
screws. See Hole Guide for locations. Go to
openh.io/build for a video demonstration.
GENERAL ASSEMBLY INSTRUCTIONS
3. Place the shell on the base plate with side A
facing towards you. Screw in 4 M3 L5 screws
from the Rubicon Shell Screw Pack.
4. (Optional for IP67) Place the small gasket into the
groove on the shell with side A facing towards you.
5. Before putting the cover on, if using a stacked
board, mount it now with 11 mm standoffs and
M2.5 L5 screws or shell mounting bosses with M2.5
L6 TF screws.
6. Place the cover on top. Screw in 4 M3.5 L6 TF
screws from the Rubicon Shell Screw Pack. Skip this
step if stacking an additional shell.
STACKING ASSEMBLY INSTRUCTIONS
1. Complete steps 1 through 5 of General
Assembly Instructions.
2. (Optional for IP67) Place the small gasket
into the groove on the shell to be stacked with
side A facing towards you.
3. Place the stacking shell on top of the other
shell, making sure both shells have side A
facing the same direction. Screw in 4 M3 L35
TF screws where indicated.
4. Perform step 6 of General Assembly
Instructions to attach the cover.
4x
4x
4x
Go to openh.io/build for video instructions
Page 3
M M
M M
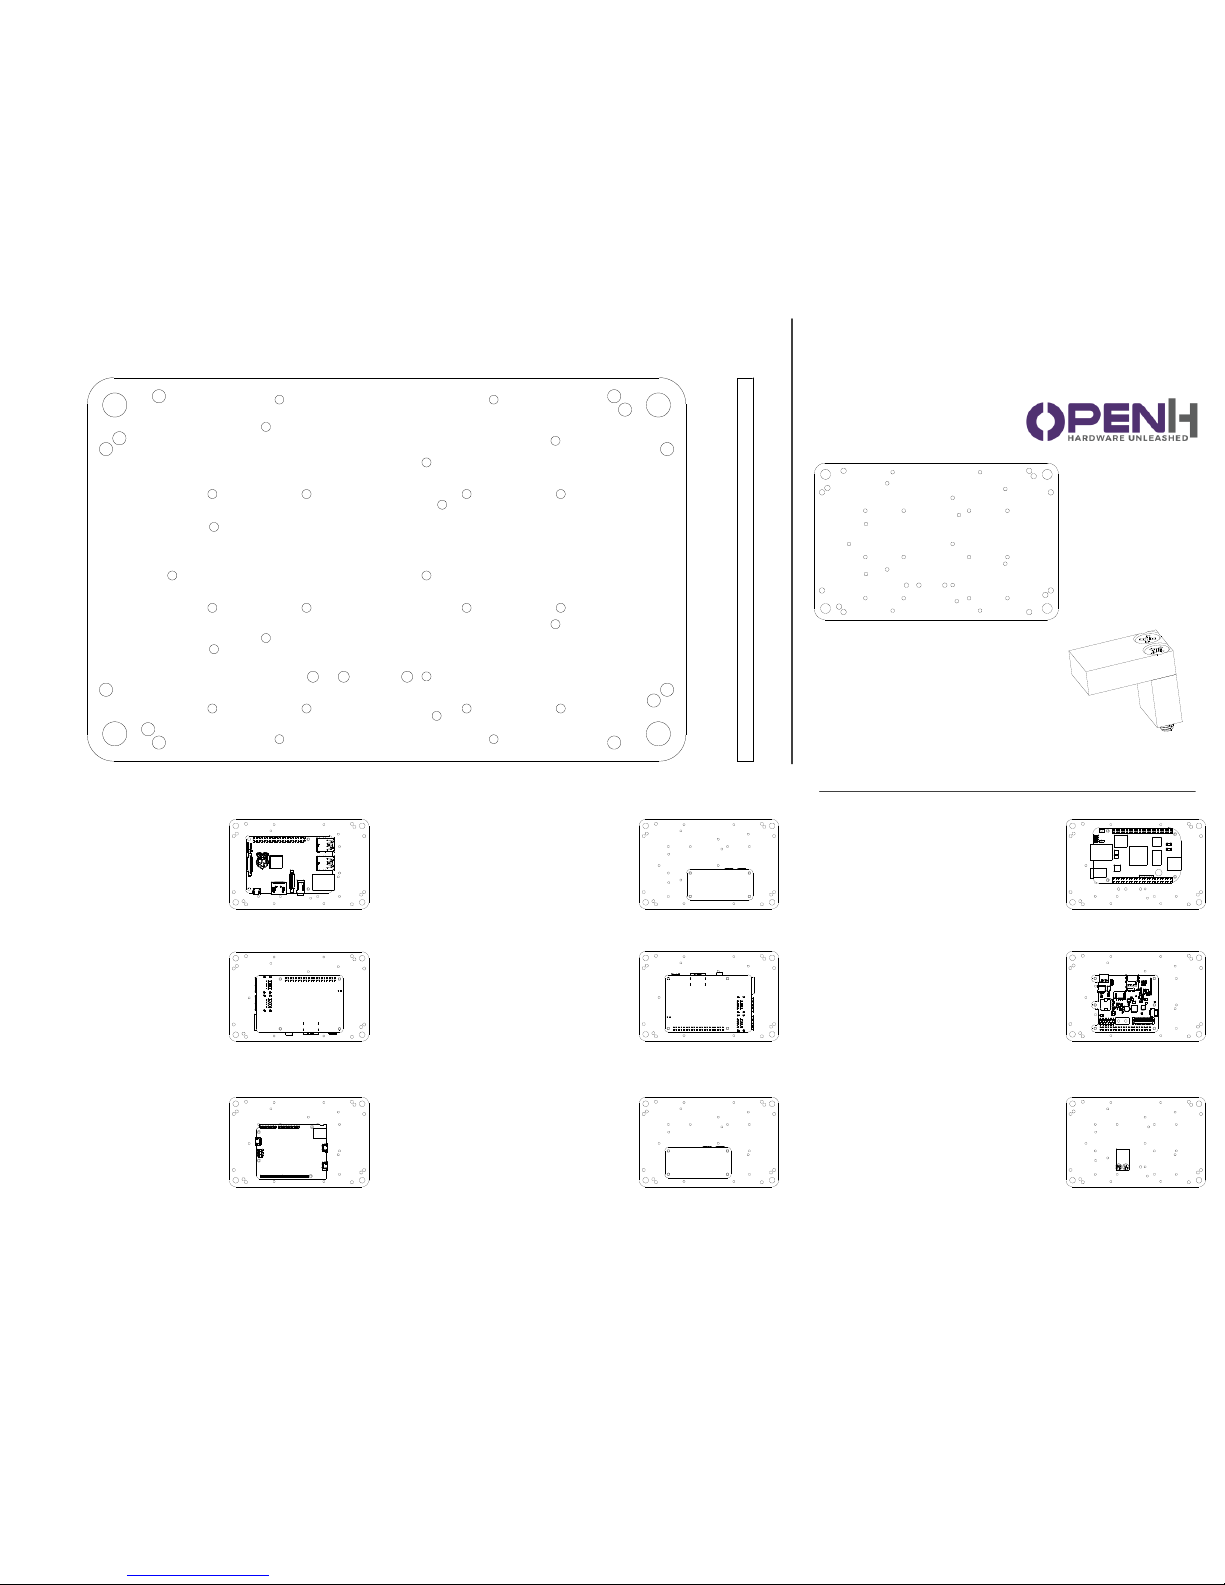
1:1 scale drawing for use as template
HOLE GUIDE AND MOUNTING TEMPLATE (P/N: 12-001L REV L PLATE)
P = Raspberry Pi mounting hole (using frame)
· M2.5 standoff
PA = Raspberry Pi alternate mounting hole
· M2.5 standoff
A = Arduino mounting hole
· M2.5 standoff
PLATE AND HEATSINK
INSTALLATION GUIDE
Open Hardware Industries, LLC. 2017 Rev 05.L
PA/PZ
H
M3
PA/PZ
PA/PZ
B
B
B
B
M3
M3
M3
M3
M3 M3
M3
M3
M3
M3
M3
H
P/PZ/Q
P
PA
PAPH/Q
PH/Q
PH/PHZ/Q
PH/PZH/Q
PH/PZH
PH/PHZ
P/PZ
H
PA/PZ
A
A
A
A
P/PZ
PZ = Raspberry Pi Zero mounting hole
· M2.5 standoff
PH = Raspberry Pi mounting hole for heatsink
use
· M2.5 standoff
PHZ = Raspberry Pi Zero mounting hole for
heatsink use
· M2.5 standoff
M3 = M3 tapped hole
B = BeagleBone mounting hole
· M2.5 standoff
Q = Quasar mounting holes
· M2.5 standoff
H = Heatsink mounting hole
· M3 screw (not included)
M = 5.5 mm dia. mounting hole
· M5 or smaller screw
· #10 or smaller screw
· Drywall screw
P/N: 88-004A
P/N: 12-001L
Page 4
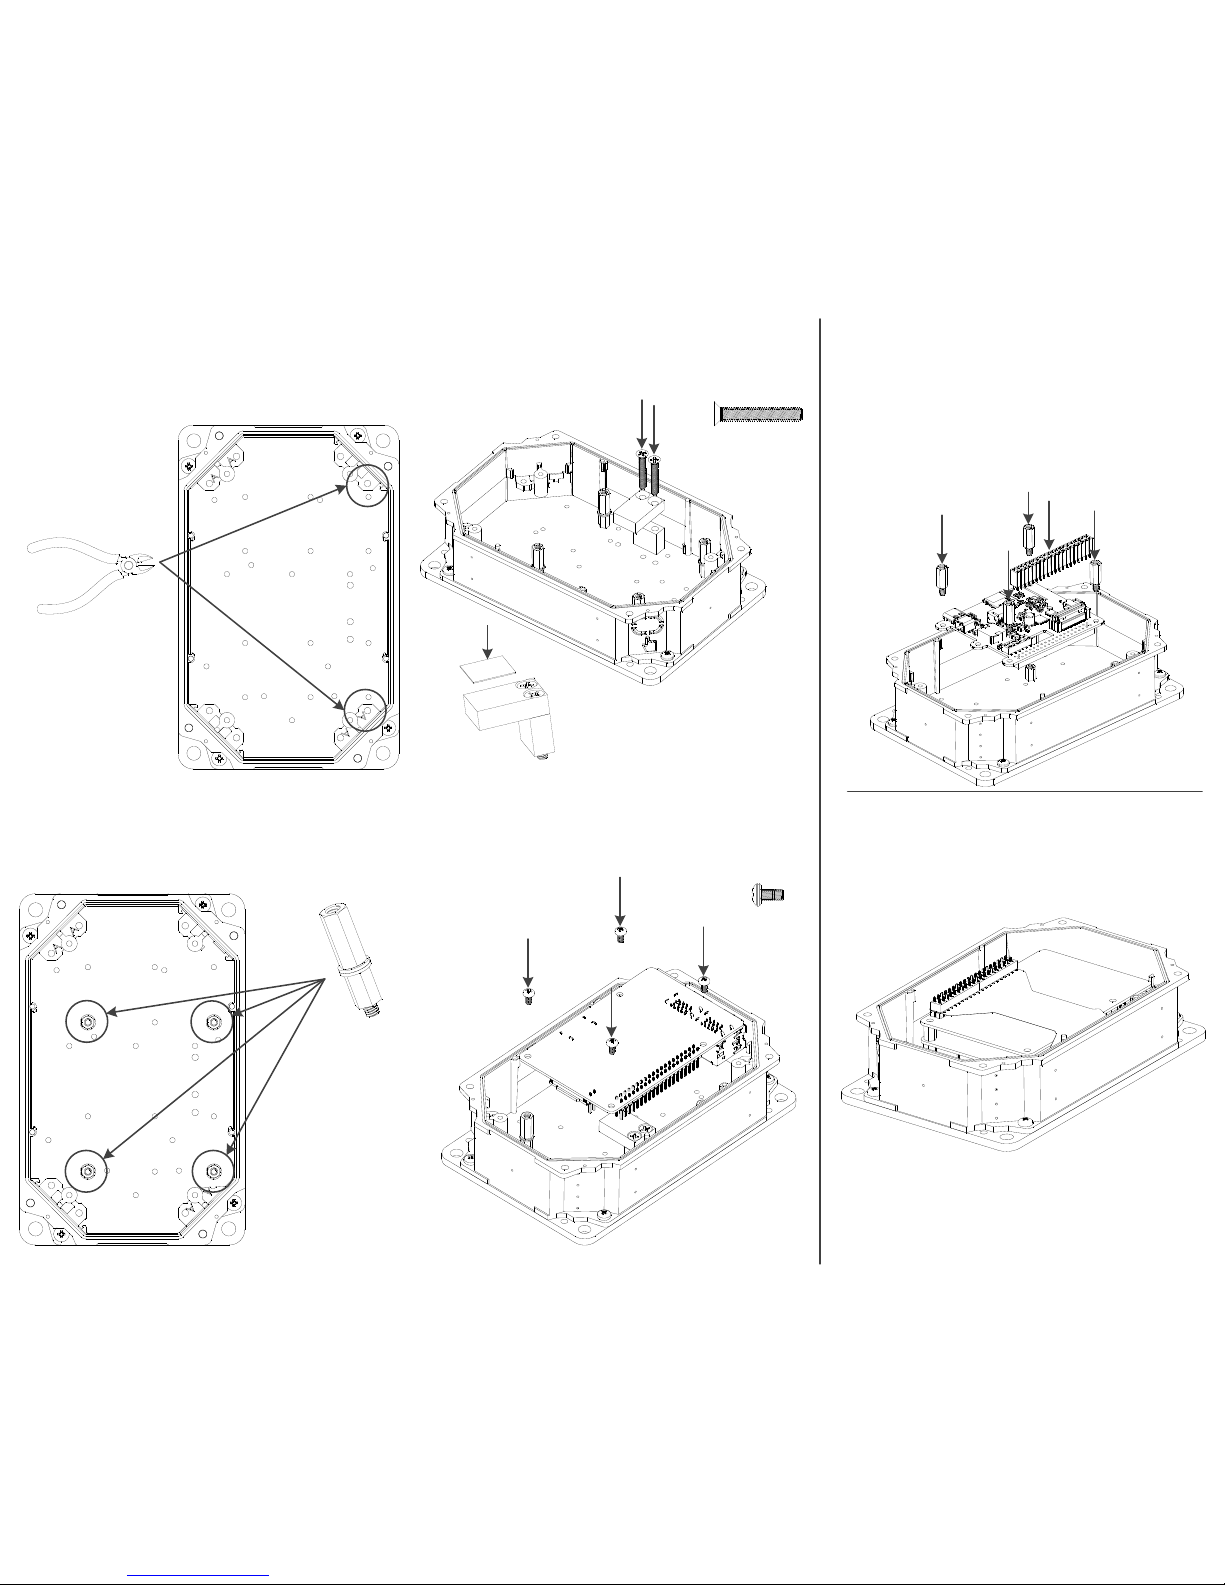
Between steps 2 and 3 of the Heatsink
Accessory Installation guide, insert the Quasar
and header. Complete the remaining steps of the
Heatsink Accessory Installation guide.
HEATSINK ACCESSORY
INSTALLATION
1. Trim bosses in
order to fit the
heatsink accessory.
2. Screw in the 7mm standoff with the 11mm
standoff and two washers included in the
heatsink accessory kit. Washers are not needed if
using the Quasar. Repeat for all four corners. See
Hole Guide for correct locations.
3. Assemble the heatsink using two M3 flathead
screws. Add one thermal pad to the top of the
heatsink.
4x
Go to openh.io/build for video instructions
4. Place the Raspberry Pi on top of the standoffs
and screw in 4 M2.5 L5 screws. The heatsink is also
compatible with the Raspberry Pi Zero – see the
Hole Guide for correct location. Ensure the
Raspberry Pi is fully pressed down for best contact
with the heatsink.
2x
4x
QUASAR WITH HEATSINK
ACCESSORY INSTALLATION
FLEX CABLE FOR EXPANSION
Use the flex cable accessory when the
Raspberry Pi is facing downward and stacking
ability is desired.
Note that pin 1 on the flex cable must match
with pin 1 on the Raspberry Pi header for
optimal operation.
 Loading...