

Page 1
SD4008 Quick Start (520007 Rev 2.2) Page 1
SD4008
Quick Start Guide
This Quick Start walks you through installing and operating your SD4008 console server
with V2.2 or later firmware. Refer to User Manual on the CDROM for more detail.
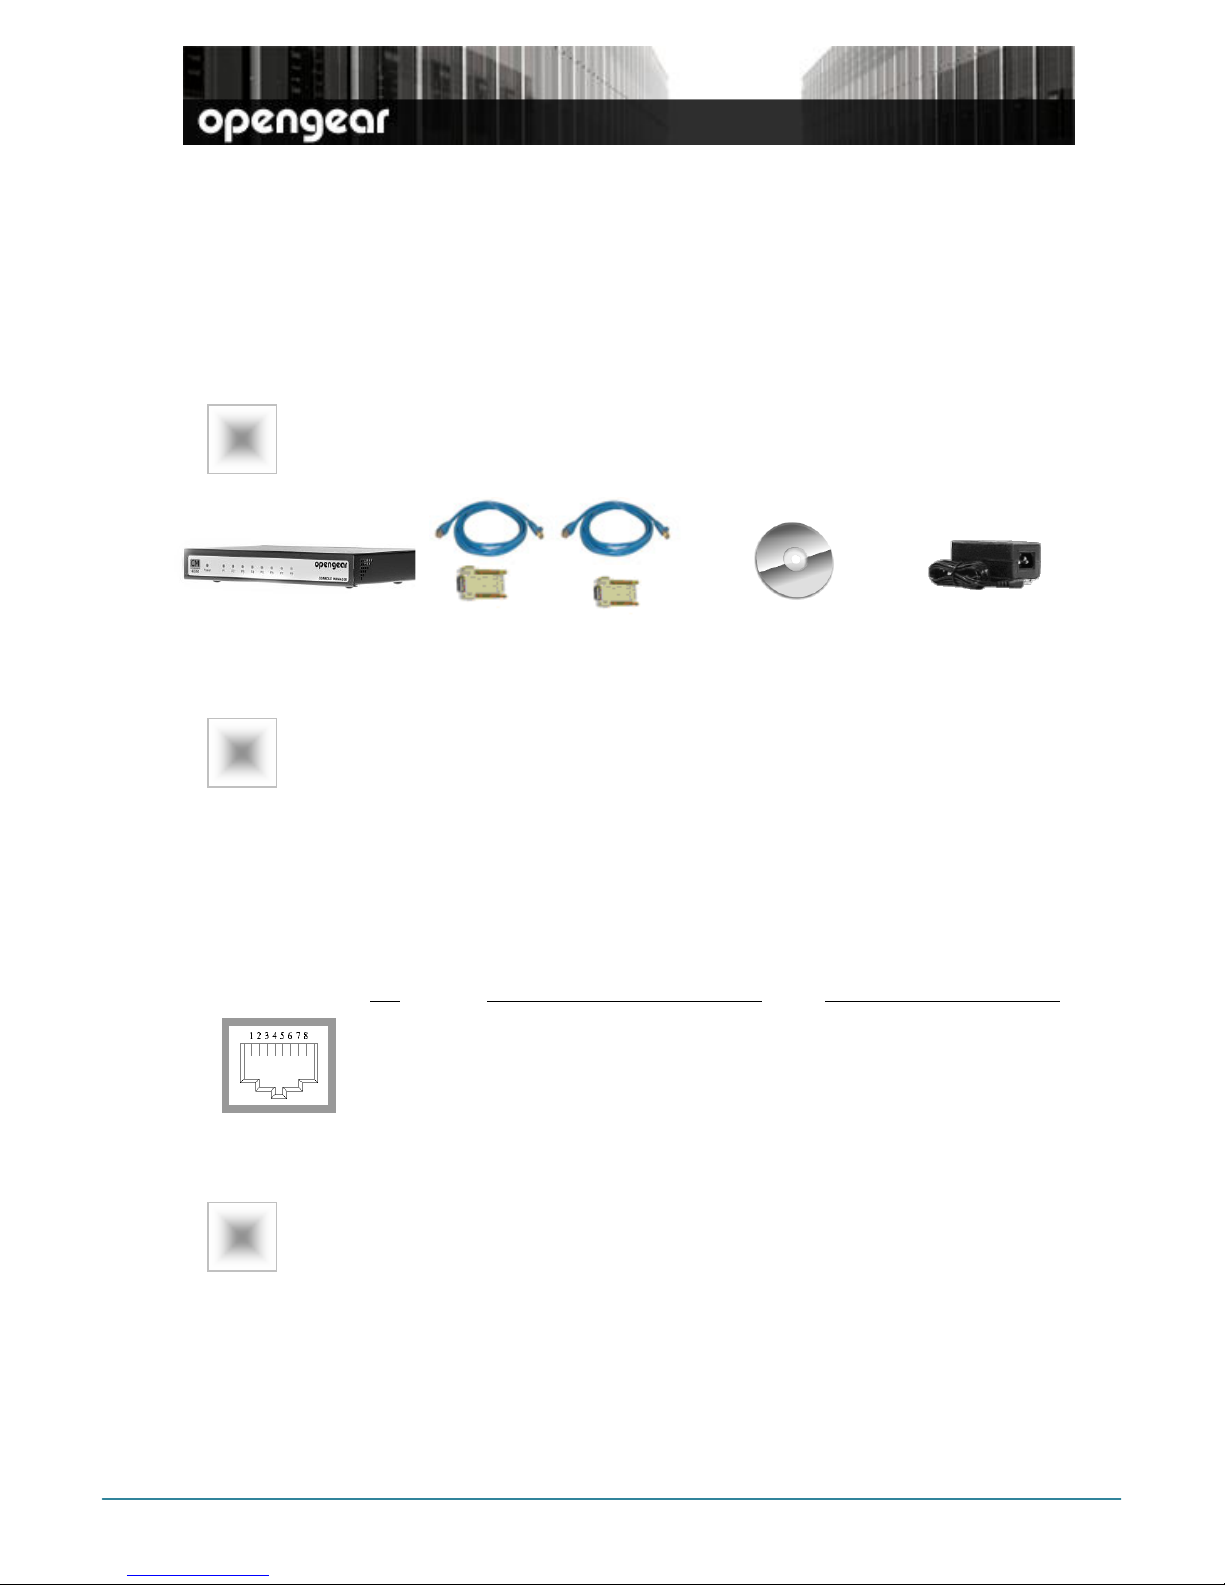
Check kit contents
SD4008
device server
2x UTP cables & DB9F-RJ45S
straight and cross-over
Quick Start &
CD-ROM
5VDC IEC power
supply and cable
Install the console server
Plug the power supply into the AC mains and connect the DC power cable to the
5VDC
power socket on the SD4008
Connect your LAN network to the SD4008
LAN
port and connect your serial device
ports to the SD4008 serial PORTS 1-8. The
LOCAL
serial port can also now be
connected to a modem for Out-of-Band access.
Set up Console Manager
The SD4008 is configured with a default IP Address 192.168.0.1 (Subnet Mask
255.255.255.0). So you can easily access it with any web browser from any computer
that is LAN connected to the SD4008:
Enter https://192.168.0.1 Post Version 2.2 the SD4008 ships by default with
HTTPS access to the Management Console enabled (and HTTP access disabled)
Pin
1
2
3
4
5
6
7
8
RS422/485 Signal Description
-
Receive Data +
-
Receive Data -
Transmit Data +
Ground
Transmit Data –
-
RS232 Signal Description
Request To Send
Data Set Ready
Data Carrier Detect
Receive Data
Transmit Data
Ground
Data Terminal Ready
Clear To Send
3
2
1
Page 2

SD4008 Quick Start (520007 Rev 2.2) Page 2
A Welcome screen listing the basic configuration steps will be displayed. Log in
using the default system user name
root
and the default password is
default
Note: The LAN connected computer must be configured with an IP address in the same
network range (192.168.0.xxx) as the SD4008. If this is not convenient, you can
use the
ARP-Ping
command to reset the SD4008 IP address. Also the SD4008 has
its DHCP client enabled by default, so it will automatically accept any network IP
address assigned by any DHCP server on your network – and will then respond at
both 192.168.0.1 and its DHCP address.
Go to System: Administration then enter and confirm a new System
Password and click Apply
You can now assign your SD4008 a new static IP address or permanently enable DHCP.
Select System: IP menu then check dhcp or static for the Configuration Method
Enable serial & network console access
Select Serial & Network: Serial Port and you will see the current labels, modes, and
RS232/422/485 protocol options that are currently set up for the serial port. By default the
serial port is set in Console Server mode (refer the User Manual if other modes are
required). For the port to be reconfigured click Edit
Configure the Common Settings (Baud Rate, Parity, Data Bits, Stop Bits and Flow
Control) for the serial port to match those of the device being controlled. Then select the
Console Server protocols (Telnet, SSH, TCP and RFC2217) that are to be used for the
data connection to that port. A Logging Level may also be set to specifies the level of
information to be logged and monitored for each Serial Port access. Click Apply
To enable Users to have SDT (RPD/VNC/Telnet/SSH/HTTP/X etc) access to LAN
connected computers or infrastructure appliances (Hosts), select Serial & Network:
Network Hosts and click Add Host
4
Page 3

SD4008 Quick Start (520007 Rev 2.2) Page 3
Enter local IP address/ DNS Name of the computer/appliance and edit the Permitted
Services (or TCP/UDP port numbers) that are authorized to be used in controlling this
host. Only these permitted services will be forwarded through by SDT to the Host. All other
services (TCP/UDP ports) will be blocked. You may also specify The level of information to
be logged and monitored for each Host access
Set up Users
Select Serial & Network: Users & Groups. Click Add User and add Usernames and
Passwords for each new user (and which serial and host ports they can access.
Nominate Accessible Hosts and Accessible Ports to specify which serial port and which
LAN connected host the User is to have access to. You may also specify if the User is to
be a member of a group. By default new Users will be in the user group (refer the User
Manual for details). Click Apply
OPENGEAR END USER LICENSE AGREEMENT
YOU SHOULD CAREFULLY READ THE FOLLOWING TERMS AND CONDITIONS BEFORE USING THE ACCOMPANYING SOFTWARE, THE
USE OF WHICH IS LICENSED FOR USE ONLY AS SET FORTH BELOW. IF YOU DO NOT AGREE TO THE TERMS AND CONDITIONS OF
THIS AGREEMENT, DO NOT USE THE SOFTWARE. IF YOU USE ANY PART OF THE SOFTWARE, SUCH USE WILL INDICATE THAT YOU
ACCEPT THESE TERMS.
You have acquired a product that includes Opengear (“Opengear”) proprietary software and/or proprietary software licensed to Opengear. This
Opengear End User License Agreement (“EULA”) is a legal agreement between you (either an individual or a single entity) and O pengear for the
installed software product of Opengear origin, as well as associated media, printed materials, and “online” or ele ctronic documentation (“Software”).
By installing, copying, downloading, accessing, or otherwise using the Software, you agree to be bound by the terms of this EULA. If you do not
agree to the terms of this EULA, Opengear is not willing to license the Software to you. In such event, do not use or install the Software. If you have
purchased the Software, promptly return the Software and all accompanying materials with proof of purchase for a refund.
Products with separate end user license agreements that may be provided along with the Software are licensed to you under the terms of those
separate end user license agreements.
LICENSE GRANT. Subject to the terms and conditions of this EULA, Opengear grants you a nonexclusive right and license to install and use the
Software on a single CPU, provided that, (1) you may not rent, lease, sell, sublicense or lend the Software; (2) you may not reverse engineer,
decompile, disassemble or modify the Software, except and only to the extent that such activity is expressly permitted by applicable law
notwithstanding this limitation; and (3) you may not transfer rights under this EULA unless such transfer is part of a perman ent sale or transfer of the
Product, you transfer at the same time all copies of the Software to the same party or destroy such materials not transferred, and the recipient
agrees to this EULA.
No license is granted in any of the Software’s proprietary source code. This license does not grant you any rights to patents, copyright, trade
secrets, trademarks or any other rights with respect to the Software.
You may make a reasonable number of copies of the electronic documentation accompanying the Software for each Software licens e you acquire,
provided that, you must reproduce and include all copyrigh t notices and any other proprietary rights notices appearing on the electronic
documentation. Opengear reserves all rights not expressly granted herein.
INTELLECTUAL PROPERTY RIGHTS. The Software is protected by copyright laws, international copyright t reaties, and other intellectual property
laws and treaties. Opengear and its suppliers retain all ownership of, and intellectual property rights in (including copyri ght), the Software
components and all copies thereof, provided however, that certain components of the Software are components licensed under the GNU General
Public License (version 2), which Opengear supports. You may obtain a copy of the GNU General Public License at
http:/www.fsf.org/copyleft/gpl.html. Opengear will provide source code for any of the components of the Software licensed under the GNU General
Public License upon request.
5
Page 4

SD4008 Quick Start (520007 Rev 2.2) Page 4
EXPORT RESTRICTIONS. You agree that you will not export or re-export the Software, any part thereof, or any process or service that is the direct
product of the Software in violation of any applicable laws or regulations of the United States or the country in which you obtained them.
U.S. GOVERNMENT RESTRICTED RIGHTS. The Software and related documentation are provided with Restricted Rights. Use, duplication, or
disclosure by the Government is subject to restrictions set forth in subparagraph (c) (1) (ii) of the Rights in Technical Data and Computer Software
clause at DFARS 252.227-7013 or subparagraphs (c) (1) and (2) of the Commercial Computer Software – Restricted Rights at 48 C.F.R. 52.227-19,
as applicable, or any successor regulations.
TERM AND TERMINATION. This EULA is effective until terminated. The EULA terminates immediately if you fail to comply with any term or
condition. In such an event, you must destroy all copies of the Software. You may also terminate this EULA at any time by destroying the Software.
GOVERNING LAW AND ATTORNEY’S FEES. This EULA is governed by the laws of the State of Utah, USA, excluding its conflict of law rules.
You agree that the United Nations Convention on Contracts for the International Sale of Goods is hereby excluded in its entirety and does not apply
to this EULA. If you acquired this Software in a country outside of the United States, that country’s laws may apply. In any action or suit to enforce
any right or remedy under this EULA or to interpret any provision of this EULA, the prevailing party will be entitled to recover its costs, including
reasonable attorneys’ fees.
ENTIRE AGREEMENT. This EULA constitutes the entire agreement between you and Opengear with respect to the Software, and supersedes all
other agreements or representations, whether written or oral. The terms of this EULA can only be modified by express written consent of both
parties. If any part of this EULA is held to be unenforceable as written, it will be enforced to the maximum extent allowed by applicable law, and will
not affect the enforceability of any other part.
Should you have any questions concerning this EULA, or if you desire to contact Opengear for any reason, please contact the Opengear
representative serving your company.
THE FOLLOWING DISCLAIMER OF WARRANTY AND LIMITATION OF LIABILITY IS INCORPORATED INTO THIS EULA BY REFERENCE. THE
SOFTWARE IS NOT FAULT TOLERANT. YOU HAVE INDEPENDENTLY DETERMINED HOW TO USE THE SOFTWARE IN THE DEVICE, AND
OPENGEAR HAS RELIED UPON YOU TO CONDUCT SUFFICIENT TESTING TO DETERMINE THAT THE SOFTWARE IS SUITABLE FOR
SUCH USE.
LIMITED WARRANTY Opengear warrants the media containing the Software for a period of ninety (90) days from the date of original purchase from
Opengear or its authorized retailer. Proof of date of purchase will be required. Any updates to the Software provided by Opengear (which may be
provided by Opengear at its sole discretion) shall be governed by the terms of this EULA. In the event the product fails to perform as warranted,
Opengear’s sole obligation shall be, at Opengear’s discretion, to refund the purchase price paid by you for the Software on t he defective media, or to
replace the Software on new media. Opengear makes no warranty or representation that its Software will meet your requirements, will work in
combination with any hardware or application software products provided by third parties, that the operation of the software products will be
uninterrupted or error free, or that all defects in the Software will be corrected.
OPENGEAR DISCLAIMS ANY AND ALL OTHER WARRANTIES, WHETHER EXPRESS OR IMPLIED, INCLUDING WITHOUT LIMITATION, ANY
IMPLIED WARRANTIES OF MERCHANTABILITY OR FITNESS FOR A PARTICULAR PURPOSE. OTHER THAN AS STATED HEREIN, THE
ENTIRE RISK AS TO SATISFACTORY QUALITY, PERFORMANCE, ACCURACY, AND EFFORT IS WITH YOU. ALSO, THERE IS NO
WARRANTY AGAINST INTERFERENCE WITH YOUR ENJOYMENT OF THE SOFTWARE OR AGAINST INFRINGEMENT. IF YOU HAVE
RECEIVED ANY WARRANTIES REGARDING THE DEVICE OR THE SOFTWARE, THOSE WARRANTIES DO NOT ORIGINATE FROM, AND
ARE NOT BINDING ON, OPENGEAR.
NO LIABILITY FOR CERTAIN DAMAGES. EXCEPT AS PROHIBITED BY LAW, OPENGEAR SHALL HAVE NO LIABILITY FOR COSTS, LOSS,
DAMAGES OR LOST OPPORTUNITY OF ANY TYPE WHATSOEVER, INCLUDING BUT NOT LIMITED TO, LOST OR ANTICIPATED PROFITS,
LOSS OF USE, LOSS OF DATA, OR ANY INCIDENTAL, EXEMPLARY SPECIAL OR CONSEQUENTIAL DAMAGES, WHETHER UNDER
CONTRACT, TORT, WARRANTY OR OTHERWISE ARISING FROM OR IN CONNECTION WITH THIS EULA OR THE USE OR PERFORMANCE
OF THE SOFTWARE. IN NO EVENT SHALL OPENGEAR BE LIABLE FOR ANY AMOUNT IN EXCESS OF THE LICENSE FEE PAID TO
OPENGEAR UNDER THIS EULA. SOME STATES AND COUNTRIES DO NOT ALLOW THE LIMITATION OR EXCLUSION OF LIABILITY FOR
INCIDENTAL OR CONSEQUENTIAL DAMAGES, SO THIS LIMITATION MAY NOT APPLY TO YOU.
OPENGEAR WARRANTY
STANDARD WARRANTY
Opengear, Inc., its parent, affiliates and subsidiaries, (collectively, "Opengear")warrant your Opengear product to be in good working order and to be
free from defects in workmanship and material (except in those cases where the materials are supplied by the Purchaser) under normal and proper
use and service for the period of one (1) year from the date of original purchase from an Authorized Opengear reseller. In the event that this product
fails to meet this warranty within the applicable warranty period, and provided that Opengear confirms the specified defects, Purchaser's sole remedy
is to have Opengear, in Opengear's sole discretion, repair or replace such product at the place of manufacture, at no additional charge other than the
cost of freight of the defective product to and from the Purchaser. Repair parts and replacement products will be provided on an exchange basis and
will be either new or reconditioned. Opengear will retain, as its property, all replaced parts and products. Notwithstanding the foregoing, this
hardware warranty does not include service to replace or repair damage to the product resulting from accident, disaster, abuse, misuse, electrical
stress, negligence, any non- Opengear modification of the product except as provided or explicitly recommended by Opengear, or other cause not
arising out of defects in material or workmanship. This hardware warranty also does not include service to replace or repair damage to the product if
the serial number or seal or any part thereof has been altered, defaced or removed. If Opengear does not find the product to be defective, the
Purchaser will be invoiced for said inspection and testing at Opengear's then current rates, regardless of whether the product is under warranty.
LIMITATION OF LIABILITY
No action, regardless of form, arising from this warranty may be brought by either party more than two (2) years after the cause of action has
occurred. Purchaser expressly agrees that Opengear's liability, if any, shall be limited solely to the replacement or repair of the product in
accordance with the warranties specifically and expressly set forth herein. The remedies of the Purchaser are the exclusive and sole remedies
available, and, in the event of a breach or repudiation of any provision of this agreement by Opengear, the Purchaser shall not be entitled to receive
any incidental damages as that term is defined in Section 2-715 of the Uniform Commercial Code. Opengear waives the benefit of any rule that
disclaimer of warranty shall be construed against Opengear and agrees that such disclaimers herein shall be construed liberally in favor of
Opengear.
THE FOREGOING WARRANTIES ARE THE SOLE ANDEXCLUSIVE WARRANTIES GIVEN IN CONNECTION WITH THE PRODUCT AND THE
HARDWARE. OPENGEAR DISCLAIMS ALL OTHER WARRANTIES, EXPRESS OR IMPLIED, INCLUDING WITHOUT LIMITATION, ANY
WARRANTIES AS TO THE SUITABILITY OR MERCHANTABILITY OR FITNESS FOR ANY PARTICULAR PURPOSE AND NONINFRINGEMENT
OF THIRD PARTY RIGHTS. OPENGEAR DOES NOT PROMISE THAT THE PRODUCT IS ERROR-FREE OR WILL OPERATE WITHOUT
INTERRUPTION. IN NO EVENT SHALL OPENGEAR BE LIABLE FOR ANY LOST OR ANTICIPATED PROFITS, OR ANY INCIDENTAL,
EXEMPLARY, SPECIAL OR CONSEQUENTIAL DAMAGES, REGARDLESS OF WHETHER OPENGEAR WAS ADVISED OF THE POSSIBILITY
OF SUCH DAMAGES.
 Loading...