

OpenEye E Quick Start Manual
SET UP CONTINUOUS RECORDING
CHANGE THE SCREEN DISPLAY
Press SEARCH on the front of the DVR or the remote control to log in to Search mode.
Select the TARGET media (HDD, DVD-RW, USB).
Select QUICK SEARCH.
Select a DATE from the list and press ENT. The list of dates only includes dates with
recorded video.
Use the arrow keys to move the bar across the displayed grid to select the search time.
Highlighted time blocks represent recorded video.
Select PLAY.
Use the play controls on the front of the DVR or remote control to play, pause, and rewind
video.
1.
2.
3.
4.
5.
6.
7.
Press BACKUP on the front of the DVR or remote control to log in to Backup mode.
Insert the media (DVD-RW, USB).
Select TARGET media (DVD-RW, USB).
CAUTION: If you are using a USB device to back up your data, you must format it fi rst as
FAT32.
Set the FROM and TO date and time.
Select the CHANNELs to include in the backup fi le.
Select ESTIMATE to display the estimated data size and the free space available on the
media.
Select WRITE to start the backup.
CAUTION Do not shut down the DVR during the backup process.
1.
2.
3.
4.
5.
6.
7.
Change the screen display while in Live mode.
Full Screen Display
Press a number key on the front of the DVR or remote control to select the desired camera
channel for full screen display. (Example: Press 1 to display channel 1.)
Divided Screen Display
Press LIVE on the front of the DVR or remote control to change the display mode. Press LIVE
successively to cycle through all display confi gurations.
Change the Displayed Channels
Press ROTATE on the front of the DVR or remote control to rotate through the remaining
channels within the display mode or rotate the display confi guration.
•
•
•
Insert the CD, DVD or connect external USB device to the client PC.
Navigate to the backup fi les on the CD, DVD, or USB device.
Double-click the DvrPlay application.
Click Open to locate the desired backup fi le saved by Date.
1.
2.
3.
4.
PLAY BACKUP FILE ON A PC
BACK UP RECORDED VIDEO
Insert the media (DVD-RW, USB).
Perform a Search to locate the desired video.
Press BACKUP at the beginning of the desired clip.
Press BACKUP again at the end of the desired clip.
Confi rm the Backup settings.
Select WRITE to start the backup.
1.
2.
3.
4.
5.
6.
QUICK BACKUP
QUICK START GUIDE
Embedded Digital Recorder
E-Series (4, 8, 16 channel)
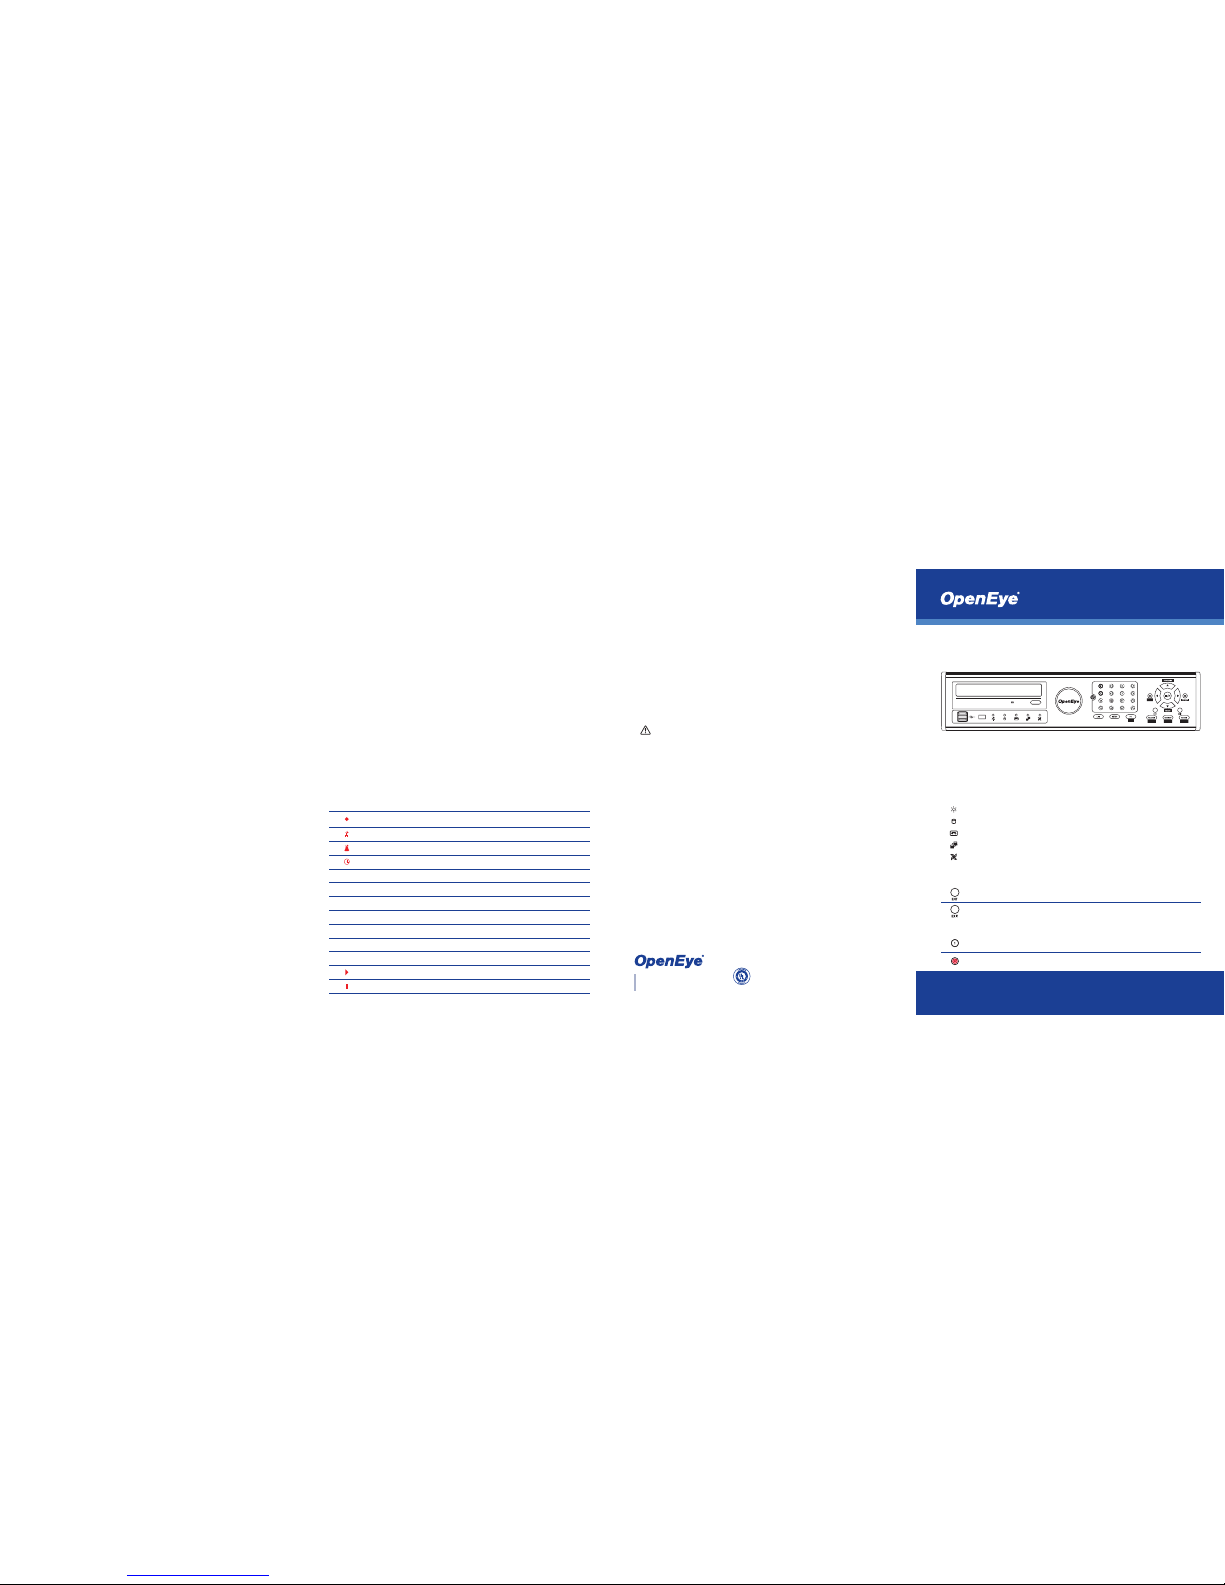
LED STATUS INDICATOR
ENTER / EXIT BUTTONS
Power
Illuminates when power is supplied to the DVR.
HDD
Flashes when the hard drive is being accessed.
Record
Flashes when live video is recording.
Network
Illuminates when the DVR is connected to a network.
Fan
Illuminates when the fan is working. Flashes when the fan is working
improperly. Unlit when the fan is not working.
Enter
Input data, make selections, and open pop-up menus.
NUMERIC BUTTONS AND REC
Numeric
In live and search modes, press to watch that channel full screen.
Record
In live mode, press to start instant recording of all channels.
Exit
Return to the previous mode or menu, without saving.
LOGGING IN FOR THE FIRST TIME
DVR User ID:
admin
Remote Software User ID:
admin1
Password:
<none>
Password:
<none>
Note
After logging in for the fi rst time, change the admin password for the DVR and
remote software to establish user level security. See the Manual for instructions.
Press SETUP on the front of the DVR or remote control .
Select RECORD > RECORD SETUP and press ENT.
Select DAY and press ENT to toggle between DAY, NIGHT, and WEEKEND schedules.
Select C-FPS and press ENT to set the desired Frames Per Second.
Select R-MODE and press ENT to select C.
Repeat for all cameras.
Select the SCHEDULE screen and press ENT.
Select the NIGHT TIME and press ENT.
Set the FROM time and press ENT.
If 19:00 to 06:00 is defi ned as nighttime, 06:00 to 19:00 is defi ned as daytime .
Repeat to set the TO time.
Select the fi rst WEEKEND day and press ENT to set the desired day .
Select the second WEEKEND day and press ENT to set the desired day.
Select SAVE and press ENT to save the settings and return to the SETUP Menu.
1.
2.
3.
4.
5.
6.
7.
8.
9.
10.
11.
12.
13.
When the E-Series DVR starts for the fi rst time, it will take about 40-45 seconds to boot up. Once boot
is complete, the Install Setup window will appear. Use this setup window to confi gure the basic settings
of the system. If any settings are changed you must restart the DVR.
Video Format: NTSC/PAL
Date Format: ASIA (YYYY/MM/DD), US (MM/DD/YYYY) and EURO (DD/MM/YYYY).
Time Zone: Set the local time zone.
DST: To use DST (Daylight Saving Time), turn on this toggle option.
Date/Time: Specify the current date and time.
Auto Log Off: Logs users off after specifi ed time (0~10 minutes).
Copyright ©2009 OpenEye. All Rights Reserved. Information contained in this
document is subject to change without prior notice. OpenEye does its best to provide
accurate information but cannot be held responsible for typos or mistakes.
28971AA
A12931
23221 E Knox Ave
Liberty Lake, WA 99019
1.888.542.1103
SEARCH RECORDED VIDEO WITH QUICK SEARCH
STARTING FOR THE FIRST TIME
Recording
This icon always appears in conjunction with the Motion or
Continuous Recording icon.
Motion
Motion Recording
Sensor
Sensor (Alarm) Recording
Continuous
Continuous Recording
V
Video Loss
Video Loss Detected
F
Freeze
Pause Live View
P
PTZ
PTZ Camera Channel
1:
Channel
Channel Number
C1:
Channel Name
User Defi ned Channel Name
S
Smart
Smart Search Mode
P
Panorama
Panorama Search Mode
Play
Playback Mode
Pause
Pause Search Video
SCREEN ICONS

MAIN SPOT1
SPOT3SPOT2
TUOOEDIV
ALARMPTZ
RS485 ALARM OUT ALARM IN
OUT
IN
CH1 CH2 CH3 CH4 CH5 CH6 CH7 CH8 CH9 CH10 CH11 CH12 CH13 CH14 CH15 CH16
AC INPUT
NETWORK
TUOOEDIVNIOEDIV
9
DIRECTIONAL AND PLAYBACK CONTROL BUTTONS
Live
Go to PTZ mode.
PTZ
Adjust zoom, focus, and iris on a PTZ channel.
Search
Start reverse playback of recordings. When pressed successively, the
search jumps back in time by 30 minute increments.
Search-Pause
When pressed successively, the reverse playback rate
decreases from 1/2X speed to 1/8X.
Live
Start playback of the latest recordings.
(By default, the system searches recordings in the past 30 secs. If no
recording is archived, the system will play back the latest one.)
PTZ
Adjust zoom, focus, and iris on a PTZ channel.
Search
Start playback of recordings. When pressed successively, the search
jumps forward in time by 30 minute increments.
Search-Pause
When pressed successively, the playback rate increases from 1/2X
speed to 1/8X.
Navigation
Move up.
PTZ
Move the camera view point up.
Search
Start Panorama Search.
Navigation
Move to the right.
PTZ
Move the camera view point to the right.
Search
Play recorded videos.
Search-Pause
Step forward one frame.
Navigation
Move to the left.
PTZ
Move camera’s view point to the left.
Search
Play recorded videos in reverse.
Search-Pause
Step back one frame.
Navigation
Move down.
PTZ
Move the camera view point down.
Search
Start Smart Search.
Operation Modes: Live Mode, Live Freeze Mode, Search Mode, Search-Pause Mode,
Navigation Mode, and PTZ Mode.
FUNCTION BUTTONS
Live
Freeze live channels.
Live Freeze
Resume live view.
Search
Pause playback channels.
Search Pause
Resume playback.
Rotate
Rotate through to the remaining channels in the current display mode or
rotate the display confi guration.
Preset
In PTZ mode, press to use the Preset function.
Setup
Open the setup menu.
Live
Change the display mode. Display switches in the following order when
the LIVE key is pressed successively: (Single > 4 > 7 > 9 > 10 > 13 > 16
> Single > 4 > 7 > 9 ...split screen mode)
Search
Open the search menu.
Focus
In PTZ mode, press to use the Focus function.
Use the buttons to adjust.
Backup
In live mode, press to open the backup menu.
In the search mode,
Press once, to set the start time for Backup.
Press twice, to set the end time for Backup.
Press three times, to complete Backup.
•
•
•
Zoom
In PTZ mode, press to use PTZ Zoom function.
Use the buttons to adjust.
Key
Log out the current user. Use to prevent accidental or unauthorized system-wide changes.
Iris
In PTZ mode, press to use the IRIS function.
Use the buttons to adjust.
16 Channel 120PPS
model displayed
Connect cameras to video inputs, and if using, connect PTZ camera control lines to RS485
connector.
Connect the main monitor to the VGA monitor output or main video output - BNC.
Connect analog monitors to looping video ouputs. (optional)
Connect the monitor to SPOT video outputs (up to 3 on 16CH only). (optional)
Connect sensors to alarm signal inputs. (optional)
Cconnect alarm devices such as buzzers to alarm signal outputs. (optional)
Connect external controllers to RS232 connector. (optional)
Connect a speaker and microphone to the audio input and output. (optional)
Connect a network cable to the network port.
Power on all the connected equipment.
Connect the power cord to the DVR.
Turn the power switch on.
1.
2.
3.
4.
5.
6.
7.
8.
9.
10.
11.
12.
QUICK INSTALLATION
When more than one E-Series DVR is installed in the same location, use one remote controller
to control multiple DVRs. To control multiple DVRs, you must change the remote controller ID to
match the SYSTEM ID of the DVR.
Follow the instructions below to change the remote controller ID.
On the DVR
Press SETUP on the front of the DVR or the Remote Controller.
Go to SYSTEM > SYSTEM SETUP.
Enter the desired SYSTEM ID number.
On the Remote Controller
Press and hold the ID button on the remote controller and enter the desired SYSTEM ID
number to operate the corresponding DVR.
Note The SYSTEM ID must be input as two numbers on the remote controller. Therefore you
should input 00 for the DVR ID 0 and input 01 for 1.
1.
2.
3.
4.
HOW TO USE IR REMOTE CONTROLLER
 Loading...