

OpenEye CM-722I, CM-722AI, CM-722VF User Manual
Camera
CM-722I
CM-722AI
CM-722VF
www.openeye.net
2MP Outdoor IR IP Bullet Camera
User Manual
Accessories
CA-510G
CA-510W
CA-510C
CA-510P25
CA-510P50
CA-510PML
CA-510PMS
CA-510PA25
CA-510PA50

31051AD 3
2MP IR IP Bullet Camera (CM-722 Series)
User Manual
Manual Edition 31051AD – APRIL 2015
©2015, OPENEYE
All Rights Reserved.
No part of this documentation may be reproduced in any means, electronic or mechanical, for any
purpose, except as expressed in the Software License Agreement. OpenEye shall not be liable for
technical or editorial errors or omissions contained herein. The information in this document is
subject to change without notice.
The information in this publication is provided “as is” without warranty of any kind. The entire risk
arising out of the use of this information remains with recipient. In no event shall OPENEYE be
liable for any direct, consequential, incidental, special, punitive, or other damages whatsoever
(including without limitation, damages for loss of business profits, business interruption or loss of
business information), even if OPENEYE has been advised of the possibility of such damages and
whether in an action or contract or tort, including negligence.
This documentation is copyrighted. All other rights are reserved to OPENEYE. OPENEYE, and
OpenEye, are registered trademarks of OPENEYE in the United States and elsewhere; Windows,
and Windows XP Embedded are registered trademarks of Microsoft Corporation. All other brand
and product names are trademarks or registered trademarks of the respective owners.
OPENEYE
Liberty Lake, WA ● U.S.A.

4
Important Safeguards
1. Read Instructions
Read all of the safety and operating instructions before using the product.
2. Retain Instructions
Save these instructions for future reference.
3. Attachments / Accessories
Do not use attachments or accessories unless recommended by the appliance
manufacturer as they may cause hazards, damage product and void warranty.
4. Installation
Do not place or mount this product in or on an unstable or improperly supported
location. Improperly installed product may fall, causing serious injury to a child or
adult, and damage to the product. Use only with a mounting device
recommended by the manufacturer, or sold with the product. To insure proper
mounting, follow the manufacturer's instructions and use only mounting
accessories recommended by manufacturer.
5. Power source
This product should be operated only from the type of power source indicated on
the marking label.
Precautions
Operating
Before using, make sure power supply and others are properly connected.
While operating, if any abnormal condition or malfunction is observed, stop
using the camera immediately and then contact your local dealer.
Handling
Do not disassemble or tamper with parts inside the camera.
Do not drop or subject the camera to shock and vibration as this can
damage camera.
Do not block the cooling holes on the bracket. This camera has a cooling
fan inside the housing. Blocking the cooling holes will cause heat to build up
and cause malfunction.
Care must be taken when you clean the clear dome cover. Scratches and
dust will ruin the image quality of your camera. Do not use strong or
abrasive detergents when cleaning the camera body. Use a dry cloth to
clean the camera when it is dirty. In case the dirt is hard to remove, use a
mild detergent and wipe the camera gently.

31051AD 5
Installation and Storage
Install electricity wiring carefully. Please note that input electricity to the unit
is at tolerance of DC 12V/AC 24V ± 10%. The camera is capable of surge
protection; ensure AC power model unit is grounded appropriately against
damage by heavy current or electric shock.
Do not install the camera in areas of extreme temperatures in excess of the
allowable range. ( -40°F ~ 122°F / -40°C ~ 50°C)
Avoid installing in humid or dusty places. The relative humidity must be
below 90%.
Avoid installing in places where radiation is present.
Avoid installing in places where there are strong magnetic fields and electric
signals.
Avoid installing in places where the camera would be subject to strong
vibrations.
Never face the camera toward the sun. Do not aim at bright objects.
Whether the camera is in use or not, never aim it at the sun or other
extremely bright objects. Otherwise the camera may be smeared and
damaged.
Regulation
This device complies with Part 15 of the FCC Rules. Operation is subject to
the following two conditions: (1) this device may not cause harmful
interference, and (2) this device must accept any interference received,
including interference that may cause undesired operation.
This symbol on the product or on its packaging indicates that this product
shall not be treated as household waste in accordance with Directive
2002/96/EC. Instead it shall be handed over to the applicable collection point
for the recycling of electrical and electronic equipment. By proper waste
handling of this product you ensure that it has no negative consequences for
the environment and human health, which could otherwise be caused if this
product is thrown into the garbage bin. The recycling of materials will help to
conserve natural resources.
For more details information about recycling of this product, please contact
your local city office, your household waste disposal service or the shop
where you purchased the product.
Compliance is evidenced by written declaration from our suppliers, assuring that any
potential trace contamination levels of restricted substances are below the maximum level
set by EU Directive 2002/95/EC, or are exempted due to their application.
6
Warning
DANGEROUS HIGH VOLTAGES ARE PRESENT INSIDE THE ENCLOSURE.
DO NOT OPEN THE CABINET.
REFER SERVICING TO QUALIFIED PERSONNEL ONLY.
Caution
CAUTION: TO REDUCE THE RISK OF ELECTRIC SHOCK,
DO NOT REMOVE COVER (OR BACK).
NO USER-SERVICEABLE PARTS INSIDE.
REFER SERVICING TO QUALIFIED SERVICE PERSONNEL.
C A U T I O N
RISK OF ELECTRIC SHOCK
DO NOT OPEN

31051AD 7
Introduction ............................................................................................ 10
Overview ....................................................................................................................... 10
Product Features ...................................................................................................... 10
Getting Started ....................................................................................... 11
Box Contents ................................................................................................................ 11
Camera Overview ......................................................................................................... 12
Dimensions ............................................................................................................... 12
Connections .............................................................................................................. 13
Micro SD Card Slot and Reset Button ...................................................................... 14
Installing the Desiccant ............................................................................................. 16
Installation .............................................................................................. 17
Power and Ethernet Connection ................................................................................... 17
Power Connection .................................................................................................... 17
Ethernet Cable Connection ...................................................................................... 17
Ceiling Installation ......................................................................................................... 18
Lens Adjustment ........................................................................................................... 19
Setup and Configuration ....................................................................... 20
OpenEye Network Camera manager ........................................................................... 20
Installation ................................................................................................................. 20
Starting Network Camera Manager .......................................................................... 20
Camera Configuration ................................................................................................... 21
Device Addressing .................................................................................................... 21
Finding Network Devices ..................................................................................... 21
Viewing a Network Camera.................................................................................. 22
Connecting to the Camera ........................................................................................ 23
Resetting the Camera .......................................................................................... 23
Administrator/User Privileges ............................................................................... 23
Connecting Over the Internet ............................................................................... 24
Viewer Software ............................................................................................................ 25
Viewer Tabs .............................................................................................................. 25

8
Live .......................................................................................................... 26
Setup ....................................................................................................... 27
System Setting .............................................................................................................. 27
Camera Name .......................................................................................................... 27
IP Address ................................................................................................................ 28
Get IP an Address Automatically (DHCP) ............................................................ 28
Use Static IP Address .......................................................................................... 29
IPv6 Address Configuration ............................................................................. 29
User Setup ................................................................................................................ 30
Admin Password .................................................................................................. 30
Add User .............................................................................................................. 30
Delete User .......................................................................................................... 30
Modify User .......................................................................................................... 31
File Location ............................................................................................................. 31
Picture Setup ................................................................................................................ 31
Camera Tab .............................................................................................................. 31
Exposure .............................................................................................................. 32
White Balance ...................................................................................................... 32
Picture Adjustment ............................................................................................... 33
Motion Detection ....................................................................................................... 33
Add Detection Window ......................................................................................... 34
Delete Motion Detection Window ......................................................................... 34
Motion Window ................................................................................................ 34
Streaming Settings ....................................................................................................... 35
Video Resolution ...................................................................................................... 35
Video Orientation ................................................................................................. 36
GOP Size ............................................................................................................. 36
H.264 Profile ........................................................................................................ 36
Video Frame Rate .................................................................................................... 37
Video Compression .................................................................................................. 38
Advanced ................................................................................................ 39
System Setting .............................................................................................................. 39
Network Setup .......................................................................................................... 39
DDNS ................................................................................................................... 39

31051AD 9
Network Advanced ................................................................................................... 39
QoS ...................................................................................................................... 39
SNMP Settings ..................................................................................................... 40
UPnP (Universal Plug N’ Play) ............................................................................. 40
Network Security ...................................................................................................... 41
HTTP .................................................................................................................... 41
IP Filtering ............................................................................................................ 41
IEEE 802.1XSEAP-TLS ....................................................................................... 41
Alarm Application ...................................................................................................... 42
Tampering and Network Failure Detection ............................................................... 43
Mail, HTTP and FTP Setup ...................................................................................... 44
SD Card .................................................................................................................... 44
Network Share .......................................................................................................... 45
Recording Schedule ................................................................................................. 46
Recording ............................................................................................................. 46
Schedule .............................................................................................................. 47
Interval Recording ................................................................................................ 48
Maintenance ............................................................................................................. 49
Configuration ........................................................................................................ 49
Factory Default ..................................................................................................... 49
Software .................................................................................................................... 50
Picture Setting .............................................................................................................. 50
Video Mask ............................................................................................................... 50
Hot Spot .................................................................................................................... 50
Text Overlay ............................................................................................................. 50
Streaming Setting ......................................................................................................... 51
Audio ......................................................................................................................... 51
Logout ..................................................................................................... 51
Specifications ......................................................................................... 52
Camera Specifications .................................................................................................. 52
Appendix A ............................................................................................. 54
Set Up Internet Security ................................................................................................ 54
Setting Internet Security Level to Default ................................................................. 54
Adjusting ActiveX Controls and Plug-ins .................................................................. 55

10
The OpenEye CM-722 series is a collection of 2MP outdoor IP bullet cameras built to
provide superior video quality. All CM-722 cameras utilize MJPEG or H.264 compression
to provide video at resolutions up to 1080p (2MP) and are capable of dual and quad
streaming at 720p (1MP). Each camera in the CM-722 series is equipped with 23 IR LEDs
and a mechanical IR cut filter for true day/night operation, allowing the camera to record
high-resolution images at 0 Lux.
The CM-722I is equipped with all the standard features of the CM-722 line, while the CM722AI includes a motorized lens and the CM-722VF includes a varifocal lens.
The CM-722 series is designed to operate in extreme conditions in a tamper-resistant
housing. It is equipped with an integrated heater, allowing operation in temperatures as
low as -40°F (-40°C). CM-722 cameras can be powered via 24vAC, 12vDC, or a PoE
switch. 24vAC power is required to operate the on-board heater.
Product Features
ONVIF™ compliant
H.264 / MJPEG quad streaming
2MP resolution (1080p HD)
IP66 weatherproof rating
True Day/Night
On-board heater
23 IR LEDs
31051AD 11
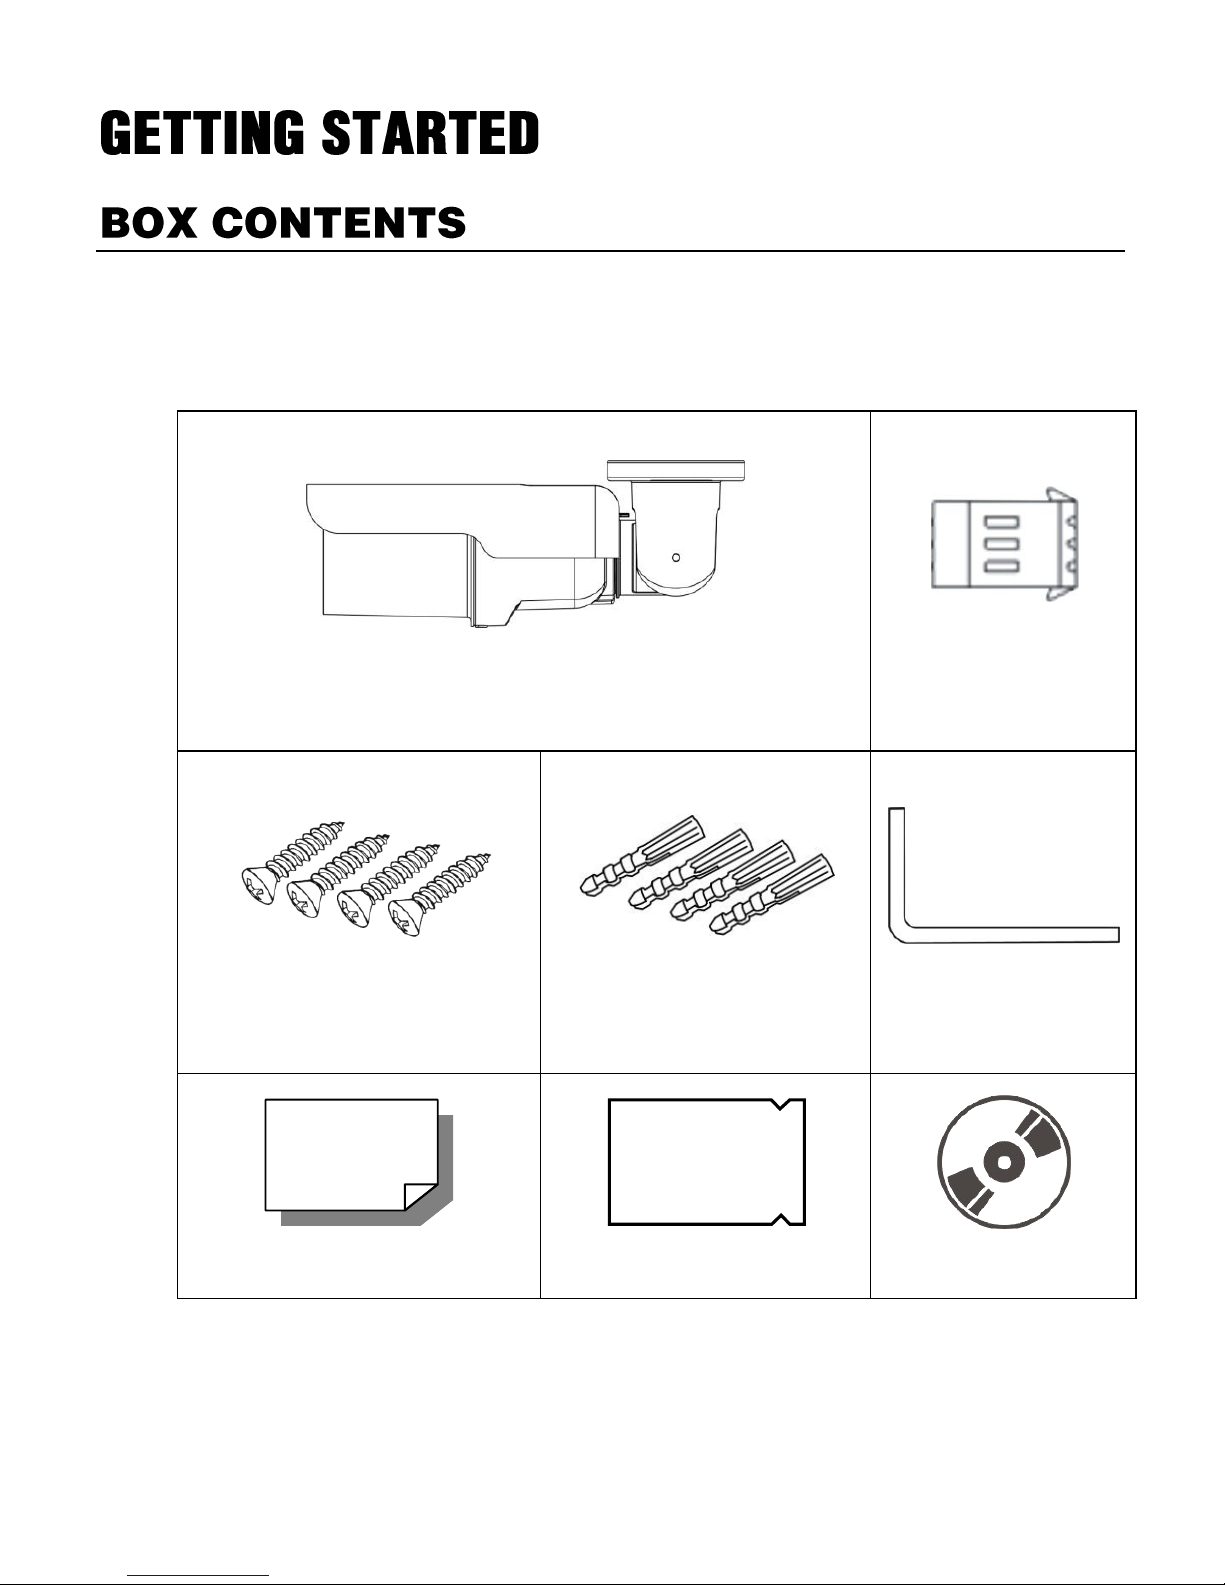
Before proceeding, please check that the box contains the items listed here. If any item is
missing or has defects, DO NOT install or operate the product and contact your dealer for
assistance.
CM-722 Series Camera (Cable included)
Power Terminal
Block
Self Tapping Screws
Plastic Anchors
M4 Inner Hex
Wrench
Quick Start Guide
Desiccant Bag
CD
12
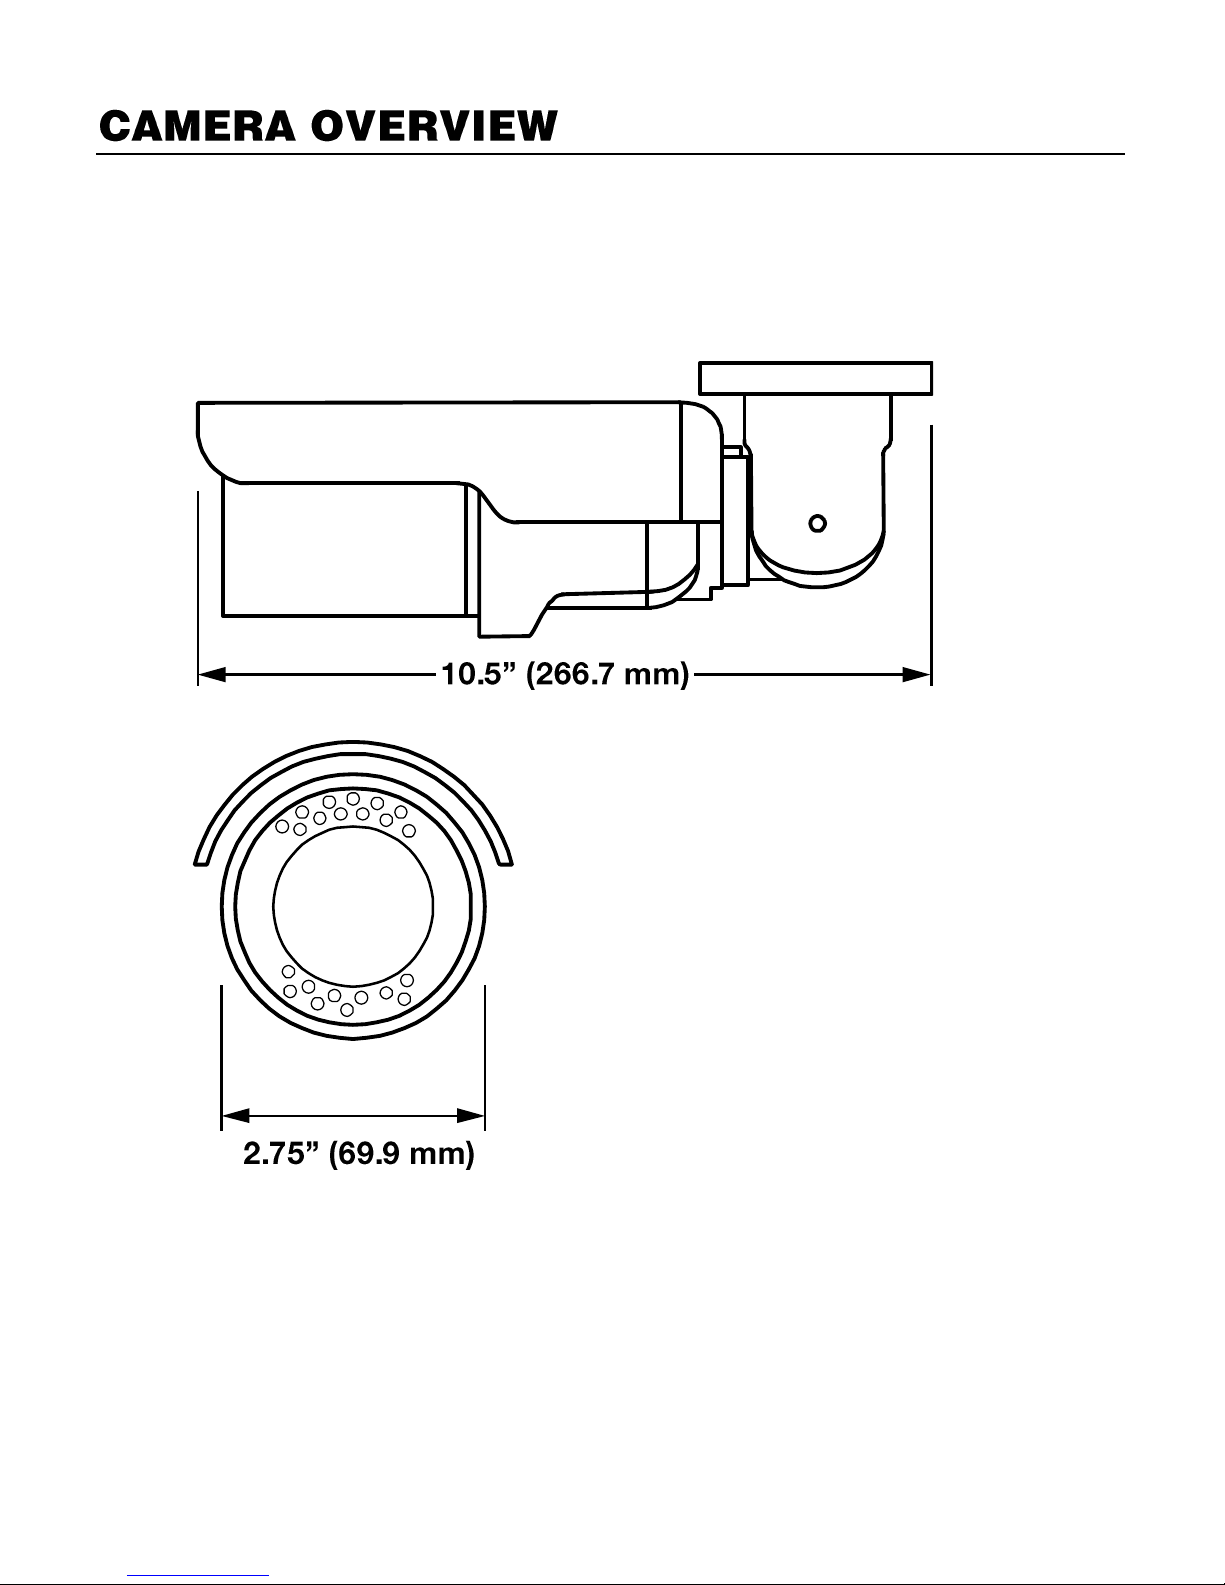
Before installing or connecting the camera, please refer to this section, including an
overview of the all-in-one cable for reference.
Dimensions
Length – 10.5 inches (84 mm)
Width – 2.75 inches (69.9 mm)
Height – 3.25 inches (82.55 mm)
31051AD 13
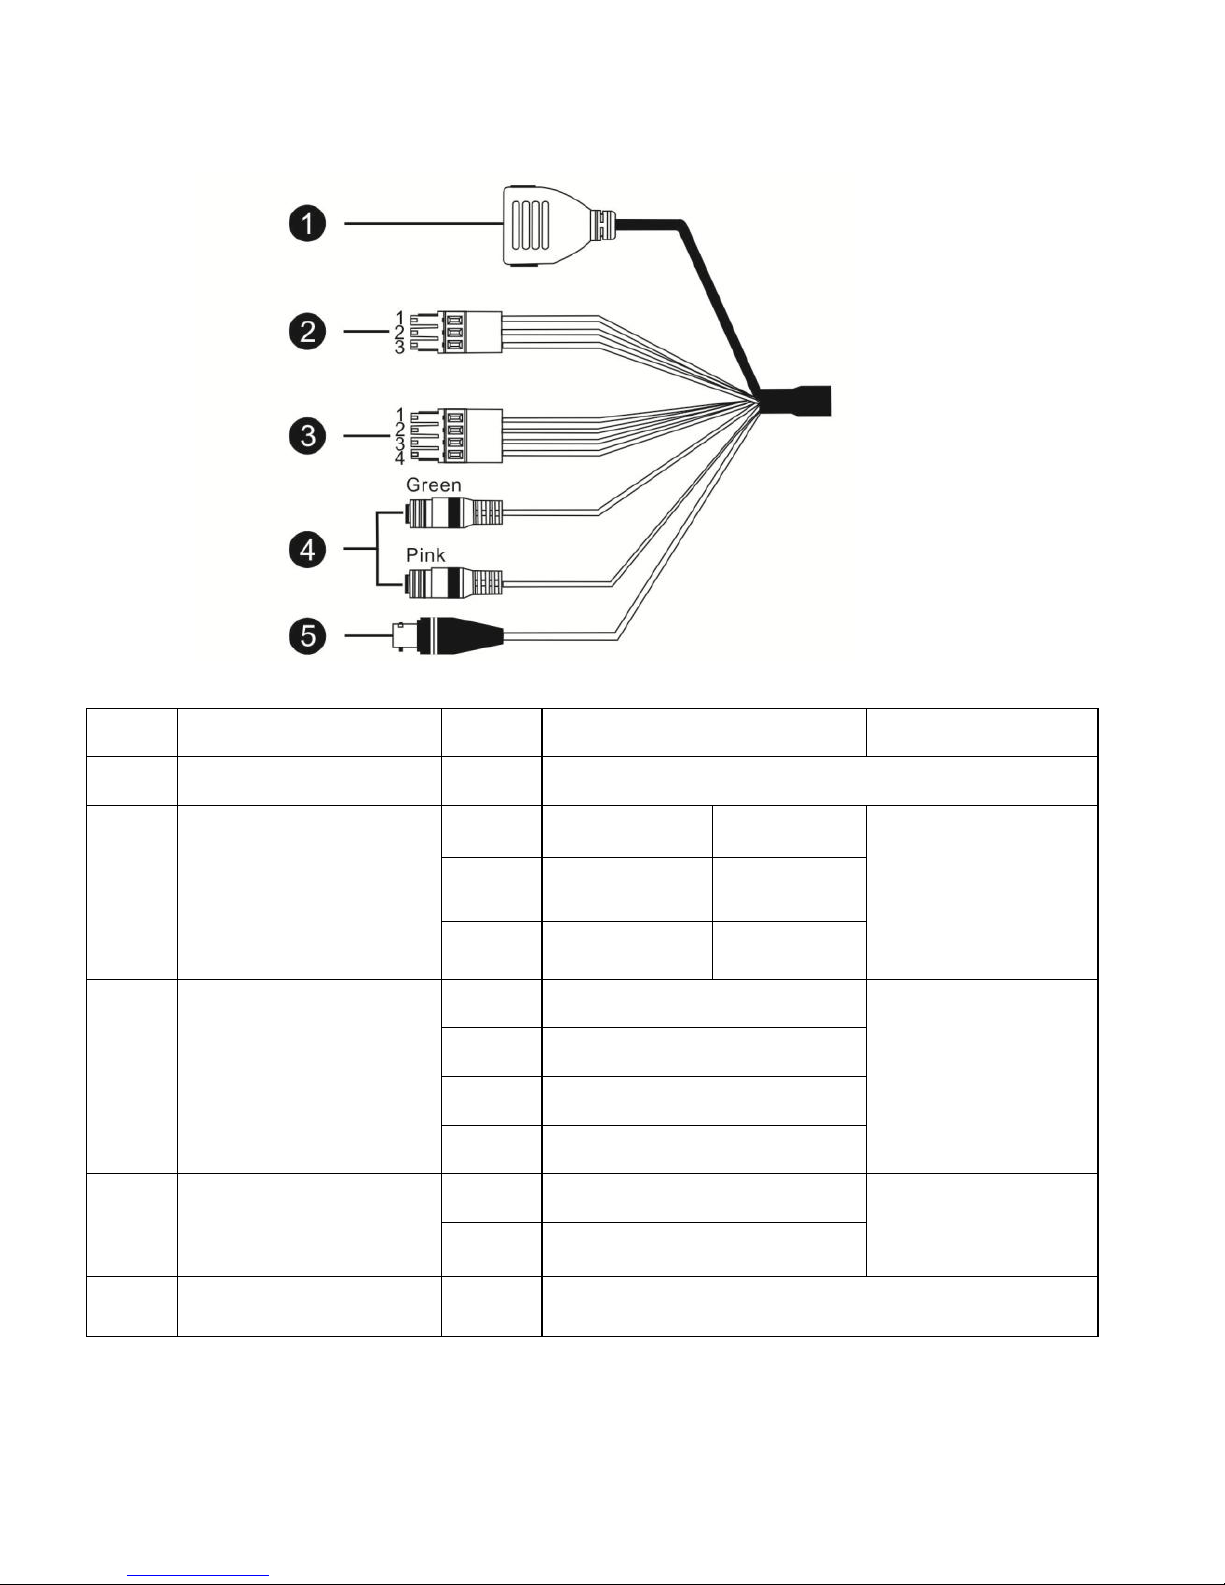
Connections
No.
Item
Pin
Definition
Remarks
1
Network (with PoE)
-
RJ-45 connector w/ LED
2
Power (3-pin Terminal
Block)
1
AC 24V-1
DC (-)
Power connection
2
GND
Reserved
3
AC 24V-2
DC (+)
3
Alarm I/O
1
ALM_DI-
Alarm connection
2
ALM_DI+
3
ALM_DO-
4
ALM_DO+
4
Audio I/O
Pink
Line In/Mic In
Two-way audio
transmission
Green
Line Out
5
BNC
-
Video out
14
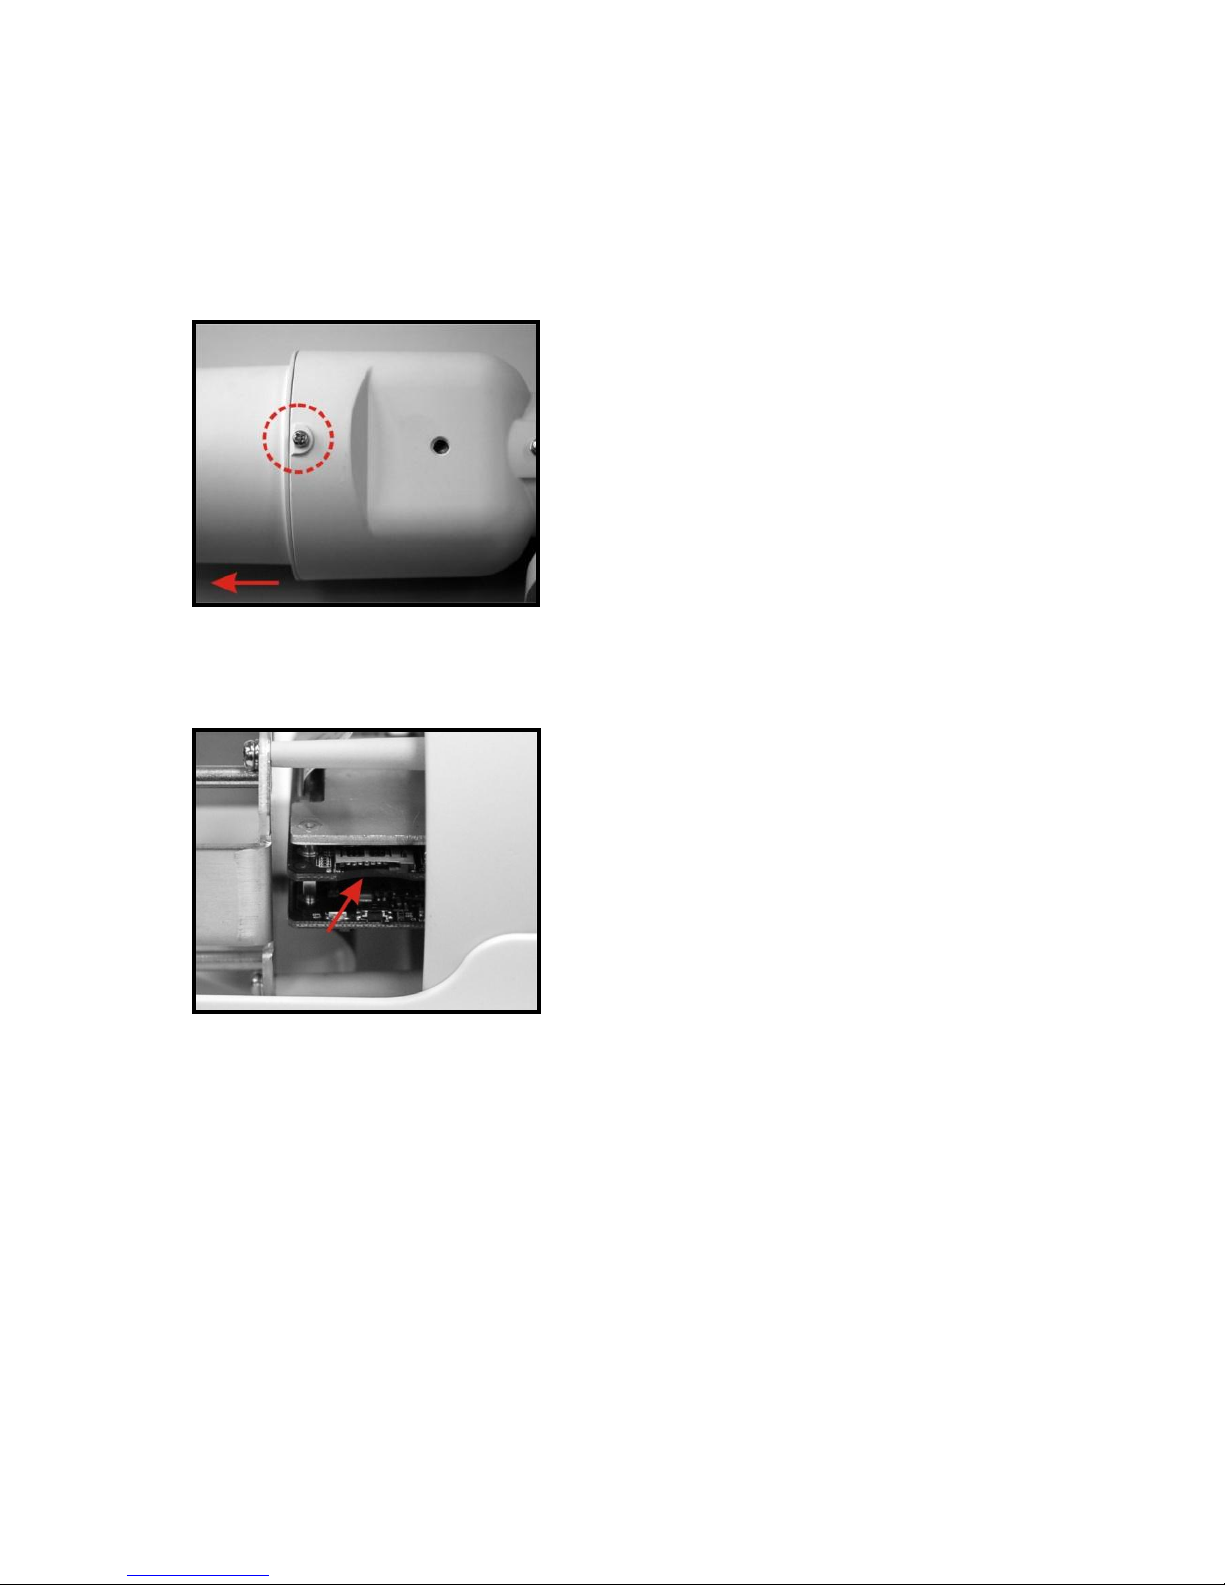
Micro SD Card Slot and Reset Button
Use these photos to reach the Micro SD card slot, reboot button, and factory default button.
1. Unscrew the camera housing to remove front cover.
2. Micro SD card slot
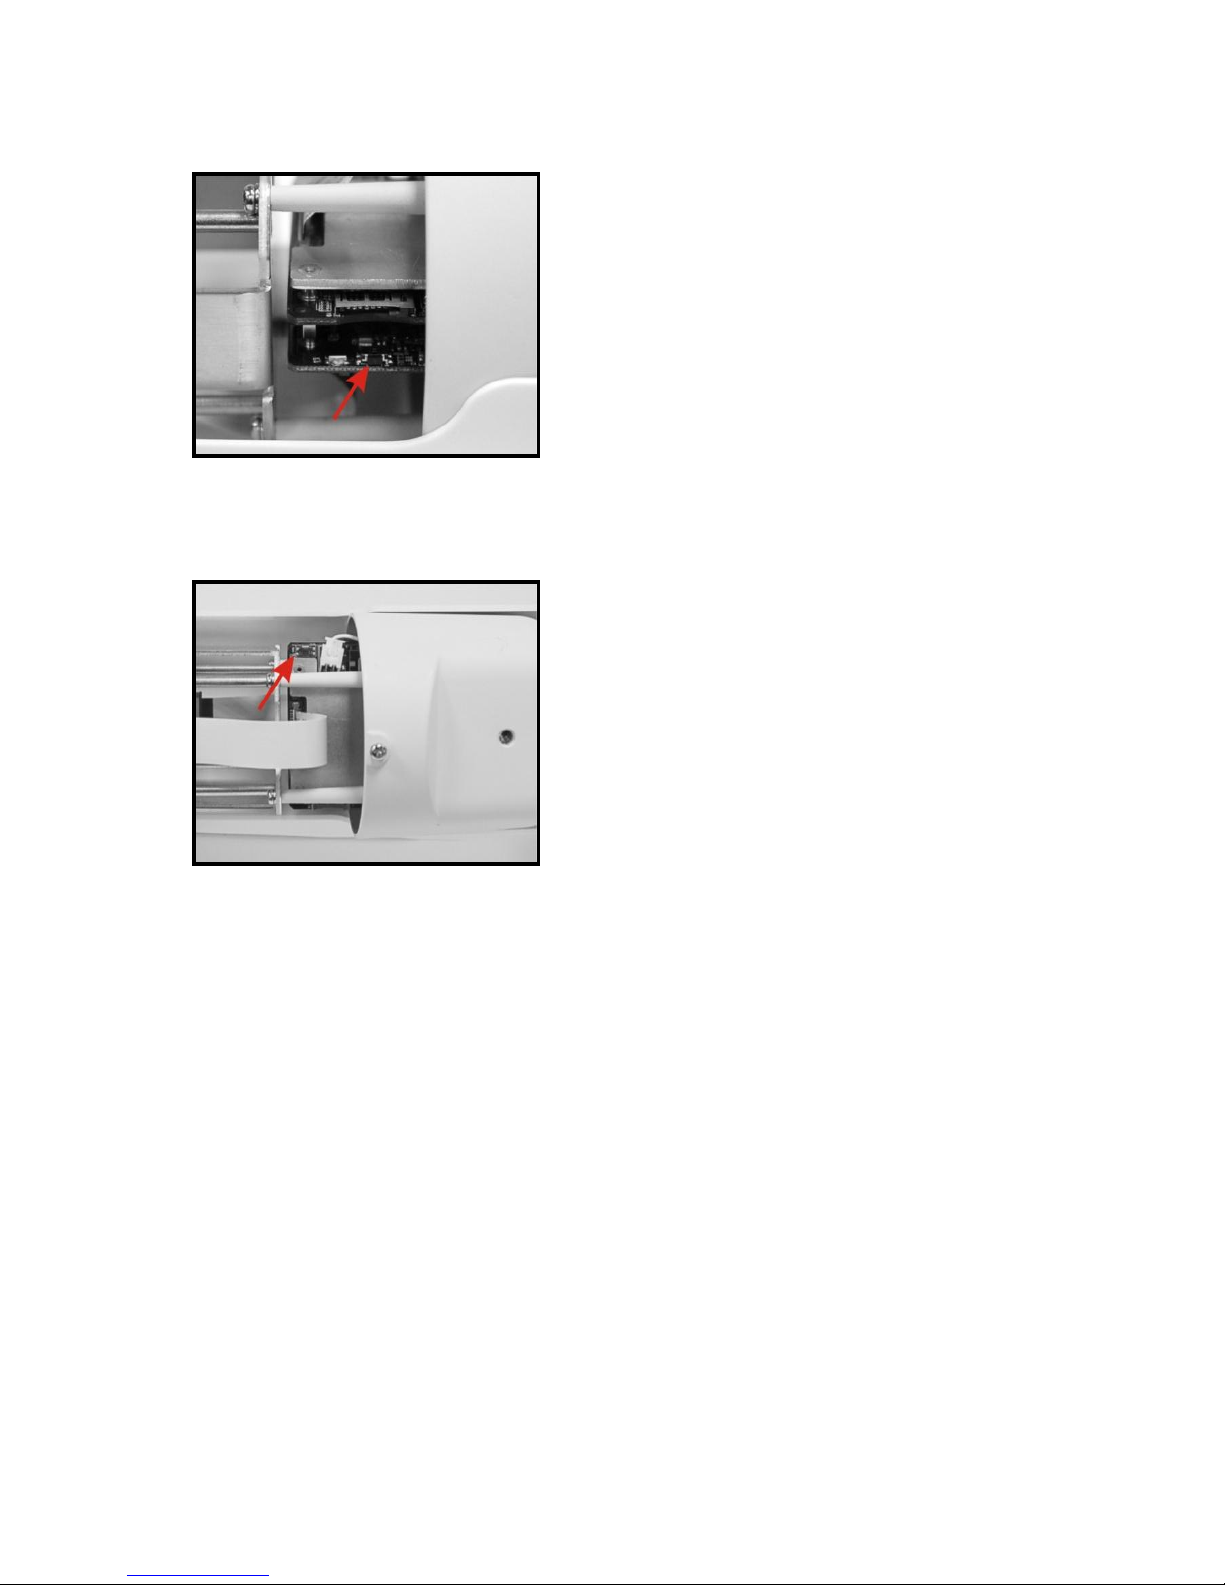
31051AD 15
3. Factory default button
4. Reboot Button
16
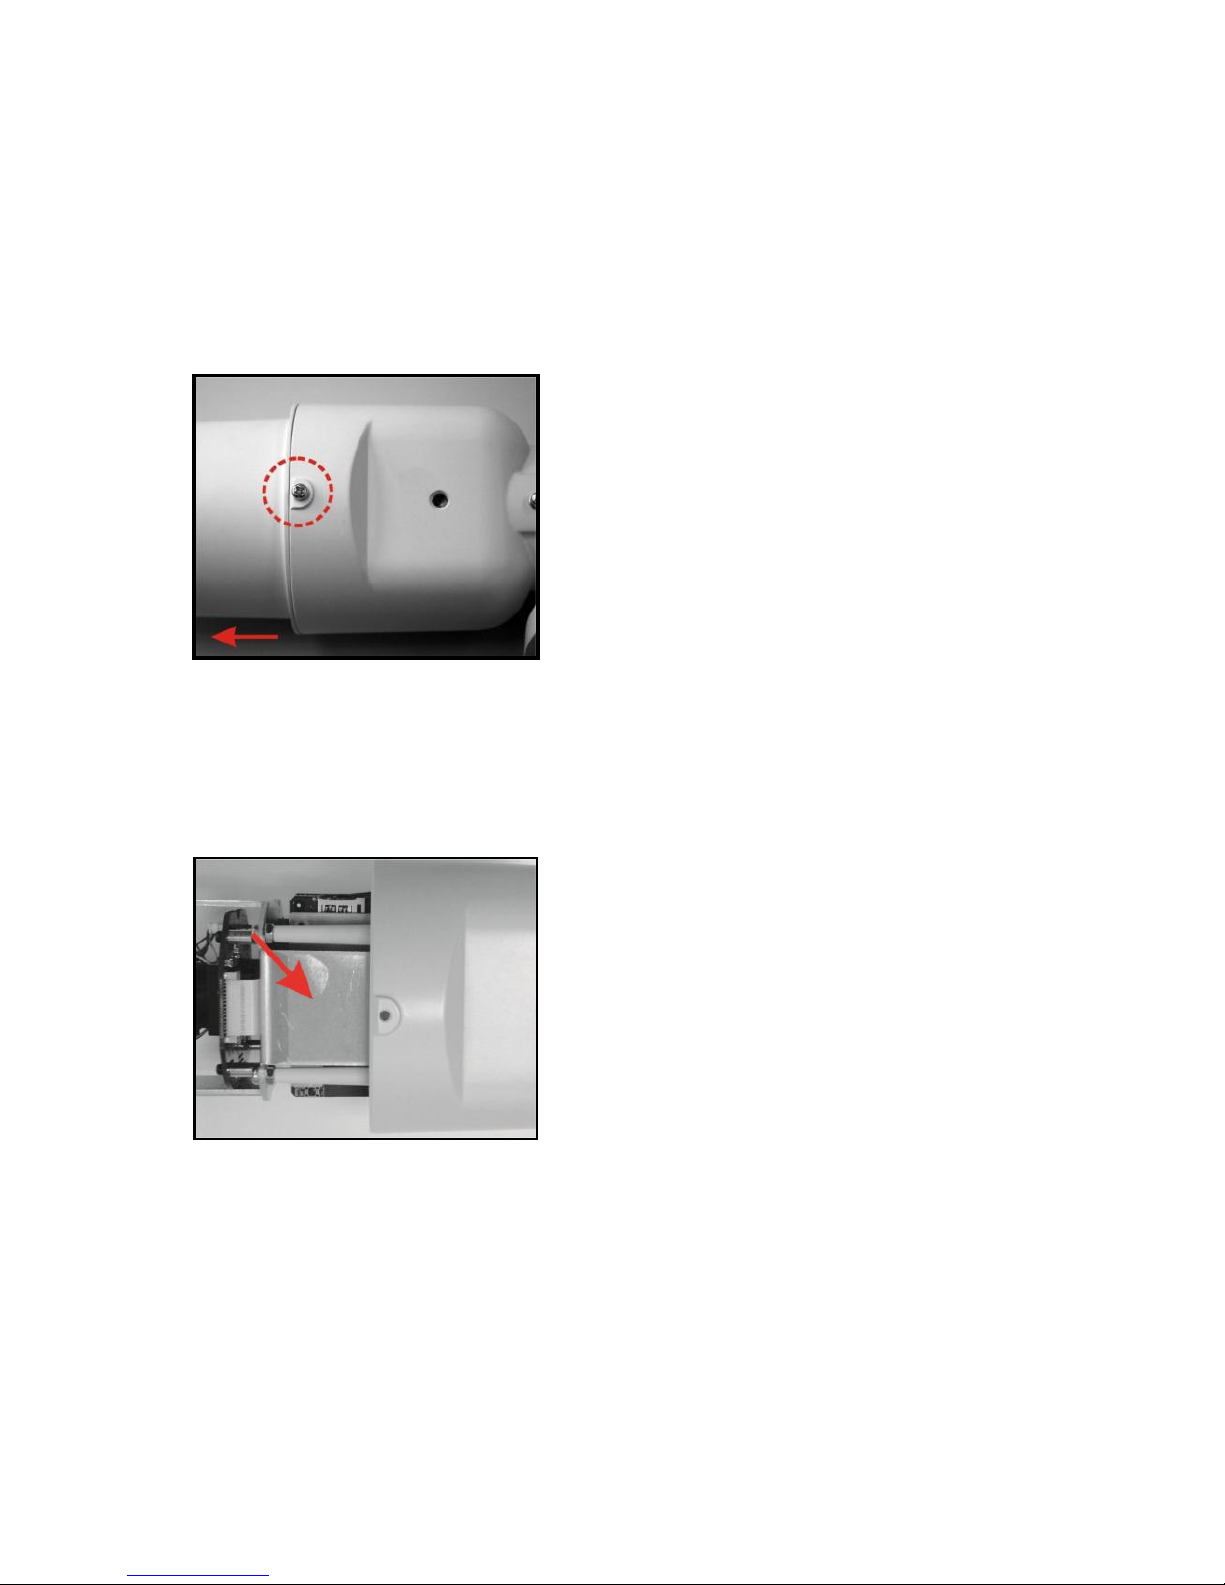
Installing the Desiccant
To prevent condensation on the glass cover of the CM-722, OpenEye recommends
placing the desiccant in the camera before installation and replacing the desiccant each
time the front cover is opened.
1. Unfasten the screw on the camera housing and remove the front cover
2. Carefully tear open the aluminum desiccant envelope and remove the desiccant.
3. Remove paper backing from the adhesive strip on the desiccant packet.
4. Place the desiccant firmly in the position indicated in here.
5. Reinstall the front cover and fasten the screw.

31051AD 17
Read the installation instructions before installing and connecting the IP camera.
Power Connection
Make sure that the camera’s power cable is correctly and firmly connected.
OpenEye recommends against using more than one power source at a
time. Do not use a PoE power source when providing the camera with
12vDC or 24vAC power.
Make sure the camera’s power cable is correctly and firmly connected. If using Power
over Ethernet (PoE), make sure Power Sourcing Equipment (PSE) is in use in the
network.
Ethernet Cable Connection
OpenEye recommends using Category 5 Ethernet cable to connect the camera to your
network. For the best transmission quality, the cable length should not exceed 328 feet
(100 meters). Connect a network cable to the camera using the RJ45 input and connect
the other end of the cable to your network switch or recorder.
If you are connecting the camera directly to a recorder, a crossover cable is
necessary for most configurations.
Check the status of the network connection by looking at the link indicator and activity
indicator LEDs. If the LEDs are not lit check your network connection. The green link LED
indicates a network connection and the orange activity LED flashes to indicate network
activity.
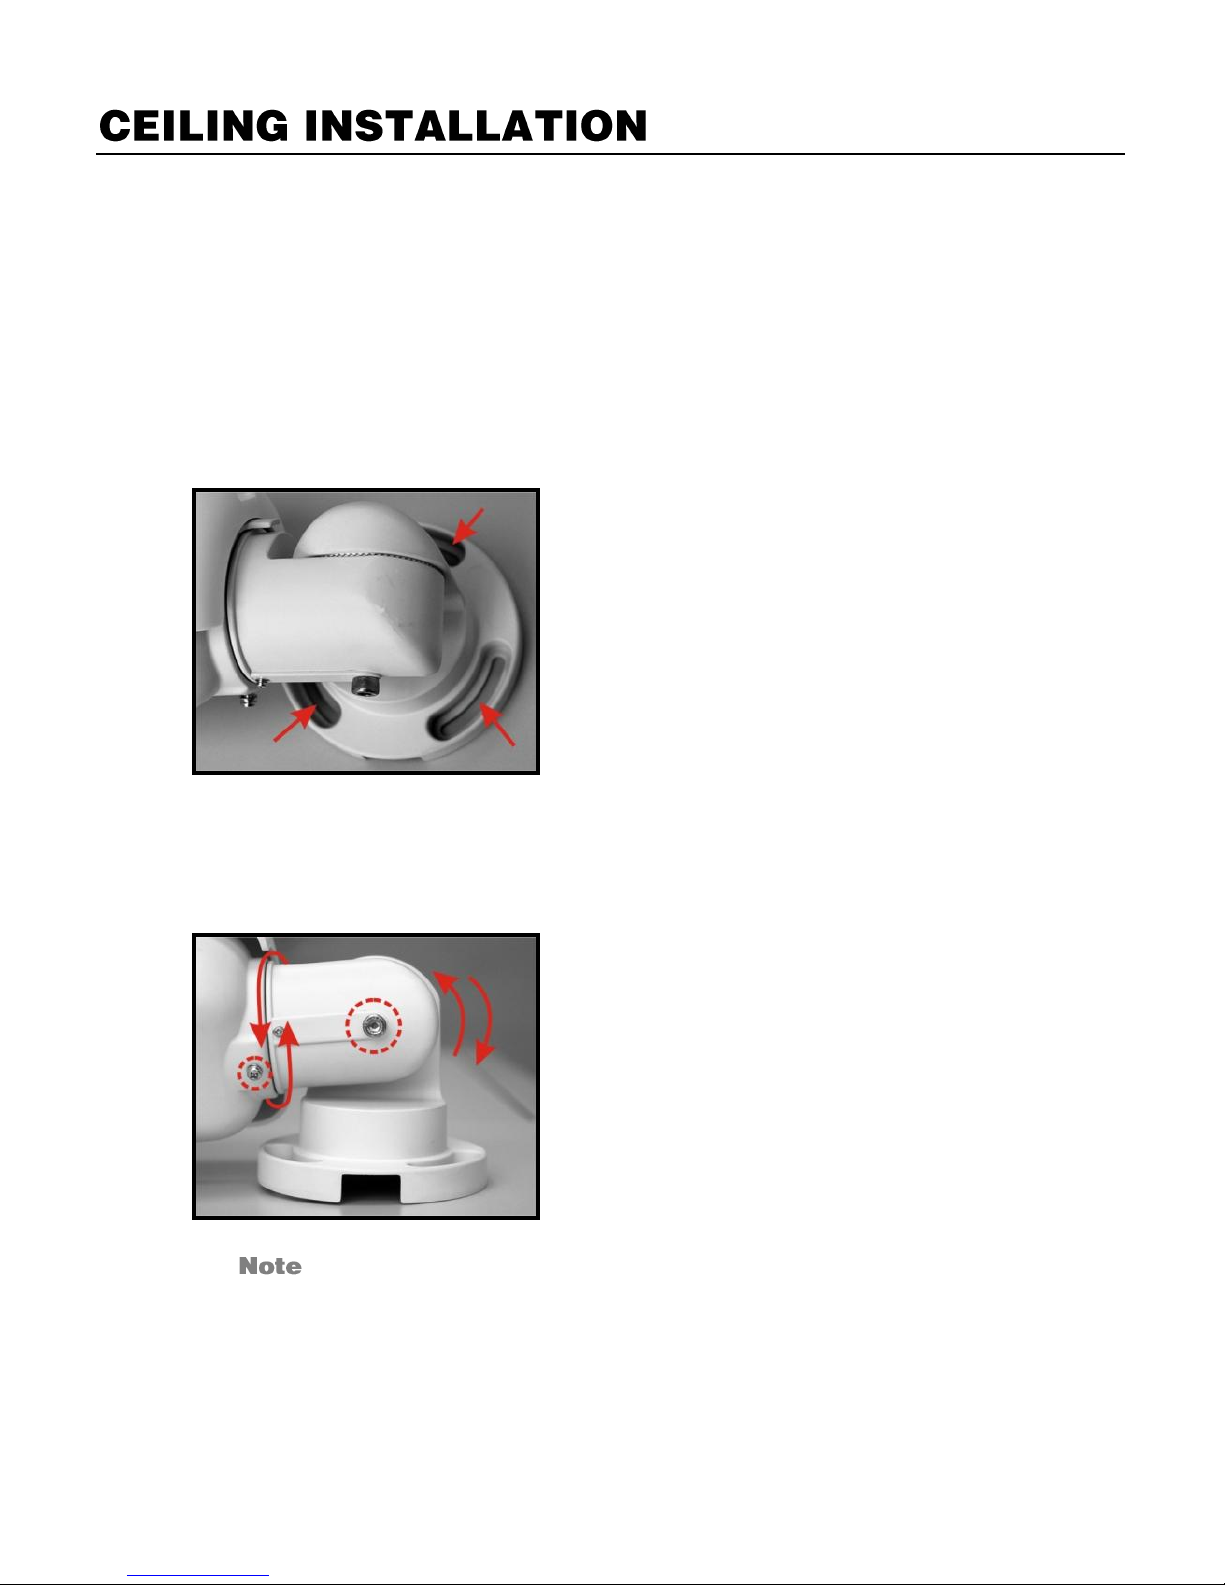
18
The IR Bullet IP Camera can be installed directly on a wall or ceiling provided it has
enough strength to support the camera.
1. Remove the IR Bullet IP Camera from packaging
2. Connect power, Ethernet, Alarm and audio wires from ceiling or wall to the
corresponding connectors of the cameras all-in-one cable.
3. Fix the camera’s bracket on the ceiling or wall with the three supplied self-tapping
screws.
4. Use the supplied inner hex wrench and a Phillips screwdriver to loosen the hex
bolt on the side of the bracket mount and the camera housing to adjust the
position of the camera.
CM-722 cameras are equipped with a seal inside the housing to prevent
moisture from entering. If you have any concerns about moisture entering
the housing or wall through the cable egress , OpenEye recommends
sealing the opening at the wall and at the base of the camera with silicone
caulking.
 Loading...