

Page 1
BRIVO INTEGRATION
ENABLE BRIVO IN WS
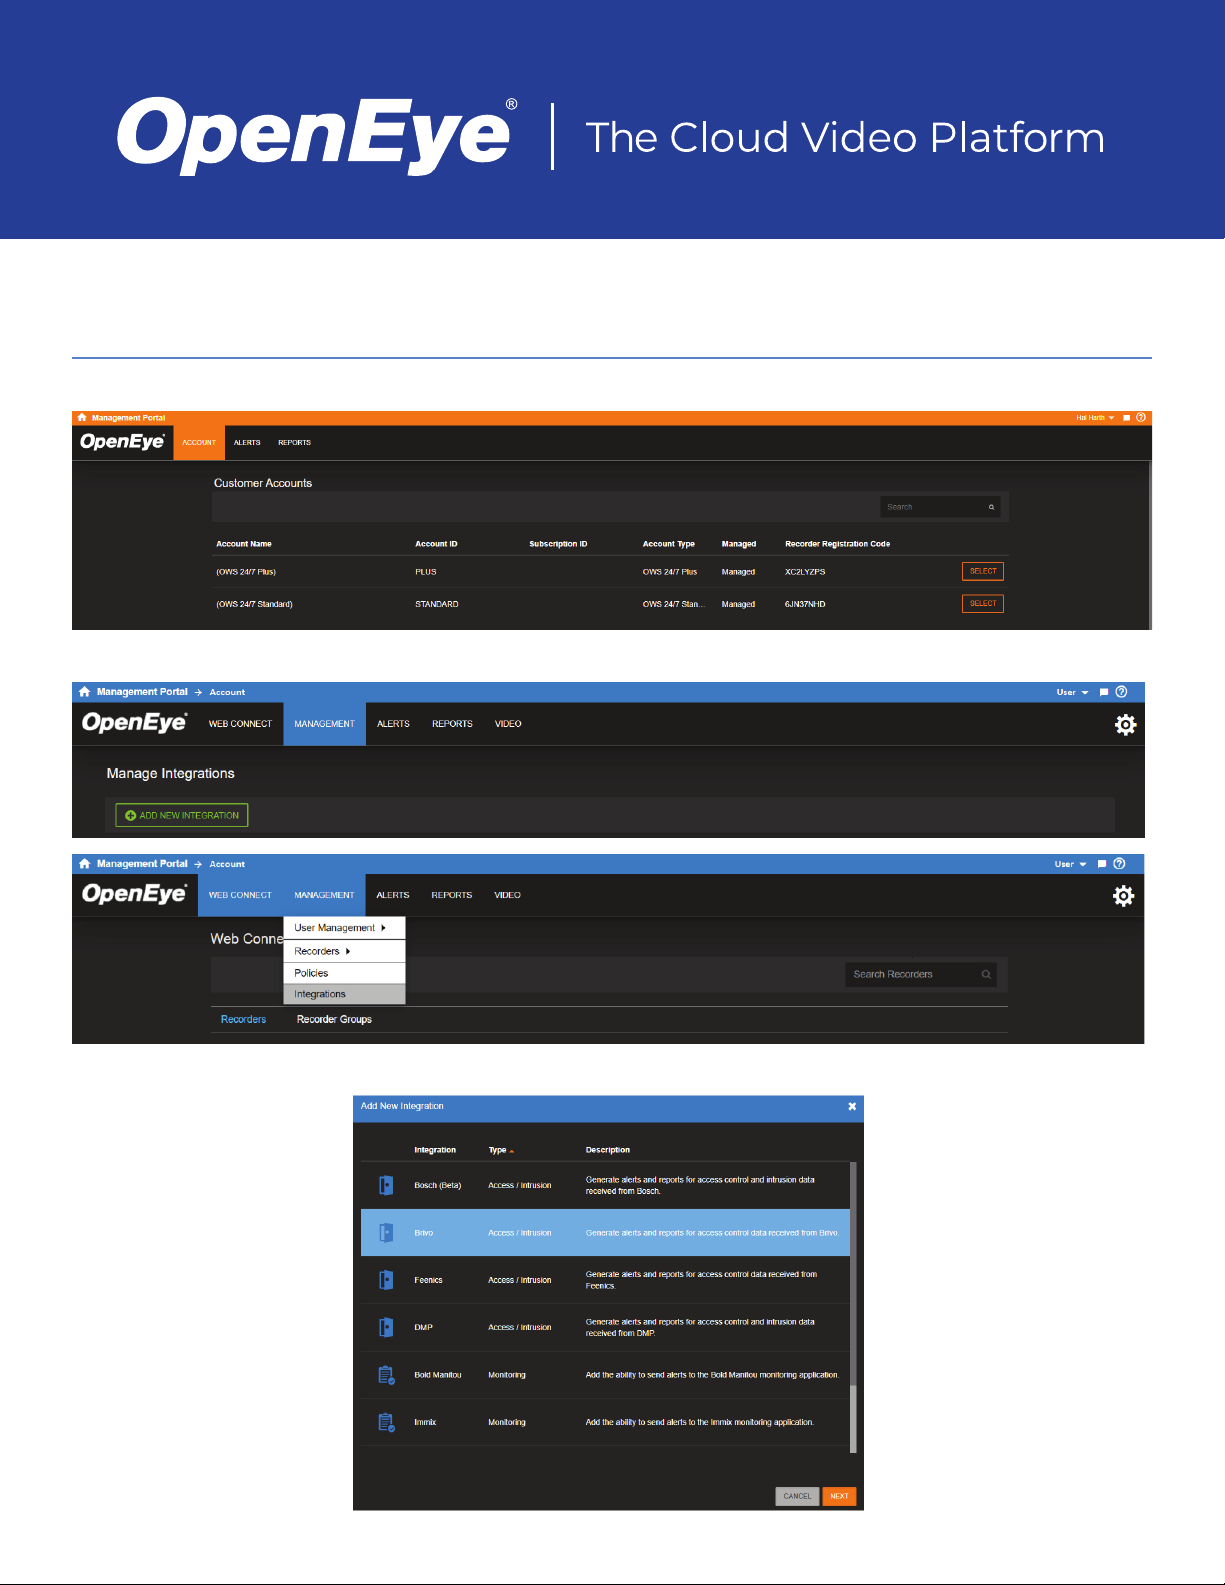
1. After logging in with an OWS account, Select the Account Name you want to enable to inegrate with Brivo.
2. Go to Management > Integrations and click Add New Integration.
3. Choose Brivo and click Next.
Page 2
4. The Brivo Integration will be added to the Manage Integrations list.
5. Click Edit to enable or disable the Brivo Integration in General Settings.
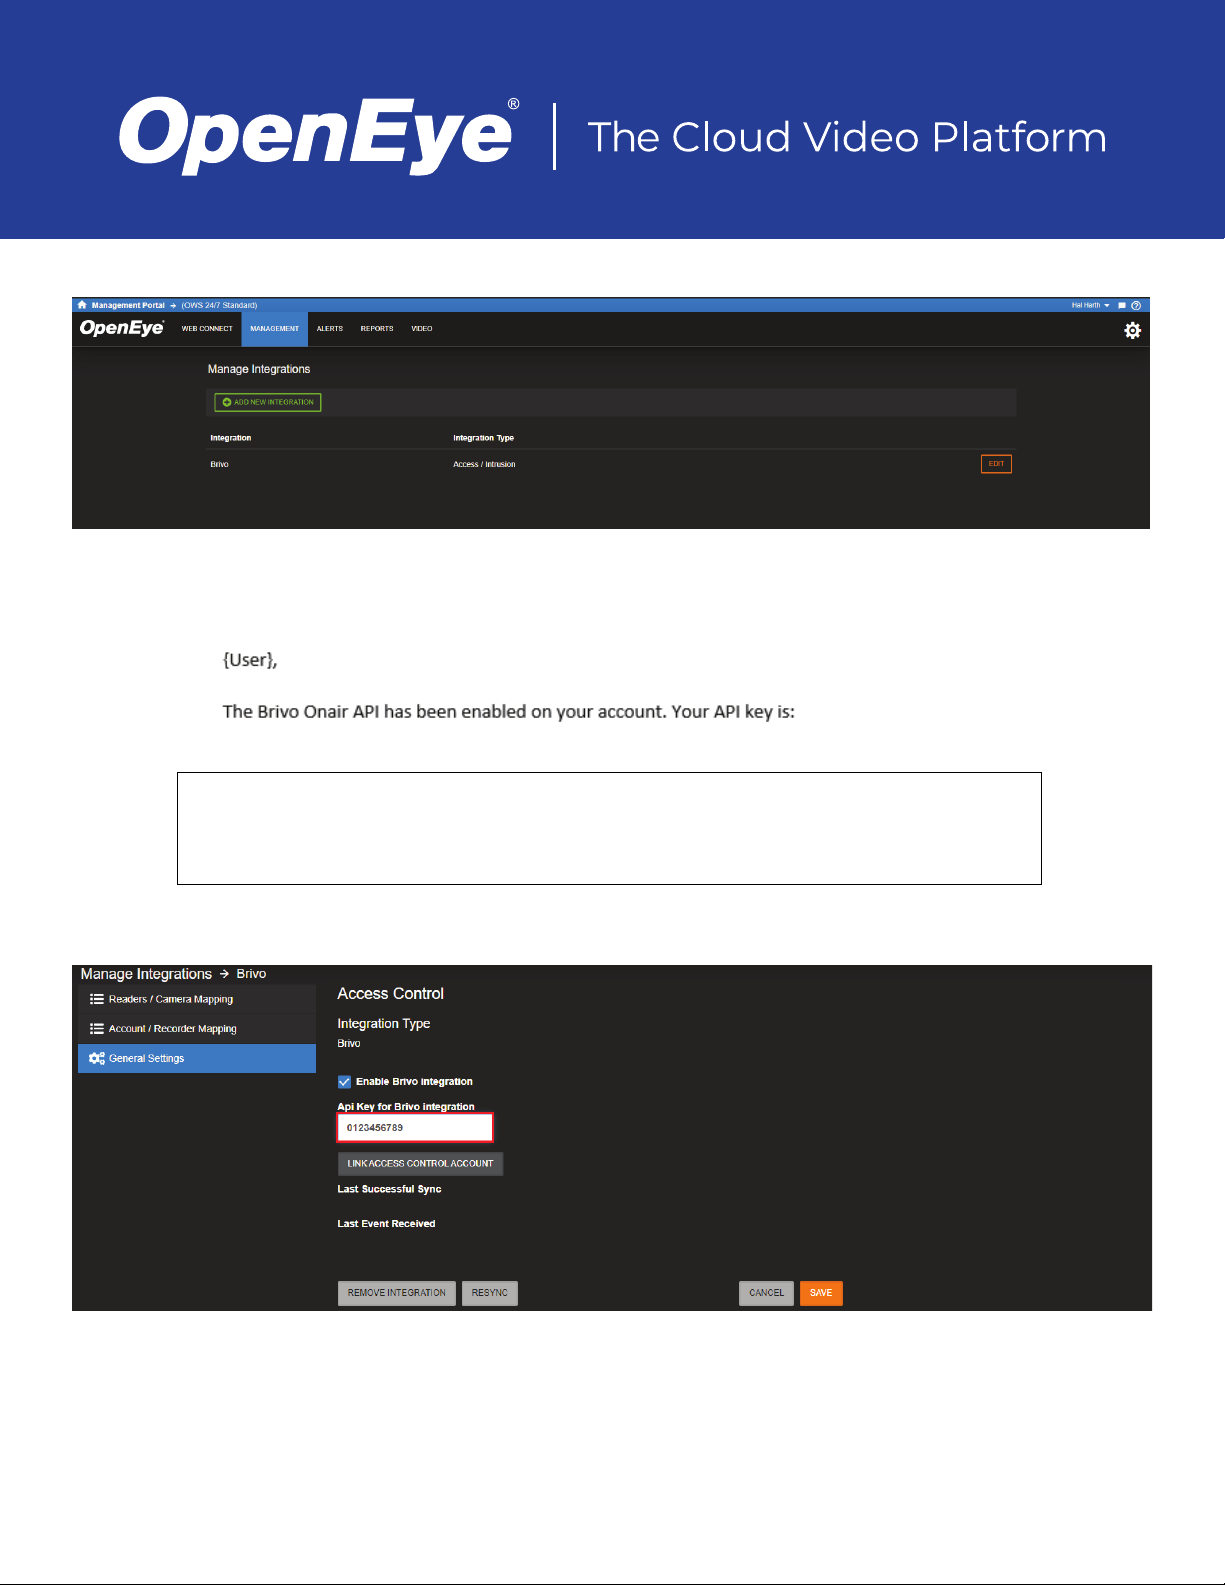
6. Contact your Brivo dealer to recieve an Api Key via email reply.
Note Brivo Onair API usage may carry an additional fee.
Note Brivo grants 100,000 API calls a month.
7. Check Enable Brivo Integration and enter the Api Key for Brivo Integration.
8. Press Link Access Control Account.
Page 3
Note After linking an account, any new devices added to the Brivo system can take 20 minutes
to sync back to OWS.
Note Last Successful Sync shows the last time and date OWS successfully synced with the
linked account.
Note Last Event Received shows the last time and date OWS received an event from the
account.
Note Validate Account manually resends the account credentials to confi rm linking is still valid.
9. Enter your Admin ID Username and Password to Log In.
10. Press Submit to authorize access to the Brivo Onair app.
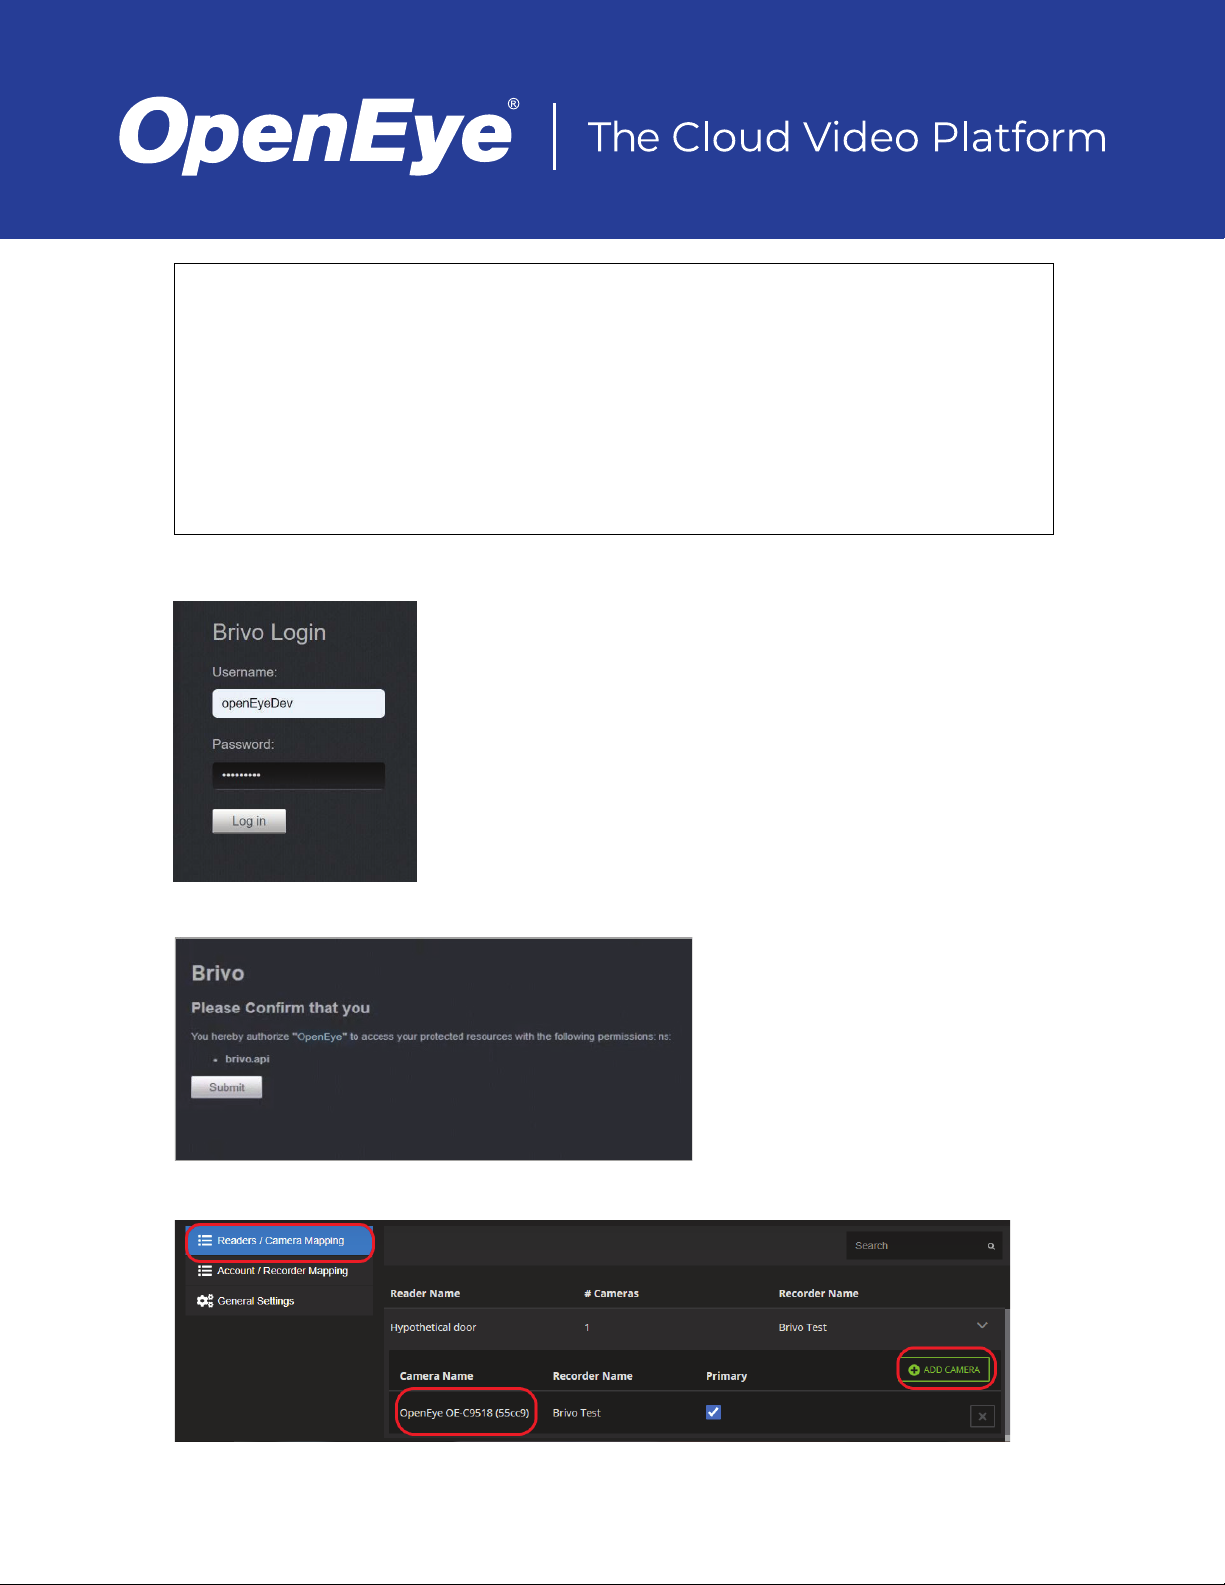
11. Press Readers / Camera Mapping.
Page 4

12. Press Reader.
13. Press Add Camera and select the desired camera to link to the reader.
14. Press Account / Recorder Mapping.
15. Select desired Brivo account.
16. Press Add Recorder and select the recorder to link to the Brivo account.
OWS ALERT CONFIGURATION
CREATE A NEW INTRUSION ALERT RULE
To set up Alerts, select the Alerts option, and then Rules.
1. In Alert Rules select Add New Rule.
2. To create an Alert based on an event from your panel, select an alert type – Door Access or Access Control then click Next.
Access Alerts are alerts based on access control readers. You can generate alerts based on access being granted to an area,
access being denied to an area and door status.
3. Enter a Name and Description, then click Add.
When creating an Alert Rule, Event Types further defi ne the event notifi cation.
Door Access Event Types
Door Opened Includes Card Holder Information
Access Denied Includes Card Holder Information [where applicable]
Late to Arm
Door Access Event Types
Door Forced Open
Door Held Open
Page 5

ADD USERS TO AN ALERT RULE
Note Adding Users to a rule will not automatically grant them permission to view alerts for
cameras and recorders they have access to. Users need to have permission in the
User Group rule ‘View Alerts’. Check the permission under Settings > User Groups > [User
Group Name] Edit > Web Services Permissions > Alerts > View Alerts.
Click Users / Notifi cations on the navigation sidebar.
1. Click Add User or Add Group.
2. Check the box next to each User or User Group who will receive emails and/or push notifi cations when the alert is triggered.
3. Click Add when fi nished.
Note To receive email alerts, push alerts or client alerts, Email Alert, Push Alert or Client Alert
boxes must be checked. Simply adding a user only gives them access to see this
alert’s history.
UPDATING, DISABLING, OR DELETING AN ALERT RULE
1. Click General Info on the navigation sidebar.
2. Edit the Name and Description as desired.
3. Click Disable Rule to turn the Alert Rule off without deleting it.
4. Click Delete Rule to permanently remove the Alert Rule and delete all history associated with it.
5. Click Save when fi nished.
Page 6

ALERT HISTORY
In OWS, select Alerts > History. Here you will fi nd all Alert events created by associated recorders that have rules assigned.
Hovering over the camera icon will show a snapshot of the video clip before viewing it. By selecting view, you will be taken to the
video created by the camera associated with that event.
NOTIFICATIONS
Email alerts and mobile push notifi cations will be sent based on any access control event.
EMAIL ALERTS
Any User or User Group checked to receive email alerts for an event, are notifi ed with Account, Recorder, Camera, Zone, Date and
Time information as well as a thumbnail image and links that allow additional Event monitoring.
Page 7

PUSH NOTIFICATIONS
A User or User Group that have Push Notifi cations enabled in an Alert Rule and have the OpenEye mobile app installed will receive
notifi cations on their mobile device with information, a screenshot, and associated video whenever an alarm condition is detected.
Page 8

BRIVO ONAIR
The same events in OWS are also viewable in the Brivo Onair app Activity Log. The name of some of the events may appear different
between OWS and Onair.
Access Control Event Types
Alert Rule OpenEye Web Services Brivo Onair
Door Access Door Open Open
Door Access Door Open Door Open
Door Access Door Closed Door Closed
Door Access Access Invalid Pin Failed Access Deleted User
Door Access Access Invalid Pin Failed Access Invalid Cred Type
Door Access Access Invalid Pin Failed Access Old Credential
Door Access Access Invalid Pin Failed Access Unassigned Card
Door Access Access Invalid Pin Failed Access Unknown Cred
Door Access Access Invalid Pin Invalid Cred Type By Unk User
Door Access Access Invalid Pin Invalid ND Factor Invalid Card
Door Access Access Invalid Pin Invalid ND Factor Two Cards
Door Access Access Invalid Pin Invalid ND Factor Two PINS
Door Access Access Invalid Pin Invalid ND Factor Unknown Card
Door Access Access Invalid Pin Invalid ND Factor Unknown PIN
Door Access Access Invalid Pin Unknown PIN
Door Access Access Invalid Time Failed Access Out Of Schedule
Door Access Access Invalid Time Failed Access User Not Enabled
Door Access Access Invalid Level Failed Access Unauthorized Door
Access Control Door Held Open Door Open Too Long
Access Control Door Forced Open Unauthorized Door Open
openeye.net
Liberty Lake, WA, USA 99019
1.888.542.1103
Copyright ©2021 OpenEye. All Rights Reserved. Information contained in this document is subject to
change without prior notice. OpenEye does its best to provide accurate information but cannot be held
responsible for typos or mistakes.
37423AF
 Loading...