

Open-E NAS-XSR ENTERPRISE User Manual
Manual (Ver. 3.04) May 11, 2006

1 Before you get started ..............................................................................5
1.1 Content of this package .......................................................................................5
1.2 System requirements............................................................................................5
1.3 Supported clients .................................................................................................5
1.4 Supported network protocols...............................................................................6
1.5 Supported network file protocols .........................................................................6
1.6 Required tools ......................................................................................................6
1.7 Safety precautions................................................................................................6
1.7.1 Personal safety ............................................................................................6
1.7.2 Safety for your data .....................................................................................6
1.7.3 ESD precautions..........................................................................................6
2 Features.....................................................................................................7
2.1 What is NAS ? .......................................................................................................7
2.2 Description of the functions..................................................................................7
2.3 Why Open-E NAS-XSR? .......................................................................................7
2.4 RAID types ............................................................................................................8
3 Hardware installation ................................................................................9
3.1 Getting ready ........................................................................................................9
3.2 Installing Open-E NAS-XSR..................................................................................9
4 Configuration...........................................................................................11
4.1 The basic configuration of the NAS-XSR computer...........................................11
4.2 First-time operation of Open-E NAS-XSR ..........................................................11
4.3 Logging into Open-E NAS-XSR ENTERPRISE...................................................12
4.4 Create Disk Array................................................................................................14
4.5 Adding Disk Array...............................................................................................14
4.6 Creating NAS-XSR shares..................................................................................16
4.6.1 Access to Windows Shares.......................................................................16
4.6.2 Access NAS-XSR Shares under Linux ......................................................22
5 Descriptions of function..........................................................................23
5.1 Functions of the console display........................................................................23
5.2 Functions of Open-E NAS-XSR via browser access..........................................24
5.2.1 Menu “Resources”.....................................................................................24
5.2.1.1 Shares...........................................................................................25
5.2.1.2 User...............................................................................................31
5.2.1.3 Groups..........................................................................................33
5.2.2 Setup..........................................................................................................34
5.2.2.1 Server............................................................................................34
5.2.2.2 Network.........................................................................................43
5.2.2.3 Administrator.................................................................................46
5.2.2.4 Hardware ......................................................................................50
5.2.2.5 Disk Manager................................................................................52
5.2.2.6 GUI................................................................................................56
5.2.3 Maintenance ..............................................................................................57
5.2.3.1 Shutdown......................................................................................57
5.2.3.2 Snapshot.......................................................................................58
5.2.3.3 Resources Miscellaneous.............................................................60
5.2.3.4 Update ..........................................................................................61
5.2.3.5 Backup..........................................................................................62
5.2.3.6 Antivirus ........................................................................................68
5.2.3.7 S.M.A.R.T......................................................................................71
2

5.2.4 Status.........................................................................................................71
5.2.4.1 Network.........................................................................................71
5.2.4.2 Logical Volume .............................................................................72
5.2.4.3 Connections..................................................................................73
5.2.4.4 Hardware ......................................................................................73
5.2.4.5 S.M.A.R.T......................................................................................75
5.2.5 Raid | FC ...................................................................................................78
5.2.5.1 H/W Raid.......................................................................................78
5.2.5.2 Fibre Channel ...............................................................................79
5.2.5.3 S/W RAID ......................................................................................80
5.2.5.4 S/W Initiator iSCSI.........................................................................84
5.2.6 Help............................................................................................................84
6 Troubleshooting Guide ...........................................................................86
7 Appendix A ..............................................................................................90
8 Appendix B..............................................................................................92
3

Copyright
(c) 2004 Open-E GmbH. All rights reserved. No part of this publication may be reproduced,
stored in a retrieval system, or transmitted in any form, by any means, electronic,
mechanical, photocopying, recording or otherwise, without the prior written consent of
Open-E GmbH, Lindberghstr. 5, 82178 Puchheim, Germany.
Trademarks
Open-E and Open-E NAS-ENTERPRISE logos are all registered trademarks of Open-E
GmbH. Windows ((R)), Microsoft ((R)) and Apple ((R)) are registered trademarks in the
United States and other countries. Pentium ((R)) and Intel ((R)) are registered trademarks in
the United States and other countries. All other trademarks herein are property of their
respective owners.
Disclaimer
Open-E GmbH assumes no responsibility for errors or omissions in this document, and
Open-E GmbH does not make any commitment to update the information contained
herein.
4

1 Before you get started
Congratulations on purchasing Open-E NAS-XSR ENTERPRISE, the ideal solution for
network-based storage management. This manual will assist you as you install and
configure the hardware.
In order to quickly reach the desired configuration, please read the following pages
thoroughly. The time invested is well spent - after all, you have purchased this solution
for your invaluable data.
1.1 Content of this package
Before you begin installing Open-E NAS-XSR ENTERPRISE, make sure that the
package contains the following items:
• Open-E NAS-XSR flash module,
• Power adapter,
• Quick Start brochure,
• A CD containing the manual (this document), brochures, images and additional
information material,
• Source CD.
If something is missing, please contact your dealer.
5
1.2 System requirements
• x86-compatible PC (Pentium III or better),
• at least 512 MB main memory,
• IDE port,
• One or several suitable hard drives,
• Network Interface Card (NIC),
• Optionally hardware Raid controller.
Open-E NAS-XSR ENTERPRISE contains its own operating system no additional
software is required.
In order to generate maximum performance, we recommend using a network
card with 100 MBit/s or more, as well as a processor with at least 1 GHz. If
several computers are accessing the NAS-XSR system, we recommend 256
MB main memory or more.
1.3 Supported clients
• Microsoft Windows (all versions)
• Linux
• Mac OS 8.0, 9.0 and OS X

1.4 Supported network protocols
• TCP/IP
• NetBEUI
• SNMP
1.5 Supported network file protocols
• SMB / CIFS / Samba
• Apple Talk
• FTP/sFTP
1.6 Required tools
• Grounding strap or mat in order to avoid electrostatic discharge (ESD)
• Tools for opening the computer’s enclosure (typically, a screwdriver)
6
1.7 Safety precautions
1.7.1 Personal safety
High voltages may occur inside computer equipment. Before removing
the enclosure, please turn off the power switch and disconnect the
power cords.
1.7.2 Safety for your data
If you are not using new hard drives for operating Open-E NAS-XSR, please backup
all important data prior to installation. Adding a hard drive to Open-E NAS-XSR goes
hand in hand with complete formatting of the hard drive, which can possibly delete
existing data.
1.7.3 ESD precautions
In order to avoid damage to your computer or to Open-E NAS-XSR, please ensure
you are grounded before opening the PC or the ESD package that contains Open-E
NAS-XSR. Using grounding straps or mats is the best way to ensure this safety. If
you don’t have grounding equipment handy, please make sure you are grounded
before working with Open-E NAS-XSR, for instance, by touching a heater.
• Avoid unnecessary touching of the components inside the PC,
• Please touch Open-E NAS-XSR only on the edges.

2 Features
2.1 What is NAS ?
Network Attached Storage (NAS) solutions are defined as storage systems that are
directly hooked up to a network infrastructure. Also, they operate independently and
do not have to be connected to a server via a controller or host adapter. The term
“storage” here generally refers to all systems that either provide data storage or
actually store or organize data. Currently, data storage is the most common and most
widespread type of NAS systems.
NAS solutions are based on a separate operating system (and often also on special
hardware), which operates independently from the servers on a network. Typically, this
operating system is software that is optimized for providing data (file server).
NAS solutions allow users to add additional storage to existing networks quickly,
easily, and cost-efficiently.
7
2.2 Description of the functions
Open-E NAS-XSR is one of the easiest ways of implementing an NAS-XSR server in
your network. Through its simple architecture – in principal, it is a flash memory with
an IDE interface and Open-E NAS-XSR as its operating system – Open-E NAS-XSR
can be used with all x86 PCs containing an IDE controller and additional SATA
Controller on your main board or hardware controller.
To start working with Open-E NAS-XSR, all you need to do is assign an IP address to
the NAS server – either automatically through an existing DHCP server or by assigning
it manually. All other settings are handled via a web front-end which can be easily
accessed through the IP address of Open-E NAS-XSR using the encrypted https
protocol.
Open-E NAS-XSR allows users to create so-called shares (i.e., resources within a
network that numerous users or user groups have certain access too). The access
rights to the shares are controlled through the user and user group settings.
2.3 Why Open-E NAS-XSR?
Often, storage in network environments is expanded the following way: File servers
have to be shut down in order to install additional drives. In the next step, they need to
be reconfigured. In is tedious work data often has to be copied manually onto larger
drives, consuming a lot of time and money.
With Open-E NAS-XSR, you can add storage to your existing network quickly, easily,
and, most important, cost-efficiently. Expensive hardware is, therefore, no longer
necessary. Take any computer – a new rack server or an old desktop PC – and

exchange the system drive for the Open-E NAS-XSR flash module. To store data,
Open-E NAS-XSR uses IDE (ATA) and SATA hard drives, connected to ports on your
main board or hardware RAID controller.
Additionally NAS-XSR support software RAID, so you can create software RAID over
single hard drives or over existing hardware RAIDs.
For example, you can create software mirror over two hardware RAID5 for very high
reliability.
Within a few minutes, you will have up to several hundred gigabytes available on your
network – without much effort and any downtime.
2.4 RAID types
This manual is not intended to replace your RAID controller manual. But we want to
provide you with an overview of common RAID types so that you can make an
informed decision on which type to choose. Depending on whom you ask, RAID
means either Redundant Array of Independent Disks or Redundant Array of
Inexpensive Disks. Both are correct. In essence, you combine the capacity, speed and
security of several disks into one.
RAID 0 forms one large hard disk by concatenating stripes from each member drive.
Stripe size is configurable roughly between 64 KB and 1 MB. The result is a lightningfast RAID, but with no added security. One failing drive may ruin the entire RAID.
RAID 1 mirrors hard drives. By writing identical data onto more than one drive,
security is enhanced. A completely defective drive does not cause any loss of data.
The drawback is reduced performance and capacity.
RAID 5 combines data striping from RAID 0 with parity checking, therefore combining
speed and improved security. The loss of one drive is tolerable.
RAID 6 extends RAID 5 by adding an additional parity block, thus it uses block-level
striping with two parity blocks distributed across all member disks. It was not one of
the original RAID levels. The user capacity of a RAID 6 array is N-2, where N is the
total number of drives in the array. RAID 6 does not have a performance penalty for
read operations, but it does have a performance penalty on write operations due to
the overhead associated with the additional parity calculations.
RAID 10 is a combination of RAID 1 and 0, hence the name. Data is written in a
striped and mirrored configuration, providing high performance and robust security.
8
3 Hardware installation
3.1 Getting ready
Switch off the computer, remove the power supply, and open the PC's enclosure. In
tower cases, the side parts often can be removed individually (on the backside of the
enclosure you just need to remove a few screws). Many machines have U- or O
shaped covers that have to be pulled off (either towards the front or the back). Should
you need any assistance, please contact your dealer.
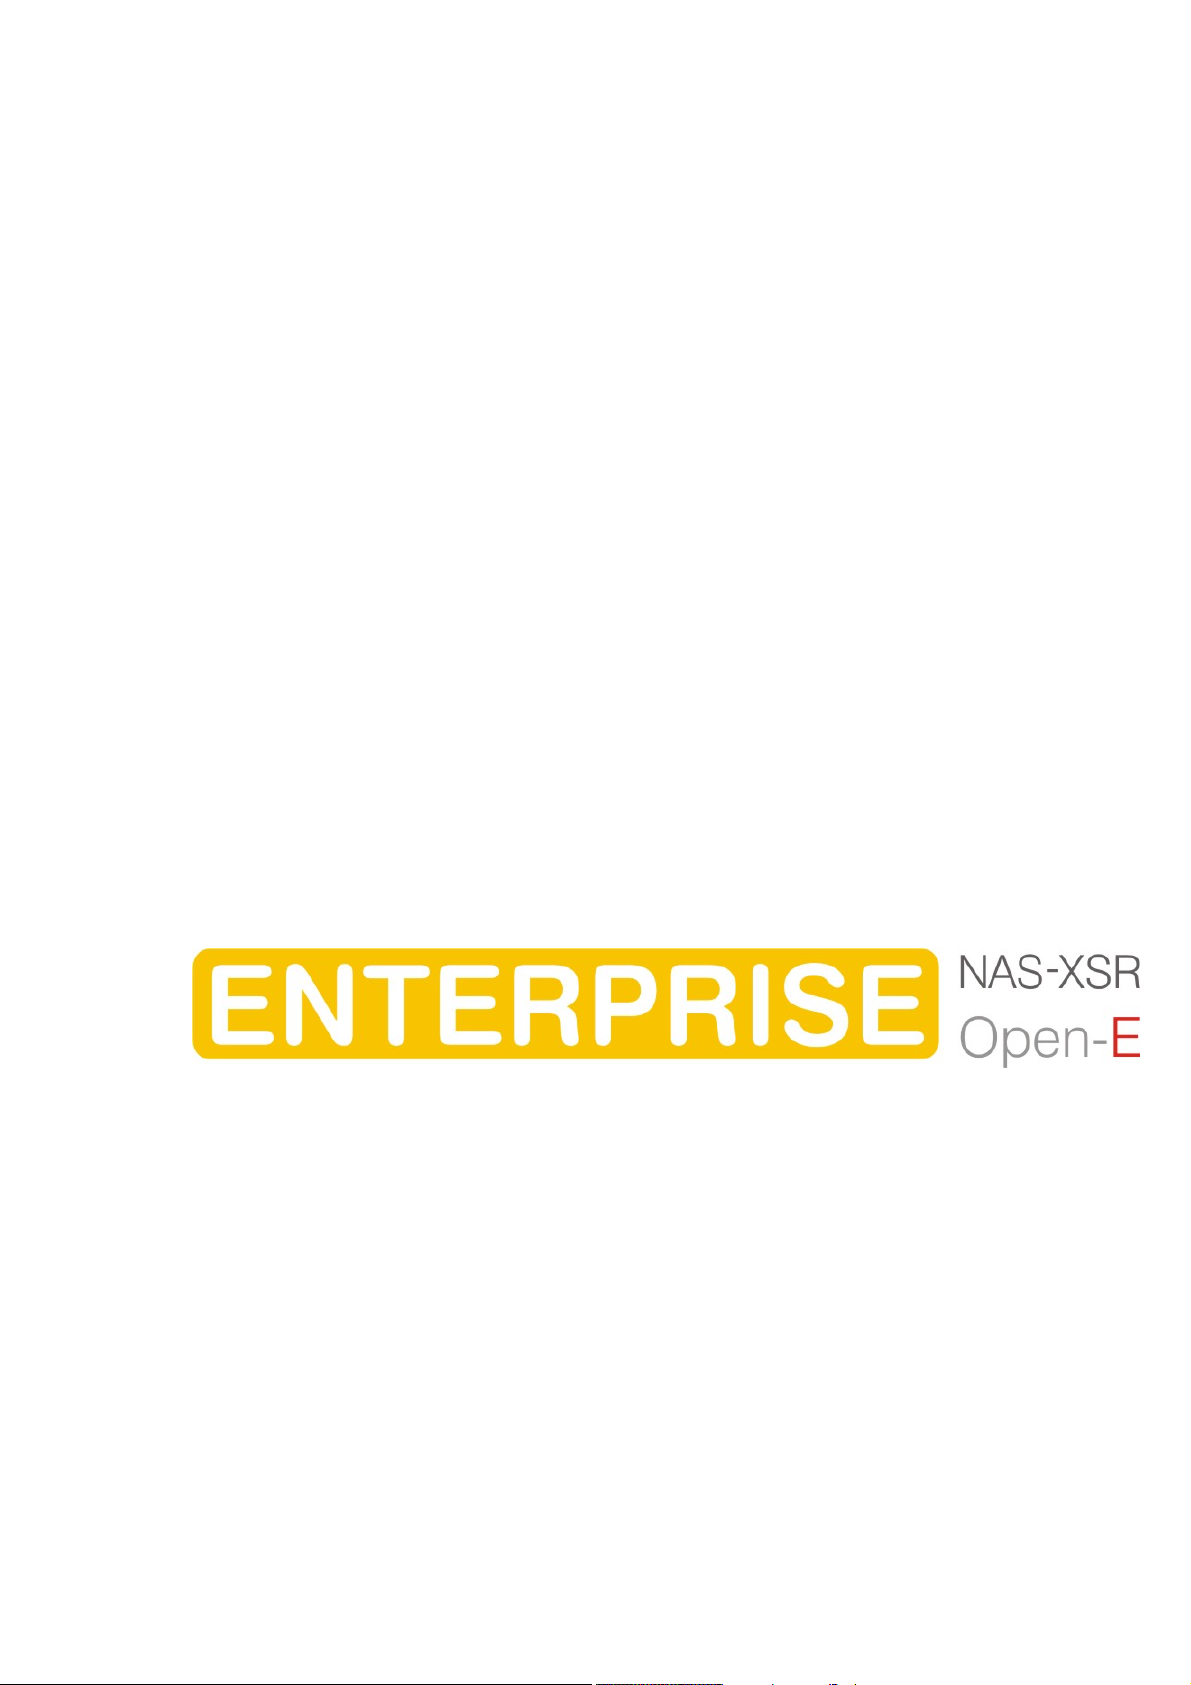
Now localize the IDE connectors on your motherboard:
9
Every motherboard has at least two such ports. To install Open-E NAS-XSR, you have
to use the first (primary) port.
Often, the labeling on the IDE connectors may be tiny, but it is always there, on each
and every board. Preferably look for “IDE 0” If this connector does not exist, the first
port is called “IDE 1” (with the second connector being 2).
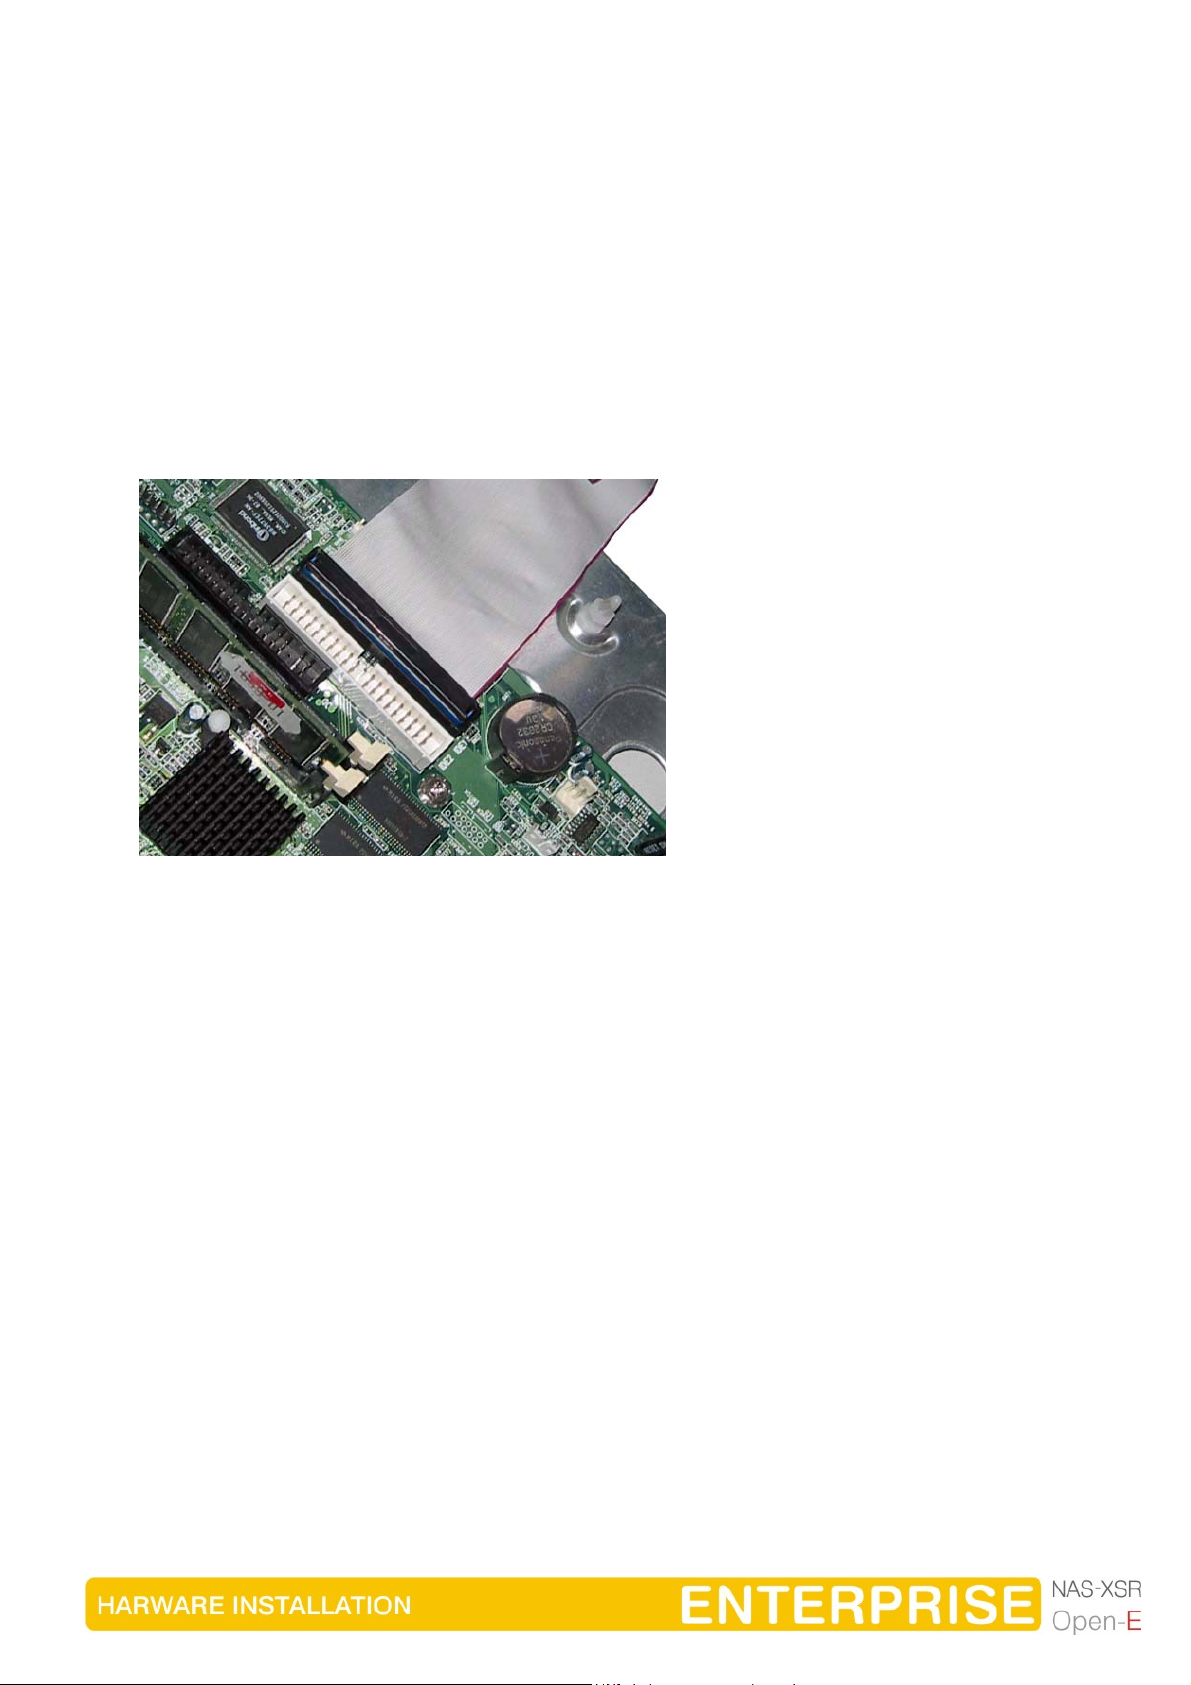
3.2 Installing Open-E NAS-XSR
If necessary, remove the flat band cable that connects your hard drive with the
controller. Open-E NAS-XSR should now carefully inserted into the connector. As IDE
ports can have a notch on one side, you can only insert the connector at the preset
position.
10
In the package you will find an adapter cable which provides Open-E NAS-XSR with
power. The little white plug corresponds with the matching connector on Open-E NASXSR. As a final step, the adapter has to be connected to the white power-supply plug
(see photo):
That should conclude the installation! Before putting the enclosure on your computer
again, do not forget to connect your hard drives to the IDE second connector, SATA
connector or to the SATA port on the RAID controller. If you have a CD or DVD drive,
you can remove it, as Open-E NAS-XSR does not support optical hard drives, but if
you want to make an ISO update it is not necessary to remove the CD drives (see
5.2.3.4)
4 Configuration
4.1 The basic configuration of the NAS-XSR computer
Connect your keyboard and a monitor to the NAS-XSR computer. You will only need
those devices for the basic configuration or extended maintenance configuration.
You may have to change the function “Halt On: All Errors” in your PC's BIOS,
so that the system starts even without the keyboard. The correct configuration
is “Halt On: All But Keyboard.”
4.2 First-time operation of Open-E NAS-XSR
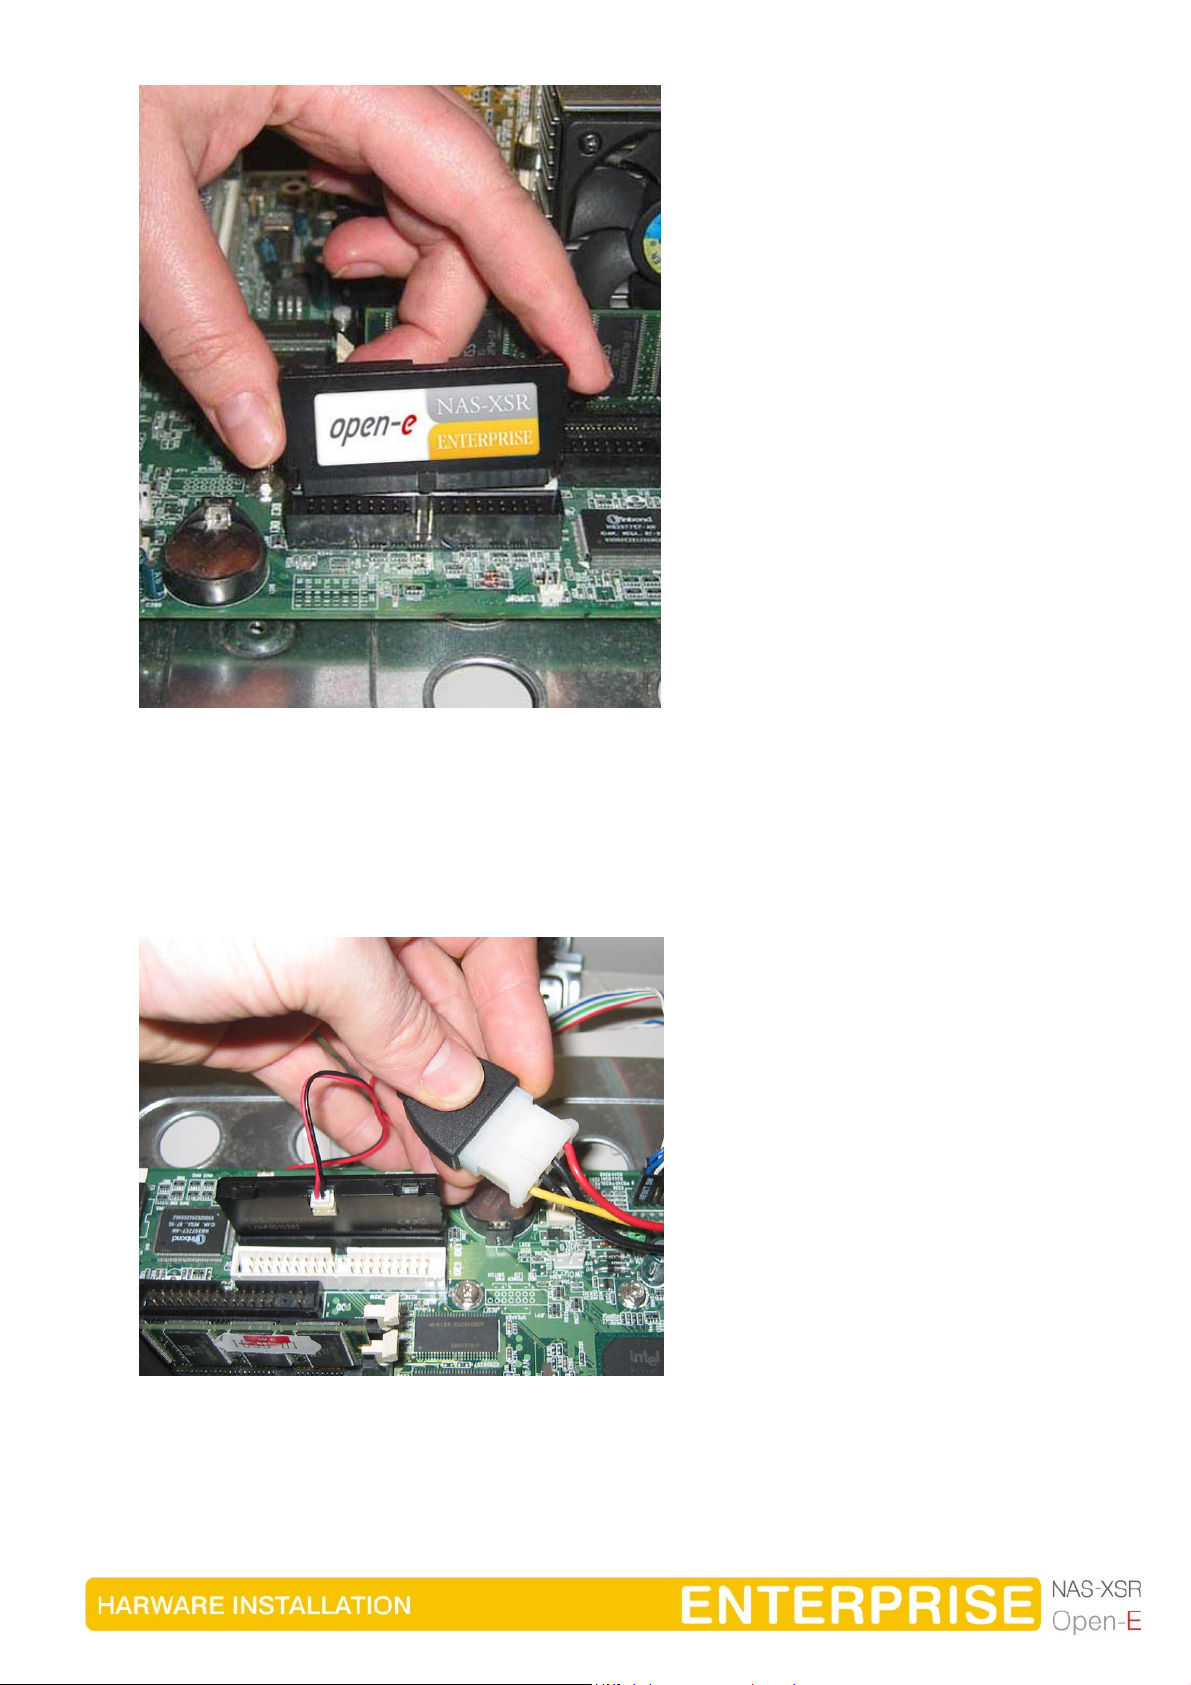
Now start your system.
11
After booting is complete, Open-E NAS-XSR will provide you with information on the
current software version and the network settings:
Welcome to Open-E NAS-XSR Press F1 for Help)
-----------------------
Model: Open-E NAS-XSR ENTERPRISE
Version: 3.04.XE00000000.1855
Release date: 2006-05-11
S/N: 1357186427
Network settings:
Interface 1: eth0 IP: 192.168.0.220/255.255.255.0
Interface 2: eth1 IP: 192.168.1.220/255.255.255.0
HTTPS settings:
Port: 443
Allow from: all

If the network has a DHCP server, Open-E NAS-XSR should gain access to the IP
settings automatically. If that is the case, you can proceed at 4.3. If your network does
not have a DHCP server, Open-E NAS-XSR will start with the default settings: IP
address 192.168.0.220 and subnet mask 255.255.255.0.
You can change these values again by typing in the following key combination: left
CTRL, left ALT and N. You can select a different IP address now. All other available
functions on of the console will appear after pressing F1 key (see below).
−−−−−−−−−−−−−−−−−−−−−−−−−−−−−−−−−−−−− Ηelp −−−−−−−−−−−−−−−−−−−−−−−−−−−−−−−−−−
You can use below key sequences (C-means ‘Left Ctrl’,A-‘Left Alt’)
C-A-N – to edit static IP addresses
C-A-P – to restore default factory administrator settings
C-A-I – to restore default factory IP configuration
C-A-T – to run Console Tools
C-A-X – to run Extended Tools
C-A-W – to run Hardware Configuration
C-A-H – to display hardware and drivers info
F2 - to display all network interface
F5 – to refresh console info
C-A-S – to shutdown the system
−−−−−−−−−−−−−−−−−−−−−−−−−−−−−−−−−−−−−−−−−−−−−−−−−−−−−−−−−−−−−−−−−−−−−− (100 %) −−−
< EXIT >
−−−−−−−−−−−−−−−−−−−−−−−−−−−−−−−−−−−−−−−−−−−−−−−−−−−−−−−−−−−−−−−−−−−−−−−−−−−−−−−−
12
After a connection has been established, all settings can also be changed remotely
via the web browser. If your network requires it, the address of the standard gateway
and the broadcast address can be changed.
For additional information, please read the chapter “Functions of the console
display.”
4.3 Logging into Open-E NAS-XSR ENTERPRISE
You can establish a connection to Open-E NAS-XSR from every network computer. To
establish this connection, use a browser (e.g. Microsoft Internet Explorer) and enter
the IP address or the name of the computer hosting the NAS-XSR server into the URL
entry line: https://192.168.0.220 (standard address) or https://ancom (this name can
be changed in the installation of Open-E NAS-XSR).
You will now be asked for verification of the encryption certification. Since Open-E
NAS-XSR does not allow for creating shares on the Internet but only on the Intranet,
there is no need for global certification by an authorized body. You can accept the
certificate for the session only, but also for all future use.
Now you have to accept the license in order to use the Open-E software and you can
choose the language you want to use.
For security reasons, Open-E NAS-XSR uses the encrypted SSL protocol
(https).
Page with the software agreement and available language option will be
shown after first launching Open-E NAS-XSR. Later you can change the
language you can change using Language Settings, which are located in
“server” through “setup”.
After accepting License agreement you can log into Open-E NAS-XSR using the
standard password “ancom” (this can be changed later). In order to start working,
you can now set all parameters.
13
Password checking is case-sensitive. If you cannot log into Open-E NAS-
XSR, please check the status of the Shift and Caps Lock keys.
In case your web browser will show something different then expected,
please delete the cache & cookies in settings menu of your web browser.
4.4 Create Disk Array
Use the RAID manager to build a disk array, when a hardware RAID controller is
installed in Open-E NAS-XSR. To create disk arrays utilize 3ware RAID manager (3DM
or 3DM2) in case of RAID controllers series 7000/8000/9000. Use an ICP console for
INTEL/ICP Vortex RAID controllers. For any additional information refer to a RAID
controller user manual.
In case you want use software RAID with single drives or even with installed hardware
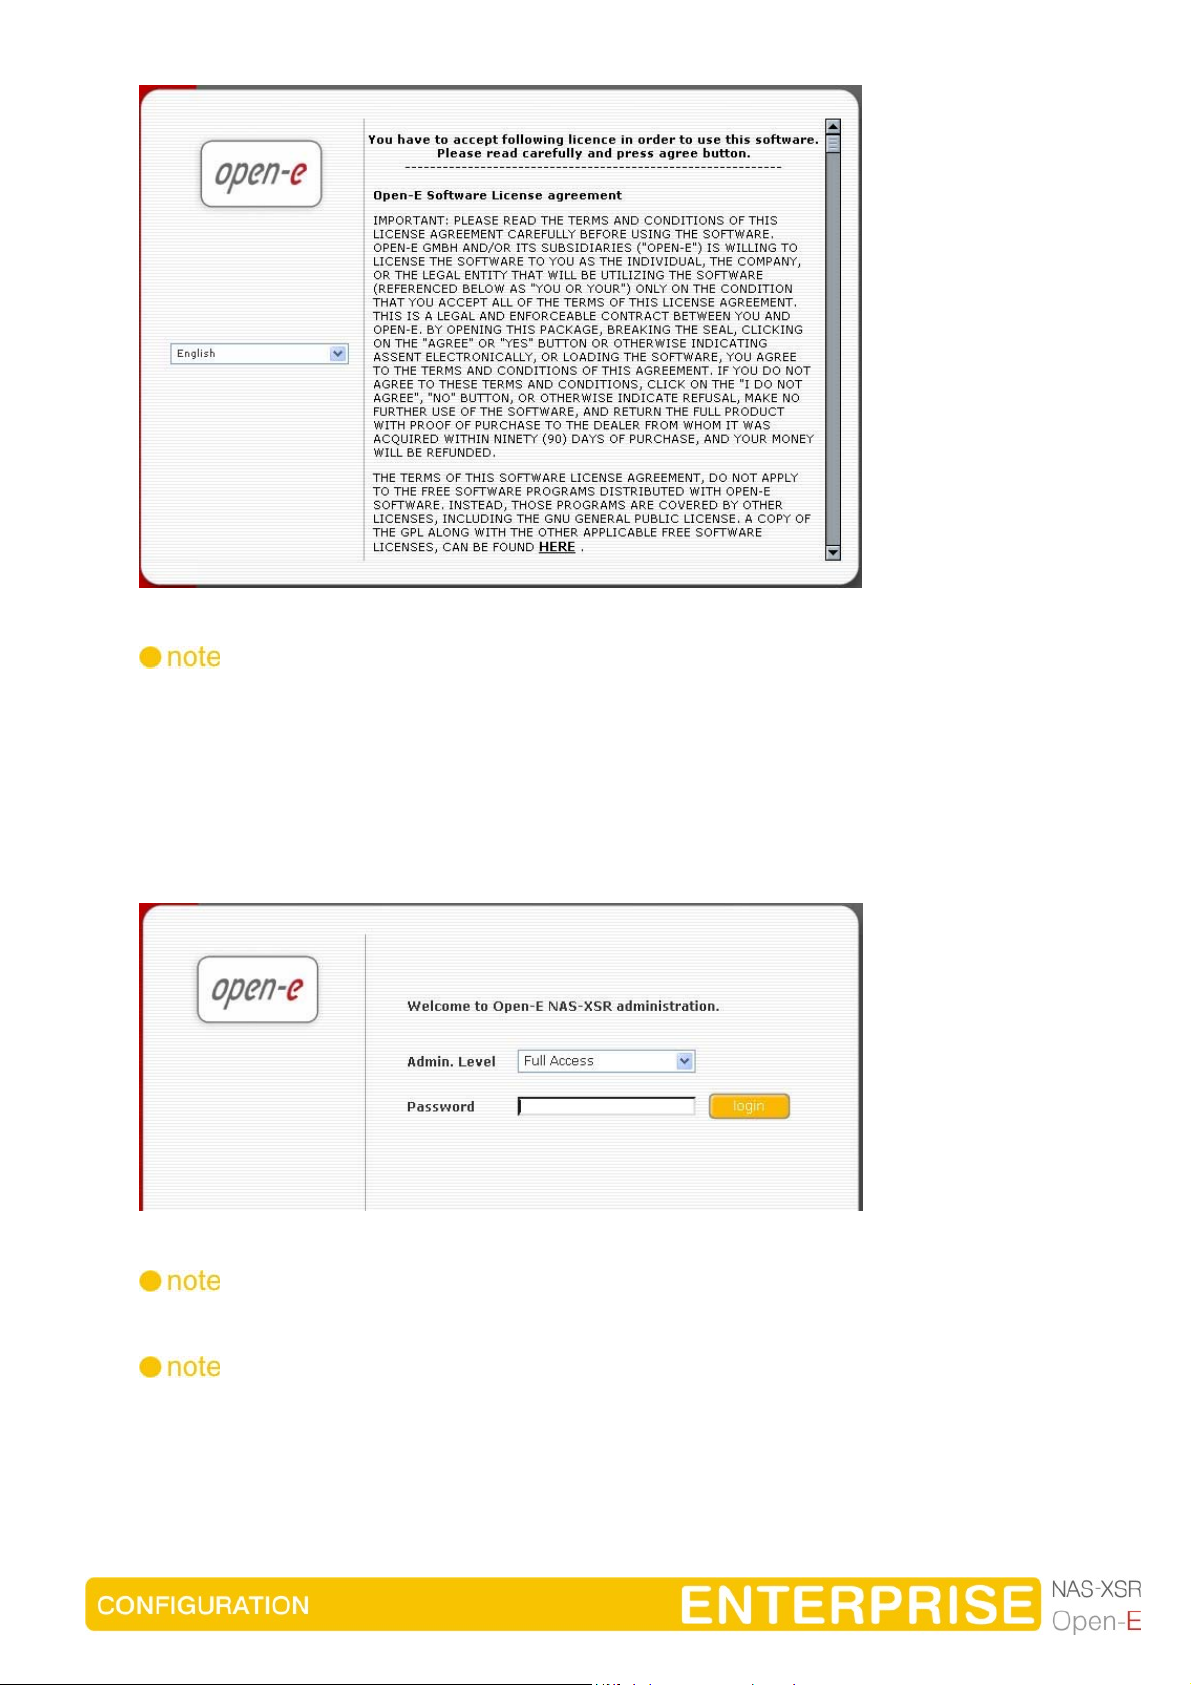
RAIDs, please go to menu “RAID|FC” Æ “SW/RAID” first.
You will find the list of available units. A unit can be a single hard disk or disk arrays in
case you have hardware RAID in the system.
Software RAID can be created with single hard disks or hardware disk arrays
accordingly.
To create software RAID, please select units, choose the RAID level and click on
create button.
14
After clicking “create” button, the status will change to “in use” with additional
information describing the kind of a disk array (e.g. MD0 is RAID 0)
4.5 Adding Disk Array
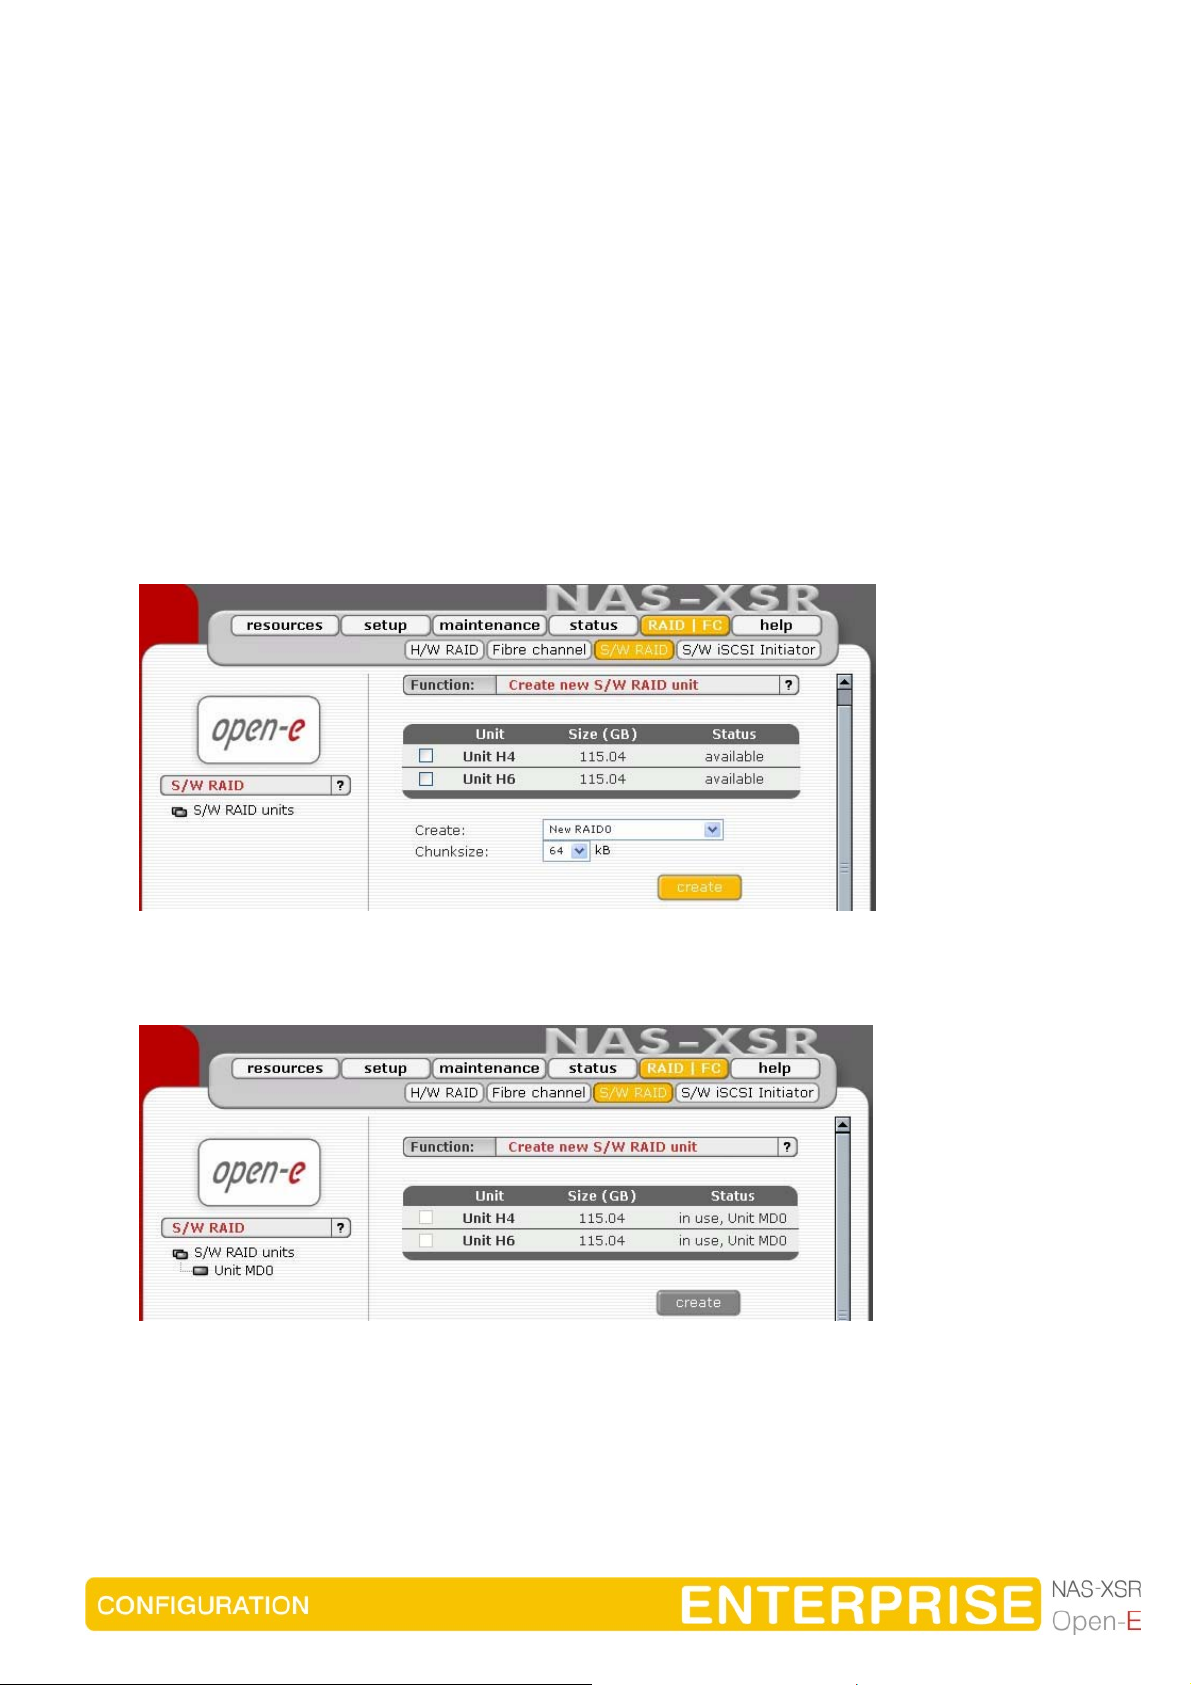
Please select the “Setup” and then the “Disk Manager”. After selecting the “Disk
Manager” you will find a list of all logical units (i.e. RAID array). To add a new unit to
the NAS-XSR, please click “Add” button. After a necessary formatting procedure, the
status of the unit will change from the “Add” button into “In use”.
It is also possible to combine two (or more) units into one Volume Group by choosing
one of actually existing groups like “vg0”, or by choosing “new” option which will
create new group “vg1” after using “add” button.
Please note that you can expand the storage capacity by adding new RAID arrays. In
the “Unit Manager” Open-E NAS-XSR will show both ‘In use’ and new unformatted
units.
15
Next, with use of function “Logical Volume Manager” you can add disk volume to a
new LV, or increase size of existing LV’s (you can’t decrease LV size). To set needed
LV size just use scrollbar, next to which, on the right side is shown size available to
use. This function can be also used to reserve disk space for “swap” and
“snapshots”. Usually for “snapshots” you need about 10% of new Logical Volume.
4.6 Creating NAS-XSR shares
In the menu, please select “Setup,” followed by “server.” Here, you select the type of
authentication. In smaller networks, this should be done via the used workgroup
name, which has to correspond with the workgroup name of the client PC.
16
In the menu “Resources,” select “Shares” on the right-hand side of the tree diagram.
Now create the first share.
The workgroup/domain name that was configured in Open-E NAS-XSR has
to match with the network settings. Otherwise, the configured shares are not
visible in the network environment.
If you made changes to the workgroup and server name in Open-E NAS-XSR
configuration, it can take some time until each workstation computer in the
Windows network detects the new name.
4.6.1 Access to Windows Shares
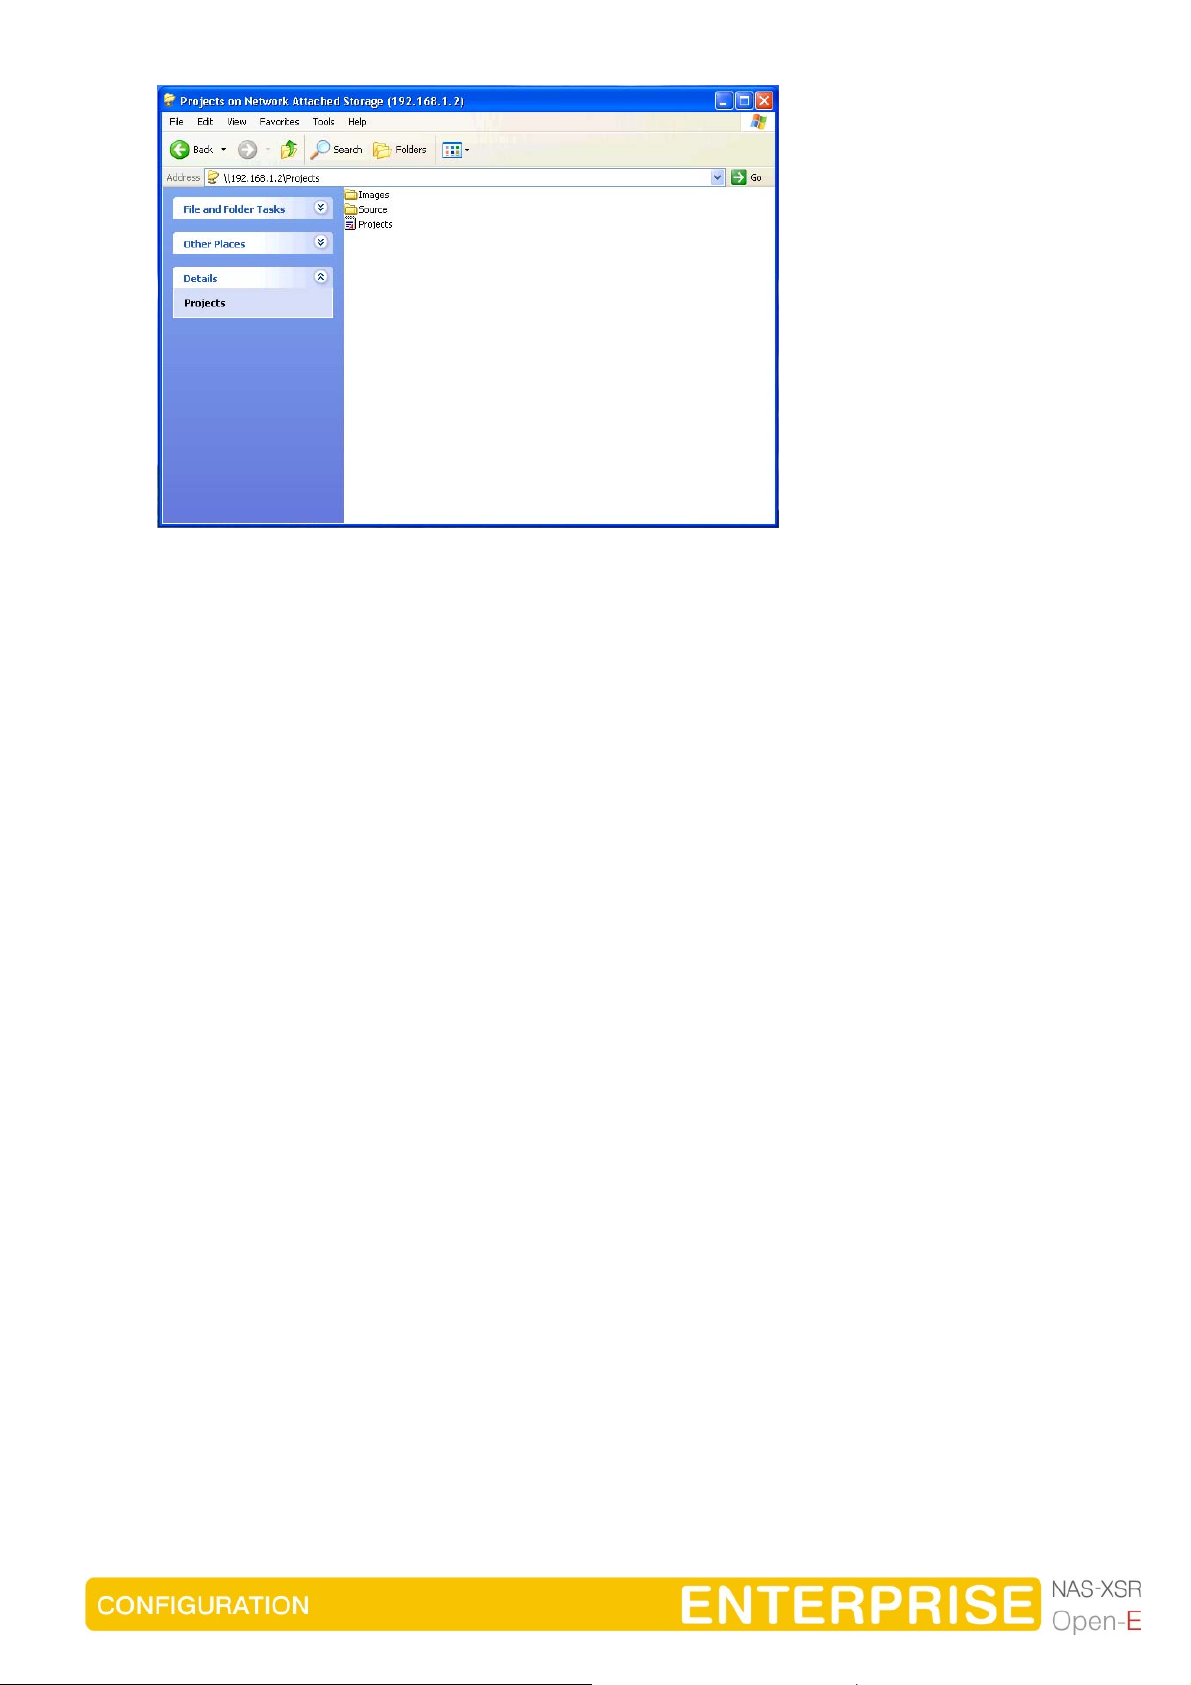
The access to newly created shares is generated via the Windows Explorer. After
entering the IP address of your Open-E NAS-XSR (in this example \\192.168.1.2), all
visible shares should be available immediately. Please keep in mind that sometimes
it takes a few minutes for the new shares or changes to become accessible.
When accessing invisible shares, you need to know beforehand the corresponding
share name and attach it to the IP address with a backslash (\):
Open-E supports Windows ACL (Access Control List) for read, write and execute
options, but based on the POSIX standard written by SGI.
Some examples how to use ACL (with ADS or PDC authentication):
1. Deny access to a Directory for every user (group):
a. Create a new folder or select one of your existing folders (you must be the owner
or superuser to set ACL permissions)*
b. Go to the “directory properties” (right mouse click on the directory then choose
"Properties")
c. Select a the “security” tab
d. Choose the group "Everyone"
e. Click the "Remove" button – only you and your group will have access to the
selected directory **
f. Click the "Apply" button
Now only you have permissions to access this directory.
2. Allow full access for a group "WORK" to this Directory:
a. Make sure that the group WORK is created
b. In the security window click the "Add" button
c. Click the "Remove" button (point 1)
d. Select the group "WORK" (Advanced Æ Find Now will show you all users and
groups) and click OK
e. Enable Full Control in the “Allow” column
f. Click the "Apply" button
3. Set “read only” permissions to the file for everyone:
a. Create a new file (you must be the owner or superuser to set permissions)*
b. Go to the permissions window
c. Select the “Everyone” group
d. Leave only a ”read” permission in "Allow" column
17

e. Click the "Apply" button
f. Make the same for your group and yourself
Now the group “Everyone” has "read only" permissions to this file.
4. Changing the directory owner:
a. On Open-E web interface go to resources Æ shares
b. In the "Set Superuser" function select your user and restart connection
(maintenance Æ shutdown Æ Function Connections reset) or wait about 15
minutes
c. Go to the directory/file properties (right mouse click Æ properties on the directory
and click the "security" tab)
d. Click the "Advanced" button
e. Select the Owner tab
f. Click the "Other Users or Group" button and select the user that will be a new
owner (Advanced
Æ Find Now will show all users and groups), click OK***
g. Select the user from the list and click OK and the "Apply" button
h. Click OK and re-open this window to refresh owner.
5. Allow a full access for the user "BIG BOSS" to this Directory
a. Make sure that the "BIG BOSS" exists
b. In the security window click the "Add" button
c. Select the user "BIG BOSS" (Advanced Æ Find Now will show you all users and
groups) and click OK
d. Enable Full Control in the Allow column
e. Click the "Apply" button
6. Allow “read” access for a group "COMPANY" to this directory
a. Make sure that the group "COMPANY" exists
b. In security window click the "Add" button
c. Select the group "COMPANY" (Advanced Æ Find Now will show you all users and
groups) and click OK
d. Enable "Read & Execute" in the Allow column
e. Click the "Apply" button
7. Make “read only” directory with a full access subdirectories for the group “ALL”
(using inheriting permissions)
a. Create a folder "ROOT"
b. Go to the security window
c. Remove both “Everyone” and “Your” group
d. Click the “Advanced” button and then the “Add” button
e. Select the “ALL” group and click OK
f. Change “Apply onto” to “This folder only”
g. In permissions leave only “Traverse Folder / Execute File” and “List Folder / Read
Data”. Click OK
h. Click once again the “Add” button and add ALL group
i. This time select “Apply onto” to “Subfolders and files only” (this step will submit
any inherited permissions)
18

j. Select “Full Control” and OK
k. Click “Apply” to save permissions.
With these settings users from the group “ALL” cannot remove the “ROOT” folder or
make any changes to its contents. All new files/folders will be created based on the
access given by inherited permissions.
Example:
- file /ROOT/some_file.txt can be changed but can not be removed
- directory /ROOT/directory can not be removed but a users from the group ALL can
create folders and files in this directory.
- file /ROOT/directory/my_file.txt can by removed and changed by the group ALL (if
inherited permissions wasn't changed)
8. Inherited permissions
If the file or directory has inherited permissions, all newly created subfolders will
inherit the main folder permissions. All permissions can be changed. Please keep in
mind that changing permissions in the main folder will trigger the same changes to
the inherited permissions of any subfolder within.
9. UNIX Rights in Windows:
Folders permissions
Permissions - - x r - - - w - r - x r w - - w x r w x
Traverse Folder / Execute File
List Folder / Read Data
Read Attributes
Read Extended Attributes
Create Files / Write Data
Create Folders / Append
Data
Write Attributes
Write Extended Attributes
Delete Subfolders and Files
Delete
Read Permissions
Change Permissions
Take Ownership
√
√ √
√ √ √ √ √ √ √
√
√
√
√
√
√
√
√ √
√ √ √ √
√ √
√ √ √
√ √ √
√ √ √
√ √ √
√ √
√
√
√
√
√
√
19

Example application of ACL permission in a small company.
The company has 10 users
Name Group Position Rights
Chris Firma Director All rights for everything
Robert Firma Manager All rights for everything
besides Directors home directory
Jennifer Firma Secretary Read access to "DOCUMENTS" directory
Clint Firma
Developers
Brad Firma
Developers
Johnny Firma
Developers
Tom Firma
Developers
John Firma
Graphics
Ben Firma
Graphics
Bill Firma Cleaner Only access to his home directory
Main
Developer
Developer Read in „DEVELOPERS“
Developer Read in „DEVELOPERS“
Developer Read in „DEVELOPERS“
Graphic
Designer
Graphic
Designer
Read and write to “DEVELOPERS” directory
read and write to “CHANGES” directory
Read and write in „Changes“
Read and write in „Changes“
Read and write in „Changes“
Read in „GRAPHICS“
Read and write in „Changes“
Read in „GRAPHICS“
Read and write in „Changes“
First create users and groups in Your Domain:
Run Menu Start Æ Programs Æ Administrative Tools Æ Active Directory Users
a.
and Computers
b. Right mouse click on your domain name and select New Æ User
c. Enter all necessary fields to create user Chris.
d. Create all users (back to point 2).
e. Click with right mouse click on your domain name and select New Æ Group
f. Create groups: Developers, Graphics, and Company.
g. Add users to groups - right mouse click on group Developers. In Members tab
click Add. Add users to groups (groups Company, Developers, Graphics)
Connection to windows domain:
Go to Open-E NAS Web interface setup Æ server
a.
b. Select ADS or PDC (depends on your system - if you have NT4 Domain or
Windows 2003 (with no Kerberos**** fix) then select PDC, else select ADS).
c. Enter your domain name - in PDC this will be the number IP and administrator
password in ADS enter the full domain name (example. COMPANY.COM.DE).
d. Enter your domain/Kerberos server IP
e. Enter the name and password of an existing Administrator user account on your
domain.
f. Click the “Apply” button to join the domain.
20

21
Creation of shares and set permissions:
a. Create a Company share (Open-E NAS web interface Æ Resources Æ Shares).
b. Set permissions for all or select only Company groups.
c. Go to share \\YOUR_NAS_SERVER_NAME\\Company
d. Create folders "WORK", "HOME" and "FORALL".
e. Set permissions for the folder WORK - right mouse click ->properties->security.
f. Deny access for everyone (point 1), change the owner to Chris user (point 4) with
a full access and add Robert with a full access.
g. In the folder WORK create folders DEVELOPER, GRAPHIC, DOCUMENTS and
CHANGES.
h. Change the owner of the DEVELOPER directory to Clint (with full rights). Add
group Developers with a “read only” access.
i. Add group Graphics with a full access to the directory GRAPHIC.
j. Change the owner of the CHANGES directory to Clint (with full rights). Add
groups Graphics and Developers with full rights.
k. Add a secretary to the DOCUMENTS directory with a “read only” access.
l. In the home directory create own private directory for each user, change user
(make that the owner and the directory name are the same). Remove an access
for the Company group (point 1).
m. Add the group Company with a full access to the directory "FOR ALL".
* If you use the SUPERUSER all files and directories will be created as a
local ROOT user.
** New directories with no inherited permissions do not have ACL
permissions at the beginning - they have only standard UNIX permissions
0777 (Windows 2003 shows - in a normal view in the security window every special permission. Windows 2000 does not show any permission in
normal view - only in the advanced view). To enable ACL for this directory,
first select “Full Access” for everyone and click the “Apply” button.
Subsequently do the same for your group and your user. Subdirectories
created in this directory should have ACL permissions inherited from the
parent. If permissions are inherited then the “ALLOW” column is grey. To
disable permission just use the “Deny” column.
If you change ACL permissions always check that a new set of permissions
for one group does not interfere with permissions for the other user/groups
or any connections between these accounts. Windows 2003 handles much
better such changes than Windows 2000.
*** This function is available in Windows 2003 - in other Windows versions only
your user can be selected.
**** Kerberos is a server for distributing security keys. Normally it is only on the
domain but it can be on some external server. In Windows 2003 this server
is ignoring specified key types, and authorization works only when entering
IP not the NAS-XSR name.

4.6.2 Access NAS-XSR Shares under Linux
Please use following line to mount an NFS share:
• mount -t nfs 192.168.0.220:/nfs /mnt/nfs
where:
192.168.0.220 is the Open-E NAS-XSR IP and /mnt/nfs your local mount point
Please use following line to mount an SMB share:
In a shell:
• mount -t smbfs -o username=root,password=12345 //192.168.0.220/test /mnt-smb
where ‘test’ is the share name
In X-windows:
• Smb://root@192.168.0.220/
22

5 Descriptions of function
5.1 Functions of the console display
While Open-E NAS-XSR can be fully administered remotely through a secure Web
interface, some of the functions you can access on the console. Open-E NAS-XSR
constantly displays following basic parameters:
• IP address
• Https settings
CTRL+ALT+n
If you press the left CTRL key + the left ALT key + n, you will be asked for the new IP
address and the subnet mask. The DHCP server will be shut down.
CTRL+ALT+p
If you press the left CTRL key + the left ALT key + p, the access restrictions are lifted
by entering the administrator password (in addition, there is a reset to the standard
https port 443).
CTRL+ALT+i
By pressing a combination of left CTRL key, left ALT key and i, you can reset the
original IP address (192.168.0.220) and the subnet settings (255.255.255.0). In this
process, the DHCP server support is turned on.
CTRL+ALT+t
By pressing a combination of left CTRL key, left ALT key and t, you can run Console
Tools. The menu will appear, with choice of following functions: Ping, DHCP Ping,
Hardware info, Memory info, Time configuration and DNS configuration.
CTRL+ALT+h
By pressing the left CTRL key, left ALT key and h, it will display hardware and driver
information.
CTRL+ALT+w
By pressing the left CTRL key, left ALT key and w, it will display hardware
configuration.
CTRL+ALT+x
By pressing the left CTRL key, left ALT key and x, it will display extended tools.
CTRL+ALT+r
By pressing the left CTRL key, left ALT key and r, it will display CLI Management Tools
for ICP Vortex.
23
This function appears in Help Console only when an ICP Vortex hardware
RAID controller is installed in the NAS-XSR server. In order to get additional
information read the user manual of ICP Vortex RAID controller manufacturer.
F1, F2 and F5
Function key F1 is available to display help information while F5 will reset the console
display to default. If you press F2 key all network interface will be displayed.
Shutting down and restarting
With Ctrl + ALT + DEL the Open-E NAS-XSR host computer will be shut down and
restart, while CTRL + ALT + S shut it down. Please be careful with this option when
users are connected.
5.2 Functions of Open-E NAS-XSR via browser access
On the following pages, we will thoroughly describe every function of Open-E NASXSR. The functions are divided by menu options, which are located at the top part of
the screen.
24
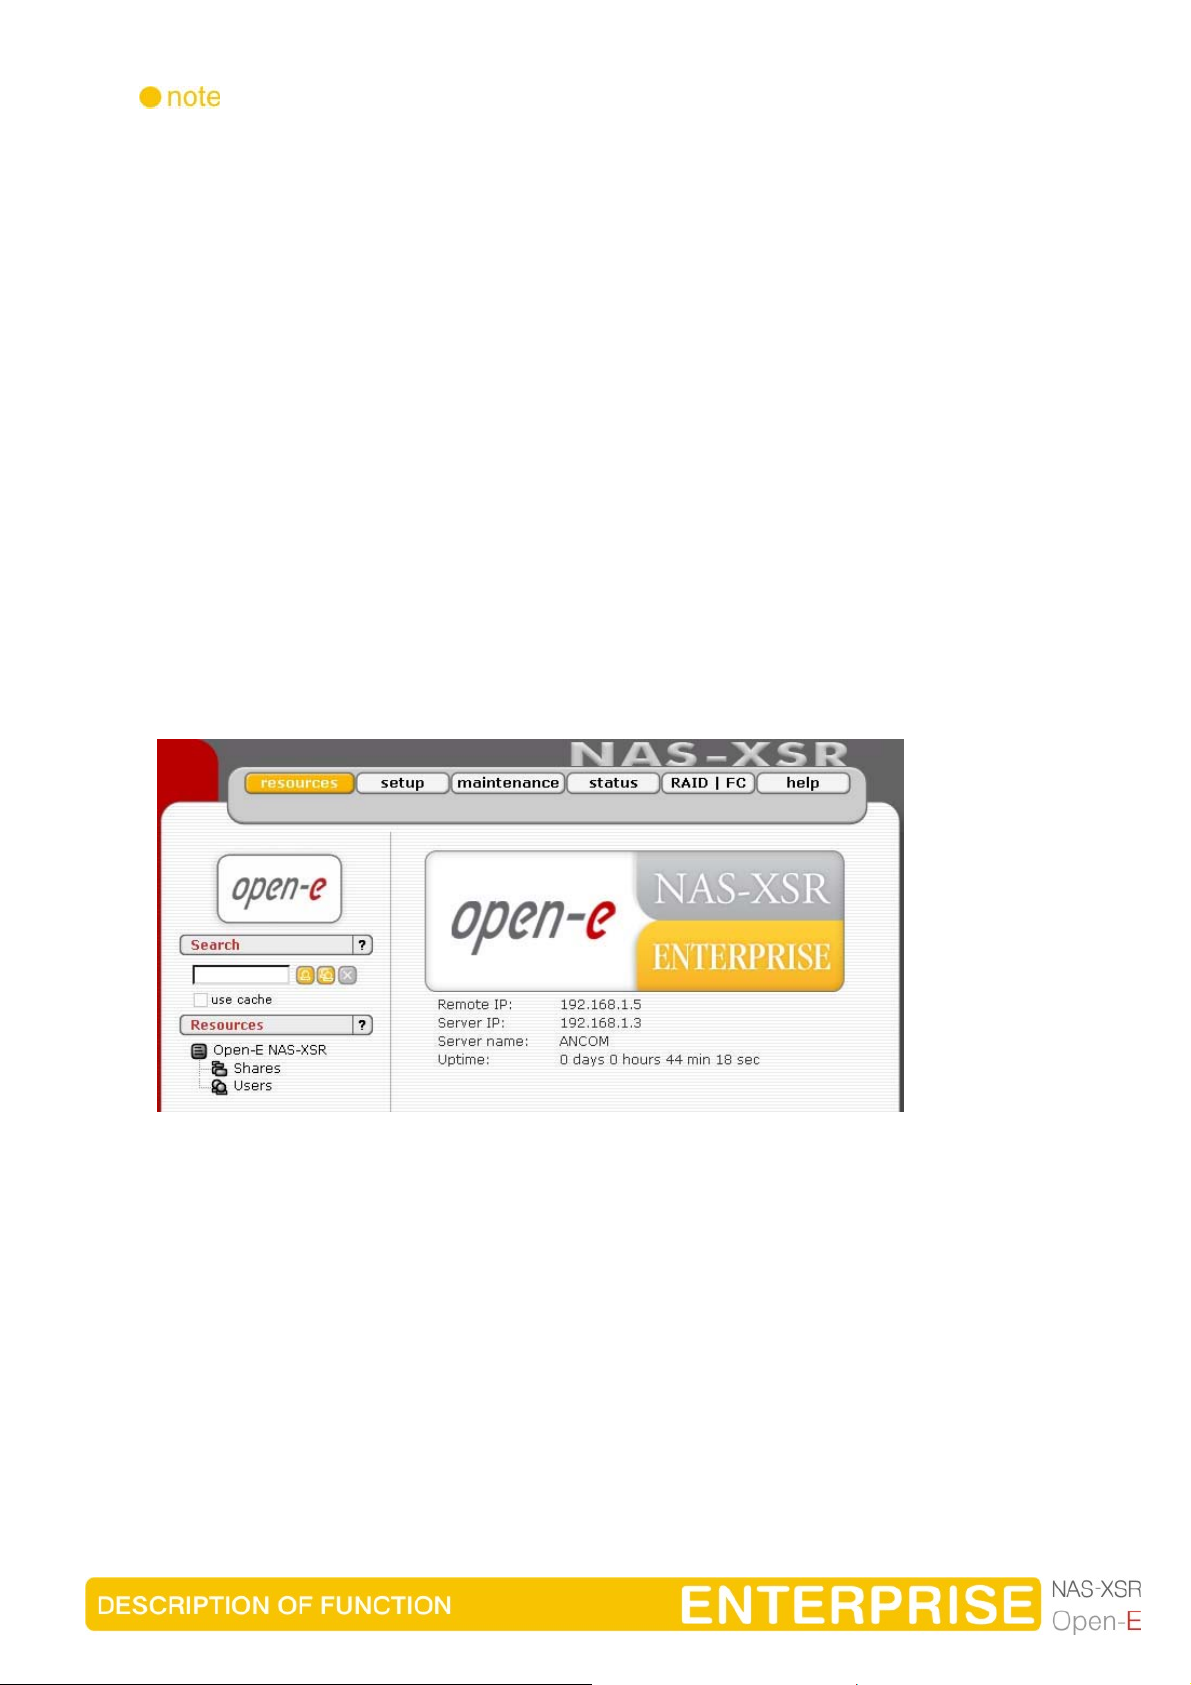
5.2.1 Menu “Resources”
Here, you can find important data status (IPs, server name, uptime), and you can
configure NAS-XSR operations. All that may be accomplished by using tree
diagrams on the left side. This will help you manage all shares, users, user groups in
a structured manner and in addition control search.
The search control can be enabled in the Open-E NAS-XSR menu Æ setup Æ GUI in
the Search preferences Function.
The search control allows to lookup users or groups in the remote or local user
database that NAS-XSR server is currently attached to. To apply a criterion put a
string into the 'search' textbox and click on the play button. All found entries,
containing the search string typed-in, would be listed. Note that the first time you use
the search facility, your query will be sent back to the server for processing. All the
subsequent searches will access only the locally cached data to save the time. To
query the database directly again, set out the 'use cache' checkbox.

You can use regular expressions to look for users, for example:
• to lookup users’ ID beginning with the word 'beg' type ^beg,
• similarly, append '$' to the string if you want to lookup entries ending with that text,
• to lookup users or groups ending with 'frog' type-in frog$.
By default the search textbox is empty which does not impose any criteria
as to what groups or users are shown in the tree. After you hit the play
button the first found users/groups will be shown (up to the limit given).
Adding elements to the tree can be a time consuming task – especially when the
criteria are not tight enough and limit is set up to more than 300 entries. To cancel
the operation before it is finished, click on the stop button.
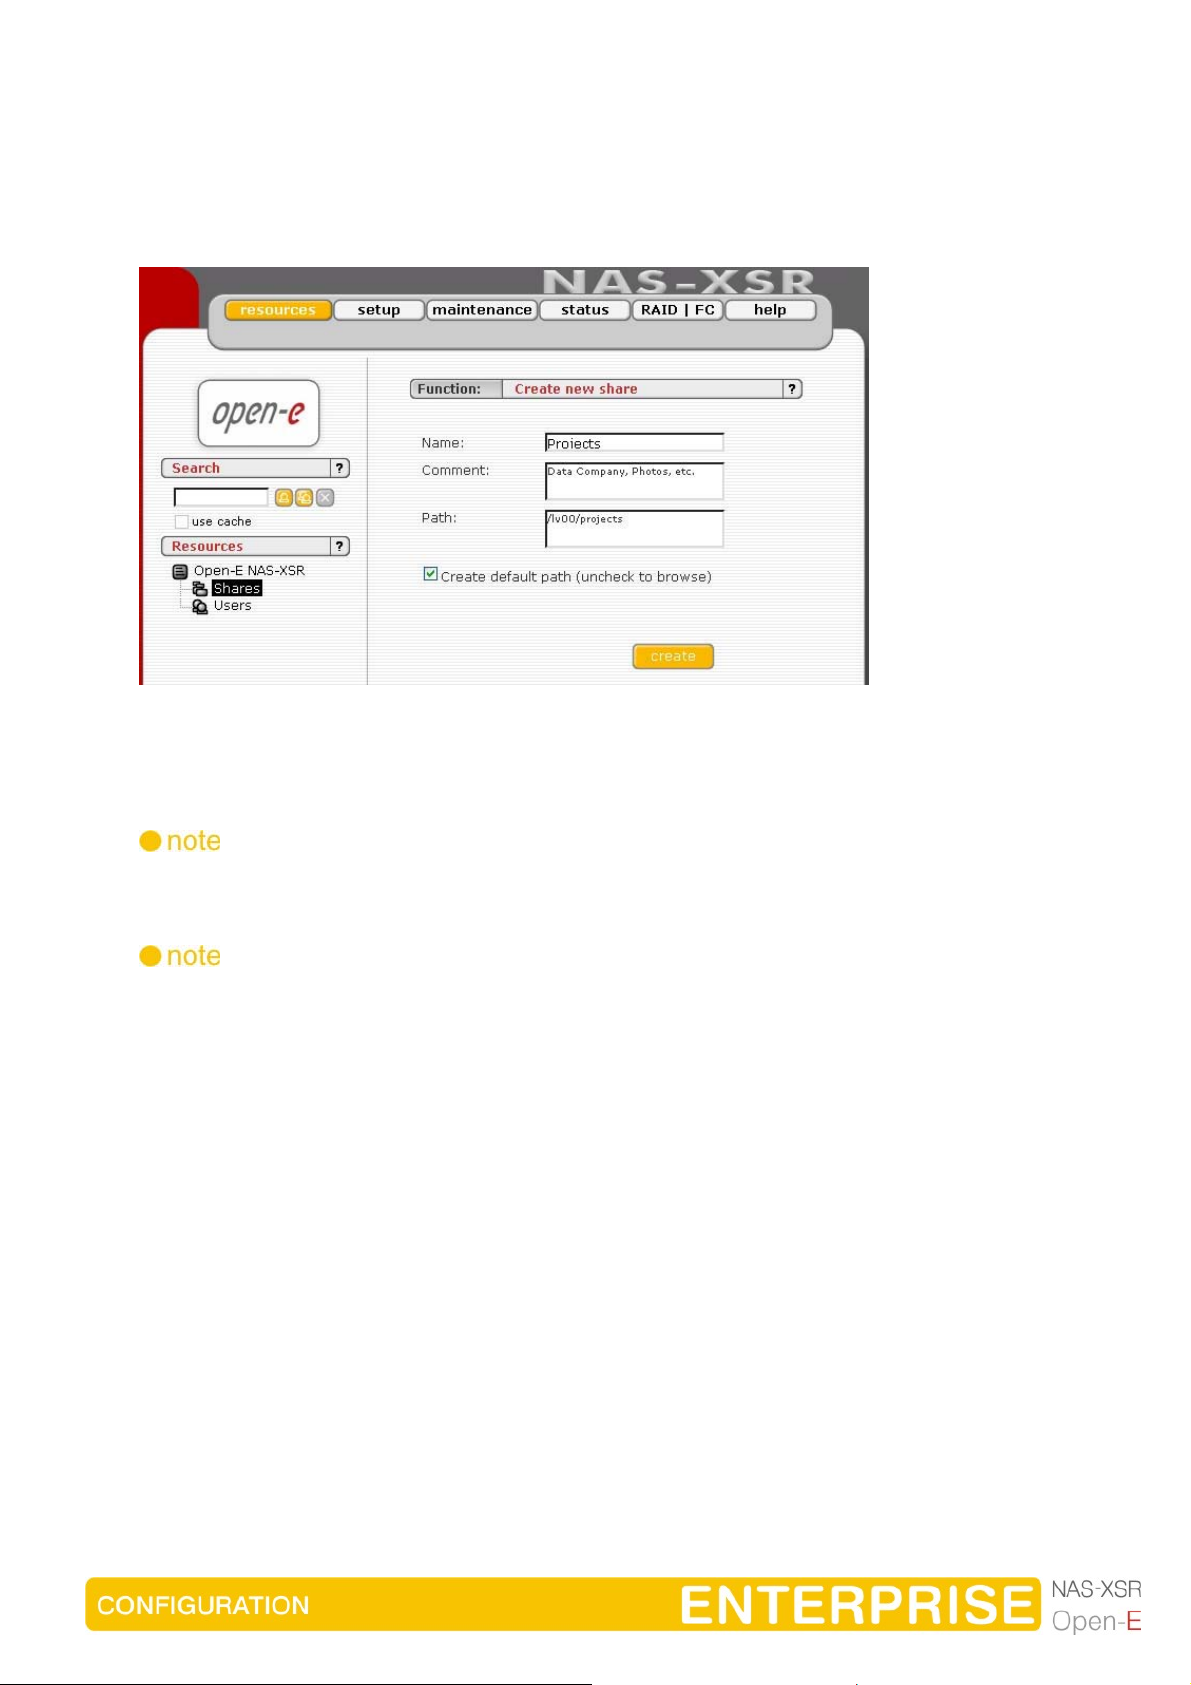
5.2.1.1 Shares
Here, all shares on your Open-E NAS-XSR are listed. By clicking on the branch
“Shares,” with Function “Create new share” you can define a new share or
comment it (optional) or set the path. Organized below, you will find all existing
shares, which you can edit with a simple click. With the exception of the name,
you may alter all parameters. If, however, you must change a name, delete it and
assign a new name.
Windows users will see the name of the share in the folders of their network
environment when they click on the icon for the NAS-XSR server. The comment is
only visible if the users take a look at the share properties, or if shares are listed
in detail.
The path represents the physical location of the data on the share volume of the
NAS-XSR server. The user does not know this information. In order to simplify
navigation through the directories, you can use the browser function.
25
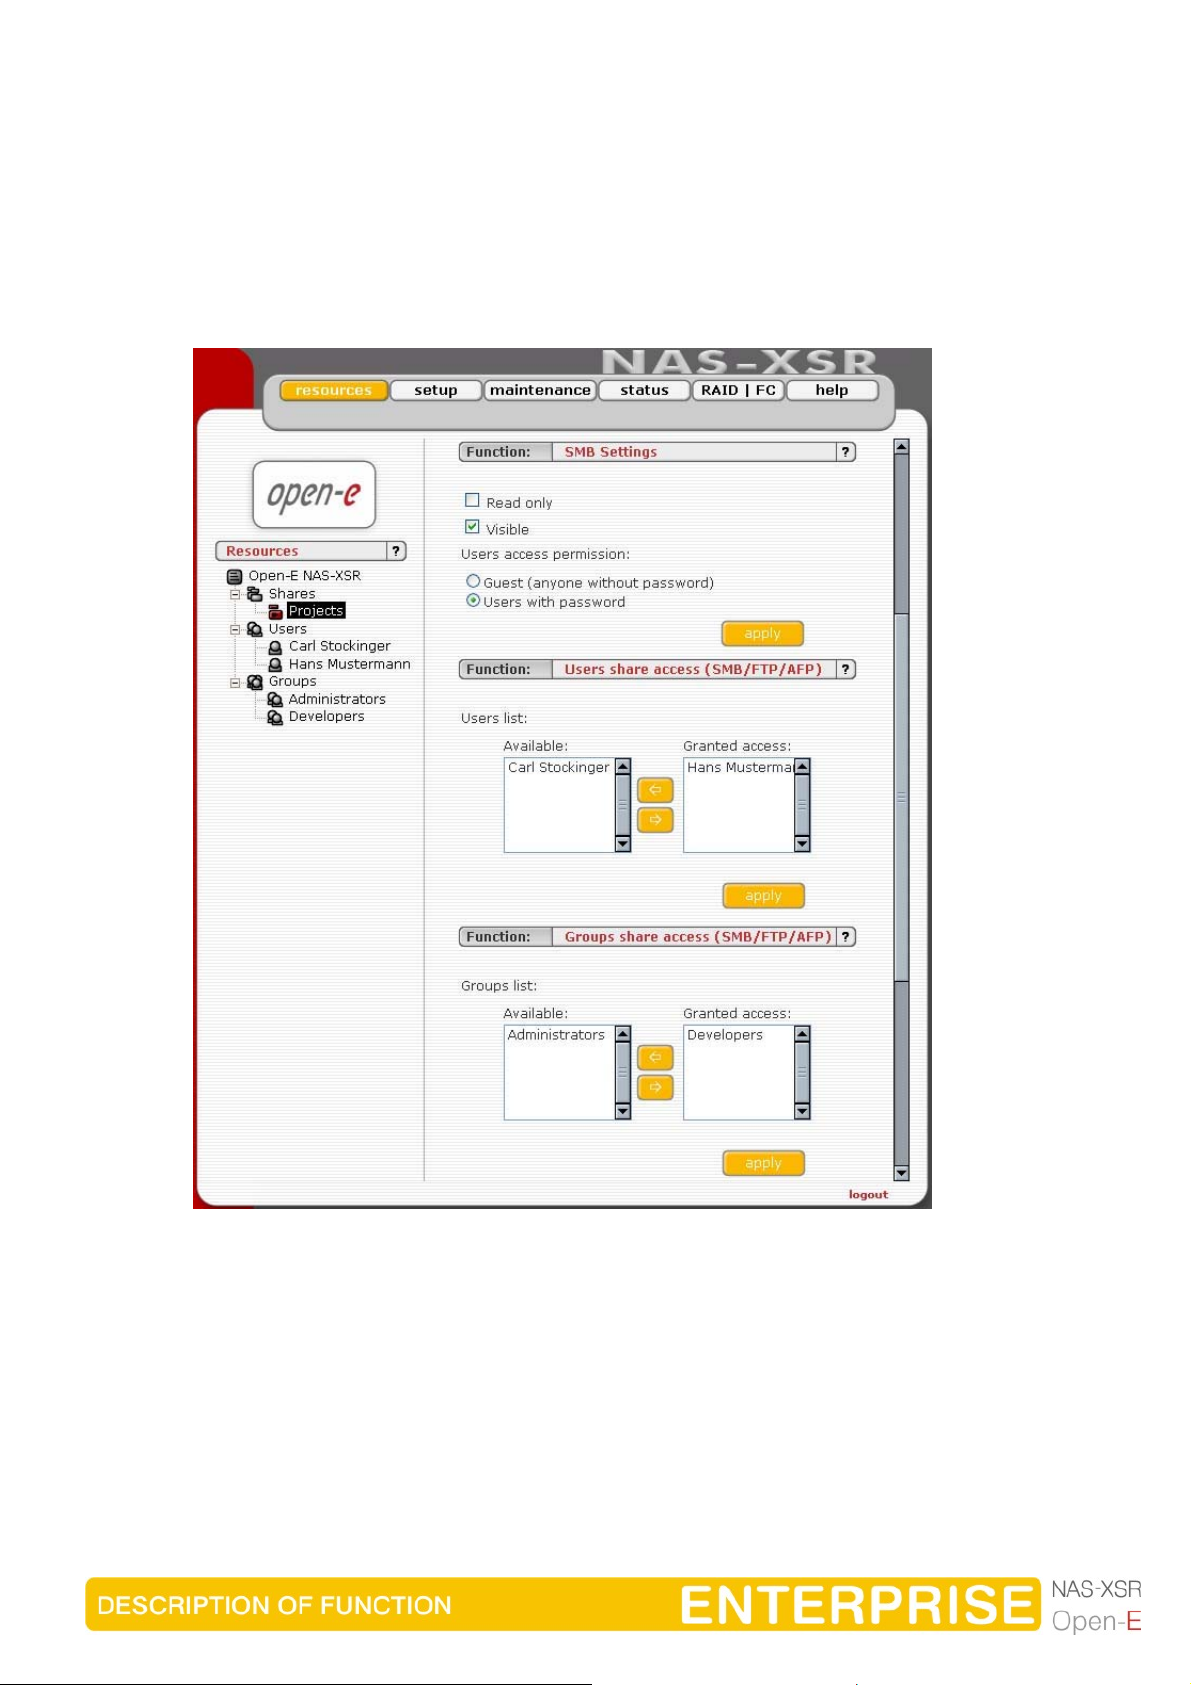
After clicking “create” button on left page, below on branch shares, will appear
the name of earlier established share, in this case “Projects”. Then by clicking on
name “Project”, you will see all available functions helpful for setting the share:
26
Function “SMB Settings”
Shares can be marked as “Read only,” and they can also be hidden (see below).
Invisible shares are not displayed in the network environment, but they may still
be used. The last parameter is “User access permission”. Either all users can be
granted access (even without a password for enabling access to public folders)
or only registered users with password.
Please note that the entered users (user and password) have to correspond with
the Windows login data.
In Functions “Users share access (SMB/FTP)” and “Groups share access
(SMB/FTP)” you can set the access to the shares to available users and/or
groups.
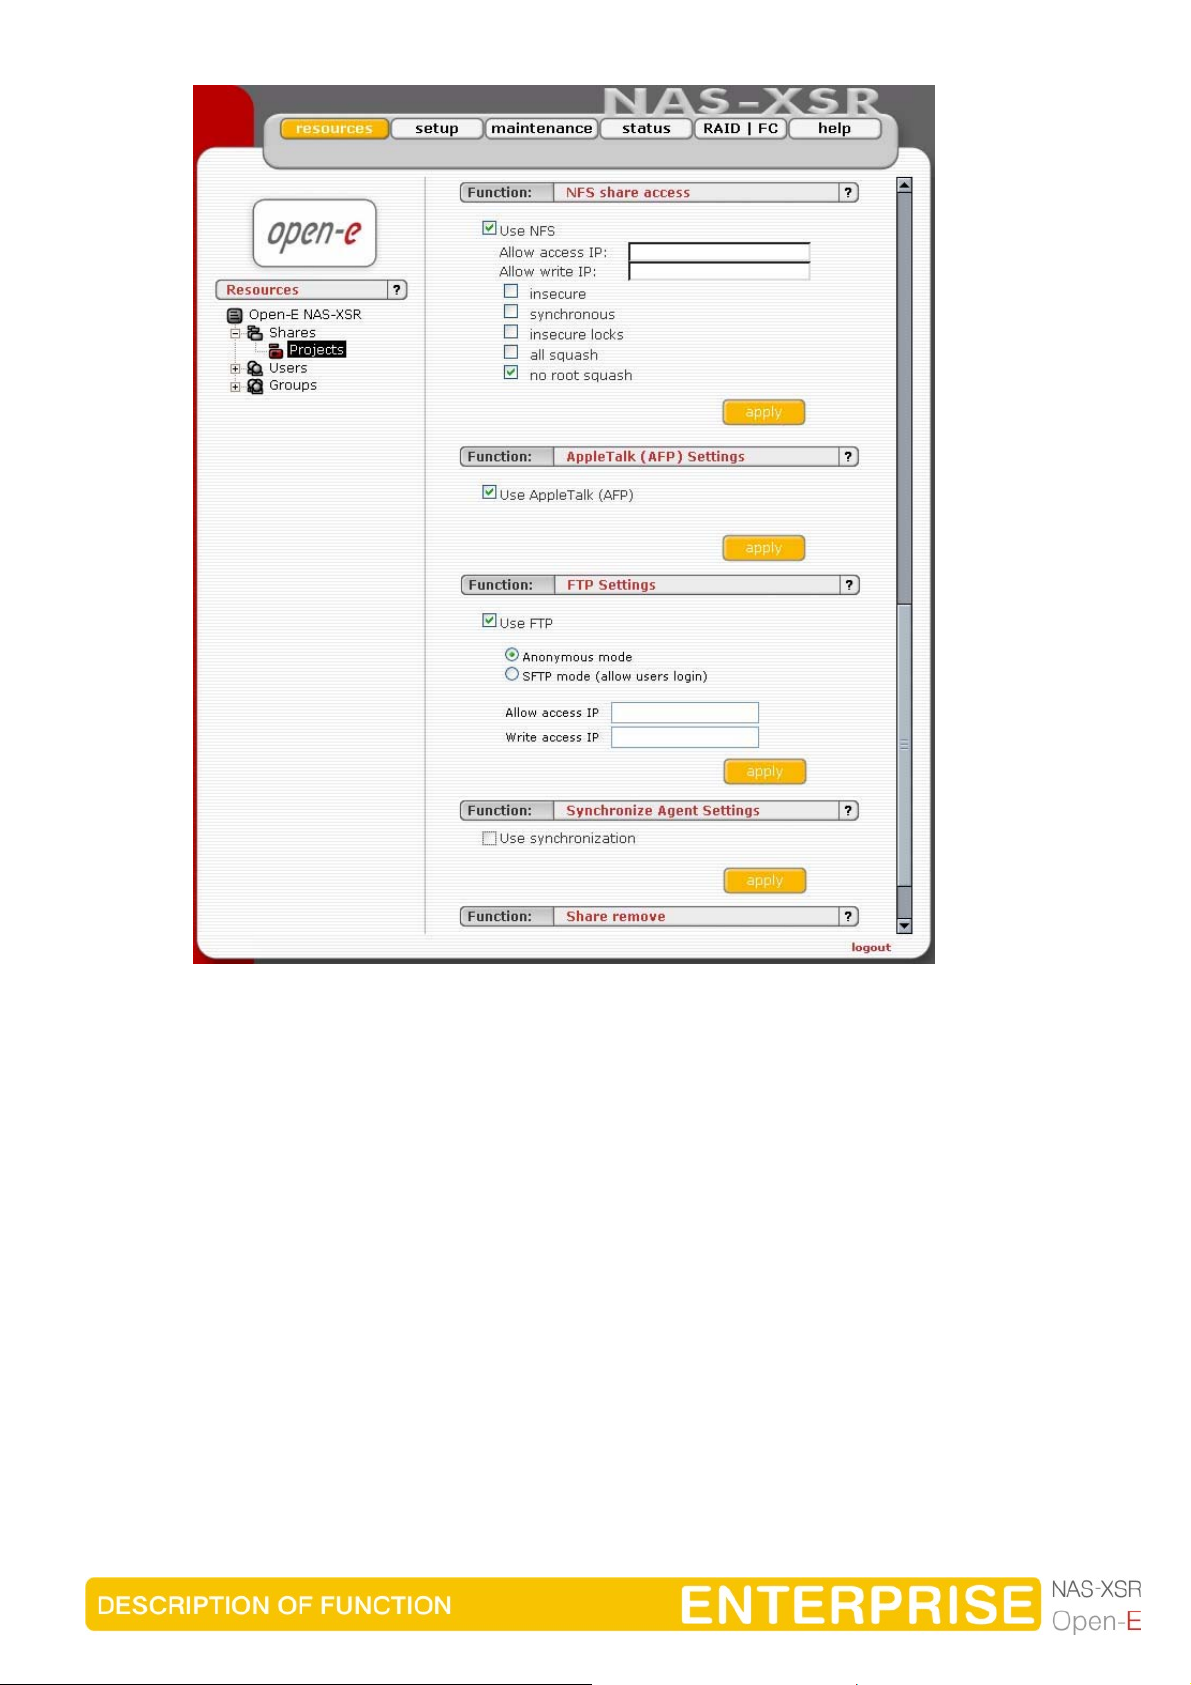
Function: “NFS share access”
Using this function you activate access to particular share via NFS. In order
activate NFS on NAS-XSR server, you must enable usage of NFS in menu
“setup”
In order to mount this share via NFS, please use following syntax:
• mount -t nfs IP_addr:/share/share_name /local_mount_point
Æ ”server” in Function NFS settings.

27
or
• mount -t nfs IP_addr:/vol/share_name /local_mount_point
Please fill-in the NFS options fields:
• Allow access IP: Please enter an IP or address range that is allowed to access
NFS. You can enter single IP or multiple IP separated with semicolon or IP
address range. IP addresses that will not be added to allow write list will have
read only access.
• Allow write IP: Please enter an IP or address range that is allowed to write to
NFS. You can enter single IP or multiple IP separated with semicolon or IP
address range.
When you leave allow access IP and allow write IP fields blank, then all
computers in subnet will have write access to NFS. When you set allow
access and leave allow write IP field blank, then specified computers will
have read only access and none will have write access. When you set
allow write IP without allow access IP, then specified IPs will have write
access and all computers in the subnet will have read only access.
• xxx.xxx.xxx.xxx
• xxx.xxx.xxx.xxx;xxx.xxx.xxx.xxx; ....
• xxx.xxx.xxx.xxx/network_prefix_length.
• insecure: allows incoming connection to originate from ports > 1024,
• synchronous: when this option is enabled, local file system is waiting for the data
to be written to the NAS server. NFS performance will be lowered, however it will
ensure that the data will be written directly to the NAS server and will not be
stored in the system cache,
• insecure locks: disables authorization of locking requests,
Some NFS clients don't send credentials with lock requests, and hence work
incorrectly with secure_locks, in which case you can only lock world-readable
files. If you have such clients you can use the insecure_locks option.
• all squash: Map all users id to nobody user and all groups id to nogroup group.
• no root squash: Please select this option to grant user root from a client
machine, the same level of access to the files on the NAS-XSR server .
Otherwise user root from a client machine will be mapped to user nobody on the
NAS-XSR server.
How to enter Ip address
In order to enter specific computers enter the desired IP addresses separated
by semicolons, in example: 192.168.0.1; 192.168.0.2; 192.168.0.222; etc.
In order to assign the entire address area between 192.168.0.1 and
192.168.0.254 writing privileges enter: 192.168.0.0/24
In order to assign the entire address area between 192.168.0.1 and
192.168.255.254 writing privileges enter: 192.168.0.0/16
There are possible many more combinations. You may find details on IP
calculation in Internet.
Just search for "ipcalc". For example: 192.168.0.1/28 will set range from
192.168.0.1 to 192.168.0.14 192.168.0.100/29 will set range from 192.168.0.97 to
192.168.0.102
You can easy calculate the network IP range using an IP Address Calculator like:
http://www.camtp.uni-mb.si/books/Internet-Book/IP_AddressCalculator.html
28
Function: AppleTalk (AFP) Settings
Here you may activate the AppleTalk protocol in the network to access shares on
the NAS Server.
How to use AppleTalk with the NAS server:
In the menu "setup” Æ “server” enable AppleTalk.
In resources menu select a share that you want to be shared with AppleTalk.
Enable AppleTalk for this share.
How to connect to the NAS AppleTalk server:
In MAC OS 9:
Open the Chooser (APPLE MENU Æ Chooser)
1.
2. Click on AppleShare
3. If the Server "NAS" does not appear in the fileserver list click "Server IP address"
and enter the NAS server IP
4. Click "OK" and choose a login type. Enter a user name and password if you want
to login as a specified user.

29
5. From available options select shares that you want to mount.
6. The icon of the mounted share will appear on the desktop.
7. To open the share click on its icon.
8. To unmount the share drop its icon onto the trash.
In MAC OSX 10.3:
1.
Click on the MAC HD, then Applications then Utilities.
2. From the Directory Access check if AppleTalk is active; if not Æ activate it.
3. If the server "NAS-XSR" does not appear in the Network list, open a web browser
and enter the IP address of the AppleTalk server. afp://192.168.1.3 ( very
important Æ "afp://" )
4. Choose a login type. Enter a user name and password when you want to login as
a specific user.
5. If you can not log in, click on the Directory Access/Authentication and change the
path to search for authentication information.
6. From available shares select all you want to mount.
7. The icon of any mounted share will appear on the desktop.
or second example is:
1. Click on "Connect to server" from the Finder (GO submenu).
2. Enter: afp://address_ip
3. You can add a link to the AFP server by clicking on the "+" sign. This adds a link
to the computer in the Favorite Servers field.
4. Choose a login type, enter a password if you want to login as a specific user.
5. From available shares select all you want to mount.
6. The icon of the mounted share will appear on the desktop.
Function: “FTP Settings”
Open-E NAS-XSR allows sharing files over FTP and SFTP protocols. FTP sends
users’ IDs, passwords and files over the network as a raw, not encrypted data.
SFTP is encrypted FTP and therefore it is much more secure. SFTP allows
passwords and files encryption (depending on ftp client configuration).
How to share files over FTP?
First enable the ftp server. To enable FTP go to “Setup Æ server Æ Function: FTP
settings”, check “Use FTP” and click the apply button.
Next, create/select share that will be accessible over the FTP protocol.
Go to the share configuration in Function “FTP settings” and check “Use FTP” –
Anonymous and SFTP modes will appear.
1. Selecting Anonymous mode will enable FTP sharing with anonymous user. For
all IPs the access is set to READ+WRITE by default. To change that, activate
“Allow access IP” and “Write access IP” options. Clicking apply will make the
share available over FTP.
To connect to this share FTP client software is required – i.e. Internet Explorer
has the FTP support. To connect from IE, enter address ftp://<NAS IP>/pub/,
(e.g. ftp://192.168.0.220/pub/).

30
Many FTP client programs need a user name and a password to establish
connection. In the Anonymous mode the user name is “anonymous” and there is
no password (empty field).
All anonymous shares are in the “pub” directory. Any user connecting from the IP
without a full access will see all shares but will not be able to see any directories
that are prohibited.
Anonymous user will see only files and directories that he owns.
2. Selecting SFTP mode will enable secure FTP sharing with the user and password
authorization. Only few FTP clients support SFTP, and even fewer SFTP clients
support SSL/TLS encryptions.
Here is a list of the tested software:
• CoreFTP (Windows)
• FileZilla (Windows)
• IgloFTP (Windows and Linux)
• SSLFTP (linux console client)
When SFTP is enabled, the user has the access to the share through the
authorized user name and password.
If the NAS-XSR server uses Windows domain authorization then a short
name of the domain must precede a user name – connected with a plus
sign, i.e. “DOMAIN+Administrator”.
To connect to a share via SFTP in the selected encryption, type in SFTP client
NAS support SSL and TLS explicit encryption. All SFTP shares are in the “shares”
directory. Users see only the allowed shares.
If you are unable to see any directories when connected to ftp server
please make sure that you have rights to access any share over ftp. If
still you cannot see any directories please change your ftp client to
passive mode.
Most FTP clients have bookmarks allowing setting up IP, port home
directory, etc. Suggested home directory for the Anonymous is “pub”
and for SFTP is “shares”.
Function: Synchronize Agent Settings
This function allows to set configuration for a synchronization of share.
In order to enable synchronization for a share, check box Use synchronization.
Its recommended to set Login name, Password and list of Allow access
IPs that have access to the share, in another case everyone will have
access to the share.
Function: Share remove
Click "remove" button to remove the share.
 Loading...