

Page 1
UUsseerr GGuuiiddee
881122LL VVooIIPP AATTAA RRoouutteerr
September 2006
Copyright
Copyright© 2006 OPEN Networks Pty Ltd. All rights reserved. The content of this manual is subject to change
without notice. The information and messages contained herein are proprietary to OPEN Networks Pty Ltd. No part
of this manual may be translated, transcribed, reproduced, in any form, or by any means without prior written
permission by OPEN Networks Pty Ltd.
Disclaimer
For content and procedures available in this document, OPEN Networks Pty Ltd does not warrant or assume any
legal liability or responsibility for the accuracy, completeness, or usefulness of any information, apparatus, product, or
process disclosed.
Release: v.1.4.2
Date Released: September, 2006
Page 2

User Guide
OPEN 812L VoIP ATA Router
Table of Contents
1. Getting Started.....................................................................................................................3
1.1 Introduction ................................................................................................................... 3
1.2 Main Features & Benefits.............................................................................................. 4
2. Information About the ATA.................................................................................................6
2.1 Important Safety Instructions ........................................................................................ 6
2.2 Package Contents......................................................................................................... 7
2.3 Appearance................................................................................................................... 8
2.3.1 Front Panel Indicators .....................................................................................................................8
2.3.2 Rear Panel Indicators ...................................................................................................................... 9
3. Connecting the ATA Router..............................................................................................10
3.1 Single-User Connection Via ADSL.............................................................................. 11
3.2 Single-User Cable Connection.................................................................................... 12
3.3 Single-User Company Network Connection................................................................ 13
3.4 Multiple-Users Connection Via ADSL ......................................................................... 14
4. PC Network Configuration ...............................................................................................15
4.1 Configuring Computers in Windows XP ...................................................................... 15
4.2 Configuring Computers in Windows 2000................................................................... 17
4.3 Configuring Computers In Windows 95/98/ME ........................................................... 19
4.4 Configuring Computers in Windows NT4.0 ................................................................. 21
4.5 Factory Default Settings.............................................................................................. 22
4.5.1 Web Interface (Username and Password) .................................................................................... 22
4.5.2 LAN Device IP Settings ................................................................................................................. 22
4.5.3 DHCP server.................................................................................................................................. 22
4.5.4 LAN and WAN Port Addresses......................................................................................................22
4.6 Configuring with your Web Browser............................................................................ 23
5. Setup via Web Interface ....................................................................................................24
5.1 Network Selection ....................................................................................................... 25
5.2 Voice Service Provider Phone 1 & 2 ........................................................................... 26
6. Basic Configuration...........................................................................................................31
6.1 Status..........................................................................................................................31
6.1.1 Overall Status ................................................................................................................................ 31
6.1.2 LAN Status..................................................................................................................................... 33
6.1.3 DHCP Client Status ....................................................................................................................... 34
6.1.4 PPP Status ....................................................................................................................................35
6.1.5 TCP Status ....................................................................................................................................36
6.1.6 System Log....................................................................................................................................38
6.1.7 Call Log.......................................................................................................................................... 39
6.2 Configurations............................................................................................................. 40
6.2.1 WAN Configuration........................................................................................................................ 40
6.2.2 LAN & DHCP Configuration........................................................................................................... 44
6.2.3 NAT Configuration ......................................................................................................................... 46
6.2.4 Port Forwarding ............................................................................................................................. 50
6.2.5 Bridge Filtering............................................................................................................................... 53
6.2.6 DNS Configuration......................................................................................................................... 55
OPEN Networks Pty Ltd
www.opennw.com
Page 3

OPEN 812L VoIP ATA Router
6.2.7
Dynamic DNS ................................................................................................................................ 57
6.2.8 Save Settings / Reboot.................................................................................................................. 58
User Guide
7. Advanced Configuration ...................................................................................................60
7.1 Advanced VoIP ........................................................................................................... 61
7.1.1 Config ............................................................................................................................................61
7.1.2 Service Provider Configuration...................................................................................................... 65
7.1.3 User Profile .................................................................................................................................... 68
7.1.4 FXO Configuration......................................................................................................................... 70
7.1.5 ATA Timer Configuration ...............................................................................................................72
7.1.6 Ringtone Configuration.................................................................................................................. 74
7.1.7 ATA Miscellaneous Configuration .................................................................................................75
7.1.8 Address Book Configuration.......................................................................................................... 78
7.1.9 Auto-Provisioning...........................................................................................................................80
7.2 Admin Privileges ......................................................................................................... 81
7.2.1 Route Table ................................................................................................................................... 81
7.2.2 Route Configuration....................................................................................................................... 83
7.2.3 Bridge Timeout ..............................................................................................................................84
7.2.4 RIP System Wide Configuration .................................................................................................... 85
7.2.5 DMZ Configuration.........................................................................................................................89
7.2.6 SNTP Configuration....................................................................................................................... 90
7.2.7 Miscellaneous Configuration .........................................................................................................91
7.2.8 Admin / Username Password Configuration ................................................................................. 93
7.2.9 Reset to Default ............................................................................................................................. 94
7.2.10 Firmware Update ........................................................................................................................... 95
7.2.11 Auto Update...................................................................................................................................97
7.2.12 Save / Reboot ................................................................................................................................ 98
8. Log Off..............................................................................................................................100
9. Making Phone Calls.........................................................................................................101
9.1 Internet/VoIP Calls .................................................................................................... 101
9.2 PSTN Calls ............................................................................................................... 101
9.3 VoIP Advanced Call Features ................................................................................... 101
9.3.1 Caller ID....................................................................................................................................... 102
9.3.2 Call-Waiting Caller ID .................................................................................................................. 102
9.3.3 Consultation Hold ........................................................................................................................103
9.3.4 Blind Transfer ..............................................................................................................................104
9.3.5 Attended Transfer........................................................................................................................ 105
9.3.6 3-Way Conferencing.................................................................................................................... 106
9.3.7 Call Waiting.................................................................................................................................. 107
9.3.8 Call Forwarding............................................................................................................................108
9.3.9 Call Return...................................................................................................................................111
9.3.10 IP Dialing .....................................................................................................................................112
9.3.11 Speed Dialling for Address Book Entries ....................................................................................113
10. Troubleshooting...............................................................................................................114
10.1 Problems starting up the router ................................................................................. 114
10.2 Problems Connecting to the Internet......................................................................... 114
10.3 Problems with the Telephone Line ............................................................................ 114
11. Appendices.......................................................................................................................115
11.1 Dial Plan Quick Reference Guide ............................................................................. 115
11.2 Glossary Table .......................................................................................................... 116
Page ii
OPEN Networks Pty Ltd
www.opennw.com
Page 4

OPEN 812L VoIP ATA Router
User Guide
1. Getting Started
1.1 Introduction
Congratulations on your purchase of the of the OPEN812L VoIP ATA router. The VoIP
Analogue Telephone Adapter (ATA) product is a standard-based communication device that
delivers true, next-generation voice-over-IP (VoIP) terminations to residential homes worldwide.
VoIP is a form of Internet telephony that allows users to make telephone calls through the
Internet. Voice data is sent through a packet-switched network instead of the circuit-switch
transmission. The VoIP system send signals to set up or terminate calls and then make it
possible for people to talk and hear each other online. Internet Telephony employs a variety of
protocols, including RTP for transport of multimedia data and SIP for call signalling and control.
The VoIP ATA connects to your broadband router and your telephone, acting as a go-between
and performing the signal translation that allows your analogue telephone to communicate
through your broadband connection. The VoIP ATA is a mixed-environment adaptor that
interface legacy analogue telephones, fax machines, analogue telephones and other analogue
devices to IP-based technology networks, thereby allowing users and VSPs to protect prior
investments in their analogue telephones, fax machine and speaker phones, and migrate to IP
at their own pace.
Page iii
OPEN Networks Pty Ltd
www.opennw.com
Page 5

OPEN 812L VoIP ATA Router
User Guide
1.2 Main Features & Benefits
Analogue telephone adapters allow customers to convert their Plain Old Telephone Service
(POTS) phone or fax machine into a SIP VoIP phone and begin taking immediate advantage of
low-cost Internet telephony services. Users simply connect their analogue phone into the OPEN
812L VoIP ATA router and the ATA provides both voice and tone to the POTS phone.
The following table is a summary of the features and benefits of the OPEN 812L VoIP ATA
Router.
OPEN812L VoIP ATA Features/Benefits
Hardware Features
Ease-ofConfiguration
Toll-quality voice
performance using
advance QoS
2 x FXS
1 x FXO
2 x 10/100 Auto MDI/MDIx (10/100Base-T
Ethernet)
Provides advanced auto-configuration features like 10/100 autonegotiation, auto MDI / MDIX crossover, DHCP, STUN.
Call in and Call out features
Port priority for VoIP packets from the QoS function
Voice-over-IP call through SIP Proxy
Support incoming and outgoing PSTN calls
IP address calling (peer to peer mode)
3-way IP Conferencing
3-way IP/PSTN Conference call
Call Features
Call waiting
Call Hold
Call Forwarding (No Answer, Busy and All)
Caller ID
Call Transfer
Expansive Audio
Support & Protocols
G.711U Speech Codec
G.711A Speech Codec
G.726-16/24/32/40 Speech/Audio Codec
G.729A Speech Codec
SIP 2.0
T.38 Fax-over-IP support
Voice Activity Detection
Silence Compression Silence Compression
Page 4
OPEN Networks Pty Ltd
www.opennw.com
Page 6

Comfort Noise Generation
Echo Cancellation
OPEN 812L VoIP ATA Router
User Guide
Setup &
Configuration
Network Status
Automated provisioning (VSP-dependant)
Web-based Configuration
Password Protection
Static IP
Network Address Translation (NAT)
NAT Traversal with STUN client
NAT with outbound proxy
Port Mapping/Forwarding
NAT Application Level Gateway for popular applications
DHCP Server/Relay/Client
DNS Relay Agent
QoS using Diffserv and Priority Queuing
Single VPN Pass Through for IPSEC, L2TP, PPTP
DMZ Support
PPP Auto Reconnect
Dynamic DNS Support
Web Management Support
FTP Management Support
Transparent bridge support (routing)
Easy Connect
Firewall (NAT-based)
Proven performance and reliability
Page 5
OPEN Networks Pty Ltd
www.opennw.com
Page 7

OPEN 812L VoIP ATA Router
User Guide
2. Information About the ATA
2.1 Important Safety Instructions
WARNING!
BEFORE USING YOUR ATA EQUIPMENT, BASIC SAFETY INSTRUCTIONS SHOULD ALWAYS BE
FOLLOWED TO REDUCE THE RISK OF FIRE, ELECTRIC SHOCK AND INJURY TO PERSON, INCL UDING
THE FOLLOWING:
1. Read and understand all instructions.
2. Follow all warnings and instructions marked on the product.
3. When cleaning this product, do not use liquid cleaners or aerosol cleaners. Use a damp cloth for
cleaning.
4. Do not use this router in high humidity or high temperatures.
5. Do not open or repair the case yourself. If this router is too hot, turn off the power immediately
and have it repaired at a qualified service centre.
6. Avoid using this product and all accessories outdoors.
7. Place this router on a stable surface.
8. Only use the power adaptor that comes with the package. Using a different voltage-rating
adaptor may damage this router.
9. Slots and openings on the sides and top of the device are provided for ventilation. To protect it
from overheating, these openings must not be blocked or covered. The opening should never be
blocked by placing the product on the bed, sofa, rug or other similar surface. This product should
never be placed near or over a radiator or heat register. This product should not be placed in a
built-in installation unless proper ventilation is provided.
10. Do not allow anything sharp to rest on the cables. Do not locate this product where the cord
could be damaged by persons walking on it.
11. Do not overload wall outlet extension cords, as this can result in the risk of fire or electric shock.
12. To reduce the risk of electric shock, do not disassemble this product. Instead, when some repair
work is required, take the unit to the place of purchase. Opening or removing covers on the
router will void the warranty that comes with the product.
13. Unplug this product from the wall outlet and refer servicing to the place of purchase under the
following conditions:
a. When the power supply cord or plug is damaged or frayed;
b. If liquid has been spilled onto the product;
c. If the product has been exposed to rain or water;
d. If the product does not operate normally by following the operating instructions. Adjust
only those controls that are covered by the operating instructions because improper
adjustment of other controls may result in damage and will often require extensive work
by a qualified technician to restore the product to normal operation;
e. If the product has been dropped or damaged;
f. If the product exhibits a distinct change in performance.
SAVE THESE INSTRUCTIONS
Page 6
OPEN Networks Pty Ltd
www.opennw.com
Page 8

2.2 Package Contents
The OPEN 812L VoIP ATA Router contains the following items:
OPEN 812L VoIP ATA Router
User Guide CD
RJ-11 ADSL/telephone Cable
Ethernet (CAT-5) LAN Cable
AC-DC power adaptor (12VDC, 800mA)
Quick Start Guide
OPEN 812L VoIP ATA Router
User Guide
Page 7
OPEN Networks Pty Ltd
www.opennw.com
Page 9
2.3 Appearance
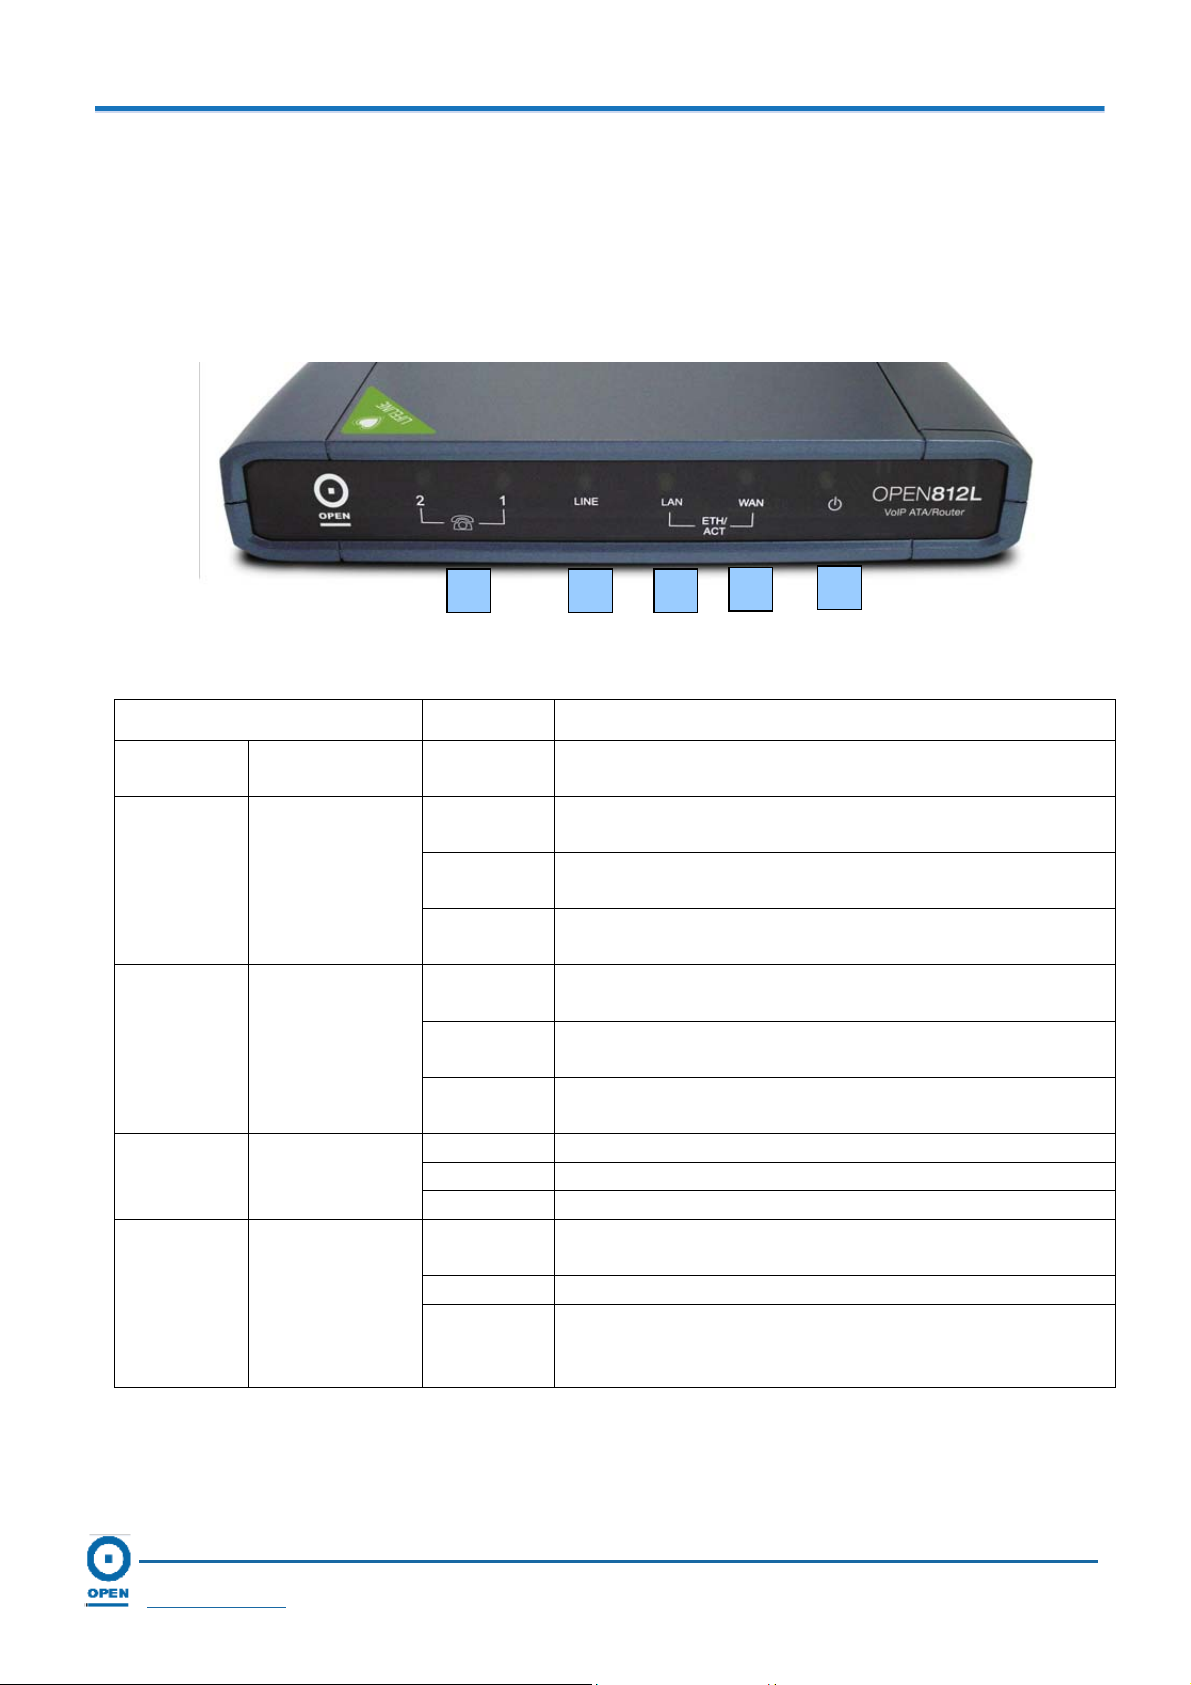
2.3.1 Front Panel Indicators
Figure 2-1 displays the front panel indicators of the VoIP ATA.
OPEN 812L VoIP ATA Router
User Guide
2
345
Figure 2-1 Front Panel Indicators
LED Status LED Label Description
1
POWER
ON Lit when the power is on; the VoIP ATA is receiving
power.
2
WAN
ON Lit when the VoIP ATA has an Ethernet connection
with cable/DSL modem.
BLINKING The VoIP ATA is sending/receiving data to/from the
cable/DSL modem.
OFF The VoIP ATA does not have an Ethernet
connection with the cable/DSL modem.
3
LAN
ON Lit when the VoIP ATA has an Ethernet connection
with a computer.
BLINKING The VoIP ATA is sending/receiving data to/from the
computer.
OFF The VoIP ATA does not have an Ethernet
connection with a computer.
4
LINE
ON The VoIP ATA has an active PSTN call.
BLINKING The VoIP ATA has an incoming PSTN call.
OFF The VoIP ATA does not have an active PSTN call.
5
PHONE 1-2
ON This port(s) is registered to the Internet Phone
Service Provider(s).
BLINKING The telephone connected to this port is off the hook.
OFF This port(s) is not registered to the Voice Service
Provider (VSP). Contact your VSP to register for a
phone line before installing the router.
1
Page 8
OPEN Networks Pty Ltd
www.opennw.com
Page 10
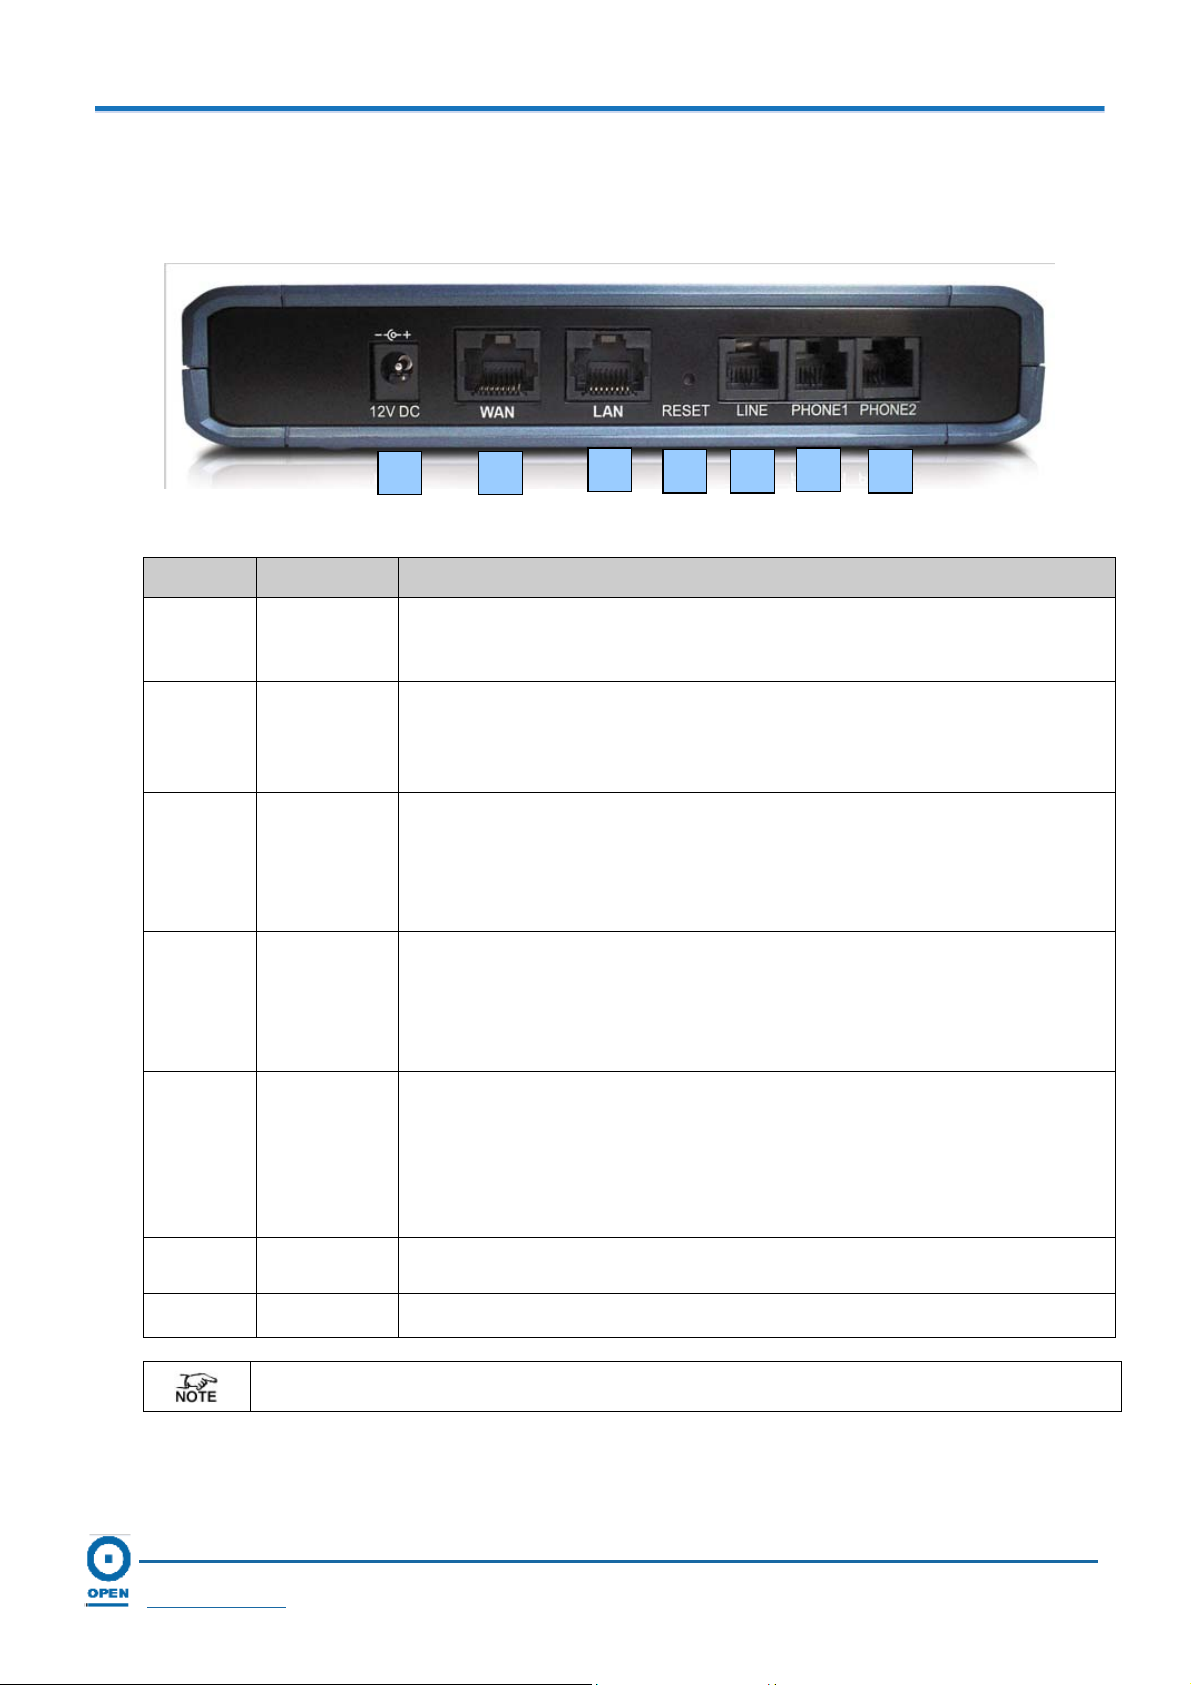
2.3.2 Rear Panel Indicators
Figure 2-2 displays the real panel indicators of the VoIP ATA.
OPEN 812L VoIP ATA Router
User Guide
1 2
Figure 1-2: Rear Panel Indicators
3
4 5
6
7
PORT Item PORT LABEL DESCRIPTION
1
12V DC
Connect your power adapter to the 12V DC. Use only the power
adapter provided.
2 WAN
The WAN port allows you to connect the VoIP ATA to you router
using Category-5 (or better) Ethernet network cable (RJ-45).
Connect your modem or router to the WAN port.
3 LAN
The LAN port allows you to connect the VoIP ATA to your computer
using a Category-5 (or better) Ethernet network cable (RJ-45).
Connect the Ethernet cable to the LAN port on one end and
connect the other to your computer or an office/home network.
4
RESET
The RESET button allows you to restore the VoIP ATA’s default
factory settings. To reset the router, press and hold the button for 3
seconds. The OPEN 812L VoIP ATA router should reboot after you
release the button.
5
LINE
This is the Lifeline. If your broadband connection is ‘off line’, you
can make calls using your traditional line as a backup. The Lifeline
port allows you to connect your normal PSTN line to the VoIP ATA.
To activate this function, connect a phone cable from your wall
phone jack to the Lifeline port.
6
PHONE 1
Connect an analogue phone to this port.
7
PHONE 2
All customized settings that you have saved will be lost upon resetting the VoIP ATA to default
factory settings.
Connect an additional analogue phone to this port, if used.
Page 9
OPEN Networks Pty Ltd
www.opennw.com
Page 11

OPEN 812L VoIP ATA Router
User Guide
3. Connecting the ATA Router
The router can be configured with your web browser. A web browser is included as a standard
application in the following operating systems: Linux, Mac OS, Windows 98/NT/2000/XP/Me,
etc. The product provides a very easy and user-friendly interface for configuration.
Computers must have an Ethernet interface installed properly and be connected to the router
either directly or through an external repeater hub, and have TCP/IP installed and configured to
obtain an IP address through a DHCP server or a fixed IP address that must be in the same
subnet as the router. The default IP address of the router is 192.168.10.1 and the subnet mask
is 255.255.255.0 (i.e. any attached computer must be in the same subnet, and have an IP
address in the range of 192.168.10.1 to 192.168.10.253). The best and easiest way is to
configure the computer to get an IP address automatically from the router using DHCP.
If you encounter any problems accessing the router’s web interface it may be advisable to
uninstall any kind of software firewall on your computers, as they can cause problems
accessing the 192.168.10.1 IP address of the router. Users should make their own decisions on
how to best protect their network.
As a quick reference, please follow the Quick Start Guide enclosed with your OPEN 812L VoIP
ATA router on how to connect your cable or DSL modem and your computer. Alternatively, you
may follow the steps in this guide for your computer’s network environment installation. These
are examples of how to use your OPEN 812L VoIP ATA router. It is recommended to check
your network components and ensure that your PC or Notebook has an Ethernet port.
Page 10
OPEN Networks Pty Ltd
www.opennw.com
Page 12

OPEN 812L VoIP ATA Router
User Guide
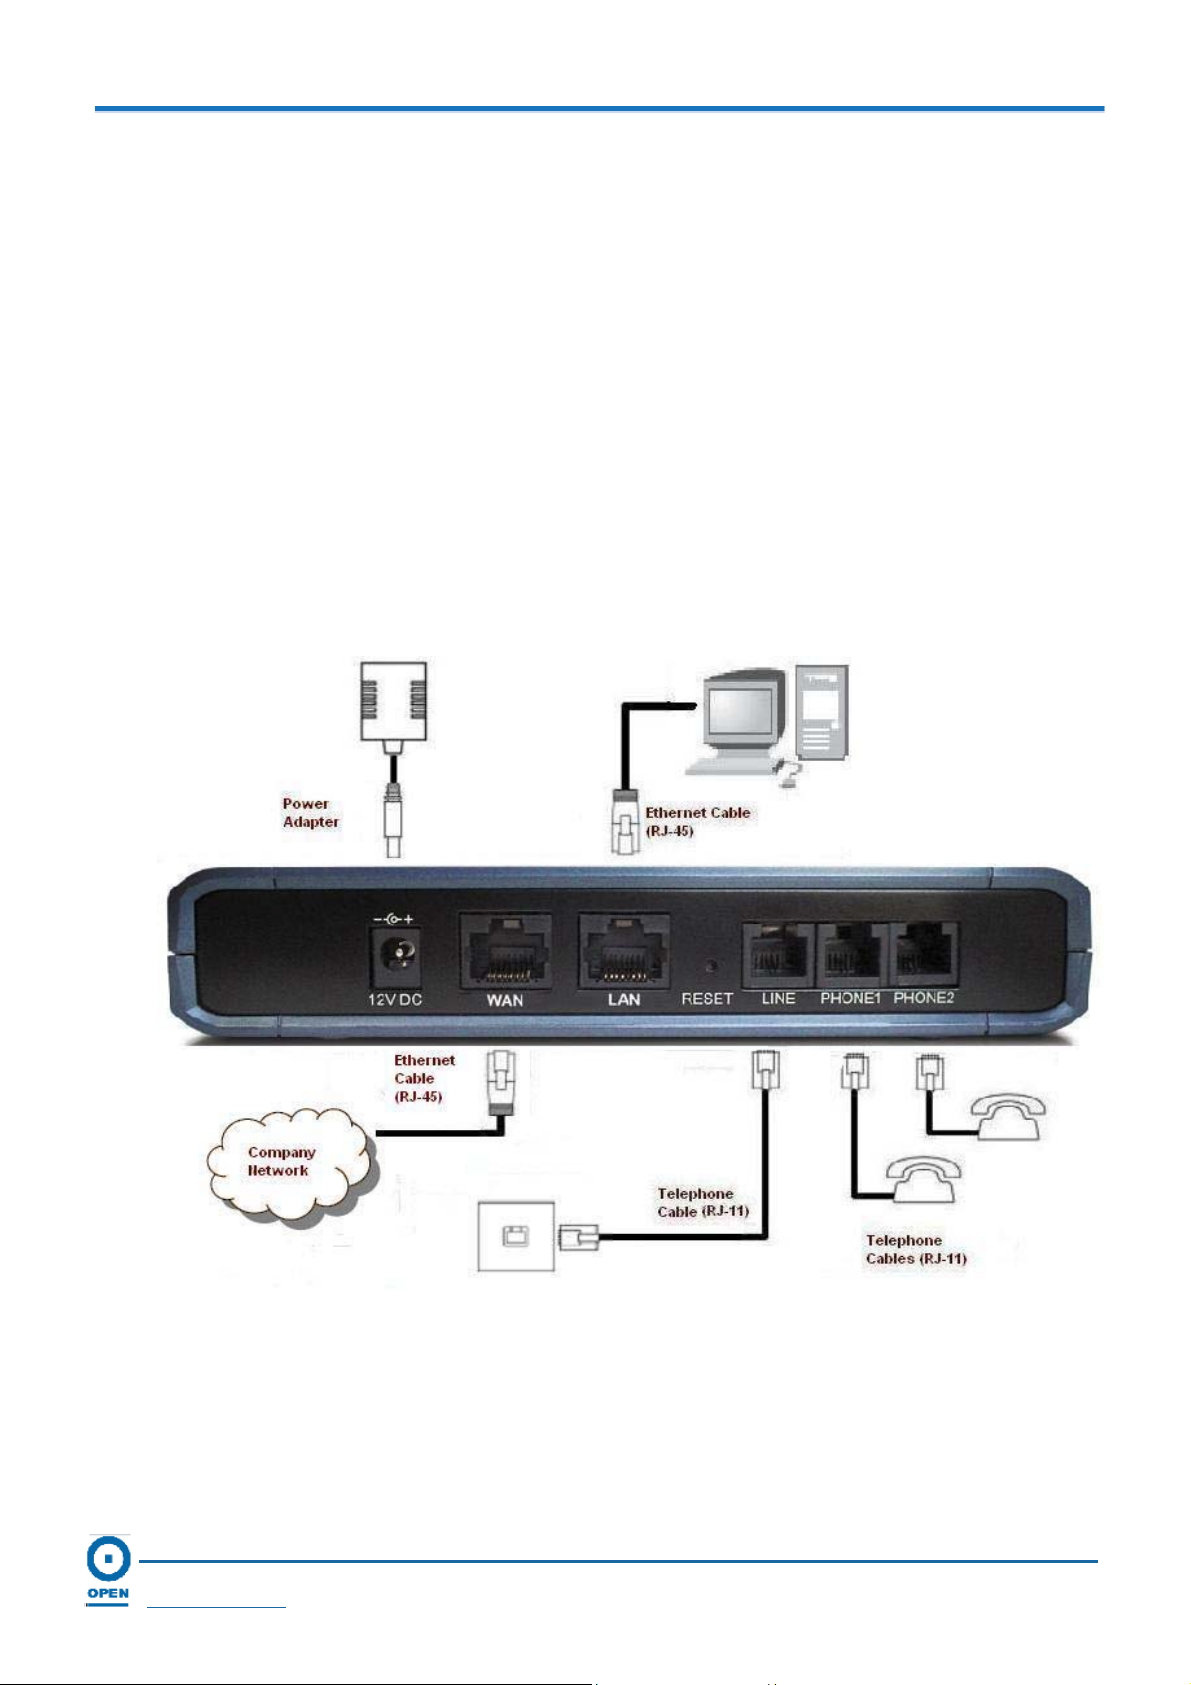
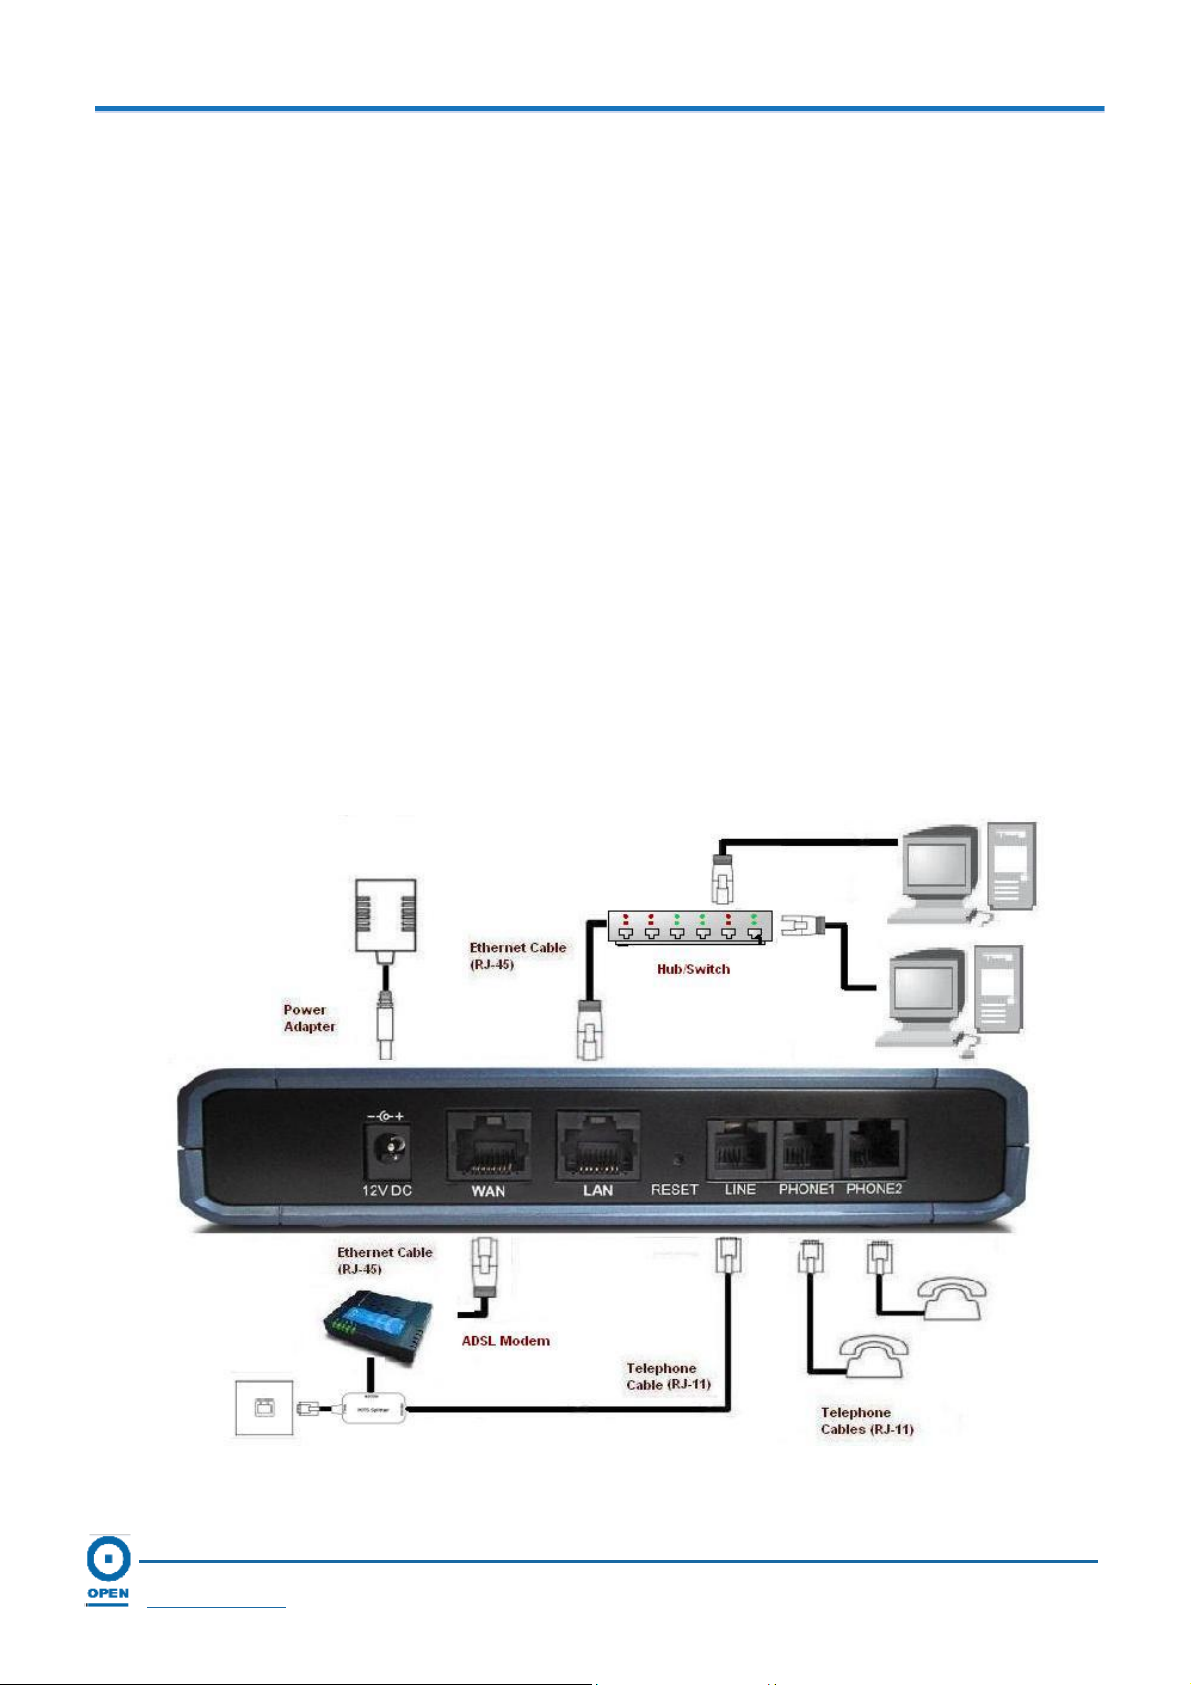
3.1 Single-User Connection Via ADSL
Step 1: Connect the power adaptor provided into the OPEN 812L VoIP ATA router and plug
the unit into a power source. Make sure the PWR LED is steadily lit.
Step 2: Connect your ADSL modem to the WAN port at the back of the OPEN 812L VoIP
ATA router using the Ethernet cable provided. The WAN LED should be steadily lit.
Step 3: Connect an Ethernet cable into the LAN port of the OPEN 812L VoIP ATA router.
Connect the other end of the cable to your computer. The LAN LED should be
steadily lit.
Step 4: Connect a phone cable into the LINE (Lifeline) port, if using as a backup. Connect
the other end of the cable to the line splitter or wall phone jack.
Step 5: Connect your analogue phone(s) to the phone Port 1 and/or 2 using a phone
cable(s).
The following diagram shows a typical single-user connection.
Figure 3-1: Connection via ADSL
Page 11
OPEN Networks Pty Ltd
www.opennw.com
Before you connect to the OPEN 812L VoIP ATA router, you need to have an ADSL modem.
Page 13

OPEN 812L VoIP ATA Router
User Guide
3.2 Single-User Cable Connection
Step 1: Connect the power adapter provided into the OPEN 812L VoIP ATA router and plug
the unit into a power source. Make sure the PWR LED is steadily lit.
Step 2: Connect your cable modem to the WAN port at the back of the OPEN 812L VoIP
ATA router using the Ethernet cable provided.
Step 3: Connect an Ethernet cable into the LAN port of the OPEN 812L VoIP ATA router.
Connect the other end of the cable to your computer. The LAN LED should be
steadily lit.
Step 4: Connect a phone cable to the LINE (Lifeline) port if using as a backup.
Step 5: Connect your analogue phone(s) to the phone Port 1 and/or 2 using a phone
cable(s).
The following shows a typical single-user cable connection.
Figure 3-2: Single-User Connection via Cable
Page 12
OPEN Networks Pty Ltd
www.opennw.com
Before you connect to the ATA, you need to have a Cable modem.
Page 14
OPEN 812L VoIP ATA Router
User Guide
3.3 Single-User Company Network Connection
Step 1: Connect the power adapter provided into the ATA and plug the unit into a power
source. Make sure the PWR LED is steadily lit. Turn on the device.
Step 2: Connect an Ethernet cable into the LAN port of the ATA using the Ethernet cable
provided. Connect the other end of the cable to your computer. The LAN LED should
be steadily lit.
Step 3: Connect your company network to the WAN port at the back of the ATA using the
Ethernet cable provided. The WAN LED should be steadily lit.
Step 4: Connect a phone cable to the LINE (Lifeline) port if using as a backup.
Step 5: Connect your analogue phone(s) to the phone Port 1 and/or 2 using a phone cable
(RJ-11).
Figure 3-3: Single-User Company Network Connection
Page 13
OPEN Networks Pty Ltd
www.opennw.com
Page 15
OPEN 812L VoIP ATA Router
User Guide
3.4 Multiple-Users Connection Via ADSL
If you want to connect more than one PC/notebook, you may do so by connecting the OPEN
812L VoIP ATA router to a switch/hub.
To do this, follow the steps provided below.
Step 1: Connect the power adapter provided into the OPEN 812L VoIP ATA router and plug
the unit into a power source. Make sure the PWR LED is steadily lit.
Step 2: Connect your ADSL modem to the WAN port of the OPEN 812L VoIP ATA router
using the Ethernet cable provided. The WAN LED should be steadily lit.
Step 3: Connect an Ethernet cable into the LAN port of the OPEN 812L VoIP ATA router.
Connect the other end of the cable to the hub/switch. The LAN LED should be
steadily lit.
Step 4: Connect your computers/notebooks to the hub/switch using the Ethernet cables.
Step 5: Connect a phone cable to the LINE (Lifeline) port if using as a backup.
Step 6: Connect your analogue phone(s) to the phone Port 1 and/or 2 using a phone cable
(RJ-11).
Figure 3-4: Multiple Users Connection Via ADSL
Page 14
OPEN Networks Pty Ltd
www.opennw.com
Page 16
OPEN 812L VoIP ATA Router
User Guide
4. PC Network Configuration
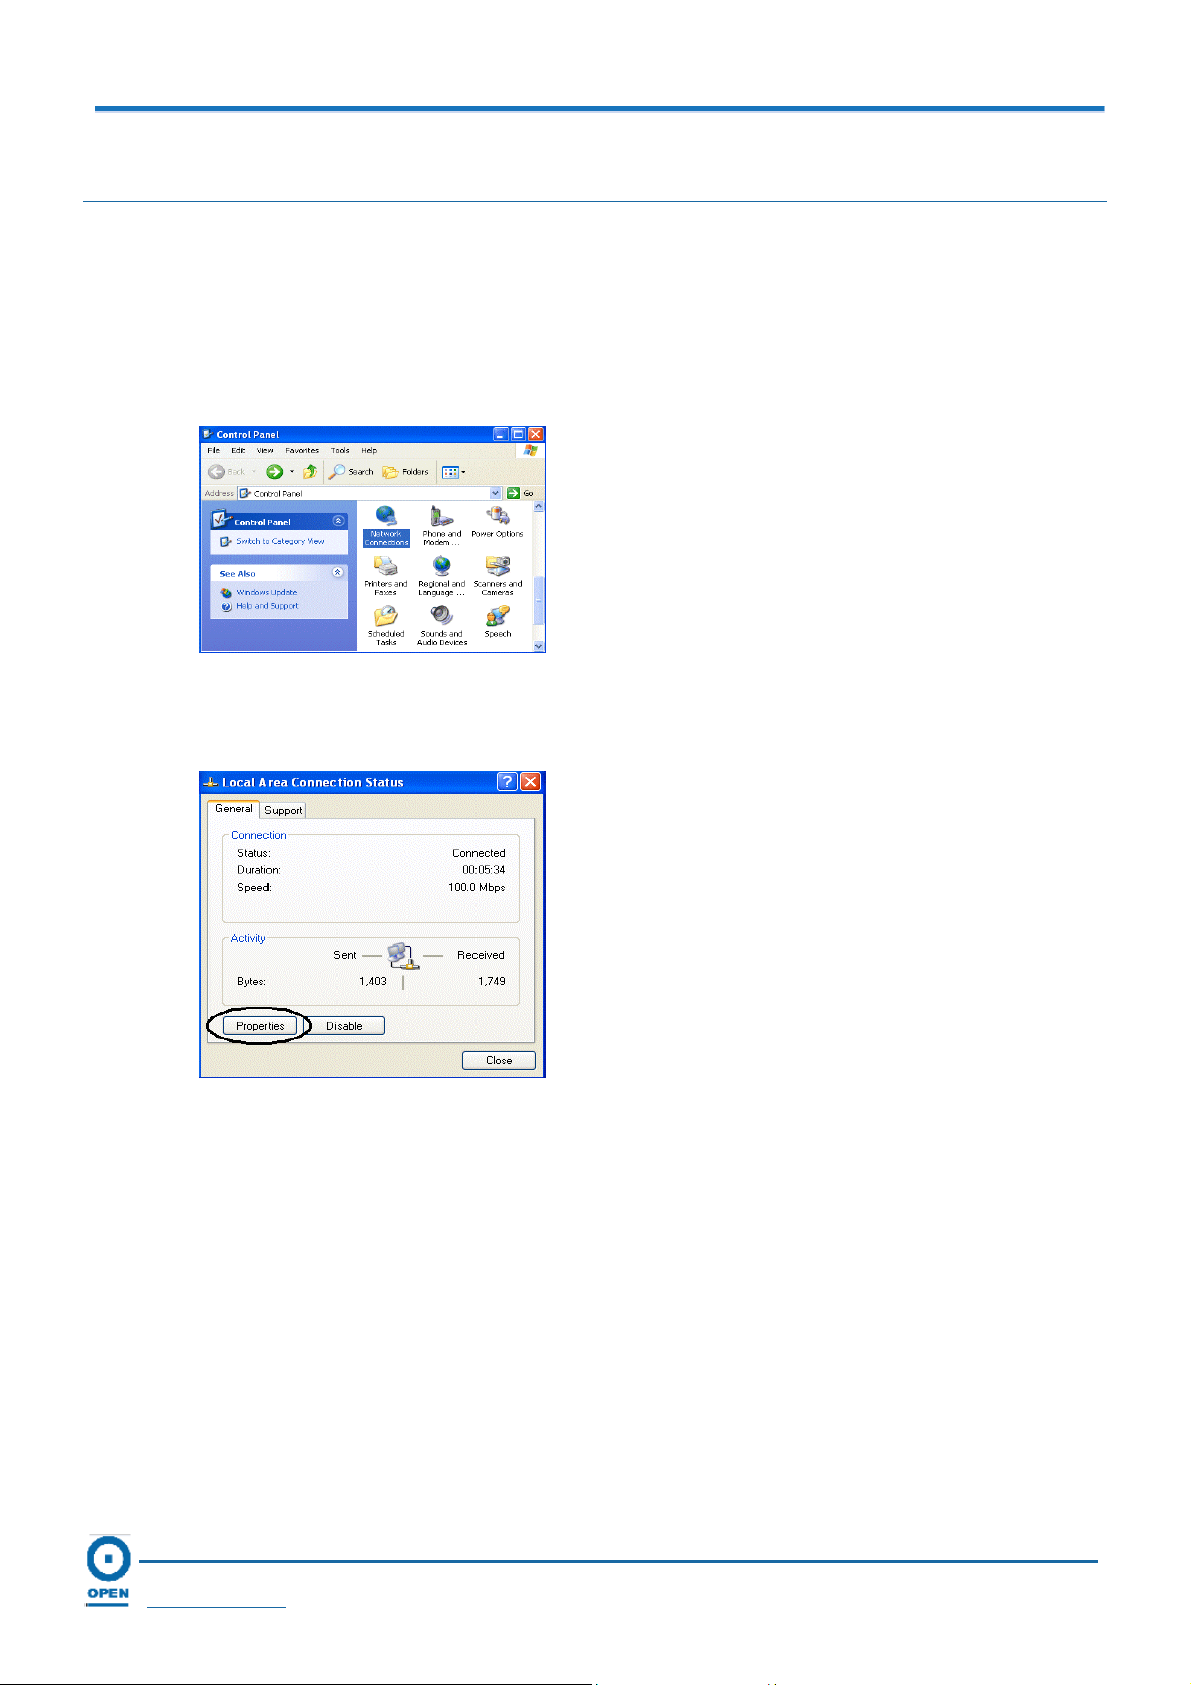
4.1 Configuring Computers in Windows XP
Step 1: Click Start/Control Panel (in Classic View). From the Control Panel window, double-
click Network Connections. The following appears:
Step 2: Double-click the Local Area Network connection name required. The following
appears:
Step 3: Click Properties. The following appears:
Page 15
OPEN Networks Pty Ltd
www.opennw.com
Page 17
OPEN 812L VoIP ATA Router
User Guide
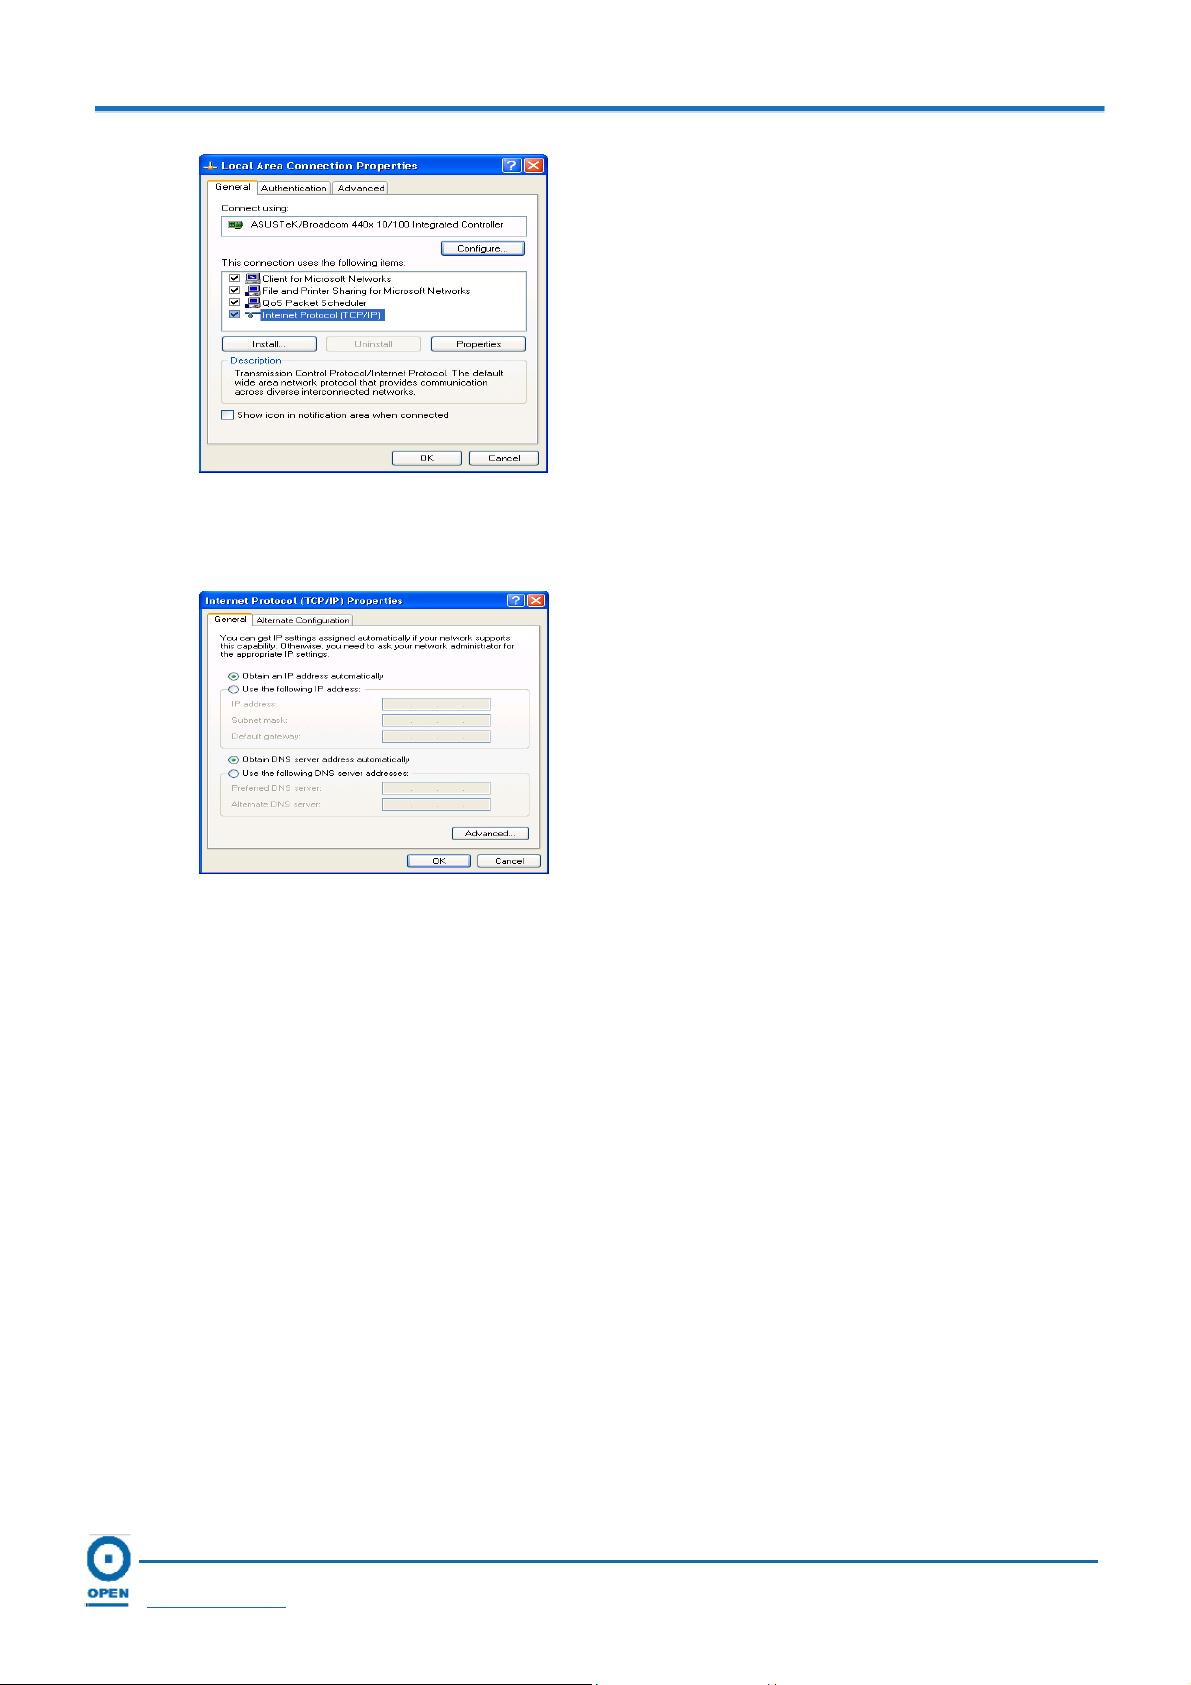
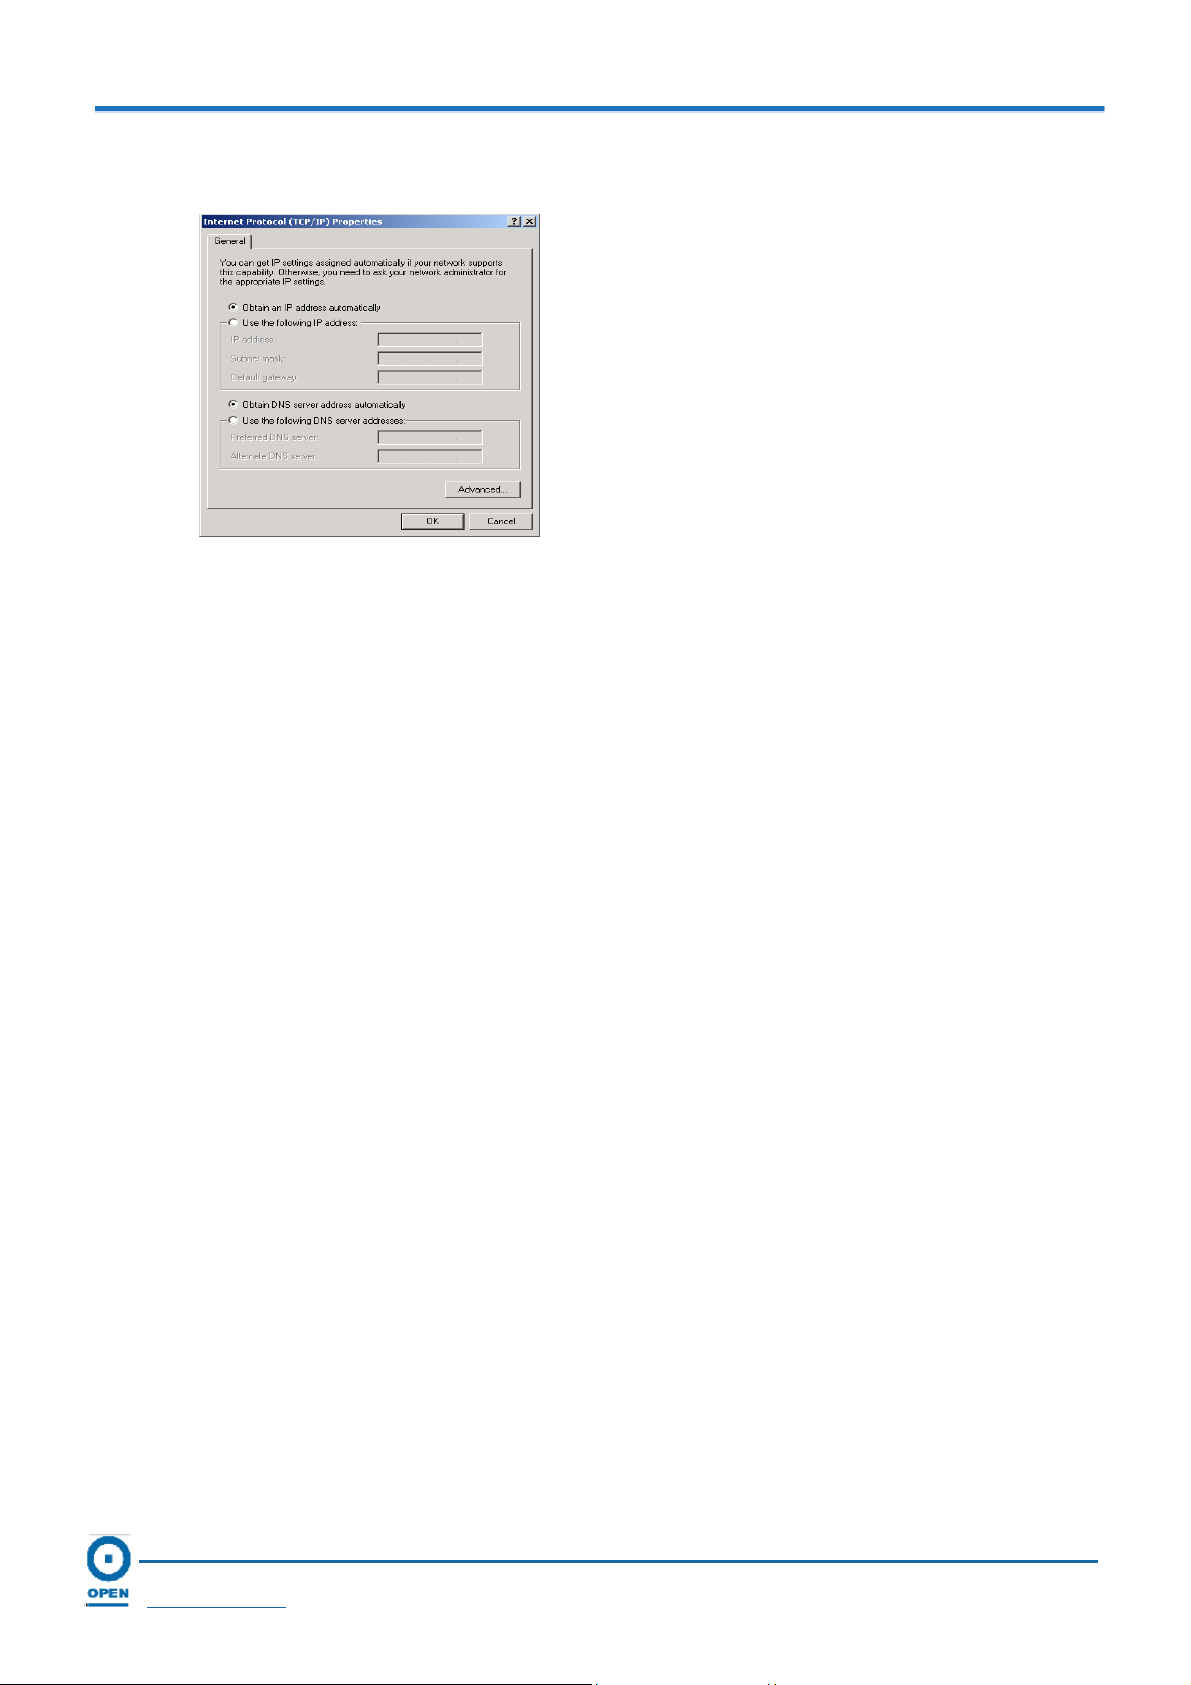
Step 4: Ensure the General tab is active and highlight Internet Protocol (TCP/IP). Click the
OK button. The following appears:
Step 5: Ensure the Obtain an IP address automatically and the Obtain DNS server address
automatically radio buttons. Click the OK button to complete the configuration.
Page 16
OPEN Networks Pty Ltd
www.opennw.com
Page 18
OPEN 812L VoIP ATA Router
User Guide
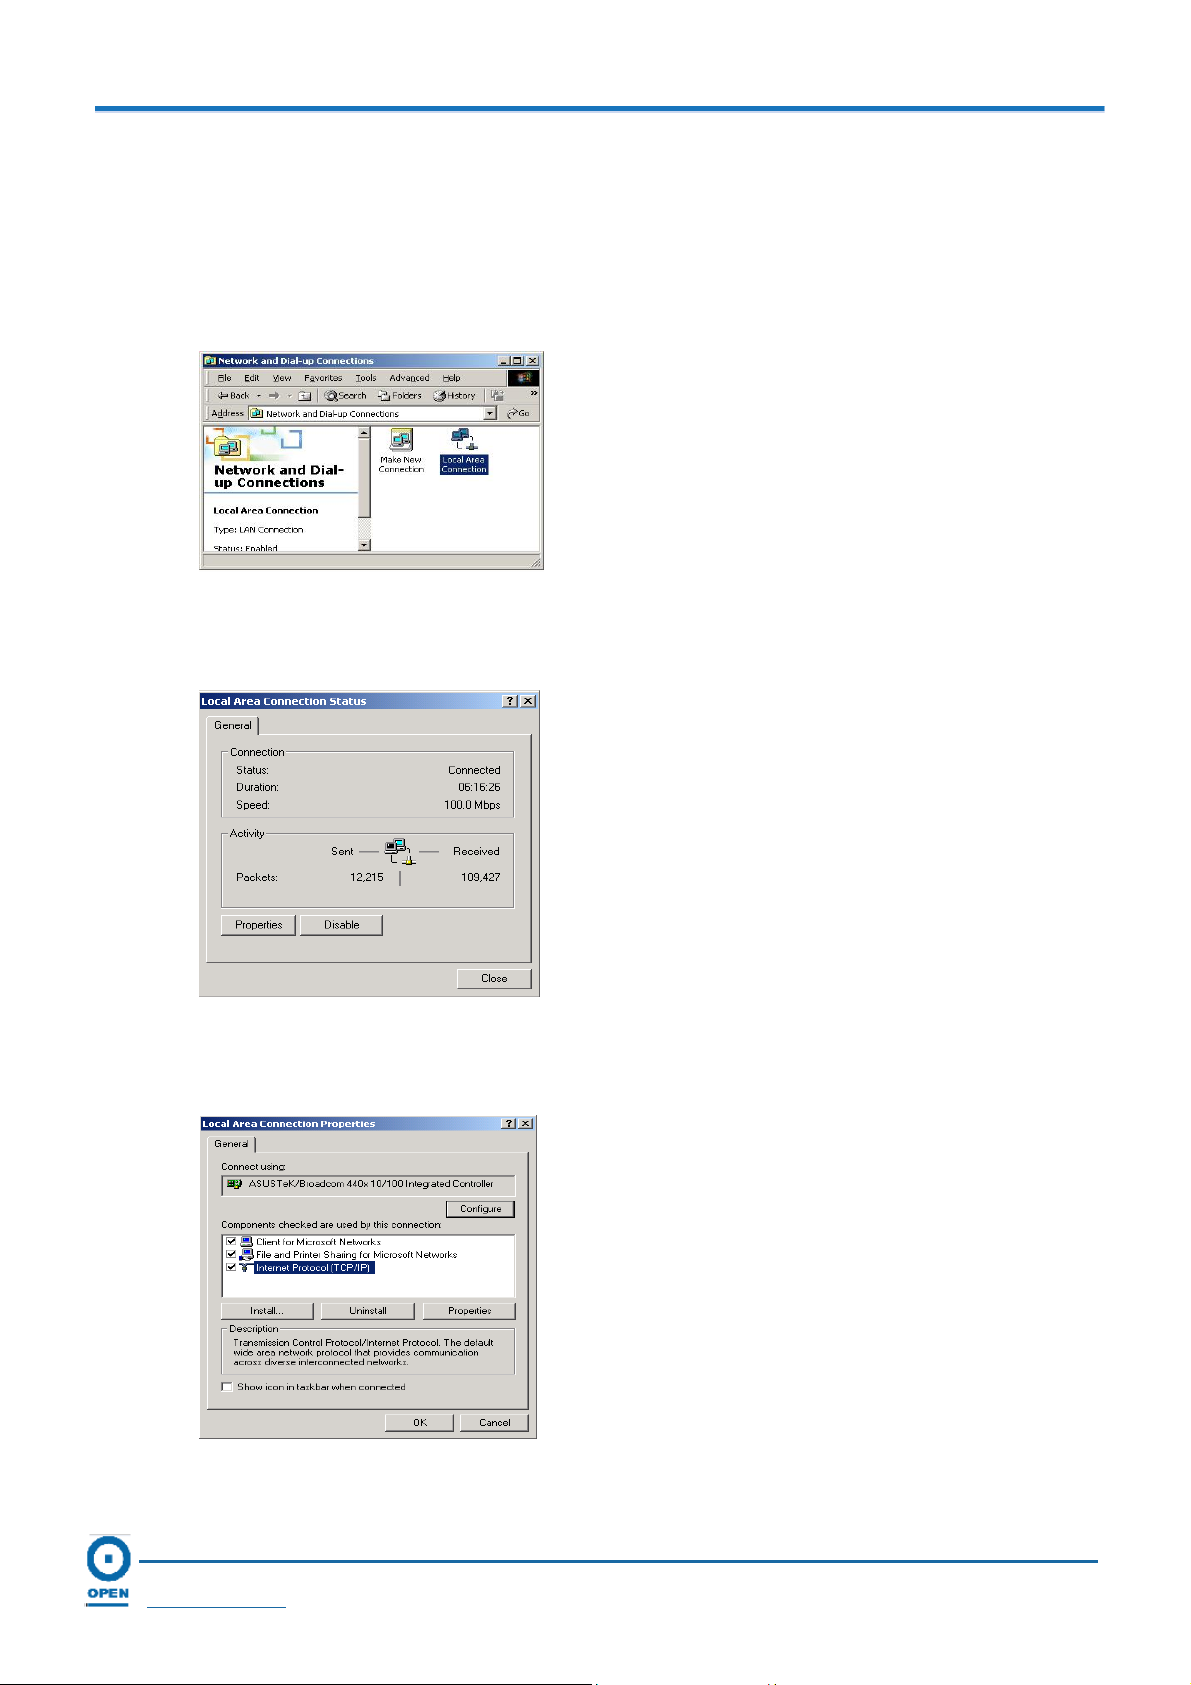
4.2 Configuring Computers in Windows 2000
Step 1: Click Start/Control Panel. From the Control Panel window, double-click Network
and Dial-up Connections. The following appears:
Step 2: Double-click the Local Area Network connection name required. The following
appears:
Step 3: From the Local Area Connection Status window, click Properties. The following
appears:
Page 17
OPEN Networks Pty Ltd
www.opennw.com
Page 19
OPEN 812L VoIP ATA Router
User Guide
Step 4: Highlight Internet Protocol (TCP/IP) and click Properties. The following appears:
Step 5: Highlight the Obtain an IP address Automatically and the Obtain DNS Server
Address Automatically radio buttons. Click the OK button to complete the
configuration.
Page 18
OPEN Networks Pty Ltd
www.opennw.com
Page 20

OPEN 812L VoIP ATA Router
4.3 Configuring Computers In Windows 95/98/ME
Step 1: Click the Start/Control Panel. From the Control Panel window, double-click
Network and highlight the Configuration tab to make it active. The following appears:
User Guide
Step 2: Highlight TCP/IP --> NE2000 Compatible, or the name of any Network Interface Card
(NIC) in your PC. Click Properties. The following appears:
Step 3: Highlight the IP Address tab to make it active, then highlight the Obtain an IP
address automatically radio button.
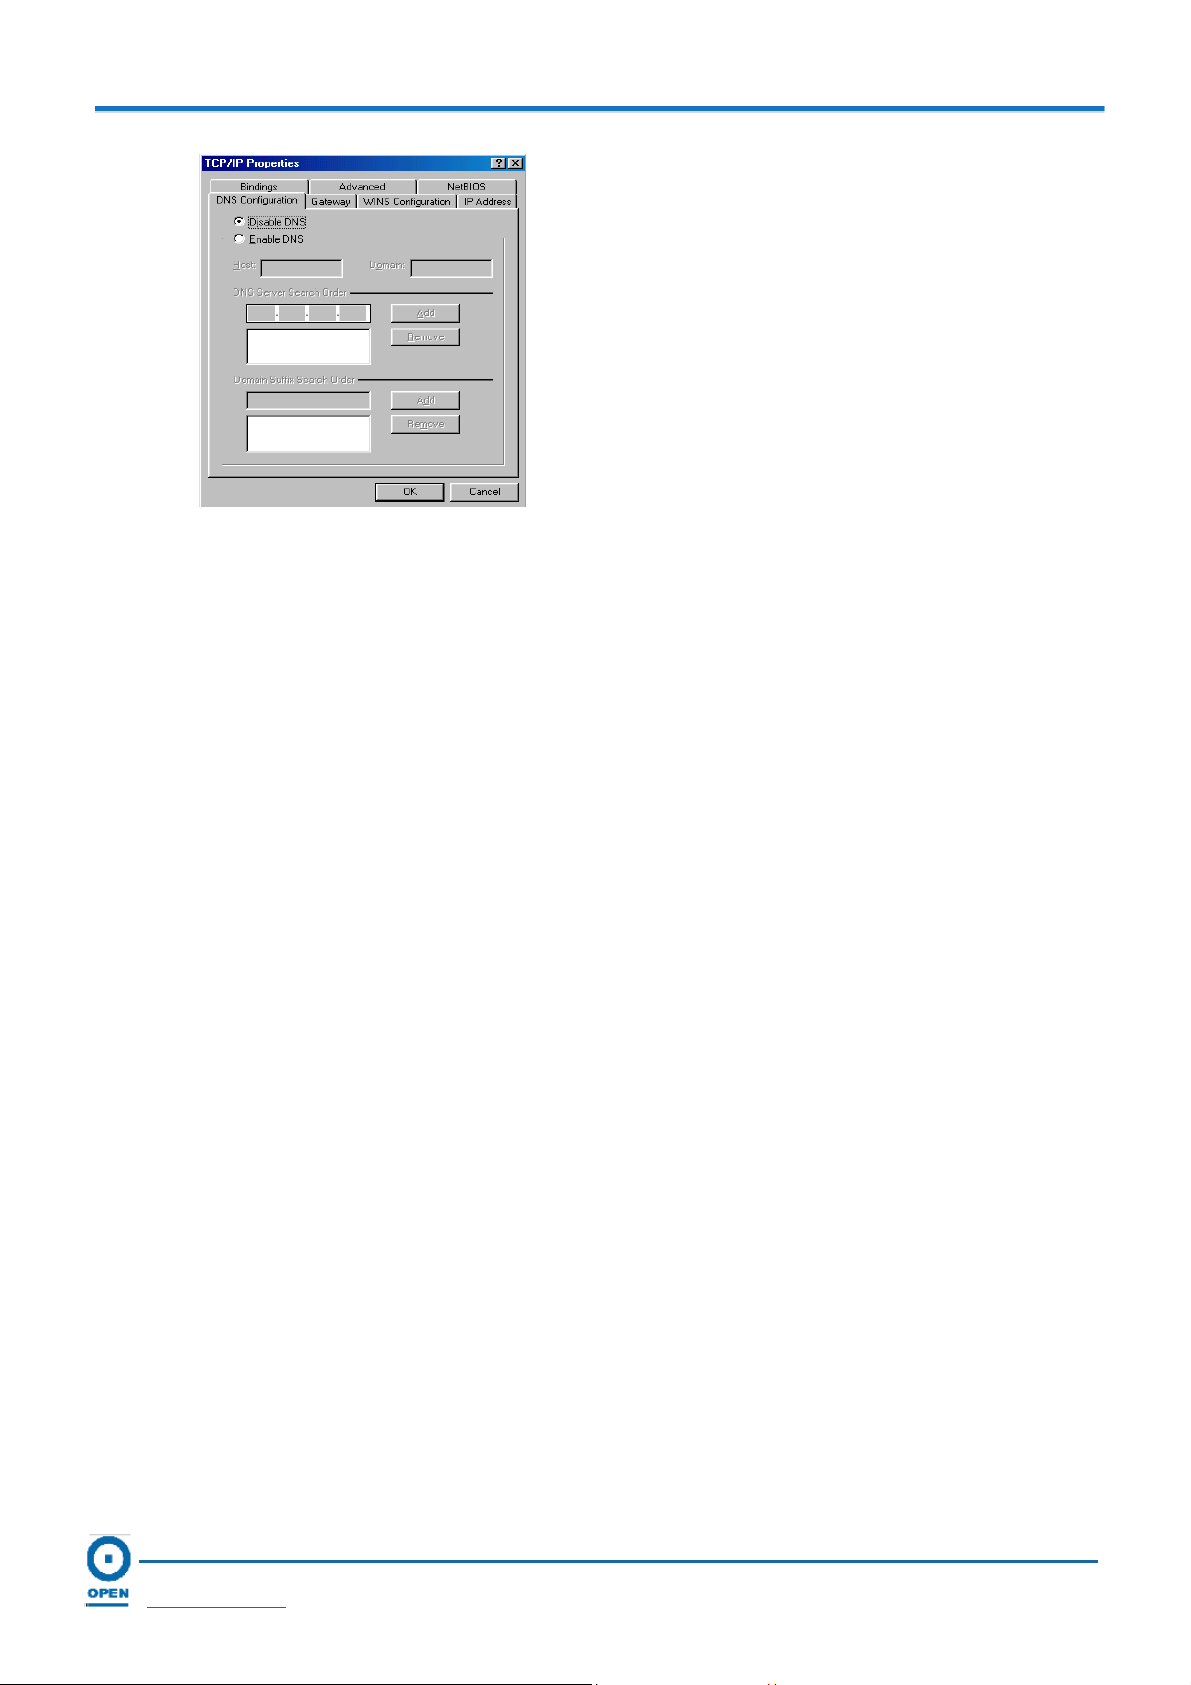
Step 4: Highlight the DNS Configuration tab to make it active. The following appears:
Page 19
OPEN Networks Pty Ltd
www.opennw.com
Page 21
OPEN 812L VoIP ATA Router
User Guide
Step 5: Highlight the Disable DNS radio button, then click OK to complete the configuration.
Page 20
OPEN Networks Pty Ltd
www.opennw.com
Page 22

OPEN 812L VoIP ATA Router
User Guide
4.4 Configuring Computers in Windows NT4.0
Step 1: Click Start/Control Panel. From the Control Panel window, double-click Network
and highlight the Protocols tab to make it active. The following appears:
Step 2: Highlight TCP/IP Protocol, then click Properties. The following appears:
Step 3: Highlight the Obtain an IP address from a DHCP Server radio button. Click the OK
button to complete the configuration.
Page 21
OPEN Networks Pty Ltd
www.opennw.com
Page 23
OPEN 812L VoIP ATA Router
User Guide
4.5 Factory Default Settings
Before configuring your router, you need to know the following default settings.
4.5.1 Web Interface (Username and Password)
Username: root
Password: 0P3N (the first character '0' denote a zero)
The default username and password are 'root' and '0P3N' respectively. These fields are case-
sensitive.
If you ever forget your login password, you may press the RESET button for up to 3 seconds to
restore the factory default settings.
4.5.2 LAN Device IP Settings
IP Address: 192.168.10.1
Subnet Mask: 255.255.255.0
4.5.3 DHCP server
DHCP server is enabled.
Start IP Address: 192.168.10.100 – End IP Address: 192.168.10.199
IP pool counts: 100 to 199.
4.5.4 LAN and WAN Port Addresses
The parameters of LAN and WAN ports are pre-set in the factory. The default values are
shown below.
LAN Port WAN Port
IP address
Subnet Mask
DHCP server function
192.168.10.1
255.255.255.0
Enabled
The WAN port is the DHCP
Client.
IP addresses for
distribution to PCs
Page 22
OPEN Networks Pty Ltd
www.opennw.com
100 IP addresses continuing from
192.168.10.100 through
192.168.10.199
Page 24

OPEN 812L VoIP ATA Router
4.6 Configuring with your Web Browser
Step 1: Open a Web Browser and enter the following address in the Address bar:
http://192.168.10.1, then click Go. The following appears:
User Guide
Step 2: Enter the default username and password in the User name and Password fields,
as provided under Section 4.5.1. Click the OK button.
Step 3: Upon logging in, the Overall Status page appears:
For more information about the Overall Status details, please refer to Chapter 6: Basic
Configuration under the Overall Status section.
Congratulations! You have now successfully logged onto the OPEN812L VoIP ATA router!
Page 23
OPEN Networks Pty Ltd
www.opennw.com
Page 25

OPEN 812L VoIP ATA Router
User Guide
5. Setup via Web Interface
Once you have physically connected the OPEN 812L VoIP ATA router successfully, the next
step is to setup the OPEN 812L VoIP ATA router in order to establish a connection to the
Internet and make phone calls over the Internet.
There are three steps in setting up the OPEN 812L VoIP ATA router, located at the left pane of
the Setup page:
Step 1: Network Selection
Step 2: Voice Service Provider for Phone 1
Step 3: Voice Service Provider for Phone 2
Please refer to the following sections of this manual for detailed instructions on how to setup the
OPEN 812L VoIP ATA Router.
Page 24
OPEN Networks Pty Ltd
www.opennw.com
Page 26
OPEN 812L VoIP ATA Router
User Guide
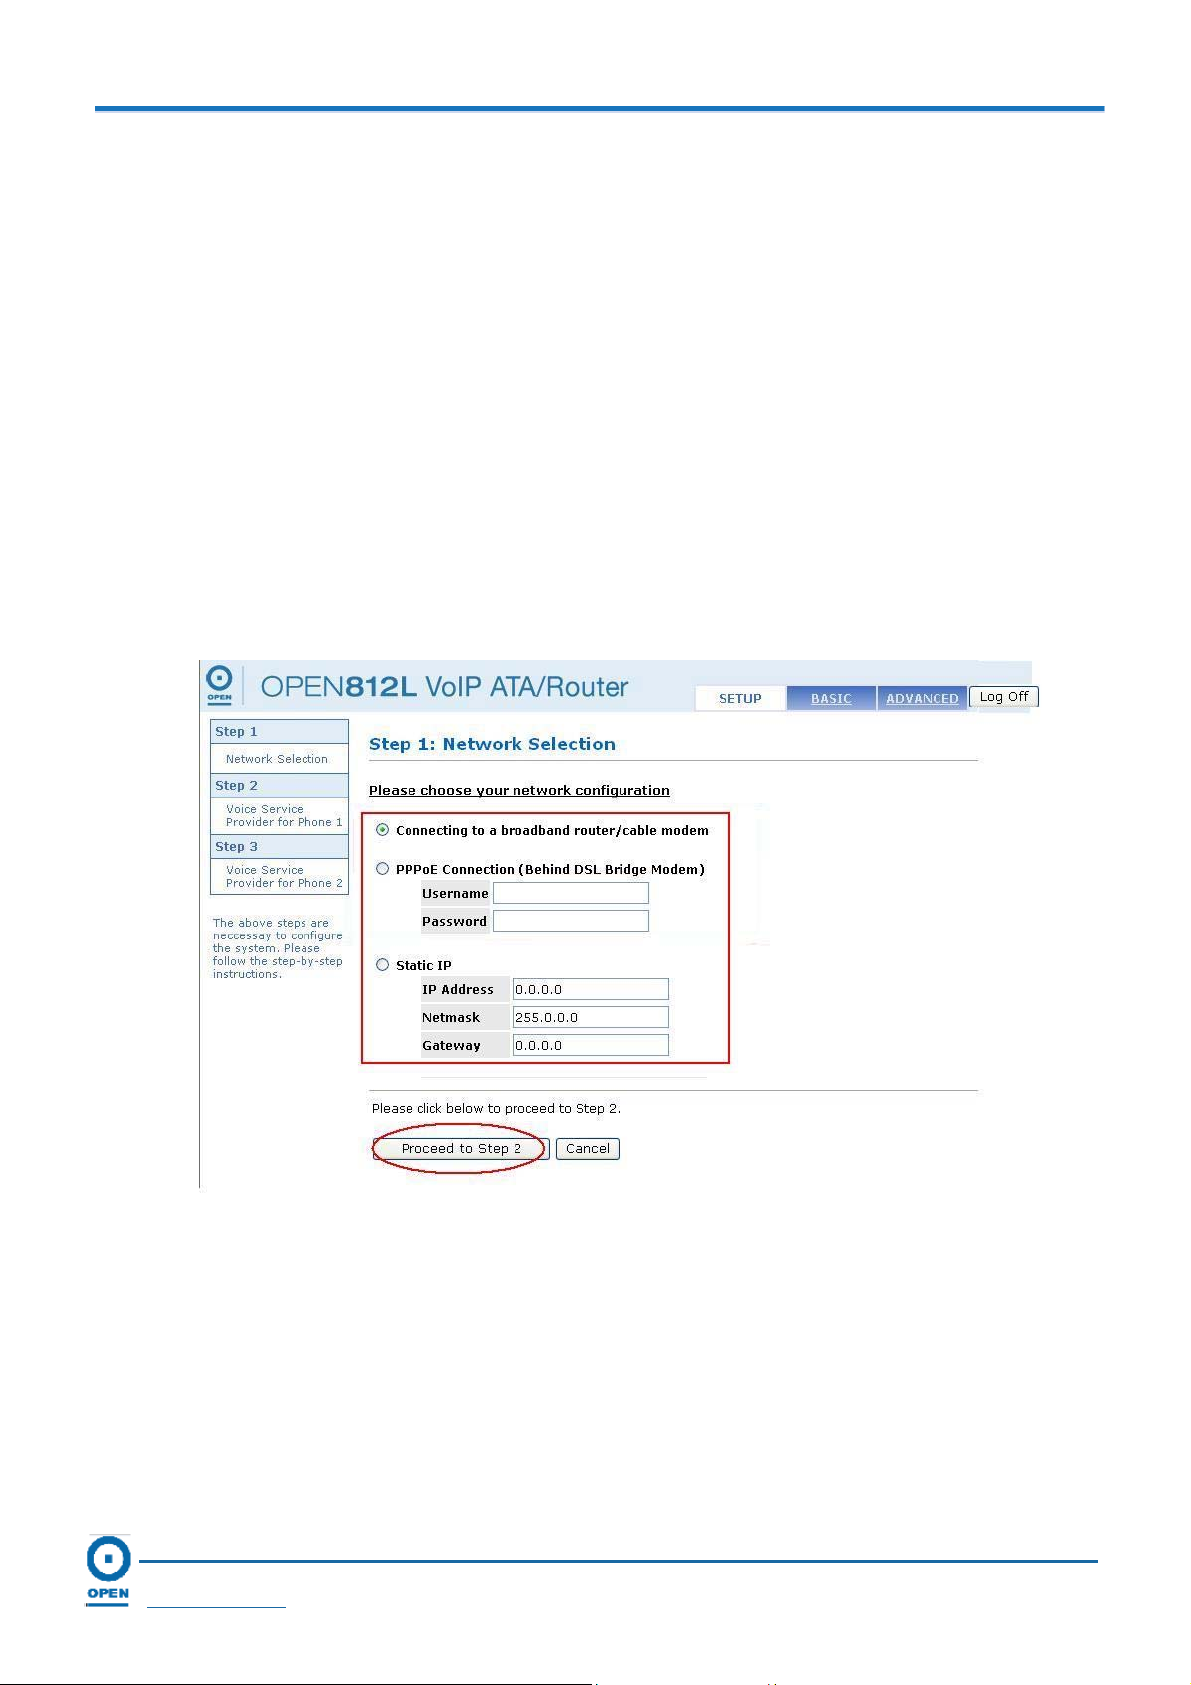
5.1 Network Selection
Step 1: There are 3 network configuration options you can choose from:
If you are a cable user (i.e. connection is behind a router), select the
Connecting to a broadband router/cable modem option.
If you are using a bridge modem, select the PPPoE Connection (Behind
DSL Bridge Modem) option.
If your connection requires Static IP, select the Static IP option and enter the
3 fields: IP Address, Netmask and Gateway.
Step 2: For PPPoE Connection, enter your Username and Password as provided by you
VSP. Refer to the image provided below.
Step 3: Click the Proceed to Step 2 button to configure Step 2. To remove the selections
made, click the Cancel button and re-select your options.
Page 25
OPEN Networks Pty Ltd
www.opennw.com
Page 27
OPEN 812L VoIP ATA Router
User Guide
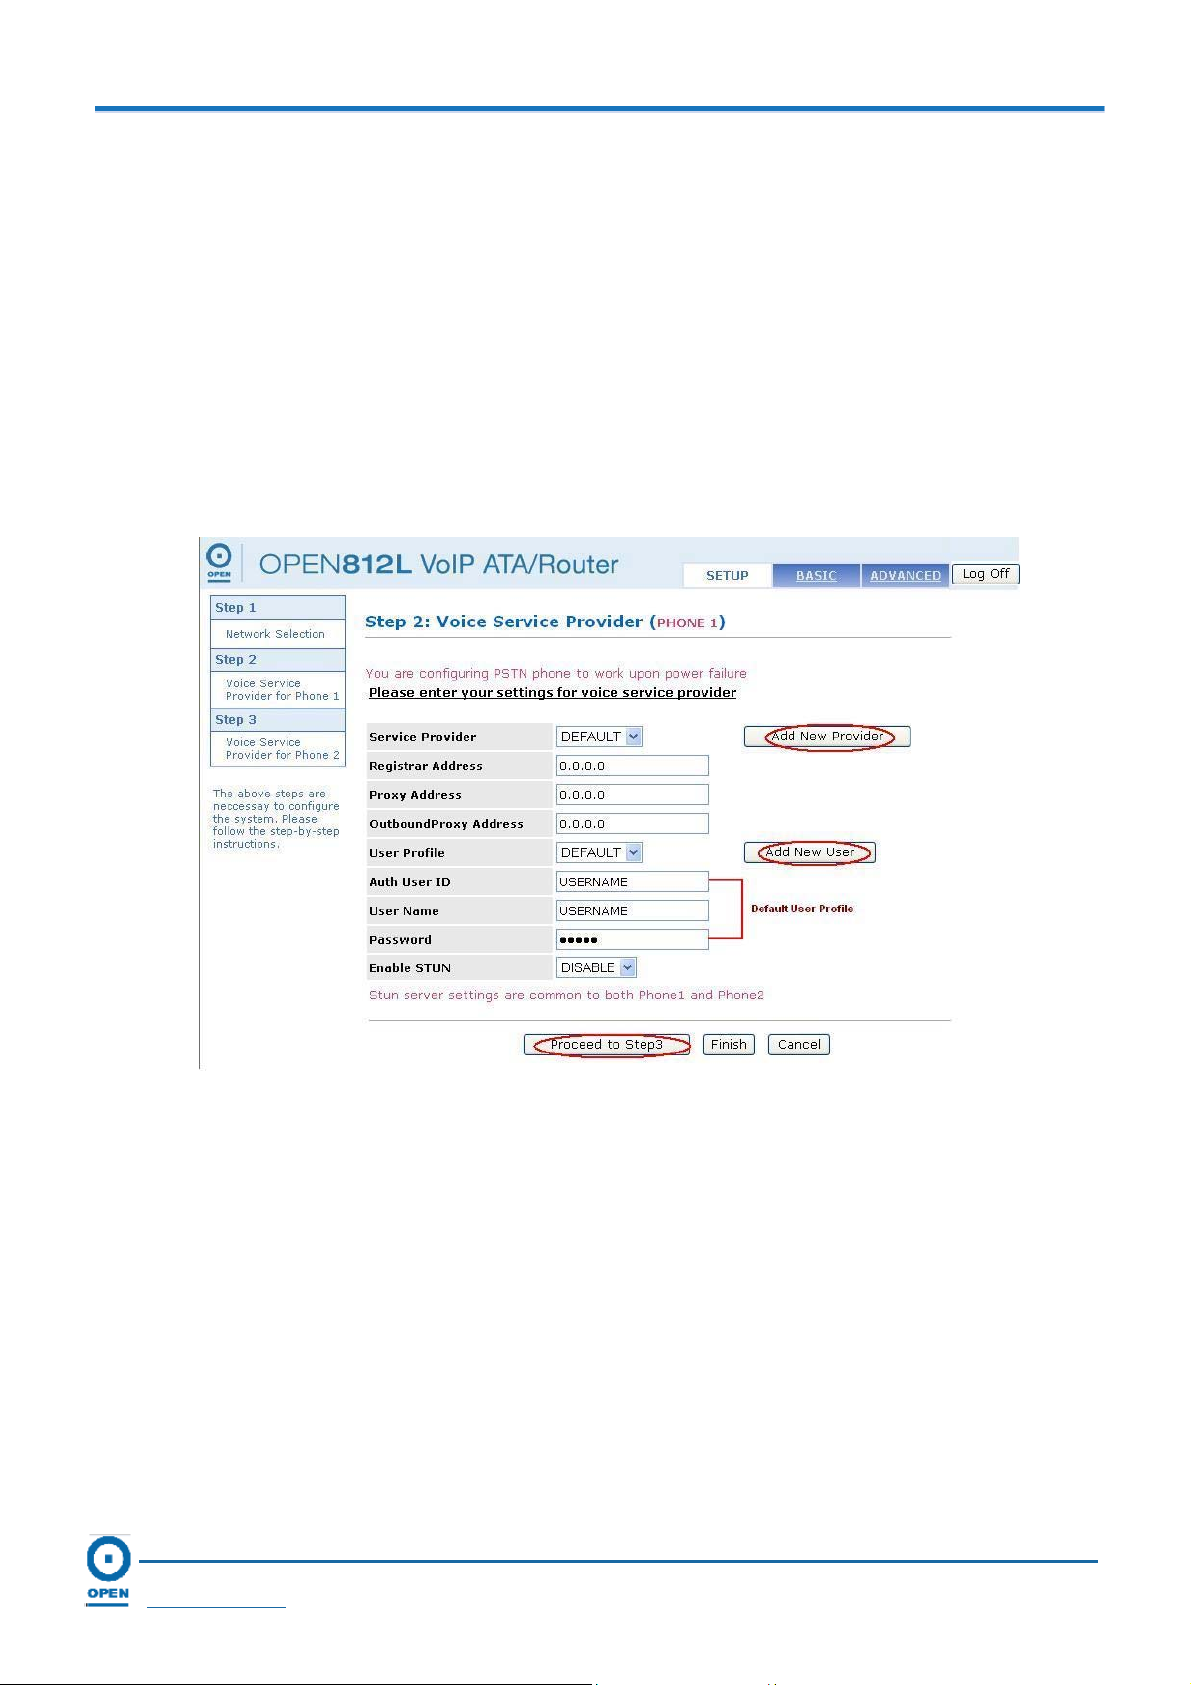
5.2 Voice Service Provider Phone 1 & 2
This section allows you to configure the information from your Voice Service Provider (VSP).
The information required includes the name of your VSP, the IP address of the service provider
and new users for the account. Ensure that you have the correct information before proceeding.
Step 1: Select your Service Provider using the drop-down menu option provided. Select the
DEFAULT option.
Enter all the fields on this screen, as they are mandatory fields. Default settings are
displayed for all the fields. You may overwrite these fields with your VSP details.
Step 2: If you wish to add an additional VSP by clicking the Add New Provider button, enter
all the mandatory fields as shown below. If you have not selected this option,
proceed to Step 4.
Page 26
OPEN Networks Pty Ltd
www.opennw.com
Page 28

OPEN 812L VoIP ATA Router
User Guide
Step 3: Click the Add New Provider to save the entries made or click the Cancel button to
re-enter the details. This will take you back to the Voice Service Provider Phone 1
screen.
You may add a maximum of 4 service providers under the Add New Service Provider option.
Step 4: Enter all the rest of the details in the next three fields as provided by your Voice
Service Provider. These include:
Registrar Address;
Proxy Address;
OutboundProxy Address
Step 5: Next, select the User Profile option. If you have no users added yet, click the Add
New User button as displayed in Step 1. You may add up to 4 users to the User
Profile.
Page 27
OPEN Networks Pty Ltd
www.opennw.com
Page 29
OPEN 812L VoIP ATA Router
User Guide
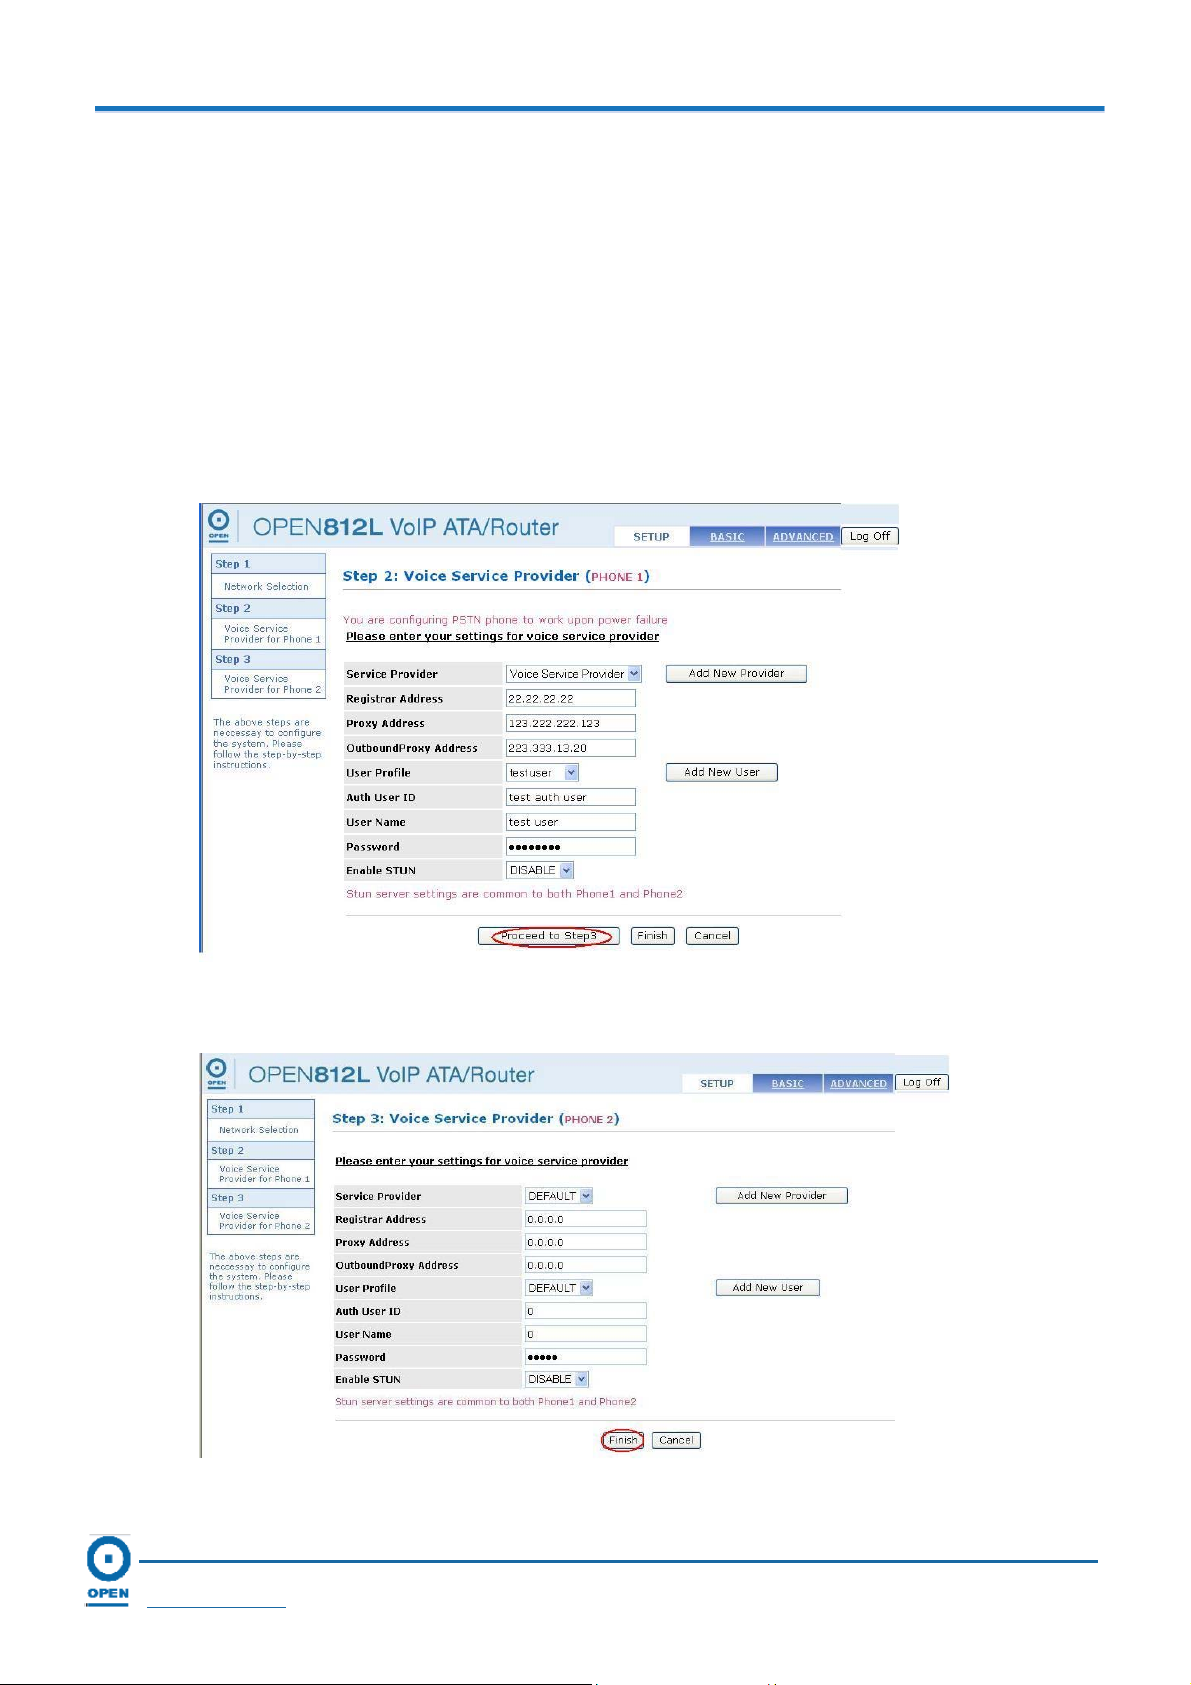
Step 6: Enter the next four fields: New User Profile, Auth User ID, User Name, Password and
Display Name, as provided by your VSP.
Step 7: Click the Add New User button to save the profile or the Cancel button to remove
the entries made.
Step 8: You will be taken to Step 2: Voice Service Phone 1 web page.
The Enable STUN field is defaulted to Disable. Check with your VSP before
enabling this function.
Step 9: Click the Proceed to Step 3 button to go to the next step.
Step 10: The Step 3: Voice Service Provider (Phone 2) screen appears:
Step 11: Enter the mandatory fields for Phone 2, if applicable. If there are no more accounts to
Page 28
OPEN Networks Pty Ltd
www.opennw.com
Page 30
OPEN 812L VoIP ATA Router
User Guide
be added, click the Finish button to save your configuration.
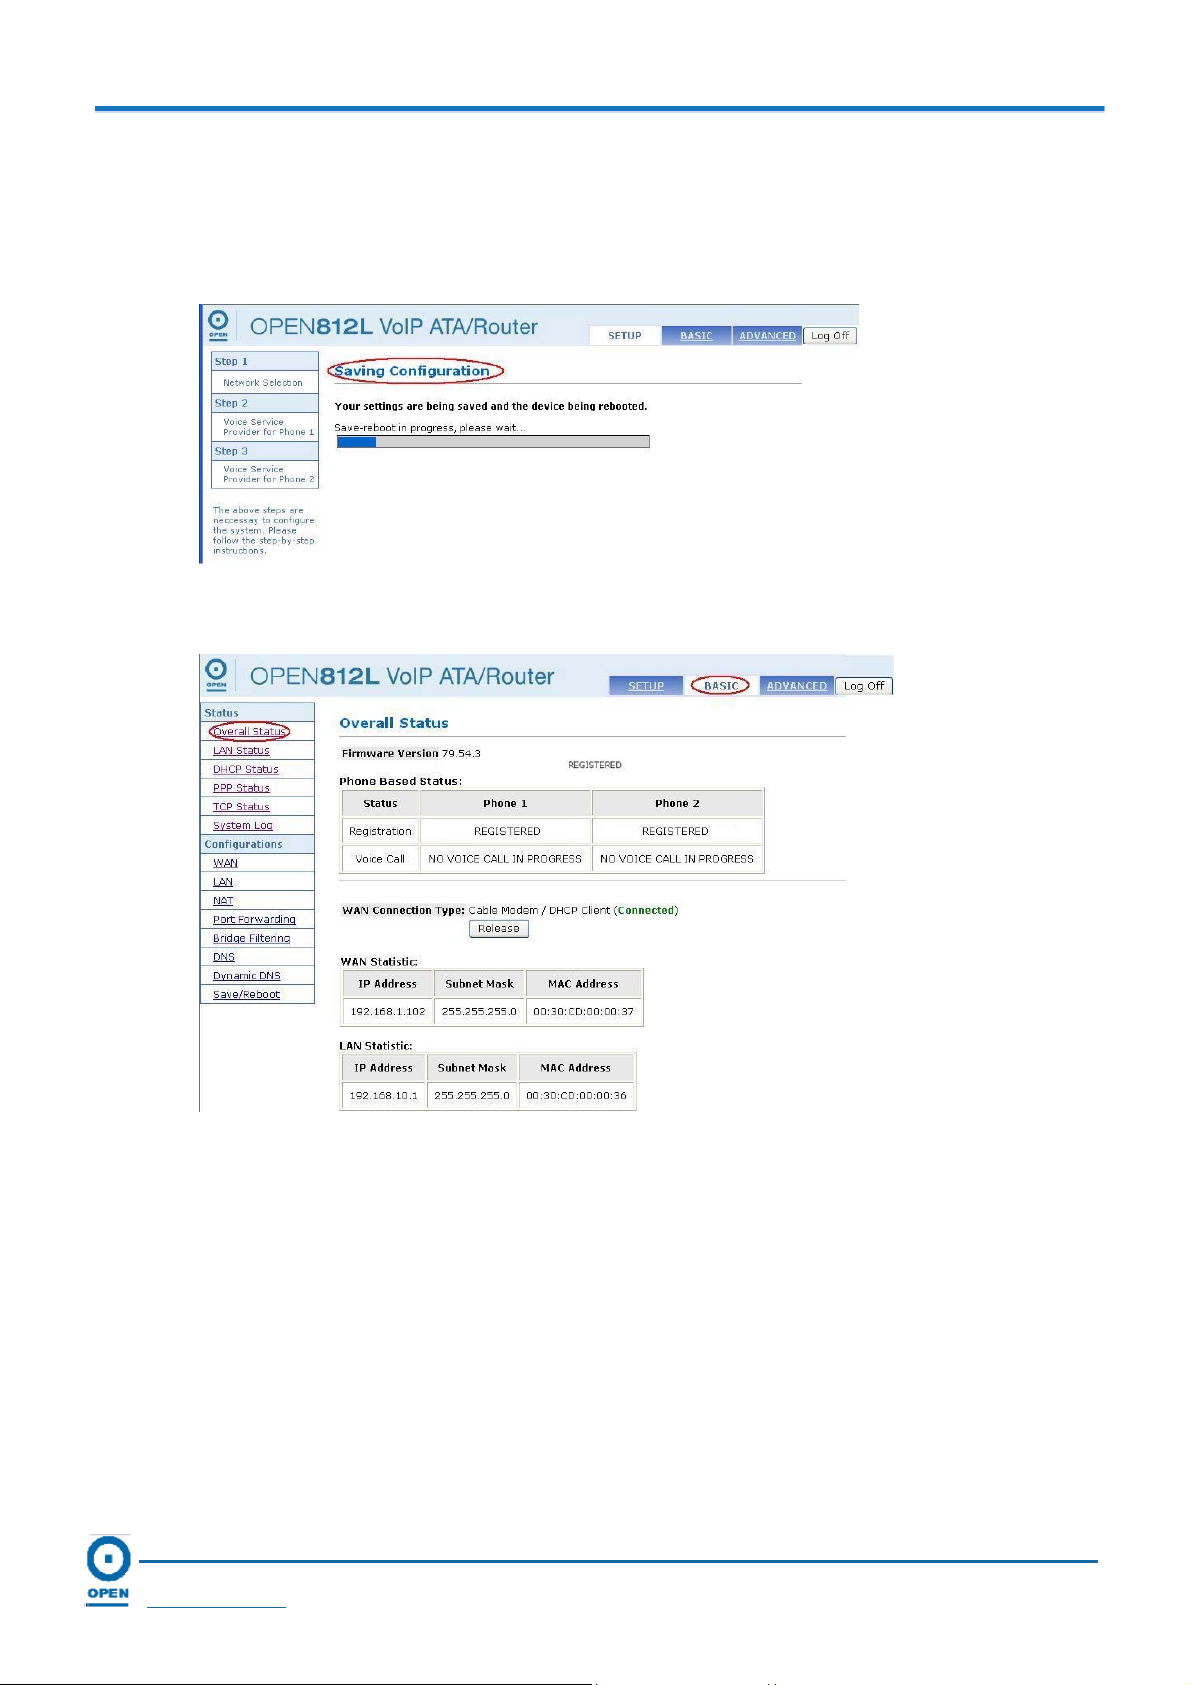
Step 12: At the Saving Configuration page, please wait for approximately 30 seconds for the
process to be completed.
Step 13: Upon completion, the Overall Status page appears.
Page 29
OPEN Networks Pty Ltd
www.opennw.com
Page 31

OPEN 812L VoIP ATA Router
User Guide
The following table lists the Voice Service Provider Phone 1, Add New Provider and Add New
User sections and their definitions:
Field Definition
Service Provider
Registrar Address
Proxy Address
OutboundProxy
Address
User Profile
Auth User ID
User Name
Password
Enable STUN
This is the VSP you have registered with. This is a mandatory
field.
This is the SIP Registrar address of the VSP's server. This is a
mandatory field that is defaulted to ‘0.0.0.0’.
This is the SIP proxy server IP address of your Voice Service
Provider. This is a mandatory field that is defaulted to ‘0.0.0.0’.
This is the Outbound Proxy IP address of your Voice Service
Provider. This is a mandatory field that is defaulted to ‘0.0.0.0’.
The user profile of each individual user for this account. A
maximum of 4 users can be added to the user profile.
The authorized user ID provided by your VSP. This field accepts
alphanumeric characters. It is a mandatory field that must contain
at least one character. It is defaulted to ‘0’.
The user name as registered on your VSP’s server.
The password as registered on your VSP's server.
STUN stands for Simple Traversal of UDP through NATs. This is
defaulted to Disable and is optional.
Display Name (Add
New User)
This parameter holds the Display Name as it should appear on
the Caller ID.
Page 30
OPEN Networks Pty Ltd
www.opennw.com
Page 32

OPEN 812L VoIP ATA Router
User Guide
6. Basic Configuration
6.1 Status
This section provides visibility on the status of your router connections. You can view the
Overall Status or specific status of the LAN, DHCP, PPP, TCP, and System Log. Each sub-
section gives you a detailed view of the IP addresses, MAC addresses, number of packets sent
and received, and so on.
6.1.1 Overall Status
The Overall Status screen displays details and status about the firmware, as well as the VoIP
registration status. In addition, the WAN and LAN statistics are provided as a quick reference to
the IP Address, MAC Address and Subnet Mask address of your router configurations.
Step 1: To access the Overall Status page, click the Basic link located at the top right-hand
side of the page.
Step 2: Click the Overall Status link located on the left menu. The following appears:
Page 31
OPEN Networks Pty Ltd
www.opennw.com
The Overall Status screen is in read-only mode and meant for diagnostics purposes.
Page 33

OPEN 812L VoIP ATA Router
User Guide
The following table provides a brief description of each of the Overall Status sub-sections.
Label Name Description
Firmware
Phone Based Status
WAN Connection Type
WAN Statistic
LAN Statistic
Displays the current version of the OPEN 812L VoIP ATA
firmware.
Displays the Registration and Voice Call statuses of
Phone 1 and/or Phone 2.
The Registration statuses are: Registered or Failed to
Register.
The Voice Call statuses are: Voice Call in Progress
followed by the Codec or No Voice Call in Progress.
Displays the type of connection that is currently used. A
status of Connected is displayed when it is connected to
the VSP.
Displays the WAN interface IP address assigned to your
router.
Displays the number of computers connected to the router
and the LAN interface IP address assigned to the
computers.
Page 32
OPEN Networks Pty Ltd
www.opennw.com
Page 34

OPEN 812L VoIP ATA Router
User Guide
6.1.2 LAN Status
The LAN Status is used to view information about the IP Address, Subnet Mask and MAC
address for the LAN interface.
Step 1: To access the LAN Status, click the Basic link located at the top right-hand side of
the page.
Step 2: Click the LAN Status link located on the left menu. The following page appears:
The LAN Status screen is in read-only mode and meant for diagno stics p urposes.
The following table provides a brief description of the items on the LAN Status screen.
Label Name Description
Number of Ethernet Devices
Connected to the DHCP Server
Displays the DHCP client table with the assigned IP
addresses and MAC addresses.
Page 33
OPEN Networks Pty Ltd
www.opennw.com
Page 35

OPEN 812L VoIP ATA Router
User Guide
6.1.3 DHCP Client Status
The DHCP Client Status is used to view information about the IP Address, Net Mask, Gateway,
DNS 1, DNS 2 and DNS 3 for the WAN interface.
Follow the steps below to access DHCP Status.
Step 1: To access the DHCP Status, click the Basic link located at the top right-hand side of
the page.
Step 2: Click the DHCP Status link located on the left menu. The following page appears:
Step 3: To release or renew the acquired dynamic IP, select Release or Renew option in the
list box.
Step 4: Click the Execute button to Release or Renew the WAN connection.
The following table provides a brief description of the items on the DHCP Status screen.
Label Name Description
IP Address
Net Mask
Gateway
DNS 1, DNS 2, DNS 3
Displays the IP address of the DHCP client.
Displays the assigned network and broadcast addresses.
Displays the IP address of the gateway server
Displays the DNS IP addresses.
Page 34
OPEN Networks Pty Ltd
www.opennw.com
Page 36

OPEN 812L VoIP ATA Router
User Guide
6.1.4 PPP Status
The PPP Status is used to view the status of each PPP session for each PPP interface. It
contains information that is dynamic and will refresh every 8 seconds.
Follow the steps below to access PPP Status.
Step 1: To access the PPP Status, click the Basic link located at the top right-hand side of
the page.
Step 2: Click the PPP Status link located on the left menu. The following page appears:
Step 3: Enter the Connection# field (‘1’ was entered in the example shown). The
Connection# specifies the PPP session that is to be connected/disconnected.
Step 4: From the list box, select the Connect or Disconnect options.
Step 5: Click the Execute button to either connect or disconnect the PPP connection. The
connection status dialogue will be displayed.
Read the following descriptions of the dialogue available:
PPP X Connecting - This is displayed while the PPP session is attempting to
connect to the VSP.
PPP X Connect Error - This is displayed when a connection cannot be made due to
an error.
PPP X Is Currently Not Connected - This is displayed when a disconnect attempt is
made on a session that is not currently connected.
PPP X Does Not Exist! - This is displayed when a Connect or Disconnect attempt is
made on a session number that does not exist.
Cable modem users are not able to connect using this option.
Page 35
OPEN Networks Pty Ltd
www.opennw.com
Page 37

OPEN 812L VoIP ATA Router
User Guide
6.1.5 TCP Status
The TCP Status is used to view the status of all the relevant TCP packets and data information.
The information is dynamic and the figures change as transmission takes place. There are 3
different types of information in the TCP Status section. These are:
General
Discarded Packets
Connections
Follow the steps below to access TCP Status.
Step 1: To access the TCP Status, click the Basic link located at the top right-hand side of
the page.
Step 2: Click the TCP Status link located on the left menu. The following page appears:
Step 3: To reset the counters to start from '0', click the Reset Counters button to clear all the
attributes.
Page 36
OPEN Networks Pty Ltd
www.opennw.com
Page 38

OPEN 812L VoIP ATA Router
The following table provides a brief description of the items on the TCP Status screen.
Label Name Description
User Guide
Reset Counters
General
Discarded Packets
Connections
This function allows you to reset the TCP Status counter,
to start from ‘0’ again.
Holds general information regarding transmissions and
receipts of packets: Total Packets, Data Packets, Data
Bytes, Out of Order Packets and Out of Order Bytes.
Displays the number of discarded packets with Bad
Checksum, Bad Offset Header and Too Short.
Displays the number of connections that are Initiated,
Accepted, Established and Closed.
Page 37
OPEN Networks Pty Ltd
www.opennw.com
Page 39

OPEN 812L VoIP ATA Router
User Guide
6.1.6 System Log
System Log is used to view the status of all the events that were triggered by the system. It
contains information that is dynamic and refreshes every 5 seconds.
Follow the steps to access System Log.
Step 1: To access System Log, click the Basic link located at the top-right hand side of the
page.
Step 2: Click the System Log link located on the left menu. The following page appears:
The following table provides a brief description of the functions on the System Log screen.
Label Name Description
Log Message
Displays log messages or events that have been triggered
by the system. Select from any one of the 3 separate
views: All, Event or Warning to view the logged messages.
The logged messages appear in this order:
Month/Day/Year,
Time in Hrs:Mins:Seconds
Event description
Clear log
This function allows you to clear the current recorded
contents in the System Log to refresh the log messages.
Refresh
Click Here Link
Allows you to refresh the log messages.
Allows you to save the current contents of the logged
messages into a text file onto your local drive. Click on the
link and select “Save Target As” to save it to a text file.
Page 38
OPEN Networks Pty Ltd
www.opennw.com
Page 40

OPEN 812L VoIP ATA Router
User Guide
6.1.7 Call Log
Call Log provides a view of the calls that have been missed, received or dialled. You can select
the Call Type from the radio buttons provided to view the Display Name, Number, Call Type,
Phone (1 or 2) and Time Stamp of the calls that have been logged.
Follow the steps to access Call Log.
Step 1: To access Call Log, click the Basic link located at the top-right hand side of the
page.
Step 2: Click the Call Log link located on the left menu. The following page appears:
Step 3: Click the Clear Log button to clear the logged calls.
Step 4: To refresh the logged calls, click the Refresh button.
Page 39
OPEN Networks Pty Ltd
www.opennw.com
Page 41

OPEN 812L VoIP ATA Router
User Guide
6.2 Configurations
This section allows you to configure WAN, LAN, NAT, Port Forwarding, Bridge Filtering, DNS,
Dynamic DNS, and to save and reboot your PC after the configurations have been made.
6.2.1 WAN Configuration
WAN refers to your Wide Area Network connection, i.e. your router’s connection to your VSP
and the Internet.
You may setup the configuration for the WAN port using the steps below.
Step 1: To access WAN, click the Basic link located at the top-right hand side of the page.
Step 2: Click the WAN link located on the left menu. The following page appears:
Step 3: To set up the WAN configuration, refer to the table below to populate each of the
fields.
Page 40
OPEN Networks Pty Ltd
www.opennw.com
Page 42

The following table describes the WAN Configuration settings:
Field Name Description
OPEN 812L VoIP ATA Router
User Guide
Bridge
IGMP
Select ENABLE to connect the LAN to the WAN (i.e. bridge the
two connections). This is available in Bridge Mode only. The
default setting is DISABLED.
This refers to the IGMP (Internet Group Management Protocol)
relay/proxy specification and environment. The default is
DISABLEDI. IGMP is available in all modes and all encapsulations.
The Support for IGMP proxy/relay function for ADSL Bridge/Router
is based on the following requirement and cases:
On the CO side, there must be at least one IGMP querier (router)
present. IGMP querier will send the IGMP query packet. The ADSL
Bridge/Router is responsible to relay these IGMP queries to
Ethernet.
End-user multicast application device sends IGMP report while
receiving IGMP query or being activated by the user. The ADSL
Bridge/Router should be responsible to proxy (that is, change
source IP to ADSL Bridge/Router’s WAN IP) the IGMP report to
ADSL WAN side, including all PVCs (Permanent Virtual Circuits).
The same case is for IGMP leave packet.
It is not necessary to relay multicast routing between two ADSL
PVCs or two interfaces in LAN side.
Static IP Settings
DHCP Client
Special purpose multicast packets (such as RIP 2 packets) should
run without interference.
These settings are for users who have a Static IP Address with
their VSP on the WAN side.
IP Address refers to the Static IP Address given by your VSP. The
range for the IP Addresses is x.x.x.y, where 0<
<
254 and the default is 0.0.0.0.
x < 255 and 1 < y
Subnet Mask refers to the subnet mask given by your VSP. The
range for Subnet Mask is x.x.x.x , where 0< x < 255 and the default
is 255.0.0.0.
Gateway refers to the gateway given by your VSP. The range for
Gateway is x.x.x.y, where 0< x < 255 and 1 < y < 254 and the
default is 0.0.0.0.
This function enables or disables the ADSL Bridge/Router WAN as
a DHCP client, where the VSP would be the DHCP Server. The
default is set to DISABLED. DHCP clients are generally used in the
following encapsulations:
1483 Bridged IP LLC
1493 Routed IP LLC
1483 Bridged IP VC-MUX
Page 41
OPEN Networks Pty Ltd
www.opennw.com
Page 43

Field Name Description
1483 Routed IP VC-MUX
Classical IP over ATM – this option is for non-static (dynamic) IP
addresses.
Host Name: When the DHCP Client is enabled, copy the VSP-
recognized Host name here. The Host Name can be up to 19
characters.
OPEN 812L VoIP ATA Router
User Guide
MAC Spoofing
PPP
Enable MAC Spoofing to make a different MAC Address appear
on the WAN side. The default is set to DISABLED. This is also
used to solve the scenario where the VSP only recognizes one
MAC Address.
MAC Address: When MAC Spoofing is enabled, copy the VSP-
recognized MAC address here. The format for MAC address is six
pairs of hexa-decimal numbers (0-9, A-F), separated by colons.
The default is set to 00:00:00:00:00:00.
PPP Enable is defaulted to disabled. Check the box to enable this
function.
User Name: Enter the PPP user name as provided by the VSP.
The User Name can be up to 127 characters.
Password: Enter the PPP password as provided by the VSP. The
Password can be up to 127 characters.
MRU: The MRU (Maximum Receive Unit) field indicates the
maximum size IP packet that the peer of PPP connection (this
device) can receive. During the PPP negotiation, the peer of the
PPP connection will indicate its MRU and will accept any value up
to that size. The actual MTU of the PPP connection will be set to
the smaller of the two (MTU and the peer’s MRU). In the normal
negotiation, the peer will accept this MRU and will not send packet
with information field larger than this value. The range for the MRU
field is 0-32767and the default value is 1492.
MTU: Maximum Transmission Unit (MTU) is the largest size
packet that can be sent by the modem. If the network stack of any
packet is larger than the MTU value, then the packet will be
fragmented before the transmission. During the PPP negotiation,
the peer of the PPP connection will indicate its MRU and will
accept any value up to that size. The actual MTU of the PPP
connection will be set to the smaller of the two (MTU and the
peer’s MRU). The range for the MTU field is 0-32767 and the
default value is 1492.
MSS: The Maximum Segment Size is the largest size of data that
TCP will send in a single, un-fragmented IP packet. The LAN client
and the WAN host will indicate their MSS during the TCP
connection handshake. The range for the MSS field is 0-32767
and the default value is 1432.
Page 42
OPEN Networks Pty Ltd
www.opennw.com
Page 44

Field Name Description
Authentication: The different types of available authentications
are:
Auto: When auto is selected, PAP mode will run by default.
However, if PAP fails, then CHAP will run as the secondary
protocol. This is the default setting.
PAP: Password Authentication Procedure. Authentication is done
through username and password.
CHAP: Challenge-Handshake Authentication Protocol. Typically
more secure than PAP, CHAP uses username and password in
combination with a randomly generated challenge
OPEN 812L VoIP ATA Router
User Guide
Submit
Save Settings
Click the Submit button to save the changes made.
Click the Save Settings this link to select from 2 options: Save
Settings/Reboot or Reboot Only. Refer to Section 6.2.8 for more
information.
Page 43
OPEN Networks Pty Ltd
www.opennw.com
Page 45

OPEN 812L VoIP ATA Router
User Guide
6.2.2 LAN & DHCP Configuration
The LAN and DHCP Configuration allows you to set the configuration for your LAN settings and
DHCP server. You may enable or disable the DHCP server and the router’s DHCP relay
functions. The DHCP protocol allows your router to dynamically assign IP addresses to
computers on your network if they are configured to obtain IP addresses automatically.
Follow the steps below to access LAN.
Step 1: To access LAN, click the Basic link located at the top-right hand side of the page.
Step 2: Click the LAN link located on the left menu. The following page appears:
Step 3: To populate each of the LAN & DHCP configuration fields, refer to the table below
and the descriptions provided.
The following table describes the LAN & DHCP Configuration settings:
Field Name Description
LAN Settings (Router
Configuration)
Assign a local IP Address and Subnet Mask to your router.
The factory default value for IP is 192.168.10.1 with a
Subnet Mask of 255.255.255.0.
Ensure that when you change the LAN Settings of the
router, you need to reset/renew the local computer IP
addresses.
DHCP Server
When enabled, the router will provide IP address to the
computers connected to the router.
Page 44
OPEN Networks Pty Ltd
www.opennw.com
Page 46

Field Name Description
DHCP address pool selection: When User Defined
option is selected, the router will assign IP address
automatically from the DHCP address pool. User can set
up to 253 IP addresses in the address pool.
User Defined Start Address: This is the starting IP
address of the DHCP pool for User Defined DHCP
Address Pool Selection. Range for User Defined Start
Address is x.x.x.x, where 0 ≤ x≤ 255. The default value is
192.168.10.100.
User Defined End Address: This is the last IP address in
the DHCP pool for User Defined DHCP Address Pool
Selection. The range for User Defined End Address is
x.x.x.x, where 0 ≤ x≤ 255. The default value is
192.168.10.199.
DHCP Gateway Selection: The default setting for the
DHCP Gateway Selection is AUTOMATIC. You can select
User Defined and specify User Defined Gateway Address.
The DHCP server will issue the User Defined Gateway
Address to the LAN DHCP clients.
OPEN 812L VoIP ATA Router
User Guide
DHCP Relay
Submit
User Defined Gateway Address: The purpose for this
function is to have two gateway addresses, as the LAN IP
Address at the top of the LAN Configuration page is also a
gateway address.
Lease time: The Lease time is the amount of time a
network user will be allowed to connect with the DHCP
server. If all fields are 0, the allocated IP addresses will be
permanently effective. The range of Lease Time fields is:
Days 0-36500, Hours 0-23, Minutes 0-59, Seconds 0- 59.
The default value is: 1 days 0 hours 0 minutes 0 seconds.
If it is ENABLED, the DHCP requests from local PCs will
be forwarded to the DHCP server running on the WAN
side. To have this function working properly, please
disable the NAT to run on router mode only, disable the
DHCP server on the LAN port, and make sure the
routing table has the correct routing entry.
DHCP Relay Target IP: If DHCP Relay is enabled,
DHCP requests are relayed to DHCP Target IP on the
WAN side. Displays the default DHCP Relay Target IP:
0.0.0.0.
Click the Submit button to submit the changes made.
Save Settings
Click the Save Settings this link to select from 2 options:
Save Settings/Reboot or Reboot Only. Refer to Section
6.2.8 for more information.
Page 45
OPEN Networks Pty Ltd
www.opennw.com
Page 47

OPEN 812L VoIP ATA Router
User Guide
6.2.3 NAT Configuration
Network Address Translation (NAT) is a method of connecting multiple computers to the
Internet or any other IP network using one IP address. It operates on the router, usually
connecting two networks together, and translates the private addresses in the internal network
into legal addresses before packets are forwarded onto another network. It can be configured in
such a way that only one address for the entire network to the outside world is exposed so that
the entire internal network can be hidden, thus providing security.
NAT serves three main purposes:
Provides a type of firewall by hiding internal IP addresses
Enables a company to use more internal IP addresses. Since they are used
internally only, there is no possibility of conflict with IP addresses used by
other companies and organizations.
Allows a company to combine multiple ISDN connections into a single Internet
connection.
The NAT module provides Dynamic Network Address (DNS) and Port Translation (Dynamic
NAPT) capability between the LAN and multiple WAN connections. The LAN traffic is routed to
appropriate WAN connections based on the destination IP address and the Route Table. This
eliminates the need for the static NAT session configuration between multiple LAN clients and
multiple WAN connections.
When Dynamic NAT is chosen, there is no need to configure the NAT session and NAT
Session Name Configuration.
Follow the steps below to access and set up your NAT configuration.
Step 1: To access NAT, click the Basic link located at the top-right hand side of the page.
Step 2: Click the NAT link located on the left menu. The following page appears:
Page 46
OPEN Networks Pty Ltd
www.opennw.com
Page 48

OPEN 812L VoIP ATA Router
User Guide
Step 3: To enable NAT, select Enable from the list box.
Step 4: To set up the NAT Mode, select from one of the available options: NAT, NAPT,
Dynamic NAPT. You may find a full description of each option in the table below.
Step 5: Click the Advanced NAT Configuration link to open the Advanced NAT
Configuration screen. This function allows you to set the configuration for session
name, available session and manual NAT configuration.
Page 47
OPEN Networks Pty Ltd
www.opennw.com
Page 49

The following table describes the settings on the NAT configuration screen:
Field Name Description
OPEN 812L VoIP ATA Router
User Guide
NAT
Mode
User this field to Enable/Disable NAT. The default is set to
ENABLE.
The options for the NAT list box menu is:
NAT: Static peer-to-peer mode (1x1). Establishes a
mapping between an inside local address and a pool of
global addresses.
NAPT: Static multiple mapping mode (1xN). This is a
method by which many network addresses and their
TCP/UDP ports are translated into a single network
address and its TCP/UDP ports.
Dynamic NAPT: Dynamic multiple mapping mode
(NxN). This is the default setting. A home office with the
following characteristics will typically use Dynamic
NAPT configuration:
- a single global IP address (whether static or dynamic);
- multiple host workstations (PCs, laptops) connected to
the home LAN
Page 48
OPEN Networks Pty Ltd
www.opennw.com
Page 50

OPEN 812L VoIP ATA Router
The following table describes the settings on the Advanced NAT configuration screen:
Field Name Description
User Guide
Session Name Configuration
Available Sessions
Manual NAT Configuration
Session Name: This field allows you to enter a Session
Name to help distinguish different NAT Sessions for
different interfaces among different PPP sessions and
PVCs. The Session Name can be up to 31 characters, and
there can be up to 16 different NAT session names.
Interface: This field allows you to choose specific WAN
Interfaces (PVC or PPP Session) for NAT Session. The
options for this field are PVC0 ... PVC7 and any PPP
session that was created by the user.
Action: Select Add or Delete and then press the Submit
button to add or delete any NAT session name setting
to/from the following table.
This table will display all the available Session Names with
their corresponding Interface and the number of sessions.
Session Name: This field allows you to select the session
from the configured NAT Session Name Configuration.
User’s IP: This field allows you to assign the IP address to
map the corresponding NAT/NAPT sessions.
Action: Select Add or Delete and then press the Submit
button to add or delete any NAT session name setting
to/from the following table.
NAT Session Name Status
Number of NAT Configurations
This table is displayed at the bottom of this page to show
all the NAT Session Names with their corresponding WAN
Interfaces.
This field displays the total number of NAT Sessions
entered. NAT allows only one entry (User IP) per session,
while NAPT allows many entries (User IPs) per session.
Page 49
OPEN Networks Pty Ltd
www.opennw.com
Page 51

OPEN 812L VoIP ATA Router
User Guide
6.2.4 Port Forwarding
In TCP/IP and UDP networks, a port is a 16-bit number used to identify an application program
(usually a server) to which incoming connections should be delivered. Some ports have
numbers that are pre-assigned to them by the IANA (the Internet Assigned Numbers Authority),
and these are referred to as “well-known ports”. Servers follow the well-known port
assignments so clients can locate them.
If you wish to run a server on your network that can be accessed from the WAN (i.e. from other
machines on the Internet outside your local network), or any application that can accept
incoming connections (e.g. Peer-to-peer/P2P software such as instant messaging applications
and P2P file-sharing applications) and are using NAT (Network Address Translation), then you
will usually need to configure your router to forward these incoming connection attempts using
specific ports to the computer on the network running the application. You will also need to use
port forwarding if you want to host an online game server.
The reason for this is that when using NAT, your publicly accessible IP address will be used by
and point to your router, which then needs to deliver all traffic to the private IP addresses used
by your computers. Please see the WAN configuration section of this manual for more
information on NAT.
The device can be configured as a Virtual Server so that remote users accessing services such
as Web or FTP services via the public (WAN) IP address can be automatically redirected to
local servers in the LAN network. Depending on the requested service (TCP/UDP port number),
the device redirects the external service request to the appropriate server within the LAN. All
TCP/UDP ports are protected from intrusion.
Follow the steps below to access and set up Port Forwarding on your router.
Step 1: To access Port Forwarding, click the Basic link located at the top-right hand side of
the page.
Step 2: Click the Port Forwarding link located on the left menu. The following page appears:
Step 3: The ID field is an automatically generated sequential number that begins with ‘1’. To
set up Port Forwarding Configuration, enter the Start Port number.
Page 50
OPEN Networks Pty Ltd
www.opennw.com
Page 52

OPEN 812L VoIP ATA Router
User Guide
Step 4: Enter the End Port and the Private Port numbers.
Step 5: Select either TCP or UDP port type from the list box.
Step 6: Enter the Host IP Address.
Step 7: Click the Add button. The following screen displays the configuration just added.
Step 8: Use the Delete This Setting button if the configuration is incorrect or no longer
required.
Step 9: Click the Save Settings link for the configuration settings to take effect.
Page 51
OPEN Networks Pty Ltd
www.opennw.com
Page 53

OPEN 812L VoIP ATA Router
The following table describes the settings for Port Forwarding Configuration and their
definitions:
Field Name Description
User Guide
ID
Public Port – Start
Public Port – End
Private Port
Host IP Address
This is the ID number corresponding to the Virtual Server
configuration.
This field allows you to enter the port number of the Public
Network (WAN or external network). If you are entering a
range of ports, this is the first port.
This field represents the last port number in a port range. If
you only want one port number (no port range), simply
enter the same number here as in the Public Port – Start
field. The maximum number of the mapped Port is 20.
This field allows you to enter the port number of the
Private Network (LAN or internal network). In most cases,
the private port number is same as public port number.
This port number cannot be seen from the WAN side.
This field allows you to enter the private network IP
address for the particular server.
You may enter a maximum number of 20 Port Forwarding configurations and a maximum
number of 20 mapped ports.
Using port forwarding does have security implications, as outside users will be able to
connect to computers on your network. For this reason you are advised to use sp ecific
Virtual Server entries just for the ports your application requires, instead of using DMZ. As a
result all connections from the WAN will attempt to access the public IP of the DMZ computer
specified.
Page 52
OPEN Networks Pty Ltd
www.opennw.com
Page 54

OPEN 812L VoIP ATA Router
User Guide
6.2.5 Bridge Filtering
Bridge Filtering allows packets to be forwarded or blocked, depending on the MAC address.
This section will guide you through configuring MAC Filtering.
Step 1: To access Bridge Filtering, click the Basic link located at the top right-hand side of
the page.
Step 2: Click the Bridge Filtering link located on the left menu. The following page appears:
Step 3: To setup Bridge Filtering, select Yes or No to enable Filtering.
Step 4: Select Block or Forward for the Filtering Action.
Step 5: Enter the Source MAC field. This field must consist of 12 hexadecimal characters.
Step 6: Enter the Destination MAC field. This field must consist of 12 hexadecimal
characters.
Page 53
OPEN Networks Pty Ltd
www.opennw.com
Page 55

OPEN 812L VoIP ATA Router
The following table describes the settings for Bridge Filtering and their definitions:
Field Name Description
User Guide
Filtering Enable
Filtering Action
Source MAC
Destination MAC
Type
Select Yes or No
Block: When block is selected, everything from the
Source MAC with Destination MAC will be blocked.
Forward: When forward is selected, everything from the
Source MAC will be forwarded to the Destination MAC.
This is the Source MAC to block or from which to forward.
The Source MAC must consist of 12 hexadecimal
characters.
This is the Destination MAC to block or to forward to. The
Destination MAC must consist of 12 hexadecimal
characters.
Enter the hexadecimal number for the Ethernet type field
in Ethernet II packets. For example, 0800 is for IP protocol.
The Type must consist of 4 hexadecimal characters.
Page 54
OPEN Networks Pty Ltd
www.opennw.com
Page 56

OPEN 812L VoIP ATA Router
User Guide
6.2.6 DNS Configuration
The DNS Configuration section allows you to set up the configuration for the DNS proxy. For
DHCP requests from local PCs, the DHCP server will set the LAN port IP as the default DNS
Server. Thus, all DNS query messages will come into the LAN port first. The DNS proxy on the
ADSL Bridge/Router records the available DNS servers and forwards DNS query messages to
one of the DNS servers.
Step 1: To access DNS Configuration, click the Basic link located at the top right-hand side
of the page.
Step 2: Click the DNS Configuration link located on the left menu. The following page
appears:
Step 3: To setup DNS Configuration, the Enable option is defaulted to enable the DNS
Proxy.
Step 4: The Auto Discovery is checked by default. When enabled, this option stores the
DNS server IP address obtained from the DHCP client or PPP.
Step 5: Check the User Configuration option to enable this function. When enabled, the
DNS Proxy will use the user-configured DNS server.
Step 6: Enter the DNS Server field with the URL name and IP.
Step 7: Select the Enable option from the list box to enable the DNS Server. It is defaulted to
Disabled.
Step 8: Enter the URL Name of the DNS Server.
Step 9: Enter the Host ID or IP Address of the DNS Server in the Host IP field.
Step 10: Click the Apply button to apply the changes made.
Page 55
OPEN Networks Pty Ltd
www.opennw.com
Page 57

OPEN 812L VoIP ATA Router
User Guide
Step 11: Click the Save the Configuration link so that the settings can take effect.
The following table describes the settings for the DNS Configuration fields and their definitions:
Field Name Description
DNS Proxy Enable/Disable
DNS Server
When the DNS Proxy is DISABLED, the LAN port does not
process the DNS query message. For DHCP requests from
local PCs, the DHCP server will set the user-configured
DNS server as the DNS server. Then all DNS query
messages will be directly sent to the DNS servers. DNS
Proxy is ENABLED by default.
Auto Discovery: When enabled, the DNS proxy will store
the DNS server IP addresses obtained from DHCP client or
PPP into the table. This field is defaulted to DISABLED. All
DNS query messages will be sent to the dynamically
obtained DNS server. Select this option when the DNS
Server address is unknown but provided (automatically) by
the VSP.
User Configuration: When enabled, the DNS proxy will
use the user-configured DNS server. All DNS query
messages will be sent to the DNS server. Enter the DNS IP
in the DNS Server field. Select this option when the DNS
Server address assigned by the VSP is known. User
Configured is disabled by default.
This is the user defined DNS server URL name and IP.
Default is DISABLED.
URL Name (Add/Delete): This is the URL name for the
DNS server. This can be up to 255 characters.
Host IP (Add Only): This is the IP address of the DNS
Server.
DNS Proxy Setting
DNS Server Setting
Save Configuration
This is a table of all DNS server IP addresses.
This is a table of all DNS sever URL names.
Click the Save Configuration link to save the settings.
Page 56
OPEN Networks Pty Ltd
www.opennw.com
Page 58

OPEN 812L VoIP ATA Router
User Guide
6.2.7 Dynamic DNS
The Dynamic DNS Configuration allows users to register with a Dynamic DNS Provider. The
Dynamic DNS is linked to the WAN IP of the router even after the VSP has updated the WAN IP
to another IP address.
This function is useful in web hosting and FTP services.
Follow the steps below to access and configure Dynamic DNS.
Step 1: To access Dynamic DNS Configuration, click the Basic link located at the top right-
hand side of the page.
Step 2: Click the Dynamic DNS link located on the left menu. The following page appears:
Step 3: To setup Dynamic DNS Configuration, check to Enable this option. It is defaulted to
Disabled.
Step 4: Select the DDNS Server from the list box.
Step 5: Select the Update Type from the list box options. The options include: dyndns
(Dynamic DNS), custom or static.
Step 6: Enter the Username and Password.
Step 7: Enter the Host Name field. Five boxes are provided from 0 to 4.
Step 8: Click the Apply button to save your settings.
Page 57
OPEN Networks Pty Ltd
www.opennw.com
Page 59

OPEN 812L VoIP ATA Router
User Guide
6.2.8 Save Settings / Reboot
This function is required for all configuration settings. To ensure that the configurations take
effect, the last step to configuration settings is to save the settings and reboot the device.
Follow the steps below to access and Save Settings/Reboot.
Step 1: To access Save Settings/Reboot, click the Basic link located at the top right-hand
side of the page.
Step 2: Click the Save/Reboot button to save your configuration settings. The Saving
Configuration page appears:
Step 3: Click Save & Reboot button if you wish to apply all changes. Two different
pages/screens will appear.
The first one states that: “Your settings are being saved and the device is being
rebooted. Save/reboot in progress, please wait….”
The second screen follows with “Your settings have been saved and the device has
rebooted. Done”.
Your settings have been saved and the router has been rebooted.
Page 58
OPEN Networks Pty Ltd
www.opennw.com
Page 60

OPEN 812L VoIP ATA Router
User Guide
Step 4: Click Reboot Only button if you wish to discard all changes since the last save. Two
different pages/screens will appear after pressing this button. Two pages will appear
after pressing this button.
The first screen states: “The device is being rebooted. Reboot in progress, please
wait….”
The second screen follows with “The modem is being rebooted. Done.”
The following table describes the settings for the Save/Reboot buttons and their definitions:
Field Name Description
Save & Reboot
Clicking this button will apply all the changes or settings
made and reboot the router. Once the settings have been
saved, the message prompt: ‘Your settings have been
saved and the modem has rebooted. Done’ will appear.
Reboot only
This function basically reboots the OPEN 812 VoIP ATA
router and does not save configuration changes.
Page 59
OPEN Networks Pty Ltd
www.opennw.com
Page 61

OPEN 812L VoIP ATA Router
User Guide
7. Advanced Configuration
This chapter covers the advanced VoIP configurations required for your router. The Advanced
Configuration page is divided into two sections: VoIP and Admin Privileges.
VoIP enables telephone calls through existing Internet connection instead of going through the
PSTN (Public Switched Telephone Network). It is not only cost-effective, especially for a long
distance telephone charges, but also toll-quality voice calls over the Internet.
The VoIP configurations are:
Config
Service Provider
User Profile
FXO Config
Timer Config
Ringtone Config
Miscellaneous Config
Address Book
Auto Provisioning
The Admin Privileges configurations are:
Route Table
Bridge Timeout
RIP Config
DMZ Config
SNTP Config
Misc Config
Admin Password
Reset to Default
Firmware Upgrade
Auto Update
Save/Reboot
A brief description of each of the configurations is discussed in the following sections.
Page 60
OPEN Networks Pty Ltd
www.opennw.com
Page 62

OPEN 812L VoIP ATA Router
User Guide
7.1 Advanced VoIP
7.1.1 Config
Your Phone-Based configuration can be set up here. Before you begin, please ensure that you
have obtained the necessary information from your VSP.
Follow the steps below to guide you through the Config setup.
Step 1: To access Config, click the Advanced link located at the top right-hand side of the
page.
Step 2: Click the Config link located on the left menu. The following page appears:
Step 3: To begin configuring the OPEN 812L VoIP ATA router, select ‘1’ or ‘2’ from the
Phone list box.
Step 4: Select your VSP from the Service Provider To Use list box. If there are no service
providers on the list, click the Update Service Provider Configuration link to add a
new service provider as shown below.
Page 61
OPEN Networks Pty Ltd
www.opennw.com
Page 63

OPEN 812L VoIP ATA Router
User Guide
Step 5: The ATA SIP Service Provider Configuration screen appears. To configure the
VSP details, please refer to the next section under Service Provider.
Step 6: Select from the Login Account To Use list box from the user account details. If
there is no user accounts set up as yet, click the Update User Login Account
Configuration link as shown below.
Page 62
OPEN Networks Pty Ltd
www.opennw.com
Page 64

OPEN 812L VoIP ATA Router
User Guide
Step 7: The ATA Login Account Configuration screen appears. To configure the user
account details, please refer to the User Profile section of this user guide.
Step 8: Click the Submit button to submit the changes made.
Step 9: Click the Save Settings button to save the changes made.
Page 63
OPEN Networks Pty Ltd
www.opennw.com
Page 65

OPEN 812L VoIP ATA Router
The following table describes the settings for the ATA Configuration window and their
definitions:
Field Name Description
User Guide
PTM Software Version
Service Provider To Use
Login Account To Use
Current Registration Status
This field displays the current version of your ATA
application and the PTM module. PTM stands for Packet
Telephony Module. It is made of codes that defines and
controls all FXS and FXO-related features.
This field holds your service provider’s details that you have
registered with. Select from the list box for the service
provider you are working with. This will update the user
logon details available and configured for that particular
service provider.
This refers to the user profile that is applicable to the service
provider you have selected to work with. Multiple user logins
can be created per service provider. Further more, SIP
protocol also allows the same login to be used for
registration from multiple locations. So the same login under
the same service provider can be used from multiple lines.
This field displays the current registration status of your line.
If the line is registered, the status will be shown as
REGISTERED. If it is not registered, you will see the
UNREGISTERED status. The dial tone cannot be played
when the WAN interface is DOWN or REGISTRATION is
FAILED.
Submit
Save Settings
Click the Submit button to submit the changes made.
Click the Save Settings link and that takes you to the Save
Settings/Reboot page. Refer to Section 7.2.12 for more
information.
Page 64
OPEN Networks Pty Ltd
www.opennw.com
Page 66

OPEN 812L VoIP ATA Router
User Guide
7.1.2 Service Provider Configuration
The Service Provider Configuration page allows user to set up the configuration related to their
SIP service provider. The information must be obtained from the VSP before configuration can
begin.
Follow the steps below to guide you through the Service Provider Configuration.
Step 1: To access Service Provider, click the Advanced link located at the top right-hand
side of the page.
Step 2: Click the Service Provider link located on the left menu. The following page
appears:
Step 3: Select the service provider from the Service Provider List provided.
Step 4: Under the New Service Provider field, manually enter the name of the new service
provider. A maximum of 31 characters is provided for this field.
Step 5: The Accept Packets Only From This SP is an optional field and is defaulted to
blank.
Step 6: To configure the remaining fields, refer to the table provided below.
Step 7: Click the Submit button to complete the configuration.
Step 8: To save the settings, click the Save Settings button.
Page 65
OPEN Networks Pty Ltd
www.opennw.com
Page 67

OPEN 812L VoIP ATA Router
The following table describes the parameters for the Service Provider window and their
definitions:
Field Name Description
User Guide
Service Provider List
New Service Provider
Registration Interval (secs)
Registrar Address
You may select your service provider during configuration
by using the list box provided. When a service provider is
selected from this dynamic list, the respective parameters
are automatically displayed. A DEFAULT set of parameters
is provided for every new service provider added. This can
be edited accordingly. You may define new service
providers and add them manually. An existing service
provider can be edited or even deleted.
New Service Provider is a text-field where you may enter
the name of the new service provider to be added (up to 31
characters), or to rename an existing service provider. The
service provider edited will be the one chosen from the
Service Provider To Use field under the ATA Configuration
page.
This parameter specifies the registration expiry interval in
seconds. After the interval period expires, re-registration is
required for the registration packet.
This parameter gives the IP address of the registrar with
which the OPEN 812L VoIP ATA router must register in
order to make VoIP calls.
Proxy Address
OutboundProxy Address
MWI Server Address
MWI Subscription Refresh
Interval (in secs)
Dial Plan String
Authentication Method
Registrar Port
This parameter is the IP address of the SIP proxy server.
This parameter is the IP address of the Outbound proxy
server. This is useful in instances where the OPEN 812L
VoIP ATA router is behind a NAT.
This parameter is the IP address of the MWI server. MWI
stands for Message Waiting Indicator. This is an optional
field.
This parameter specifies the MWI Subscription Refresh
interval in seconds.
This parameter defines the advanced telephony features.
This parameter indicates the authentication method used.
Currently, only MD5 is being supported. MD5 is a widely
used crytopgraphic hash function with a 128-bit hash value.
It is an Internet standard (RFC 1321) that has been
employed in a wide variety of security applications, and is
also commonly used to check the integrity of files.
This parameter informs the port of the registrar on which it
will listen for Registrar requests from the OPEN 812L VoIP
ATA router.
Page 66
OPEN Networks Pty Ltd
www.opennw.com
Page 68

Field Name Description
Note: The range for the Registrar port address is between
5000 and 65535.
The default port is set to 5060.
OPEN 812L VoIP ATA Router
User Guide
Proxy Port
This parameter is the port on which the SIP proxy server will
listen for messages.
OutboundProxy Port
This parameter is the port on which the outbound proxy
server listens for messages from the ATA.
MWI Server Port
This parameter is the port on which the MWI server listens
for messages from the ATA.
The ATA provides radio buttons with options to Display, Add, Delete or Edit the service provider
details. You will be able to manipulate the various SIP and dial plan parameters for your working
service provider.
Display SP Rules
This is the default option. Selecting this option means that
the selected service provider will be displayed in the Service
Provider List after clicking on the Submit button. This
selected option is the Service Provider To Use field under
the ATA Configuration page and it is mandatory.
Add New SP
This function allows you to add a new service provider after
you click the Submit button, based on the value that
appears in the Service Provider To Use field under the ATA
Configuration page.
Delete Selected SP
Selecting this option will delete the selected Service
Provider To Use field under the ATA Configuration page.
Edit Selected SP
Editing the selected SP basically overwrites the selected
service provider’s parameters and displays the current
parameters displayed on the web page. The New Service
Provider field is optional and it needs to be filled only when
the service provider name also has been changed.
Submit
Save Settings
Click the Submit button to submit the changes made.
Click the Save Settings link and that takes you to the Save
Settings/Reboot page. Refer to Section 7.2.12 for more
information.
Page 67
OPEN Networks Pty Ltd
www.opennw.com
Page 69

OPEN 812L VoIP ATA Router
User Guide
7.1.3 User Profile
The User Profile allows users to set up and configure login accounts that are registered with the
selected service provider currently selected under the Config page. For example, if the Service
Provider To Use option selected is ‘DEFAULT’, the Service Provider Name on the User Profile
page will display ‘DEFAULT’.
Follow the steps below to guide you through the set up.
Step 1: To access User Profile, click the Advanced link located at the top right-hand side of
the page.
Step 2: Click User Profile on the left menu. The ATA Login Account Configuration page
appears:
Step 3: Notice that the Service Provider Name displayed is ‘DEFAULT’, as per the Service
Provider To Use selection made in the Config page. Similarly, the User Profile List of
‘DEFAULT’ is also displayed based on the parameters set up for the Login Account
To Use, also named ‘DEFAULT’.
Step 4: The Auth User ID and Password will be defaulted to the user name and password
entries made during the Setup of your router, as per Step 2: Voice Service Provider
(Phone 1) page.
Step 5: Refer to the following table for a detailed description of the fields on the User Profile
page.
Page 68
OPEN Networks Pty Ltd
www.opennw.com
Page 70

OPEN 812L VoIP ATA Router
User Guide
The following table describes the settings for the User Profile window and their definitions:
Field Name Description
Service Provider Name
This is defaulted to the Service Provider set up on the
Config page under the Service Provider To Use option.
User Profile List
The options on the list box allows you to select the login
account for which the configuration needs to be done. When
a login account is selected from this dynamic list, the
respective parameters are automatically displayed. A
DEFAULT set of parameters is provided for every new login
added. This can be edited accordingly. Alternatively, you
can define and add new logins manually. Similarly, you can
also edit or delete and existing user account using the radio
options provided.
New User Profile
This is a text-field where you may enter the name of the
new login account you wish to add, or to rename an existing
login account. The login account edited will be the one
chosen from the Service Provider List.
Auth User ID
This is the authorized user ID as per the setup of your router
under the Voice Service Provider (Phone 1).
User Name
This parameter holds the Registration ID given by the
service provider you have registered your account with.
Password
This parameter holds the Password used for authentication
with your registered service provider.
Display Name
This parameter holds the Display Name, as it should appear
on the Caller ID.
The ATA provides the following radio options – Display, Add, Edit and Delete – where you can
manipulate the various login parameters for the login account chosen. You may use these
functions to update your user login accounts.
Display User
This is the default option. When you click the Submit button,
the selected login details will be displayed.
Add User
This function allows you to add a new login account when
you select the Add User option. Click the Submit button to
submit the new user details. Remember to enter the New
User Profile field before you click the Submit button.
Edit User
Changes made to the user profile details will overwrite
existing parameters with the new parameters when you
click the Submit button. The New User Profile field is
optional when are editing an existing login account.
Delete User
Selecting this option will remove the selected login account
from the Login Account List.
Submit
Click the Submit button to submit the changes made.
Save Settings
Click the Save Settings link and that takes you to the Save
Settings/Reboot page. Refer to Section 7.2.12 for more
information.
Page 69
OPEN Networks Pty Ltd
www.opennw.com
The maximum number of login accounts you can add is 4 per service provider and
there must be at least 1 login account per service provider available.
Page 71

OPEN 812L VoIP ATA Router
User Guide
7.1.4 FXO Configuration
The FXO Configuration is used to configure the system level FXO parameters. FXO stands for
Foreign Exchange Office.
Follow the steps to guide you through FXO Configuration.
Step 1: To access FXO Exchange, click the Advanced link located at the top right-hand side
of the page.
Step 2: Click the FXO Exchange link located on the left menu. The following page appears:
Step 3: To configure the remaining fields on this page, refer to the following table for
definitions of each field.
The following table describes the settings for the FXO Exchange window and their definitions:
Field Name Description
CID Enable
CID stands for Caller ID. This parameter is used to enable
or disable the PSTN Caller ID display.
Tone Detection Wait Timer
(secs)
This field determines the length of time in seconds that the
device will wait for the PSTN dial tone to be detected after
you have pressed the Hook Flash/recall button.
In case the dial tone is not detected or there is a timeout, a
fast busy tone will be heard.
Page 70
OPEN Networks Pty Ltd
www.opennw.com
Page 72

Field Name Description
OPEN 812L VoIP ATA Router
User Guide
User PSTN on Registration
Failure
Relay Hook Flash to CO
Submit
Save Settings
The OPEN 812L VoIP ATA router will use the PSTN
network when SIP Registration fails.
This radio button enables hook flash/recall to be sent to
your PSTN Network. It is defaulted to Yes.
Click the Submit button to submit the changes made.
Click the Save Settings link and that takes you to the Save
Settings/Reboot page. Refer to Section 7.2.12 for more
information.
Page 71
OPEN Networks Pty Ltd
www.opennw.com
Page 73

OPEN 812L VoIP ATA Router
User Guide
7.1.5 ATA Timer Configuration
The ATA Timer Configuration provides a number of timers used at the system level, which can
be configured through the Web Interface. The values on the timer have to be given in seconds
only. This section explains the various timers available for your configuration.
Follow the steps below to access the ATA Timer Configuration web page.
Step 1: To access ATA Timer Configuration, click the Advanced link located at the top right-
hand side of the page.
Step 2: Click Timer Configuration on the left menu. The following page appears:
Step3: The fields on this page are defaulted to the timings displayed above. To change the
timings for any of the fields, simply enter the new time in seconds and click the
Submit button.
Page 72
OPEN Networks Pty Ltd
www.opennw.com
Page 74

OPEN 812L VoIP ATA Router
User Guide
The following table describes the settings for the ATA Timer Configuration window and their
definitions:
Field Name Description
Phone
Predial Timeout (secs)
Alert Timeout (secs)
Disconnect Timeout (secs)
RingBack Timeout (secs)
Phone ‘1’ is the default option. Select ‘1’ to configure
PHONE 1 or select '2' to configure PHONE 2. When a
phone is selected, the other fields in this section are
refreshed with the currently configured values.
The pre-dial timer indicates the time period through which
the dial tone is heard once the phone has been lifted off the
hook. At the end of this period (e.g. 10 seconds), if no digits
are entered, you will hear a fast and busy tone on your
phone.
The Alert timer indicates the time when the OPEN 812L
VoIP ATA router will ring when an incoming call is received
and the phone is off the hook. After the timer seconds have
run out, the OPEN 812L VoIP ATA router will automatically
stop ringing and reject the call.
The disconnect timer indicates the time when the fast and
busy tone will be heard when a call has been disconnected
by the other party. At the end of this time, a warning or
warbling tone can be heard until the user hangs up the
phone.
The Ringback timer indicates the time period when the
OPEN 812L VoIP ATA router will wait while the Ringback
tone is played for the final response from the other end. This
happens after the initial response has been made after an
outgoing call has been made.
Call Progress Timeout (secs)
The CallProgress timer indicates the time period when the
OPEN 812L VoIP ATA router will wait for the initial response
once an outgoing call has been made.
Call Waiting Timeout (secs)
The CallWaiting timer indicates the period when the callwaiting tone can be heard when an incoming call is received
in an active connection state. The Call Waiting tone can be
heard at intervals of 10 seconds. It is configurable using the
Call Waiting tone parameters.
Call Fwd No Ans Timeout
(secs)
Submit
Save Settings
This field indicates the time after the call has been
forwarded but there was no answer or response.
Click the Submit button to submit the changes made.
Click the Save Settings link and that takes you to the Save
Settings/Reboot page. Refer to Section 7.2.12 for more
information.
Page 73
OPEN Networks Pty Ltd
www.opennw.com
Page 75

OPEN 812L VoIP ATA Router
User Guide
7.1.6 Ringtone Configuration
The Ringtone Configuration page allows users to select the country-specific ringtones that are
generated by the OPEN 812L VoIP ATA router application. These include ring, dial, busy and
ring back tones.
The OPEN 812L VoIP ATA router provides default ring-tone parameters configured for various
countries.
Follow the steps below to access and configure the Ringtone Configuration web page.
Step 1: To access Ringtone Configuration, click the Advanced link located at the top right-
hand side of the page.
Step 2: Click Ringtone Config on the left menu. The following page appears:
Step 3: Click the down-arrow of the Region list box, and select Australia.
Step 4: Click the Submit button to complete the configuration.
Step 5: To save the settings, click the Save Settings button.
Page 74
OPEN Networks Pty Ltd
www.opennw.com
Page 76

OPEN 812L VoIP ATA Router
User Guide
7.1.7 ATA Miscellaneous Configuration
The ATA Misc Configuration page allows users to set up configurations related to the SIP,
STUN parameter and the Codec preference. Default settings can be found on this page.
Follow the steps below to view or modify the settings on the ATA Misc Configuration page.
Step 1: To access ATA Misc Configuration, click the Advanced link located at the top right-
hand side of the page.
Step 2: Click Misc Configuration on the left menu. The ATA Misc Configuration page
appears:
Step 3: The default settings for the various sections are shown as above. You may make
changes to the current settings to configure your router.
Page 75
OPEN Networks Pty Ltd
www.opennw.com
Page 77

OPEN 812L VoIP ATA Router
User Guide
The following table describes the settings for the ATA Misc Configuration window and their
definitions:
Field Definition
Phone
Codec
Preference
SIP Device
Phone ‘1’ is the default option. Select ‘1’ to configure PHONE 1 or select 2
to configure PHONE 2. When a phone is selected, the other fields in this
section are refreshed with the currently configured values.
This section allows the user to select the preferred codec in a sequence of
1 To 7. '1' is the most preferred Codec to use. Refer to your VSP on which
Codec Preference to use.
The Codec Preference determines the order by which all the supported
codecs will be placed in a call setup message sent to any destination line.
Local SIP
Port
Enter the local SIP Port number on which the ATA should
listen for the messages. The range is 1 to 65535. The default
port is 5060.
Media
Base Port
Enter the Media Base Port (also known as the RTP port)
number. This parameter provides the base value from the
media (RTP) ports that are assigned for various lines and the
different call-sessions that may exist within an end-point. Odd
port values are not recommended. If an Odd Value is
entered, the next higher even value is used as the Media
Base Port. This is to conform to the RFC specifications. The
range is 1 to 65500. The default port is 5000
STUN
Parameters
This section configures NAT Traversal technique support in the OPEN
812L VoIP ATA router. These parameters are dependent on your VSP.
The parameters are optional.
STUN
The default setting is DISABLED Select ENABLED to enable
STUN if the ATA is behind a NAT enabled router and the
router has no ALG for SIP, or DISABLED to disable STUN
(ATA is not to use STUN for NAT traversal).
STUN
Server
Address
STUN
Server Port
Enter the IP address or Domain Name of the STUN Server.
The default is 66.7.238.210. This field is applicable only if
USE STUN is selected as the NAT traversal technique.
Enter the port number on which the STUN server listens for
requests from the STUN Client on the ATA. The range is 1 to
65535. The default is 3478. This field is applicable only if
USE STUN is selected as the NAT traversal technique.
Force Keep
Alive
Only valid when STUN is not used. If STUN is not enabled,
and keep alive is still expected to be sent then select Yes
otherwise select No.
Keep Alive
Period
The Keep Alive interval in seconds to be used when STUN is
not enabled.
Submit
Page 76
OPEN Networks Pty Ltd
www.opennw.com
Click the Submit button to submit the changes made.
Page 78

Field Definition
OPEN 812L VoIP ATA Router
User Guide
Save Settings
Click the Save Settings link and that takes you to the Save Settings/Reboot
page. Refer to Section 7.2.12 for more information.
Page 77
OPEN Networks Pty Ltd
www.opennw.com
Page 79

OPEN 812L VoIP ATA Router
User Guide
7.1.8 Address Book Configuration
The Address Book page allows for the configuration of address book entries that can be used
for the speed dial execution of calls.
The Address Book page is divided into two sections. The top half of the screen displays the
current address book table that have been configured for the selected Endpoint.
The bottom half of the screen can be used for editing the address book. This includes adding
new entries, deleting existing entries, modifying existing entries and displaying the values
corresponding to an entry index or speed dial index in the address book.
Follow the steps below to access and configure the Address Book page.
Step 1: To access Address Book, click the Advanced link located at the top right-hand side
of the page.
Step 2: Click Address Book on the left menu. The Address Book page appears:
Step 3: Select ‘1’ to configure PHONE 1 or ‘2’ to configure PHONE 2 from the list box.
Step 4: Enter the Display Name for this address book entry.
Step 5: Enter the Phone number in the Number field. Do not add any spaces in this field.
Step 6: Enter the IP Address/Domain Name that applies to this address book entry you are
currently adding. This field is optional if the IP Address field is entered. Similarly, if
you leave this field blank, ensure that the Number field is populated.
Step 7: Enter the Port Number using the SIP port number on which the remote end will
receive the call. This field is useful when you want to specify non-telephone number
entries, where the call can be made directly without going through the configured
Page 78
OPEN Networks Pty Ltd
www.opennw.com
Page 80

OPEN 812L VoIP ATA Router
User Guide
proxy server. When this field is not specified, the default SIP port of 5060 is
assumed.
Step 8: Enter the Speed Dial Code you wish to use for the number being configured. This
refers to the index in the address book as well as the speed dial entry code.
Step 9: The Address Book Action provides a list box to select the action to be taken. You
may select from one of the following options. The definitions for these options can be
found in the table below:
Display Address Book
Add New Entry
Edit Sel Entry
Delete Sel Entry
Step 10: Click the Submit button to complete the configuration.
Step 11: To save the settings, click the Save Settings button.
The following table describes the various Address Book Action options and their definitions:
Field Definition
Address Book
Action
1. The above parameters are specific to the endpoint selected in the ATA
There are four Address Book Action options available.
Display
Address
Book
Add New
Entry
Edit Sel
Entry
Delete Sel
Entry
Configuration page.
2. Up to ten addresses book entries can be added per endpoint.
3. Address book entries addition/deletion/editing do not need a Save and
Reboot. The changes are reflected immediately.
This is the default option. Selecting this option displays the
selected address book details after clicking the Submit
button.
Selecting this option adds a new address book entry after
clicking the Submit button.
This option deletes the selected address book entry from the
Address Book List.
This option deletes the selected address book entry. Select
Yes or No as required.
Page 79
OPEN Networks Pty Ltd
www.opennw.com
Page 81

OPEN 812L VoIP ATA Router
User Guide
7.1.9 Auto-Provisioning
Auto-Provisioning allows VSPs to update the OPEN 812L VoIP ATA router's configuration
automatically.
This functionality is dependent on any changes from you VSP.
Page 80
OPEN Networks Pty Ltd
www.opennw.com
Page 82

OPEN 812L VoIP ATA Router
User Guide
7.2 Admin Privileges
7.2.1 Route Table
The Route Table page displays the routing table and allows you to manually enter a routing
entry. It consists of three sections: the Routing Status table, the System Default Gateway
Configuration and Route Configuration.
The Routing status table provides information on the Destination, Netmask, Gateway, and
Interface of your routing connections. The interface 'lo0' indicates the loop back interface; ppp1
indicates the PPP interface.
Follow the steps below to access and configure the Route Table page.
Step 1: To access Route Table, click the Advanced link located at the top right-hand side
of the page.
Step 2: Click Route Table on the left menu. The following page appears:
Step 3: To set up the configurations for the Route Table, please refer to the table provided
of the field definitions and the available options for your configurations.
Page 81
OPEN Networks Pty Ltd
www.opennw.com
Page 83

The following table lists the Route Table screen fields and their definitions:
Field Definition
This provides the following four options:
OPEN 812L VoIP ATA Router
User Guide
System Default
Gateway
Configuration
Execute
Submit
Save Settings
None
This field allows the user to choose to have no
Default Gateway in the router.
This field allows the user to select the router to
Auto
automatically decide the Default Gateway. (System
Default)
This field allows the user to select a Network
Interface from a list. This option allows the user
Select
Interface
associate the system default gateway to a network
interface, static or dynamic, and provides a way to
fix the Default Gateway to a dynamic Network
Interface before the interface is established.
Specify IP
This field allows the user to manually enter a Default
Gateway IP.
Click the Execute button to in order for the configuration to take
effect.
Click the Submit button to save the changes made.
Click the Save Settings link and that takes you to the Save
Settings/Reboot page. Refer to Section 7.2.12 for more information.
Page 82
OPEN Networks Pty Ltd
www.opennw.com
Page 84

7.2.2 Route Configuration
OPEN 812L VoIP ATA Router
User Guide
You may Add or Delete the IP addresses using the Add/Delete list box option provided.
The following table lists the Route Configuration screen fields and their definitions:
Field Definition
Destination
Netmask
This field allows the user to enter the remote network or host
IP address for static routing.
This field allows the user to enter the subnet mask for static
routing.
This field allows the user to enter the IP
address of the gateway device that allows the
Specify IP
router to contact the remote network or the
host for Specified IP or select an Interface for
Gateway
Add/Delete Option
Select
Interface
You may choose to add new or delete existing route
configurations
the Gateway.
There are 2 options:
Ip WAN
Ip LAN
Reset
Submit
Save Settings
Click the Reset button if you wish to reset route configuration
details completely.
Click the Submit button to save the changes made.
Click the Save Settings link and that takes you to the Save
Settings/Reboot page. Refer to Section 7.2.12 for more
information.
Manually Configured
Routes
Page 83
OPEN Networks Pty Ltd
www.opennw.com
This field displays the static route entries submitted by the
user.
Page 85

OPEN 812L VoIP ATA Router
User Guide
7.2.3 Bridge Timeout
Network bridges operate at the physical network layer. The purpose of a bridge is to connect
two or more networks and enable packet sharing between them. Bridges are different from
routers because they forward packets based on physical addresses, whereas routers use IP
address to forward packets.
Bridges must learn all the physical (MAC) addresses of the devices so it can forward the
packets reliably. The purpose of the Bridge MAC Table is to store and display these bridge-
recognized MAC addresses. This page contains information that is dynamic and will refresh
every 8 seconds.
Follow the steps below to access and configure the Bridge Timeout page.
Step 1: To access Bridge Timeout, click the Advanced link located at the top right-hand
side of the page.
Step 2: Click Bridge Timeout on the left menu. The Bridge MAC Table page appears:
Step 3: There is only one field to populate in the Bridge MAC Table. Enter the number of
seconds for the Aging Timeout field.
This field allows you to enter the update period for the MAC table. Make the number
lower if you wish to have a more frequent refresh rate.
The range for the Aging Timeout field is 0 - 32767. The default is set to 300.
Step 4: Click the Submit button to complete the configuration.
Page 84
OPEN Networks Pty Ltd
www.opennw.com
Page 86

OPEN 812L VoIP ATA Router
User Guide
7.2.4 RIP System Wide Configuration
RIP (Routing Information Protocol) is a management protocol that ensures that all hosts in a
particular network share the same information about routing paths. In RIP, a host computer will
send its entire routing table to another host computer every X seconds, where X is the supply
interval. The receiving host computer will in turn repeat the same process by sending the same
information to another host computer. The process is repeated until all host computers in a
given network share the same routing knowledge.
There are several components to RIP, including the authenticator, supplier, and listener.
Authenticator: Authentication is only available for RIPv2. When it is disabled, RIPv2
messages containing authentication entries are discarded. When it is enabled, all RIPv2
messages must have proper authentication entries, and all RIPv2 messages without verified
authentication entries and all RIPv1 messages are automatically rejected.
Supplier: The RIP Supplier has two functions:
It transmits route updates over every RIP Supplier interface at the interval specified by Supply
Interval (see below).
It transmits route updates in response to specific requests from other routers.
Listener: The RIP Listener listens to and processes all RIP messages it receives from other
RIP routers and updates the host routing tables accordingly. The RIP Listener is always
enabled when RIP is enabled. By default, RIP is disabled.
The announcement messages RIP sends are based on two configuration parameters: RIP
Version number and Multicast:
Version Multicast Announcements Sent
1 OFF V1
2 ON V1
2 OFF V2-BC
2 ON V2-MC
The RIP messages that can be received and processed are based on two configuration
parameters: RIP Version number and Multicast:
Version Multicast Announcements Sent
1 OFF V1
2 ON V1
2 OFF V2-BC
2 ON V2-MC
Follow the steps below to access and configure the RIP System WIde Configuration page.
Page 85
OPEN Networks Pty Ltd
www.opennw.com
Page 87

OPEN 812L VoIP ATA Router
User Guide
Step 1: To access RIP System WIde Configuration, click the Advanced link located at the
top right-hand side of the page.
Step 2: Click RIP Config on the left menu. The RIP System WIde Configuration page
appears:
Step 3: Select to Enable or Disable RIP session using the list box provided. RIP is
disabled by default. The resulting RIP session will monitor all network interfaces that
are currently available for messages from tother RIP routers.
Step 4: Populate the Supply Interval field in seconds. This field specifies how often the RIP
sends out announcements as a RIP Supplier. The range for the Supply Interval field
is from 0 - 2147483647 seconds. It is defaulted to 30 seconds.
Step 5: Populate the Expire Timeout field in seconds. This field specifies the expiration
time of a route. When a route has not been updated for more than the 'expired'
period of time, it is removed from the Route Table. This route is then regarded as
invalidate and will remain in the internal RIP Route Table.
It will be included in the RIP announcements to let other routers know the changes.
The range for Expire Timeout is from 0 - 2147483647. The default is set to 180.
Step 6: Populate the Garbage Timeout field. This field specifies how long the expired and
invalidate routes are to be kept in the internal RIP Route Table before they are
removed. The range for Garbage Timeout is from 0 - 2147483647. The default is
set to 120.
Step 7: Click the Submit button to complete the configuration.
Step 8: To save the settings, click the Save Settings button.
Page 86
OPEN Networks Pty Ltd
www.opennw.com
Page 88

OPEN 812L VoIP ATA Router
User Guide
Advanced Configuration
Follow the steps below to access the RIP Per Interface Configuration page.
Step1: To configure the Interface and view Current RIP Settings, click the Advanced
Configuration link provided.
Step 2: The RIP Per Interface Configuration page appears:
Step 3: Refer to the following table to configure the fields on this screen.
Page 87
OPEN Networks Pty Ltd
www.opennw.com
Page 89

OPEN 812L VoIP ATA Router
User Guide
The following table lists the RIP Per Interface Configuration screen fields and their definitions:
Field Definition
Interface
Enabled
Supplier
Listener
Current RIP Settings
This field allows you to choose the Interface. The available
selections are: Ip VPN and Ip WAN (maximum of 16).
This field allows you to Enable (Yes) or Disable (No ) the
specified interface for RIP.
This field allows you to select the Supplier Mode (RIP
Transmit).
Disabled
V1 BC
V2 BC
V2 MC
The supplier transmit is disabled.
The supplier transmits in RIPv1 Broadcast.
The supplier transmits in RIPv2 Broadcast.
The supplier transmits in RIPv2 Multicast.
This field allows you to select the Listener Mode (RIP Receive)
V1
V2
V1 + V2
The listener receives the RIPv1 only.
The listener receives the RIPv2 only.
This listener receives the both RIPv1 and RIPv2.
This field displays the each interface’s RIP status.
Page 88
OPEN Networks Pty Ltd
www.opennw.com
Page 90

OPEN 812L VoIP ATA Router
User Guide
7.2.5 DMZ Configuration
The DMZ (De-Militarized Zone) Configuration page allows you to map a local computer to this
zone. The DMZ is added between a protected network and an external network. When there
is a suspected packet coming from the WAN, the firewall will forward this packet to the DMZ
host.
Follow the steps below to access and configure the DMZ Configuration page.
Step 1: To access DMZ Config, click the Advanced link located at the top right-hand side of
the page.
Step 2: Click DMZ Config on the left menu. The DMZ Config page appears:
Step 3: Select to Enabled or Disabled the DMZ. The default is set to Disabled.
Step 4: Populate the DMZ Host IP field with the IP address of the DMZ host.
Step 5: Click the Apply button to apply the settings made.
Step 6: Click the Reset button to refresh the page. Re-enter the fields as required.
Step 7: Click the Save Settings link to save the changes made.
Page 89
OPEN Networks Pty Ltd
www.opennw.com
Page 91

OPEN 812L VoIP ATA Router
User Guide
7.2.6 SNTP Configuration
This screen allows you to set the Simple Network Time Protocol or SNTP configuration. SNTP
is an efficient method of obtaining the time from a timeserver. It is a system used for
synchronizing the clocks of networked computer systems, primarily when data transfer is
handled via the Internet.
Follow the steps below to access and configure the SNTP Configuration page.
Step 1: To access SNTP Configuration, click the Advanced link located at the top right-
hand side of the page.
Step 2: Click SNTP Configuration on the left menu. The SNTP Configuration page
appears:
Step 3: Enter the time zone of your geographical location. For example: +10 GMT for
Canberra, Melbourne and Sydney.
Step 4: Select Yes or No from the list box for Daylight Saving Time. Select Yes if it applies
to your location and No if it does not apply.
Step 5: Specify the IP address of your preferred SNTP server in the User-Defined Time
Server field. The default is set to 0.0.0.0.
Step 6: Click the Apply button to apply the settings made.
Step 7: Click the Save Settings link to save the changes made.
When the OPEN 812L ATA router is successfully connected to the SNTP server, the
system log will reflect the updated time. Refer to the screen image example below.
Page 90
OPEN Networks Pty Ltd
www.opennw.com
Page 92

OPEN 812L VoIP ATA Router
User Guide
7.2.7 Miscellaneous Configuration
This page allows you to configure miscellaneous configurations such as HTTP, FTP, IGMP
and PPP.
Follow the steps below to access and configure the Miscellaneous Configuration page.
Step 1: To access Miscellaneous Configuration, click the Advanced link located at the top
right-hand side of the page.
Step 2: Click Misc Config on the left menu. The Miscellaneous Configuration page
appears:
Step 3: Refer to the table below to configure the fields on this page.
Page 91
OPEN Networks Pty Ltd
www.opennw.com
Page 93

OPEN 812L VoIP ATA Router
The following table lists the Miscellaneous Configuration fields and their definitions:
Field Definition
User Guide
HTTP Server Access
HTTP Server Port
HTTP Password
Protection
FTP server
Disable WAN side
FTP access:
TFTP server
This field allows you to configure the location from which these Web
pages can be accessed.
All
When this field is checked, it allows both WAN
and LAN access to the Web pages.
Restricted LAN
This field allows the Web pages access from the
LAN side. This is the default setting.
Restricted WAN
Specified IP &
Subnet Mask
This field allows the Web access from the WAN
side with a specified IP and subnet mask. The
default settings for Specified IP and Subnet
Mask are 10.0.0.10 and 255.0.0.0 respectively.
This field allows you to specify the port of the Web access. For
example, when it is changed to 8080, the HTTP server address for
the LAN side is http://192.168.10.1:8080.
Range for HTTP Server port is 0 – 32767. The default value is 80.
This field allows you to enable or disable HTTP authentication. The
default is set to DISABLED.
This field allows you to enable or disable the FTP server connection.
The default is set to Enabled.
This will disable the WAN side access to the FTP server. The default
is set to DISABLED.
This field allows you to enable or disable the TFTP connection. The
default is set to DISABLED.
IGMP Proxy
PPP Half Bridge
PPP reconnect on
WAN access
Connect PPP when
ADSL link is up
Submit
Save Settings
This is the global setting for IGMP Proxy. If it is enabled, the enabled
IGMP Proxy on the WAN PVCs will be working. Otherwise, no WAN
PVC can have IGMP Proxy working on it. The system is defaulted to
DISABLED.
When PPP Half Bridge is enabled, only one PC is able to access the
Internet, and the DHCP server will duplicate the WAN IP address
from the VSP to the local client PC. Only the PC with the WAN IP
address can access the Internet. The system default is set to
DISABLED.
If enabled, the PPP session will automatically establish a connection
when a packet tries to access the WAN. The system is defaulted to
DISABLED.
If this option is enabled, the OPEN 812L VoIP ATA router will connect
the PPP session whenever an Internet connection is established.
Click the Submit button to save the changes made.
Click the Save Settings link and that takes you to the Save
Settings/Reboot page. Refer to Section 7.2.12 for more information.
Page 92
OPEN Networks Pty Ltd
www.opennw.com
Page 94

OPEN 812L VoIP ATA Router
User Guide
7.2.8 Admin / Username Password Configuration
This page allows you to change the Administrator password.
Follow the steps below to access and configure the Admin Password page.
Step 1: To access Admin Password, click the Advanced link located at the top right-hand
side of the page.
Step 2: Click Admin Password on the left menu. The following page appears:
Step 3: Enter your Current Password into this field.
Step 4: Your Username of 'root' is automatically populated.
Step 5: Enter your New Password into this field. Make sure the password is at least 8
characters long and does not contain the ampersand symbol '&'. This symbol will
not be accepted.
Step6: Enter your new password again into the Retype Password field.
Step 7: Click the Submit button to complete the configuration.
Step 8: To save the settings, click the Save Settings button.
Page 93
OPEN Networks Pty Ltd
www.opennw.com
Page 95

OPEN 812L VoIP ATA Router
User Guide
7.2.9 Reset to Default
This page allows you to reset the OPEN 812L VoIP ATA router to its original factory default
configuration.
Follow the steps below to access and restore your factory default settings.
Step 1: To access Reset to Default, click the Advanced link located at the top right-hand
side of the page.
Step 2: Click Reset to Default on the left menu. The following page appears:
Step 3: Click the Restore button to restore the settings. The following screen appears.
Please wait a few minutes until the factory settings have been restored.
Page 94
OPEN Networks Pty Ltd
www.opennw.com
Page 96

OPEN 812L VoIP ATA Router
User Guide
7.2.10 Firmware Update
This page allows the user to upgrade the firmware from the Web Interface.
Follow the steps below to access and upgrade your firmware.
Step 1: To access Firmware Upgrade, click the Advanced link located at the top right-hand
side of the page.
Step 2: Click Firmware Upgrade on the left menu. The following page appears:
Step 3: Click the Firmware Update button. The OPEN 812L VoIP ATA router prepares the
for the firmware upgrade. The message as shown below will be displayed. Wait a
few moments until the update process is completed.
Step 4: Enter the path of the file in the text box as shown below or click the Browse button
to locate the file. For example, 'C:/firmware.dlf'.
Page 95
OPEN Networks Pty Ltd
www.opennw.com
Page 97

OPEN 812L VoIP ATA Router
User Guide
Step 5: Click the Upload button to start the upgrading process. Please wait a few moments.
Do not turn off your router when the upgrade is being processed.
Step 6: Click the Cancel Update button to stop the update from being updated. The
configuration will be restored. Wait a few moments until this process is completed.
Page 96
OPEN Networks Pty Ltd
www.opennw.com
Page 98

OPEN 812L VoIP ATA Router
User Guide
7.2.11 Auto Update
The Auto Update page allows your VSP to update the OPEN 812L VoIP ATA firmware
automatically.
There are three options for the Download Mode (as shown in the image below): Disabled,
Download After Reboot and Download at Timed Intervals.
This functionality is dependent on any updates from you VSP.
Page 97
OPEN Networks Pty Ltd
www.opennw.com
Page 99

OPEN 812L VoIP ATA Router
User Guide
7.2.12 Save / Reboot
This page allows you to save the new configurations to the flash and reboot the OPEN 812L
VoIP ATA router or simply reboot the ATA router without saving changes.
Follow the steps below to access and save your settings.
Step 1: To access Save Settings/Reboot, click the Advanced link located at the top right-
hand side of the page.
Step 2: Click Save Settings/Reboot on the left menu. The following page appears:
Step 3: Click Save & Reboot button if you wish to apply all changes. Two different
pages/screens will appear.
The first one states that: “Your settings are being saved and the device is being
rebooted. Save/reboot in progress, please wait….”
Page 98
OPEN Networks Pty Ltd
www.opennw.com
Page 100

OPEN 812L VoIP ATA Router
User Guide
The second screen follows with “Your settings have been saved and the device has
rebooted. Done”.
Your settings have been saved and the router has been rebooted.
Step 4: Click Reboot Only button if you wish to discard all changes since the last save.
Two different pages/screens will appear after pressing this button. Two pages will
appear after pressing this button.
The first screen states: “The device is being rebooted. Reboot in progress, please
wait….”
The second screen follows with “The modem is being rebooted. Done.”
Page 99
OPEN Networks Pty Ltd
www.opennw.com
 Loading...