

Page 1

Opalum® FLOW series
Opalum® STREAM series
Wireless setup guide
w w w . o p a l u m . c o m
Wireless setup guide
The Control Hub of the Opalum FLOW and STEAM series speaker systems is sold in two versions, with and without
wireless LAN (WLAN) support. This guide applies to WLAN enabled units only.
Connecting the Opalum Control Hub to your wireless network
There are two ways of connecting the Control Hub to your wireless network. Either by push-button or by USB
configuration. Push-button connection is recommended for most users.
In this guide a lot of third party applications are mentioned. Opalum/Actiwave AB can in no case be made
responsible for damage or loss, direct or indirect, caused by the use of third party applications. Help and
support issues concerning third party applications should be directed to their respective creator. The names of
these third party applications are properties of their respective owners.
Contents Page
Push-button connection (recommended) 2
Connection by USB configuration 3
Verifying that the Opalum system is connected to the network 6
Introduction to DLNA 7
User scenarios 9
Wireless setup guide v1.0
1/10
Page 2

Opalum® FLOW series
Opalum® STREAM series
Wireless setup guide
w w w . o p a l u m . c o m
Push-button connection (recommended)
The easiest way of connecting the Control Hub to your wireless network is by using the push-button on your
wireless home router. Connection by push-button is supported by most fairly new routers. The name of this
feature varies from vendor to vendor. Common names are WPS, QSS or PBC. The routers push-button may also
be indicated by just a figure. On some routers this feature needs to be enabled before use, please consult your
routers user manual if that is the case. If your router does not support connection by push-button please see
“Connection by USB configuration” below.
To connect by push-button:
1. Disconnect the DC power from the Control Hub. See fig 1. (Make sure
the power supply is connected to the wall socket).
2. Wait for at least three minutes1.
3. Connect the DC power to the Control Hub. See fig 2. The status led on the
Control Hub should now start flashing white.
4. Now, within one minute, push the connection push-button on your wireless
router2.
5. After a while the Control Hub will automatically shut down.
The wireless network setup is now done. To verify network connection please start the Opalum system using
the remote control. Turn to green source. When the status led on the Control Hub stops flashing and goes solid
green, the system should show up as a media rendering device on your network.
To verify network connection please see “Verifying that the Opalum system is connected to the network”.
1 Due to the Control Hub's ultra low power consumption three minutes without power is needed to allow for a clean reboot.
2 On some routers the push-button needs to be pushed and held for some seconds.
Wireless setup guide v1.0
2/10
Fig 1
Fig 2
Page 3
Opalum® FLOW series
Opalum® STREAM series
Wireless setup guide
w w w . o p a l u m . c o m
Connection by USB configuration
To configure network connection by USB you will need the following:
• Empty USB stick memory.
• Windows PC (preferably with wireless network support).
• Internet connection to download the OpalumWirelessConfig configuration utility.
To configure by USB
1. Disconnect the DC power from the Control Hub. See fig 3. (Make sure
the power supply is connected to the wall socket).
2. Insert a USB stick memory into your PC and make sure it is empty.
3. Download the OpalumWirelessConfig configuration utility from
http://www.opalum.com/download/OpalumWirelessConfig.exe and save it
to your empty USB stick memory. Save the file from your internet browser, do not run the file directly. If
your browser automatically saves files in a default hard drive folder, please move the file from there to the
USB stick memory.
Important: The OpalumWirelessConfig.exe-file must be placed at the root of your USB stick memory (not
inside any folder).
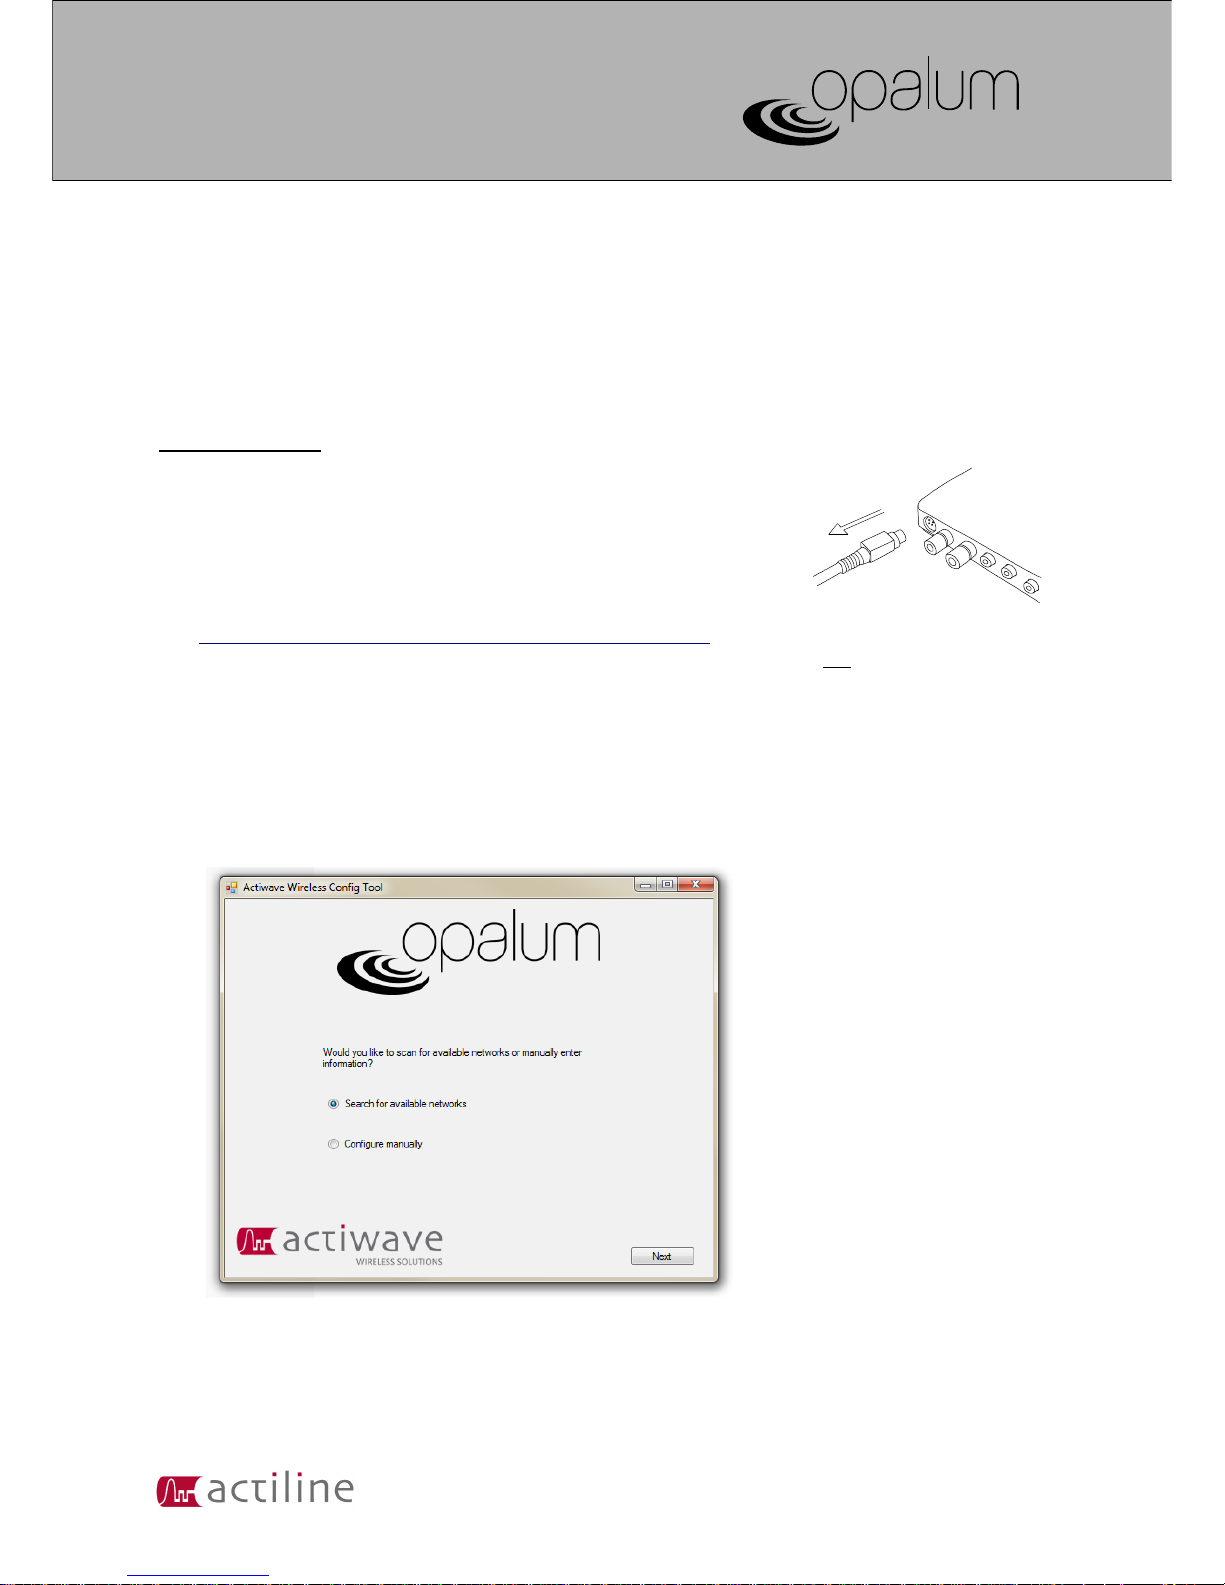
4. Run the OpalumWirelessConfig utility from your USB stick memory (double-click the file in windows
explorer). If windows “User account control” box shows up, click yes to proceed. The following screen will
be displayed:
5. If your computer has a wireless network card you may automatically scan for available networks. If this is
the case select “Search for available networks”, click Next and continue reading on step 6. If you prefer to
manually configure the network settings, or want to use a static IP address, select “Configure manually”,
click Next and continue reading on step 9.
Wireless setup guide v1.0
3/10
Fig 3
Page 4

Opalum® FLOW series
Opalum® STREAM series
Wireless setup guide
w w w . o p a l u m . c o m
6. The following screen will show up. Click scan to search for available wireless networks. If there are no
available networks or if your computer does not have a wireless network card (make sure the wireless card
is activated if using a laptop) the network list will remain empty. Select the network to which you want to
connect your Opalum system and click Next.
7. On the following page, enter the network password and the preferred name of your Opalum system. Click
Save.
Wireless setup guide v1.0
4/10
Page 5

Opalum® FLOW series
Opalum® STREAM series
Wireless setup guide
w w w . o p a l u m . c o m
8. A configuration file is now created and saved to your USB stick memory. Now do the following:
1. Close the configuration utility.
2. Remove the USB stick from your computer.
3. Make sure the Control Hub has been disconnected from the DC power supply for at least three
minutes3.
4. Insert the USB stick memory into the Control Hub.
5. Connect the DC power to the Control Hub. See fig 4. The status
led on the Control Hub should now start flashing white.
6. The Control Hub now reads the configuration file from your USB
stick memory.
7. Wait until connection box automatically turns off. This may take
several minutes, please be patient.
8. Remove the USB stick memory from the Control Hub.
The wireless network setup is now done. To verify network connection please start the Opalum system
using the remote control. Turn to green source. When the status led on the Control Hub stops flashing and
turn solid green, the system should show up as a media rendering device on your network.
To verify network connection please see “Verifying that the Opalum system is connected to the network”.
9. In the manual configuration mode enter the network name (SSID), network password, select if DHCP should
be used and enter the preferred name of your Opalum system. Also enter the type of network encryption, if
used, on your network. If DHCP box is checked click Save and continue read on step 6. Otherwise click Next
and enter the preferred IP address of the Opalum system, the network mask, primary DNS server IP address
and gateway address. Click Save and go to step 6.
3 Due to the Control Hubs ultra low power consumption three minutes without power is needed to allow for a clean reboot.
Wireless setup guide v1.0
5/10
Fig 4
Page 6

Opalum® FLOW series
Opalum® STREAM series
Wireless setup guide
w w w . o p a l u m . c o m
Verifying that the Opalum system is connected to the network.
As soon as you start your Opalum system it connects to the specified wireless network. Change to green source
and you will see the status led on the control hub flash. When the led stops flashing green it has successfully
connected. To verify the connection in Windows 7 click the Windows button and type network in the search
field. Click Network. You can also open this view from Windows Explorer.
If your Opalum system shows up as expected it is now time to choose what media servers and control points you
would like to use. Media servers and Control points are not in the scope of Opalum. But there are plenty of them
out there to buy or to use for free. To help you getting started please go through “Introduction to DLNA/UPnP”
and “User scenarios” on the next few pages.
Wireless setup guide v1.0
6/10
The Opalum system shows up under Media Devices.
Page 7

Opalum® FLOW series
Opalum® STREAM series
Wireless setup guide
w w w . o p a l u m . c o m
Introduction to DLNA/UPnP
Media sharing through DLNA or UPnP is basically built as a three way system where all units connects to the
same network. This way you are in total control of what song is played, from anywhere to anywhere in your
home network. There are many third party software applications and hardware devices handling Digital Media
Server (DMS), Digital Media Controller (DMC) and Digital Media Renderer (DMR) functionality. Some times a
combination of DMC and DMR is called Digital Media Player (DMP) or DLNA/UPnP clients. Applications can be
found online or in Apples AppStore or Googles Android Market. Many of these applications are available free of
charge.
The wireless version of the Opalum Control Hub can receive streaming music as a DMR from all DLNA and UPnP
compatible devices made for this purpose.
Media Server (DMS)
A DMS is a device that holds all of your media files. This device may be a computer running a media server
software, your smartphone/pad or a NAS with a built in DMS. Some wireless network routers also has a built in
DLNA compatible USB NAS functionality that can be used for sharing your media.
Media Renderer (DMR)
The DMR is the device that renders the media for you, typically playing an audio or video stream. This might be a
DLNA compatible flat screen TV, a computer or as in this case – your Opalum sound system.
Control Point (DMC)
To control the flow of media from DMS to DMR you use a DMC. This may be a computer or your
smartphone/pad.
All-in-one clients
There are also devices and software programs that combines several of these functionalities. For example a
smartphone app may be at the same time a media server and a control point letting you stream song stored on
your smartphone to a media renderer. A flat screen TV may be both control point and media renderer letting you
browse video media files stored on your computer on the TV screen before playback.
Wireless setup guide v1.0
7/10
Media Server
Media Renderer
Control Point
Wireless network router
Page 8

Opalum® FLOW series
Opalum® STREAM series
Wireless setup guide
w w w . o p a l u m . c o m
Example Media Servers (DMS):
Jamcast (windows)
http://www.sdstechnologies.com
Windows Media Player (win7/vista/xp)
http://windows.microsoft.com/en-US/windows/products/windows-media-player
TVMOBiLi (win7/vista/xp/Mac OSX/linux)
http://www.tvmobili.com
Foobar2000 + UPnP plugin (win7/vista/xp)
http://www.foobar2000.org
http://www.foobar2000.org/components/view/foo_upnp
Allegro Media Server (Mac OSX/win7/vista/xp)
http://www.allegrosoft.com/ams.html
Twonky Server (Mac OSX)
http://www.twonky.com
Playback (Mac OSX)
Apple AppStore
Media:connect (iOS)
http://itunes.apple.com/us/app/media-connect-for-dlna-upnp/id335036887?mt=8
MediaServer (Android)
http://www.prosyst.com/index.php/de/html/content/65/Mobile-Media-Server
Example Media Control Points (DMC):
Windows Media Player (win7/vista/xp)
http://windows.microsoft.com/en-US/windows/products/windows-media-player
Foobar2000 + UPnP plugin (win7/vista/xp)
http://www.foobar2000.org
http://www.foobar2000.org/components/view/foo_upnp
Media:connect (iOS)
http://itunes.apple.com/us/app/media-connect-for-dlna-upnp/id335036887?mt=8
PlugPlayer (iOS/Android)
http://www.plugplayer.com/
Twonky Mobile (iOS/Android)
http://www.twonky.com
Wireless setup guide v1.0
8/10
Page 9

Opalum® FLOW series
Opalum® STREAM series
Wireless setup guide
w w w . o p a l u m . c o m
User scenarios
In this section of the Wireless setup guide some common user scenarios are presented. These scenarios should
be seen as examples of how you can benefit from media streaming and represents only a small selection of the
streaming possibilities. In these scenarios many third party applications are exemplified*. These applications are
continuously updated and new ones are created and released, correctness of this guide can therefor not at all
times be guaranteed. What will be the best software or device to use in your application is of course always up to
you to decide. Many of them are available for download free of charge and a good idea is to download and try
several of them to see if they fits your needs.
*Opalum/Actiwave AB can in no case be made responsible for damage or loss, direct or indirect, caused by the
use of third party applications. Help and support issues concerning third party applications should be directed
to their respective creator.
I want to stream songs to my Opalum system from Windows Media Player, how can I do that?
To stream music from Windows Media Player is very simple. For the best experience make sure you have an
updated version of Windows Media Player.
For Media Player instructions please consult these pages from Microsoft:
http://windows.microsoft.com/en-US/windows7/Getting-started-with-media-streaming
http://windows.microsoft.com/en-US/windows7/using-the-play-to-feature-to-stream-media
I want to set up a media server in my home to store all my media files, I want to play my music on my Opalum
system and I want to use my smartphone to control everything from the sofa. What do I need?
First your will need some kind of media server. This can be a standard PC or Mac running a DLNA/UPnP
server software or a DLNA compatible NAS or a network router with built in DLNA/UPnP server. There are
many software servers out there to be used for example TwonkySever, Allegro Media Server, Jamcast and
there is even one built natively into Windows 7.
To browse the media you will need a smartphone/pad with a DLNA/UPnP control point application. Many
applications are available in for iOS and Android in AppStore and Android Market.
To connect it all together you will need a network router and of course also a wireless enabled Opalum
Control Hub.
I want to play songs that are stored on my Android phone/pad to my Opalum system.
Some Android smartphones and pads has DLNA supported natively. If this is not the case with your device
your can use a DLNA control point app to stream your music to the Opalum system. There are many apps
that can be used for this, for example PlugPlayer and Twonky Mobile. These apps can be found in Android
Market.
I want to play songs that are stored on my iPhone, iPod touch or iPad to my Opalum system.
(In this scenario you will do fine with the Opalum Control Hub without wlan support)
The most intuitive way to do this is to use an Apple Airport Express router. This router has its own optical
audio output that you can connect by a cable to the Opalum Control Hub. This router can be bridged wired or
wirelessly to your existing home network if you dont want to replace your current router. The audio output of
Wireless setup guide v1.0
9/10
Page 10

Opalum® FLOW series
Opalum® STREAM series
Wireless setup guide
w w w . o p a l u m . c o m
this router is natively supported in iPod on iPod touch, iPhone and iPad.
(In this scenario you will need the Opalum Control Hub with wlan support)
To stream song stored on your iPhone, iPod touch or iPad directly to the Opalum Control Hub you will need a
DLNA control point app that supports this. The problem here is that Apple is blocking access to the songs
stored on your device. But there are apps that circumvents these restrictions. One such app is
Media:Connect by Persona Software. This app can be found in AppStore.
I want to stream audio from my MAC to the Opalum system, how can I do that?
(In this scenario you will do fine with the Opalum Control Hub without wlan support)
The most intuitive way to do this is to use an Apple Airport Express router. This router has its own optical
audio output that you can connect by a cable to the Opalum Control Hub. This router can be bridged wired or
wirelessly to your existing home network if you dont want to replace your current router. The audio output of
this router is natively supported in iTunes. You can also stream all audio on your Mac, including Spotify and
other audio applications, to the Airport Express using the program Airfoil by Rough Amoeba
http://www.rogueamoeba.com/airfoil.
I want to stream the music from Spotify (or any source) on my PC to the Opalum system...
(In this scenario you will need the Opalum Control Hub with wlan support)
Spotify does not (at this date) have built in support for DLNA streaming. But there are workarounds. One
trick is to use a “virtual soundcard” to hijack all audio on your PC and send as one very long song through
DLNA. The media server Jamcast implements this feature. Along with Jamcast you will also need a control
point to get the Opalum system to start playing this very long song. For this you can use a control point app
of your choice for your smartphone.
I have a Mac with all my music sorted in iTunes, now I want to use my iPhone to control the flow of music from
the my Mac to my Opalum system.
(In this scenario you will do fine with the Opalum Control Hub without wlan support)
There are several ways of solving this problem. If you have an audio cable connecting your Mac to the
Opalum Control Hub you may use the Apples app “Remote” to control the iTunes playback from your iPhone.
This app is available in AppStore free of charge.
If you do not want to use a cable between your Mac and the Opalum system but still want to use iPhone as a
remote there are two options. One is to buy an Apple Airport Express wireless router. This router can be
wirelessly bridge connected to your existing home network and it has its own analog and optical audio
output to connect by cable to the Opalum system. The router can be hidden away along with your Opalum
Control Hub.
(In this scenario you will need the Opalum Control Hub with wlan support)
If you have the wlan enabled version of the Opalum Control Hub you can use DLNA to stream the audio. To
do this you will need to install a DLNA media server on your Mac and a DLNA control point app on your
iPhone. There are media servers that automatically shares your iTunes library, one such is “Media Server”
from Allegro and “Playback” from Yazsoft.
Wireless setup guide v1.0
10/10
 Loading...