

ooznest WorkBee CNC xPro V3 Assembly Manual
WorkBee CNC
CNC xPro V3 Assembly & Commissioning


WorkBee CNC 1
Table of Contents
1.0 Getting Started 3
1.1 Check Product Contents 4
1.2 Notes on Assembly 4
2.0 CNC xPro Assembly 5
2.0.1 Fan Mount Assembly.................................................................... 6
2.0.2 Attaching The CNC-xPro ............................................................... 7
2.0.3 Mounting the CNC-xPro Assembly.................................................. 8
3.0 Wiring & Commissioning 10
3.1 CNC-xPro Wiring 11
3.2 Software & Machine Settings 12
3.2.1 Installing Universal G-Code Sender (UGS) .................................... 12
3.2.2 Configuring The Firmware .......................................................... 14
3.3 Testing 15
3.4 Wire Tidying 17
4.0 Appendix 18
4.1 Appendix A - Kit Contents 19
5.0 Appendix B 22
5.1 Recommended GRBL Settings 23
5.2 Invert Mask Table 26
6.0 Appendix C 27
6.1 Common Trouble Shooting Questions 28

WorkBee CNC Getting Started 2
1.0 Getting
Started

WorkBee CNC Getting Started 3
1.1 Check Product Contents
When you receive your kit, the first thing you should do is check the contents against the
list in Appendix A. The majority of the parts will be separated into boxes that correspond
to the subsections in this manual. Additional spare small parts will be included. If anything
is missing or damaged (or if you have any other problems) please contact us at
sales@ooznest.co.uk and we will aim to resolve the issue as quickly as possible.
1.2 Notes on Assembly
This manual has been written for the construction of a 750 x 750mm screw driven version
of the WorkBee. If you have a different version everything is exactly the same, with the
exception of longer V-Slot extrusions and wire routing.
It is recommended that you read through the whole manual before beginning the build in
order to get a full picture of the assembly process. Before beginning each step, make
sure you have studied the diagram and have the required parts in front of you. A PDF
version of the manual is available on our website and this will allow you to zoom in on the
diagrams if needed.
Be very careful to not over tighten the nuts and bolts on the plastic parts, otherwise they
may crack. Everything should easily fit together, and so if it isn’t, take a step back and
re-read the instructions.
Assembly of this kit involves the use of electricity and therefore you should take appropriate precautions to ensure you are assembling the kit in a safe manner. When following
wiring diagrams, double check that everything is connected correctly. Before carrying out
any work on the electrics make sure that the machine is switched off.
The polarity is indicated by the color of the wire, not by the color of the connectors at each
end. For the AC IEC input, the live wire is brown, neutral blue, and earth is green and yellow. For the DC Wiring of the machine a positive wire is red, negative is black, and earth
is green and yellow.

WorkBee CNC CNC xPro Assembly 4
2.0 CNC xPro
Assembly

WorkBee CNC CNC xPro Assembly 5
2.0.1 Fan Mount Assembly
A. Attach the Dual-30mm-24V-DC-Fan to the CNC-xPro-Fan-Mount using 8 x M3-Cap-
Head-20mm bolts and 8 x M3-Nyloc-Nuts. Ensure that the Dual-30mm-24V-DC-Fans
are blowing downwards by ensuring that the side of the fan with the label on is
against the CNC-xPro-Fan-Mount. Make sure that the power wires on the Dual-30mm24V-DC-Fans are both on the same side of the CNC-xPro-Fan-Mount.

WorkBee CNC CNC xPro Assembly 6
2.0.2 Attaching The CNC-xPro
A. If you have purchased the bluetooth adaptor, now would be a good time to attach it to
the CNC-xPro following the instructions on the pamphlet inside the bluetooth packet.
B. Insert 4 x M4-Cap-Head-40mm bolts through the previously assembled CNC-xPro-
Fan-Mount, and then through the CNC-xPro and each through a Nylon-Spacer-Quarter-Inch. Finally, go through the CNC-xPro-Mount. While doing so plug the fans into
the white 3 pin fan output header on the CNC-xPro. The CNC-xPro should be orientated so the USB terminal is in the same position as shown by the red square above.
Secure the whole assembly using 4 x M4-Nyloc-Nuts.

WorkBee CNC CNC xPro Assembly 7
2.0.3 Mounting the CNC-xPro Assembly

WorkBee CNC CNC xPro Assembly 8
A. Insert 4 x M5-Low-Profile-50mm bolts through each mounting hole on the CNC-xPro-
Mount.
B. On to each M5-Low-Profile-50mm bolt slide an Aluminium-Onehalf-Inch and a Slot-
Washer. The rounded face of the Slot-Washer should be flush against the AluminiumOnehalf-Inch.
C. On to the end of each M5-Low-Profile-50mm bolt, slightly thread a M5-Drop-In-Tee-
Nut.
D. Bring the CNC-xPro-Assembly to the back of the WorkBee X-Gantry, and align the M5-
Low-Profile-50mm bolt assemblies from Step A/B/C with the backward facing top and
bottom slots on the V-Slot-2040-750mm.
E. With the M5-Low-Profile-50mm bolt assemblies aligned, mate the CNC-xPro-Assembly
with the V-Slot-2040-750mm slots. It should be roughly 10mm from the end of VSlot-2040-750mm.
F. Screw each M5-Low-Profile-50mm bolt to engage the M5-Drop-In-Tee-Nut with the
slot. Fully tighten each M5-Low-Profile-50mm bolt.

WorkBee CNC Wiring & Commissioning 9
3.0 Wiring &
Commissioning
WorkBee CNC Wiring & Commissioning 10
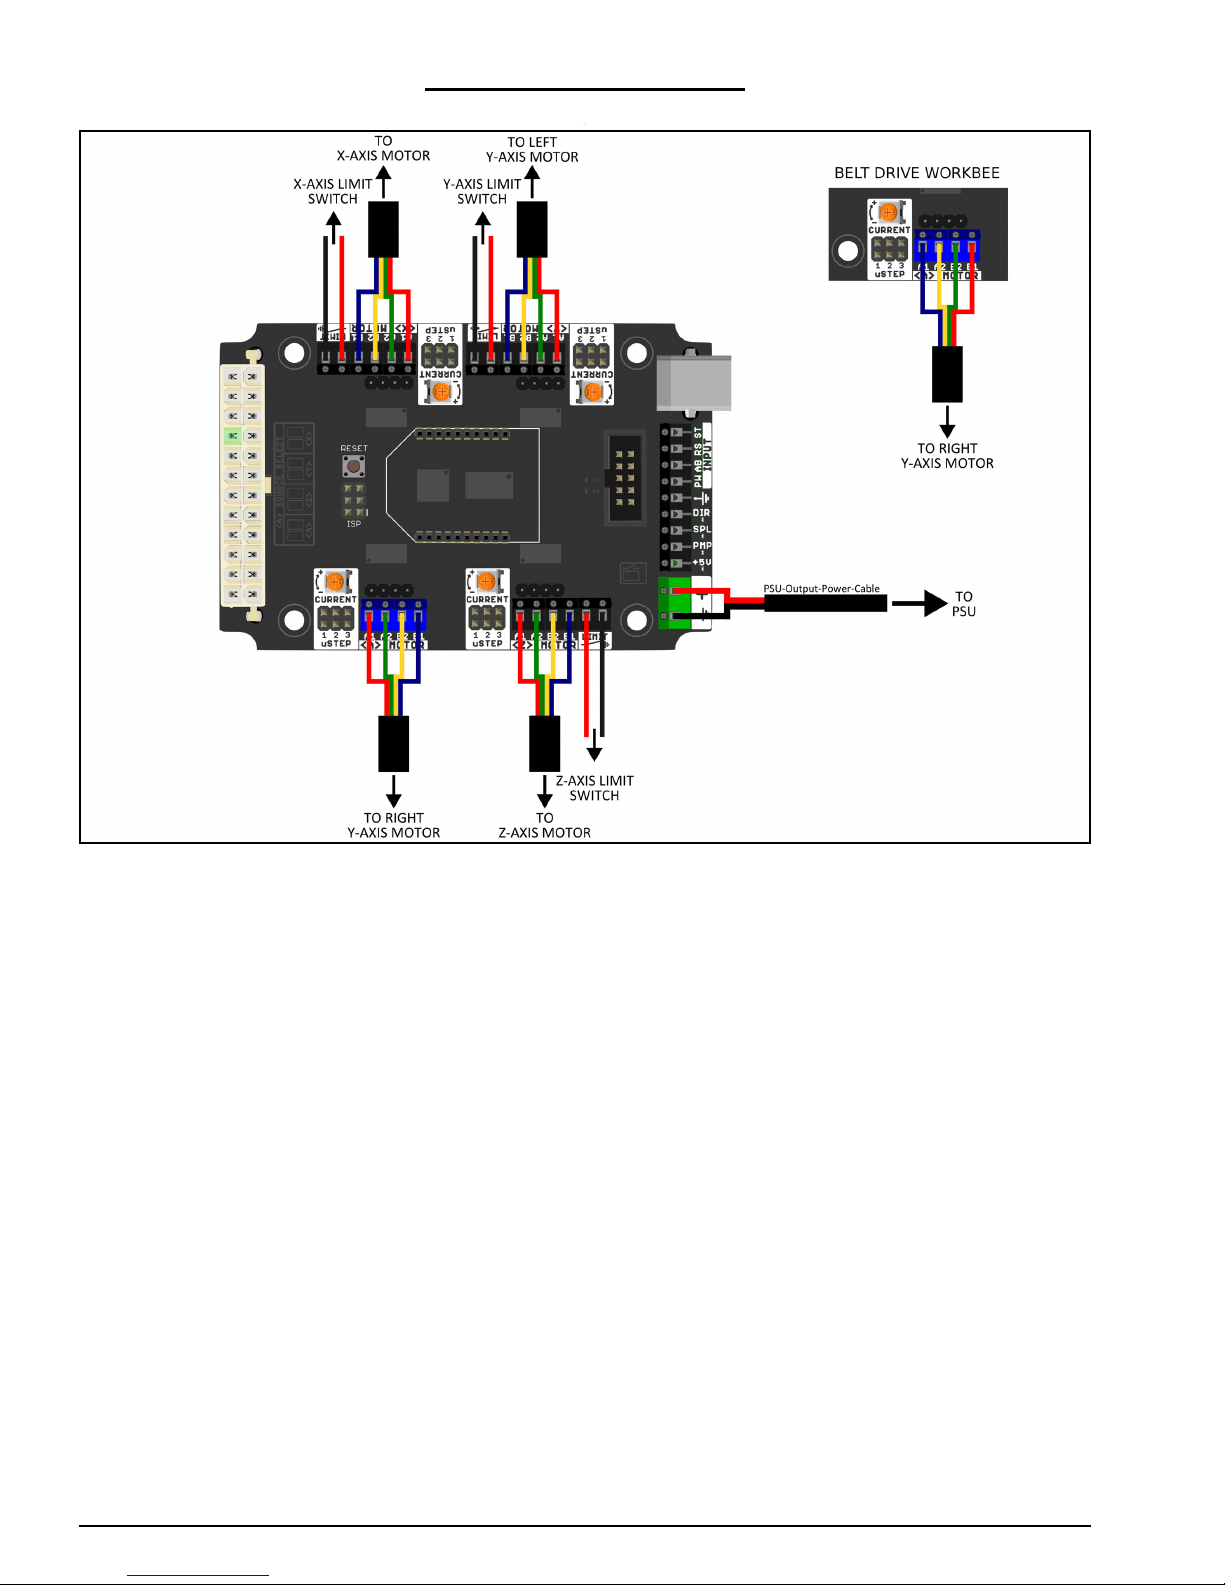
3.1 CNC-xPro Wiring
A. Following the wiring diagram above, strip and connect the second PSU-Output-Power-
Cable to the power input terminal on the CNC-xPro. If you have the bluetooth adaptor
also attach the provided capacitor, with the correct orientation with regards to the
positive and negative side.
B. Connect the 4 x NEMA23-Stepper-Motors to the CNC-xPro as shown above. Take note
of the order of the wire colours. For the belt drive version of the WorkBee notice that
the colour order is reversed on the A driver (this is also true for a 1000x1500mm Belt
& Screw drive WorkBee).
C. Wire in the 3 Limit-Switches, note the polarity of the wires in the image above.
D. Plug the PSU-Output-Power-Cable into the XT60-Male Output on the assembled 24V-
360W-Power-Supply. Do not tidy up the wiring just yet, as this is best left until the
machine has been fully checked to ensure that it is operating correctly.
E. If interested, it is a good idea to read the CNC-xPro Wiki for more in-depth informa-
tion: https://github.com/Spark-Concepts/xPRO/wiki
WorkBee CNC Wiring & Commissioning 11
3.2 Software & Machine Settings
3.2.1 Installing Universal G-Code Sender (UGS)
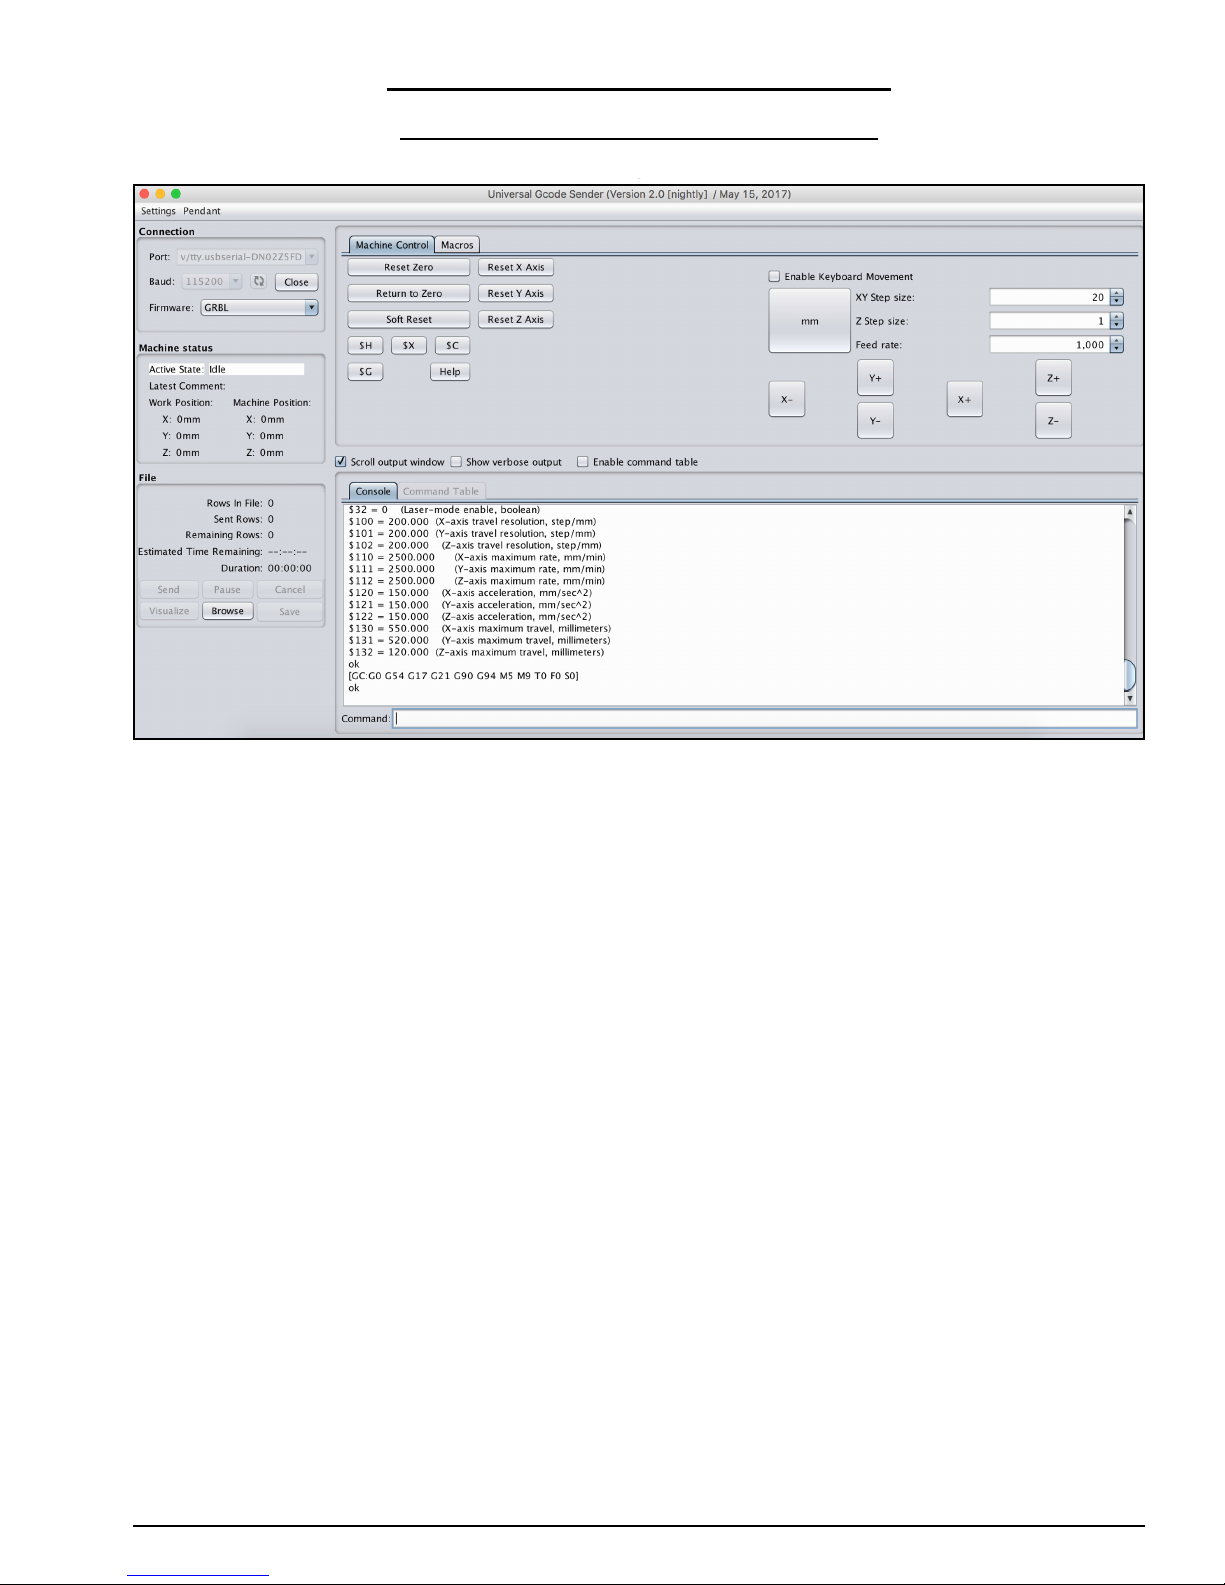
A. Universal G-Code Sender (UGS) is a simple Java-based cross platform G-Code sender.
It requires the latest version of Java to be installed on your computer from https://
java.com/en/download/ . Download UGS from the first Classic GUI link under the
‘Nightly Builds’ header from: https://winder.github.io/ugs_website/download/
B. Unzip the folder to a location of your choosing.
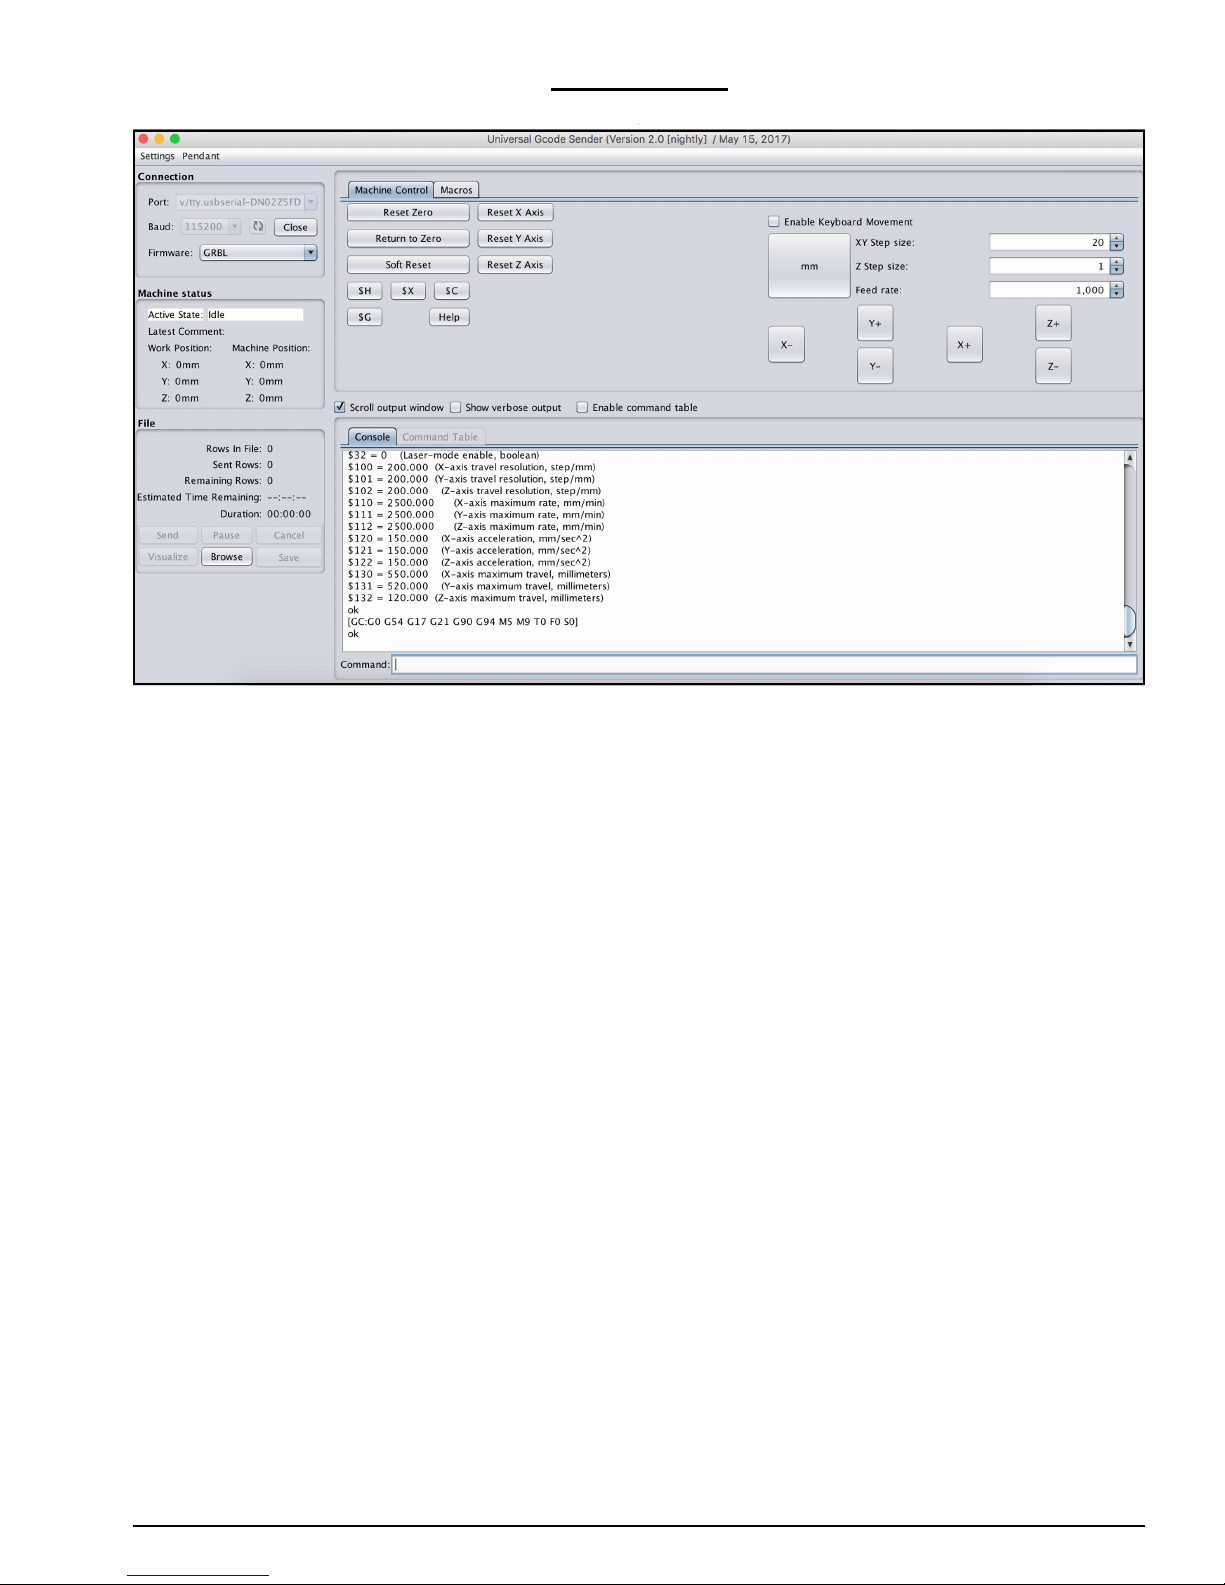
C. Run the file named ‘UniversalGcodeSender.jar’ and UGS should open and look similar
to the above image.
D. Download and install the appropriate drivers for the chip used on the CNC-xPro from:
http://www.ftdichip.com/Drivers/VCP.htm. For Windows, under the comments section
there is a link to an executable setup file.
E. Using the supplied USB-Cable, connect the CNC-xPro to your computer. It is recom-
mended to get the WorkBee fully operating and multiple cuts completed under USB
initially. Once everything is running correctly then use the bluetooth adaptor.
F. In UGS set the ‘Baud’ to ‘115200’ and ‘Firmware’ to ‘GRBL’. Press the refresh symbol.
G. On the ‘Port’ drop down list find the CNC-xPro, if on a Mac it should look similar to
what is selected in the image above. If on a windows computer, it will show up as a
COM port. Once found click ‘Open’ and UGS should successfully connect to the CNCxPro. The Console output will show information similar to the above.
WorkBee CNC Wiring & Commissioning 12
3.2.2 Configuring The Firmware
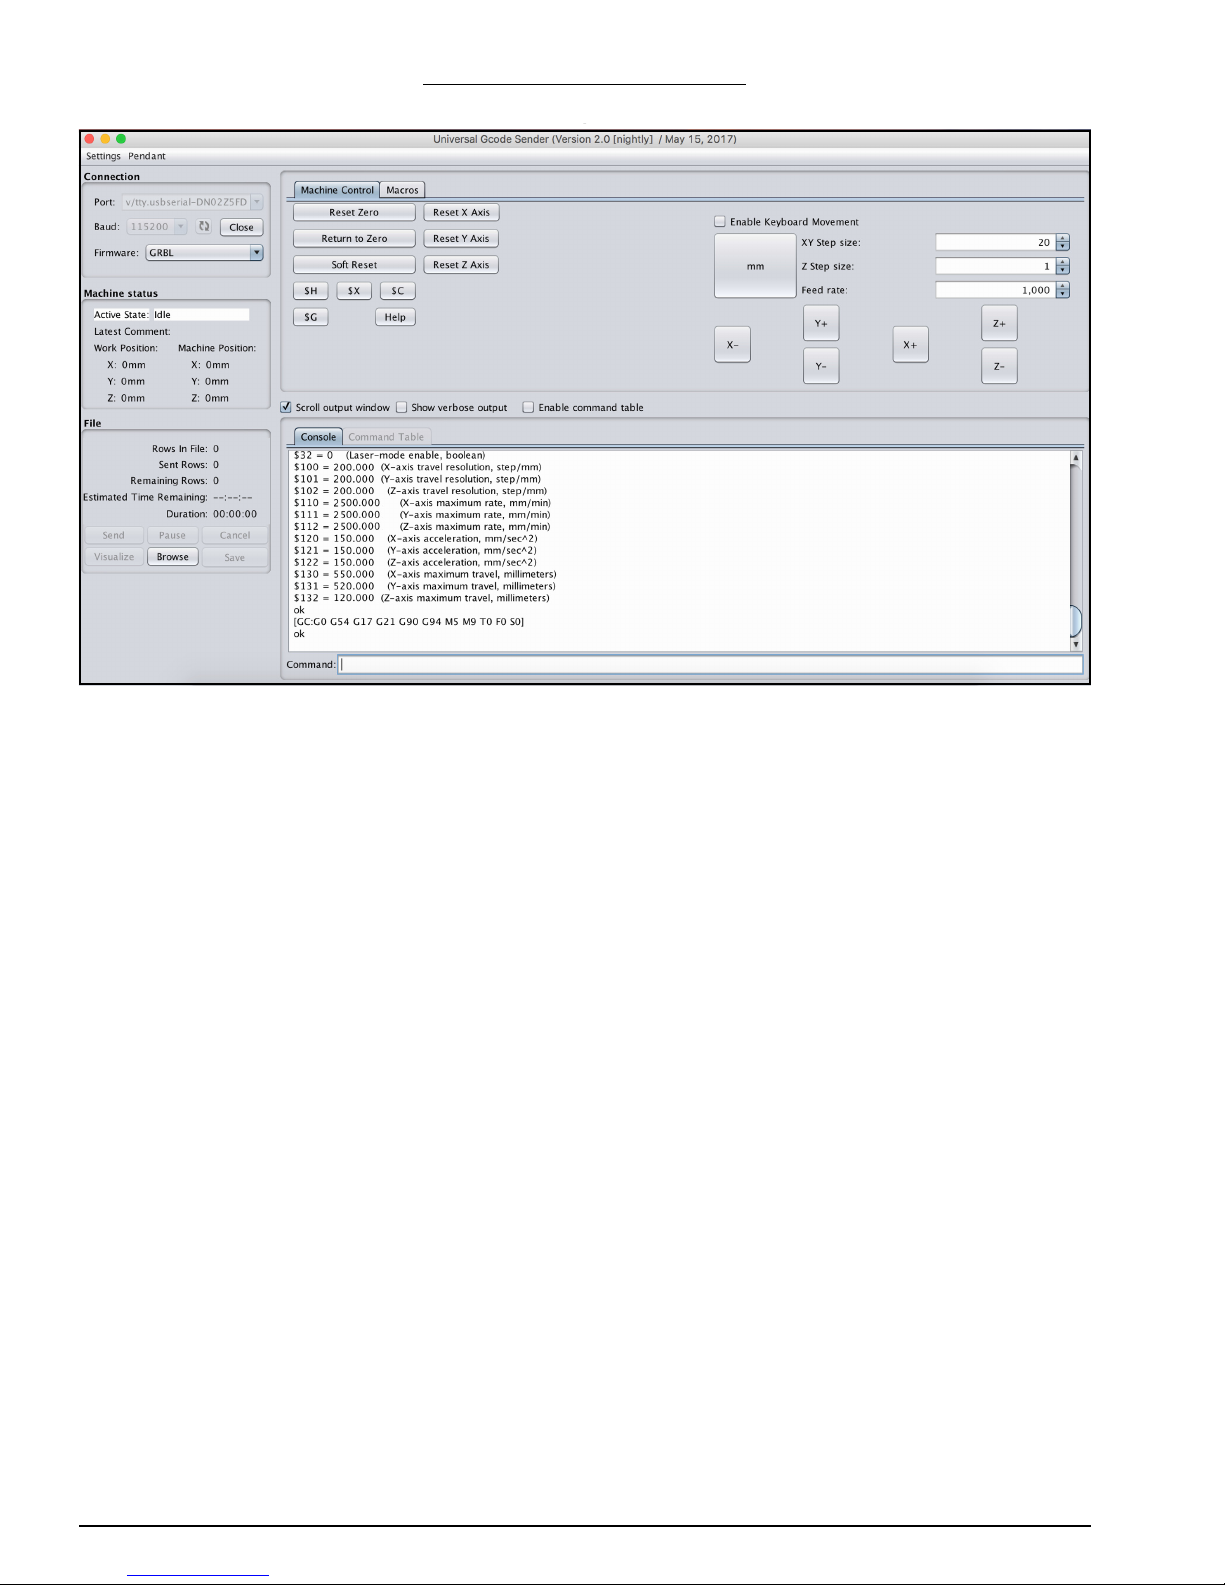
A. Under the large white console output, there is a text input area labeled ‘Command:’
where G-Code commands can be sent to the CNC-xPro. To bring up the current firmware settings type ‘$$’ and press enter.
B. In Appendix B we have provided a set of recommended settings for each drive version
of the WorkBee. Each setting has an id number and a value, and in order to change a
setting to a new value, enter $id = new value. For instance, if setting number 100 is
incorrect when compared to Appendix B, correct it by entering $100 = 200. Do this for
all the settings in Appendix B, choosing the list that is appropriate for the drive of
machine you have.
C. Setting number 130 and 131 will depend on the size of the machine you have. The
values to enter here should be 200mm less than your X-Axis size and 230mm less
than your Y-Axis size. For instance, on a 750x750mm machine the values for 130 and
131 should be 550 and 520 respectively.
D. If interested, it is a good idea to read the GRBL Firmware Wiki for more in-depth
information: https://github.com/grbl/grbl/wiki
WorkBee CNC Wiring & Commissioning 13
3.3 Testing
A. Next to each driver on the CNC-xPro, there is a current control pot, and these can be
adjusted using the Ceramic-Screwdriver. Rotate clockwise to increase the current, and
anti-clockwise to decrease. Turn each one clockwise until it stops, and then back 1/4
of a full turn. This is the ideal setting for the drivers.
B. Switch on the 24V-360W-Power-Supply, and the Dual-30mm-24V-DC-Fan should acti-
vate.
C. Looking from the front of the machine, the correct axes machine motion is: X-Axis
negative to the left, Y-Axis negative towards the front, Z-Axis negative going down. To
test this in UGS, click on the ‘Machine Control’ tab on the top bar. O n t h e r ig ht h a n d
side there are jog controls. Set the ‘XY Step size’ to 20, ‘Z Step size’ to 1, ‘Feed Rate’
to 1000 and select ‘millimeters’. Press the ‘X-’ button to jog the machine in the negative X direction, and the carriage should move to the left. Press ‘Y-’ and the gantry
should move towards the front. Press ‘Z-’ the Z-Axis should go down.
D. If in Step C any of the axes have moved in the opposite directions than should be
expected, then the appropriate driver direction needs inverting. The $3 Direction Port
Invert setting can be used to correct this issue, this is set by using the table in Appendix B section 2. For instance for a screw drive machine $3 currently is set at 2, setting
$3 = 3, would invert the X Axis direction, but leave all the others as they are. Change
$3 to the appropriate setting to get all the axes moving in the correct direction.
E. Next the homing cycle needs to be checked, the correct home position is the back
right hand corner of the machine. Press the button labeled ‘$H’, this is the Home button. The machine should first move positive upwards, and seek the Z limit switch.
Once it has located the Z limit switch, the X-Axis should begin homing to the right,
and the Y-Axis should begin homing to the back. Once the machine has located all 3
limit switches, it should pull off them by 3mm. If the machine homes in the incorrect
direction on any of the axes, change setting $23 using Appendix B section 2 in the
same fashion as Step D. If the machine fails to stop at any of the limit switches check
that they are wired correctly according to Section 6.1

WorkBee CNC Wiring & Commissioning 14
F. Testing of the machine is now complete.
WorkBee CNC Wiring & Commissioning 15
3.4 Wire Tidying
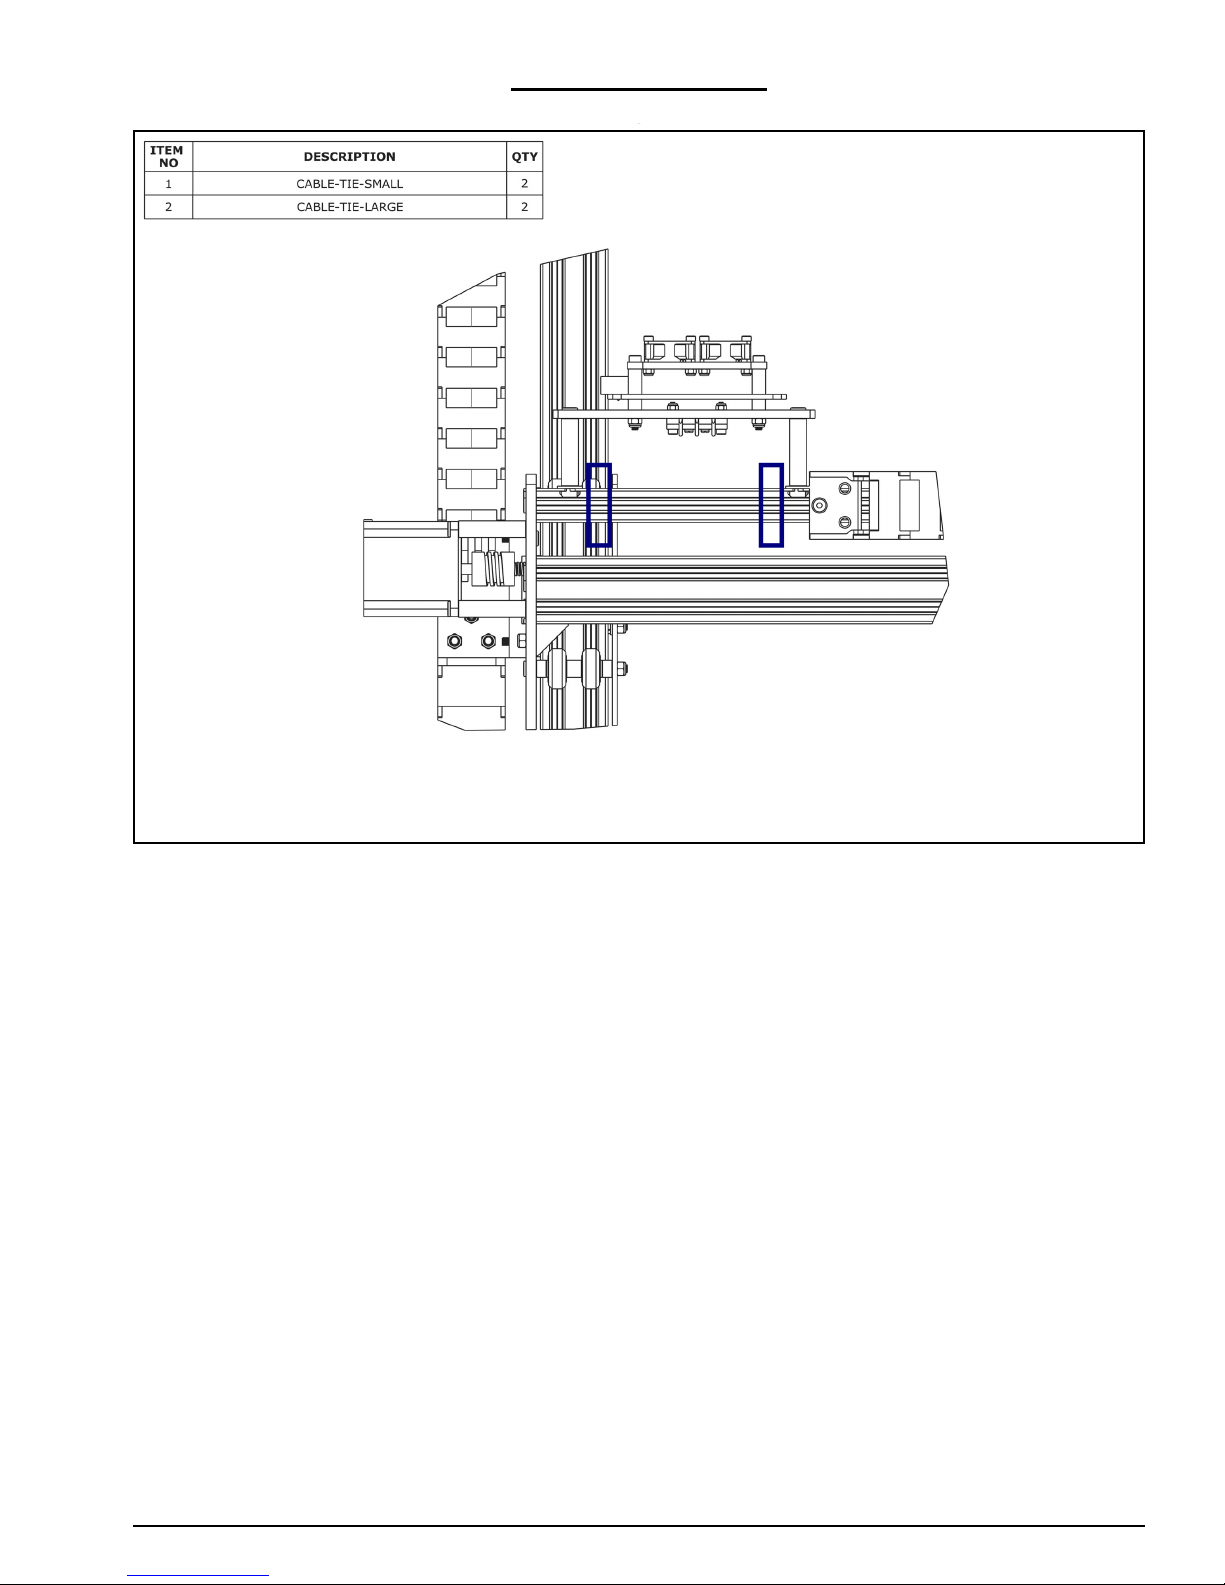
A. Once the machine is operating correctly, using a Cable-Tie-Large secure the wires in
Section 4.2.2 or 4.2.3 to the V-Slot-2040-750mm at the position shown by the right
hand rectangle above. One at a time, the wires can be disconnected from the CNCxPro and trimmed to the correct length.
B. Any excess wire in the PSU-Output-Power-Cable should be pulled out at the 24V-
360W-Power-Supply end and bundled using a Cable-Tie-Large. Use 2 x Cable-TieSmalls secure the PSU-Output-Power-Cable to the slotted holes on the Y-Drag-ChainFixed-End-Mount.
C. Using a Cable-Tie-Large secure the wires in Section 4.2.5 or 4.2.6, and the PSU-Out-
put-Power-Cable to the V-Slot-2040-750mm at the position shown by the left hand
rectangle above. One at a time, the wires can be disconnected from the CNC-xPro and
trimmed to the correct length.

WorkBee CNC Appendix 16
4.0 Appendix
WorkBee CNC Appendix 17
4.1 Appendix A - Kit Contents
CNC-xPro Assembly
1 x CNC-xPro 1 x CNC-xPro-
Mount
1 x CNC-xPro-FanMount
1 x Ceramic-ScrewDriver
1 x Dual-30mm24V-DC-Fan
Cap-Head:
8 x M3-20mm
4 x M4-40mm
4 x M5-Low-Profile50mm
4 x Slot-Washer
WorkBee CNC Appendix 18
4 x Nylon-SpacerQuarter-Inch
4 x AluminiumSpacer-OneHalfInce
Nyloc-Nuts:
8 x M3
4 x M4
6 x M5-Drop-InTee-Nut
2 x Limit-Switch 1 x Z-Axis-Limit-
Switch (They are
the same as the
Limit-Switch except
the holes are
larger)
2 x Limit-SwitchPlate
2 x M5-Low-Profile8mm
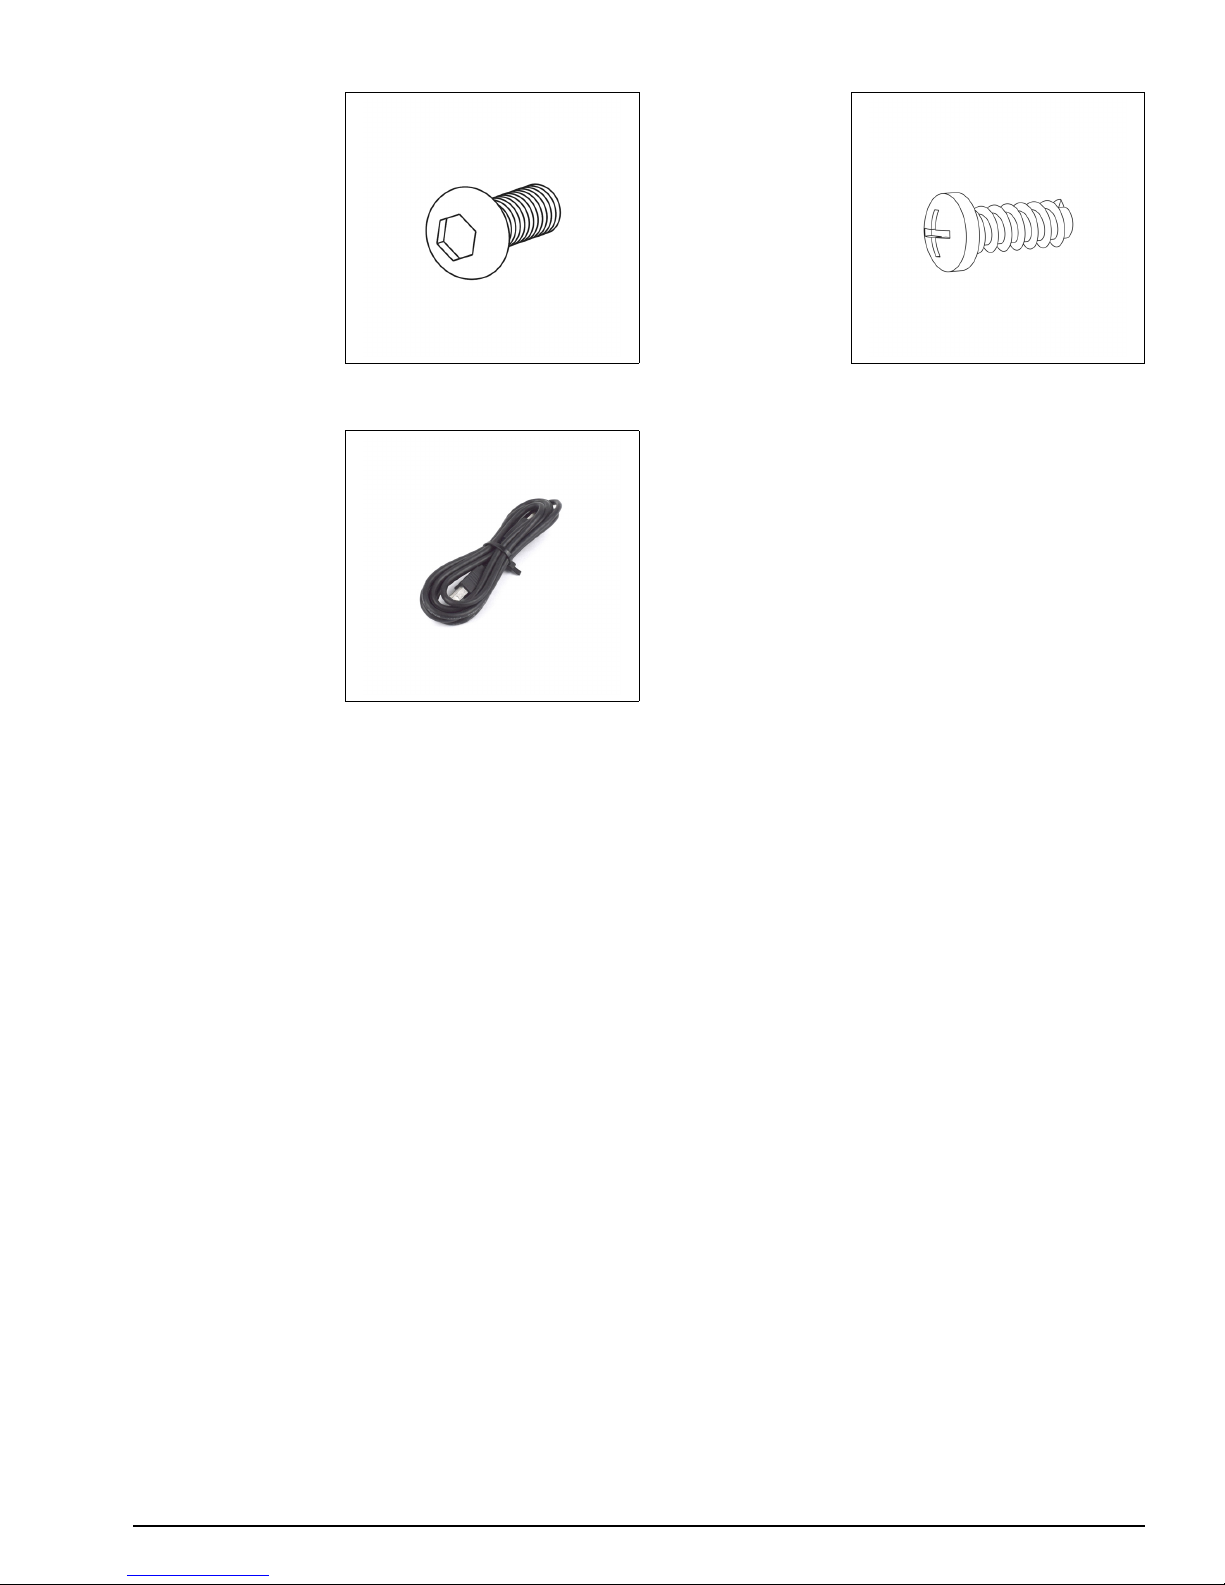
WorkBee CNC Appendix 19
2 x M3-SocketHead-10mm
4 x Plastite-ScrewM3-8mm
1 x USB-Cable
 Loading...