

Page 1
Yealink T53W IP Phone
Wi-Fi
1. Wi-Fi On
2. Wi-Fi Status
3. Known Network(s
)
4. Available
Network(s
)
Back WPS Scan Enter
Quick Installation Guide
Introduction
Setting up your Yealink T53W IP phone with Ooma Office is
quick and easy. Follow the instructions below to install your
phone. You should be up and calling in a few minutes!
NOTE If you do not have an Ooma Office account,
please visit http://office.ooma.com/signup
Package contents
Confirm your package contents, then follow the instructions
to install your phone.
Yealink T53W
IP phone
Handset
cord
Power
adapter
Ethernet
cable
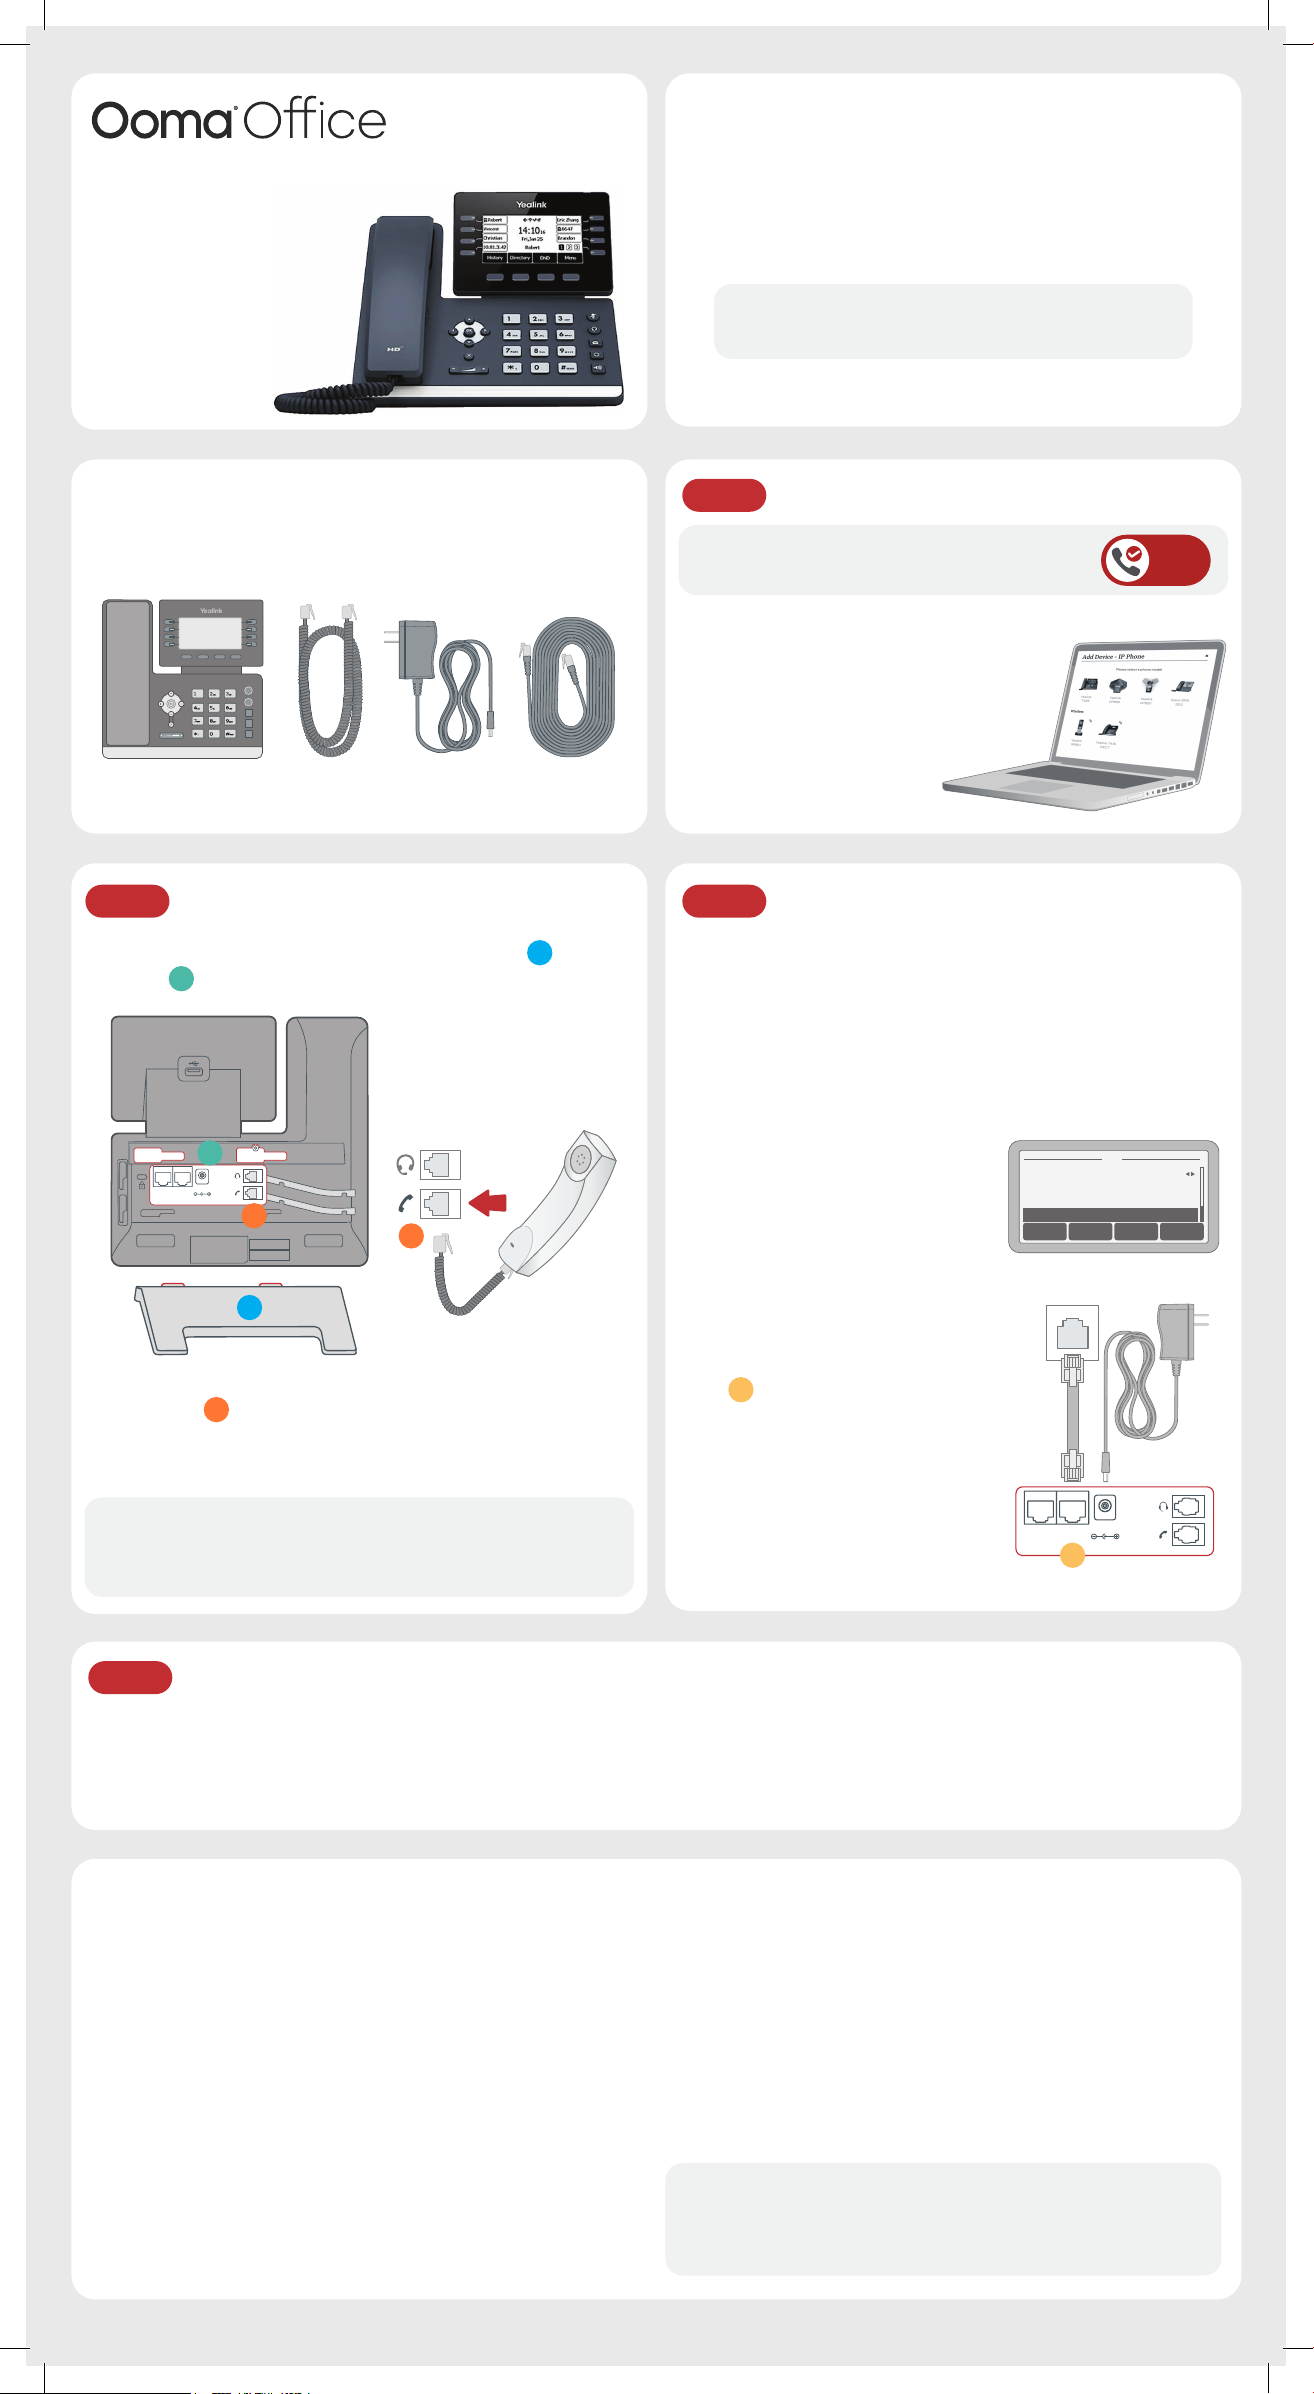
Step 2 Assemble your phone
A
Attach the phone stand to the body. Align the stand
the slots
B
, and slide up until you hear a click.
B
DC5V
PC
Internet
C
C
with
Step 1 Add phone to your account
If your phone is labeled Ready to Call,
you may skip this step and continue to Step 2.
Otherwise, you will need to add your new
phone to your Ooma Office account.
Visit http://office.ooma.com/add_device
and simply follow the on-screen instructions.
READY
TO CALL
Step 3 Connect your phone
Your phone can be connected to the Internet via Wi-Fi
or Ethernet.
Wi-Fi
Connect your phone to power. Once the phone powers up,
you are ready to connect to your Wi-Fi network. The phone
will prompt you to connect, or go to Menu
Basic Settings
Wi-Fi and then
›
select the desired network.
For detailed instructions, please visit
support.ooma.com/yealink-wi-fi.
Settings ›
›
A
Ethernet
Use the Ethernet cable that came with
the phone to connect the INTERNET
Connect the phone handset to the
handset jack
using the coiled
C
port
then connect to your router or switch.
on the back of the phone and
D
phone cord.
Connect the power supply as shown
to the right. Skip this step if using
NOTE If you need additional assembly instructions, please
review the phone manufacturer’s user manual included in
Power Over Ethernet (PoE).
Internet
D
DC5V
PC
your box.
Step 4 Get started!
Once connected to the Internet, the startup process will commence automatically. It will take several minutes,
during which time your new IP phone may restart a few times. This is expected behavior.
Once you see your extension number (e.g. x1001) displayed on the screen along with your name, your phone is ready
to use to make and receive calls!
Troubleshooting
Phone display is not illuminated
• Connect the phone to AC power.
Phone displays “Network is Unavailable”
• Make sure the phone is connected to the Internet. If you
suspect issues with your Wi-Fi network, try connecting
via Ethernet to further troubleshoot. Make sure the Ethernet
cable is connected to the phone’s INTERNET port.
Phone displays “No Service” message or doesn’t have
extension number listed on line keys
• Confirm that the IP phone is assigned to a user.
• Log into Ooma Office Manager, navigate to the Devices
section, select the user to whom the device should be
assigned, and assign the phone to the desired user.
Ooma-QIG-Yealink-T53W Phone-EN-FR-Aug2020-R8.indd 1Ooma-QIG-Yealink-T53W Phone-EN-FR-Aug2020-R8.indd 1 9/14/20 7:46 PM9/14/20 7:46 PM
If the device is already assigned to a user
• Restart the phone by disconnecting its power, wait for
30 seconds, and then reconnect its power supply.
• Factory reset the phone by pressing and holding the OK
button for ten seconds. Click OK when you see a warning that
says, “reset to factory setting.” Once reset, the phone will
attempt its startup process as described in Step 3.
Need help? If the phone still has no service, please contact
Ooma Office Support at 866-939-6662 (US) or 877-948-6662
(Canada).
710-0204-100
Page 2
Téléphone IP
Wi-Fi
1. Wi-Fi On
2. Wi-Fi Status
3. Known Network(s
)
4. Available
Network(s
)
Back WPS Scan Enter
Yealink T53W
Guide de Démarrage
Rapide
Introduction
La configuration de votre téléphone IP Yealink T53W
avec Ooma Office est simple et rapide. Veuillez suivre les
instructions ci-dessous pour installer votre téléphone.
Cela ne prend que quelques minutes et vous pourrez
passer vos premiers appels.
REMARQUE Si vous ne possédez pas de compte Ooma
Office, veuillez visiter http://office.ooma.com/signup
Contenu de la boite
Veuillez confirmer le contenu de votre colis, puis suivre
les instructions pour utiliser votre téléphone.
Yealink T53W
Téléphone IP
Cordon
Combiné
Adaptateur
Secteur
Câble
Ethernet
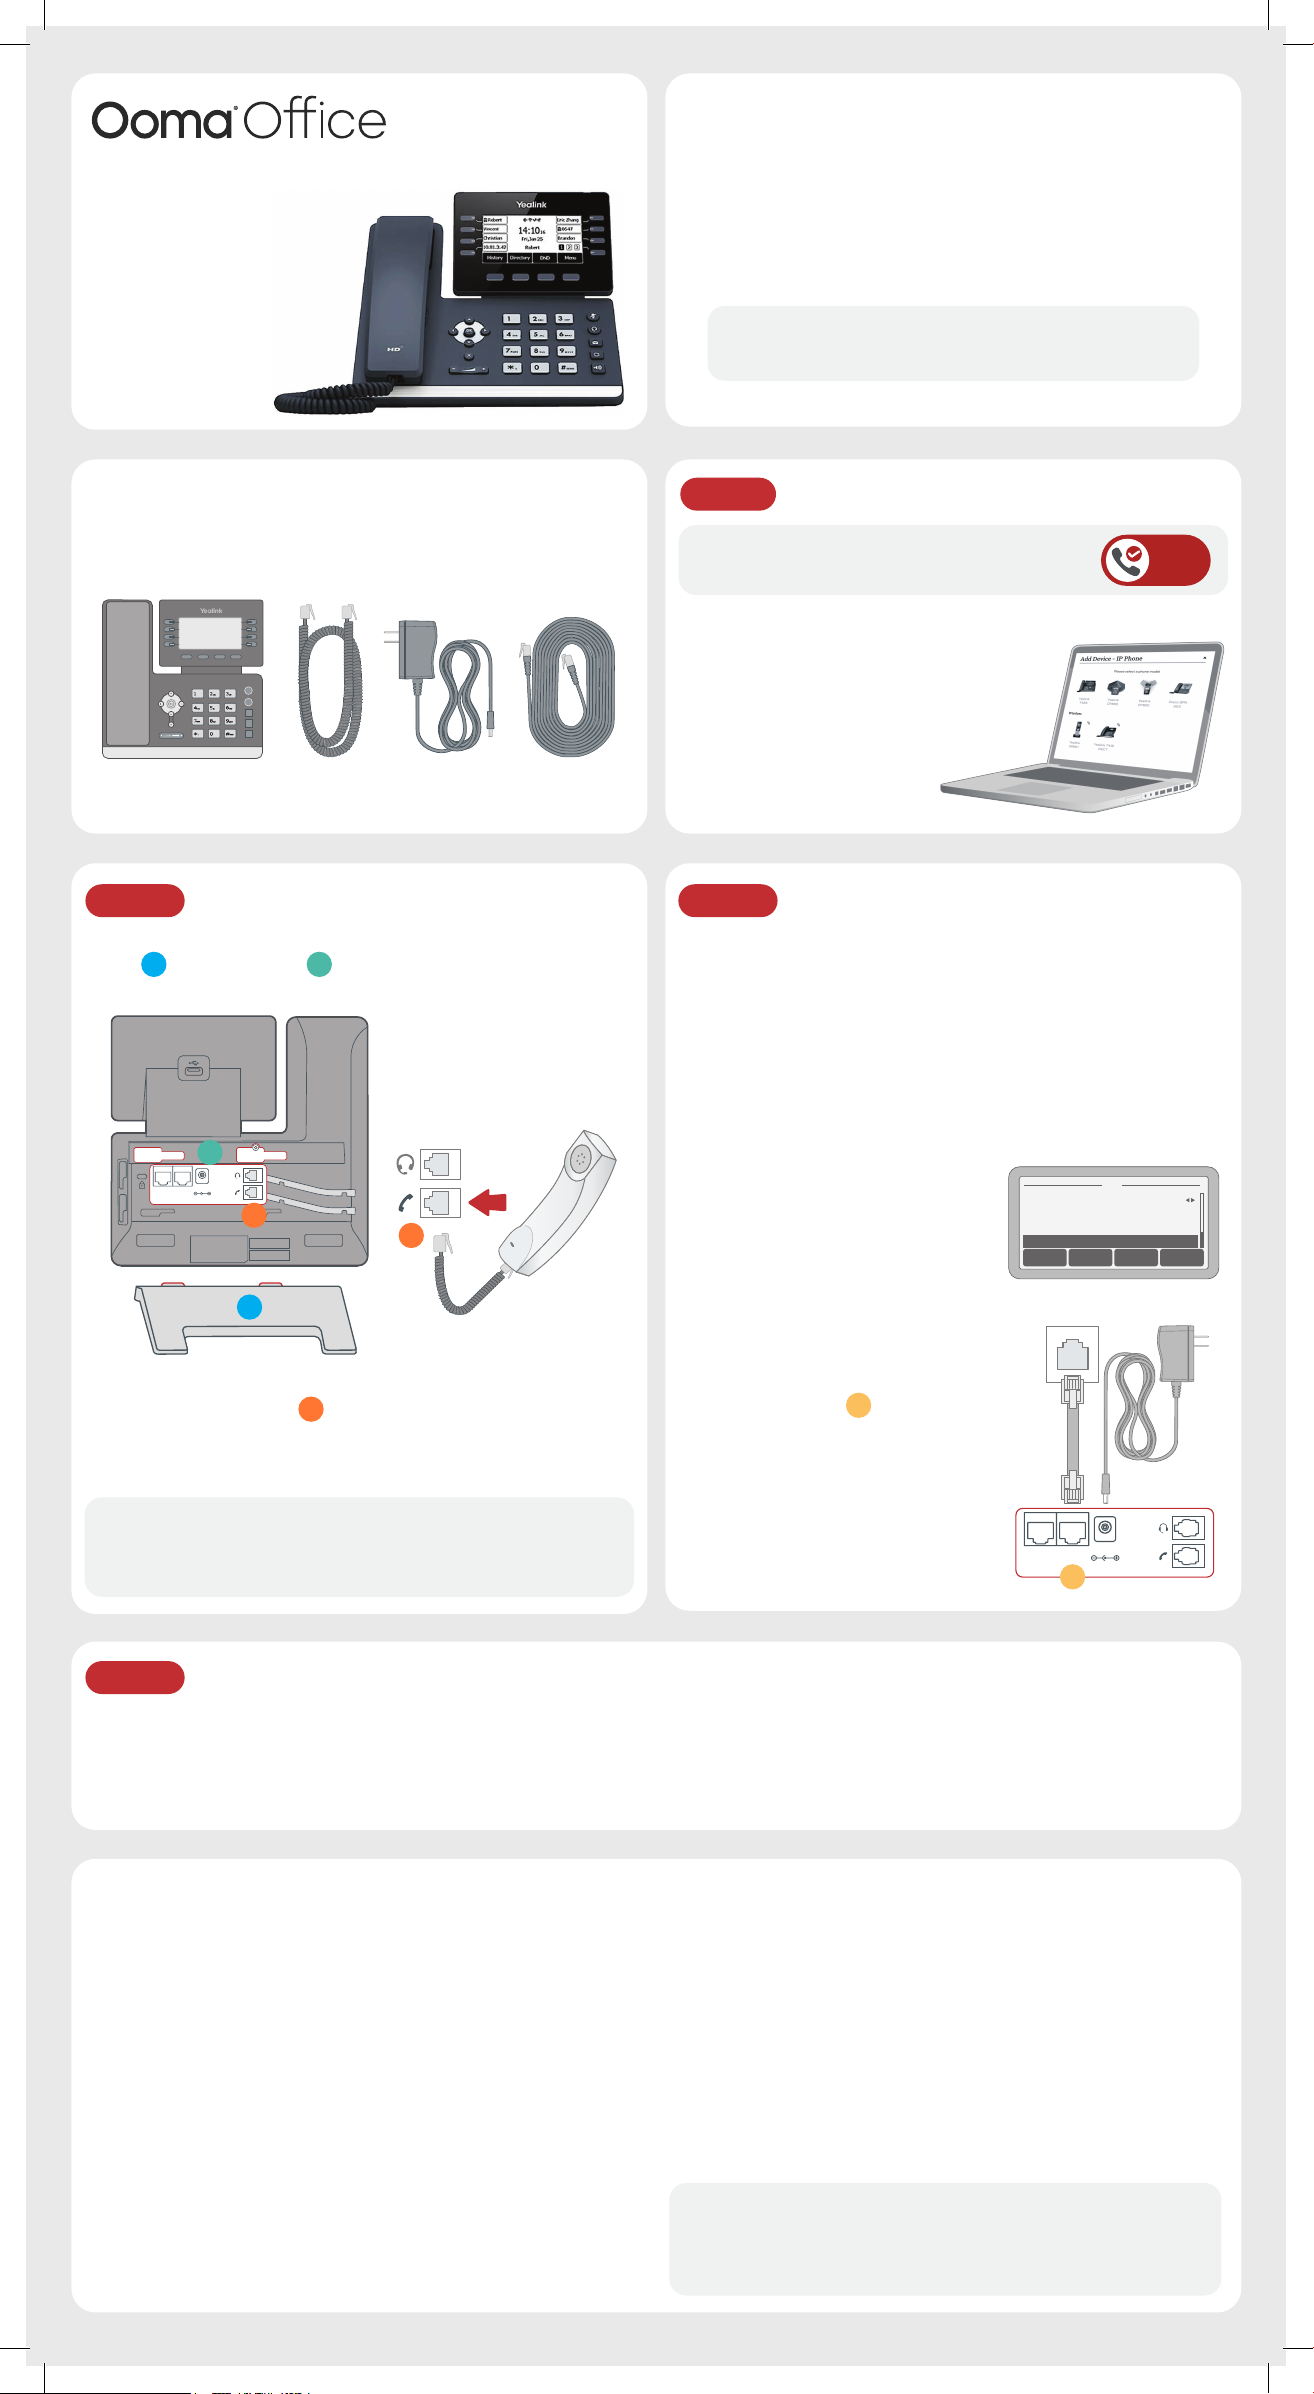
Étape 2 Installation du téléphone
Fixez le support du téléphone au dos de l’appareil. Alignez le
socle
vous entendiez un clic.
avec les orifices
A
B
DC5V
PC
Internet
C
B
, et faites-le glisser jusqu’à ce que
C
Étape 1 Ajoutez un téléphone à votre compte
Si votre téléphone est étiqueté Prêt à Appeler, vous
pouvez ignorer cette étape et passer à l’étape 2.
Si ce n’est pas le cas, vous devrez ajouter
votre nouveau téléphone à votre compte
Ooma Office.
Veuillez visiter http://office.ooma.com/
add_device
et suivre simplement
les instructions à l’écran.
READY
TO CALL
Étape 3 Connexion de votre téléphone
Votre téléphone peut être connecté à Internet via Wi-Fi ou
Ethernet.
Wi-Fi
Branchez votre téléphone à une prise secteur. Une fois le
téléphone allumé,vous êtes prêt à vous connecter à votre réseau
Wi-Fi. Le téléphone vous invitera à vous connecter ou allez
dans Menu
sélectionnez le réseau souhaité.
Pour obtenir des instructions
détaillées, veuillez consulter
support.ooma.com/yealink-wi-fi.
Paramètres › Paramètres de base › Wi-Fi puis
›
A
Ethernet
Utilisez le câble Ethernet fourni
Connectez le combiné du téléphone à
la prise jack du combiné
à l’aide du
C
cordon téléphonique à spirale.
avec le téléphone pour connecter
le port INTERNET
téléphone et le connecter à votre
à l’arrière du
D
routeur ou commutateur.
Branchez l’alimentation comme
REMARQUE Si vous avez besoin d’instructions d’assemblage
supplémentaires, veuillez consultez le manuel d’utilisation du
fabricant du téléphone inclus dans votre boîte.
indiqué à droite. Veuillez Ignorer
cette étape si vous utilisez
Alimentation Par Ethernet (PoE).
Internet
D
DC5V
PC
Étape 4 Commençons !
Une fois connecté à Internet, le processus de démarrage commencera automatiquement. Cela prendra plusieurs minutes, pendant
lesquelles votre nouveau téléphone IP peut redémarrer plusieurs fois. Cela fait partie du processus de démarrage.
Une fois que vous voyez votre numéro de poste (par exemple x1001) affiché à l’écran avec votre nom, votre téléphone est
prêt à être utilisé pour passer et recevoir des appels !
Assistance
L’écran du téléphone n’est pas allumé
• Connectez le téléphone à l’alimentation secteur.
Le téléphone affiche «Réseau Indisponible»
• Assurez-vous que le téléphone est connecté à Internet. Si vous
rencontrez des problèmes avec votre réseau Wi-Fi, essayez de
vous connecter via Ethernet pour résoudre ce problème.
Assurez-vous que le câble Ethernet est connecté au port
INTERNET du téléphone.
Le téléphone affiche le message «Aucun Service» ou n’a pas
numéro de poste indiqué sur les touches en ligne
• Confirmez que le téléphone IP est attribué à un utilisateur.
• Connectez-vous à Ooma Office Manager, accédez à la section
des Appareils, sélectionnez l’utilisateur à qui l’appareil doit
être affecté et attribuez le téléphone à l’utilisateur souhaité.
Ooma-QIG-Yealink-T53W Phone-EN-FR-Aug2020-R8.indd 2Ooma-QIG-Yealink-T53W Phone-EN-FR-Aug2020-R8.indd 2 9/14/20 7:46 PM9/14/20 7:46 PM
Si l’appareil est déjà attribué à un utilisateur
• Redémarrez le téléphone en débranchant son alimentation,
attendez 30 secondes, puis rebranchez-le.
• Réinitialisez le téléphone aux paramètres d’usine en appuyant
longuement sur le bouton OK pendant dix secondes. Cliquez
sur OK lorsque vous voyez un avertissement indiquant
«réinitialiser aux paramètres d’usine». Une fois réinitialisé,
le téléphone suivra son processus de démarrage comme
décrit dans l’étape 3.
Besoin d’aide ? Si le téléphone n’a toujours pas de service,
veuillez contacter le Service Clients d’Ooma Office au
877-948-6662 (Canada) ou au 866-939-6662 (États-Unis).
710-0204-100
 Loading...