

Page 1
Have a Question or Need Assistance?
Here is where you can look for help:
Knowledge base: support.ooma.com/home/home-security
Community Forum: forums.ooma.com
Live Customer Care. Speak with a support specialist at 1-877-629-1284.
This devi ce complies w ith all of the fol lowing smoke al arm standar ds:
UL 217 - “Si ngle and Multi St ation Smoke Ala rms”
CAN-ULC-S531-02 - “Standard for Smoke Alarms”
P/N: 700-0177-202
Smoke Alarm
Quick Start Guide
Page 2
Contents
English
What to Do in Case of Fire ....................................................... 4
Key Features .................... ..................................................... 5
Power On Your Smoke Alarm ................................................... 7
Test Your Smoke Alarm .......................................................... 8
Mount Your Smoke Alarm ....................................................... 9
Nuisance Alarms ..................................................................12
Cleaning Your Smoke Alarm ...................................................13
Alarm and Status Light Indicator Reference ..............................14
Deactivating and Replacing Your Smoke Alarm .......................... 16
Warnings and Limitations ......................................................19
Where Not to Install Your Smoke Alarm ..................................... 22
NFPA Requirements.................................................................23
Page 3

What to Do in Case of Fire
Key Features
■ Have a family escape plan. Know the exit routes out of your home.
Have a designated meeting place outside of your home.
■ Do not panic. Stay calm.
■ Get everyone to exit the building as quickly as possible. Do not stop to
collect anything.
■ Feel doors with the back of your hand before opening them. If a door is
cool, open it slowly. Do not open a hot door.
■ Keep doors and windows closed unless you must escape through them.
■ Cover your nose and mouth with a damp cloth. Take short, shallow breaths.
■ Meet at at your designated meeting place and do a head count.
■ Call the fire department as soon as possible from outside the building.
Give your address followed by your name.
■ Never go back inside a burning building for any reason.
Your Ooma Smoke Alarm functions as a complete standalone smoke alarm
once powered on. The Ooma Smoke Alarm is intended for use in single-family
residences only.
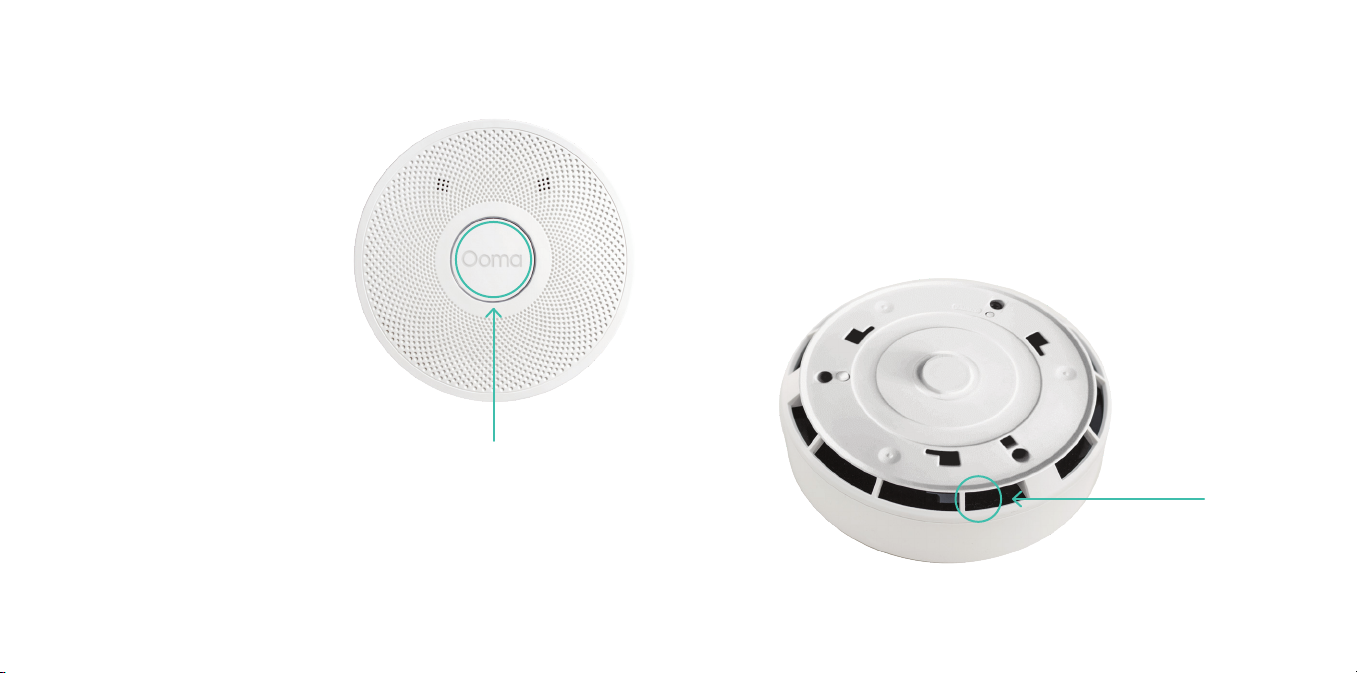
Test/Hush Button
A
B
Status indicator
light ring
Speaker ports
C
A B
C
54
Page 4
STEP 1
Power On Your Smoke Alarm
A pack of two lithium-ion batteries, permanently sealed inside the alarm,
powers this unit. No battery installation or replacement is necessary for
the life of the alarm.
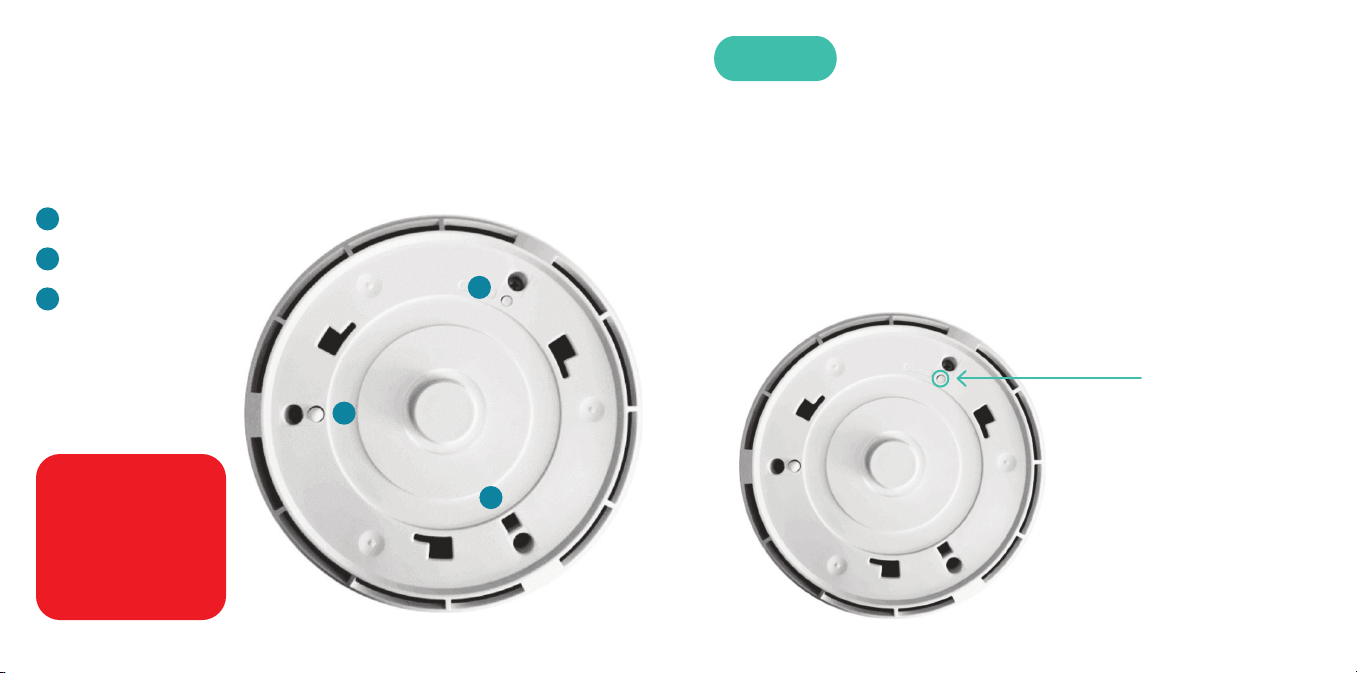
Pairing button
D
Tamper button
E
Deactivation hole
F
WARNING: DO
E
D
F
NOT ATTEMPT
TO OPEN THE
ALARM FOR
ANY REASON
Remove the mounting plate from your Ooma Smoke Alarm by twisting
it counterclockwise.
Use something narrow like a pencil to quickly press the Pairing button,
labeled PAIRING. Your smoke alarm will power on and sound three loud
beeps. The status indicator light ring will blink red while the device
initializes. When it stops blinking, your smoke alarm is ready to detect
smoke. This feature is intended for one time use only.
Pairing button
76
Page 5
STEP 2
Test Your Smoke Alarm
STEP 3
Mount Your Smoke Alarm
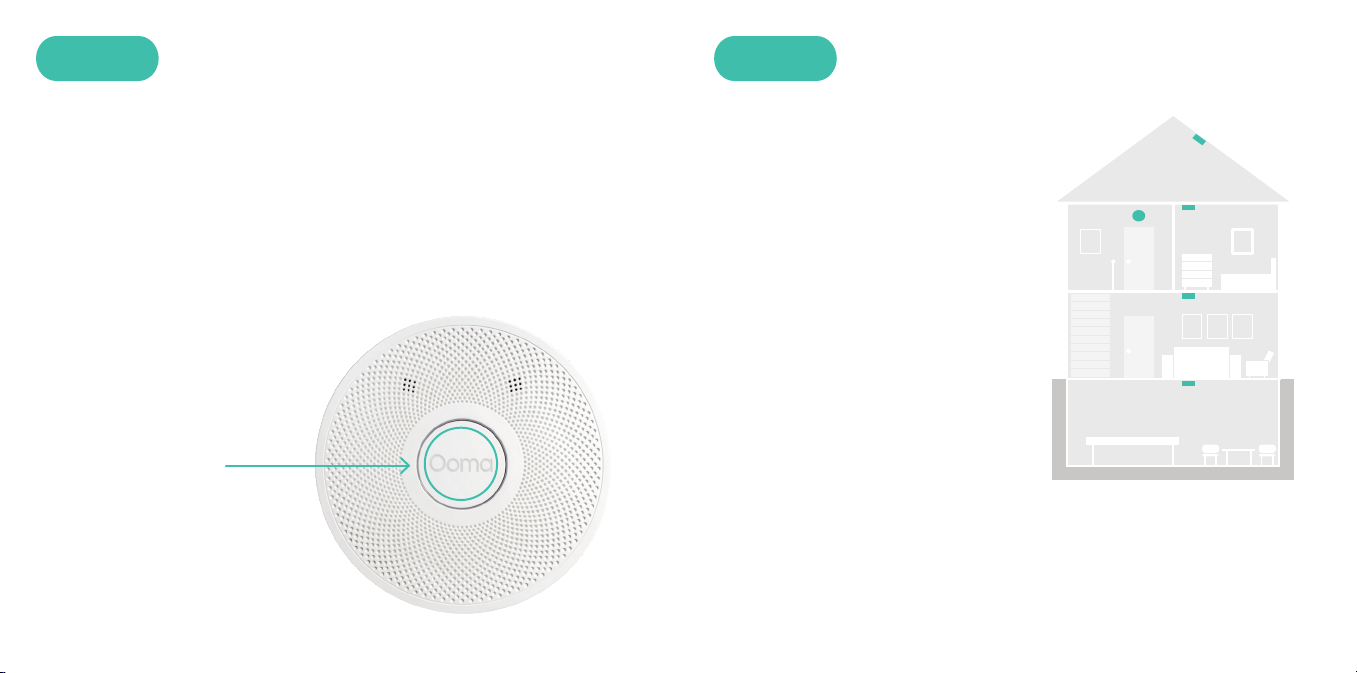
Press and hold the test button for one second. It will blink red and
sound three loud beeps to indicate that it is functioning correctly. If it
does not, please contact our customer support team. The National Fire
Protection Association (NFPA) recommends that you perform this test
on all smoke alarms at least once a week. Never use an actual flame to
test your alarm.
Test/Hush Button
8 9
The NFPA recommends installing a
smoke alarm in the following areas:
■ On every floor, including finished
attics and basements.
■ Inside and outside every
sleeping area.
■ At the top of the first-to-second
floor stairway and on the
basement ceiling near the entry
of the stairs.
■ In homes with more than
1,000 square feet on one level,
additional alarms may
be required.
Page 6
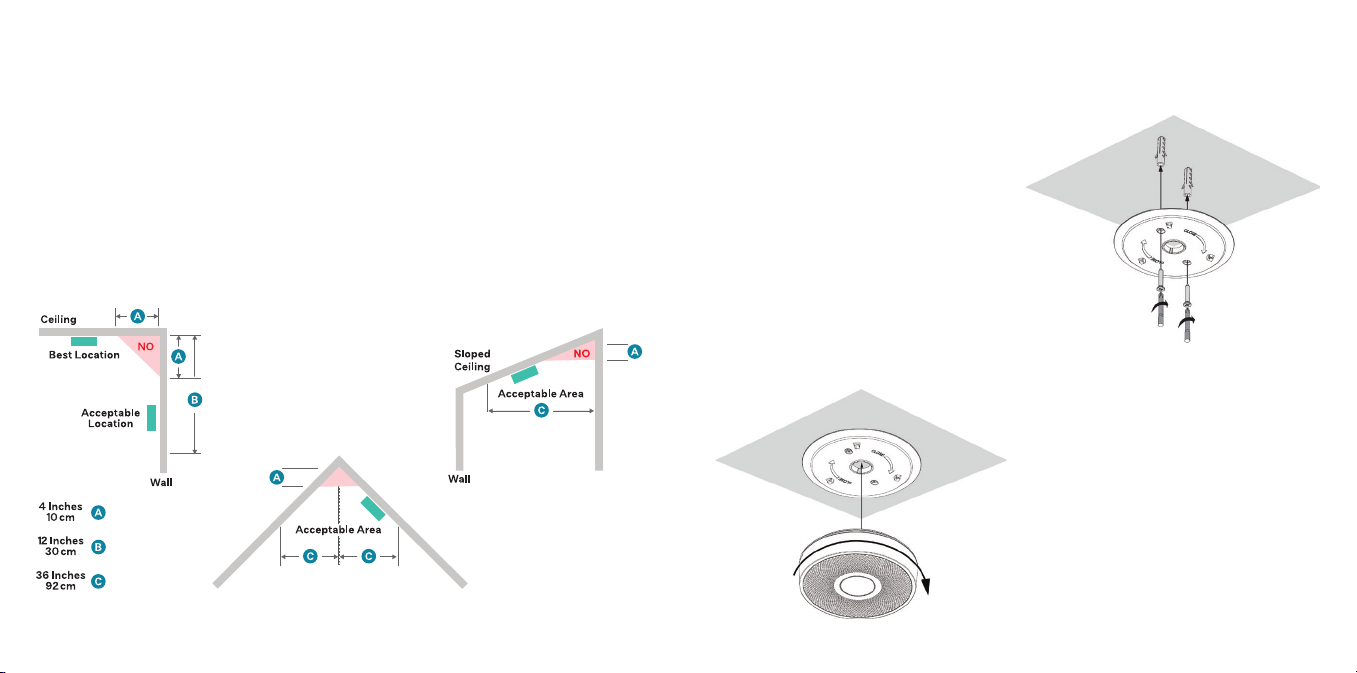
Placement on the ceiling or wall
It is recommended that you install your
Ooma Smoke Alarm on the ceiling.
Make sure it is at least 4 inches away
from the wall.
Placement on a sloped ceiling
If you have a sloped, peaked or
cathedral ceiling, your Ooma Smoke
Alarm should be 4 inches to 3 feet
from the highest point.
Screw the mounting plate to the ceiling
or wall using the included screws and
drywall anchors.
NO
Then, hold your Ooma Smoke Alarm
against the mounting plate and turn it
clockwise to secure it.
10 11
Page 7
Nuisance Alarms
Cleaning Your Smoke Alarm
Nuisance alarms can be caused by
things like fumes from cooking or
exhaust from a motor vehicle.
To stop a nuisance alarm, press the
Hush button, which is also the Test
button, on your Ooma Smoke Alarm.
This will hush the alarm for up to five
minutes. Remove the source of the
nuisance alarm and clear
the air surrounding the smoke alarm.
Never try to avoid false alarms by
disabling the device. If the nuisance
alarm persists, clean your Ooma
Smoke Alarm as described in this
quick start guide.
12 13
Test/Hush Button
To ensure that your Ooma Smoke Alarm functions properly,
we recommend that you clean it at least once a year. To
do this, remove it from the mounting plate by turning it
counterclockwise. Use a soft brush to remove any dust
from the openings around the device. Never use water,
cleaners, or solvents to clean your Ooma Smoke Alarm.
Openings
Page 8

Alarm and Status Light
Alarm Conditions
Indicator Reference
Initial Setup and Pairing
What You Hear What You See What It Means What To Do
Three beeps
None Green flashes Pairing mode
None
None
14 15
Red flashes
(approximately
20 seconds)
Long Green pulse
for 3 seconds
Red flashes for
10 seconds
Smoke alarm
initializing
Pairing successful
Pairing failed Try pairing again
Wait for
initialization to
complete
Follow in-app
instructions
Complete in-app
pairing process
What You Hear What You See What It Means What To Do
Three beeps,
pause, repeating
continuously
None Red flashes Alarm hushed
Red flashes Smoke detected
Evacuate
immediately.
If nuisance alarm,
resolve it
Resolve nuisance
alarm source
Testing and Maintenance
What You Hear What You See What It Means What To Do
One chirp (20ms)
every minute
Three beeps One red flash Test succeeded No action needed
One beep One red flash Test failed
One beep (200ms)
every minute
One red flash
every minute
One red flash
every minute
Low battery/
End of life
Trouble signal
Replace your
smoke alarm
immediately
Contact Ooma
support
Contact Ooma
support
Page 9

Deactivating and Replacing
Your Smoke Alarm
This smoke alarm has an expected
life of 10 years. When it needs
to be replaced, this alarm has a
low battery monitor which will
cause the device to “chirp” every
minute for a minimum of thirty
(30) days. When this happens,
you should immediately purchase
and install another Ooma Smoke
Alarm to ensure that your home
remains protected.
First, rotate the device
To permanently deactivate the
device, follow these instructions:
WARNING: ONCE THE DEVICE HAS BEEN DEACTIVATED, IT
CANNOT BE REMOUNTED ONTO THE MOUNTING BRACKET.
counterclockwise and remove it
from the mounting bracket.
Press the PAIRING button, TEST button and TAMPER button simultaneously to
deactivate it. The unit will no longer function once put into this mode.
Test/Hush Button Tamper button Pairing button
16 17
Page 10

Warnings and Limitations
Use a tool, such as a screwdriver, to take out the red pin from its insert and push
it into the square hole. When fixed, the red part will prevent the device from
being re-mounted onto the mounting bracket.
1
Take out the pin
2
Fix the pin
Smoke alarms only work if they are properly installed, maintained, and
if smoke reaches the alarm. The following warnings and indications will
help avoid false alarms or trouble signals:
■ This smoke alarm will not work if it has not been powered on. To power it
on, follow the setup instructions in this quick start guide.
■ This smoke alarm uses photoelectric detection technology to detect smoke
in a residential environment. Photoelectric detection is generally more
sensitive than ionization technology at detecting large particles, which
tend to be produced by slow-smoldering fires. Sources of large particles
include cigarettes burning in couches or bedding.
■ It is also recommended to purchase and install ionization smoke alarms,
which are more sensitive to small particles from fast-flaming fires. Sources
of small particles include paper burning or grease fires in the kitchen.
■ NOTICE: The National Fire Protection Association standard requires that
smoke alarm batteries last at least 10 years and be non-replaceable and
non-removable. Our batteries are certified by the relevant authorities to
meet these requirements on a stand-alone basis. However, if you pair an
Ooma smoke alarm with an Ooma Telo Base Station, the battery life may
not last 10 years. To maximize optimum battery life, you must make sure
the Smoke Alarm has a good and uninterrupted connection to the Ooma
1918
Page 11

Telo base station. It is your responsibility to keep the equipment in good
working order as stated elsewhere herein.
■ Smoke alarms are not foolproof and cannot prevent or extinguish fires.
■ This smoke alarm may not be heard if the occupants are impaired or if the
alarm is drowned out by surrounding noise. Special smoke alarms should
be installed for residents who are hearing impaired.
■ This smoke alarm will not work if its surroundings prevent smoke particles
from reaching the detector.
■ Do not stand close to the smoke alarm when it is sounding. Prolonged
exposure to the alarm may cause hearing damage.
■ Do not paint over your smoke alarm as this may prevent smoke particles
from reaching the detector.
■ The smoke alarm may not be effective for fires where the victim is in close
contact with a flame; for example, when a person’s clothes catch fire
while cooking.
20 21
■ The smoke alarm may not be effective for fires where the smoke is
prevented from reaching the smoke alarm due to a closed door or
other obstruction.
■ The smoke alarm may not be effective for incendiary fires where the fire
grows so rapidly that an occupant’s egress is blocked even with properly
located smoke alarms.
■ This smoke alarm should not be installed in locations where the normal
ambient temperature is below 40°F (4.4°C) or exceeds 100°F (37.8°C),
unless the alarm has been determined to be capable of being used at
installation points with higher or lower ambient temperatures.
■ Studies have shown smoke alarms may not awaken all sleeping individuals.
It is the responsibility of individuals in the household that are capable of
assisting others to aid those who may not be awakened by the alarm sound,
or to those who may be incapable of safely evacuating the area unassisted.
■ This smoke alarm will emit a “trouble” alarm if a critical component
has failed.
Page 12

Where Not to Install Your Smoke Alarm
■ Do not install smoke alarms in areas where combustion particles are
produced, such as kitchens or garages. Installing in these areas will cause
unnecessary nuisance alarms. Keep a smoke alarm at least 20 feet from the
source of combustion particles if possible.
■ Do not install smoke alarms in the path of air vents. Installing in these area
will reduce the effectiveness of your alarm.
■ Do not install smoke alarms in damp or very humid areas, such as
bathrooms or showers. Moisture in humid air can enter the sensing
chamber, which can cause nuisance alarms. Install smoke alarms at least 10
feet away from bathrooms.
■ Do not install Do not install smoke alarms in areas where the ambient
temperature is below 14°F (-10°C) or above 131°F (55°C). Smoke alarms may
not function properly at extreme temperatures.
■ Do not install smoke alarms in very dusty or dirty areas. Installing in these
areas will cause unnecessary nuisance alarms.
■ Do not install in “dead air” spaces, such as at the top of a peak roof or in
the corners between ceilings and walls. Dead air may prevent smoke from
reaching your alarm.
■ Do not install smoke alarms in insect-infested areas. Insects can enter the
sensing chamber, causing unnecessary nuisance alarms.
■ Do not install smoke alarms near LED or fluorescent lights, which emit
electrical noise that may cause nuisance alarms. Install smoke alarms at
least 5 feet from LED or fluorescent lights.
NFPA Requirements
The Oom a Smoke Alarm is int ended for use i n single-famil y homes and apar tments. It i s not
design ed for compli ance with Occ upational Saf ety and Health A dministrati on (OSHA) commer cial or
industrial standards.
This equ ipment shoul d be installe d in accordanc e with the Nation al Fire Protect ion Associa tion’s
Stand ard 72 (National Fi re Protection A ssociatio n, Batterym arch Park, Qui ncy, MA 02269).
NFPA 72 reads a s follows:
“29.5.1* Required Detection.”
“29.5.1.1* Whe re required by ot her governing
laws, co des, or stand ards for a spec ific type of
occupancy, approved single and multiple-station
smoke ala rms shall be ins talled as foll ows:
1. *In all sleeping rooms and guest rooms
2. *Outsid e of each separ ate dwelling uni t sleeping
area, wi thin 21 ft (6.4 m) of any do or to a sleepin g
room, w ith the distan ce measured a long a path
of travel
3. O n every level o f a dwelling unit, i ncluding
basements
4. On eve ry level of a res idential bo ard and care
occupancy (small facility), including basements
and exclud ing crawl spac es and unfini shed attic s
5. * In the living ar ea(s) of a gues t suite
6. In t he living area(s) of a re sidential bo ard and
care occupancy (small facility)”
Reprin ted with permi ssion from NFPA 72®,
Nation al Fire Alarm Co de Copyright ©2 016
National Fire Protection Association, Quincy,
MA 0226 9. This reprinte d material is no t the
compl ete and offic ial position o f the National Fir e
Protection Association, on the reference d subject
which is r epresente d only by the stan dard in its
entire ty. National Fire A larm Code® and N FPA 72®
are regi stered trad emarks of the Nat ional Fire
Protec tion Associ ation, Inc., Quin cy, MA 02269.
2322
Page 13

Smoke Alarm
Guide de Démarrage Rapide
25
Page 14

Table des matières
Français
Quoi faire en cas d’incendie .................................................... 28
Caractéristiques principales ................................................... 29
Mettre en marche votre avertisseur de fumée ............................. 31
Testez votre avertisseur de fumée ............................................32
Installez votre avertisseur de fumée .........................................33
Fausses alarmes ...................................................................36
Nettoyage de votre avertisseur de fumée ...................................37
Alarme et indicateur lumineux de référence sur le statut ..............38
Désactiver et remplacer votre détecteur de fumée ...................... 40
Avertissements et limites ...................................................... 43
Endroits où l’avertisseur de fumée ne doit pas être installé ............. 46
Exigences NFPA ..................................................................... 48
Avez-vous une question ou besoin d’aide? .................................... 49
Page 15

Quoi faire en cas d’incendie
Caractéristiques principales
■ Concevez un plan d’évacuation familial. Sachez quelles sont les voies de
sortie de votre résidence. Convenez d’un point de rencontre hors de votre
résidence.
■ Ne paniquez pas. Restez calmes.
■ Veillez à ce que chacun sorte du bâtiment aussi vite que possible. Ne
vous arrêtez pas pour ramasser quoi que ce soit.
■ Touchez les portes du revers de la main avant de les ouvrir. Si une porte
est froide, ouvrez-la doucement. N’ouvrez pas une porte chaude.
■ Gardez les portes et les fenêtres fermées à moins que vous deviez passer
par là pour vous échapper.
■ Couvrez-vous le nez et la bouche au moyen d’un linge humide. Prenez de
courtes et légères inspirations.
■ Rendez-vous au point de rencontre et voyez si vous êtes tous là.
■ Appelez le service des incendies dès que possible dès que vous êtes à
l’extérieur du bâtiment. Donnez votre adresse suivie de votre nom.
■ Ne retournez jamais à l’intérieur d’un bâtiment en flammes, pour quelque
raison que ce soit.
Votre avertisseur de fumée Ooma fonctionne en tant qu’avertisseur de fumée
autonome complet une fois qu’il est mis sous tension. Il est destiné à être utilisé
uniquement dans des résidences unifamiliales.
Bouton de test/
A
sourdine
B
Anneau lumineux
indicateur de statut
C
Ports de hautparleur
A B
C
2928
Page 16

Il est alimenté par un bloc de deux piles au lithium-ion enchâssé
dans l’appareil. Aucune installation ni remplacement de piles n’est
nécessaire pour la durée de vie du détecteur.
Bouton de
D
jumelage
Bouton anti-
E
sabotage
Orifice de
F
désactivation
E
D
ÉTAPE 1
Mettre en marche votre
avertisseur de fumée
Utilisez un objet pointu comme un stylo pour appuyer promptement
sur le «bouton de jumelage» étiqueté «PAIRING» (JUMELAGE).
Votre avertisseur de fumée se mettra en marche et émettra trois bips.
L’anneau lumineux indicateur de statut clignotera en rouge pendant
l’initialisation du dispositif. Une fois que le clignotement arrête, votre
avertisseur de fumée est prêt à détecter la fumée. Cette fonction est
destinée à une utilisation unique.
Bouton de jumelage
AVERTISSEMENT:
N’ESSAYEZ EN
AUCUN CAS
D’OUVRIR LE
BOÎTIER DU
DÉTECTEUR
F
3130
Page 17

ÉTAPE 2
Testez votre avertisseur
ÉTAPE 3
Installez votre avertisseur
de fumée
Appuyez et maintenez enfoncé le bouton test pendant une seconde. Il
clignotera en rouge et émettra trois bips pour indiquer qu’il fonctionne
correctement. S’il ne le fait pas, veuillez contacter notre équipe du
soutien à la clientèle. La National Fire Protection Association (NFPA)
recommande d’effectuer ce test sur tous les avertisseurs de fumée au
moins une fois par semaine. N’utilisez jamais une flamme réelle pour
tester votre avertisseur.
Bouton de test
32 33
La NFPA recommande l’installation
d’un avertisseur de fumée dans les
zones suivantes:
■ À chaque étage, incluant les
combles et les sous-sols finis.
■ À l’intérieur et à l’extérieur de
tous les endroits réservés
au sommeil.
■ Au plafond de l’escalier allant du
rez-de-chaussée au deuxième
étage et au plafond du sous-sol
près de l’entrée des escaliers.
■ Dans les résidences de plus
de 1 000 pieds carrés, des
avertisseurs supplémentaires
peuvent être exigés.
de fumée
Page 18

Installation au plafond ou sur
un mur
Il est recommandé d’installer votre
avertisseur de fumée Ooma au
plafond. Assurez-vous qu’il soit
installé à au moins 10 cm du mur.
34 35
Installation sur un plafond incliné
Si vous avez un plafond incliné, pointu
ou un plafond cathédrale, votre
avertisseur de fumée Ooma doit être
placé entre 10 cm et 90 cm du point le
plus élevé.
Vissez la plaque de montage au
plafond ou au mur en utilisant les vis et
ancrages pour cloison sèche inclus.
Puis, tenez votre avertisseur de fumée
Ooma contre la plaque de montage et
tournez-le dans le sens des aiguilles
d’une montre pour le bloquer.
Page 19

Fausses alarmes
Les fausses alarmes peuvent être
provoquées par des événements
tels que des vapeurs de cuisson ou
des émissions d’échappement d’un
véhicule. Pour arrêter une fausse
alarme, appuyez sur le bouton
«sourdine», qui est également
le «bouton de test», sur votre
avertisseur de fumée Ooma. Ceci
mettra l’alarme en sourdine pour un
maximum de cinq minutes. Supprimez
la source de la fausse alarme et aérez
l’environnement de l’avertisseur de
fumée. N’essayez jamais d’éviter les
fausses alarmes en désamorçant
l’appareil. Si la fausse alarme persiste,
nettoyez votre avertisseur de fumée
Ooma comme c’est décrit dans ce
guide de démarrage rapide.
Nettoyage de votre avertisseur
de fumée
Pour vous assurer que votre avertisseur de fumée Ooma fonctionne comme
il faut, nous vous recommandons de le nettoyer au moins une fois par année.
Pour ce faire, enlevez-le de la base de montage en le tournant dans le sens
contraire des aiguilles d’une montre. Utilisez une brosse souple pour supprimer
toute poussière des ouvertures autour de l’appareil. N’utilisez jamais ni eau ni
nettoyant, ou solvants pour nettoyer votre avertisseur de fumée Ooma.
Bouton de sourdine
Ouvertures
36 37
Page 20

Alarme et indicateur lumineux de
référence sur le statut
Configuration initiale et jumelage
Ce que vous
entendez
Trois bips
Rien Flashs Vert s Mode jumelage
Rien
Rien
Ce que vous voyez
Flashs rouge
(environ 20
secondes)
Longue impulsion
Ver ts pendant
3 secondes
Flashs rouge
pendant 10
secondes
Ce que cela
signifie
Initialisation de
l’avertisseur de
fumée
Jumelage réussi
Jumelage échoué
Quoi faire
Attendre que
l’initialisation soit
terminée
Suivre les
directives de
l’application
Processus de
jumelage par
l’application
Essayer le jumelage
de nouveau
terminé
Situations d’alerte
Ce que vous
entendez
Trois bips, pause,
se répétant sans
interruption
Rien Flashs rouge Alarme étouffée
Ce que vous voyez
Flashs rouge Fumée détectée
Test et entretien
Ce que vous
entendez
Un bip (20ms) à
chaque minute
Trois bips Un flashs rouge Test réussi
Ce que vous voyez
Signal lumineux
rouge à chaque
minute
Ce que cela
signifie
Ce que cela
signifie
Pile faible/
Fin de vie
Quoi faire
Évacuer les lieux
immédiatement.
S’il s’agit d’une
fausse alarme, la
résoudre
Régler la source de
la fausse alarme
Quoi faire
Remplacer
l’avertisseur
de fumée
immédiatement
Aucune action
requise
Un bip Un flashs rouge Test échoué
Un bip (200ms) à
chaque minute
38 39
Signal lumineux
rouge à chaque
minute
Signal de
dérangement
Contacter le ser vice
de soutien de Ooma
Contacter le ser vice
de soutien de Ooma
Page 21

Désactiver et remplacer votre
détecteur de fumée
Ce détecteur a une durée de vie
prévue de 10 ans. Quand il devra
être remplacé, le dispositif de
contrôle des piles qu’il renferme
fera en sorte que l’appareil
émette un « bip » une fois par
minute pendant au moins trente
(30) jours. Le cas échéant, vous
devriez acheter et installer sans
tarder un autre détecteur de
fumée Ooma afin que votre maison
reste en sécurité. Pour désarmer
l’appareil définitivement, suivez
ces indications :
Faites tourner l’appareil dans le sens
antihoraire pour le dégager du support
de fixation.
Pour désarmer le détecteur, appuyez simultanément sur les boutons de
jumelage, d’essai et d’anti-sabotage. Une fois dans ce mode, l’appareil
ne fonctionnera plus.
Bouton de sourdine
AVERTISSEMENT: N’ESSAYEZ EN AUCUN CAS D’OUVRIR LE BOÎTIER
DU DÉTECTEUR. UNE FOIS DÉSARMÉ, LE DÉTECTEUR NE PEUT PAS
ÊTRE RÉARMÉ.
40 41
Bouton anti-
sabotage
Bouton de jumelage
Page 22

Avertissements et limites
Servez-vous d’un outil tel un tournevis pour retirer la tige rouge et enfoncez-la
dans l’orifice carré. Une fois en place, la tige rouge empêchera la réinstallation
de l’appareil sur le support de fixation.
1
Retirez la tige
Enfoncer la tige dans
2
l’orifice carré
Les avertisseurs de fumée fonctionnent parfaitement uniquement
s’ils sont installés et entretenus comme il se doit, et si la fumée atteint
l’appareil. Les mises en garde et indications ci-dessous aident à éviter
les fausses alarmes et les faux signaux de dérangement :
■ Cet avertisseur de fumée ne fonctionnera pas s’il n’a pas été mis sous
tension. Pour le mettre sous tension, suivez les directives de configuration
dans ce guide de démarrage rapide.
■ Cet avertisseur de fumée utilise la technologie de détection
photoélectrique pour détecter la fumée dans un environ-nement
résidentiel. La détection photo-électrique est généralement plus sensible
que la technologie d’ionisation pour la détection de grandes particules, qui
sont en général produites par des incendies à évolution lente. Les sources
de grandes particules comprennent les cigarettes qui brûlent dans un
divan ou un lit.
■ Il est également recommandé d’acheter et d’installer des avertisseurs de
fumée à ionisation qui sont plus sensibles aux petites particules provenant
de feux à flammes vives. Les sources de petites particules comprennent la
combustion de papier ou de graisse dans la cuisine.
4342
Page 23

■ AVI S : La norme de la National Fire Protection Association exige que
les piles de détecteur de fumée durent au moins 10 ans et soient non
remplaçables et inamovibles. Nos piles sont certifiées par les autorités
compétentes pour répondre à ces exigences sur une base autonome.
Cependant, si vous jumelez un détecteur de fumée Ooma à une unité
de base Ooma Telo, la pile pourrait ne pas durer 10 ans. Pour maximiser
la durée de vie de la pile, assurez-vous que le détecteur de fumée est
correctement connecté de façon ininterrompue à l’unité de base Ooma
Telo. Il vous incombe de maintenir l’équipement en bon état de marche,
comme indiqué ailleurs dans le présent document.
■ Les avertisseurs de fumée ne sont pas infaillibles et ne peuvent ni prévenir
ni éteindre les feux.
■ Cet avertisseur de fumée peut ne pas être entendu si les occupants
souffrent d’une déficience ou si l’alarme est étouffée par le bruit ambiant.
Des avertisseurs de fumée spéciaux doivent être installés pour les
résidents malentendants.
■ Cet avertisseur de fumée ne fonctionnera pas si son environnement
empêche les particules de fumée d’atteindre le détecteur.
■ Ne restez pas à proximité de l’avertisseur de fumée lorsqu’il sonne. Une
exposition prolongée à l’alarme pourrait être préjudiciable pour l’ouïe.
■ N’appliquez pas de peinture sur votre avertisseur de fumée, car cela
44 45
pourrait empêcher les particules de fumée d’atteindre le détecteur.
■ Le détecteur de fumée peut ne pas fonctionner dans une situation où les
flammes sont en contact avec la victime, p. ex. si ses vêtements prennent
feu alors qu’elle cuisine.
■ Le détecteur de fumée peut ne pas fonctionner dans une situation
d’incendie où un obstacle (porte fermée ou autre) empêche la fumée
d’atteindre le détecteur.
■ Le détecteur de fumée peut être inefficace dans le cas d’un feu de cause
incendiaire qui se propage si rapidement que la sortie de l’occupant est
bloquée, malgré la présence de détecteurs aux bons endroits.
■ On ne doit pas installer ce détecteur de fumée dans un endroit où
la température ambiante normale est inférieure à 40 oF (4,4 oC) ou
supérieure à 100 oF (37,8 oC), sauf s’il a été déterminé qu’on pouvait
l’utiliser en des points d’installation où les températures ambiantes sont
inférieures ou supérieures.
■ Les études montrent que les détecteurs de fumée ne réveillent pas toujours
toutes les personnes présentes. Il revient aux occupants de la maison qui
sont aptes à porter secours d’aider ceux qui risquent de ne pas être réveillés
par l’alarme ou d’être incapables de quitter les lieux sans assistance.
■ En cas de défaillance d’une de ses composantes essentielles, ce détecteur
émettra un avertissement de mauvais fonctionnement.
Page 24

Endroits où l’avertisseur de fumée ne
doit pas être installé
■ N’installez pas des avertisseurs de fumée dans les endroits où des
particules de combustion sont produites, comme les cuisines ou les
garages. L’installation dans ces endroits provoquera de fausses alarmes
inutiles. Si possible, installez un avertisseur de fumée à au moins 20 pieds
d’une source de particules de combustion.
■ N’installez pas les avertisseurs de fumée dans le passage de courants d’air.
L’installation dans un tel endroit réduira l’efficacité de votre avertisseur.
■ N’installez pas d’avertisseurs de fumée dans des endroits mouillés ou très
humides, comme des salles de bains ou des douches. L’humidité présente
dans l’air peut pénétrer dans la cellule sensible du détecteur, ce qui peut
provoquer de fausses alarmes. Installez les avertisseurs de fumée à au
moins 10 pieds des salles de bains.
■ N’installez pas de détecteurs de fumée dans des zones où la température
ambiante est inférieure à -10 °C (14 °F) ou supérieure à 55 °C (131 °F). Les
détecteurs de fumée peuvent ne pas correctement fonctionner à des
températures extrêmes.
■ N’installez pas d’avertisseurs de fumée dans des endroits très poussiéreux
ou sales. L’installation dans ces endroits déclenchera de fausses
alarmes inutiles.
■ N’installez pas l’avertisseur de fumée dans des endroits où l’air est
immobile, comme au sommet d’un toit pointu ou dans les coins entre les
plafonds et les murs. L’air immobile peut empêcher la fumée d’atteindre
votre avertisseur.
■ N’installez pas d’avertisseurs de fumée dans des endroits infestés par
des insectes. Les insectes peuvent pénétrer dans la cellule sensible du
détecteur, ce qui peut provoquer de fausses alarmes inutiles.
■ N’installez pas le détecteur de fumée à proximité de lumières au DEL ou de
lampes fluorescentes qui émettent du bruit électrique pouvant provoquer
de fausses alarmes. Installez les détecteurs de fumée à au moins 1,5 m
(5 pi) de toute lumière au DEL ou de lampe fluorescente.
4746
Page 25

Exigences NFPA
Avez-vous une question ou
L’aver tisseur de fu mée Ooma est d estiné à une util isation dans l es résidenc es unifamilia les ou les
appartements. Il n’es t pas conçu conformément aux normes commerciales ou industrielles de
l’organisme Occupational Safety and Health Administration (OSHA).
Cet équ ipement doit ê tre installé c onforméme nt à la norme 72 de la N ational Fire Pro tection Ass ociation
(Nation al Fire Protecti on Associat ion, Batter ymarch Park, Q uincy, MA 02269).
La NFPA 72 se lit co mme suit :
«29.5.1* Déte ction requi se.»
«29.5.1.1* Là où c’est ex igé en vertu d’autr es lois,
codes o u normes con cernant un ty pe particul ier
d’occupat ion, les aver tisseurs de fu mée simples
ou à multi ples postes d oivent être ins tallés de la
manière suivante :
1. Dans tou tes les chamb res et pièces p our invités
2. À l’extérieur d e chacune des zo nes de repos d ’un
logem ent, dans une dis tance de 21 p ieds (6,4 m)
de toute porte d’une chambre, distance mesurée
le long d’une voie de circulation
3. À tous les étages d’un logement, y compris les
sous-sols
4. À tous les étages d’un foyer résidentiel ou d’un
établissement de soins (petit établissement),
y compr is les sous-so ls et excepté les v ides
sanit aires et les gre niers non fi nis
5. Dans les espaces habitables d’une chambre
d’hôt e
6. Da ns les espac es habitabl es d’un foyer
résid entiel ou d’un éta blissemen t de soins
(petit établissement) »
Reprod uit avec l’autoris ation de la NFPA 72®,
Nation al Fire Alarm Co de Copyright ©2 016
National Fire Protection Association, Quincy,
MA 0226 9. Le présent maté riel reprod uit ne
const itue pas la posi tion offic ielle et compl ète
de la Nati onal Fire Prote ction Assoc iation sur
le sujet a uquel il est fai t référence , laquelle est
repré sentée unique ment par la nor me dans son
intégr alité. Nationa l Fire Alarm Cod e® et NFPA 72®
sont de s marques dép osées de la Nati onal Fire
Protec tion Associ ation, Inc., Quin cy, MA 02269.
which is r epresente d only by the stan dard in its
entire ty. National Fire A larm Code® and N FPA 72®
are regi stered trad emarks of the Nat ional Fire
Protec tion Associ ation, Inc., Quin cy, MA 02269.
besoin d’aide?
Voici où vous pouvez trouver de l’aide :
Base de connaissances : support.ooma.com/home/home-security
Forum de discussion : forums.ooma.com
Service clientèle : 1-877-629-1284
Cet app areil est conforme à tout es les normes s uivantes s’appliqu ant aux avertis seurs de fumé e :
UL 217 – «Aver tisseurs d e fumée simpl es et multipos tes»
CAN-ULC-S 531-02 – «Nor me sur les avert isseurs de fu mée»
P/N: 700-0177-202
4948
 Loading...