

Page 1

For warr anty, safety, and oth er legal infor mation, visi t ooma.com/legal
This devi ce complie s with part 15 of t he FCC rules. Op eration is su bject to the fol lwing two con ditions: (1) This d evice
may not ca sue harmful in terferen ce, and (2) Thsi devi ce must acce pt any interfe rence rece ived, includi ng interfer ence
that may c ause undesir ed operatio n. P/N: 700-01 68-300
Motion Sensor
Quick Start Guide
Page 2

Contents
1. What’s in the Box . . . . . . . . . . . . . . . . . . . . . . . . . 5
2. Installation and Activation . . . . . . . . . . . . . . . . . . . . . 8
Install the App . . . . . . . . . . . . . . . . . . . . . . . . . . . . . . . . . 8
Activate account . . . . . . . . . . . . . . . . . . . . . . . . . . . . . . . . 8
3. Setting up Your Ooma Sensor . . . . . . . . . . . . . . . . . . . . 9
Pair Your Sensor . . . . . . . . . . . . . . . . . . . . . . . . . . . . . . . . 9
Insert Batteries . . . . . . . . . . . . . . . . . . . . . . . . . . . . . . . .9
Sensor Initializing . . . . . . . . . . . . . . . . . . . . . . . . . . . . . . 10
Pair Your Sensor . . . . . . . . . . . . . . . . . . . . . . . . . . . . . . . 10
2 3
4. Mounting Your Sensor . . . . . . . . . . . . . . . . . . . . . . 11
Preparing to Mount Your Sensor . . . . . . . . . . . . . . . . . . . . . . . .11
Mount with Standing Attachment (optional) . . . . . . . . . . . . . . . . . 12
Mount with Adhesive Pads (optional) . . . . . . . . . . . . . . . . . . . . . 13
Mount with Screws (optional) . . . . . . . . . . . . . . . . . . . . . . . . . 15
5. Additional Information . . . . . . . . . . . . . . . . . . . . . . 18
Status indicator reference . . . . . . . . . . . . . . . . . . . . . . . . . . 18
6. Need Help? . . . . . . . . . . . . . . . . . . . . . . . . . . . 19
Page 3
1
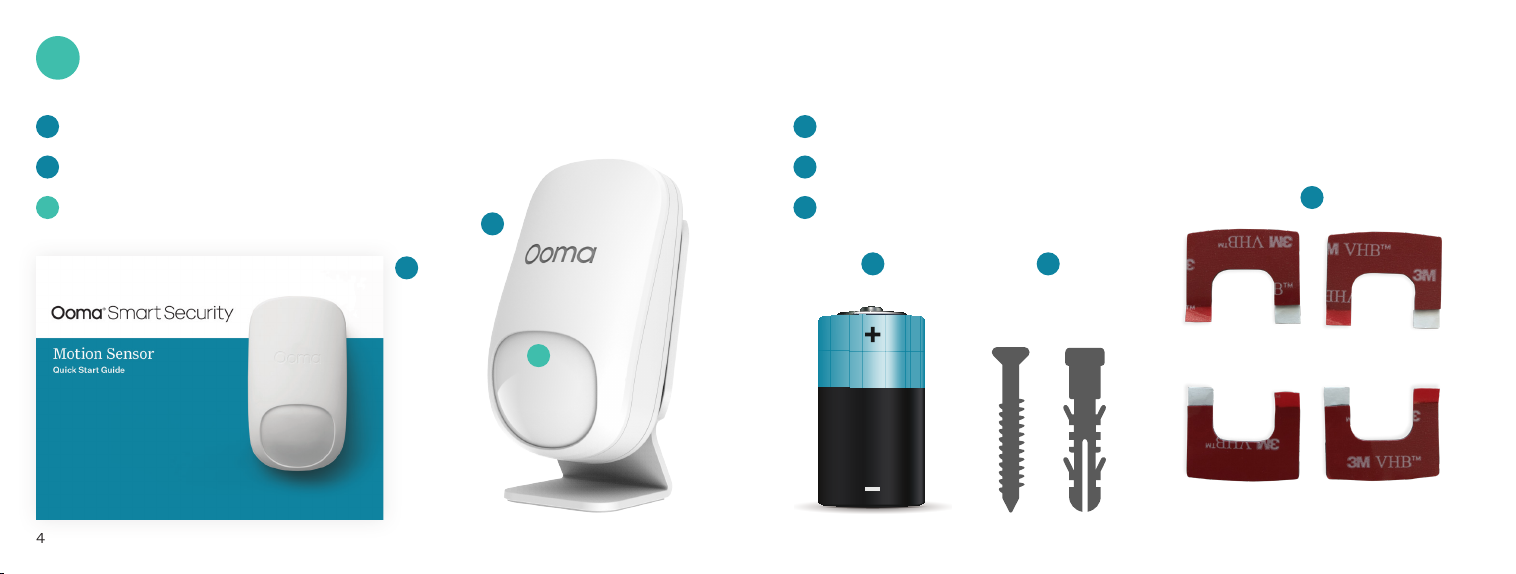
What’s in the Box
A
Quick Start Guide
B
Motion Sensor
C
Status indicator light
(hidden when off)
D
(1) CR123A battery
E
Screws and Anchors
F
B
A
C
Adhesive Pads
D E
F
54
Page 4

2
2
Installation and Activation
G
Standing attachment
H
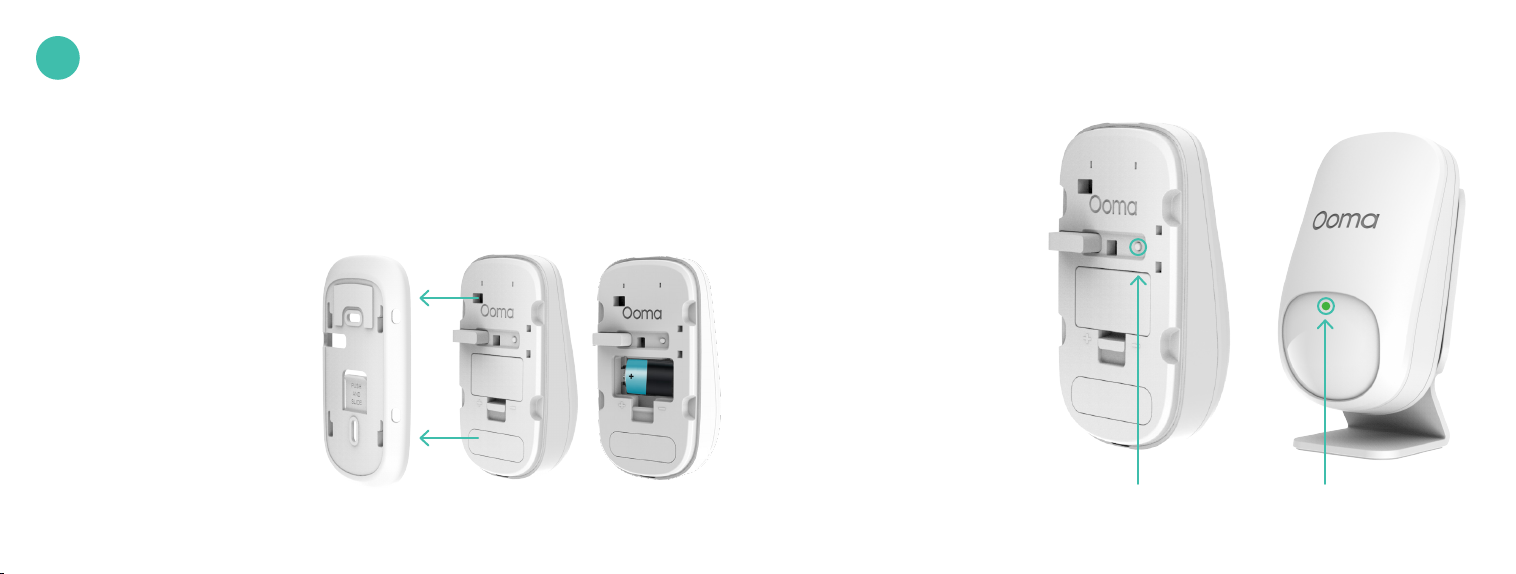
Back cover
I
Tamper sensor
J
Pairing button
G H I J
Install the App
If you haven’t done so already, install the Ooma Smart
Security app on your iOS or Android device. Visit the
Apple App Store or Google Play Store and search for
“Ooma Smart Security.” Download the app and install
it on your device.
Activate account
Once you get to the login screen, press “Activate Account” and
follow the steps in the app to set up your account.
76
Page 5
3
Setting up Your Ooma Sensor
Pair Your Sensor
Once you have finished setting
up your account, press the “A dd
Sensor” button on the dashboard.
Pick “Motion Sensor” and follow
the steps in the app.
Insert Batteries
Remove the Motion Sensor’s
magnetic back cover. Open the
battery compartment and insert
the battery. Make sure that the
positive end (“+”) of the battery
is facing the left side of the
battery compartment. You can
replace the battery compartment
cover afterwards.
Remove back cover
Insert battery
Sensor Initializing
The Motion Sensor will
initialize for 30 seconds,
during which time the LED
on the front of the sensor
will flash red. When the light
stops flashing, you’re ready
to move on.
Pair Your Sensor
Stand within 10 feet of your
Base Station. Press and
hold the pairing button for 5
seconds. Watch for the LED
on the front of the sensor to
blink green, indicating the
sensor is in pairing mode.
Pairing button Status indicator light
98
Page 6
4
Mounting Your Sensor
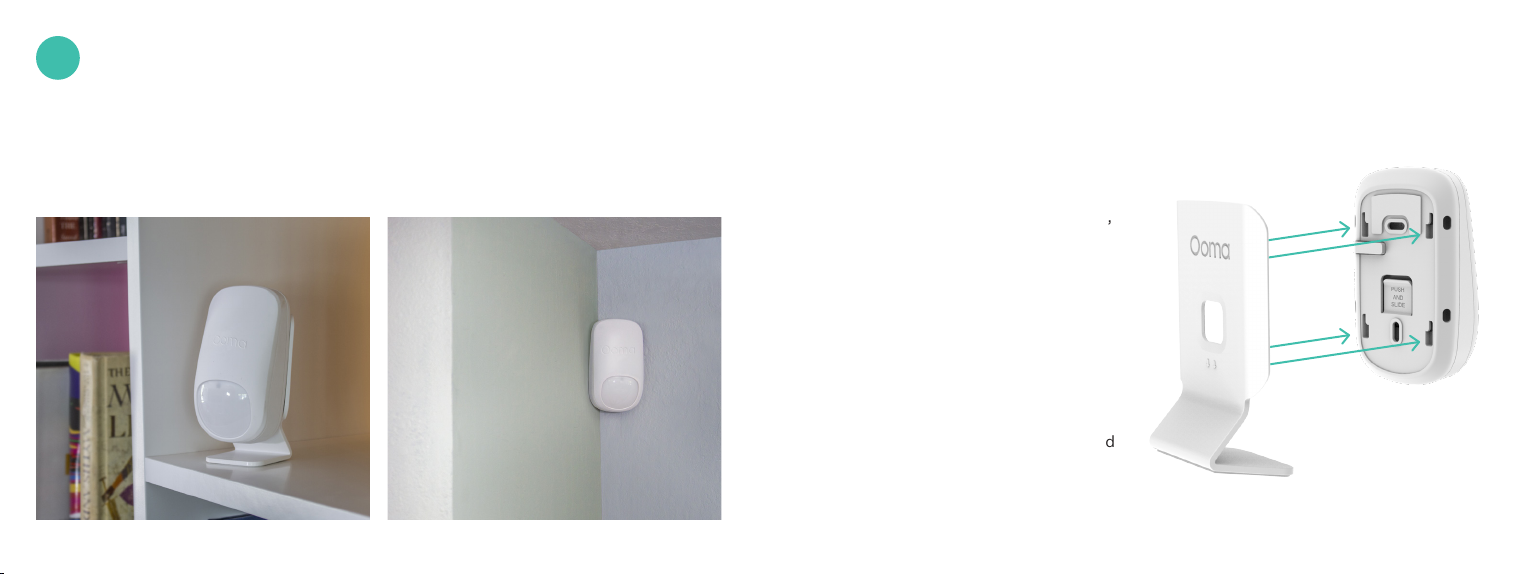
Preparing to Mount Your Sensor
After pairing your sensor, the next step is to decide where you want
to place or mount it. We’ve provided a few placement ideas here.
10 11
Mount with Standing
Attachment (optional)
a. If your motion sensor is not already
attached to the standing attachment,
do so now. Align the four rails with
the four grooves on the back plate
and slide upwards. The stand will
snap into place. Use a damp cloth to
clean the area where you want your
sensor to be so that the adhesive
pads stick properly
b. Place your motion sensor on any flat
surface pointing in the direction you’d
like it to monitor.
Page 7

Mount with Adhesive Pads (optional)
a. You won’t need the standing attachment if you’re
using adhesives. Release it from the back cover by
pressing the marked square and pulling the stand
away. The standing attachment will come free.
b. Use a damp cloth to
clean the area where
you want your sensor to
be so that the adhesive
pads stick properly.
c. If you haven’t already done
so, replace the magnetic back
cover. Peel off one side of
each of the included adhesive
pads and place them firmly
onto the areas shown below.
d. Peel off the other backing
on the adhesive pad. Firmly
press the newly-exposed
adhesive onto the desired
surface for 30 seconds.
Press marked square Pull sensor up and of f the stand
c.
Replace cover
Press adhesive onto surface
d.
1312
Page 8

Mount with Screws (optional)
You won’t need the standing attachment if you’re using adhesives.
Release it from the back cover by pressing the marked square and
pulling the stand away. The standing attachment will come free.
a. Using the back cover
as a stencil, mark the
screw holes with a
pencil. Keep in mind
that the screw holes
are different if you’re
mounting on a flat wall
vs. a corner. If you’re
using the optional
anchors, use a drill to
bore holes and then
place the anchors in
the holes.
Mounting on a flat wall Mounting in a corner
1514
Page 9

5
Additional Information
b. Align the screw holes of
the sensor’s back cover
over the pencil marks
(or the wall anchors).
Place screws through
these gaps and tighten.
c. Once the back cover
is secure, place the
sensor onto it. The
magnet will hold it
in place.
(optional)
(optional)
Status indicator reference
First time setup – Quick
red flashes
Pairing mode – Quick
green flashes
Pairing sucess – Long
green flash
Unpairing sucess –
Slow red flashes
Motion sensed – Quick
red flash
Signal disconnected –
Long red flash
1716
Page 10

6
Need Help?
Ooma has a wealth of available resources if you need assistance.
Support Articles and User Manuals. Access our comprehensive knowledge
base at support.ooma.com/support
Community Forum. Talk with your fellow Ooma customers and our support
staff at forums.ooma.com
Live Customer Care. Speak with a support specialist at: 1-877-629-1284
18 19
Page 11

Détecteur de mouvement
Guide de démarrage rapide
Page 12

Table des matières
1. Contenu de l’emballage . . . . . . . . . . . . . . . . . . . . . . 24
2. Installation et activation . . . . . . . . . . . . . . . . . . . . . 27
Installation de l’appli . . . . . . . . . . . . . . . . . . . . . . . . . . . . . 27
Activation du compte . . . . . . . . . . . . . . . . . . . . . . . . . . . . 27
3. Configuration de votre détecteur Ooma . . . . . . . . . . . . . . . 28
Jumelez votre détecteur . . . . . . . . . . . . . . . . . . . . . . . . . . . 28
Insertion de la pile . . . . . . . . . . . . . . . . . . . . . . . . . . . . . . 28
4. Installation de votre détecteur . . . . . . . . . . . . . . . . . . . 30
Préparatifs avant s’installer votre détecteur . . . . . . . . . . . . . . . . . . 30
Installation sur le support de surface horizontale (facultatif) . . . . . . . . . . 31
Fixation avec des bandes adhésives (facultatif) . . . . . . . . . . . . . . . . 32
Fixation avec des vis (facultatif) . . . . . . . . . . . . . . . . . . . . . . . 34
5. Renseignements supplémentaires Information . . . . . . . . . . . . 37
Référence pour les voyants lumineux d’état . . . . . . . . . . . . . . . . . . . 37
6. Besoin d’aide? . . . . . . . . . . . . . . . . . . . . . . . . . . 38
Initialisation du détecteur . . . . . . . . . . . . . . . . . . . . . . . . . . 29
Jumelez votre détecteur . . . . . . . . . . . . . . . . . . . . . . . . . . . 29
22 23
Page 13

1
Contenu de l’emballage
A
Guide de démarrage rapide
B
Détecteur de mouvement
C
Voyant lumineux d’état
(caché lorsque le voyant
est éteint)
D
(1) pile CR123A
E
Vis et ancrages
F
B
A
C
Bandes adhésives
D E
F
2524
Page 14

2
2
Installation et activation
G
Support de surface
horizontale
H
Couvercle arrière
I
Détecteur antieffraction
J
Bouton de jumelage
G H I J
Installation de l’appli
Si ce n’est pas déjà fait, installez l’appli Sécurité intelligente
d’Ooma sur votre appareil iOS ou Android. Recherchez
“Ooma Smart Security” (Sécurité résidentielle Ooma)
dans la boutique Apple App Store ou Google Play Store.
Téléchargez l’appli et installez-la sur votre appareil.
Activation du compte
Une fois sur l’écran de connexion, appuyez sur “Activate Account”
(Activer le compte) et suivez les étapes dans l’appli pour configurer
votre compte.
2726
Page 15

3
Configuration de votre détecteur Ooma
Jumelez votre détecteur
Une fois la configuration de votre compte
terminée, appuyez sur le bouton Add Sensor
(Ajouter un détecteur) sur le tableau de bord.
Choisissez Motion Sensor (Détecteur de
mouvement) et suivez les étapes dans l’appli.
Retrait du
couvercle
arrière
Insertion de la pile
Retirez le couvercle arrière magnétique du
détecteur de mouvement. Ouvrez le compartiment
de la pile et insérez la pile. Assurez-vous que
l’extrémité positive (+) de la pile fait face au côté
gauche du compartiment de la pile. Vous pouvez
ensuite remettre en place le couvercle de la pile.
28 29
Insertion de
la pile
Initialisation du détecteur
Le détecteur de mouvement s’initialisera
durant 30 secondes pendant lesquelles
le voyant au DEL sur le devant du détecteur
clignotera en rouge. Lorsque le voyant arrête
de clignoter, vous êtes prêt à continuer.
Jumelez votre détecteur
Tenez-vous à une distance de 3 m (10 pi) de
votre unité de base. Appuyez sur le bouton
de jumelage et tenez-le enfoncé 5 secondes.
Attendez que le voyant au DEL sur le devant
du détecteur clignote en vert, indiquant que
le détecteur est en mode de jumelage.
Bouton de jumelage
Voyant lumineux
d’é tat
Page 16

4
Installation de votre détecteur
Préparatifs avant s’installer votre détecteur
Une fois le jumelage de votre détecteur terminé, la prochaine étape consiste à décider
où vous voulez l’installer. Voici quelques exemples de positionnement.
30 31
Installation sur le support de surface
horizontale (facultatif)
a. Si votre détecteur de mouvement n’est pas déjà
fixé au support de surface horizontale, faites-
le maintenant. Alignez les quatre rails avec les
quatre rainures sur la plaque arrière et faites
glisser vers le haut. Le support s’enclenchera.
Utilisez un chiffon humide pour nettoyer l’endroit
où vous voulez installer votre détecteur afin que
les bandes adhésives collent correctement.
b. Placez votre détecteur de mouvement sur toute
surface plate en le tournant dans la direction que
vous souhaitez surveiller.
Page 17

Fixation avec des bandes adhésives (facultatif)
a. Vous n’aurez pas besoin du support de surface
horizontale si vous utilisez les bandes adhésives.
Dégagez-le du couvercle arrière en appuyant sur le
carré marqué et en tirant sur le support. Le support
de surface horizontale se détachera.
Presse carré marqué
Soulevez le capteur et
retirez-le du support
b. Utilisez un chiffon
humide pour nettoyer
l’endroit où vous
voulez installer votre
détecteur afin que
les bandes adhésives
collent correctement.
c. Si ce n’est pas déjà fait,
remettez le couvercle arrière
magnétique en place. Retirez
la pellicule protectrice sur
l’un des côtés de chaque
bande adhésive incluse et
placez-les fermement sur les
zones indiquées ci-dessous.
d. Retirez l’autre pellicule
protectrice de la bande
adhésive. Appuyez
fermement le côté adhésif
à l’emplacement souhaité
pendant 30 secondes.
Remettez le couvercle
c.
en place.
Appuyez le côté adhésif
d.
sur la surface.
3332
Page 18

Fixation avec des vis (facultatif)
Vous n’aurez pas besoin du support pour surface horizontale si
vous utilisez des vis. Dégagez-le du couvercle arrière en appuyant
sur le carré marqué et en tirant sur le support. Le support de
surface horizontale se détachera.
a. En utilisant le couvercle
arrière comme un
pochoir, marquez les
trous de vis à l’aide
d’un crayon. Notez
que les trous des vis
sont différents selon
que vous installez le
détecteur sur un mur
plat ou sur un coin.
Si vous utilisez les
ancrages facultatifs,
utilisez une perceuse
pour percer des trous
et placez les ancrages
dans les trous.
Installation sur
un mur plat
Installation sur
un coin
3534
Page 19

b. Alignez les trous de vis
du couvercle arrière
du détecteur sur les
marques de crayon (ou
les ancrages muraux).
Placez les vis dans les
trous et serrez.
c. Une fois le couvercle
arrière solidement fixé
au mur, accrochez-y le
détecteur. L’aimant le
maintiendra en place.
(facultatif)
(facultatif)
Renseignements supplémentaires
5
Information
Référence pour les voyants lumineux d’état
Première configuration –
clignotements rouges rapides
Mode de jumelage –
clignotements verts rapides
Jumelage réussi – long
clignotement vert
Déjumelage réussi – lents
clignotements rouges
Mouvement détecté –
clignotement rouge rapide
Déconnexion du signal – long
clignotement rouge
3736
Page 20

6
Besoin d’aide?
Ooma vous offre une foule de ressources si vous avez besoin d’aide.
Articles de soutien et manuels de l’utilisateur. Accédez à notre base de connaissances
complète à support.ooma.com/security
Forum communautaire. Parlez avec d’autres clients d’Ooma et avec notre personnel
de soutien sur le site forums.ooma.com
Service à la clientèle en direct. Parlez à un spécialiste du soutien technique
au 1-888-629-1284.
Pour des i nformation s sur la garantie , la sécurité et a utres infor mations léga les, allez sur: ooma.com/legal
Cet app areil est co nforme à la Par tie 15 des dire ctives de la FCC. Son fonctionnement est soumis aux deux conditions
suivantes : 1) Cet appareil ne doit pas provoquer de brouillage préjudiciable, et 2) cet appareil doit accepter tout brouillage
reçu, y compris le brouillage susceptible d’en compromettre le fonctionnement. P/N: 700-0168-300
38 39
 Loading...