

Page 1
User Manual
Page 2

Contents
1. Welcome to Ooma Smart Cam! . . . . . . . . . . . . . . . . . . .06
How Ooma Smart Cam Works . . . . . . . . . . . . . . . . . . . . . . . . .08
2. Setting up Ooma Smart Cam . . . . . . . . . . . . . . . . . . . . 09
Getting Started . . . . . . . . . . . . . . . . . . . . . . . . . . . . . . . .09
Adding Ooma Smart Cam to an Existing Account . . . . . . . . . . . . . . . . .10
Ooma Smart Cam LED Blink Codes . . . . . . . . . . . . . . . . . . . . . . . 11
Firmware Updates . . . . . . . . . . . . . . . . . . . . . . . . . . . . . . . 12
App Updates . . . . . . . . . . . . . . . . . . . . . . . . . . . . . . . . .12
Finding the Best Location for Your Ooma Smart Cam . . . . . . . . . . . . . .13
Using Your Ooma Smart Cam Unplugged and Offline . . . . . . . . . . . . . .15
Physical Installation of the Smart Cam . . . . . . . . . . . . . . . . . . . . .16
3. Faces (Advanced Facial Recognition) . . . . . . . . . . . . . . . .19
Understanding Facial Recognition on your Camera . . . . . . . . . . . . . . .19
How Faces Works . . . . . . . . . . . . . . . . . . . . . . . . . . . . . . .20
Using Faces . . . . . . . . . . . . . . . . . . . . . . . . . . . . . . . . . .21
02
Page 3

4. Live Streaming and Viewing Recorded Events . . . . . . . . . . . .22
Viewing the Camera’s Feeds & Events Page . . . . . . . . . . . . . . . . . . .22
Viewing the Camera’s Livestream . . . . . . . . . . . . . . . . . . . . . . .22
Panning and Zooming Video . . . . . . . . . . . . . . . . . . . . . . . . . . 23
Livestream Recording . . . . . . . . . . . . . . . . . . . . . . . . . . . . .23
Two-Way Talk . . . . . . . . . . . . . . . . . . . . . . . . . . . . . . . . . 24
Viewing Timeline Recordings . . . . . . . . . . . . . . . . . . . . . . . . .24
Sharing, Managing, and Downloading Recordings . . . . . . . . . . . . . . .25
5. Features, Rules, and Smart Alerts . . . . . . . . . . . . . . . . . . 26
Power and Internet Outages . . . . . . . . . . . . . . . . . . . . . . . . . .26
Privacy Mode / Arm & Disarm Mode . . . . . . . . . . . . . . . . . . . . . .26
Managing Notifications . . . . . . . . . . . . . . . . . . . . . . . . . . . .28
Timeline Filtering . . . . . . . . . . . . . . . . . . . . . . . . . . . . . . .28
Local Network Streaming . . . . . . . . . . . . . . . . . . . . . . . . . . .29
03
Page 4

6. Settings . . . . . . . . . . . . . . . . . . . . . . . . . . . . . 30
Wi-Fi Preferences . . . . . . . . . . . . . . . . . . . . . . . . . . . . . . .30
Notifications . . . . . . . . . . . . . . . . . . . . . . . . . . . . . . . . .30
Enable/Disable Audio . . . . . . . . . . . . . . . . . . . . . . . . . . . . .30
Changing the Camera’s Name . . . . . . . . . . . . . . . . . . . . . . . . .31
Camera Status . . . . . . . . . . . . . . . . . . . . . . . . . . . . . . . . .31
Remaining Battery . . . . . . . . . . . . . . . . . . . . . . . . . . . . . . .31
Firmware Version . . . . . . . . . . . . . . . . . . . . . . . . . . . . . . .32
MAC Address . . . . . . . . . . . . . . . . . . . . . . . . . . . . . . . . .32
7. Personalizing Your Ooma Smart Cam . . . . . . . . . . . . . . . .33
Profile Settings . . . . . . . . . . . . . . . . . . . . . . . . . . . . . . . .33
Sharing Login Credentials . . . . . . . . . . . . . . . . . . . . . . . . . . . 33
8. Managing Your Premium Plan Membership with Ooma Smart Cam . . .34
Upgrading to a Membership Plan . . . . . . . . . . . . . . . . . . . . . . . . 34
Cancelling a Paid Plan . . . . . . . . . . . . . . . . . . . . . . . . . . . . .36
9. FAQs and Troubleshooting . . . . . . . . . . . . . . . . . . . . . 37
10. Technical Specifications . . . . . . . . . . . . . . . . . . . . . . 3
04
Page 5
05
Page 6
1
Welcome to Ooma Smart Cam!
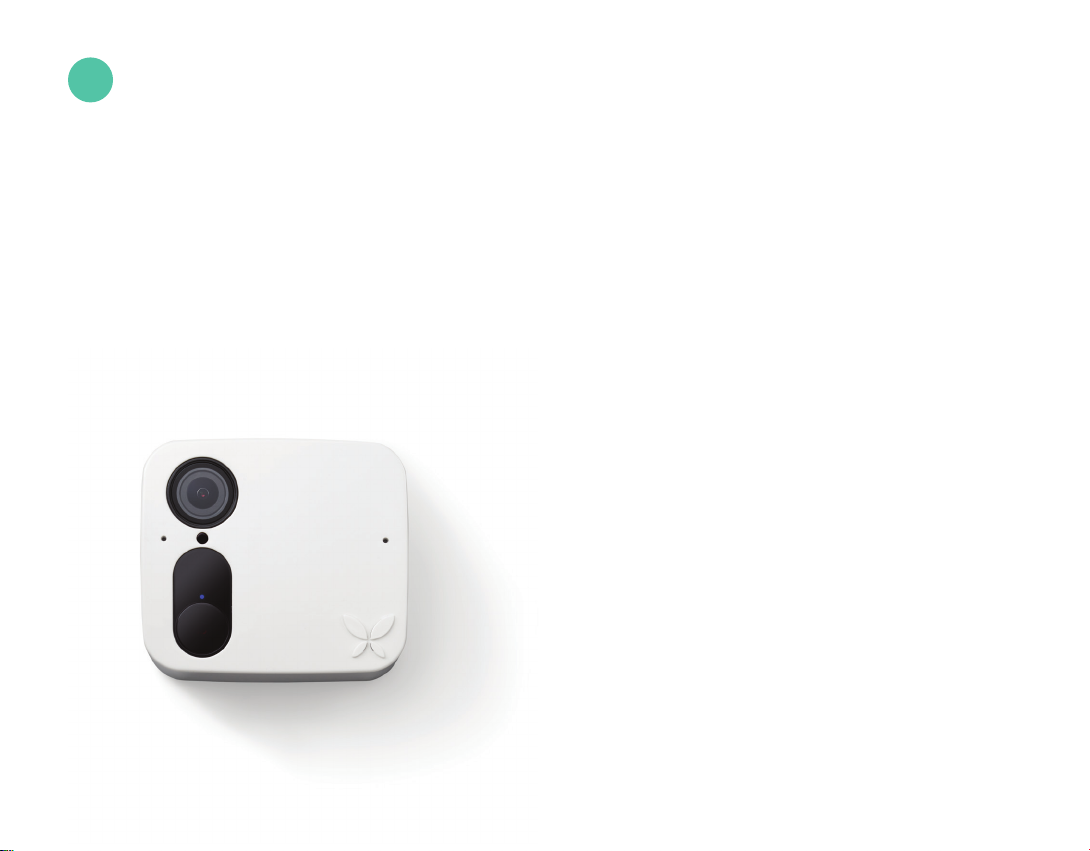
What Ooma Smart Cam Can Do for You
Ooma Smart Cam is a smart indoor/outdoor video security camera that records every event it
sees. Equipped with high-accuracy motion detection sensors and advanced, AI-powered facial
recognition, the camera continues to operate under all conditions, including internet and power
outages. The Ooma Smart Cam camera can be plugged in using the power adapter, or it can
operate using its built-in rechargeable battery. Since it connects to your Wi-Fi network and
does not require a base station, it can be used in any household configuration.
The Ooma Smart Cam boasts many
advanced features, including:
■ FACIAL RECOGNITION – The artificial
intelligence built-into the Ooma Smart Cam and
its cloud storage service lets users train the
camera to recognize faces. Facial recognition can
significantly reduce false positives, common in
other home security cameras, where friends or
family members trigger unnecessary alerts. The
camera also detects unknown faces and saves
them. Users can access a list of unknown faces
and a detailed report of events that have triggered
the camera directly through the app.
06
Page 7

■ FULL HD 1080P VIDEO WITH ADVANCED
NIGHT VISION – The Ooma Smart Cam has a
full HD resolution of 1080p with a high refresh
rate. The Smart Cam has night vision capability
that yields crystal-clear recordings regardless
of lighting conditions.
■ ONBOARD BATTERY AND STORAGE – The
Ooma Smart Cam contains onboard memory
storage and an internal battery that will keep the
camera running for six months under typical usage
conditions. If your Wifi goes down, the camera
will still record all the motion events and when the
camera is reconnected to Wi-Fi, all recorded clips
are automatically uploaded so users can see what
happened even during a power or internet outage.
The camera can also be used in locations where
power and internet aren’t available.
■ INSTANT VIDEO CAPTURE – The Ooma Smart
Cam instant capture activates almost instantly
when an event is triggered. Whenever a motion
event is detected, the camera records a clip that
can be viewed on a mobile device through the
Ooma Smart Cam app.
■ OUTDOOR CAPABILITIES – The Smart Cam is
an IP 65-rated, waterproof, all-weather camera,
which makes it perfect for outdoor use and has a
field of view of 130 degree.
■ AUTO PRIVACY MODE – Geofencing tracks
the location of a user’s mobile phone. It can
automatically turn the Smart Cam off when the
user is home and turn the camera back on when
the user departs.
■ TWOWAY TALK – The Ooma Smart Cam
contains both a microphone and a speaker. While
the camera is livestreaming, users can use the
Ooma Smart Cam app on their phones to talk to
people within the camera’s range.
07
Page 8
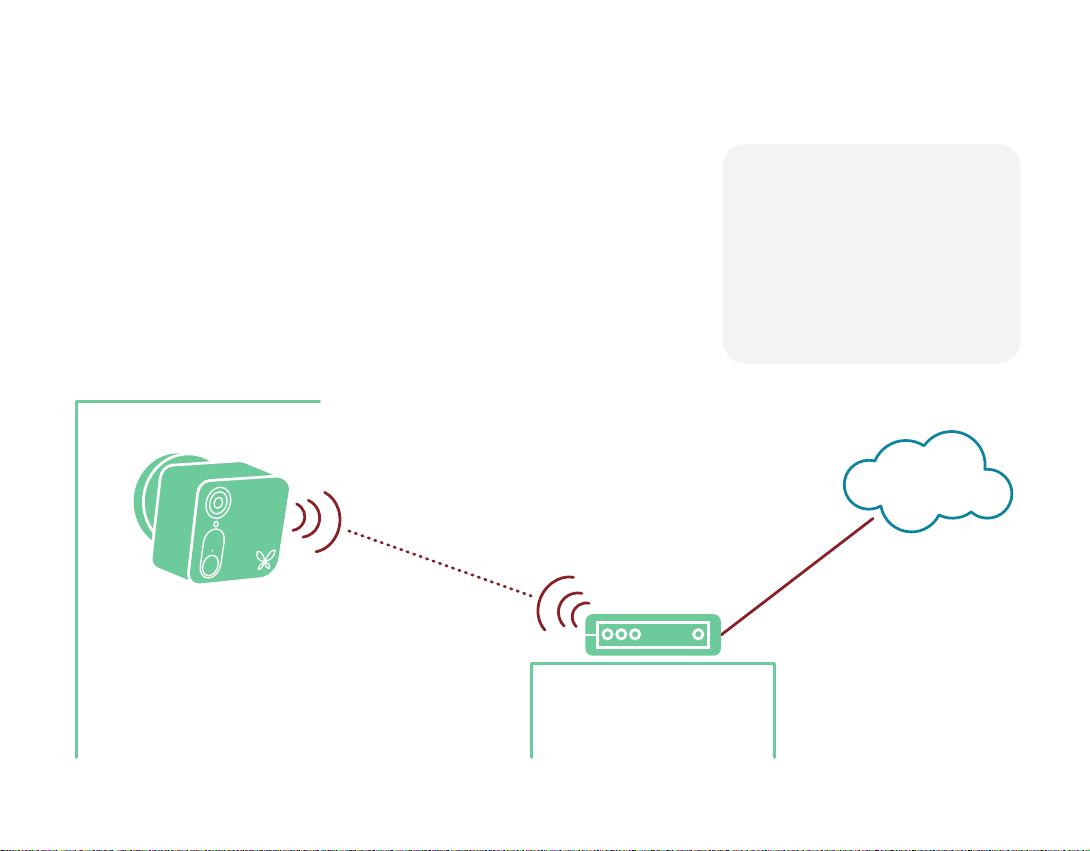
How Ooma Smart Cam Works
When your Ooma Smart Cam detects motion, sound, or that the camera
has been moved, it communicates via Wi-Fi to stream video to your
Ooma Smart Cam cloud account. Your iOS or Android device will alert
you through the Smart Cam app when a new video clip is uploaded so
you will be aware of every unexpected movement that occurs.
Getting Help
Ooma Smart Cam customer
support is available by phone
at 888-711-6662 or by Email
at info@butterfleye.com
08
Page 9
2
Setting up Ooma Smart Cam
Getting Started
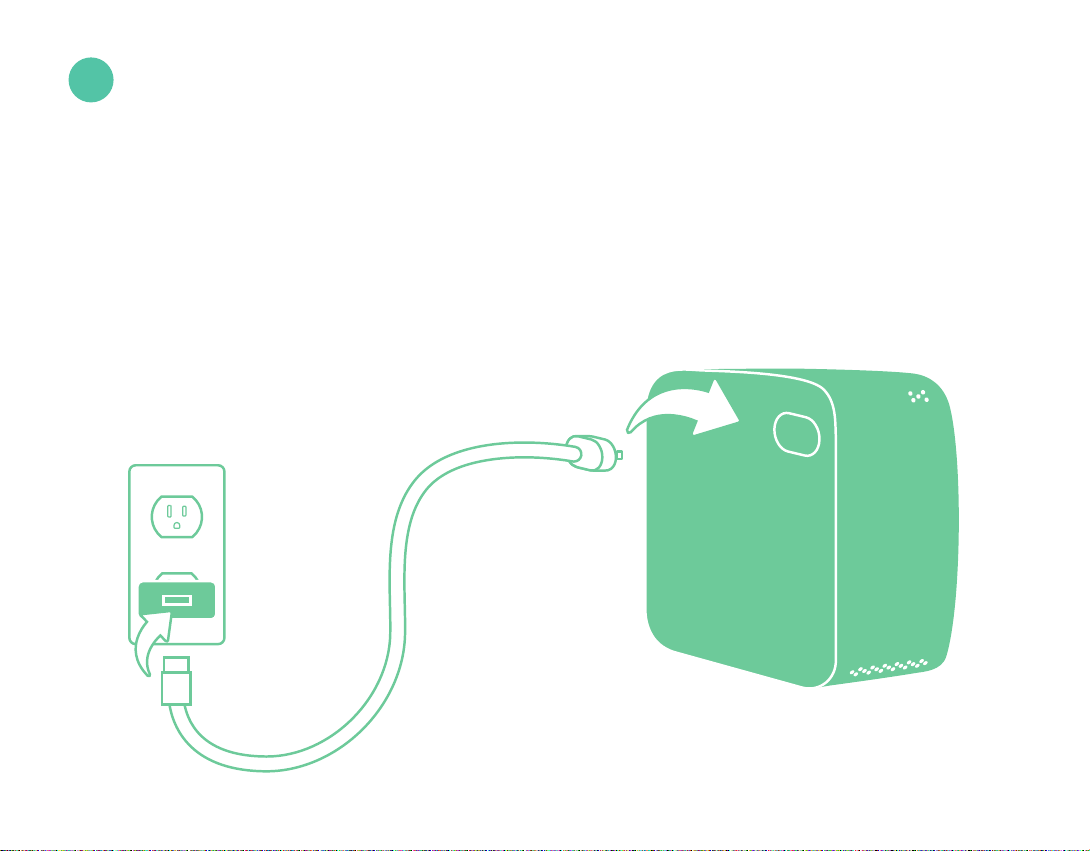
Ooma Smart Cam has a permanently-installed battery. When you unbox the device,
please use the included AC adapter and micro USB cable to plug the camera in and
charge the camera for least 4-5 hours. If the battery is fully drained, charging the
camera takes about four hours.
09
Page 10

Once the camera is fully charged, follow these steps to
complete your setup:
1. Download the Ooma Smart Cam app from the App Store (iOS) or from Google Play
(Android) and install it on your mobile device.
2. Open the app and either create an Ooma Smart Cam account or sign into an existing
account. Make sure your phone’s Wi-Fi and Bluetooth are turned on.
3. Hold down the power button on top of the camera to turn it on. The status LED in front of the
camera will blink green three times. When the LED lights up a solid blue, the camera is ready
to sync with your account. Tap the ‘Start Pairing’ option in the app. The application will
automatically detect your camera and will guide you through connecting it to the internet.
4. If you have another camera to sync, tap the “Add a Camera” option from the Menu Icon on
top left of Feed and Events page and follow the on-screen prompts.
Adding Ooma Smart Cam to an Existing Account
You can add up to six Ooma Smart Cam cameras to your Smart Cam account. To
add additional cameras, navigate to the “Add a Camera” page inside the Ooma
Smart Cam app and follow steps 3 and 4 from the section above.
10
Page 11

Ooma Smart Cam
LED Blink Codes
Blue blink – Video is recording
Blue stays for 5 seconds – Find & Identify button
is being pressed in the app
Blue stays for 5 minutes – Camera is ready to
be paired
Green 3x blink – Camera is turning on.
Amber continuous blink – Internet is unavailable
(Butterfleye Only)
Red 3x blink – Camera is turning off
Red continuous blink – Battery is at or below 20%
(Butterfleye Only)
Red solid – There is an error
Amber 3x blink – Camera is plugged into
the charger
Purple continuous blink – Camera upgrade
in progress
11
Page 12

Firmware Updates
Ooma is continuously working to enhance the Ooma Smart Cam to add new
software features and improve efficiency. When an update becomes available, a
circle with a 1 inside will appear on the gear icon in the Ooma Smart Cam app. Tap
the gear icon and scroll to the bottom of the camera details page. Tap “Update
Camera Software” to begin the firmware update.
App Updates
The Smart Cam Security Camera app will update itself whenever a new version
is released, provided that your phone is configured to accept automatic updates.
Updates may contain new features and major security updates.
12
Page 13
Finding the Best Location for
Your Ooma Smart Cam
The Ooma Smart Cam camera is rated for both indoor
and outdoor use. For best results, the camera should
be installed within range of your Wi-Fi network.
You should set up your camera in a location with a
clear, unobstructed field of view of the area you want
to monitor. The field of view is the area within which
the camera can detect motion. Your Ooma Smart Cam
camera has a 130° viewing angle.
13
Page 14

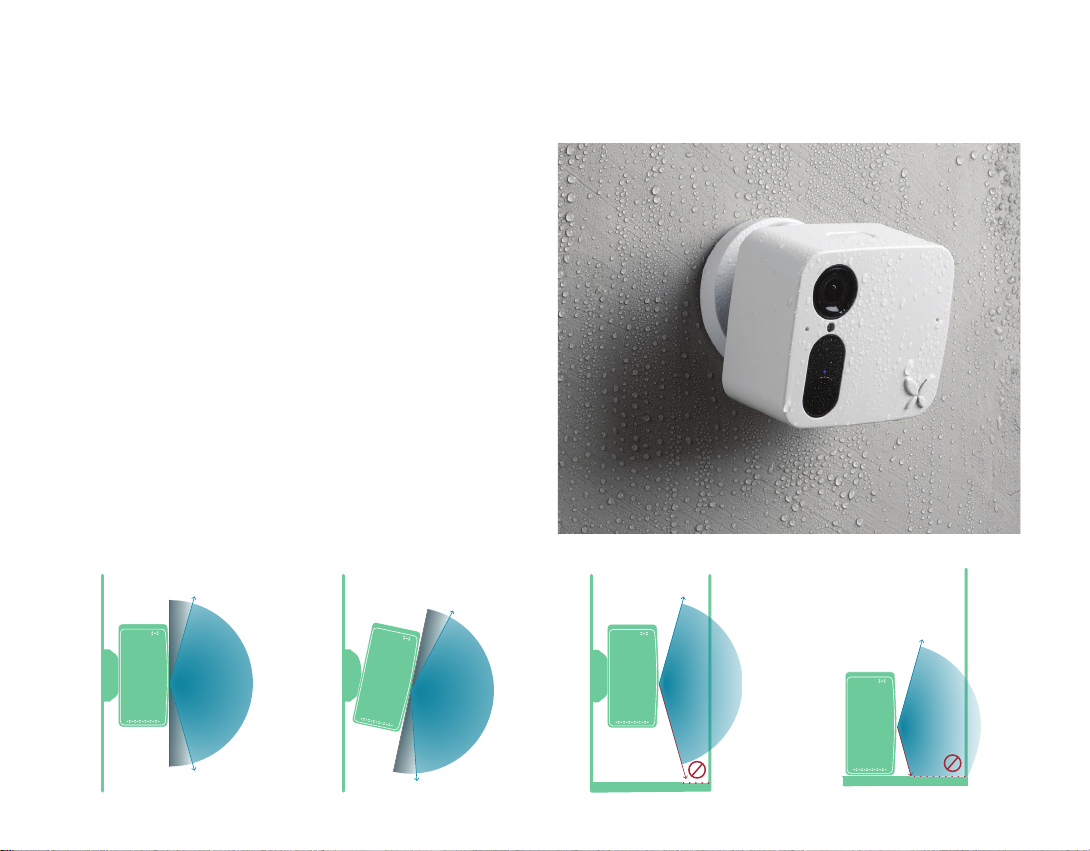
Do not block the camera’s field of view. Make sure that no walls, tables, or objects are
too close to the camera. If an object is within 2.5 inches of the sides or front of your
camera, it can reflect light back into the camera lens and cause glare or hazy video.
The Smart Cam has advanced motion detection capabilities and night vision that
are powerful enough to allow the camera to detect events and faces, even at night.
For optimal facial recognition results, place the camera at eye level.
14
Page 15
Using Your Ooma Smart Cam Unplugged and Oine
The Ooma Smart Cam camera has a built-in battery and onboard storage that
allows the camera to record even when it is disconnected from AC power and Wi-Fi.
This makes the camera usable in locations without electrical outlets. With average
use, a fully-charged camera will operate unplugged for multiple months. The
camera only needs to be plugged in for about four hours to fully recharge.
Ooma Smart Cam can also operate without a Wi-Fi connection. Video clips are
stored in the camera’s onboard memory and are uploaded to the user’s account
when the camera is reconnected to Wi-Fi. The front led will blink amber when the
camera is operating without a Wi-Fi connection. This is normal.
15
Page 16
Physical Installation of the Smart Cam
Wall Mount Installation:
(Indoor/Outdoor)
Please visit the “Contact Support” section on your
App or Support Website (https://support.ooma.com/
camera/) to access our complete video tutorials.
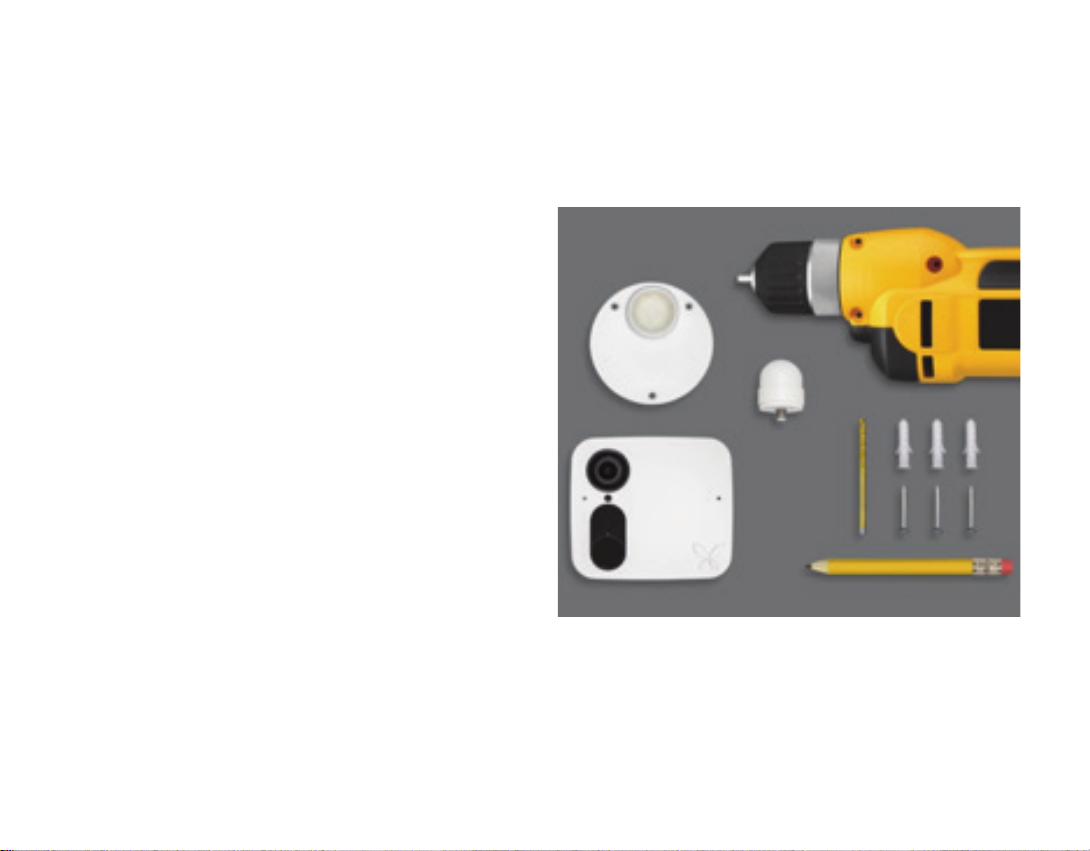
What equipment do you need to install
the Smart Cam?
■ Ooma Smart Cam
■ Wall mount and magnetic bolt
■ Screws with anchors
■ Drill with 0.8 mm drill head
■ Screwdriver
■ Pencil
16
Page 17
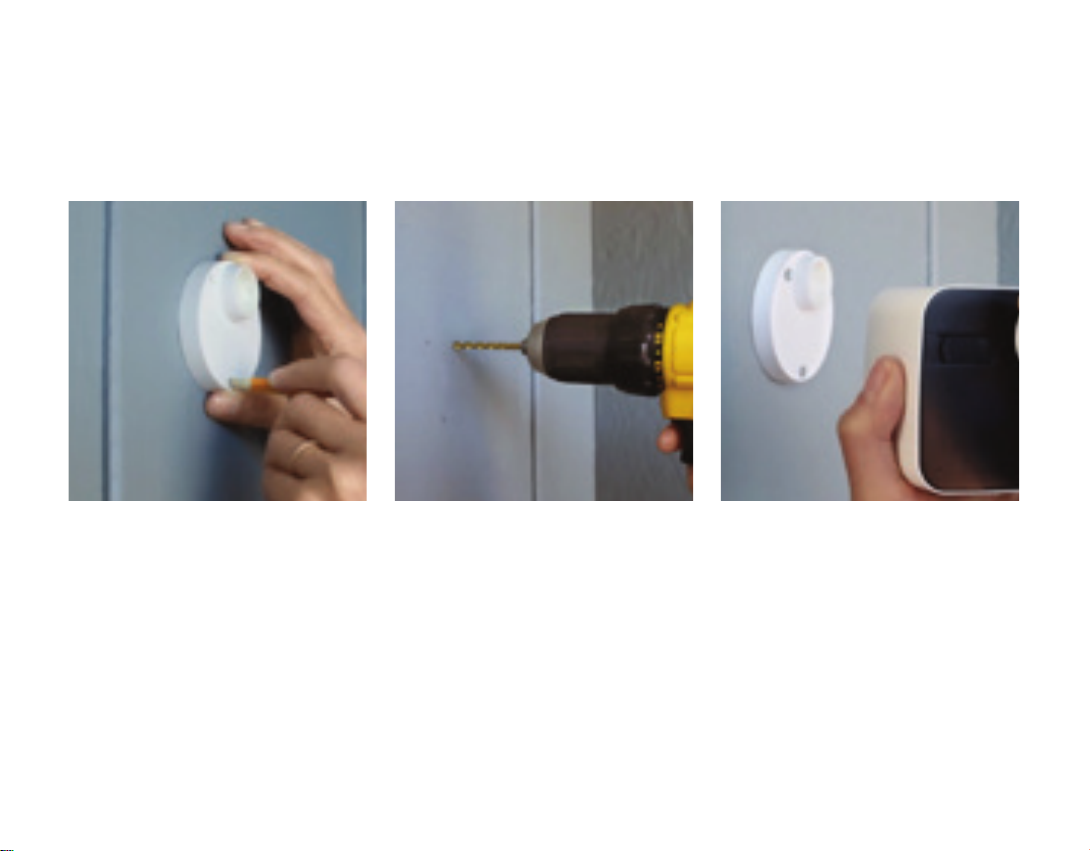
Follow the instructions below to install your camera:
Find a clean spot where you would
like to connect the wall mount. Use a
pencil to mark three dots through
the screw slots.
Drill the three dots and insert the
provided anchors into the holes. Put
the wall mount against the wall and
use a screwdriver to insert the screws.
Make sure the protruding side faces
towards the camera attachment.
Put the washer on the magnetic bolt
and attach the bolt to the camera.
Attach the camera to the mount’s
magnetic clip. Rotate the camera until
it is aligned in the direction you wish
to monitor.
17
Page 18
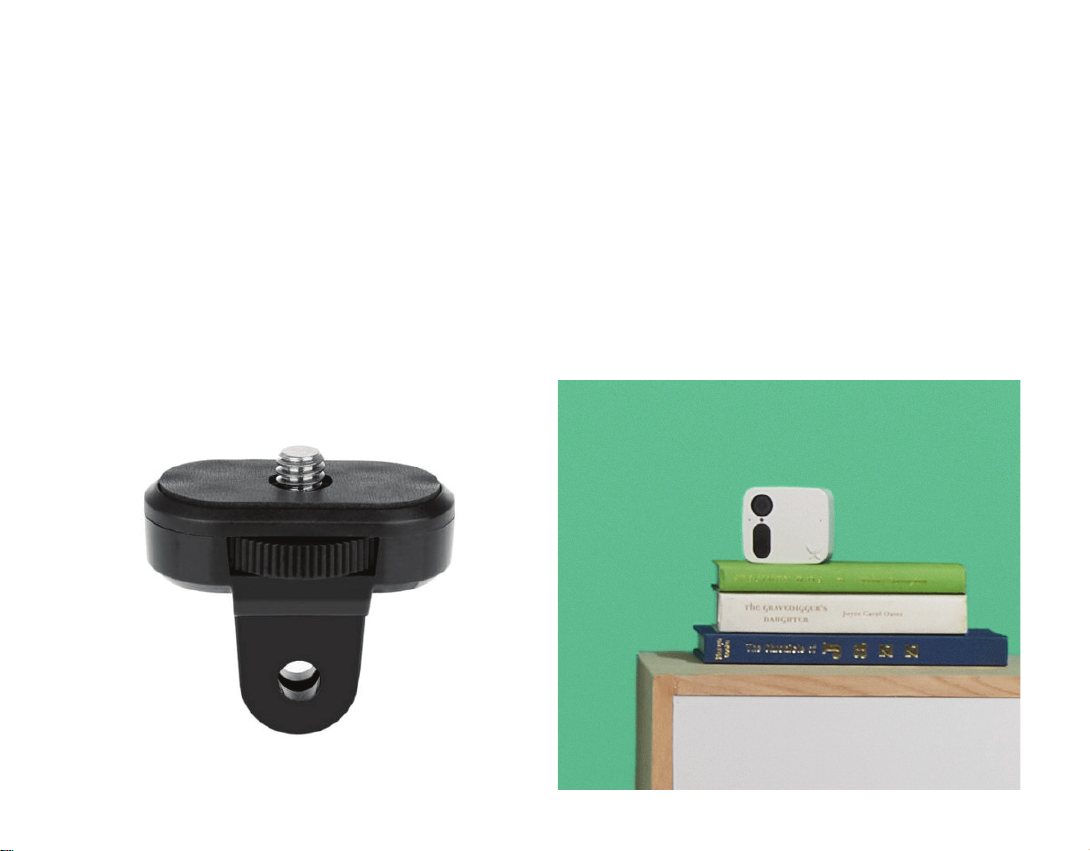
Third Party Mount Installation:
The Smart Cam comes with universal threads on the back
of its casing, which allows the camera to be connected to
third-party mounts, making it perfect for use as security
protection anywhere. Make sure you have the universal
thread to your thirdparty mount otherwise it can damage
the camera thread.
Installing the Smart Cam Indoors:
Ooma Smart Cam is perfect for indoor surveillance in almost
any situation. If you don’t wish to put holes in the wall, you
can install the camera on any flat, horizontal surface like a
desk, shelf, or even a crib. If you are comfortable permanently
affixing the camera to the wall, the magnetic mount can
be installed wall by following the instructions for a Wall
Mount Installation.
18
Page 19

3
Faces (Advanced Facial Recognition)
Understanding Facial Recognition on your Camera
The Faces feature allows Ooma Smart Cam users to identify the person appearing
on camera, making the notifications you receive accurate and detailed.
Ooma Smart Cam leverages proprietary facial recognition that uses machine
learning and artificial intelligence to learn to recognize individual faces. Once a face
has been recognized, it can be named, or tagged, inside the Ooma Smart Cam app.
Recognition of faces improves as you train the camera over the course of afew weeks.
For best results, the camera should be mounted outside or if kept indoors at or little
above the eye level where it will see faces from the front rather than from the side.
19
Page 20
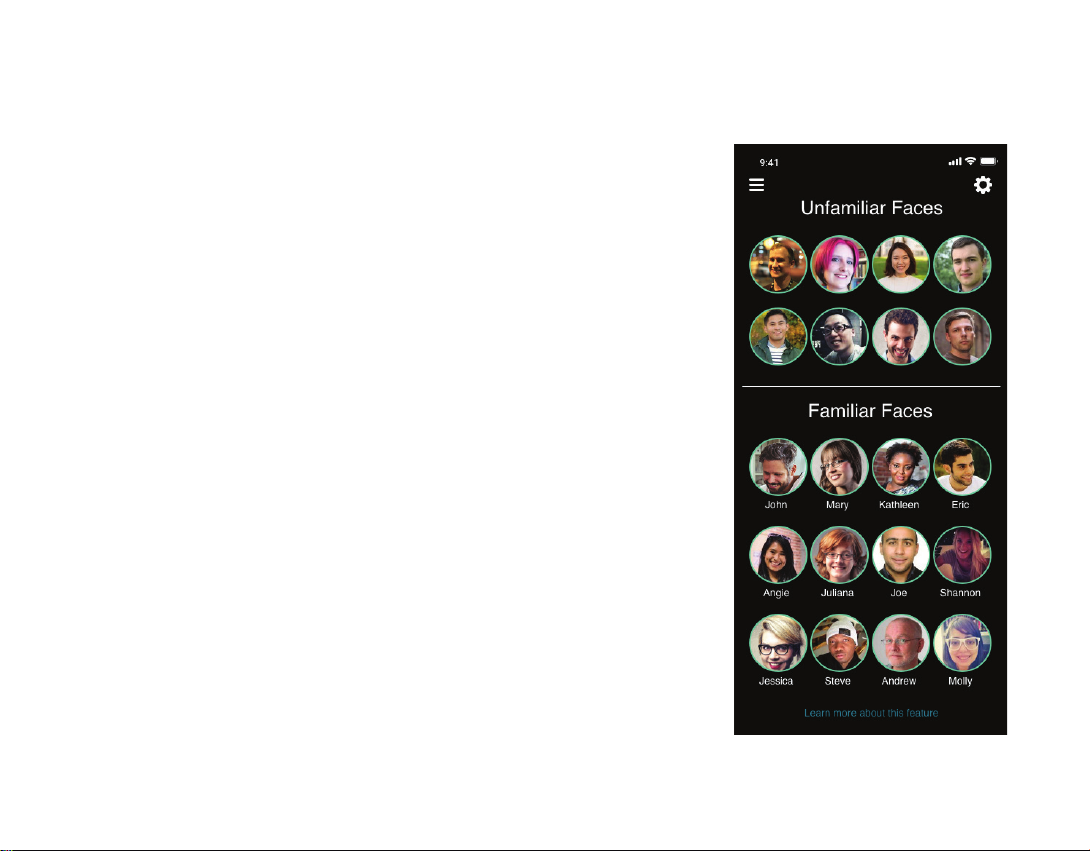
How Faces Works
You can train the camera to recognize new faces, add images to existing
faces for better recognition, or delete faces you do not want the camera
to remember.
1. Open the Ooma Smart Cam app on your mobile device.
2. Tap the Faces option in the Menu bar to navigate to the Feeds & Events page in
the app.
3. Tap any of the faces in the Unfamiliar Faces section to identify them. You have
three options:
• If this is the first time you are identifying the person, enter their name in the
pop-up window that appears when you tap their face.
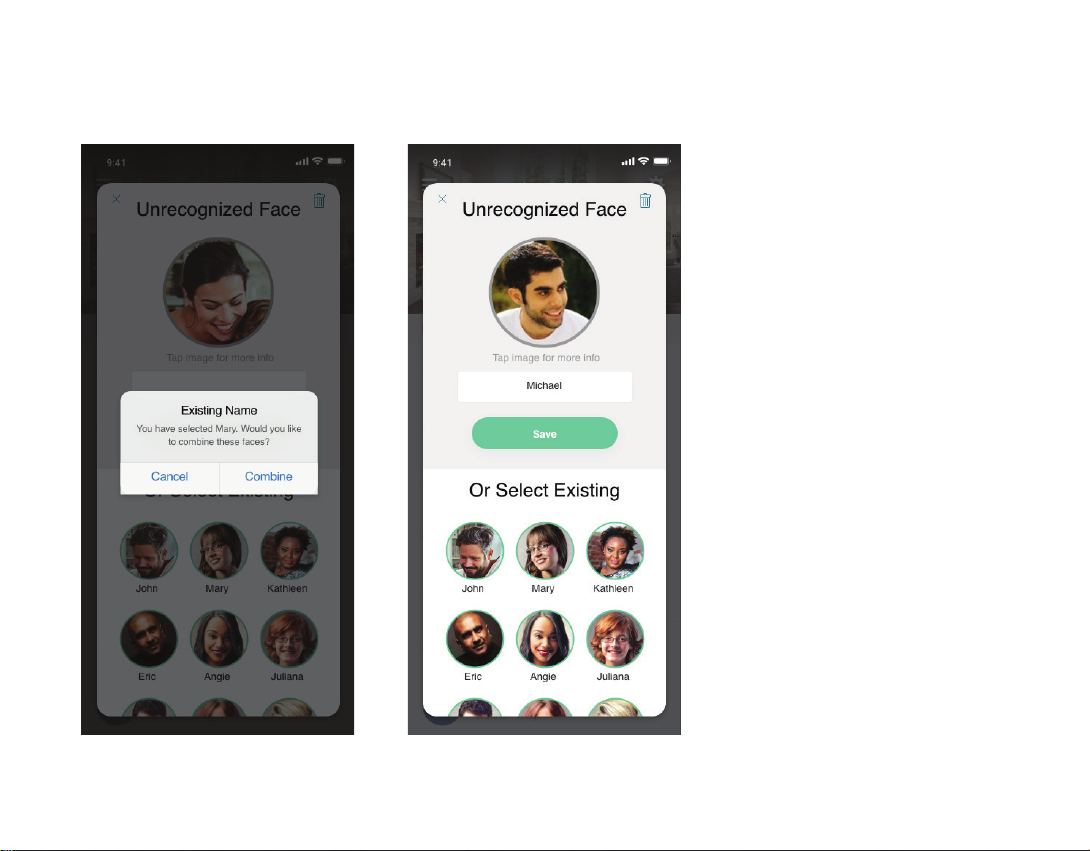
• If this is a person you have previously identified, select an existing face from
the list in the pop-up window and then tap “Combine.” This will help improve
the recognition accuracy when the person is next seen by the camera.
• If this is a person you don’t want identified in future, click the trash icon in
the upper-right corner of the pop-up window.
The camera may occasionally incorrectly associate an image of an
unknown person with a known face. To correct this, navigate to the Faces
page and tap on the known face. Tap the picture of the face in the center
circle in the pop-up window that appears. This will open a gallery of all
recent images associated with that face. Train your camera by combining
incorrect messages together so that it improves everytime.
Scroll through the gallery and use the trash icon at the bottom of the
screen to delete any incorrect images
20
The Faces page
Page 21
Using Faces
You can choose to receive
notifications only when the camera
sees unknown faces, when it sees
only known faces, or for all faces:
1. Open the Ooma Smart Cam app
on your mobile device.
2. Navigate to the Feeds &
Events page.
3. Tap the gear icon in the upper-right
corner of the screen, then tap the
Notifications line.
4. Toggle the “Known Person was
detected” and the “Unknown
Person was detected” switches
on or off.
The Combine option The Gallery pages
21
Page 22
4
Live Streaming and Viewing Recorded Events
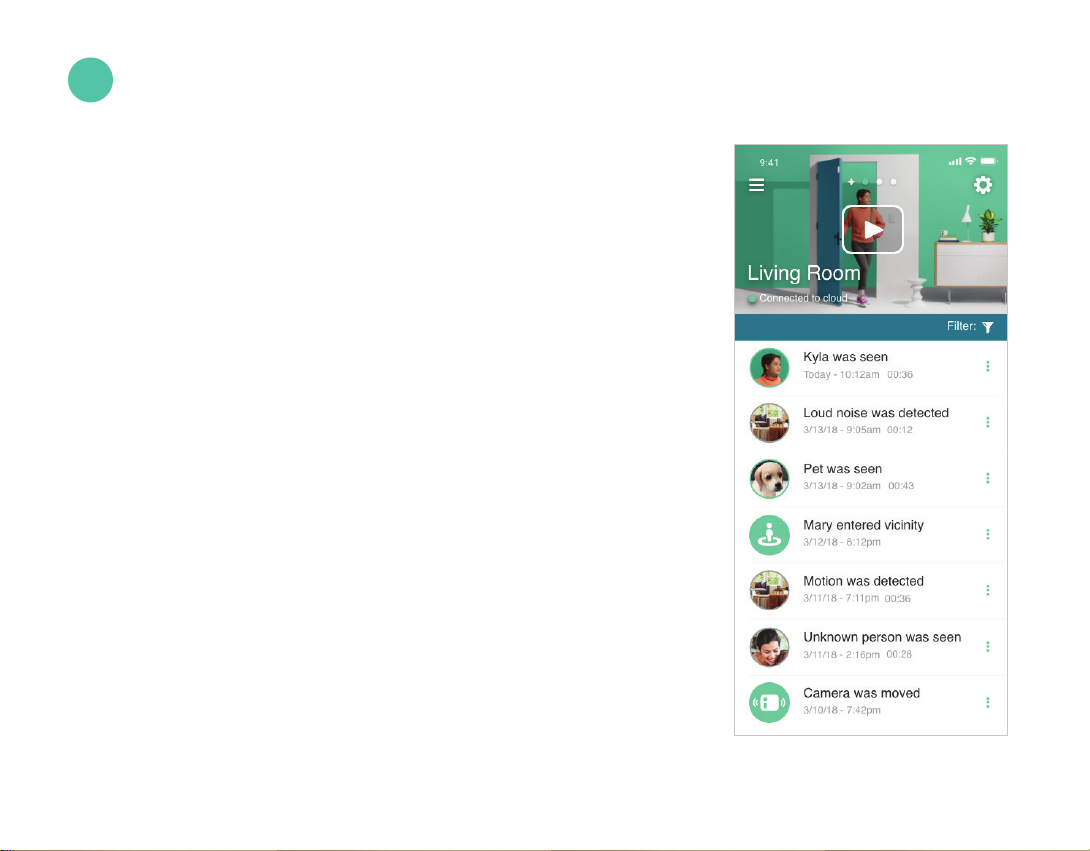
Viewing the Camera’s Feeds & Events Page
Video clips that are recorded by your Ooma Smart Cam, also known as
events, are stored in the event timeline. You can swipe right or left to view
each of the cameras connected to your account. This page allows you to
view your recordings as well as to download, share, and delete events.
Viewing the Camera’s Livestream
You can view a livestream of the camera’s video feed at any time.
1. Open the Ooma Smart Cam app on your mobile device.
2. Navigate to the Feeds & Events page.
3. Click the play button on the top video player.
4. Swipe left or right to end the livestream.
22
The Feeds & Events page
Page 23

Panning and Zooming Video
You can pan and zoom to see the details of any live or recorded video. Just pinch
and drag on the desired location.
1. Open the Ooma Smart Cam app on your mobile device.
2. Start the livestream or select an event from your timeline, then:
• To zoom in and out of the video, pinch the screen.
• To move around in the player, touch and drag to the desired location without removing
your fingers after pinching the screen.
Livestream Recording
Whenever livestream viewing is initiated, the video is recorded and uploaded to
the cloud as an event. This enables real-time viewing along with later playback
from the timeline.
23
Page 24
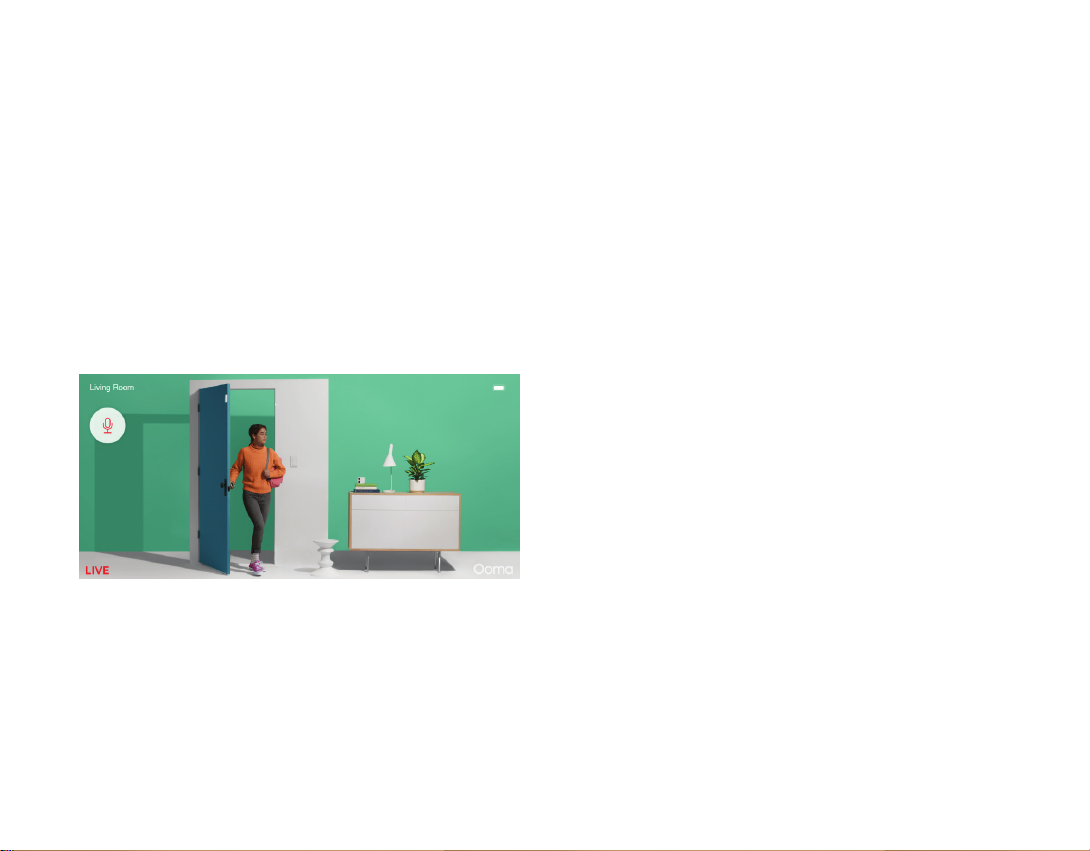
Two-Way Talk
Viewing Timeline Recordings
Two-Way Talk enables you to communicate remotely
with people who appear on your camera’s feed.
1. Open the Ooma Smart Cam app on your mobile device.
2. Start the livestream to display the camera’s video feed
and play audio (if enabled). Be sure that the mobile
device is in landscape mode.
3. Tap the microphone icon in the upper-left corner and wait
for it to turn red, indicating that two-way audio is enabled.
4. Press and hold the microphone icon to speak. You will
not hear audio while the microphone button is pressed.
Expect a delay of several seconds between the time you
speak and the time your voice comes out of the speaker
on the camera.
All recordings are posted on the Ooma Smart Cam
timeline. The timeline can be used to manage events:
re-watching events, downloading events as MP4 files,
sharing events, and deleting events.
If you receive a notification of a new event but do not
see that event on your timeline, please close and
reopen the Ooma Smart Cam app.
24
Page 25

Sharing, Managing,
and Downloading
Recordings
You can share, manage, and
download recordings from Ooma
Smart Cam’s timeline.
1. Open the Ooma Smart Cam app on
your mobile device.
2. Navigate to the Events Timeline,
then select the event you wish to
manage by tapping the three green
dots on the right side of the event.
3. Tap on Delete This Event to delete
the event, or on Share or Save Full
Event to download the event to your
mobile device as a video.
4. If you have chosen to download
the video, a notification will appear
when the download is complete
so you can save the event on your
mobile device or share it.
Three green dots
Share or Save Full Event
25
Page 26

5
Features, Rules, and Smart Alerts
Power and Internet Outages
Ooma Smart Cam has an internal battery that lasts six months under
typical usage conditions. When the internet or power goes out, Ooma
Smart Cam continues to operate normally. All data is uploaded to the
cloud once a Wi-Fi connection is re-established.
Privacy Mode / Arm & Disarm Mode
The Privacy Mode feature allows you to put the camera to sleep when
you want to stop recording or when you don’t want to be disturbed
by notifications.
Auto Privacy Mode/Auto Arm & Disarm Mode
(Geofencing)
Ooma Smart Cam supports geofencing to automatically arm and disarm
cameras based on the location of the user’s mobile device. If you have
Privacy Mode enabled and travel 50 meters (about 165 feet) away from
your camera while carrying your mobile device, Privacy Mode will turn
off so that your camera will capture anything that happens while you are
away. When you return to the camera’s home zone, Privacy Mode
will be reenabled.
26
Auto Privacy Mode switch
Page 27

Auto Privacy Mode
Set up:
1. Open the Ooma Smart Cam
mobile app.
2. Navigate to the Feeds & Events
page and click the gear icon in
the upper-right.
3. Toggle the Auto Privacy Mode
switch to the on position.
4. Follow the instructions to either
enter the street address for the
camera’s location or to accept
the GPS location shown on your
mobile device.
5. Accept the address shown in the
pop-up confirmation window which
is your current camera location or
edit the address manually
6. Tap on edit if you wish to select a
specific radius. You have the option
to choose Small Medium or Large.
Default will be medium as we think
this is the optimum range one
should have.
7. Tap on Update once you choose
the radius.
27
Page 28

If you have multiple Ooma Smart Cam cameras synced to your account,
you must enable Auto Privacy Mode for each one.
Managing Notifications
Ooma Smart Cam allows users to determine which notifications they wish
to receive and which they would prefer to mute. Notification options can
be automatically updated depending on the time of day.
1. Open the Ooma Smart Cam mobile app.
2. Navigate to the Feeds & Events page and click the gear icon in the upper-right
3. Navigate to the Details page and tap the word “Custom” on the Notifications line.
4. Use the toggle switches to select the notifications you wish to receive.
5. Toggle the switch at the bottom of the page to create a Notification Schedule,
which will turn off notifications at set times of day such as when you’re home
at night.
Notification work great with you wish to be notified about certain motion
event as an when needed. For camera movement and loud noise detection
notifications, please make sure to have your camera plugged in.
Timeline Filtering
Timeline filtering allows users to quickly sort through all timeline events to
find specific recordings.
28
Details page
Page 29

To filter your timeline:
1. Open the Ooma Smart Cam mobile app.
2. Navigate to the Feeds & Events page.
3. Tap the filter icons on the “Filter by:” line. These are all selected by default.
4. On the Filter Timeline Events page, de-select the items of your choice to create
a filter. You can filter your results to a specific date range by using the “Show
Videos On:” filter at the bottom of the page.
Local Network Streaming
Local Network Streaming allows users to bypass an external internet
connection to create instant livestreams if their mobile device is
connected to the same Wi-Fi router as the Ooma Smart Cam.
To turn on Local Network Streaming:
1. Ensure that the Ooma Smart Cam and the mobile device are connected to
same Wi-Fi router.
2. Open the Ooma Smart Cam app.
3. Navigate to the Feeds & Events page and click on the gear icon in
the upper-right.
4. Turn on Local Network Streaming.
Notifications page
29
Page 30

6
Settings
Wi-Fi Preferences
Your mobile device must be within Bluetooth range of the Ooma Smart Cam camera
to change the camera’s Wi-Fi network. To switch the camera’s Wi-Fi settings,
launch the Ooma Smart Cam app on your mobile device and tap the gear icon of the
camera whose Wi-Fi connection you wish to update. From the Details page, select
“Change Settings” and then select the new network you wish to connect to. You
may need to enter the network’s credentials.
Notifications
To switch your notification settings, launch the Ooma Smart Cam app on your
mobile device and tap the gear icon of the camera whose notifications you wish to
update. From this page, you can customize the notifications you wish to receive.
You can also schedule times when you would prefer not to receive notifications.
Enable/Disable Audio
To change audio settings, launch the Ooma Smart Cam app and tap the gear icon of
the camera whose settings you wish to update. Toggle the “Audio Enabled” switch
on or off.
30
Page 31

Changing the Camera’s Name
To change your camera’s name, launch the Ooma Smart Cam app on your mobile
device and tap the gear icon of the camera whose name you wish to change. Tap on
the camera’s current name on the “Camera Name” line. A popup window will appear
to ask for the camera’s new name.
Camera Status
To view a camera’s status, launch the Ooma Smart Cam app on your mobile device
and tap the gear icon of the camera whose status you wish to see. The status will
either be “Connected to cloud” or “Offline”. Please refer to our trouble shooting
guide on the Support website if any problems occur.
Remaining Battery
To view a camera’s remaining battery charge, launch the Ooma Smart Cam app on
your mobile device and tap the gear icon of the camera whose battery you wish to
check. The remaining battery capacity is listed on the camera’s Details page.
31
Page 32

Firmware Version
To view the camera’s firmware version, launch the Ooma Smart Cam app on your
mobile device and tap the gear icon of the camera whose firmware you wish to
check. The firmware version is listed on the camera’s Details page.
MAC Address
To view your camera’s MAC address, launch the Ooma Smart Cam app and tap the
gear icon of the camera whose MAC address you wish to view. The MAC address
can be found at the bottom of the camera’s Details page.
32
Page 33

7
Personalizing Your Ooma Smart Cam
Profile Settings
To customize your profile settings, launch the Ooma Smart Cam app on your mobile
device. Tap the Menu icon in the upper left, then select Profile. You can use this
page to:
■ Change your username
■ Update the email address of your Ooma Smart Cam account
■ Update your password
■ See what version of the app you are using
■ See which Premium plan you have subscribed to
■ Sign out of your account
Sharing Login Credentials
For privacy purposes, we do not encourage sharing your account’s login
credentials. We recommend that only one mobile device be used to log into
an account.
Only one user can be logged into an account at a time. If a second user logs in,
the first user is automatically logged out of the account.
33
Page 34

Managing Your Premium Plan
8
Membership with Ooma Smart Cam
Upgrading to a Membership Plan
Ooma Smart Cam can be used without a monthly subscription plan, although
Ooma offers two membership plans that unlock powerful features and increase the
duration of cloud storage. All plans allow users to connect up to six cameras to a
single account at no additional cost.
Details of current Ooma Smart Cam plans:
Monitor Premium Business
$4.99/mo
Price per customer
FREE
(1 cam era)
$9. 99/mo
(2 - 6 camer as)
$29.99/mo
34
Cloud storage
Instant video capture
Livestreaming
Video history
Works during power and internet outages
Instant alerts (motion, sound, anti-tamper)
Onboard storage
Instant streaming
7 Days 30 days 90 Days
• • •
• • •
• • •
• • •
• • •
• • •
• • •
Page 35

Monitor Premium Business
Privacy arm/disarm
Unlimited video download & share
Audio enabled/disabled
Abilit y to save multiple Wi-Fi credent ials
Camera sotware upg rade over the air
Programmable notifications
Filter and sort timeline events
Bank-level AES-256 encryption
Facial recognition
Remote 911 (comi ng soon, Telo customers only)
Automatic arm/disarm
Two-way audio
Do-Not-Di sturb Mode
Connect Upto 6 cameras
Multi-site automatic arm/disarm (coming soon)
• • •
• • •
• • •
• • •
• • •
• • •
• • •
• • •
• •
• •
• •
• •
• •
• •
•
Business analytics (coming soon)
35
Page 36

Cancelling a Paid Plan
You can use the Ooma Smart Cam mobile app to manage your payment method
and cancellations.
For iPhone:
1. Open your device’s Settings app
2. Scroll down and tap iTunes Store & App Store
3. Tap your email and Apple ID
4. Tap View Apple ID and enter your password
5. Tap Subscriptions, then select Ooma Smart Cam
For Android:
1. Launch the Google Play Store app
2. Tap Menu, then My Apps, then Subscriptions, then tap on the Ooma Smart Cam app
3. Tap “Cancel” and then “Yes” to confirm the cancellation
4. The status of the subscription should change from Subscribed to Cancelled.
36
Page 37

9
FAQs and Troubleshooting
1. What is the minimum internet speed required for Ooma Smart Cam? Ooma Smart Cam requires a minimum upload
speed of 2 Mbps per camera. For example, you will need a minimum of 6 Mbps of upload speed on your wireless network to
support three cameras in your home.
2. How can I recharge my Ooma Smart Cam? Your camera has an internal battery. Please use the provided power adapter
and the micro USB cable to charge your camera. Once fully charged, which takes up to four hours, the camera will operate
for six months at an average recording time of fiveminutes per day.
3. Does Ooma Smart Cam work with both the 2.4 GHz and the 5 GHz frequency bands on Wi-Fi routers? Ooma Smart Cam
only works with the 2.4 GHz frequency band.
4. What might make the Ooma Smart Cam’s batter drain faster? Ooma Smart Cam’s battery will drain faster if the camera
is in a completely dark location that requires heavy use of the infrared monitor. The battery will also drain faster on Wi-Fi
networks with many connected devices.
5. Does Ooma Smart Cam work outdoors? Yes, the camera is IP65 Weather Resistant and is specially designed for outdoor
usage. The camera should not, however, be submerged in water. This can damage the camera.
6. Does Ooma Smart Cam work without an internet connection? Yes. Ooma Smart Cam needs a Wi-Fi connection for live
view and video upload. When the internet connection is interrupted, Ooma Smart Cam can use its built-in storage to record
events that will be uploaded when a connection becomes available. Ooma Smart Cam can also connect directly to a mobile
device through a local Wi-Fi network without needing an internet connection.
7. Does the Ooma Smart Cam record audio? Yes. You can also use the Ooma Smart Cam app to talk to people who are near
your camera.
8. How do I access my videos? Ooma Smart Cam automatically uploads videos to the cloud. Videos are accessed through
the Ooma Smart Cam app.
9. How can I update my camera? The Ooma engineering team frequently releases free software updates for the Ooma Smart
Cam. These updates will be available through your app under the Details tab. If the camera software update button is
greyed out, then you are running the latest version of the software. If you have notifications enabled, you’ll also receive a
notification through the app when new software is released.
For more FAQs and troubleshooting data, please visit https://support.ooma.com/camera
37
Page 38

10
Technical Specifications
Camera
■ 1/3" 3.5 MP full color CMOS sensor
■ Full HD 1080p, 30 FPS
■ 130-degree field of view
■ 1080p full HD video with 8x digital zoom
■ H.264 encoding
■ Auto-adaptive white and black balance
+ exposure
■ Noise reduction – low-light high sensitivity
■ Focus range – fixed focus (2 ft - infinity)
■ Night vision for clear display in pitch dark
Wireless & Audio
■ 802.11 b/g/n 2.4 Ghz
■ WEP, WPA, and WPA2 support
■ Bluetooth Low Energy (BT 4.2)
■ Half duplex two-way audio with speaker
and microphone
■ Noise Cancellation
Power & Capacity
■ USB: Input – Micro USB 5 V DC, 2 A
■ AC Adaptor: Input – 110-240 VAC, 50-60 Hz
■ AC Adaptor: Output – 5 V DC, 2 A
■ 6000 mAH built-in Lithium-Ion
rechargeable battery
■ Battery level indicator
■ 16 GB built-in storage
38
Page 39

Sensors & Detection
■ Passive infrared detector
■ Ambient light detector
■ Accelerometer
■ Instant push notifications
Dimensions & Certifications
■ Weight: 17.06oz (500g)
■ Length: 83.01mm
■ Width: 40.91mm
■ Height: 73mm
■ Operating temperature : -20C to 45C
■ IP 65
■ UL, FCC, and IC and CE certified
39
Page 40

Have a Question or Need Assistance?
Ooma has a wealth of available resources if you need assistance.
Support articles. Access our comprehensive knowledge base at support.ooma.com
User manuals. Access this guide and all other product manuals at ooma.com/userguide
Forums. Talk with your fellow Ooma customers and our support staff at forums.ooma.com
Live support. Still having trouble? Chat with a service representative at any time at support.ooma.com
Speak with a support specialist M–F, 5am–5pm PST, or Sat/Sun 8am–5pm PST at 1-888-711-6662
525 Almanor Avenue, Suite 200
Sunnyvale, CA 94085
Learn more at info@butterfleye.com
or call 1-888-711-6662
© 2019 Oo ma, Inc. All righ ts reserv ed. Patent Pendi ng. Ooma, Oom a Telo, Oo ma Connect 4 G Adapter, Ooma Pre mier, Ooma HD2 Hand set, Ooma HD3 H andset, Ooma
Linx, Oom a Home Secur ity, and the Ooma l ogo are trade marks or serv ice marks of Oo ma, Inc. Othe r company and pr oduct names m entioned he rein are trade marks of
their respective companies. Mention of third-party products is for informational purposes only and constitutes neither an endorsement nor a recommendation. Ooma
assum es no respons ibility with r egard to the pe rformanc e or use of these p roducts.
Page 41

Manuel de l’utilisateur
Page 42

Table des matières
1. Voici la Smart Cam d’Ooma! . . . . . . . . . . . . . . . . . . . .06
Fonctionnement de la caméra Smart Cam d’Ooma . . . . . . . . . . . . . . .08
2. Configuration de la Smart Cam d’Oom . . . . . . . . . . . . . . . . 09
Pour commencer . . . . . . . . . . . . . . . . . . . . . . . . . . . . . . .09
Ajouter la Smart Cam d’Ooma à un compte existant . . . . . . . . . . . . . . . .10
Voyants d’état de la Smart Cam d’Ooma . . . . . . . . . . . . . . . . . . . .11
Mises à niveau du micrologiciel . . . . . . . . . . . . . . . . . . . . . . . .12
Mises à jour de l’appli . . . . . . . . . . . . . . . . . . . . . . . . . . . . .12
Trouvez le meilleur emplacement pour votre Smart Cam d’Ooma . . . . . . . .13
Utilisation de votre Smart Cam d’Ooma débranchée et hors ligne . . . . . . . .15
Installation physique de la Smart Cam . . . . . . . . . . . . . . . . . . . . .16
3. Étiquette de visage (reconnaissance faciale avancée) . . . . . . . . .19
Comprendre la reconnaissance faciale sur votre caméra . . . . . . . . . . . .19
Fonctionnement de l’option Faces (Visages) . . . . . . . . . . . . . . . . . . 20
Utilisation de l’option Faces (Visages) . . . . . . . . . . . . . . . . . . . . .21
42
Page 43

4. Diusion continue en direct et visionnement d’événements enregistrés . . 22
Visionnement de la page Feeds & Events (Flux et événements) de la caméra . . .22
Visionnement de la diffusion en continu de la caméra . . . . . . . . . . . . . .22
Fonctions panoramique et zoom pour les vidéos . . . . . . . . . . . . . . . .23
Enregistrement de la diffusion en continu . . . . . . . . . . . . . . . . . . . .23
Interphone bidirectionnel . . . . . . . . . . . . . . . . . . . . . . . . . . .24
Visionnement des enregistrements de la chronologie . . . . . . . . . . . . . .24
Le partage, la gestion et le téléchargement des enregistrements . . . . . . . .25
5. Fonctionnalités, règles et alertes intelligentes . . . . . . . . . . . . . 26
Pannes de courant et d’Internet . . . . . . . . . . . . . . . . . . . . . . . .26
Mode privé/activation et désactivation . . . . . . . . . . . . . . . . . . . . . 26
Gestion des notifications . . . . . . . . . . . . . . . . . . . . . . . . . . . .28
Filtre de la chronologie . . . . . . . . . . . . . . . . . . . . . . . . . . . . .28
Diffusion en continu sur réseau local . . . . . . . . . . . . . . . . . . . . . .29
43
Page 44

6. Paramètres . . . . . . . . . . . . . . . . . . . . . . . . . . . . 30
Préférences Wi-Fi . . . . . . . . . . . . . . . . . . . . . . . . . . . . . . .30
Notifications . . . . . . . . . . . . . . . . . . . . . . . . . . . . . . . . .30
Activer/désactiver l’audio . . . . . . . . . . . . . . . . . . . . . . . . . . .30
Changer le nom de la caméra . . . . . . . . . . . . . . . . . . . . . . . . . .31
État de la caméra . . . . . . . . . . . . . . . . . . . . . . . . . . . . . . .31
Autonomie restante . . . . . . . . . . . . . . . . . . . . . . . . . . . . . . 31
Version du micrologiciel . . . . . . . . . . . . . . . . . . . . . . . . . . . . 32
Adresse MAC . . . . . . . . . . . . . . . . . . . . . . . . . . . . . . . . .32
7. Personnaliser la Smart Cam d’Ooma . . . . . . . . . . . . . . . . . 33
Paramètres du profil . . . . . . . . . . . . . . . . . . . . . . . . . . . . . .33
Partage de l’information d’identification . . . . . . . . . . . . . . . . . . . .33
8. Gérer votre plan d’abonnement Premium avec la Smart Cam d’Ooma . .34
Mise à niveau vers un plan d’abonnement . . . . . . . . . . . . . . . . . . . .34
Annuler un plan payé . . . . . . . . . . . . . . . . . . . . . . . . . . . . . . 36
9. FAQ et dépannage . . . . . . . . . . . . . . . . . . . . . . . . . 37
10. Caractéristiques technique . . . . . . . . . . . . . . . . . . . .38
44
Page 45

45
Page 46

1
Voici la Smart Cam d’Ooma!
Ce que la Smart Cam d’Ooma Cam peut faire pour vous
La Smart Cam d’Ooma est une caméra de sécurité intelligente intérieure et extérieure qui
enregistre tous les événements qu’elle voit. Dotée de détecteurs de mouvement de haute précision
et de la reconnaissance faciale par IA, la caméra fonctionne dans toutes les conditions, même en
cas de panne d’Internet et de courant. La caméra Smart Cam d’Ooma peut être branchée à l’aide
de l’adaptateur de courant ou elle peut fonctionner grâce à sa pile rechargeable intégrée. Étant
donné qu’elle se connecte à votre réseau Wi-Fi et ne nécessite pas d’unité de base, elle peut être
utilisée dans n’importe quelle configuration.
La Smart Cam d’Ooma est dotée de
nombreuses fonctionnalités avancées,
notamment :
■ RECONNAISSANCE FACIALE – L’intelligence
artificielle intégrée à la Smart Cam d’Ooma et à
son service de stockage dans le nuage permet aux
utilisateurs d’apprendre à la caméra à reconnaître
les visages. La reconnaissance faciale peut
considérablement réduire les faux positifs, qui se
produisent souvent avec les autres caméras de
sécurité à domicile, où des amis ou des membres
de la famille déclenchent des alertes inutiles. La
caméra détecte également les visages inconnus
46
Page 47

et les enregistre. Les utilisateurs peuvent accéder
à la liste des visages inconnus et à un rapport
détaillé des événements qui ont déclenché la
caméra, directement sur l’appli.
■ VIDÉO HD INTÉGRALE 1080P AVEC VISION
NOCTURNE AVANCÉE – La Smart Cam d’Ooma
est dotée d’une résolution HD intégrale 1080p
avec une fréquence de rafraîchissement élevée.
La Smart Cam est dotée de la vision nocturne, qui
produit des enregistrements très clairs et nets,
quelles que soient les conditions d’éclairage.
■ PILE ET STOCKAGE INTÉGRÉS – La Smart
Cam d’Ooma comporte une mémoire de stockage
intégrée et une pile interne qui permettra à la
caméra de fonctionner pendant six mois dans
des conditions d’utilisation typiques. Si votre
connexion Wi-Fi ne fonctionne pas, la caméra
continuera d’enregistrer tous les mouvements,
et lorsqu’elle est reconnectée au réseau WiFi, toutes les séquences vidéo enregistrées
sont automatiquement téléversées afin que
les utilisateurs puissent voir ce qui s’est passé
même lors d’une panne de courant ou d’Internet.
La caméra peut également être utilisée dans
des endroits où il n’y a pas d’électricité et pas
d’Internet.
■ ENREGISTREMENT VIDÉO INSTANTANÉ – La
fonctionnalité d’enregistrement de la Smart Cam
d’Ooma fait en sorte que la caméra est déclenchée
presque instantanément lorsqu’un événement
se produit. Chaque fois qu’un mouvement est
détecté, l’appareil enregistre une séquence qui
peut être affichée sur un appareil mobile grâce à
l’appli Smart Cam d’Ooma.
■ CAPACITÉS EXTÉRIEURES – The Smart Cam is
an IP 65-rated, waterproof, all-weather camera,
which makes it perfect for outdoor use and has a
field of view of 130 degree.
■ MODE PRIVÉ AUTOMATIQUE – Le géoblocage
fait le suivi de l’emplacement du téléphone
cellulaire de l’utilisateur. Il peut automatiquement
éteindre la caméra lorsque l’utilisateur est à la
maison et la rallumer lorsque l’utilisateur quitte la
maison.
■ INTERPHONE BIDIRECTIONNEL – La Smart
Cam d’Ooma contient à la fois un microphone et
un haut-parleur. Lorsque la caméra diffuse en
continu en direct, les utilisateurs peuvent se servir
de l’appli Smart Cam d’Ooma sur leur téléphone
pour parler aux gens qui se trouvent dans le
champ de la caméra.
47
Page 48

Fonctionnement de la caméra Smart Cam d’Ooma
Lorsque votre Smart Cam d’Ooma détecte un mouvement ou un son
ou qu’elle a été déplacée, elle communique par Wi-Fi afin de diffuser la
vidéo en continu sur votre compte Smart Cam d’Ooma sur le nuage. Votre
appareil iOS ou Android vous alertera grâce à l’appli Smart Cam lorsqu’une
nouvelle séquence vidéo est téléversée afin que vous soyez au courant de
tout mouvement inattendu qui se produit.
Obtenir de l’aide
Le soutien client pour la Smart
Cam d’Ooma est offert par
téléphone au 888-711-6662
ou par courriel à l’adresse
info@butterfleye.com
48
Page 49

2
Configuration de la Smart Cam d’Ooma
Pour commencer
La caméra Smart Cam d’Ooma est dotée d’une pile permanente. Lorsque vous
déballez l’appareil, veuillez utiliser l’adaptateur c.a. et le micro-câble USB fournis
pour brancher la caméra et la charger pendant au moins six à sept heures ou toute
la nuit. Si la pile est complètement déchargée, il faut charger la caméra pendant
environ quatre heures.
49
Page 50

Une fois la caméra complètement chargée, suivez ces étapes
pour compléter votre configuration :
1. Téléchargez l’appli Smart Cam d’Ooma à partir de l’App Store (iOS) ou de Google Play
(Android) et installez-la sur votre appareil mobile.
2. Ouvrez l’appli et créez un compte Smart Cam d’Ooma ou connectez-vous à un compte
existant. Assurez-vous que le Wi-Fi et le Bluetooth de votre téléphone sont activés.
3. Maintenez enfoncé le bouton de mise en marche sur le dessus de la caméra pour l’activer.
Le voyant d’état au DEL sur le devant de la caméra clignotera en ver t trois fois. Lorsque
le voyant au DEL est bleu fixe, la caméra est prête à se synchroniser avec votre compte.
Touchez l’option Start Pairing (Commencer le jumelage) dans l’appli. L’appli détectera
automatiquement votre caméra et vous guidera pour la connecter à Internet.
4. Si vous avez une autre caméra à synchroniser, touchez l’option Add a Camera (Ajouter
une caméra) à partir de l’icône du menu dans le haut à gauche de la page Feed and Events
(Flux et événements) et suivez les directives à l’écran.
Ajouter la Smart Cam d’Ooma à un compte existant
Vous pouvez ajouter jusqu’à six caméras Smart Cam d’Ooma à votre compte Smart
Cam. Pour ajouter d’autres caméras, allez à la page Add a Camera (Ajouter une
caméra) dans l’appli Smart Cam d’Ooma et suivez les étapes 3 et 4 de la section
ci-dessus.
50
Page 51

Voyants d’état de la
Smart Cam d’Ooma
Clignote en bleu – La caméra enregistre une vidéo
et la diffuse en continu.
Bleu fixe pendant 5 secondes – Le bouton Find &
Identify (Trouver et identifier) est maintenu enfoncé
dans l’appli.
Bleu fixe pendant 5 minutes – La caméra est prête à
être jumelée.
Clignote en vert 7 x – La caméra est sous tension.
Clignote en rouge 3 x – La caméra est mise hors
tension.
Clignote en rouge en continu – La pile est à
un niveau critique. Avertissement générique
s’appliquant à la fois à la Smart Cam d’Ooma et à la
Butterfleye Gen1.
Rouge fixe – Il y a une erreur
Clignote en jaune doré en continu – L’Internet n’est
pas disponible (Butterfleye uniquement).
Clignote en jaune doré 7 x – La caméra est
branchée dans le chargeur.
Clignote en mauve en continu – La mise à jour de la
caméra est en cours.
51
Page 52

Mises à niveau du micrologiciel
Ooma s’efforce continuellement d’améliorer la Smart Cam d’Ooma, d’ajouter de
nouvelles fonctionnalités logicielles et d’améliorer son efficacité. Lorsqu’une
mise à jour est disponible, un cercle avec un 1 à l’intérieur s’affiche sur l’icône de
l’engrenage dans l’appli Smart Cam d’Ooma. Touchez l’icône de l’engrenage et
faites défiler jusqu’en bas de la page des détails de la caméra. Touchez Update
Camera Software (Mettre à jour le logiciel de la caméra) pour lancer la mise à jour du
micrologiciel.
Mises à jour de l’appli
L’appli de la caméra de sécurité Smart Cam se mettra à jour elle-même chaque fois
qu’une nouvelle version est lancée, à condition que votre téléphone soit configuré
pour accepter les mises à jour automatiques. Les mises à jour peuvent contenir de
nouvelles fonctionnalités et des mises à jour de sécurité importantes.
52
Page 53

Trouvez le meilleur emplacement
pour votre Smart Cam d’Ooma
La caméra Smart Cam Ooma est conçue pour une
utilisation à l’intérieur ou à l’extérieur. Pour de
meilleurs résultats, la caméra devrait être installée à
portée de votre réseau Wi-Fi.
Vous devriez installer votre caméra dans un endroit
où la caméra aura une vue claire et dégagée de la zone
que vous souhaitez surveiller. Votre caméra Smart
Cam d’Ooma a un angle de prise de vue de 130 degrés.
53
Page 54

Ne bloquez pas le champ de visée de la caméra (le champ de visée est la zone dans
laquelle la caméra peut détecter le mouvement). Assurez-vous qu’il n’y a pas de
murs, tables ou objets trop près de la caméra. Si un objet se trouve dans un rayon de
2,5 pouces des côtés ou de l’avant de votre caméra, il pourrait refléter la lumière dans
l’objectif de l’appareil et causer un éblouissement et des vidéos floues.
La Smart Cam est dotée de capacités de détection de mouvement avancées et
de vision de nuit assez puissantes pour permettre à la caméra de détecter des
événements et des visages, même en pleine nuit. Pour obtenir une reconnaissance
faciale optimale, placez la caméra à la hauteur de l’œil.
54
Page 55

Utilisation de votre Smart Cam d’Ooma débranchée et
hors ligne
La caméra Smart Cam d’Ooma est dotée d’une pile et d’une capacité de stockage
intégrées qui lui permettent d’enregistrer même lorsqu’elle est débranchée de la
source d’alimentation c.a. et du réseau Wi-Fi.
Elle peut donc être utilisée dans des endroits où il n’y a pas de prises électriques.
Dans le cadre d’une utilisation moyenne, une caméra complètement chargée
fonctionnera débranchée pendant plusieurs mois. Il suffit de brancher la caméra
pendant environ quatre heures pour la recharger complètement.
La Smart Cam d’Ooma peut aussi fonctionner sans l’aide d’une connexion Wi-Fi.
Les séquences vidéo sont stockées dans la mémoire intégrée de la caméra et sont
téléversées au compte de l’utilisateur lorsque l’appareil est reconnecté au réseau
Wi-Fi. Le voyant au DEL situé sur l’avant de la caméra clignotera en jaune doré
lorsque l’appareil fonctionne sans connexion Wi-Fi. C’est normal.
55
Page 56

Installation physique de la Smart Cam
Installation murale : (intérieur/
extérieur)
Veuillez consulter la section Contact Support (Accéder
au service de soutien) sur votre appli ou le site de
service de soutien d’Ooma (https://support.ooma.
com/camera/) pour accéder à notre gamme complète
de tutoriels vidéo.
Quel est le matériel dont vous avez besoin pour
installer la Smart Cam?
■ Smart Cam d’Ooma
■ Support mural et boulon magnétique
■ Vis et ancrages
■ Perceuse avec une mèche de 0,8 mm
■ Tour nev is
■ Crayon
56
Page 57

Suivez les instructions ci-dessous pour installer votre caméra :
Trouvez un endroit propre où vous
aimeriez installer le support mural. À
l’aide du crayon, faites trois points à
travers les trous pour les vis.
Percez les trois points et insérez les
ancrages fournis dans les trous. Placez
le support mural sur le mur et utilisez
un tournevis pour insérer les vis.
Assurez-vous que le côté ayant une
partie saillante fait face à l’élément de
fixation de la caméra.
Mettez la rondelle sur le boulon
magnétique et fixez le boulon à la
caméra. Fixez la caméra à l’attache
magnétique du support. Faites pivoter
la caméra jusqu’à ce qu’elle pointe
dans la direction que vous souhaitez
surveiller.
57
Page 58

Installation sur un support de tiers :
La Smart Cam est dotée d’un filetage universel à l’arrière
de son boîtier, ce qui permet d’installer la caméra à un
support de tiers, facilitant son utilisation comme protection
de sécurité n’importe où. Assurez-vous que votre support
de tiers est doté d’un filetage universel, sinon, cela pourrait
endommager le filetage de la caméra.
Installation de la Smart Cam à
l’intérieur :
La Smart Cam d’Ooma est parfaite pour la surveillance à
l’intérieur dans pratiquement toutes les situations. Si vous
ne souhaitez pas faire des trous dans le mur, vous pouvez
placer la caméra sur toute surface plate et horizontale
comme un bureau, une étagère ou même un lit de bébé. Si
vous êtes à l’aise à fixer la caméra de façon permanente au
mur, le support magnétique peut être installé au mur en
suivant les instructions pour une installation murale.
58
Page 59

3
Étiquette de visage (reconnaissance faciale avancée)
Comprendre la reconnaissance faciale sur votre caméra
La fonctionnalité d’étiquette de visage permet aux utilisateurs de la Smart Cam
d’Ooma d’identifier la personne qui apparaît sur la caméra, ce qui fait en sorte que
vous recevez des notifications exactes et détaillées.
La Smart Cam d’Ooma tire parti d’une technologie de reconnaissance faciale
brevetée qui utilise l’apprentissage machine et l’intelligence artificielle pour
apprendre à reconnaître les visages. Une fois qu’un visage a été reconnu, il peut
être nommé, ou étiqueté, dans l’appli Smart Cam d’Ooma. La reconnaissance
faciale s’améliore en quelques semaines à mesure que la caméra « prend de
l’expérience ».
Pour de meilleurs résultats, la caméra doit être installée à l’extérieur. Si elle est à
l’intérieur, il faut l’installer à la hauteur de l’œil ou juste un peu au-dessus où elle
pourra voir les visages de face plutôt que de côté.
59
Page 60

Fonctionnement de l’option Faces (Visages)
Vous pouvez habituer la caméra à reconnaître les nouveaux visages,
ajouter des images aux visages existants pour une meilleure
reconnaissance ou supprimer des visages dont vous ne voulez pas que la
caméra se souvienne.
1. Ouvrez l’appli Smart Cam d’Ooma sur votre appareil mobile.
2. Touchez l’option Faces (Visages) dans la barre de menu pour vous rendre sur la
page Feed & Events (Flux et événements) de l’appli.
3. Touchez n’importe lequel des visages dans la section Unfamiliar Faces (Visages
inconnus) pour l’identifier. Vous avez trois options :
• Si c’est la première fois que vous identifiez la personne, entrez son nom
dans la fenêtre contextuelle qui s’ouvre lorsque vous touchez son visage.
• S’il s’agit d’une personne que vous avez déjà identifiée, choisissez un visage
existant dans la liste de la fenêtre contextuelle et touchez ensuite Combine
(Combiner). Cela permettra d’améliorer la précision de la reconnaissance
faciale lorsque la personne sera vue la prochaine fois par la caméra.
• Si c’est une personne que vous ne voulez pas identifier à l’avenir, cliquez
sur l’icône de la corbeille dans le coin supérieur droit de la fenêtre
contextuelle.
La caméra peut parfois associer incorrectement l’image d’une personne
inconnue avec un visage connu. Pour corriger cela, allez à la page Faces
(Visages) et touchez le visage connu. Touchez la photo du visage dans le
cercle central dans la fenêtre contextuelle qui s’ouvre. Cela ouvrira une
galerie de toutes les récentes images associées à ce visage.
La page Faces (Visages)
Parcourez la galerie et utilisez l’icône de la corbeille en bas de l’écran pour
supprimer toute image incorrecte.
60
Page 61

Utilisation de l’option
Faces (Visages)
Vous pouvez choisir de recevoir
des notifications uniquement
lorsque la caméra voit des visages
inconnus, lorsqu’elle ne voit que
des visages connus ou pour tous
les visages :
1. Ouvrez l’appli Smart Cam d’Ooma
sur votre appareil mobile.
2. Allez jusqu’à la page Feeds &
Events (Flux et événements).
3. Appuyez sur l’icône d’engrenage
dans le coin supérieur droit de
l’écran, puis touchez la ligne
Notifications.
4. Activez ou désactivez les curseurs
Known Person was detected
(Personne connue détectée) et
Unknown Person was detected
(Personne inconnue détectée).
L’option Combine (Combiner) Les pages de la galerie
61
Page 62

4
Diusion continue en direct et visionnement d’événements
enregistrés
Visionnement de la page Feeds & Events (Flux et
événements) de la caméra
Les séquences vidéo, également appelées événements, enregistrées
par votre Smart Cam d’Ooma sont stockées dans la chronologie des
événements. Vous pouvez faire glisser vers la droite ou vers la gauche
pour afficher chacune des caméras connectées à votre compte. Cette
page vous permet de visionner vos enregistrements, et de télécharger,
partager et supprimer des événements.
Visionnement de la diusion en continu de la
caméra
Vous pouvez voir une diffusion en continu du flux vidéo de la caméra à
tout moment.
1. Ouvrez l’appli Smart Cam d’Ooma sur votre appareil mobile.
2. Allez jusqu’à la page Feeds & Events (Flux et événements).
3. Cliquez sur le bouton de lecture du lecteur vidéo situé en haut de la page.
4. Faites glisser vers la gauche ou vers la droite pour mettre fin à la diffusion en
continu.
62
The Feeds & Events page
Page 63

Fonctions panoramique et zoom pour les vidéos
Vous pouvez faire un panoramique et un zoom pour voir les détails d’une vidéo,
qu’elle soit en direct ou enregistrée. Il suffit de pincer et de faire glisser sur
l’emplacement souhaité.
1. Ouvrez l’appli Smart Cam d’Ooma sur votre appareil mobile.
2. Démarrez la diffusion en continu ou choisissez un événement dans votre chronologie :
• Pour effectuer un zoom avant et arrière de la vidéo, pincez l’écran
• T• Pour vous déplacer dans le lecteur, touchez et faites glisser vers l’emplacement
souhaité sans soulever vos doigts de l’écran après l’avoir pincé.
Enregistrement de la diusion en continu
Chaque fois que le visionnement de la diffusion en continu est lancé, la vidéo
est enregistrée et téléversée sur le nuage en tant qu’événement. Cela permet le
visionnement en temps réel et la lecture ultérieure à partir de la chronologie des
événements.
63
Page 64

Interphone bidirectionnel
L’interphone bidirectionnel vous permet de
communiquer à distance avec les gens qui
apparaissent dans le flux vidéo de la caméra.
1. Ouvrez l’appli Smart Cam d’Ooma sur votre appareil
mobile.
2. Lancez la diffusion en continu pour afficher le flux vidéo
de la caméra et lire les données audio (si la fonction audio
est activée). Assurez-vous que l’appareil mobile est en
mode paysage.
3. Touchez l’icône du microphone dans le coin supérieur
gauche et attendez qu’elle devienne rouge, indiquant que
la fonction d’audio bidirectionnel est activée.
4. Pour parler, touchez l’icône du microphone sans la
relâcher (vous n’entendrez pas d’audio pendant ce
temps). Attendez-vous à un délai de plusieurs secondes
entre le moment où vous parlez et le moment où votre
voix sort du haut-parleur sur la caméra.
Visionnement des enregistrements
de la chronologie
Tous les enregistrements sont affichés dans la
chronologie de la Smart Cam d’Ooma. On peut
utiliser la chronologie pour gérer les événements : les
regarder de nouveau, les télécharger sous forme de
fichiers MP4, les partager et les supprimer.
Si vous recevez une notification d’un nouvel
événement, mais que vous ne voyez pas cet
événement dans votre chronologie, veuillez fermer et
rouvrir l’appli Smart Cam d’Ooma.
64
Page 65

Le partage, la gestion
et le téléchargement
des enregistrements
Vous pouvez partager, gérer et
télécharger les enregistrements
depuis la chronologie de la Smart
Cam d’Ooma.
1. Ouvrez l’appli Smart Cam d’Ooma
sur votre appareil mobile.
2. Allez jusqu’à la chronologie des
événements, puis choisissez
l’événement que vous souhaitez
gérer en touchant les trois points
verts à droite de l’événement.
3. Touchez Delete This Event
(Supprimer cet événement) pour
le supprimer ou touchez Share
or Save Full Event (Partager
ou enregistrer l’événement
au complet) pour télécharger
l’événement sur votre appareil
mobile sous forme de vidéo.
4. Si vous avez choisi de télécharger
la vidéo, une notification s’affichera
lorsque le téléchargement sera
terminé afin que vous puissiez
enregistrer l’événement sur votre
appareil mobile ou le partager.
Trois points verts
Partager ou enregistrer l’événement
au complet
65
Page 66

5
Fonctionnalités, règles et alertes intelligentes
Pannes de courant et d’Internet
La Smart Cam d’Ooma est équipée d’une pile interne qui dure six
mois dans des conditions d’utilisation normales. Lors d’une panne de
courant ou d’Internet, la Smart Cam d’Ooma continue de fonctionner
normalement. Toutes les données sont téléversées dans le nuage une fois
que la connexion Wi-Fi est rétablie.
Mode privé/activation et désactivation
Le mode privé vous permet de mettre la caméra en mode veille lorsque
vous souhaitez arrêter l’enregistrement ou lorsque vous ne voulez pas
être dérangé par la réception des notifications.
Mode privé automatique/activation et
désactivation automatique (géoblocage)
La Smart Cam d’Ooma prend en charge le géoblocage pour s’activer
et se désactiver automatiquement en fonction de l’emplacement de
l’appareil mobile de l’utilisateur. Si le mode privé est activé et que vous
vous éloignez de votre caméra de 50 mètres (environ 165 pieds) avec
votre appareil mobile, le mode privé se désactivera pour que votre caméra
puisse enregistrer tout ce qui se passe pendant que vous êtes sorti.
Lorsque vous revenez dans la zone domicile de la caméra, le mode privé
est réactivé.
Curseur de mode privé automatique
66
Page 67

Configuration du mode
privé automatique :
1. Ouvrez l’appli mobile Smart Cam
d’Ooma.
2. Allez jusqu’à la page Feeds &
Events (Flux et événements) et
cliquez sur l’icône de l’engrenage
en haut à droite.
3. Faites glisser le curseur du mode
privé automatique à la position
d’activation.
4. Suivez les directives pour entrer
l’adresse de l’emplacement de la
caméra ou pour accepter la position
GPS indiquée sur votre appareil
mobile.
5. Acceptez l’adresse indiquée
dans la fenêtre contextuelle de
confirmation qui est l’emplacement
actuel de votre caméra ou modifiez
l’adresse manuellement.
6. Touchez Edit (Modifier) si vous
souhaitez choisir un rayon d’action
précis. Vous avez la possibilité
de choisir Small (Petit), Medium
(Moyen) ou Large. La valeur par
défaut sera Medium (Moyen), car
nous croyons que c’est le rayon
optimal.
7. Touchez Update (Mettre à jour) une
fois que vous avez choisi le rayon.
67
Page 68

Si vous avez plusieurs caméras Smart Cam d’Ooma synchronisées avec
votre compte, vous devez activer le mode privé automatique pour chacune.
Gestion des notifications
La Smart Cam d’Ooma permet aux utilisateurs de déterminer les
notifications qu’ils souhaitent recevoir et celles qu’ils préfèrent
mettre en sourdine. Les options d’envoi de notifications peuvent être
automatiquement mises à jour selon l’heure de la journée.
1. Ouvrez l’appli mobile Smart Cam d’Ooma.
2. Allez jusqu’à la page Feeds & Events (Flux et événements) et cliquez sur l’icône
de l’engrenage en haut à droite.
3. Accédez à la page sur les détails et touchez le mot Custom (Personnaliser) sur la
ligne Notifications.
4. Faites glisser les curseurs pour sélectionner les notifications que vous
souhaitez recevoir.
5. Faites glisser le curseur situé au bas de la page pour créer un calendrier de
notifications (Notifications Schedule), qui désactivera les notifications pendant
certaines périodes de la journée comme lorsque vous êtes à la maison la nuit.
Les notifications peuvent être personnalisées en fonction de certaines
activités, le cas échéant. Pour les notifications de déplacement de la
caméra et de détection de bruit fort, veuillez vous assurer que votre caméra
est branchée.
Filtre de la chronologie
La fonction de filtre de la chronologie permet aux utilisateurs de passer
rapidement au tr avers de tous événements dans la chro nologie pour trouver
des enregistrements précis.
68
Page des détails
Page 69

Page des notifications
Pour filtrer votre chronologie :
1. Ouvrez l’appli mobile Smart Cam d’Ooma.
2. Allez jusqu’à la page Feeds & Events (Flux et événements).
3. Touchez les icônes de filtre sur la ligne Filter by (Filtrer par). Elles sont toutes
sélectionnées par défaut.
4. Sur la page Filter Timeline Events (Filtrer les événements de la chronologie),
désélectionnez les éléments de votre choix pour créer un filtre. Vous pouvez
filtrer vos résultats à l’aide d’une plage de dates précises en utilisant le filtre
Show Videos On (Montrer les vidéos le) au bas de la page.
Diusion en continu sur réseau local
La fonction Local Network Streaming (Diffusion en continu sur réseau local)
permet aux utilisateurs de contourner une connexion Internet externe pour
créer des diffusions en continu instantanées si leur appareil mobile est
connecté au même routeur Wi-Fi que la caméra Smart Cam d’Ooma.
Pour activer la fonction Local Network Streaming
(Diffusion en continu sur réseau local) :
1. Assurez-vous que la Smart Cam d’Ooma et l’appareil mobile sont connectés au
même routeur Wi-Fi.
2. Ouvrez l’appli Smart Cam d’Ooma.
3. Allez jusqu’à la page Feeds & Events (Flux et événements) et cliquez sur l’icône
de l’engrenage en haut à droite.
4. Activer la fonction Local Network Streaming (Diffusion en continu sur réseau
local).
69
Page 70

6
Paramètres
Préférences Wi-Fi
Votre appareil mobile doit se trouver dans la portée Bluetooth de la caméra
Smart Cam d’Ooma pour modifier le réseau Wi-Fi de la caméra. Pour modifier les
paramètres Wi-Fi de la caméra, lancez l’appli Smart Cam d’Ooma sur votre appareil
mobile et touchez l’icône de l’engrenage de la caméra dont vous souhaitez mettre
à jour la connexion Wi-Fi. À partir de la page sur les détails, choisissez Change
Settings (Modifier les paramètres) puis sélectionnez le nouveau réseau auquel vous
souhaitez vous connecter. Vous pourriez devoir entrer l’information d’identification
du réseau.
Notifications
Pour modifier vos paramètres de notification, ouvrez l’appli Smart Cam d’Ooma
sur votre appareil mobile et touchez l’icône de l’engrenage de la caméra dont
vous souhaitez mettre à jour les notifications. À partir de cette page, vous pouvez
personnaliser les notifications que vous souhaitez recevoir. Vous pouvez également
planifier des moments où vous ne souhaitez pas recevoir de notifications.
Activer/désactiver l’audio
Pour modifier les paramètres audio, ouvrez l’appli Smart Cam d’Ooma sur votre
appareil mobile et touchez l’icône de l’engrenage de la caméra dont vous souhaitez
mettre à jour les paramètres. Faites glisser le curseur Audio Enabled (Audio activée)
pour activer ou désactiver.
70
Page 71

Changer le nom de la caméra
Pour changer le nom de votre caméra, ouvrez l’appli Smart Cam d’Ooma sur votre
appareil mobile et touchez l’icône de l’engrenage de la caméra dont vous souhaitez
changer le nom. Touchez le nom actuel de la caméra sur la ligne Camera Name (Nom
de la caméra). Une fenêtre contextuelle s’ouvrira et vous demandera le nouveau nom
de la caméra.
État de la caméra
Pour voir l’état d’une caméra, ouvrez l’appli Smart Cam d’Ooma sur votre appareil
mobile et touchez l’icône de l’engrenage de la caméra dont vous souhaitez voir
l’état. L’état sera soit Connected to Cloud (Connectée au nuage) ou Offline (Hors
ligne). En cas de problème, veuillez consulter notre guide de dépannage sur le page
de soutien du site Web.
Autonomie restante
Pour voir l’autonomie restante de la pile, ouvrez l’appli Smart Cam d’Ooma sur votre
appareil mobile et touchez l’icône de l’engrenage de la caméra dont vous souhaitez
vérifier la pile. L’autonomie restante de la pile est indiquée sur la page des détails de
la caméra.
71
Page 72

Version du micrologiciel
Pour voir la version du micrologiciel de la caméra, ouvrez l’appli Smart Cam d’Ooma
sur votre appareil mobile et touchez l’icône de l’engrenage de la caméra dont vous
souhaitez vérifier le micrologiciel. La version du micrologiciel est indiquée sur la
page des détails de la caméra.
Adresse MAC
Pour voir l’adresse MAC de votre caméra, ouvrez l’appli Smart Cam d’Ooma sur
votre appareil mobile et touchez l’icône de l’engrenage de la caméra dont vous
souhaitez voir l’adresse MAC. L’adresse MAC se trouve au bas de la page des détails
de la caméra.
72
Page 73

7
Personnaliser la Smart Cam d’Ooma
Paramètres du profil
Pour personnaliser les paramètres de votre profil, lancez l’appli Smart Cam d’Ooma
sur votre appareil mobile. Touchez l’icône Menu dans le coin supérieur gauche, puis
sélectionnez Profile (Profil). Vous pouvez utiliser cette page pour :
■ modifier votre nom d’utilisateur;
■ mettre à jour l’adresse de courriel de votre compte Smart Cam d’Ooma;
■ mettre à jour votre mot de passe;
■ voir quelle version de l’appli vous utilisez;
■ voir le plan Premium auquel vous êtes abonné;
■ vous déconnecter de votre compte.
Partage de l’information d’identification avec d’autres
utilisateurs
La Smart Cam appuie la fonctionnalité multi-utilisateurs.
- Veuillez partager votre information d’identification pour la Smart Cam avec une
personne digne de confiance. Demandez-lui de télécharger l’appli Smart Cam
d’Ooma sur l’App Store ou Google Play. Demandez-lui de se connecter en utilisant
la même information d’identification.
73
Page 74

Gérer votre plan d’abonnement Premium avec la Smart
8
Cam d’Ooma
Gérer votre plan d’abonnement Premium avec la Smart Cam d’Ooma
La Smart Cam d’Ooma peut être utilisée sans plan d’abonnement mensuel, cependant, Ooma propose deux plans
d’abonnement qui activent des fonctionnalités puissantes et prolongent la durée de stockage en nuage. Tous les
plans permettent aux utilisateurs de connecter jusqu’à six caméras à un seul compte sans frais supplémentaires.
Détails des plans actuels de la Smart Cam d’Ooma :
Surveillance Premium Entreprise
4,99 $/mois
Prix par client
GR ATU IT
(1 cam éra)
9,99 $/mois
(2 - 6 camér as)
29,99 $ /mois
Stockage dans le nuage
Enregistrement vidéo instantané
Diusion en continu
Historique vidéo
Fonctionnement lors des pannes d’électricité ou d’Inter net
Alertes instantanées (mouvement, son, anti-eraction)
Stockage intégré
Diusion en continu instantanée
74
7 jours 30 jours 90 jours
• • •
• • •
• • •
• • •
• • •
• • •
• • •
Page 75

Surveillance Premium Entreprise
Activation et désactivation du mode privé
Téléchargement et partage illimités des vidéos
Audio activée/désactivée
Possibilité d’enregistrer plusieurs identifiants Wi-Fi
Mise à niveau logicielle de la caméra en direct
Notifications programmables
Filtre et trie des événements
Chirement bancaire AES-256
Reconnaissance faciale
911 à distance (à venir, pour les clients Telo seulement)
Activation/désactivation automatiques
Interphone bidirectionnel
Mode Ne pas déranger
Connectez jusqu’à 6 caméras
Activation/désactivation automatiques multi-sites (à venir)
• • •
• • •
• • •
• • •
• • •
• • •
• • •
• • •
• •
• •
• •
• •
• •
• •
•
Analyses commercia les (à venir)
75
Page 76

Annuler un plan payé
Vous pouvez utiliser l’appli mobile Smart Cam d’Ooma pour gérer votre mode de
paiement et vos annulations.
Pour l’iPhone :
1. Ouvrez les paramètres de votre appareil mobile
2. Faites défiler vers le bas et touchez iTunes Store et App Store.
3. Touchez votre courriel et votre identifiant Apple.
4. Touchez Afficher l’identifiant Apple et entrez votre mot de passe.
5. Touchez Abonnements, puis sélectionnez Smart Cam d’Ooma.
Pour Android :
1. Lancez l’appli Google Play Store
2. Touchez Menu, puis Mes applications, puis Abonnements et touchez l’appli Smart Cam
d’Ooma.
3. Touchez Annuler, puis Oui pour confirmer l’annulation.
4. L’état de l’abonnement devrait passer d’Abonné à Annulé.
76
Page 77

9
FAQ et dépannage
1. Quelle est la vitesse Internet minimale requise pour faire fonctionner la Smart Cam d’Ooma? La Smar t Cam d’Ooma exige une
vitesse de téléversement minimale de 2 mégaoctets par seconde par c améra. Par exemple, vous aurez besoin d’une vitesse de
téléversement minimale de 6 mégaoctets par seconde sur votre réseau sans fil pour faire fonctionner trois caméras dans votre
maison.
2. Comment puis-je recharger ma Smart Cam d’Ooma? Votre caméra est équipée d’une pile interne. Veuillez utiliser l’adaptateur
de courant et le câble micro-USB fournis pour charger votre caméra. Une fois complètement chargée, ce qui peut prendre jusqu’à
quatre heures, la caméra fonctionnera pendant six mois à un taux d’enregistrement moyen de cinq minutes par jour.
3. Est-ce que la Sm art Cam d’Ooma fonctionne avec les bandes de fréque nce 2,4 GHz et 5 GHz sur les routeurs Wi-Fi? La Smart
Cam d’Ooma fonctionne uniquement avec la bande de fréquence 2,4 GHz.
4. Qu’est-ce qui pourrait faire en sorte que la pile de la Smar t Cam d’Ooma se décharge plus vite? La pile de la Smart Cam
d’Ooma se déchargera plus vite si la caméra est placée dans l’obscurité totale, car cela nécessite une utilisation intensive du
contrôle infrarouge. La pile se déchargera également plus rapidement sur des réseaux Wi-Fi auquel de nombreux appareils sont
connectés.
5. La caméra Smart Cam d’Ooma fonctionne-t-elle à l’extérieur? Oui, la caméra est résistante aux intempéries (conforme à la
norme IP65) et est spécialement conçue pour un usage extérieur. Cependant, la caméra ne doit pas être immergée dans l’eau, car
cela pourrait l’endommager.
6. La Smart Cam d’Ooma fonctionne-t-elle sans connexion Internet? Oui. La Smart Cam d’Ooma a besoin d’une connexion Wi-Fi
pour voir les vidéos en direct et les téléverser. Lorsque la connexion Internet est interrompue, la Smar t Cam d’Ooma peut utiliser sa
mémoire intégrée pour enregistrer les événements qui seront téléversés lorsque la connexion sera rétablie. La Smart Cam d’Ooma
peut aussi se connecter directement à un appareil mobile par le biais d’un réseau local Wi-Fi sans avoir besoin d’une connexion
Internet.
7. Est-ce la Smar t Cam d’Ooma enregistre aussi l’audio? Oui. Vous pouvez également utiliser l’appli Smart Cam d’Ooma pour
parler aux gens qui se trouvent près de votre caméra.
8. Comment puis-je accéder à mes vidéos? La Smar t Cam d’Ooma téléverse automatiquement les vidéos sur le nuage. L’appli de la
Smart Cam d’Ooma permet d’accéder aux vidéos.
9. Comment puis-je mettre ma caméra à jour? L’équipe d’ingénierie d’Ooma propose souvent des mises à jour logicielles gratuites
pour la Smar t Cam d’Ooma. Ces mises à jour seront disponibles dans votre appli, sous l’onglet Details. Si le bouton de mise à jour
du logiciel de la caméra est grisé, cela signif ie que vous utilisez la plus récente version du logiciel. Si vos notifications sont activées,
vous recevrez également une notification par l’entremise de l’appli lorsqu’un nouveau logiciel est disponible.
Pour une autre FAQ et des données de dépannage, veuillez consulter le https://support.ooma.com/camera
77
Page 78

10
Caractéristiques techniques
Caméra
■ Capteur CMOS couleur 1/3 po 3,5 MP
■ HD intégrale 1080p, 30 images/sec
■ Champ de visée de 130 degrés
■ Vidéo HD intégrale 1080p avec zoom numérique
8x
■ Encodage H.264
■ Exposition et équilibrage du noir et du blanc auto-
adaptifs
■ Réduction du bruit – faible luminosité haute
sensibilité
■ Plage de mise au point – mise au point fixe (de 2 pi
à l’infini)
■ Vision de nuit pour un affichage clair dans
l’obscurité totale
Sans fil et audio
■ 802.11 b/g/n 2,4 Ghz
■ Prise en charge de WEP, WPA et WPA2
■ Connectivité Bluetooth à faible consommation
d’énergie (BT 4.2)
■ Capacités audio bidirectionnelles semi-duplex
avec haut-parleur et microphone
■ Annulation du bruit
Alimentation et capacité
■ USB : Entrée – Micro-USB de 5 V c.c., 2 A
■ Adaptateur c.c. : Entrée - 110-240 V c.a., 50-60 Hz
■ Adaptateur c.c. : Sortie – 5 V c.c., 2 A
■ Pile lithium-ion 6 000 mAH intégrée rechargeable
■ Indicateur de niveau de pile
■ Stockage intégré de 16 Go
78
Page 79

Détecteurs
■ Détecteur infrarouge passif
■ Détecteur de lumière ambiante
■ Accéléromètre
■ Notifications mobiles directes
Dimensions et certifications
■ Poids : 500 g (17,06 oz)
■ Longueur : 83,01 mm
■ Profondeur : 40,91 mm
■ Hauteur : 73 mm
■ Température de fonctionnement : De -20 oC à 45
oC
■ IP 65
■ Homologuée UL, FCC, IC ET CE
79
Page 80

Vous avez une question ou besoin d’aide?
Ooma vous offre une foule de ressources si vous avez besoin d’aide.
Articles de soutien. Accédez à notre base de connaissances complète à support.ooma.com
Manuels de l’utilisateur. Accédez au présent manuel et à tous les autres manuels sur les produits à
support.ooma.com/camera/
Forums. Parlez avec d’autres clients d’Ooma et avec notre personnel de soutien à forums.ooma.com
Soutien en direct. Le problème persiste? Clavardez avec un représentant du service à la clientèle à tout moment à support.
ooma.com
Parler à un spécialiste du soutien technique, du lundi au vendredi, de 5 h à 17 h HNP, et le samedi et le dimanche de 8 h à 17 h
HNP au 1-888-711-6662.
525 Almanor Avenue, Suite 200
Sunnyvale, CA 94085
Pour en savoir plus : info@butterfleye.com
ou composez le 1-888-711-6662
© 2019 Oo ma, Inc. Tous droits ré servés. B revet en instan ce. Ooma, Oom a Telo, ad aptateur Oom a Connect 4 G, Ooma Premie r, com biné Ooma HD2, c ombiné Ooma H D3,
Ooma Linx, Ooma Sécurité à domicile et le logo d’Ooma sont des marques déposées ou des marques de service d’Ooma, Inc. Les noms d’autres entreprises et d’autres
produits mentionnés dans le présent document sont des marques de commerce de leurs entreprises respectives. Toute référence à des produits de tiers est faite à des
fins d’information uniquement et ne constitue ni une approbation ni une recommandation. Ooma n’assume aucune responsabilité quant à la performance ou à l’utilisation
de ces produits.
 Loading...