

Page 1

SW2200XS
DVD PLAYER
Page 2

1
SYMBOLS AND IMPORTANT SAFEGUARD 2-3
1. BASIC INFORMATION
1.
1 Front and Rear Panel View
1.
2 Remote Control View
2 SYSTEM SET UP
2.1 Language Setup
2.
2 Screen Setup
2.4
2.
5
Custom
Set up
Exit
3 BASIC OPERATIONS
3.
1 Turn on/off
3.2
Open/ Close the disc
tray
3.3 Prestop/Stop
3.
4 Pause/ Play
3.5 Return to Root
Men
u
3.6
Screen Saver
3.7
Fast Forward
3.8
Fast Backward
3.
9 Slow Playing
3.10 Next Chapter/ Next Track
3.11 Previous Chapter/ Previous Trac
k
3.12 Sear
ch Time
3.
13 Repeat Playing
3.
14 Repeat A-B
3.
15 Program Play
3.16
Screen Play
3.17 PBC (Play Back Control)
3.
18 Zoom
3.
19 Title Menu
3.20 Menu
3.
21 Volume
3.
22 Mute
3.
23 Multi-Languange Audio
3.
24 Multi-Languange Subtitle
3.25 Angle Mark
3.
26 Rotate JPEG Picture
13
4. HELP AND ADVICE
5. TECHNICAL SPECIFICATION
8-10
11-12
13
13
13
13
13
13
14
14
14
14
14
14
14
15-16
17
17
17
17
17
18
18
18
18
18
20
21
4
6-8
2.3
Audio Setup
11
5
12
3.
27
Resume
3.28 Clear
3.29 N/P
3.30 Audio
3.31 L/R
3.32 Surround
3.33 Shuffle
3.34 Step
19
19
19
19
19
19
19
19
3.35 Return
19
3.36 P-Scan
18
19
CONTENT
Page 3

2
Help line
For assistance during normal working hours (9am-5pm, Mon-Fri, New Zealand local time) call
Oriental Pacific International Ltd.
NZ call: 0800 89 85 80
Email: service@orientalpacific.com
SYMBOLS
The graphic symbols used in this manual or on the back cover of the set
mean
the following:
Read
this manual in full before use.
Class II Double insulated Appliance
The lightning flash symbol is intended to alert the user to the enclosures that
contain
hazardous voltages.
The
exclamation symbol is intended to alert the user to the presence of
important
operating and maintenance (servicing) instructions in the literature
accompan
ying the appliance.
CLASS 1
IMPORTANT SAFEGUARDS
When using any electrical apparatus always observe safety regulations
and use basic safety precautions to reduce the risk of fire, electric
shock and personal injury, including the following
Read, Keep and Follow these instructions, heeding all Warnings.
Page 4

3
WARNING! Do not remove any cover.
WARNING! No objects filled with liquid, such as vases, shall be placed on this equipment or in any
po
sition where liquid may fall into this equipment or any other electrical apparatus.
WARNING! Do not insert any objects into any openings of this equipment or any other electrical
app
aratus.
WARNING! Do not use this apparatus near water. To avoid the risk of fire or electric shock, do not
expose this apparatus to rain or moisture. The apparatus shall not be exposed to dripping or splashes
and is strictly for indoor use only.
WARNING! Do not immerse in any liquid whilst in use or cleaning. Clean only with a damp cloth,
dr
y with a dry towel. Do not use harsh abrasives as these may damage the plastic parts.
WARNING! DO NOT block any ventilation openings. Keep away from curtains, newspapers and
restricted
areas. Install in accordance with any specific manufacturer’s instructions. Always allow a
su
fficient gap around the apparatus to avoid overheating.
WARNING! Do not install near any heat sources such as radiators, gas heaters, stoves or other
apparatus (including amplifiers) that produce heat. Do not leave in direct sunlight.
WAR
NING! Do not place any naked flame source, such as lighted candles on any electrical apparatus.
WARNING! Connect to a suitable 230-240V ~ 50 Hz power supply only.
WARNING! Keep out of reach of young children. This apparatus is not suitable for use by young
children or infirm persons without supervision. Young children must be supervised to ensure that they
do
not play with the apparatus. Ensure young children have enough knowledge to operate the
equipment safely if they do have access to this equipment.
WARNING! Do not abuse or damage a power cord. If any power cord is damaged, it must be
rep
laced by the manufacturer, its service agent or a similarly qualified person in order to avoid a hazard.
A replaceable cord must be replaced with an authorised replacement from an authorised service agent
on
ly.
WARNING! Only use attachments/accessories specified by the manufacturer.
WARNING! Unplug completely from the power source this apparatus during lightening storms or
wh
en unused for long periods of time.
WARNING! Attention is drawn to the environmental aspects of disposing of any battery.
WARNING! Refer all servicing to qualified personnel. Servicing is required when the apparatus has
bee
n damaged in any way, such as when the power supply cord or plug is damaged, liquid has been
spilled or objects have fallen into the apparatus, the apparatus has been exposed to rain or moisture,
does not operate normally, or has been dropped.
WARNING! For household use only, this apparatus is not intended for commercial use.
WARNING! If this apparatus is to be used by a third party, please supply these instructions with it.
WARNING! Do not prevent easy access to the main wall switch and plug.
WARNING! No liability will be accepted for any personal injury or damage caused by failure to
follow these instructions.
Page 5

4
1.1 Front and Rear Panel View
S-Video Output
Coa
xial Output
Audio Output Right
Audio Output Left
Video Output
Cr/Pr Video Output
Cb/Pb Video Output
Y Video Output
Scart Socket
(Connect to TV)
Power C
ord
Remote Control Sensor
Play/Pause
Open/Close
PowerStop
Disc Drawer
LED
1 Basic Information
Page 6

5
1.2 Remote Control View
SURROUND
NUMERIC KEYS
LEFT ARROW
DOWN
ARROW
Page 7

6
Press SETUP to enter SETUP menu. There are 4 options:
including【 Language Setup
】、
【
Screen
Setup
】、
【
Audio
Setup
】、
【 Setup】 , we
can
use and PLAY to modify setting, and set value will refresh directly right now. When
screen show dialog ,press SETUP or will return to parent parental menu;In other status, Press
SETUP will exit SETUP menu.
SETUP menu will be modified as below.
2.1 Language setup
2.1.1 OSD
2.1.2 Menu
This is to select the SETUP DVD menu language.。Menu appear 13 kinds of languages, including
English、Chinese、Japanese、French、German、 Italian 、 Spanish 、 Portuguese 、Hindi 、 Thai 、
Russian
、Korean、Others. If the DVD Disc support SETUP audio language, system will play the
corresponding menu language, if DVD disc doesn’t support SETUP menu language,system will select
first
menu language in disc automatically.
Custom
The default OSD language is English
.
There is a
options :English.
2 System Setup
Page 8

7
2.1.3 Audio
This is to select the SETUP audio language. ”Audio language” appears 13 kinds of languages, including
English、Chinese、Japanese、French、German 、 Italian 、 Spanish 、Portuguese、 、Thai、
Russian
、Korean、Others. If the DVD Disc supports SETUP audio language, system will play the
corre
sponding audio language, if DVD disc doesn’t support SETUP audio language, system will select
first audio language in d
isc auto
matically.
2.1.4 Subtitle
This is to select the SETUP subtitle language.
including English、Chinese、Japanese、French、German、Italian、Spanish、Portuguese、 、
Thai、Russian、Korean、Others、OFF. If the DVD Disc supports SETUP subtitle language, system
will play the corresponding audio language, if DVD disc doesn’t support SETUP subtitle language,
system
will
select
first subtitle language in disc automatically.
14 kinds of languages will appear in “Subtitle Language”,
the
Hindi
Hindi
Page 9

8
※In 【 Menu Language 】 、 【 Audio Language 】 、 【 Subtitle Language 】 setup, when we select
【Others】, system will let user input four numbers of language codes, and we can use Reference A language
code table to input the number we want, and then pressing ENTER
just to finish the input. As the steps 1、2
below.
Step
1:Select【Others】
Step 2: Input 4 number language code:8888.
If input error,system
will show “Invali
d”
Use
r c
an press to return parent menu.
[Note] It will right now change only setting in 【OSD】, others as 【Menu】, 【Audio】and【Subtitle】,
it need the disc has these functions support, otherwise it will not have any change after finishing
setting.
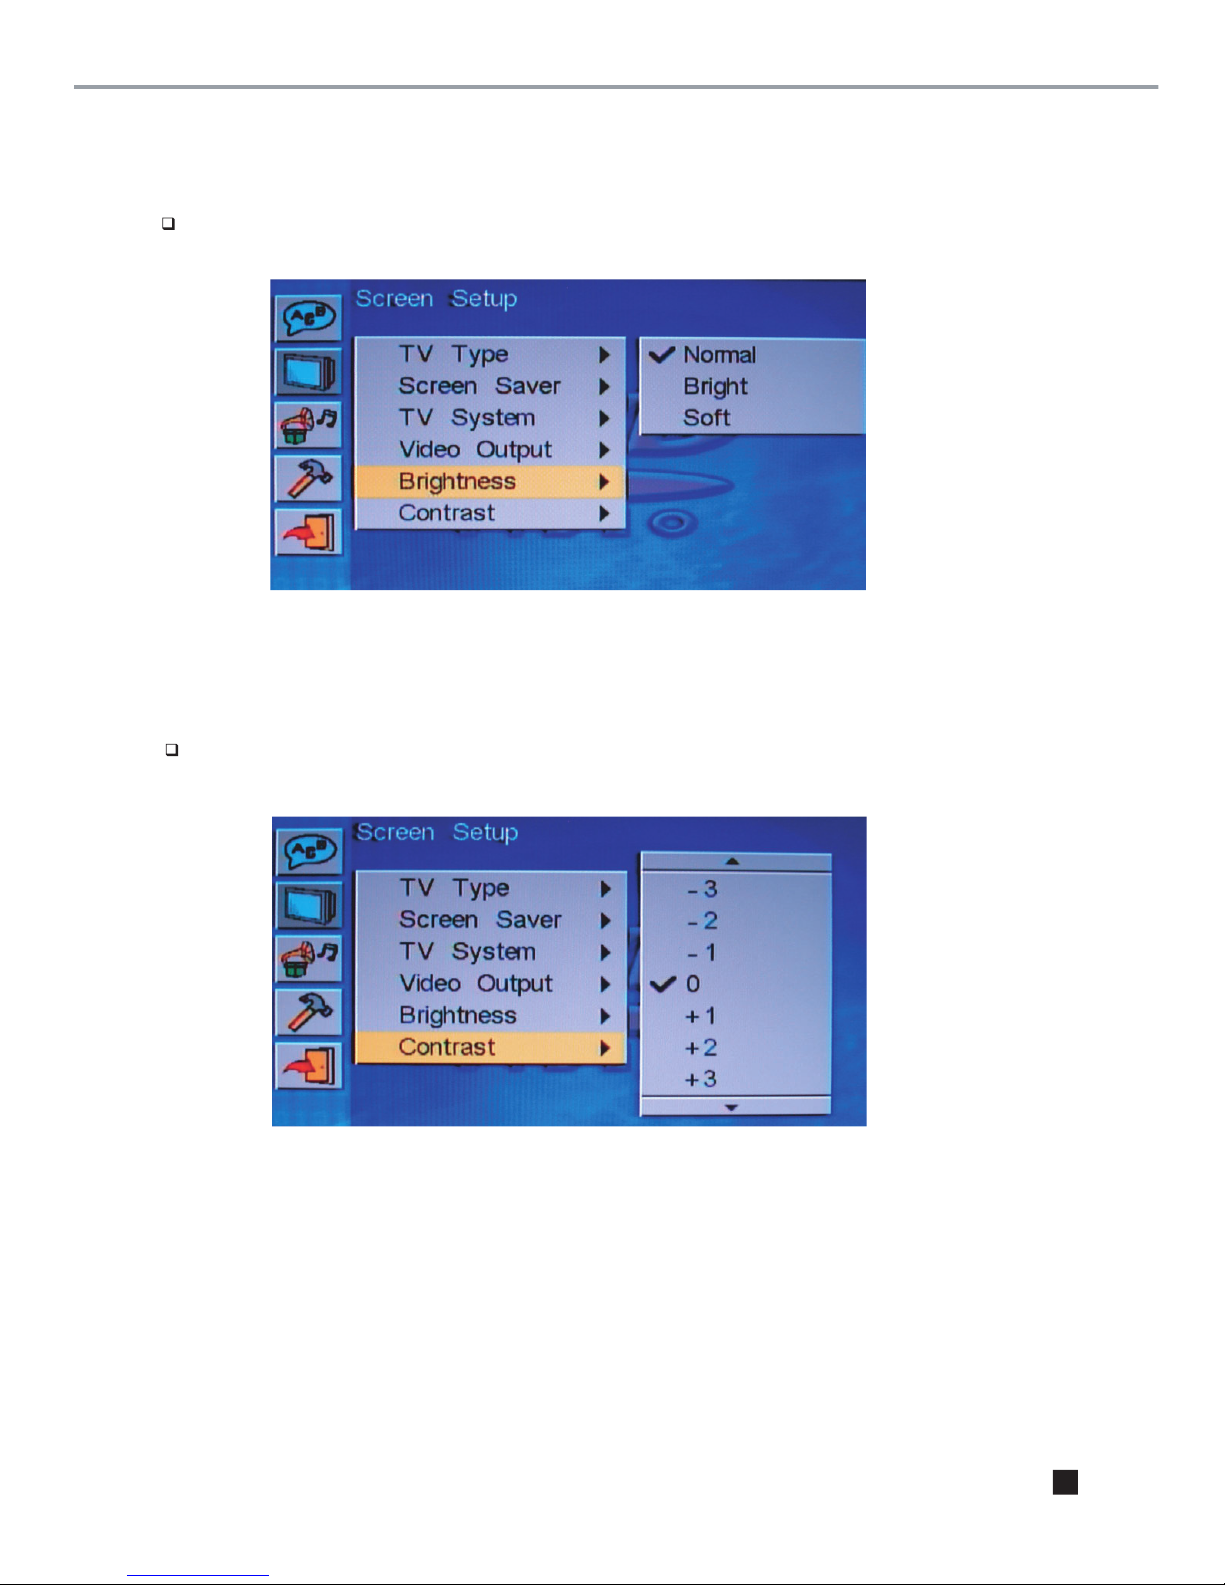
2.2 Screen Setup
2.2.1 TV Type
TV Type: there are three types , including【4:3 PS】, 【4:3 LB】, 【16:9】.
4:3 PS
4:3 LB
16:9
and let user to input again.
Page 10

9
2.2.2 Screen Saver
There are two options: ON and OFF, user can set this function On or Off.
TV System
2.2.3
(Color TV)
There are 3 options for TV system: NTSC, PAL and Auto.
2.2.4 Video Output
It supports S-VIDEO、CVBS+YUV、CVBS+RGB、
YUV
P-SCAN
If TV support (YUV) input or (RGB) input,we can select the setting, let user get better view
If user enters from NONE-【P-SCAN】 mode to【P-SCAN】 mode,system will appear a dialog, to
let user decide setup p-sca
n or not.
.
Page 11
10
2.2.5
Brightness
There are 3 kinds of brightness, including 【Normal】、【Bright】、【Soft】.
2.2.6
Contrast
From -4 to +4, 0 as normal, user can select by his preference.
Page 12

11
Page 13

Page 14

13
Page 15

14
Page 16

15
Program Play
3.15
This function can set playing order, when playing DVD, press PROG, the screen will appear the following picture.
Then use numeric key or buttons to select the Title/Chapter you want.
Press PLAY to start playing.
When playing
VCD/SVCD,
press
PROG
then show
program screen:
Using
numeric
key or to select the track we want to play, after input and press to start to
play the trace we input.
※The max track of this function is 20.
PLAY
dicection key
Page 17

16
In【Program】Mode, the selected file will show background and reverse color. User can select
the song or picture he wants,for example, user selects test_5_01、test_5_03, and test_5_06 three files,
it can select over tha
n one f
older, even in sub-folder, or sub-sub-folder.
orange
When user wants to play the selected files in【Program】mode, it needs to move the cursor to the
buttons, then press key to play.
In the file of cursor indicated, if the file is not yet to be selected, then user can press to add it to the
program list, system will show red rectangle.
the file we selected, then move the
cursor to the place again, press
again, this file we select will be cancelled.
If user wants to cancel all the selected files, he just needs to press PROG again to delete all.If user wants to cancel
MP3_ 004
Page 18

17
Page 19

18
Page 20

19
Press Clear to delete selected items in the program list.
Press this button to change system among NTSC, PAL and Auto.
Press this button, user can play the disc step by step, in this way user can catch any picture
on the disc. This function is disc specified.
This function allows user to change audio track while playing VCD discs, there are 3 options:
L/R,L/L and R/R.
this function allows user to change different audio effect by pressing Surround button repeatedly.
there are 3 options available:Live, Therter and No Surround.
By pressing this button, user can set the play order to Oder Play or Random Play.
3.27 Resume
3.29 N/P
3.28 Clear
3.30 Audio
3.31 L/R
3.32 Surround
3.33 Shuffle
3.34 Step
Press this button while playing DVD, to select different kind of output voice language.
This function is disc specified, playing disc must support this function, then user can operate
this step.
3.35 Return
Press this button to return to its title menu while playing VCD discs under the mode of PBC ON.
3.36 P-Scan
This function allows user to transform the video system,there are 4 options:S-Video,CVBS+YUV,
YUV P-SCAN and CVBS+RGB.
This function enables DVD or VCD disc to return back to playback mode and go on playing
after pressing Stop button.
Page 21

20
The DVD Player will not power on.
Ensure that the plug is connected to the mains socket and that it is switched on.
Replace the fuse in the plug
Disc does not play
Check that the disc has been correctly loaded, label facing up.
Check that the formal of the disc is supported.
No picture
Ensure that the DVD player and television are powered on.
Check that the connection cables are fitted securel
y.
Ensure that the television has the
AV channel or equivalent selected.
Try a disc that you know plays without problems.
No sound
Check that the volume has not been set low on the television.
Check that the sound has not been muted on either the DVD player or the television.
Check that all cables are connected securel
y.
Press the AUDIO button to select other audio tracks on the DVD.
The picture quality is poor.
Check that the disc surface has not been damaged.
Try cleaning the disc.
Check that the connecting cables are connected securel
y.
Cannot skip
If the DVD has been produce without chapter markers, the skip functions will not operate.
Some functions do not work (e.e. Angle, Goto etc)
Refer to the DVD disc packing. Not all functions are available on all DVD discs.
Help and Advice
Page 22

21
Power Supply:
Power Consumption:
10W
Com
patible
Discs: DVD
Audio CD
Kodak Picture CD
Vi
deo Format: PAL/NTSC/
AUTO
Output Terminals: Scart out
RCA audio/video cable
Coaxial digital output
S-Video output
Y、Cb、Pb、Cr、Pr component video cable
Audio: 2.0C
H
Note: design and specification is subjiect to change without n
otic
e.
JPEG
MP3
Technical Specification
AC 100-240V 50/60Hz
Page 23

Warranty Card
This product is guaranteed against faulty materials and workmanship for a period of twelve
months from the date of purchase with proof of purchase. The obligation to the purchaser
under this warranty is limited to servicing the unit and replacing defective parts or refund
when the product is returned freight prepaid to the retailer with proof of purchase. This
warranty becomes void if the product has been tampered with, damaged by accident,
damaged in any other way by improper use or has been purchased second hand. All
production orders have quality inspections. In the unlikely event of a deficiency, please
contact the retailer from which this product was purchased.
WARRANTY FOR APPLIANCES USED COMMERCIALLY LIMITED TO 90 DAYS
Type of Appliance: _______________________________________________________________
Model No.: __________________________________ Purchase Date: ____________________
Product Purchased From: ________________________________________________________
__________________________________________________________________________________
Your Name: ______________________________________________________________________
Address: _________________________________________________________________________
_______________________________________________ Phone Number: __________________
IMPORTANT!
Please retain this warranty card along with your purchase receipt. Please do not
post to the retailer. If service or a warranty claim is required, both of these
documents are to be returned with the appliance to your retailer, otherwise a fee
may be charged or warranty declined. For technical help contact the helpline.
 Loading...