

Page 1

®
350 AC/DC Balance
Charger / Discharger
ONXC4100
Page 2

NOTICE
All instructions, warranties and other collateral documents are subject to change at the sole discretion of Horizon Hobby, LLC. For
up-to-date product literature, visit horizonhobby.com or towerhobbies.com and click on the support or resources tab for this product.
Meaning of Special Language
The following terms are used throughout the product literature to indicate various levels of potential harm when operating this
product:
WARNING: Procedures, which if not properly followed, create the probability of property damage, collateral damage, and
serious injury OR create a high probability of super cial injury.
CAUTION: Procedures, which if not properly followed, create the probability of physical property damage AND a possibility of
serious injury.
NOTICE: Procedures, which if not properly followed, create a possibility of physical property damage AND a little or no
possibility of injury.
WARNING: Read the ENTIRE instruction manual to become familiar with the features of the product before operating.
Failure to operate the product correctly can result in damage to the product, personal property and cause serious injury.
This is a sophisticated hobby product. It must be operated with caution and common sense and requires some basic
mechanical ability. Failure to operate this Product in a safe and responsible manner could result in injury or damage to the
product or other property. This product is not intended for use by children without direct adult supervision. Do not attempt
disassembly, use with incompatible components or augment product in any way without the approval of Horizon Hobby, LLC.
This manual contains instructions for safety, operation and maintenance. It is essential to read and follow all the instructions
and warnings in the manual, prior to assembly, setup or use, in order to operate correctly and avoid damage or serious injury.
Age Recommendation: Not for children under 14 years. This is not a toy.
NOTICE: This appliance is not intended for use by persons with reduced physical, sensory or mental capabilities, or lack
of experience and knowledge, unless they have been given supervision or instruction concerning use of the appliance by a
person responsible for their safety.
DANGER: To reduce the risk of re or electric shock, carefully follow these instructions.
Table of Contents
Charging Warnings ............................................................ 3
Box Contents .................................................................... 4
Features ........................................................................... 4
Speci cations ................................................................... 5
Special Features ............................................................... 6
Standard Battery Parameters ............................................. 7
Program Flow Chart ..........................................................7
Operation ......................................................................... 9
Operating Program ............................................................ 9
Battery Memory Set And Call Out ..................................... 12
System Setting................................................................ 13
Battery Meter .................................................................. 14
Battery Resistance Meter ................................................. 14
Warning And Error Message ............................................ 14
Limited Warranty ............................................................. 15
Warranty and Contact Information ....................................16
2
Page 3
CHARGING WARNINGS
WARNING: Failure to exercise caution while using this
product and comply with the following warnings could
result in product malfunction, electrical issues, excessive heat,
FIRE, and ultimately injury and property damage.
• NEVER LEAVE CHARGING BATTERIES UNATTENDED.
• NEVER CHARGE BATTERIES OVERNIGHT.
• Never attempt to charge non-rechargeable batteries.
• Never leave the power supply, charger and battery
unattended during use.
• Never attempt to charge dead, damaged or wet battery packs.
• Never attempt to charge a battery pack containing different
types of batteries.
• Never allow children under 14 years of age to charge
battery packs.
• Never charge batteries in extremely hot or cold places or
place in direct sunlight.
• Never charge a battery if the cable has been pinched or shorted.
• Never connect the charger if the power cable has been
pinched or shorted.
• Never attempt to dismantle the charger or use a damaged
charger.
• Never drop charger or batteries.
• Never place the charger or battery on a car seat, carpet or similar.
• Never attempt to charge a battery that is already fully
charged or just slightly discharged.
• Never attempt to charge batteries that require a different
charge technique from NiCd, NiMh, LiPo or Gel cell
(Pb, Lead acid).
• Never attempt to charge a battery tted with an integral
charge circuit or a protection circuit.
• Never attempt to charge batteries installed in a device or
which are electrically linked to other components.
• Never attempt to charge batteries that are not expressly
stated by the manufacturer to be suitable for the currents
the charger delivers during the charge process.
• Always place the charger and the battery on a heatresistant, in ammable and nonconductive surface.
• Always keep all the in ammable volatile materials away
from operating area.
• Always keep the charger well away from dust, damp, rain,
heat, direct sunshine and vibration.
• Always use only rechargeable Li-Po batteries designed for
use with this type of charger.
• Always inspect the battery before charging.
• Always keep the battery away from any material that could
be affected by heat.
• Always monitor the charging area and have a re
extinguisher available at all times.
• Always end the charging process if the battery becomes
hot to the touch or starts to change form (swell) during the
charge process.
• Always connect the charge cable to the charger rst, then
connect the battery to avoid short circuit between the charge
leads. Reverse the sequence when disconnecting.
• Always connect the positive red leads (+) and negative
black leads (–) correctly.
• Always disconnect the battery after charging, and let the
charger cool between charges.
• Always charge in a well-ventilated area.
• Always terminate all processes and contact Horizon Hobby if
the product malfunctions.
• Always supervise children and ensure they DO NOT play
with or attempt to use this appliance.
WARNING: Never leave charger unattended, exceed
maximum charge rate, charge with non-approved
batteries or charge batteries in the wrong mode. Failure to
comply may result in excessive heat, re and serious injury.
CAUTION: Always ensure the battery you are
charging meets the speci cations of this charger and
that the charger settings are correct. Not doing so can result
in excessive heat and other related product malfunctions,
which can lead to user injury or property damage. Please
contact Horizon Hobby or an authorized retailer with
compatibility questions.
3
Page 4
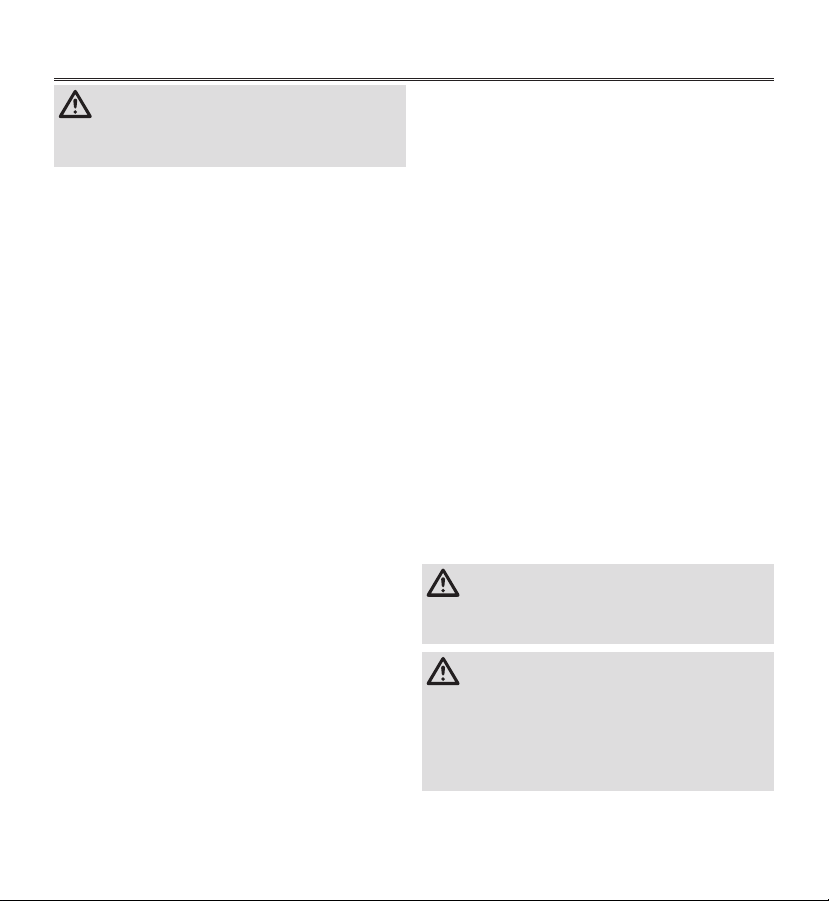
Box Contents
1. Onyx 350 Charger
2. AC Power Cord
3. IC3 to Deans charge cables (2)
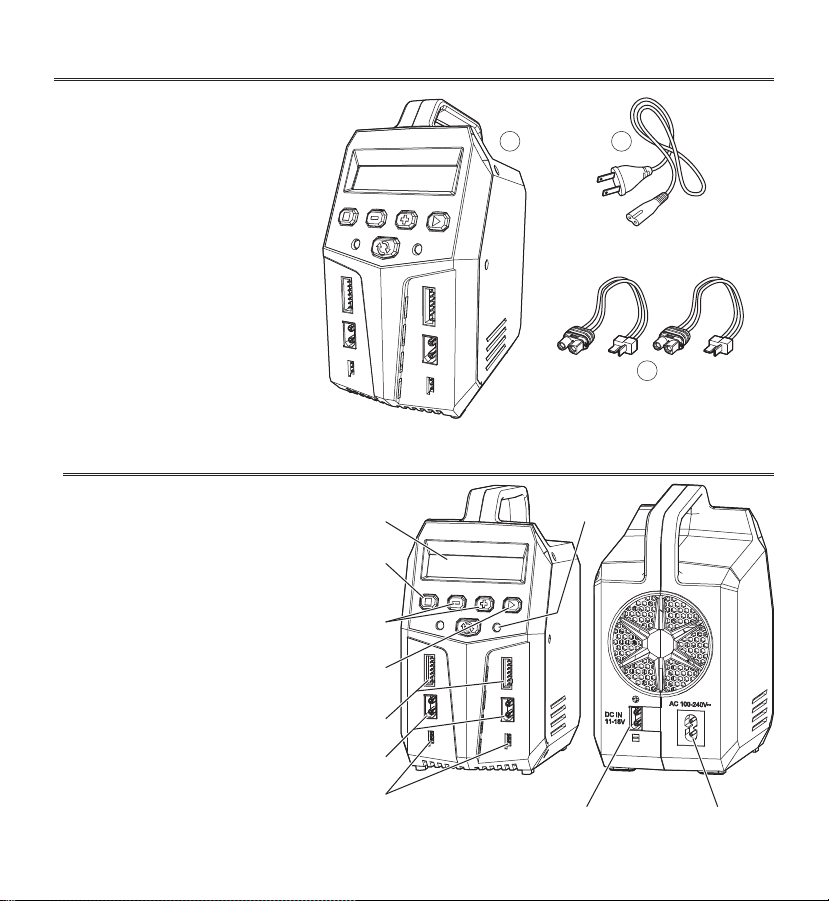
Features
12
3
LCD Display
Scroll Through the Main Menu
Stop Any Charge Processes
Alter Values
See The Status Of Individual Cells In Balance Charge Mode
Resume or Start Charge Processes
Con rm Any Action
Balance Ports
Power Output Ports
Temperature Sensor Ports
4
LED Indicator
DC Input
AC Input Power Port
AC 100-240V
Page 5

Specifi cations
ONXC4100
Net Weight 850g
Dimensions (L × W × H) 178 × 135 × 96mm
AC Power Input Voltage 100–240V
Display Type 2 × 16 LCD, Blue backlight
External Ports
Delta Peak Detection for
NiMH/NiCd
Battery Cutoff Temperature 20ºC/68ºF–80ºC/176ºF (adjustable)
NiMH/NiCd: Delta peak detection
Charge Voltage
Balance Current 500mA/cell
Reading Voltage Range 0.1–26.1V/cell
Battery Types/Cells
Battery Capacity Range NiMH/NiCd: 100–50000mAh, LiPo/LiHV/LiFe/LiIon: 100–50000mAh, Pb: 100–50000mAh
Charge Current 0.1A–12.0A
Safety Timer 1–120 minutes / OFF
Charge Wattage 100W × 2
Discharge Current 0.1A–2.0A
Discharge Cut-off Voltage
Discharge Wattage 10W
Balance Cells 2–6 cells
Memory 10 different charge/discharge pro les
Charge Method C/CV for lithium types and lead (Pb) batteries, Delta-peak Sensitivity for NiMH/NiCd
LiHV: 4.20–4.35V/cell
LiIon: 4.08–4.1V/cell
Pb AGM: 2.45V/cell
LiPo/LiHV/LiFe/LiIon: 1–6cells
NiMH/NiCd: 1–15cells
Pb: 2–20V
NiMH/NiCd: 0.1–1.1V/cell
LiHV: 3.1–3.4V/Cell
LiIon: 2.9–3.2V/cell
1 6S Balance Socket-XH, Temperature Probe Socket,
Battery Socket, DC Input
3-15mV/cell / Default: 4mV/cell
LiPo: 4.18–4.20V/cell
LiFe: 3.58–3.6V/cell
Pb Normal: 2.4V/cell
Pb Cold: 2.45V/cell
LiPo: 3.0–3.3V/cell
LiFe: 2.6–2.9V/cell
Pb: 1.8–2.0V/cell
5
Page 6

Special Features
Dual Channel Charger
The Onyx® 350 allows you to charge 2 batteries with different
chemistries simultaneously, and it will intelligently and
automatically initiate the charging to their maximum capacity.
Power of each channel is 100W.
Optimized Operating Software
The Onyx 350 features an AUTO function that automatically
sets the current during charging/discharging. When charging
lithium batteries, this may prevent overcharging, which may
lead to a re. If the charger detects a malfunction, it will
disconnect the circuit automatically and sound an alarm.
Settings can be con gured by the user.
Balance Voltage Calibration
The Onyx 350 allows you to calibrate the balance voltage
with a 6S LiPo battery. (For more information please contact
Horizon Product support)
Memory of Last Operation
The Onyx 350 will memorize your last operation of charging/
discharging before powering down.
AGM Charge and Cold Charge
For Pb batteries, there are two charging modes: AGM charge
and Cold charge.
Battery Memory (Data Store/Load)
Store up to 10 different charge/discharge pro les for each
channel. You can keep the data pertaining to program setting
of the battery of continuous charging or discharging. Users
can call out these data at any time without any special
program setting.
Terminal Voltage Control(TVC)
Allows user to change the end voltage. (for expert user only)
Balancing Individual Cells Battery During Discharging
During the process of discharging, the Onyx 350 can
monitor and balance each cell of the battery individually.
An error message will be appear and the process will end
automatically if the voltage of any single one cell is abnormal.
• See the status of individual Lithium cells (works in any
charge, discharge and storage modes)
• Capacity percentage
• Final voltage when the program ends
• Input voltage
• Safety timer and duration of time in minutes
• Cutoff temperature
6
• Internal and external temperature
(Temperature probe needs to be connected to show
external temperature.)
• Capacity cut-off and value of the set capacity limit
Fast Charge and Storage Mode of Lithium Battery
Fast charge mode shortens the overall charge time required
for lithium batteries with a slight reduction in overall capacity.
Storage mode is used for charging or discharging lithium
batteries that will not be used for an extended period of time.
Re-Peak Mode of NiMH/NiCd Battery
In re-peak charge mode, the charger can peak charge the
battery once, twice or three times in a row automatically. This
is good for making sure the battery is fully charged.
Cyclic Charging/Discharging
A series of 1 to 5 charge to discharge (>) or discharge to
charge cycles can be used for refreshing older batteries and
improve cell balance.
Automatic Charging Current Limit
Set the upper limit of the charging current when charging
your NiMH or NiCd battery, battery. This is useful for NiMH
batteries with low impedance and capacity in the ‘AUTO’
charging mode.
Battery Voltage Meter
Check battery’s total voltage, the highest voltage, the lowest
voltage and each cell’s voltage.
Battery Internal Resistance Meter
Check battery voltage and battery internal resistance.
Capacity Limit
The charging capacity is always calculated as the charging
current multiplied by time. If the charging capacity exceeds
the limit, the process will be terminated automatically when
you reach the set maximum value.
Temperature Threshold
The battery’s internal chemical reaction will cause the
temperature of the battery to rise. If the temperature limit
is reached, the process will be terminated. This function is
only available by connecting the optional temperature probe
(DYN5033).
Processing Time Limit
You can limit the maximum process time to avoid
overcharging the battery.
Page 7

Standard Battery Parameters
LiPo LiIon LiFe LiHV NiCd NiMH Pb
Nominal Voltage 3.7V/cell 3.6V/cell 3.3V/cell 3.7V/cell 1.2V/cell 1.2V/cell 2.0V/cell
Max Charge Voltage 4.2V/cell 4.1V/cell 3.6V/cell 4.35V/cell 1.5V/cell 1.5V/cell 2.46V/cell
Storage Voltage 3.8V/cell 3.7V/cell 3.3V/cell 3.85V/cell n/a n/a n/a
Allowable Fast Charge ≤1C ≤1C ≤4C ≤1C 1C-2C 1C-2C ≤0.4C
Min. Discharge Voltage
3.0–3.3V/
cell
2.9–3.2V/
cell
2.6–2.9V/
cell
3.1–3.4V/
cell
0.1–3.4V/
cell
0.1–1.1V/
cell
1.8V/cell
WARNING: Always ensure you are inputting the correct voltage for your battery type. Incorrect settings may result in
re, causing personal injury or damage to property.
Program Flow Chart
–+
BATT/PROGRAM
LiPO BATT
ENTER
–+
BATT/PROGRAM
LiFe BATT
ENTER
–+
BATT/PROGRAM
LiIo BATT
ENTER
–+
BATT/PROGRAM
LiHV BATT
ENTER
–+
BATT/PROGRAM
NiMH BATT
ENTER
–+
BATT/PROGRAM
NiCd BATT
ENTER
–+
BATT/PROGRAM
Pb BATT
ENTER
–+
Continued on page 8.
LiPo BALANCE CHG
2.0A 7.4V (2S)
LiFe BALANCE CHG
2.0A 6.6V (2S)
LiIo BALANCE CHG
2.0A 7.2V (2S)
LiHV BALANCE CHG
2.0A 7.6V (2S)
NiMH CHARGE
CURRENT 2.0A
NiCd CHARGE
CURRENT 2.0A
Pb NORMAL CHG
2.0A 2.0V (1P)
–
LiPo CHARGE
2.0A 7.4V (2S)
+
–
LiFe CHARGE
2.0A 6.6V (2S)
+
–
LiIo CHARGE
2.0A 7.2V (2S)
+
–
LiHV CHARGE
2.0A 7.6V (2S)
+
–
NiMH AUTO CHG
CURRENT 2.0A
+
–
NiCd AUTO CHG
CURRENT 2.0A
+
INC
Pb AGM CHG
0.1A 2.0V (1P)
DEC
–
LiPo FAST CHARGE
2.0A 7.4V (2S)
+
–
LiFe FAST CHARGE
2.0A 6.6V (2S)
+
–
LiIo FAST CHARGE
2.0A 7.2V (2S)
+
–
LiHV FAST CHARGE
2.0A 7.6V (2S)
+
–
NiMH DISCHARGE
0.1A CUT:1.0V
+
–
NiCd DISCHARGE
0.1A CUT: 1.0V
+
INC
Pb COLD CHG
0.1A 2.0V (1P)
DEC
–
LiPo STORAGE
2.0A 7.4V (2S)
+
–
LiFe STORAGE
2.0A 6.6V (2S)
+
–
LiIo STORAGE
2.0A 7.2V (2S)
+
–
LiHV STORAGE
2.0A 7.6V (2S)
+
–
NiMH RE-PEAK
1
+
–
NiCd RE-PEAK
1
+
–
Pb DISCHARGE
0.1A 2.0V (1P)
+
–
+
–
+
–
+
–
+
–
+
–
+
LiPo DISCHARGE
2.0A 7.4V (2S)
LiFe DISCHARGE
2.0A 6.6V (2S)
LiIo DISCHARGE
2.0A 7.2V (2S)
LiHV DISCHARGE
2.0A 7.6V (2S)
NiMH CYCLE
CHG > DCHG 1
NiCd CYCLE
CHG > DCHG 1
7
Page 8

Program Flow Chart
Continued from page 7
BATT/PROGRAM
BATT METER
–+
BATT/PROGRAM
BATT RESISTANCE
–+
BATT/PROGRAM
SYSTEM SETTING->
–+
BATT/PROGRAM
BATT MEMORY
ENTER
ENTER
ENTER
Stop
Batt type
ENTER
4.20 4.19 4.19V
0.00 0.00 0.00V
5 3 3 mΩ
5 0 0 mΩ
Version
HW 1.00 FW1.00
[ BATT MEMORY 1 ]
ENTER SET->
START/ENTER > 3 seconds
–
MAIN 12.58V
H4.20V L4.19V
+
–
TOTAL: 16 mΩ
+
–
Safety Timer
ON 120 Min
+
Load Factory Set
–
Enter
+
BATT TYPE
LiPo
ENTER
[ BATT MEMORY 1 ]
C:4.9A D:2.2A
–
+
–
+
–
+
Capacity Cut-Off
ON 5000mAH
DC Input Low
Cut-off 1 LOW
BATT VOLTAGE
7.4V (2S)
[ BATT MEMORY 1 ]
LiPo 7.4V (2S)
–
Temp Cut-Off
ON 50°C 122°F
+
–
Key Beep ON
Buzzer ON
+
–
CHARGE CURRENT
4.9A
+
SAVE PROGRAM
SAVE...
–
Temperature Unit
Celsius
+
–
NiCd Sensitivity
D.Peak 4mV
+
–
DISCHG CURRENT
2.2A
+
SAVE PROGRAM
ENTER
ENTER
–
Rest Time
CHG>DCHG 10Min
+
–+
–
NiMH Sensitivity
D.Peak 4mV
+
–
DISCHG VOLTAGE
3.0V/CELL
+
–+
–
TVC=YOUR RISK
4.2V
+
ENTER CHARGER
LOAD...
[ BATT MEMORY 2 ]
ENTER SET->
–
LiPo BALANCE CHG
4.9V 7.4V(2S)
+
BATT TYPE
NiMH
ENTERENTER
–
LiPo CHARGE
4.9A 7.4V(2S)
+
–
BATT VOLTAGE
2.4V (2S)
+
–
LiPo FAST CHARGE
4.9A 7.4V(2S)
+
–
CHARGE CURRENT
3.3A
+
–
LiPo STORAGE
4.9A 7.4V(2S)
+
–
TRICKLE
100mA
+
–
LiPo DISCHARGE
2.2A 7.4V(2S)
+
–
PEAK DELAY
1Min
+
–+
[ BATT MEMORY 2 ]
C:1.0A D:1.0A
ENTER CHARGER
LOAD...
[ BATT MEMORY 3 ]
ENTER SET->
[ BATT MEMORY 2 ]
NiMH 2.4V (2S)
–
NiMH CHARGE
CURRENT 1.0A
+
BATT TYPE
Pb
ENTERENTER
SAVE PROGRAM
SAVE...
–
NiMH Auto CHARGE
CURRENT 1.2A
+
–
BATT VOLTAGE
4.0V (2P)
+
SAVE PROGRAM
ENTER
ENTER
v–
NiMH DISCHARGE
1.0A CUT:2.0V
–
CHARGE CURRENT
3.3A
+
–
DISCHG VOLTAGE
1.1V/CELL
+
NiMH RE-PEAK
2
+
–
DISCHG CURRENT
1.5A
+
–
DISCHG CURRENT
2.2A
+
–
NiMH CYCLE
DCHG>CHG 1
+
–
DISCHG VOLTAGE
1.7V/CELL
+
–+
Pb NORMAL CHG
2.0A 2.0V (1P)
Pb AGM CHG
0.1A 2.0V (1P)
ENTER CHARGER
LOAD...
+
INC
Pb COLD CHG
0.1A 2.0V (1P)
DEC
[ BATT MEMORY 3 ]
C:3.3A D:1.5A
ENTER > 3 Seconds
PB DISCHARGE
0.1A 4.0V (2P)
[ BATT MEMORY 3 ]
Pb 4.0V (2S)
SAVE PROGRAM
SAVE...
ENTER
SAVE PROGRAM
ENTER
–
8
Page 9

Operation Operating Program
BATT/PROG
STOP
DEC INC
STATUS
CHANNEL
ENTER
START
1. Connection
a. Connecting to power source
There are two kinds of power inputs for The Onyx 300,
DC 11-18V and AC 100-240V. Choose one or the other
and connect as shown.
A
BATT PROG/STOP Button:
Used to stop the current process or go back to previous step/screen
DEC – Button:
Used to cycle through the menus and decrease the parameter
value
INC + Button:
Used to cycle through the menus and increase the parameter
value
ENTER/START Button:
Used to enter parameter or store parameter on screen
CHANNEL Button:
Used to switch from Channel A to B or vice versa.
To alter the parameter value, press the START/ENTER button
once. The parameter will begin to blink. Change the value by
pressing the DEC or INC button. Store the value by pressing
the START/ENTER button again. If there is another adjustable
parameter available, it will begin to blink. Change the value
by pressing DEC or INC button. Store the value by pressing
the START/Enter button again. Once there is no longer any
blinking values. the charging process is ready to be initiated.
To start charging, press and hold the START/ENTER button for
3 seconds. To stop charging or to go back to a previous step/
screen, press the BATT PROG/STOP button once.
The charger defaults to the most previously used battery type
program. Change the program mode to Normal, Fast Charge,
Storage, or Discharge modes by pressing the DEC or INC
button. Once nished, press the BATT PROG/STOP button to
enter the BATT PROGRAM screen.
B
12V DC battery or
11~18V DC, 30
amp power supply
WARNING: Never connect AC and DC power to the
charger at the same time.
b. Connecting the battery
WARNING: Before connecting the battery, check to
make sure the parameters are set correctly.
Incorrect settings may result in re, causing personal injury
or damage to property.
To avoid short circuits between the banana plugs,
always connect the charge leads to the charger rst,
then connect them to the battery. Reverse the sequence
when disconnecting the pack.
c. Balance Charge
When using Balance Charge Mode, connect the balance
wire attached to the battery to the balance socket in the
charger, then connect the IC3™ battery connector to
the IC3 device connector on the charger.
Connection of the balance lead is required for operation in
all Lithium modes except for 1S batteries.
WARNING: Failure to connect the battery and charger
properly may result in damage to the charger. To avoid
short circuit, plug the charger into the power supply rst before
connecting a battery to the charger.
AC 100-240V
9
Page 10

2. Getting started
The owcharts show the entire programming menu. It is
highly recommended to have these owcharts handy while
learning to operate this charger.
There are two main ways in which to set the charger.
1. A memory pro le is available for setting and storing
pertinent information for up to 10 different batteries.
Once a battery’s information is stored into a memory it
will be retained until changed again manually. Recalling
a battery’s memory number makes the charger instantly
ready to go!
2. If you do not wish to use the battery memories, this
charger can be manually set before each use.
Manually setting:
BATT/PROGRAM
START/ENTER
LiPo BALANCE CHG
2.0A 11.1V (3S)
START/ENTER
LiPo BALANCE CHG
2.0A 11.1V (3S)
START/ENTER
LiPo BALANCE CHG
2.0A 11.1V (3S)
3. BATT/PROGRAM Select
LiPO BATT
Press INC and DEC to go through all the
programs and press START/ENTER to enter
LiPo BATT Program.
4. Mode Select
Press INC and DEC to go through all the
modes and press START/ENTER to enter LiPo
Balance Charge Mode.
5. Battery Settting
Press START/ENTER. The current value will
start to blink. Press INC and DEC to change
the value and press START/ENTER to con rm
your setting.
At the same time, the battery cells number
START/ENTER
will start to blink. Press INC and DEC to
change the value and press START/ENTER to
con rm your setting.
LiPo BALANCE CHG
2.0A 11.1V (3S)
START/ENTER
> 3 seconds
BATTERY CHECK
6. Program Start
Press and hold START/ENTER for 3 seconds
to start the program.
The charger is detecting the battery cell.
R shows the number of cells detected by the
R: 3SER S: SER
CANCEL (STOP)
charger and S is the number of cells set by
you at the previous screen. If both numbers
are not identical, press STOP to go back to
previous screen to recheck the number of
cells of the battery pack before going ahead.
10
R shows the number of cells detected by the
R: 3SER S: SER
CONFIRM (ENTER)
START/ENTER
LP4s 1.5A 12.14V
BAL 000: 50 00022
charger and S is the number of cells set by
you at the previous screen. If both numbers
are identical, press START/ENTER to start
charging process.
7. Charging Status Monitor
During charge process, real-time status will
be showed as left screen.
Various Information During the Process
Press INC or DEC during charging or discharging process,
you can inquire various information on LCD screen.
LP4s 1.5A 12.14V
BAL 000: 50 00022
3.91 3.90 3.91 V
3.91 0.00 0.00 V
Fuel = 90%
Cell = 4.10V
5.1 5.2 mΩ
3.2 0 mΩ
Real-time status: battery type, battery cell,
charge current, battery voltage, elapsed
time and charged capacity
INC
Voltage of each cell in the battery pack when
the battery is connected with balance lead.
INC
Charged capacity percentage and average
cell voltage of the battery pack.
INC
Resistance of each cell in the battery pack
when the battery is connected with balance
lead.
LP4s 1.5A 12.14V
BAL 000: 50 00022
DEC
End Voltage
12.6V (3S)
Ext. Temp ---
Int. Temp 37°C
Temp Cut-Off
50°C
Safety Time
ON 200min
Capacity Cut-Off
ON 500mAh
Final voltage when the program ends.
DEC
Internal temperature. Temperature probe is
needed to show external temperature.
DEC
Cut off temperature
DEC
Safety timer ON and duration of time in
minutes.
DEC
Capacity cut-off ON and the setting value
of capacity.
Page 11

8. Program Stop
During the charging process, press STOP to stop the charging process.
9. Program Complete
When the charging process nishes, an audible sound will be heard.
Charging Program
Depends on different battery type, the operation programs are different.
Battery
Type
LiPo
LiHV
LiIon
LiFe
NiMH
NiCd
Pb
Operation
Program
CHARGE This charging mode is for charging LiPo/LiHV/LiFe/LiIon battery in normal mode.
DISCHARGE This mode is for discharging LiPo/LiHV/LiFe/LiIon battery.
STORAGE
FAST CHG
BAL CHARGE This mode is for balancing the voltage of lithium-polymer battery cells while charging.
CHARGE The charger will charge NiMH and NiCd batteries using the charge current set by the user.
AUTO CHG
DISCHARGE This mode is for discharging NiMH/NiCd battery.
RE-PEAK
CYCLE
NORMAL CHG This mode is for charging Pb battery.
AGM CHG This mode is for charging AGM battery.
COLD CHG This mode is for charging Pb battery in cold days when the temperature is 5°C to –20°C.
DISCHARGE This mode is for discharging Pb battery.
For either charging or discharging a lithium battery to a storage voltage in the case that it
may not be used again for some time.
The charging capacity may be a bit less than normal charging but the process time will be
reduced.
In this program the charger detects the condition of the battery connected to the output and
automatically charges the battery.
CAUTION: Never set the max charge current higher than 1C.
In re-peak charge mode, the charger can peak charge the battery once, twice or three
times in a row automatically. This is good for con rming the battery is fully charged, and for
checking how well the battery receives fast charges.
1 to 5 cyclic and continuous process of charge to discharge or discharge to charge is for
battery refreshing and balancing to stimulate the battery’s activity.
Description
11
Page 12

Battery Memory Set and Use
The charger can store up to 10 different charge/discharge
pro les for your convenience, and the stored pro les can be
recalled quickly without having to go through the setup process.
When you are willing to alter the parameter value in the
program, press START/ENTER to make it blink then change
the value with INC or DEC. The value will be stored by
pressing START/ENTER once.
IMPORTANT: All following screens are using a 2S (7.4V)
LiPo battery as an example.
1. Battery Memory Set
[ BATT MEMORY 1 ]
ENTER SET->
START/ENTER
BATT TYPE
LiPo
BATT VOLTS
7.4V ( 2S )
CHARGE CURRENT
4.9A
DSCH CURRENT
2.0A
DSCH VOLTAGE
2.0V/CELL
TVC=YOUR RISK
4.20V
SAVE PROGRAM
ENTER
START/ENTER
SAVE PROGRAM
SAVE
Enter the battery memory program.
(10 different charge/discharge pro les can
be stored).
Set the battery type(LiPo/LiHV/LiFe/LiIon/
NiMH/NiCd/Pb).
INCDEC
Set the voltage and number of cells(1S–6S).
INCDEC
Set the charge current(0.1–12.0A).
INCDEC
Set the discharge current (0.1A–2.0A).
INCDEC
Set the discharge voltage(3.0–3.3V/Cell).
INCDEC
Set the terminal voltage(4.18–4.25V).
INCDEC
Press ENTER to save program.
[ BATT MEMORY 1 ]
LiPo 7.4V (2S)
[ BATT MEMORY 1 ]
C: 4.9A D: 2.2A
START/ENTER
>3 seconds
LiPo BALANCE CHG
4.9A 7.4V(2S)
Indicate the battery type and battery cell of
the saved pro le.
Indicate the charge and discharge current of
the saved pro le.
Press the START/ENTER for 3 seconds to call
out the memory.
Press START/ENTER for 3 seconds to start
the process.
12
Page 13

System Setting
The System Setting Screen displays the following information in sequence. These values may be changed by the user. To
change parameter values, press the START/ENTER button to make the value blink, then use the INC or DEC buttons to increase
or decrease the values. Store the values by pressing START/ENTER again.
Item Selection Description
Safety Timer
ON 120Min
Capacity Cut-Off
ON 5000mAH
Temp Cut-Off
On 50 C 122 F
Temperature Unit
Celsius
Rest Time
CHG>DCHG 10Min
NiMH Sensitivity
D.Peak Default
NiCD Sensitivity
D.Peak Default
Key Beep ON
Buzzer ON
Load Factory Set
Enter
Version
HW: 1.00 FW: 1.10
OFF/ON
(1-720 Min)
OFF/ON
(100–50000 mAh)
OFF/ON
(20 C/68 F –
80 C/176 F)
Celsius
Fahrenheit
1–60Min A rest time allows the battery to cool down between charging/discharging cycles.
Default: 4mV/Cell
3–15mV/Cell
OFF/ON
When you start a charge process, the integral safety timer automatically starts running
at the same time. This is programmed to prevent overcharging the battery if it proves
to be faulty, or if the termination circuit cannot detect the battery full. The value for the
safety timer should be generous enough to allow a full charge of the battery.
This program sets the maximum charge capacity that will be supplied to the battery
during charge. If the delta peak voltage is not detected or the safety timer expires for any
reason, this feature will automatically stop the process at the selected capacity value.
The battery’s internal chemical reaction will cause the temperature of the battery to
rise. If the temperature limit is reached, the process will be terminated.
You can choose the temperature displayed as Celsius or Fahrenheit.
This program is for NiMH/NiCd battery only. When the charger detects the delta peak
value you set, the charger will say the battery is fully charged.
A higher setting may be required in order to fully charge aged or under used batteries.
The key beep sounds at every time the buttons are touched to con rm your action. A beep
or buzzer sounds at various times during operation to alert different mode changes.
Press ENTER to reset all settings to their factory default position.
It indicates the hardware and rmware version.
13
Page 14

Battery Meter
The Battery Meter can check the battery’s total voltage, the
highest voltage, the lowest voltage and each cell’s voltage.
Connect the balance wire attached to the
battery to the balance socket and the
IC3 battery connector to the IC3 device
connector on the front of the charger.
This diagram shows the
correct way to connect
your battery to check
the voltage.
BATT/PROGRAM
BATT METER
START/ENTER
4.20 4.19 4.19 V
4.18 0.00 0.00 V
MAIN 16.76V
H4.200V L4.182V
Press the START/ENTER to enter the Lithium
Battery Meter program.
The screen indicate each cell’s voltage.
INC
The screen indicate the total voltage, the
highest voltage and the lowest voltage.
Battery Resistance Meter
The user can the check battery’s total resistance, the highest
resistance, the lowest resistance and each cell’s resistance.
Connect the balance wire attached to the battery to the
balance socket and the IC3 battery connector to the IC3
device connector in front of the charger.
BATT/PROGRAM
BATT RESISTANCE
START/ENTER
012 005 005 mΩ
006 mΩ
TOTAL: 28mΩ
H: 12mΩ L: 5mΩ
Press the START/ENTER to enter the Lithium
Battery Resistance program.
The screen indicate each cell’s resistance.
INC
The screen indicate the total resistance, the
highest resistance and the lowest resistance.
Warning and Error Messages
BALANCE WIRES
NOT CONNECTED
REVERSE POLARITY
CONNECTION BREAK
CONNECT ERROR
CHECK MAIN PORT
BALANCE CONNECT
ERROR
DC IN TOO LOW
DC IN TOO HIGH
CELL ERROR
LOW VOLTAGE
CELL ERROR
HIGH VOLTAGE
CELL ERROR
VOLTAGE-INVALID
CELL NUMBER
INCORRECT
INT. TEMP. TOO HI
EXT. TEMP. TOO HI
OVER CHARGE
CAPACITY LIMIT
OVER THE LIMIT
BATTERY WAS FULL
NO POWER
DISTRIBUTED
Indicates that the balance lead from the battery
is not connected to the charger or is faulty
Incorrect polarity connected.
Current process has been interrupted. Check
all connections.
The battery connection is wrong or faulty.
The balance connect is wrong or faulty.
Input voltage is less than 11V.
Input voltage is greater than 18V.
Voltage of one cell in the battery pack is too low.
Voltage of one cell in the battery pack is too high.
Voltage of one cell in the battery pack is out of
normal range for the chemistry chosen.
The cell number is wrong.
The internal temperature of the unit is too high.
The external temperature of the battery is
too high.
The battery capacity has reached a mAh that
reaches the maximum capacity the user sets.
The charging time has reached the maximum
charging time which the user sets.
The battery voltage is higher than the
maximum voltage which the user sets when
charging in balance mode.
No power allocated to the charger.
14
Page 15

1-Year Limited Warranty
What this Warranty Covers - Horizon Hobby, LLC, (Horizon)
warrants to the original purchaser that the product purchased
(the “Product”) will be free from defects in materials and
workmanship for a period of 1 year from the date of purchase.
What is Not Covered
This warranty is not transferable and does not cover (i)
cosmetic damage, (ii) damage due to acts of God, accident,
misuse, abuse, negligence, commercial use, or due to
improper use, installation, operation or maintenance, (iii)
modi cation of or to any part of the Product, (iv) attempted
service by anyone other than a Horizon Hobby authorized
service center, (v) Product not purchased from an authorized
Horizon dealer, (vi) Product not compliant with applicable
technical regulations, or (vii) use that violates any applicable
laws, rules, or regulations.
OTHER THAN THE EXPRESS WARRANTY ABOVE, HORIZON
MAKES NO OTHER WARRANTY OR REPRESENTATION, AND
HEREBY DISCLAIMS ANY AND ALL IMPLIED WARRANTIES,
INCLUDING, WITHOUT LIMITATION, THE IMPLIED
WARRANTIES OF NON-INFRINGEMENT, MERCHANTABILITY
AND FITNESS FOR A PARTICULAR PURPOSE. THE
PURCHASER ACKNOWLEDGES THAT THEY ALONE HAVE
DETERMINED THAT THE PRODUCT WILL SUITABLY MEET THE
REQUIREMENTS OF THE PURCHASER’S INTENDED USE.
Purchaser’s Remedy
Horizon’s sole obligation and purchaser’s sole and exclusive
remedy shall be that Horizon will, at its option, either (i)
service, or (ii) replace, any Product determined by Horizon
to be defective. Horizon reserves the right to inspect any
and all Product(s) involved in a warranty claim. Service or
replacement decisions are at the sole discretion of Horizon.
Proof of purchase is required for all warranty claims. SERVICE
OR REPLACEMENT AS PROVIDED UNDER THIS WARRANTY IS
THE PURCHASER’S SOLE AND EXCLUSIVE REMEDY.
Limitation of Liability
HORIZON SHALL NOT BE LIABLE FOR SPECIAL, INDIRECT,
INCIDENTAL OR CONSEQUENTIAL DAMAGES, LOSS OF
PROFITS OR PRODUCTION OR COMMERCIAL LOSS IN ANY
WAY, REGARDLESS OF WHETHER SUCH CLAIM IS BASED IN
CONTRACT, WARRANTY, TORT, NEGLIGENCE, STRICT LIABILITY
OR ANY OTHER THEORY OF LIABILITY, EVEN IF HORIZON HAS
BEEN ADVISED OF THE POSSIBILITY OF SUCH DAMAGES.
Further, in no event shall the liability of Horizon exceed the
individual price of the Product on which liability is asserted.
As Horizon has no control over use, setup, nal assembly,
modi cation or misuse, no liability shall be assumed nor
accepted for any resulting damage or injury. By the act of use,
setup or assembly, the user accepts all resulting liability. If you
as the purchaser or user are not prepared to accept the liability
associated with the use of the Product, purchaser is advised to
return the Product immediately in new and unused condition to
the place of purchase.
Law
These terms are governed by Illinois law (without regard to
con ict of law principals). This warranty gives you speci c
legal rights, and you may also have other rights which vary
from state to state. Horizon reserves the right to change or
modify this warranty at any time without notice.
WARRANTY SERVICES
Questions, Assistance, and Services
Your local hobby store and/or place of purchase cannot
provide warranty support or service. Once assembly, setup or
use of the Product has been started, you must contact your
local distributor or Horizon directly. This will enable Horizon to
better answer your questions and service you in the event that
you may need any assistance. For questions or assistance,
please visit our website at www.horizonhobby.com, submit a
Product Support Inquiry, or call the toll free telephone number
referenced in the Warranty and Service Contact Information
section to speak with a Product Support representative.
Inspection or Services
If this Product needs to be inspected or serviced and is
compliant in the country you live and use the Product in,
please use the Horizon Online Service Request submission
process found on our website or call Horizon to obtain a Return
Merchandise Authorization (RMA) number. Pack the Product
securely using a shipping carton. Please note that original boxes
may be included, but are not designed to withstand the rigors
of shipping without additional protection. Ship via a carrier that
provides tracking and insurance for lost or damaged parcels, as
Horizon is not responsible for merchandise until it arrives and is
accepted at our facility. An Online Service Request is available
15
Page 16

at http://www.horizonhobby.com/content/service-center_
render-service-center. If you do not have internet access, please
contact Horizon Product Support to obtain a RMA number along
with instructions for submitting your product for service. When
calling Horizon, you will be asked to provide your complete
name, street address, email address and phone number where
you can be reached during business hours. When sending
product into Horizon, please include your RMA number, a list
of the included items, and a brief summary of the problem. A
copy of your original sales receipt must be included for warranty
consideration. Be sure your name, address, and RMA number
are clearly written on the outside of the shipping carton.
NOTICE: Do not ship LiPo batteries to Horizon. If you
have any issue with a LiPo battery, please contact
the appropriate Horizon Product Support offi ce.
Warranty Requirements
For Warranty consideration, you must include your original
sales receipt verifying the proof-of-purchase date. Provided
warranty conditions have been met, your Product will be
serviced or replaced free of charge. Service or replacement
decisions are at the sole discretion of Horizon.
Warranty and Service Contact Information
Non-Warranty Service
Should your service not be covered by warranty, service
will be completed and payment will be required without
noti cation or estimate of the expense unless the expense
exceeds 50% of the retail purchase cost. By submitting
the item for service you are agreeing to payment of the
service without noti cation. Service estimates are available
upon request. You must include this request with your item
submitted for service.
Non-warranty service estimates will be billed a minimum
of ½ hour of labor. In addition you will be billed for return
freight. Horizon accepts money orders and cashier’s checks,
as well as Visa, MasterCard, American Express, and Discover
cards. By submitting any item to Horizon for service, you
are agreeing to Horizon’s Terms and Conditions found on
our website http://www.horizonhobby.com/content/servicecenter_render-service-center.
ATTENTION: Horizon service is limited to Product
compliant in the country of use and ownership.
If received, a non-compliant Product will not be
serviced. Further, the sender will be responsible
for arranging return shipment of the un-serviced
Product, through a carrier of the sender’s choice
and at the sender’s expense. Horizon will hold
non-compliant Product for a period of 60 days from
notifi cation, after which it will be discarded.
10/2015
Country of
Purchase
United States
of America
16
Horizon Hobby Contact Information Address
Horizon Service Center
(Repairs and Repair Requests)
Horizon Product Support
(Product Technical Assistance)
Sales
servicecenter.horizonhobby.com/RequestForm/
productsupport@horizonhobby.com.
877-504-0233
websales@horizonhobby.com
800-338-4639
2904 Research Rd.
Champaign, Illinois, 61822
USA
Page 17

Supplier’s Declaration of Conformity
350 AC/DC Balance Charger / Discharger
ONXC4100
This device complies with part 15 of the FCC rules. Operation
is subject to the following two conditions: (1) this device
may not cause harmful interference, and (2) this device must
accept any interference received, including interference that
may cause undesired operation.
CAUTION: Changes or modifi cations not expressly
approved by the party responsible for compliance
could void the user’s authority to operate the equipment.
NOTE: This equipment has been tested and found to comply
with the limits for a Class B digital device, pursuant to part
15 of the FCC Rules. These limits are designed to provide
reasonable protection against harmful interference in a
residential installation. This equipment generates, uses and
can radiate radio frequency energy and, if not installed and
used in accordance with the instructions, may cause harmful
interference to radio communications.
However, there is no guarantee that interference will not
occur in a particular installation. If this equipment does cause
harmful interference to radio or television reception, which
can be determined by turning the equipment off and on, the
user is encouraged to try to correct the interference by one or
more of the following measures:
• Reorient or relocate the receiving antenna.
• Increase the separation between the equipment and receiver.
• Connect the equipment into an outlet on a circuit different
from that to which the receiver is connected.
• Consult the dealer or an experienced radio/TV technician
for help.
Horizon Hobby, LLC
2904 Research Road
Champaign, IL 61822
Email: compliance@horizonhobby.com
Web: HorizonHobby.com
17
Page 18

18
Page 19

19
Page 20

®
© 2019 Horizon Hobby, LLC. Onyx, IC3, and the Horizon Hobby Logo are
registered trademarks of Horizon Hobby, LLC.
Created 04/2019 | 60993
 Loading...