

Page 1

Page 2

Content
1. How to get support
1
2. Before installation
1
3. Connect device
2
4. View on mobile via App
3
Steps to view on mobile
3
3 options to add camera to mobile app
6
System setting on mobile app
14
a. Wifi setting for flexible placement
14
b. SD card setting for storage
15
c. View records on mobile app
16
d. Motion alert setting
17
5. View on PC via PC client software
20
PC Client Software Function Illustration
21
a. Alarm setting & motion detected recording setting
22
b. Continuous/ scheduled recording setting
24
c. Set recording path on PC
26
d. Search video records or alarm records
28
e. Modify password
29
6. FAQ: Camera is offline, how to do?
30
Page 3

1
Dear Valued Customer,
Thanks for your business! For any question about your order, please email us
at [email protected] or go to www.onwote.com to get customer
support; more screen-shots of your connection or settings will help us figure
out your problem. We will reply you within 1 business day!
Statement
This guide may have inaccurate content due to hardware or software
upgrading. It is subject to change without notice.
Safety Caution
1. Please do not put any fluid container on the product.
2. Please use the product in ventilated environment and prevent blocking
the vents.
3. Please use included power supply with the product to prevent damage to
the product.
4. Please use the product under its standard working temperature and
humidity.
5. Please obey the regulation and policy in your country and area during the
installation of this product.
Before Installation
This product may require cabling. It is strongly suggested to test all products
and parts, and set up remote access before installation.
Page 4
2
Packing List:
* 1x HD IP Network Camera with an Antenna
*1x Power Adapter for Camera
*1x Network Cable
* 1x Bracket for Camera
* 1x 2 Packs of Screws for Installing Cameras
* 1x Quick User Guide
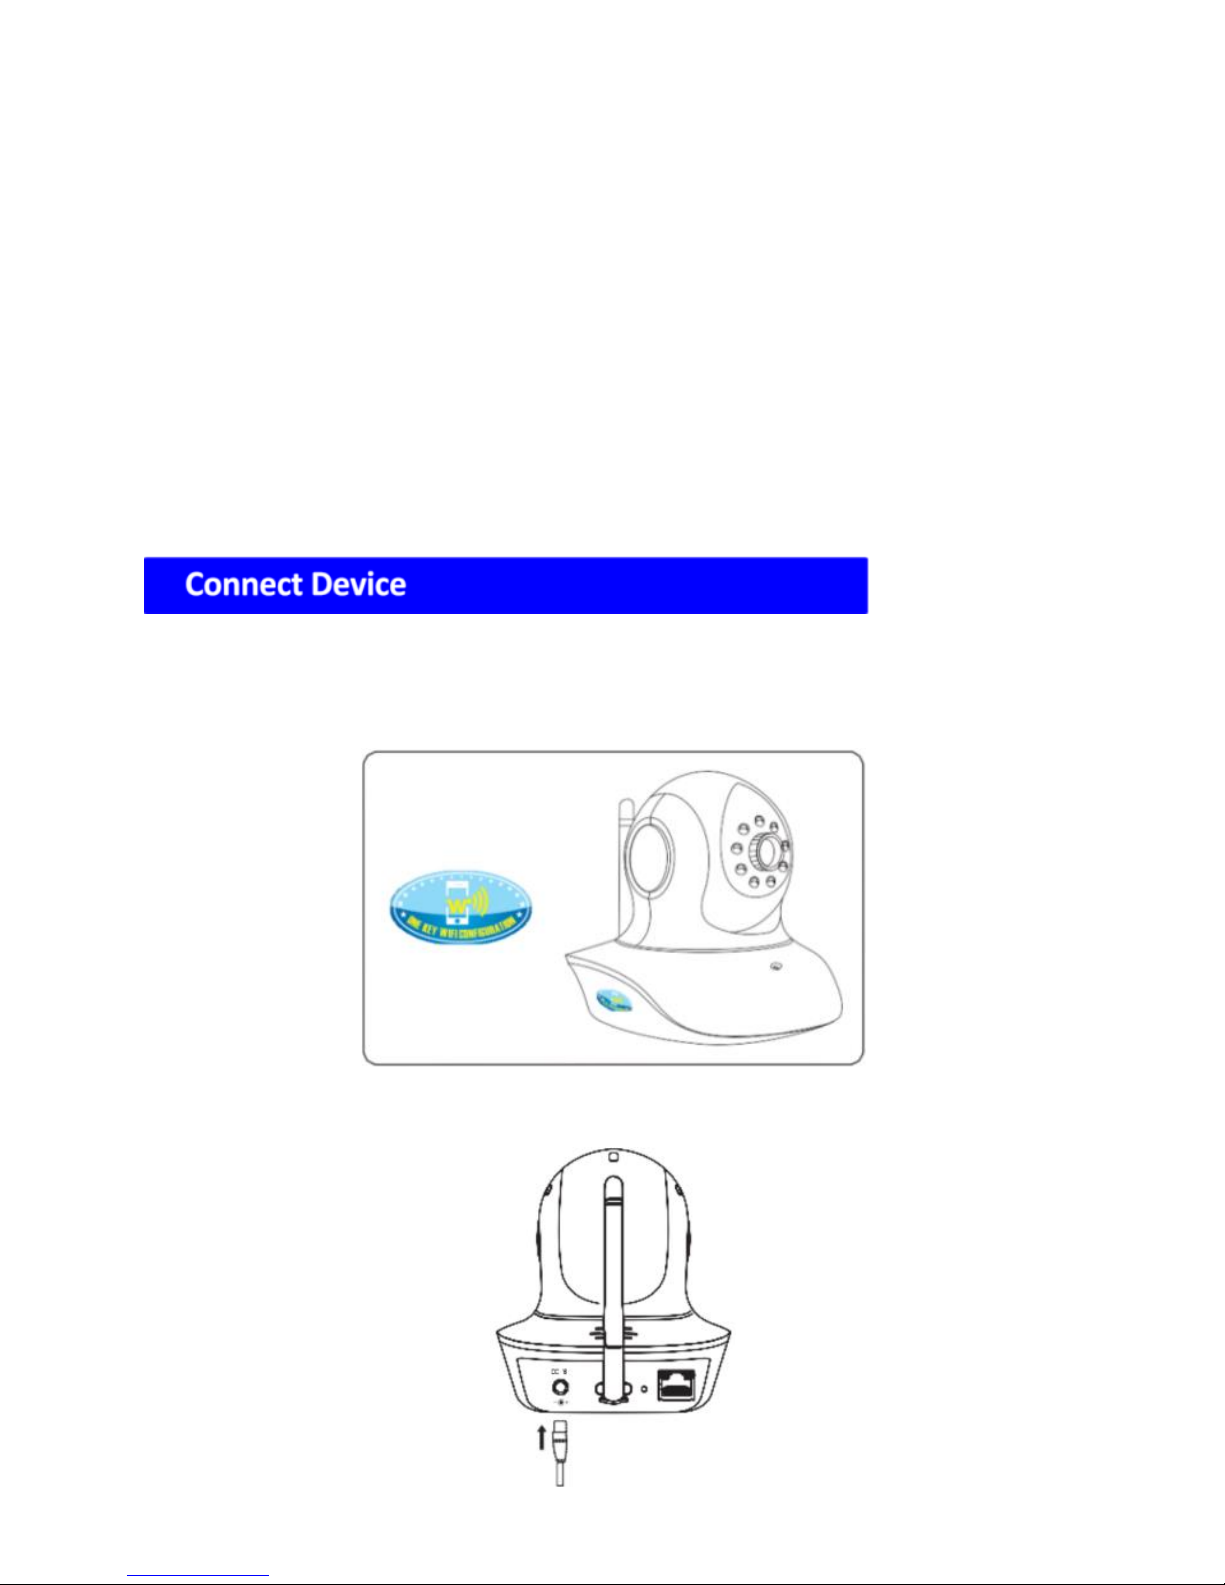
Please check whether there is a sticker like below on the body of the
camera.
1. If there is a sticker - please power on the camera directly.
Page 5
3
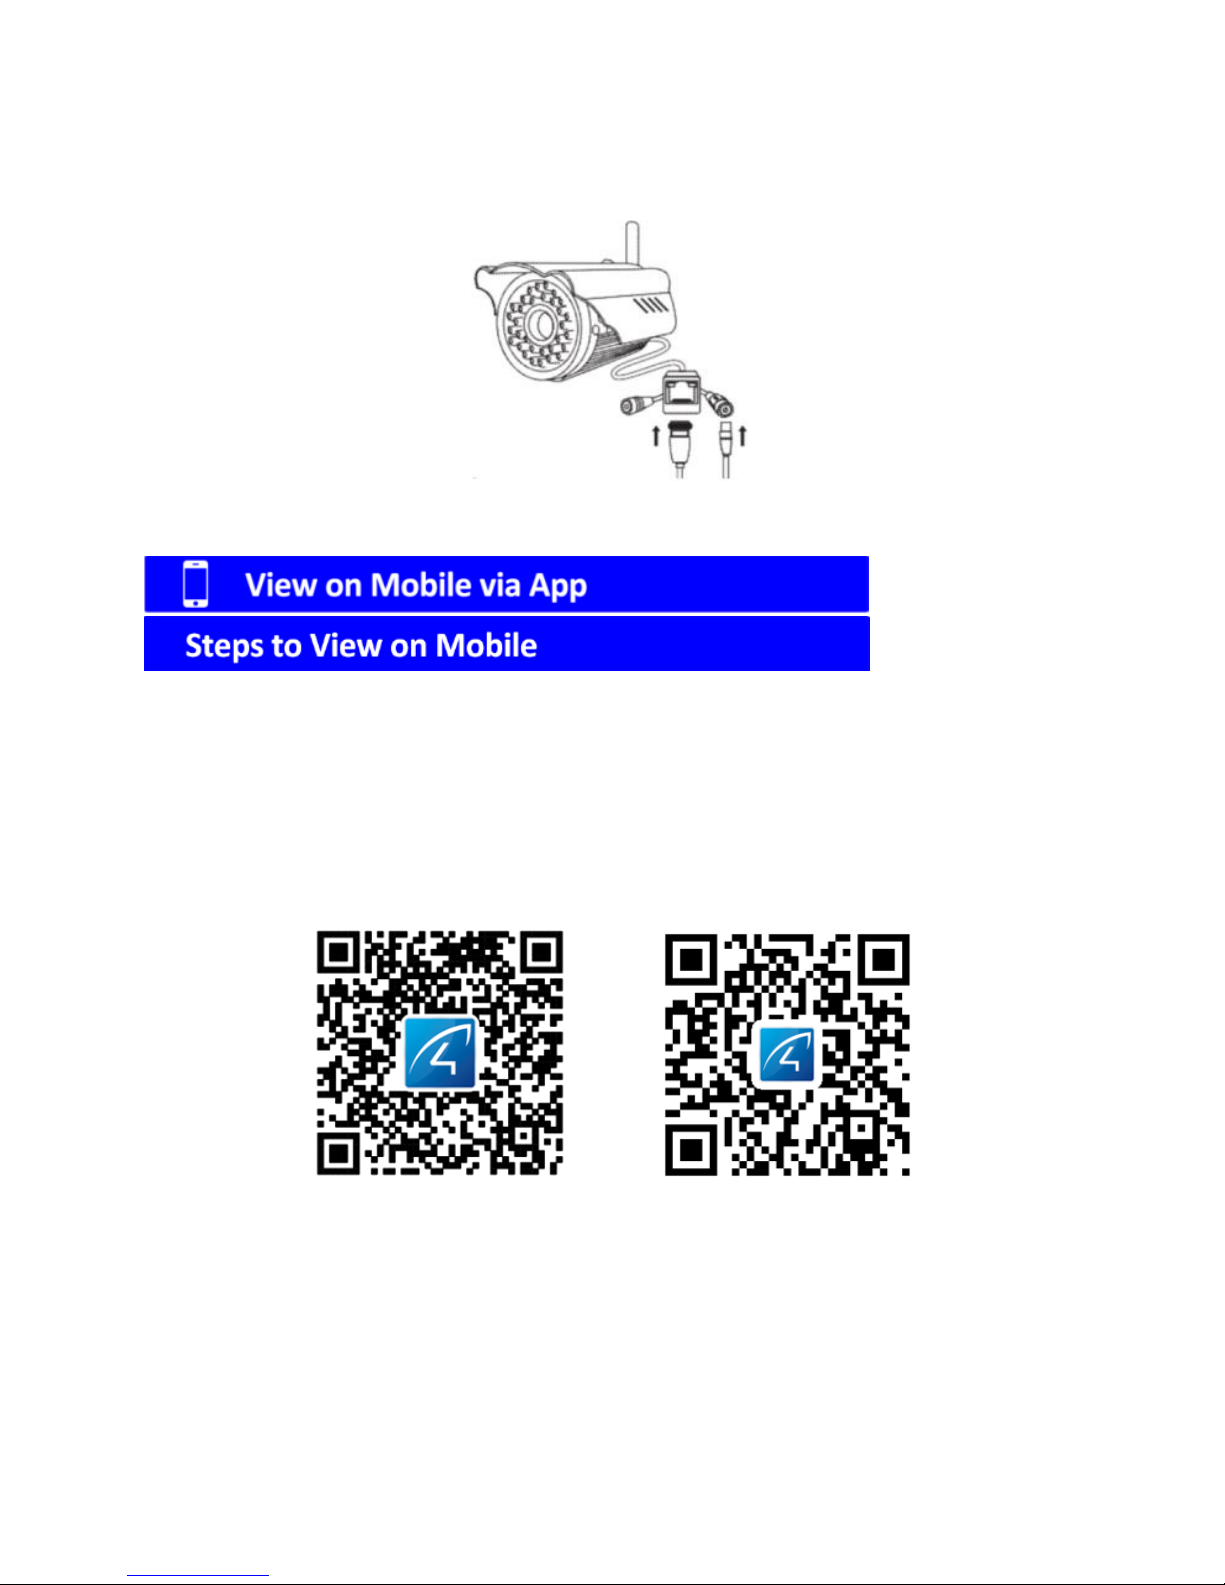
2. If there is no sticker, please power on the camera directly and using the
included 1 meter network cable to connect your camera to the WiFi Router.
1. Download App
Please make sure your smart phone has been connected to your WiFi router
first.
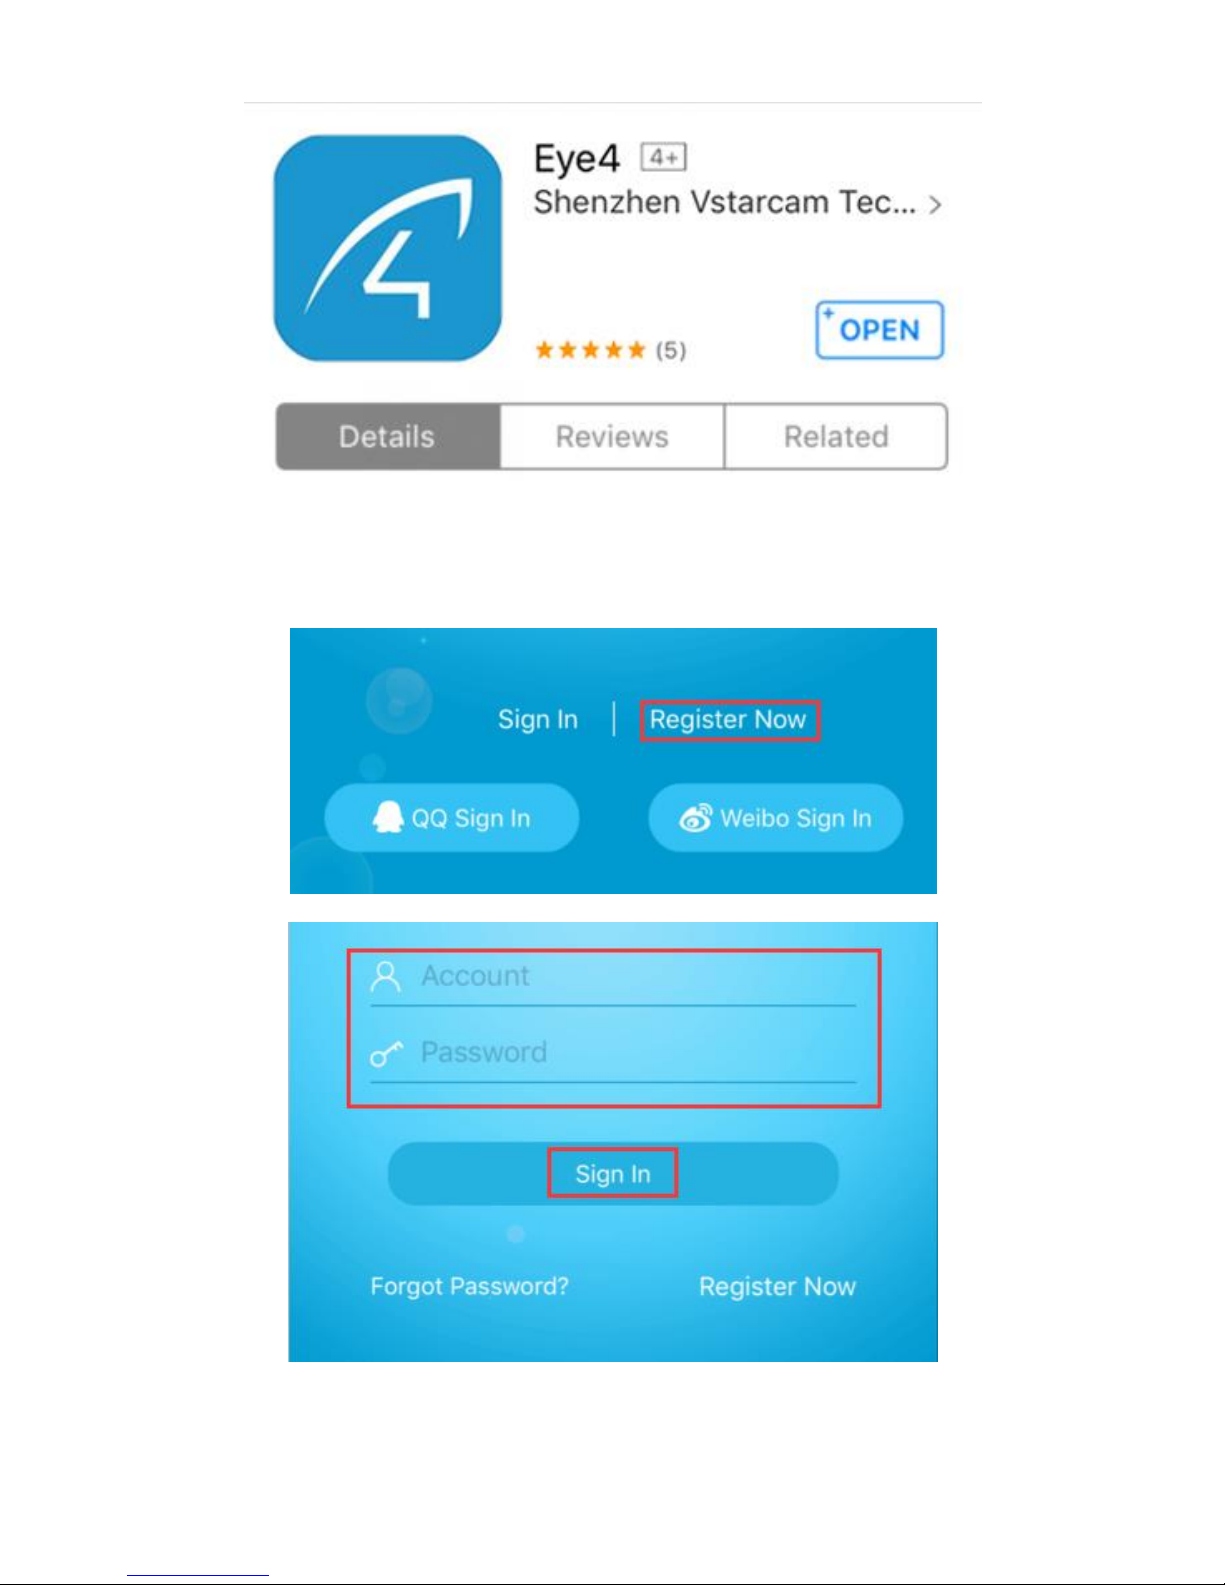
Option1: Scan the QR Code below to download app to view on mobile
For ios For Android
Option 2: Search “Eye4” in App Store or Android market to download.
Page 6
4
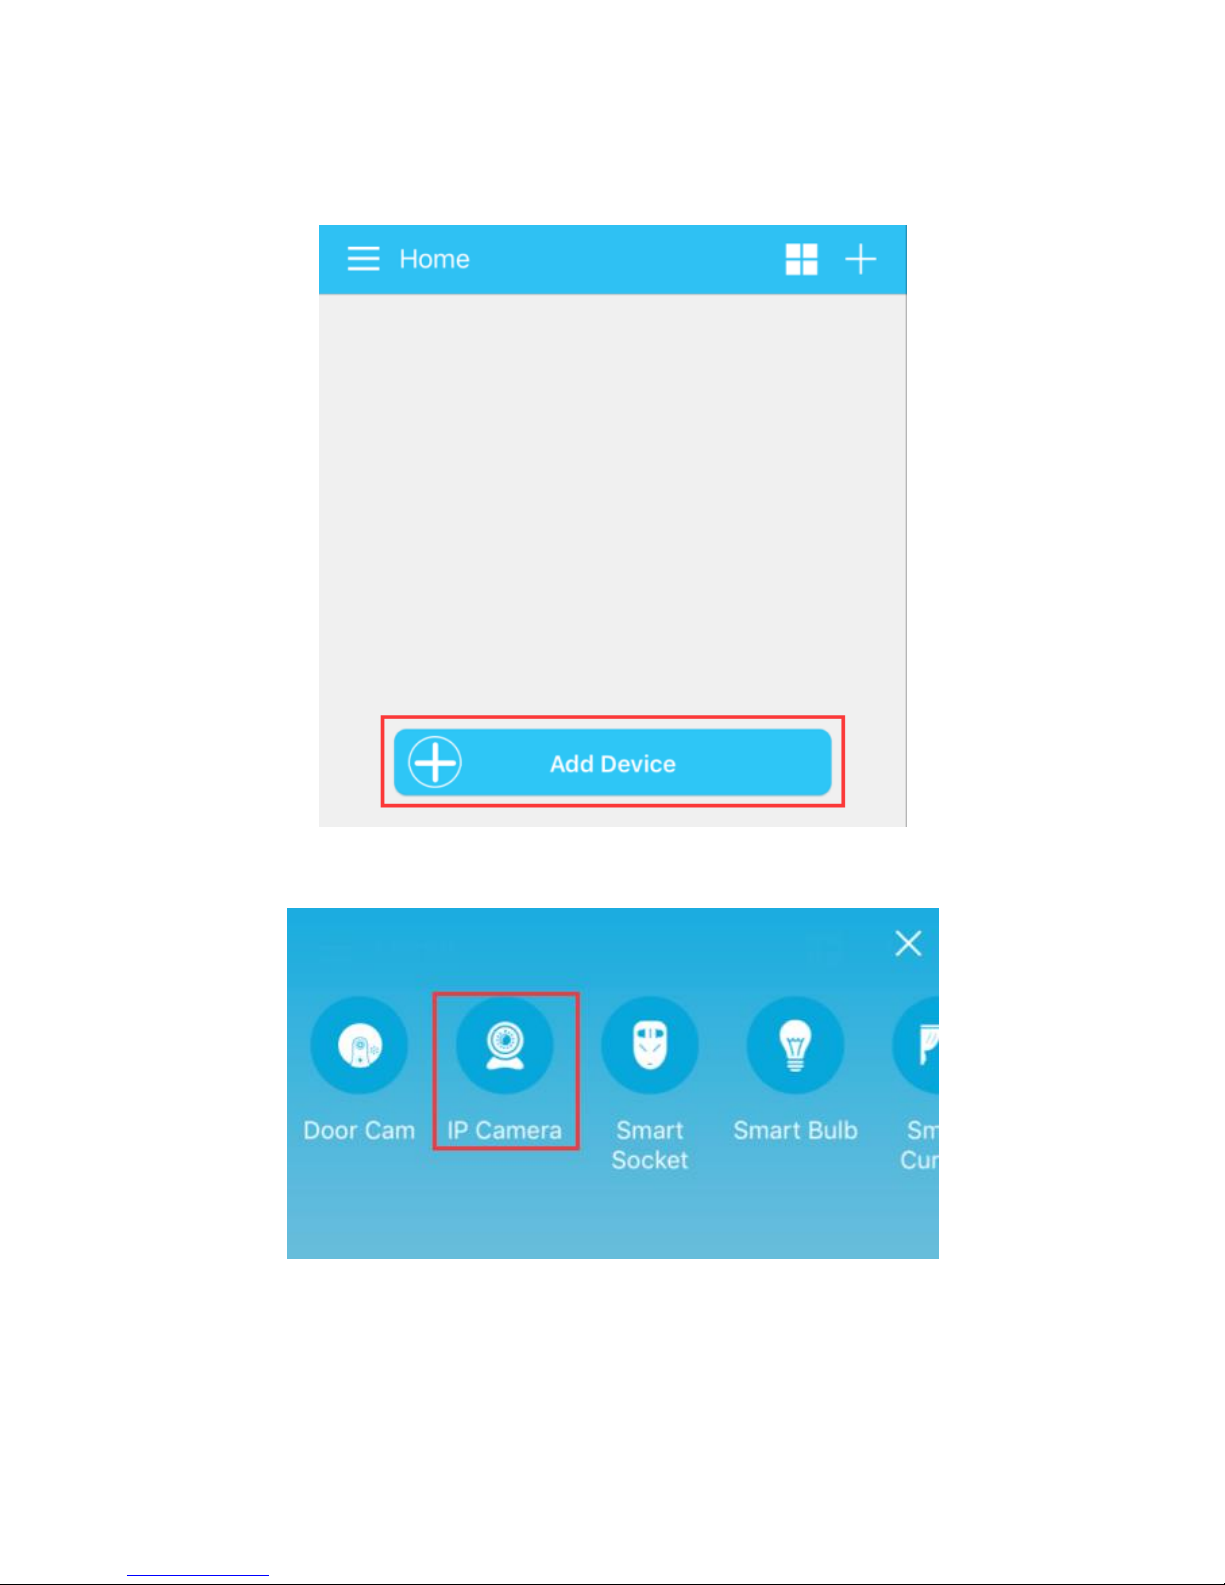
2. Register an account
Install the Eye4 app; register an account and login your account.
Page 7
5
3. Add Camera to your app account.
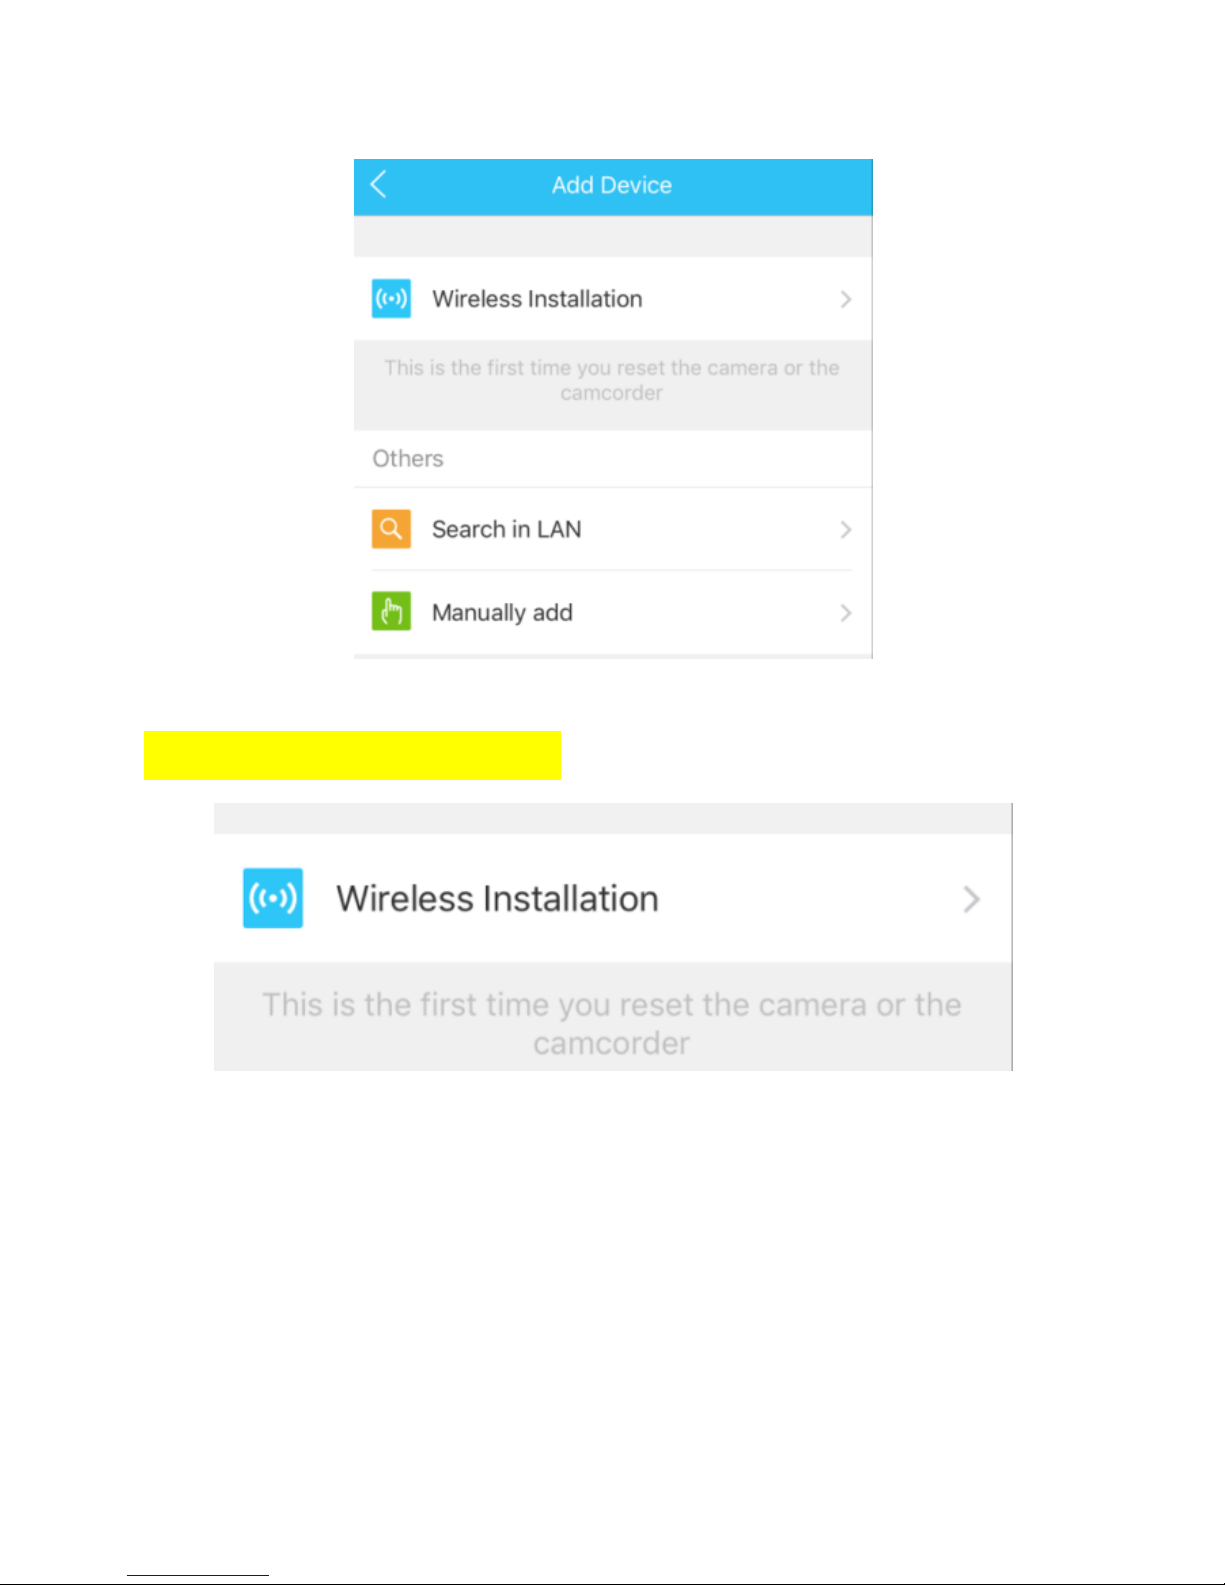
Click “Add Device” or “+” to add device.
4. Pease choose “IP Camera”.
Page 8
6
5. Three options to add camera to mobile app.
Option 1: Wireless Installation
Pair the camera with your Wi-Fi network wireless (No Ethernet cable
required, only works with 2.4g Wi-Fi router configurations.)
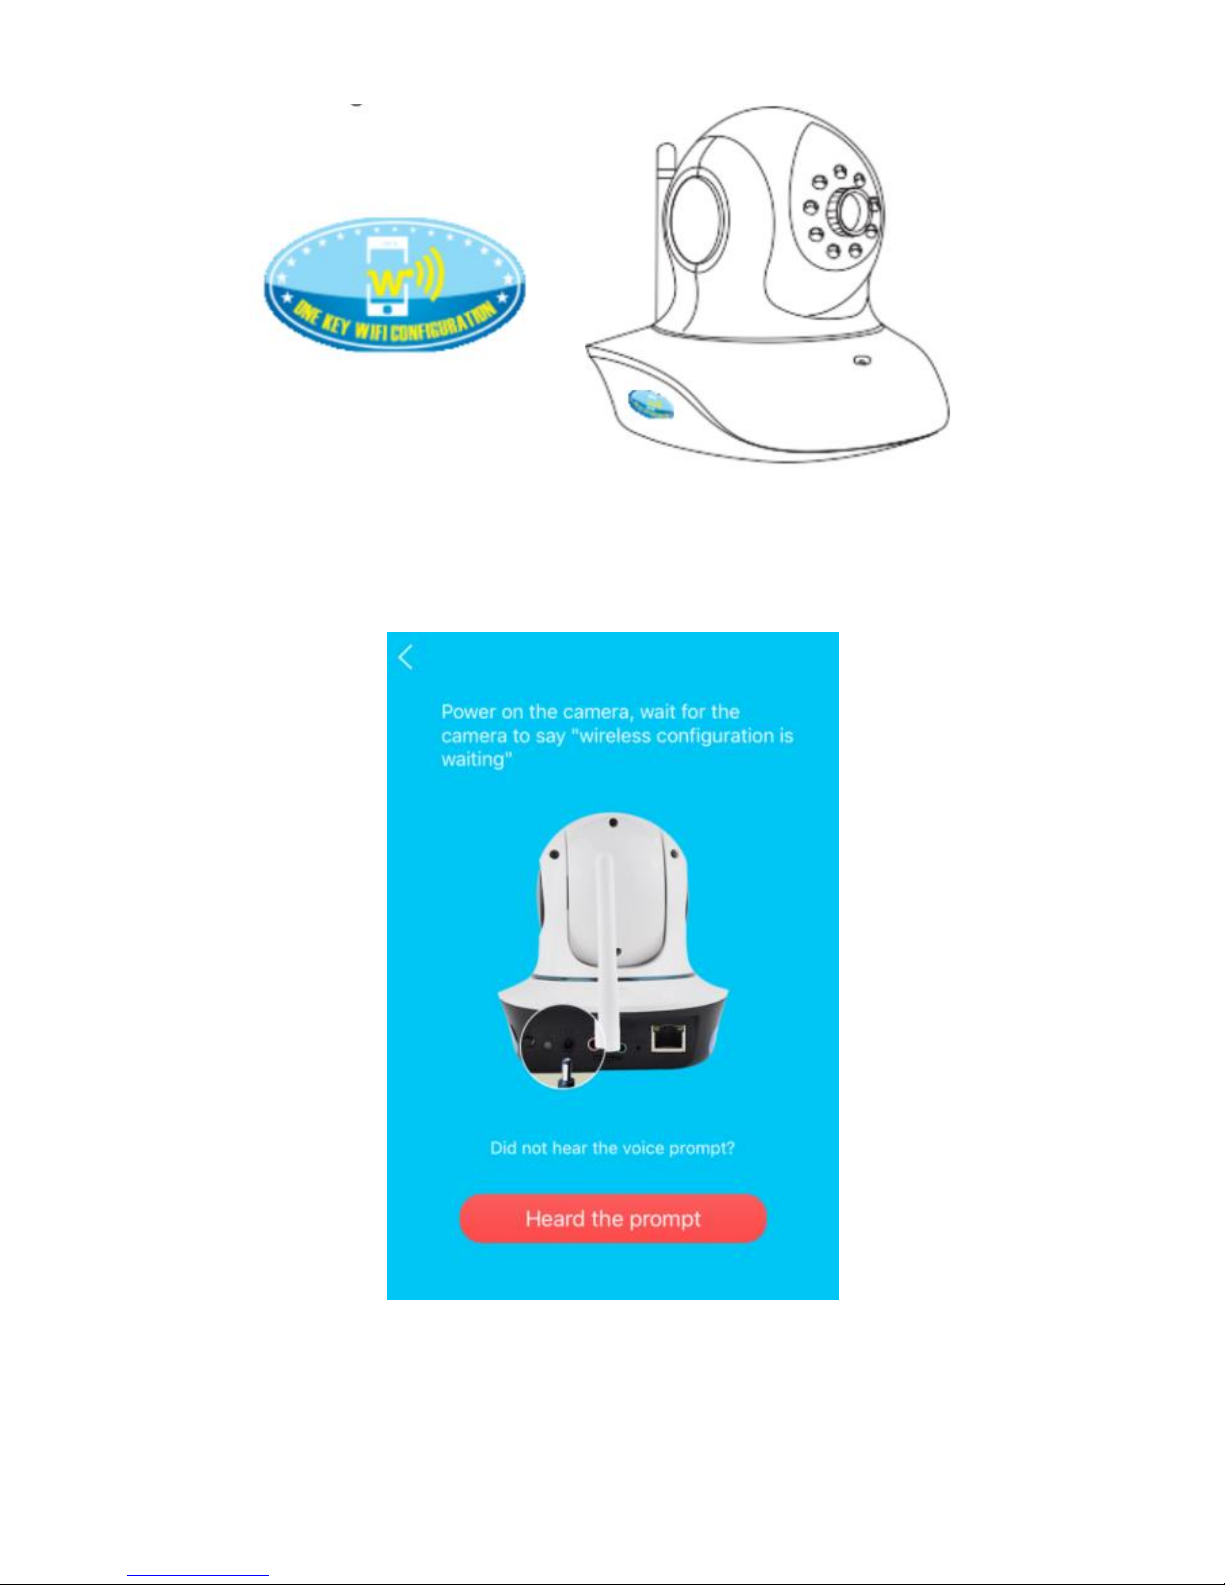
① Check whether there is a “One key WiFi configuration” sticker on the
body of the camera.
Page 9
7
② Power on the camera, then wait until the camera speaks “Wireless
configuration is waiting”.
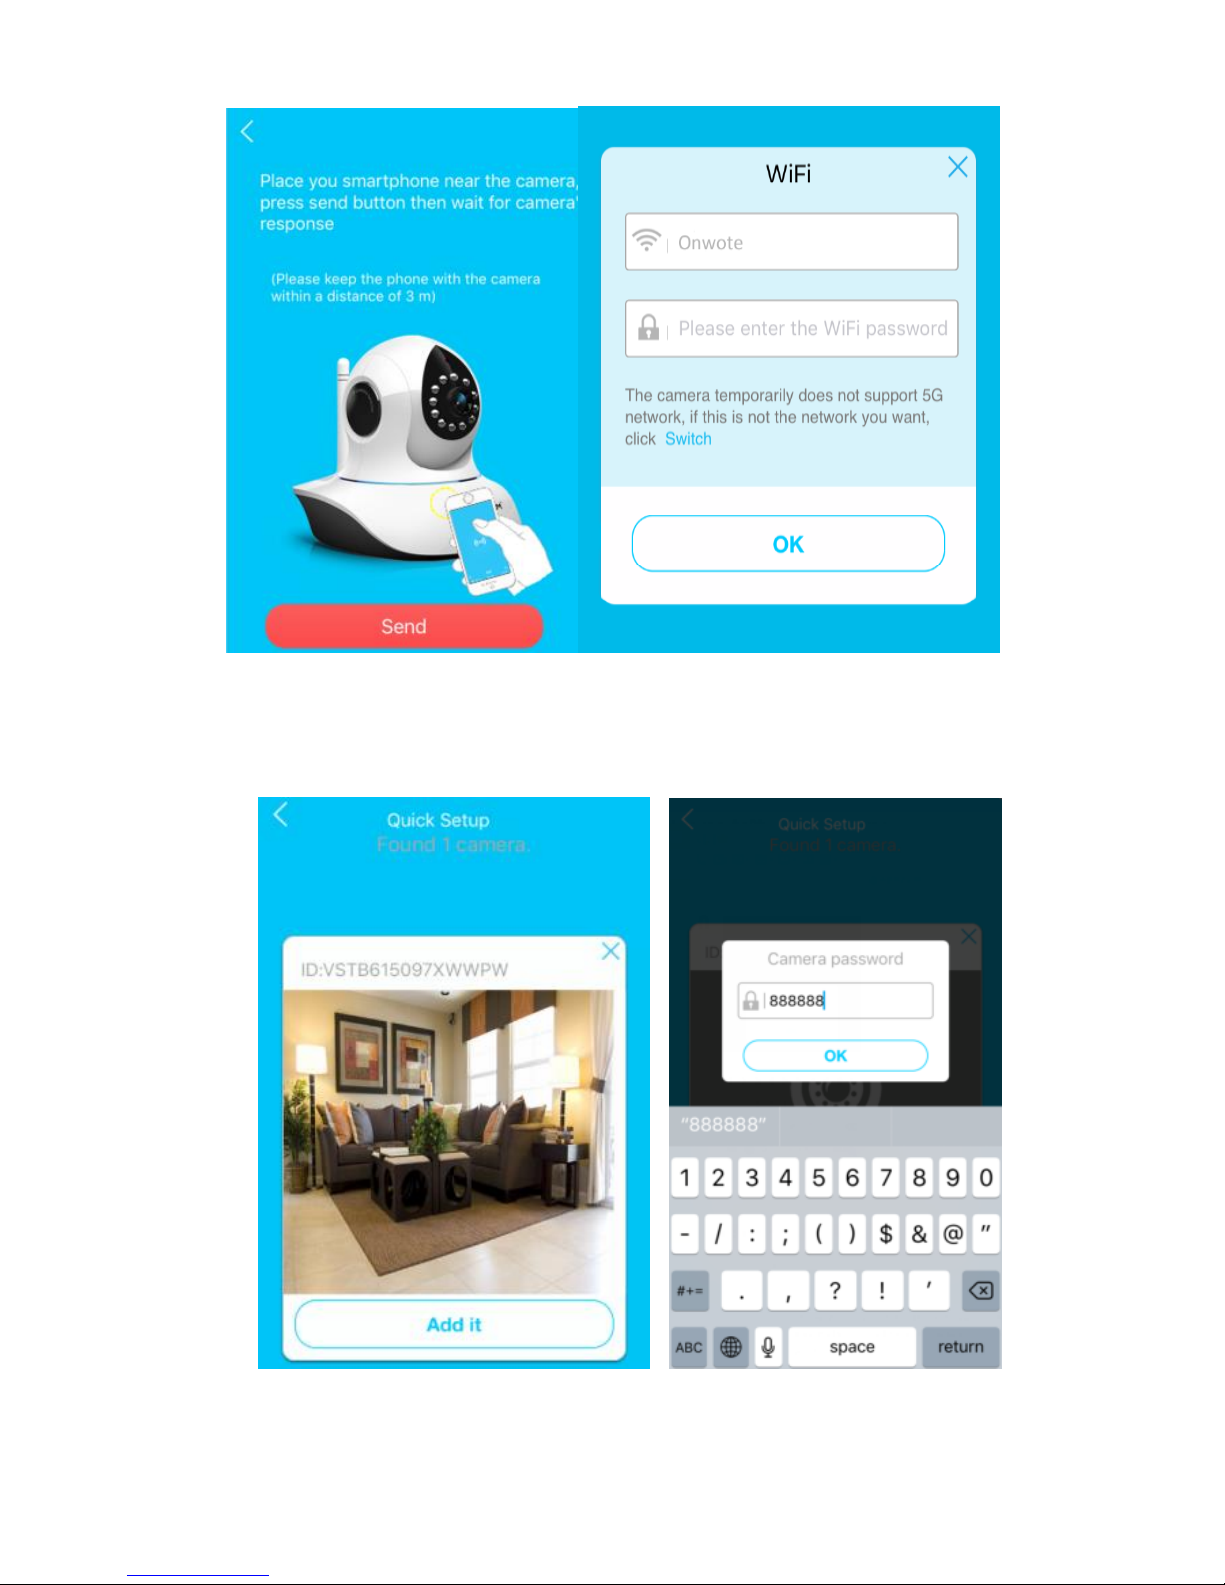
③ Place your phone near to the camera pickup as closer as possible,
click send button, type WiFi password, wait your camera speaks
“config success”.
Page 10
8
④ When the app find one camera, click 【Add it】and input the default
password (888888)
Page 11
9
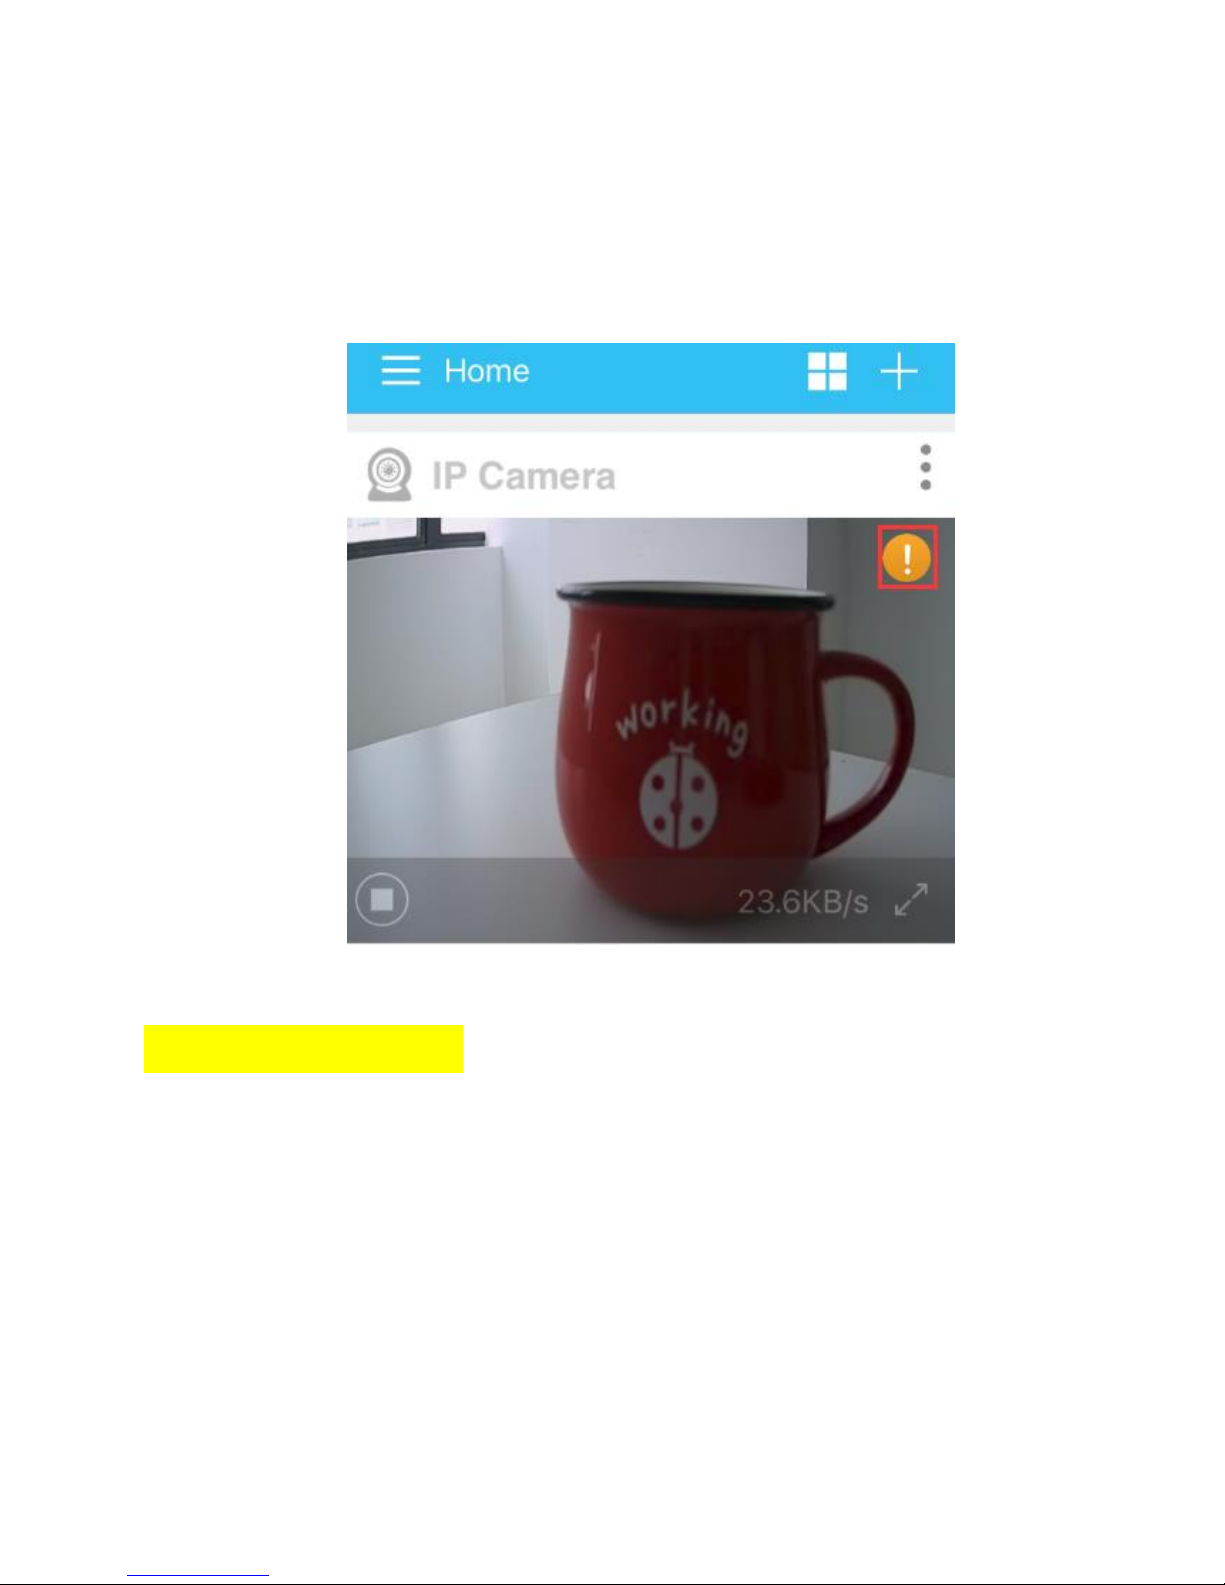
After you added the camera successfully you will see a warming icon
on the upper right corner of the video image. Please click it to change
your password. The camera will restart automatically after the
password was changed.
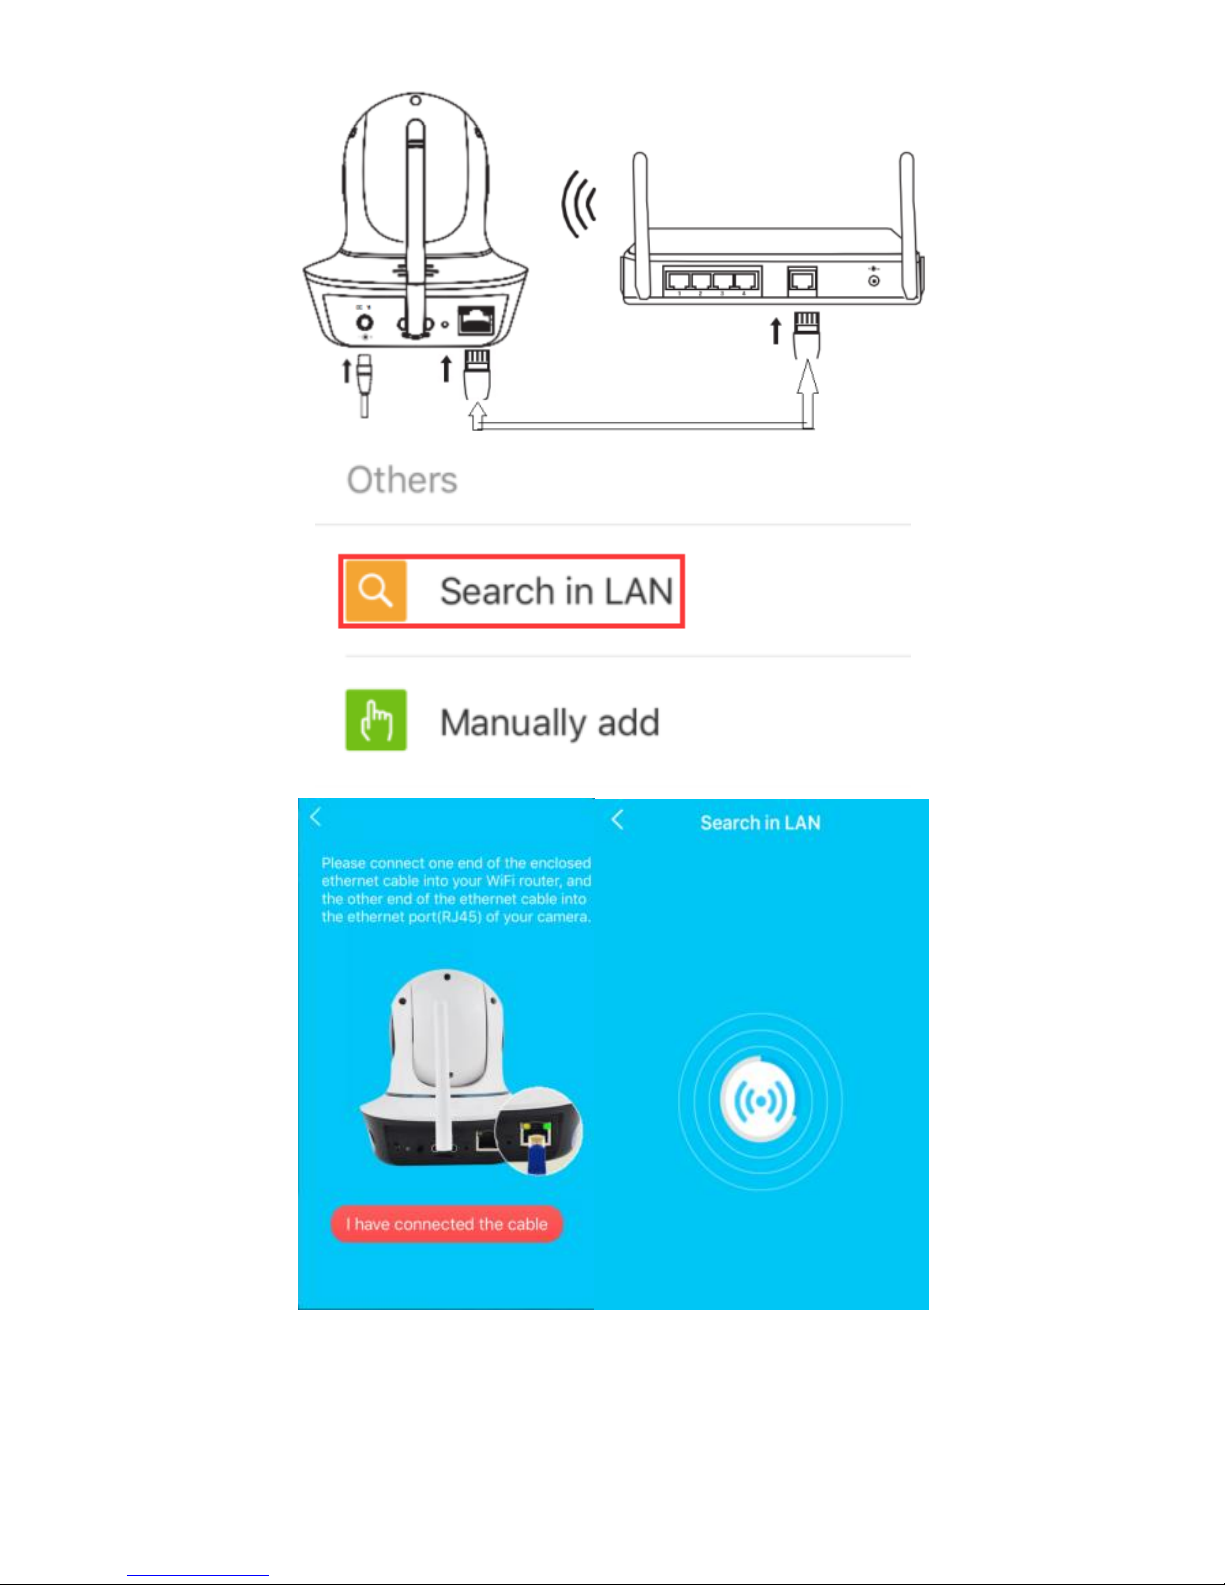
Option 2: Search in LAN
Search and add a camera in the local area network.
Please make sure using the included Ethernet cable to connect your camera
to your local WiFi router first, then tap【Add Cameras】---【IP Camera】---
【Search in LAN】.
Page 12
10
Page 13
11
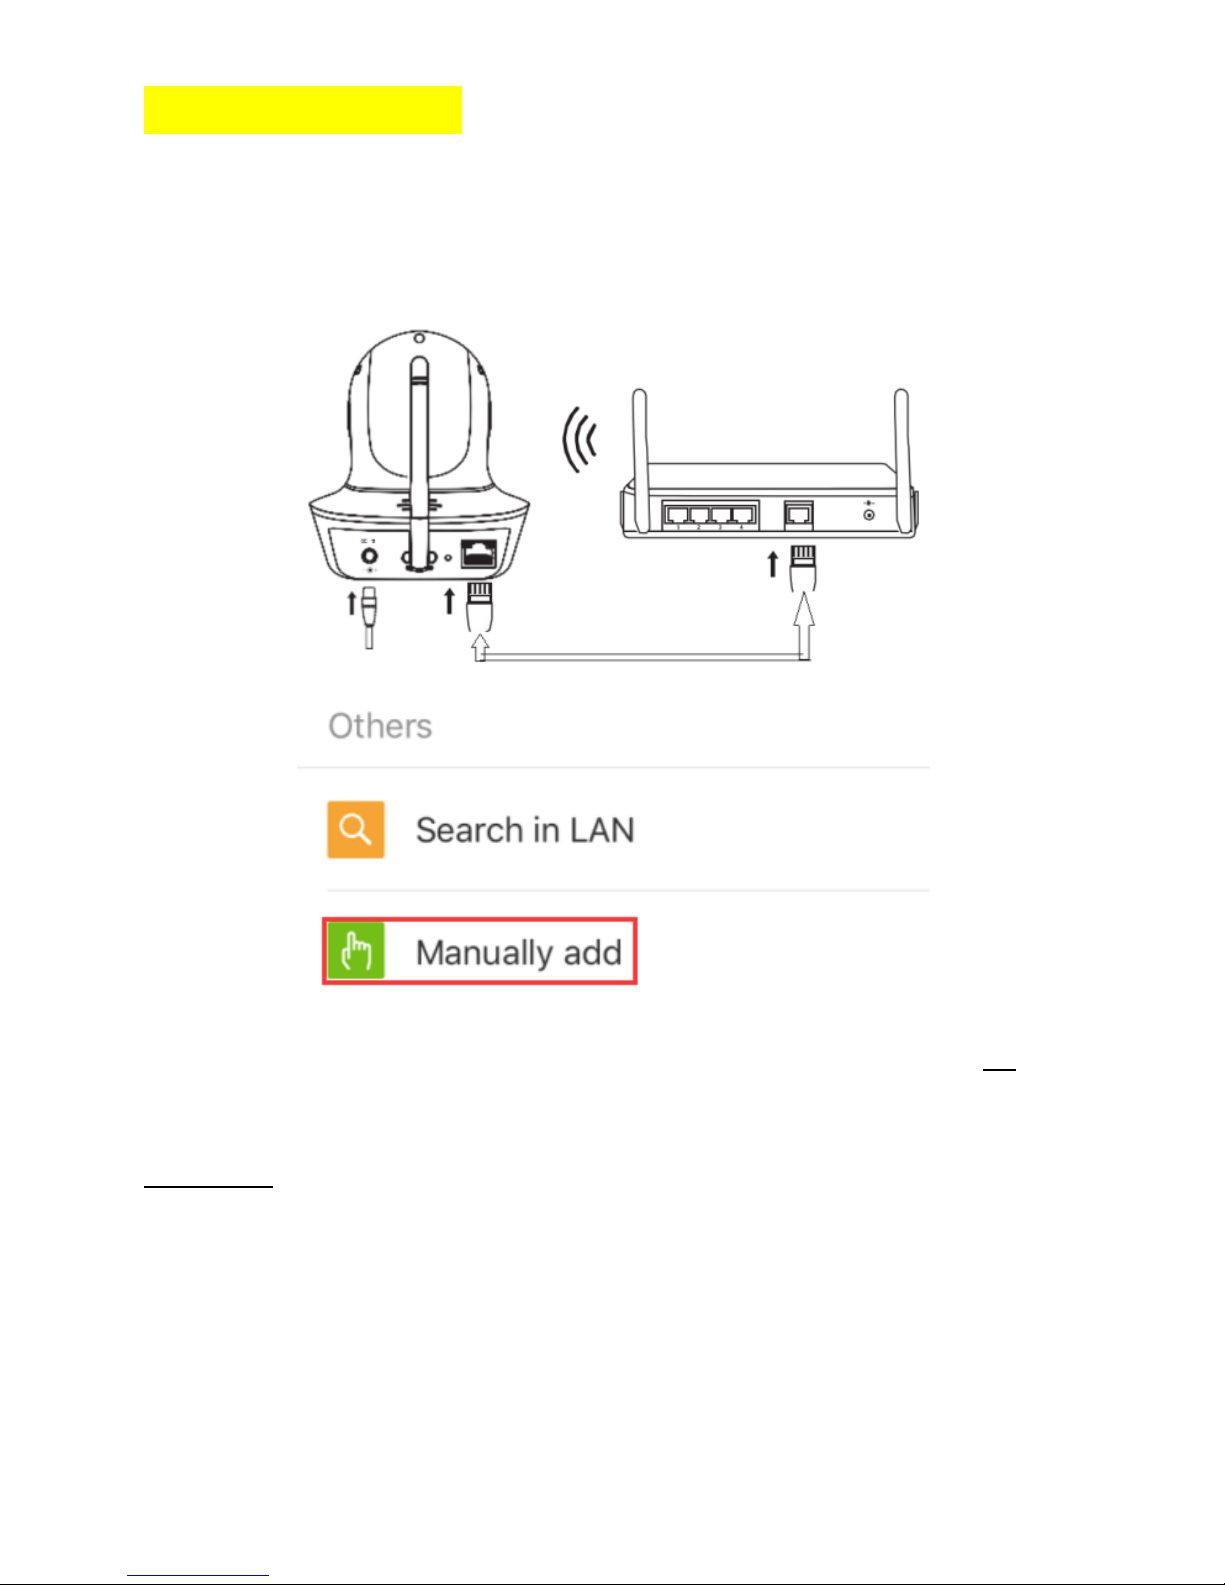
Option 3: Manually add
Please make sure using the included Ethernet cable to connect your camera
to your local WiFi router first, then tap 【Add Cameras】---【IP Camera】---
【Search in LAN】.
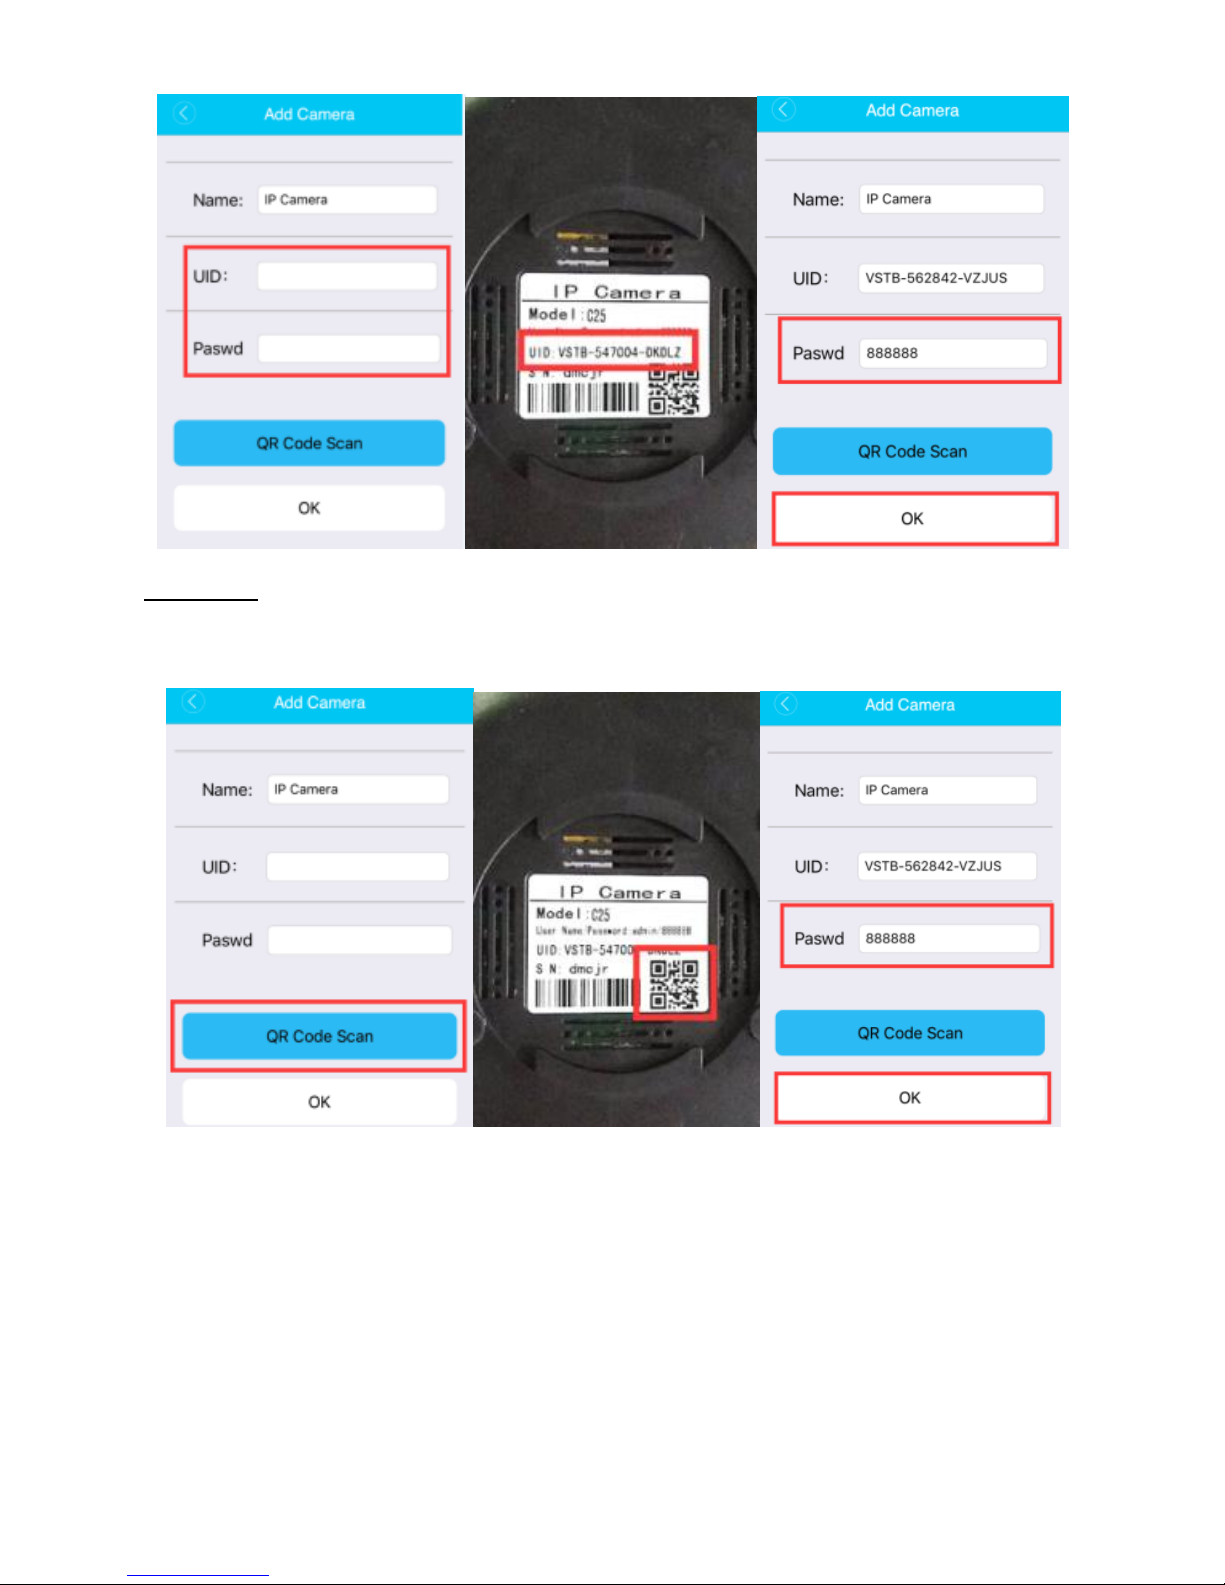
① You can choose to type UID and password to add a camera or scan
QR Code to add a camera manually.
Option 1: Type UID and password to add a camera manually. UID is on the
bottom of the camera, the default password is 888888.
Page 14
12
Option 2: Scan QR Code to add a camera manually. QR Code is on the
bottom of camera
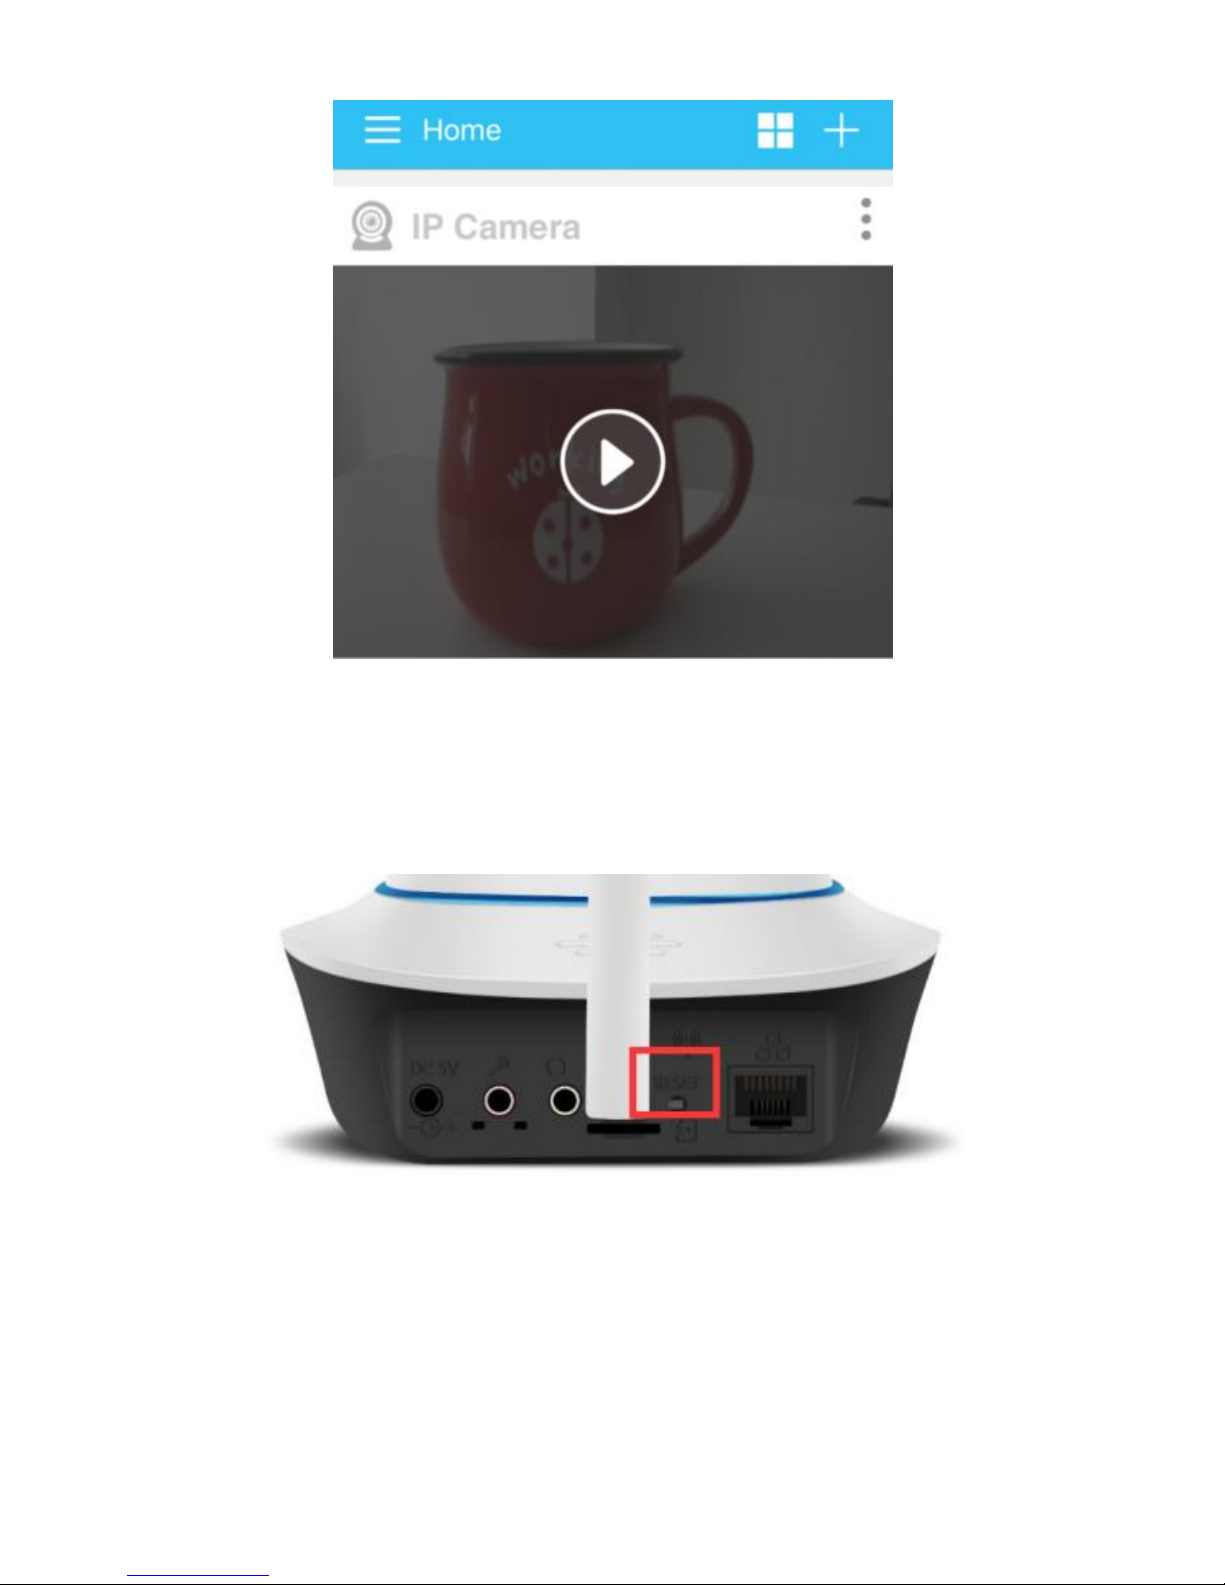
5. View live video.
When you add one camera successfully, the app will show online camera
information as below, click on【Video】to live view.
Page 15
13
Note: if you failed to add your camera to mobile app, please reset camera;
Use a pin to hold the rest button for 5-10 seconds to complete reset; then
add your camera again.
Page 16
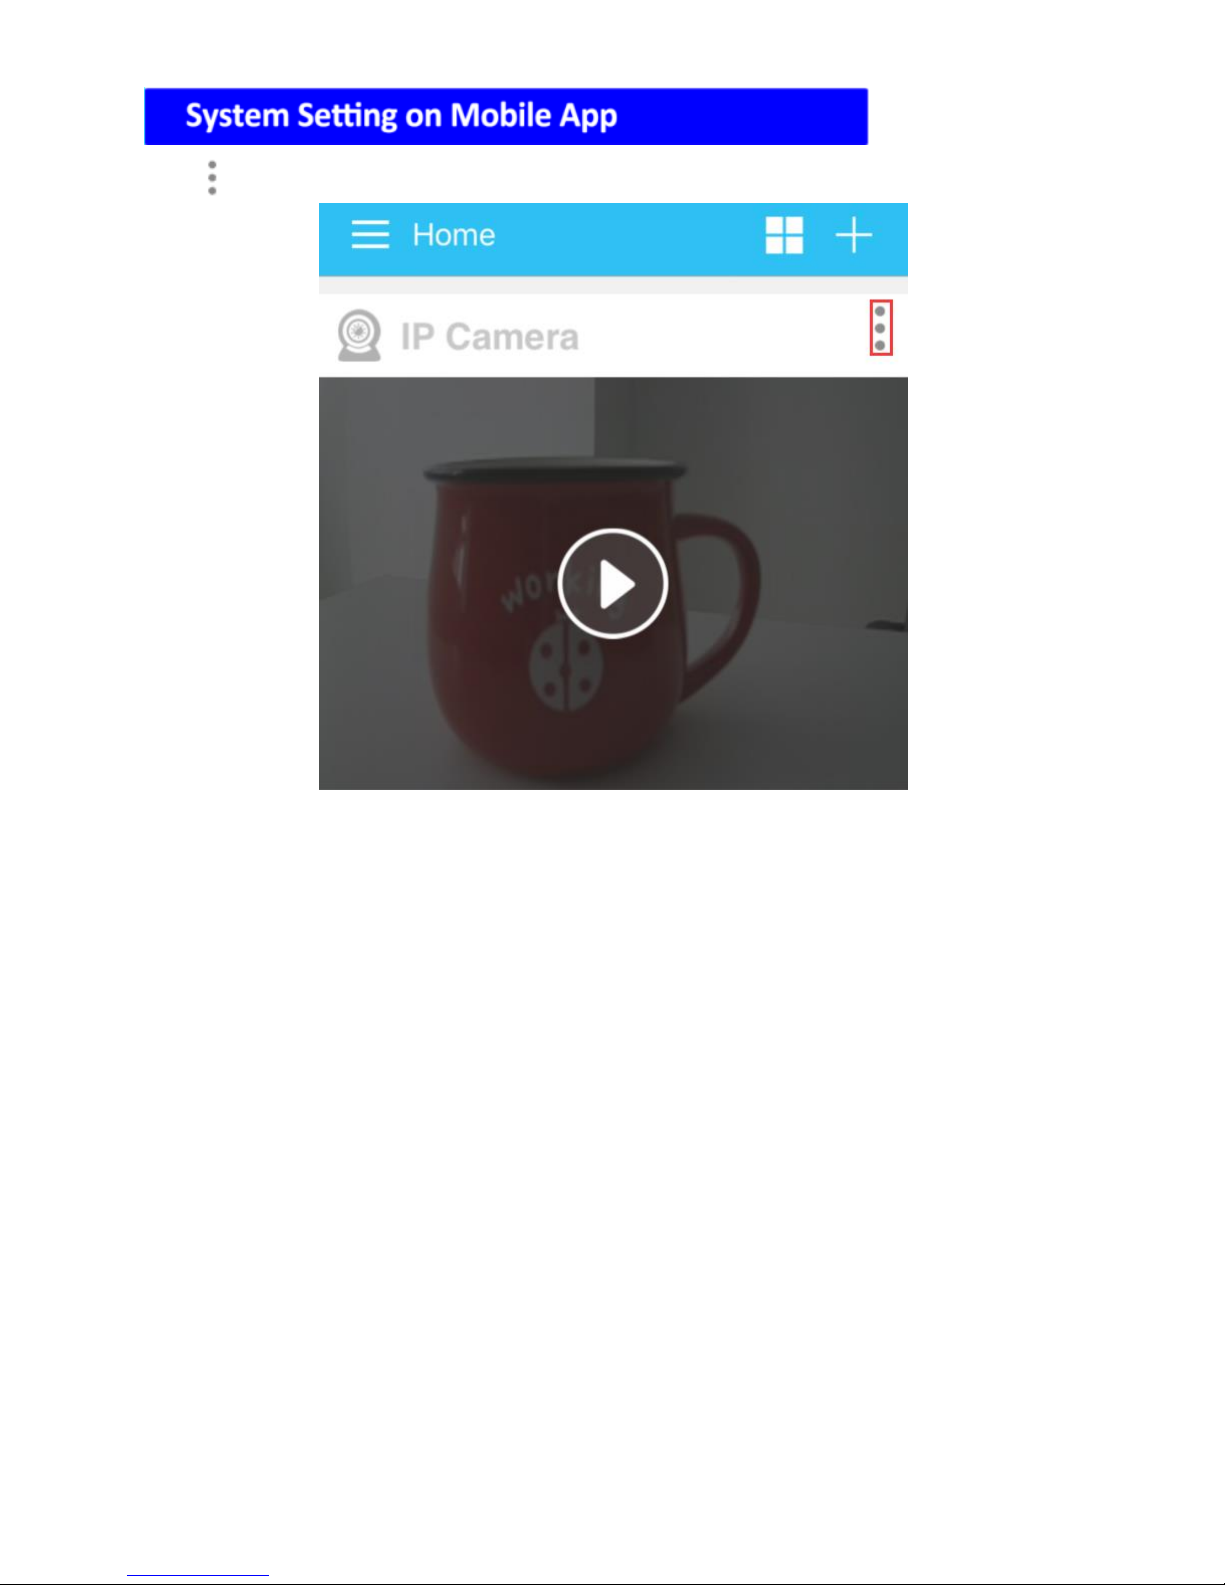
14
Click to do other setting.
a. Wifi setting for flexible placement
Note:If you choose 【Option 1: Wireless installation】 and add camera
successful, you are able to place camera flexibly; if you choose【Option 2:
Search in LAN】or 【Option 3:Manually add】, you need to do WiFi setting
first to plug out the Ethernet cable from WiFi router.
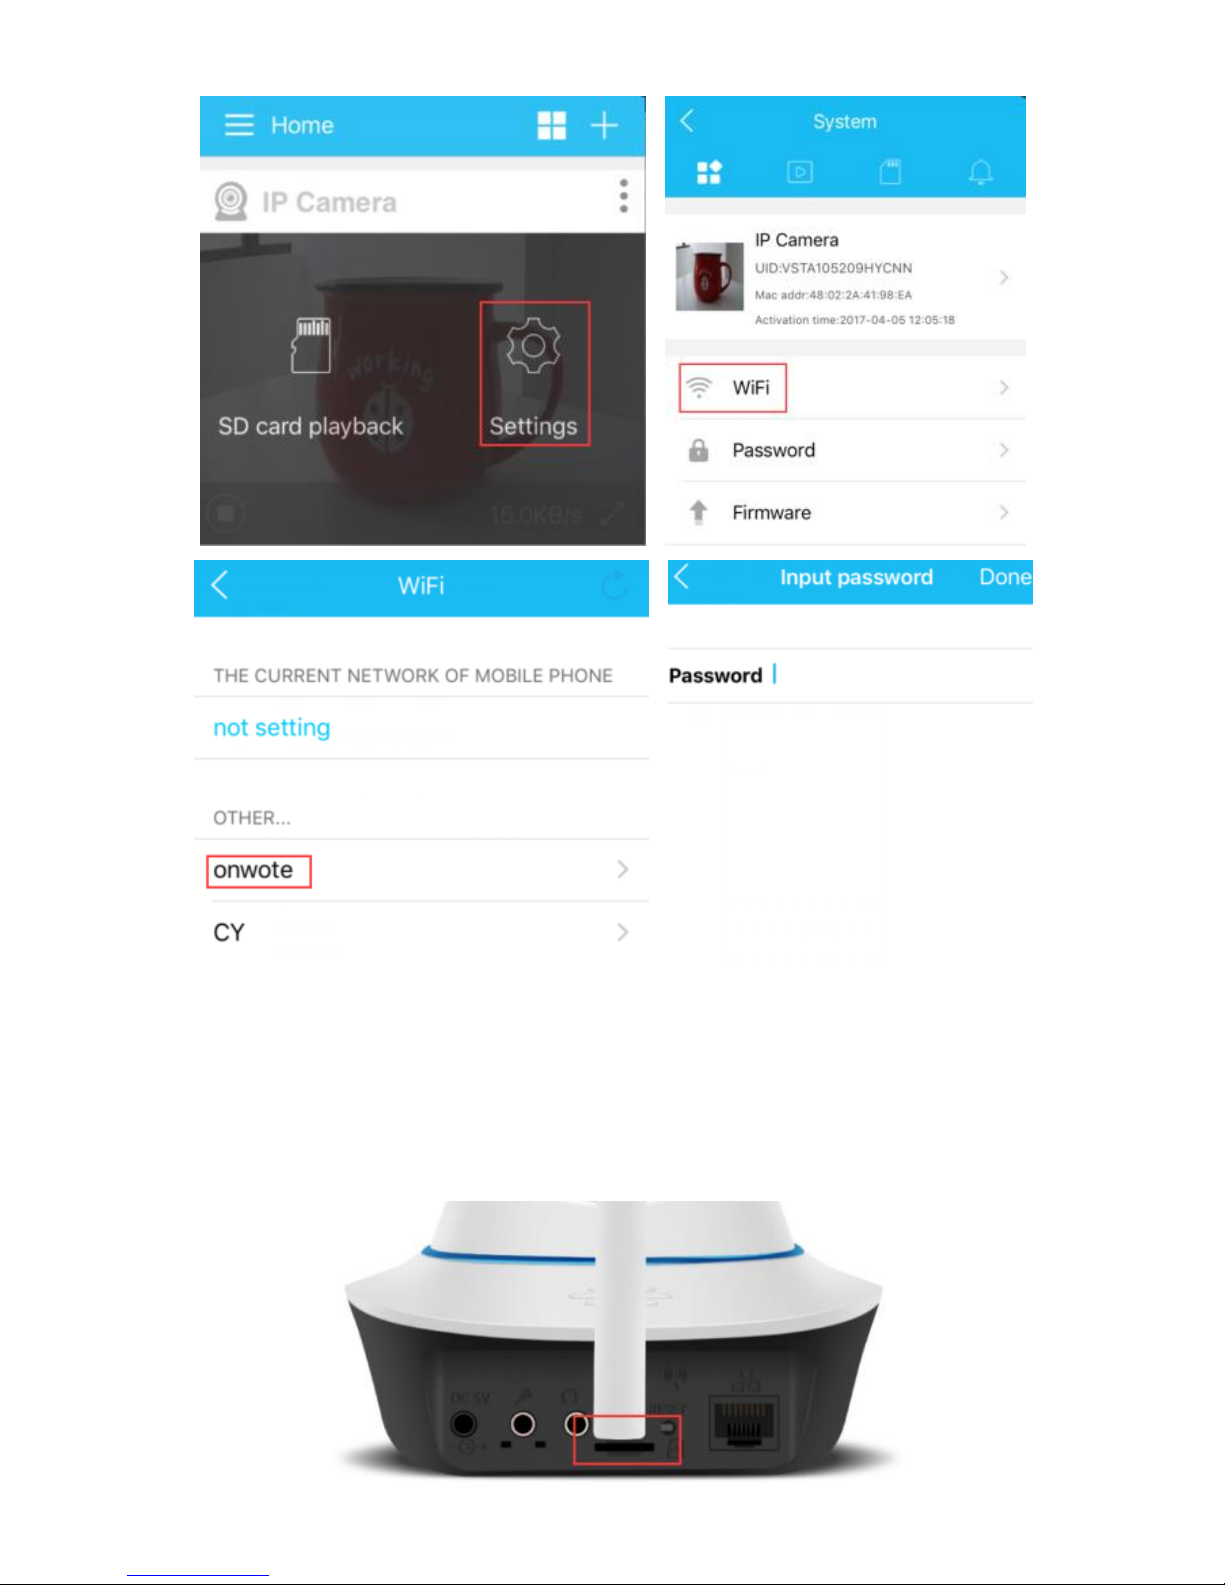
To plug out the Ethernet cable for flexible placement, please complete WiFi
setting first. Click on 【WiFi】 and type Wifi router password. Then your
camera will take several seconds to reboot by itself. When it finished reboot,
it is OK to plug out Ethernet cable from WiFi router.
Page 17
15
b. SD card setting for storage
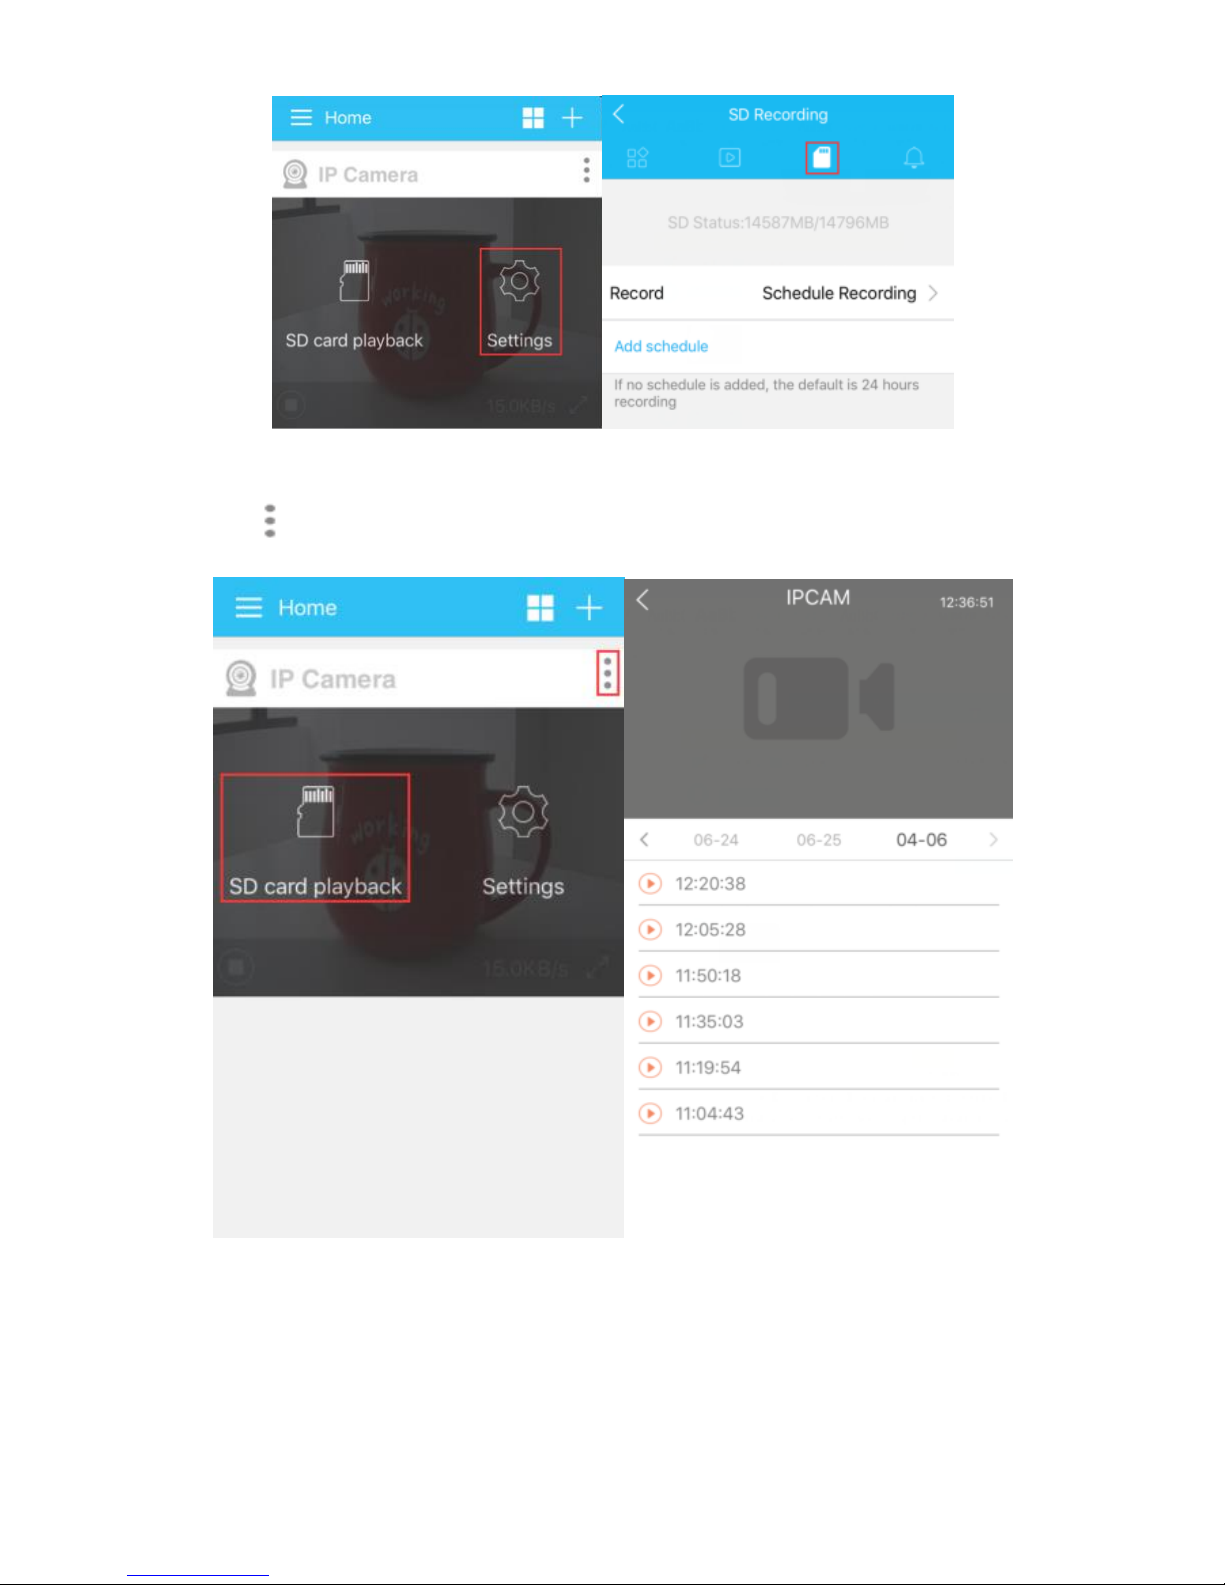
Insert a SD Card (support up to 64GB) to the SD card slot at the back panel of
camera. Then your camera will record video to your SD card. Be aware,
【Format SD card】will delete all records.
Page 18
16
c. View records on mobile app
click on --> click on 【SD card playback】
Select the specific date and time to view records.
Page 19
17
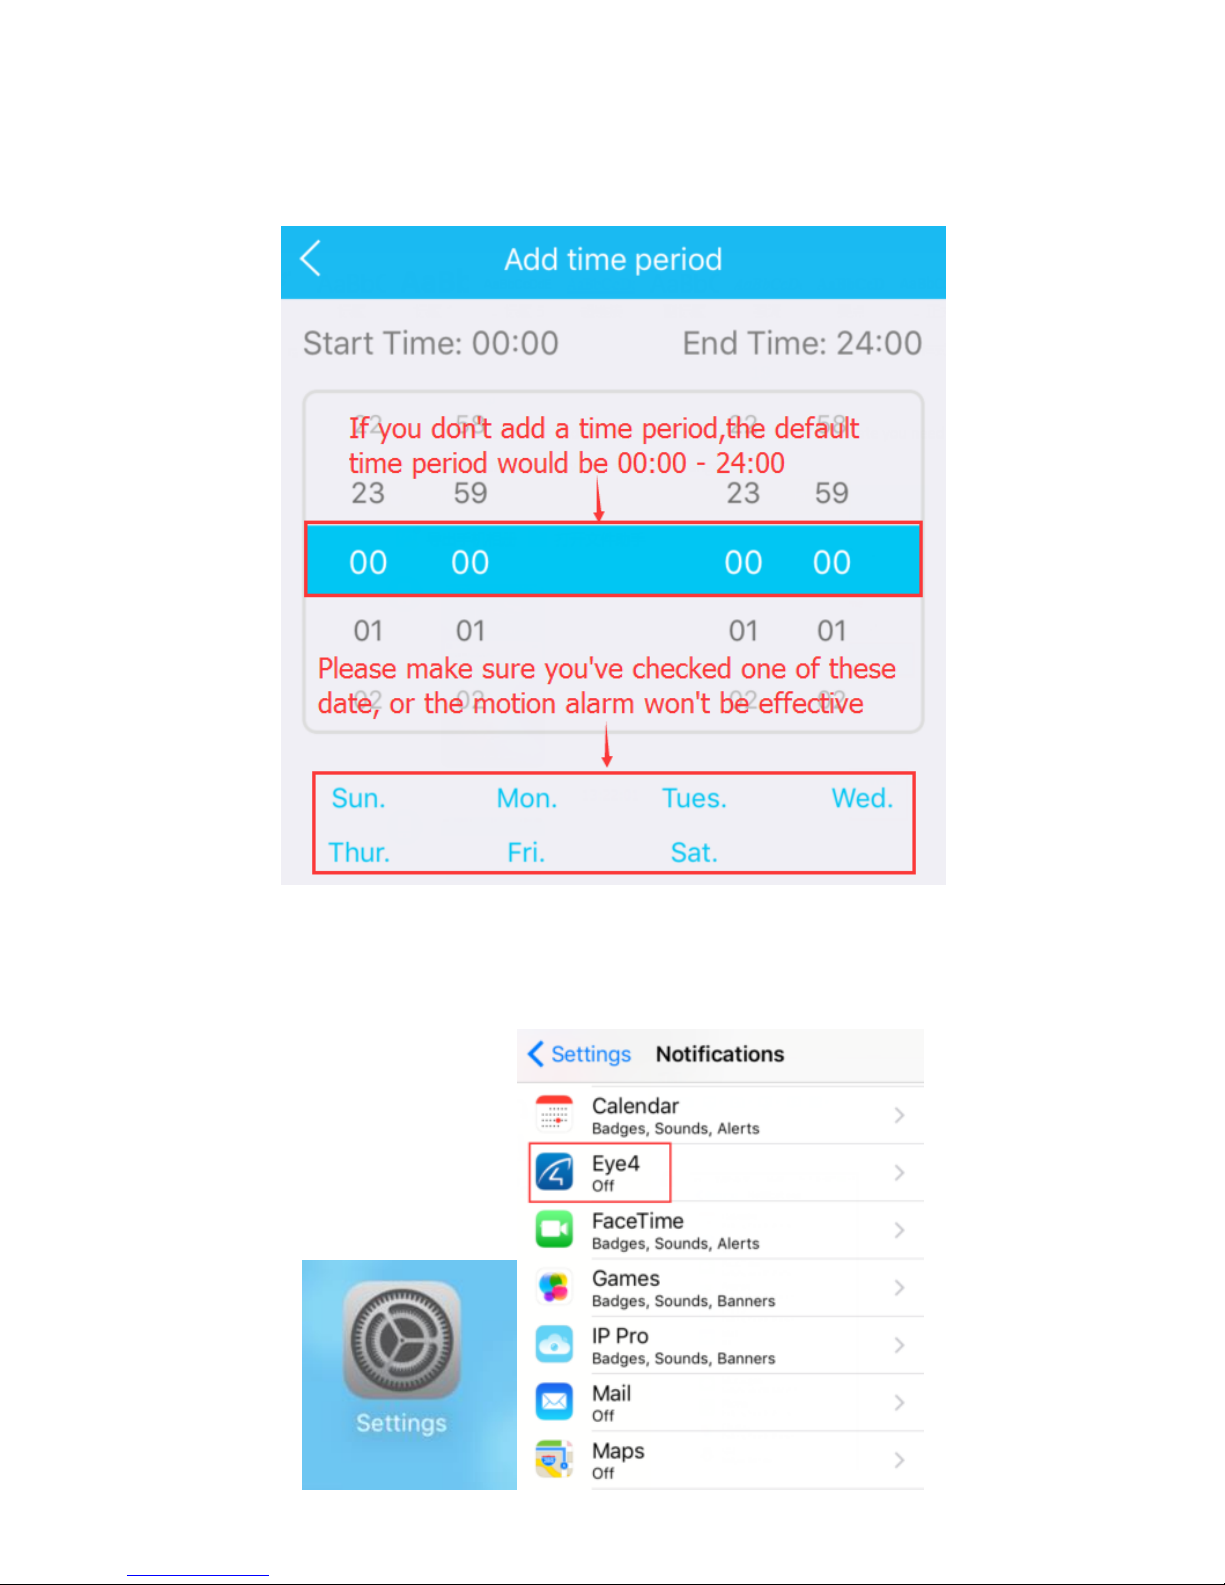
d. Motion alert setting
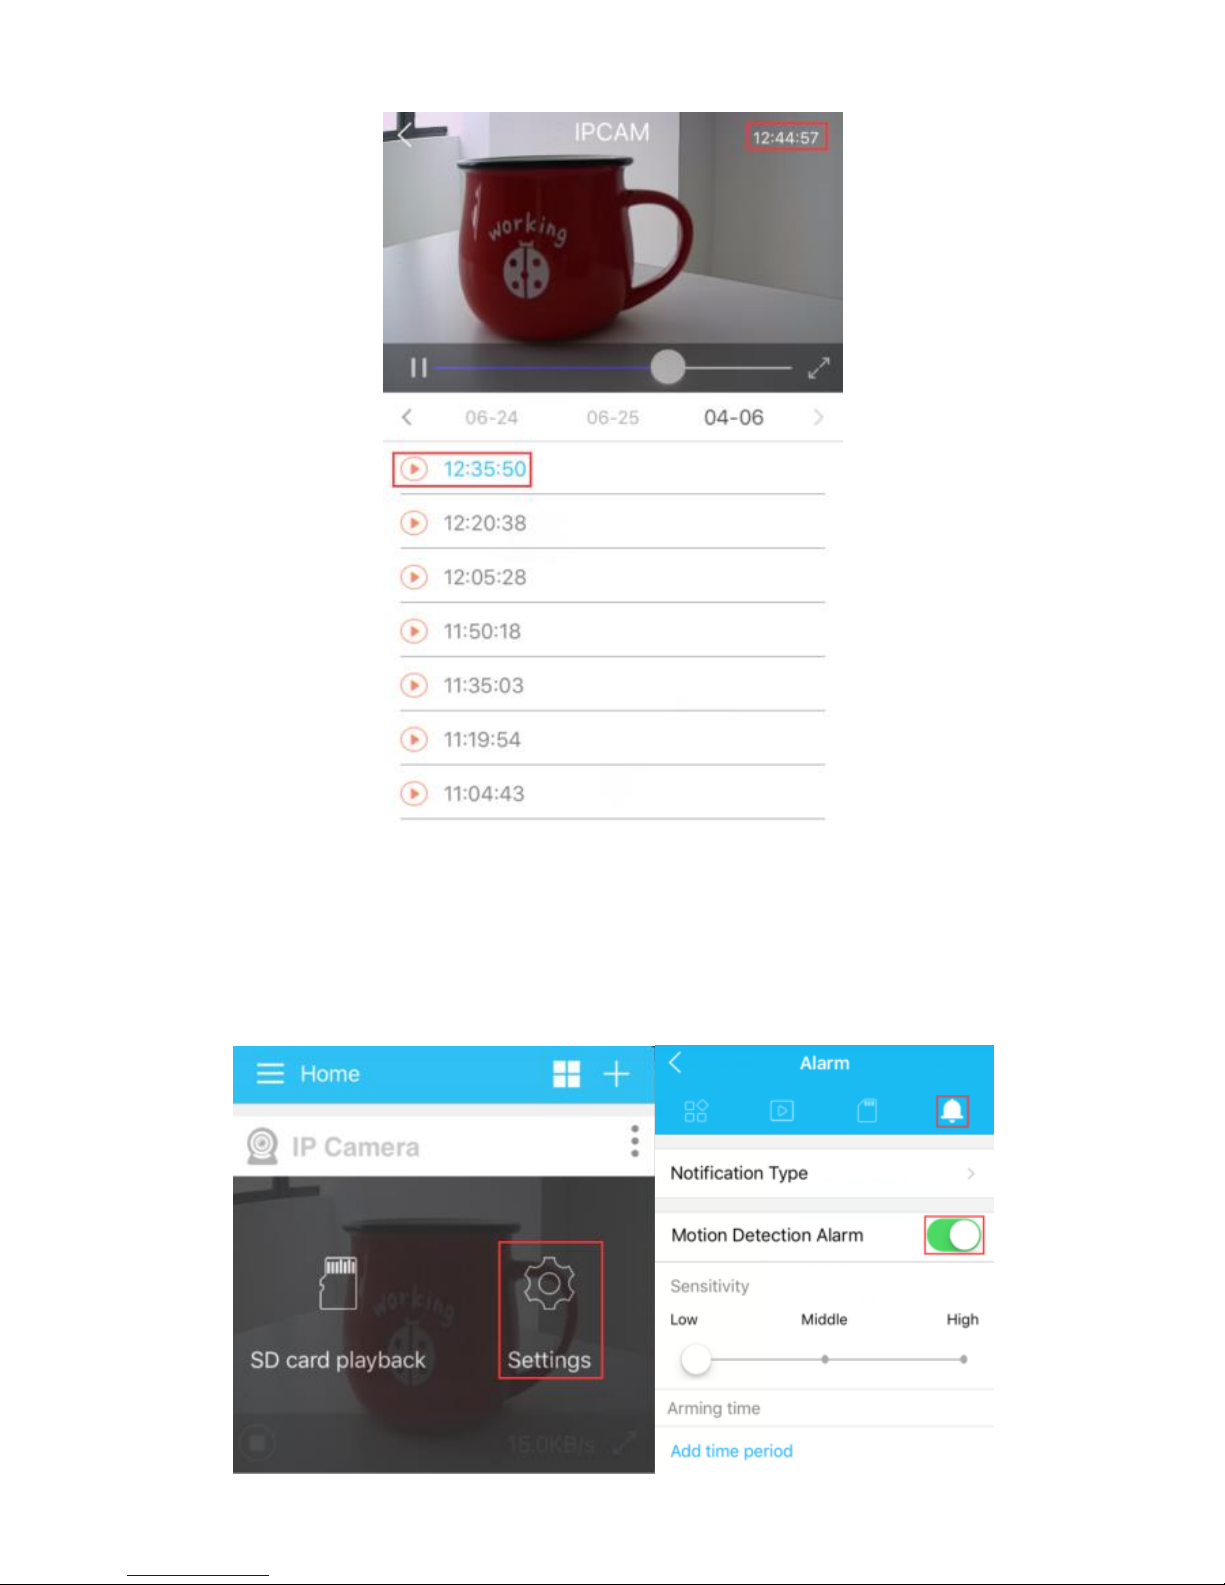
To set up motion alert, click on 【Settings】, turn on the 【Motion Detection
Alarm】, set motion detection sensitivity.
Page 20
18
Then click “Add time period” , choose a time period & date you need to record
and click “Save” to save the changes.
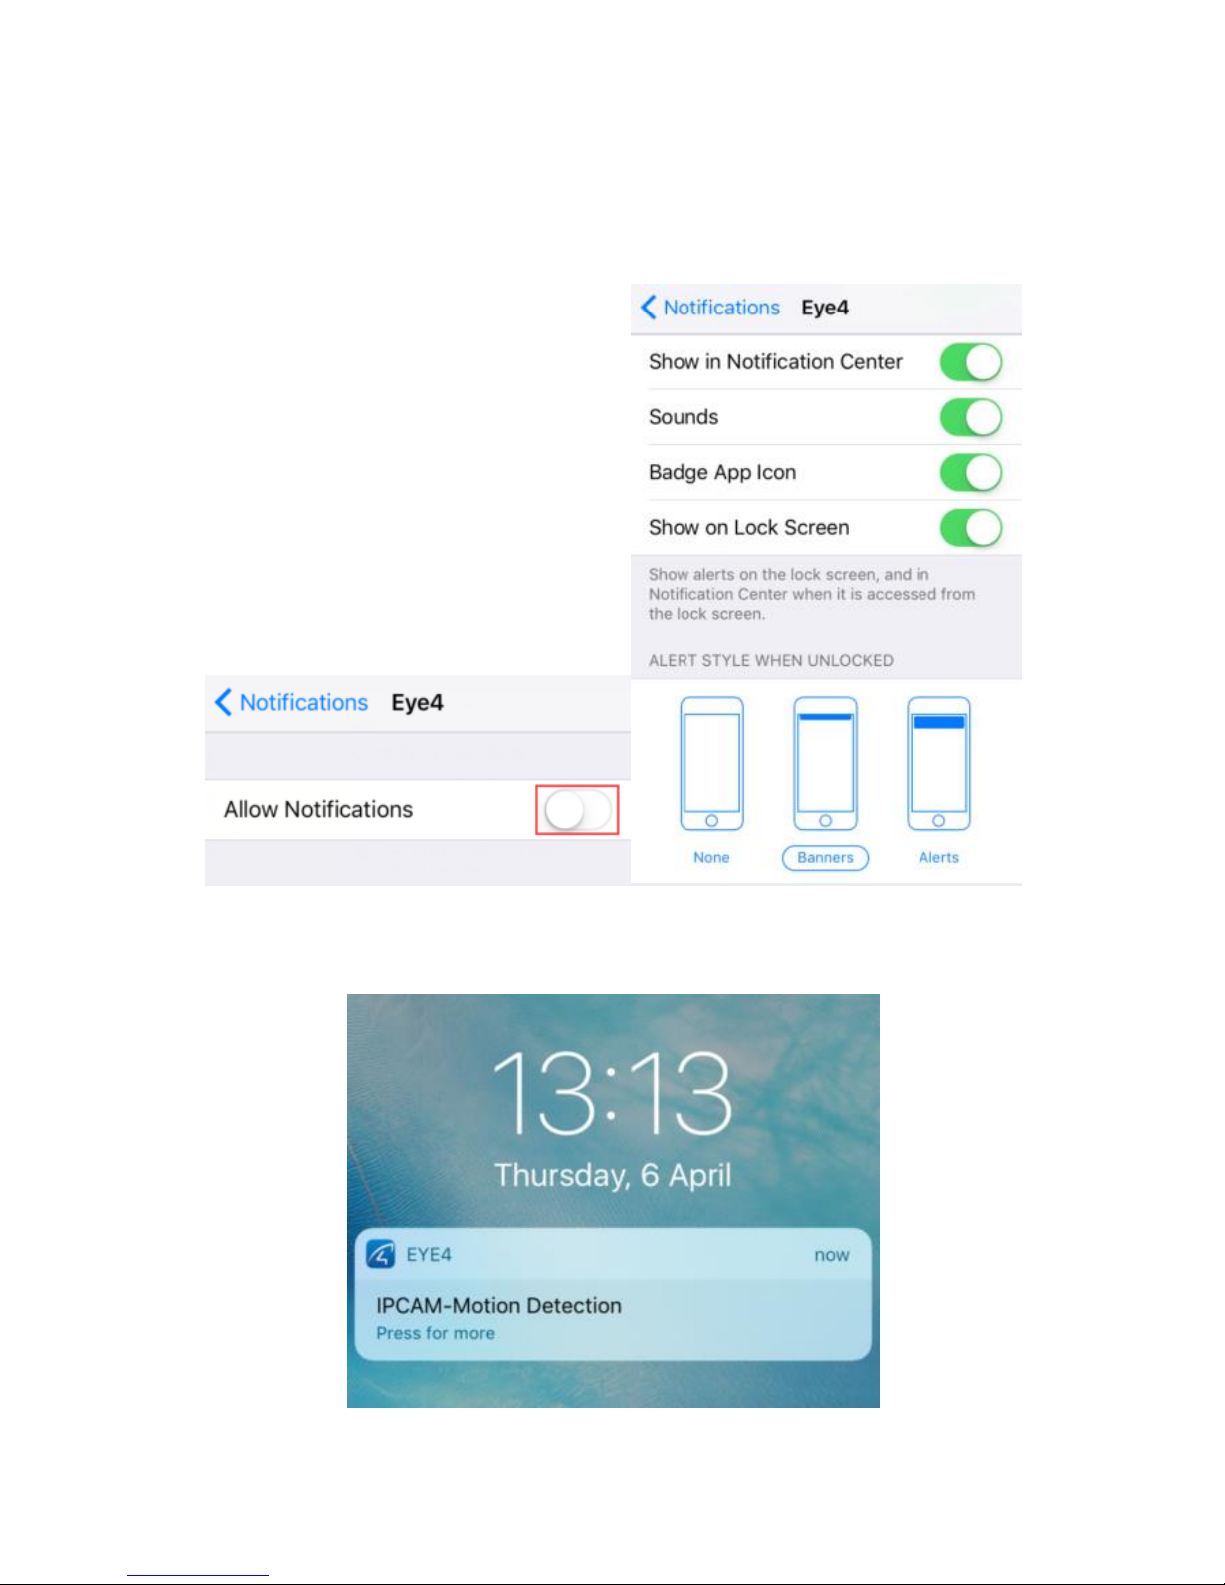
Go to your mobile phone 【Settings】 and go to 【Notification】, click on
Eye4
Page 21
19
Turn on 【Allow Notification】, make very sure to turn on 【Show on Lock
Screen】; Make very sure to select the right alert style (banners or alerts), if
you choose none, you will not receive notification.
When motion is detected, the app will send you a notification like below.
Page 22
20
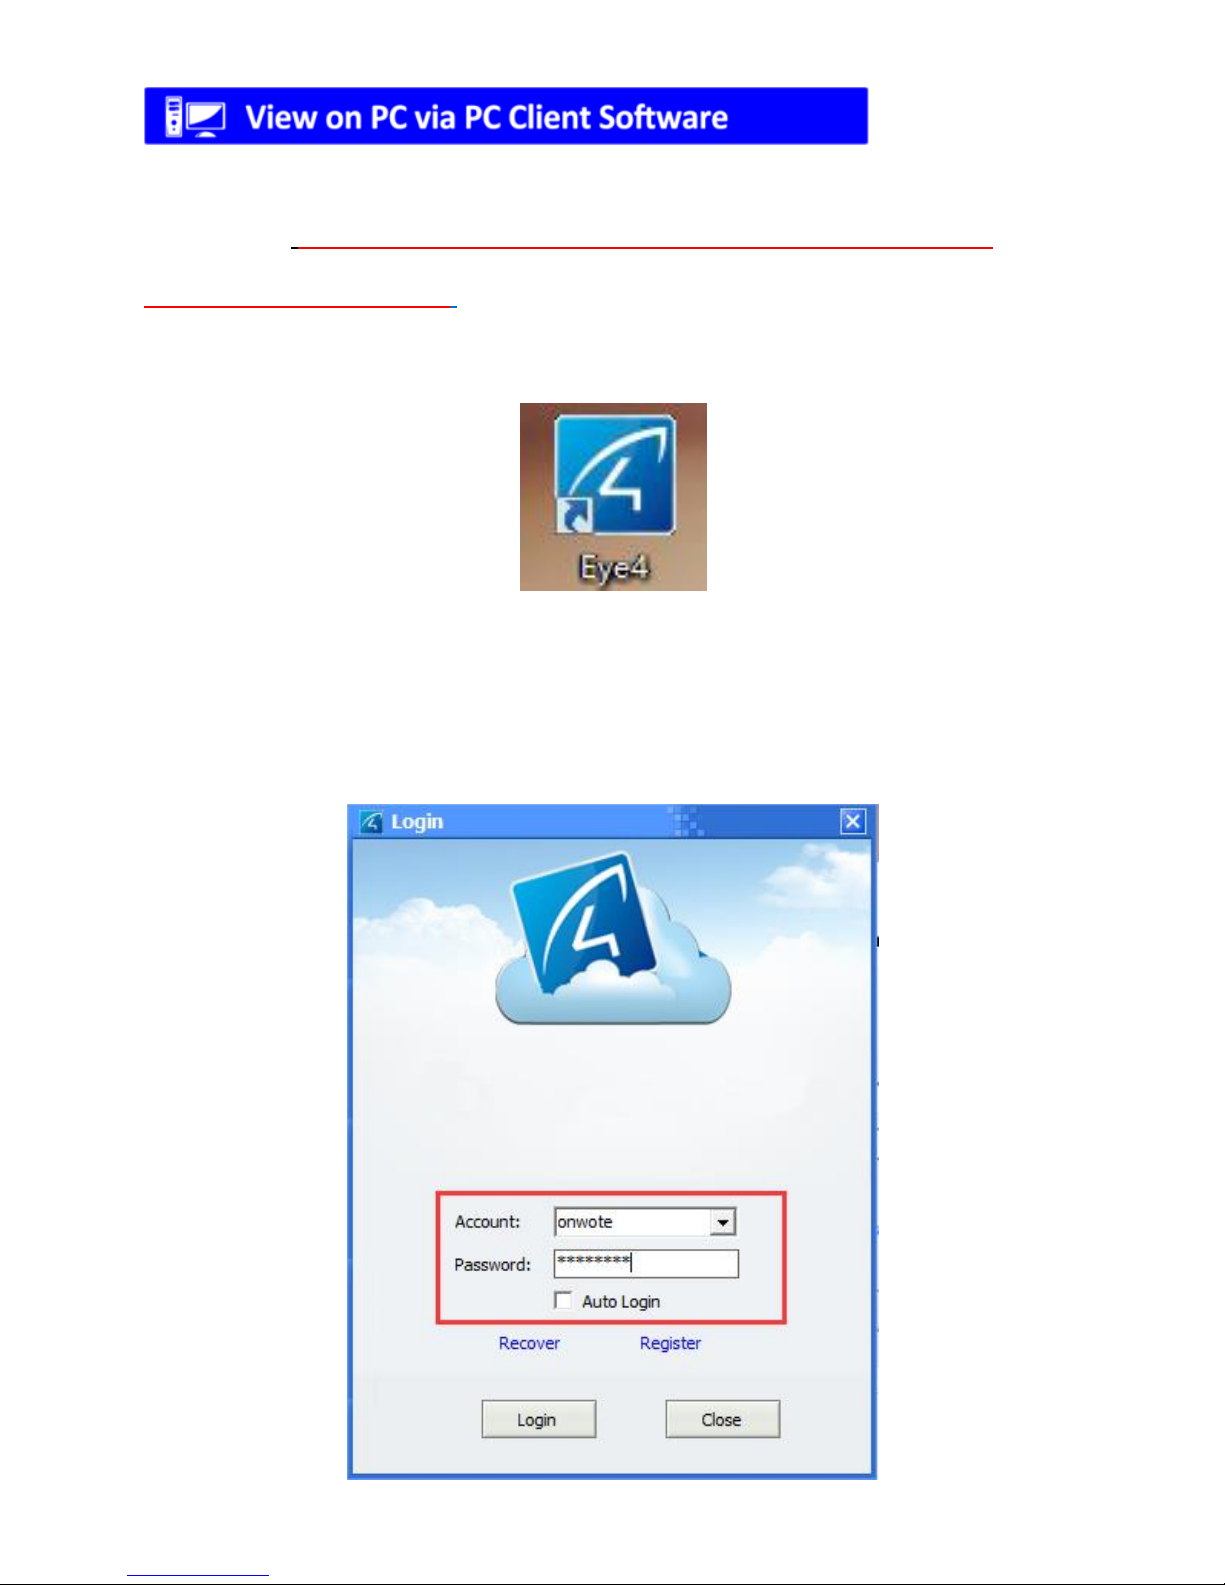
1. Download PC Client Software
Please go to http://www.onwote.com/download_category.php?id=11 or visit
http://www.onwote.com (Support—Download—Software—Pan Tilt IP
Camera) to download the PC Client Software.
2. Login the account.
Please use the same account information for mobile app to login.
Page 23
21
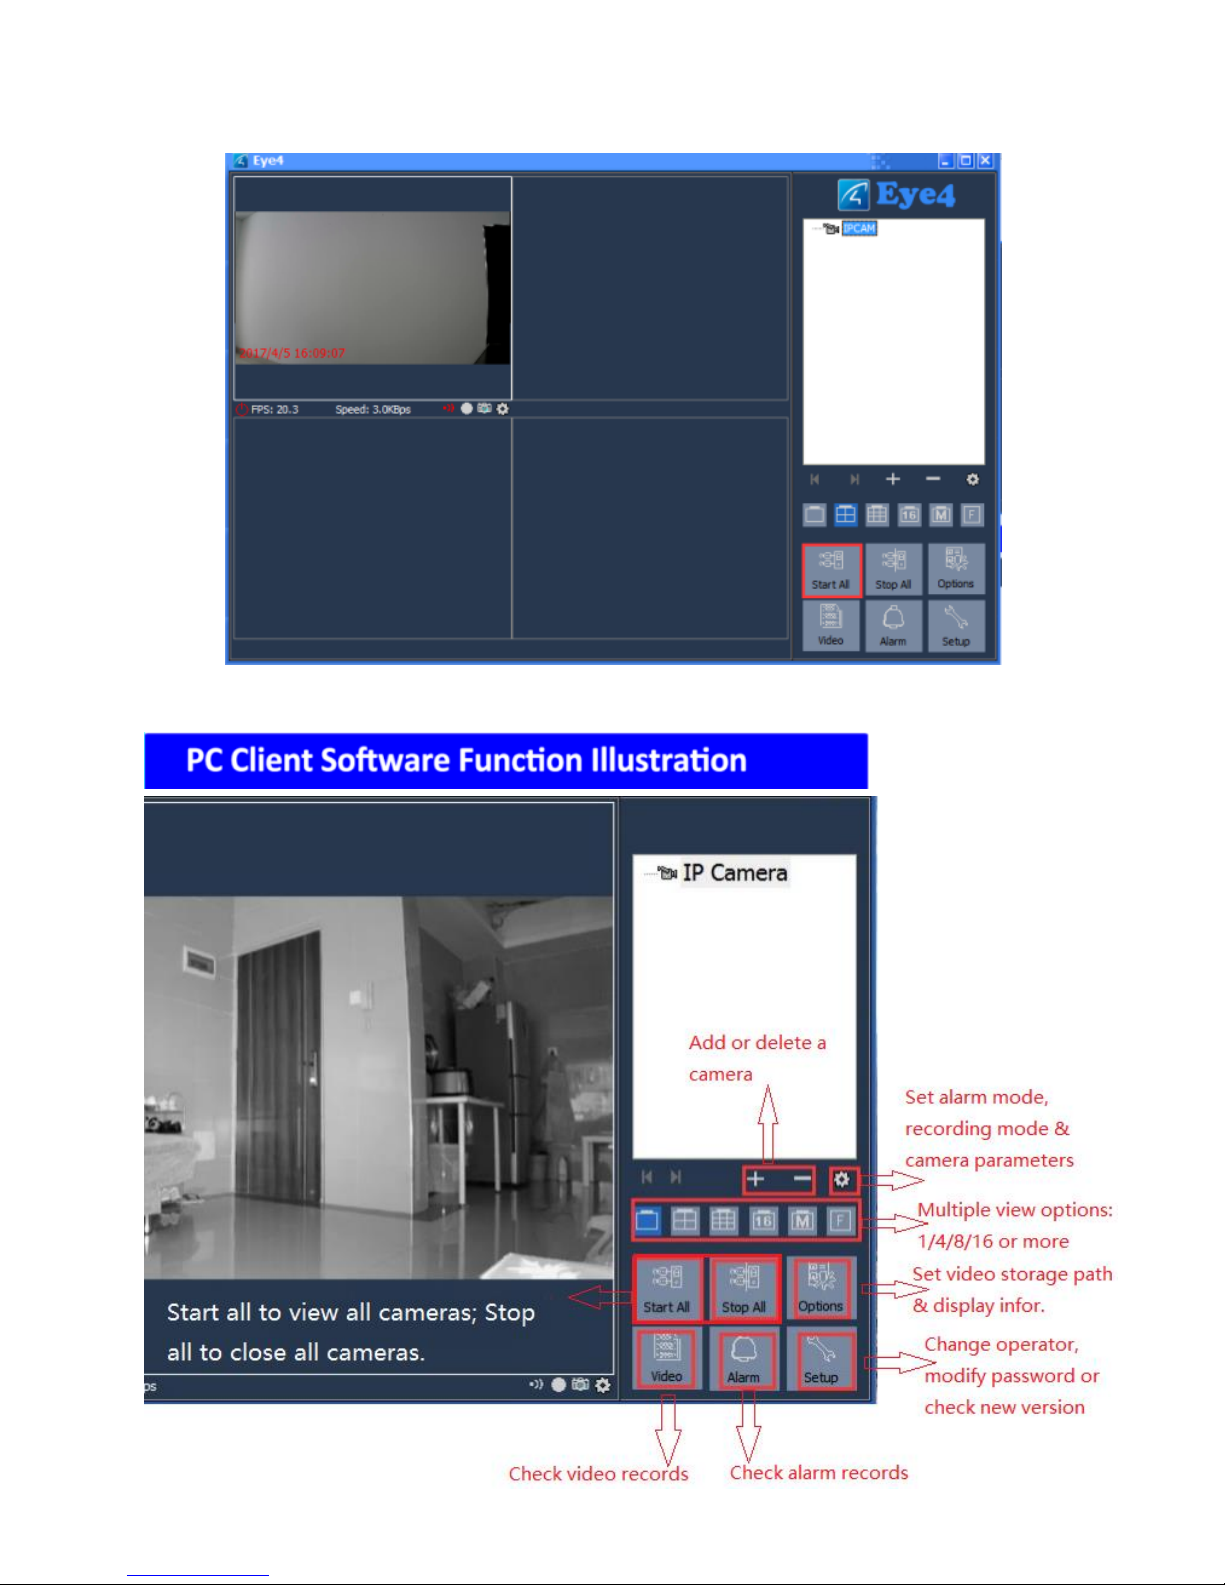
3. Click on【Start All】, wait for seconds to view live video.
Page 24
22
a. Alarm Setting & Motion Detected Recording Setting
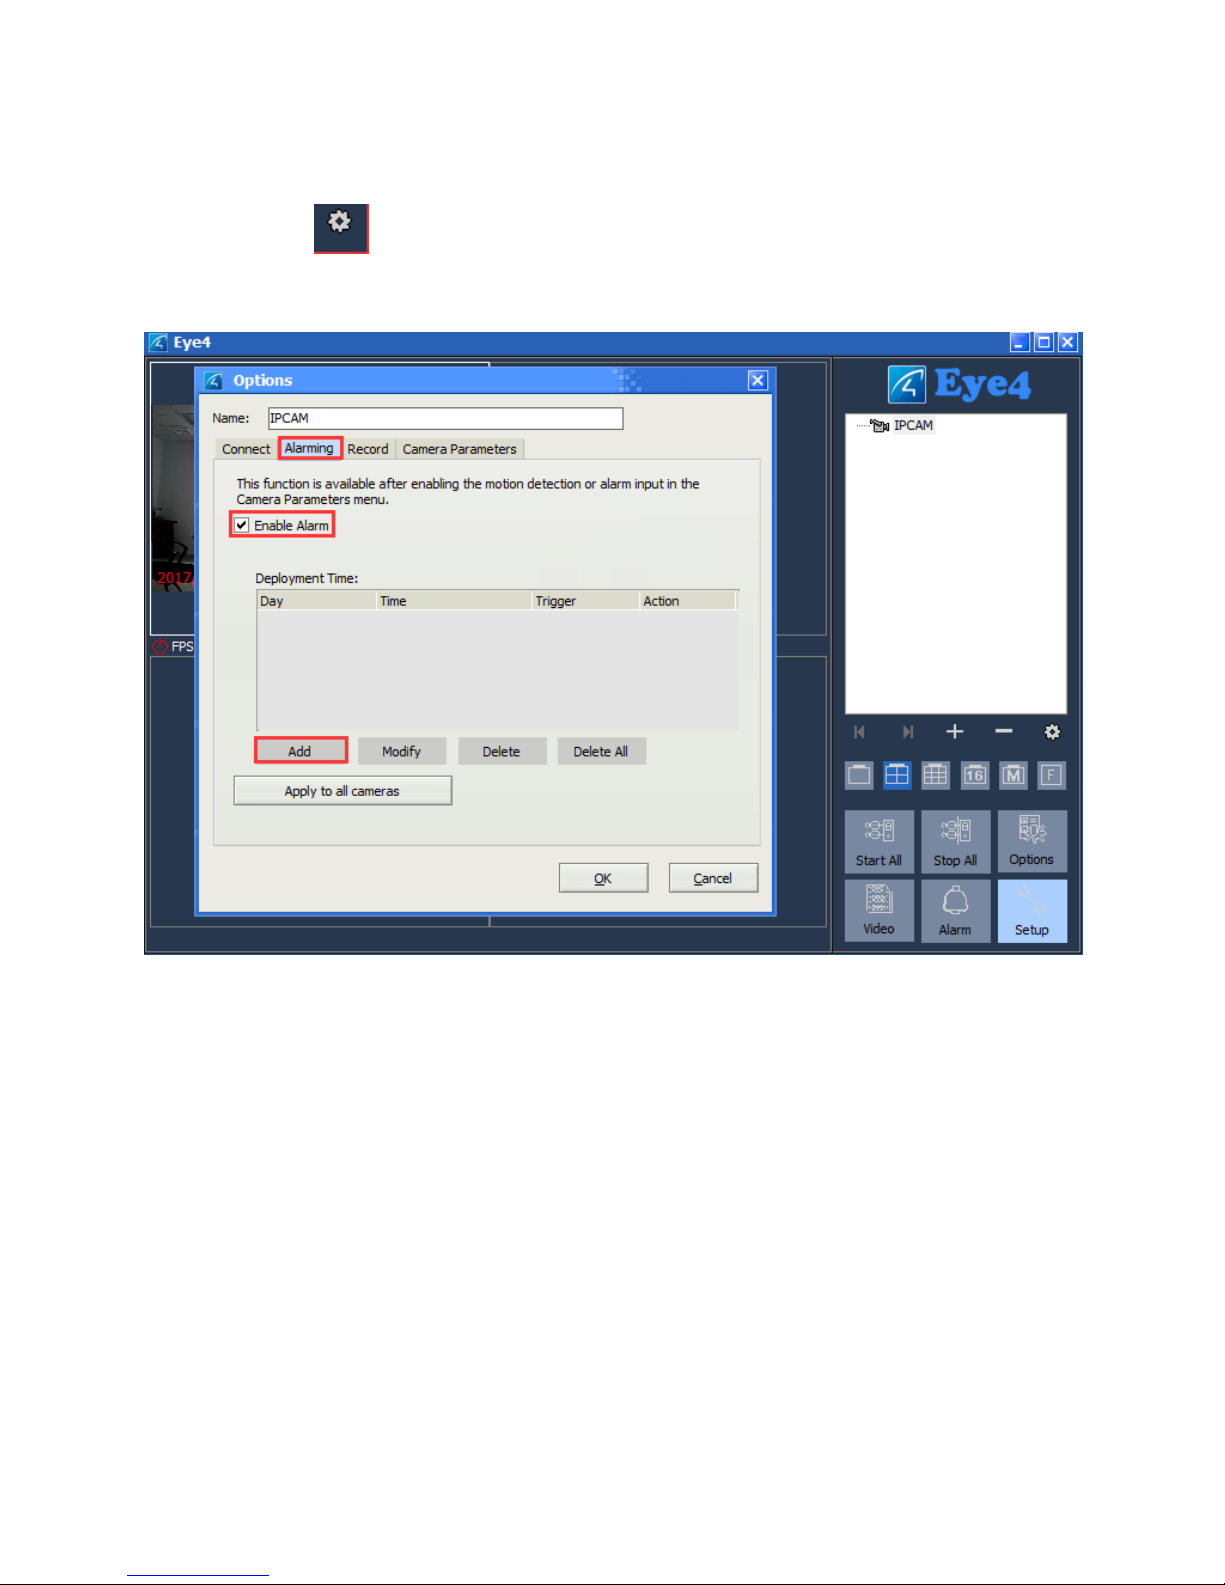
Set up alarm alert and do alarm video management.
① Click on to enter into settings; Click on 【Alarming】and 【Enable
Alarm】, then click 【Add】to set alarm mode.
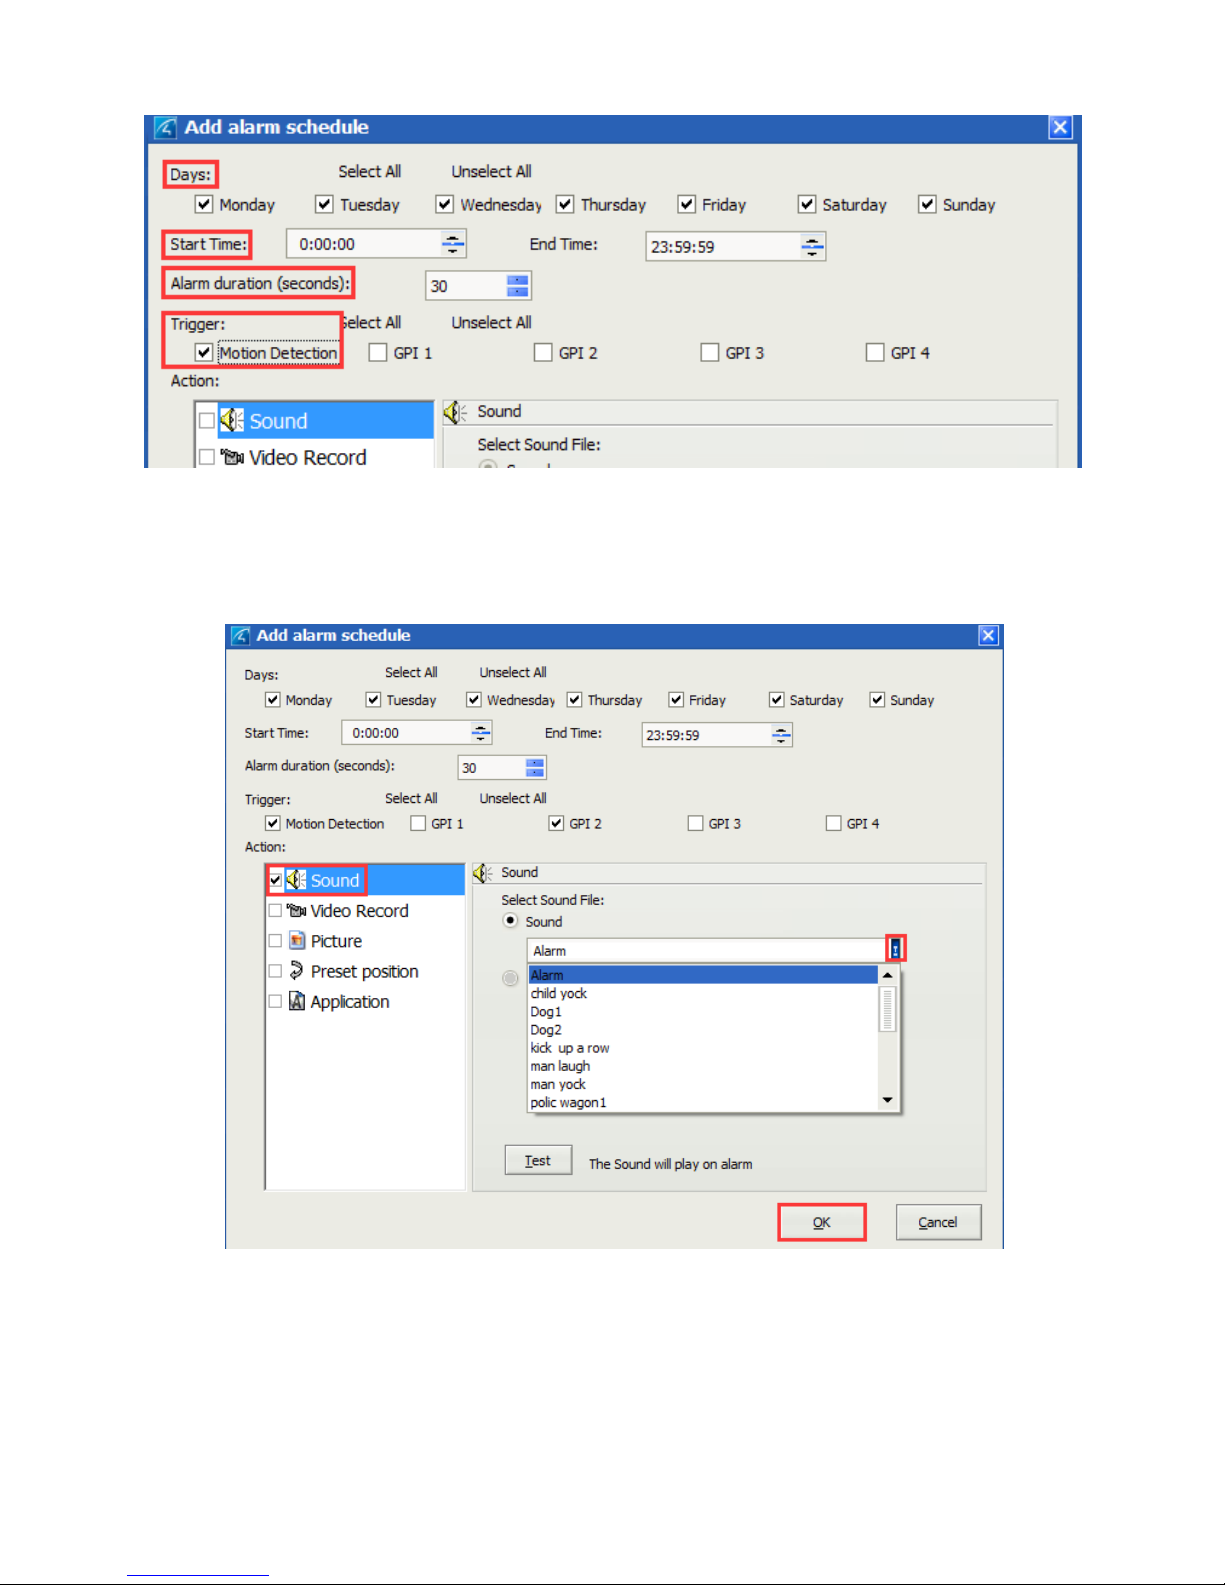
② For alarm time schedule, you are able to select days from Monday to
Sunday, and specify start and end time for a day;
Set alarm duration (duration) according to your needs.
Select Trigger mode as【Motion Detection】, it will start to record/ take a
snapshot/ make a sound when motion detected according to your setting.
Page 25
23
③ Make a sound when motion detected.
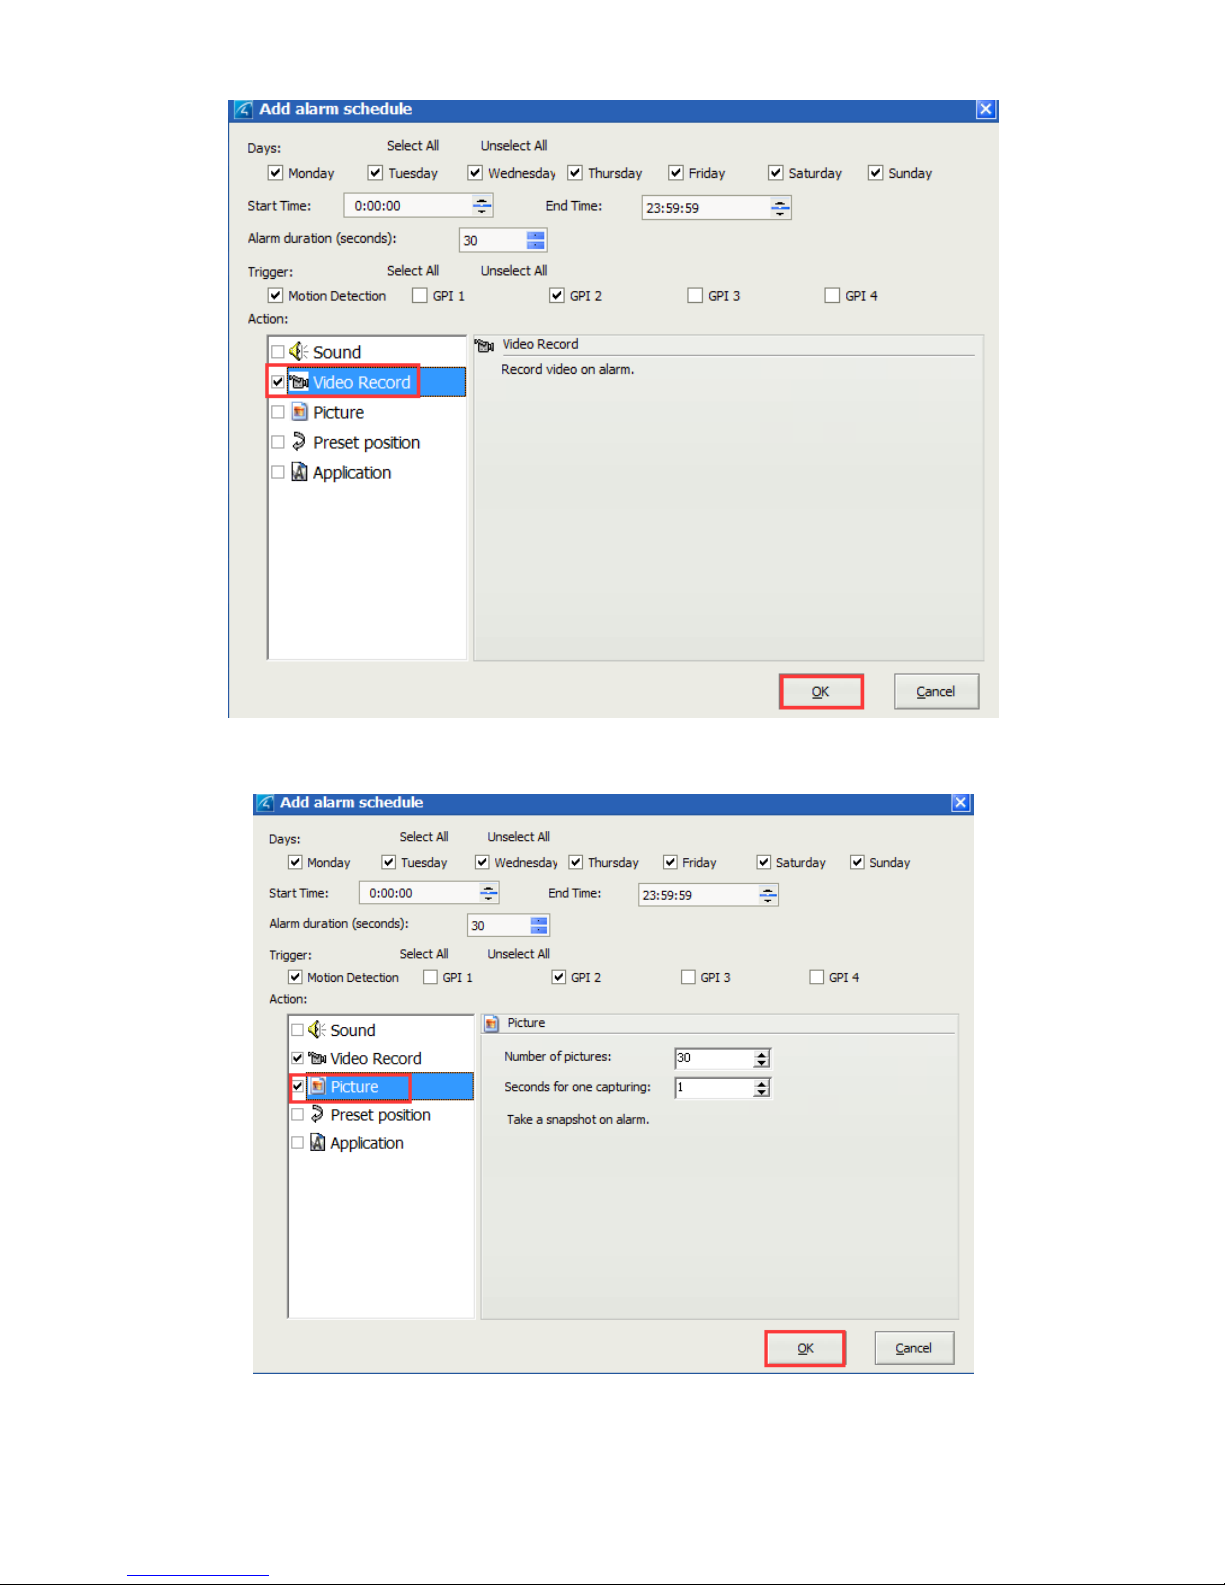
④ Start to record video when motion detected.
Page 26
24
⑤ Take a snapshot on alarm.
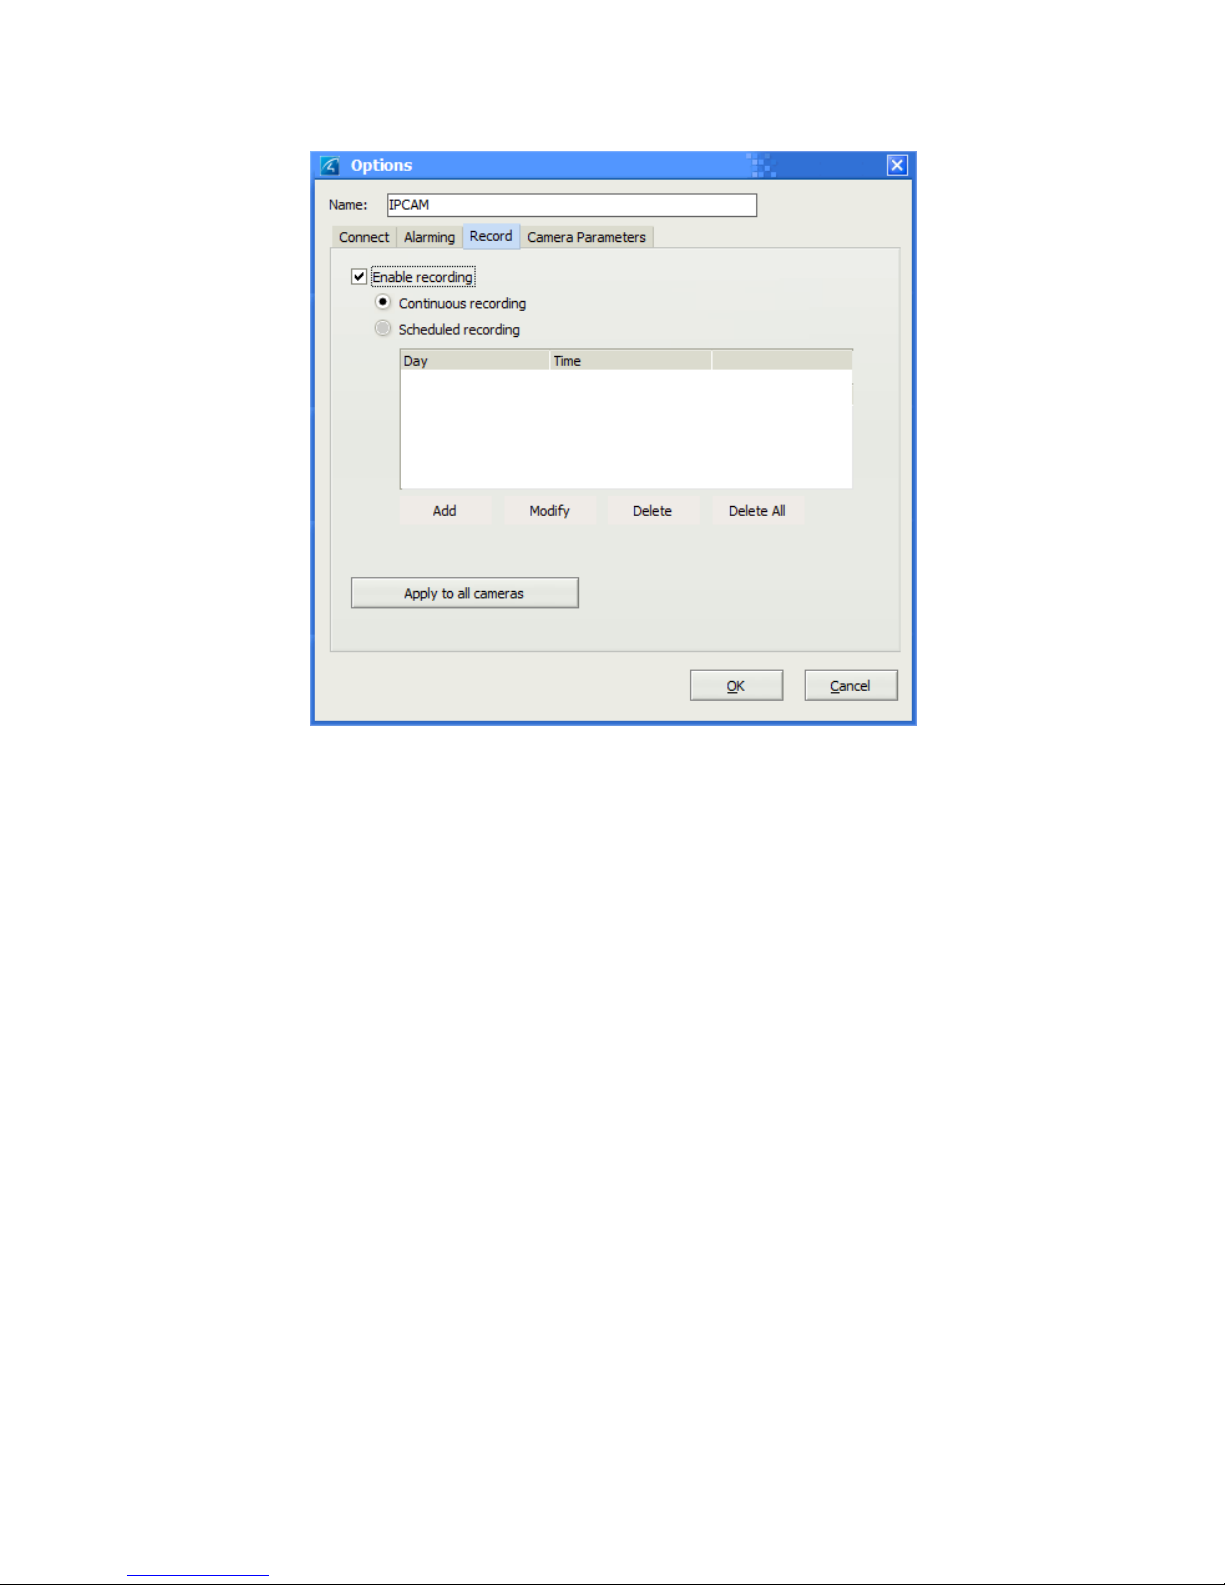
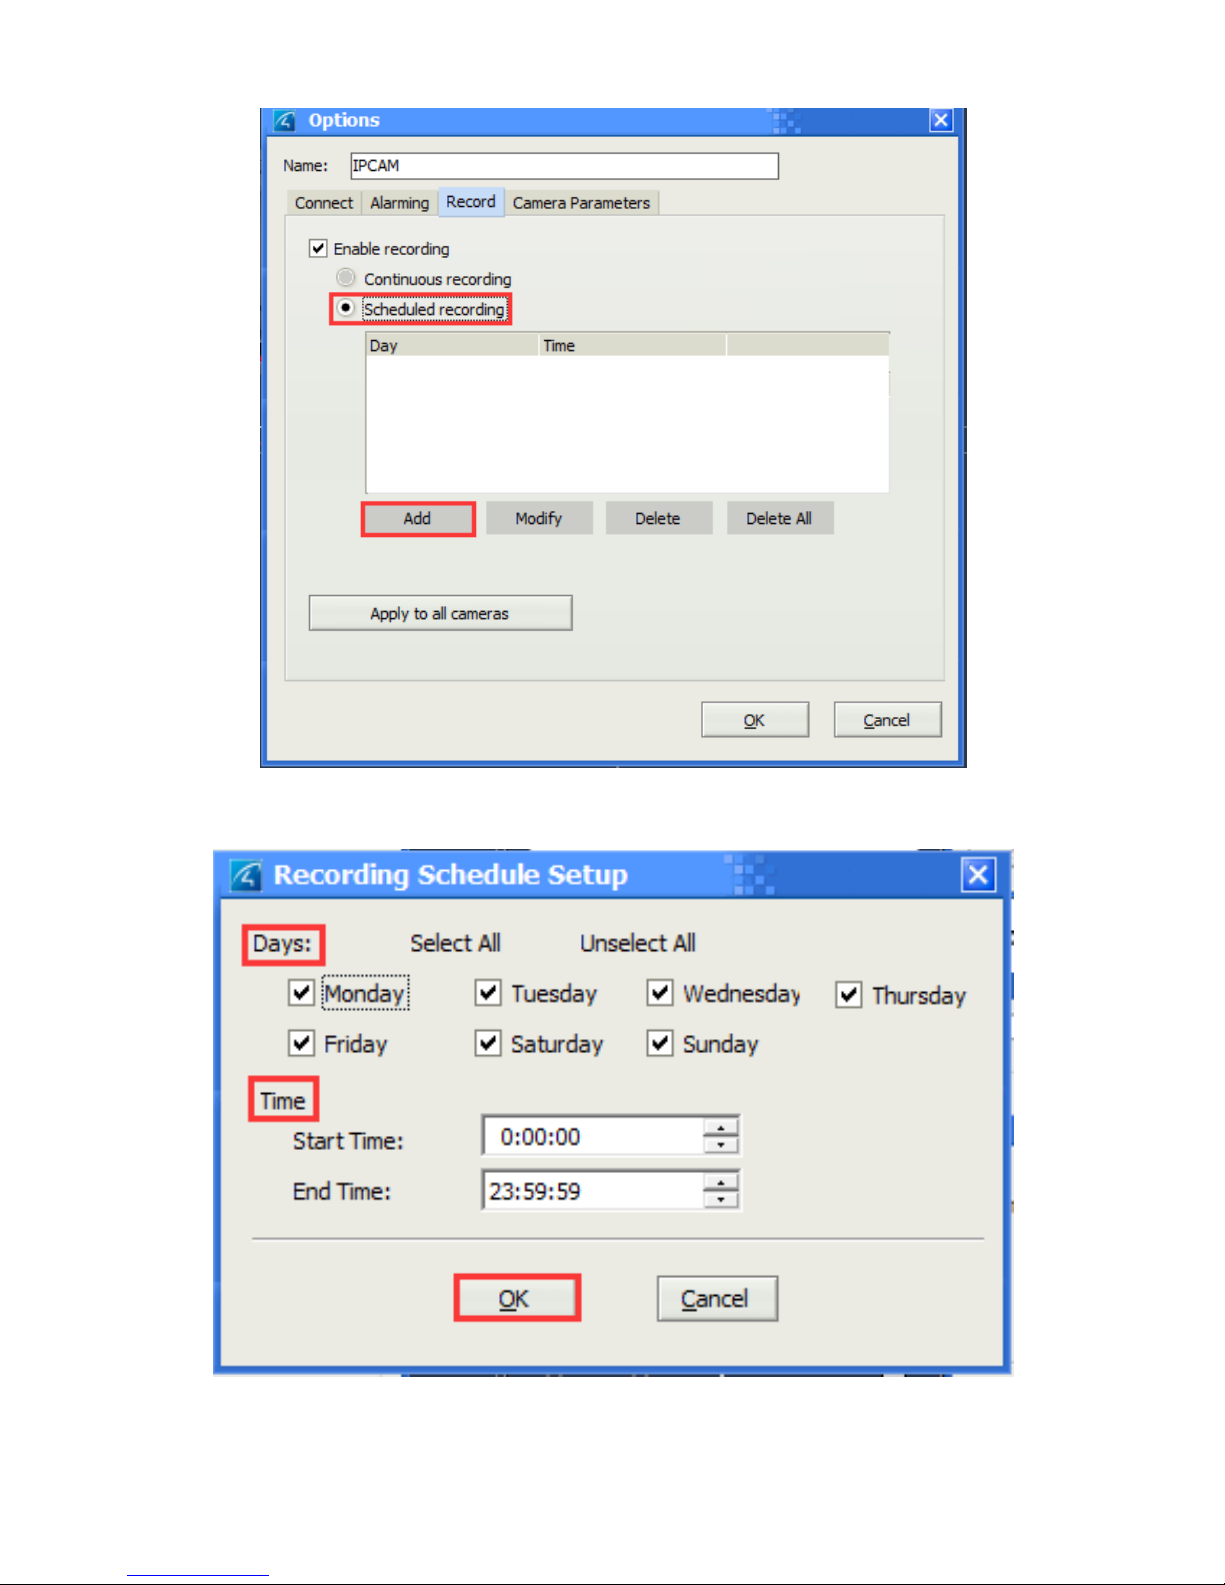
b. Continuous/ Scheduled Recording Setting
Page 27
25
① Enable continuous recording
② Or set scheduled recording. Select 【scheduled recording】, then click on
【Add】.
Page 28
26
③ Set specific days and time for recording according to your needs.
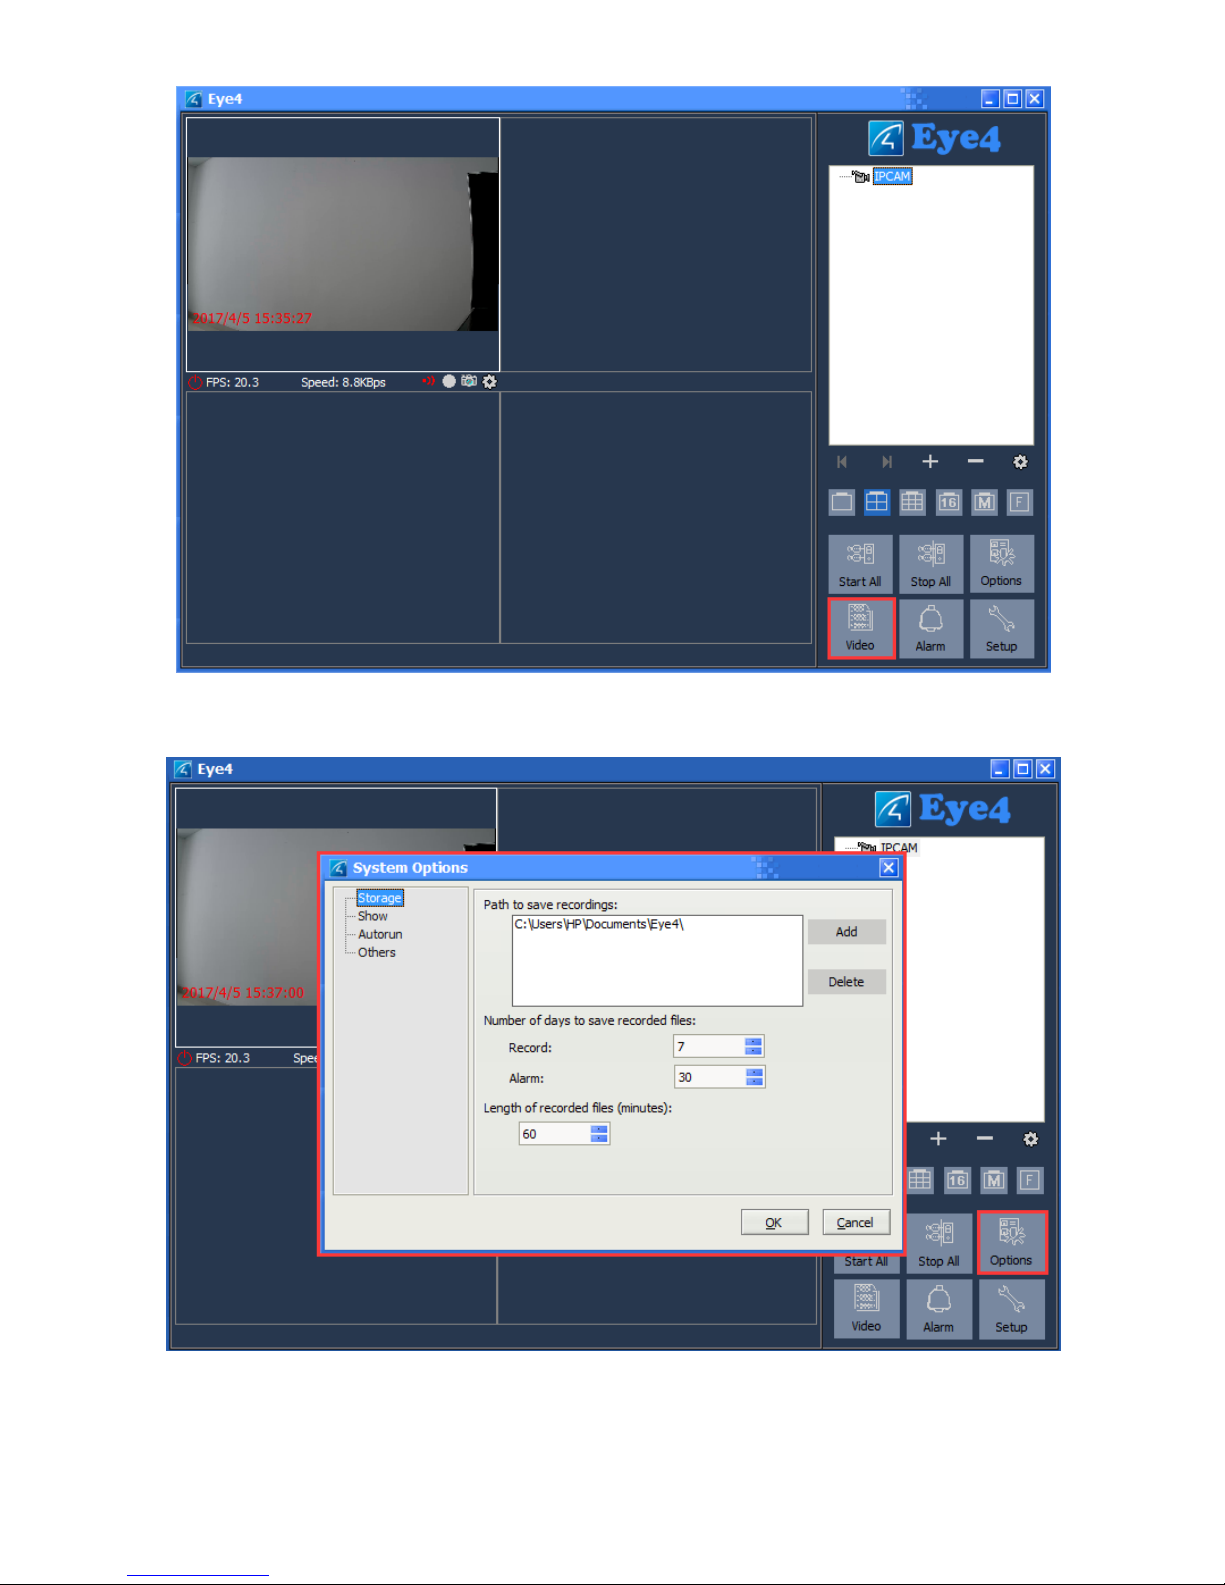
c. Set Recording Path on PC
① Click on 【Video】to pop up a window as below.
Page 29
27
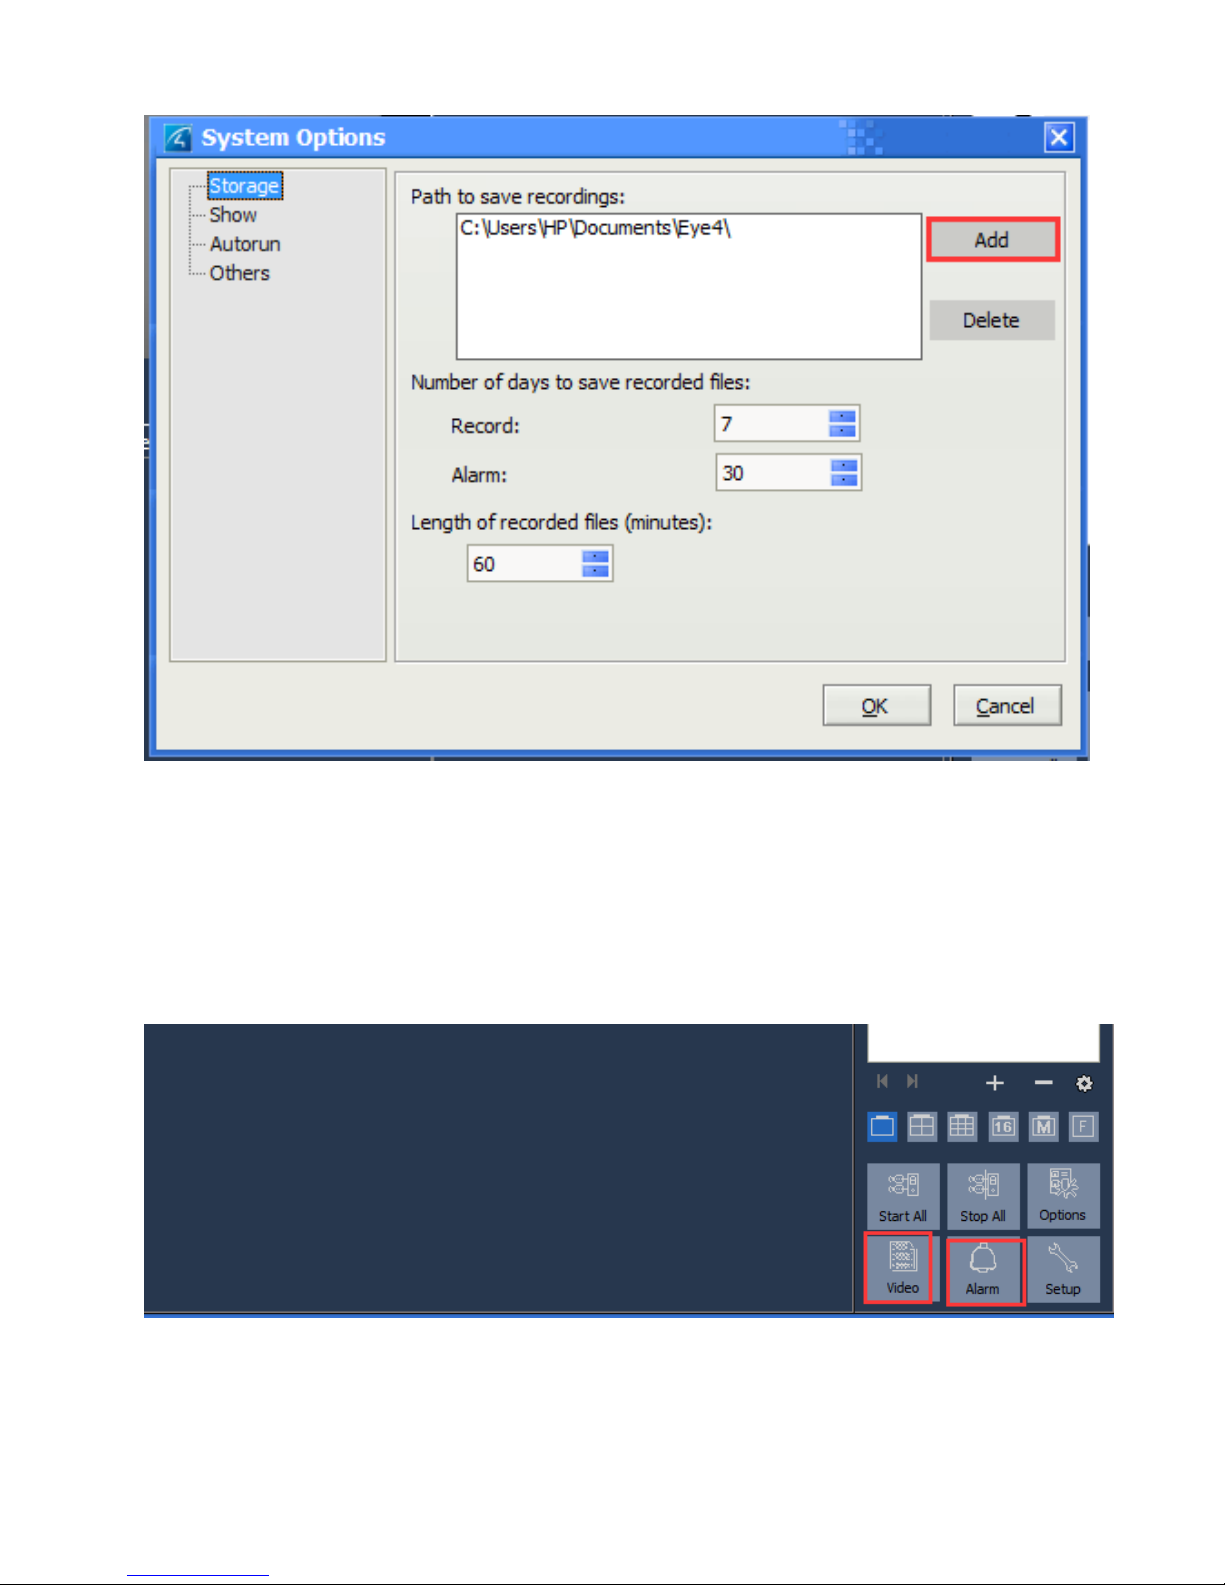
② Click on 【Options】to pop up a window like below.
③ Click on【Add】to set path to save recordings.
Page 30
28
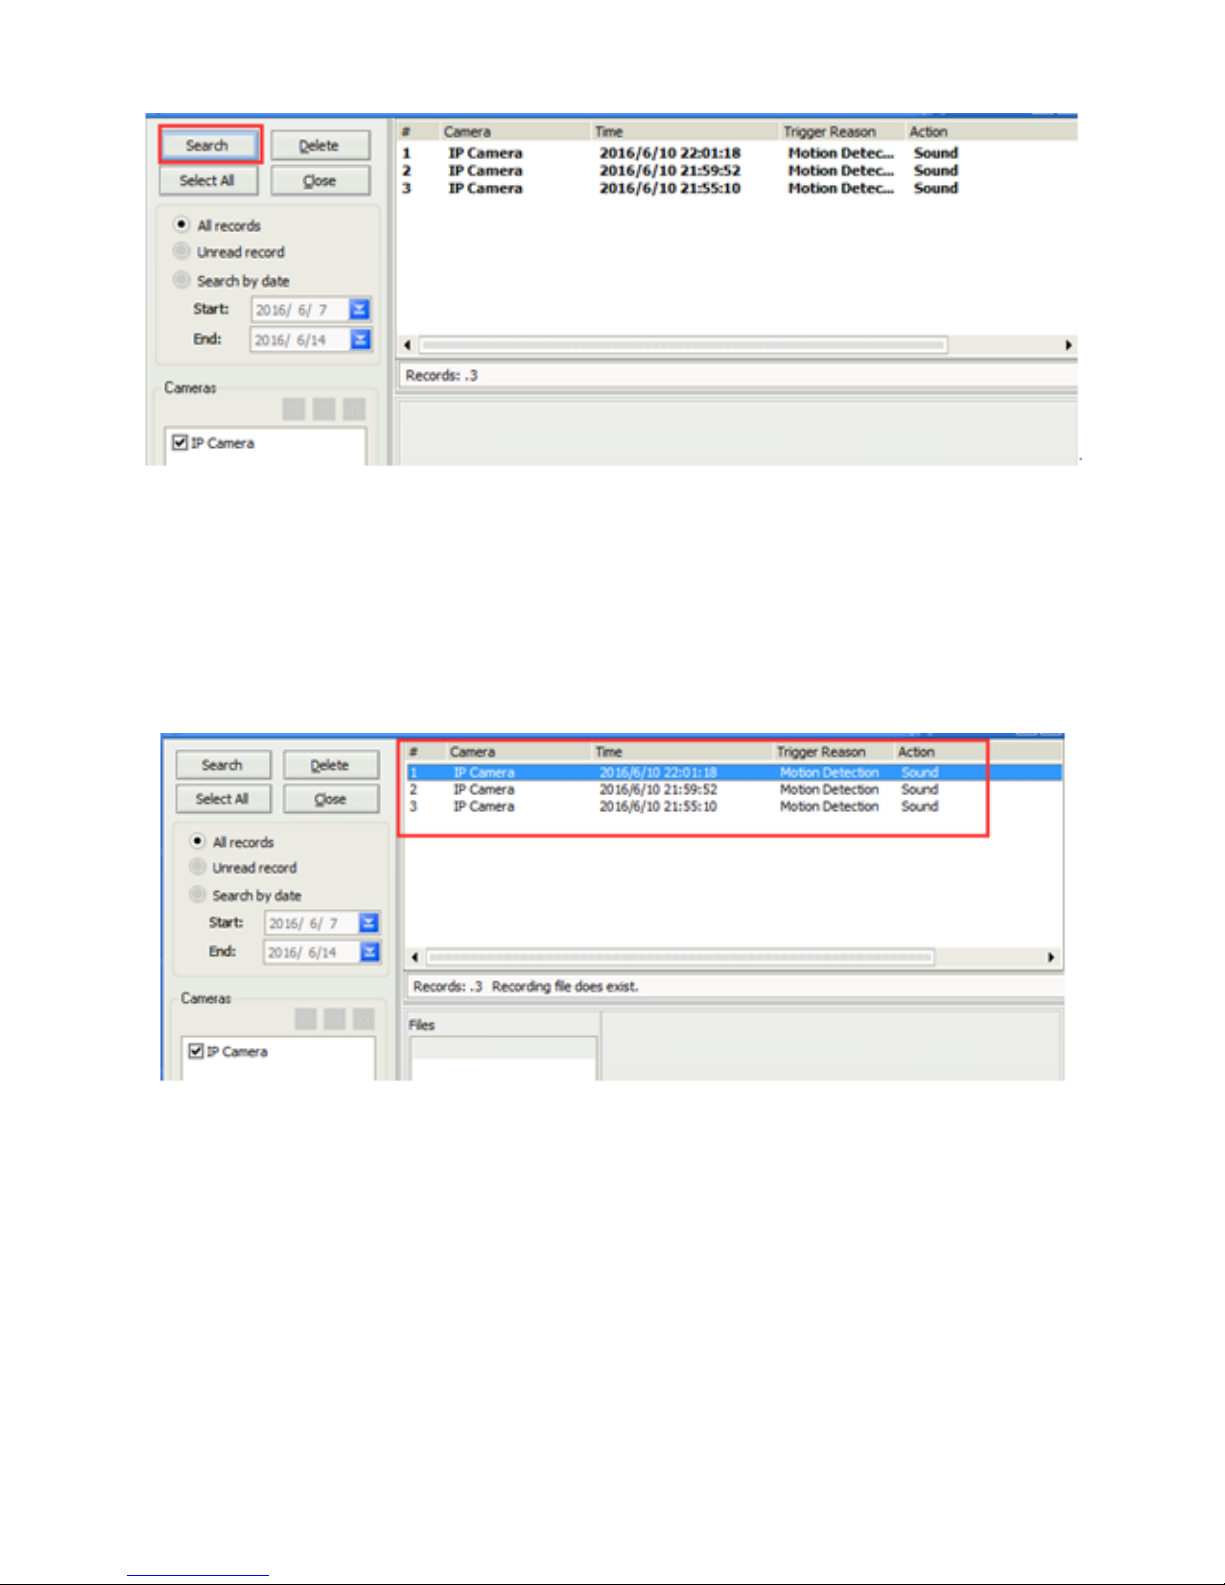
d. Search Video Records or Alarm Records
① Click on 【Video】to view common video records; Click on 【Alarm】
to view motion detected video records.
② Click 【Search】to show records list.
Page 31
29
③ Click on specific records to play; it will show records type under
【Action】, like sound, picture or video records.
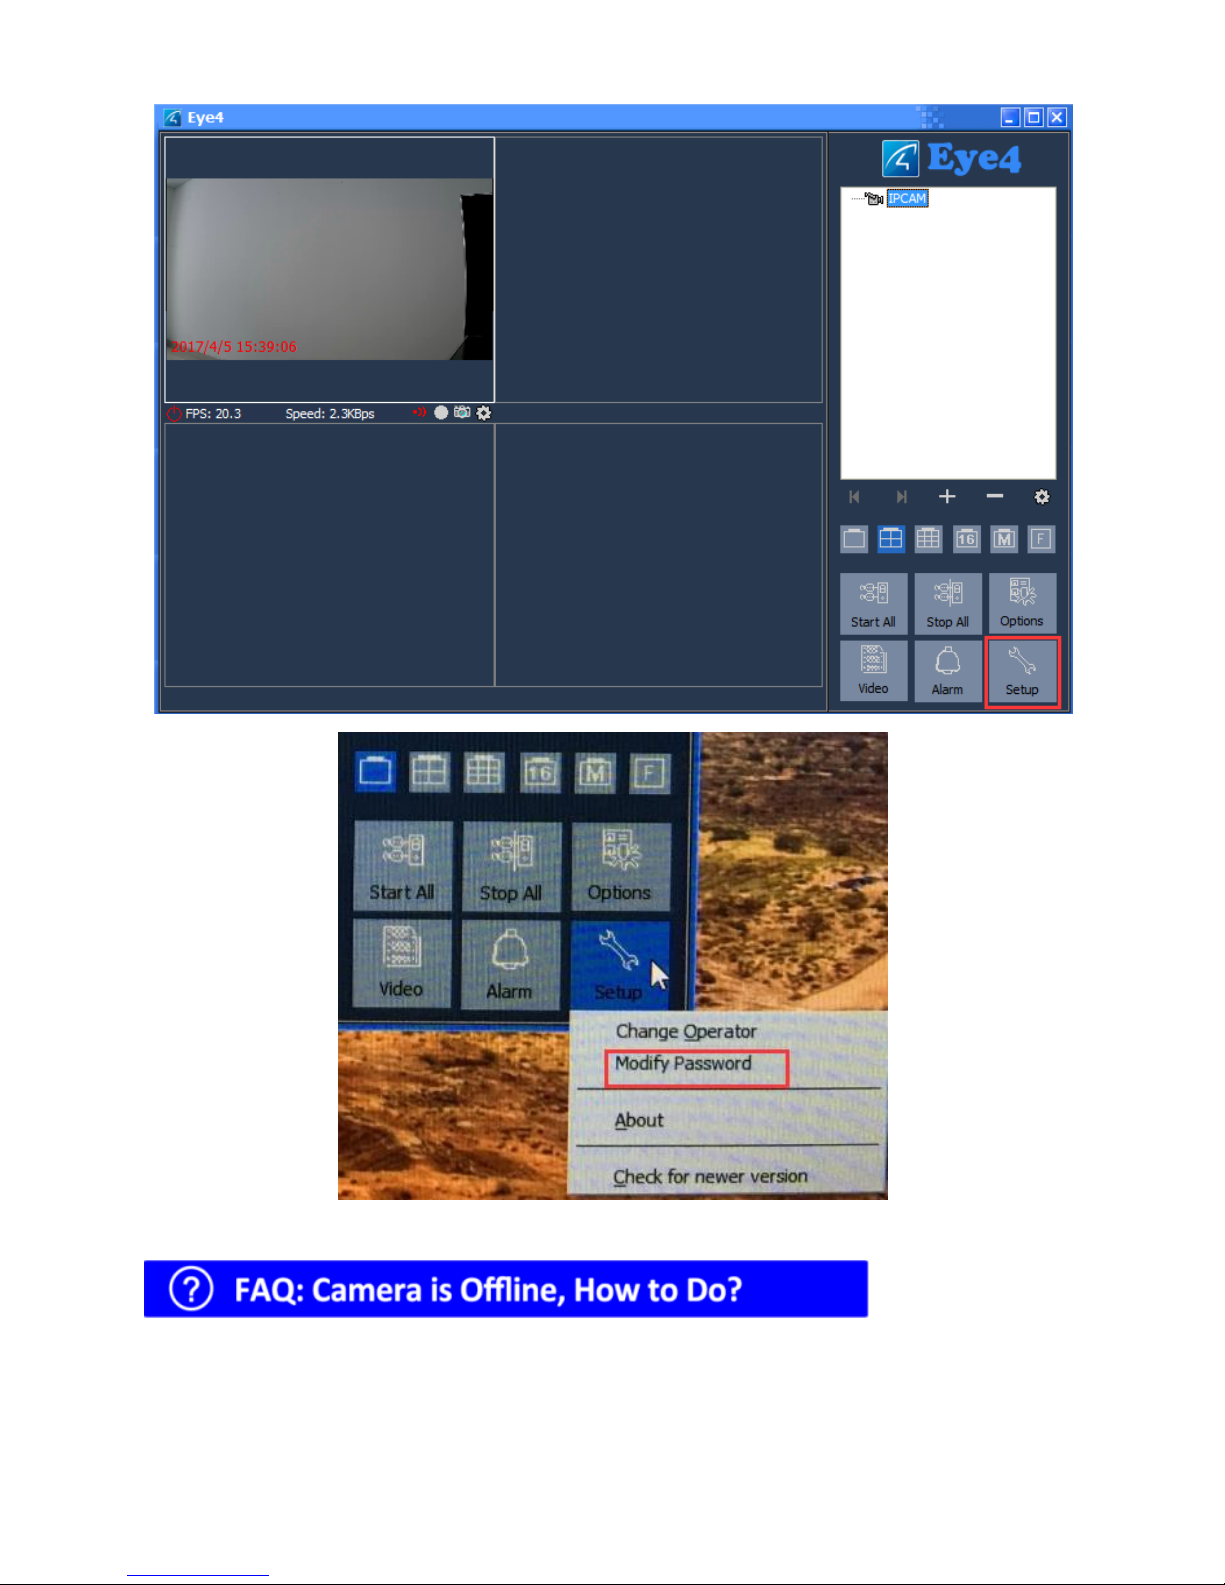
e. Modify Password
① Click on 【Setup】, then click on 【Modify Password】
Page 32
30
1. Please make sure your Wi-Fi router is 2.4G (the IP camera does not work
with 5G Wi-Fi router) and the Wi-Fi password doesn’t include any special
characters like: “-, +, / ,*,etc.”.
Page 33
31
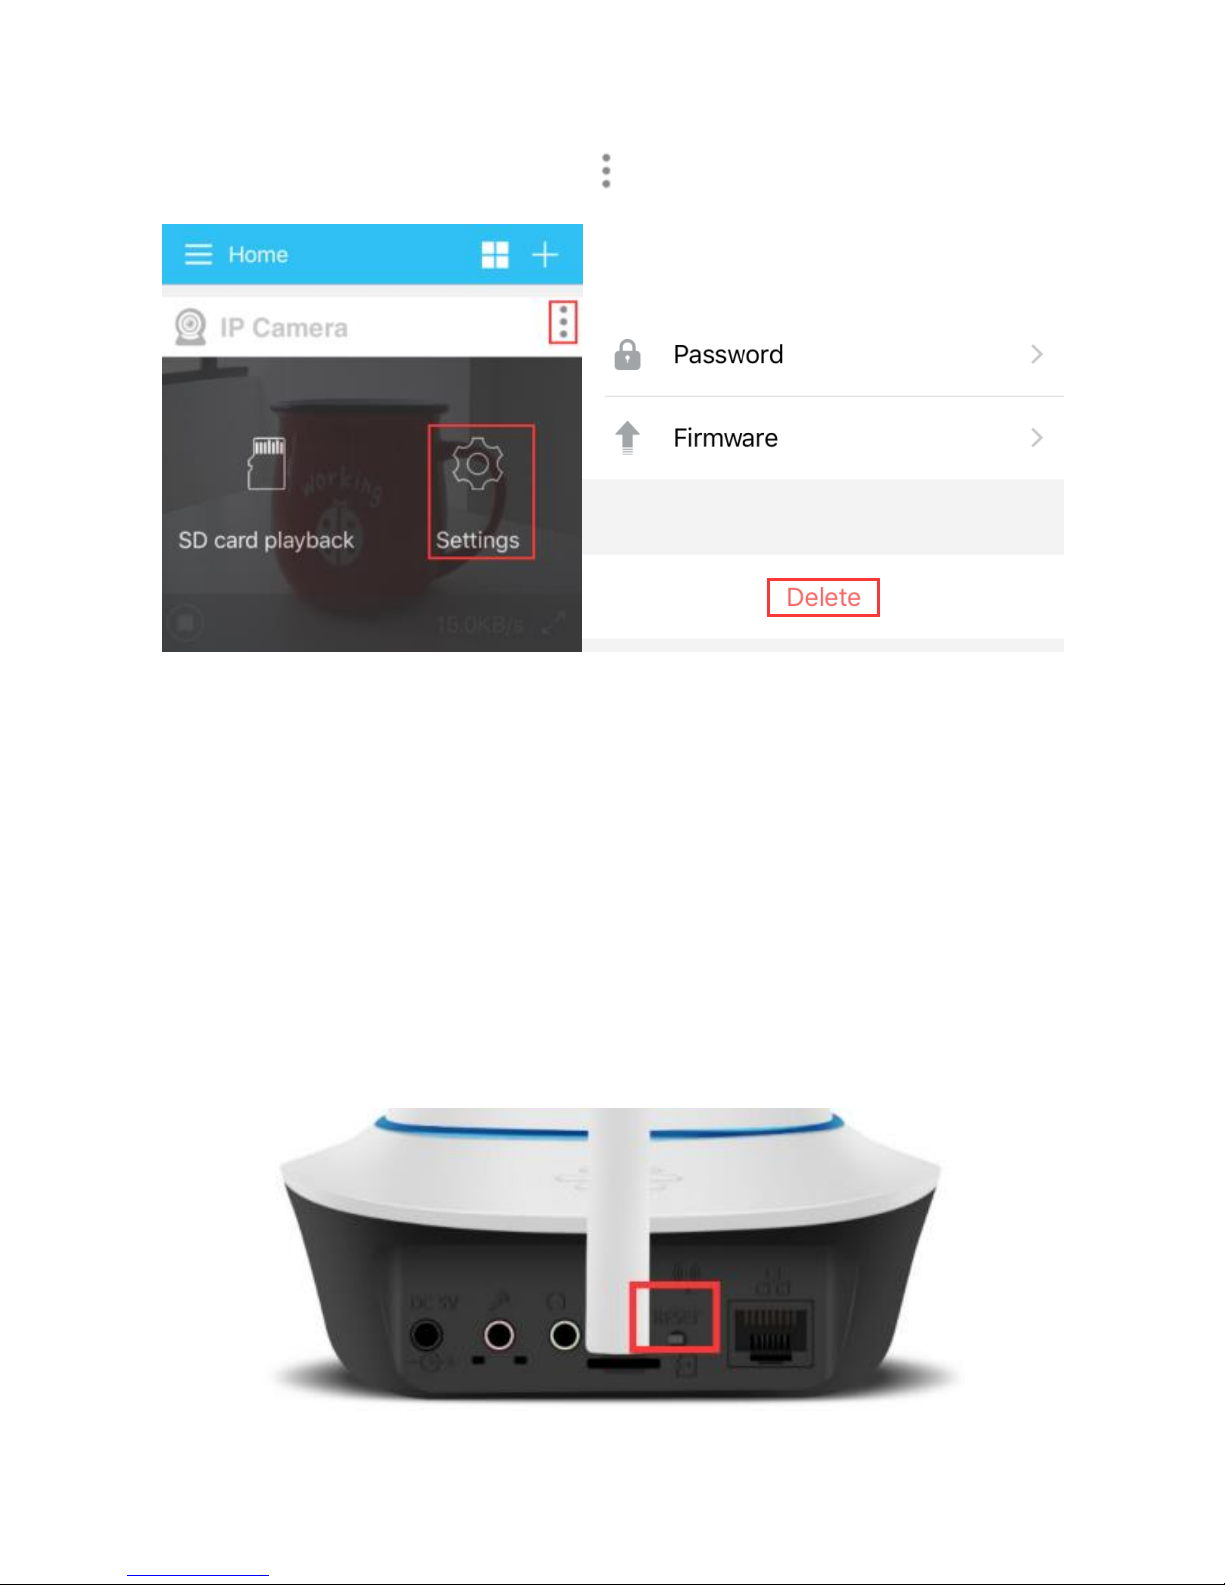
2. Please delete the camera from your app account first.
Step1: Open your app account, click , then 【Settings】---【Delete】
Step2: Log out your app first then login in again.
3. Please reset your camera
Please power on the camera first, then the camera will pan and tilt for
several seconds before it is ready for wireless configuration. Then use a pin
to hold the reset button as the picture shows below for 5-10 seconds till the
camera speaks out “Reset complete! Will reset the device.”
4. Please add camera to your app account.
Page 34
32
There are three options to add a camera, you can go through them all and
select one to have a try!
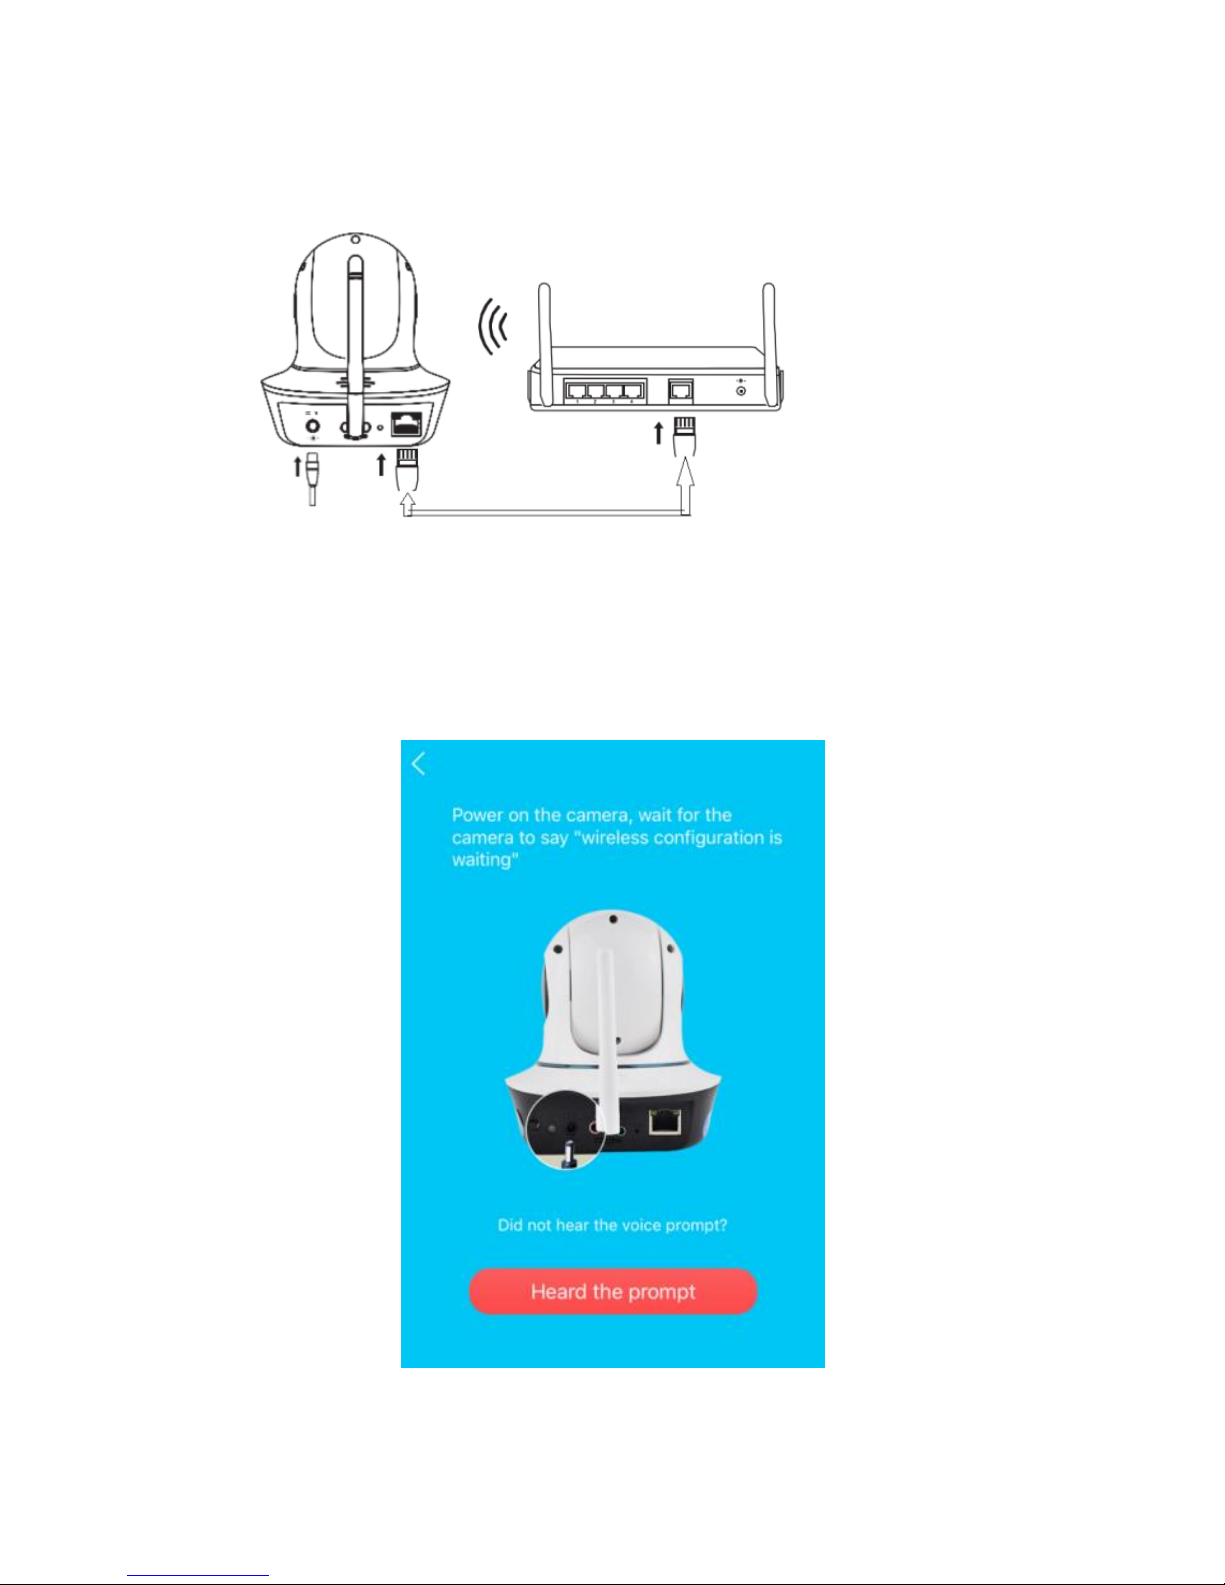
Option1:
Attention: Make sure you type the right password for your wifi network.
. When you have done reset, wait the camera speaks “One key WiFi
configuration is waiting”.
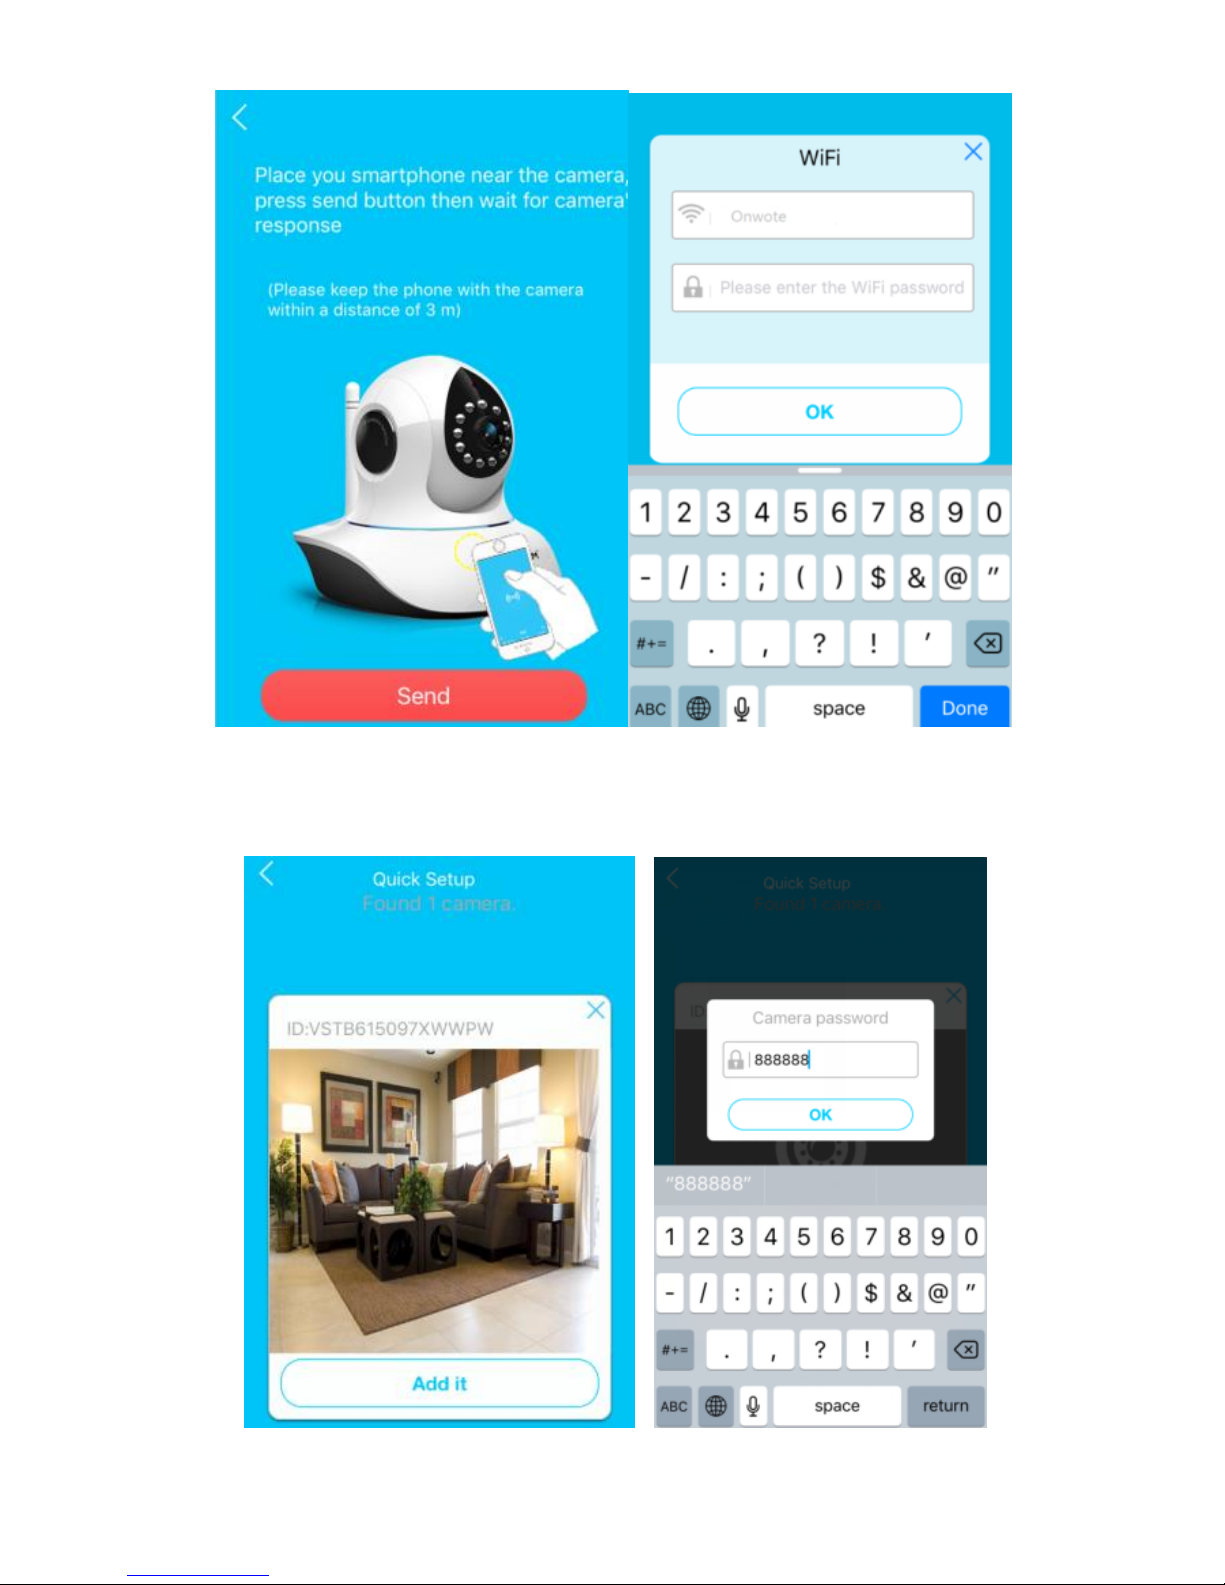
. Place your phone near to the camera pickup as close as possible, click
send button, type WiFi password, wait your camera speaks “config success”.
Page 35
33
. When the app find one camera, type 【Add it】, then enter the default
password 【888888】.
Page 36
34
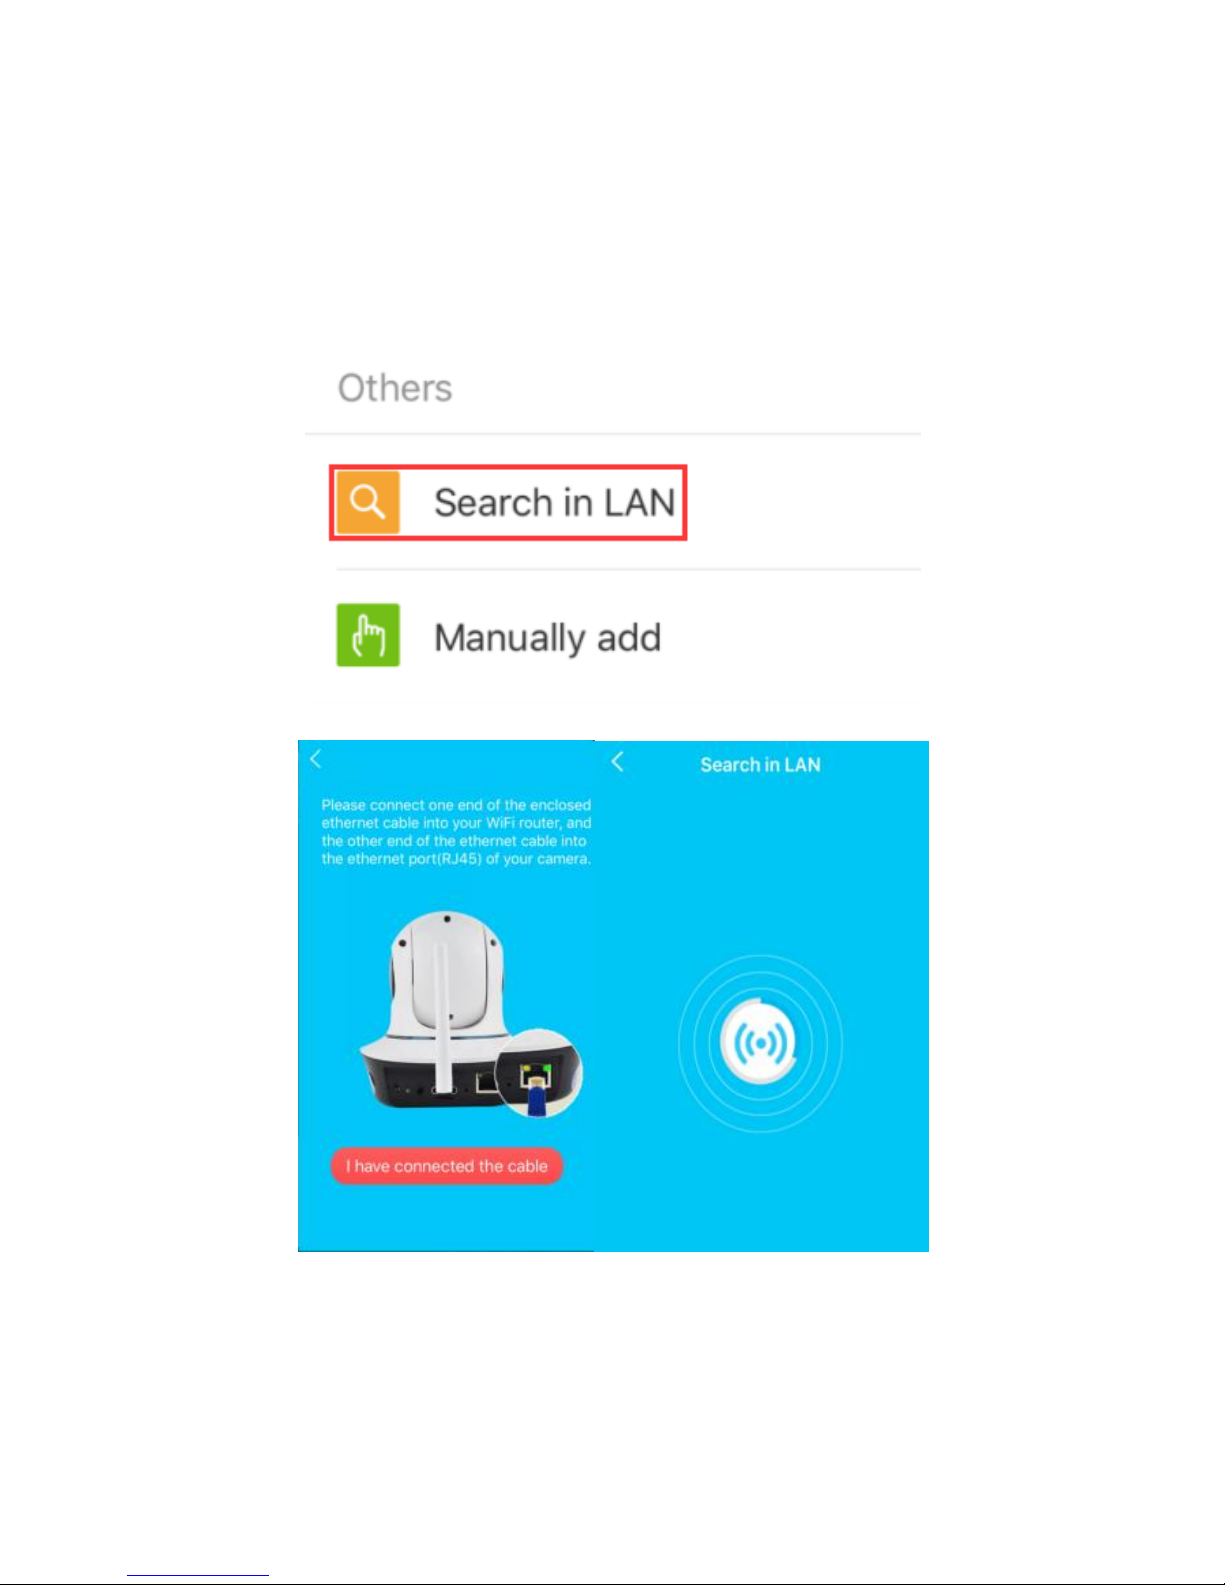
Option2: Search camera in the LAN
Search and add a camera in the local area network.
Please make sure using the included Ethernet cable to connect your camera
to your local WiFi router first, then tap【Add Cameras】
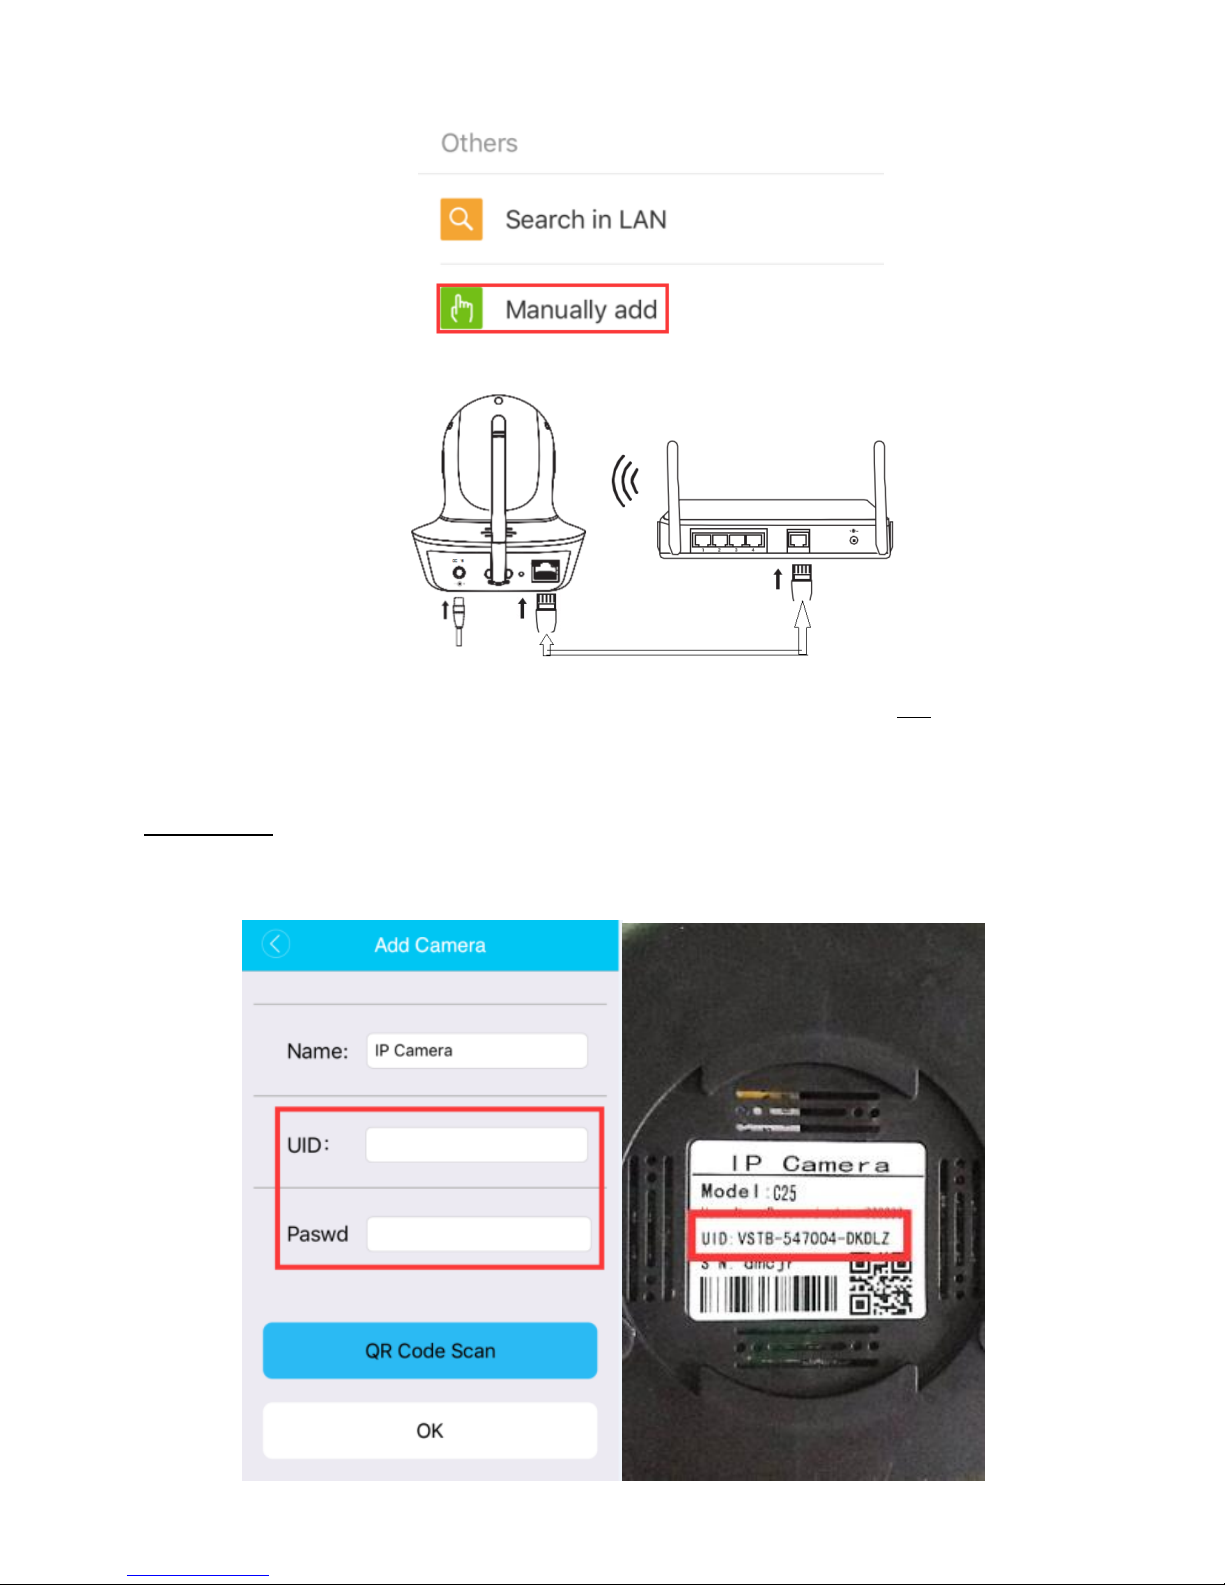
Option3: Manually add a camera
.Please make sure using the included Ethernet cable to connect your came
ra to your local WiFi router first, then tap【Add Cameras】
Page 37
35
You can choose to type UID and password to add a camera or scan QR
Code to add a camera manually.
Option 1: Type UID and password to add a camera manually. UID is on the
bottom of the camera, the default password is 888888.
Page 38
36
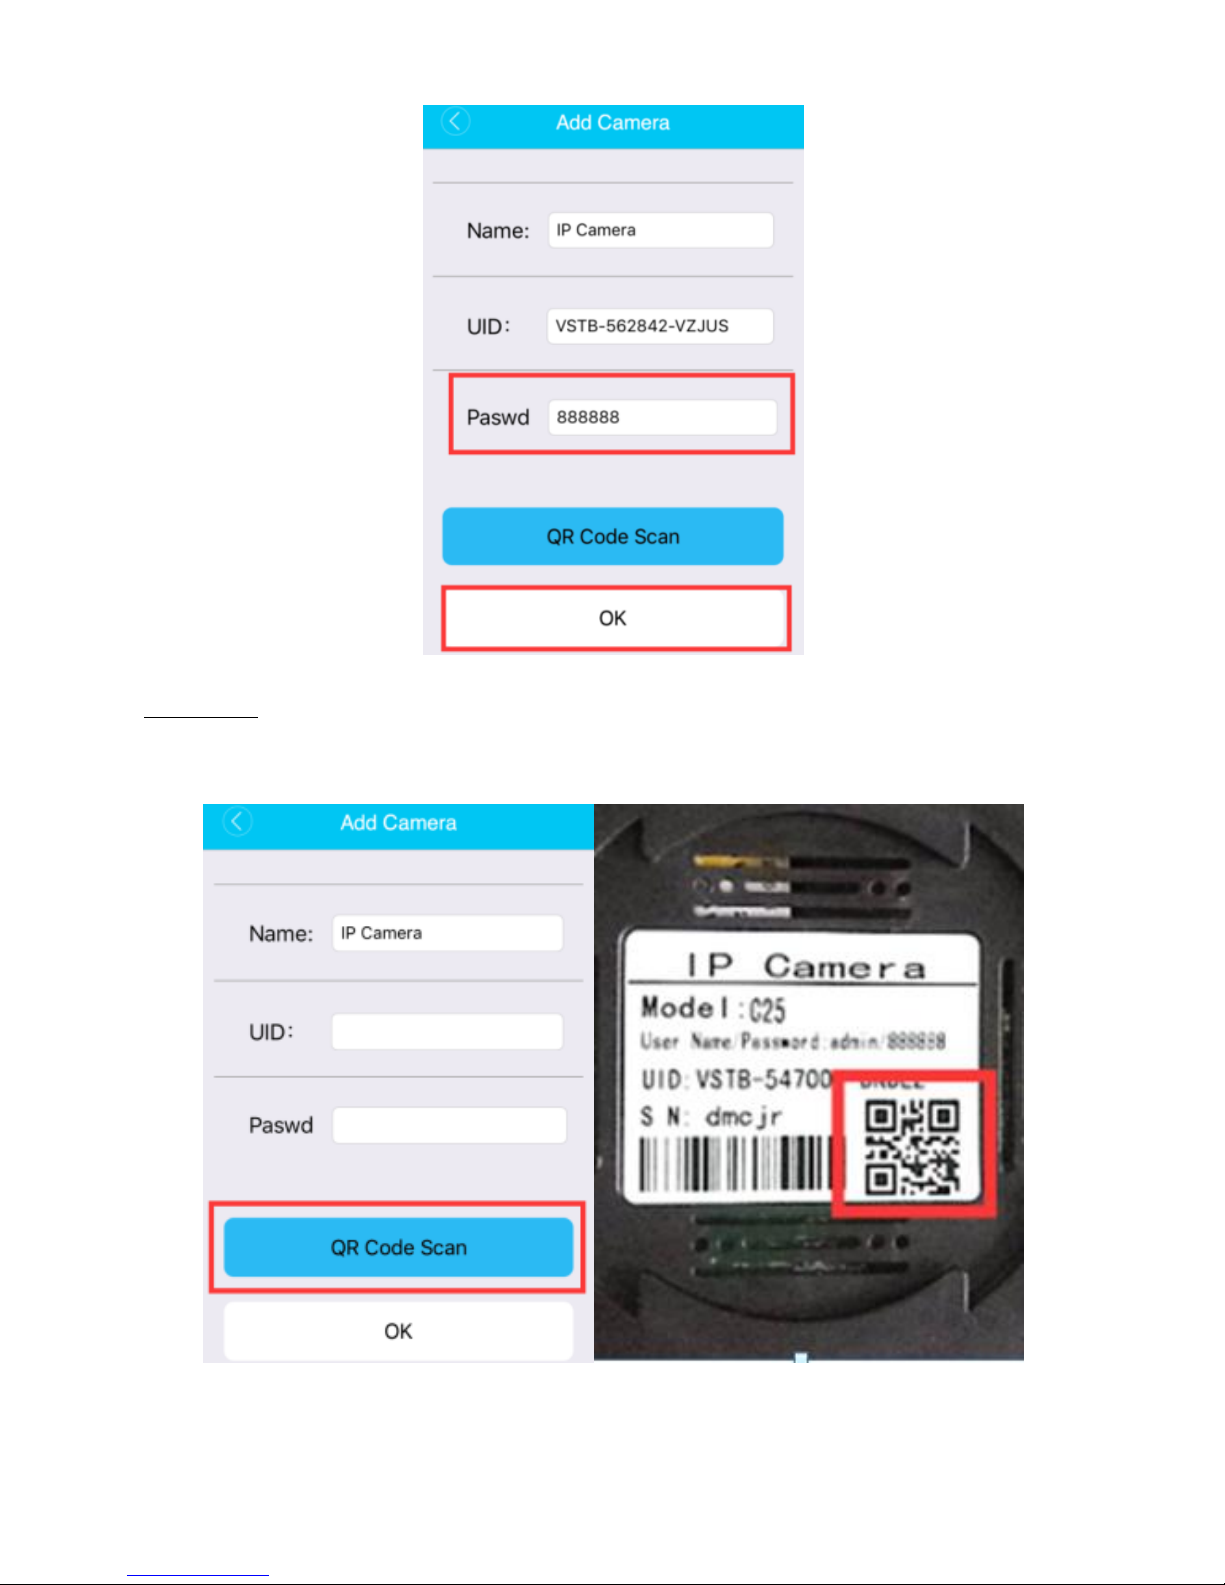
Option 2: Scan QR Code to add a camera manually. QR Code is on the
bottom of camera
Page 39
37
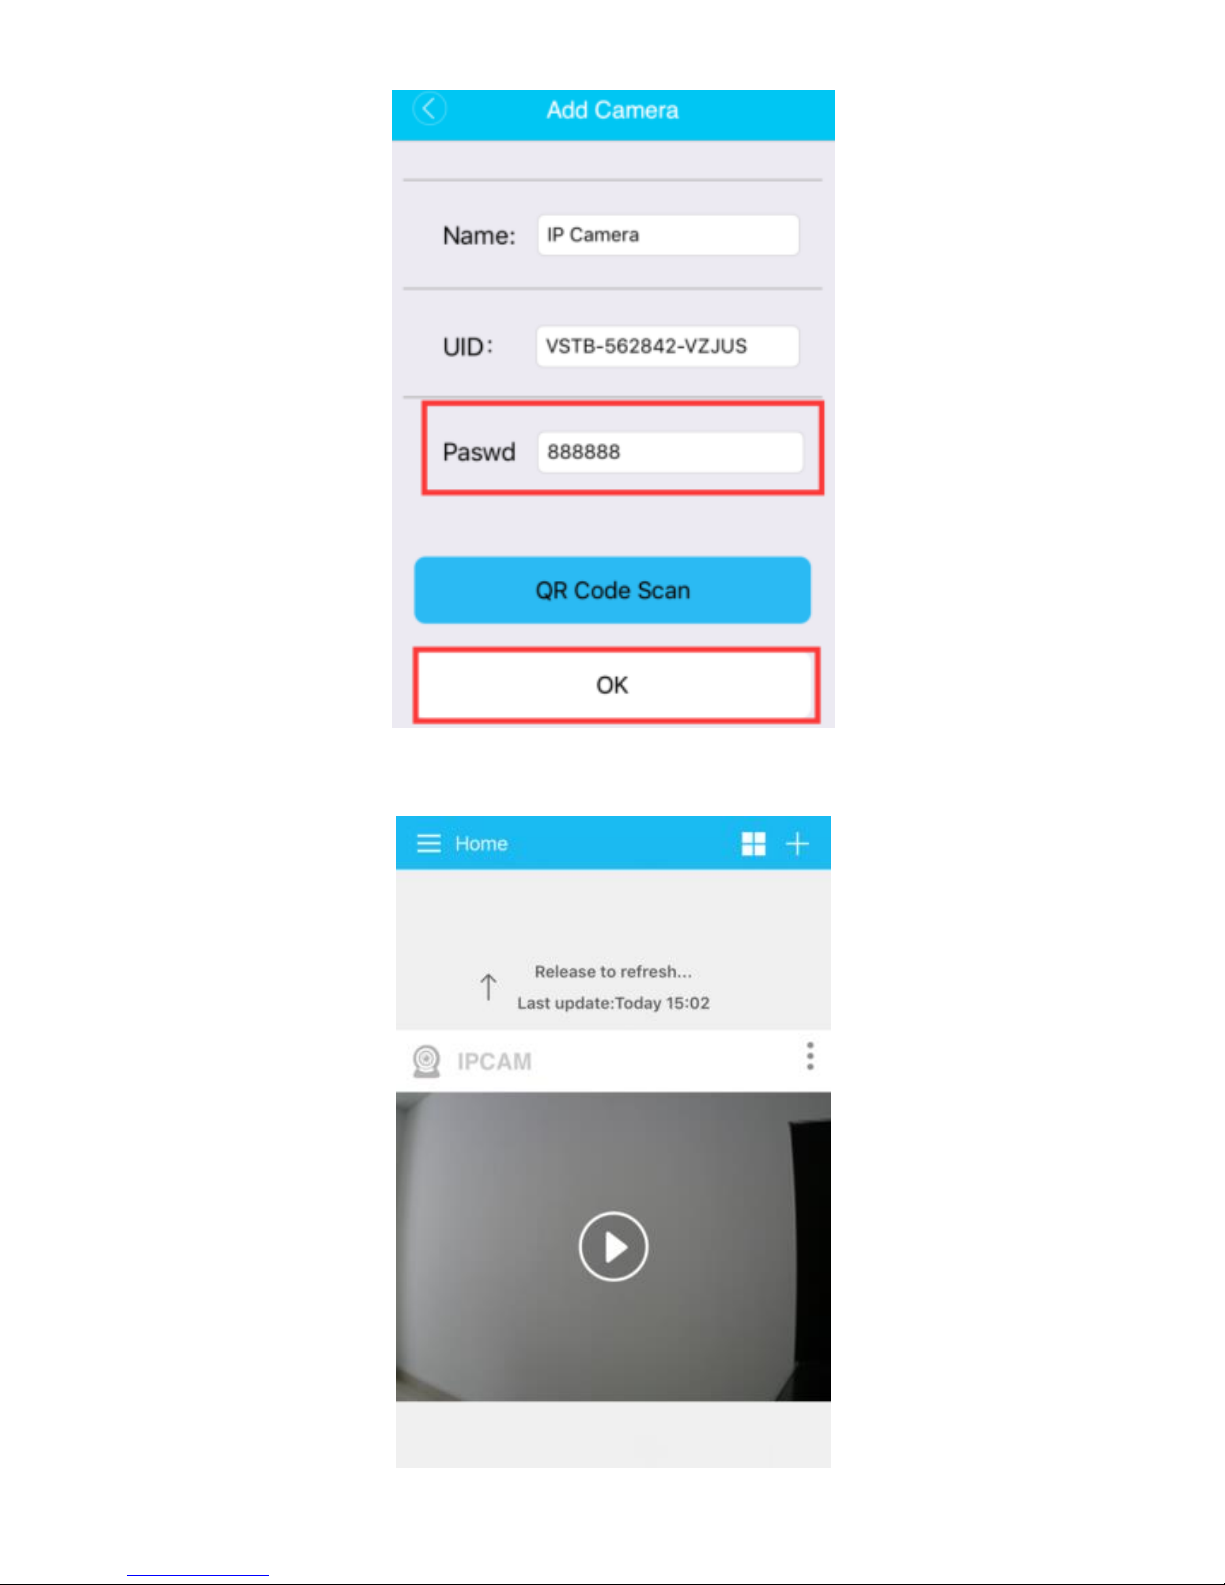
5. Slide down to refresh your device information.
Page 40
38
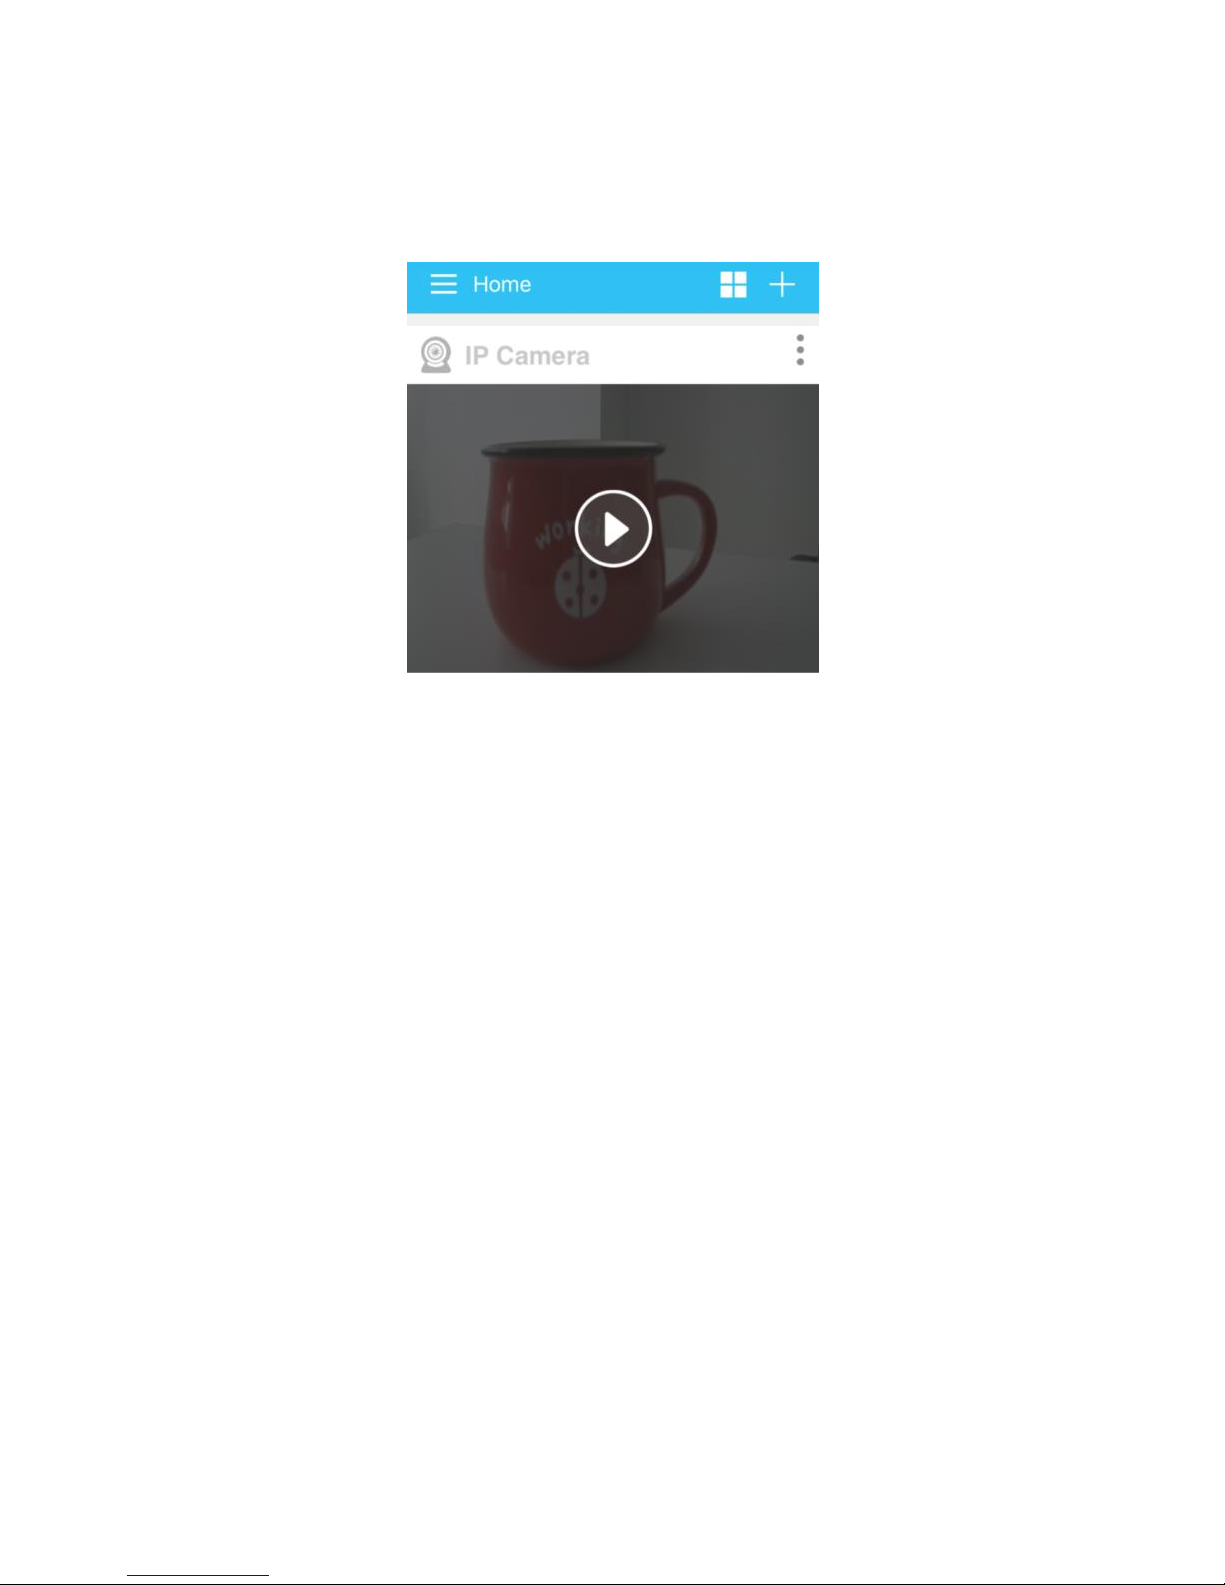
6. View live video.
When you add one camera successfully, the app will show online camera
information as below; click on it, then click on【Video】to live view
 Loading...