

Onward Broil King Regal S 590 Pro, Broil King Regal 490, Broil King Imperial XLS, Broil King Regal S 490 Pro, Broil King Regal S 440 Pro Owner's And Assembly Manual
...
INFRARED SIDE BURNER
OWNER’S AND ASSEMBLY MANUAL
FOR USE WITH BUTANE OR PROPANE GAS
CATEGORY I
3+(28-30/37)
, CATEGORY I
3B/P(30)
CATEGORY I
3B/P(37)
, CATEGORY I
3P(50)
FOR USE WITH NATURAL GAS
CATEGORY I
2E(20)
, CATEGORY I
2H(20)
CONTENTS
SAFETY ............................................................. 2
LEAK TESTING ................................................ 3
LIGHTING .......................................................... 4
OPERATION ..................................................... 5
COOKING TECHNIQUES ................................. 5
MAINTENANCE ................................................ 6
TROUBLE SHOOTING ..................................... 7
ASSEMBLY ....................................................... 8
PARTS LISTING ............................................. 19
WARRANTY .................................................... 20
FITS:
Broil King® Imperial™ XLS, Imperial™ XL, Imperial™ 590, Imperial™ 490
Broil King® Regal™ XL, Regal™ S 590 Pro, Regal™ 590, Regal™ S 490 Pro, Regal™ 490, Regal™ S 440 Pro, Regal™ 440
Broil King® Baron™590, Baron™ 490, Baron™ 440, Baron™340
READ ALL INSTRUCTIONS CAREFULLY BEFORE OPERATING.
RETAIN THESE INSTRUCTIONS FOR FUTURE REFERENCE.
20094-IREU REV A
01/19
SAFETY
This appliance is designed in accordance with CE
Standards.
Use outdoors only.
Read the instructions before using the appliance.
Warning: accessible parts may be very hot. Keep
young children away.
Do not move the appliance during use.
Use caution when handling or transporting this
product. Metal edges can present a hazard. Use
appropriate gloves when lifting or handling.
Turn off the gas supply after use.
Use protective gloves when handling hot components.
Any modification of the appliance may be dangerous.
In the event of a gas leak, shut off gas supply.
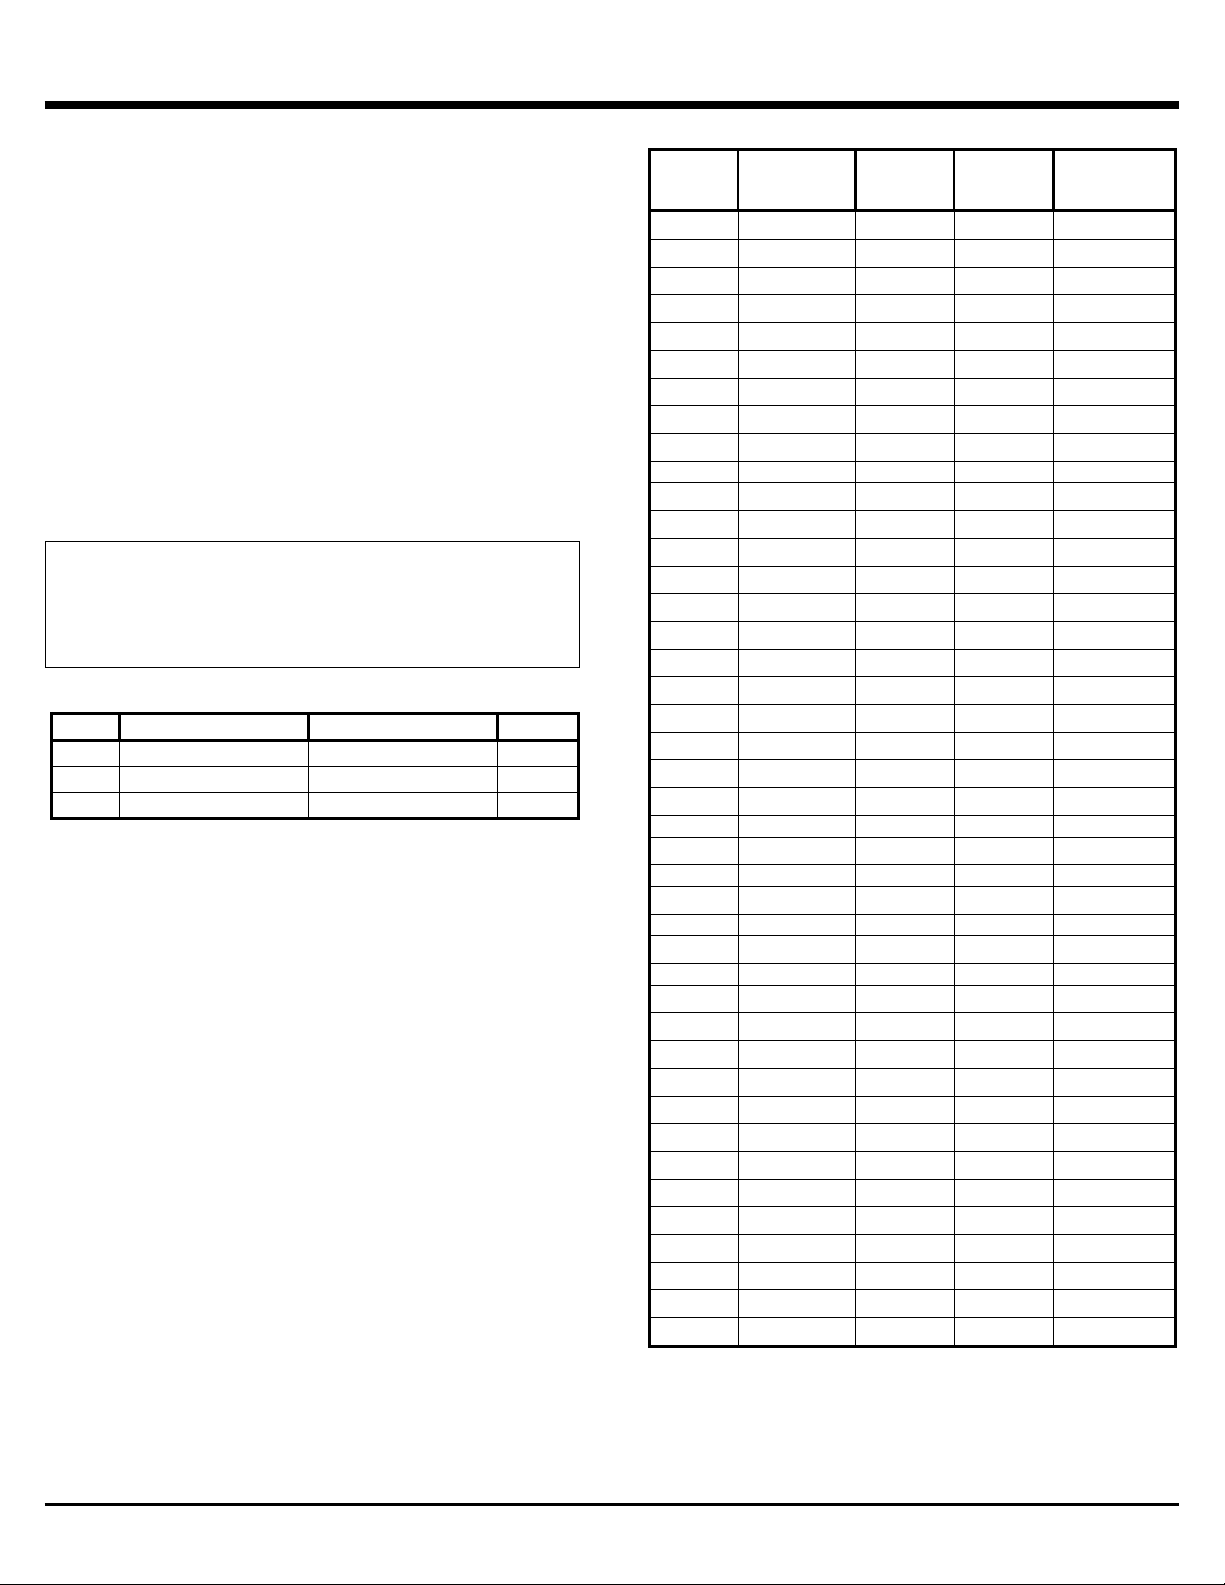
SPECIFICATIONS
SPECIFICATIONS
2
MODEL
TOTAL HEAT INPUT Kw
TOTAL HEAT INPUT g/h
JET SIZE
18672
2.7 Kw
196 g/h
0.74mm
18673
2.7 Kw
196 g/h
0.79mm
18676
2.7 Kw
196 g/h
1.09mm
If you smell gas:
1.
Shut off gas to the appliance.
2.
Extinguish any open flame.
3.
If odor continues, immediately call your gas
supplier.
FOR USE
IN
CATEGORY
SUPPLY
PRESSURE
BUTANE
SUPPLY
PRESSURE
PROPANE
SUPPLY
PRESSURE
NATURAL GAS
BE
I
3+(28-30/37)
28-30 mbar
37 mbar
CH
I
3+(28-30/37)
28-30 mbar
37 mbar
ES
I
3+(28-30/37)
28-30 mbar
37 mbar
FR
I
3+(28-30/37)
28-30 mbar
37 mbar
GB
I
3+(28-30/37)
28-30 mbar
37 mbar
IE
I
3+(28-30/37)
28-30 mbar
37 mbar
IS
I
3+(28-30/37)
28-30 mbar
37 mbar
IT
I
3+(28-30/37)
28-30 mbar
37 mbar
PT
I
3+(28-30/37)
28-30 mbar
37 mbar
CZ
I
3B/P(30)
30 mbar
30 mbar
DK
I
3B/P(30)
30 mbar
30 mbar
FI
I
3B/P(30)
30 mbar
30 mbar
GR
I
3B/P(30)
30 mbar
30 mbar
HU
I
3B/P(30)
30 mbar
30 mbar
LT
I
3B/P(30)
30 mbar
30 mbar
LU
I
3B/P(30)
30 mbar
30 mbar
LV
I
3B/P(30)
30 mbar
30 mbar
NL
I
3B/P(30)
30 mbar
30 mbar
NO
I
3B/P(30)
30 mbar
30 mbar
RO
I
3B/P(30)
30 mbar
30 mbar
SE
I
3B/P(30)
30 mbar
30 mbar
PL
I
3B/P(37)
37 mbar
37 mbar
DE
I
3P(50)
50 mbar
DE
I
2E(20)
20 mbar
AT
I
2H(20)
20 mbar
CH
I
2H(20)
20 mbar
CZ
I
2H(20)
20 mbar
DK
I
2H(20)
20 mbar
ES
I
2H(20)
20 mbar
FI
I
2H(20)
20 mbar
GB
I
2H(20)
20 mbar
GR
I
2H(20)
20 mbar
IE
I
2H(20)
20 mbar
IT
I
2H(20)
20 mbar
NO
I
2H(20)
20 mbar
PT
I
2H(20)
20 mbar
SE
I
2H(20)
20 mbar
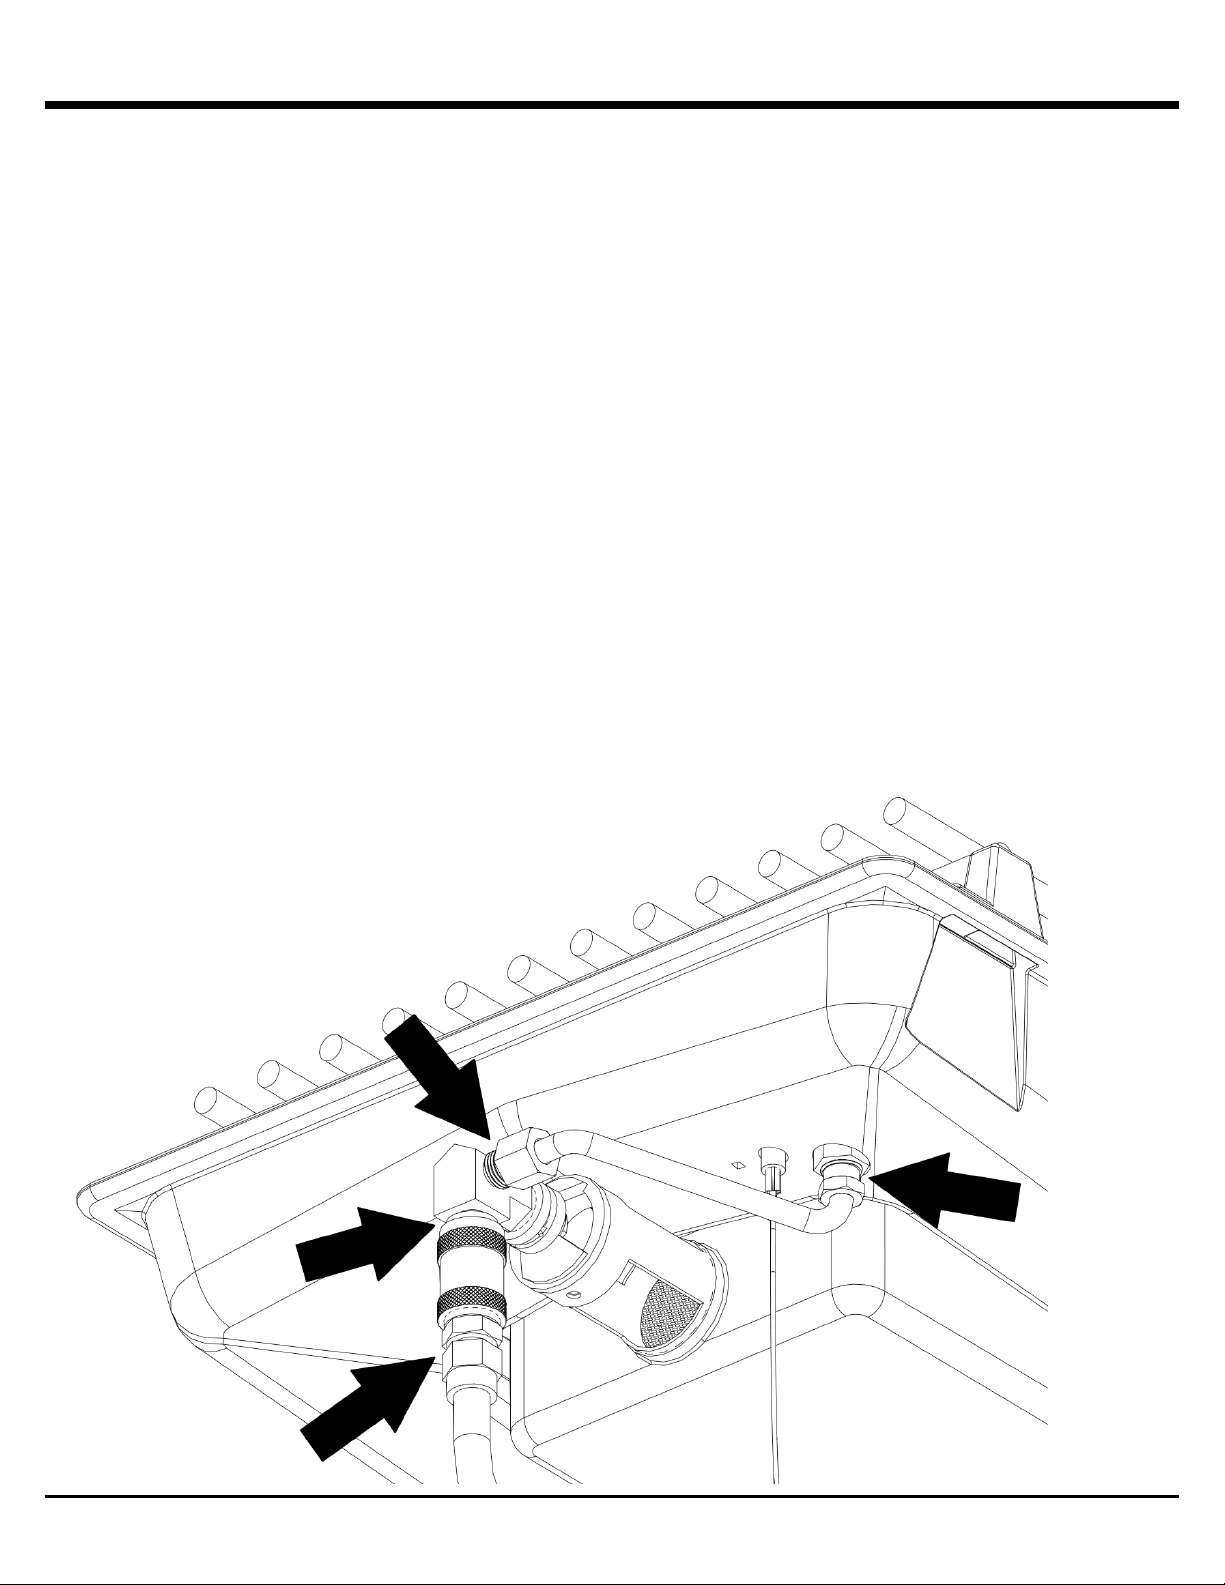
LEAK TESTING
All factory-made connections have been thoroughly tested
for gas leaks and the burner has been flame tested.
However, shipping and handling may have loosened a gas
fitting.
AS A SAFETY PRECAUTION:
•
TEST ALL FITTINGS FOR LEAKS BEFORE USING
YOUR INFRARED SIDE BURNER.
TEST THE CYLINDER VALVE FOR LEAKS EACH
TIME THE CYLINDER IS FILLED.
TEST FOR LEAKS EVERY TIME YOU DISCONNECT
AND RECONNECT A GAS FITTING.
DO NOT SMOKE!
NEVER TEST FOR LEAKS WITH A LIGHTED
MATCH OR OPEN FLAME.
TEST FOR LEAKS OUTDOORS.
•
•
•
•
•
TO TEST FOR LEAKS
1.
Assemble the infrared side burner per the
assembly instructions. See page 8.
2.
3.
Check that all control knobs are turned to "OFF".
Prepare a soap solution of one-part water, one-part
liquid detergent.
Open gas source.
Light the infrared side burner. See lighting on page 4.
Brush the soap solution on each connection.
A leak is identified by a flow of bubbles from the area of
the leak.
If a leak is detected, close the gas source, turn side
burner control to “OFF”. Tighten the connection and
retest (Step 5).
If the leak persists, contact your barbecue dealer for
assistance. Do not attempt to operate appliance if a
leak is present.
4.
5.
6.
7.
8.
9. 3

LIGHTING
LIGHTING INSTRUCTIONS
•
The infrared side burner must be assembled and
installed as per the assembly and installation
instructions. See page 8.
Ensure the grill is properly connected to the LP or
Natural Gas supply.
Ensure there are no gas leaks in the gas supply
system. See: “Leak Testing.” (Page 3).
Ensure that ignition wire is connected.
Check that the battery has been installed in the
electronic ignition.
Carefully review all instructions on the information
plate attached to the gas grill.
Open lid before lighting.
Do not lean over gas grill while lighting.
Set control knobs to “OFF” and turn on the gas supply.
• •
•
•
•
1.
2.
3.
LIGHTING THE INFRARED SIDE BURNER:
To light burner with the Ignitor:
A.
B.
C.
IGNITOR
SIDE BURNER CONTROL
SIDE BURNER
4.
5.
6.
Push and turn side burner control knob to “HIGH.”
Push and hold the ignitor button.
Burner should ignite within 5 seconds.
To light burner with a match:
4.
5.
Apply lit match to burner ports.
Push in the side burner control knob and turn to
“HIGH.”
Burner should ignite within 5 seconds.
6.
Note: Pots on the side burner must not be less than 1” (2.5
cm) or exceed 9” (23 cm) in diameter or 15 lbs. (7 kg) in
weight.
IF BURNER DOES NOT IGNITE:
•
Push and turn control knob to “OFF.” Wait 5 minutes
then try again with control knob set at “MEDIUM.”
If burner will not light, see “Troubleshooting” on page 7.
If problem persists, do not attempt to operate the
appliance; contact OMC, your dealer or an approved
service center.
•
SHUTDOWN:
1. Turn off cylinder valve.
2. Turn control knobs to “OFF.”
4
OPERATION
COOKING TECHNIQUES
First Time Use
Before cooking on your infrared side burner for the first
time, clean the components and preheat the appliance to
rid it of any odors or foreign matter in the following manner:
INFRARED COOKING:
Broil King’s infrared side burner technology gives you the
ability to sear and grill delicious foods quickly and efficiently.
The infrared burner is designed to focus the gas flame onto
the ceramic tile comprised of thousands of microscopic
holes. This converts the heat of the flame into infrared
energy generating consistent even heat across the entire
surface. Traditional gas burners heat the air surrounding
the burner through combustion which rises to the cooking
surface. In contrast, the infrared burners direct heat radiates
to the cooking surface with more intensity to allow for higher
grilling temperatures than a traditional gas burner.
DIRECT GRILLING
The direct grilling method involves cooking the food on the
grid directly over the infrared burner. Direct grilling is the
most popular method for most single serving items such as
steaks and chops.
•
Remove and clean the cooking grid with mild soap and
water.
With cooking grid removed, light the infrared side
burner following lighting instructions (see Page 4) and
operate the infrared side burner for 10 minutes. Next,
turn gas source off then turn side burner control knob to
the “OFF” position.
Season the cooking grid by coating grid with an organic
cold processed cooking oil with a high smoke point,
light the grill and operate on Med/Low for 30 minutes.
Recommended cooking oils:
o Avocado Oil – smoke point (260C/500F)
• •
•
o
o
Rice Bran Oil – smoke point (255C/490F)
Canola Oil – smoke point (204C/400F)
•
You are ready to grill. Proceed to “Preheating.”
1.
Prepare food in advance to avoid delay and timing
problems. If using marinade or spices, they should be
applied before placing meat on the cooking grid. If
basting with sauces, they should be applied in the last 24 minutes of grilling to avoid burning.
Organize the area around the gas grill to include
tongs, oven mitts, sauces and seasonings to allow you
to stay in the vicinity of the gas grill while cooking.
Bring meat to room temperature just prior to grilling.
Trim excess fat from meat to minimize the “flare-ups”
that are caused by dripping grease.
Coat the grid with a high smoke point oil to prevent
food from sticking to the grid.
Hold the salt when cooking meats on the infrared
side burner. The meat will stay juicier if the salt is
added after cooking.
Learn to test when the meat is done by time and feel.
Meat firms up as it cooks. When the meat is soft it is
rare. When it is firm, it is well done.
Go online to see great infrared grilling recipes.
www.broilkingbbq.com
Preheating
•
Preheat the infrared side burner on HIGH for 5
minutes.
Clean cold grids with a nylon grill brush (Item # 65643) or
hot grids with a stainless steel wire grill brush (Item #’s
65225, 64014, 64034) and carefully inspect to ensure
there are no broken bristles left on the grid.
Coat the grid with a high smoke point cooking oil.
Adjust heat as appropriate for what you are grilling.
•
2.
•
•
3.
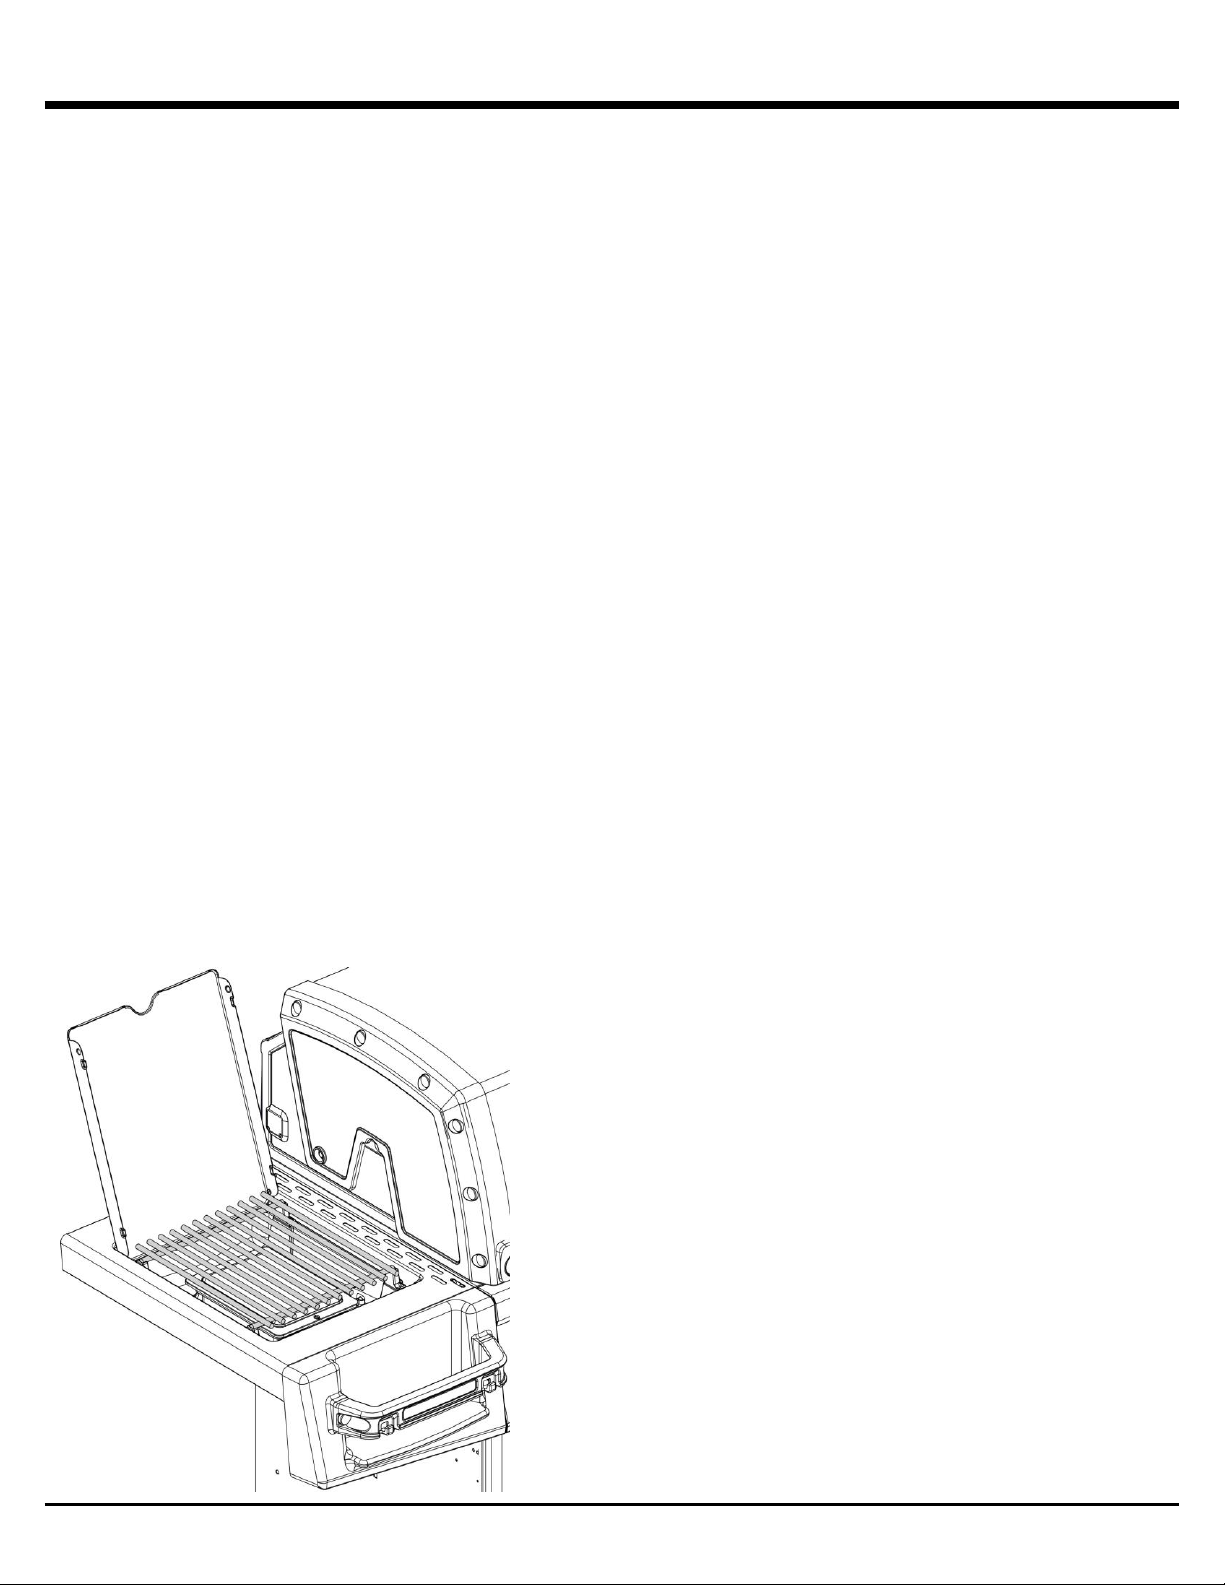
Lid Position. The infrared side burner lid must always
remain open during cooking. Keep the lid closed when
infrared side burner is not in use. Allow the infrared side
burner to cool down before closing lid.
Grid Position. The infrared side burner grid must
always remain in the upper position during cooking.
4.
5.
6.
7.
5

MAINTENANCE
REGULAR MAINTENANCE
To ensure optimal performance and safety, the following
components should be inspected and cleaned as required before
use of your infrared side burner.
COOKING GRIDS - HEAVY ROD STAINLESS
BROIL KING® Heavy Rod stainless grids provide maximum
durability and good heat retention and good grilling performance.
For optimum performance:
ANNUAL MAINTENANCE
The following components should be inspected and cleaned at
least once a year or after any period of storage over 30 days to
ensure optimal performance, safety and efficiency.
BURNER
Inspect for cracks and deterioration. Clean venturi tubes using a
pipe cleaner or venturi brush to eliminate any blockages. While the
burner is removed, clean the interior by scraping the sides and
bottom and vacuuming.
HOSE
Inspect and replace if necessary.
REPLACEMENT PARTS
If a problem is found with the regulator, hose, burner, or control
valves, do not attempt repair. See your dealer, approved service
center, or contact the factory for repairs or replacement parts. To
ensure optimum performance, use only original BROIL KING®
replacement parts.
LEAK TEST
When reconnecting a gas cylinder on propane models, be sure to
check for leaks. See “Leak Testing.” (Page 3)
•
Before first use and after long periods of storage, wash grids
using a light detergent and water and then rinse and dry with
paper towel; never air dry grids or use a dishwasher.
Immediately after washing, season cooking grids by coating
grids with an organic cold pressed cooking oil with a high
smoke point, light the grill and operate on Med/Low for 30
minutes. Recommended cooking oils:
•
Avocado Oil – smoke point (260C/500F)
Rice Bran Oil – smoke point (255C/490F)
Canola Oil – smoke point (204C/400F)
o
o
o
•
Before and after each use, brush grids with a good quality
stainless steel bristle brush (Item #’s 65225, 64014, 64034)
and lightly coat with a high smoke point cooking oil. This will
continue the seasoning process.
Avoid applying sugar based marinades or salt to meat before
grilling, apply sugar based marinades at end of grilling and salt
after grilling.
Use oil based marinades, avoid water based marinades.
Lightly coat food with cooking oil of your choice before grilling.
Ensure the surface of the grid is always coated with a light
layer of oil. This helps prevent rust and deterioration and
improves the grids non-stick performance.
If rust does occur, Burn-Off the grid, brush with a stainless
steel bristle brush and re-season.
Keep infrared side burner cover closed when not in use.
•
•
•
•
•
•
During long periods of inactivity, grid should be seasoned, then
stored in a dry place. The grid may be wrapped in protective plastic
food wrap. After periods of storage, Burn-Off grid, wash, dry with
paper towel and re-season with a high smoke point cooking oil.
GREASE PAN
The grease pan is located at the rear under the shelf. Clean
regularly.
GENERAL CLEANING
Perform a Burn-Off (see below).
When infrared side burner is cool, remove grid.
Clean the interior of the infrared side burner as necessary by
scraping the sides and bottom of the with the grid lifter and vacuum
residue.
Rust is a natural oxidation process and may appear on internal
stainless steel parts. Rust will not affect performance of your
infrared side burner.
BURN-OFF
Ignite the burner as per “Lighting” (page 4).
Operate infrared side burner on HIGH for 10 minutes maximum.
Turn the gas source off then turn control knob to OFF.
6
Warning:
If the infrared side burner is hot, use caution and oven mitts
while handling the stainless steel bristle brush.
Inspect the grid carefully after brushing to ensure there are
no broken bristles left on the grid.
 Loading...