

Page 1
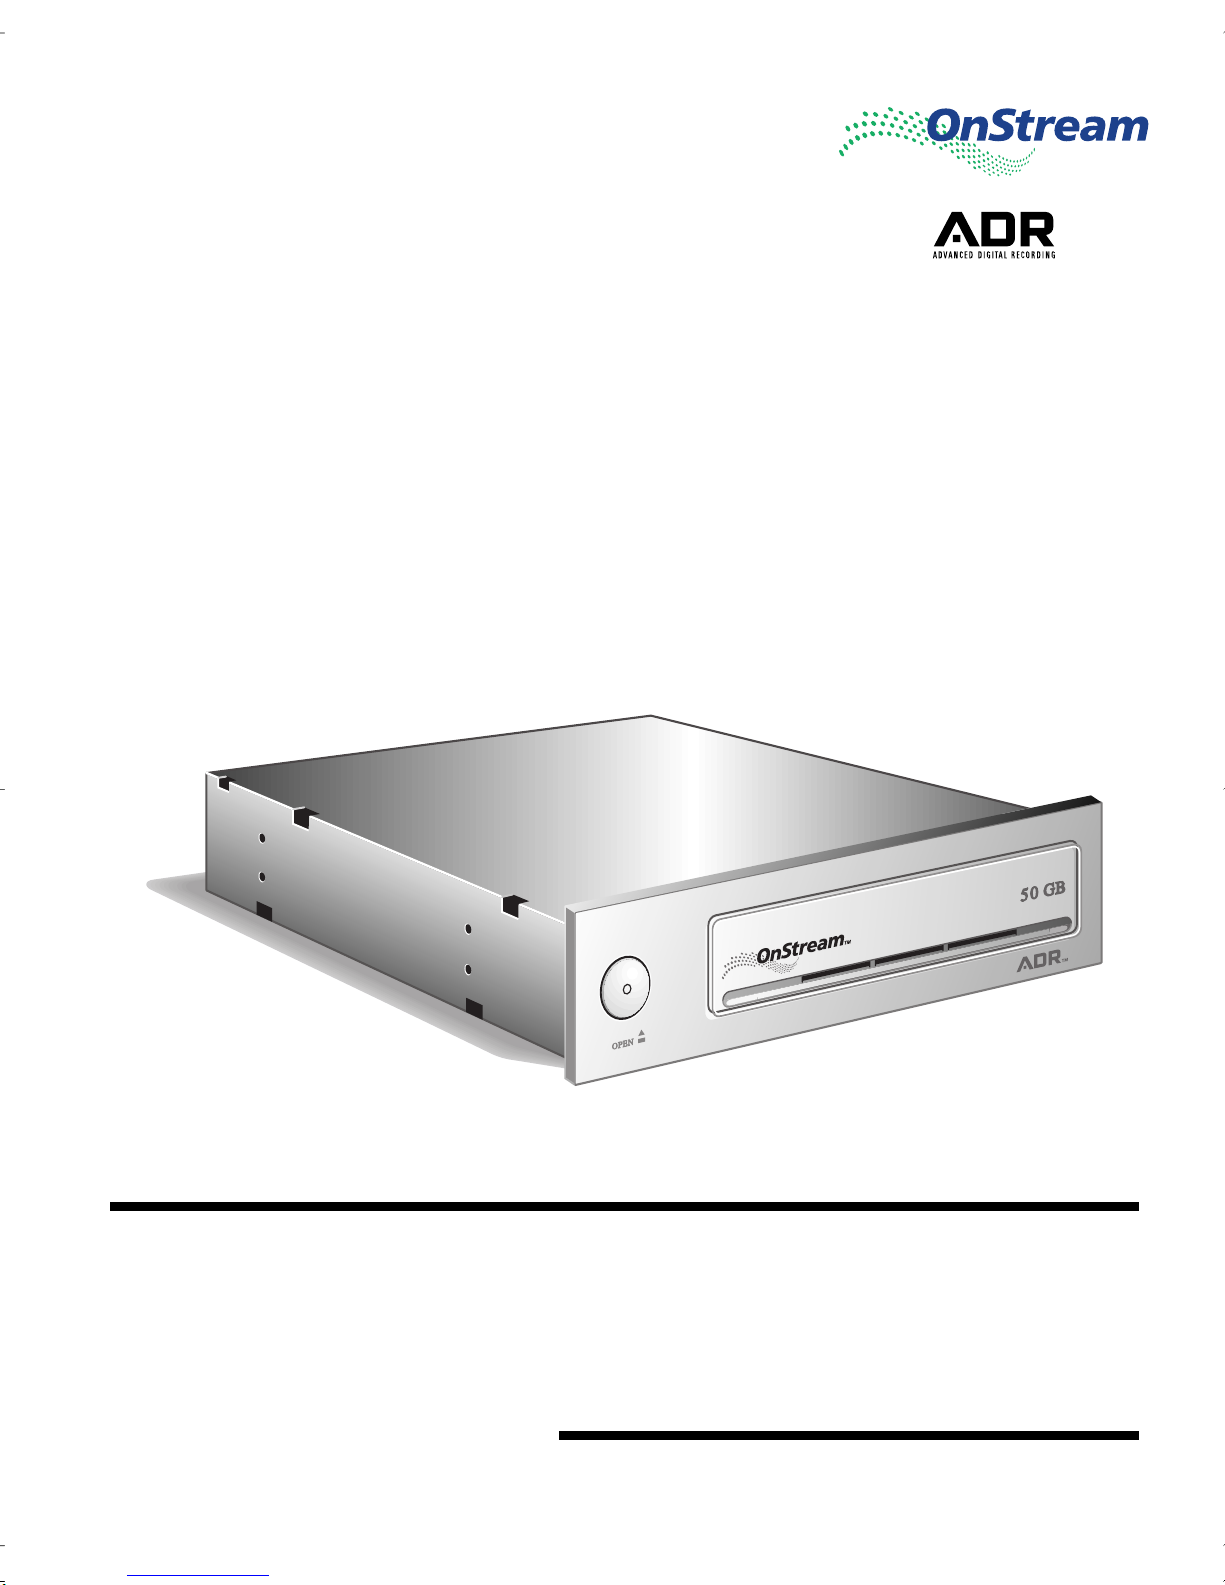
OnStream SC30/SC50
Digital Tape Drive
Installation Guide
Hardware and Software Installation Guide
Document numb er: 3122 255 5032 1
Page 2

Reprodu ction in whole or in part is pr ohibited without the written consent of the co pyright
owner. T he inform ation presented in this document does not form part of any quotation or
contract, is believed to be accurate and reliable and may be changed without notice. No
guaran tee as t o its accur acy or co mplet eness is given or impl ied. OnStre am Inc. does n ot assum e
liability for any consequ ences resulting from its use or misuse. Speci fications and availability
of goods me ntioned in it are subject to change without notice. Publ ication thereof does not
convey nor imply any licence under patent or other industrial or intellectual property rights.
All trademark s are hereby acknow ledged.
Revision date: January 19, 1999
©
1999 OnStream, Inc. All rights reserved.
Page 3

Table of Contents
Introduction . . . . . . . . . . . . . . . . . . . . . . . . . . . . . . . . . . . . . . . . . . . 1
Scope of this Installation Guide. . . . . . . . . . . . . . . . . . . . . . . . . . 2
Online User Guides. . . . . . . . . . . . . . . . . . . . . . . . . . . . . . . . . . . 2
Items Needed for Installation . . . . . . . . . . . . . . . . . . . . . . . . . . . 3
Other Necessary Items . . . . . . . . . . . . . . . . . . . . . . . . . . . . . . . . 4
System Requirements. . . . . . . . . . . . . . . . . . . . . . . . . . . . . . . . . 4
Precautions. . . . . . . . . . . . . . . . . . . . . . . . . . . . . . . . . . . . . . . . . 4
Your OnStream SC30/SC50 Digital Tape Drive . . . . . . . . . . . . . 5
Installing your OnStream SC30/SC50
Digital Tape Drive . . . . . . . . . . . . . . . . . . . . . . . . . . . . . . . . . . . . . . 7
Setting the SCSI ID Jumper . . . . . . . . . . . . . . . . . . . . . . . . . . . . 7
Installing the Hardware . . . . . . . . . . . . . . . . . . . . . . . . . . . . . . . . 8
Connecting the Cables . . . . . . . . . . . . . . . . . . . . . . . . . . . . . . . 12
Securing your OnStream SC30/SC50 Digital Tape Drive
in your Computer. . . . . . . . . . . . . . . . . . . . . . . . . . . . . . . . . . . . 15
Installing the Software . . . . . . . . . . . . . . . . . . . . . . . . . . . . . . . . . 16
Installing your Server Backup Software . . . . . . . . . . . . . . . . . . 16
Installing O n Stream Ech o fo r your Worksta tion . . . . . . . . . . . . 1 6
Using OnStream ADR Cartridges. . . . . . . . . . . . . . . . . . . . . . . . . 18
Inserting an OnStream ADR Cartridge into the Drive . . . . . . . . 18
Removing a Cartridge from the Drive . . . . . . . . . . . . . . . . . . . . 19
How to use OnStream ADR Cartridges. . . . . . . . . . . . . . . . . . . 19
Takin g Care of y ou r OnS t rea m D i gi t al
Tape Drive & OnStream ADR Cartridges. . . . . . . . . . . . . . . . . . . 20
Troubleshooting . . . . . . . . . . . . . . . . . . . . . . . . . . . . . . . . . . . . . . 21
Customer Support. . . . . . . . . . . . . . . . . . . . . . . . . . . . . . . . . . . . . 22
Technical Specifications. . . . . . . . . . . . . . . . . . . . . . . . . . . . . . . . 23
Regulatory Notices . . . . . . . . . . . . . . . . . . . . . . . . . . . . . . . . . . . . 24
FCC Notice . . . . . . . . . . . . . . . . . . . . . . . . . . . . . . . . . . . . . . . . 24
Approvals . . . . . . . . . . . . . . . . . . . . . . . . . . . . . . . . . . . . . . . . . 24
Safety Notices . . . . . . . . . . . . . . . . . . . . . . . . . . . . . . . . . . . . . . . . 25
Table of Contents i
Page 4

OnStream Warranty . . . . . . . . . . . . . . . . . . . . . . . . . . . . . . . . . . . .26
ii Installation Guide
Page 5

Introduction
Congratulations on your selection of a new O nStream™ SCSI Digit al Tape
Drive. At 30GB or 50 GB c apacities, you can back up the hard disks of most PC
servers or wor kstations on a single ca rtridge.
We have partnered with leading backup software compan ies in order to provide
you wit h virtually eff ortless management and protection of your critical
information. Whether you’re a small /medium sized business, managing a
depa rtmental server, or a high-performance desktop user, we have a comple te,
depe ndable dat a prot ection so luti on with the pe rfor mance, reliabi lity, a nd pric ing
nece ssary to m eet the most demandin g storage needs.
For you r Wi ndows NT™ server needs, the OnStream Dig ital Tape Drive is
comp a tib le with A R Cserve
Exec™ from Seagate Software. Included with your Digital Tape Drive is the
innovat iv e OnSt ream Echo™ sof t ware for wor kst ati ons whi ch enabl es gi gabyte s
of extra “drag-and-drop” storage, completely automa tic daily backup, and
effo rtless organization of files on removab le media .
OnStr eam's Digital Tape Drives deliver a uni que level of reliabili ty for your
mission-critical installations through ADR™ technology. This technological
breakthrough delivers exceptional transfer rates and data reliability while
maximizing media lif e and mini m izing audible noise. Your OnStream Digital
Tape Dr ive gives you the un ique blend of capacity, perfor m ance, reliability,
value, and convenience needed to handle your ever-growing storage
requirements.
The S C 50 can read and write both 30 GB and 50 GB ADR cartridges. The SC30
uses 30 G B ADR cartridges onl y.
®
IT™ from Com puter Associates and Backup
Introduction 1
Page 6

Scope of this Installation Guide
This Installa tion G u id e takes you through the process of installing your
OnStr eam SC30/SC50 Digital Tape Drive and Echo software in detail. If you
have install ed a SCSI hard drive or CD dri ve in your computer before, muc h of
the material presented in this guide may be familiar to you. Important information
that you should pay attention to, regardless of your level of experience, is
indicate d by this symbol:
¯
Note:
your compu ter, you should carefully read and follow all of the instruct ions
presented in this guide to make sure that you install your OnStream SC30/
SC50 Digital Tape Drive properly.
T
T
T
T
If you have not pr eviously installed a SCSI hard dr ive or CD drive in
By follow ing the instructions presented i n this guide, you will lear n how to:
Locate a ll of t he it ems ne ede d to in st al l your O nS tream SC3 0/ SC50 Di gi tal Tape
Drive and softwar e
Set the SCSI ID jumper on your OnStream SC30/SC50 Digital Tape Drive
Install your OnStrea m SC30/SC50 Digital Tape Drive in your server or
workstation
Install your server backup software or OnStream Echo workstation software
Online User Guides
A complete softwar e user guide is supplied in Adobe® Acrob at ™ (P D F ) fo rm a t
on the Installation CD-ROM . If you need more information wh ile installing or
usi ng the drive or software, refe r to the appropriate user guide.
To access the user guides on the CD-ROM:
1. Inse rt the OnSt ream Installat ion CD-ROM into your computer’s CD drive.
2. When the OnStream CD Setup program starts, click Read Online User Guides.
Note:
the
replaci ng
3. Select the document you want to view or print.
If the OnSt ream CD Setup program does not start automatically, click
Start bu tton
d:
Documents on CD-ROM require Acrobat™ Reader to view and print. If you do
not ha ve A crobat Reader installed on you comput er, the OnStream CD Se tup
program automatically installs it for you.
on your Windows Taskbar, click
with the letter ass igned to your CD-ROM drive, and click OK.
2 Installation Guide
Run
, type
\setup. exe
d:
,
Page 7
About the Getting Started Guide
The printed Getting Started Guide takes you through the process of installing
your OnS tream SC30/SC50 Dig ital Tape Drive and Echo software and also
includ es b asi c s oftw are o per at in g in stru ct ion s. In m ost cas es , th is gui de pro vides
all the information necessary to install and use your OnStream Digital Tape
Drive. The Getting Started Guide do es not, how ev e r, pr o vide detailed
explana ti ons of t he in stal lat ion p ro ces s. Use t his Inst alla tion Guid e instead when
you nee d a com p lete, detai led explanation of any installation issu e.
About the OnStream Ech o™ Software User Guide
The OnStream Echo™ software User Guide is included as a separate Adobe
Acrobat file on the OnStream SC30/SC50 Installation CD-ROM.
¯
Items N eeded fo r I n stallatio n
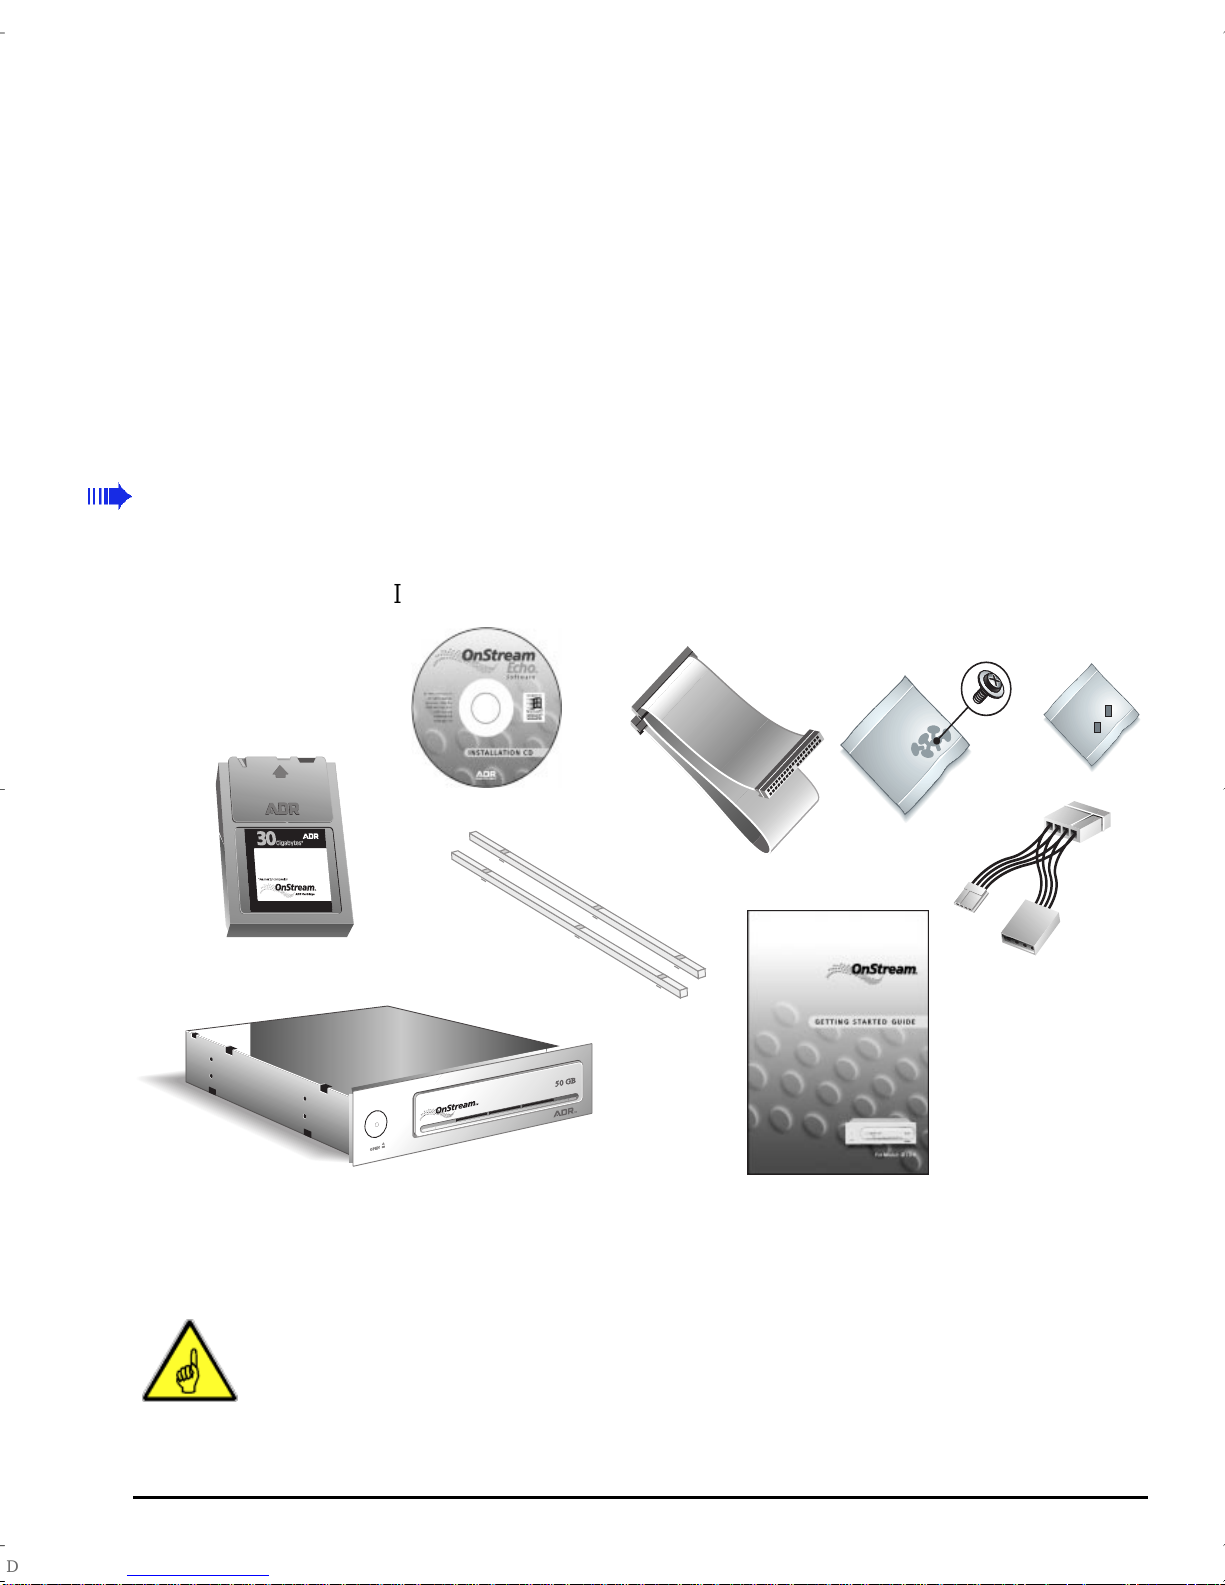
Make sure you have all the items shown in Figur e 1.
Inst allation CD-ROM
OnStream ADR
Cartridge
(sold separately )
2 SCSI ID jumpers
4 mounting screws
SCSI Cable
Power splitter
Spacer R ails
Getting S ta rted
Guide
OnStream SC30/SC50 Digital Tape Drive
Figure 1: Contents of O nStream SC30/SC50 package
Note:
SC30/SC50 Digi tal Tape Drive is packaged t o prevent any damage during
shipment and handling. If you do find that the contents are damaged in any
way, contact your supplier immediately.
OnStream has taken every preca uti on to ensure that your OnStream
Introduction 3
Page 8
Please keep t he box an d packi ng mate rial fr om your OnStrea m SC30/SC5 0 driv e.
Should you need to return the drive for service or repair, use t he original
pack aging. OnStr eam cannot accept re sponsi bilit y for damage tha t occurs during
shipment. The original packaging is the safest way to make sure that the drive is
delivered undamaged.
Other Necessary Items
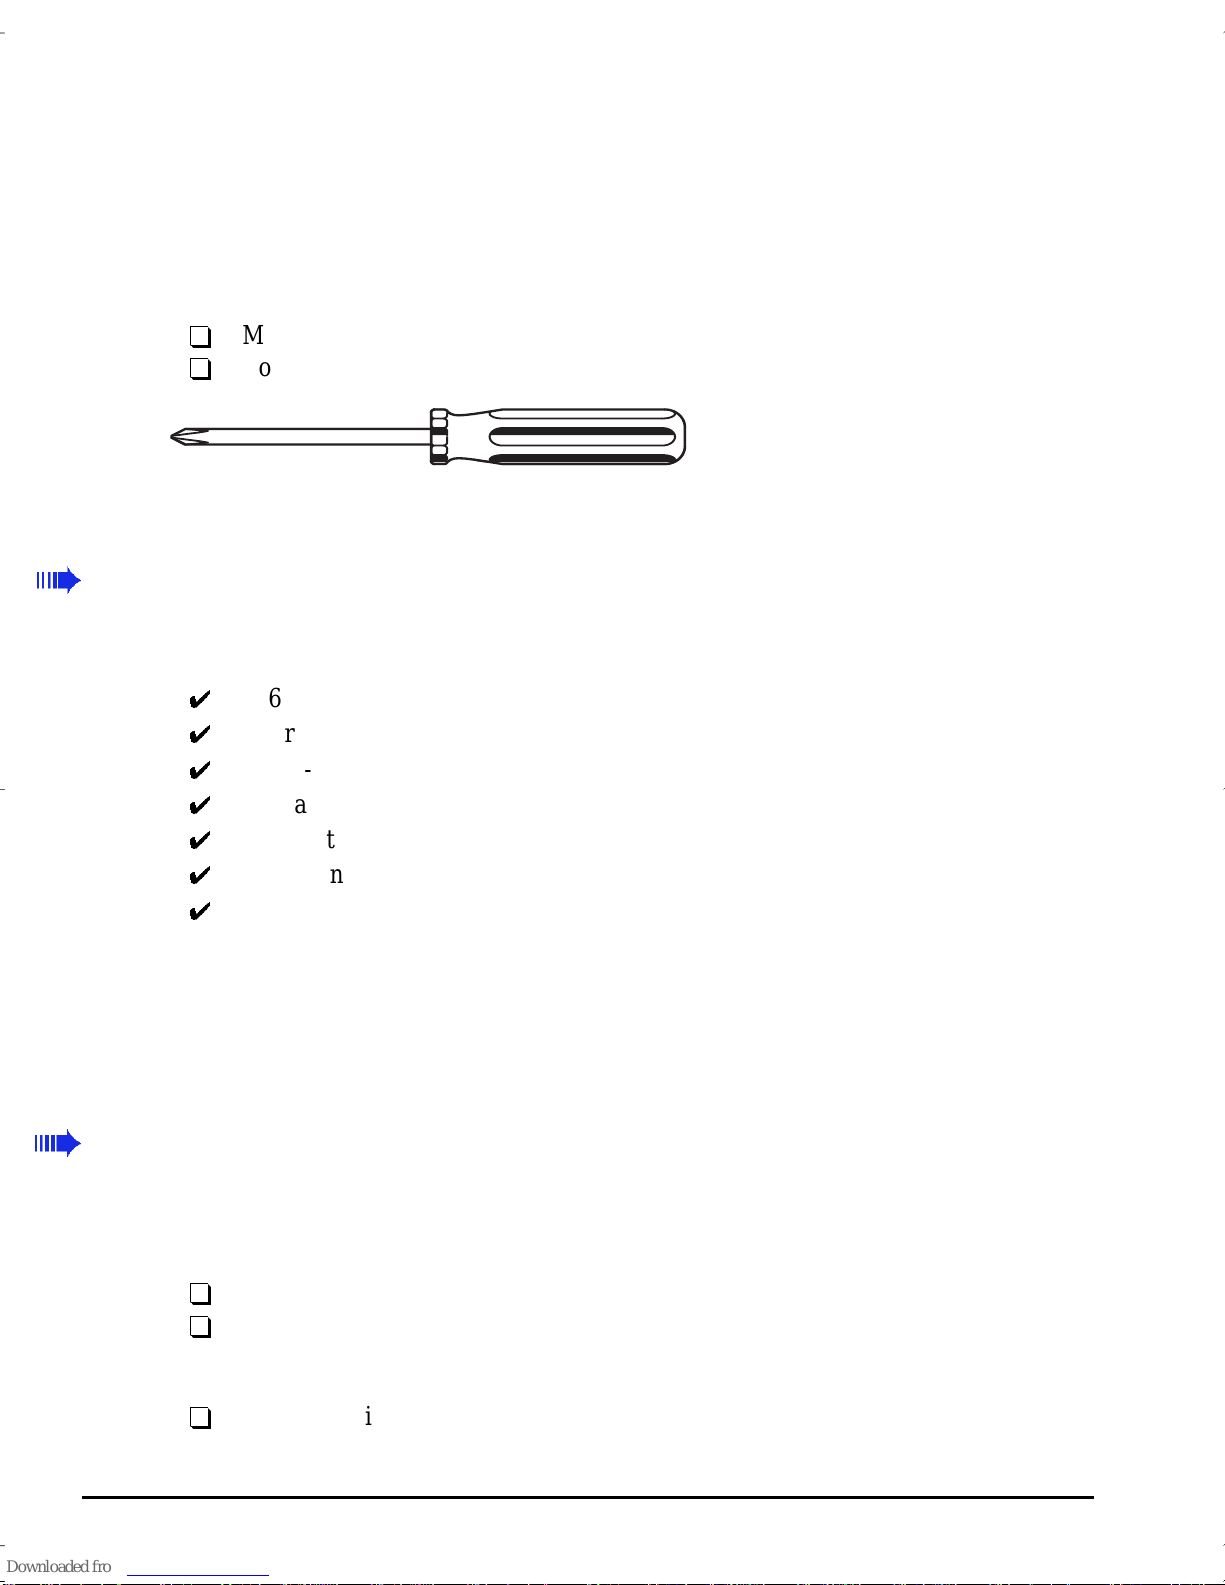
T
Medium phillips screwdriver
T
Your computer user’s guide (optio nal)
System Requirements
¯
Before installing your OnStream SC30/SC50 Digit al Tape Drive and Ech o
soft w are, make sure your computer meets these minimum requirements :
Figure 2: Tools needed for installation
Precautions
¯
486 or Pentium® processor*
Microsoft® Windows 95, Windows 98, or Windows NT™
A CD-ROM, CD-R, CD-RW, or DVD drive
At least 32 MB of RAM (Random A ccess Memory)
An empty 5¼-inc h drive bay
SCSI con troller card* *
50 MB of free hard drive space for OnStream Echo softw are (Other supplier’s
softw are may have dif ferent space requirements.)
*To pl ay high bit-rate streaming video, a 200MHz or faster Pentium
is recommended.
**If your computer does not have a SCSI controller card, you must install one
before continuing. Contact your comput er supplier for informat ion.
Your OnSt ream SC30/SC5 0 Dig ital Tape Dri ve is a pr ecisi on ele ctrome cha nical
device. Like all computer equipment, it requires reasonable care in its installation
and use.
®
processor
T
Read this Installation G ui d e carefully and keep it for future reference.
T
Before you install your OnStrea m SC30/SC50 Digital Tape Drive, make sure it
is not exposed to excessive heat, strong electromagnetic fiel ds generated by
devices such as microwave ovens, or placed near high current electrical devices.
T
Keep the drive in its anti-static bag to avoid dust contamination and static
dama g e befor e it is insta lled.
4 Installation Guide
Page 9
T
Do not spill any liqui ds on your On Stream SC30/SC50 Digital T ape Drive.
T
Atte mpti ng to re move the cabi net fr om you r OnSt re am SC30/ SC50 Digita l Tape
Drive voids your warranty.
T
Do not drop, jolt, or expose your OnStream SC30/SC50 Digital Tape Drive to
excessive force.
T
Installing your OnStream SC30/SC50 Digital Tape Drive requires that you
remove the cover from your computer when indicated. Before removing the
cove r from your computer, make absolutely ce rtain that the computer and all
per ip herals (e.g. a printer) are all turned off and unplugged at the wall outlet.
Caution!
T
Static electricity can destroy sensitive electronic devices. Your OnStream SC30/
Unplug your computer and all attached devices when instructed.
SC50 Digi tal Tape Drive is sealed, and upon being correctly installed in your
computer, is grounded to prevent damage from static electricity. Do not touch
any of the components in side the drive. Handle your OnStream SC30/SC50
Digi tal T a pe Drive using the anti -static ba g in w hich is it packed as much as
possible.
Attention!
Observe precautions for handling st atic-sensitive devices.
Your OnStream SC30/SC50 Digital Tape Drive
This section describes the front and rear panel layouts of your OnStream SC30/
SC50 Digital Tape Drive.
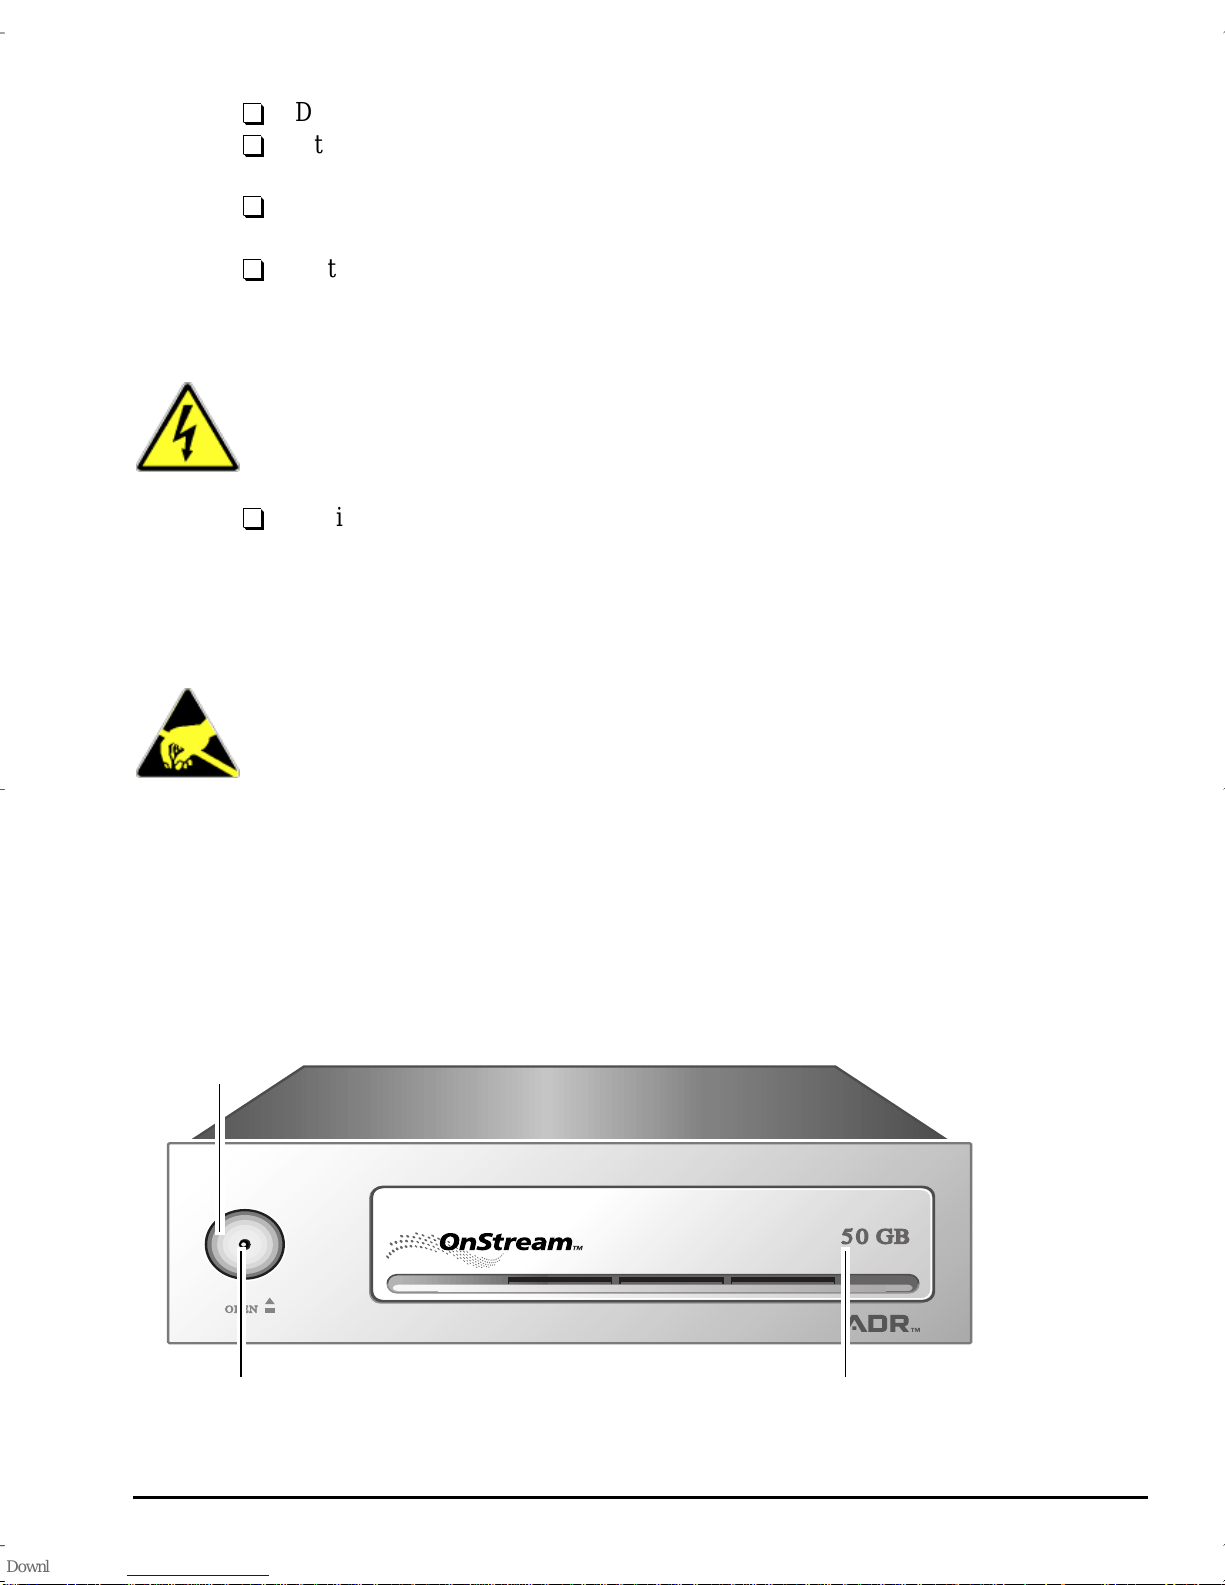
Front panel
The front panel of your OnStream SC30/SC50 Digital Tape Drive is shown in
Figure 3.
2
31
Figure 3: OnStream SC30/SC50 front panel
Introduction 5
Page 10
1. ADR ca rtridge slot
2. Cartridge eject button
3. Drive activity indicator:
Solid green: Read /w rite in pro g ress
Slow flash: Reposition in progress
Fast fla s h: Erro r condition. Ma y be self-c orrecting .
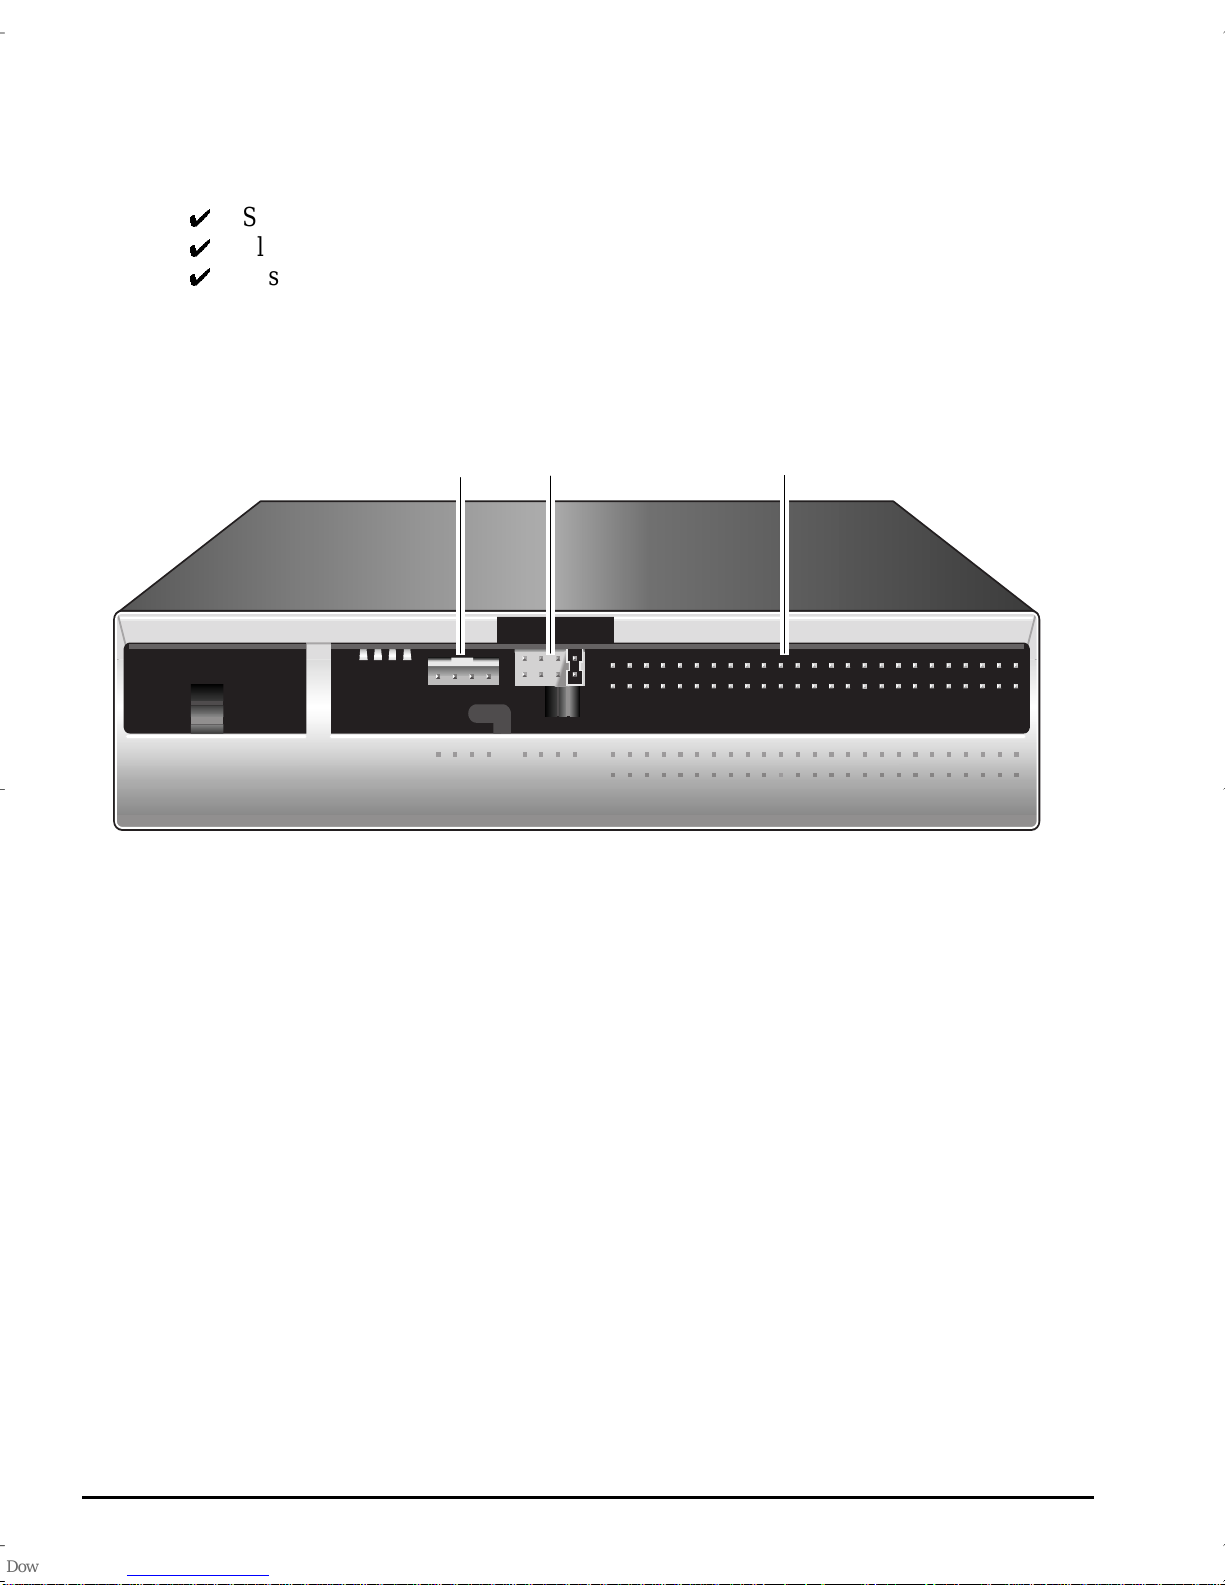
Rear pa nel
The re ar panel of your OnStream SC30/SC50 Digital Tape Drive is sh ow n in
Figure 4.
12 3
49
Power
50
Hos t inter face
Figure 4: OnStream SC30/SC50 rear panel
1. Power connector: Connects to a power cable insid e your computer.
2. SCSI ID pins: There are fou r sets of jumpers that select the SCSI ID and
termination for your OnStream SC30/SC50 Digital Tape Drive.
3. SCSI Connector: This is the connector thro ugh w h ich your computer
communicates with and transfers data to and from your OnStream SC30/SC50
Digi tal Tape Drive. Connects to a SCSI ca ble inside your com puter.
1
2124T5GG12
6 Installation Guide
Page 11
¯
Installing your OnStream SC30/SC50
Digital Tape Drive
Your n ew OnStr eam SC30/ SC50 Digi tal Tape Drive is not diffi cult to insta ll. Ju st
follow the instructions in this section.
Setting the SCSI ID Jumper
Each d evice on a SCSI ca ble , com monly ca ll ed a SCSI Chai n, must hav e it s own
SCSI ID number. The SCSI co ntroller typically uses SCSI ID 7, whil e the other
SCSI dev ices use any of th e remaining IDs. Your OnStream Digi tal Tape Drive
can use SCSI IDs 0 through 7. The last device on the SCSI chain also requires
termination.
Your OnStream Digital Tape Drive is set at the factory to SCSI ID 4 with the
termination jumper on. This SCSI ID is commonly used for tape devices and
should work in mo st installations. If the facto ry settings are appro p riate for your
installati on, ski p th is sec tion.
If anoth er devic e on your compu ter’s SCSI Chain is alrea dy using ID 4, you must
select an unused SCSI I D f or your OnStream Digital Tape Drive. If your
OnStr eam Digi tal Tap e Drive is no t the l ast devic e on the SCS I chain , remove the
termi natio n jump er .
To select a different SCSI ID, follow these steps:
1. Choose a SCSI ID number not used by any other device on your computer’s
SCSI Chain for your OnStream Digit al Tape Drive.
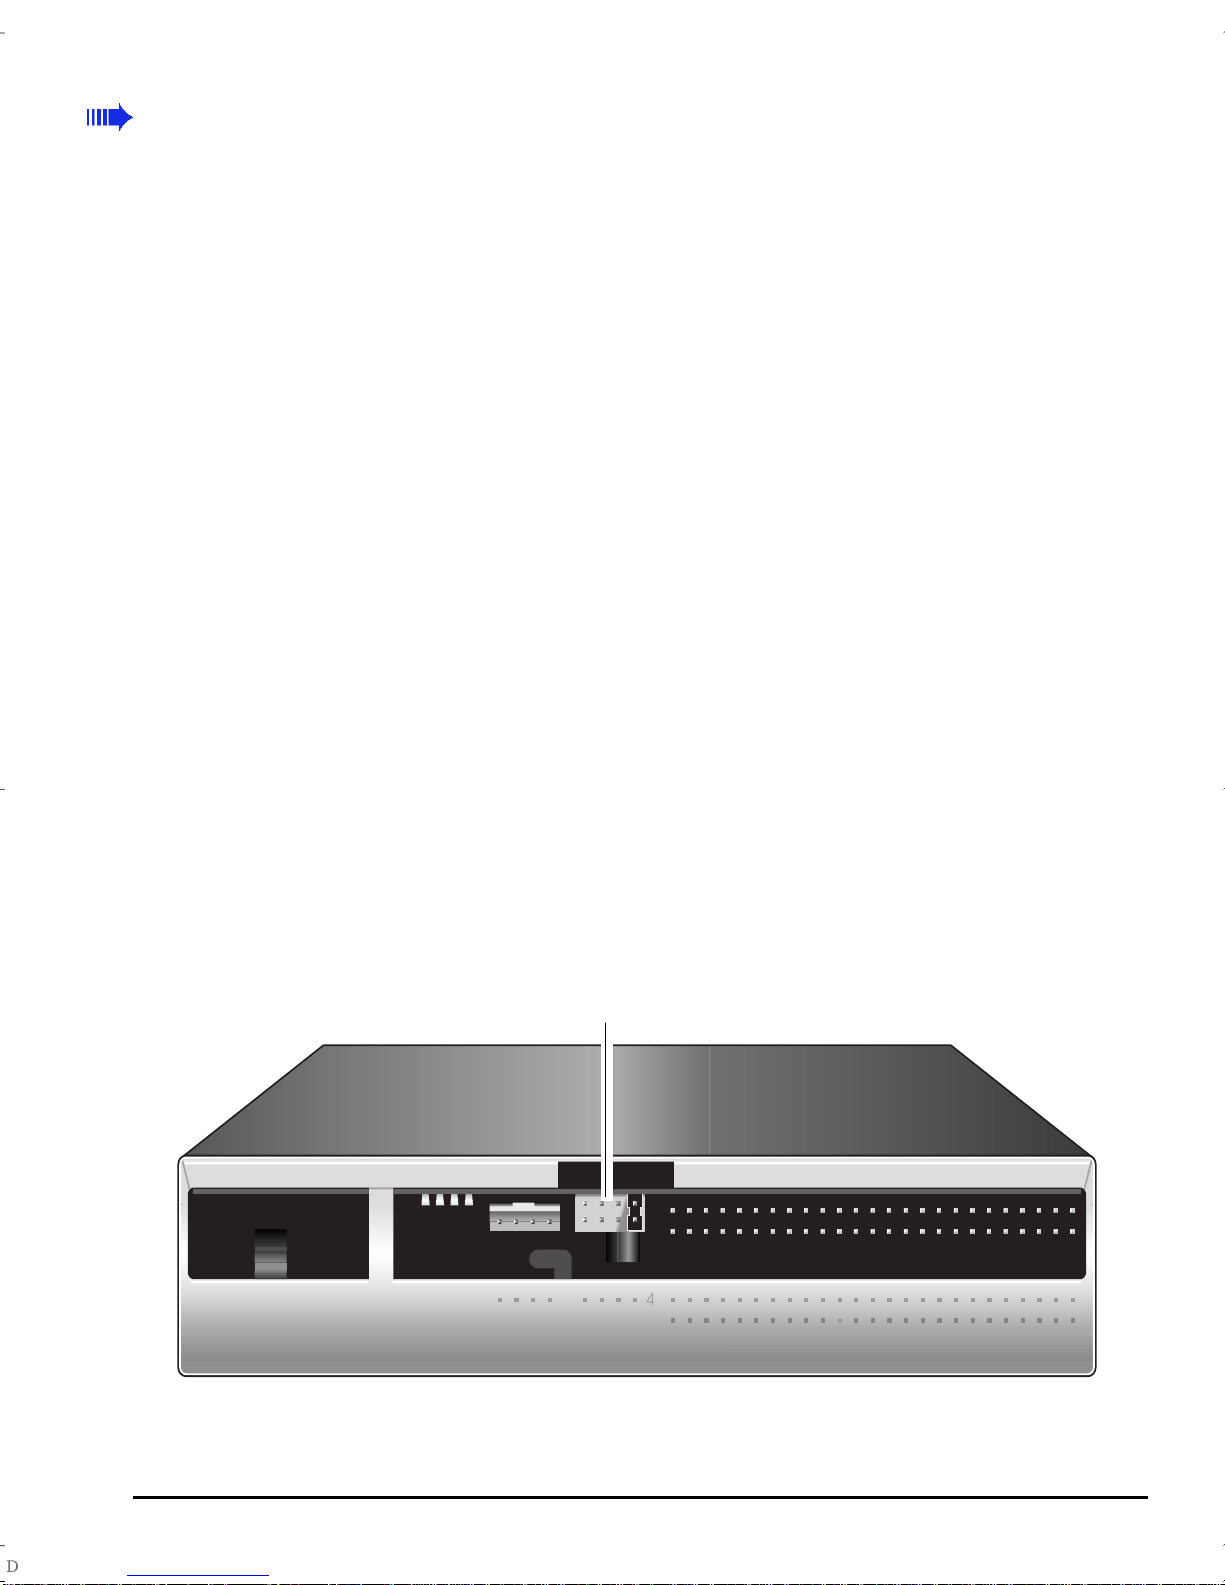
2. Locate the SCSI ID jumpe r pins on the back panel of your OnStream Digital
Tape Dr ive as sh ow n in Figure 5.
SCSI ID Jumpers
Power
49
50
Hos t inter face
1
2124T5GG12
Figure 5: SCSI ID jumper pins on the back panel of your OnStream Digital Tape Dri ve
Installing your OnStream SC30/SC50 Digital Tape Drive 7
Page 12
3. Push th e jumper(s) onto the necessary pins to set your OnStream Digita l Tape
Drive to use the selected SCSI ID.
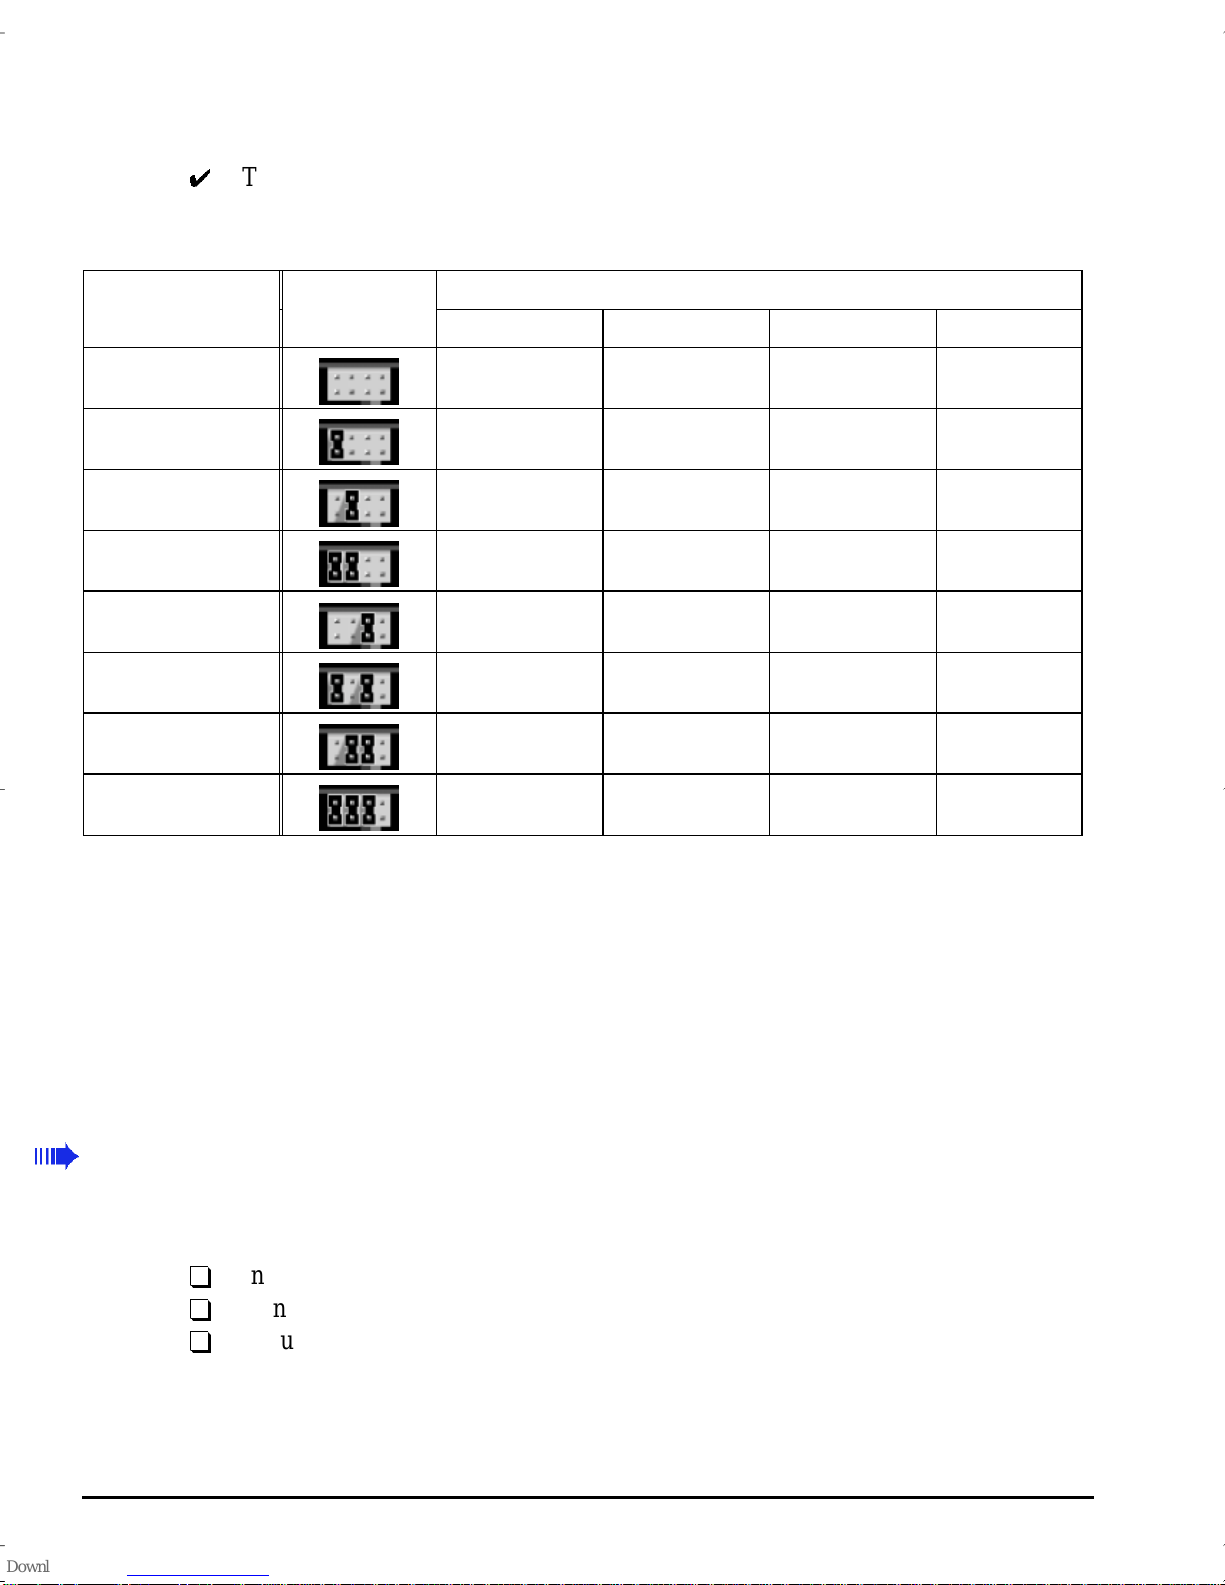
The table below shows how to set the jumpers to select the necessary SCSI ID.
The exa mples are all shown without the terminati on jumper.
SCSI ID Example
0
1
2
3
**
4
5
6
***
7
Notes:
X = jumper,
– = no jum per
Pin numbers
124T
–––
X––
–X–
XX–
––X
X–X
–XX
XXX
*
*
*
*
*
*
*
*
* Remove the jumper from the Termination pins if your O nStream Digital Tape
Drive is not the last o r only device on the SCSI chain.
** SCSI ID 4 is th e factory default setting.
*** SC S I ID 7 is usu ally reserv e d fo r the SC S I co ntrol ler card .
Installing the Hardware
¯
Now that you have set the SCSI ID, you can install your OnStream Digital Tape
Drive. In this section, you wi ll:
T
Install your OnStream Digital Tape Drive drive in an empty 5¼-inch drive bay
T
Connec t the SCSI and power cables
T
Secure your OnStream Digital Tape Drive in its bay
To inst all your OnS t re am SC30/SC 5 0 Di gital Ta p e D rive, fo llow the se steps:
1. Shut down Windows.
8 Installation Guide
Page 13
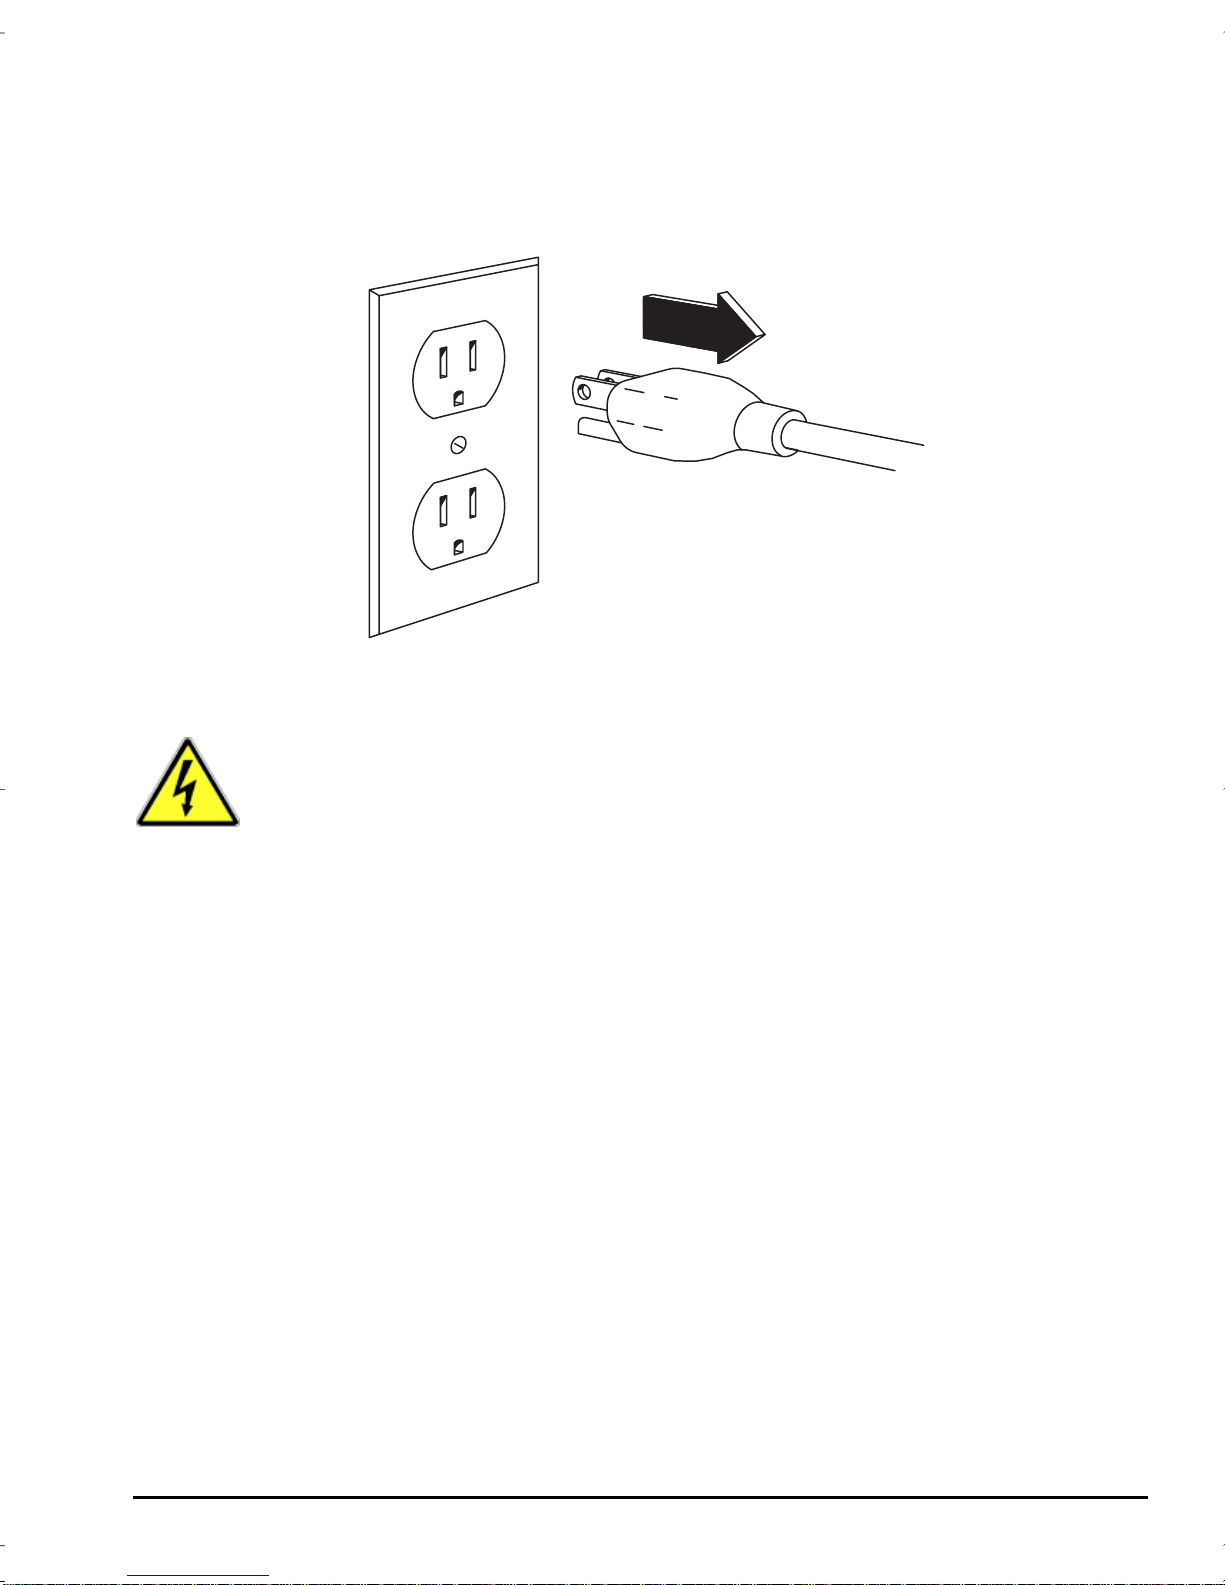
2. Turn OFF your computer.
3. UNPLUG your computer power ca ble from the wall outlet. UNPLUG the
power cable for all attached devices, such as a printer, from the wall outlet as
well.
Figure 6: Unplug yo ur computer and all attached devices!
Caution!
Unplug your computer and all attached devices b efore performing
the next step!
Installing your OnStream SC30/SC50 Digital Tape Drive 9
Page 14
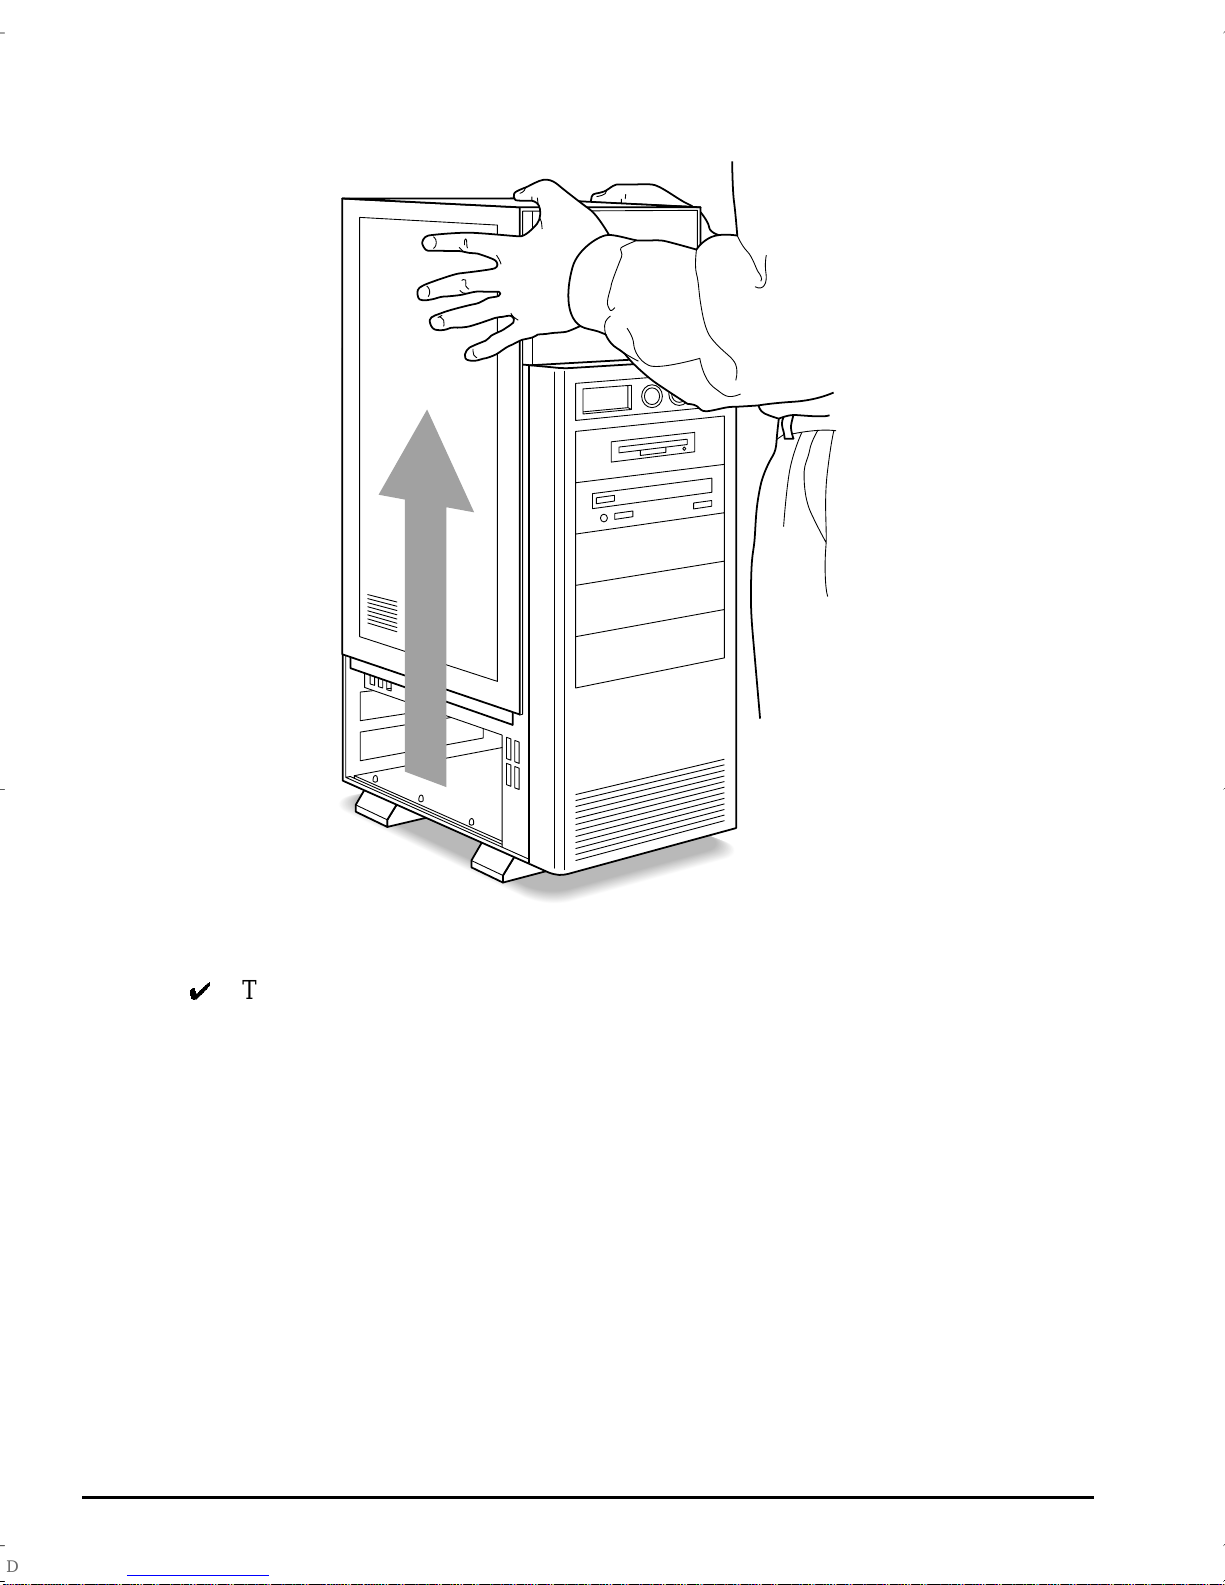
4. Remove your computer’s cover as described in your computer user’s manual.
Figure 7: Remove your com puter’s cover
The wide v ariety of computer cabinets makes it impossible to describe in detail
the process of removing your specific computer cover. Refer to your computer
user’s guide for detailed instructions.
5. Remove the cover from an em pty 5
¼
-inch drive bay as described in your
computer user’s manual.
10 Installation Guide
Page 15
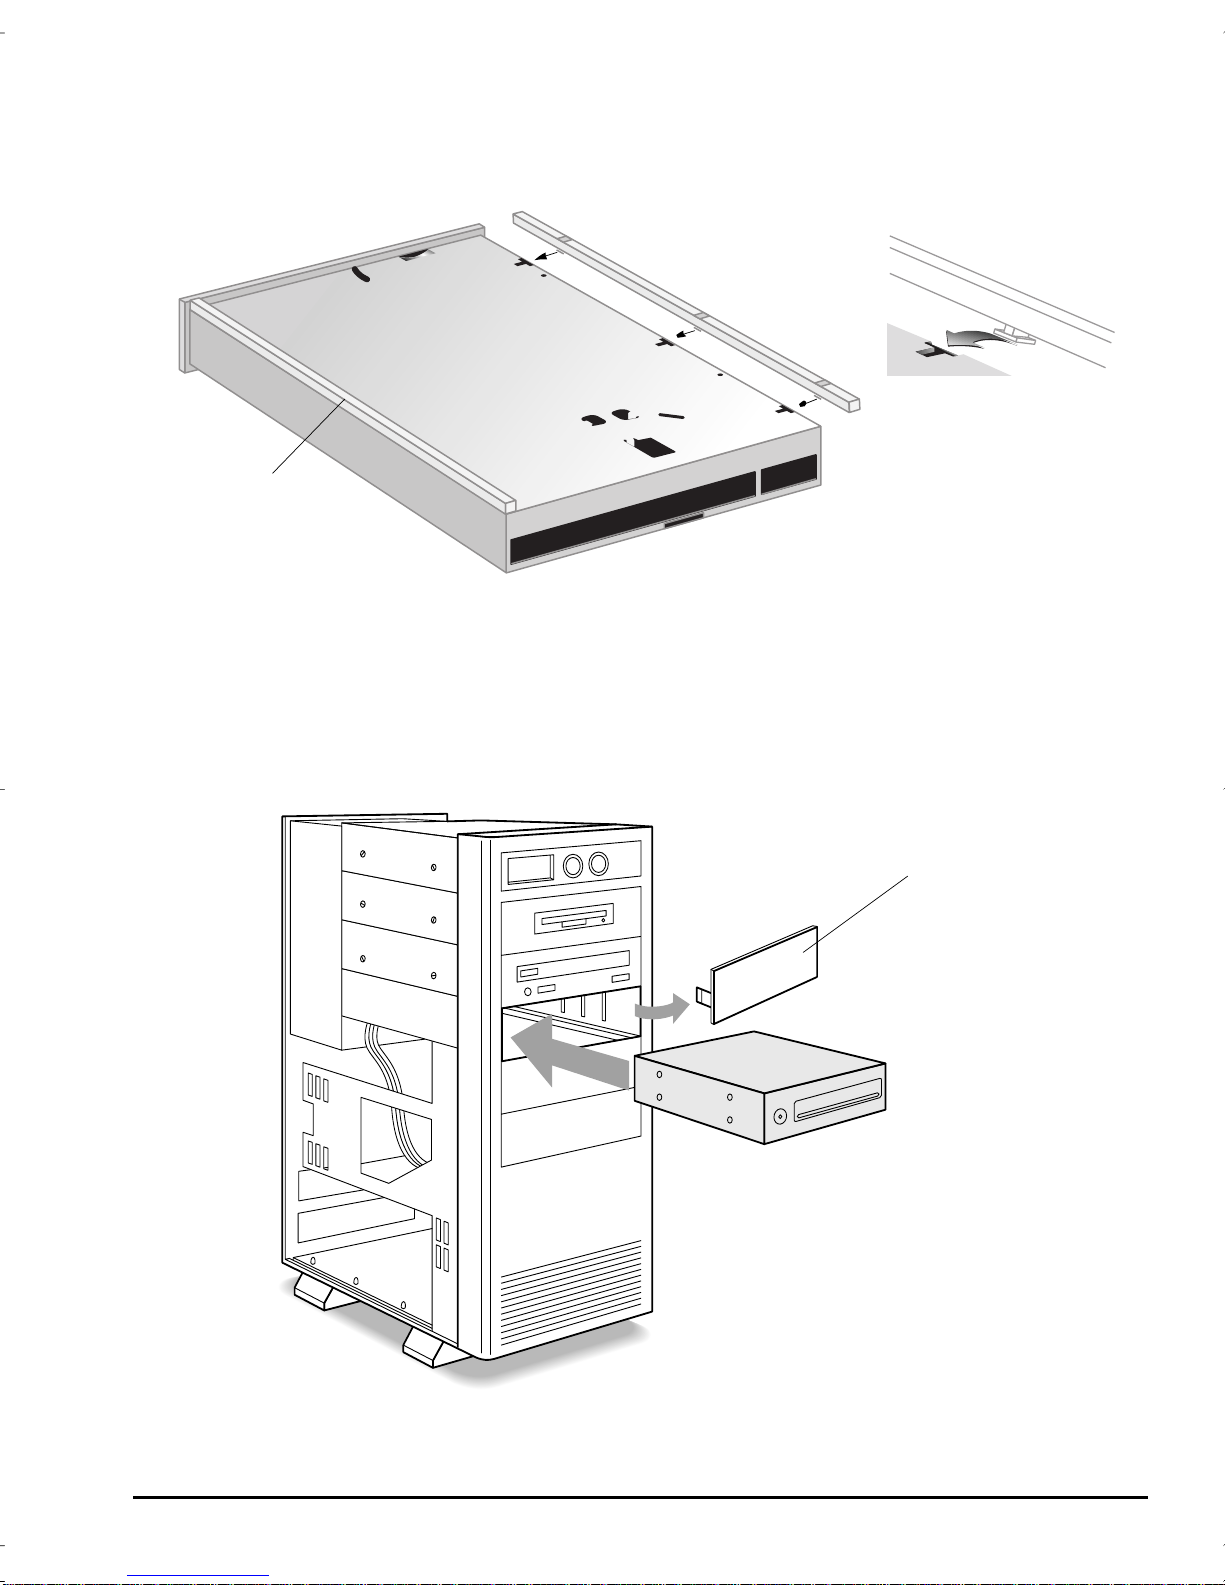
6. To help you with the vertical alignment of your OnStream Digital Tape Dr ive,
two spacer rails are included. If desired, at tach the spacer rails by sliding them
onto the bottom left and right edges as sho w n in Figure 8.
Bottom of drive
Detail view
Spacer rail
inst alled
Figure 8: Slide spacer rails onto bottom of drive (optional)
7. Slide your O nStre am SC30 /SC5 0 Di git al Ta pe Dr iv e int o th e e mpty drive bay as
shown i n Figure 9. You can mount your OnStream SC30/SC50 Digital Tape
Drive horizontal ly or ver tically as necessary.
Remove dri ve bay
cover
Slide driv e into
empty bay
Figure 9: Slide your OnSt ream SC30/SC5 0 D igital Tape Driv e into an empty drive bay.
Installing your OnStream SC30/SC50 Digital Tape Drive 11
Page 16
Connecting the Cables
¯
Connec t the powe r a nd SCS I cabl es to your OnSt r eam Di gi tal Ta pe Dr i ve b efo re
secu ring it in the drive bay. You may need to slide the drive to the front or back
of the drive bay to connect the cables.
Connecting the Power Cable
1. Locat e a spare power connect or inside your computer. If you are having diffi-
culty l oca ti ng a pow er con nec to r, find yo ur c omput er’s powe r su ppl y and fol l ow
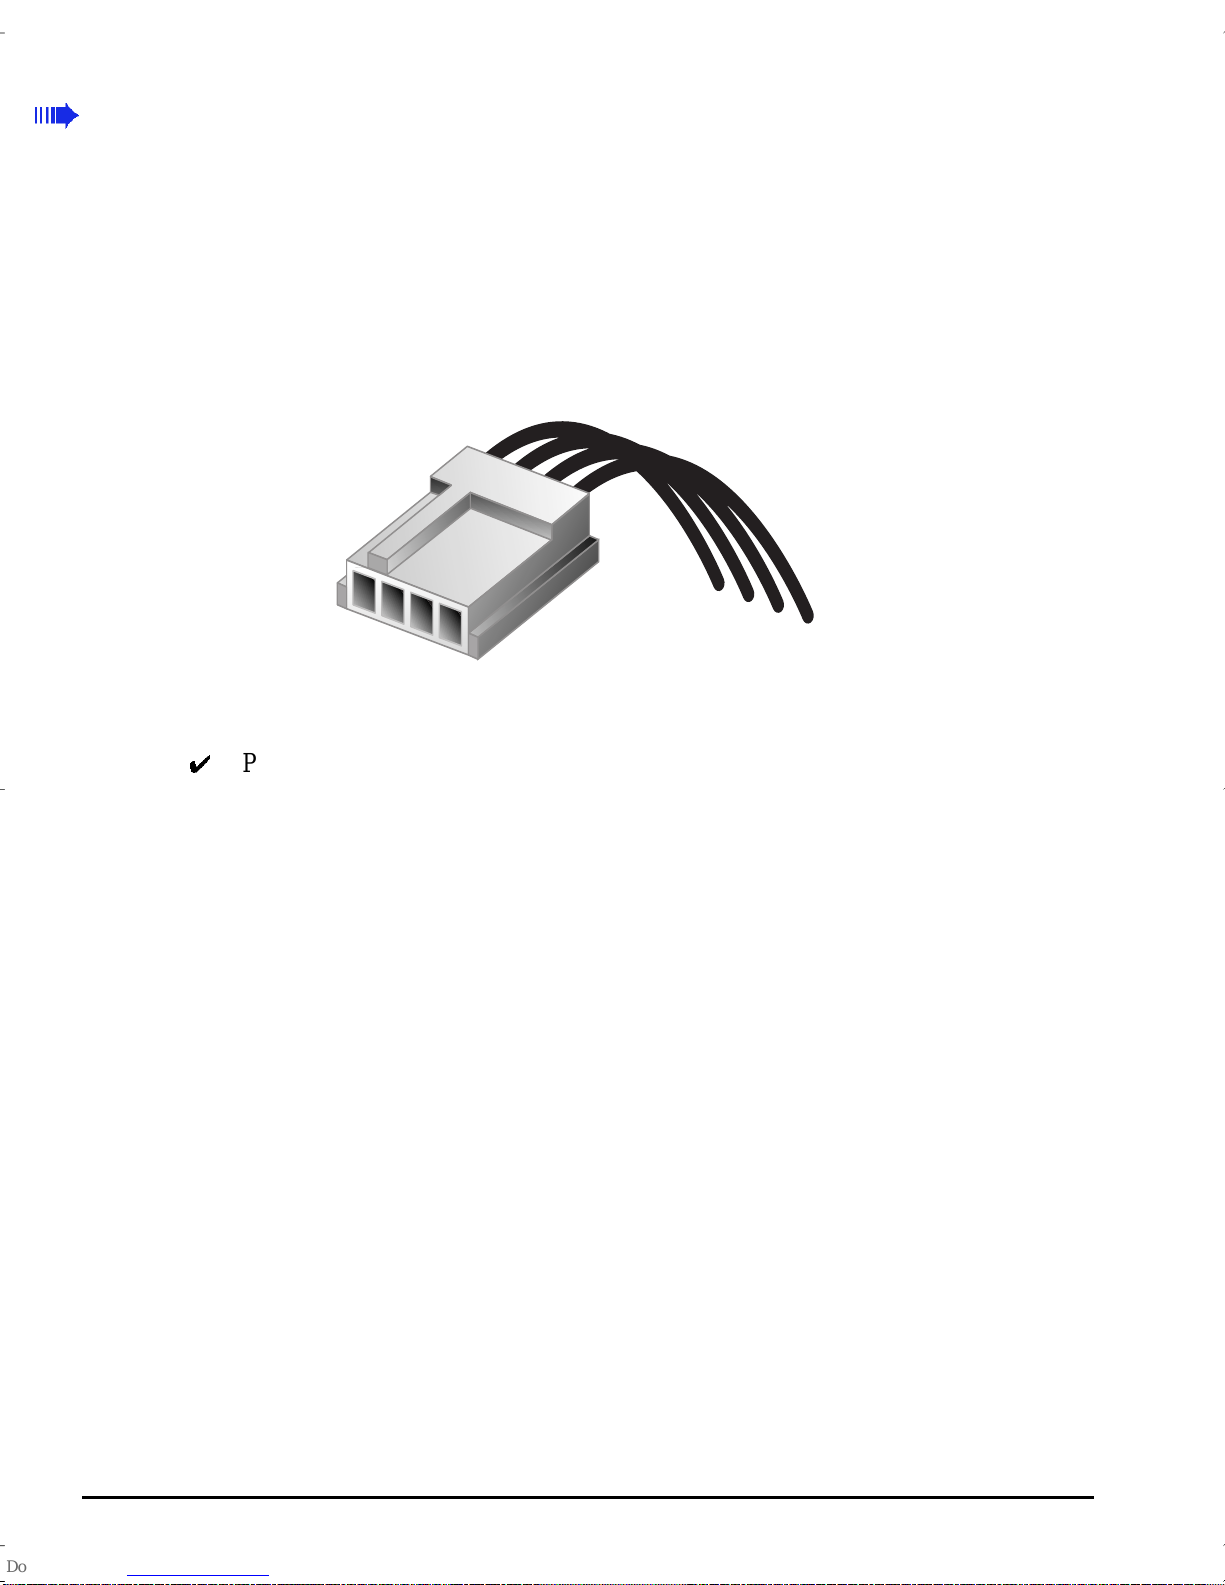
the bu ndle of wires that come out of it. Your OnStream D igital Tape Drive
requ ires a small powe r connector like the one shown in Figure 10.
Figure 10: Power conn ector required for your OnStr eam D igital Tape Drive
Power connectors have 4-pins , are usually white plastic, and have t w o b lack
wires, one red wire, and one yellow wire.
2. Connect the power cable to the power connect or on the back of your O n Stream
Digi tal Tape Drive as show n in Figure 12.
Using the Power Splitter Cable
If there is no free po w er connector in your computer or if the fr ee power
conne ctor in your compu ter does not fit t he connector on the back of your
OnStr eam Digital Tape Dr ive, use the supplied power splitter cable.
1. Locate a spare power connector in your computer or dis connect the power connector from another device, such as a CD-ROM drive.
2. Connec t the suppli ed power splitter cable to the power connec tor.
12 Installation Guide
Page 17

3. Conn ect t h e la rg er con nector on the splitt er cable to th e device from which
Connect to
your OnStre am
drive
4. Connect the smaller connector on the sp litter cable to the pow er connecto r on
you ju st removed the compute r pow er cable (if applicable).
Power cable in
your co m puter
Connect to CD-ROM
or other device
(only if necessary)
Figure 11: Connecting the power spli tter cable
the back of your OnStream Digital Tape Drive as shown in Figure 12.
Connectin g t he SCSI Cable
The SCSI cable is a ribbon cable (wide and flat), usually gray, with a colored
stripe on one edge. The easiest way to locate a S C SI cable in your com puter is to
look for the cable attached to your SCSI controller.
Your computer user’s guide should show you exactly where the SCSI controller
is located in your com puter. If you are instal ling a new SCSI controller for your
OnStr eam Digital Tape Dr ive, do so now.
Installing your OnStream SC30/SC50 Digital Tape Drive 13
Page 18
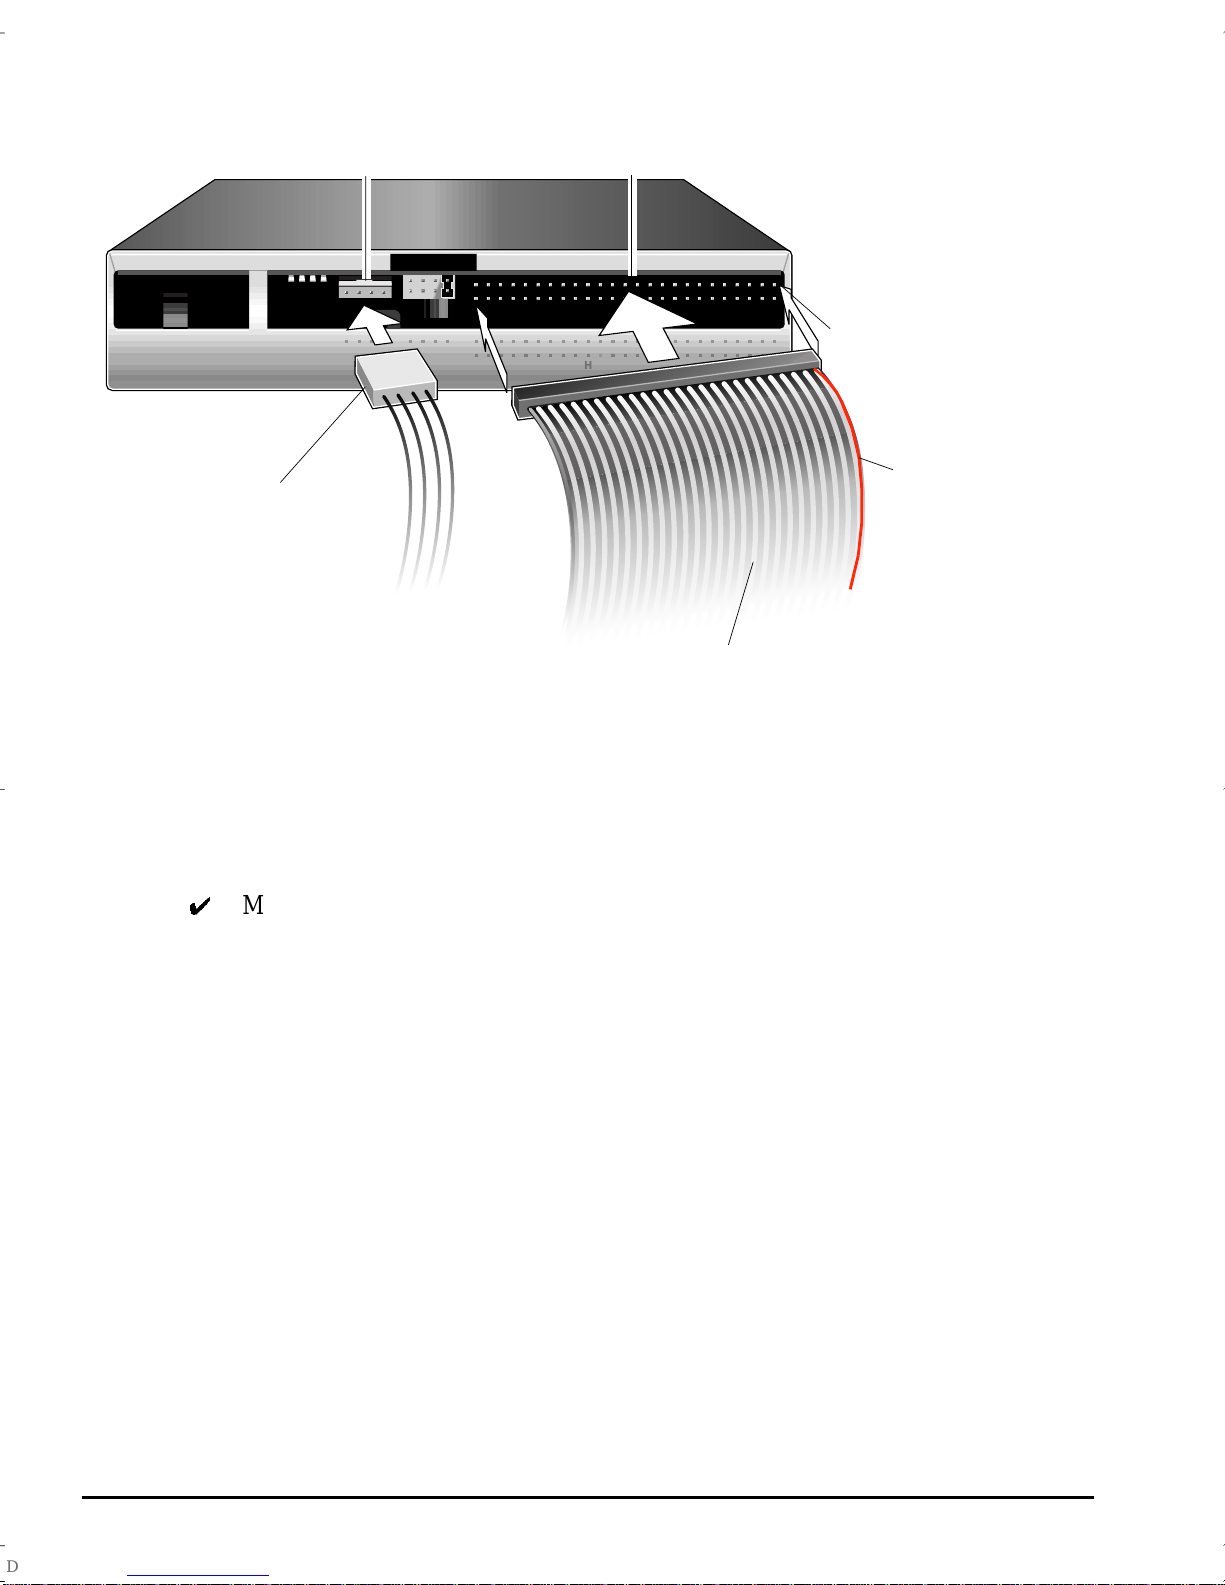
1. Locate the SCSI cable included with your OnStream Digital Tape Drive.
Power connector
Power connector
Figure 12: Attach power and SCSI cables to drive
Power
SCSI connector
49
50
Host inter face
Pin 1
1
21 2 4 T5 G G 12
Colo red stripe
lines up w ith
pin 1
SCSI cable
2. Connect one end of the SCSI cable to your SCSI controller, aligning the color
stripe on the cable wi th Pin 1 on the controller connector.
3. Connect the SCSI cable’s other connector to th e SC SI connector on the back
of you r O nStream Digita l Tape Drive as show n in Figure 12.
Make sure that the SCSI cable’s color st ripe is aligned with Pin 1 on your
OnStr eam Digital Tape Dr ive as shown in Fig ure 12.
14 Installation Guide
Page 19
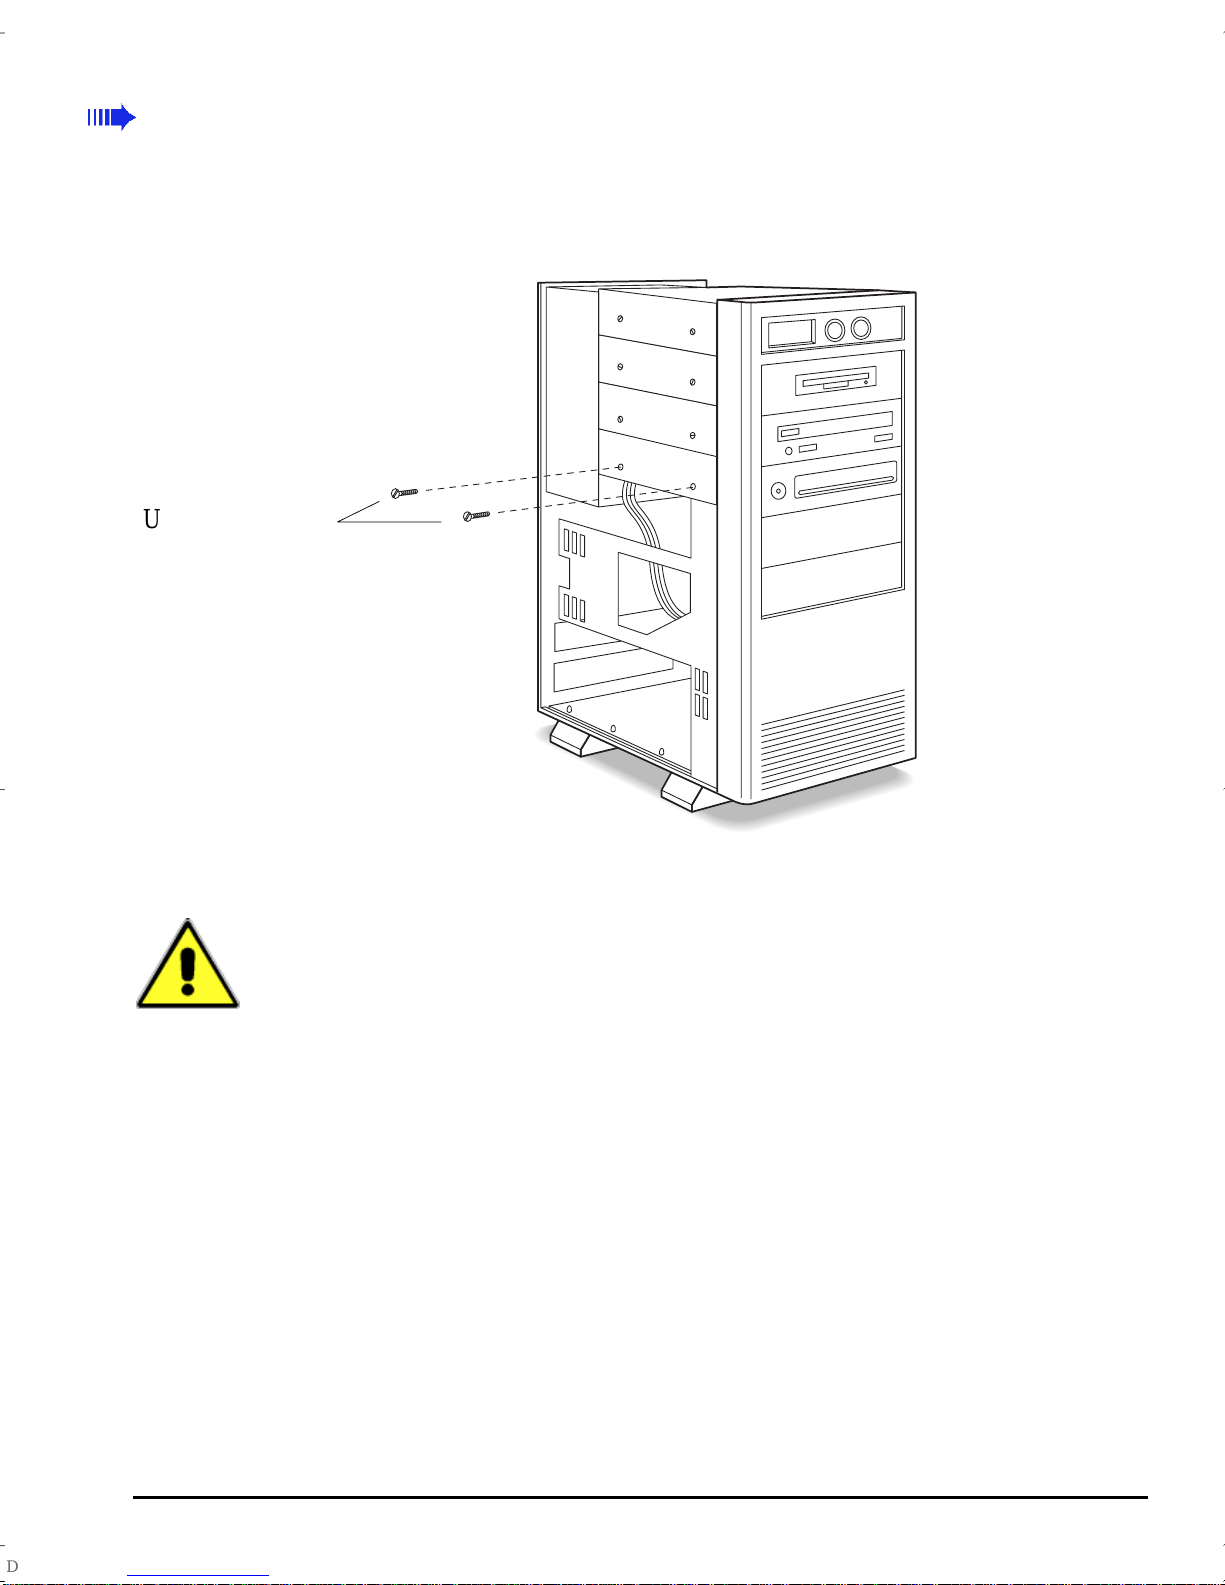
Securing your OnStream SC30/SC50 Digital Tape Drive
¯
in your Computer
1. Secure your OnStream SC30/SC50 Digital Tape Drive to the drive bay with the
four screws supplied as shown in Figur e 13. Use two screws on either side of
the drive.
Use the supplied
scre ws only to se cure
the drive
Figure 13: Securing your OnStream Digital Tape Drive in its drive bay
Caution!
Digital Tape Drive.
new drive. Do not overtighten the sc rews.
2. Replace yo ur computer’s cover.
3. Plug in your computer and any other devices you unplugged earlier.
4. Fill out and mail the Product R egistration Card. Doing so extends your limited
warrant y for an ex tr a year and ensures that you receive product upda te
announcements and other useful information.
Use only th e scr ews suppl ied wit h your OnStr eam SC30/ SC50
Other screws may be too long and could damage your
Installing your OnStream SC30/SC50 Digital Tape Drive 15
Page 20
¯
Installing the Software
Your OnStream SC30/SC50 Digital Tape Drive is alm ost ready to use. Just
follow the server or workstation software installation instructions below.
Installing your Server Backup Software
If you inst alled your O nStream SC30/S C50 Digita l Tape Drive on a server, inst all
your server backup so ftware and skip to the next section. Refer to your server
back up software user documentation for complete installation instructions.
Installing OnStream Echo for your Workstation
If you inst alle d your OnStr eam Digital Tape Drive on a work stat ion, all you have
to do is install the OnStream Echo software.
To ins tall the OnStr eam Echo software, follow these steps:
1. Turn ON your computer and allow it to boot.
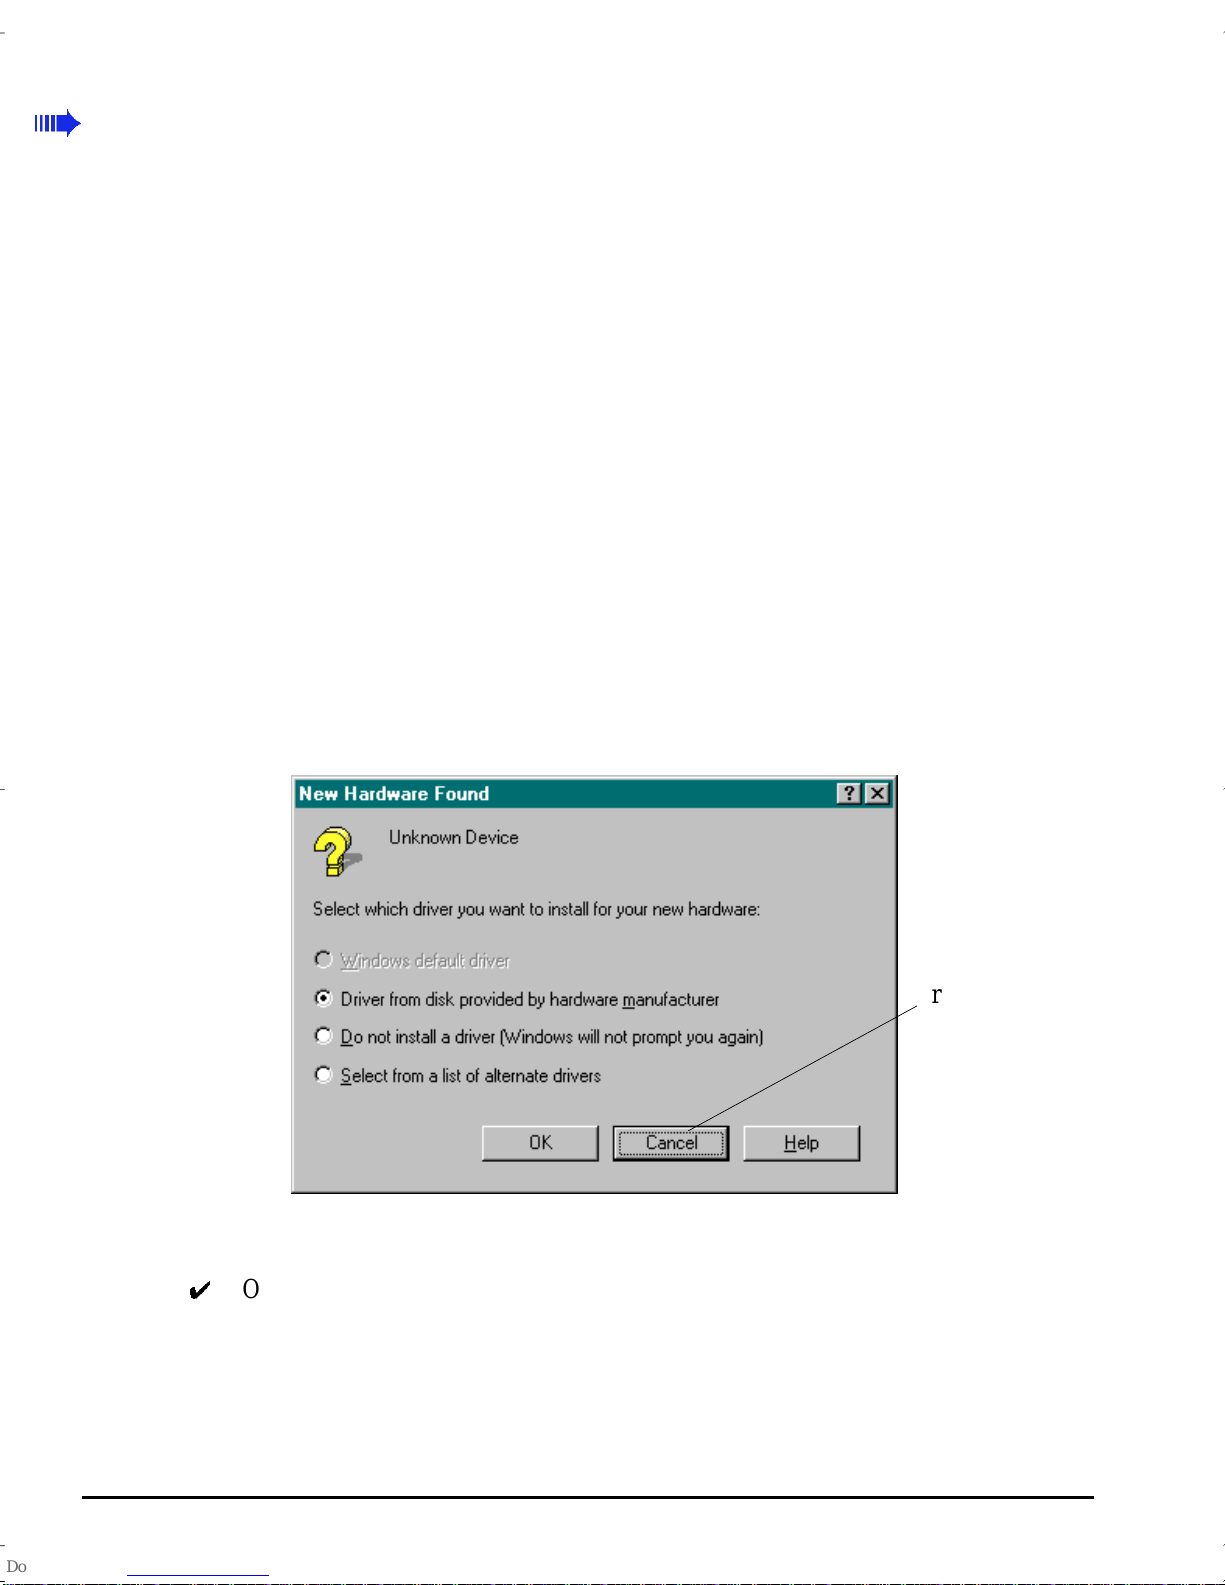
2. When your computer starts, Windows ma y detect that new har dw are, your
OnStr eam SC30/SC50 Digital Tape Drive, has been instal led. If this happens,
you wil l see a dialog box li ke the one shown below. Press Cancel and continue
to th e next step.
Figure 14: Windows New Hardware Found dialog box: Press Cancel
OnStream Echo installs the driver for your OnStream SC30/SC50 Digi tal Tape
Drive later.
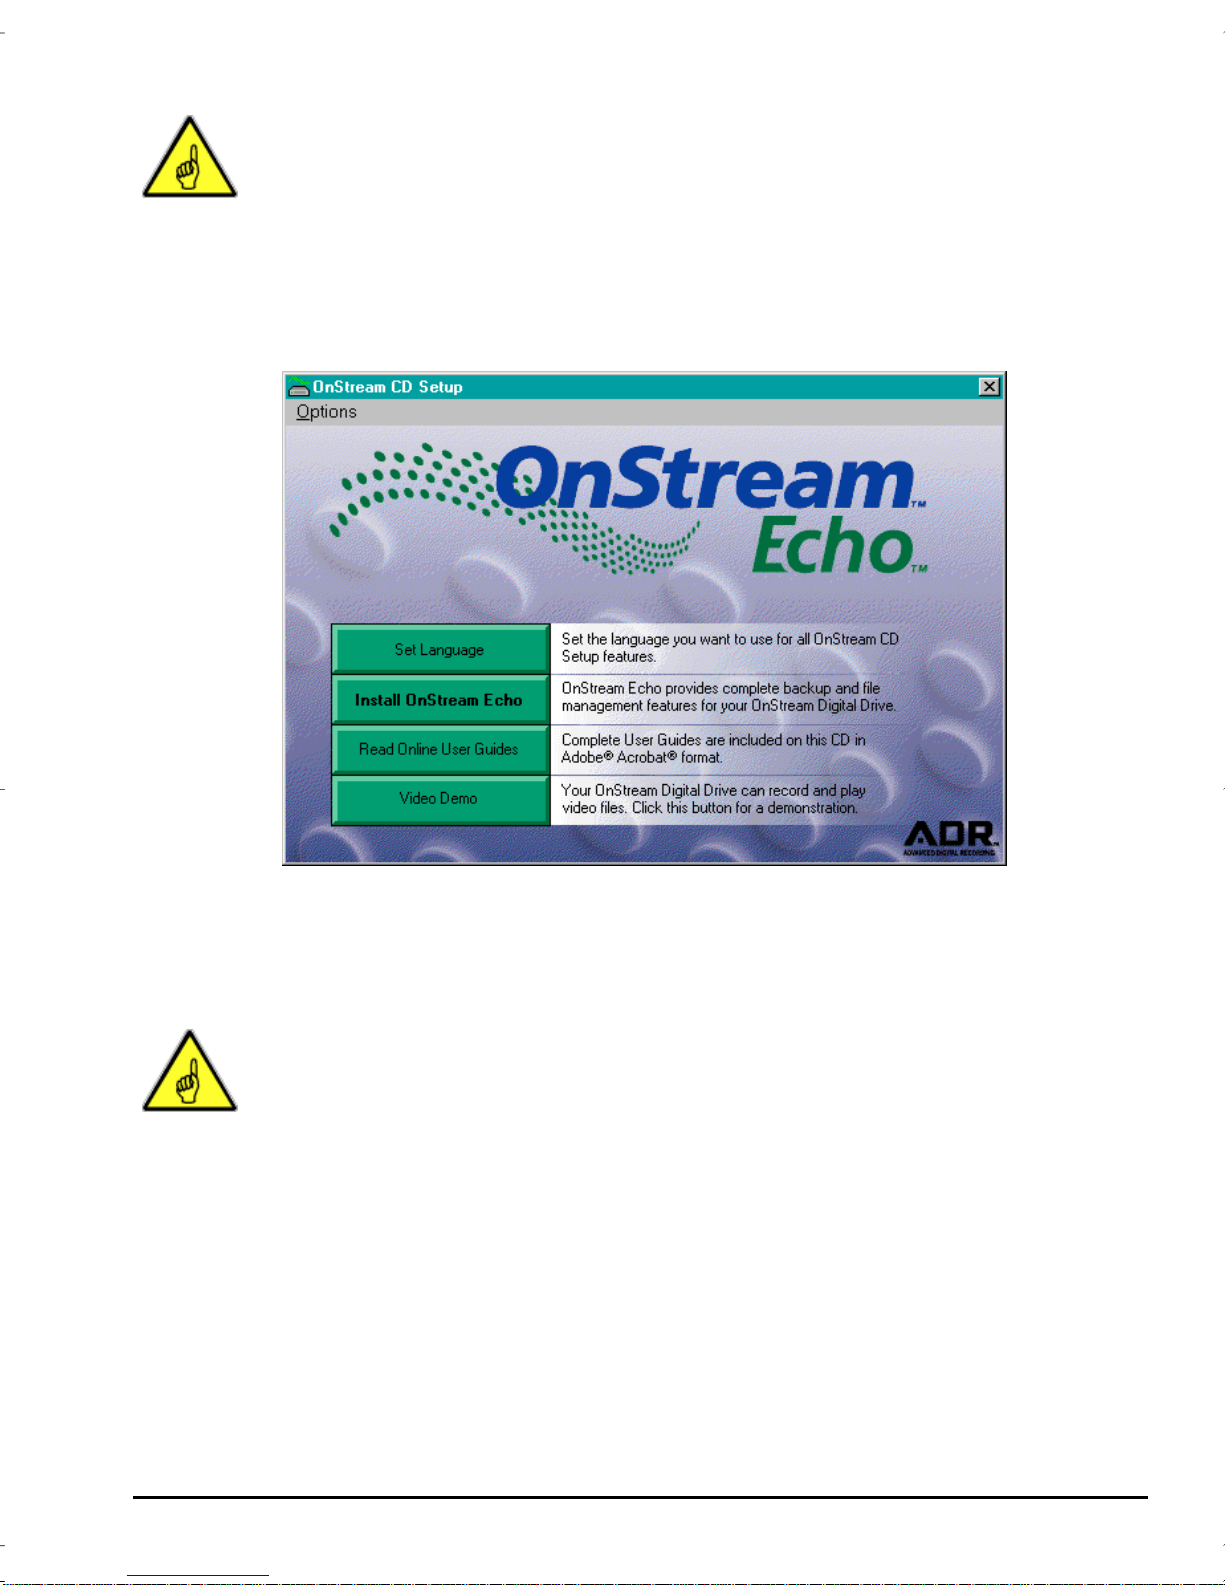
3. Insert the OnStream Installation CD-ROM into your CD drive. The OnSt ream
CD Setup program starts automatically.
16 Installation Guide
Press Cancel if
you see this
dialog box
Page 21
Note:
the
replaci ng
If the OnSt ream CD Setup program does not start automatically, click
Start bu tton
d:
with the letter ass igned to your CD-ROM drive, and click OK.
on your Windows Taskbar, click
Run
, type
\setup. exe
d:
,
4. When the OnStream CD Setup program prompts you to select your drive type,
click the SC30 or SC50 radio button.
5. Press the Install OnStream Echo button.
Figure 15: OnStream CD Setup main window
6. Follow all on-screen instructions.
7. When installation is complete, restart your computer.
Note:
Started Guide.
Echo User Guide
To get start ed using OnStream Echo right away, refer to the
For complete operating instructions, refer to the
on the Installation CD-ROM.
Getting
OnStream
Installing the Software 17
Page 22

¯
Using OnStream ADR Cartridges
Your OnStream SC30/SC50 Digital Tape Drive uses Ad vanced Digital
Record ing (ADR) technology to ensure the security of your data and to ac hieve
high cartridge capacities. Only ADR cartridges can be used in your OnStream
SC30/SC50 D igital Tape Drive.
In this section, you will:
T
Remove the plas ti c s hippi ng p late fr om you r On Str ea m SC30/ SC50 D igit al Tape
Drive.
T
Inse rt an OnStre am AD R ca rtri dg e int o you r On Str ea m SC30/SC50 Dig it al Tape
Drive.
T
Remove an OnStream ADR cartridge from your OnSt ream SC30/SC50 Digital
Tape Drive.
Note:
Fingerpr ints can damage the tape and drive wheel . Refer to Figure 16 for a
pictur e of an OnStr eam ADR cart ri dge.
Do not touch the front edge of the OnStr eam ADR cart ri dge.
Inserting an OnStream ADR Cartridge into the Drive
1. Press the eject button on the le ft side of your OnS tream SC30/SC50 Digital
Tape Dr ive’s front panel as shown in Figure 16.
The cartridge door opens.
Note:
plastic plate that prevents the read/write heads from being damaged during
shipment and installation. You must remove this plate bef ore inserting a
cartridge into the drive.
2. Locate the plastic shipping plate on the ca rtridge transport tray and remove it
Your OnStream SC30/SC50 Digital Tape Drive is shipped with a
fro m t he drive.
18 Installation Guide
Page 23
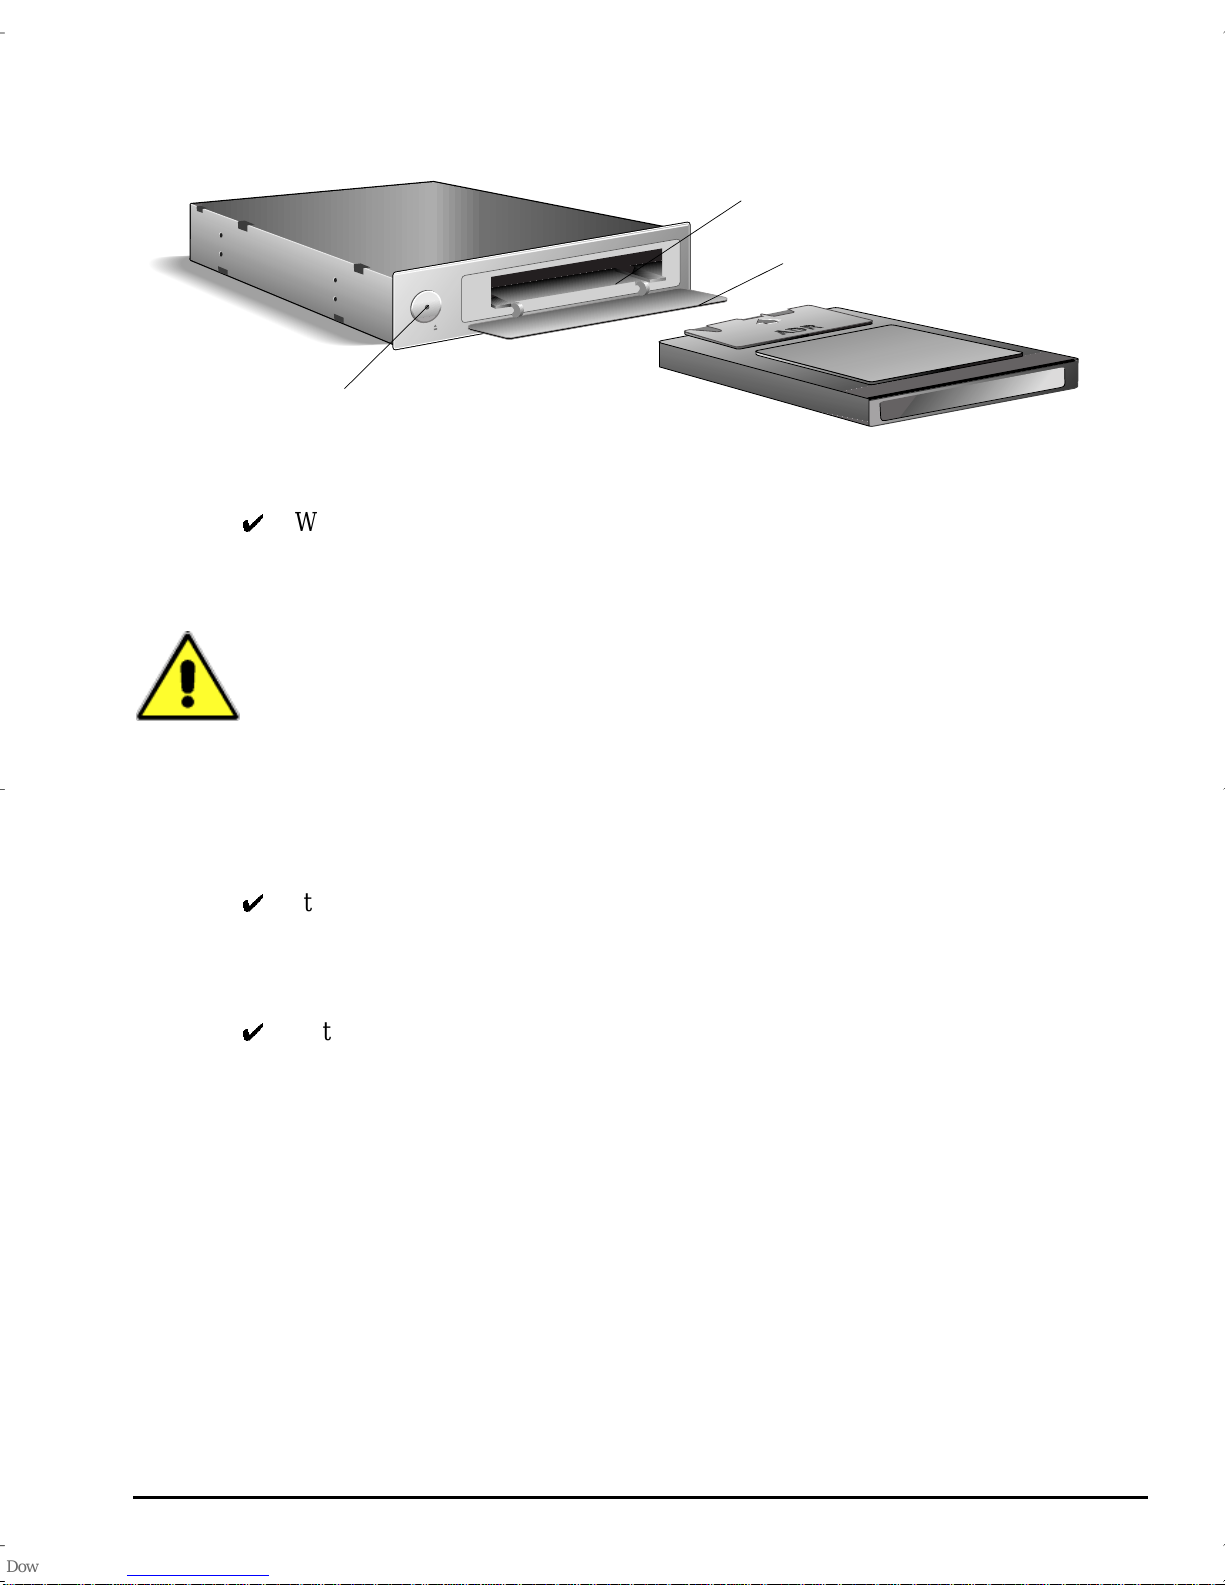
3. Slide the OnSt ream ADR cartri dge gently into the cartridge bay wit h the arrow
faci n g th e d riv e and th e ca rtridge’s me ta l plate dow n .
Shipping plate si ts on tr ansport tray
Cartridge door
OPEN
OPEN
Eject button/
activity LED
Figure 16: Inser ting an OnStream ADR cartridge
When you insert a cartridge, the drive’s cartridge transport mechanism grips and
load s the c ar trid ge, much like a VCR doe s. The drive the n t ake s a few sec onds to
wind t he tape to the main directory.
Caution!
ADR 50 GB cartridges are lon ger than ADR 30 GB cartridges,
preventi ng the car tri dge door fr om closi ng compl etel y. Do not at tempt to pu ll
an ADR 50 GB cartridge out of t he drive!
Removing a Cartridge from the Drive
1. Press the eject button on the le ft side of your OnS tream SC30/SC50 Digital
Tape Dr ive’s front panel as shown in Figure 16. The cartridge door opens and
ejects the cartridge.
It ma y take a few se conds to eject an OnStream A D R cartridge. Your OnStrea m
Digi tal D rive mu st fin is h th e curre nt fi le copy op er at ion a nd updat e t he ca rtri dg e
directory before ejecting the car tridge.
2. Remove the cartridge immediately.
Afte r a fe w se cond s t he cart ri dge door cl os es aut omat i call y. Do not pr ess on the
door while it is open.
How to use OnStream ADR Cartridges
Tape Rotation Makes Sense
When defining the best tape rotation strategy for your needs, the key thing to
cons ider is how ofte n your data cha nges. The following ar e some explan atio ns of
typic al tape ro ta tion st ra te gies.
6-Tape Rotation
For da ta that changes mo re frequently, you may wa nt to use a 6-tape rotation
strategy. The simplest way to manage a 6- tape strategy is to use five tapes
Monday t hr ough Fri da y an d la bel th e si xth t ape “Off -S ite” . Th en, eve ry Monday
make a total backup onto the Monday tape. The rest of the week you make
incremental backups to the corresponding tape. At the end of the week, make
Using OnStream ADR Cartridges 19
Page 24

another total backup using the Off-Site tape. And of course, remember to store
the Of f-Site tape in a secure locati on w hen you ar e not using it for backup.
10-Tape Rotation
The 10-tape rotation strategy works best if you need to keep track of weeks or
months of data. It is basical ly an extensi on of t he 6-tape rotation strategy except
that you label t he 6th tape “O ff-Si te Week 1”, the 7th tape “Off-Si te Week 2” , the
8th tape “Off -Site Week 3” and th e 9th tap e “O ff-Site Week 4.” Label the 10th
tape “O ff-Site Mont hly” and you are se t. By using a different off -site tape each
week, and yet another at the end of th e month, you can build a complete history
of data , just in case you need it.
Adding additional monthly tapes, o ne for each quarter of the year or for each
month, further enhances the data security of your tape rotation schedule.
Archiving
In add ition to backup, you will also want to consider implementing a solid
arch iving strategy. That way you can clean up your hard drives and still have
acce ss to all of your old data, just in case you need it. And a good archiving
strat egy h elps you g et m ore out of your ha rd dri ves a nd can eve n d elay t hat cos tl y
upgrade .
Taking Care of your OnStream Digital
¯
Beyond Backup
—
Tape Drive & OnStream ADR Cartridges
Your OnStream SC30/SC50 Digital Tape Drive and ADR cartridges are very
dura ble, but shoul d not be subje ct ed t o hars h t re atm ent. T o en sur e long dri ve and
cartridge life, please observe these recom mendations:
T
Use only OnStream ADR cartridges in your OnS tream SC30/SC50 D igital Tape
Drive.
T
Do not touch the tape or driv e wheel, both of which are located on the front
edge of the cartridge. Fingerprints can damage the tape.
T
Clean your O nStr eam SC 30/SC5 0 Di git al Tape Drive onc e a mo nth . Use on ly
OnStr eam ADR cleaning cartridges in your OnStream SC30/SC50 Digi tal T ape
Drive. Other types of cleaning cartridges may fit in the drive, but can damage
the read/write he ads and dr ive wheel.
20 Installation Guide
Page 25

Troubleshooting
This table provides solutions to some problem s that may occur.
Symptom Possible Cause Solution
The drive does not
respond.
The drive does not
respond or behaves
erratically.
Cannot access the
drive.
If your backup operations are taking longer than expected and your computer is
gene rally sluggish while a backup is in progress, you may be run ning an antivirus program that has real-time scanning enabled. This could be the cause of
your comp uter’ s sluggi sh pe rform a nce. To i mpro ve perfo rman ce, sim ply dis abl e
real-time scanning in your anti-virus application. For inform ation on how to do
this, plea se cons ult your anti-virus softw are manual.
1. Power or SC SI cable is
not connected properly.
2. Power or SC SI cable is
damaged.
1. The dr i ve has a SCSI I D
conflict with another
device.
1. The dr i ve has a SCSI I D
conflict with another
device.
1. Make sure the power and SCSI
cable s are f i rmly a tt ac hed t o t he d ri ve
connec tors.
2. Check the power and SCSI cables
for damage.
1. Make sur e tha t t he SCSI I D j umpe r
is set to an ID not us ed by any other
device on the SCSI Chain.
1. Make sur e tha t t he SCSI I D j umpe r
is set to an ID not us ed by any other
device on the SCSI Chain.
Troubleshooting 21
Page 26

Customer Support
OnStr eam is committ ed to providi ng the best pos sible custom er suppor t. Whe ther
you nee d help w ith p rod uct sel ec tion or you simpl y ne ed an an swer t o a que st ion
on ins tallation or operation of your OnStream drive, our service and technical
suppo rt professionals are ready to help.
North America
Product & Sales Inform ati on
5 days a week, 12 hours a day
800-759-4621
Technical Support
7 days a week, 24 hours a day
877-23 4-3246North American
Headquarters
OnStream, Inc.
1951 South Fordham Street
Longmont, CO 80503
USA
Tel: (303) 772-9000
Fax: (303) 772-9001
www.onstream.com/contact
Europe
Europea n H eadquarters
OnStream B.V.
Lodewijkstraat 1
5652 AC Eindhoven
The Netherlands
Tel: +31.40.2724358
Fax: +31. 40.2723101
22 Installation Guide
Page 27

Technical Specifications
Tape
Capacity Compressed*/Nati ve SC30: 30/15GB
SC50: 50 / 25GB ( A D R 50GB cart ridge)
Media compatibilit y 30GB and 50GB ( SC50 only) ADR car tridges av ail-
able from OnStream, Inc., and Verbatim
Format ADR
Tape width 8mm
Number of tracks 192
Aerial density (MB per inch
Media type CoFe
2
)43.6
2O3
tape, ADR servo signal
Performance
Data transf er rate (native) 2MB/sec
Seek speed 60 ips
Read/write speed 11-44 ips, continuously variabl e
Reliabi lity
Random bit error rate 1:10
Error cor rection Reed-Solomon double layer C1 (72,66,7), C2 (76,
MTBF 200,000 hours
Approvals CE, FCC Class B, UL, CSA
19
64, 13)
®
Corp.
Power Require me nts
Voltage 5VDC±5% 12VDC±10%
Power consum pti on 12W nominal
Environmental
Operating temperature 50° F -104° F/10° C - 40° C
Humidity, operational 30% to 80% noncondensing
Shock 5.0G peak for 11ms, half sine wit hout data loss
Vibration 0.5G, 5 to 500Hz in all directions
Physical
Weight 1.25 lbs/0.57kg
Front panel controls Eject button, dri ve active LED: green
Interface Fast narrow SCSI-2
Connections DC power in, 50-pin header SCSI
Technical Specifications 23
Page 28

Jumper settings SCSI ID, Termination
Dimensions 1.6 x 5.8 x 7.0 i n/42 x 147 x 178 mm
Tape insertion Automatic motorized tape loader
Warranty 2 yea rs (ad diti onal y ear gra nte d with product regi s-
trati on)
* Compressed capacities are based on a 2:1 compression ratio using backup software. The
capa city, backup speed, and transfer rates wil l vary with file and system configuration.
Regulatory Notices
FCC Notice
This device complies with the limits for a Class B digital device, pursuant to Part
15 of the FCC rules. Operation is subject to the following two conditions:
(1) This device may not cause harmful interference, and (2) this de vice must
acce pt any in terf erenc e rece ived, includi ng int erfere nce th at may c ause un desir ed
oper ation.
For Canada
For Europe
Approvals
T
T
T
This digita l app aratus does n ot exc eed t he Class B li mits for radi o noi se emi ssions
fro m di gital apparatus set out in the radio interference-causing equipment
sta ndard entitled Digi tal Apparatus, ICES-003 of Industry Canada.
Cet appareil numérique respecte les limites de bruits radioélectriques applicables
aux app ariels numériqu es de Classe B préscrites dans la norm e sur le matériel
brouiller: Appariels Numériques, NMB-003 édictée pa r l’Industrie Canada.
This product complies wit h the EMC directives 89/336/EEG, EN55022,
EN50081-1 and EN50082-1 (CE Marking).
This product complie s with the foll ow ing safety directives:
Europe: IE C 9 50
USA: UL1950
Canada: c-UL
UL Listed
24 Installation Guide
Page 29

¯
Safety Notices
To pr event electric shock during installation, you must ensure that your
OnStr eam SC30/ SC50 Di gital T ape Dri ve is not exp osed t o mois ture or exc essive
humidity. It is imperative that you follow all safety instructions given below.
Electric Shock Hazard!
1. Pers onnel should be warned that pote ntially lethal voltages exi st on and around
computer power supplies. All measures should be taken to prevent ina dvertent
expos ure to these voltages. Only remove the computer’s cover after all power is
removed from th e computer and all its p e ripherals and the main power plugs are
removed from the wall outlet or other supply. Do not reconnect the power until
the co m puter is fully re-assembl ed.
2. Read all instructions before using your On Stream SC30/SC50 Digital Tape
Drive.
3. Adhere to all safety warnings on pr inted your OnSt ream SC30/SC50 Di gital
Tape Dr ive and in this manual.
4. Grounding and polarization - This device is designed only to ope rate from a
D.C. power supply in the computer, which is generated from alternating current
from a l ine outlet. Ensure that adequate grounding is provided on the co m puter
power supply.
5. If the computer’s AC power plug is fit ted with a fuse , ensure a manufacturer’s
rec ommended fuse of the corr ect rating is used.
6. Do not overload a main p ow er outl et with an exces sive number of devices.
7. Ensure the device, including the computer, is situated well away from sources of
hea t su ch as radia t o r s, stove s etc.
8. Ventilation - this product is designed to operate within a computer and does not
require any extra forced ventilation.
9. Do not at te mpt to serv ic e this pr odu ct yourse lf. Any modif i cat ions no t exp res sl y
auth orized by the manu facturer may vo id the warranty. Refer all servicing to
qual ified service pers onnel authorized by the manufacturer or supplier.
Safety Notices 25
Page 30

¯
OnStream Warranty
1. DATA STORAGE PRODUCT WARRANTY
1.1. Express Warranty. OnStream warrants to the End User of the Data
Storage Pro duc t (the “Pr oduc t” ) that , for the two ( 2) year per i od co mmenci ng o n
the dat e t he Produc t wa s p urc has ed (t he “ Warr an ty Per io d”) , the Pr oduct s ha ll be
free from defects in ma terials, parts and workmanship under normal use and
conditions. This wa rranty may be ext ended an additional year if the End User
completes the registration card and sends it to OnStream. This warranty applies
to hardw are component s packaged with t he Product and does not apply to
softw are contained in or included with the Product. Such software is warranted
as provided herein or in the Software License Agreement packaged with the
Produ ct, as appli cable. OnStr eam is not r esponsible for any damage to or loss of
any programs, data, or other information stored on any media o r any part of a
Product. This warranty does not apply to consumables (such as batter ies)
supplied with the Product. OnStream ma kes no warranty to resel lers, dealers or
other distributors of the Products.
1.2. R emedies for Breach of Warrant y.
foregoing warranty, OnStream will, in its sole discretion and at its cost, repair the
non- conforming Product, replace the non-conforming Product with a new or
reconditioned Product or refund of the purchase price for the Produc t. Any new
or re conditioned P roduct provid ed pursuant to this paragraph is warranted as
prov ided he re in f or th e r emai nde r of t he or igin al Warr ant y Pe riod. The End Us er
agre es to pa y f rei gh t char ge s f or Produc ts re tu rn ed to O n Strea m and t o ot he rwi se
comply with OnStream's then-current return materials authorization (RMA)
poli cy, includi ng w ithout limitation shipping the Pro duct to OnStream in its
original packaging or equivalent packaging. O nStream shall not be responsible
for dam age or loss during shipment to OnStream. THE REM E D Y SET FORTH
IN THIS PARAGRAPH SHALL BE THE END USER'S SOLE AND
EXCLUSIVE REMEDY FOR BREACH OF THE FOREGOING WARRANTY.
1.3. V oiding of Warranty.
apply to failure of the Product if the Product h as been subjected to: (i) Physic al
abus e, misuse, impr oper installation, abnormal use, power failure, or use not
cons istent with t he operating instructions provided by OnStream; (ii)
Modification or repair by any party in any manner other than approved by
OnStr eam including , but not limited to , tempestizing, ruggedizing, and/or
mili tarizi ng Prod ucts; (iii) Fraud, tamper ing, u nusual phy sical or elect rica l stres s,
unsui table operating or physical conditions, negligence or accidents; (iv )
Removal or alteration of the Product serial number tag; or (v) Improper
packaging of Pr oduct returns.
The express warranty set forth above shall not
In the even t of a breach of the
1.4. Warranty Disclaimers.
GIVEN FOR THE PRODUCT IN LIEU OF ALL OTHER WARRANTIES,
WHETHER WRITTEN, ORAL, EXPRESS OR IMPLIED, INCLUDING ANY
26 Installation Guide
THE EXPRESS WARRANTIES HEREIN ARE
Page 31

WARRANTY OF MERCHANTABILITY, FITNESS FOR A PARTICULAR
PURPOSE OR NONINFRINGEMENT OF THIRD PARTY RIGHTS. NO
PERSON (INCLUDING WITHOUT LIMITATION, ONSTREAM
EMPLOYEES, AGENTS OR DISTRIBUTORS) IS AUTHORIZED TO MAKE
ANY OTHER WARRANTY OR REPRESENTATION CONCERNING THE
PRODUCT OTHER THAN AS EXPRESS WARRANTY SET FORTH
ABOVE. IF THE DISCLAIMER OF ANY IMPLIED WARRANTY IS NOT
PERMITTED BY LAW, THE DURATION OF ANY SUCH IMPLIED
WARRANTY IS LIMITED TO NINETY (90) DAYS FROM THE DATE OF
DELIVERY. SOME JURISDICTIONS DO NOT ALLOW THE EXCLUSION
OF IMPLIED WARRANTIES OR LIMITATIONS ON HOW LONG AN
IMPLIED WARRANTY MAY LAST, SO SUCH LIMITATIONS OR
EXCLUSIONS MAY NOT APPLY TO THE END USER. THIS WARRANTY
GIVES THE END USER SPECIFIC LEGAL RIGHTS AND THE END USER
MAY ALSO HAVE OTHER RIGHTS WHICH VARY FROM J URISDICTION
TO JURISDICTION.
2. LIMITATION OF LIABILITY.
IN NO EVENT SHALL ONS TREAM
BE LIABLE TO THE END USER OR ANY THIRD PARTY FOR ANY
INDIRECT, SPEC IAL, INCIDENTAL OR CONSEQUENTIAL DAMAGES IN
CONNECTION WITH OR ARISING OUT OF THIS AGREEMENT OR THE
SALE OR USE OF THE PRODUCT (INCLUDING BUT NOT LIMITED TO
LOSS OF PROFIT, USE, DATA, OR OTHER ECONOMIC ADVANTAGE),
HOWEVER IT ARISES, WHETHER FOR BREACH OF THI S AGREEMENT,
INCLUDING BREACH OF WARRANTY, OR IN CONTRACT OR IN TORT
(INCLUDING NEGLIGENCE), OR STRICT LIABILITY, EVEN IF
ONSTREAM HAS BEEN PREVIOUSLY ADVISED OF THE POSSIBILITY
OF SUCH DAMAGE AND EVEN IF A LIMITED REMEDY SET FORTH IN
THIS AGREEMENT FAILS OF ITS ES SENTIAL PURPOSE. IN NO EVENT
SHALL ONSTREAM'S LIABILITY TO THE END USER OR ANY THIRD
PARTY EXCEED THE PRICE PAID FOR THE PRODUCT. Because some
jurisdictions do not allow the exclusion or limitation of liability for consequential
or in cidental damages, the above limitations may no t apply to the End Us er.
OnStream Warranty 27
 Loading...