

Page 1

LS7730
Lighting Stand
Congratulations on your purchase of the
LS7730 Lighting Stand! Please read the
following instructions carefully.
We hope you enjoy your new purchase.
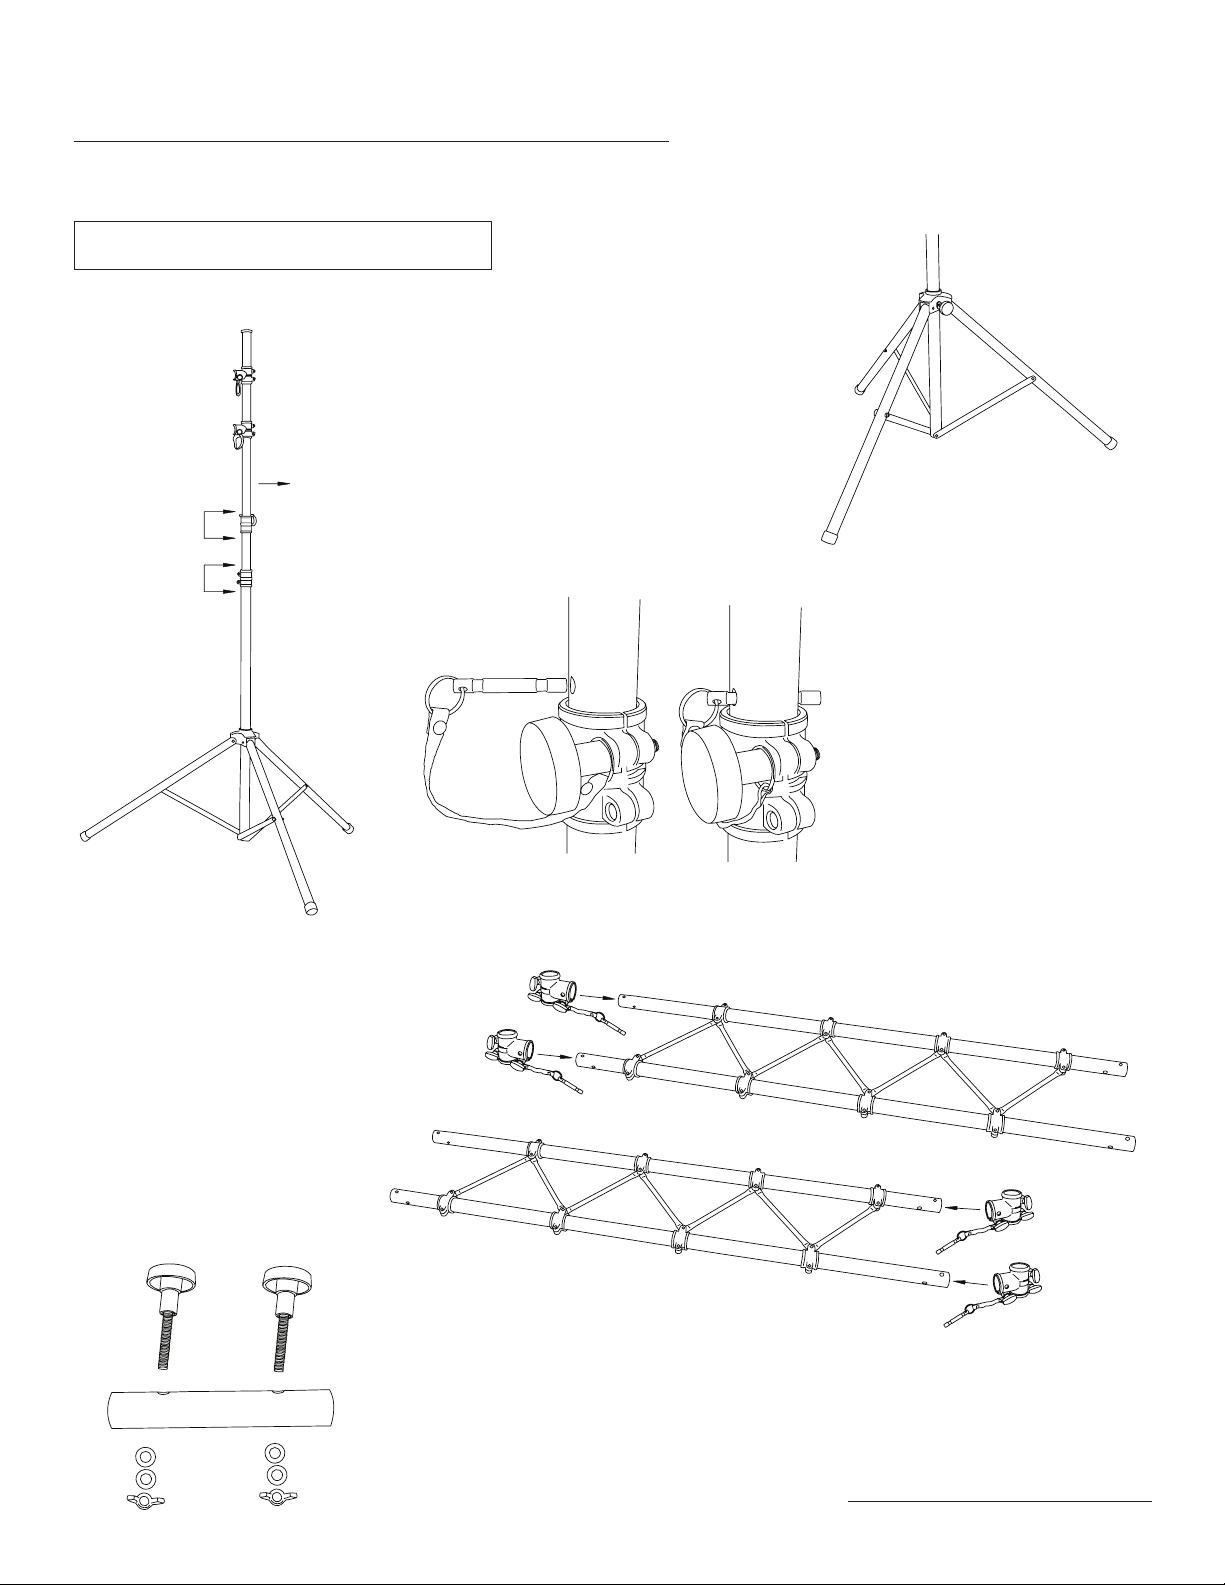
Components:
STANDS
T-Clamps
Truss Section (x2)
Vertical Truss
Support (1)
T-Bar (x2)
Internal Truss
Attachment Section (x2)
Bolts (x8)
CAUTION
ONCE THE TRUSS IS ATTACHED TO THE LIGHTING STANDS, BOTH STANDS
MUST BE RAISED AT THE SAME TIME. THEREFORE, STEPS 5 - 10 MUST BE
COMPLETED BY 2 PEOPLE. THIS STAND CAN SUPPORT STATIC WEIGHT ONLY.
Midpoint
Clutches
Stand (x2)
T-Clamp (x4)
FAILURE TO OBSERVE PROPER ASSEMBLY INSTRUCTIONS, EXCEEDING THE
WEIGHT CAPACITY OR FAILURE TO OBSERVE THE WARNINGS AS MENTIONED
IN THIS INSERT MAY CAUSE STAND TO COLLAPSE, BODILY INJURY OR EQUIPMENT DAMAGE AND WILL VOID THE PRODUCT WARRANTY.
©2016 The Music People On-Stage.com
Page 2
Assembly Instructions
BEFORE YOU BEGIN: Please be aware that assembly requires 2 people.
Remove all contents from the box and identify the parts using these diagrams.
Visit On-Stage for the most recently-updated instructions.
1. Adjust the legs of the stand
to the desired width (36" to 48").
2. Raise the Upper Shaft of
each stand to 18" above the
Midpoint
Clutches
midpoint clutch.
4.
Install the T-Clamps on one end
of each Truss Section. Ensure that
the security pins are installed
through the T-Clamp and the Truss
tubing. Tighten the knobs.
3. Ensure that the security
pins are installed through
the Clutch and the Stand
tubing. Tighten the knobs.
5.
Remove the hardware and
Knobs from one of the Internal
Truss Attachment Sections.
©2016 The Music People On-Stage.com
Page 3

6. Slide one Internal Truss Attachment into one
end of each of the Truss Sections, so that one
Internal Truss Attachment is at the top and one
at the bottom. Attach the Truss Sections and
Internal Truss Attachments with the hardware
that was removed. Tighten all the knobs.
7. Use the Vertical Truss Support to connect
the two Truss Sections by sliding the Internal
Truss Attachment into the Vertical Support.
Tighten all the knobs.
8. With 2 people, raise the truss and slide
over the upper shafts of both stands. Slide
the trussing down the shaft to the desired
location. Ensure that all the security pins
are installed properly. Tighten the knobs.
9. Slide the T Bars onto the top of each
stand and tighten the knobs securing
them to the stand.
10. With 2 people, raise the stands at the
same time to the desired height and tighten
the knobs to x the location.
NOTE: The extra bolts are for attaching lights Truss Sections
and T-Bars. Before installing any lighting to the truss system,
check each knob to ensure that it is tight.
©2016 The Music People On-Stage.com
Page 4

LS7730
Lighting Stand
Specications
Vertical Shaft Specications
Top shaft diameter: 38mm
Middle shaft diameter: 41mm
Lower shaft diameter: 45mm
Vertical Shaft Height adjustment
Maximum height : 124”
Upper shaft: 2 preset adjustment holes
8” on center. 33” Usable shaft length.
Middle shaft: 5 preset adjustment holes
8” on center. 38” Usable shaft length.
Lower shaft: 51” xed height from oor.
Truss Specications
Diameter: 38mm
STANDS
Each Truss - 60” xed length
120” total length.
Safety Factor:
Base leg spread is 36” to 48”.
Total Weight Capacity: 100lbs.
(with 10’ truss assembly)
REGISTER ONLINE. HERE’S WHY:
Lightning Fast Service - Get the fastest turn-around in
the unlikely event of a warranty claim.
Product Notications - We can contact your directly
with product notications and safety information.
Better Products - Your registration helps us to improve
our products and develop new ones.
©2016 The Music People On-Stage.com
 Loading...