

Page 1
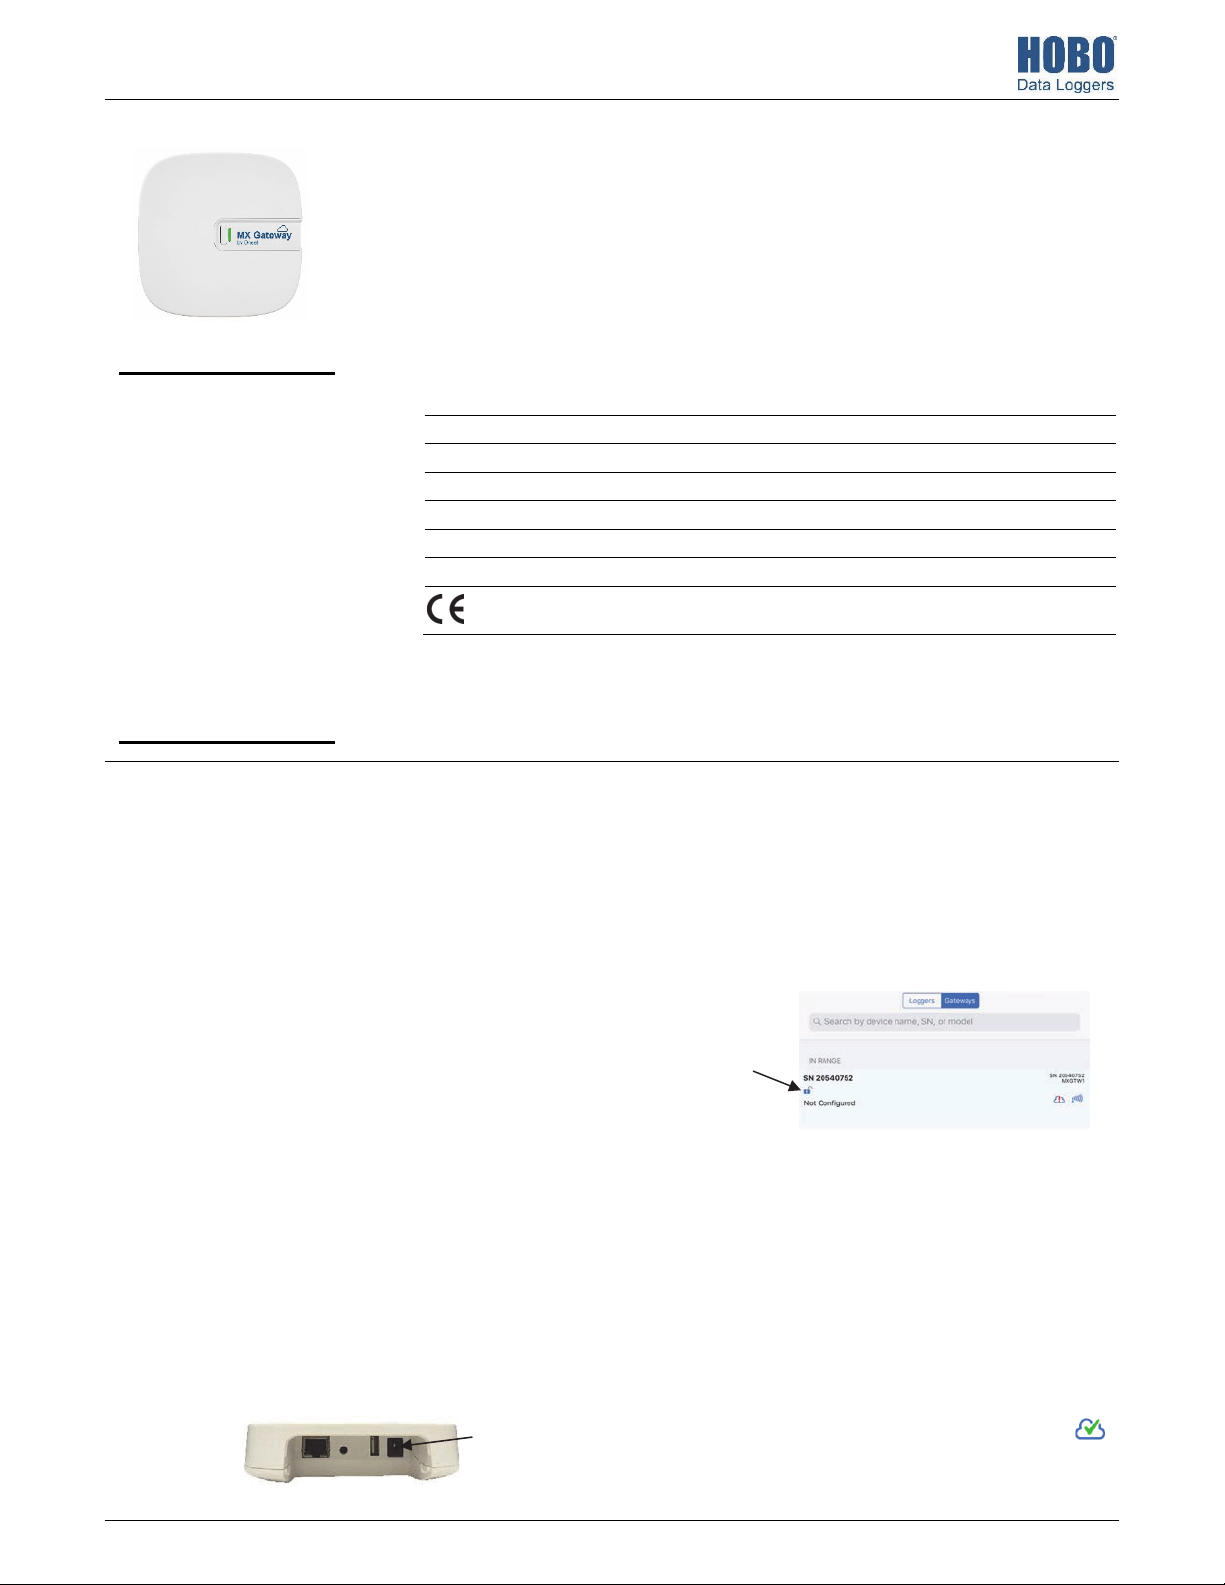
HOBO® MX Gateway (MXGTW1) Manual
The HOBO MX Gateway provides near real-time data monitoring for most MX series loggers by
automatically transmitting logged data to the HOBOlink® website. You can easily set up the
gateway with the HOBOmobile® app on your phone or tablet. Once configured, the gateway
uses Bluetooth® Low Energy (BLE) to regularly check for measurements from up to 100 loggers
within range. Logger measurements are then uploaded from the gateway via Ethernet or WiFi
to HOBOlink, where you can set up automatic email or text alarm notifications, display your
data in a dashboard, and export data for further analysis. Note: All MX loggers except the
MX100 series are supported by the gateway.
HOBO MX Gateway
MXGTW1
Included Items:
• Mounting kit
• AC adapter
Required Items:
• HOBOlink account
• HOBOmobile app
• Device with iOS or
Android™ and Bluetooth
Low Energy
• MX1101, MX1102,
MX2001, MX2200,
MX2300, or MX2501
loggers
Specifications
Transmission Range Approximately 30.5 m (100 ft) line-of-sight
Wireless Data Standard Bluetooth 5.0 (BLE)
Connectivity WiFi 802.11a/b/g/n 2.4/5 GHz or 10/100 Ethernet
Power Source AC adapter or PoE
Dimensions 12.4 x 12.4 x 2.87 cm (4.88 x 4.88 x 1.13 inches)
Weight 137 g (4.83 oz)
Setting up the Gateway
Follow these steps to set up the gateway for the first time.
1. Download the HOBOmobile app.
Go to the App Store® or Google Play™ and download
HOBOmobile to your phone or tablet. Open the app and
enable Bluetooth in the device settings if prompted.
2. Set up HOBOlink settings in HOBOmobile.
a. Tap the Devices icon and then tap Gateways at the top
of the screen.
b. If you do not already have a HOBOlink account, tap the
ou’ll
receive an email to activate the new account. Return to
HOBOmobile when done.
c. In HOBOmobile, tap Use MX Gateways (or go to Settings
and then tap HOBOlink).
d. Enter your HOBOlink username and password and tap
Done. (Enable Upload Data if you are not prompted for
the username and password.)
e. Select “from a Gateway” for the default HOBOlink
upload setting.
3. Power up the gateway.
a. Insert the appropriate plug for your region into the AC
adapter. Connect the AC adapter to the gateway and
plug it in.
Plug in AC
adapter here
The CE Marking identifies this product as complying with all relevant
directives in the European Union (EU).
b. Wait for the gateway to boot up and appear in
HOBOmobile. While the gateway boots up, the LED on
the gateway will start as solid yellow and then switch to
blinking yellow. It will take 4 to 5 minutes before the
gateway appears in HOBOmobile.
4. Set up gateway network settings.
a. In HOBOmobile, tap Devices and then tap Gateways at
the top of the screen. Tap the gateway to connect to it.
Tap anywhere
in the row to
connect to the
gateway
If the gateway does not appear, make sure it is
completely powered up as described in step 3 and
within range of your phone or tablet.
b. To set up WiFi:
i. Tap Network Settings.
ii. Tap WiFi and then the arrow to open WiFi Settings.
iii. Select Use Current WiFi Network to use your phone
or tablet’s existing WiFI SSID and then type your
password. Tap Save.
iv. The gateway will automatically test the network
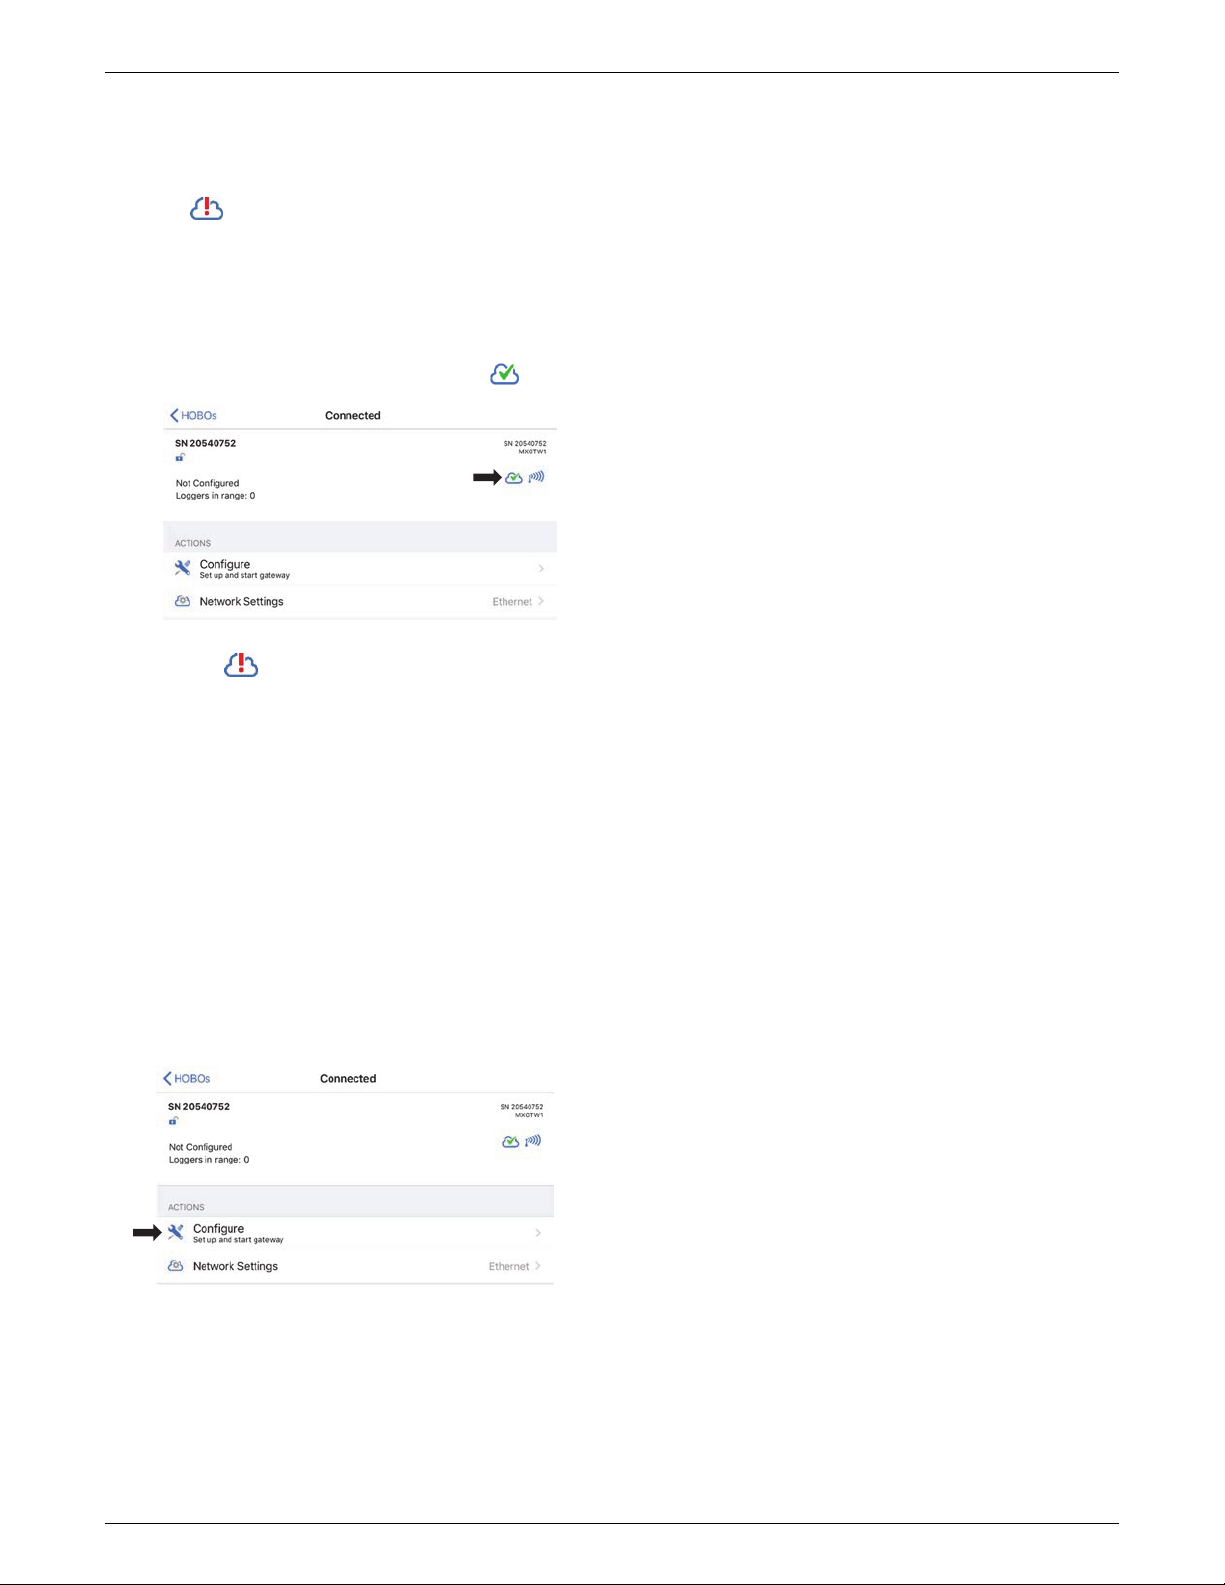
connection after saving the settings. The cloud icon
in HOBOmobile will display a green checkmark
once the network settings have been successfully
configured. If a message appears in the app
23470-D
Find Quality Products Online at: [email protected]
www.GlobalTestSupply.com
Page 2
HOBO MX Gateway Manual
prompting you to cycle the power on the gateway,
follow the instructions and remove the power cord
and then plug it back in after a couple of seconds. If
the test is not successful and this icon still appears
, make sure all your settings are entered
correctly and saved.
c. To set up Ethernet:
Plug in an Ethernet cable. The network settings are
automatically configured if your Ethernet connection is
using DHCP (dynamic IP addresses). The cloud icon in
HOBOmobile will display a green checkmark .
If your Ethernet uses static IP addresses and this icon
appears :
i. Tap Network Settings.
ii. Tap Ethernet and then the arrow to open Ethernet
Settings.
iii. Disable DHCP.
iv. Tap IP Address, Subnet Mask, and Router to edit the
addresses (consult your Network Administrator).
v. Tap Add DNS Server and enter an address. Repeat if
necessary (the app can store up to three DNS server
addresses).
vi. Tap Save.
5. Configure the gateway.
a. If HOBOmobile is not already connected to the gateway,
tap Devices and then tap the gateway to connect to it.
b. Tap Configure.
c. Enter a name for the gateway. The gateway serial
number will be used if no name is entered.
d. Tap Start.
6. Set up and start loggers.
MX series loggers must be configured to use them with the
gateway. If any of your loggers are already logging, you will
need to reconfigure them as described in the following
steps.
Note: MX100 series loggers are not supported by the
To configure a logger for use with the gateway:
a. Tap Devices, and then Loggers at the top of the screen.
b. Tap the logger to connect to it and then tap Configure.
c. Make sure “from a Gateway” is checked under Upload
Data to HOBOlink.
d. Choose other logger settings keeping in mind the
following:
• A logging interval of 5 minutes or slower is optimal for
the gateway, although it can support a logging interval
down to 1 minute (see Viewing Data Uploaded from
the Gateway for details).
• If you select a logging interval faster than 1 minute, the
data logged at the faster rate will not be available for
the gateway to upload. Use HOBOmobile to read out
the logger and retrieve this data.
• Burst logging and statistics are not supported by the
The gateway will regularly check loggers within range and
upload data to HOBOlink. See Viewing Data Uploaded from the
Gateway for details on working with data.
gateway. Use H
retrieve this data.
• For MX2200, MX2300, and MX2501 loggers, Bluetooth
is automatically enabled to ensure regular gateway
uploads can occur.
• The gateway uses Bluetooth Low Energy to
communicate over the air with loggers within range. If
MX2200 or MX2501 loggers or the top end of an
MX2001 logger is deployed in water, the gateway will
not be able to communicate with them.
e. Tap Start. See the HOBOmobile User’s Guide at
using HOBOmobile.
OBOmobile to re
ad out the logger and
for more details on
Deployment and Mounting Guidelines
Follow these guidelines when selecting a location to place the
gateway:
• The gateway requires AC power and an internet
connection. Select a location for the gateway that is near
an AC outlet and an Ethernet port (if using Ethernet) or
within range of your WiFi router (if using WiFi).
• The range for successful wireless communication between
the gateway and loggers is approximately 30.5 m (100 ft)
with full line-of-sight. If there are obstacles between the
gateway and the loggers, such as walls or metal objects,
the connection may be intermittent and the range
between loggers and the gateway will be decreased. Test
the range by positioning your phone or tablet where you
want to deploy the gateway. If the phone or tablet can
connect to a logger with HOBOmobile from that location,
then the gateway should be able to connect to the logger
as well.
• If you are mounting the gateway on a wall or other flat
surface, mount the face of the gateway towards the
coverage area with the logo oriented horizontally as
Find Quality Products Online at: [email protected]
www.GlobalTestSupply.com
Page 3
HOBO MX Gateway Manual
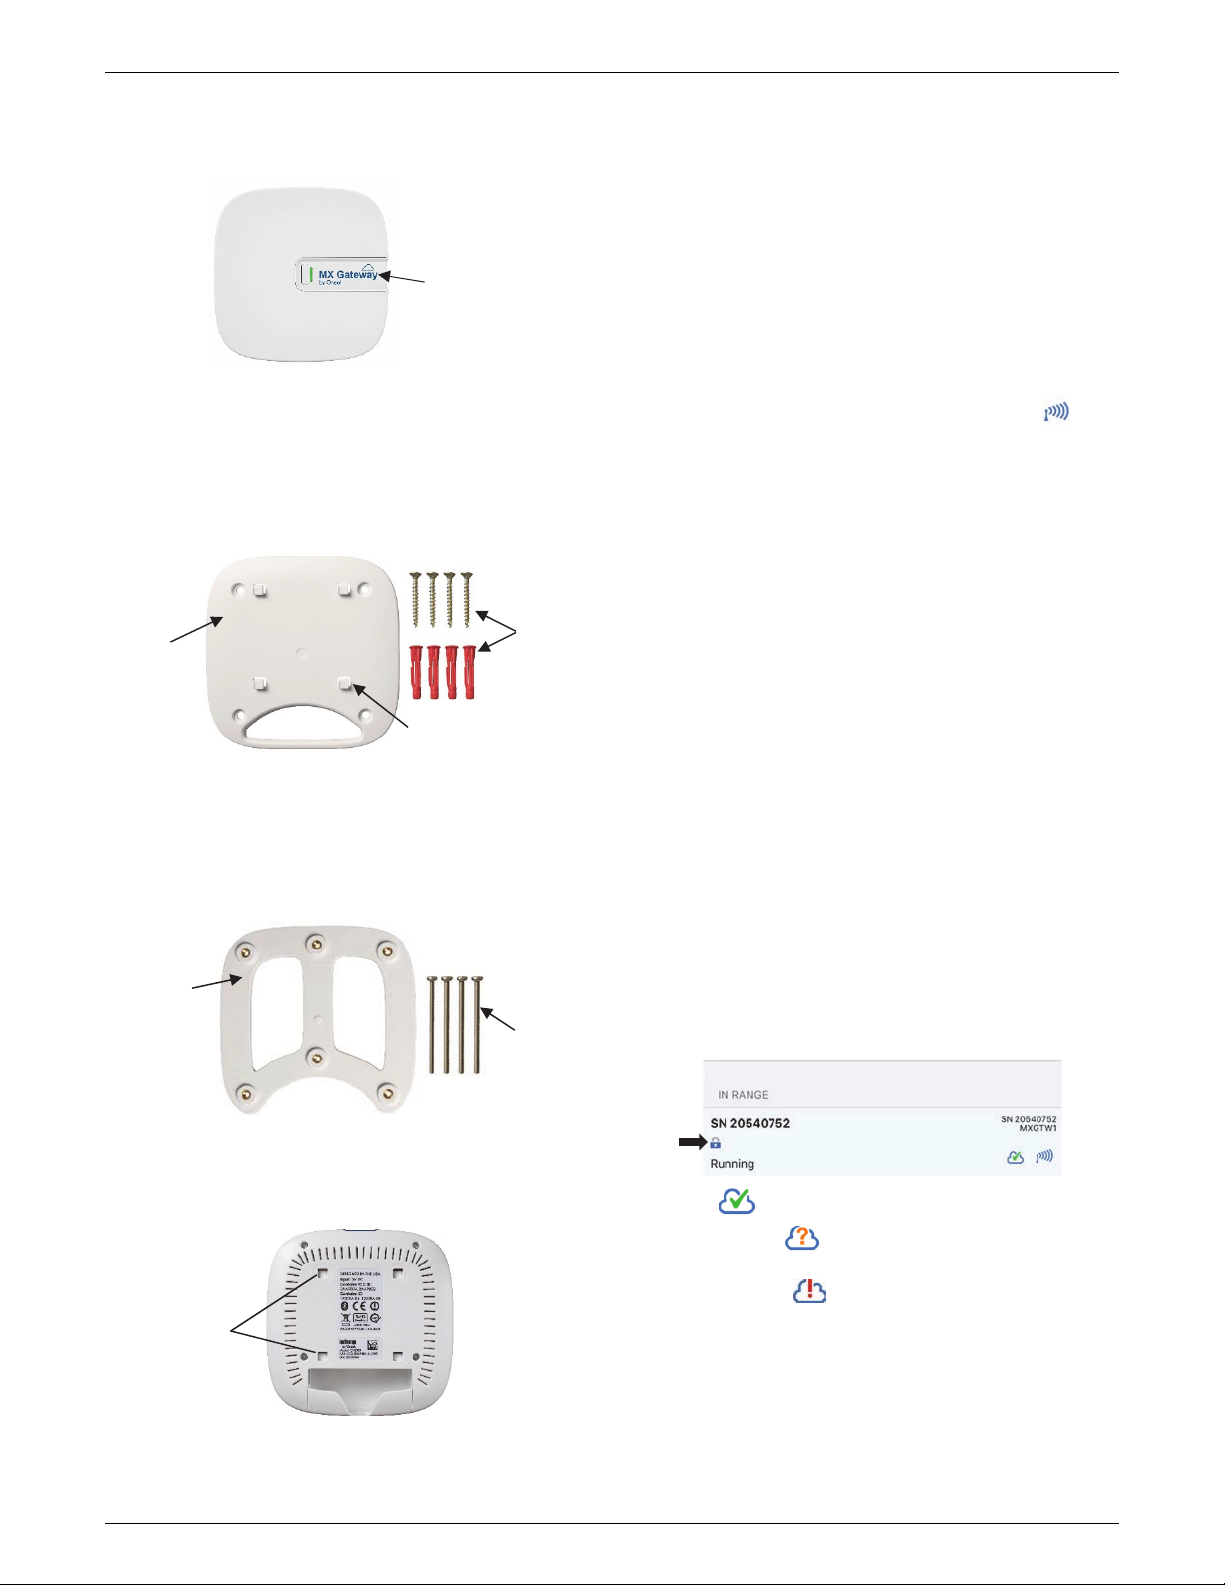
shown below for optimal signal strength. Also mount away
from the corners where walls meet and above the tallest
obstructions in the room.
For wall mounting,
position the gateway
facing the coverage
area with the logo
oriented as shown
• If you are mounting the gateway on a ceiling, place it on
the lowest available mounting point facing downwards for
optimal signal strength. Also mount away from HVAC ducts
and below I-beams or support beams.
• Use the enclosed mounting kit to mount the gateway to a
flat surface. Use the self-tapping screws and anchors to
affix the gateway mounting plate to a wall or ceiling.
Gateway
mounting
plate
One of four clips to
attach to gateway
Self-tapping
screws and
anchors
If you are mounting the gateway on a wooden surface, use
both the gateway mounting plate and the mounting
bracket shown below. Place the gateway mounting plate
over the mounting bracket so the holes are aligned. Use
the machine screws to affix it the surface (you may need
to drill pilot holes in the surface first).
Mounting
bracket;
attach to
mounting
plate above
Machine
screws
Connecting to the Gateway
To connect to the gateway with your phone or tablet:
1. In HOBOmobile, tap Devices and then tap Gateways at the
top of the screen.
2. Tap the gateway in the list to connect to it.
If the gateway does not appear in the list or if it is having
trouble connecting, follow these tips:
• Make sure the gateway is within range of your phone or
tablet when connecting to it. If your mobile device can
connect to the gateway intermittently or loses its
connection, move closer to the gateway, within sight if
possible. Check the gateway signal strength icon in the
app to make sure there is a strong signal between the
phone and the gateway. The more blue bars, the stronger
the signal.
• Change the orientation of your phone or tablet to ensure
the antenna in your device is pointed toward the gateway
(refer to your device’s manual for the antenna location).
Obstacles between the antenna in the device and the
gateway may result in intermittent connections.
• Wait a few minutes and then try to connect again. The
gateway will not be displayed in HOBOmobile when it is
booting or when an automatic firmware upgrade is
underway.
• If you recently powered up the gateway and the LED is
continuously flashing, but the gateway is not displayed in
HOBOmobile, then disconnect the power from the
gateway and plug it back in. The gateway should then
appear in HOBOmobile after it powers back up.
Once your phone or tablet is connected to the gateway, you
can check how many loggers are in range. You can also select
one of the following actions:
• Configure. Enter a gateway name and tap Start.
• Network Settings. Change the Ethernet or WiFi settings.
When the gateway is configured, it is automatically locked to
prevent unauthorized wireless access. Press the button next to
the LED on the gateway for at least 10 seconds to reset or
unlock the gateway.
Once the gateway mounting plate is in place on the wall or
other flat surface, use the four holes on the back of the
gateway to attach it to the four clips on the mounting
plate.
This icon indicates the gateway is connected to the
internet. This icon indicates the gateway is currently not
connected likely due to a temporary outage. If the problem
persists or this icon appears, connect to the gateway and
Use these holes
to attach the
gateway to the
clips on the
mounting plate
Find Quality Products Online at: [email protected]
www.GlobalTestSupply.com
check your network settings to make sure no changes are
necessary.
Page 4

HOBO MX Gateway Manual
Monitoring the Gateway
A heartbeat is regularly sent from the gateway to HOBOlink to
make sure the gateway is still active. If no heartbeat is sent
after 15 minutes, then the gateway status will change from OK
to missing. The gateway will continue downloading the loggers
even if it is not able to connect to HOBOlink. The data will be
stored temporarily in the gateway and uploaded the next time
it is able to connect to HOBOlink.
To check the status of the gateway in HOBOlink, click Devices
and then click MX Devices. Each gateway is listed by name and
serial number with the status and the last time data was
uploaded with the gateway.
You can also set up an alarm to notify you via text or email
when a gateway is missing or when the loggers that are being
monitored by the gateway are missing, tripped an alarm, or
have low batteries.
To set up a gateway alarm:
1. In HOBOlink, click Devices and then click MX Devices.
2. Click Configure Gateway Alarms.
3. Click Add New Alarm.
3. Select a gateway.
4. Select the alarms you want to add for the gateway:
• Missing gateway. A gateway has not sent a heartbeat to
HOBOlink for 15 minutes.
• Missing logger. A logger has not been found by the
gateway for 30 minutes.
• Logger alarm. A logger being monitored by the gateway
has tripped or cleared a sensor alarm.
• Logger low battery. A logger being monitored by the
gateway has a low battery.
5. Select whether you want gateway alarm notifications sent
via email or text.
6. Enter the email address or country code destination plus
cell number.
7. Click Save Alarms.
Viewing Data Uploaded from the Gateway
A running gateway uses Bluetooth to regularly monitor loggers
within range that have been configured for use with the
gateway. New logger data received by the gateway is then
uploaded via WiFi or Ethernet to HOBOlink every 5 minutes.
To check when the latest data was uploaded, click Devices and
then MX Devices. In the MX Devices table, look for the logger
(by name, serial number, and/or model number) and check the
last sensor reading listed. You can also see the date and time
the logger was configured and which gateway uploaded the
data.
To view logger data uploaded to HOBOlink from the gateway:
• Set up a dashboard for real-time monitoring of the
conditions where the logger is located.
• Export the data to a file.
• Set up a data delivery schedule so that uploaded data is
automatically delivered to you via email or FTP on a
schedule you specify.
See the HOBOlink Help for details on how to set up a
dashboard, export data, or create a data delivery schedule.
Notes:
• A logging interval of 5 minutes or slower is optimal for the
gateway, although it can support a logging interval down
to 1 minute. If the logging interval is set from 1 minute up
to 5 minutes, there may be occasional missing individual
data points in exported files. Both the gateway and loggers
regularly “advertise” or send out Bluetooth signals. The
rate at which these signals are sent may differ between
the gateway and the loggers and can result in occasional
data points not being uploaded. Use HOBOmobile to read
out the logger and generate a report with all data points
for the current deployment.
• No data will be uploaded for loggers configured with
logging intervals faster than 1 minute. If your deployment
requires logging faster than 1 minute, use HOBOmobile to
read out the logger and generate a report with this data.
• Burst logging and statistics are not supported by the
gateway. If you configured the logger with these settings,
use HOBOmobile to read out the logger and create a
report with any burst logging data and statistics.
If no data is appearing in HOBOlink, do the following:
• Check the gateway status in HOBOlink. If the gateway is
missing, check to make sure it is plugged in, the network
settings are correct, and it is within range of the loggers.
• If you just set up a gateway and configured loggers, it may
take a few minutes before data begins appearing in
HOBOlink. Wait a few minutes and then check HOBOlink
again.
• Make sure the logger was configured with “from a
Gateway” selected under Upload Data to HOBOlink. If you
selected “from HOBOlink” instead of “from a Gateway,”
then data will only be uploaded to HOBOlink when you
read out the logger with your phone or tablet. The
gateway will not monitor the logger and upload data when
“from HOBOlink” is selected.
• Check that you are logged into the same HOBOlink
account that you used to set up the gateway in
HOBOmobile.
• Make sure the loggers have started logging and are not
waiting for a delayed start or a push button start.
• Make sure the logger is not deployed in water. The
gateway cannot communicate with loggers while they are
deployed in water.
Gateway Firmware Updates
Occasional automatic firmware updates may be necessary for
the gateway. While the firmware update is taking place, devices
will not be able to connect to the gateway and no data will be
uploaded to HOBOlink. The LED on the gateway will blink
yellow while the firmware update is underway. The update
should only last a few minutes and then the gateway will
resume normal operation.
Find Quality Products Online at: [email protected]
www.GlobalTestSupply.com
Page 5
HOBO MX Gateway Manual
Resetting the Gateway
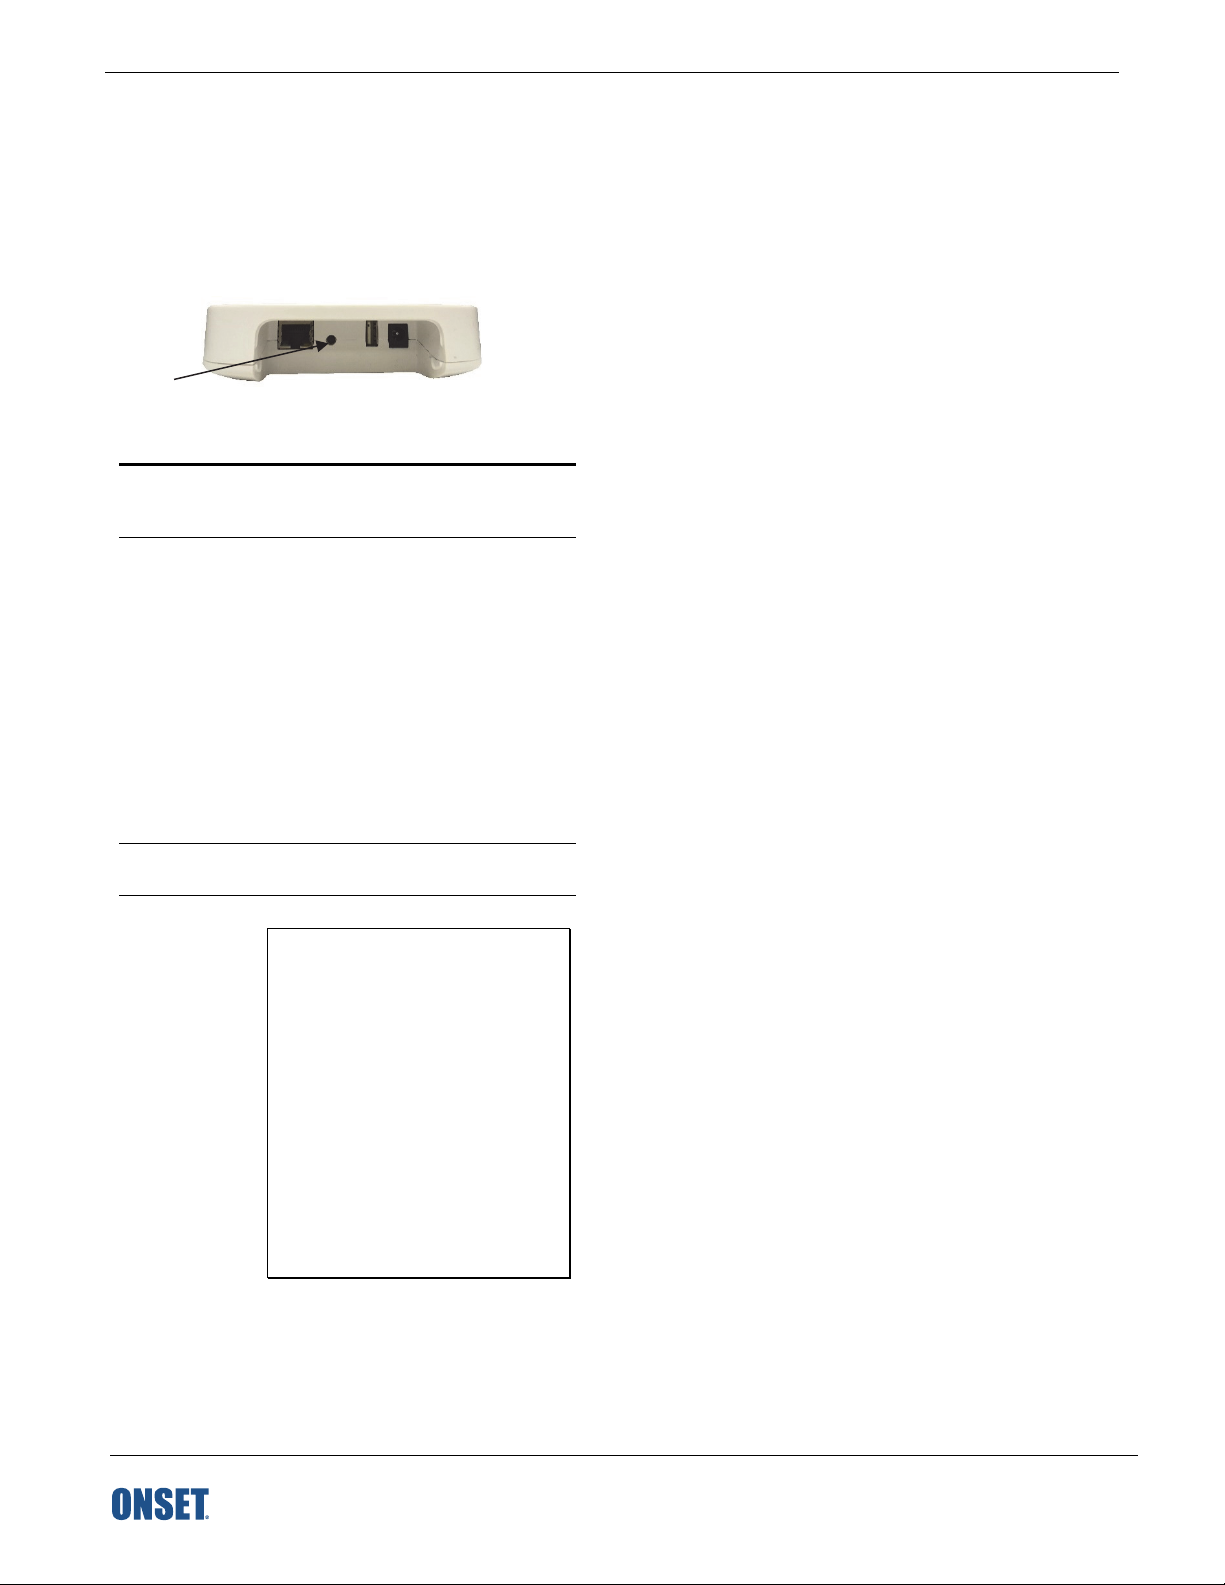
There is a reset button on the back of the gateway next to the
Ethernet port as shown below. You may be directed to press
this button by Onset Technical Support if you are experiencing
problems with the gateway. Refer to the table below for the
action taken by the gateway when the reset button is pressed
for varying lengths of time.
Reset
button
When you press
the reset button
like this: The gateway does this:
Quick press, less
than 2 seconds
Short press,
2–4 seconds
Long press,
10–15 seconds
Very long press,
greater than 30
seconds (NOT
RECOMMENDED)
Soft reboot. This restarts the operating
system on the gateway without interrupting
power.
Network reset. This clears all connections
configured by the gateway and requires the
button to be pressed for 2 to 4 seconds. To
aid the timing of the network reset, the LED
quickly flashes yellow to indicate the
window when the button should be
released. When the button is released
during that window, the LED will quickly
flash green to confirm the network reset
operation has been triggered. If you release
the button after 4 seconds, the LED will
return to the behavior it displayed before
quickly flashing yellow. If you release the
button between 4 and 8 seconds, no actions
(reboot or reset) are performed.
Hard reboot. This resets the processor and
restarts the gateway operating system.
Factory reset.
Important: This should not be performed
unless instructed by Onset Technical
Support. Factory reset will wipe all data
from the gateway and reinstall the
operating system. If the gateway loses
power during the reinstall process, the
installation might be corrupted and the
gateway rendered inoperable. If you
perform a factory reset, do not remove
power while the LED is solid yellow. In
addition, you must install an Ethernet
cable after performing a factory reset,
even if your gateway is normally
configured for Wi-Fi. The Ethernet cable
must remain installed with the gateway
powered until the reinstallation process
completes, which may take up to 2 hours.
© 2019 Onset Computer Corporation. All rights reserved. Onset, HOBO, and HOBOlink are registered trademarks of Onset Computer
Corporation. App Store is a service mark of Apple Inc. Android and Google Play are trademarks of Google LLC. Bluetooth is a registered
Find Quality Products Online at: [email protected]
www.GlobalTestSupply.com
trademark of Bluetooth SIG, Inc. All other trademarks are the property of their respective companies.
23470-D
 Loading...