

Onset UX100-011 User Manual
HOBO® Temp/RH 2.5% Data Logger (UX100-011) Manual
The HOBO Temp/RH data logger records temperature and relative humidity (within 2.5%
accuracy) in indoor environments with its integrated sensors. Using HOBOware®, you can easily
configure the logger alarm to trip for specific high or low sensor readings. Or, you can set up burst
logging in which the logger records data at a different interval during certain conditions. The
logger can also calculate minimum, maximum, average, and standard deviation statistics. This
compact data logger has a built-in LCD screen to monitor the current temperature, relative
humidity, logging status, battery use, and memory consumption in between readouts.
Specifications
Temperature Sensor
Range -20° to 70°C (-4° to 158°F)
HOBO Temp/RH 2.5%
Data Logger
UX100-011
Included Items:
• Command™ strip
• Double-sided tape
• Hook & loop strap
Required Items:
• HOBOware 3.4 or later
• USB cable (included with
software)
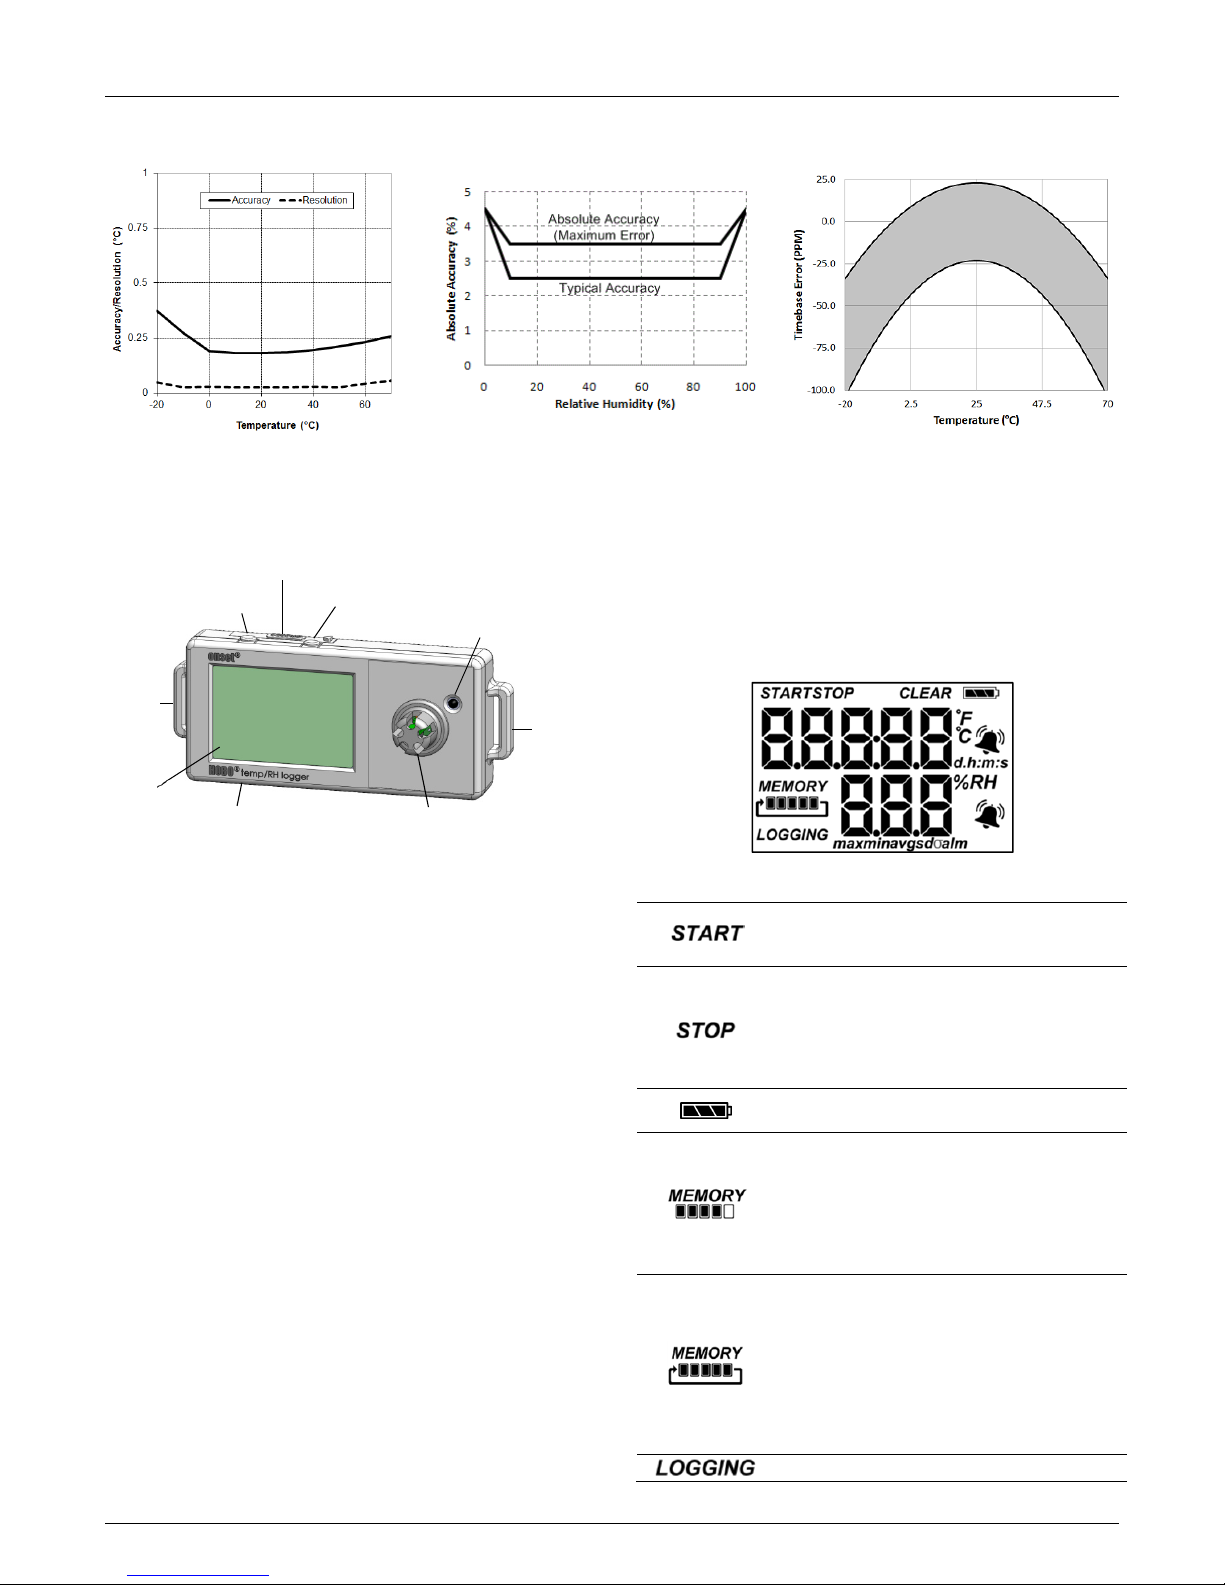
Accuracy ±0.21°C from 0° to 50°C (±0.38°F from 32° to 122°F), see Plot A
Resolution 0.024°C at 25°C (0.04°F at 77°F), see Plot A
Response Time 4 minutes in air moving 1 m/s (2.2 mph)
Drift <0.1°C (0.18°F) per year
RH Sensor
Range 1% to 95% (non-condensing)
Accuracy ±2.5% from 10% to 90% typical to a maximum of ±3.5% including
Resolution 0.05% at 25°C (77°F)
Response Time 11 seconds to 90% in airflow of 1 m/s (2.2 mph)
Drift <1% per year typical
Logger
Logger Operating Range Logging: -20° to 70°C (-4° to 158°F); 0 to 95% RH (non-condensing)
Logging Rate 1 second to 18 hours, 12 minutes, 15 seconds
Logging Modes Fixed interval (normal), burst, or statistics
Memory Modes Wrap when full or stop when full
Start Modes Immediate, push button, date & time, or next interval
Stop Modes When memory full, push button, or date & time
Restart Mode Push button
Time Accuracy ±1 minute per month at 25°C (77°F), see Plot C
Power Source One 3V CR2032 lithium battery and USB cable
Battery Life 1 year, typical with logging rate of 1 minute and sampling interval of
Memory 128 KB (84,650 measurements, maximum)
Download Type USB 2.0 interface
Full Memory Download Time 20 seconds
LCD LCD is visible from 0° to 50°C (32° to 122°F); the LCD may react slowly
Size 3.66 x 8.48 x 2.29 cm (1.44 x 3.34 x 0.9 in.)
Weight 30 g (1.06 oz)
Environmental Rating IP50
hysteresis, see Plot B
Launch/Readout: 0° to 50°C (32° to 122°F) per USB specification
15 seconds or greater
or go blank in temperatures outside this range
The CE Marking identifies this product as complying with all relevant
directives in the European Union (EU).
16210-G
HOBO Temp/RH 2.5% Data Logger (UX100-011) Manual
Specifications (continued)
Plot A: Temperature
Accuracy and Resolution
Logger Components and Operation
Battery Tray
Start/Stop Button
Mounting
Loop
LCD Screen
USB Port
Start/Stop Button: Press this button for 3 seconds to start or
stop logging data, or to resume logging on the next even
logging interval. This requires configuring the logger in
HOBOware with a push button start or stop, and with “Resume
logging on next button push” selected (see Setting up the
Logger). You can also press this button for 1 second to record
an internal event (see Recording Internal Logger Events) or to
turn the LCD screen on if the option to turn off the LCD has
been enabled (see Setting up the Logger).
Battery Tray: Remove the battery tray on the top of the logger
to access the logger battery (see Battery Information).
Alarm/Stats Button: Use this button to clear a tripped alarm
(see Setting up Alarms) or to switch between statistics, alarm
readings, and the current sensor readings.
Mounting Loops: Use the two mounting loops to mount the
logger with the hook-and-loop strap (see Mounting the Logger).
Temperature Sensor: This sensor is located to the right of the
RH sensor.
RH Sensor: The RH sensor is housed in the cap to the right of
the LCD screen.
USB Port: Use this port (not visible in the diagram) to connect
the logger to the computer or the HOBO U-Shuttle via USB
cable (see Setting up the Logger and Reading Out the Logger).
Alarm/Stats Button
Temperature
Sensor
RH Sensor
Plot B: RH Accuracy
LCD Screen: This logger is equipped with an LCD screen that
displays details about the current status. This example shows all
symbols illuminated on the LCD screen followed by definitions
of each symbol in the table below.
Mounting
Loop
LCD Symbol Description
Plot C: Time Accuracy
The logger is waiting to be launched. Press and
hold the Start/Stop button for 3 seconds to launch
the logger.
The logger has been launched with a push button
stop enabled; press and hold the Start/Stop
button for 3 seconds to stop the logger. Note: If
you also launched the logger with a push button
start, this symbol will not appear on the display for
30 seconds.
The battery indicator shows the approximate
battery power remaining.
The logger has been configured to stop logging
when memory fills. The memory bar indicates the
approximate space remaining in the logger to
record data. When first launched, all five segments
in the bar will be empty. In this example, the
logger memory is almost full (only one segment in
the memory bar is empty).
The logger has been configured to never stop
logging (wrapping). The logger will continue
recording data indefinitely, with newest data
overwriting the oldest data. When first launched,
all five segments in the memory bar will be empty.
In this example, the memory is full (all five
segments are filled in) and new data is now
overwriting the oldest data. This will continue until
the logger is stopped or the battery runs out.
The logger is currently logging.
1-800-LOGGERS 2 www.onsetcomp.com
HOBO Temp/RH 2.5% Data Logger (UX100-011) Manual
LCD Symbol Description
A sensor reading is above or below the high or low
alarm that you configured. Press and release the
Alarm/Stats button until the “alm” symbol
(described below) is displayed on the screen. This
symbol at left will clear depending on how alarms
were configured in HOBOware. If the alarm was
configured to clear when the logger is relaunched,
this symbol will remain on the LCD. Otherwise, it
will clear when the sensor reading is back within
the alarm limits or by pressing the Alarm/Stats
button for 3 seconds.
An alarm is ready to be cleared. This will only
appear if “Cleared with button press” was selected
in the HOBOware alarm settings. Press the
Alarm/Stats button for 3 seconds to clear the
alarm.
These symbols show the maximum, minimum,
average, and standard deviation values most
recently calculated for the logger (if the logging
mode has been set to Statistics in HOBOware).
Press the Alarm/Stats button for 1 second to cycle
through each of the available statistics and then
back to the current sensor reading (or to the alarm
value if applicable).
This is the sensor reading that tripped the alarm.
Press the Alarm/Stats button to view this reading.
Press the Alarm/Stats button again to cycle
through any statistics (defined above) and
ultimately back to the current sensor reading.
This is an example of a temperature reading.
Temperature units are determined by the settings
in HOBOware. To switch between Celsius and
Fahrenheit, change the Display Preferences in
HOBOware before launching the logger.
This is an example of an RH reading.
The logger has been configured to start logging on
a particular date/time. The display will count down
in days, hours, minutes, and seconds until logging
begins. In this example, 5 minutes and 38 seconds
remain until logging will begin.
The launch settings are being loaded onto the
logger from HOBOware. Do not disconnect the
USB cable during this process.
An error occurred while loading the launch
configurations onto the logger from HOBOware.
Make sure the USB cable is connected to both the
logger and the computer and try launching again.
The logger has been stopped with HOBOware or
because the memory is full.
Notes:
• You can disable the LCD screen when logging. Select
“Turn LCD off” when setting up the logger as described in
the next section. When this option is enabled, you can
still temporarily view the LCD screen by pushing the
Start/Stop button for 1 second. The LCD will then remain
on for 10 minutes.
• The LCD screen refreshes every 15 seconds regardless of
the logging interval selected in HOBOware. If you choose
a logging interval less than 15 seconds, the data will be
recorded at the faster interval, but the sensor readings
will only be updated on the screen every 15 seconds.
• When the logger has stopped logging, the LCD screen will
remain on until the logger is offloaded to a computer or
HOBO U-Shuttle (unless launched with the “Turn LCD off”
option). Once the logger has been offloaded and
disconnected from the computer, the LCD will turn off
automatically after 2 hours. The LCD will turn back on the
next time the logger is connected to the computer.
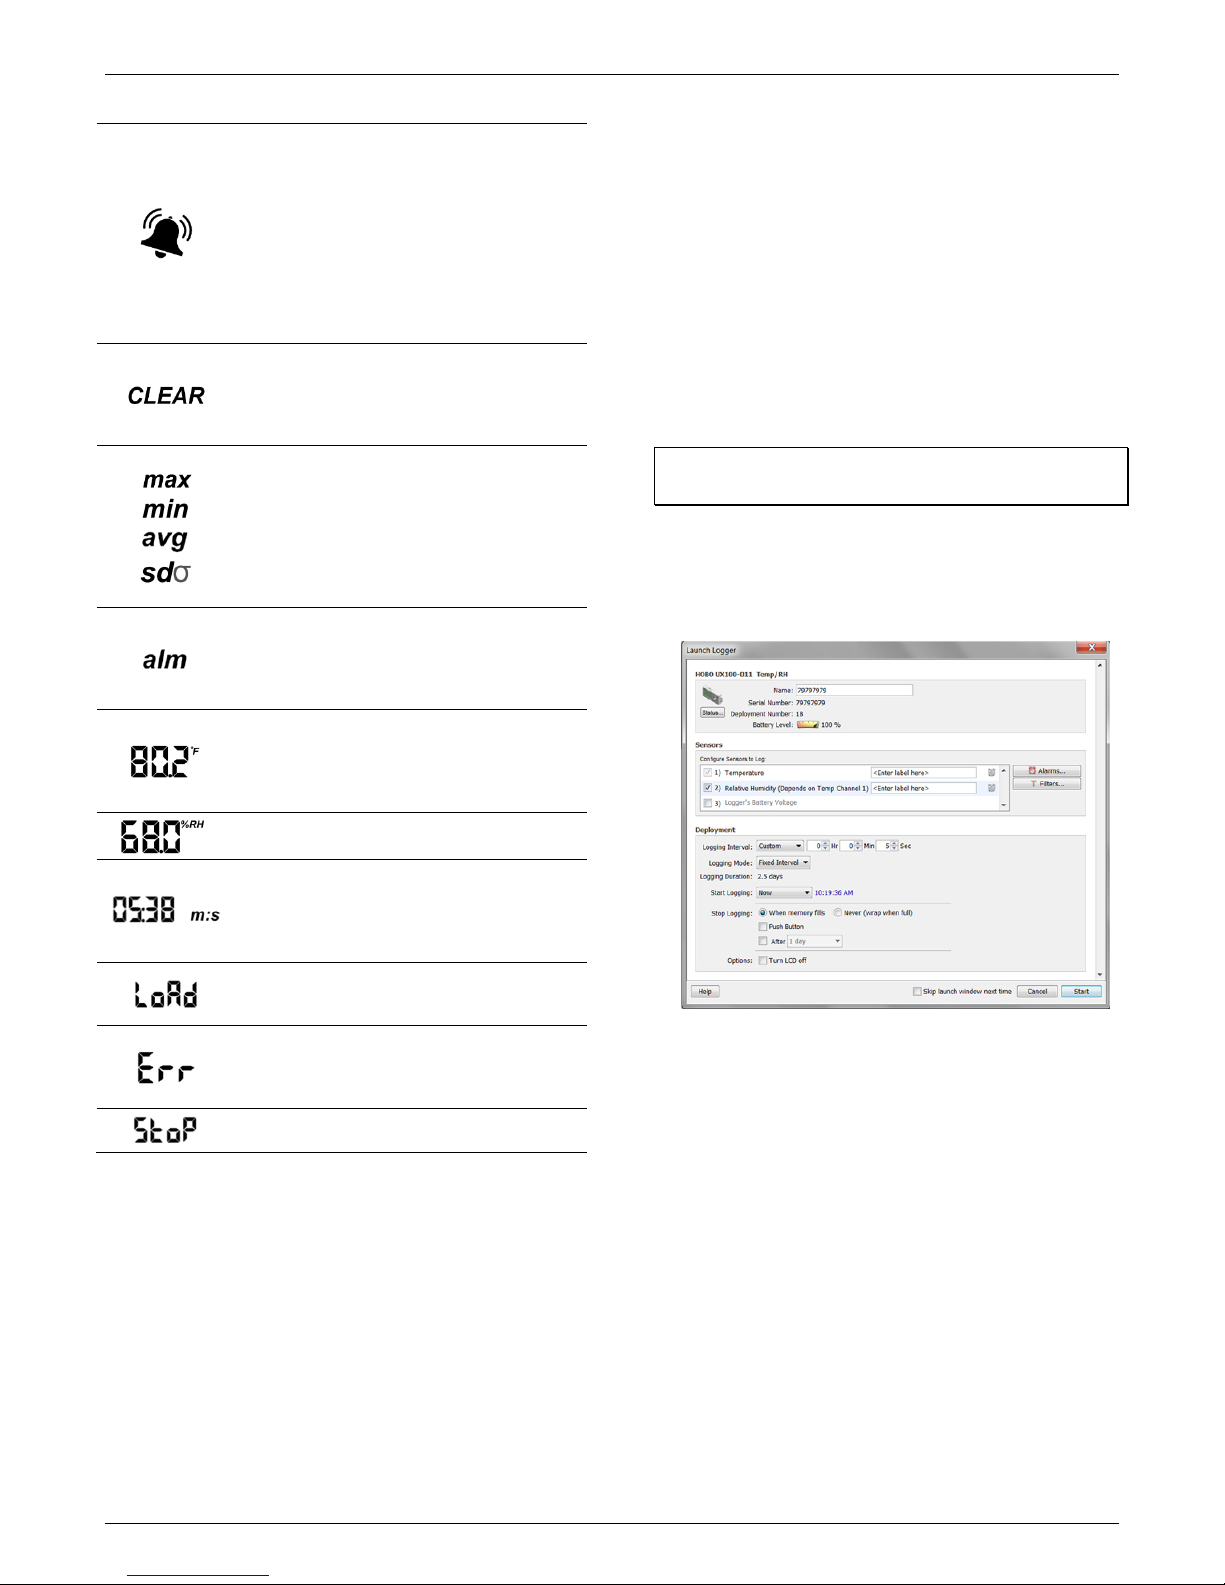
Setting up the Logger
Use HOBOware to set up the logger, including setting alarms,
selecting the options to start and stop logging, and choosing a
logging mode.
1. Connect the logger and open the Launch Logger window.
To connect the logger to a computer, use the cable
provided. Click the Launch icon on the HOBOware toolbar
or select Launch from the Device menu.
Important: USB 2.0 specifications do not guarantee
operation outside the range of 0°C (32°F) to 50°C (122°F).
2. Select the sensors to log in this deployment. Choose
Temperature or Temperature and RH. Type a label for the
sensor(s) if desired. Note that both sensors are required to
calculate dew point, which is an additional data series
available for plotting after reading out the logger.
3. Set up alarms (optional). Click the Alarms button if you
want to configure an alarm to trip when the sensor reading
is above or below a value you specify. See Setting up Alarms
for details.
4. Configure filters (optional). Click the Filters button to
create additional filtered data series. Any filtered series will
be available automatically upon reading out the logger.
5. Select the Logging Interval. Select a logging interval from 1
second to a maximum of 18 hours, 12 minutes, and 15
seconds.
6. Select the Logging Mode:
• Fixed Interval. In Fixed Interval mode, data will always be
recorded at the regular logging interval set in the
previous step. This is the default setting.
• Burst. In Burst mode, logging will occur at a different
interval when a specified condition is met. See Burst
Logging for more information.
• Statistics. In Statistics mode, maximum, minimum,
average, and standard deviation statistics are calculated
1-800-LOGGERS 3 www.onsetcomp.com
 Loading...