

Page 1
HRB-U30-S100
Replacement Batteries
Important Lead Acid Battery Information
Use protective eye wear when testing, charging and/or
handling the batteries.
Do not attempt to disassemble batteries.
Contact with sulfuric acid may cause harm. Should contact
occur, wash skin and/or clothes with liberal amounts of water.
Do not throw batteries into fire; batteries so disposed may
rupture or explode.
Disassembled batteries are hazardous waste and must be
treated accordingly.
Dispose of old batteries per local regulations.
Doc #: 12696-E, Part #: MAN-HRB-U30
1
Before You Begin - Testing the Battery
Before you install the battery, use a voltmeter to make sure it has an
adequate charge. If the charge is less than 3.0 volts, charge the battery
externally with a current-limited variable power supply.
Hold the battery across a constant voltage source of 4.5 volts with a current
limit of 1 Amp. It takes up to 24 hours to fully charge a dead battery.
IMPORTANT: Do not apply more than 4.6 volts absolute maximum to the
battery. Do not exceed 1 Amp of current when charging. If the battery gets
hot, immediately stop charging the battery.
Inside this Package
- Replacement battery (1)
Page 2
Replacing the Battery
Follow these steps to replace the battery:
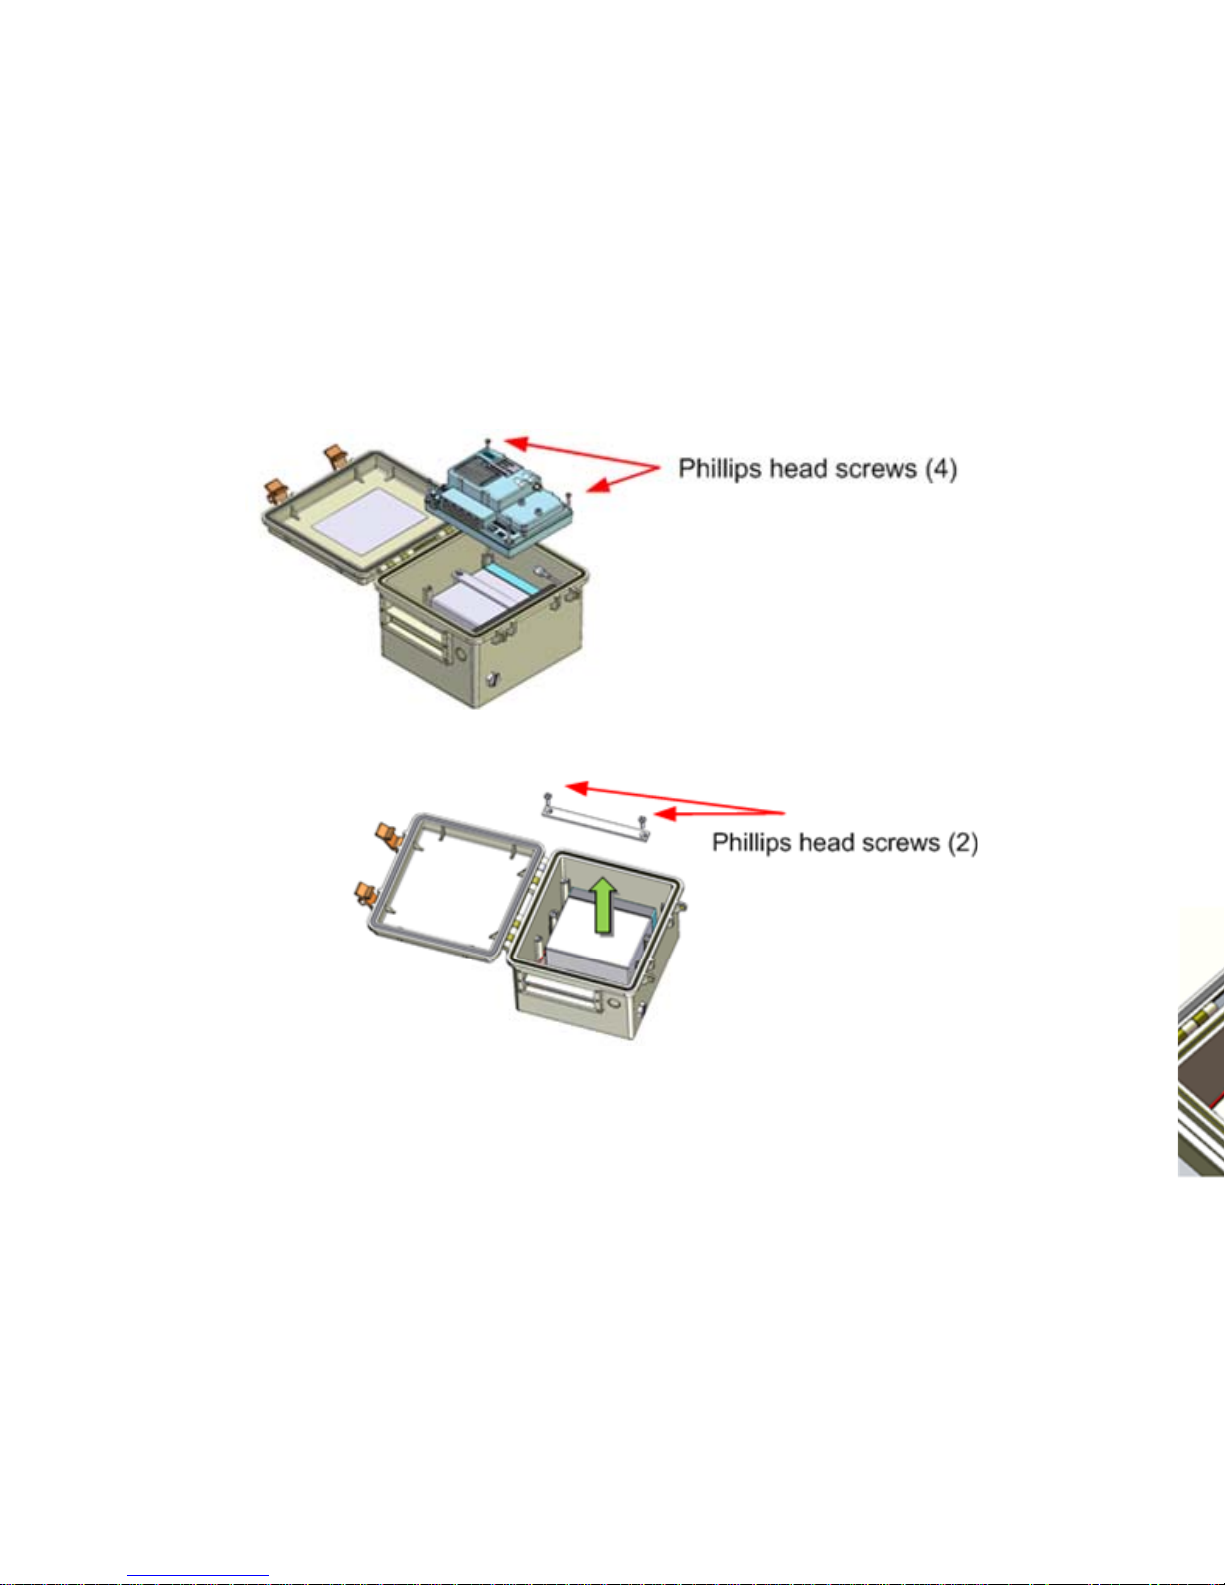
1. Open the U30 enclosure and disconnect the external power source (AC adapter
or solar panel) first, then the battery, and finally any Smart Sensors. For U30/GSM
and U30/Wi-Fi models, use a 5/16” wrench to unscrew the antenna connection.
For the U30/Ethernet model, disconnect the Ethernet cable.
2. Use a Phillips-head screwdriver to remove the four screws at the corners of the
logger (clear inner case), and then remove the logger.
3. Use a Phillips-head screwdriver to remove the bar that secures the battery.
4. Remove the battery. Remove the cable from the old battery.
5. Remove the protective caps from the terminals of the replacement battery.
7. Install the battery with the positive (+) terminal towards the upper right corner of
the case. Insert the battery at an angle, with the bottom against the shelf in the
case, as shown. Press the battery down flat into place and then push it to the right
to make room for the cable. Make sure the cable is positioned as shown below,
routed between the battery and center left post. This ensures the cable will be able
to reach the battery connector on the logger when that is added back in later.
2 3
6. Connect the red wire of the cable to the positive (+) terminal and the black wire
to the negative (-) terminal. Terminals are color coded. ALWAYS confirm polarity.
Page 3

7. Install the battery with the positive (+) terminal towards the upper right corner of
the case. Insert the battery at an angle, with the bottom against the shelf in the
case, as shown. Press the battery down flat into place and then push it to the right
to make room for the cable. Make sure the cable is positioned as shown below,
routed between the battery and center left post. This ensures the cable will be able
to reach the battery connector on the logger when that is added back in later.
6. Connect the red wire of the cable to the positive (+) terminal and the black wire
to the negative (-) terminal. Terminals are color coded. ALWAYS confirm polarity.
Page 4

Important Lead Acid Battery Information
Use protective eye wear when testing, charging and/or
handling the batteries.
Do not attempt to disassemble batteries.
Contact with sulfuric acid may cause harm. Should contact
occur, wash skin and/or clothes with liberal amounts of water.
Do not throw batteries into fire; batteries so disposed may
rupture or explode.
Disassembled batteries are hazardous waste and must be
treated accordingly.
Dispose of old batteries per local regulations.
IMPORTANT: Re-charging battery when not in use
Due to the self-discharge characteristics of this type of battery, if the
battery is not being actively used it is imperative that you charge the
battery for at least 12 hours every six months, at a minimum. Otherwise,
permanent loss of battery capacity may occur.
8. Re-install the battery bar. If the bar has foam on one side, make
sure the foam side faces down.
CAUTION: Make sure the battery cable is routed below the battery
bar as shown to avoid possible shorting hazard!
9. Re-install the logger into the enclosure. For U30/GSM and U30/Wi-Fi
models, reconnect the antenna. For the U30/Ethernet model, reconnect
the Ethernet cable. Plug in the Smart Sensors first, then the battery, and
finally the external power source (AC adapter or solar panel).
10. Dispose of the old battery per local regulations.
4
Before You Begin - Testing the Battery
Before you install the battery, use a voltmeter to make sure it has an
adequate charge. If the charge is less than 3.0 volts, charge the battery
externally with a current-limited variable power supply.
Hold the battery across a constant voltage source of 4.5 volts with a current
limit of 1 Amp. It takes up to 24 hours to fully charge a dead battery.
IMPORTANT: Do not apply more than 4.6 volts absolute maximum to the
battery. Do not exceed 1 Amp of current when charging. If the battery gets
hot, immediately stop charging the battery.
Inside this Package
- Replacement battery (1)
 Loading...