

Page 1
EVBUM2497/D
IoT Development Kit (IDK)
Quick Start Guide
Getting Started with the IoT Development
Kit from ON Semiconductor
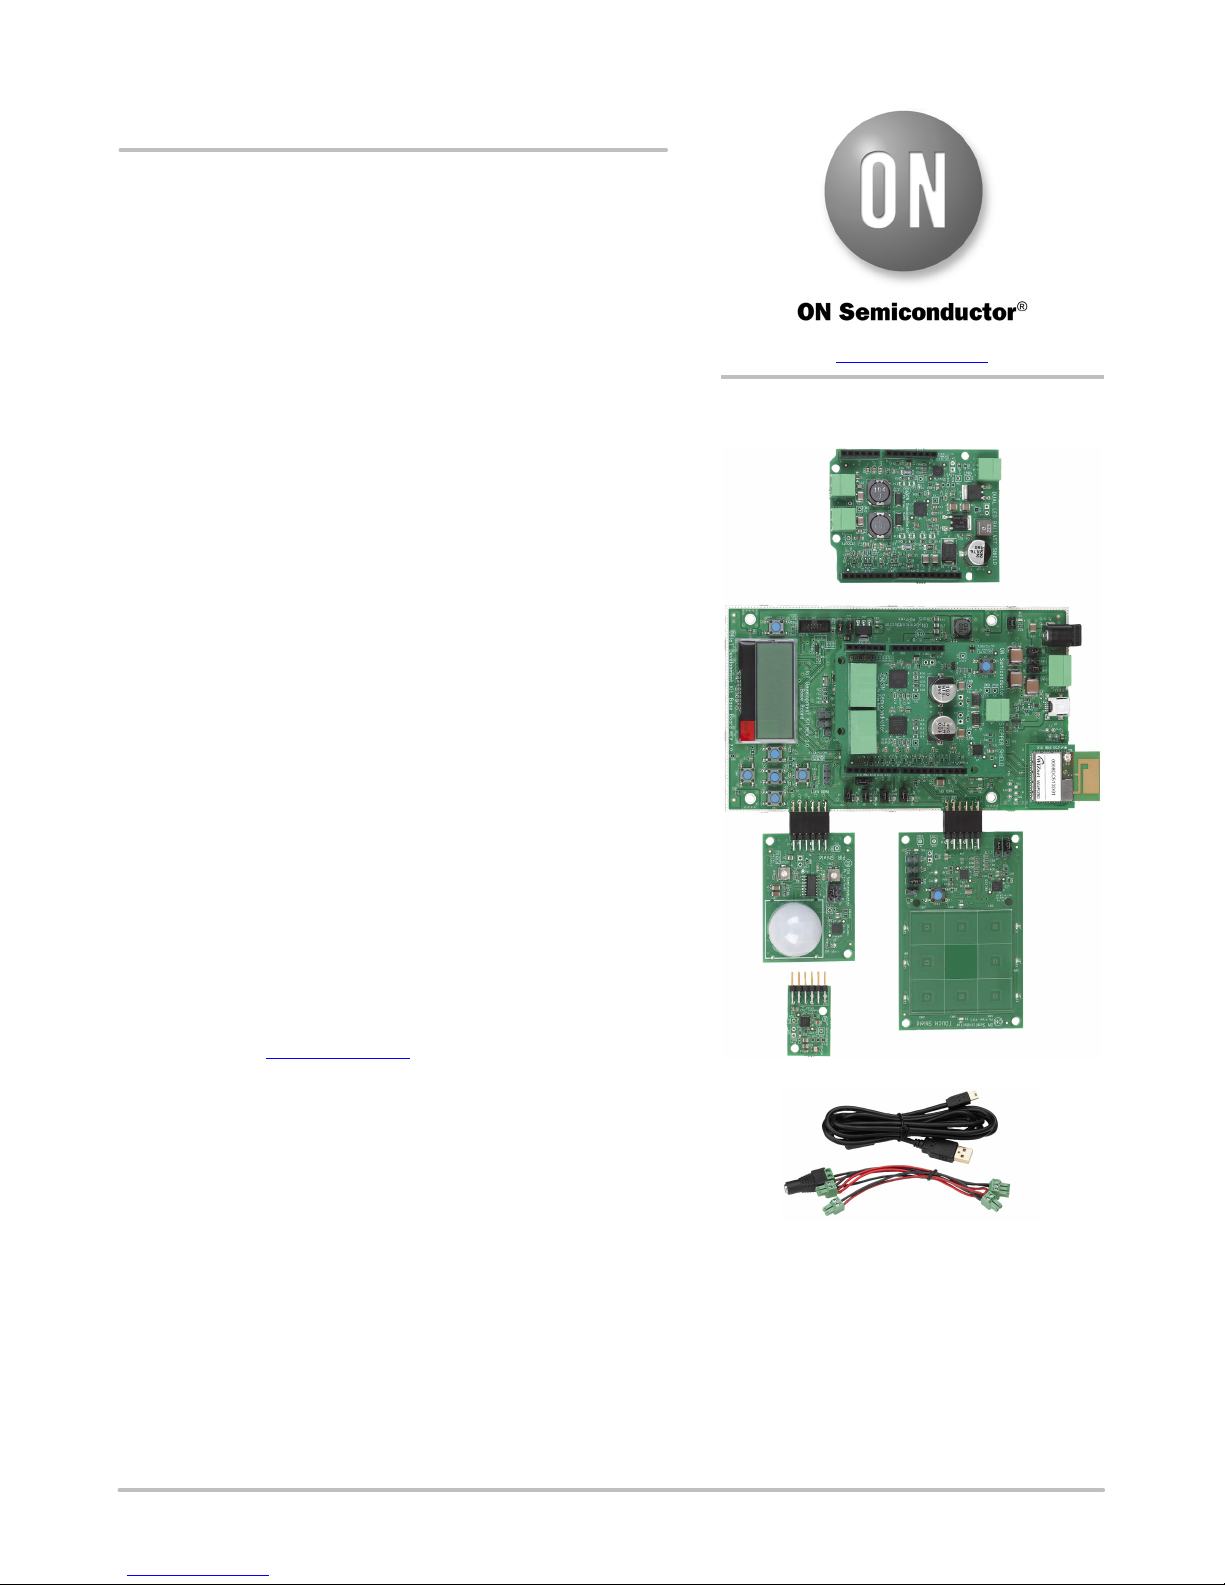
Available Shields
• IDK Baseboard
• Ambient Light Sensor (ALS) Shield
• Touch Shield, PIR Shield, Stepper Motor Shield
• LED Ballast Shield, Wi-Fi
• BLDC Shield, PoE Shield, CAN Shield
Accessories
• Mini-USB Cable
• Cable Assembly
Tools Needed
• IDE Installer
• PC: Windows
8u101 or later installed. OS: Windows 7, 8 or 10.
®
PC with minimum 1 USB port, JRE/JDK version
®
Module
www.onsemi.com
EVAL BOARD USER’S MANUAL
Introduction
The IDK baseboard can be connected with different shields
depending on the required IoT application. The IDK baseboard allows
the user to create many types of IoT nodes and/or gateways depending
on which shields are used with the baseboard. The IDK baseboard is
configured by connecting the baseboard with the PC and USB cable
and using accompanying PC software.
Software Installation
Programing/configuring the IDK requires the ON Semiconductor
IDE software. The IDE should be installed on the PC before
connecting the hardware to the PC. The Software Suite can be
downloaded from www.onsemi.com.
Steps for installation of the IDE are mentioned on page 5 of this
Quick Start guide.
Hardware Setup
After the IDE software is installed, hardware can be connected as
shown in Figure 1. A single 12 V, 2 A power supply adapter powers
the evaluation board (e.g. CUI INC, model SMI24−12....12 V/2 A or
any other supporting V
the correct operation of the baseboard and the shields are listed in
subsequent sections in this document. The shield boards plug directly
into the IDK baseboard. The PC connects to the IDK baseboard
through a USB cable.
The shields are classified into two broad categories − PMOD &
Arduino − based on the interface where the shields are connected to
the baseboard. In addition, Arduino-type shields include “Powered”
and “Non-Input Power” shields.
= 10−35 V). Jumper settings required for
OUT
© Semiconductor Components Industries, LLC, 2017
March, 2017 − Rev. 0
1 Publication Order Number:
EVBUM2497/D
Page 2

EVBUM2497/D
Figure 1. Hardware Setup
APPLICATIONS INFORMATION
Powering Up the IDK
The IDK baseboard can be powered up in stand-alone
USB Mode.
Powered shields require additional power supply for its
operation. No-Input power shields (e.g. PMOD-type
shields) draw power from the baseboard itself.
PMOD type shields: ALS, PIR & Touch (does not require
additional power supply).
Arduino powered shields: Stepper Motor & LED Ballast
shields are supplied from external power source.
IDK Powering Modes
The IDK can be powered in 4 different ways:
1. USB: The IDK baseboard can be powered through
USB Mode. Jumper setting: None.
CAUTION: In USB Mode, powered shields like Stepper
motor, LED Ballast, etc. need to be connected
to an external 12 V supply using the cable
assembly provided with the IDK.
2. External 12 V DC power adapter supplied with the
IDK: Wall power adapter can be connected to the
DC jack J11. Jumper settings: J16:ON. J12: OFF
& J15: OFF.
3. External 12 V DC through J11 Connector: 12 V
can be provided from an external DC power
supply through J11 Pin no.2 (+Ve) & J11 Pin
No. 3
(−Ve). Jumper settings: J12: ON. J15: OFF & J16:
OFF.
4. External 9−32 V DC through J11 Connector: 12 V
can be provided from an external DC power
supply through J11 Pin No.2 (+Ve) & J11 Pin
No. 3 (−Ve). Jumper settings: J12: OFF, J15: ON
& J16: OFF.
Jumper Settings
The default jumper settings are highlighted below for the
IDK boards.
Baseboard Rev2.0
J16,
J15,
J12
J22
J14
J35,
J36
J24
J10
J32: Pins 2−3 to be shunted for Expander IO1_6 th pin as
Wi-Fi Mod Chip select
J31: Pins 1−2 to be shunted for HR pulse from HRM shield to
DIO16
J31: Pins 2−3 to be shunted for DIO16 to Arduino connector.
J35, J36: Pins 1−2 to be shunted for expander IO pins to
Arduino connectors
J35, J36: Pins 2−3 to be shunted for expander IO Pins to LEDs
Figure 2. Baseboard Rev 2.0
321
J29,
J30
J3
J4
J6
J5
J31
www.onsemi.com
2
Page 3
EVBUM2497/D
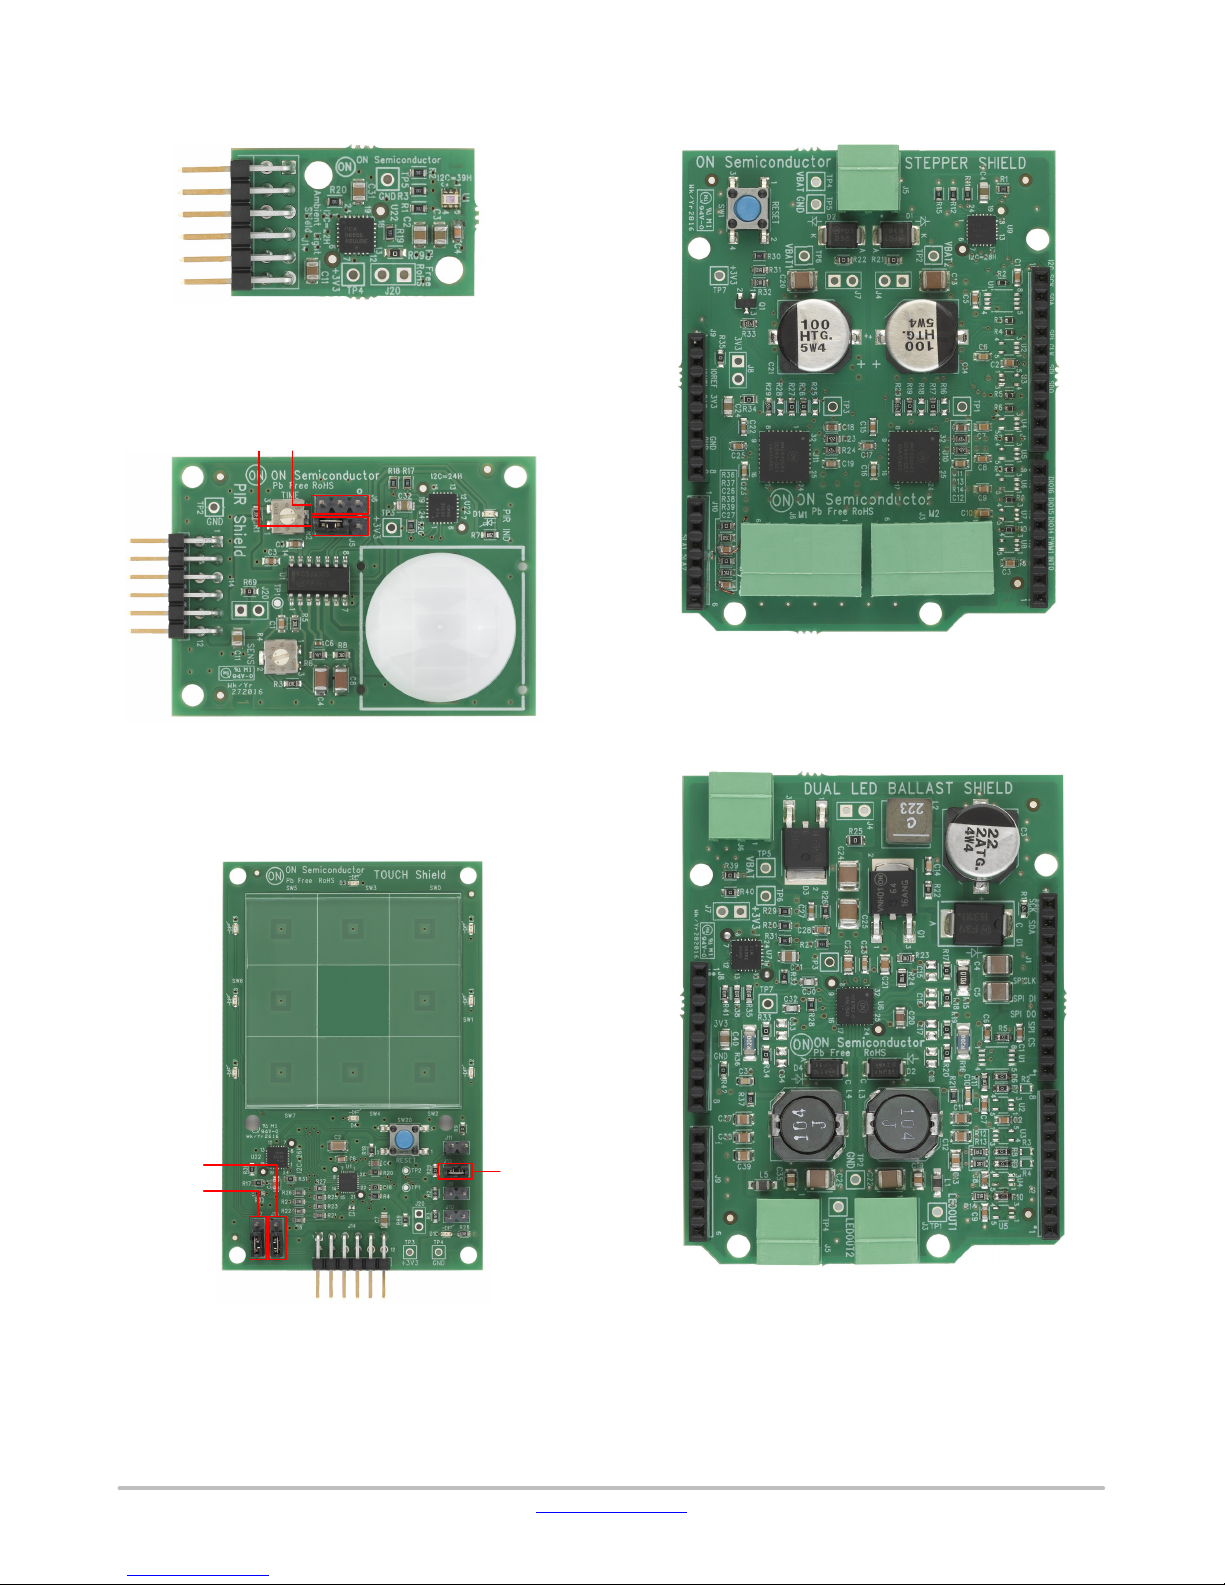
ALS
PIR
No Jumper settings needed
Figure 3. ALS
J6
J5
123
123
Stepper
No Jumper settings needed
Figure 6. Stepper
Touch
J6: 2−3 to be shunted
J5: 2−3 to be shunted
Figure 4. PIR
J15
J7
3
3
2
2
1
1
J7: 1−2 to be shunted for I2C Mode selection
J15: 1−2 to be shunted for I
J13: 1−2 to be shunted
2
C Mode selection
Ballast
J13
No Jumper settings needed
Figure 7. Ballast
Figure 5. Touch
www.onsemi.com
3
Page 4

EVBUM2497/D
BLDC Shield
PoE Shield
No Jumper settings needed
Figure 8. BLDC Shield
CAN Shield
12 3123
123
No Jumper settings needed
Figure 9. PoE Shield
CAN H − J15, CAN L − 16, GND − J17
Jumper Configuration for DB9 Pins
CAN OBD II
Pin 7 Pin 3CAN H
Pin 2 Pin 5CAN L
Pin 3 Pin 2GND
Figure 10. CAN Shield
J17
J15 J16
www.onsemi.com
4
Page 5

SW INSTALLATION STEPS
Java Installation
JRE/JDK version 8u101 or above needs to be installed on
the PC:
http://www.oracle.com/technetwork/java/javase/
downloads/jdk8−downloads−2133151.html
Figure 11. Java
EVBUM2497/D
Figure 14. GNU Toolchain Installation (3/5)
Installer automatically downloads toolchain and installs.
GNUToolchain
The GNU cross compiler needs to be installed to compile
the IDK application. Double click on the
GNUToolchain.exe to install the cross compiler.
Internet
connection is mandatory to install the cross compiler.
Figure 12. GNU Toolchain Installation (1/5)
Select the “GNU Toolchain” checkbox and click Next.
Figure 15. GNU Toolchain Installation (4/5)
GNU Tool chain installation complete.
Figure 13. GNU Toolchain Installation (2/5)
Select Destination folder and click Next. It is
recommended to not change installation path.
Figure 16. GNU Toolchain Installation (5/5)
www.onsemi.com
5
Page 6

IDK Installation
Double click on the installer downloaded from
ON Semiconductor.
For 32 bit machines, install IDK Installer x86.exe. For 64
bit machines, install IDK Installer x86 64.exe
Figure 17. IDK Installation (1/5)
Read the license, check the box and click Next.
EVBUM2497/D
Figure 20. IDK Installation (4/5)
Once in i s successfully installed, a shortcut will be created
on the desktop.
Double click on the IDK shortcut on the desktop to launch
the IDK IDE.
The ON Semiconductor splash screen will launch,
followed by the Welcome Screen.
Figure 18. IDK Installation (2/5)
Choose the destination directory to install the IDK. It is
recommended to have IDK installed under
C:\OnSemiconductor or D:\OnSemiconductor.
If a previous workspace is being retained, then make sure
that metadata folder inside Workspace directory is deleted.
Figure 19. IDK Installation (3/5)
Figure 21. IDK Installation (5/5)
www.onsemi.com
6
Page 7

EVBUM2497/D
P
t
al
Windows is a registered trademark of Microsoft Corporation. Wi-Fi is a registered trademark of Wi-Fi Alliance. All other brand names and produc
names appearing in this document are registered trademarks or trademarks of their respective holders.
ON Semiconductor and are trademarks of Semiconductor Components Industries, LLC dba ON Semiconductor or its subsidiaries in the United States and/or other countries.
ON Semiconductor owns the rights to a number of patents, trademarks, copyrights, trade secrets, and other intellectual property. A listing of ON Semiconductor’s product/patent coverage
may be accessed at www.onsemi.com/site/pdf/Patent−Marking.pdf
ON Semiconductor makes no warranty, representation or guarantee regarding the suitability of its products for any particular purpose, nor does ON Semiconductor assume any liability
arising out of the application or use of any product or circuit, and specifically disclaims any and all liability, including without limitation special, consequential or incidental damages. Buyer
is responsible for its products and applications using ON Semiconductor products, including compliance with all laws, regulations and safety requirements or standards, regardless of
any support or applications information provided by ON Semiconductor. “Typical” parameters which may be provided in ON Semiconductor data sheets and/or specifications can and
do vary in different applications and actual performance may vary over time. All operating parameters, including “Typicals” must be validated for each customer application by customer’s
technical experts. ON Semiconductor does not convey any license under its patent rights nor the rights of others. ON Semiconductor products are not designed, intended, or authorized
for use as a critical component in life support systems or any FDA Class 3 medical devices or medical devices with a same or similar classification in a foreign jurisdiction or any devices
intended for implantation in the human body. Should Buyer purchase or use ON Semiconductor products for any such unintended or unauthorized application, Buyer shall indemnify and
hold ON Semiconductor and its officers, employees, subsidiaries, affiliates, and distributors harmless against all claims, costs, damages, and expenses, and reasonable attorney fees
arising out of, directly or indirectly, any claim of personal injury or death associated with such unintended or unauthorized use, even if such claim alleges that ON Semiconductor was
negligent regarding the design or manufacture of the part. ON Semiconductor is an Equal Opportunity/Affirmative Action Employer. This literature is subject to all applicable copyright
laws and is not for resale in any manner.
UBLICATION ORDERING INFORMATION
LITERATURE FULFILLMENT:
Literature Distribution Center for ON Semiconductor
19521 E. 32nd Pkwy, Aurora, Colorado 80011 USA
Phone: 303−675−2175 or 800−344−3860 Toll Free USA/Canada
Fax: 303−675−2176 or 800−344−3867 Toll Free USA/Canada
Email: orderlit@onsemi.com
◊
. ON Semiconductor reserves the right to make changes without further notice to any products herein.
N. American Technical Support: 800−282−9855 Toll Free
USA/Canada
Europe, Middle East and Africa Technical Support:
Phone: 421 33 790 2910
Japan Customer Focus Center
Phone: 81−3−5817−1050
www.onsemi.com
ON Semiconductor Website: www.onsemi.com
Order Literature: http://www.onsemi.com/orderlit
For additional information, please contact your loc
Sales Representative
EVBUM2497/D
7
 Loading...