

Page 1
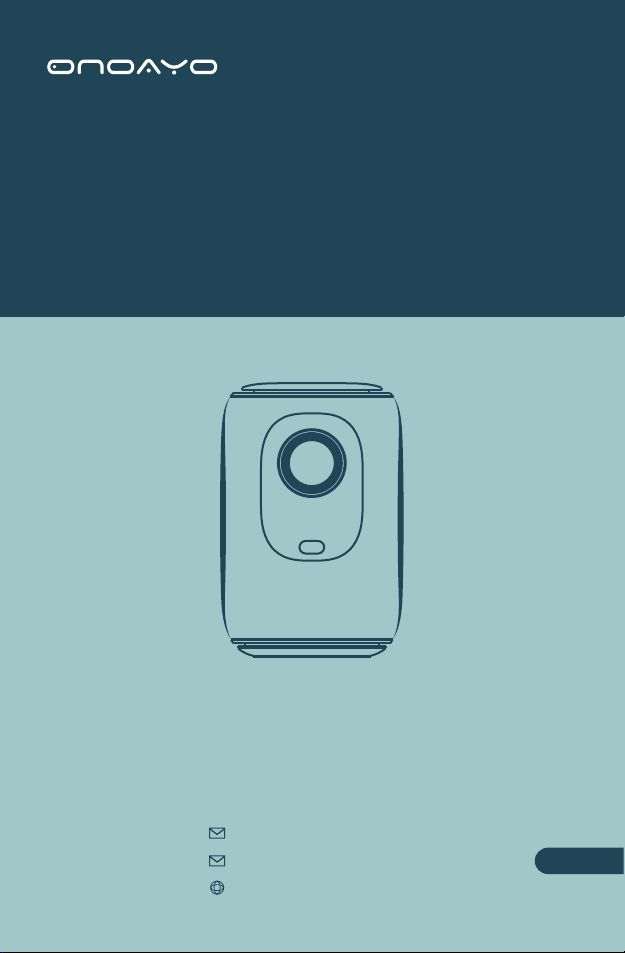
USER MANUAL
AY2Pro MINI VIDEO PROJECTOR
SHARE MOMENTS,SHARE ONOAYO
www.hdprojectortech.com
W240111
Page 2

Page 3

EN
JP
..........
..........
001~029
030~057
Page 4

Page 5

CONTENTS
CONTACT US ······························································· 001
TROUBL ESHOOTING ··················································· 002
PACKING LIST ····························································· 004
FUNCTION OVERVIEW ·················································· 005
REMOTE CONTROL ······················································ 007
QUICK START ······························································ 008
INPUT SOURCE ···························································· 009
-HDMI Connection·························································· 009
-USB Connection···························································· 010
-Speaker/Headphones Connection ···································· 011
WIRELESS PROJECTION ·············································· 012
SETTINGS···································································· 017
BLUETOOTH CONNECTION··········································· 018
PROJECTOR IMAGE SETTINGS ····································· 021
-Installation Method························································· 021
-Auto ±50° Vertical Keystone Correction ····························· 023
-Manual ±50° Vertical Keystone Correction ·························· 023
-Electric-focus ······························································· 024
-Zoom Function······························································ 025
INSTALLATION ···························································· 026
-Projection Distance and Size············································ 026
-Projector Installation ······················································ 027
PROJECTOR SPECIFICATIONS ······································ 028
FCC STATEMENT·························································· 029
Page 6
Activate Your 3-year Warranty
and Exclusive Surprise
Ladies and Gentlemen
Thank you for purchasing AY2Pro Projector. Please take 1 minute
to scan the code and activate your 3 year warranty.
It is recommended to complete the
Tips: If you find that you cannot activate your warranty by scanning
the code, you can contact us via the email below, and we will help
process within 3 days of receiving this card.
you activate your warranty for you.
www.hdprojectortech.com [email protected]
Page 7
WE ARE
constantly optimizing and upgrading our products,
the pictures and descriptions in the manual are for
reference only may differ from the actual product,
please refer to the actual product. You can get the
latest version through online upgrade. Thank you
for your understanding.Product warranty and
support are provided if products have been
purchased from our authorized seller. In order to
protect your rights, you can also send an email to
ONOAYO official email [email protected] to
verify the authenticity of your ONOAYO AY2Pro.
Our High qualified and responsible customer service team is waiting to hear
from you and answer any of your questions 24/7.
We are happy to receive your message about the problems you met so that
we can help you to get out of the trouble. We are even happier to hear your
praise about our wonderful projector and to see the happy moments our
projector have brought to your life!
The fastest and most efficient way to contact us?
Method 1- Via email:
Method 2:
Your Orders>The order has a problem>Choose a topic from list displayed>
Select Contact seller
Please come. Please~~~
www.hdprojectortech.com
Page 8

CONTACT US
Thank you very much for supporting Onoayo! Hope our products and
services bring you a pleasant journey of audio-visual enjoyment.
Onoayo promises a 3-Year Warranty and Lifetime Technical Support,
please
do not worry when encountering any problems. Any buyer with any
questions who comes to contact us will have our promise to get a
satisfactory solution + an Extra 6-Month Warranty to thanks for your
support!
By the way, we are racking our brains to develop a new projector. If you
have
any ideas about projector, such as user experience, parameters, features,
colors and appearance, we warmly invite you to tell us in detail.
We value all voices, and you won't imagine how much we look forward to
your ideas. Once your idea is adopted, as a thank you, I will apply to
send one to you for FREE as the first tester when the new product is
developed.
Looking forward to your messages!
Onoayo Support Team
Scan QR code below, start chatting with us!!!
Scan this code, learn how to operate the projector visually on YouTube!!!
YouTube: Search “Onoayo” on YouTube
Official website: www.hdprojectortech.com
EN 001 002 003 004 005 006 007 008 009 010 011 012 013 014 015 016 017 018 019 020 021 022 023 024 025 026 027 028 029
Page 9

TROUBLE SHOOTING
Our high-qualified customer services team is waiting to hear from you and
answer any of your questions 24 hours a day and 7 days a week. We are
happy to receive your message about the problems you met so that we can
help you to get out of the trouble. You can contact us through email.
Q: Where can I find the instructional videos on how to set up the
projector?
A: We have prepared detailed operation videos on YouTube, which contains
almost every step of operating the projector, like wifi connection, wired
connection and so on. Just search "Onoayo" on YouTube and you will find it.
Q: I received the projector but it has no remote control. Could you send
it to me?
A: If the product you receive is missing any accessories, please let us know
what accessory do you miss. We will send them to you as soon as possible.Just contact us via our e-mail:[email protected]
Q: I can't find the focus ring on the projector,how can I adjust the
focus?
A: This mini projector support electric-focus with remote control,just need to
press the "F+"&"F-" on the remote.Note: Projector and screen/wall must be
in effective distance.
Q: The remote control is unresponsive.
A: ①Make sure remote points at IR receiver directly.
②Do not cover IR receiver.
③Make sure you have put the battery in,this remote control does not come
with batteries.
Q:I don't need the projector lanyard,how can I remove it?
A: The buckle connecting the lanyard has an opening that can be opened
and closed. You only need to open the buckle to remove the lanyard.
Q: The projector is scratched, did I receive a second-hand product?
A: We promise that our projector has been carefully checked before
shipping. However the long time and distance shipping may cause damageto the projector. Plz don't worried about that and you can contact us to get a
satisfactory solution.
EN 001 002 003 004 005 006 007 008 009 010 011 012 013 014 015 016 017 018 019 020 021 022 023 024 025 026 027 028 029
Page 10

Q: I can't play Netflix video on the projector, why?
A: There are quite a few video platforms like Netflix, Disney+ and Hulu are
under HDCP copyright protection, and thus do not support being displayed
on a projector, this is the same situation for all projectors. You would need a
TV stick to enjoy these video platforms.
Q: Up Side Down Images.
A: Enter [Set], then enter [projector setting] to flip the projection image.
Q: I contact the customer service team as suggested, but has not
received any reply. Why?
A: We promise that we will reply to all the emails within 24 hours. If you
haven’t received any reply from us more than one day, then maybe our email
has been blocked or has gone to the spam email box. Please send us email
again or contact us by Whatsapp or Facebook.
Q: Hello,could you tell me what the size of the mounting screw is at the
bottom of the projector? I am struggling to find a stand.
A: The size of the mounting screw is M4.
EN 001 002 003 004 005 006 007 008 009 010 011 012 013 014 015 016 017 018 019 020 021 022 023 024 025 026 027 028 029
Page 11
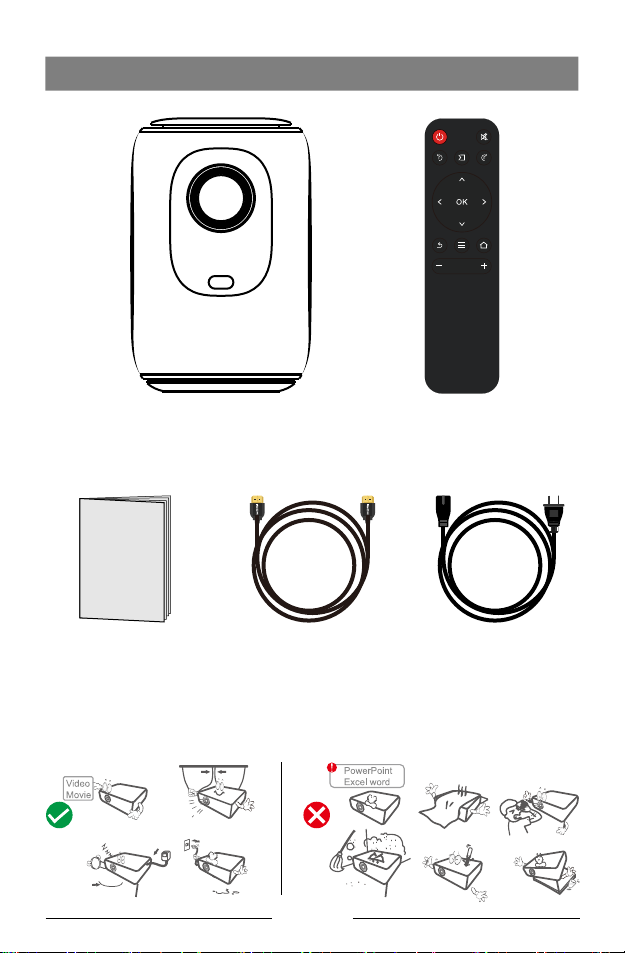
PACKING LIST
AY2Pro
User Manual
HD Cable Power Cable
NOTICE
Recommended Not Recommended
EN 001 002 003 004 005 006 007 008 009 010 011 012 013 014 015 016 017 018 019 020 021 022 023 024 025 026 027 028 029
Remote
Page 12
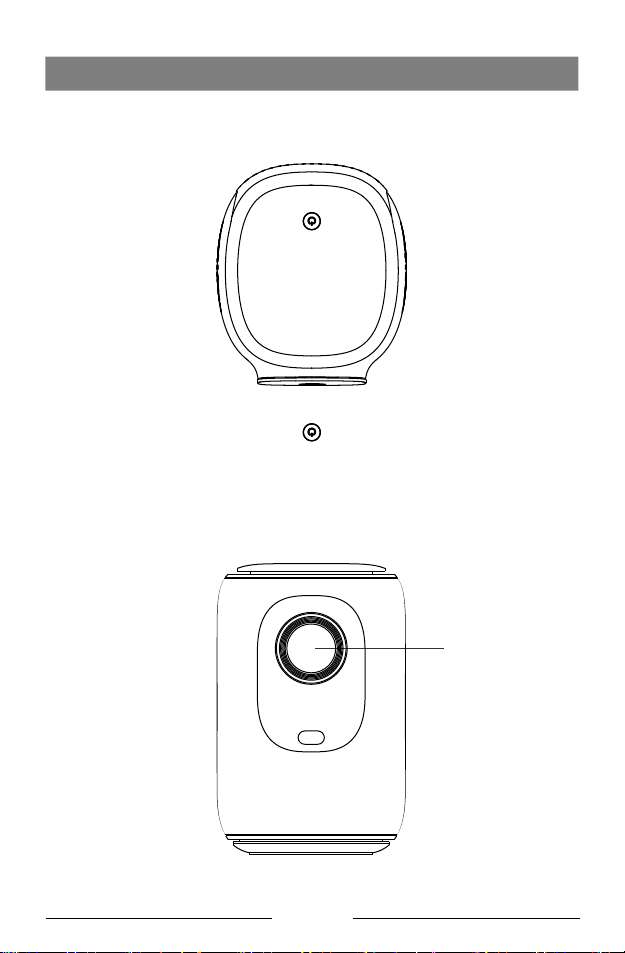
FUNCTION OVERVIEW
Top View
Front View
Power
Lens
EN 001 002 003 004 005 006 007 008 009 010 011 012 013 014 015 016 017 018 019 020 021 022 023 024 025 026 027 028 029
Page 13
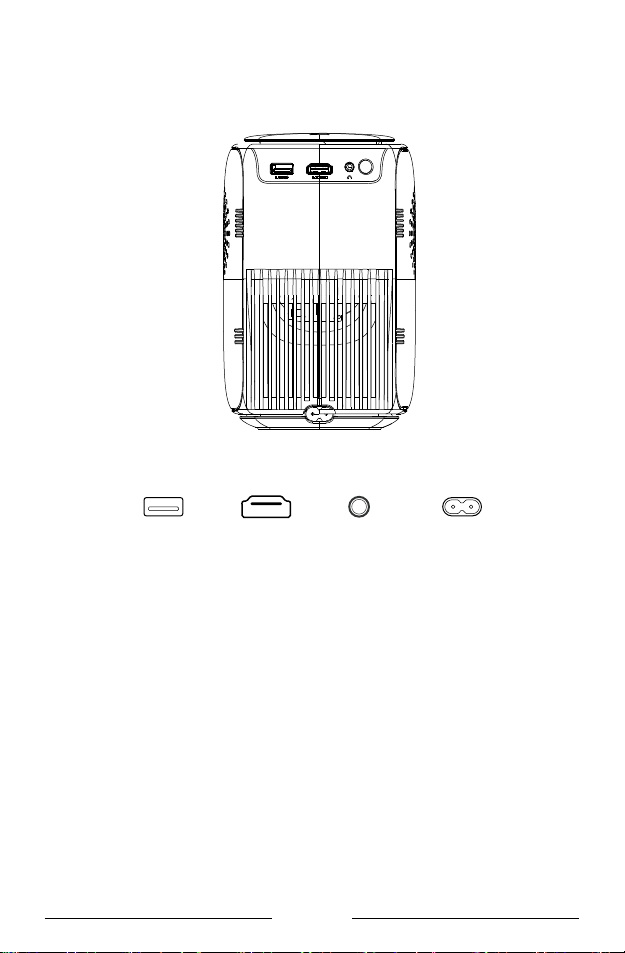
Rear View
Headphone
EN 001 002 003 004 005 006 007 008 009 010 011 012 013 014 015 016 017 018 019 020 021 022 023 024 025 026 027 028 029
Power InputUSB HDMI
Page 14
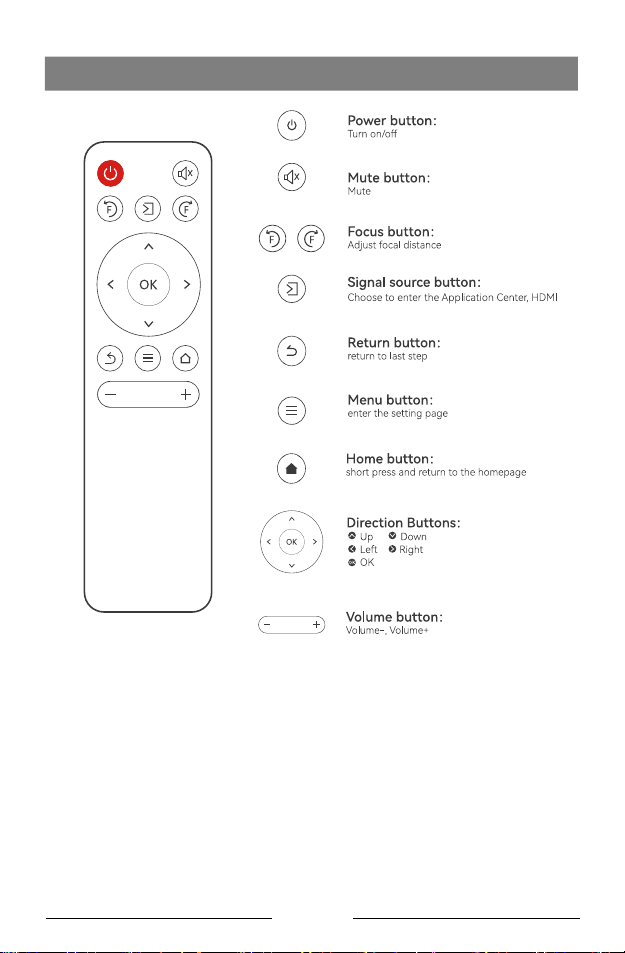
REMOTE CONTROL
Installation of the remote control
1. Install 2 pieces of AAA batteries into the remote before using it. Do not
combine new batteries with old ones in a remote controller, which can
cause operation failure due to insufficient power supply.
2. When using the remote controller, please make sure that the signal
transmitter of the remote controller aims at the infrared signal receiver of
the projector.
EN 001 002 003 004 005 006 007 008 009 010 011 012 013 014 015 016 017 018 019 020 021 022 023 024 025 026 027 028 029
Page 15
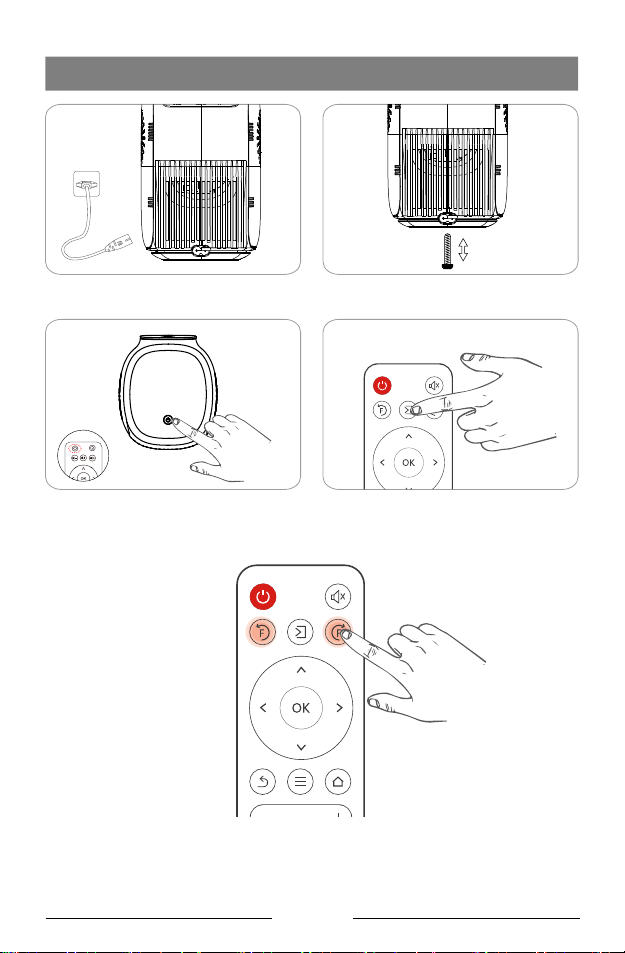
QUICK START
1. Plug the power cord into an outlet
3. Press the power button to turn on
the projector
Press the button F+ or F- on the remote, a focus indicator will appear on
the image. Please adjust according to the focus ring to get the best image
performance.
2. Adjust the kickstand accordingly
4. Select the correct input source to
project your device.
EN 001 002 003 004 005 006 007 008 009 010 011 012 013 014 015 016 017 018 019 020 021 022 023 024 025 026 027 028 029
Page 16
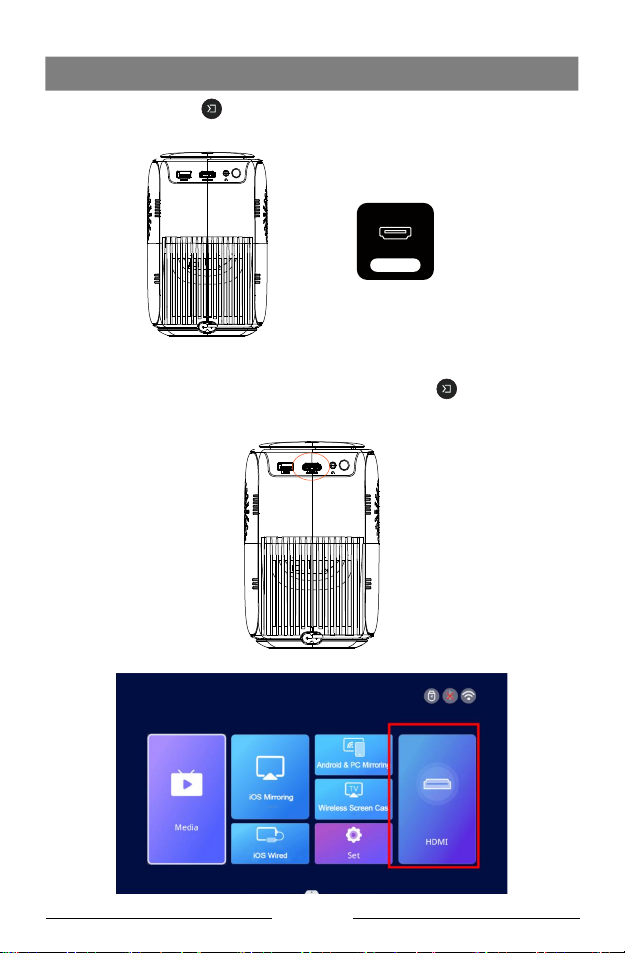
INPUT SOURCE
Press on this button on the projector remote to enter the interface of
input source.
HDMI
HDMI Connection
When the HDMI cable is plugged in, presse the button on the remote
and select the [HDMI] mode, then select [HDMI] from the homepage to
play the video.
EN 001 002 003 004 005 006 007 008 009 010 011 012 013 014 015 016 017 018 019 020 021 022 023 024 025 026 027 028 029
Page 17
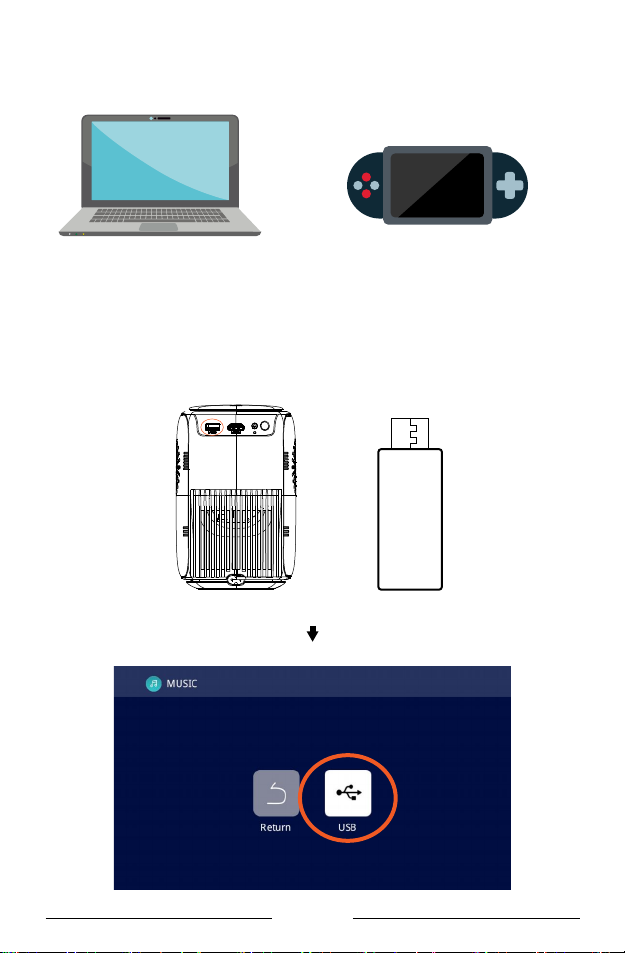
USB Connection
When the U disk is plugged in, and entering the Media, you can play any
document in your USB disk.
USB
Insert U disk
EN 001 002 003 004 005 006 007 008 009 010 011 012 013 014 015 016 017 018 019 020 021 022 023 024 025 026 027 028 029
Page 18
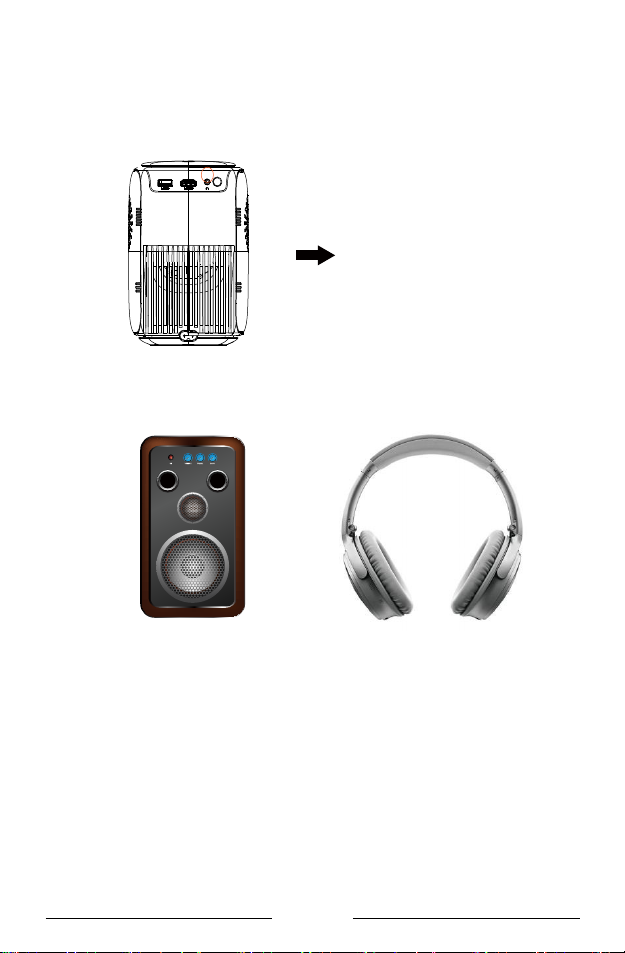
Speaker/Headphones Connection
Directly connect the wired speaker and your headphones/earphones to the
Audio Out port on the projector with a 3.5mm audio cable.
EN 001 002 003 004 005 006 007 008 009 010 011 012 013 014 015 016 017 018 019 020 021 022 023 024 025 026 027 028 029
Page 19
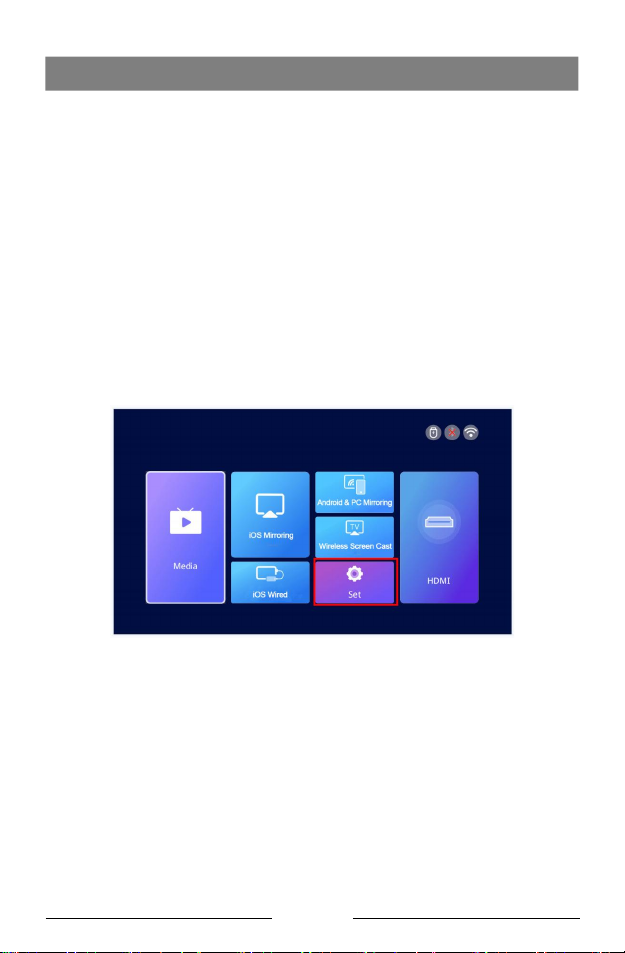
WIRELESS PROJECTION
Warming Tips:
① The fluency of screen mirroring with wireless connection will be affected
by the network environment. A bandwidth of 100Mbit or more is recommended when using screen mirroring.
② Make sure your mobile device is close to the projector when using
wireless connection. A distance within 1 meter is recommended.
③ Some mobile devices may not support screen mirroring due to the
compatibility.
④ Any questions, please feel free to email Onoayo via
Step 1 : Connect Projector to your Home WiFi
Go to set page -- Select the [Network Setting] Select your home WiFi from
the list -- Connect the projector to your home WiFi.
EN 001 002 003 004 005 006 007 008 009 010 011 012 013 014 015 016 017 018 019 020 021 022 023 024 025 026 027 028 029
Page 20
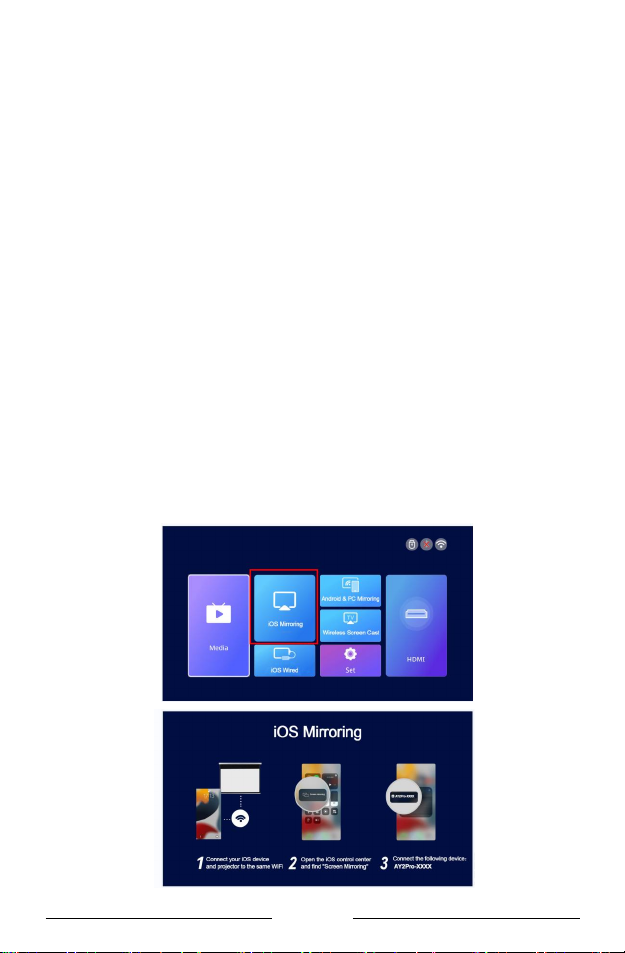
For iOS Devices:
Step1: Connect the projector and your iOS device to the same WiFi.
Step2: Go to Homepage of the projector and select [iOS Mirroring] to enter
the screen mirroring interface.
Step3: Go to the Control Center of your iOS device and select Screen
Mirroring.
Step4: Select the device name that appears on the projector screen from
the searching list.
EN 001 002 003 004 005 006 007 008 009 010 011 012 013 014 015 016 017 018 019 020 021 022 023 024 025 026 027 028 029
Page 21
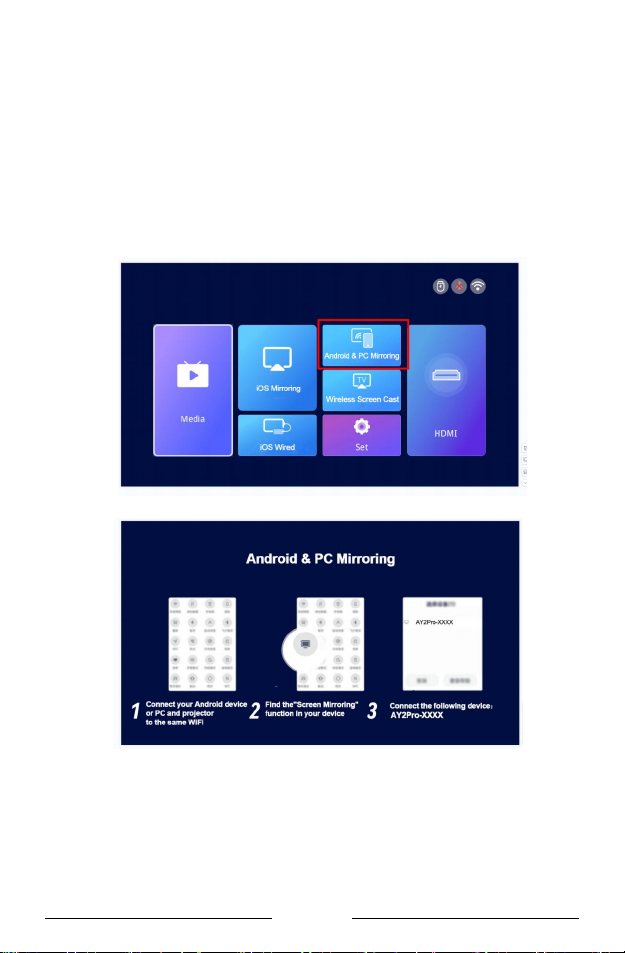
For Android&PC Devices
Step1: Connect your Android device or PC and projector to the same WiFi.
Step2: Go to Homepage of the projector and select [Android&PC Mirroring]
to enter the screen mirroring interface.
Step3: Go to the Control Center of your Android device or PC and select
Screen Mirroring.
Step4:Select the device name that appears on the projector screen from
the searching list.
EN 001 002 003 004 005 006 007 008 009 010 011 012 013 014 015 016 017 018 019 020 021 022 023 024 025 026 027 028 029
Page 22
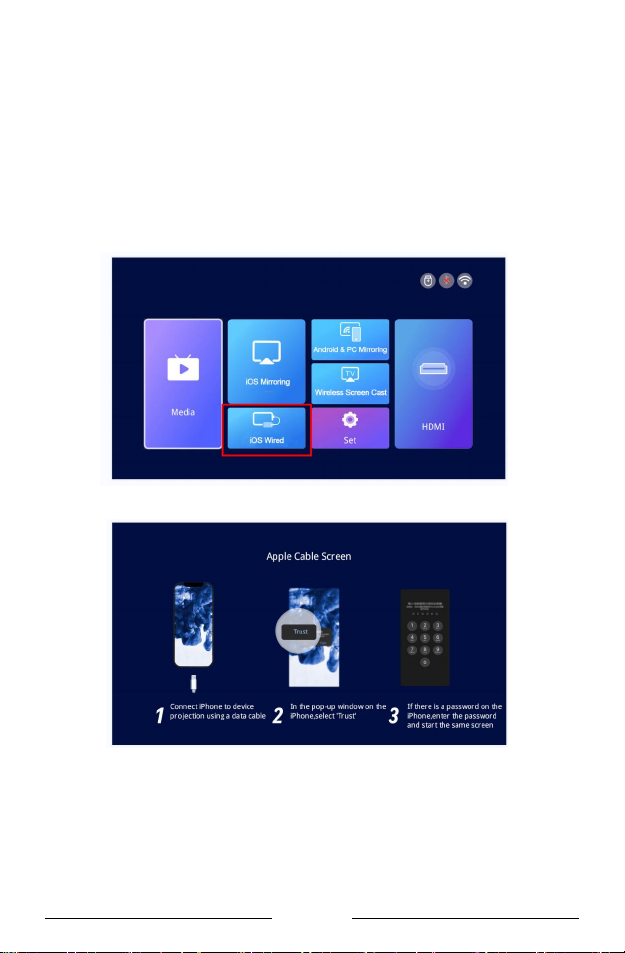
For iOS Cable devices
Step1: Go to Homepage of the projector and select [iOS Wired] to enter
the screen mirroring interface.
Step2: Connect iOS device to device projection using a data cable.
Step3: ln the POP-up window on the iOS device,select 'Trust'
Step4: lf there is a password on the iOS device,enter the password and
Start the same screen.
EN 001 002 003 004 005 006 007 008 009 010 011 012 013 014 015 016 017 018 019 020 021 022 023 024 025 026 027 028 029
Page 23
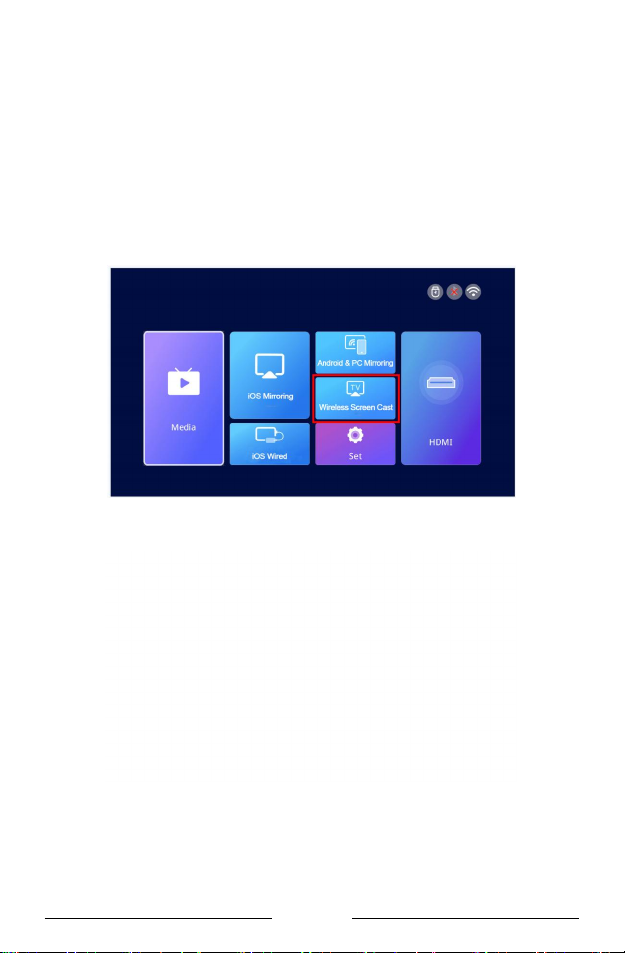
For APP Screen Cast
Step1: Please keep your device and projector on the same network.
Step2: Go to Homepage of the projector and select [Wireless Screen Cast]
to enter the screen mirroring interface.
Step3: Open the screen projection app
Step4: Find the "Screen Cast" or "Wirelss Projection"button
Step5: Then select the device name that appears on the projector screen
from the searching list.
EN 001 002 003 004 005 006 007 008 009 010 011 012 013 014 015 016 017 018 019 020 021 022 023 024 025 026 027 028 029
Page 24
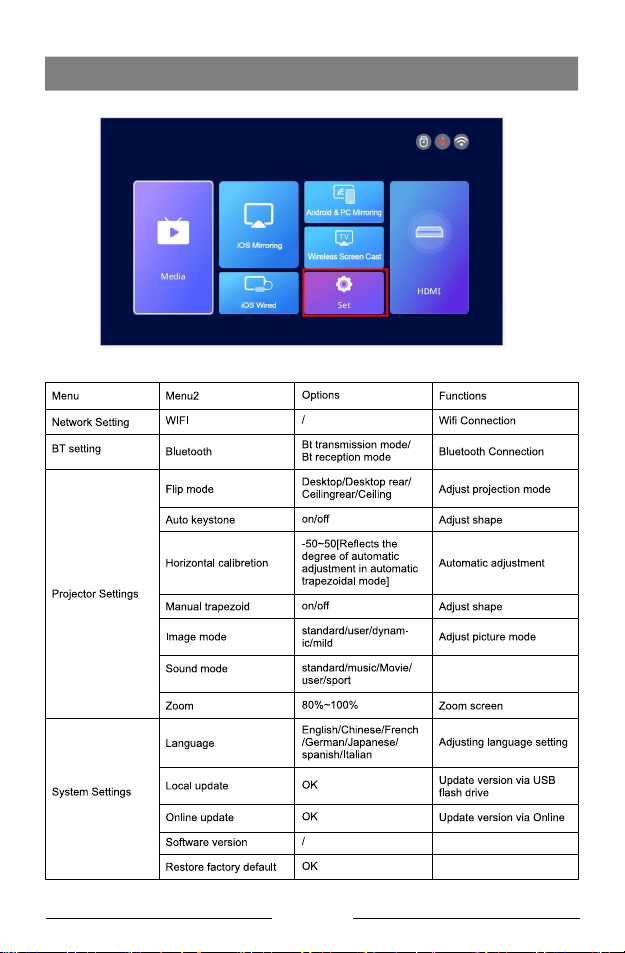
SETTINGS
EN 001 002 003 004 005 006 007 008 009 010 011 012 013 014 015 016 017 018 019 020 021 022 023 024 025 026 027 028 029
Page 25
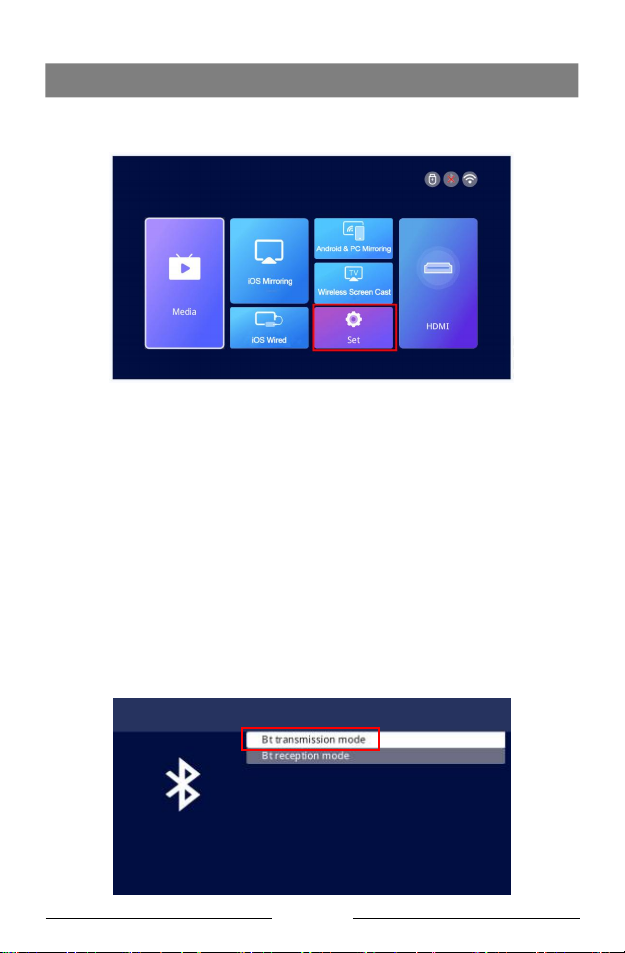
BLUETOOTH CONNECTION
Go to the home page, click the “ Set ” to go to the Setting page. Choose
the [BT Setting] to enter the BT function.
1.Connect the projector to an exterior Bluetooth speaker.
On the BT Setting page, Choose the Bt transmission mode and Press OK
button to turn on the BT and scan for available devices.Choose the
rightBluetooth device name, Press OK button to pair.
EN 001 002 003 004 005 006 007 008 009 010 011 012 013 014 015 016 017 018 019 020 021 022 023 024 025 026 027 028 029
Page 26
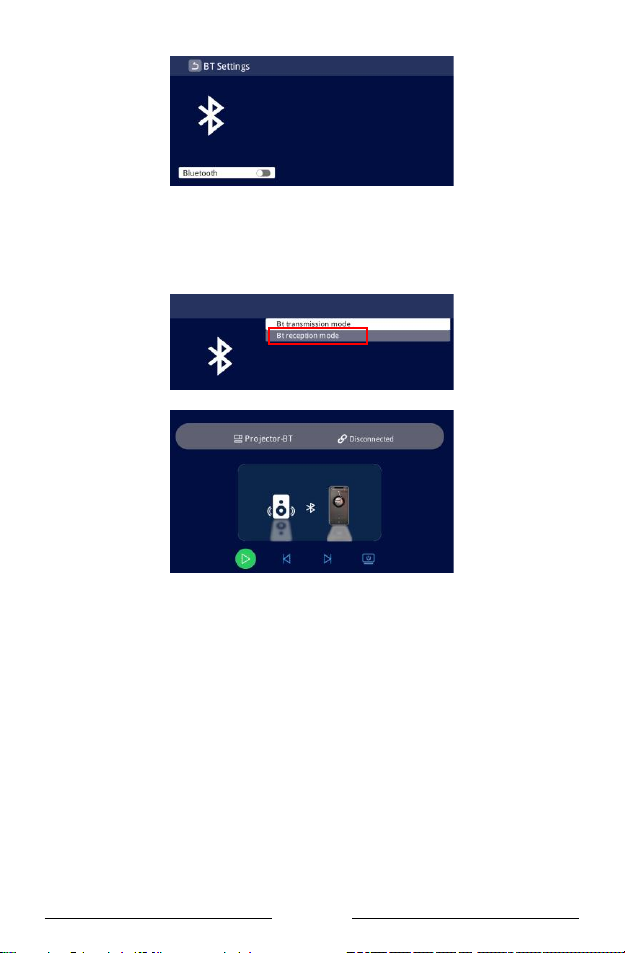
2.Connect your phone to the projector using Bluetooth.
On the Bluetooth settings page, Choose the Bt reception mode and wait on
this page. Then use your phone to search and scan for available devices,
Choose the rightBluetooth device name, Press OK button to pair.
3.Cannot connect Bluetooth speaker?
When the Bluetooth speaker is connected to the projector, it will show up in
paired devices ,it means that the projector has been successfully connected.If it shows pairing failed, it means that the Bluetooth speaker has not
been connected to the projector.
Please try the following methods:
Method 1: Please click the [UNPAIR] , then connect your BT again.
Method 2: Operate on the projector to turn off Bluetooth (press the “OK”
button on the remote control).
Then turn on BT (the "OK" button on the remote control). Reconnect the
Bluetooth speaker again.
Method 3: Turn off the projector and restart it, then reconnect the Bluetooth
speaker.
Method 4: Restore the factory settings and then reconnect the Bluetooth
speakers.
EN 001 002 003 004 005 006 007 008 009 010 011 012 013 014 015 016 017 018 019 020 021 022 023 024 025 026 027 028 029
Page 27
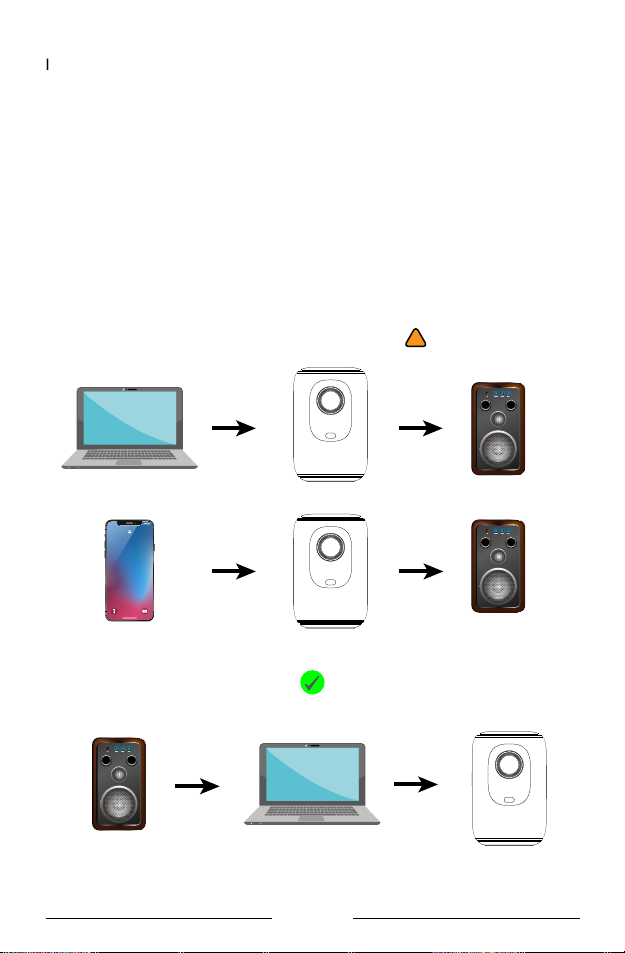
If you tried the above methods but still can not solve your problem, please
contact our customer service team to get a more specified checking and
instruction. We promise that you will get a satisfactory solution.
4.Audio Delay After Connecting Bluetooth?
If you have an audio delay after connecting Bluetooth, you can try a different
connection method, which is: Connect your Bluetooth speaker with your
phones(or iPads, laptops) first, and then connect your phones with our
projector. Please refer to the following pictures.
Please note: Due to Apple protocols, Apple devices do not support connecting a mobile phone to a Bluetooth speaker and then sharing the screen.
Connection methods that may cause sound delay !
20:30
Monday, September 23
Recommended connection method
✔
EN 001 002 003 004 005 006 007 008 009 010 011 012 013 014 015 016 017 018 019 020 021 022 023 024 025 026 027 028 029
Page 28
20:30
Monday, September 23
PROJECTOR IMAGE SETTING
Installation Method
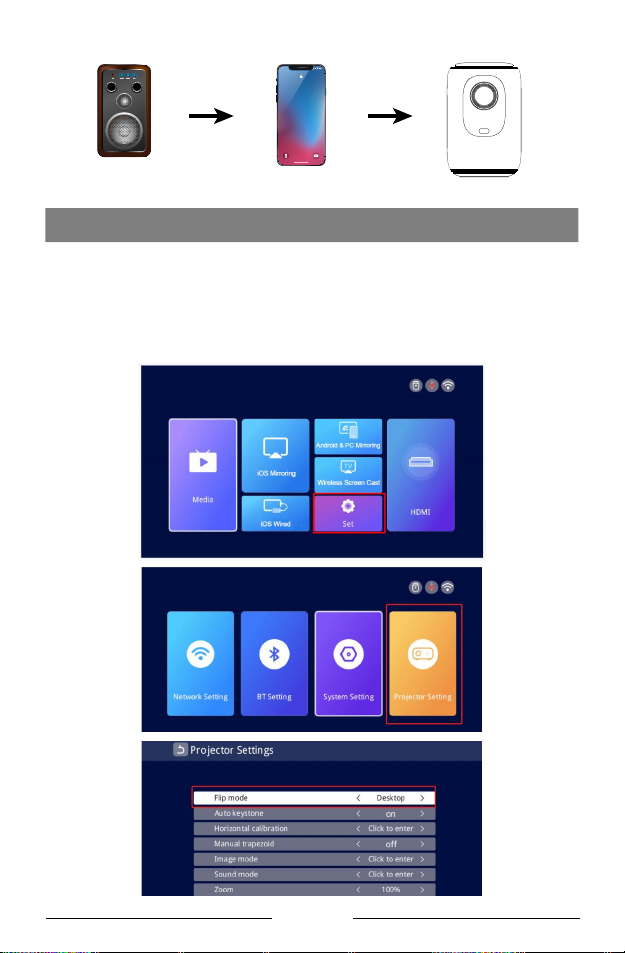
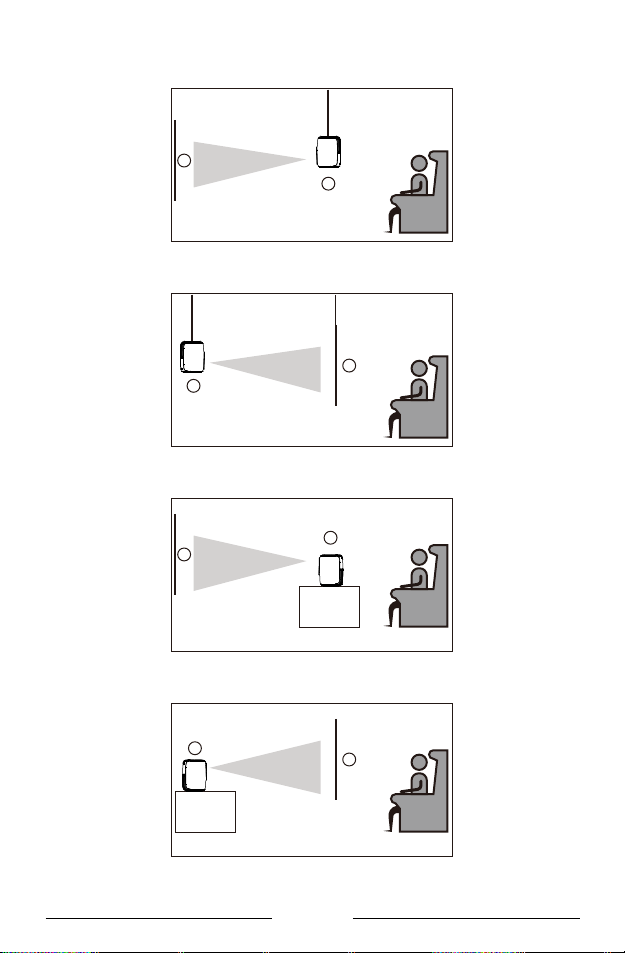
The projector support front and rear projection, it can be table mounted and
ceiling mounted. To set the projection mode, go to the homepage. Click on
the “Set” and find “Projector Setting”. You can see the “Flip Mode” option,
press the left and right button to change to your desired mode.
EN 001 002 003 004 005 006 007 008 009 010 011 012 013 014 015 016 017 018 019 020 021 022 023 024 025 026 027 028 029
Page 29
1
2
Front/ceiling
1
2
Rear/ceiling
1
2
Front
2
1
Rear
EN 001 002 003 004 005 006 007 008 009 010 011 012 013 014 015 016 017 018 019 020 021 022 023 024 025 026 027 028 029
Page 30
Auto & Manual Vertical Keystone Correction & Electric-focus &
Zoom Function
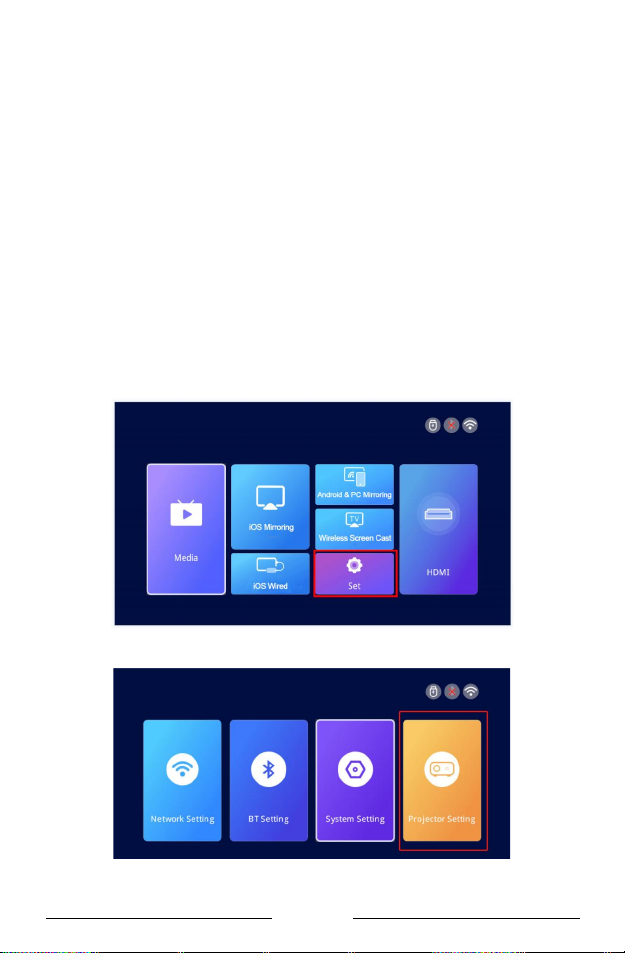
Go to the setting page. Click on the “Projector Setting” then you can see
every option about the adjustment.
>> Auto ±50° Vertical Keystone Correction
For auto vertical keystone correction, simply keep the interface "Auto
Keystone" in the "on" state, and the projector will automatically correct the
image distortion.
>> Manual ±50° Vertical Keystone Correction
If you prefer manual keystone correction, you can disable the automatic
feature,keep it in the "off" state . After that,the "Manual Trapezoid" will
shows "on" state then you can adjust the keystone correction degree using
the left and right buttons on the remote control.
EN 001 002 003 004 005 006 007 008 009 010 011 012 013 014 015 016 017 018 019 020 021 022 023 024 025 026 027 028 029
Page 31
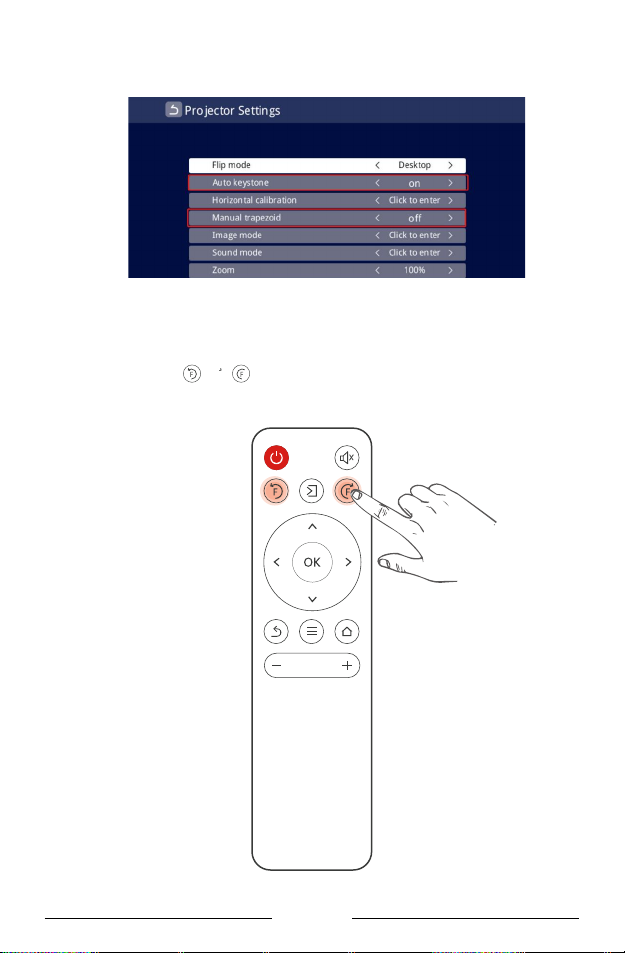
>> Electric-focus
①This mini projector only support electric-focus with remote control,just
need to press the " "&" " on the remote.
②Note: Projector and screen/wall must be in effective distance.
EN 001 002 003 004 005 006 007 008 009 010 011 012 013 014 015 016 017 018 019 020 021 022 023 024 025 026 027 028 029
Page 32
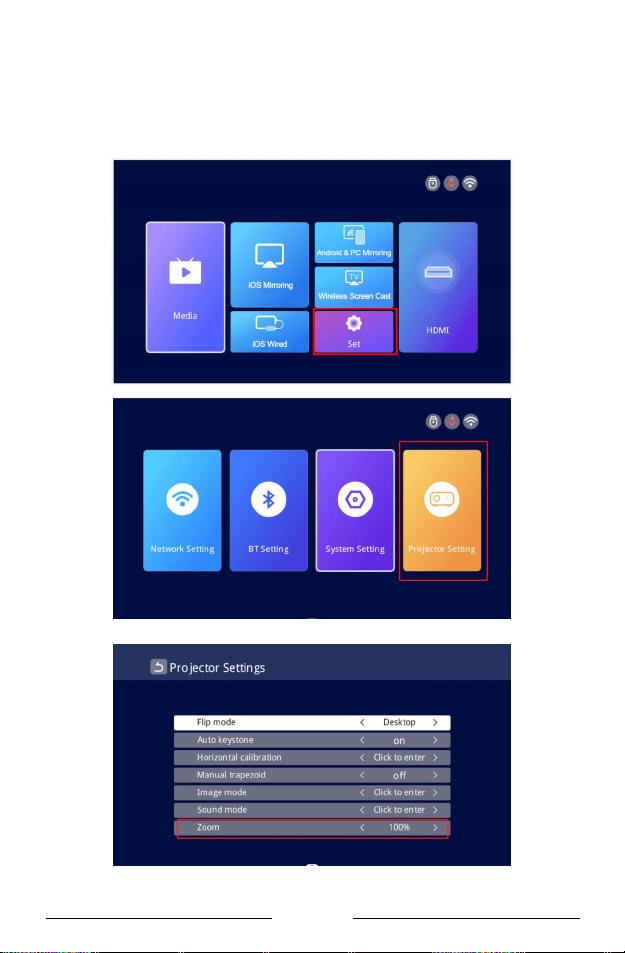
>> Zoom Function
Go to the setting page. Click on the “Projector Setting” then you can see the
"zoom" adjustment.The projector supports 80%-100% zoom adjustment.
EN 001 002 003 004 005 006 007 008 009 010 011 012 013 014 015 016 017 018 019 020 021 022 023 024 025 026 027 028 029
Page 33
INSTALLATION
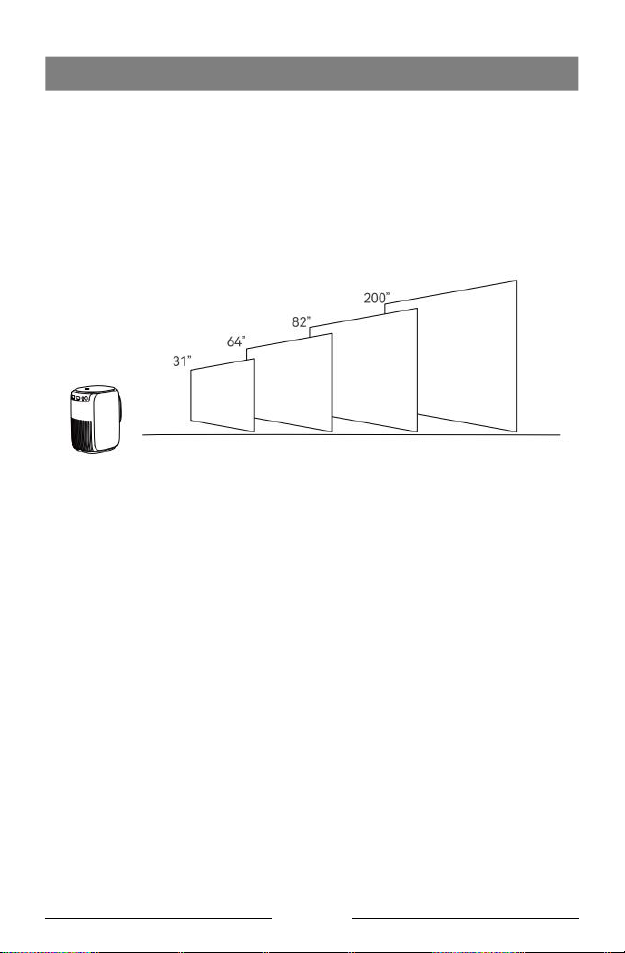
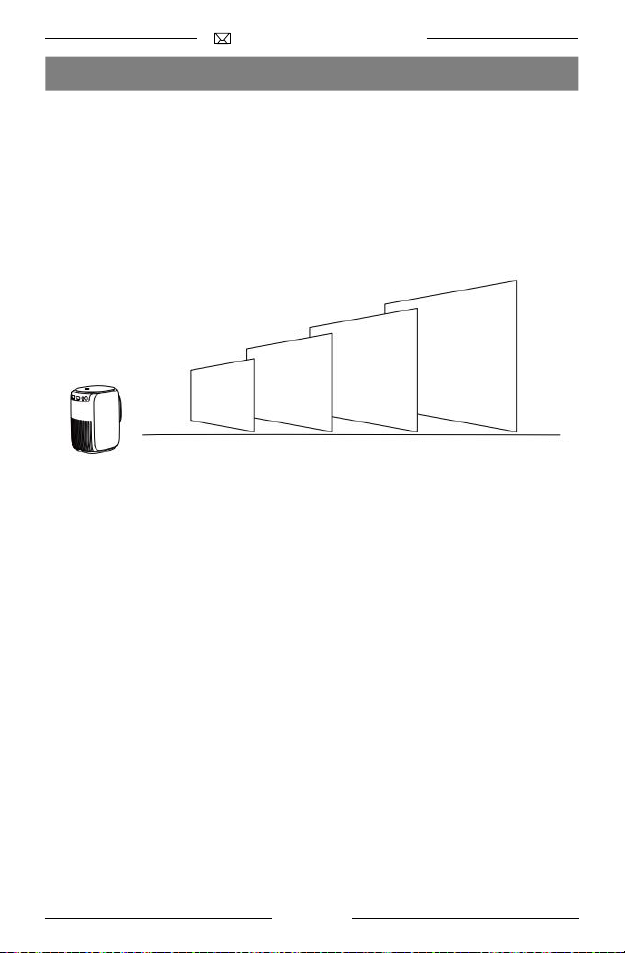
Projection Distance and Size
If you want to get a free projection screen,please email us via
Please follow the data in chart below, to adjust the image size and the
distance.
3.28ft 6.56ft 8.2ft 19.68ft
Please note:
1.The best image quality would be achieved with a projection distance of
3.28ft-19.68ft. A larger screen size would affect the image quality in a
certain degree.
2.The image size depends on the distance between projector and
screen,there may be 3% deviation among above listed data. Different
settings cause various distances.
EN 001 002 003 004 005 006 007 008 009 010 011 012 013 014 015 016 017 018 019 020 021 022 023 024 025 026 027 028 029
Page 34
EN 001 002 003 004 005 006 007 008 009 010 011 012 013 014 015 016 017 018 019 020 021 022 023 024 025 026 027 028 029
Page 35
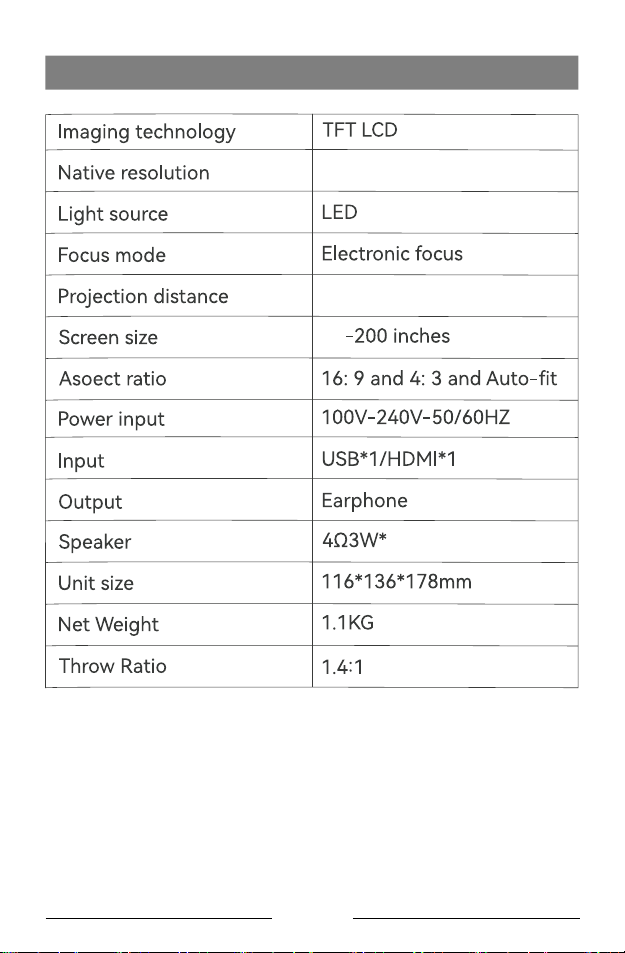
PROJECTOR SPECIFICATIONS
1920*1080
3.28-19.68ft;
31
2
*Any buyer with any questions who comes to contact us will have our
promise to get a satisfactory solution + an Extra 6 Month Warranty+other
surprises to thanks for your support!
US: [email protected]
Official website: www.hdprojectortech.com
EN 001 002 003 004 005 006 007 008 009 010 011 012 013 014 015 016 017 018 019 020 021 022 023 024 025 026 027 028 029
Page 36

FCC STATEMENT:
This device complies with Part 15 of the FCC Rules. Operation is subject to
the following two conditions:
(1)This device may not cause harmful interference, and
(2)This device must accept any interference received, including interfer ence
that may cause undesired operation.
Warning: Changes or modifications not expressly approved by the party
responsible for compliance could void the user's authority to operate
theequipment.
NOTE:
This equipment has been tested and found to comply with the limits for a
Class B digital device, pursuant to Part 15 of the FCC Rules. These limits
are designed to provide reasonable protection against harmful interference
in a residential installation. This equipment generates uses and can radiate
radio frequency energy and, if not installed and used in accordance with the
instructions, may cause harmful interference to radio communications.
However, there is no guarantee that interference will not occur in a particular
installation. If this equipment does cause harmful interference to radio or
television reception, which can be determined by turning the equipment off
and on, the user is encouraged to try to correct the interference by one or
more of the following measures:Reorient or relocate the receiving
antenna.Increase the separation between the equipment and receiver.Connect the equipment into an outlet on a circuit different from that to which the
receiver is connected.
Consult the dealer or an experienced radio/TV technician for help.
FCC Radiation Exposure Statement:
This equipment complies with FCC radiation exposure limits set forth for an
uncontrolled environment. This equipment should be installed and
operated with minimum distance 20cm between the radiator & your body.
EN 001 002 003 004 005 006 007 008 009 010 011 012 013 014 015 016 017 018 019 020 021 022 023 024 025 026 027 028 029
Page 37

目次
ONOAYOにお問合せになる方法··············································
故障かな?と思ったら ·······························································
梱包品の確認 ··········································································
プロジェクター 各 部 の は たらき ·················································
リモコン各 部 の はたらき ···························································
プロジェクター の 起 動 ·······························································
入力信号の選択·······································································
-HDMI接続 ································································································
-USB接続 ····································································································
-スピーカー接続·······················································································
ワイヤレスで接 続 する ······························································
設定·························································································
ブルートゥースで 接 続する ························································
プロジェクターの設置方法 ·······················································
-取付け方法 ······························································································
-自動台形補正···························································································
-手動台形補正···························································································
-電 動 フォーカス ·······················································································
-ズーム機能 ·······························································································
プロジェクター の 取 付 ·······························································
-投影距離と画面サイズ ·········································································
-天井に設置する ······················································································
製品の仕様 ··············································································
030
031
033
034
036
037
038
038
039
040
041
046
047
050
050
052
052
053
054
055
055
056
057
Page 38
弊社はより良い製品をより良いサービスで、お届けできることを目指してお
常に商品機能の改善を行っておりますので、取説に書かれていた画像や説
明は実際の商品とは異なる場合があります。アップグレード機能による最新
の状態に更新することができます。
お買い上げいただいた AY2Proの保証登録または正規品認証(真贋判定)を
行うには、下記の公式にお問い合わせください。
本製品は到着日から24時間365日受付可能のアフターサービスが無料で提供され
ます。ご注文番号が保証書の代わりとなりますので、保証書を紛失された場合、保証
は受けられない心配はありません。突然のトラブルやお困りごとがございましたら、
弊社のスタッフにお問い合わせくださいませ。
保証登録または延長するには、お客様による登録が必要です。
下記のURLにアクセスするか、QRコードをスキャンして登録ください。
公式サイト:www.hdprojectortech.com
公式サイトからの登録ができない場合は、メールにてお問い合わせください:
Amazonでお問い合わせ:
注文履歴>注文の詳細>出品者名をクリック>出品者に質問する
Page 39
ONOAYOにお問合せになる方法
このたびはONOAYOをお買い上げいただきありがとうございます。
弊社のプロジェクターの画質にはご満足いただけるのでしょうか?
ご使用中に何か不明点がございましたら、お気軽にお問い合わせください。
お客様のご希望に沿って解決策を提供できるように努めてまいります。
ONOAYOに連絡すれば、保証期間を3年間+6ヶ月に 延 長 することができます。
もし弊社のプロジェクターを使用していただいた感想や、商品開発・改善点(
商品機能、色、デザイン)などのご意見などがございましたら、ぜひお聞かせく
ださい。商品開発部にお声を伝え、今後の商品開発の参考にさせていただき
ます。
ご意見が採用された場合には、より早く新商品をご自由にお試しいただける体
験資格をご用意します。その時は新製品を無料でお送りさせていただきます。
ご連絡をお 待ちしております。
ONOAYOサポ ートチ ー ム
下記のQRコードをス キャンして、ONOAYOに 連 絡 し ま し ょ う!
lINE
下記のQRコードをス キャンして、YouTubeで操作説明動画をご参照ください。
Japan: [email protected]
YouTube: YouTubeで「 ONOAYO」を検索する
公 式 サイト : www.hdprojectortech.com
JP 030 031 032 033 034 035 036 037 038 039 040 041 042 043 044 045 046 047 048 049 050 051 052 053 054 055 056 057
Page 40

故障かな?と思ったら
プロジェクターの使用中にご不明な点がありましたら、下記のよくある質問の
解決策をご参考ください。それにしても問題が解決できない場合は、遠慮なく
メールにてご連絡くださいませ。24時間365日受付可能のアフターサービスが
無料で提供されます。弊社に連絡してくださるお客様に半年保証期間を延長
するサービスを提供します。
Q:プロジェクターを設置する方法が分からないんですが。参考になる操作説明
動 画 は ありま す か?
A:弊社は手順説明&商品紹介のハウツー動画をYouTubeにアップロード完了
いたしました。YouTubeで「 ONOAYO」で検索すれば、すぐに見つかります。
Q:プロジェクターが 届きましたが 、リモコンがありません。どうしたらいいのでし
ょう か?
A: : もし受け取った製品に付属品がない場合は、どの付属品がないかをお知
らせください。できるだけ早くお送りするために[email protected]まで
ご連絡ください。
Q:プロジェクターのフォーカス調整をしたいのですが、方法が分かりません。
A:リモコンの【】と【】を押すだけでフォーカスを調整することができます。
ご 注 意:プ ロジェクタとスクリーン /壁は有効距離内にしてください。
Q:リモコンが反応しません。
A:①リモコンが赤外線受信機に向かっていることをご確認ください。
②赤外線受信機を被せないことをご確認ください。
③バッテリーを入れたことをご確認ください(リモコンに乾電池が付属してお
り ま せ ん )。
Q:ロジェクター付きのストラップは必要がありません。どうすれば取り外せます
か?
A:ランヤードを接続するバックルには開閉可能な開口部が付いています。バッ
クルを開けるだけでストラップを取り外すことができます。
Q:受け取った商品の包装が壊れましたが、中古品ですか?
A:弊社製品は全数検査を行っておりましたが、長距離輸送は損傷をもたらす
可能性がありますので、損傷がありました場合はお気軽に
[email protected]お問い合わせください。
JP 030 031 032 033 034 035 036 037 038 039 040 041 042 043 044 045 046 047 048 049 050 051 052 053 054 055 056 057
Page 41

Q:Netflixの動画をプロジェクターで再生できないのはなぜですか。
A:Netflix、Disney+、Huluなどのアプリが著作権保護のため、ワイヤレス投影
できない場合もあります。それはandroid TVが搭載しないプロジエクターの仕
様で す。FireTVStickをプロジェクターと接続すれば再生できます。
Q:プロジェクターにサウンドバーが 繋がらないけどどうしたらいいで すか?
A:
①動画の手順の通りに接続することをチェックしてください。またサウンドバ
ーがほかのBluetoothデバイスに接続していないことをご確認ください。
②プロジェクターを初期化にして、再度接続してみてください。
③それでも解決できない場合は、プロジェクターと互換性がない可能性があり
ます。ONOAYOだけでなく、ほとんどのプロジェクターに共通する問題となって
おります。
この問題についての解決策は今のところ見つかっていません。よろしければメ
ールにてsupport[email protected]お問い合わせください。
Q:カスタマーサービスに連 絡しましたが、返信がありません。
A: 通常の場合は24時間内に返信しますが、受信時にメールは自動的に「迷惑
メール」フォルダに移動される可能性がありますので、24時間以上返信が無い
場合にはお手数ですがメールの再送、もしくは前のページで「ONOAYOにお
問合せになる方法」にあるlineのQRコードを読み取ってお問い合わせくださ
い。
Q:画面の上下調整には?
A:プロジェクタ−のホームページから「設定」→「投影設定」→「投影方式」に移
動し、投影画面を調整できます。
Q:取り付けネジのサイズを教えていただけませんか?
A:取り付けネジのサイズはM4で す。
JP 030 031 032 033 034 035 036 037 038 039 040 041 042 043 044 045 046 047 048 049 050 051 052 053 054 055 056 057
Page 42
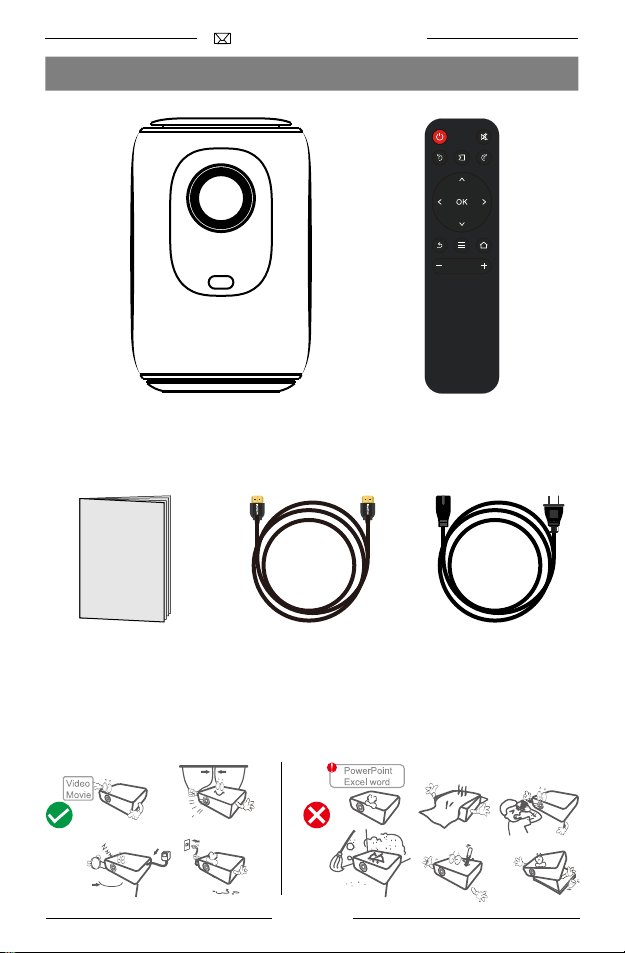
梱包品の確認
取扱説明書
注意すべき点
おすすめ 不正使用
AY2Pro
リモコン
HDMIケーブル 電源ケーブル
JP 030 031 032 033 034 035 036 037 038 039 040 041 042 043 044 045 046 047 048 049 050 051 052 053 054 055 056 057
Page 43
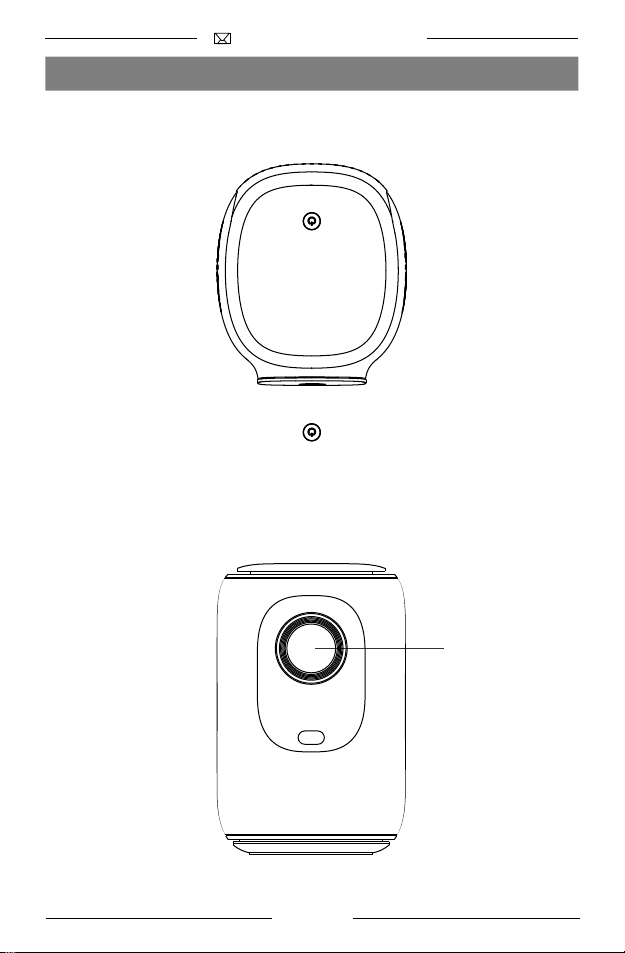
プロジェクター 各 部 の は たらき
上面
電源ボタン
正面
レンズ
JP 030 031 032 033 034 035 036 037 038 039 040 041 042 043 044 045 046 047 048 049 050 051 052 053 054 055 056 057
Page 44
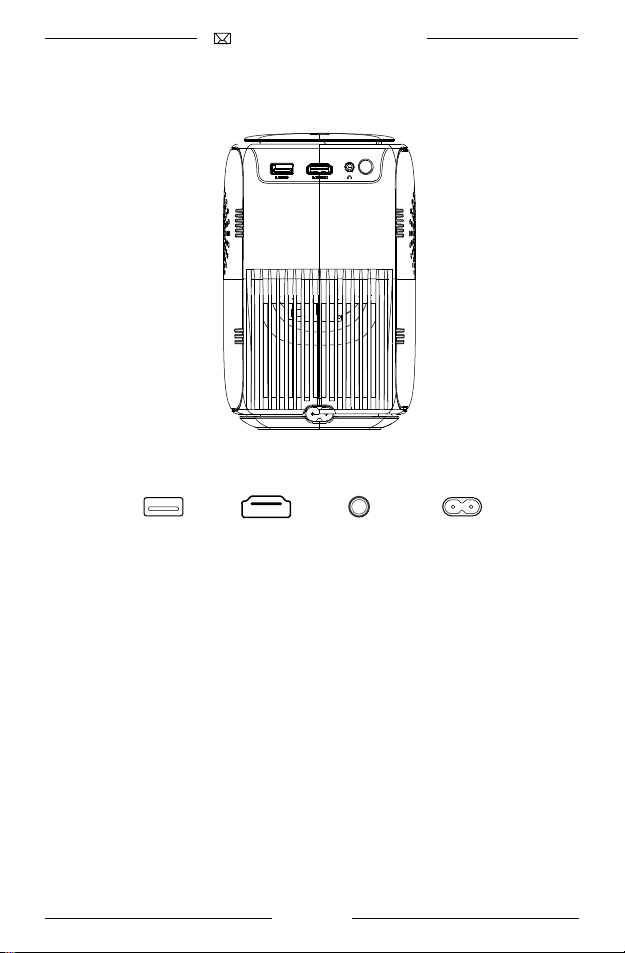
後ろ
オーディオ
JP 030 031 032 033 034 035 036 037 038 039 040 041 042 043 044 045 046 047 048 049 050 051 052 053 054 055 056 057
電源USB HDMI 3.5mm
Page 45
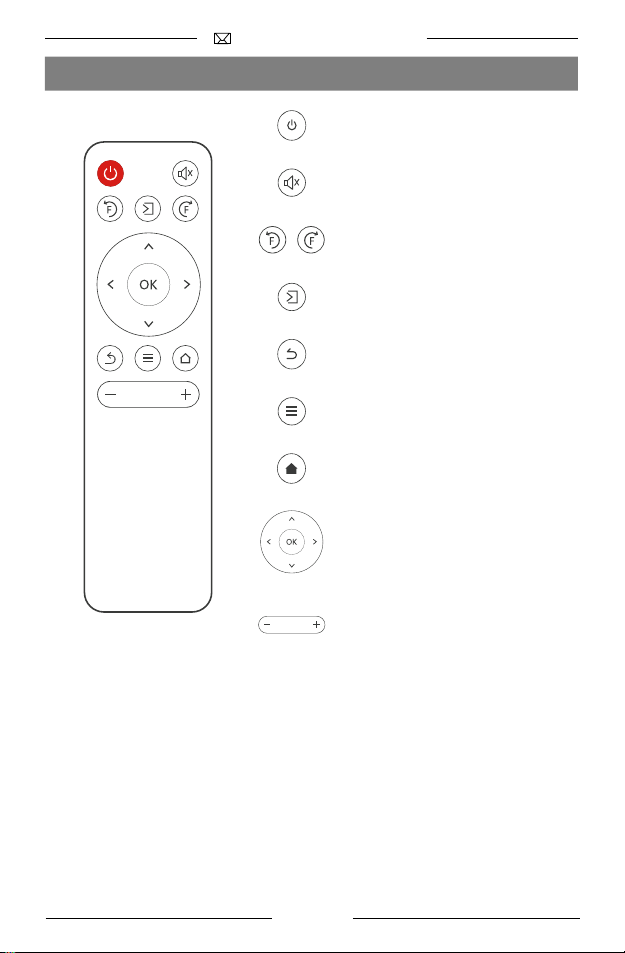
リモコン各 部のはたらき
電源
静 音 モ ード
フォーカス+/-
入力ソース
戻る
メニュー
ホームページ
方向キー
音量+/-
ご 注 意:
1.リモコンに単四形乾電池を2本入れて使用できます。古い電池を混ぜて使
用すると、電源不足による不良を起こす可能性があります。
2. リモコンを使用する際、リモコンの信号発信部がプロジェクターの赤外線
信号受信部に向いていることをご確認ください。
JP 030 031 032 033 034 035 036 037 038 039 040 041 042 043 044 045 046 047 048 049 050 051 052 053 054 055 056 057
Page 46
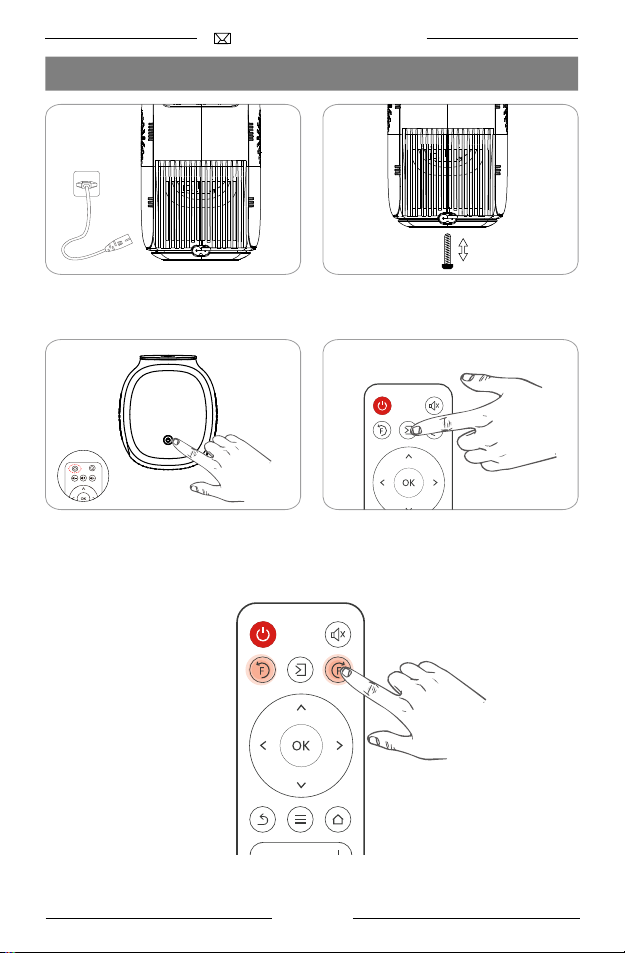
プロジェクター の 起 動
電源コードをコンセントに差し込み
ます。
リモコンもしくは本体の電源ボタ
ンを押します。
スタンドなどを使うと機器を適当的
な位置に調整します。
正しい入力ソースを選択します。
F+/F-ボタンを押すと、ピント調整ができます。
JP 030 031 032 033 034 035 036 037 038 039 040 041 042 043 044 045 046 047 048 049 050 051 052 053 054 055 056 057
Page 47
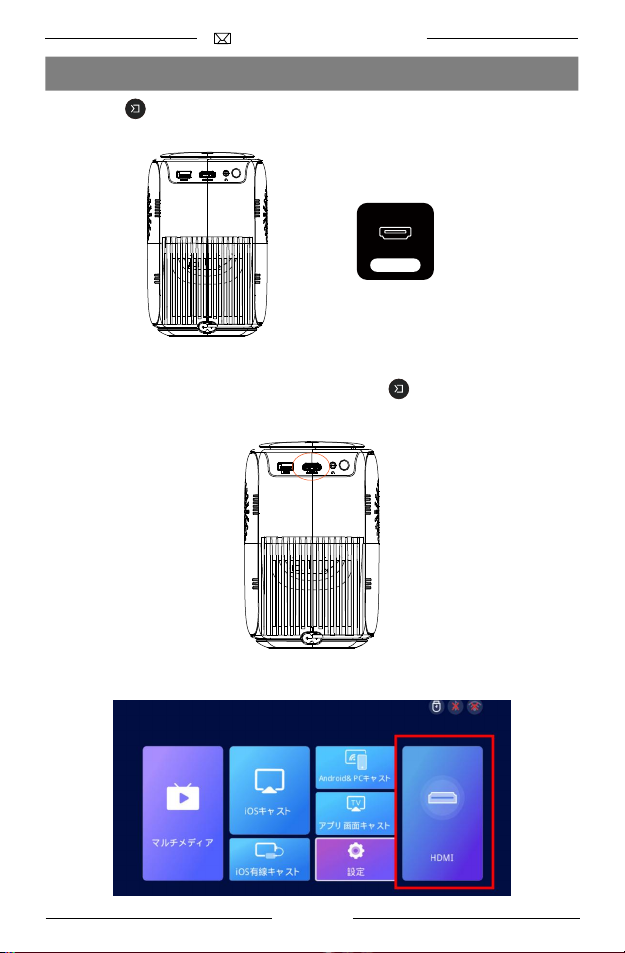
入力信号の選択
リモコンのボタンを押して、対応する入力ソースを変更します。
HDMI
HDMI経由で接続
HDMIケーブルが接続されている場合、リモコンのボタンを押して 「HDMI
」 モードを選択し、ホームページから「HDMI」 を選択してビデオを再生しま
す。
JP 030 031 032 033 034 035 036 037 038 039 040 041 042 043 044 045 046 047 048 049 050 051 052 053 054 055 056 057
Page 48
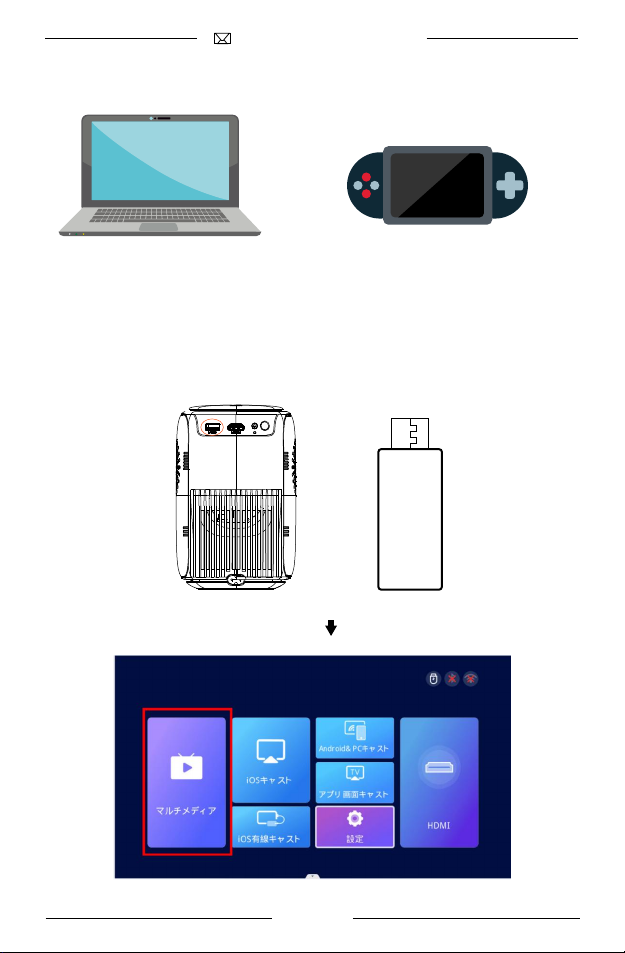
USB経由で接続
プロジェクターに USBメモリを差し込むと、プロジェクターのホームページか
ら「マルチメディア」に移動して、USB内に保存されたファイルを再生すること
がで きます。
USB
JP 030 031 032 033 034 035 036 037 038 039 040 041 042 043 044 045 046 047 048 049 050 051 052 053 054 055 056 057
Page 49
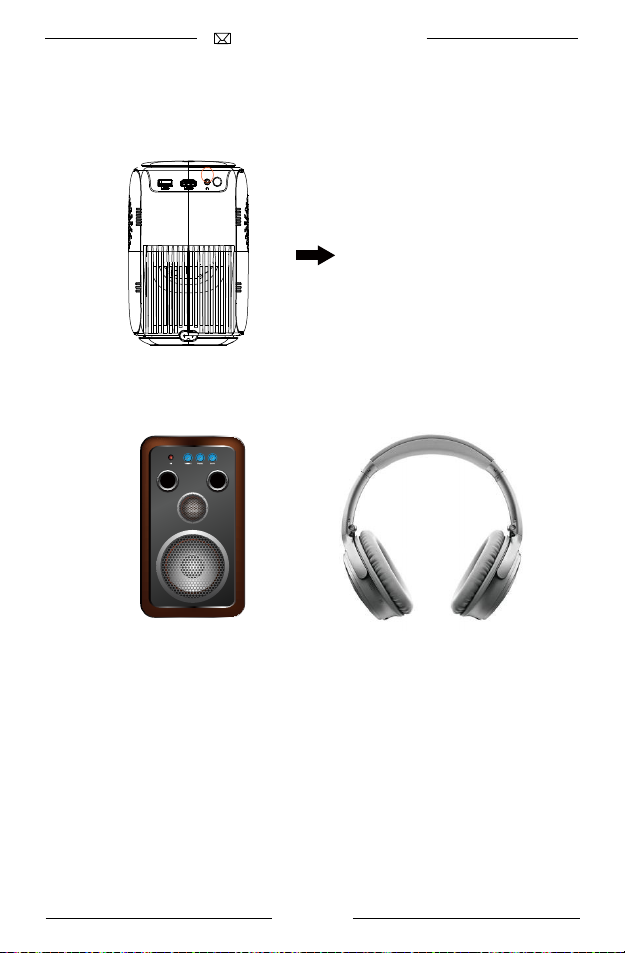
スピーカー/ヘッドホンとの接続
3.5mmのオーディオケーブルでスピーカー/ヘッドホンとプロジェクター
と接続します。
JP 030 031 032 033 034 035 036 037 038 039 040 041 042 043 044 045 046 047 048 049 050 051 052 053 054 055 056 057
Page 50
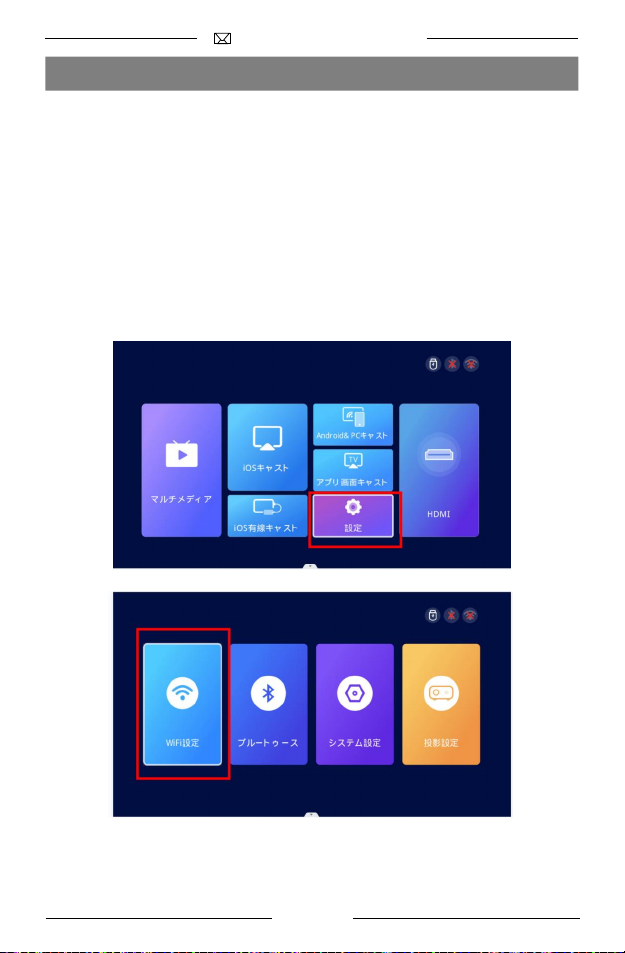
ワイヤレスで 接続
ご 注 意:
①. ワイヤレス接続するには実際のWIFI環境によって多少異なる場合がござ
います。100Mbps以上の通信速度をおすすめします。
②. モバ イル 機 器とプ ロ ジェクター は 1m 以内の距離で接続してください。
③. 機種によってプロジェクターとの互換性が認められない可能性があります。
④. ご不明なところがございましたら、ONOAYOにお問い合わせください。
ステップ 1、ご自宅のWIFIに 接 続しま す。
ホームページから「設定」→「WIFI設定」の画面に移行し、プロジェクターをご
自宅のWIFIに 接 続しま す。
JP 030 031 032 033 034 035 036 037 038 039 040 041 042 043 044 045 046 047 048 049 050 051 052 053 054 055 056 057
Page 51
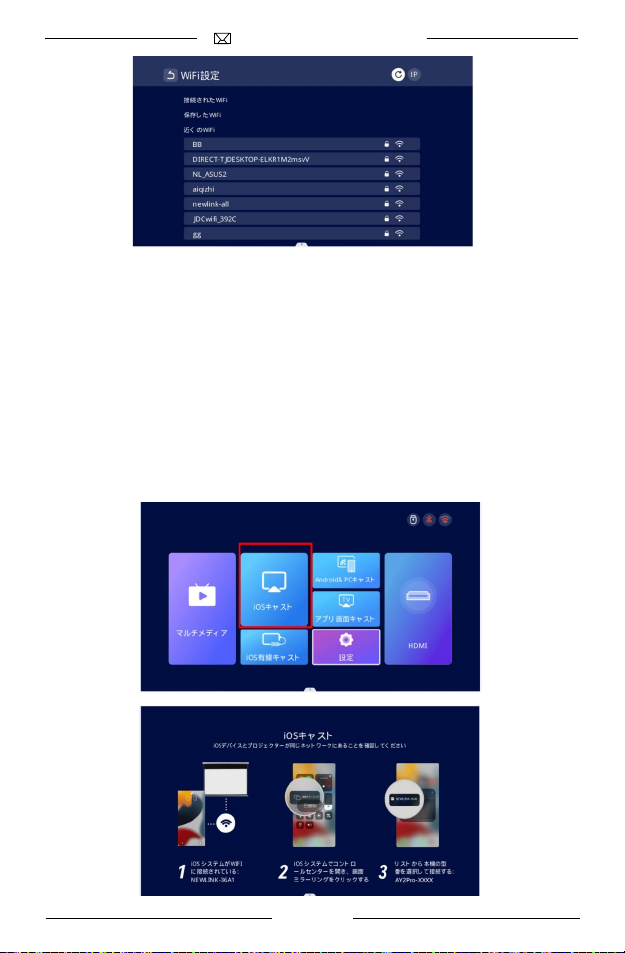
iOSミラーリング
ステップ 1、プ ロ ジェクターとiOSデバイスの両方を同じWIFIに接続したことを
ご確認ください。
ステップ 2、「iOSキャスト」を選択するとiOSミラーリングのページに入ります。
手順に従ってスマホをプロジェクターに接続しましょう。
ステップ 3、iOSデバイスの画面の上から下にスフイプすることで、「コントロ
ールセンター」を開きます。 「画面ミラーリング」をタップし、リストから 「
AY2Pro-XXXX」を 選 択 し ま す 。
ステップ 4、こ れ で iOSデバイスの画面上で視聴しているコンテンツを、プロジ
ェクターの大画面に映し出せます。
JP 030 031 032 033 034 035 036 037 038 039 040 041 042 043 044 045 046 047 048 049 050 051 052 053 054 055 056 057
Page 52
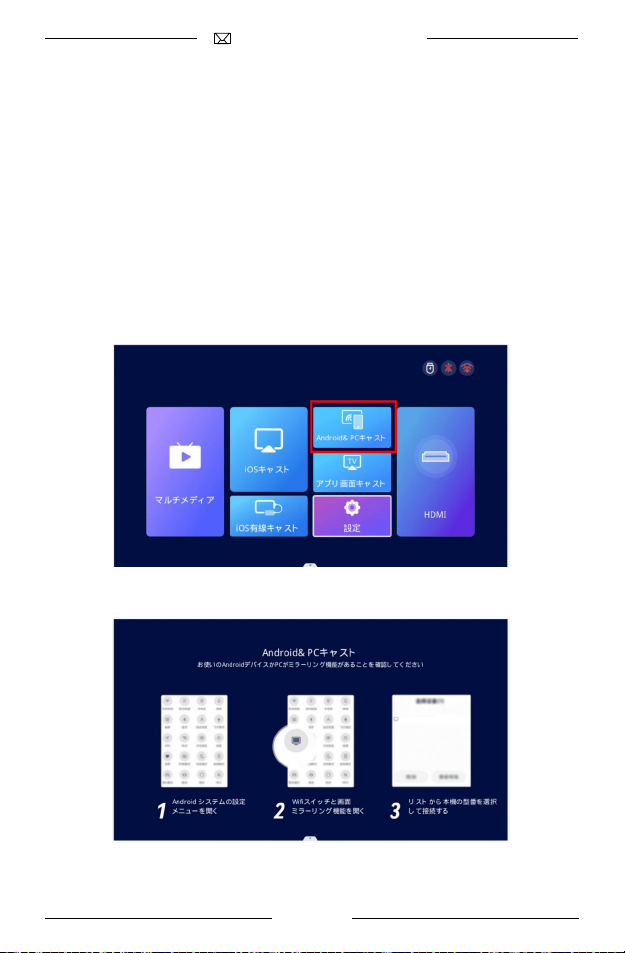
Android&PCミラーリング
ステップ 1、プ ロ ジェクターとandroidデバイスかPCの両方を同じWIFIに接続
したことをご確認ください。
ステップ 2、「Android&PCキャスト」を選択するとandroidデバイスかPCミラー
リングのページに入ります。手順に従ってスマホをプロジェクターに接続しまし
ょう。
ステップ 3、androidデバイスかPCの画面で、「コントロールセンター」を開き
ます。「画面ミラーリング」をタップし、リストから 「AY2Pro-XXXX」を 選 択 し
ます。
ステップ 4、こ れ で androidデバイスかPCの画面上で視聴しているコンテンツ
を、プロジェクターの大画面に映し出せます。
AY2Pro-XXXX
JP 030 031 032 033 034 035 036 037 038 039 040 041 042 043 044 045 046 047 048 049 050 051 052 053 054 055 056 057
Page 53
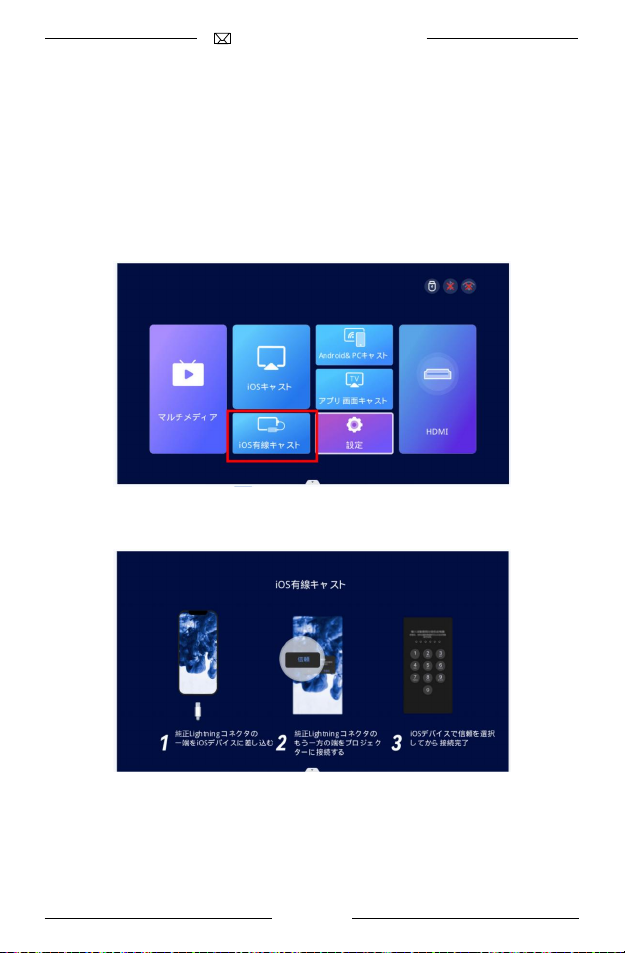
iOS有 線ミラ ーリング
ステップ 1: プロジェクターのホームページに移動し、「iOS有線キャスト」を選択
するとiOS有線ミラーリングのページに入ります。手順に従ってスマホをプロ
ジェクター に接 続しましょう。
ステップ 2: ケーブルを使用してiOSデ バ イスをプロジェクター に接 続しま す。
ステップ 3: iOS デ バイスの ポップアップ ウィンドウで、「信頼」を選択します。
ステップ 4: iOSデバイスにパスワードがある場合は、パスワードを入力してミ
ラーリングします。
JP 030 031 032 033 034 035 036 037 038 039 040 041 042 043 044 045 046 047 048 049 050 051 052 053 054 055 056 057
Page 54
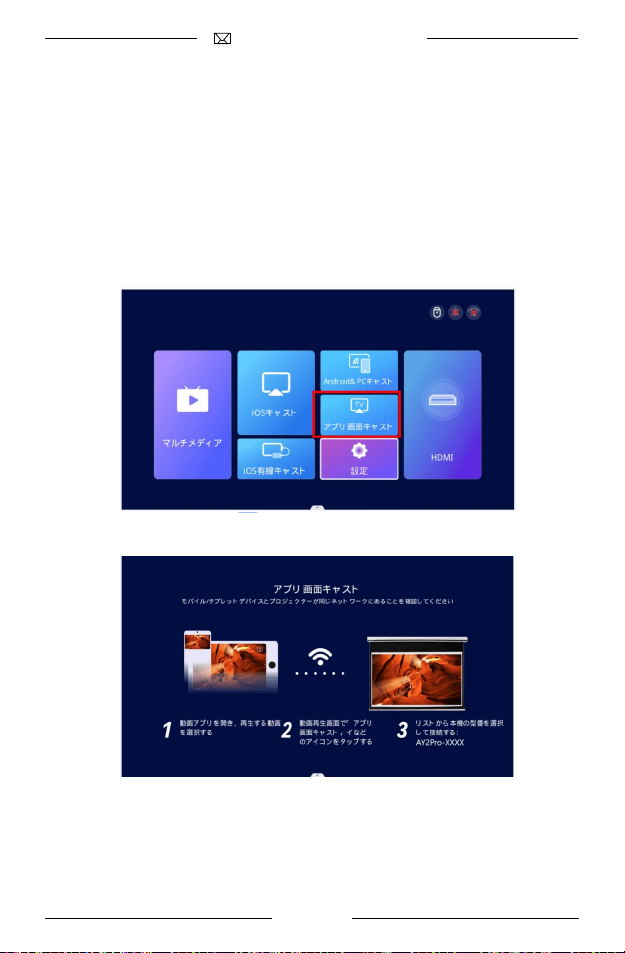
アプリ画面ミラーリング
ステップ 1: プ ロ ジェクターとiOSデバイスの両方を同じWIFIに接続したことを
ご確認ください。
ステップ 2: プロジェクターのホームページから「アプリ画面キャスト」を選択し
て、画面ミラーリングのページに入ります。手順に従ってスマホをプロジェクタ
ーに接続しましょう。
ステップ 3: 投影したいビデオを対応するアプリで開きます。
ステップ 4: ビデオの画面で「画面キャスト」のアイコンをクリックします。
ステップ 5: リストから「AY2Pro-XXXX」を 選 択 し ま す 。
JP 030 031 032 033 034 035 036 037 038 039 040 041 042 043 044 045 046 047 048 049 050 051 052 053 054 055 056 057
Page 55
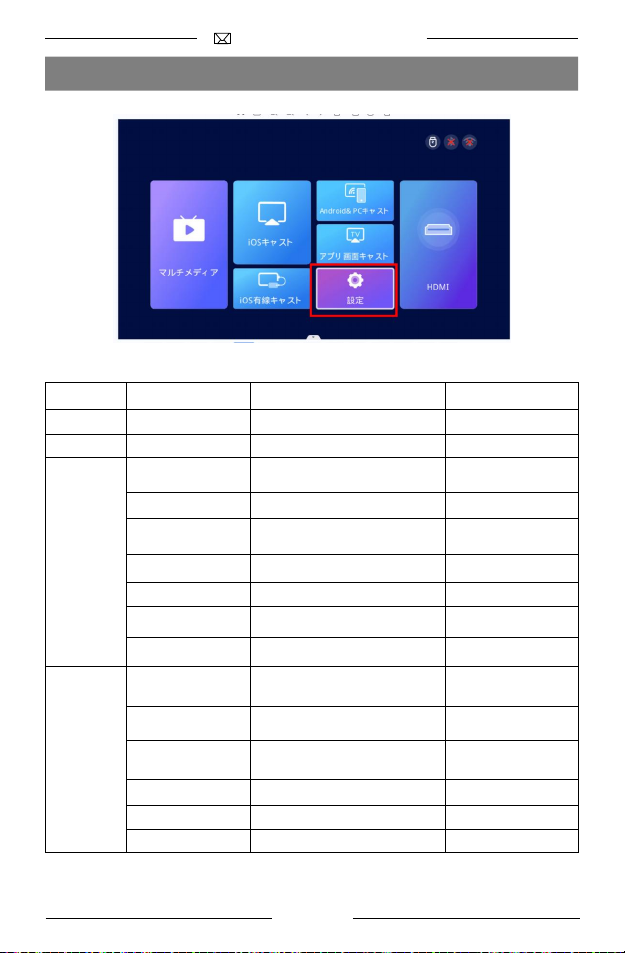
設定
メニュー
WIFI設定
ブ ル ートゥー ス
投影設定
システム 設定
メニュー 2
WIFI
Bluetooth
投影方式
自動台形補正
水平キャリプレーション
手動台形補正
画像 モ ード
サウンド モ ード
画面ズーム
言語
USBアップグレード
オンラインアップグレード
ソフトウェアバ ー ジョン
工場出荷時の設定に戻す
保証書
オプ ション
/
送信モード/受信モード
正面設置で正面投影/天井吊りで背面投影/
天井吊りで正面投影/正面設置で背面投影
オン/オフ
-50~50「自動台形補正モードの調整角度
値を表示します。」
オン/オフ
標準/ダイナミック/マイルド/ユーザー
標準/ミュージック/映画/スポーツ/ユーザ
ー
80%-100%
" 英 語・中 国 語・日 本 語・フラ ン ス 語・ド イ ツ
語・イタ リ ア 語・ポ ル ト ガ ル 語 "
OK
OK
/
OK
OK
ファンクション
ワイヤレス 接続
ブルートゥース接続
投影モードの設定
画面歪みを補正する
画面歪みを補正する
画像設定
音声設定
表示画面のサイズ調整
表示言語を選択する
ローカル環境でアップデ
ート(USBのみ対応)
オンラインローカル 環境
でアップデ ート
保証登録
JP 030 031 032 033 034 035 036 037 038 039 040 041 042 043 044 045 046 047 048 049 050 051 052 053 054 055 056 057
Page 56
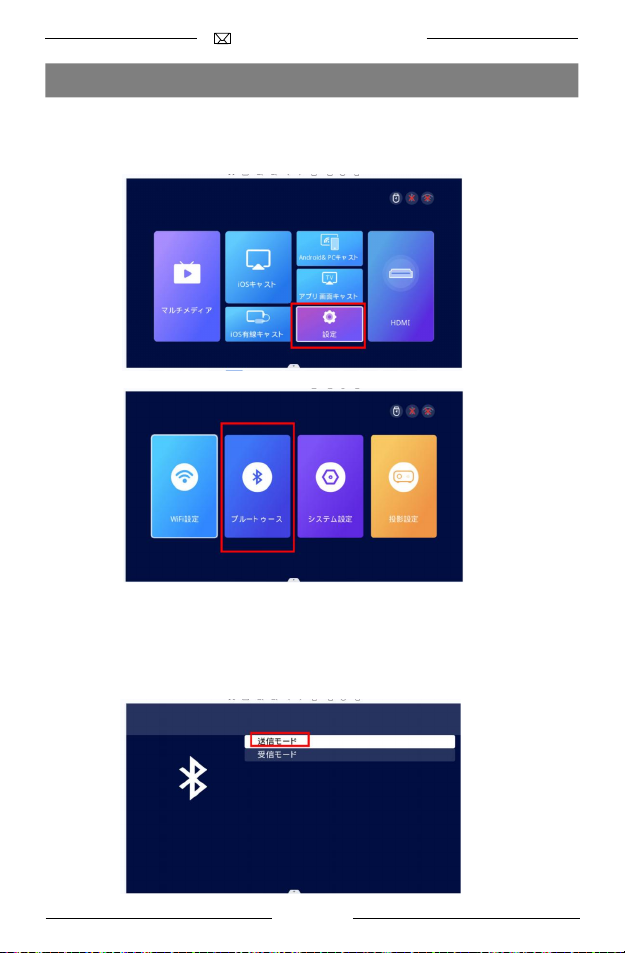
ブルートゥースで接続
【ご注意:ブルートゥース機能の目的は、音を出すデバイスを変更することです
。】 ホームページから「設定」→「ブルートゥース」に移動し、Bluetooth設定画面
に入ります。
1.プロジェクターを外部スピーカーと接続する
「送信モード」を選択して、リストから接続をご希望のBluetoothデバイスと接
続しましょう。"接続済み"が表示されている場合は接続が完了となります。
JP 030 031 032 033 034 035 036 037 038 039 040 041 042 043 044 045 046 047 048 049 050 051 052 053 054 055 056 057
Page 57
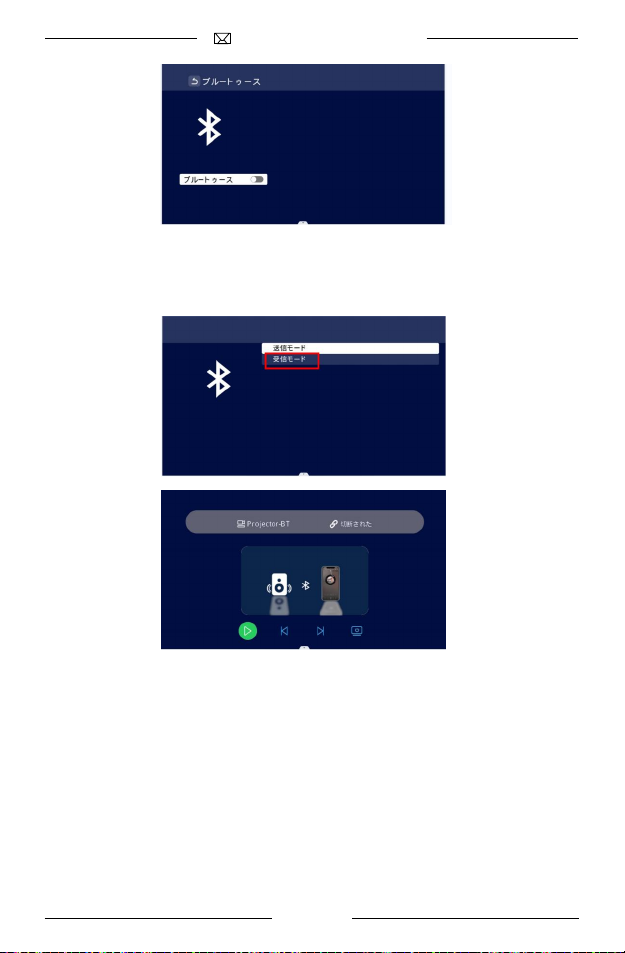
2.プロジェクターをスピーカーとしての使用
「受信モード」を選択して、携帯でのブルートゥースで検出されたリストから「
Projector-BT」に接続しましょう。接続が完了次第"接続済み"と表示されます。
3.Bluetoothスピーカーに接続できない場合は?
ペアリングに失敗したと表示された場合は、Bluetoothスピーカーがプロジェク
タ−に接続されていないことを示します。
下記の方法を試してください。
方法1:プロジェクターとスピーカー両方のBluetoothをオフにしてオン、再度接
続してみてください。
方法2:目 的 の Bluetoothデバイスが他のデバイスに接続されていないことを
ご確認ください (Bluetoothデバイスには自動再接続機能があり、電源を入れる
とすぐに他のデバイスに接続される可能性があります)。
方法3:プロジェクターを再起動してください。
方法4:プロジェクターを初期化にしてみてください。
JP 030 031 032 033 034 035 036 037 038 039 040 041 042 043 044 045 046 047 048 049 050 051 052 053 054 055 056 057
Page 58
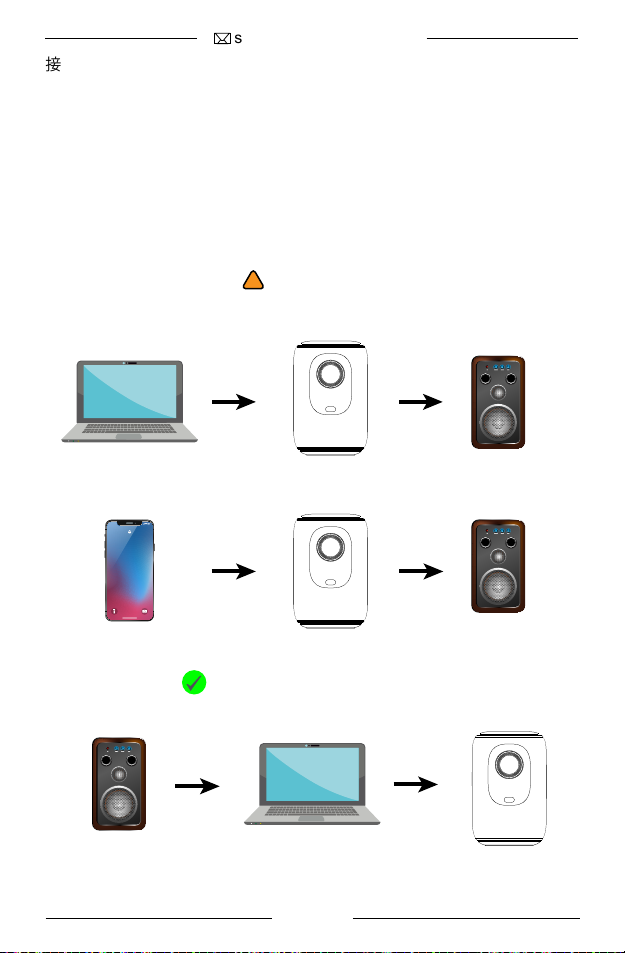
接続に関するご質問がございましたら、サポートセンターにお問い合わせくだ
さい。
4.Bluetooth接続後のオーディオ遅延?
Bluetooth接続後にオーディオ遅延が発生した場合は、Bluetoothスピーカーを
携帯電話(またはiPad、ノートパソコン)に接続に関するがございましたら、下
記の手順に従ってください。
遅延が発生しやすい接続順!
20:30
Monday, September 23
おすすめの接続順
✔
JP 030 031 032 033 034 035 036 037 038 039 040 041 042 043 044 045 046 047 048 049 050 051 052 053 054 055 056 057
Page 59
20:30
Monday, September 23
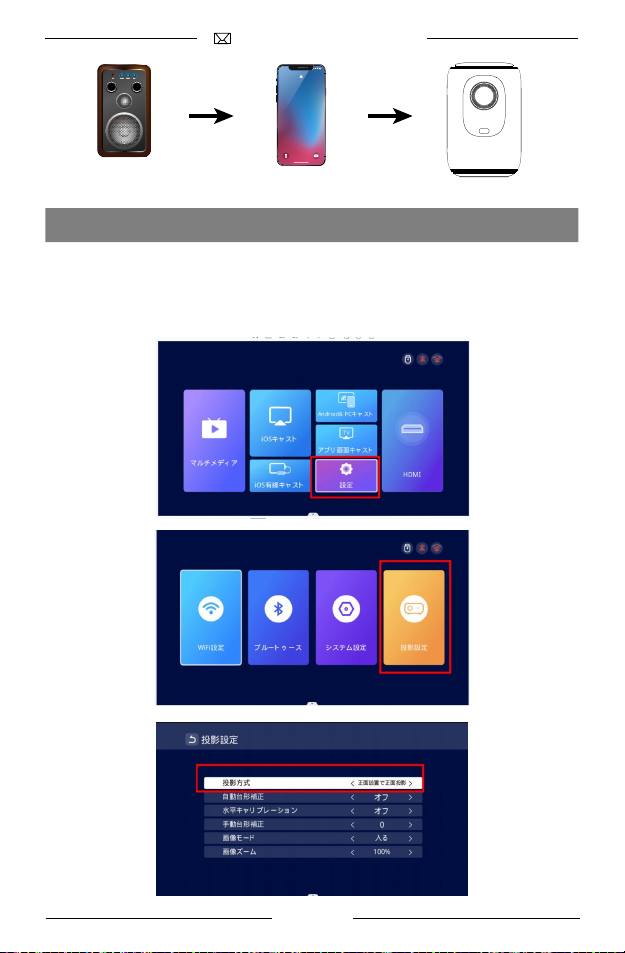
プロジェクターの設置方法
取付方法
ホームページから「設定」→「投影設定」→「投影方式」に移行し、取り付け方法
によって投影モードを選択します。
JP 030 031 032 033 034 035 036 037 038 039 040 041 042 043 044 045 046 047 048 049 050 051 052 053 054 055 056 057
Page 60
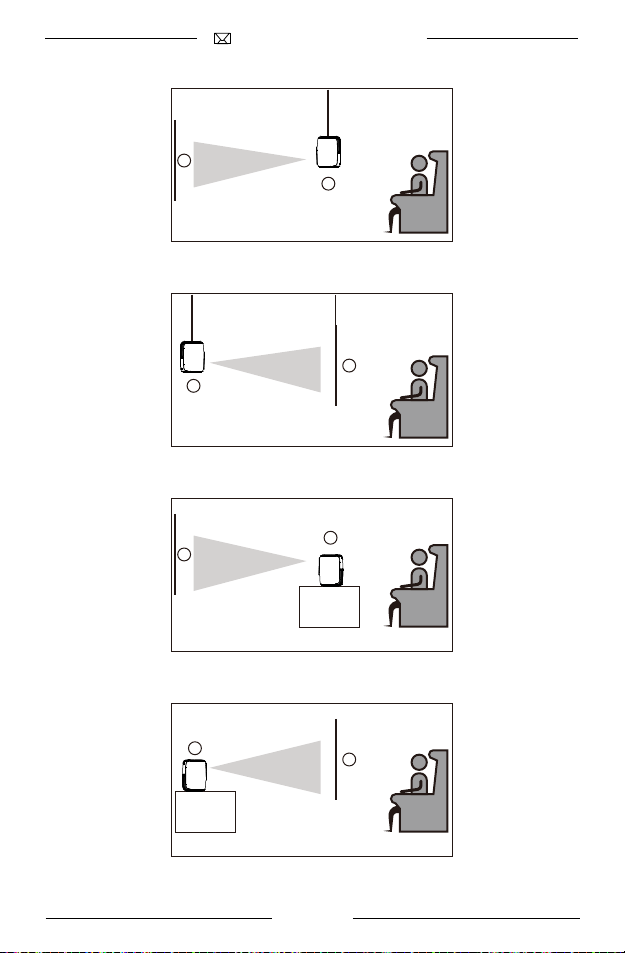
1
正面設置で正面投影
2
天井吊りで背面投影
2
1
1
2
天井吊りで正面投影
2
1
正面設置で背面投影
JP 030 031 032 033 034 035 036 037 038 039 040 041 042 043 044 045 046 047 048 049 050 051 052 053 054 055 056 057
Page 61
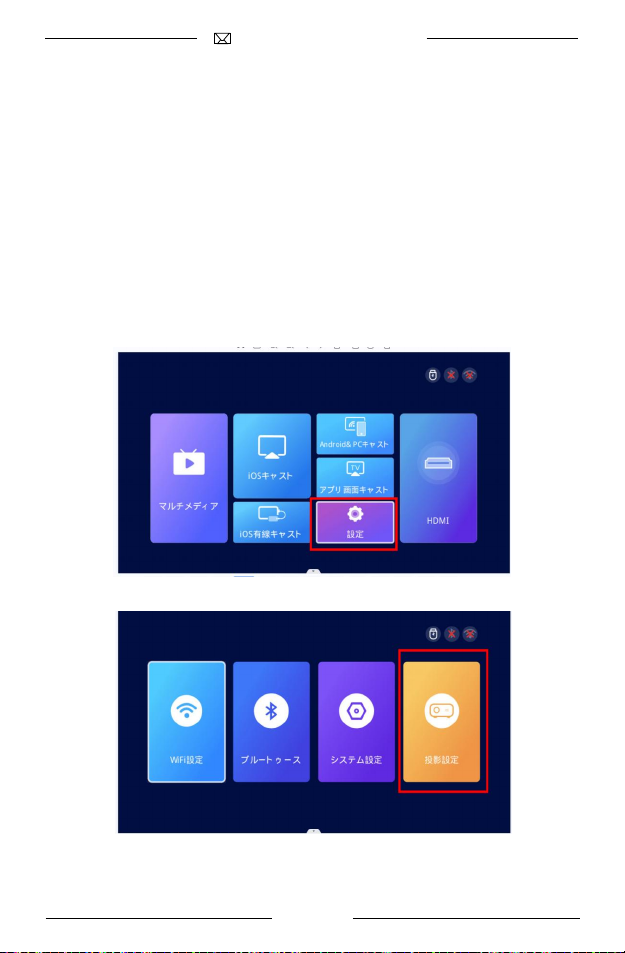
自動台形補正&手動台形補正&電動フォーカス&ズーム機能
設定ページに移動します。 「投影設定」をクリックすると、調整に関するすべて
のオプションが表示されます。
>>自動±50°台形補正
自動台形補正の場合は、インターフェースを「自動」のままにします。
「自動台形補正」を「オン」状態にすると、プロジェクターは画像の歪みを自動的
に補正します。
>>手動±50°台形補正
手動台形補正を希望する場合は、自動機能を無効にし、「オフ」状態のままにし
ます。 その後、「手動台形補正」が「オン」の状態になり、リモコンの左右のボタ
ンを使用して台形補正の度合いを調整できます。
JP 030 031 032 033 034 035 036 037 038 039 040 041 042 043 044 045 046 047 048 049 050 051 052 053 054 055 056 057
Page 62
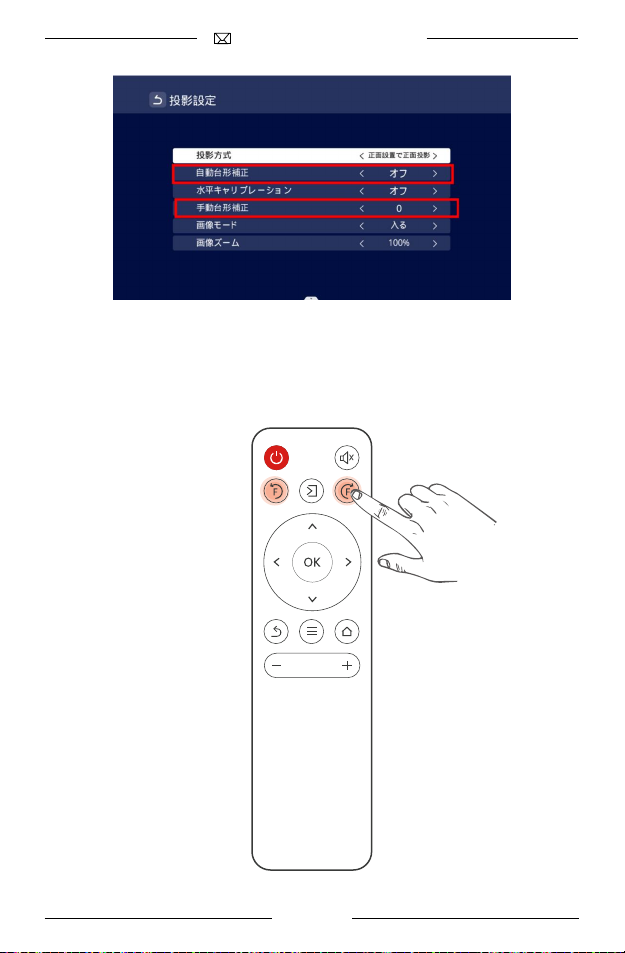
>> 電 動 フォー カ ス
F+/F-ボタンを押すと、ピント調整ができます。
JP 030 031 032 033 034 035 036 037 038 039 040 041 042 043 044 045 046 047 048 049 050 051 052 053 054 055 056 057
Page 63
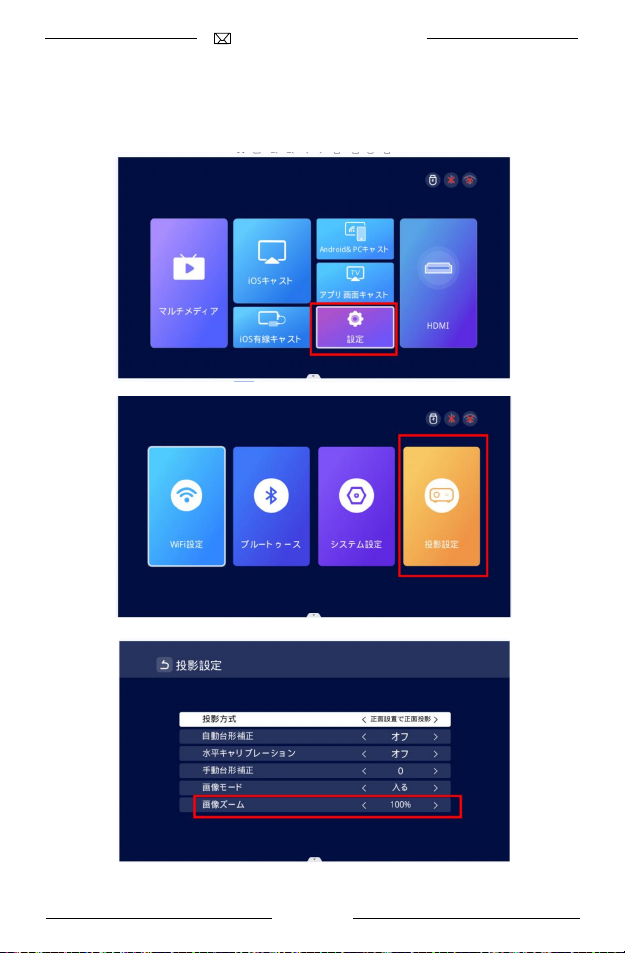
>> ズーム機能
投影設定ページに移動します。 「画像ズーム」をクリックすると、ズームの調整
ができます。プロジェクターは80%〜100%のズーム調整をサポートしており
ます。
JP 030 031 032 033 034 035 036 037 038 039 040 041 042 043 044 045 046 047 048 049 050 051 052 053 054 055 056 057
Page 64
プロジェクター の 取 付
投影距離と画面サイズ
下記の手順に従ってプロジェクターの投影距離と画面サイズを調整しましょう
。
今すぐ弊社に連絡すると、スクリーンが無料でもらえるチャンスがあります。
或はlineのQRコードをスキャンしてご連絡くださいませ。
6m
2.5m
2m
1m
40” 80” 100” 240”
ご注意:
1.1.9m~2.6mの投影距離で最高の画質が達成できます。画面サイズを大
きすぎるとなった場合、画質にある程度の影響を与える可能性があります。
2.画像サイズはプロジェクターとスクリーンの間の距離で決まります。上記
の投影距離の上で3%の偏差があるかもしれません。 設定によって、距離も
異なります。
JP 030 031 032 033 034 035 036 037 038 039 040 041 042 043 044 045 046 047 048 049 050 051 052 053 054 055 056 057
Page 65
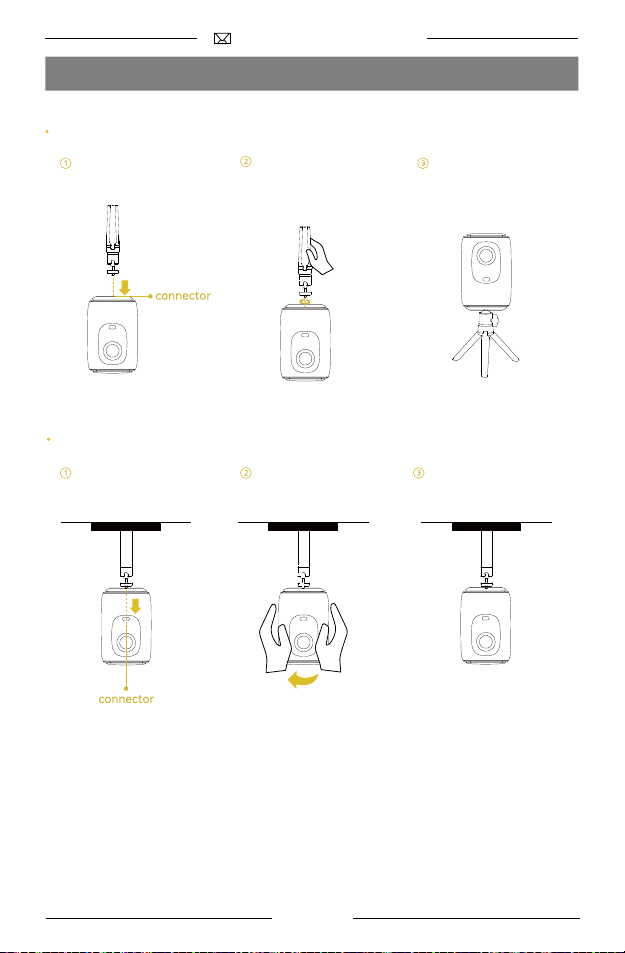
卓上/天井に設置する
卓 上 スタンド
卓上スタンドを使う
天井金具
天井金具を使う 固定されるまでブラ
固定されるまでブラ
ケット を 回 転 さ せ る
ケット を 回 転 さ せ る
接続完了
接続完了
ご注意:取り付けネジのサイズはM4です。
卓上スタンド/天井金具は付属しておりません。
JP 030 031 032 033 034 035 036 037 038 039 040 041 042 043 044 045 046 047 048 049 050 051 052 053 054 055 056 057
Page 66
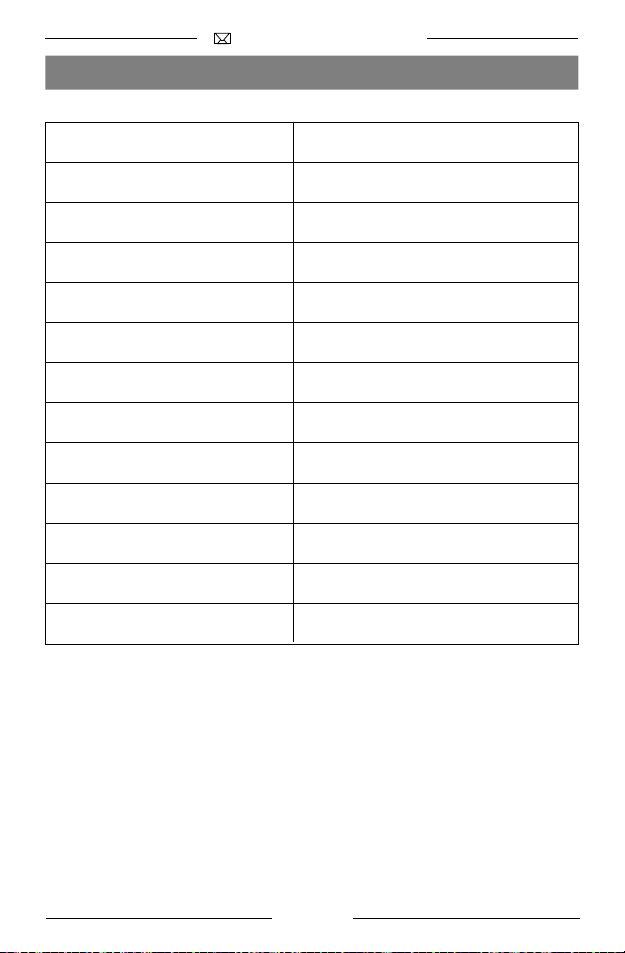
製品の仕様
画像技術
解像度
ディスプレイ技術
焦点
距離
アスペクト比
入力電圧
入力ポート
出力ポート
オーディオファイル 形式
サイズ
重量
スローレシオ
*ご使用中に何か不明点がございましたら、お気軽にお問い合わせください。
お客様のご希望に沿って解決策を提供できますように努めています。
弊社に連絡すれば、保証期間を3年間+6ヶ月に延長することもできま す。
TFT LCD
1920*1080
LED
電 動フォー カ ス
1M-6M
16:9/4:3/自動
100V-240V-50/60HZ
USB*1/HDMI*1
3.5mmオーディオ
4Ω3W*2
111*136*178mm
1.1KG
1.4:1
或はlineのQRコードをスキャンしてご連絡くださいませ。
JP 030 031 032 033 034 035 036 037 038 039 040 041 042 043 044 045 046 047 048 049 050 051 052 053 054 055 056 057
Page 67

Page 68

 Loading...