

Page 1
www.onnettechnologies.com
Page 2
2
is the registered trademark of Onnet Technologies (India) Pvt. Ltd All the
products and product names mentioned herein are the trademarks or registered
trademarks of their respective holders. Copyright of the whole product as integration,
including its accessories and software, belongs to Onnet Technologies (India) Pvt. Ltd
Without the express permission of Onnet Technologies (India) Pvt. Ltd, any individual
or party is not allowed to copy, plagiarize, imitate or translate it into other languages.
All the photos and product specifications mentioned in this manual are for references only.
As the upgrade of software and hardware, there will be changes. And if there are changes,
Onnet Technologies is not responsible for informing in advance. If you want to know
mo r e ab o ut o u r pr o du c t in f or m at i on , ple a se v i si t our w e bs i te a t
www.onnettechnologies.com
Copyright Statement
Page 3
3
1. The device complies with Part 15 of the FCC rules. Operation is subject to the following conditions:
2. This device may not cause harmful interference, and this device must accept any interference
received, including interference that may cause undesired operation.
3. FCC RF Radiation Exposure Statement: The equipment complies with FCC RF radiation exposure
limits set forth for an uncontrolled environment. This equipment should be installed and operated
with a minimum distance of 20 centimeters between the radiator and your body.
4. This Transmitter must not be co-located or operating in conjunction with any other antenna or
transmitter.
5. Changes or modifications to this unit not expressly approved by the party responsible for
compliance could void the user authority to operate the equipment.
FCC Caution
This product has been tested in typical configuration by Ecom Sertech Corp and was found to
comply with the essential requirement of “Council Directive on the Approximation of the Laws of the
Member States relating to Electromagnetic Compatibility” (89/336/EEC; 92/31/EEC; 93/68/EEC)
CE Statement of Conformity
Page 4
4
Dear Customer,
Thank you for buying another innovative product from Onnet Technologies. We assure you of an
unparalleled and exceptional experience with our Onnet product. This product offer the best of USB
/Print server applications.
It is yet another example of Onnet's commitment to get the latest and most innovative technologies to
you for your experience. All Onnet products come with an extensive service support and a 1 year
warranty. Each Onnet product is subjected to a stringent Quality Control program at our assembly plant.
However, in the rare event that your device does not behave as it is meant to, please ensure that you log
on to our website www.onnettechnologies.com and use the “Register” tab for the first time , choose
the Product Registration tab and simply follow the tab menu to register your product and user details
with us. You must enter the serial number of your device that is printed on the box for our support team to
get back to you immediately. You will receive a confirmation mail after you have registered your product
successfully.
Sincerely,
Onnet Technologies (India) Pvt. Ltd.
Chapter-1 Introduction
Page 5
5
Welcome to the wonderful world of Onnet Technologies. “Anytime, Anywhere …”
You are now successfully registered with us and will now be able to access our online support center for
software upgrades, troubleshooting and receive regular updates on your email for product launches,
special offers and much more.
1.1 About Onnet
Onnet Technologies is a Green Initiative inspired company. Our core focus is to bring together
innovative energy efficient wireless network routers for the small office and home office users
as well as Energy Efficient power and switching equipments for the outdoor network in the ICT
industry .
Onnet also intends to offer Green Alternate Energy Technology for us in rural micro telecom
environments . Headquartered at Ahmedabad Gujarat, Onnet Technologies aims to make the
best of one of the most progressive business environments offered in the country.
Page 6
6
WEE Directives & product disposal:
All the end of its serviceable life, this product should not be treated as household or general waste. It
should be handed over to the applicable collection point for the recycling of electrical and electronic
equipment, or return to the supplier for disposal.
The state of the art assembly unit for integrating the latest technology is also located at Gandhinagar.
With one of the youngest pool of entrepreneurial skills available in the country, Onnet Technologies is
revolutionizing the knowledge and technology based growth engine. Onnet Technologies objective is
to contribute to the eventual energy security of the country.
Trademarks:
Microsoft, windows Xp, windows VISTA and windows 7 are register trademark of the Microsoft
Corporation. All other brand and product names mentioned herein may be registered trademarks
of their respective owners. Customers should ensure that their use of this product does not
infringe upon any patent rights. Trademarks mentioned in this public
Page 7
7
Table of Content
Environment setup.....................................................................................................08
Introduction................................................................................................................09
Hardware installation .................................................................................................12
Installation Konnect+ networking USB server Utility..................................................13
Installation Konnect+ networking USB server featured functions..............................20
Connect automatically for printing .............................................................................20
Connect this device when application starts..............................................................21
Auto disconnect printer/MFP/storage device.............................................................22
Create a shortcut on your desktop ............................................................................24
Device properties.......................................................................................................25
Control menu .............................................................................................................26
Configuration with the utility.......................................................................................27
Configuration with web-based UI...............................................................................29
Removing Konnect+ networking USB server utility from your system.......................32
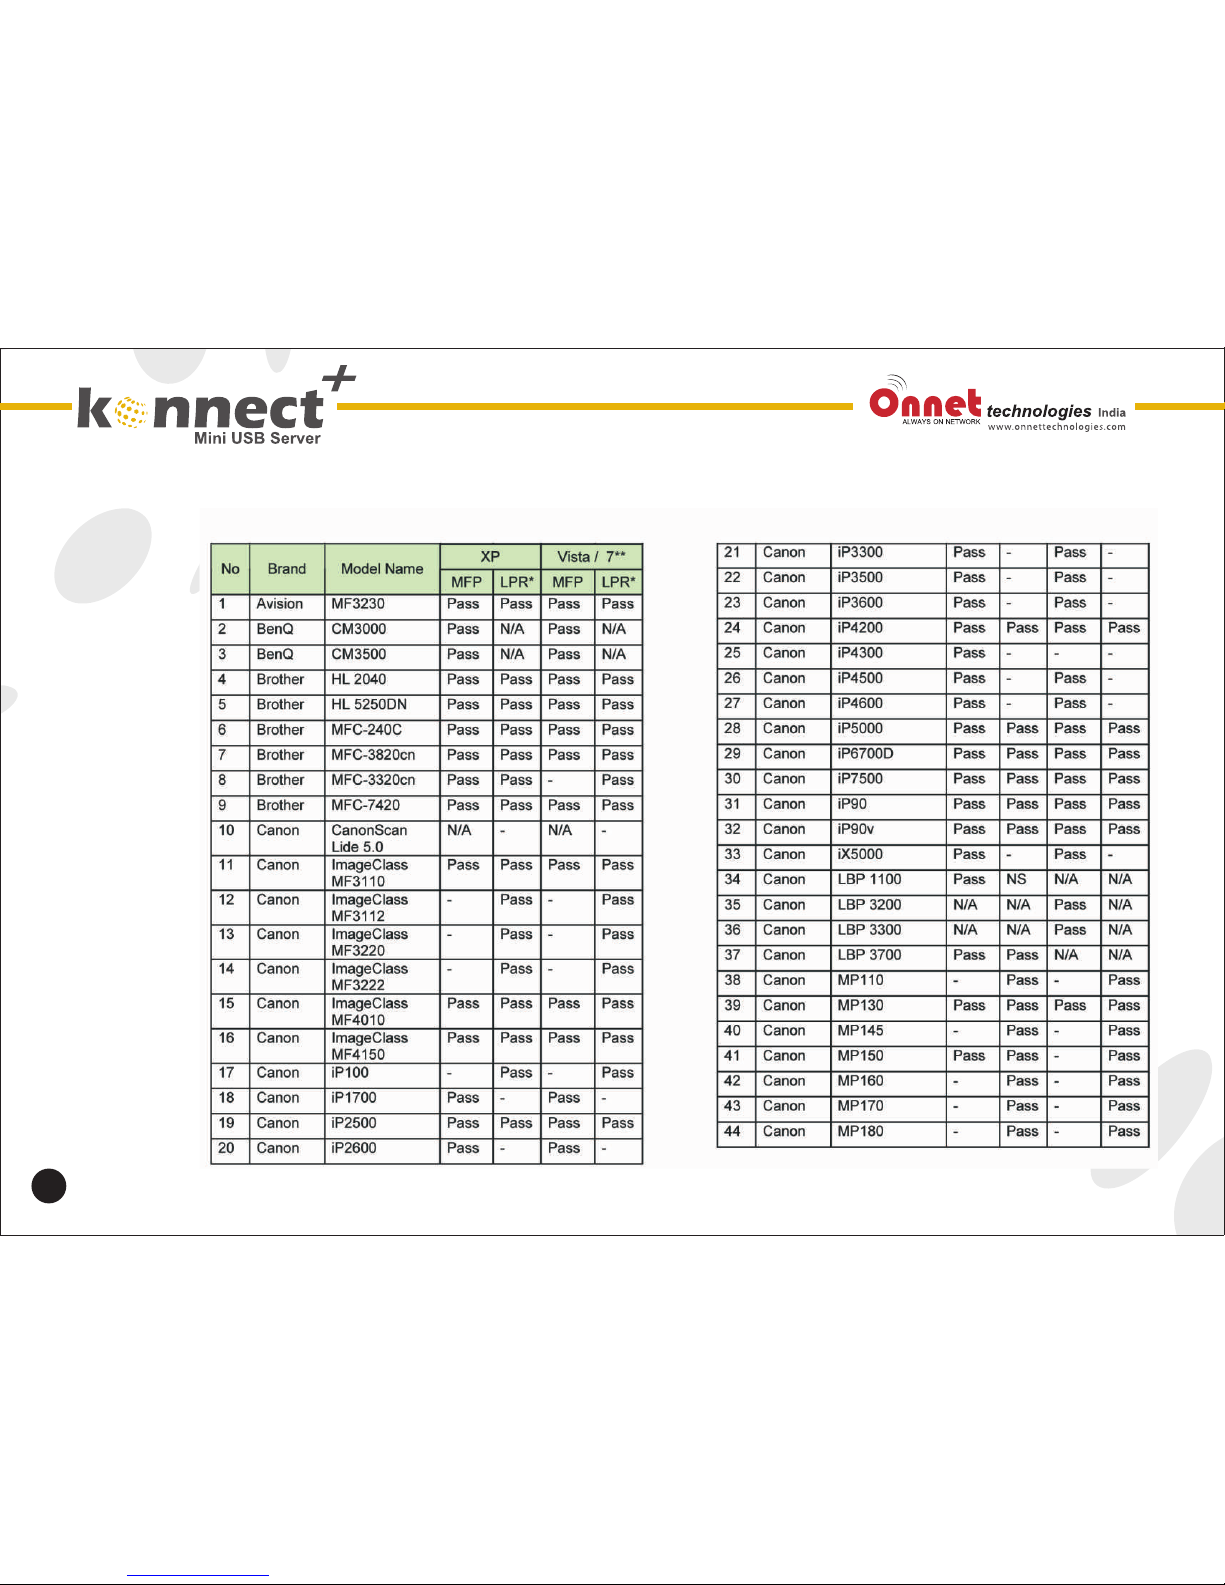
MFP-Printer/LPR printer compatibility list..................................................................33
The Manual for:
• Konnect+ networking USB server 100M
(Support Multi-Function Printers & USB devises)
Page 8
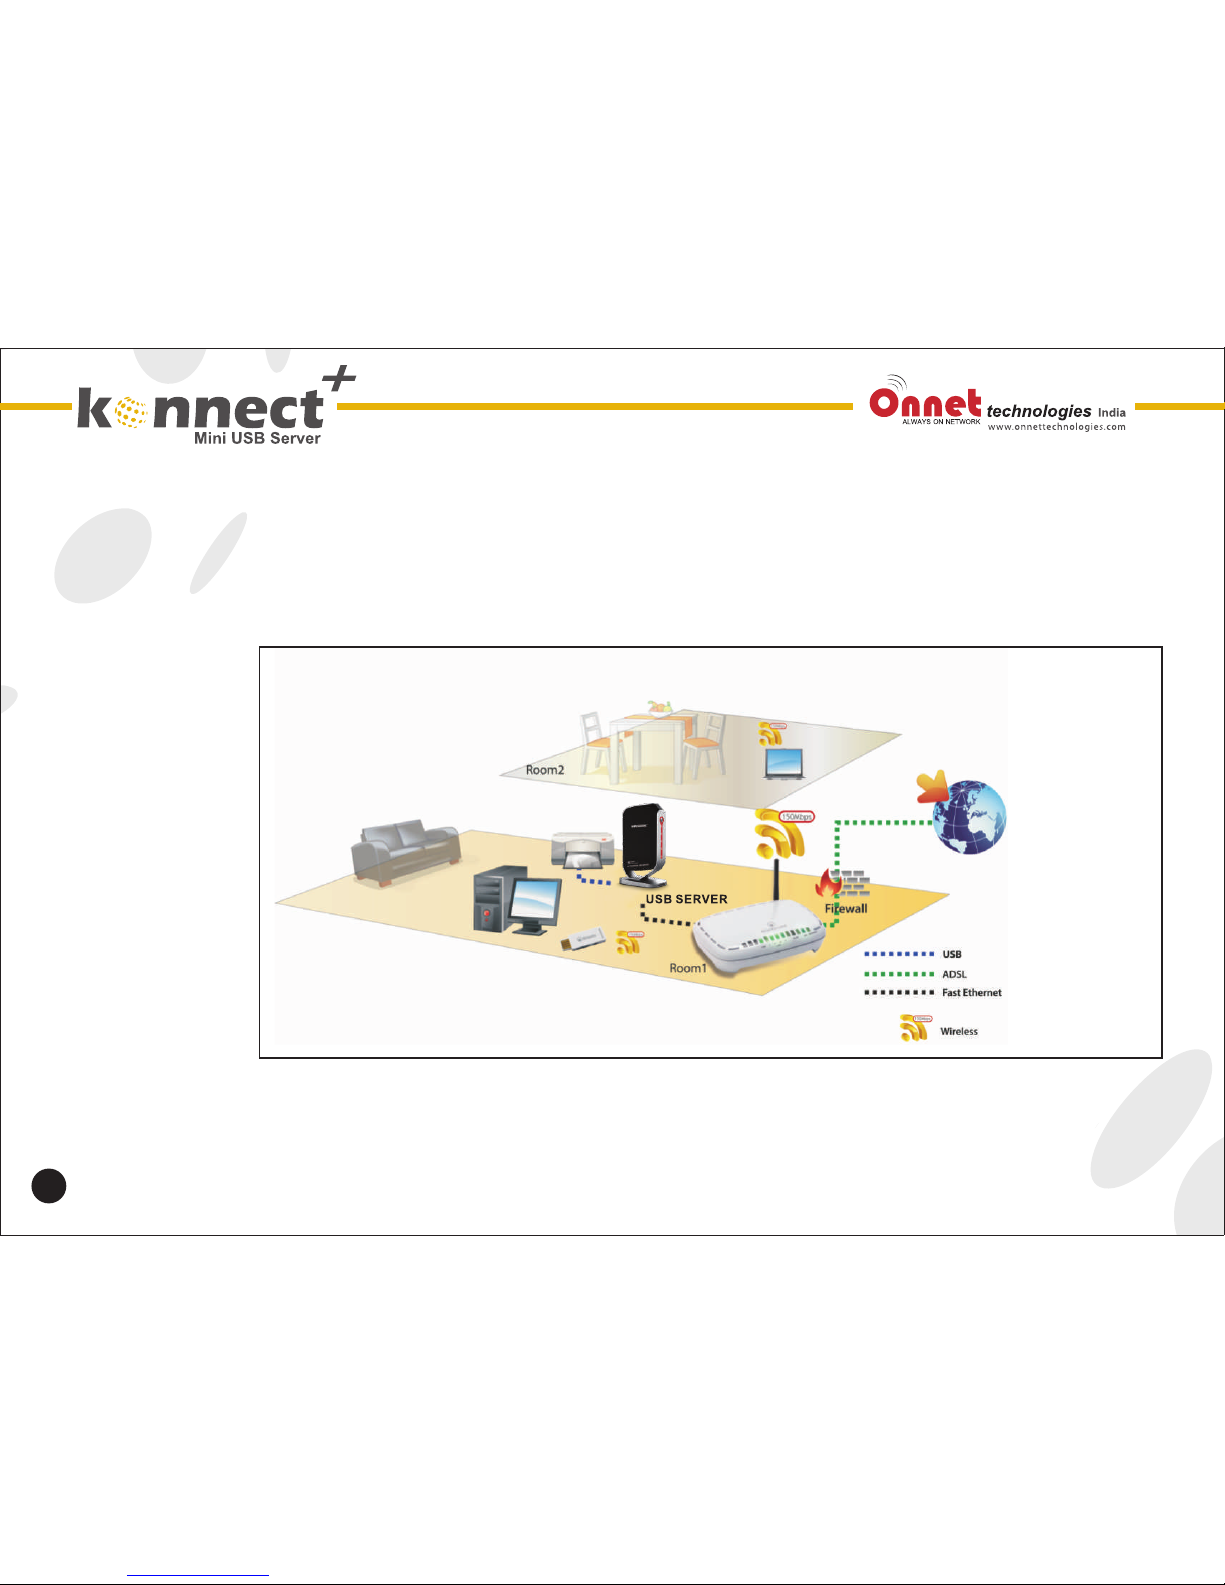
The picture above depicts a sample household network USB device use environment.
To setup the devise, simply plug it into the home/office network under the same router
and power it on. Then it could be shared by all the computers on the same network
8
Environment Setup
Page 9
Thanks you for purchasing this Konnect+ networking USB server that allows any
networked computer to share a USB printer. USB devises. It complies with USB 2.0
specifications and is backward compatible with USB 1 (and provided an auto-sensing
Ethernet port that works with either 10Base-T, 100Base-T or 1000Based-T networks.
This until also supports multiple protocols and multiple operating systems. The built-in
web management feature provides more convenience by allowing the user to configure,
monitor and even reset the USB server via a web browser.
The new USB server enables an external hard drive, flash drive, memory card reader,
USB webcam, USB speaker, USB multifunction printer ( MFP), or other USB devises to
be shared on a network, with the versatility afforded by the USB server, user can now
enjoy their favorite multimedia content stored on their computer from anywhere in their
home or office use. When connecting USB server to a wireless router, users can access
their multimedia content and USB devices wirelessly. The UPnP technology enables
quick and easy setup and configuration in a windows environment.
We hope that you will enjoy using your USB server/print server and find it to be a useful
solution.
Please read this user manual carefully before using. All information on this booklet is
subject to change without notice due to technical reasons.
9
Introduction
Page 10
System requirements:
• Windows 2000/XP/2003/VISTA, Windows 7
• Mac OS X 10.2 or later (Only support printer)
• Device with a USB connection.
Features
• Easily connect your USB printer, USB devices to a network
• Allows multiple computers to share USB printer, USB device on the network
• Print from any computer on your local network
• Support DHCP client and multiple network protocols
• 10Base-T/100Base-T
• Auto sensing
• 10Base-T/100Base-T/1000Base-T auto sensing (for 1000M LAN model)
• Supports web management software.
Package contents : For Networking USB server
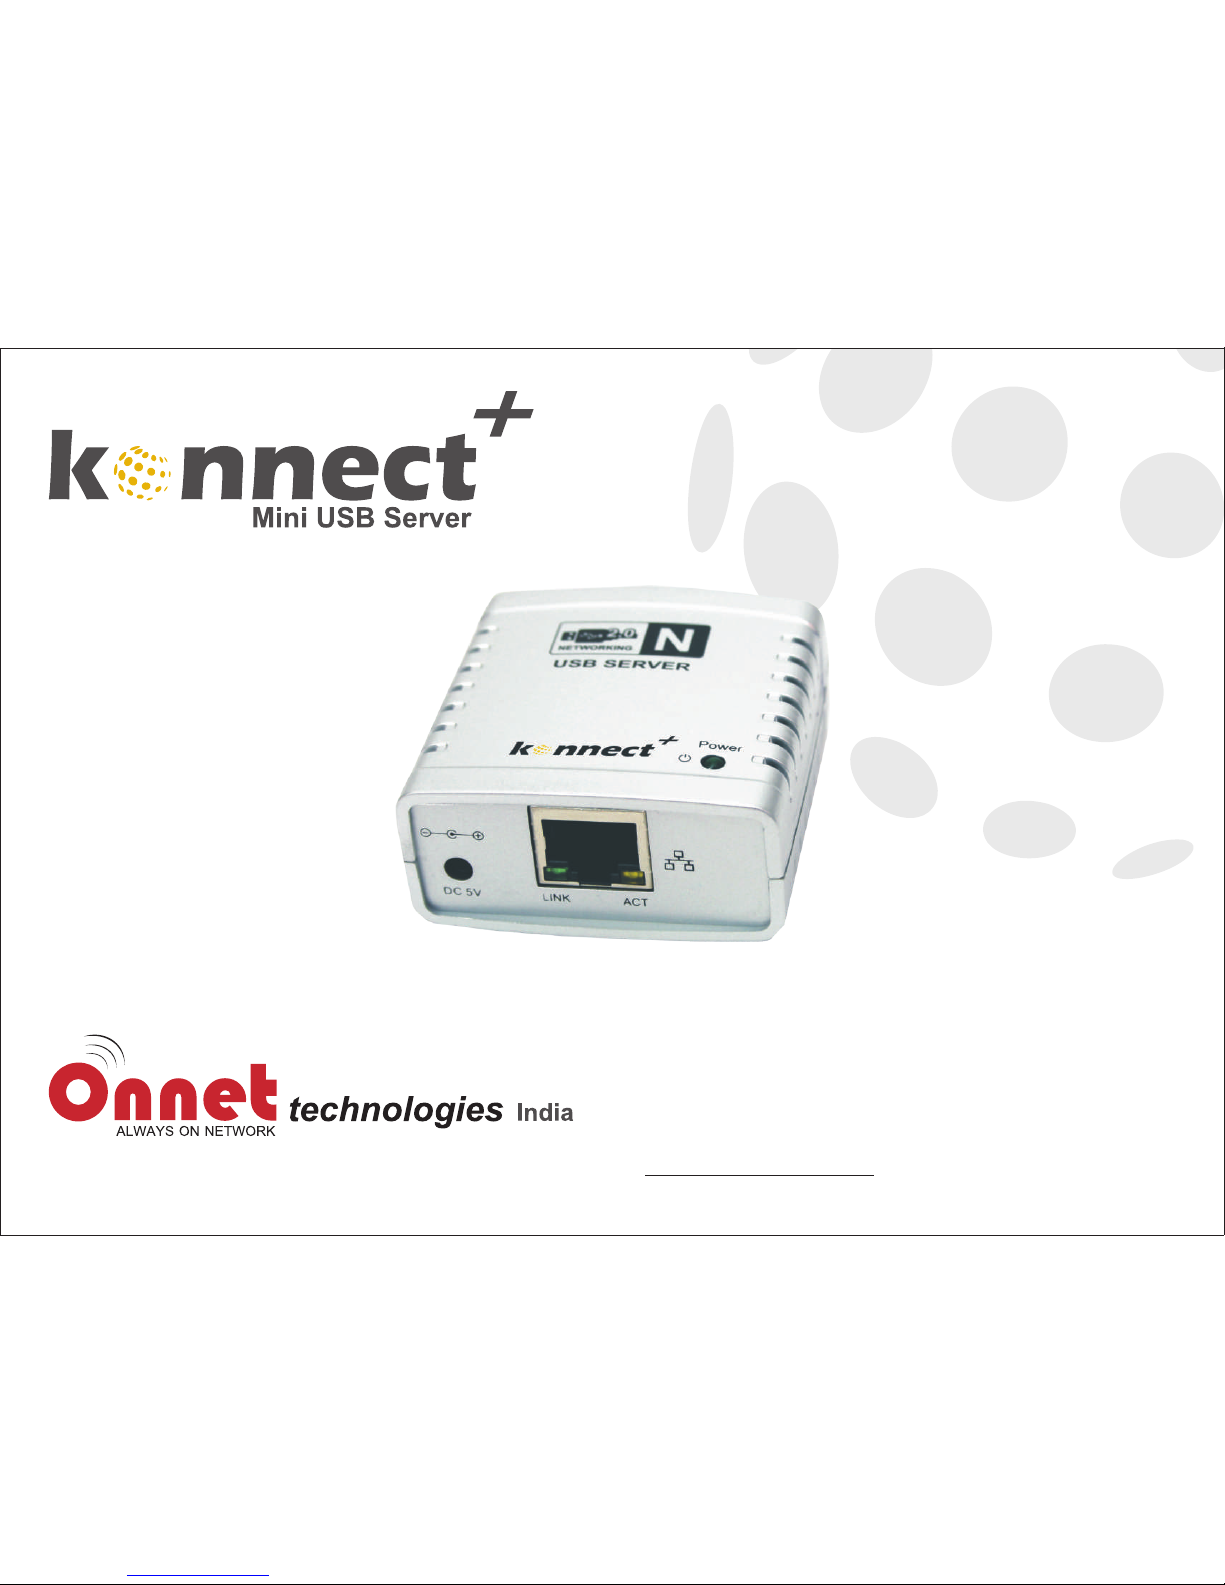
• Onet Konnect+ networking USB server
• Networking cable
• Power adapter 5V
• Installation CD
• User manual
10
Page 11
Notice:
1. Do not use the network USB server in the extreme hot, cold, dusty or humid
environment.
2. Prevent friction with objects or it may lead to surface abrasion or hardware damage.
3. Avoid the hub falling down from a high place, or it may damage the hardware inside.
4. Do not use any alcohol, thinner or benzence to clean the device.
5. Please do not use power adaptor with different voltage rating. It will damage or burn
the network hub.
6. Always check I the device driver is required by some USB peripherals such as
printers, webcams etc. please install the device driver is require on your computer
first.
7. Some USB devices require a direct connection to PC for optimum performance.
8. The network hub provides 5V power supply which is enough for most USB devices
but the power can be in short supply when connecting too many devices like 2.5'
external hard disk or .connecting other devices with high power consumption
simultaneously. Please attach their self-power supply in order to co-work with the
network hub properly.
9. Make sure your network is working and the network cable is connected to the network
hub as well.
10. You may need to configure the IP address of the network before accessing any USB
devices connected with the hub. Please read the user manual
You can reset your network USB server to default setting by press the “RESET'
button on the back side of the hub.You can use this solution if you forget your
password.
IMPORTANT NOTE:
11
Page 12
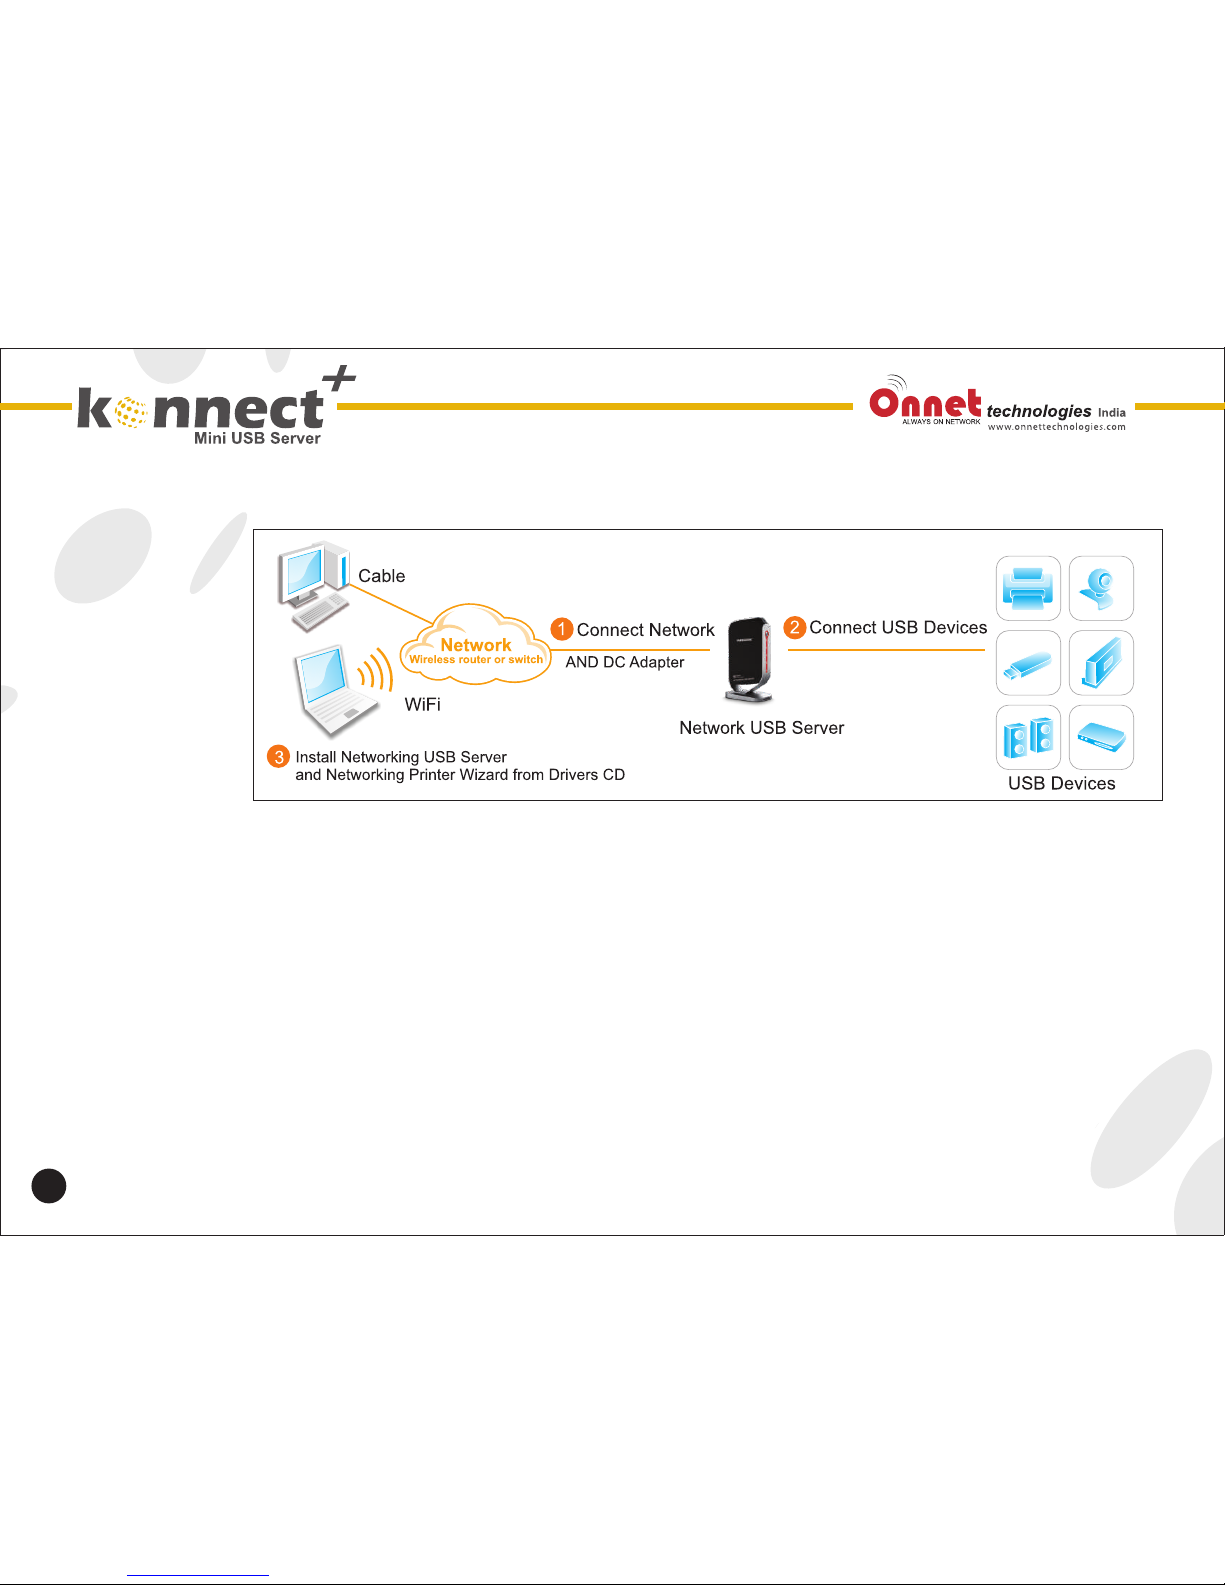
1. Make sure your network is working properly.
2. Connect the USB printer or other USB devices to the USB ports on the network USB
server
3. Make sure all the driver of the devices connected with the network USB server is
installed on your computer properly,
4. Connect the network USB server to the router or Ethernet switch/hub or bridge it
enclosed network cable.
5. Plug in the power adapter to the network USB server.
6. Install the driver of the network USB server (Please find instructions in the next
section).
12
Hardware Installation
Page 13
13
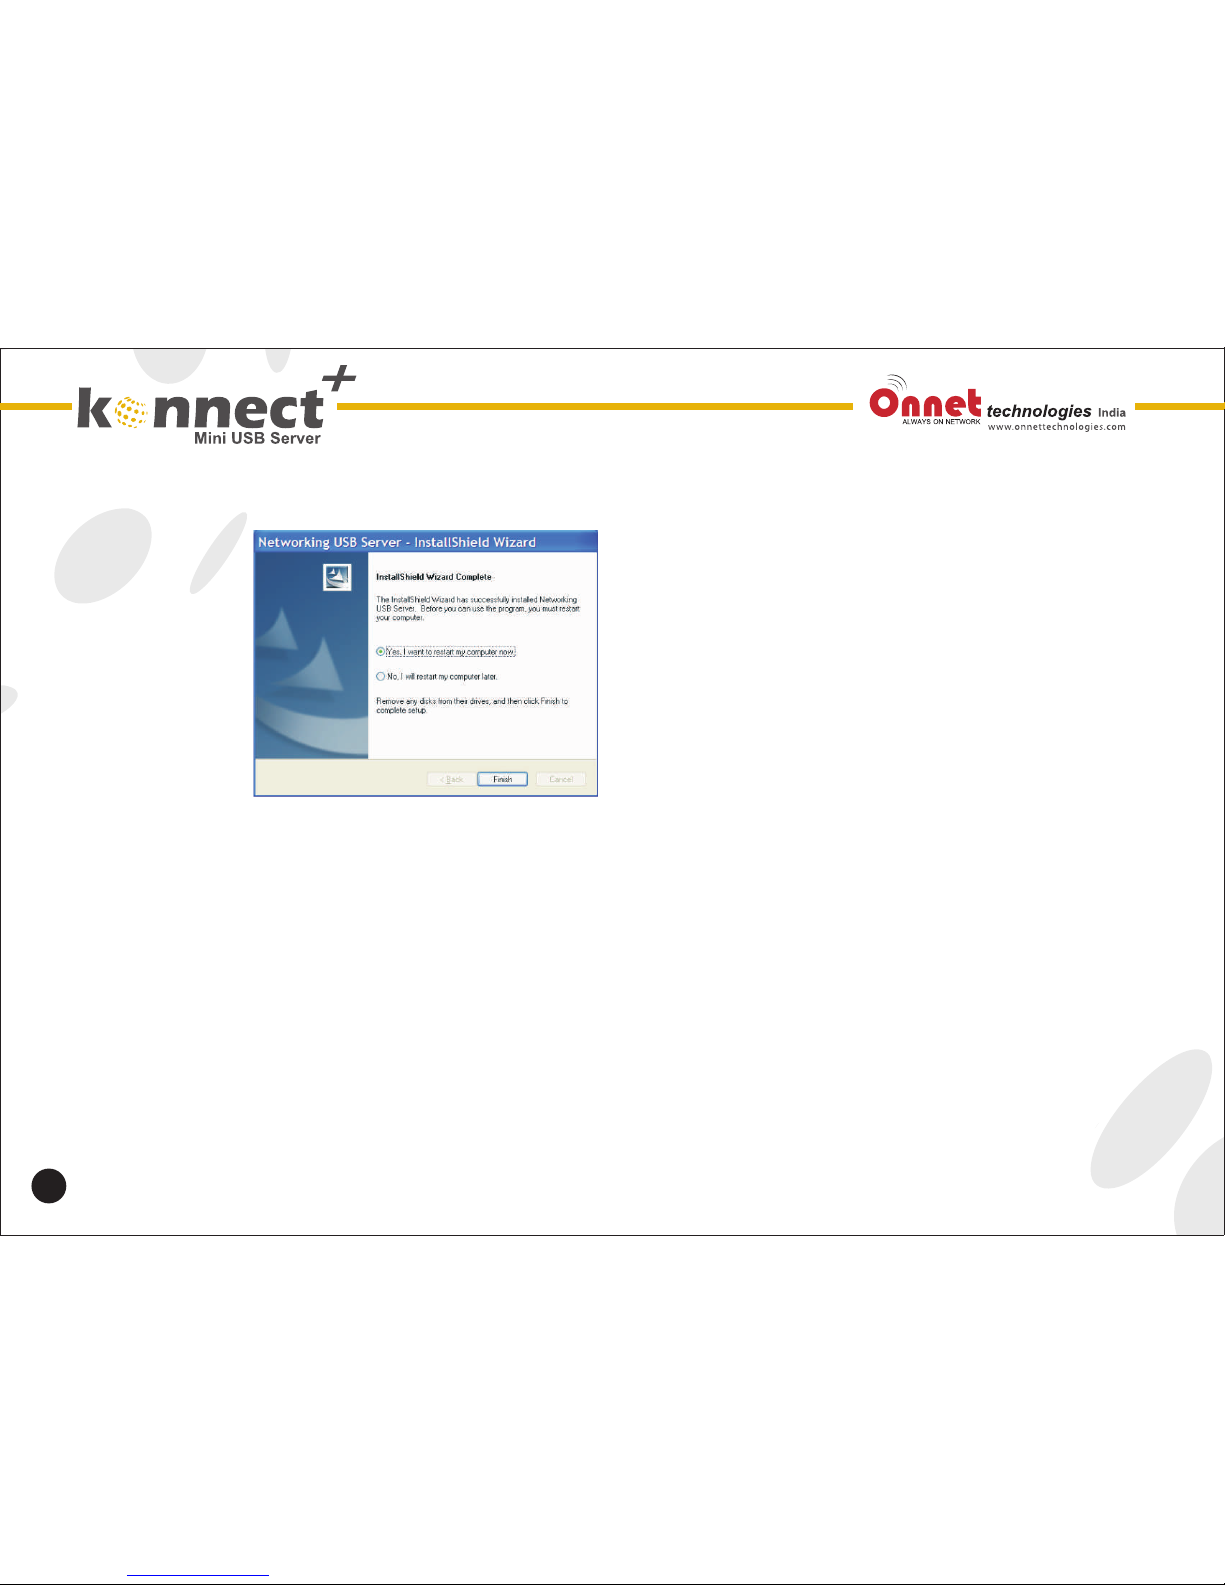
Installation Konnect+ networking USB server Utility:
• To start the installation, please double click
Setup.exe.
• And then click USB Server for Windows from
auto run setup cover page.
• The installer will automatically install the program.
• When done, Select YES, I want to restart my
computer now and click FINISH to reboot your
computer.
Page 14
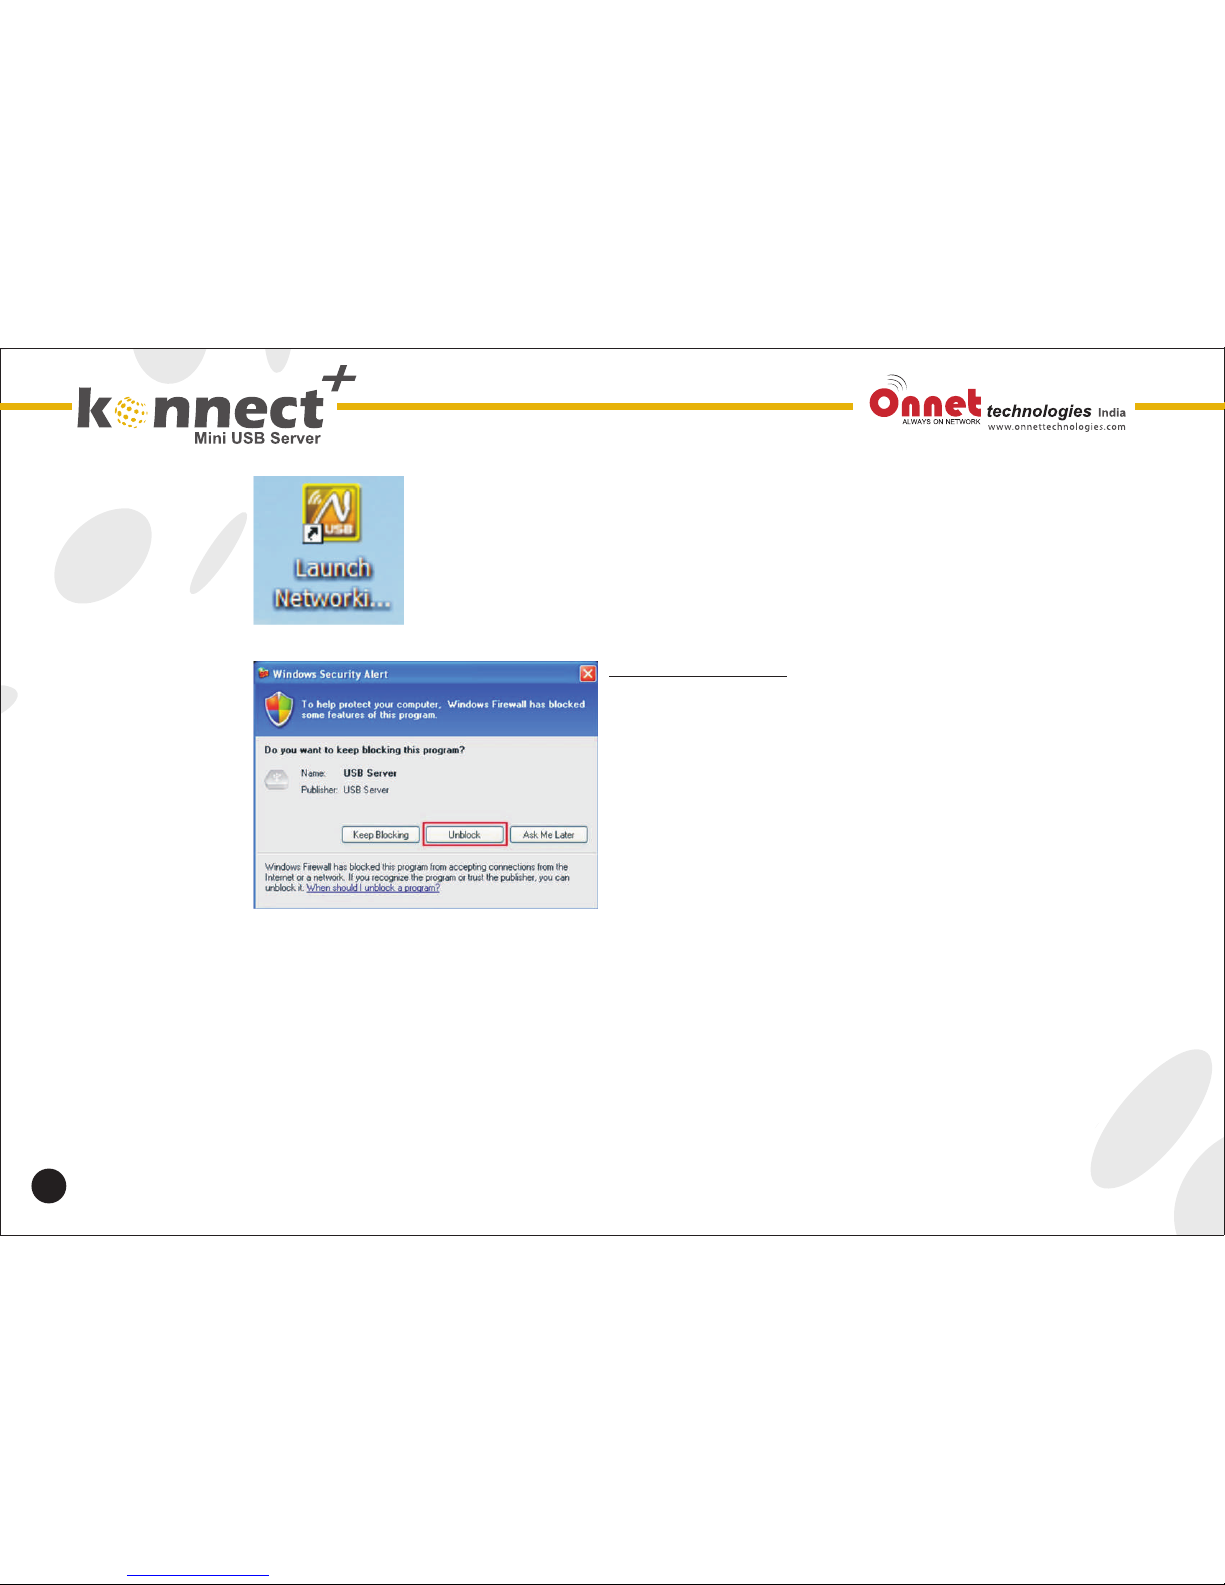
• After the installation completes, a shortcut will be
created on your Desktop.
System Firewall
When you start the program for the first time, your
windows OS will prompt to firewall Access. Please
make sure you unblock the software or grant it access,
otherwise the program will not work correctly.
Windows XP Firewall Access Alert
Please make sure you “Unblock” the program.
14
Page 15
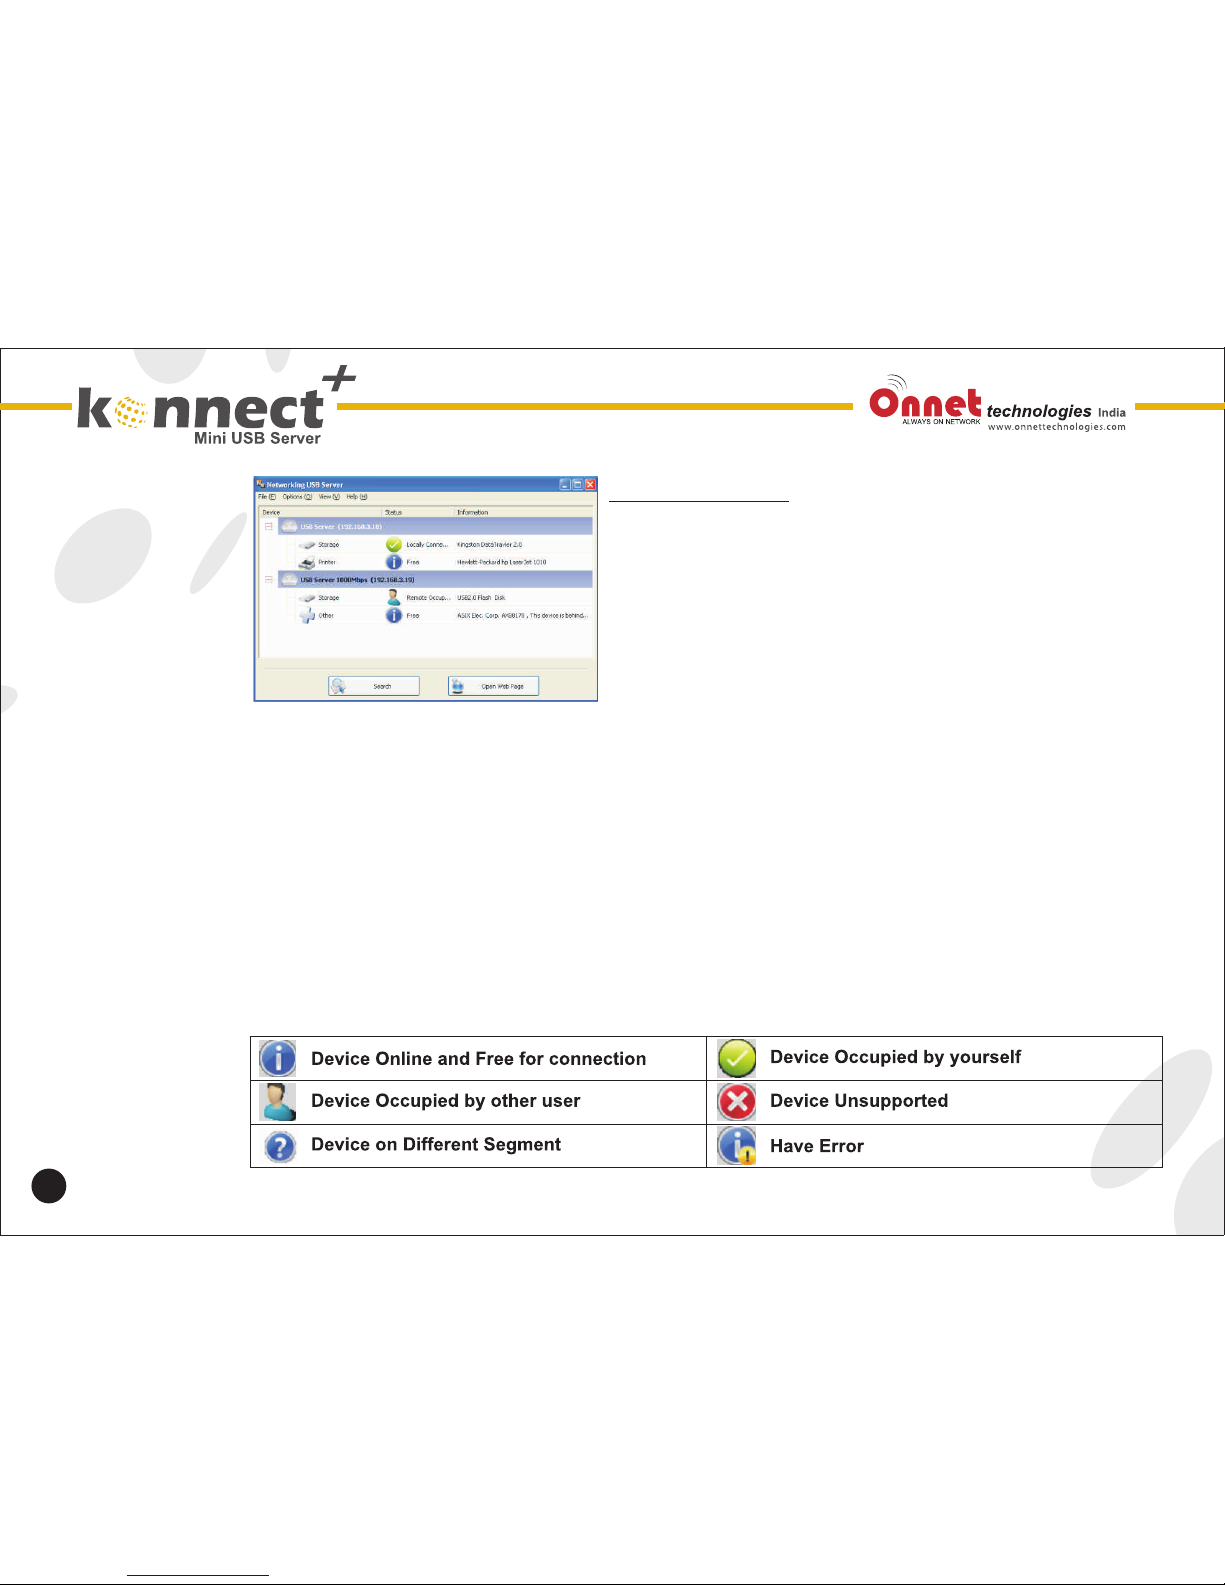
Main Dialog Box
Once you have start up the program and grant it
access through the firewall, you will see this main
dialog box.
The main dialog box is considered of Control Menu
(File, Option, View and Help), a tree view in the middle
that displays a list of all the server and devices
discovered on the network, a Search button to get the
current status of all USB Servers and devices, and a
button that toggles between Open Web Page and
Connect Device depending on the node you select
on the tree view. The Open Web Page button toggles
to Connect Device when a device is highlighted.
15
Status of USB Server and Devices
The device might be in one of the following states and there are different things you can do
with it in each of the states. Each status is respectively by a specific icon.
Page 16
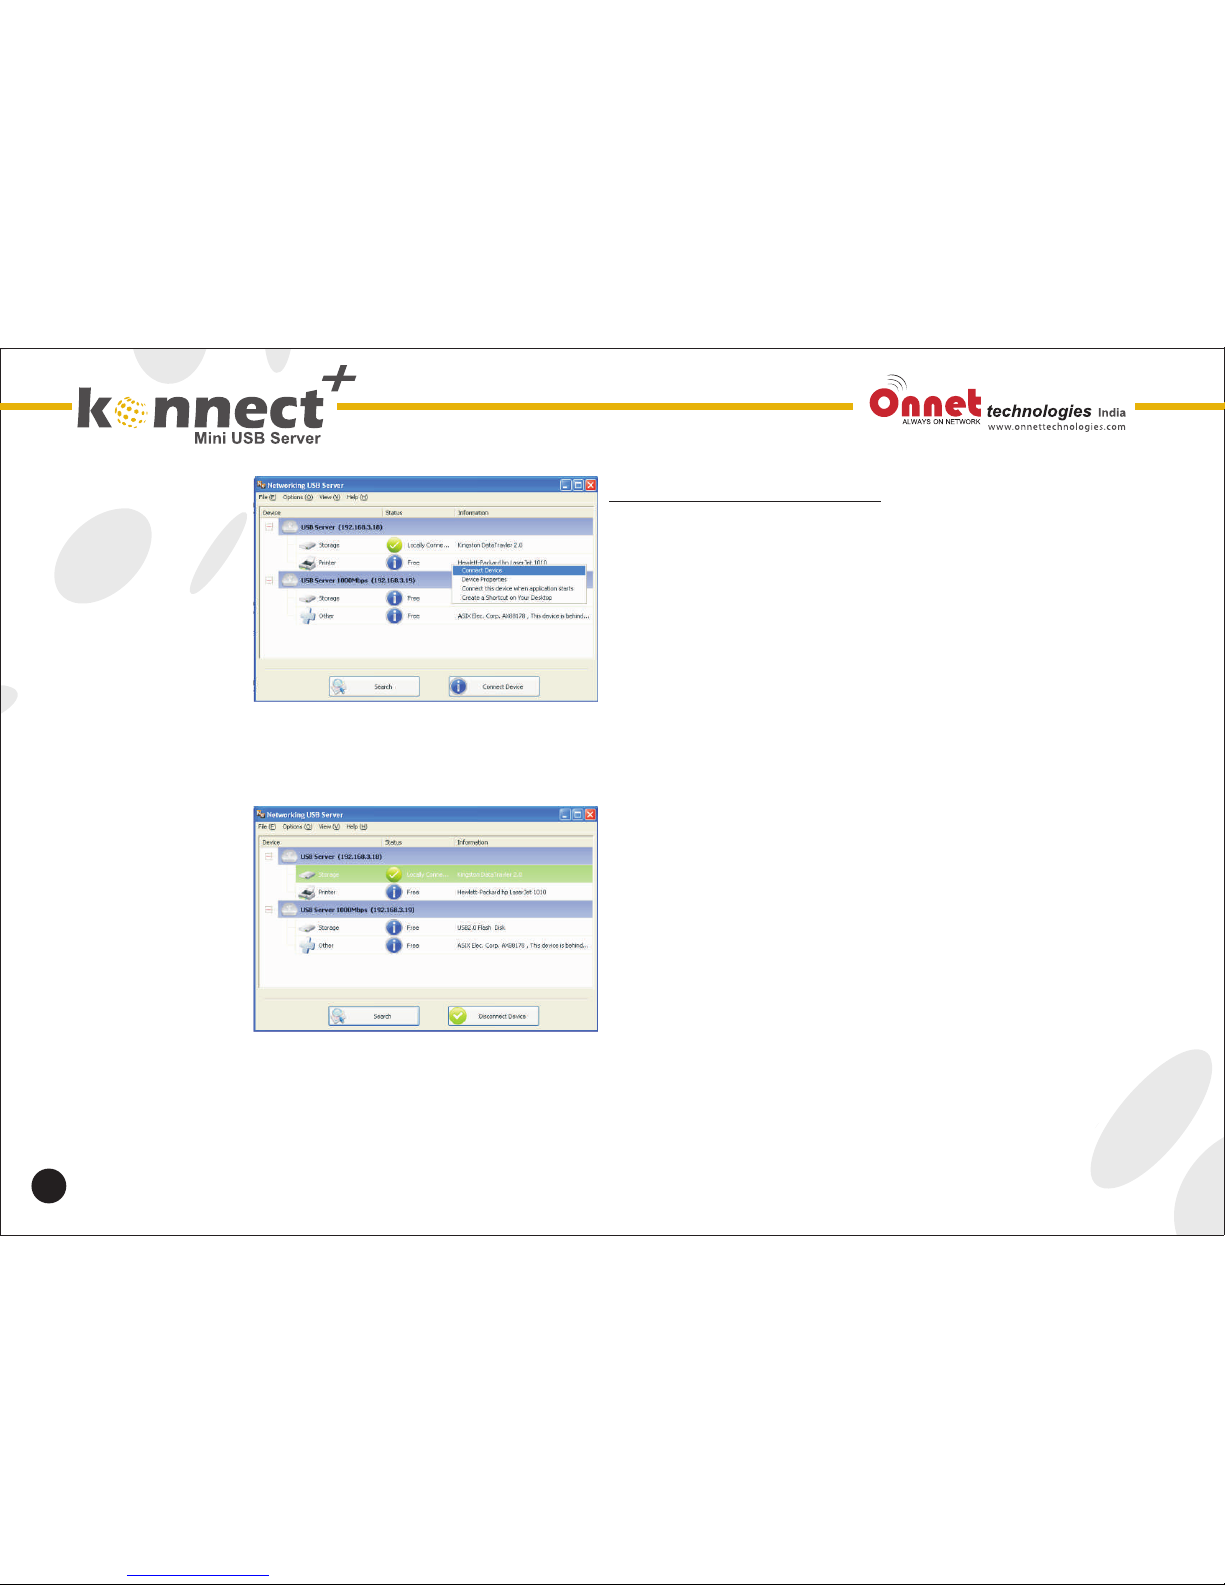
Accessing a USB Device
To connect to a USB device, please select it on the
tree view and click on Connect Device button or
double click on it. This process might take a few
seconds up to a minute, depending upon complexity
of the device.
Then you can operate a connected USB device as if it
is connected to your PCs USB port directly.
If you select a connected device on the UI, you can
see the Connect Device button is changed to
Disconnect Device:
Clicking on this button releases the selected device
for other users. Once you see the icon turns back, the
device has been disconnected and other users will
then be able to connect to it.
This operation is exactly like when you unplug a
USB device from your PC`s USB port.
16
Page 17
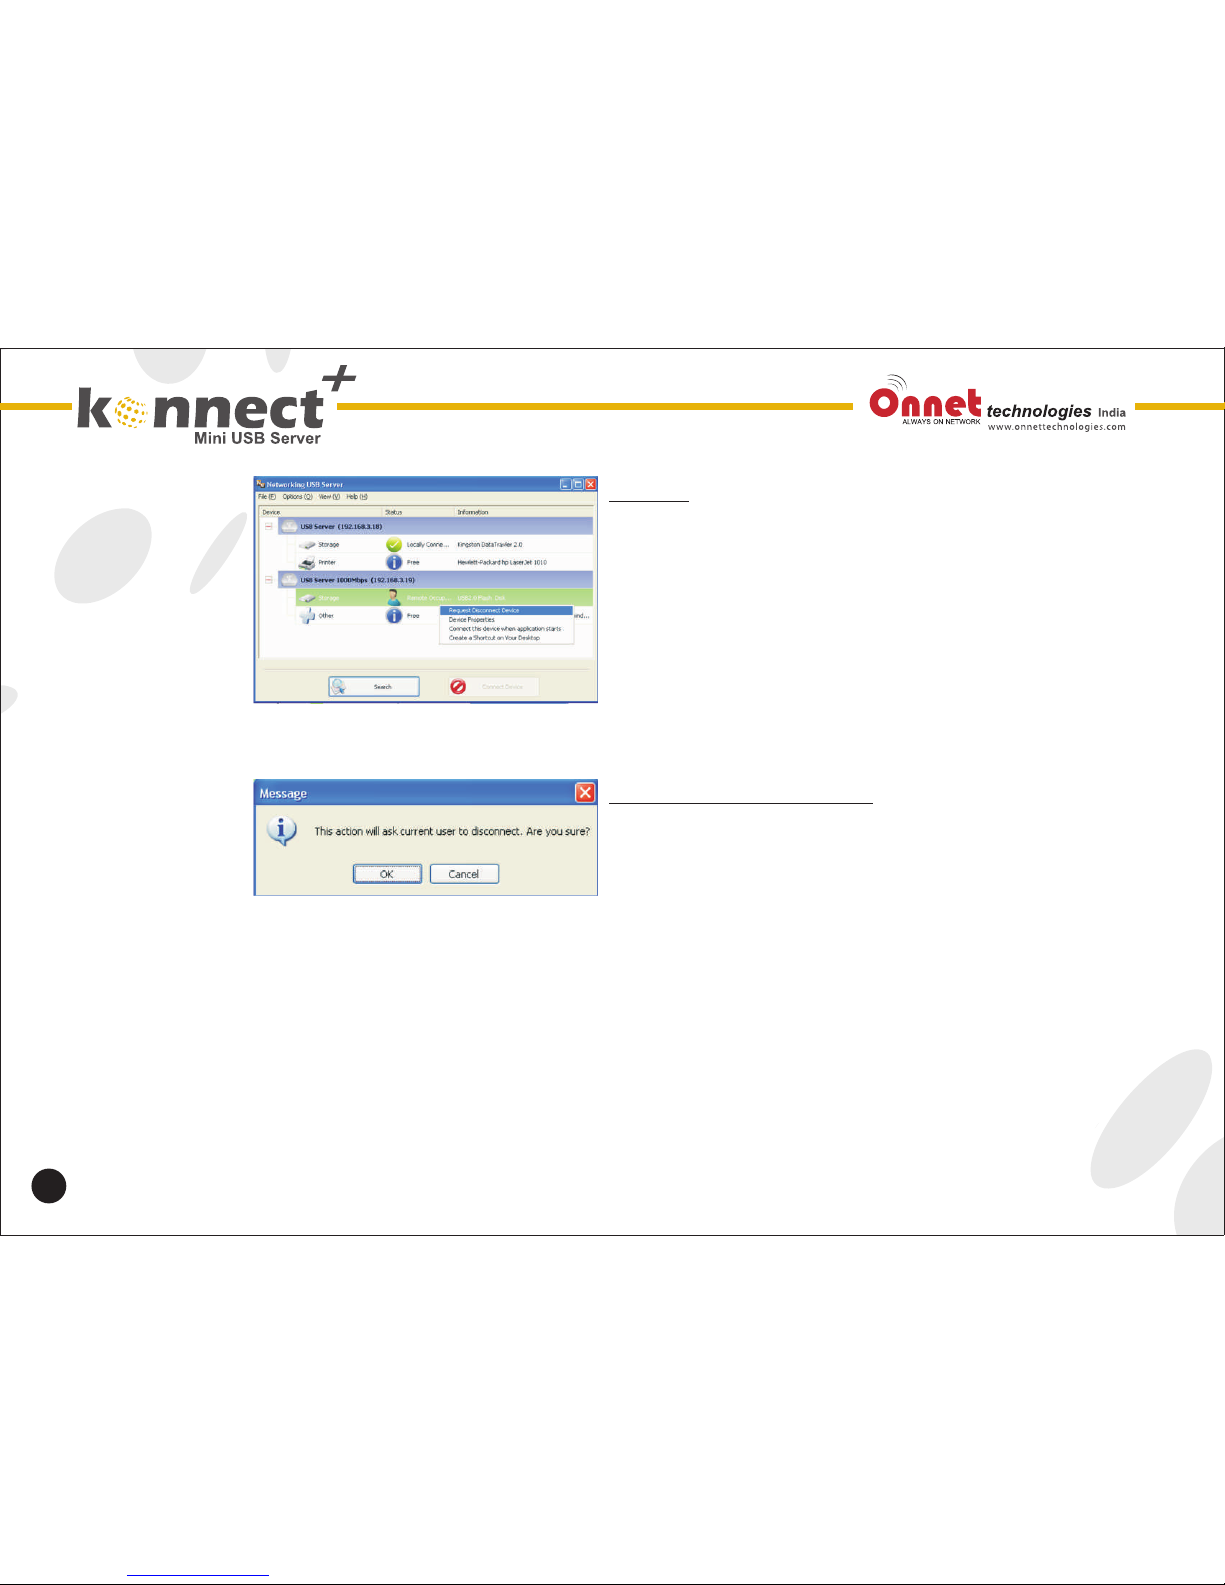
Search
When you are in need of knowing the status of all the
servers and devices immediately, use the Search
button.
Clicking on the Search button triggers the program to
immediately poll the network for the status of all the
servers and devices. The result will be updated to the
tree view.
17
Device Control Request
To request other user to release a Network USB
device, use the Request Disconnect Device option
from the right-click menu.
Of course, this option would only be enabled when the
device is currently occupied by someone else. The
current occupied user will see this message pops up.
Page 18
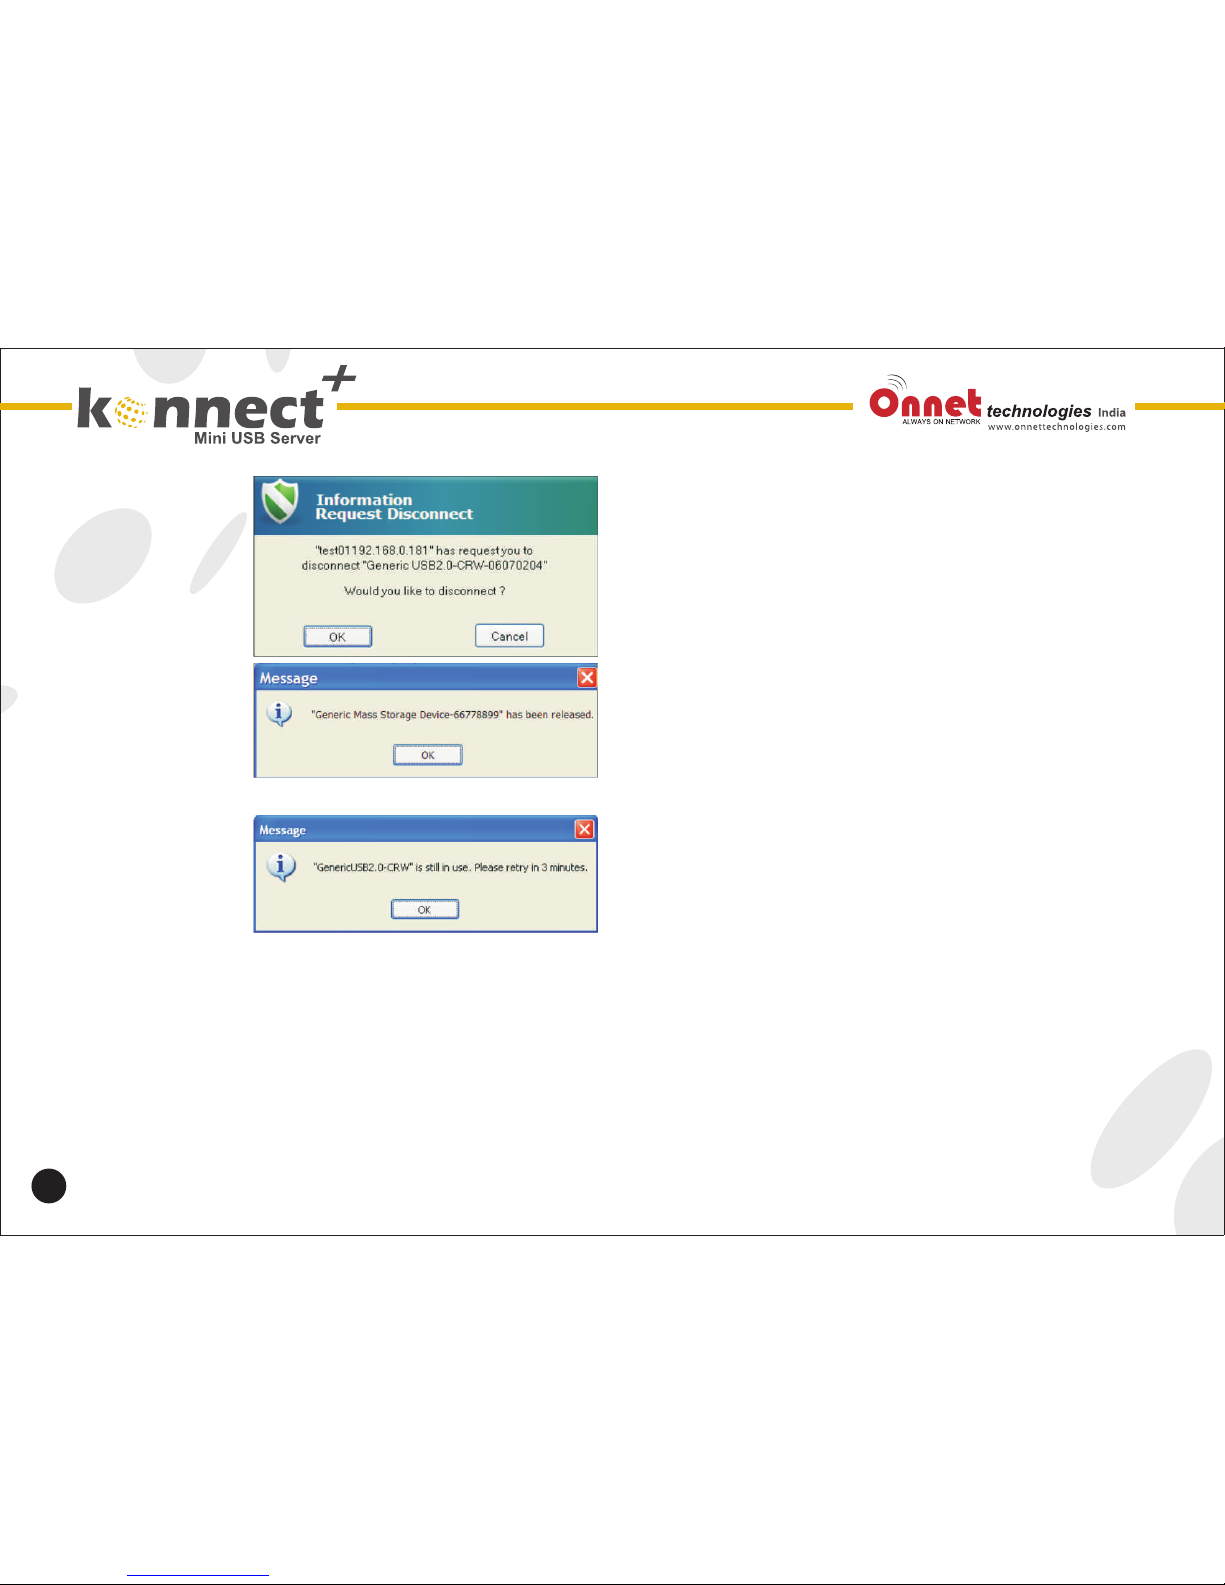
Clicking on YES to release the device if you are done,
click on Cancel if you are still using it.
The requesting user will see this message if the
occupying user releases the device:
Then the device will be free to connect:
18
If the occupying users click on CANCEL when
received the request, requesting user will see this
message instead:
The 3 minute rule is to prevent request spamming.
That is, to prevent the current occupying user from
being flooded with disconnect request in a short
period of time.
Page 19
19
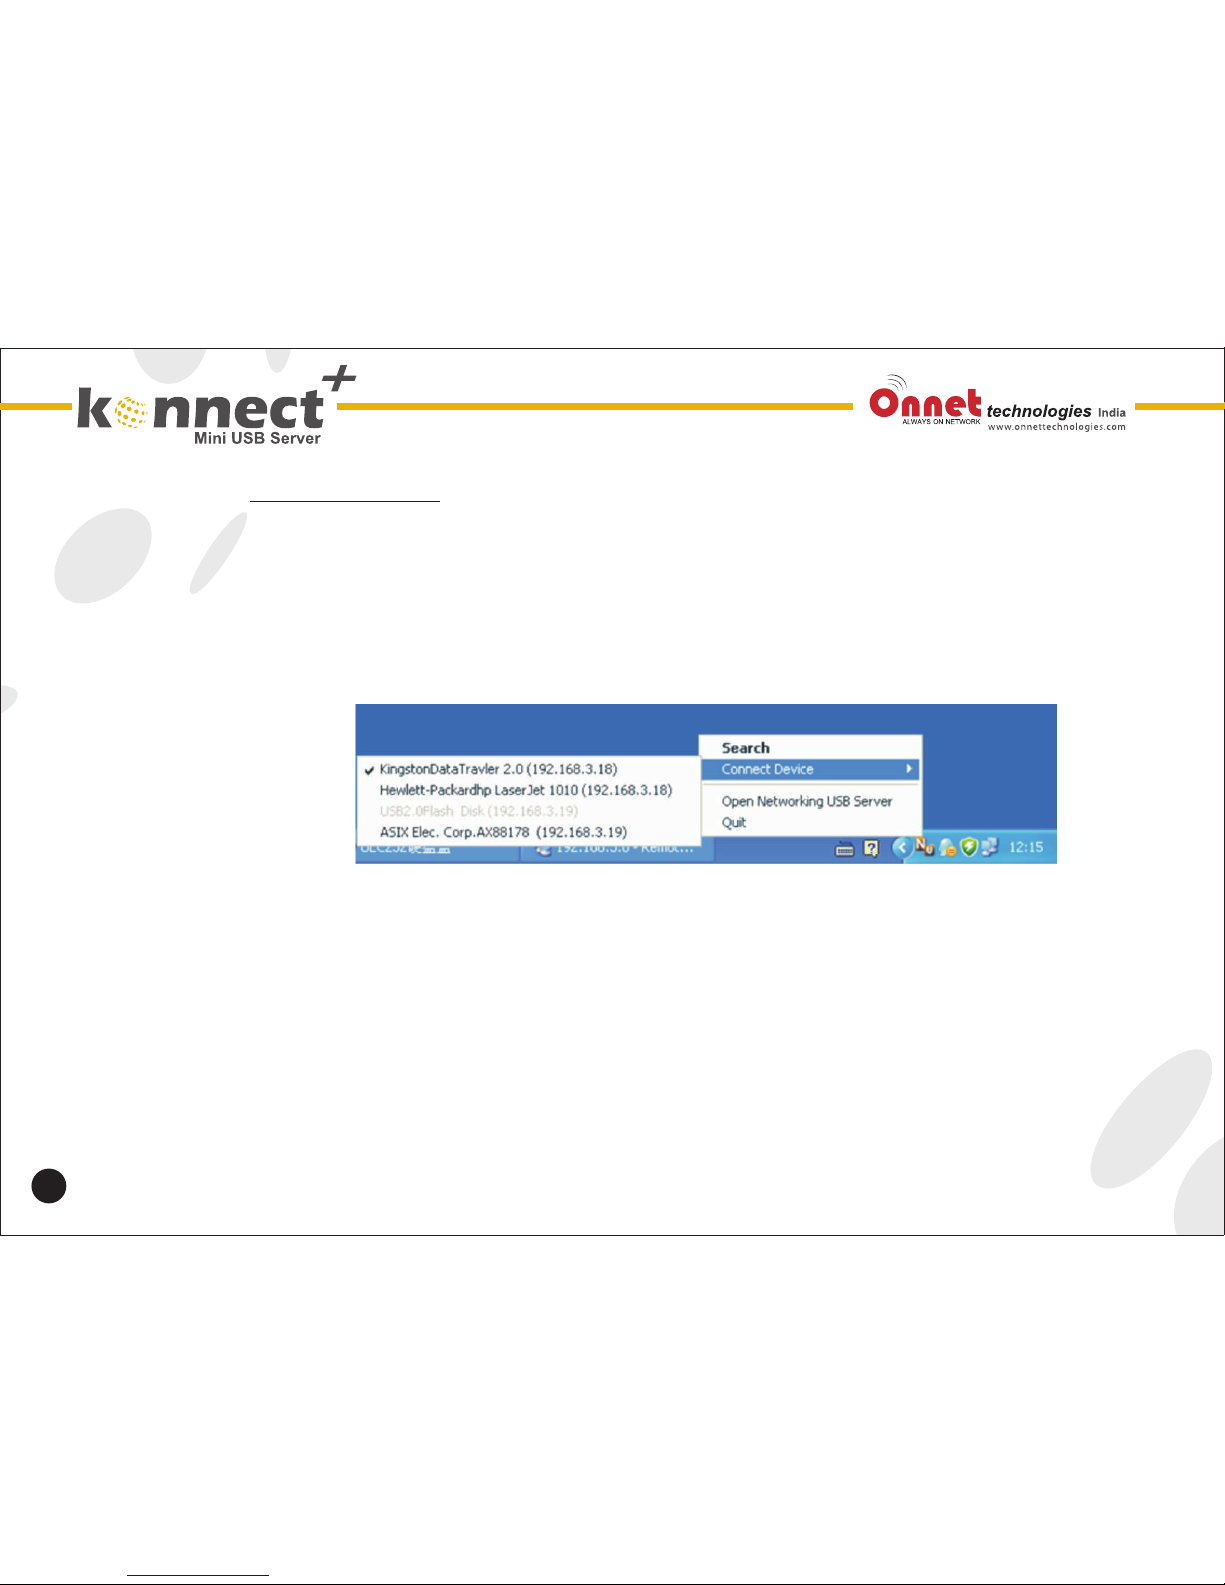
System Tray Icon
When minimized to system tray, the Konnect+ networking USB server Utility will still be
running. Right Click on the icon brings up a menu of operations you can still do.
As you can see, you can still do Search and Connect. Search is the same but to connect a
storage device, move your mouse to the “Connect” option and a list of Network USB
Devices will show up. Simply click on the device you would like to connect.
When connect, a check mark will appear right next to the device on the device list. To
disconnect the device, simply click on it again.
“Open Networking USB Server” option brings up the main GUI.
“EXIT” option terminates the utility entirely.
Page 20
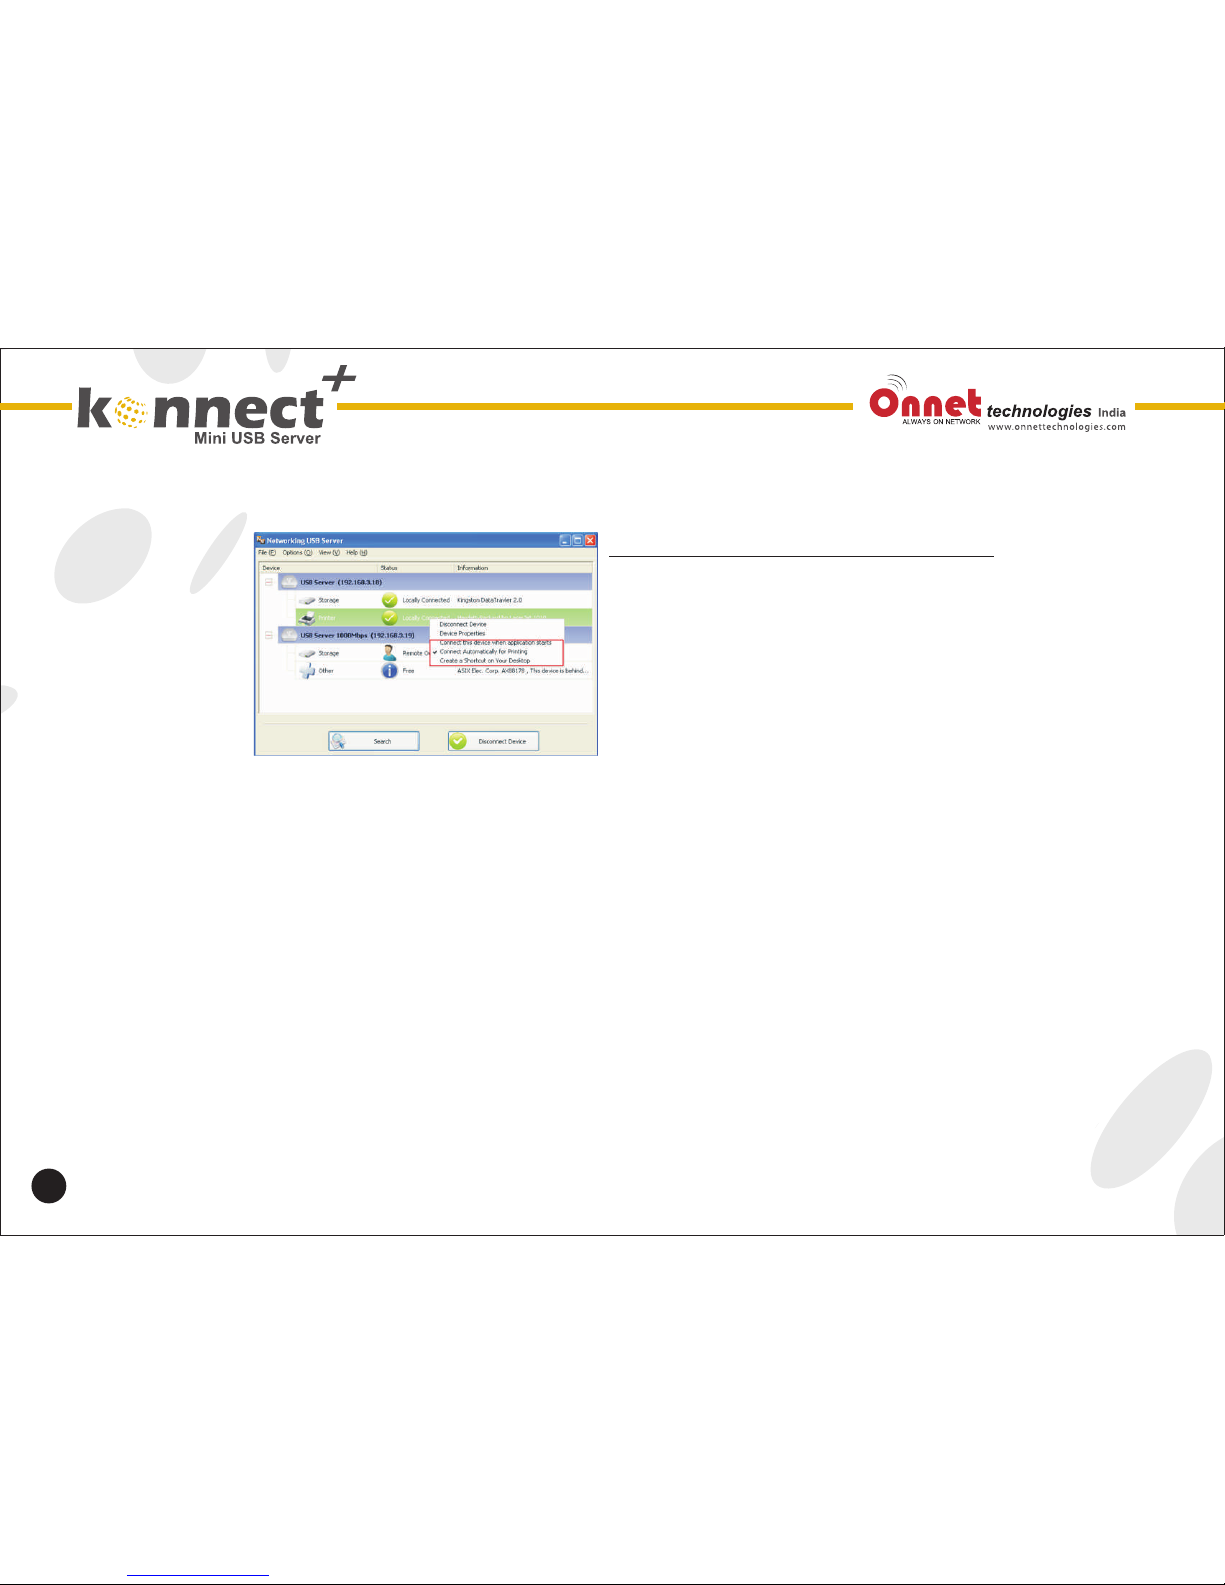
Connect Automatically for Printing
This is another one of very convenient functions. What
this function does it that when you send a printing task
to the printer, it detects this printing task and
AUTOMATICALLY connect this printer to print out the
document. When the printing task is done, the printer
will then be AUTOMATICALLY disconnected so that
other user can use it.
The user no longer has to manually connect and
disconnect the printer.
NOTE: This function will be enabled for printers or
MFPs that has been installed and used on your
PC. For a new printer/MFP, please make sure you
have installed it(has been connected via USB port
or via USB Server Software and worked
correctly)on your PC first.
20
Konnect+ networking USB server Featured Functions
Page 21
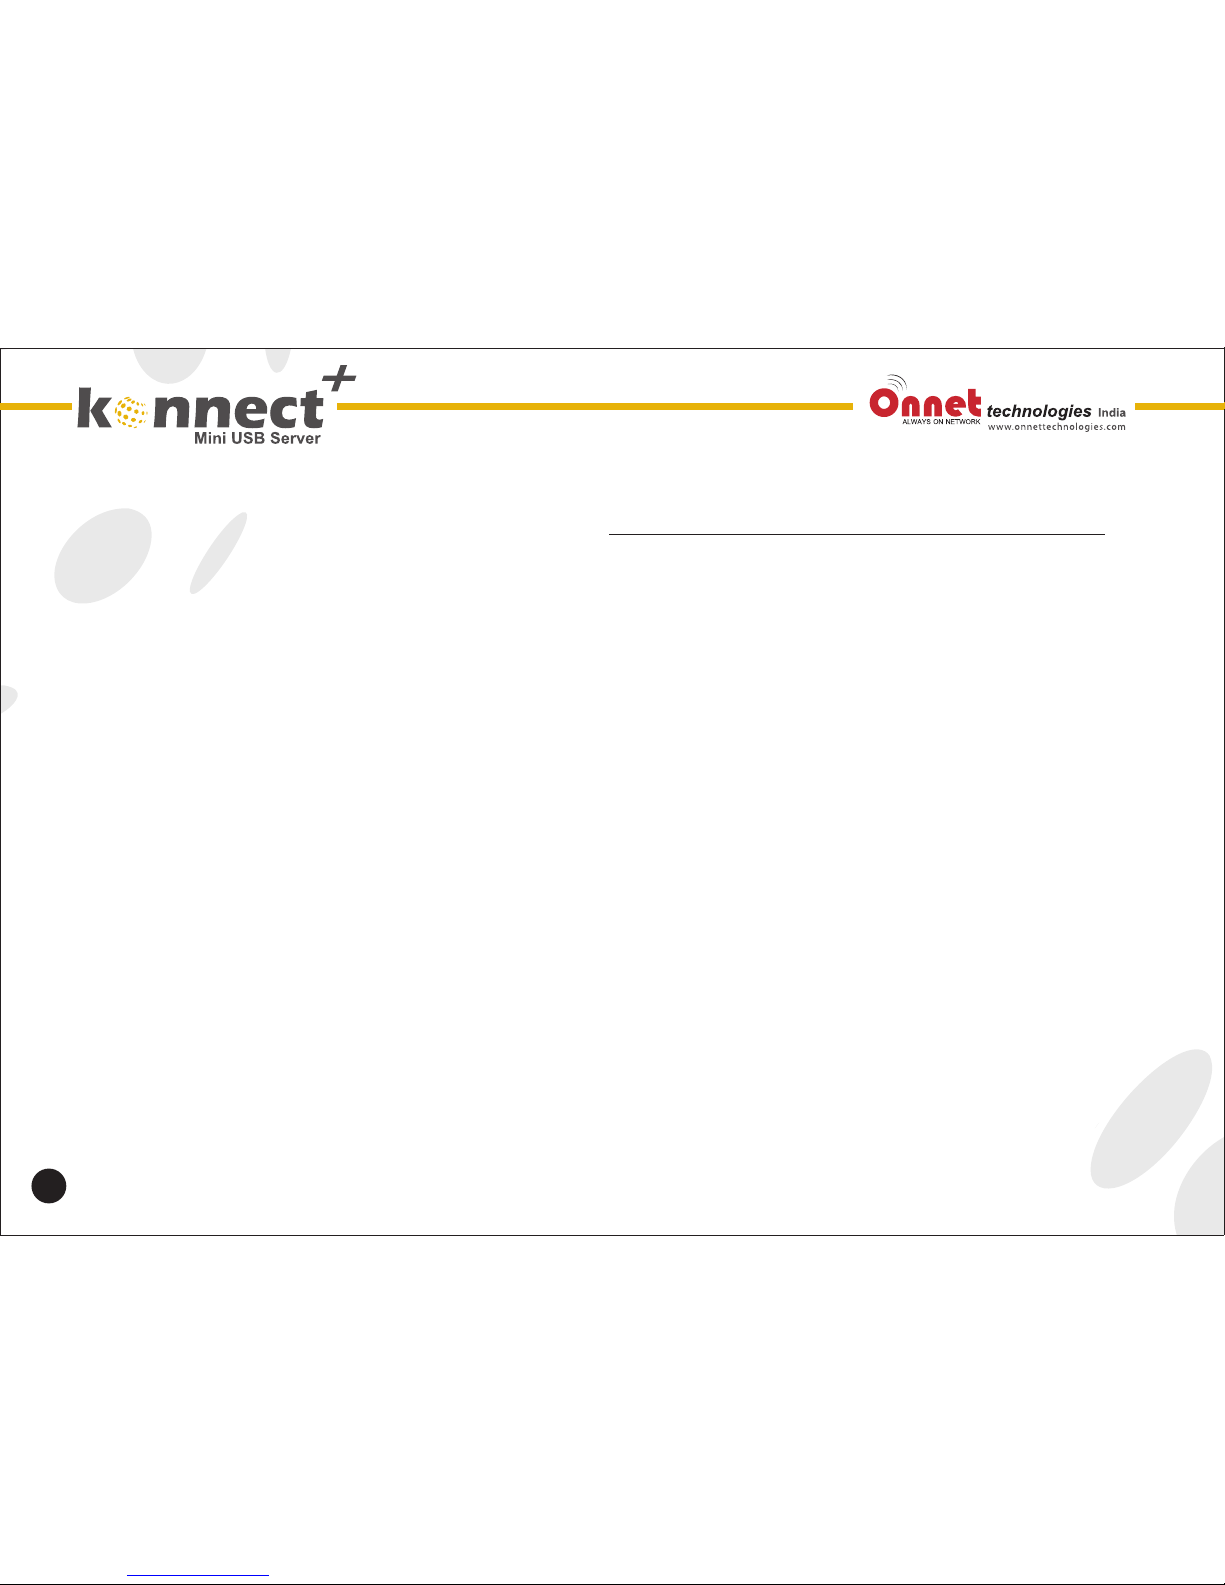
Connect this device when application starts :
When enabled, this function automatically connects
the target device 15 seconds after the application
starts running. If you are using a USB hub or the
server has a build-in HUB (4-port USB server has a
build-in hub), the device won`t be automatically
connected if you switch to another port.
If device is occupied when the application starts, then
it will not be connected.
If the device is offline when the application starts, then
the device will not be connected.
21
Page 22
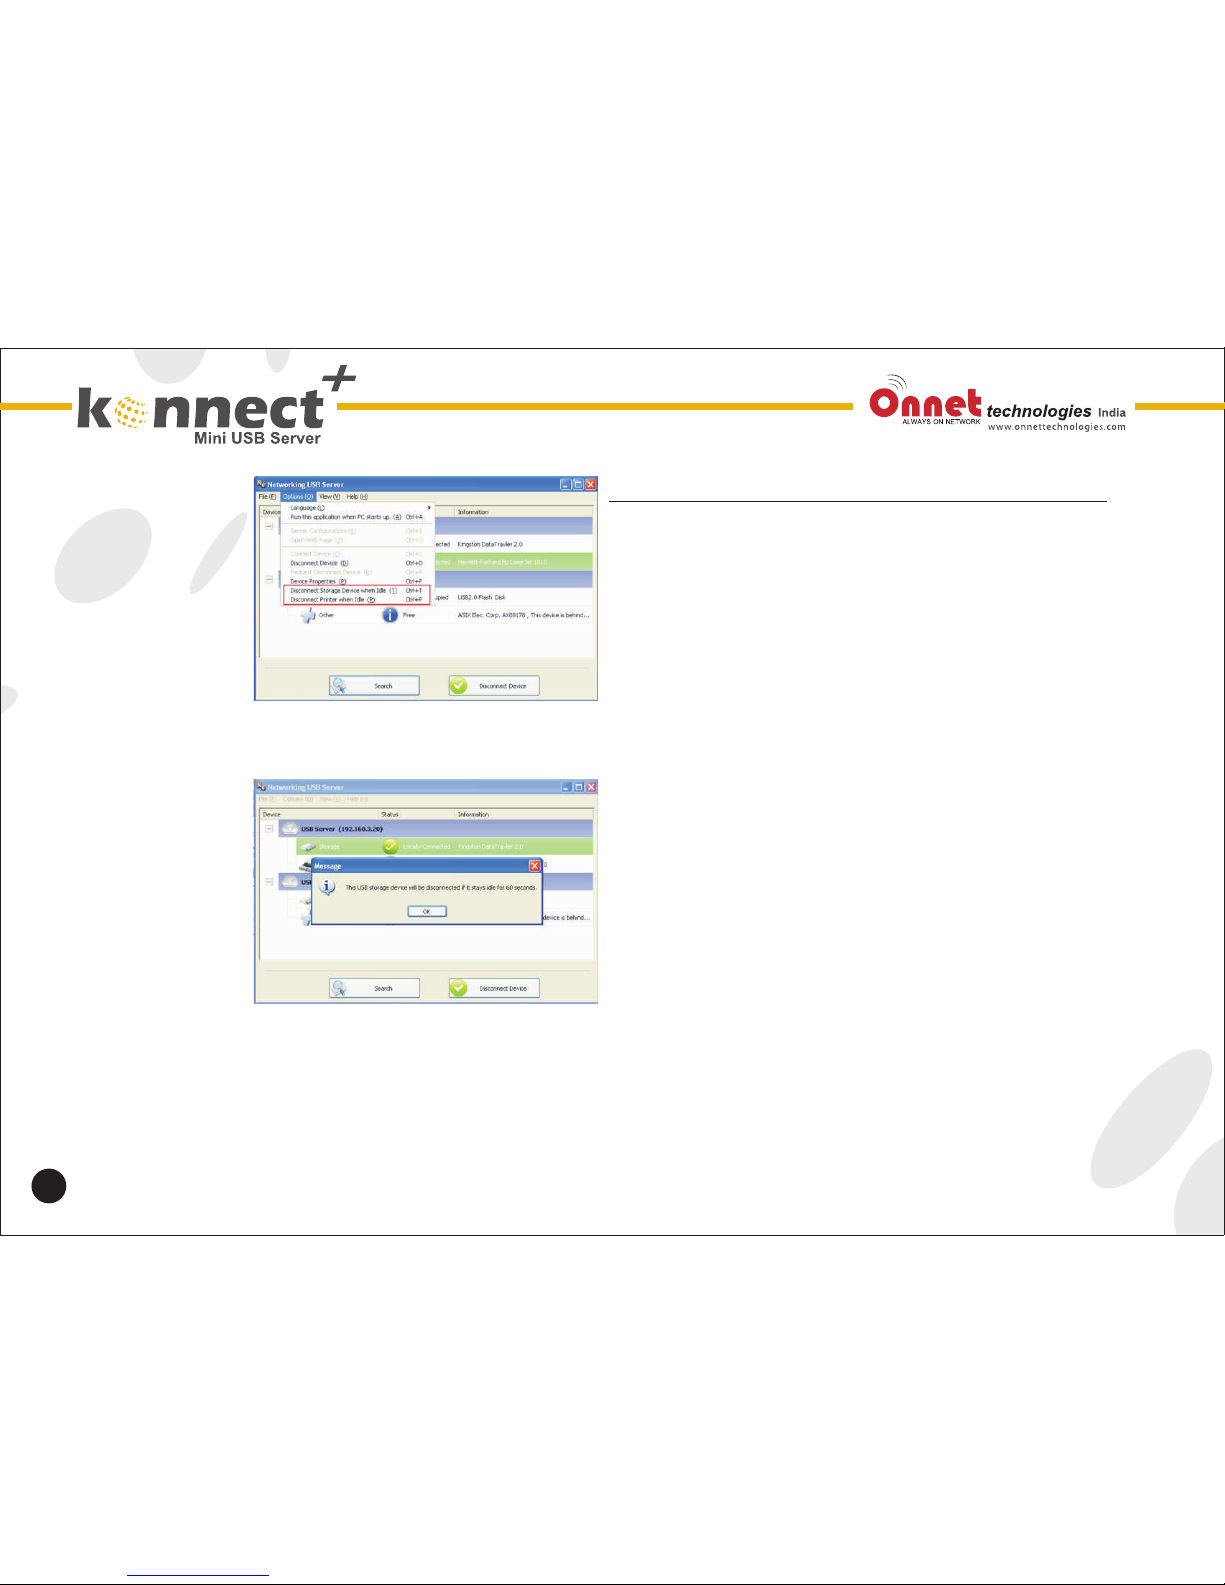
Auto Disconnect Printer/MFP Storage Device
These functions are there to prevent the case when
one user connected a Printer or Storage device but
forget to disconnect when he/she is done with the
device.
22
When these two functions are enabled, you will see
below message when you connect a Storage device
or a printer:
Page 23
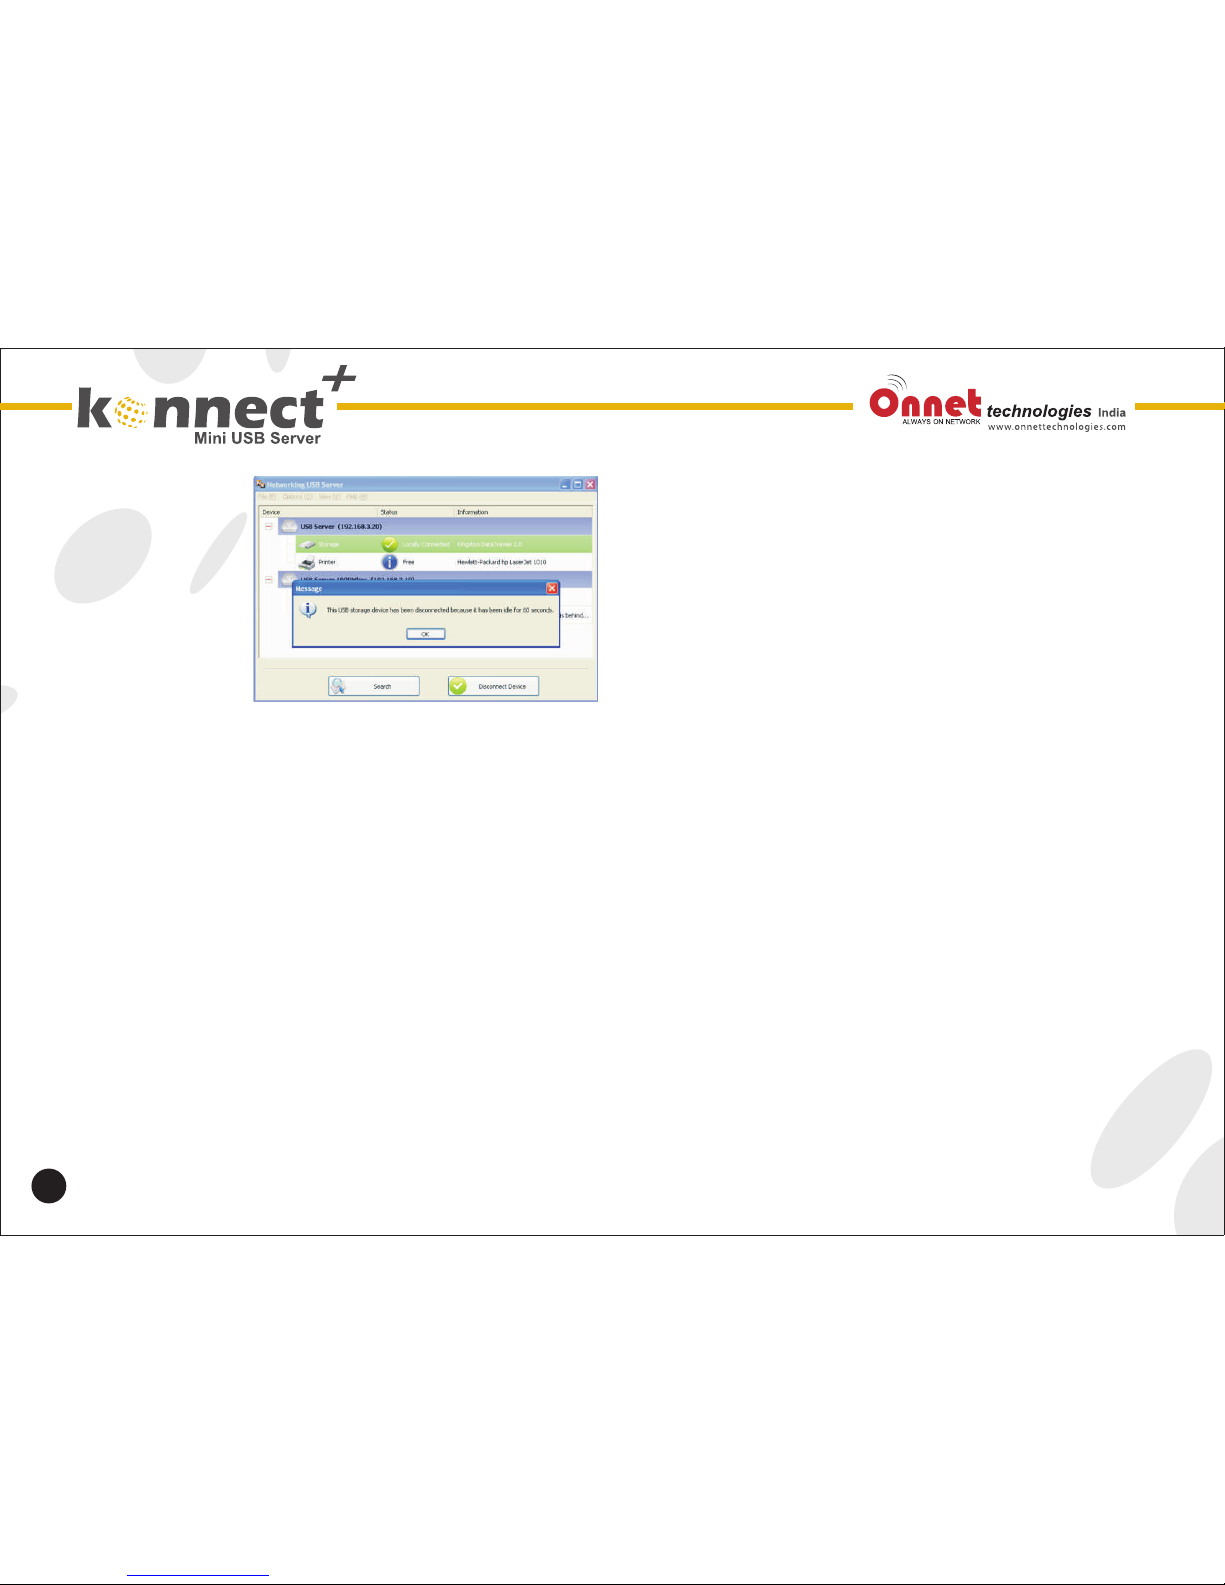
When the idle time is up and the device has been
disconnected, you get another notification:
23
NOTE :
This function might not work with Storage device such
as pen driver/flash driver.
These devices tend to periodically (on a millisecond
base) communicate with the OS even when the user is
not reading data from it or writing data to it. So it never
actually stays “Idle”and will never be automatically
disconnected by this function. External USB HDD
type storage device does not have this problem.
Page 24
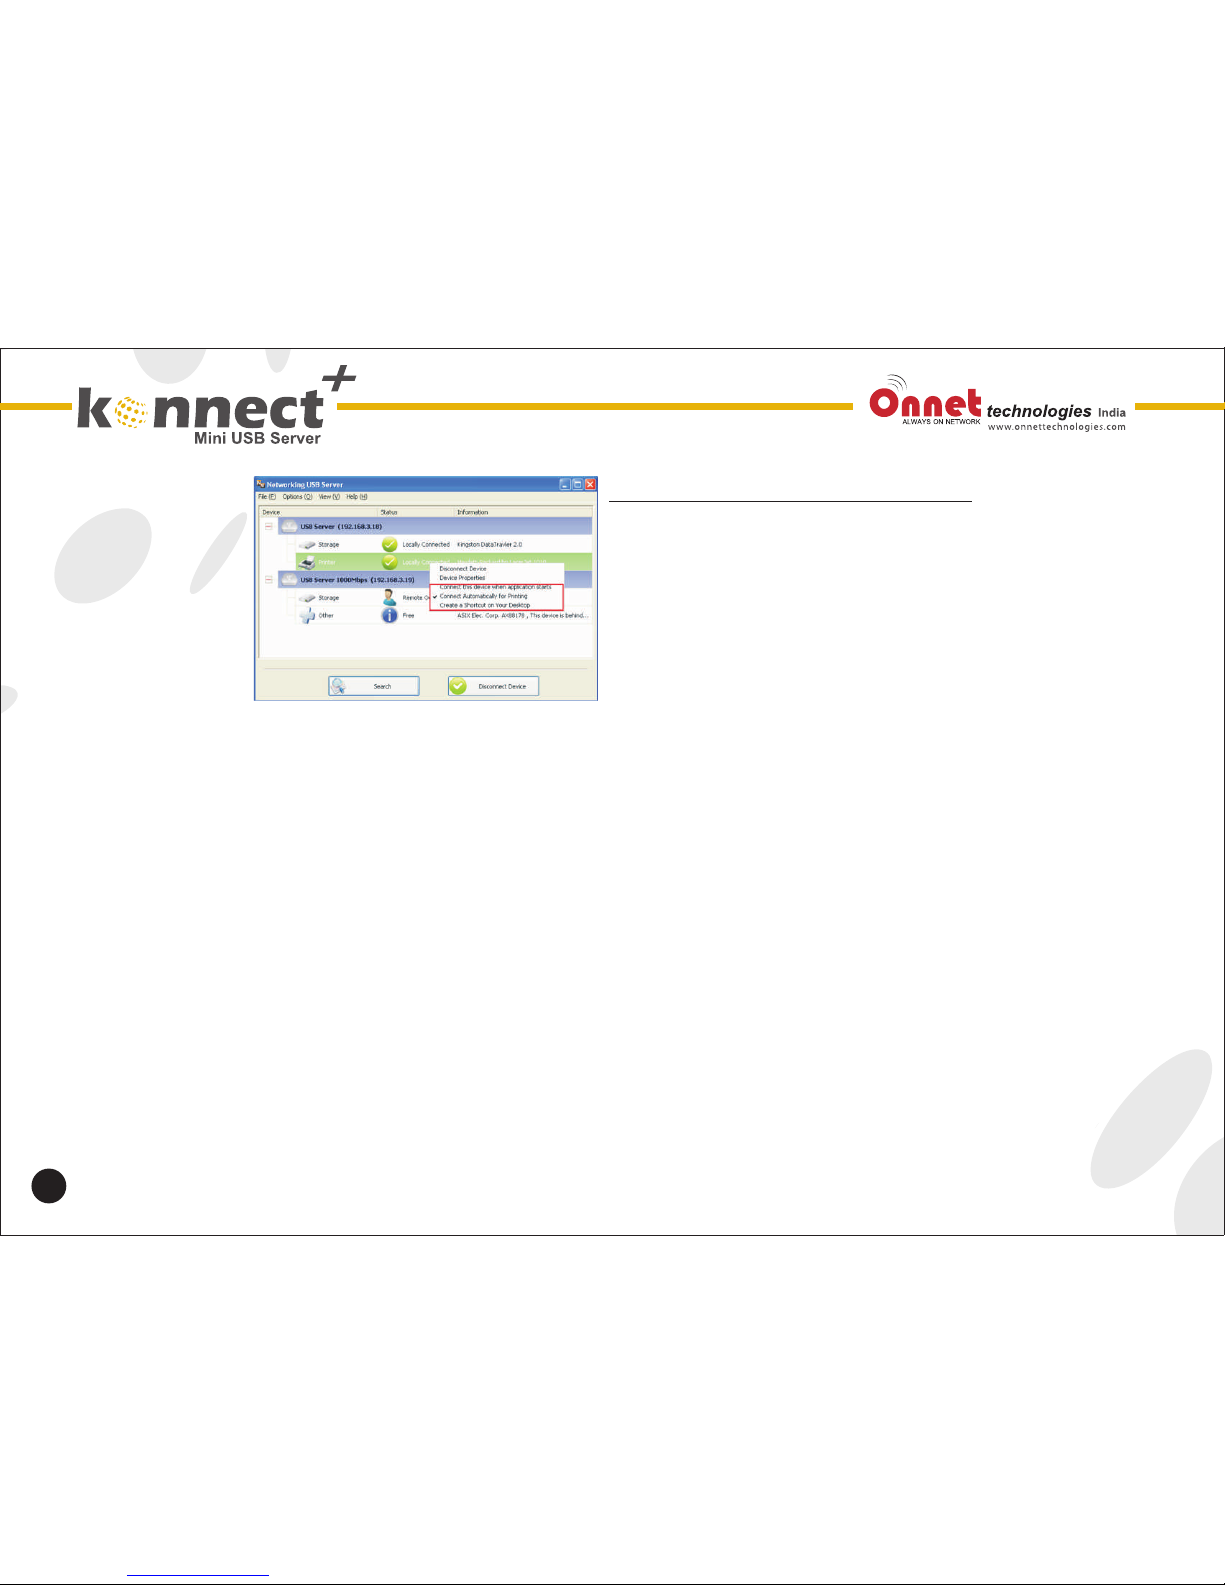
Create Shortcut on your Desktop
This function creates a shortcut on your desktop that,
when double clicked start up an application and
connects a targeted device at the same time.
This function is particularly useful when the functions
or one of the functions of the targeted device must
work with a specific application such as a multiFunctions printer and the photo/picture scanning
utility normally if you want to scan with a scanner
connected to a USB server you must first connected
the scanner with the USB server software then run the
scan software and start scanning when you finish with
scanning you have to close the scan software and
then disconnected scanner so that other user can use
it.
However this shortcut function consolidates these
steps into two quick double click
24
Page 25
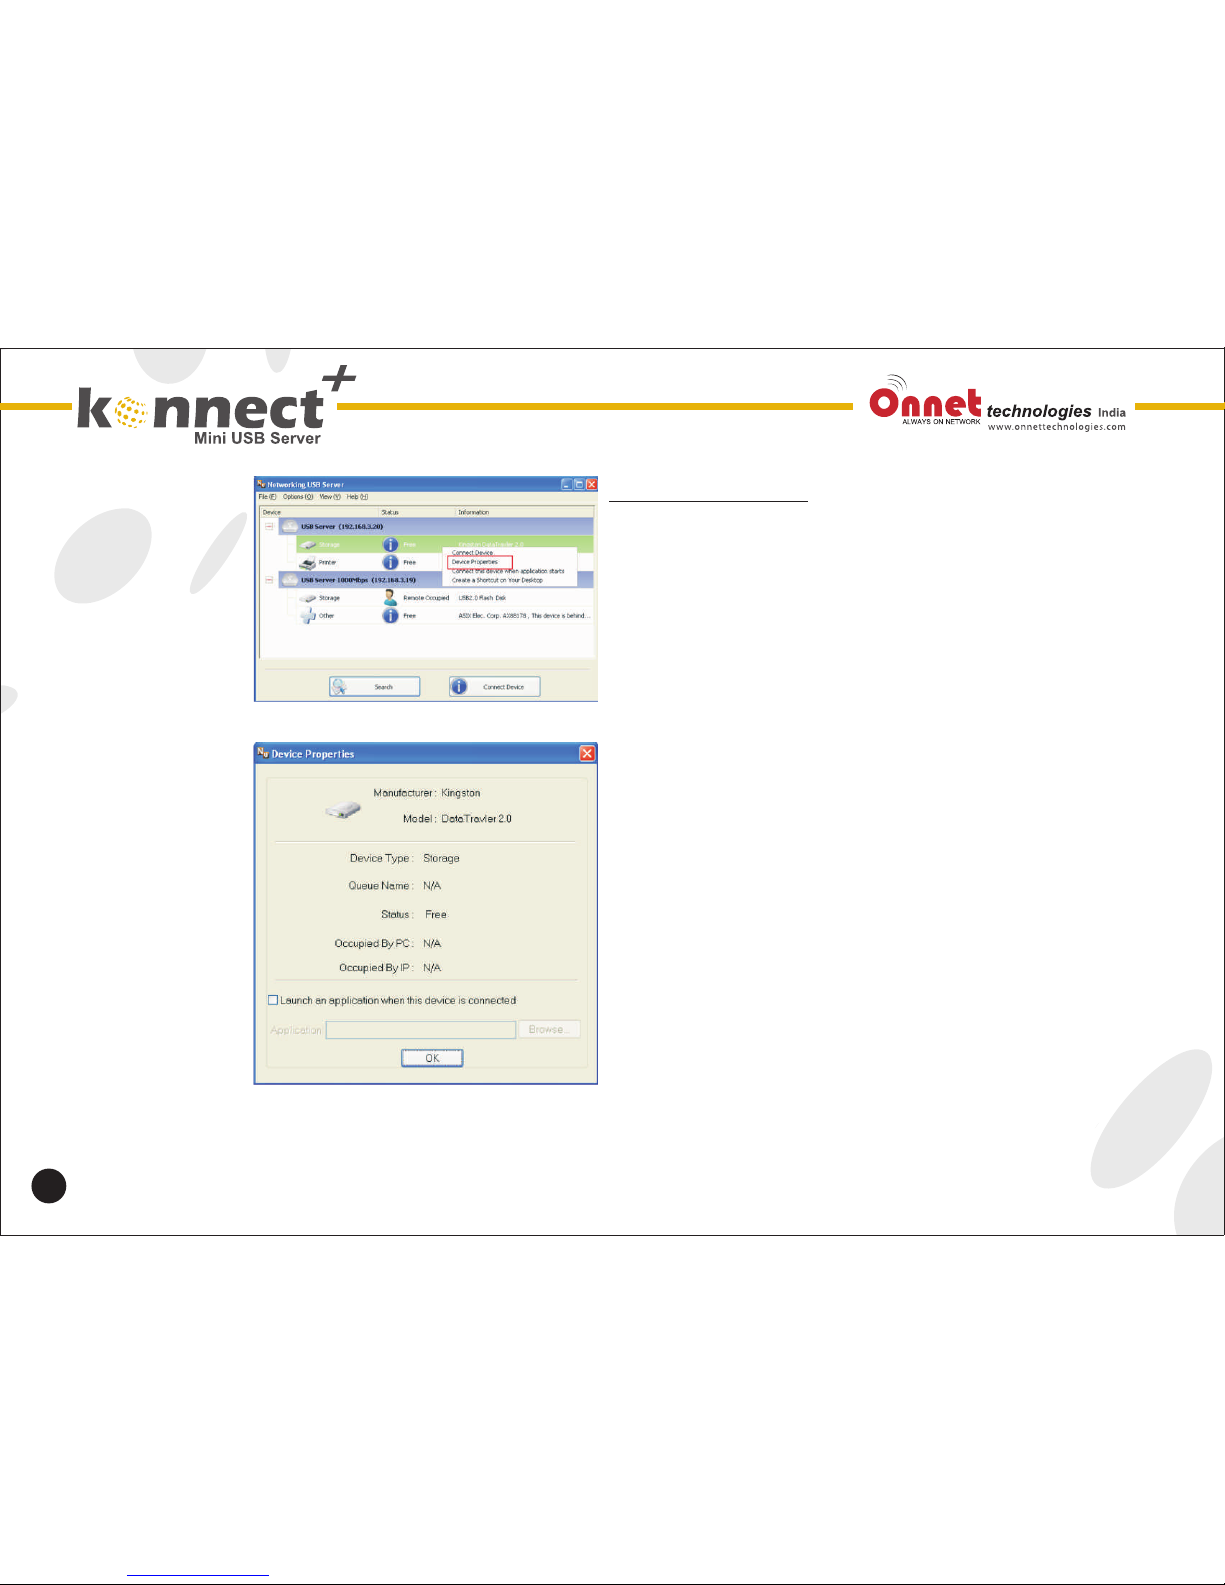
Device Properties
Clicking on the Device Properties to bring up the
Device property dialog box
Device Properties dialog box displays information of
the USB Device if the device is occupied it also
displays the occupying PC Name and the IP of the PC
occupying it. This dialog box provides a quite useful
check the Launch a program when this device
connects checkbox and Provide the path to the
program/utility/application software then The
progr a m / u t ility / a p p l icatio n so f t w a r e w o uld
automatically starts up after you connect the device.
This function is particularly useful when the USB
device you connect works with an application such as
scanning utility with a multiple function printer.
25
Page 26
26
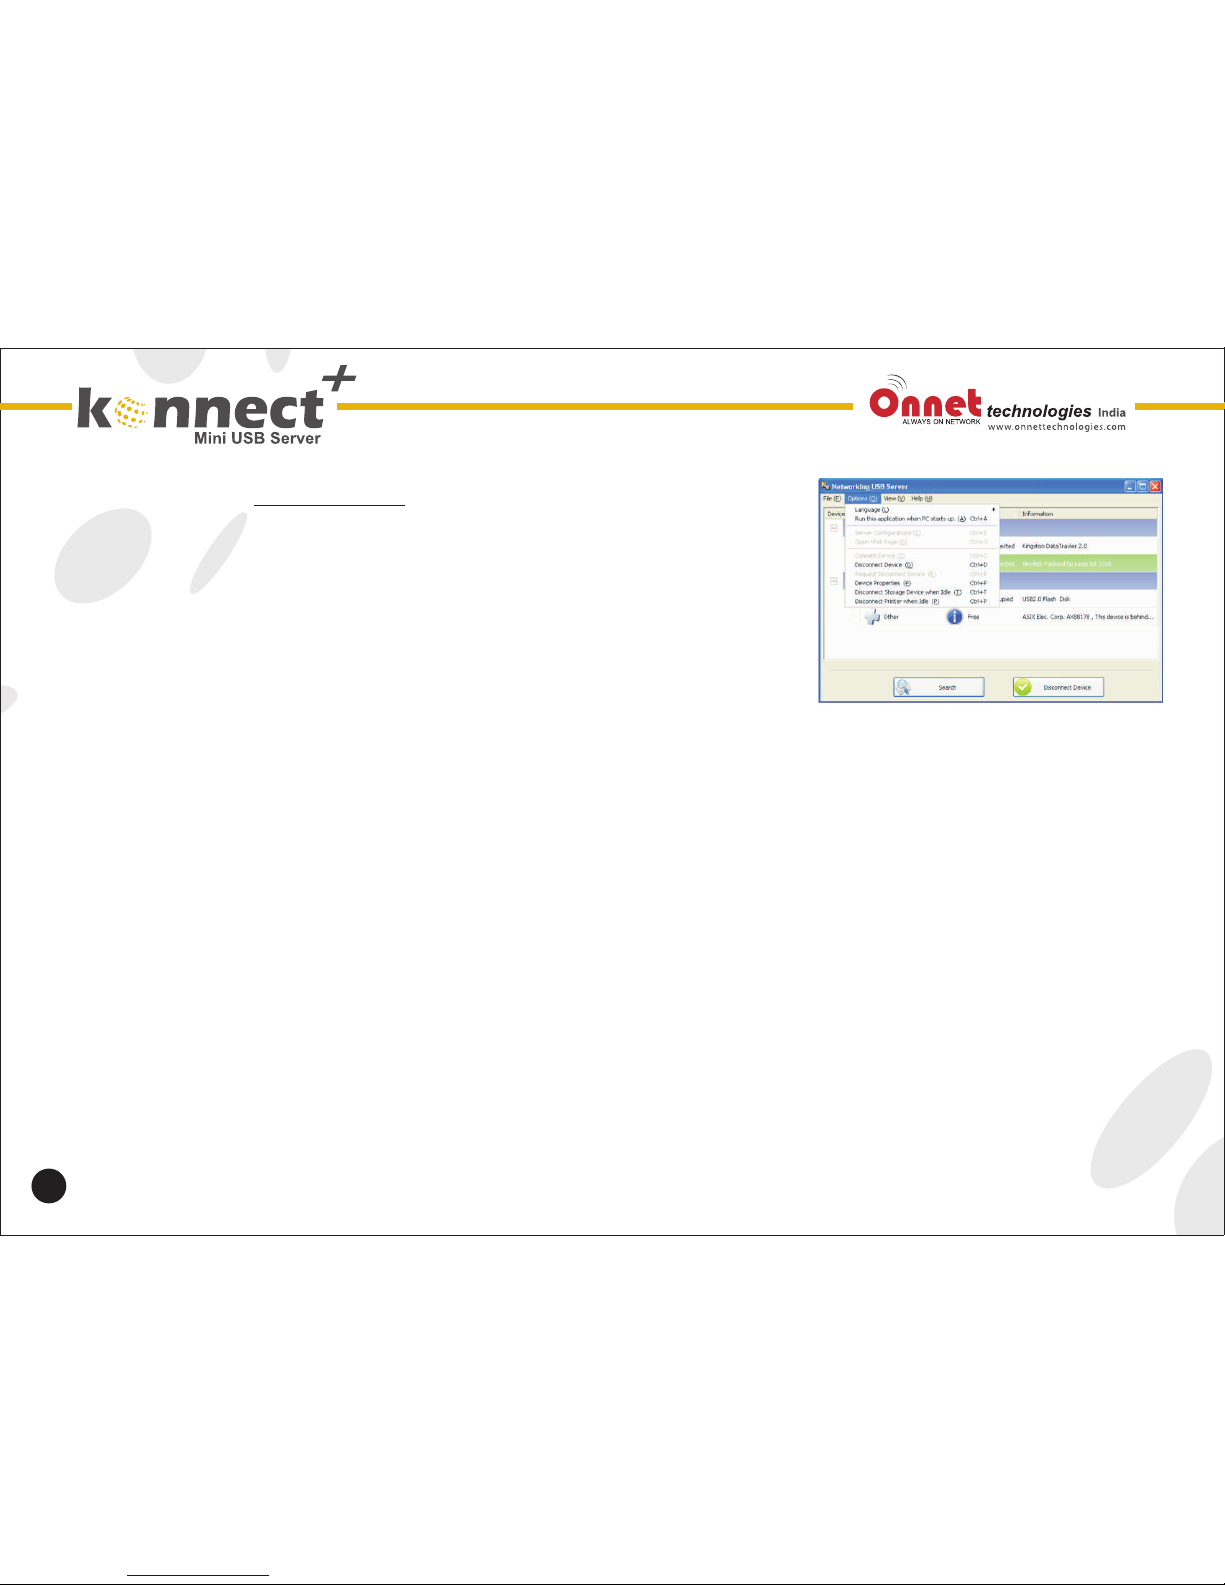
Control Menu
File-the Quit function exits the program
Options > Language: you can change the utilities
Language with this option the default language would
be the same as your systems language
Setting Server: same function as the setting
Server option on the server icon right click menu
Run USBS server When PC Start UP: this utility automatically runs when your system
start up. Open web page brings up the server configuration web pages
Connect Device and Disconnect Device: connects and disconnects the selected
device
Request Disconnect Device: when you want to use a device occupied by other user
you can highlight that device and use this function. This sends a message to the
occupying user with your Request. The occupying user would either release the device or
deny the request if s/he is still using the
Device
View : The tree view in the main dialog has two display modes;' servers and Device
“mode and Device Only mode the default setting is device only mode. You can toggle
between these two displays Mode with the view option on the control menu.
Page 27
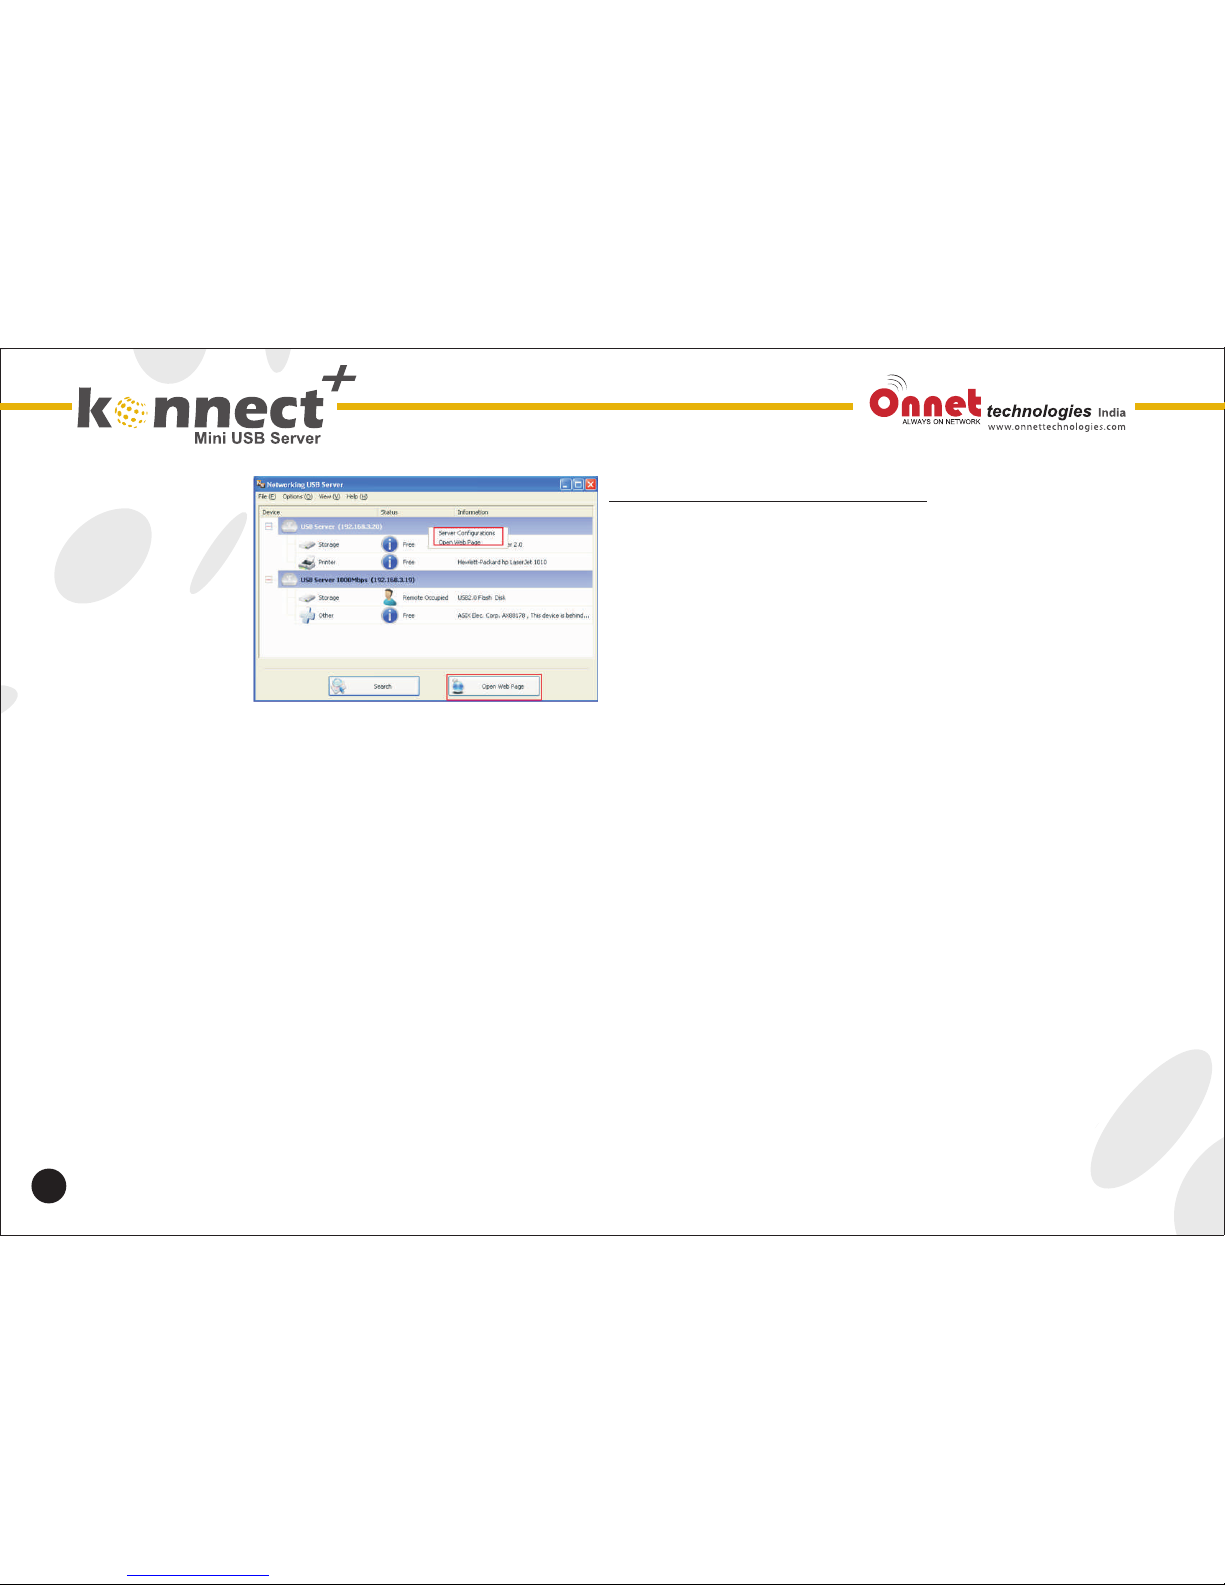
Configuration with the Utility
Konnect+ networking USB server utility provides
some advanced setting function for users to configure
the Device to better fit their needs. To bring up the
configuration dialog, please RIGHT CLICK device you
would like to configure like this. And select the Setting
Server option.
You might be prompted to enter password if a
Password has been set. If not you will immediately
See the dialog.
NOTE: ONLY A FREE DEVICE IS ALLOWED TO BE
CONFIGURED, AND TEHEREFORE THIS SETTING
OPTION ONLY APPEARS ON FREE NETWORK
USB DEVICE
27
Page 28
28
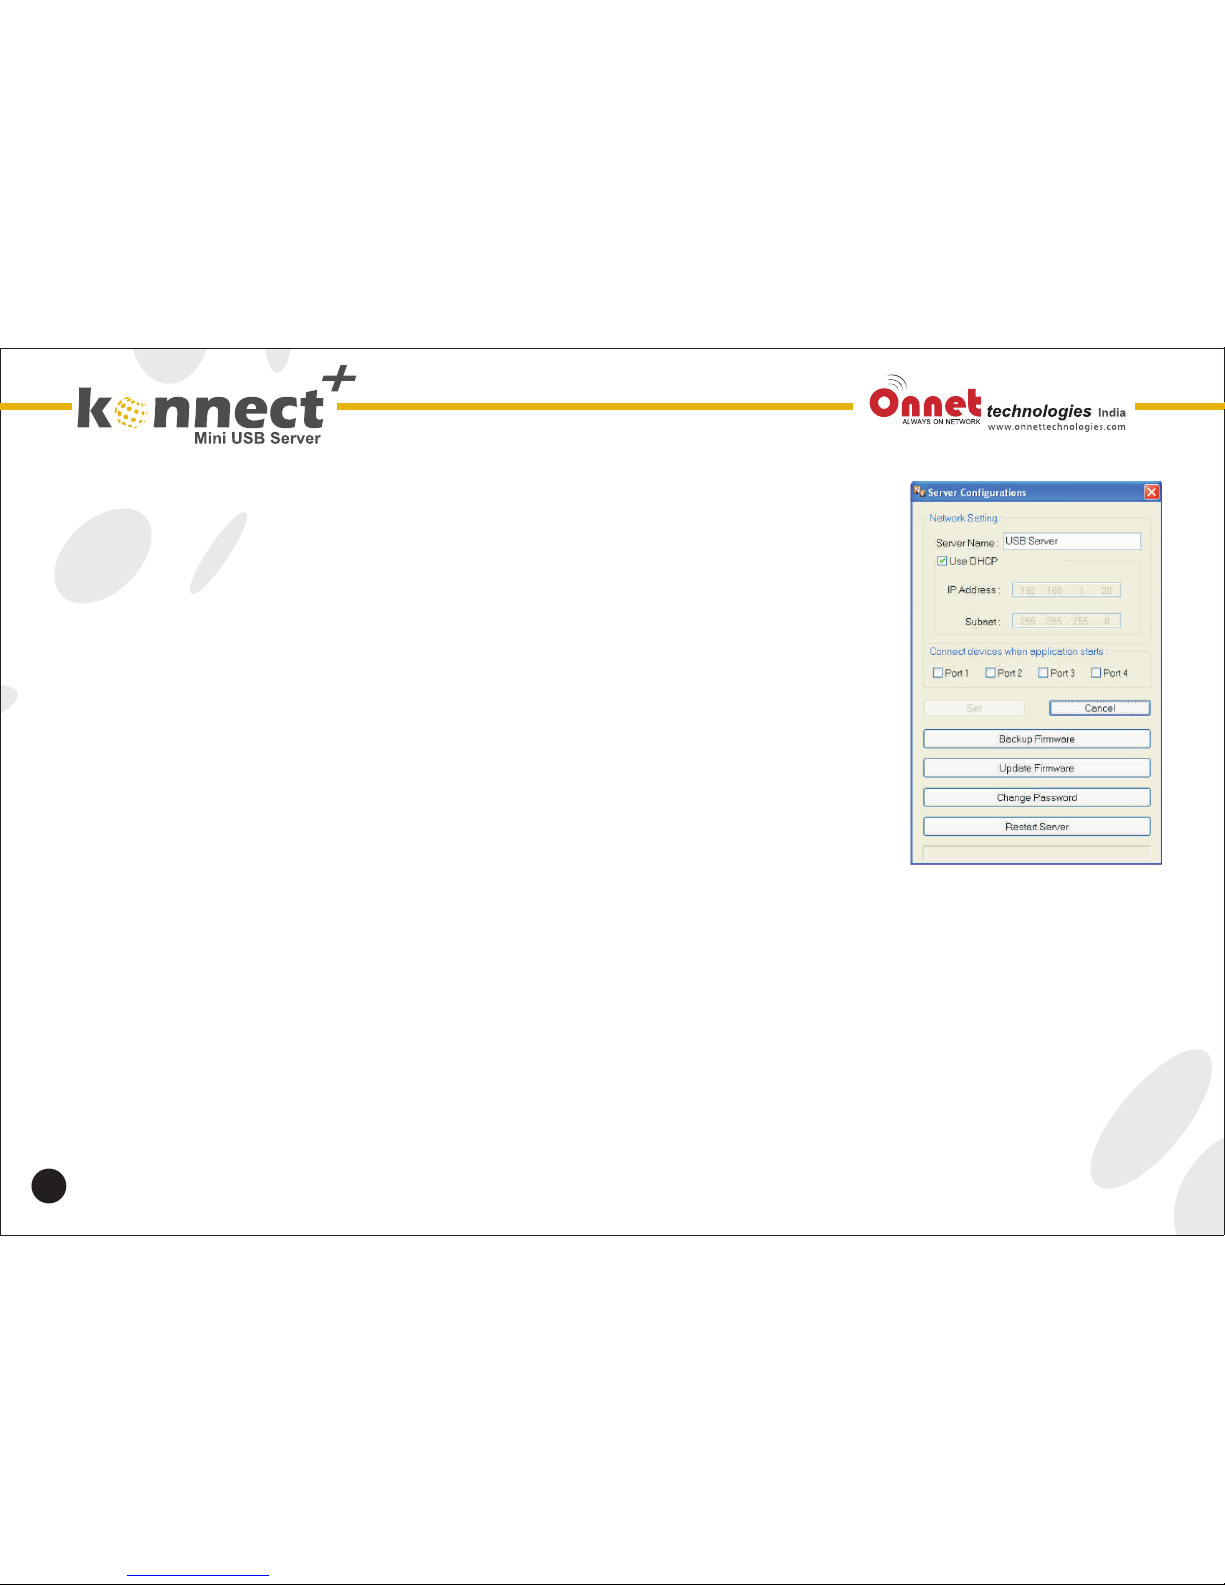
Server Name: this field allows you change the server name
change it whatever you want
USE DHCP: when this field is checked, your server acquires IP
address automatically. Uncheck it and you can enter IP
address automatically
NOTE: you can apply this function to a server under different
network segment. HOWEVER some router/switch hub does
not allow communication between servers under different
segment. In this case, you won't even see the server on a
different network segment.
Backup Firmware: this function is a fail-server mechanism for
the update Firmware function. Just browse to where you want
to save the backup file and click on save to save the file.
Update firmware: update firmware with this function. Use the browse button to chose
the firmware to update. Click on open to start.
Change Password: simply enter the new password and enter it again for confirmation.
Click on submit to change.
Restart Server: this button reboots the server. Please note that function will not work if
the server. You attempt to reset has a device connected to it and the device is occupied by
a user.
Page 29
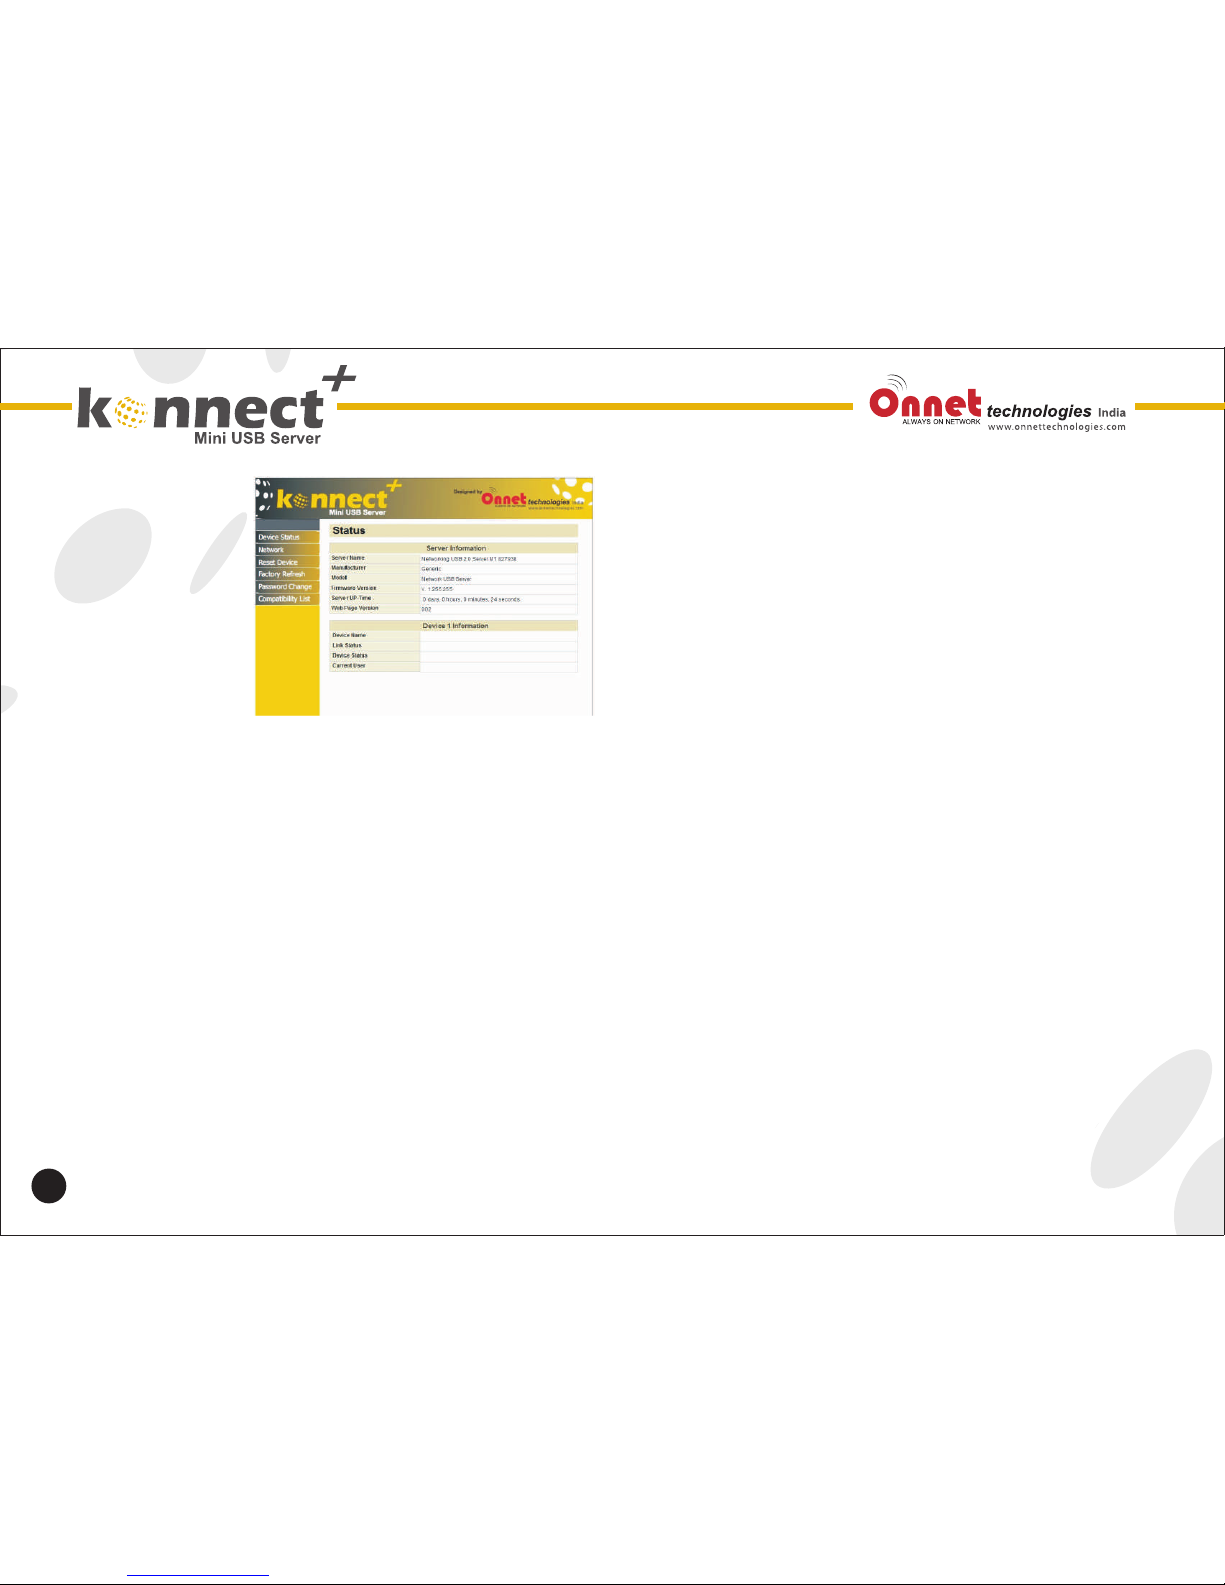
Configuration with Web- based UI
We allow the users to configure the setting the USB
server via the web-based UI select the target server
on the tree view and then click on the Open web page
button or the same option on the right-click menu of
server Icon, to bring up web-based configuration UI.
Your default web browser will pop up and take you into
the web-based configuration UI of the Server.
This is the main page of the configuration UI. You can
see the important information about the Konnect+
networking USB server and the device (s)
Connected to it the links at the left-hand side Each
represents a function. Click in on Device Status
brings you back to this page, and the other links take
you to pages with different function.
29
Page 30
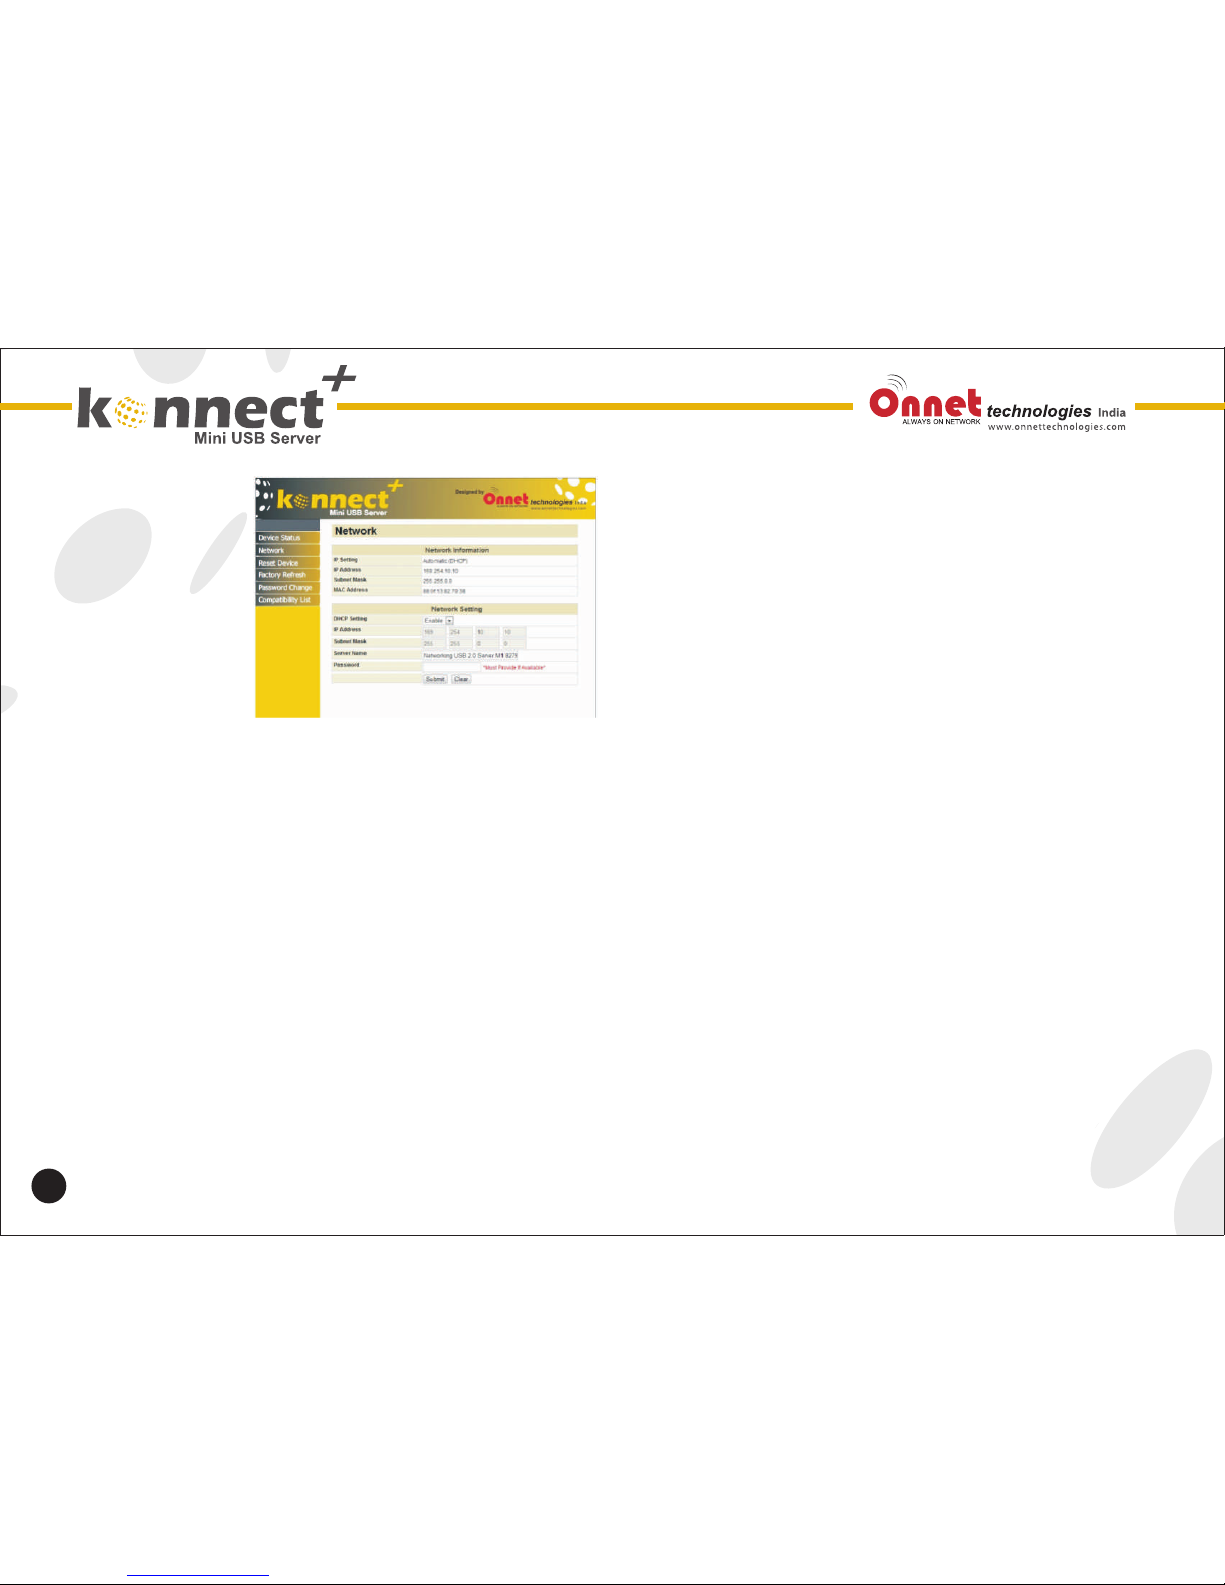
Networking information/setting
This page displays the current network setting of the
server and provides links to The pages where you can
perform special Action you can change the network
Setting according to your need.
However, please note that if you would like to give this
server a static IP, please disable the DHCP option.
Once you are done, please click on the Submit button
and reboot the Server.
NOTE: A Server with busy device (s) Connected is
pro hibit ed to be configured to prevent
interruption of any ongoing tasks.
30
Page 31
31
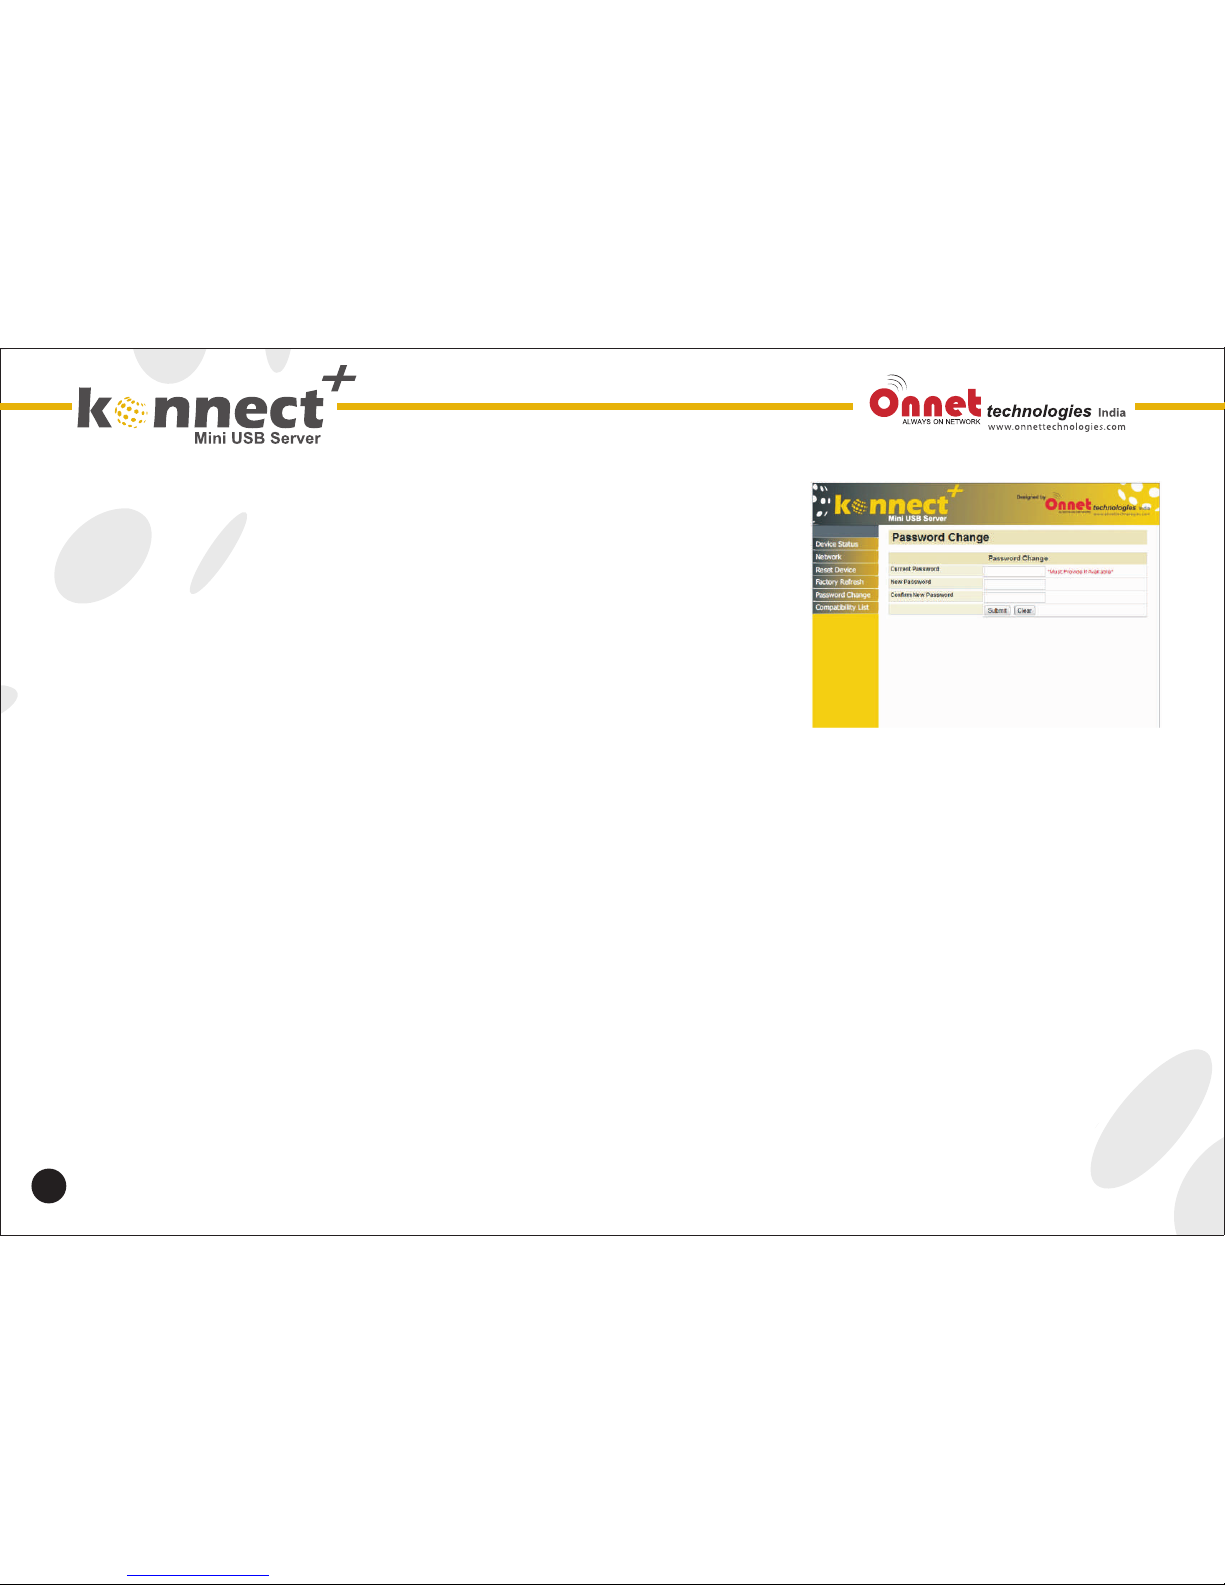
Change Password
Clicking on this link takes you to the Password
update page below. To change the password, you
must enter Current password, input new password
and Re-input new password for confirmation and
then click on Submit if you are setting the password
for the first time you don't have to provide current
password.
Reset Server
Clicking on this link takes you the page
Show below
With the Restart Server button you can reboot the server. However, if there is a
password, you must Enter it for this function to work. Password is by default blank. So
unless a password is explicitly set you Do not have to enter anything for the reset function
to work.
Factory Default
Clicking on this link takes you the page where you can restore the server's settings back
to default: Again the password is not necessary if no password is set. Just leave the field
empty and click on the Factory Default button to restore the factory default setting.
Page 32
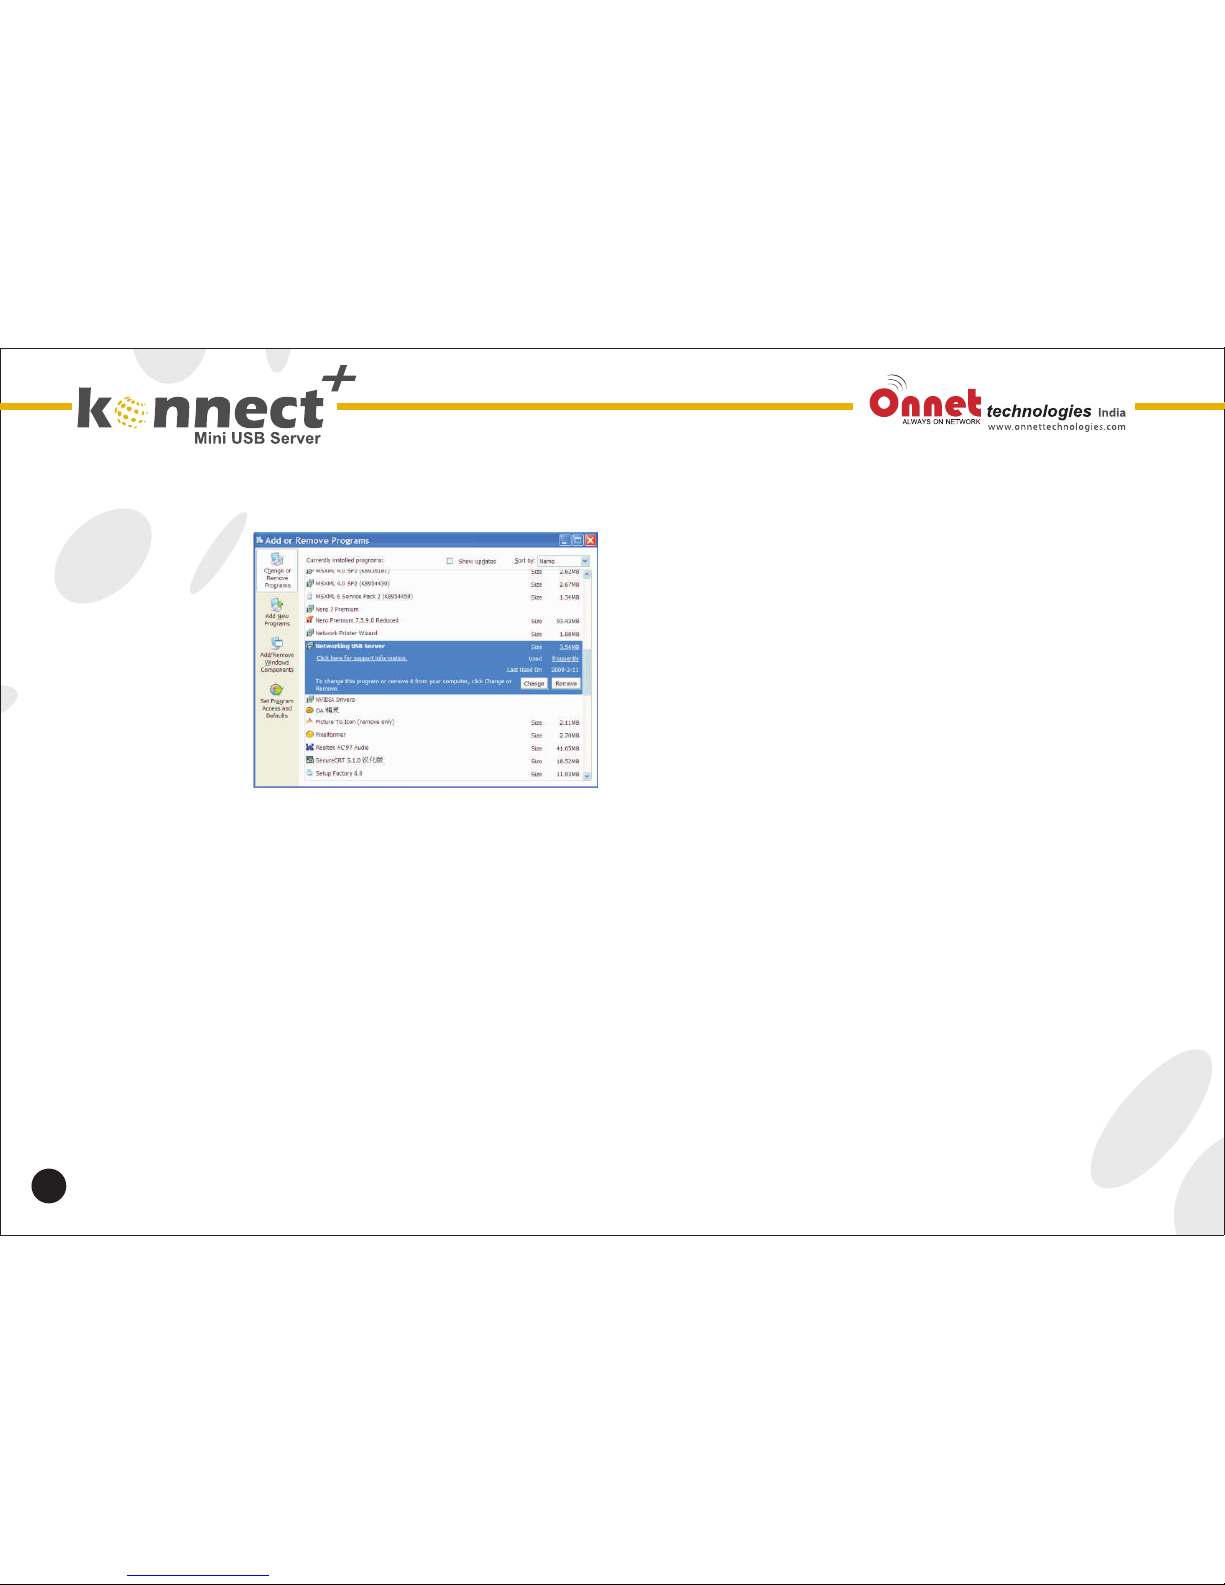
To uninstall Konnect+ networking USB server
Software please go to Control panel > Add or
Remove Programs
Then please browse through the program list and find
Konnect+ networking USB server program Please
select it and click on the Change/Remove button.
Then the un-Installer will start up and prompt you:
When done the installer will prompt you to reboot;
please select Finish to restart your computer. This
completely uninstalls the Konnect+ networking
USB server software from your computer.
32
Removing Konnect+ networking USB serverUtility From your System
Page 33
33
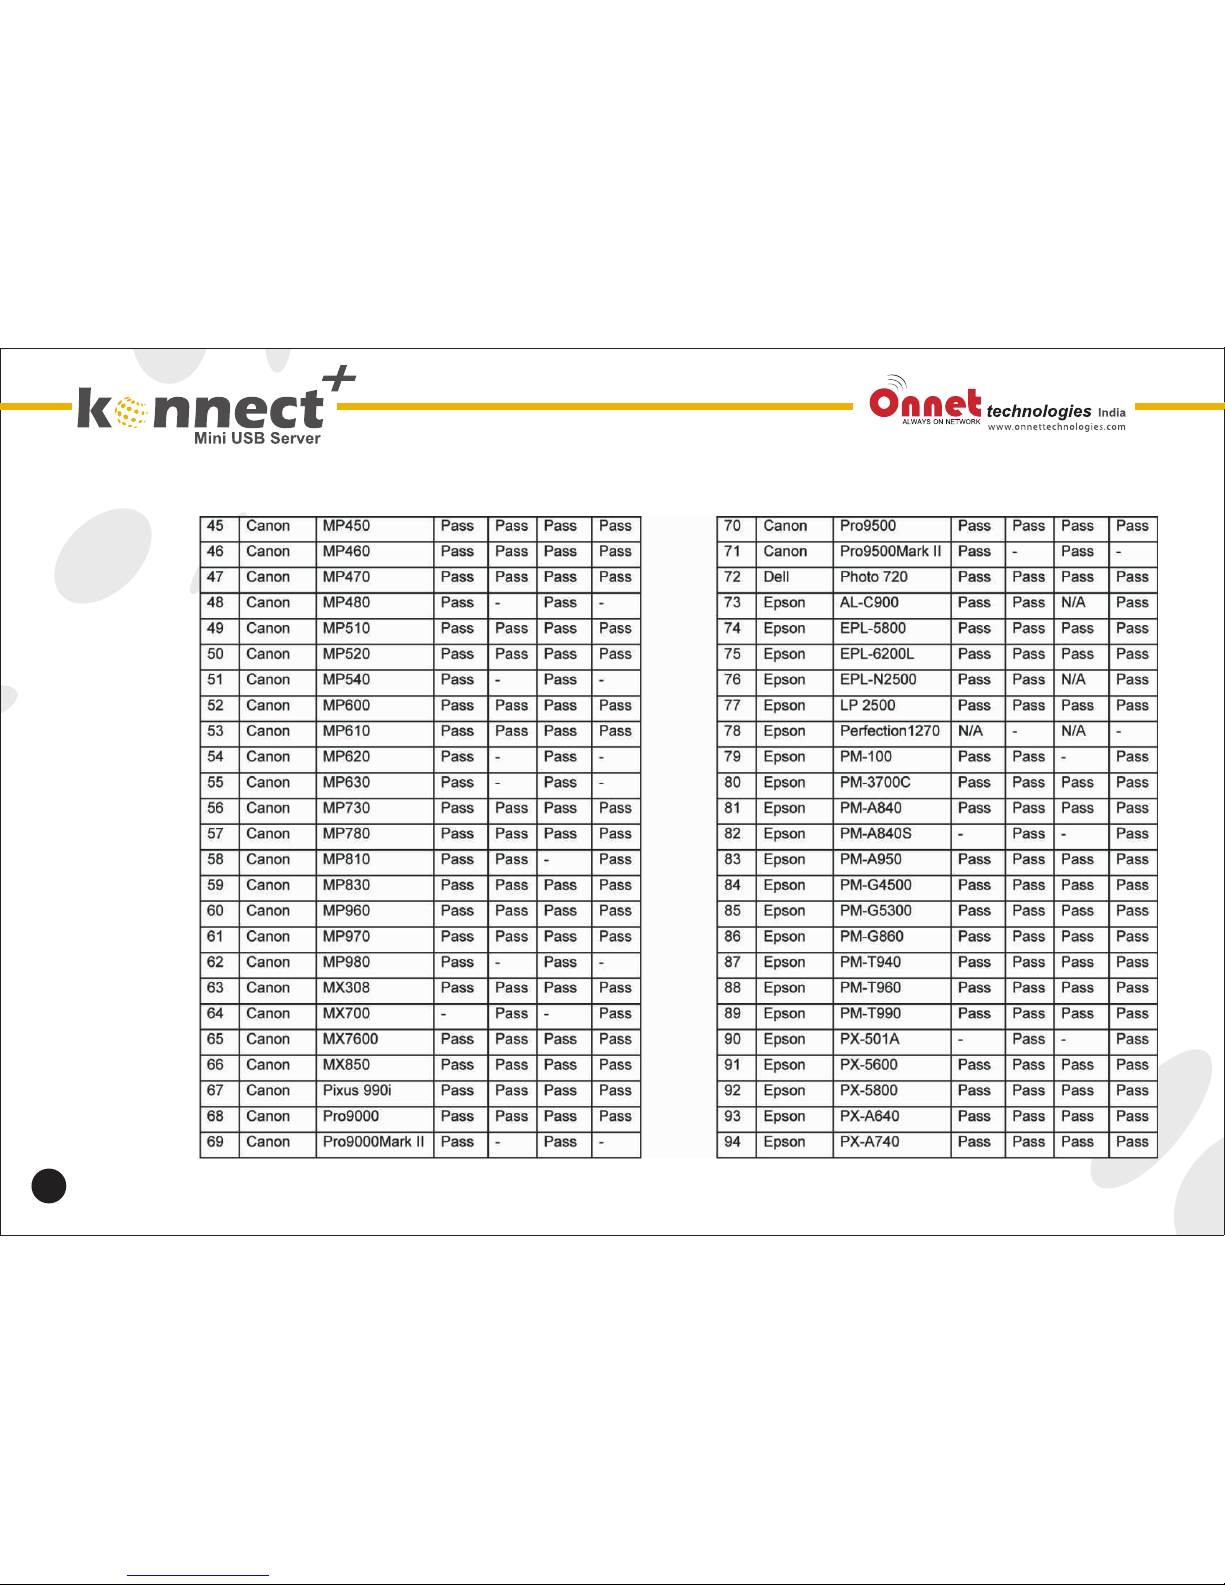
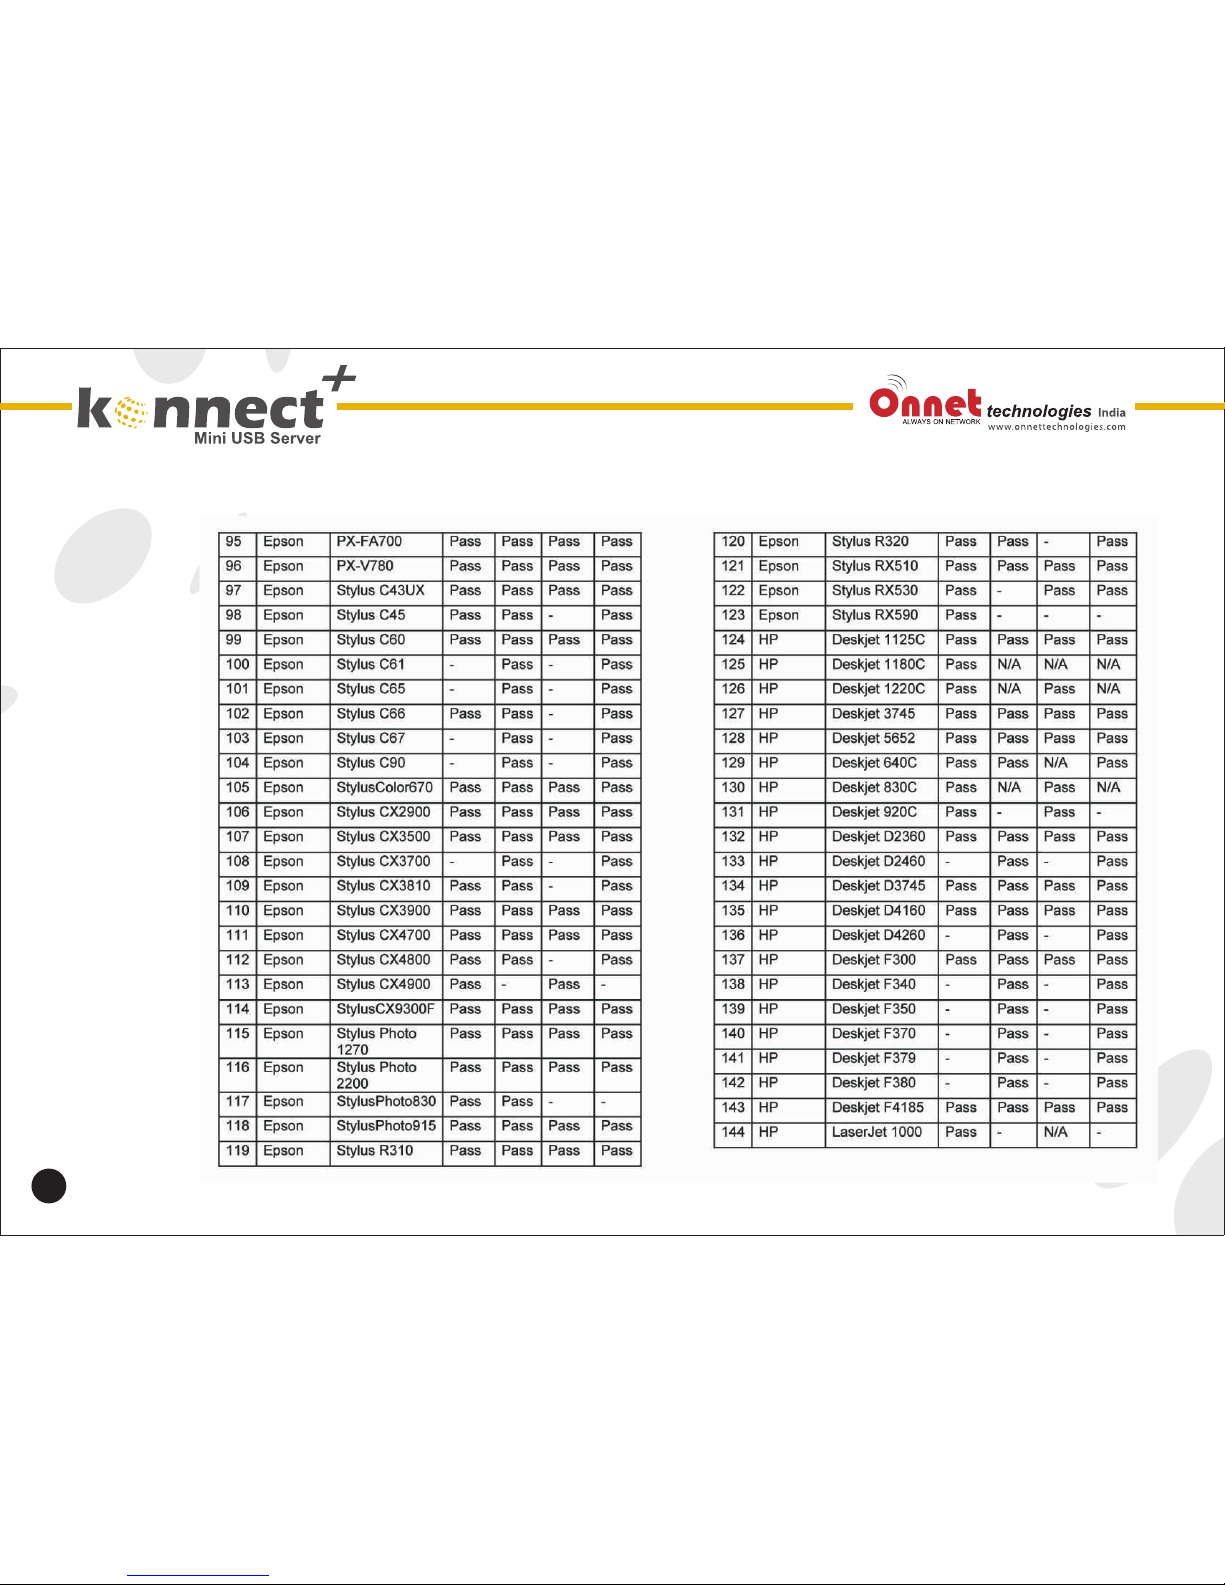
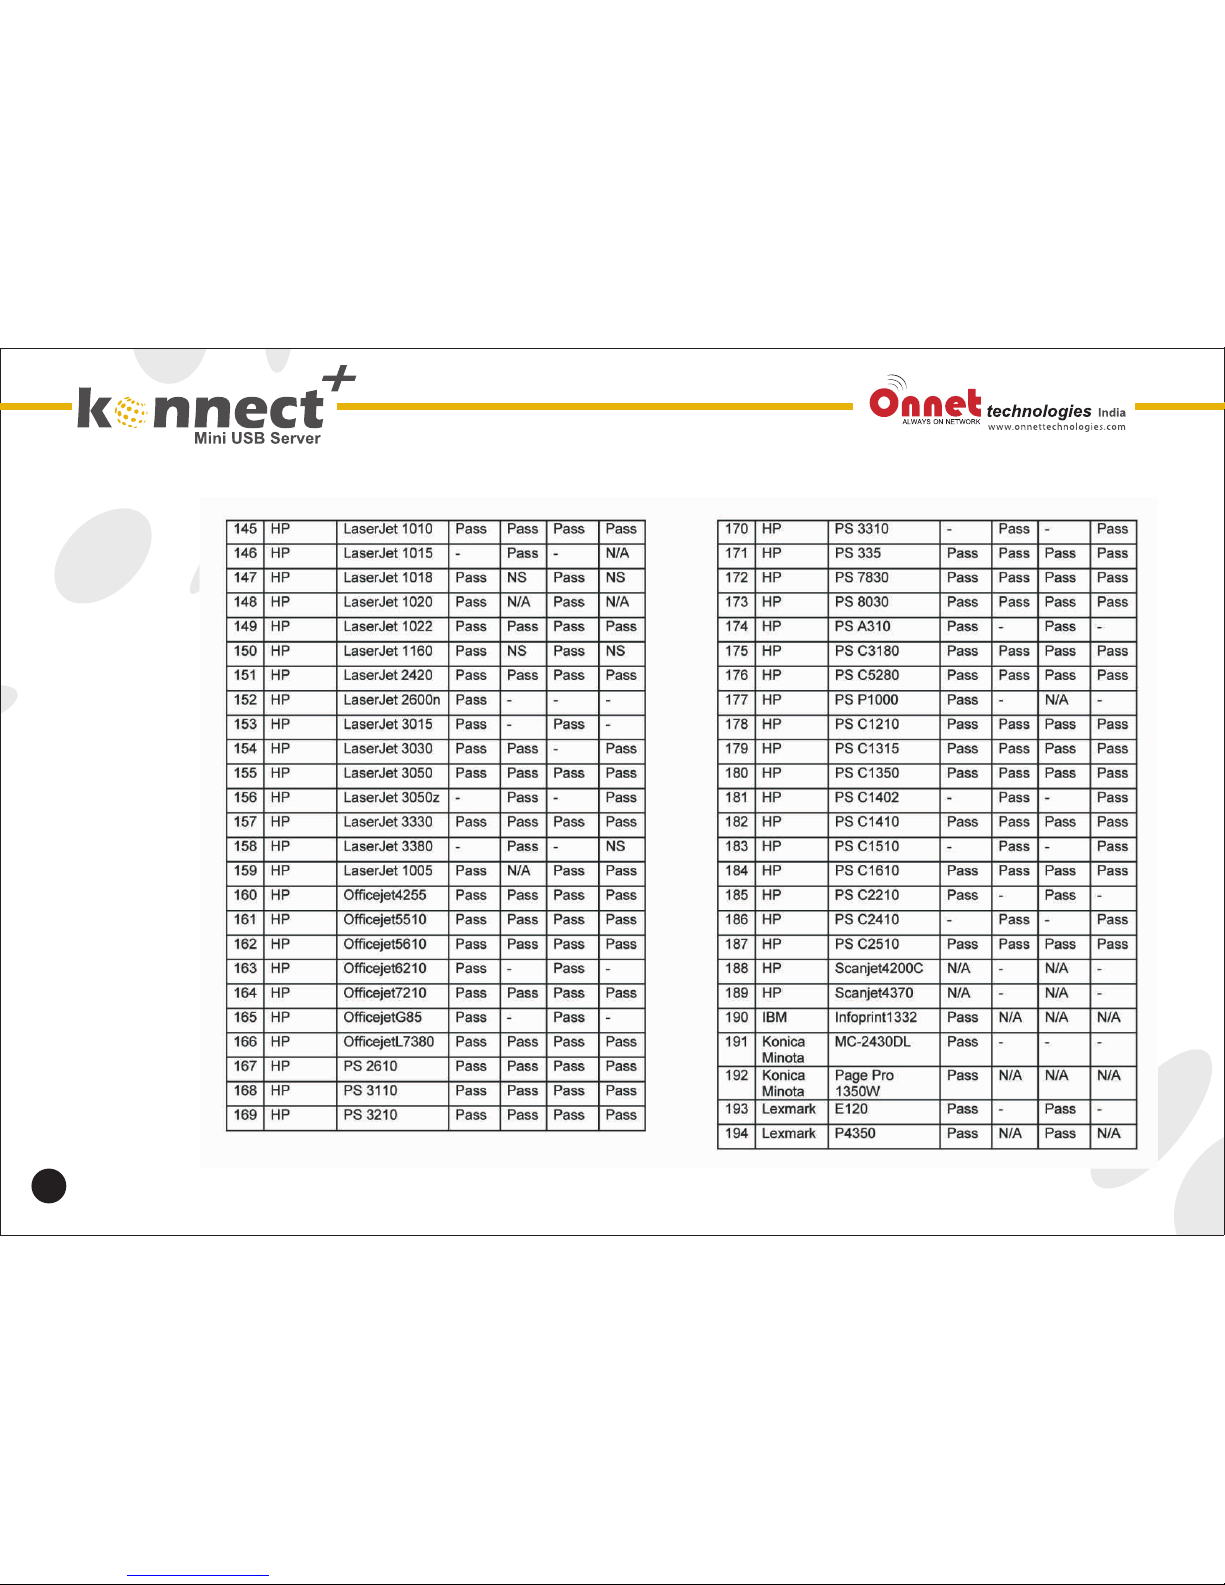
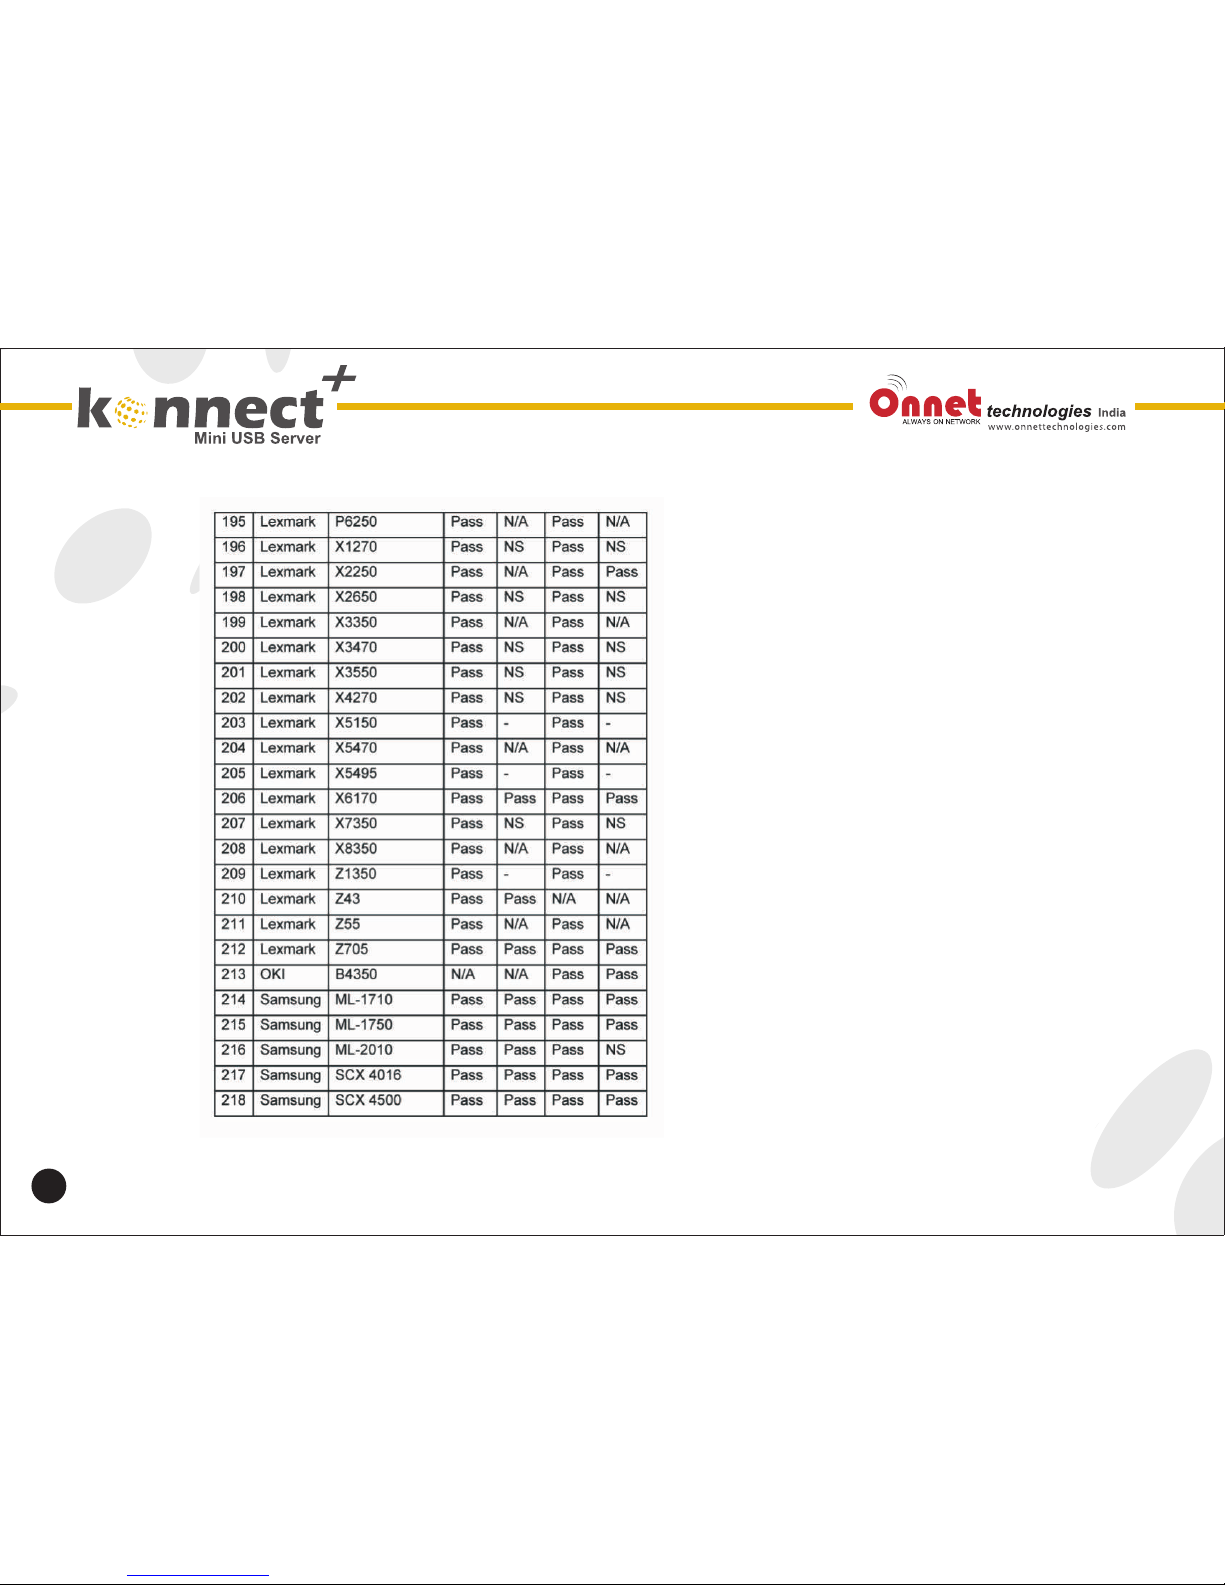
MFP-Printer / LPR Printer Compatibility List
Page 34
34
Page 35
35
Page 36
36
Page 37
37
N/A : This USB device does not have this
function:- NOT tested (Only a certain function of
this devices was test)
NS: This function is not support
Remark:
1. ** Devices compatible should be the same
on both windows VISTA and 7, except for
the case that device does NOT support the
OS.
2. MFP – Multi-Function printer
3. 3. LPR – Line printer remote
Page 38
38
Onnet Technologies India Private Ltd
Terms & Conditions of Warranty
Definitions : Unless the context otherwise requires, the following terms would have the prescribed meanings:
OTPL : Onnet Technolgies India Private Limited, a company duly registered under the Companies Act having
its Registered Office 5, Celler Silicon Tower, B/h Samartheswar Mahadev, Nr. Law garden, Ellisbridge,
Ahmedabad, 380006, Gujarat, India.
Product(s) :
Nova+ : ( 3G USB data Modem)
Minuto : Mini 3G & Broadband 11N router
Minuto+ : Pocket 3G & Broadband 11n router
Curro : 3G & Broadband 11n,
Micrron : 11N wi-fi Adaptor
Konnect : Mini USB print server
Konnect+ : Mini USB server
These models are marketed and sold by OTPL, either directly or through its Authorized Dealers / Authorized
Resellers. Customer : An end-user ( a person , firm, company or the legal entity) which purchases the
Product(s) from OTPL or its Authorized Dealers / Authorized Resellers. Onnet Authorised Reseller; (OAR):
OTPL Authorized Reseller within the territory of India, which may collect the product(s) for repair, and either
repair the Product(s) by itself or send the Product(s) for repair to OTPL's Authorised Service Centres (ASC). .
Warranty Clause
Page 39
39
OTPL's Warranty for the Product(s) is only against any defects in the manufacturer's material or workmanship,
which provide for the repair of the defective Products(s). OTPL's warranty does not cover against any
accidental damage, loss, acts of god, or misuse /abuse of the Product(s) or any other event not attributable to
the manufacturer's material or workmanship or manufacture of the product.
Warranty Period:
Product(s) is covered under one year standard warranty from the date of Product(s) purchase by the
customer. Warranty period confirmation would be done through either Online Warranty Serial No. Trekking
system (WMS) or Warranty Card and Customer Invoice date or Product(s) installation date, whichever is
earlier, but subject to the satisfaction of OTPL /OAR/ ASC. If a Customer transfers the ownership of product(s)
to another end user, the remainder of the warranty period may also transfer to the new owner. Customer shall
be required to provide proof of purchase including Warranty Card of the Product(s) , as a pre-condition for
availing the warranty of the Product(s) .
Warranty Type:
Warranty will be Carry in, depending upon the Customer's location. Carry-in Warranty: Carry-in Warranty
service requires that the product(s) be brought to the OAR / ASC for diagnosis and repair. The Customer needs
to carry the product(s) to the nearest OAR / ASC at its own cost.
For further details contact OTPL Call Centre at +91 079 26566198.
Warranty Terms:
• Warranty is provided only on product(s) which are purchased from OTPL Authorized Dealer/Reseller.
• The warranty is limited only to the manufacturing /workmanship defects in the Product(s).
• The warranty does not cover accessories and consumables, like Antenna Rods, Sim Cards and
Plastic/ Aesthetic parts.
Page 40
40
• The warranty does not cover the replacement of the product(s).
• Warranty does not cover warranty of functionality of the Product(s)
• Warranty does not cover damage caused due to act of God & force majeure events including but not
limited to fire or water damage, electrical disturbances etc.
• Within warranty period, OTPL’s OAR / ASC will repair or replace any defective part(s) of the
Product(s), if required, to rectify the problem in the Product(s). OTPL reserves the right to use reengineered part(s) with performance parameter equivalent to the similar new part(s), for performing
the warranty services. The replaced part(s) shall become the property of OTPL.
• In the event of repairs or replacement of any part(s), during the warranty period, the warranty shall
thereafter continue only for the unexpired period of original warranty.
The Warranty of the product(s) shall be rendered null and void if:
• The Product is physically damaged
• The Product is modified, repaired, maintained and /or disassembled by a party not authorized by
OTPL i.e damage arising out of unauthorized modification, repair, and alteration.
• The Product is installed, operated and/or maintained in ways other than recommended by OTPL in
the user manual. Product operation outside the usage parameters stated in the user manual provided
with the product;
• Improper site preparation or maintenance;
• The model No. or serial no. sticker of product is removed, mutilated or tampered with.
• Use of Non-original / Counterfeit / Duplicate Consumable(s) as well as compatibles, refills of
consumables along with the Product(s). Use of any accessories other than those supplied by OTPL
Authorized Resellers.
• Defect is the result of physical breakage, electric connection or electrical faults external to the
product(s).
Page 41
41
Limitation Of Liability
OTPL makes no other express warranty either in writing or otherwise and expressly disclaims all warranties
and conditions not stated in this limited warranty. OTPL does not warrant that the operation of the product(s)
will be uninterrupted or error-free. To the extent allowed by the Indian laws, OTPL disclaims all implied
warranties or conditions, including any implied warranties or conditions of merchantability, merchantable
quality, and fitness for a particular purpose. OTPL’s maximum liability under this limited warranty is limited to
the price of the product(s) or the cost of repair or replacement charges, whichever is lower.
Except as indicated above, in no event will OTPL be liable for Indirect damage caused due to improper
functioning of the product, including but not limited to lost profits or savings, business interruption, loss of data,
lost revenue, loss of use, or any other commercial or economic loss of any kind, or special, incidental, or
consequential damages.
Any claim made by a third party or made by customer on behalf of a third party. Any damage that occurs as a
result of customer’s failure to follow the directions in the User manual. Product(s) is covered under one year
standard warranty. This limitation of liability applies in all circumstances i.e. when damages are sought, a claim
made under this limited warranty or as a tort claim (including negligence and strict product liability), a contract
claim, or any other claim. This limitation of liability cannot be waived or modified by any person. This limitation
of liability will be effective even if Customer has advised OTPL /its representative of the possibility of any such
damages or even if such possibility were reasonably foreseeable.
Governing Laws:
Any disputes arising in connection with this Limited Warranty shall be governed by the laws of India. The
courts of Ahmedabad shall have the exclusive jurisdiction over disputes arising hereunder.
Page 42
FF3,Mardia Plaza, CG Road, Ahmedabad, Gujarat, India.
Tel :+91 79 2656 6198, Fax :+91 79 26566333. www.onnettechnologies.com
 Loading...