

Page 1
Universal Remote
PRODUCT GUIDE
Model: ONB13AV004
Page 2

2
Congratulations on your purchase of the ONN
Universal Remote. This remote is capable of
operating thousands of audio/video devices
including TVs, DVD players, cable, satellite
receivers, and more!
IMPORTANT:
SAVE THIS MANUAL AND CODE LIST FOR
FUTURE REFERENCE
QR Code
Scan the QR code to view our helpful
demonstration video for programming your
ONN remote.
Introduction ........................................................... 2
Battery Installation ................................................. 3
Care and Maintenance ..................................... 3
Button Functions ................................................... 4
Programming Your Remote ................................... 6
Direct Code Entry ............................................. 6
Auto Code Search ............................................ 8
Controlling Combo Devices ............................. 9
Master Volume Feature ....................................... 10
Reset to Factory Settings .................................... 11
Troubleshooting ................................................... 12
FCC Statement .................................................... 13
Remote Code Section ......................................... 14
Table of Contents
Scan this to view remote
setup video
Mira a ver el video de
instalación remota
http://www.myonnremote.com
Page 3

3
Your universal remote requires two (2) AAA
Alkaline batteries (not included).
To Install the Batteries:
1. Remove the battery compartment cover by
sliding the cover down.
2. Match the (+) and (-) marks on the batteries
to the (+) and (-) marks inside the battery
compartment, then insert two (2) AAA Alkaline
batteries. Be sure to use fresh batteries.
3. Slide the battery compartment cover back
into place.
Note: If your remote stops operating properly,
replace the batteries with new ones. The remote
will retain the codes you have programmed for up
to 10 minutes after the batteries are removed.
Battery Precautions:
• Donotmixoldandnewbatteries.
• Donotmixalkaline,standard(carbon-zinc),or
rechargeable (Ni-Cd, Ni-MH, etc.) batteries.
• Alwaysremoveold,weakorworn-outbatteries
promptly and recycle or dispose of them in
accordance with local and national regulations.
Care and Maintenance
• Keeptheremoteawayfrommoisture.Ifitgets
wet, dry it immediately.
• Useandstoretheremoteatnormal
household temperatures.
• Useasoft,dampclothtocleantheremote.
• Iftheremoteisnotgoingtobeusedfora
long period of time, remove the batteries
from the remote.
• Handletheremotewithcare.
Battery Installation
Page 4
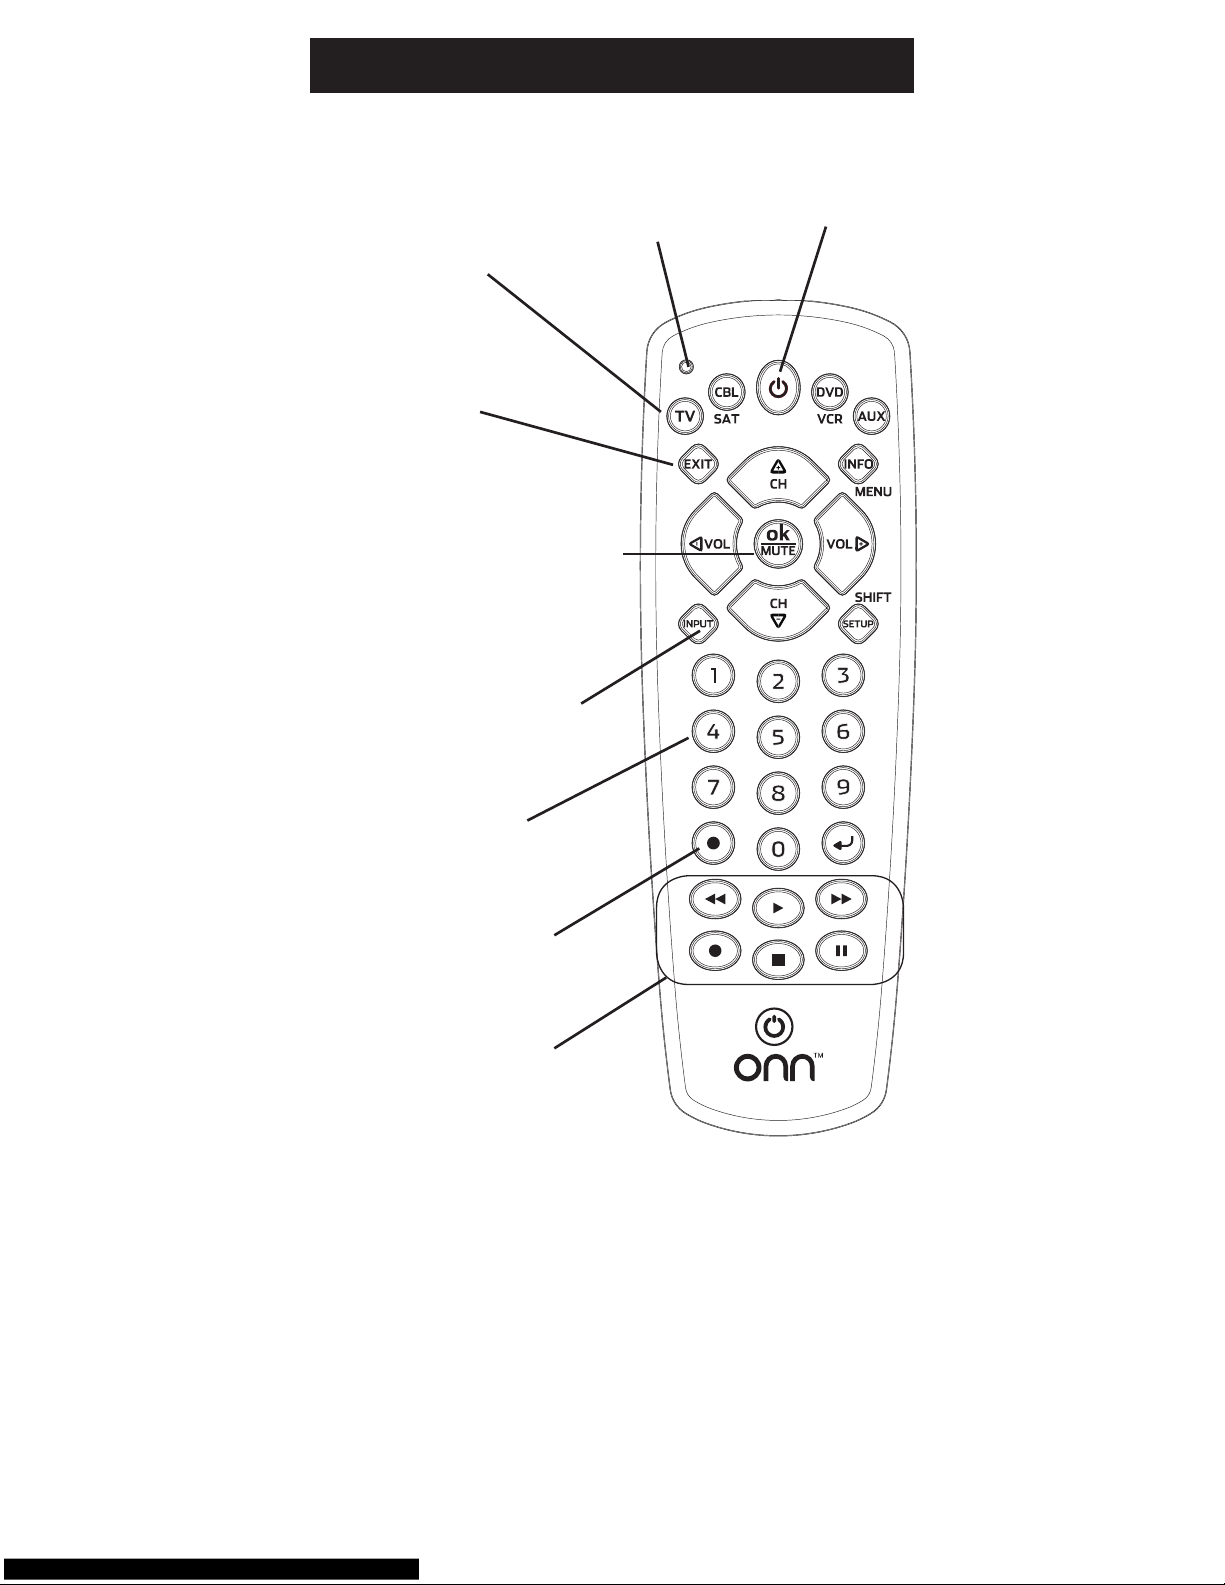
4
INPUT Selects the video
inputs from available
viewing sources.
NUMBERS
Enter numbers for direct
channel selection.
ON•OFF Turns
the device On
or Off.
MUTE Turns off the TV
sound while the picture
remains. In SHIFT mode
OK Selects menu items
for the device you are
controlling.
EXIT ExitsOn-
Screen Menus.
TV, CBL/SAT,
DVD/ VCR, AUX
Selects the device
to control.
Red Indicator
Light when
any button is
pressed.
Button Functions
DOT: Used to select
digital channels, for
example:4.1,9.2.
RECORD, PLAY
STOP, REWIND,
FAST FORWARD,
PAUSE
Page 5
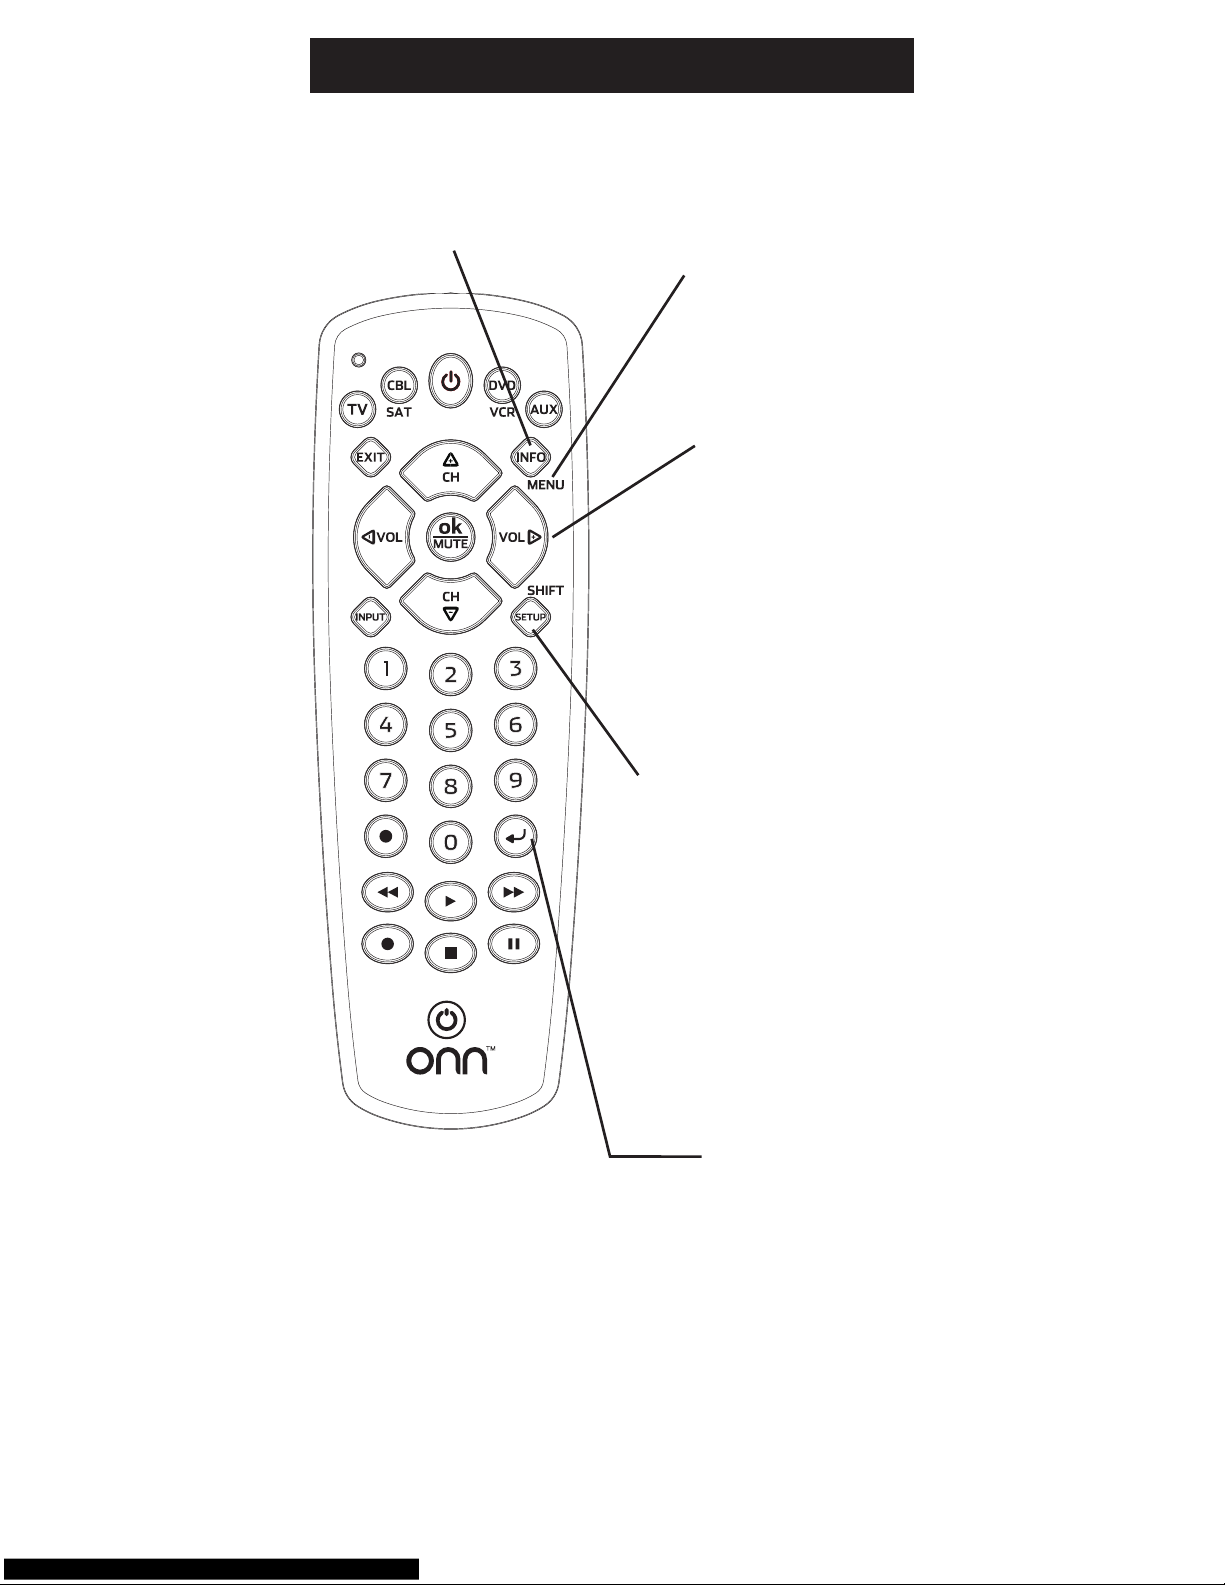
5
MENU displays the
Menu on the TV and
other devices. Use
the SHIFT button to
access this feature.
INFO displays/selects onscreen channel information,
etc.
ENTER
For some TV models, the
ENTER button is used after
a channel number is entered
to immediately change to the
selected channel.
VOLUME UP/DOWN
Changes the volume
level of the device,
normally the TV.
CHANNEL UP/DOWN
Changes the channels.
In SHIFT mode, these
buttons navigate on-
screen cursors and
are used to make
selections.
Button Functions, cont.
SETUP button is used to
program the remote.
SHIFT is the alternative
function of this button.
Use the SHIFT button
to access the Menu and
Navigation functions of your
device. To enter the SHIFT
mode press this button once.
Toexittheshiftmode,press
the SHIFT button again.
NOTE: The red indicator light
will blink when the remote is
in SHIFT mode.
Page 6

6
Programming Your Remote
Your ONN universal remote control is designed to
control up to 4 different audio/video devices such
as TV, DVD, VCR, satellite, cable and audio using
only one remote. To use this remote, you will need
to program it to control the devices of your choice.
There are two ways to program the remote - direct
code entry or auto code search.
Direct Code Entry (Recommended)
1. Locate the Remote Code List
provided in this manual. Find the
DEVICE CATEGORY you wish to
program(forexampleTV, DVD,
SAT, AUX)andthenndthe
BRAND of that device. Circle all the
codesunderthatbrand.Example:
For a GE TV, locate the TV code
section then circle all of the GE TV
codes.
2. Manually turn on the device you
wish to control.
3. Press and hold the SETUP button
until the red indicator light stays on
(approximately2seconds)andthen
release the SETUP button.
4. Press and release the desired device
button on the remote (TV, DVD,
SAT, AUX). The red indicator will
blink once and then remain on.
5. Entertherst4-digitcodepreviously
found in the code list using the
number buttons on the remote. If
the code entered is a valid code, the
red indicator light will turn off. If the
code entered is not a valid code, the
redindicatorlightwillashand
remain on allowing you to re-enter
the code.
Note: If no buttons are pressed for
35 seconds, the remote will exit the
SETUP mode and you will have to
Page 7

7
Programming Your Remote
start over.
6. Point the remote at the device.
Press the POWER button—if
the device turns off, no further
programming is required for that
device. If the device does not turn
off, return to step 3 and use the
nextcodefoundinthecodelist.
Continue this process until a code
for your device is found.
To view a helpful demonstration video for
programming your ONN remote, see QR code
on page 2 of this manual.
Programming Notes
• Ifyourdevicedoesnotrespondtotheremote
after trying all codes listed or your brand is
not listed in the code list, use the Auto Code
Search method to program your remote.
• Sometimestherstcodethat“works”withyour
device may operate only a few functions of your
device. There may be another code in the code
list that performs more functions. Try other
codes from the code list for more functionality.
• Youcanuseanydevicebuttontocontrolother
devices in your home entertainment system.
Forexample,youcanusetheAUX device
button to control an audio receiver or a DVD,
VCR, satellite, etc.
• Forcombinationdevices,youmayhaveto
enteracodeforeachdevice.Forexample,for
a VCR/DVD device, you may have to enter a
code for the DVD under the DVD button and
enter a code for the VCR using a different
device button on the remote.
• Writedownthecodefoundtooperateyour
device for future reference.
Page 8

8
Programming Your Remote
Auto Code Search
The Auto Code Search searches automatically
through all of the codes stored in this remote. Read
all the following steps prior to starting the auto
search as you will need to be prepared to lock-in
the proper code when found.
1. Manually turn on the device you wish
to control.
2. Press and hold the SETUP button
until the red indicator light stays on
(approximately4seconds)andthen
release the button.
3. Press and release the desired device
button on the remote (TV, DVD, SAT,
AUX). The red indicator will blink
once and then remain on.
4. Point the remote at the device and
press and release the POWER button
(for TV) or PLAY button (for DVD,
VCR, etc.) to start the search. The red
indicatorwillash(approximately
every 2 seconds) as the remote
searches. Note: The remote must be
pointed at the device for the duration
of this search.
5. Placeyourngeronthe#1 button so
you are prepared to lock-in the code.
6. Whenthedeviceshutsofforbegins
playing, press the #1 button to lock-in
the code. The red indicator light will
turn off. Note: You have
approximately two seconds after the
device shuts off or begins playing to
lock-in the code.
7. Point the remote at the device and
check to see if the remote operates
the device as desired. If it does, no
further programming is required for
that device. If it does not, return to
step 2 and start the auto search.
Page 9

9
Programming Your Remote
To view a helpful demonstration video for
programming your ONN remote, see QR code
on page 2 of this manual.
Programming Notes
• Thisprocessmaytakeseveralminutesasthe
remote contains many codes.
• TheSETUP button can be used during the
search process to reverse the direction of the
searchoftheremotecodes.Forexample,if
you miss the code for your device and the
remote is continuing to search (as indicated by
the blinking red light), press the SETUP button
and the code search will reverse direction and
return to the code.
• WhenusingtheAutoCodeSearch
programming method, the device button
corresponding to the type of device you want
tocontrolmustbeselected(forexample,the
TV device button must be selected in step 3 if
you want to control a TV, the DVD/VCR device
button for a DVD player, etc.)
• Sometimestherstcodethat“works”with
your device may operate only a few functions
of your device. There may be another code
in the code list that performs more functions.
Continue the code search as directed above
until the best code is found.
Controlling Combo Devices
Some Combo devices (e.g. TV/VCR, TV/DVD,
DVD/VCR, etc.) will require you to setup up two
different Mode buttons to control both parts of
theCombodevice.Forexample,ifyouhavea
TV/DVD Combo, you might need to set up one
code under the TV button to control the TV part
AND a separate code (under any other Mode
button) to control the DVD part.
Page 10

10
Master Volume Feature
Master Volume Feature
The Master Volume Feature allows you to select
a single device (TV or audio receiver) that the
volumecontrolalwayscontrols.Forexample,
the remote can be in TV mode while the volume
buttons control the volume on your audio receiver
instead of your TV.
Enabling the Master Volume Feature
1. Press and hold the SETUP button
until the red indicator stays on
(approximately4seconds)andthen
release the button.
2. Press and release desired device
button (TV, DVD, SAT, AUX) for the
device you wish to setup to control
the volume.
3. Press and release the
MUTE button.
4. Press and release the VOL + button.
The red indicator will blink twice and
then go off.
To test the feature put the remote in
another mode such as the TV mode
if you programmed the audio receiver
to be the Master Volume Device.
Point the remote at the audio receiver,
press and hold either the VOL + or
the VOL - button. If the audio receiver
volume changes then the remote is
programmed correctly. If the TV volume
changes and not the audio receiver,
you will have to repeat the steps above
and test again.
Disabling the Master Volume Feature
1. Press and hold the SETUP button
until the red indicator stays on
(approximately4seconds)andthen
release the button.
Page 11

11
2. Press and release the device button
(TV, DVD, SAT, AUX) which is
programmed to control the Master
Volume Feature.
3. Press and release the
MUTE button.
4. Press and release the VOL -
button. The red indicator light
will blink twice and go off.
To make sure the Master Volume
Feature is disabled, put the remote in
TV mode if you programmed the audio
receiver to be the Master Volume
Device. Point the remote at the TV and
press a volume button. If the volume
changes on the TV, the feature is
disabled. If the volume on the audio
receiver changes, and not the TV, you
will have to repeat the steps above
and test again.
Reset to Factory Settings
1. Press and hold the SETUP button
until the red indicator stays on
(approximately4seconds)andthen
release the button.
2. Press and release the OK button.
3. Press and release the number #0
button. The red indicator light will
ashtwice.
Master Volume Feature, cont.
Page 12

12
Remote does not operate your device.
• Makesurethebatteriesarefreshand
installed correctly.
• Aimtheremotedirectlyatyourdevice,and
make sure that there are no obstructions
between the remote and device.
• Makesureyouselecttheappropriatedeviceon
theremoteyouwishtocontrol,forexample,TV
for TV, DVD for DVD, etc.
• Tryprogrammingtheremotewithadifferent
code. See Direct Code Entry section.
• Remotemaynotbecompatiblewith
your device.
Remote does not operate some features of
your device.
• Sometimesaparticularcodemightoperate
a few features but not all. Try programming
remote with a different code from the code list.
See Direct Code Entry section.
• Remotemaynotbeabletooperateallfeatures
of your device or button names may be
different than that of your original remotes.
Remote Code is not available for a combo
device (e.g. TV/VCR, TV/DVD)
• SomeCombodevices(e.g.TV/VCR,TV/DVD,
DVD/VCR, etc.) will require you to set up two
different Mode buttons to control both parts of
theCombodevice.Forexample,ifyouhavea
TV/DVD Combo, you might need to set up one
code under the TV button to control the TV part
AND a separate code (under any other Mode
button) to control the DVD part.
BEFORE YOU RETURN THIS PRODUCT TO
THE STORE, PLEASE VISIT THE WEBSITE
www.myOnnRemote.com FOR FURTHER
ASSISTANCE; Or, contact us at 1-800-654-8483
between 7:30AM—5:00PM CST.
Troubleshooting
Page 13

13
FCC Statement
This device complies with Part 15 of the FCC
Rules. Operation is subject to the following two
conditions:(1)thisdevicemaynotcauseharmful
interference, and (2) this device must accept any
interference received, including interference that
may cause undesired operation.
Warning:Changesormodicationstothisunit
notexpresslyapprovedbythepartyresponsible
for compliance could void the user’s authority to
operate the equipment.
NOTE: This equipment has been tested and found
to comply with the limits for a Class B digital
device, pursuant to Part 15 of the FCC Rules.
These limits are designed to provide reasonable
protection against harmful interference in a
residential installation. This equipment generates,
uses and can radiate radio frequency energy and,
if not installed and used in accordance with the
instructions, may cause harmful interference to
radio communications.
However, there is no guarantee that interference
will not occur in a particular installation. If this
equipment does cause harmful interference
to radio or television reception, which can be
determined by turning the equipment off and
on, the user is encouraged to try to correct the
interference by one or more of the following
measures:
• Reorientorrelocatethereceivingantenna.
• Increasetheseparationbetweentheequipment
and receiver.
• Connecttheequipmentintoanoutletona
circuit different from that to which the receiver
is connected.
• Consultthedealeroranexperiencedradio/TV
technician for help.
FCC Statement
DistributedbyWal-MartStores,Inc.
Bentonville, AR 72716
MADE IN CHINA
Page 14

14
Code List – Lista de Códigos
TV
Abex ............................................0401, 4021
Acer .............................................3291, 4001
Acme .....................................................0471
ADA .......................................................0461
ADC .............................................1431, 1661
Admiral ..........0371, 0681, 1441, 1661, 4991
Advent .........................................3261, 0581
.......................0631, 0871, 2131, 2891, 4931
Adventura ..............................................0151
Aiko..............................................1011, 4321
Aiwa .......................................................0411
.......................0651, 0931, 1411, 4731, 4801
Akai ........................................................3215
.......................3111, 0331, 0351, 0781, 1901
.......................4141, 4151, 4461, 5141, 5171
Alleron....................................................1711
Amark ....................................................1441
Ames .....................................................1275
Amtron ...................................................2191
AMW ............................................0645, 0825
ANABA...................................................1375
Anam National .......................................0271
.......................1941, 2151, 2191, 2331, 3431
AOC .........................0001, 0011, 0251, 0391
.......................0611, 0891, 1221, 4221, 4261
Apex ..................................0045, 0191, 0245
.......................0375, 0425, 0431, 0671, 1025
.......................1105, 1891, 2911, 4841, 5111
Archer ....................................................1441
Aspect ...................................................1271
Audiovox........2191, 2451, 4031, 4051, 4521
Aurora ....................................................3061
Axion......................................................0881
Bang&Olufsen........................................1591
Belcor ....................................................0001
Bell&Howell ...1261, 1421, 1661, 1691, 3421
BenQ .......................1741, 1761, 2221, 3871
Bluesky ........................................3511, 3921
Bradford ................................................2191
Broksonic ......0211, 0371, 0851, 1631, 4951
Brokwood ..............................................0001
Candle .....................0001, 0151, 0961, 1221
Capehart ......................................0391, 4221
CCE .......................................................3721
Celebrity ................................................1901
Celera ....................................................0191
Centrios .................................................1361
Centurion ...............................................1221
Cetomer ...................0001, 1631, 2901, 2961
Cetronic .................................................1941
Changhong ........................0191, 1891, 4841
Chimei ...................................................3071
Cineral .........................................3511, 4321
Citizen ..........................................0001, 0351
.......................0371, 0961, 1011, 1221, 1311
.......................1381, 1661, 1941, 2191, 4321
Clairtone ................................................0011
Classic .....................0191, 1891, 1941, 4841
CLP ........................................................0061
CLP Classic .......................0001, 0041, 0161
COBY ................................3351, 2511, 2521
.......................2531, 2541, 2551, 5091, 5191
Color voice ............................................1431
Coloryme ...........................0001, 1221, 1431
Concerto ......................................0001, 1221
Concierge ....................................1771, 1781
Contec .....................0011, 1911, 1941, 2191
Cornea ...................................................1471
Craig ............................................1941, 2191
Crosley ..................................................1961
Crown ..........................................1941, 2191
CTX ........................................................1441
Curtis Mathes ........................................5351
.......................5371, 0001, 0261, 0351, 1191
.......................1221, 1261, 1311, 1421, 1551
.......................1661, 1691, 3421, 4011, 4941
CXC .............................................1941, 2191
Cybervision ............................................3511
Daewoo .................................................0001
.......................0221, 0251, 0591, 0721, 0831
.......................0971, 1011, 1081, 1221, 1231
.......................1251, 1431, 1501, 1521, 1551
.......................1561, 1941, 2181, 4321, 4681
Daytron ........................................0001, 1221
Dell.........................................................0981
.......................1401, 2041, 3441, 3601, 3811
Diamond Vision .....................................1211
.................................1611, 2001, 4771, 4811
Digimate ................................................4301
Digistar ....................0381, 0581, 0871, 1061
.......................2451, 2471, 3811, 3881, 3901
Dimensia ............................1421, 1691, 3421
Dish Network .........................................5491
Disney ..........................................0371, 1101
Distar .....................................................3231
Dukane ........................................1271, 1981
Dumont ..............................0001, 1771, 1781
Durabrand....................................0371, 0861
.......................0921, 1381, 2271, 2291, 5121
Dynasty ..................................................1941
Dynex ............5311, 3141, 3161, 0371, 2891
Electroband .................................0001, 1901
Electrohome ..0001, 1221, 1921, 2151, 3431
Elektra....................................................1661
Element....................5361, 5411, 2401, 4111
Elite Video ..............................................0901
Emerson ........5341, 2761, 5221, 5231, 0001
.......................0021, 0031, 0041, 0271, 0281
.......................0291, 0371, 0441, 0451, 0691
.......................0701, 0731, 0741, 0851, 0931
.......................1221, 1251, 1261, 1371, 1381
.......................1451, 1461, 1551, 1611, 1631
.......................1681, 1701, 1711, 1931, 1941
.......................2171, 2191, 2361, 3451, 4701
.......................4731, 4751, 4761, 4831, 4911
Envision .................................................5401
.......................0001, 0071, 1221, 3751, 4261
ESA ........................................................1381
Fisher ...........................................1161, 1261
.......................1531, 1581, 1911, 3481, 5001
Fluid ...................................2401, 2421, 2431
Fujitsu ......................0901, 1711, 4241, 4341
Funai ..................................0701, 0931, 1381
.......................1711, 1941, 2191, 4731, 4761
Futuretec .....................................1941, 2191
Gateway ................................................0501
GE ............................0001, 0041, 0051, 0141
.......................0261, 0361, 0791, 0811, 1221
.......................1421, 1691, 1921, 1951, 2111
.......................2151, 3421, 3431, 4011, 4921
Gibralter .............................0001, 1771, 1781
Gold Star .......0001, 0251, 0611, 0761, 0931
.......................1181, 1221, 1501, 1911, 4731
GPX .......................................................4701
Gradiente .......0001, 2291, 3661, 3951, 3961
Grundy .........................................1711, 2191
Guestvision ............................................1861
Gvision ...................................................4871
Haier ......................................................0671
.......................0861, 0921, 1741, 3831, 4851
Hallmark ......................................0001, 1221
Hannspree .........................5451, 5461, 5291
Harvard ..................................................2191
Hauppauge ............................................3791
HelloKitty ..............................................5391
HP
................................................3491, 4881
Hisense ..............................5331, 4671, 0671
.......................2081, 2211, 3671, 4381, 4391
Hitachi ...................................................3341
.......................0001, 0841, 0931, 1041, 1221
.......................1271, 1341, 1371, 1481, 1661
.......................1721, 1751, 1801, 1911, 1981
.......................2051, 3621, 4121, 4331, 4731
Hyundai .................................................4651
ILO .........................................................3215
.......................1141, 1381, 1971, 2391, 2481
.......................3691, 4231, 5031, 5141, 5171
IMA ........................................................2191
Innity ................................1171, 1961, 4791
InFocus ..................................................3421
Initial ..............2481, 4231, 4821, 5031, 5041
Insignia ....................0371, 0581, 0701, 0871
.......................0921, 1241, 1381, 2241, 2271
.......................2891, 2921, 3761, 3841, 4371
.......................4721, 4761, 5051, 5061, 5181
Integra ...................................................1841
Inteq ............................................1771, 1781
ISymphony ............................................3041
Janeil .....................................................0151
Page 15

15
Code List – Lista de Códigos
JBL ........................................................1961
JC Penney ...............0001, 0051, 0251, 0261
.......................0351, 0791, 0811, 0961, 1221
.......................1311, 1421, 1451, 1691, 1911
.......................1921, 1951, 3421, 3451, 4011
JCB ........................................................1901
Jensen ...............................0001, 1221, 2271
JVC ................5281, 0311, 0481, 0771, 0901
.......................0941, 1281, 1481, 1801, 1911
.......................2381, 2751, 4121, 4201, 5071
Kawasaki ...............................................4741
Kawasho ............................0001, 1221, 1901
Kaypani ........................................0391, 4221
KEC .............................................2191, 1941
Kenwood .....................................0001, 1221
KLH ........................................................0191
KlossNovabeam .........................0151, 1021
Kogi .......................................................4871
Konka ................................5441, 0471, 0521
.......................0751, 1241, 1671, 2121, 2191
.......................2241, 2371, 4621, 4901, 4971
KTV ................0011, 1491, 1681, 1941, 2191
Kurazai ...................................................1661
KWorld ...................................................2931
Lasonic ..............................1211, 1611, 4811
Legend...................................................0581
LG ................................................5501, 5511
.......................3001, 3021, 3091, 3221, 3281
.......................3311, 5271, 0001, 0131, 0251
.......................0611, 0761, 0931, 1181, 1221
.......................1471, 1501, 1911, 3811, 4731
Liquidvideo ..................................0881, 1111
Lodgenet ...............................................1421
.......................1661, 1691, 2091, 3421, 4091
Loewe ..........................................1871, 1961
Logik ........................1421, 1661, 1691, 3421
Luce .......................................................0301
Luxman ........................................0001, 1221
Lxi ......................................0001, 0261, 0811
.......................0931, 1221, 1261, 1311, 1421
.......................1691, 1961, 3421, 4011, 4731
Magnasonic ...........................................1711
Magnavox ..............................................0001
.......................0321, 0681, 0701, 0961, 1021
.......................1171, 1221, 1801, 1961, 2321
.......................4191, 4641, 4761, 4791, 4991
Majestic ...................1421, 1661, 1691, 3421
Manhattan .............................................5381
Marantz....................0001, 1221, 1841, 1961
Maxent .........................................3361, 0501
Medion...............................1101, 1141, 2351
Megatron ...........................0001, 1221, 1271
Mei .........................................................0011
Memorex .......0001, 0211, 0371, 1161, 1221
.......................1261, 1421, 1631, 1661, 1691
.......................1711, 2401, 3421, 4251, 5001
MGA ..................................0001, 0251, 1221
.......................1581, 1711, 1801, 1911, 1921
Midland ........................................0051, 0261
.......................0811, 1691, 1771, 1781, 4011
Mintek ....................................................4231
Minutz ....................................................1951
Misakai ..................................................1381
Mitsubishi ......3271, 0001, 0251, 1221, 1581
.......................1711, 1801, 1811, 1921, 2701
Monivision .............................................0491
MontgomeryWard ...1421, 1661, 1691, 3421
Moteva .........................................1261, 3661
Motorola ............................1441, 2151, 3431
MTC .......................................................0001
.......................0011, 0251, 0351, 1221, 1311
Multitech ................................................2191
Multivision .............................................0081
Myron&Davis .........................................2101
NAD ...............0001, 0401, 1221, 1311, 4021
NEC ...............0001, 0251, 0341, 1221, 1431
.......................1801, 1841, 2151, 3431, 4401
Net TV ..........................................0121, 0501
Nexxtech .....................................0871, 1201
Nikei .......................................................1941
Nikko .......................0001, 1011, 1221, 4321
Niko .......................................................3581
Norcent ..............................0511, 0671, 2181
NTC .............................................1011, 4321
Olevia ...........................................3081, 2431
.......................2771, 2781, 2791, 5151, 5161
Oncommand ................................1861, 3991
Onking ...................................................1941
Onkyo ....................................................3101
Onwa ...........................................1941, 2191
Optimus .............................0201, 0401, 1571
.......................1881, 3551, 4021, 4691, 5201
Optoma........................................3121, 2441
Optonica ......................................0341, 1441
Orion ........................0281, 0371, 1771, 1781
Panasonic National............5481, 3381, 3401
.......................0051, 0201, 0951, 1091, 1491
.......................1571, 1651, 1831, 1881, 1961
.......................2151, 2711, 2801, 3431, 3551
.......................3771, 4691, 4781, 4861, 5201
Philco .......................0001, 0251, 0321, 0961
.......................1021, 1221, 1671, 1801, 1961
.......................2151, 2321, 2941, 3431, 3931
Philips ................................3031, 3131, 3151
.......................3171, 3371, 3391, 0181, 0001
.......................0161, 0321, 0421, 0541, 0661
.......................0701, 0791, 0911, 0961, 1021
.......................1151, 1171, 1381, 1391, 1601
.......................1741, 1801, 1961, 2151, 2321
.......................3431, 3541, 3591, 3861, 3911
.......................3971, 3981, 4191, 4761, 4791
PhilipsMagnavox ....0181, 0681, 0911, 1171
.......................1961, 2321, 3591, 4791, 4991
Pilot .......................................................0001
Pioneer ....................0001, 0401, 1221, 1371
.......................1511, 1841, 1981, 4021, 4661
PIVA .............................................2411, 5021
Planar ....................................................4251
Polaroid .................................................0191
.......................0581, 1241, 2081, 2271, 2311
.......................2401, 2451, 3741, 4631, 5131
Portland .................................................0001
.......................0251, 1011, 1081, 1221, 1551
Precision ................................................0621
Price Club ..............................................0351
Prima .....................................................3011
.......................0381, 0581, 0631, 0871, 2451
Princeton Graphics ......................1301, 1441
Prism .....................................................0051
Proscan .............................0261, 0811, 1421
.......................1691, 2061, 2301, 3421, 4011
Proton ......................0001, 0391, 0641, 1221
.......................1911, 2231, 4211, 4221, 4271
Protron .........................................3731, 4301
Proview ..............................2401, 2421, 2431
Pulsar.................................0001, 1771, 1781
Pyle ........................................................3331
Quasar ...............................0051, 0201, 1091
.......................1491, 1571, 1831, 1881, 1961
.......................2151, 3431, 3551, 4691, 5201
Radio Shack ............0001, 0141, 0341, 0931
.......................1001, 1221, 1261, 1421, 1571
.......................1691, 1701, 1911, 1941, 2111
.......................2191, 3421, 3551, 4731, 4921
RCA ...................................0001, 0051, 0091
.......................0141, 0251, 0261, 0361, 0551
.......................0811, 0891, 1001, 1131, 1221
.......................1331, 1371, 1421, 1521, 1691
.......................1851, 1921, 2011, 2061, 2111
.......................2151, 2251, 2301, 2851, 2951
.......................3421, 3431, 3571, 4011, 4921
Realistic .......................................0001, 0141
.......................0341, 0931, 1001, 1221, 1261
.......................1421, 1571, 1691, 1701, 1911
.......................1941, 2191, 3421, 3551, 4731
Rhapsody ..............................................0011
Runco ................................1771, 1781, 1841
Sampo .........................................0001, 0121
.......................0391, 0501, 1221, 1911, 4221
Samsung .................5471, 5521, 3301, 3321
.......................2741, 2961, 0331, 0001, 0101
.......................0251, 0261, 0351, 0531, 0571
.......................0711, 0781, 1191, 1221, 1311
.......................1501, 1911, 2071, 2141, 2721
.......................3471, 3561, 4011, 4941, 4961
Samsux ..................................................1221
Samtron .................................................0351
Sansui ......................5551, 0211, 0371, 1631
Santeca .................................................0171
Sanyo ................................2981, 2991, 3051
Page 16

16
.......................5251, 2871, 5241, 5261, 0001
.......................0801, 1051, 1161, 1261, 1531
.......................1581, 1911, 2881, 3481, 5001
Sceptre ..............................3521, 4071, 5111
Scotch .........................................0001, 1221
Scott ........................3215, 0001, 0021, 0281
.......................1221, 1711, 1941, 2191, 5141
Sears .................................0001, 0211, 0261
.......................0351, 0701, 0811, 1221, 1261
.......................1291, 1311, 1381, 1421, 1531
.......................1581, 1691, 1711, 1911, 1961
.......................2021, 3421, 3481, 4011, 4761
Selectron ...........................2471, 2491, 2501
Semp .....................................................3611
Sharp .......................5421, 3181, 3191, 3201
.......................2731, 0001, 0341, 0461, 0681
.......................0691, 1221, 1291, 1441, 2031
.......................2201, 2261, 3461, 4751, 4991
Shogun ..................................................0001
Signature .......1421, 1661, 1691, 2171, 3421
Signet ................................2811, 2821, 2861
Simpson ................................................0961
Sonic .....................................................0011
Sony ......................................................5321
.......................1071, 1641, 1731, 1901, 2161
.......................2741, 3531, 3891, 4101, 4981
Soundesign ...........................................0001
.......................0961, 1221, 1711, 1941, 2191
Sova ............................................3631, 4431
Soyo ............................................4611, 5101
Spectra ..................................................1611
Spectravision .........................................2341
Squareview ............................................1381
SSS ....................................0001, 1941, 2191
Star Sight ...............................................0061
Starlite ...................................................2191
Superscan ...............0701, 1291, 2021, 4761
Supersonic ..................................0241, 4701
Supra ...........................................0001, 1991
Supremacy ............................................0151
Supreme ................................................1901
SVA .............................................. 0671, 2101
Sylvania .......................................0001, 0321
.......................0371, 0701, 0931, 0961, 1021
.......................1221, 1381, 1801, 1821, 1961
.......................2321, 2761, 3701, 4731, 4761
Symphonic ..................................0021, 0701
.......................0931, 1381, 2191, 4731, 4761
Syntax................................2431, 5151, 5161
Tandy ..................................................... 1441
Tatung ...................... 1141, 1741, 2151, 3431
TCL ....................................2851, 0091, 1421
.......................1691, 1851, 2011, 2061, 2111
.......................2301, 3421, 3431, 3571, 4921
Technics.................................................0051
Techwood .......................... 0001, 0051, 1221
Teknika...............................0001, 0151, 0251
.......................0351, 0961, 1011, 1221, 1311
.......................1421, 1571, 1661, 1691, 1711
.......................1911, 1941, 2191, 3421, 3551
Telecaption ............................................ 0821
Telerent .................... 1421, 1661, 1691, 3421
Tera .............................................. 0001, 0641
Tevion .................................................... 1141
TMK .............................................0001, 1221
Toshiba .............................. 5531, 3211, 1311
.......................0211, 0231, 0341, 0351, 0821
.......................1121, 1191, 1261, 1351, 1541
.......................1571, 1621, 1801, 1841, 1911
.......................2691, 3551, 4891, 4941, 5081
Trutech ...............................2461, 3821, 4551
Universal ......................................0791, 1951
Venturer .................................................3781
Victor ...........................................1481, 4121
Videocon................................................4061
Vidtech...............................0001, 0251, 1221
View Sonic .............................................5301
.......................0501, 1981, 3751, 3801, 4281
Viking .....................................................0151
Viore.........................5431, 2831, 2841, 3681
Visteon ..................................................3411
Vizio .........................5561, 5571, 5581, 5591
.......................5601, 5611, 5621, 5631, 5641
.......................5651, 5661, 5671, 5681, 5691
.......................5701, 5711, 2901, 1471, 1741
.......................2021, 3651, 3741, 3851, 4081
Wards ..........................................0001, 0021
.......................0251, 0321, 0341, 0791, 0961
.......................1021, 1221, 1321, 1421, 1661
.......................1691, 1711, 1951, 1961, 3421
Westinghouse ..............................3241, 3251
.......................0111, 1901, 2281, 3711, 3851
White-Westinghouse .........0601, 0931, 1081
.......................1501, 1521, 1551, 3641, 4731
Yamaha ..........0001, 0251, 1221, 1571, 3551
Zenith.................................5281, 5271, 0001
.......................0061, 0131, 0371, 0681, 0691
.......................0931, 0941, 0991, 1011, 1031
.......................1081, 1171, 1181, 1191, 1221
.......................1251, 1271, 1471, 1631, 1661
.......................1751, 1771, 1781, 1791, 2171
.......................2291, 3501, 4201, 4321, 4731
.......................4751, 4791, 4941, 4991, 5211
TV/VCR COMBOS
Admiral ........................................0302, 1682
Aiwa ...................................0312, 0432, 0752
Akai ..............................................0032, 1592
Broksonic ................................(0851 & 0462)
.............................(0851 & 0892), 0942, 1631
Curtis mathes ..............................0652, 1522
Daewoo ...................................(1081 & 0762)
.......................................(1251 & 0082), 1092
Diamond vision ........................(2001 & 0422)
Durabrand................................(2291 & 0182)
Electrohome ................................0032, 1592
Emerson ..........(0851 & 0462), (0851 & 0892)
.............................(1251 & 0082), 0032, 0192
.......................0232, 0312, 0332, 0432, 0942
.......................1092, 1172, 1432, 1592, 1631
Fisher ...........................................0602, 1712
Funai ............................................0312, 0432
GE ................................................1152, 1482
Goldstar .............................0312, 0432, 1181
Gradiente .................................(2291 & 0182)
Hitachi .........................................0312, 0432
Innity ....................................................0622
JVC ..............................................0452, 4201
LG ......................................0312, 0432, 1181
LXI ...............................................0312, 0432
Magnavox ................0302, 0412, 0622, 1682
Memorex .................0602, 0942, 1631, 1712
Mitsubishi ....................................0032, 1592
Optimus ...................1722, 0122, 1062, 1762
Panasonic ................1722, 0122, 1062, 1762
Philips ..........................................0412, 0622
PhilipsMagnavox ..............0302, 0622, 1682
Quasar ...............................1722, 0122, 1062
Radio Shack ............0312, 0432, 1152, 1482
RCA .....................(1691 & 0242), 1152, 1482
Realistic .......................................0312, 0432
Samsung .................0652, 1522, 1535, 2141
Sansui ..........................................0942, 1631
Sanyo ..........................................0602, 1712
Sharp .................................1682, 0302, 0332
Sony ..................................0972, 1292, 1652
Sylvania .......................................0312, 0432
Symphonic ..................................0312, 0432
Toshiba .................... 0652, 0902, 1402, 1522
Whitewestinghouse ................(1081 & 0762)
.....................................................0312, 0432
Zenith.......................................(1081 & 0762)
.........................(1251 & 0082), (2291 & 0182)
.................................0302, 0312, 0332, 0432
.......................0452, 0622, 0652, 0942, 1092
.......................1181, 1522, 1631, 1682, 4201
TV/DVD COMBOS
Advent ..................................................1515
Akai ................................(3215 & 3285), 4461
Apex .......................................(0191 & 1245)
Audiovox..................................(4031 & 4481)
.......................................(4051 & 1135), 4521
Axion.......................................(0881 & 1335)
Broksonic ...................................0015, 0211
Coby .....................................................3475
Changhong ..............................(0191 & 1245)
Code List – Lista de Códigos
Page 17

17
Classic .....................................(0191 & 1245)
Daewoo ...................................(1561 & 0065)
Diamond Vision .......................(1611 & 0855)
.......................................(2001 & 0422), 0455
Durabrand......................(2291 & 3885), 0205
Emerson ......................................0412, 0445
Funai ............................................0412, 0445
GPX .......................................................0135
Haier ............................................0315, 1257
Ilo ...................................(3215 & 3285), 1945
Initial ..................................0994, 1945, 2735
Insignia ............(1241 & 0285), (2891 & 3335)
.......................0412, 0445, 2805, 2815, 3305
JVC ..............................................1685, 3015
Kawasaki ...............................................0325
Konka ..........................................1425, 1605
Lasonic ....................................(1611 & 0855)
Liquidvideo ..............................(0881 & 1335)
Magnavox ....................................0412, 0445
Maxent ...................................................3361
Memorex .....................................0015, 0211
Nexxtech .....................................1201, 2005
Panasonic ......0552, 0595, 1195, 1346, 3401
Philips ....................................................3371
...................(1381 & 0702), 0412, 0445, 0795
Piva ........................................................1805
Samsung ...............................................1535
Sansui ..........................................0015, 0211
Sears ...........................................0015, 0211
Sharp .......................................(1291 & 3115)
Sova ........................................(3631 & 4431)
Supersonic ............................................0135
Sylvania ...............(1381 & 0702), 0412, 0445
Symphonic ..................................0412, 0445
Toshiba .................... 0015, 0115, 0211, 3075
Trutech ...................................................4551
Westinghouse ..........................(3711 & 2865)
SAT/CBL
ABC ...................................0004, 0074, 0134
.......................0464, 0594, 0784, 0794, 1034
ADB .......................................................1933
Adelphia.................................................1404
.......................2023, 0514, 0574, 0744, 1523
ADTH .....................................................1393
Akai ..............................................1323, 1303
Allegro .........................................0054, 0114
Americast ....................................1594, 0254
Amino ....................................................2063
Amplica ..................................................0103
Antronix .......................................0264, 0334
Archer ............0264, 0334, 0404, 0474, 1044
Arris Gateway ........................................1274
Astro ......................................................1273
AT&T ......................................................1963
.......................2093, 0844, 1272, 0514, 0674
Bell ...........................1963, 5491, 2073, 0173
.......................2083, 2103, 0433, 0903, 0984
BellExpressvu .......................................0073
.................................0173, 0343, 0433, 0903
Bell South ..............................................0254
Bendbroadband ....................................1244
Bright House................................1394, 0694
Buckeye .................................................1233
Cable One..............................................1384
Cabletenna ............................................0264
Cableview ..............................................0264
Cablevision ............................................1434
.......................1404, 0514, 0654, 0694, 1523
Cebride ..................................................1374
Century ........................................0474, 1723
Cetomer .......................................0723, 1153
Channel Master .................0283, 0393, 0483
Chapparal ....................................0573, 0653
Charter ...............................1304, 1404, 0824
.......................1523, 0514, 0664, 0684, 0714
Charter Communications ......................1274
Charter Digital........................................1264
Cheyenne ..............................................0653
Cisco .....................................................1444
.......................1444, 1464, 1474, 1484, 1494
Citizen ....................................................0474
Clearmax ...............................................1024
Cogeco ........................................1294, 0514
Color Voice ..................................0534, 0604
Comcast ......................................1544, 1554
.......................1283, 0824, 1404, 0514, 0684
Comtronics ..................................0014, 0084
Contec .........................................0144, 1054
Coolsat ........................................1733, 1913
Cox ..............................................0514, 0824
.......................1324, 1334, 1364, 1404, 1444
.......................1454, 1464, 1474, 1484, 1494
CoxDigitalCable ...............1404, 0514, 0734
DigitalMusicExpress ............................0044
Digital Stream ..............................1203, 1194
Digiwav ........................................1953, 1923
Director ..................................................0514
DirecTV ..........1504, 1514, 0203, 0213, 0233
.......................0303, 0333, 0353, 0443, 0523
.......................0553, 0623, 0703, 0793, 0803
.......................0853, 0873, 0983, 0993, 1073
.......................1083, 1093, 1103, 1113, 1123
.......................1133, 1143, 1153, 1163, 1173
.......................1183, 1193, 1353, 1443, 1513
.......................1533, 1773, 1783, 1793, 1893
Dish Network .........................................2073
.......................2083, 1613, 0073, 0173, 0343
.......................0403, 0433, 0493, 0603, 0783
.......................0903, 1003, 1013, 1023, 1033
.......................1043, 1053, 1063, 1503, 1683
Dishpro ..................................................0073
.......................0403, 0493, 0603, 1503, 1683
Drake .................................0023, 0293, 0733
Dreambox ..........................2113, 2123, 1553
DX Antenna..................................0383, 0753
Eastern ..................................................0214
Echosphere ...........................................0433
Echostar ................................................0903
.......................0073, 0173, 0343, 0403, 0433
.......................0493, 0603, 0783, 1503, 1683
Emtec ..........................................4411, 4441
Entone .........................................2043, 2053
Everquest...............................................0014
Expressvu ......0073, 0173, 0343, 0433, 0903
Fortec Star .............................................0083
.......................0183, 0263, 0373, 0463, 0473
Fujitsu ..........................................0673, 0763
Garrard ..................................................0474
GC Electronics.......................................0334
GE ......................................0384, 0874, 0333
.......................0543, 0643, 0723, 0793, 0803
.......................0873, 1073, 1083, 1373, 1383
Gemini ...............................0123, 0204, 0344
General Instrument(GI) ..........................0013
...........................................0004, 0093, 0163
.......................0193, 0323, 0453, 0633, 0833
.......................0893, 0953, 0963, 1573, 1583
.......................1603, 0044, 0074, 0314, 0374
.......................0464, 0514, 0594, 0634, 0784
.......................0794, 0814, 0884, 0894, 1034
Geosatpro ..............................................2003
Globecast ....................................0003, 1004
Go Video ................................................1883
Gold Star ...............................................0924
Hamlin ...........0414, 0464, 0484, 0544, 0784
Hitachi .........................................0594, 0303
.......................0443, 0523, 0623, 1103, 1153
HNS .......................................................1153
Hughes ........................................0593, 1343
Hughes Network ....................................0303
.................................0443, 0523, 0563, 0593
.......................0703, 1093, 1103, 1153, 1343
Humax ...................................................1505
Illico ...................................1354, 1404, 1523
ILO .........................................................1035
Insight ..........................................1284, 1314
Jasco .....................................................0474
Jerrold ...............................0004, 0074, 0194
.......................0314, 0324, 0444, 0464, 0514
.......................0594, 0784, 0794, 0814, 1034
JVC ....................................1145, 0433, 0783
Kenwood ...............................................0413
Knology ...................1424, 1344, 1284, 1564
LG ............................2925, 0303, 1103, 1153
Liteon .....................................................1035
Luxor ...........................................0503, 1653
Macom ..................................................0613
Code List – Lista de Códigos
Page 18

18
Magnavox ......0203, 0533, 0783, 0094, 1064
Mediacom ....................................1284, 1584
Medion...................................................1035
Memorex ...............................................0154
Microyal .................................................1423
Mitsubishi ..........................1534, 0303, 0443
.......................0523, 0623, 1093, 1103, 1153
Motorola ......................................0453, 1573
.......................1593, 1603, 1863, 0004, 0074
.......................0194, 0314, 0374, 0514, 0594
.......................0634, 0684, 0794, 0814, 0824
.......................0844, 0884, 0894, 0914, 1034
Movie Time ..................................0224, 1074
Moxi .......................................................1274
NEOSTAT ...............................................1413
NET ..............................................1543, 1713
Norstat ...................................................0683
Novaplex .....................................0834, 0854
Nowtv ....................................................1473
NSC .............................................0224, 1074
OAK ...................................0144, 0354, 1054
Omegasat ..............................................1983
Onkyo ....................................................1243
Orasat ....................................................1973
Orion ......................................................1523
Pace ......................................................1363
.......................0053, 0133, 1593, 1673, 0904
Panasonic ......0545, 1272, 0304, 0394, 0954
.......................1014, 0213, 0223, 0243, 1353
Pansat .....................1993, 0033, 0883, 1403
Paragon .......................................0154, 0284
Philips ............0092, 0252, 1052, 1163, 1492
.......................1502, 1542, 0094, 0344, 0424
.......................0474, 0494, 0554, 1064, 1084
.......................1094, 1104, 0203, 0303, 0443
.......................0523, 0533, 0623, 0703, 0783
.......................1093, 1103, 1153, 1633, 1753
PhilipsMagnavox ..................................0203
.................................0533, 0783, 0064, 0104
Pinnacle .............................1493, 1823, 1833
Pioneer ....................1404, 0532, 0985, 2855
.......................1853, 0024, 0274, 0614, 0924
Polaroid .................................................4561
Primestar .......1253, 0323, 0633, 1563, 1573
Prosat ..........................................0813, 1333
Proscan .............................0333, 0643, 0723
.......................0803, 0873, 1073, 1083, 1383
Pulsar.....................................................0154
Quasar ...................................................0154
Radio Shack ............0064, 0104, 0114, 0964
RCA .............................................0244, 0394
.......................0474, 1014, 1083, 0333, 0363
.......................0543, 0643, 0723, 0793, 0803
.......................0873, 1073, 1373, 1383, 1873
RCN .............................................0514, 0824
Realistic ...................0334, 0273, 0843, 1643
Regal .....................................................0544
Regency ................................................0214
Rembrandt .............................................0594
ReplayTV ...............................................1272
Rogers ...............................1344, 0174, 1523
Runco ....................................................0154
Samsonic ...............................................1433
Samsung .....................................4451, 1213
.......................0043, 0233, 0853, 1113, 1123
.......................1143, 1763, 0014, 0024, 0924
ScienticAtlanta ....................................1324
.......................1334, 1364, 1404, 1414, 1444
.......................1454, 1464, 1474, 1484, 1494
.......................0124, 0134, 0164, 0234, 0294
.......................0574, 0714, 0804, 0834, 0864
Seiki .......................................................1263
Sharp .....................................................1853
Shaw ............................................1524, 0514
Sierra I II III .............................................0653
Signal .....................................................0014
Signature ...............................................0594
Sky Network ..0053, 0133, 1363, 1593, 1673
.......................1743, 1753, 1773, 1783, 1793
SLMarx .................................................0014
Sonic Blue .............................................1272
Sony ..............1162, 1302, 2865, 2985, 3055
.......................0113, 0353, 0553, 0773, 1893
Sprucer ........................................0394, 1014
Standard ................................................0364
Star Sight .....................................0244, 0863
Star Trak ......................................0423, 0184
Starchoice .............................................0163
.......................0323, 0633, 1563, 1573, 1583
Starcom .............................0314, 0464, 0784
Stargate .................................................0014
STS ....................................0383, 0583, 0663
Super Guide ..........................................0513
Sylvania .................................................1903
Tandy ........................................... 0434, 0974
Teleview ................................................. 0014
Telsat ..................................................... 1723
Telus ...................................................... 1943
Texscan ................................................. 0364
Thomson......................................0803, 1753
TimeWarner ......................1254, 1424, 1404
.......................0514, 0694, 0724, 0824, 1523
Tivax ......................................................1293
Tivo ................0092, 0252, 0353, 0982, 1052
.......................1162, 1492, 1502, 1505, 1542
.......................1745, 1223, 0704, 0754, 0764
Tocom .................................................... 0004
.......................0444, 0504, 0634, 0934, 1034
Toshiba ........................................ 1735, 1745
.......................3325, 0154, 0063, 0143, 0303
.......................0443, 0523, 0623, 0713, 0743
.......................0973, 1093, 1103, 1133, 1153
TV86 ............................................0224, 1074
TVA ........................................................ 1703
Ultimate TV ........................0333, 0553, 0873
Uniden ...............................0693, 0823, 0863
Unika .................................0264, 0334, 0474
United ....................................................1663
United Cable ................................0464, 0784
Universal ............................0054, 0264, 0334
.......................0404, 0474, 0564, 0944, 1044
Verizon ...............................2033, 1404, 0514
.......................1283, 0174, 0684, 0824, 1523
Video Cipher ii .......................................0023
Video Tech ............................................. 0454
Videotron ...........................1404, 1574, 1523
Videoway ...............................................0034
Viewsat ..................................................1803
Viewstar .......................................0084, 0094
.......................0224, 0434, 0974, 1064, 1074
Visionetics .............................................1483
Visiontec ................................................1693
Voom .....................................................2971
V-Tech ....................................................1813
WebTV ........................................0113, 0783
Zenith.....................................................0114
.......................0154, 0474, 0524, 0584, 0624
.......................0644, 0023, 0123, 0153, 0253
.......................0293, 0313, 0733, 1173, 1593
Zenith Network ......................................0254
Zinwell ...................................................2013
HDTV Set Top Boxes
Apex ......................................................2911
Charter ........................................0174, 1523
Directv Models .....................................0703
.................................0983, 1443, 1513, 1533
GE HDSTB .............................................0874
Go Video Hdt100 ...................................2631
Hitachi61hdx98b ........................1103, 2661
Hughes Hird E8 .....................................0303
.......................1103, 1153, 2591, 2651, 2661
Hughes Htl HD.......................................0303
.......................1103, 1153, 2591, 2651, 2661
Insignia ..................................................2921
KWorldSA290QE ..................................2931
LG HTL HD ............................................0303
.......................1103, 1153, 2591, 2651, 2661
LG LSS 3200a .......................................0303
.......................1103, 1153, 2591, 2651, 2661
Mitsubishi SRHD 400 ..................1103, 2661
Mitsubishi SRHD 500 ..................1103, 2661
Mitsubishi SR HD5 ......................1103, 2661
Motorola HDT100 ..................................2601
Motorola HRT100 ..................................2601
Philco TB100HH9 ..................................2941
Philips DSHD800R ......................1103, 2661
Pioneer SH-D505 ..................................2561
Code List – Lista de Códigos
Page 19

19
Proscan PSHD105 .......................0803, 2581
RCA DTA800B1 ...................................2951
RCA DTC-100 ..............................0803, 2581
RCA DTC-210 ..............................0803, 2581
RCAHD65W20 ......................................2611
RCA PSHD105 ............................0803, 2581
Samsung SIR-T165 .....................1143, 2671
Samsung SIR-T351 .....................1143, 2671
Samsung SIR-TS160 ...................1123, 2621
Samsung SIR-TS360 ...................1123, 2621
Sony SATHD100 ....................................2681
Sony SATHD200 ....................................2681
Sony SATHD300 ....................................2681
Sylvania 6900DTD .......................2641, 2941
Toshiba DST3100 .... 0303, 1153, 2591, 2651
ToshibaDW65x91 ... 0303, 1153, 2591, 2651
Toshiba DST3000 .............. 0303, 1153, 2591
Venturer .................................................1164
Zenith DTV1080 ...........................1173, 2571
Zenith HDSTAT420 ......................1173, 2571
Zenith HDSTAT520 ......................1173, 2571
DTV
Access HD .............................................1234
Airlink101 ...............................................1174
Alpha Digital ..........................................1234
Amtc ......................................................1234
Apex ......................................................1114
Artec ......................................................1224
Cadence ................................................1214
Channel Master .....................................1204
Coship ...................................................1214
Digitalstream..........................................1194
Dish Network .........................................0073
Echostar ................................................0073
GE ..........................................................0874
Goodmind ..............................................0874
Gridlink ..................................................1144
iNet Access ...........................................1234
Insignia ..................................................1184
Kingbox .................................................1224
Lasonic ..................................................1144
Magnavox ..............................................2941
Microgem ..............................................1154
Philco .....................................................2941
RCA .......................................................1083
Sansonic ................................................1144
Skardin ..................................................1174
Sunkey ...................................................1134
Tivax ......................................................1234
Venturer .................................................1164
Winegard ...............................................1164
Zenith.....................................................1184
Zentech .................................................1174
Zinwell ...................................................1124
STREAMING MEDIA
Apple ...........................................5541, 4295
Asus .......................................................1684
Dlink .............................................1614, 1724
HP ..........................................................1624
Iomega ...................................................1744
LG ..........................................................1714
Magnavox ..............................................1704
Netgear ........................................1604, 4475
Niveus ....................................................1634
Philips ....................................................1654
Popcorn Hour ........................................1664
RCA .......................................................1694
Roku ............................................4395, 4355
Seagate .................................................1674
Sling Media ............................................1644
Vudu ......................................................1734
WD ...............................................4345, 4265
X-Box ...........................................4245, 4255
DVD
Acesonic ................................................3135
Advent ...................................................1515
Afreey ....................................................0575
Aiwa ...............0035, 0195, 0235, 3285, 3565
Allegro .........................................3725, 3885
Ames .....................................................1275
AMW ............................................0645, 0825
Anaba ....................................................1375
Apex ............................................0045, 0245
.......................0375, 0425, 0615, 0845, 0945
.......................0965, 1025, 1065, 1105, 1235
.......................1245, 1405, 1675, 3825, 3895
Aspire ....................................................1695
Astar ......................................................3525
A-Trend .................................................. 1585
Audiovox............................1335, 3585, 3625
Axion......................................................1335
B&K .......................................................0885
Blaupunkt ....................................1105, 3895
Blue Sky ............................0215, 0245, 3155
Blue-Ray ..................2795, 2965, 2995, 3315
.......................3685, 3695, 3705, 3885, 3905
Body Sonic ............................................0575
Bose ........................4455, 4465, 1475, 3955
Boss ......................................................1325
Boston Acoustic ....................................3245
Britania ..................................................3675
Broksonic ................0015, 0695, 1525, 3495
Cavs ......................................................2745
Centrios .........0955, 1335, 1365, 1755, 1765
.......................1785, 1795, 1845, 1875, 1895
.......................1935, 1975, 2015, 3945, 3965
Cetomer .................................................0075
Changhong ............................................1245
Cine Vision ...................................0205, 3885
Citech ....................................................2065
Citizen ....................................................2065
Classic ...............................1245, 1275, 1965
COBY ......................3835, 0085, 0245, 0475
.......................0485, 0505, 0675, 0835, 2085
.......................2095, 2105, 2115, 2125, 2155
.......................2655, 2885, 3145, 3265, 3475
Concept .......................................1105, 3895
Conia .....................................................0245
Contel ....................................................2915
Criterion .................................................0785
Curtis International ............0835, 1005, 2885
Curtis Mathes ........................................4185
Cyber Home ..4155, 0175, 1015, 1585, 2045
Cyber Vision ..........................................3595
Cytron ..........................................0435, 0725
Daewoo .........0065, 0345, 1115, 1285, 1385
Denon ................................1075, 1265, 3315
Denzel ....................................................0765
Desay .....................................................0865
Diamond Vision .......0465, 0855, 1485, 3755
Digitrex ..................................................0245
Digix.......................................................0125
Disney ..........................................0795, 3815
Drive ......................................................3535
Dual .......................................................0005
.......................0435, 0515, 0605, 0765, 3035
Durabrand......0205, 0435, 0955, 2685, 2935
.......................3515, 3525, 3885, 3925, 3945
DVD 2000 ..............................................1415
Dynex ................................4235, 2455, 2255
Eigervision .............................................3615
Element..................................................4305
Elta...............................................0055, 0235
Emerson ..................0205, 0445, 0795, 0975
.......................1185, 3745, 3815, 3855, 3885
Esa .........................................................0515
Escient ...................................................2845
Farenheit ................................................1205
Fisher ...........................................0405, 2645
Funai ..............0445, 0795, 3745, 3815, 3855
GE ......................................0915, 1105, 3895
Gold Star .....................................0205, 3885
Go Video ......................................0075, 0255
.................................0415, 0565, 0665, 1275
.......................1315, 1385, 1495, 3735, 3765
GPX .............................................0135, 0495
Gradiente ...........................0215, 3635, 3645
Greenhill ......................................1105, 3895
Haaz ............................................1295, 1465
Haier ............................................0315, 4015
Harman/Kardon .....................................0585
HD-DVD .............................2795, 2835, 2965
.......................3685, 3695, 3705, 3885, 3905
Code List – Lista de Códigos
Page 20

20
Helios .....................................................2275
HelloKitty ..............................................4195
Hitachi .........................................0025, 0545
.......................0565, 0765, 0925, 1245, 3765
Hiteker ...................................................0245
Humax ...................................................1505
ILO .....................................1035, 1945, 3285
Innity ....................................................0575
Initial ..............1105, 1945, 2735, 3895, 3935
Insignia ..................................................4205
.......................2365, 0975, 0205, 0285, 0445
.......................0725, 1105, 1335, 1945, 2195
.......................2805, 2815, 2915, 3305, 3335
.......................3745, 3785, 3815, 3885, 3895
Integra ...................................................1435
IRT .........................................................2885
ISymphony ............................................2525
JBL ........................................................0585
JVC ..............................................2385, 2535
.......................0155, 0395, 0755, 1145, 1685
.......................2025, 2945, 3015, 3795, 3805
Jwin .........................0275, 1065, 1655, 3275
Kawasaki ...........................0325, 0955, 3945
Kenwood .....................................0935, 1075
Kiss ........................................................0765
KLH ..........................0375, 0465, 1105, 3895
Konka ............0285, 1085, 1255, 1425, 1605
Koss.............................................0215, 0725
KXD .............................................0085, 2885
Lasonic ..............................0855, 1295, 2825
Lenoxx .....................0235, 1345, 3515, 3525
LG ................................................4285, 2335
.......................2555, 2565, 2635, 0205, 0635
.......................1565, 2925, 3785, 3885, 3915
Linn ..............................................1635, 2955
Liquid Video ...........................................1335
Liteon .............0805, 1035, 1495, 1575, 1905
Magnavox ..........................2425, 4105, 0975
.......................0105, 0295, 0445, 0735, 0745
.......................1045, 1055, 1225, 1395, 2945
.......................3025, 3715, 3745, 3795, 3815
Marantz....................4105, 0205, 0735, 0745
.......................1395, 1615, 2945, 3795, 3885
Maxent ...............................1665, 1685, 3015
Medion...................................................0435
.......................0455, 1035, 1325, 1665, 3755
Memorex ...............................................2375
.......................0435, 1925, 2755, 3125, 3495
Meridian .......................................0735, 3795
Microsoft .....................................0915, 3255
Microvision ............................................1325
Mintek ..........................................1105, 3895
Mitsubishi ..........................2585, 1415, 3895
Mustek ...................................................1275
Myron&Davis .........................................1555
NAD .........................0205, 1625, 3295, 3885
Nakamichi ..............................................1445
NEC .......................................................3885
Nesa ..................................1105, 1555, 3895
Nexxtech .......0125, 0145, 0335, 0515, 0725
.......................0955, 1025, 1545, 1755, 1765
.......................1785, 1815, 1835, 2005, 2055
.......................2915, 3505, 3825, 3945, 3965
Norcent ..........0305, 0485, 0655, 0835, 1575
Onkyo ....................................................2355
.......................2505, 0355, 1435, 3795, 3985
Optimus .............................0025, 1245, 2975
Orion ............................................0015, 3495
Oritron..........................................0215, 1935
Pacic ....................................................0435
Panasonic ..............................................4175
.......................2395, 2595, 2605, 0165, 0385
.......................0545, 0595, 1075, 1195, 1215
.......................2965, 3105, 3775, 3975, 4005
Philco .....................................................3605
Philips ....................................................2415
.......................2615, 2625, 4105, 0745, 0105
.......................0265, 0445, 0735, 0795, 1045
.......................1055, 1225, 1395, 1615, 2665
.......................2705, 2765, 2775, 2945, 3165
.......................3705, 3715, 3745, 3795, 3815
PhilipsMagnavox ..............4105, 0735, 0745
.......................1055, 1225, 1615, 2945, 3795
Pioneer ..........0025, 0525, 0705, 0875, 0985
.......................1245, 1595, 1775, 2675, 2695
.......................2855, 2895, 2975, 3695, 3905
Piva ........................................................1805
Polaroid .................................................0185
.......................0685, 1025, 1485, 3665, 3825
Polk Audio .............................................4105
.......................0735, 0745, 1395, 2945, 3795
Portland .......................................0235, 1545
Power Acoustik .....................................3575
Proline....................................................0215
Proscan .......................................0915, 1135
Prosonic ................................................0485
Protron ...................................................0305
Pyle ..............................................2515, 1155
Radio Shack ..........................................0955
.......................0995, 1165, 1645, 2905, 3945
RCA .............................................2465, 0215
.......................0915, 0955, 1105, 1135, 1165
.......................1645, 2755, 2905, 3895, 3945
Regent .........................................1345, 3925
Reoc ......................................................1295
RIO ..............................................0205, 3885
RJ Technology ............................. 1825, 2715
Rosen ..........................................1175, 3035
Rotel ......................................................0395
Saba ......................................................0995
Sampo ...................................................0575
Samsung .................4125, 2285, 2325, 2345
.......................2485, 4095, 0075, 0255, 0565
.......................1305, 1535, 1725, 2185, 2725
.......................2995, 3085, 3555, 3765, 3865
Sansui ................................0015, 0695, 3495
Sanyo ............2495, 0095, 0405, 2205, 2215
.......................2225, 2235, 2245, 2645, 3945
Sears .......................0015, 0445, 3495, 3745
Seg ........................................................0765
Selectron ...........................1855, 1885, 1915
.......................1955, 1995, 2035, 2075, 2875
Semp .....................................................0725
Sensory Science ....................................1495
Sharp .....................................................4115
.......................4315, 4325, 4335, 2315, 2445
.......................0555, 0625, 0815, 2795, 3115
Sherwood ....................................4225, 0225
Shinco .........................................1105, 3895
Shinsonic .....................................1105, 3895
Sonic Blue .............................................0665
Sony ......................................................4165
.......................4275, 2305, 0365, 0535, 0715
.......................0725, 0895, 0905, 2165, 2865
.......................2985, 3055, 3685, 3825, 3995
Soundstorm .................................1155, 1325
Sova ......................................................3545
Spectroni ...............................................2575
Sungale........................................0675, 1715
Superscan ...................................0445, 3745
Supersonic ............................................0135
SV2000 ........................................0445, 3745
SVA .............................................. 0245, 0815
Sylvania .............................4215, 2405, 0445
.......................0795, 3745, 3815, 3855, 3875
Symphonic ............................................0445
.......................0795, 0975, 3745, 3815, 3855
Tascam .................................................. 0395
TCL ........................................................2435
Teac ............... 0025, 0955, 1245, 3885, 3945
Technics.................................................1075
Techwood ................ 1625, 1985, 2945, 3845
Terapin ................................................... 1705
Tevion .......................................... 0435, 0605
.......................0725, 0785, 1125, 1295, 1465
Theta Digital ................................0025, 1245
Tivo ..............................................0985, 1505
Toshiba .............................. 4145, 2295, 2475
.......................2545, 0015, 0115, 0735, 1735
.......................1745, 2135, 2145, 2175, 2835
.......................3065, 3075, 3325, 3495, 3795
Tredex .................................................... 1355
Trutech ...............................1385, 2045, 3655
United ..........................................0955, 3945
Venturer .............................0955, 3065, 3945
Vizio .............................................4135, 4405
.......................4415, 4425, 4435, 4445, 2265
Westinghouse ........................................2865
Wharfedale ..................................0575, 1455
WhiteWestinghouse ....................0795, 3815
Code List – Lista de Códigos
Page 21

21
X-Box .................................4245, 4255, 0915
Xenius ....................................................0725
Yamaha ....................4105, 0745, 1055, 1075
.......................1095, 1225, 2785, 2945, 3005
Yamakawa .........................0765, 0775, 1865
Zenith.............0205, 0635, 3785, 3795, 3885
Blu-Ray-DVD
Denon ...................................................4035
Dynex ...................................................4235
HP ..........................................................4085
Insignia ..............................4205, 0975, 2635
JVC ........................................................2385
LG ......................................4285, 2635, 2335
Magnavox ..............................................2425
Memorex ..............................................2375
Onkyo ....................................................2355
Oppo........................4365, 4375, 4385, 4045
Panasonic ...................................4175, 2395
Philips ....................................................2415
Pioneer .................................................4055
Samsung .................4125, 2325, 2345, 4095
Sharp ..........................................4115, 2315
Sherwood ....................................4225, 4065
Sony ..................................4165, 4275, 2305
Sylvania .......................................4215, 2405
TCL ........................................................2435
Toshiba .................................................. 2295
Vizio .............................................4135, 4025
Yamaha ..................................................4075
DVD-R
Apex ......................................................0845
Aspire ....................................................1695
Astar ......................................................2885
Broksonic ..............................................0695
Centrios .............................1365, 1935, 1975
Coby ......................................................2885
Cyberhome ............................................1015
Emerson ................................................1612
Funai ......................................................0412
Go-Video ...........................1275, 1315, 1495
Hitachi .........................................0545, 0925
Humax ...................................................1505
Ilo ...........................................................1035
Insignia ..................................................0562
JVC ..............................................1145, 2025
KXD .......................................................2885
LG ..........................................................0562
Liteon .................................0805, 1035, 1495
Magnavox ..........................1055, 1225, 3025
Medion.........................................1035, 1665
Memorex .....................................1925, 3125
Mustek ...................................................1275
Oritron....................................................1935
Panasonic ..............................................0545
Philips ......................1055, 1225, 2705, 3165
Philips-Magnavox ........................1055, 1225
Pioneer ..............................0985, 2695, 2855
Polaroid .................................................0185
RCA .......................................................0915
Samsung .....................................1305, 4451
Sanyo ....................................................0095
Selectron ...............................................1955
Sharp .....................................................0625
Sony ..................................2865, 2985, 3055
Sylvania .......................................1612, 1672
Symphonic ............................................1612
Toshiba .............................. 0682, 1735, 3325
Trutech ...................................................2045
Yamaha ........................................1055, 1225
Zenith.....................................................0562
DVD/VCR COMBOS
Allegro .....................................(3885 & 0182)
Apex ............................................0852, 1025
Broksonic ..........................0015, 0211, 0695
Cinevision ................................(0205 & 0182)
Daewoo .................................................1385
Diamond Vision ...........................0422, 0455
Durabrand................................(0205 & 0182)
Emerson ..................................(0702 & 0312)
.................................0412, 0432, 0445, 0795
Fisher .......................................(0405 & 0472)
Funai ........................................(0702 & 0312)
.................................0412, 0432, 0445, 0795
Go-Video ...............................................0255
.......................0402, 0415, 0542, 0565, 1385
Hitachi .....................................(0925 & 0432)
Insignia ..........................(0205 & 0182), 0562
JVC ..........................0692, 0755, 1145, 2025
LG ................................................0562, 0635
Liteon .....................................................1905
Magnavox ................................(0105 & 1642)
.................................0342, 0412, 0445, 1045
Medion.........................................0422, 0455
Nexxtech .................................(0486 & 0492)
.................................0852, 0955, 1025, 2055
Panasonic ....................................0552, 0595
Philips ......................................(0105 & 1642)
.......................0342, 0412, 0445, 1045, 1372
Pioneer ........................................1775, 2695
Polaroid .......................................0852, 1025
RCA .........................................(0915 & 0162)
Rio ...........................................(0205 & 0182)
Samsung ...........................0255, 1662, 1725
Sansui ................................0015, 0211, 0695
Sanyo ......................................(0405 & 0472)
Sears ...........................................0015, 0211
Sony ......................................................0832
Sylvania ...................................(0702 & 0312)
.............................(0702 & 1392), 0312, 0412
.......................0432, 0445, 0795, 1612, 1672
Symphonic ..............................(0702 & 0312)
.......................................(1612 & 1392), 0312
.......................0412, 0432, 0445, 0795, 0975
Techwood .................................... 1602, 1985
Toshiba .................... 0115, 0682, 0735, 3075
Trutech ...................................................1385
WhiteWestinghouse ................(0795 & 0432)
Zenith.......................................(0205 & 0182)
VCR
Accele ....................................................0102
Admiral ........................................0302, 1682
Adventura ..............................................0992
Aiko..............................................0082, 1092
Aiwa ...............0182, 0312, 0432, 0752, 0992
Akai ........................................................0312
.......................1362, 0032, 0432, 0502, 0582
.......................0712, 0872, 0982, 1212, 1592
Allegro ...................................................0182
.......................0452, 0792, 1182, 1732, 4201
American High .......................................1112
Apex ......................................................0852
Asha.......................................................0102
AT & T ....................................................1272
Audio Dynamics ......0012, 0392, 0522, 0532
Audiovox................................................0182
Beaumark ..............................................0102
Bell & Howell ...............................0602, 1712
Broksonic ....................................0132, 0211
.......................0322, 0442, 0462, 0572, 0695
.......................0772, 0892, 0942, 1562, 1631
Calix .......................................................0182
Candle ...................................................0012
.......................0022, 0102, 0182, 0882, 1082
Cannon ..............................0162, 0802, 1112
Canon ................................0162, 1112, 1552
Capehart ................................................0792
Carver ....................................................0482
CCE .........................0082, 0362, 0372, 1092
Cine Vision ...................................0182, 1732
Citizen ................................0012, 0022, 0082
.......................0102, 0182, 0882, 1082, 1092
Colortyme ..............................................0012
Colt ..............................................0362, 0372
Craig ..............0102, 0182, 0362, 0372, 0592
Curtis Mathes ..............................0012, 0082
.......................0102, 0162, 0312, 0432, 0482
.......................0652, 0732, 1112, 1472, 1522
Cybernex ...............................................0102
Daewoo .........0022, 0082, 0762, 0882, 0892
.......................0992, 1082, 1092, 1385, 1472
DBX .............................................0012, 0392
Code List – Lista de Códigos
Page 22

22
Denon ....................................................0222
Diamond Vision .....................................0422
Dimensia ................................................0162
Durabrand....................................0182, 1732
Dynatech ...........................0312, 0432, 0992
Electrohome ......................0032, 0182, 1592
Electrophonic ........................................0182
Emerson ........0032, 0082, 0102, 0182, 0192
.......................0232, 0312, 0322, 0332, 0412
.......................0432, 0442, 0462, 0602, 0702
.......................0732, 0742, 0752, 0772, 0882
.......................0892, 0912, 0922, 0942, 0952
.......................0982, 0992, 1012, 1032, 1092
.......................1102, 1112, 1172, 1192, 1422
.......................1432, 1562, 1592, 1631, 1712
Fisher .....................................................0012
.......................0042, 0052, 0472, 0482, 0592
.......................0602, 1202, 1442, 1712, 2645
Fuji ...............................................0712, 1112
Funai ..............0312, 0412, 0432, 0702, 0992
Garrard ..................................................0992
GE ............................0102, 0162, 0242, 0612
.......................1022, 1112, 1152, 1482, 1702
Gold Star .....................................0012, 0182
.......................0312, 0432, 0792, 1181, 1632
Go Video ........0102, 0255, 0272, 0292, 0402
.......................0542, 0662, 1385, 1532, 1692
Gradiente .....................................0182, 0992
Harley-Davidson ....................................0992
Harman/Kardon .................0012, 0032, 1592
Harwood ......................................0362, 0372
Headquarter ..........................................0432
.......................0512, 0602, 1142, 1212, 1712
HL-Q ......................................................0592
Hitachi ...................................................0312
.......................0512, 0812, 0925, 1142, 1212
Innity ....................................................0622
Insignia ..............................0182, 0562, 1732
Instant Replay ....................0312, 0432, 1112
Inteq ......................................................0182
JC Penney ...............0012, 0102, 0162, 0182
.......................0392, 0522, 0532, 0602, 0812
.......................1112, 1142, 1212, 1242, 1712
JCL ........................................................1112
Jensen .........................................0812, 1212
JVC ........................................................0012
.......................0392, 0452, 0522, 0532, 0602
.......................0692, 1212, 1712, 2025, 4201
Kenwood .....................................0012, 0392
.......................0522, 0532, 0602, 1212, 1712
KLH ..............................................0362, 0372
Kodak ..........................................0182, 1112
LG ..................0312, 0432, 0562, 0792, 1181
Liteon .....................................................1905
Lloyd ..................................0312, 0432, 0992
Logik ............................................0362, 0372
LXI .....................................0182, 0312, 0432
Magnavox ..............................................0105
.......................0142, 0162, 0172, 0302, 0312
.......................0342, 0412, 0432, 0482, 0622
.......................0792, 0862, 1112, 1642, 1682
Magnin ...................................................0102
Marantz..................................................0012
.......................0392, 0482, 0522, 0532, 0602
.......................0772, 0802, 1112, 1552, 1712
Marta .....................................................0182
Matsushita .............................................1112
Medion...................................................0422
MEI ........................................................1112
Memorex .....................................0052, 0102
.......................0182, 0302, 0312, 0432, 0482
.......................0502, 0592, 0602, 0792, 0942
.......................0992, 1112, 1631, 1682, 1712
MGA ..................................0032, 0922, 1592
MGN Technology ................................... 0102
Midland ..................................................0612
Minolta .........................................0812, 1142
Mitsubishi ................0032, 0202, 0392, 0522
.......................0532, 0632, 0812, 0922, 1592
MontgomeryWard .............1162, 0302, 0932
Motorola ..................1742, 0302, 1112, 1682
MTC .........................0102, 0312, 0432, 0992
Multitech ......................................0102, 0312
.......................0362, 0372, 0432, 0612, 0992
NEC .......................................................0012
.......................0392, 0522, 0532, 0602, 0732
.......................0772, 1012, 1122, 1212, 1712
Nexxtech .......0486, 0492, 0842, 0852, 2055
Nikko .....................................................0182
Noblex ...................................................0102
Olympus ................................................1112
Onkyo ....................................................1382
Optimus .........0102, 0122, 0182, 0302, 0722
.......................1042, 1062, 1262, 1682, 1722
Optonica ......................................0102, 0932
Orion ........................0322, 0942, 1562, 1631
Panasonic(National) .0122, 0162, 0552, 1062
.......................1112, 1262, 1272, 1642, 1722
Pentax ...............................0012, 0812, 1142
Philco .......................0162, 0172, 0482, 1112
Philips ......................1352, 1372, 0092, 0105
.......................0252, 0342, 0412, 0482, 0622
.......................0672, 1052, 1112, 1282, 1642
PhilipsMagnavox ....0302, 0482, 0622, 1682
Pilot .......................................................0182
Pioneer ........................................0222, 0392
.......................0522, 0532, 0812, 1242, 2695
Polaroid .................................................0852
Portland .......................................0022, 1082
Proscan .......................................0162, 0642
Protec ..........................................0362, 0372
Pulsar.....................................................0792
Quarter ........................................0602, 1712
Quartz ..........................................0602, 1712
Quasar .........................................0122, 0162
.......................1062, 1112, 1262, 1642, 1722
Radio Shack ................................0032, 0042
.......................0102, 0162, 0182, 0302, 0312
.......................0432, 0502, 0592, 0602, 0722
.......................0932, 0992, 1042, 1112, 1152
.......................1262, 1482, 1592, 1682, 1712
Radix .....................................................0182
Randex ..................................................0182
RCA ...................................0062, 0102, 0162
.......................0182, 0212, 0242, 0352, 0582
.......................0612, 0642, 0782, 0812, 0915
.......................1022, 1112, 1132, 1142, 1152
.......................1222, 1452, 1482, 1572, 1702
Realistic ...................0032, 0042, 0102, 0162
.......................0182, 0302, 0312, 0432, 0502
.......................0592, 0602, 0932, 0992, 1042
.......................1112, 1262, 1592, 1682, 1712
ReplayTV ...............................................1272
Ricoh .....................................................1252
Rio .....................................0182, 0282, 1732
Runco ....................................................0792
Samsung ...............................................0102
.......................0255, 0292, 0502, 0652, 0812
.......................0872, 0882, 1522, 1535, 1662
Samtron .................................................1692
Sanky .................................0302, 0792, 1682
Sansui ..........................................0132, 0211
.......................0322, 0392, 0522, 0532, 0572
.......................0695, 0942, 1212, 1562, 1631
Sanyo ..........................................0052, 0102
.......................0472, 0592, 0602, 1072, 1322
.......................1332, 1342, 1442, 1712, 2645
Scott ..................................0442, 0462, 0882
.......................0892, 0922, 1032, 1192, 1422
Sears .............0042, 0132, 0182, 0211, 0412
.......................0482, 0592, 0602, 0812, 1112
.......................1142, 1202, 1242, 1262, 1712
Sharp .....................................................0032
.......................0302, 0312, 0332, 0432, 0932
.......................0962, 1042, 1082, 1592, 1682
Shintom .......................................0362, 0372
.......................0522, 0712, 0812, 1252, 1512
Shogun ..................................................0102
Signature .....................................0312, 0432
Singer ................................0362, 0372, 1112
Sonic Blue .............................................1272
Sony ........................0072, 0112, 0262, 0382
.......................0712, 0822, 0832, 0972, 1006
.......................1162, 1232, 1252, 1582, 1652
STS ....................................0812, 1112, 1142
Superscan .............................................0412
Sylvania .......................................0162, 0312
.......................0412, 0432, 0482, 0702, 0922
.......................0992, 1112, 1392, 1612, 1672
Symphonic ..................................0312, 0412
Code List – Lista de Códigos
Page 23

23
.......................0432, 0702, 0992, 1392, 1612
Tandy ....................... 0312, 0432, 0602, 1712
Tashiko .................................................. 0182
Tatung .................................................... 1212
Teac ......................... 0312, 0432, 0992, 1212
Technics.................................................1112
Techwood .............................................. 1602
Teknika...................................................0182
.......................0232, 0312, 0432, 0992, 1112
Tivo ..............................................1052, 1162
TMK ...................................0102, 0732, 1012
Toshiba .................................................. 0042
.......................0152, 0482, 0652, 0682, 0812
.......................0882, 0902, 0922, 1002, 1032
.......................1312, 1402, 1412, 1522, 3075
Totevision.....................................0102, 0182
Trutech ...................................................1385
Unitech ..................................................0102
Vector Research ....................................0012
.................................0392, 0522, 0532, 0882
Victor .................................0392, 0522, 0532
Video Concepts ...........................0012, 0032
.......................0392, 0522, 0532, 0882, 1592
Videosonic .............................................0102
Wards ............0032, 0102, 0162, 0182, 0302
.......................0312, 0362, 0372, 0432, 0592
.......................0812, 0882, 0932, 0992, 1032
.......................1112, 1142, 1462, 1592, 1682
WhiteWestinghouse 0312, 0432, 0702, 0762
XR-1000...................0362, 0372, 0992, 1112
Yamaha ..........0012, 0392, 0522, 0532, 1212
Zenith.......................0082, 0182, 0302, 0312
.......................0332, 0392, 0432, 0452, 0512
.......................0522, 0532, 0622, 0652, 0662
.......................0712, 0762, 0792, 0942, 1072
.......................1092, 1181, 1182, 1252, 1522
.......................1532, 1631, 1682, 1732, 4201
LASER DISC
Denon ....................................................0222
Pioneer ..................................................0222
Proscan .................................................0642
RCA .......................................................0642
Sanyo ....................................................1072
Sony ............................................1006, 1232
Zenith...........................................1072, 1232
CD
ADC .............................................0517, 1277
Adcom .........................................0027, 0777
Aiwa .........................0357, 0966, 0987, 1007
Akai ....................................0167, 0377, 0757
Audio Technica ...................................... 0117
California Audio Labs ............................0257
Captronic .....................................0527, 1623
Carver ......................0197, 0207, 0317, 0417
Casio .....................................................0397
Centrios .................................................1097
Citizen ....................................................0277
Coby ......................................................1287
Curtis Mathes ........................................0397
Denon ....................................................0637
Emerson ......................................0777, 1017
Fisher ...........................................0127, 0217
.......................0317, 0327, 0457, 1137, 1157
Genexxa ............................0427, 0577, 1017
Goldstar .................................................0687
HarmonKardon ...........................0647, 0797
Hitachi ...................................................0427
Inkel .......................................................0787
Insignia ..................................................1526
JC Penny .....................................0397, 0657
JVC ....................................0897, 1056, 1107
Kenwood .................0137, 0367, 0467, 0497
.......................0537, 1016, 1027, 1147, 1167
Krell........................................................0207
Kyocera .......................................0517, 1277
Luxman ....................0227, 0337, 0477, 0587
LXI .........................................................0397
Magnavox ..........................0207, 0737, 0837
Marantz....................0207, 0437, 0547, 0947
MCS.............................................0397, 0657
MGA ......................................................0797
Mission ..................................................0207
Mitsubishi ....................................0797, 0907
NAD .........................0766, 0827, 1026, 1087
Nakamichi ..........................0007, 0877, 1037
NEC .......................................................0657
Nexxtech ...........................0097, 0487, 0536
.......................0576, 0607, 0617, 0666, 0727
.......................0856, 0887, 0916, 0967, 1217
Nikko .................................0117, 0217, 1017
NSM.......................................................0207
Onkyo ....................................................0147
.......................0237, 0816, 0867, 0937, 1177
Optimus .......................................0057, 0317
.......................0347, 0387, 0417, 0427, 0447
.......................0537, 0557, 0667, 0776, 0857
Panasonic ..............................................0257
.......................0696, 0707, 0747, 0997, 1077
Philips ................................0197, 0207, 0837
Pioneer ....................0057, 0307, 0407, 0427
.......................0577, 0717, 0807, 0917, 1227
Proton ....................................................0207
Quasar ...................................................0257
Radio Shack ......................0107, 0247, 0267
.......................0307, 0417, 0507, 0717, 1227
RCA .............................................0087, 0107
.......................0187, 0307, 0317, 0717, 0777
.......................1047, 1067, 1117, 1207, 1227
Realistic ...................0317, 0347, 0427, 0527
.......................0547, 0557, 0777, 1017, 1623
Rotel ......................................................0207
SAE ........................................................0207
Samsung .....................................0847, 1396
Sansui ......................0017, 0047, 0207, 1067
Sanyo ..........................................0157, 0177
.......................0317, 0457, 0957, 1127, 1197
Scott ............................................0777, 1017
Sears .................................0397, 0537, 0547
Sharp ...........................................0537, 0547
Sherwood ..............................................0247
.......................0447, 0547, 0606, 0627, 0787
Shure .....................................................0657
Sony ........................0077, 0357, 0737, 0977
STS ..............................................0517, 1277
Sylvania .................................................0207
Symphonic ............................................0567
Teac ......................... 0217, 0297, 0547, 0557
.......................0567, 0646, 0677, 0817, 1187
Technics.........0257, 0696, 0747, 0997, 1077
Theta Digital ..........................................0837
Toshiba ........................................ 0766, 0827
Victor .....................................................0897
Yamaha ..........0037, 0117, 0287, 0927, 1057
Zenith.................................0067, 0217, 0516
.......................0597, 0656, 0697, 0716, 0767
AUDIO
Aiwa .......................................................0586
.......................0726, 0846, 0966, 1296, 1386
Apex ......................................................0425
Apple Ipod .............................................0186
Bose ..................................0886, 1237, 1606
Carver ....................................................0197
Centrios .........1116, 1217, 1546, 1552, 1566
Citizen ....................................................0277
Criterion .................................................0785
Delphi ....................................................0376
Denon ......................0316, 0976, 1046, 1136
Duraband ...............................................1476
Fisher ...........................................0026, 0826
Gold Star ...............................................0216
Harman/Kardon ...........................0016, 0436
Insignia ..................................................0725
Ipod .......................................................0066
JVC ....................................0566, 0676, 1056
JWL .......................................................1126
Kenwood ...........................0246, 0426, 0497
.......................0616, 0956, 1016, 1416, 1596
Koda ......................................................1552
Koss.......................................................0215
Magnavox ......0026, 0206, 0226, 0295, 1266
Marantz........................................0036, 0437
Mitsubishi ..............................................0366
Code List – Lista de Códigos
Page 24

24
NAD ...................................0496, 0766, 1026
Nelson ...................................................1217
NEO .......................................................0076
Nexxtech .................0487, 0536, 0576, 0666
.......................0725, 0856, 0916, 1116, 1217
Norcent ..................................................0835
Onkyo ................................1186, 1246, 1256
.......................0116, 0816, 0936, 0996, 1376
Optimus .........0006, 0317, 0386, 0387, 0506
.......................0776, 0896, 1036, 1446, 1486
Panasonic ..........................1206, 1236, 0056
.......................0126, 0686, 0746, 0796, 0876
.......................1066, 1096, 1346, 1436, 1466
Philips ................................1196, 0026, 0036
.......................0197, 0265, 1066, 1266, 1576
Pioneer ........................................0266, 0356
.......................0407, 0476, 0776, 0896, 1106
.......................1406, 1446, 1496, 1506, 2675
Radio Shack ..........................................0006
.......................0166, 0176, 0236, 0247, 0266
.......................0356, 0476, 0507, 0626, 1036
.......................1316, 1406, 1446, 1486, 1506
RCA ...............0146, 0176, 0196, 0266, 0276
.......................0326, 0356, 0476, 0486, 0626
.......................0736, 0786, 0866, 0906, 0986
.......................1165, 1207, 1276, 1286, 1306
.......................1316, 1326, 1336, 1406, 1506
Realistic .................................................0946
Regent ...................................................1476
Rio ...............................................3885, 0286
Saba ......................................................0995
Samsung ...............................................0075
Sanyo ......................0157, 1156, 1166, 1176
Scott ......................................................0396
Sharp .....................................................1616
.......................1626, 1216, 0556, 0756, 1267
Sherwood ................0236, 0247, 0466, 0606
Sirius ............................................1247, 1267
Sky .......................................................0076
Sony ............................................1226, 0046
.......................0106, 0136, 0256, 0296, 0406
.......................0416, 0526, 0546, 0636, 1006
.......................1076, 1086, 1426, 1456, 1586
TAO ........................................................0076
Teac ............... 0156, 0297, 0306, 0346, 0646
Technics.............................0056, 0126, 0686
.......................0696, 0796, 1066, 1096, 1436
Tevion .................................................... 0785
Venturer .................................................0086
Vizio .............................................1636, 1646
Wonder ..................................................1566
XM Radio .....................................0076, 0376
Yamaha ........................................0076, 0287
.......................0336, 0446, 0456, 0596, 0706
.......................0806, 0836, 0926, 1146, 1536
Zenith.....................................................3885
.......................0026, 0067, 0096, 0216, 0217
.......................0286, 0506, 0516, 0656, 0716
HOME AUTOMATION
GE Homeminder ....................................0008
Lutron ....................................................1516
X10 Home Automation ..........................0018
X10 NEC ................................................0028
Vizio .......................................................0068
MEDIA CENTER PC
MCE .......................................................3255
Microsoft ...............................................3255
Vista .......................................................3255
HTIB
(HOME THEATER IN A BOX)
Aiwa .........................................(0586 & 0035)
Amw ......................................................0825
Apex ......................................................0425
Bose ..................................4455, 0886, 1475
Boston Acoustic ....................................3245
Centrios .........0486, 0955, 1116, 1785, 1845
Classic ...................................................1965
Criterion .................................................0785
Durabrand....................................3885, 0205
.......................0486, 0955, 1476, 2685, 2935
Dynex ....................................................0038
Emerson ................................................1185
Insignia ..................................................0725
JVC ........................................................0155
KLH ........................................................0465
Koss.......................................................0215
Lenoxx ...................................................1345
LG ......................................4285, 1463, 1565
Magnavox ........(0105 & 1266), (2945 & 1266)
.................................0206, 0295, 0745, 1045
Myron & Davis .......................................1555
NESA .....................................................1555
Nexxtech .......0486, 0725, 0955, 1116, 1785
Norcent ..................................................0835
Onkyo ......................0048, 0058, 0355, 1376
Panasonic ....................................0165, 1466
Philips ......................................(0105 & 1266)
.........................(2665 & 1266), (2945 & 1576)
.................................0206, 0265, 1045, 2765
Pioneer ......(2675 & 1496), 0525, 0875, 2895
Radio Shack ............................(0003 & 1316)
...........................................0085, 0275, 0486
.......................0626, 0955, 0995, 1165, 1645
RCA ..........................................(0003& 1316)
.......................0486, 0626, 0955, 1165, 1645
Regent .........................................1345, 1476
Rio ...........................................(0205 & 0286)
Saba ......................................................0995
Samsung ...........................0075, 1535, 2725
Selectron .....................................1885, 2075
Sony ............................................0365, 1426
Techwood .................................... 1602, 1985
Tevion .................................................... 0785
Zenith.......................................(0205 & 0286)
TV/VCR/DVD COMBO
Broksonic ..............................................1525
Diamond Vision .............(2001 & 0422), 0455
Magnavox ....................................0445, 0412
Panasonic ....................................0595, 0552
Philips ..........................................0445, 0412
Samsung ...............................................1535
Sears ...........................................0445, 0412
Superscan ...................................0445, 0412
Sylvania .......................................0445, 0412
Toshiba ........................................ 0115, 3075
Code List – Lista de Códigos
Model:
ONB13AV0047252
Manual Version 1
Updated: 03/28/14
 Loading...