

Onn BWA16AA002 Product Manual
PRODUCT GUIDE
Micro Bluetooth
®
Stereo
with CD Player and FM Radio
Model: BWA16AA002
CAUTION: To use product properly, please read the user guide completely before initial use.
TM
IMPORTANT SAFETY INSTRUCTIONS
1. Read these Instr uctions.
2. Keep these Instr uctions.
3. Heed all Warnings .
4. Follow all instructions.
5. Do not use this ap paratus near water.
6. Clean only with a dr y cloth.
7. Do not blo ck any ventilation openings . Install in accordance with the ma nufacturer’s instructions.
8. Do not install near any h eat sources such as radiators , heat registers, stoves , or other apparatus
(including amp lifiers) that produce heat.
9. Do not defeat th e safety purpose of the p olarized or grounding - t ype plug. A polarized plu g has two
blades with on e wider than the other. A grounding t ype plug has two blades and a th ird grounding
prong. The w ide blade or the third prong ar e provided for your safe ty. When the provided plug do es
not fit into your o utlet, consult an electr ician for replacement of the o bsolete outlet.
10. Protect th e power cord from being walked o n or pinched particularl y at plugs, convenience
receptacle s, and the point where they e xit from the apparatus.
11. Only use attachmen ts/accessories specifi ed by the manufacturer.
12. Use on ly with a cart, stand, trip od, bracket, or table sp ecified by the manufacture r,
or sold with th e apparatus. When a cart is use d, use caution when movin g the
cart/apparatus combination to avoid injury from tip-over.
13. Unp lug this apparatus during lightni ng storms or when unused fo r long periods of time.
14. Refer all se rvicing to qualified ser vice personnel. Ser vicing is required when th e apparatus has been
damaged in any way, such as p ower-supply cord or plug is damaged, l iquid has been spilled or obj ects
have fallen into the a pparatus, the apparatus has be en exposed to rain or moistur e, does not operate
normally, or has be en dropped.
15. Pow er Sources - This product sh ould be connected to a pow er supply only of the type d escribed in
these operat ing instructions, or as mar ked on the unit.
16. Water and Mois ture - This product shoul d be kept away from direct cont act with liquids.
The apparatus sh all not be exposed to dripp ing or splashing and that no obje cts filled with liquids,
such as vases, shal l be placed on the apparatus.
17. C AUTION – Danger of explo sion if battery is incorre ctly replaced. Replace onl y with the same or
equivalent t ype. Batteries (a battery pa ck or an installed batter y) s hall not be exposes to excessive
heat such as sunshi ne, fire, etc.
18. Where the mai ns plug or an appliance coupler is us ed as the disconnect devi ce, the disconnect device
shall remain readily operable.
19. Do not ins tall this equipment in a confine d or "boxed-in" space such as a bookcas e or similar unit,
and maintain go od ventilation conditions . The ventilation should n ot be impeded by covering the
ventilation op enings with items such as newsp aper, tablecloths, curtains , etc.
20. This apparatus is fo r professional use only.
21. Whe n moving or not using the applia nce, secure the power cord (e.g., wra p it with a cable tie).
Be careful no t to damage the power cord. Be fore using it again, make sure the p ower cord has not
been damage d. If the power cord has been da maged at all, bring the unit an d cord to a qualified
service tec hnician for repair or replace ment as specified by the manu facturer.
22. WARNING: P lease refer to any import ant information (e.g., electr ical, safety, etc.) printed on the
exterior b ottom enclosure or rear pa nel before installing or o perating the product.
WARNINGS AND PRECAUTIONS
• CAUTION: To prevent electric shock, match wide blade of plug to wide slot, fully insert.
• WARNING: To reduce the risk of fire or electric shock, do not expose this apparatus to rain or moisture.
• CAUTION: Use of any controls or adjustments or performance of procedures other than those herein
specified may result in hazardous radiation exposure.
• WARNING: Changes or modifications to this unit not expressly approved by the party responsible for
compliance could void the users authority to operate the equipment.
• WARNING: Do not place the unit on top of any so, porous, or sensitive surfaces to avoid damaging the
surface. Use a protective barrier between the unit and surface to protect the surface.
• WARNING: Use of this unit near fluorescent lighting may cause interference regarding use of the
remote. If the unit is displaying erratic behavior move away from any fluorescent lighting, as it may be
the cause.
• CAUTION: Danger of explosion if battery is incorrectly replaced. Replace only with the same or
equivalent type.
• WARNING: The remote control button cell battery contains mercury. Do not put in trash, instead recycle
or dispose of as hazardous waste.
• WARNING: Lithium batteries, like all rechargeable batteries are recyclable and should be recycled or
disposed of in normal household waste. Contact your local government for disposal or recycling
practices in your area. They should never be incinerated since they might explode.
CAUTION: TO REDUCE THE RISK OF ELECTRIC SHOCK, DO NOT REMOVE COVER (OR BACK).
NO USER-SERVICEABLE PARTS INSIDE. REFER SERVICING TO QUALIFIED SERVICE PERSONNEL.
CAUTION
RISK OF ELECTRIC SHOCK
DO NOT OPEN
ATTENTION
RISQUE D’ ÉLECTROCUTION
NE PAS OUVRIR
DANGEROUS VOLTAGE: The lightning flash with arrowhead symbol, within an
equilateral triangle is intended to alert the user to the presence of uninsulated dangerous
voltage within the product’s enclosure that may be of sucient magnitude to constitute
a risk of electric shock to persons.
ATTENTION: The exclamation point within an equilateral triangle is intended to alert the
user to the presence of important operating and maintenance (servicing) instructions in
the literature accompanying the appliance.
DANGER: This product utilizes a Class 1 laser to read Compact Discs. This laser
Compact Disc Player is equipped with safety switches to avoid exposure when the CD
door is open and the safety interlocks are defeated. Invisible laser radiation is present
when the CD Player’s lid is open and the system’s interlock has failed or been defeated.
It is very important that you avoid direct exposure to the laser beam at all times. Please
do not attempt to defeat or bypass the safety switches.
INFORMATION: This equipment has been tested and found to comply with the limits for a Class B
digital device, pursuant to Part 15 of the FCC Rules. These limits are designed to provide reasonable
protection against harmful interference in a residential installation. This equipment generates, uses and
can radiate radio frequency energy and, if not installed and used in accordance with the instructions,
may cause harmful interference to radio communications. However, there is no guarantee that
interference will not occur in a particular installation. If this equipment does cause harmful interference
to radio or television reception, which can be determined by turning the equipment o and on, the user
is encouraged to try to correct the interference by one or more of the following measures:
• Reorient or relocate the receiving antenna.
• Increase the separation between the equipment and receiver.
• Connect the equipment into an outlet on a circuit dierent from that to which the receiver is connected.
• Consult the dealer or an experienced radio/TV technician for help.
NOTICE: This device complies with Part 15 of the FCC Rules. Operation is subject to the following two
conditions: (1) This device may not cause harmful interference, and (2) This device must accept any
interference received, including interference that may cause undesired operation.
Programming a CD
Step 1 Follow the steps for “Playing a CD”, then press the STOP button.
Step 2 Press the PROG/REP button on the remote control, “PROGRAM”
and “P-01” will appear on the LCD display, indicating that the unit
is in program mode, and it is ready for the first track to be selected.
Step 3 Press the TUNE/SKIP buttons to select the track as you desire.
Step 4 Press the PROG/REP button to select a track, “P-01” will change
to“P-02”.
Step 5 Repeat steps 3 and 4 until the desired CD tracks are programmed.
Step 6 Press the PLAY/PAUSE button to begin playing the programmed
tracks.
Step 7 If you want to review the programmed tracks, press the PROG/REP
button repeatedly in stop mode.
CD OPERATION
Playing a CD
If this is your first time playing a CD on this unit, remove the cardboard disc
from behind the CD DOOR before attempting to play an actual CD.
Step 1 Press the OPEN AREA to open the CD DOOR.
Step 2 Insert a CD into the unit.
Step 3 Press the POWER button to turn on the unit.
Step 4 Press the SOURCE button to select CD mode, the loaded CD will
begin to play automatically.
Step 5 Press the PROG/REP button on the remote control to select the
play mode as the following sequence:
Normal > Repeat 1 > Repeat all > Random > Normal
• Do not expose the apparatus to dripping or splashing. Do not place objects filled with liquids (e.g., vases)
on top of the apparatus.
• Adapter is used as disconnect device and it should remain readily operable during intended use. In order
to disconnect the apparatus from the mains completely, the adapter should be disconnected form the
mains socket outlet completely.
• Battery shall not be exposed to excessive heat such as sunshine, fire or the like.
• Caution marking is located at the bottom of apparatus.
FOLD FOLD
FOLD FOLD
FOLD FOLD
FOLD
FRONT
FOLD
LR
USB DEVICE CHARGING
Your unit includes a USB power jack (DC 5V, 1A) for charging most devices
with a standard USB connection, including iPhone, iPod, and Android devices.
For charging, simply connect your device to the unit’s USB charging port.
FM RADIO OPERATION
Playing the Radio
Step 1 Press the POWER button to turn on the unit.
Step 2 Press the SOURCE button to set the unit to Radio mode as
indicated on the LCD display.
Step 3 Press the TUNE/SKIP buttons to adjust the radio frequency.
AUX INPUT OPERATION
Using the AUX-IN
Step 1 Connect an audio device such as smartphones, tables or MP3
player to the Line-In jack using a Line-In cable (not included).
Step 2 Press the SOURCE button to set the unit to AUX mode as
indicated on the LCD display.
Step 3 The audio device will play through the speakers.
BLUETOOTH WIRELESS
You can stream audio to this product from up to 33' away using your iPod,
iPhone, iPad , Android or other Bluetooth enabled device.
Step 1 Turn on the unt by pressing the POWER button.
Step 2 Press the SOURCE button to set the unit to BT mode.
Step 3 On your enabled Bluetooth device, select “BWA16A002” from
the available list and your Bluetooth device will connect to the
BWA16AA002.
Step 4 If you want to pair the BWA16AA002 with another Bluetooth
audio device, press and hold the PAIRING button to disconnect
the current paired Bluetooth audio device or make sure the
current device has been moved out of range.
Step 5 During playback, press the PLAY/PAUSE button to pause
playback and again to resume playback.
Note: If the last paired bluetooth audio device is powered on and within
available range with Bluetooth enabled, the device will automatically
reconnect to the BWA16AA002.
SPECIFICATIONS
GENERAL
AC Input ................................................................................................................................ 120V/60Hz
Power Source(Remote Control)............................................................DC 3V,CR2025,Lithium Battery
Speaker (Tweeter) .................................................................................................................... 3ohm x 2
Speaker (FullRange) ................................................................................................................ 3ohm x 2
Output Power (reference).................................................... 50W+50W(per channel at 3 ohm, 1kHz)
Dimensions (Main Unit) ...................................... 11.9in x 7.3in x 4.9in( 30.2cm x 18.5cm x 1 2.3cm)
Dimensions (Speaker)................................ 5.5in x 6.3in x 10.9inx2(14cm x 16cm x 27.6 cm x 2cm)
RADIO SECTION
Frequency Range ......................................................................................................FM: 87.5 - 108MHz
BLUETOOTH SECTION
Bluetooth specification............................................................................................................ v2.1+EDR
Supported Protocol................................................................................................................ A2DPV1.2
Range ............................................................................................................ 33 feet (10m) line of sight
Specifications are subject to change and improvement without notice.
Actual product may vary from the images found in this document.
Saving with Programming
Step 1 Tune the radio to the station you want to save.
Step 2 Press the PROG/REP button on the remote control, then press
the PRESET button to select a preset number.
Step 3 Press the PROG/REP button again to save the current station to
the selected memory slot.
Step 4 Repeat steps 1, 2 and 3 to program more stations.
Note: You can program up to 20 FM presets.
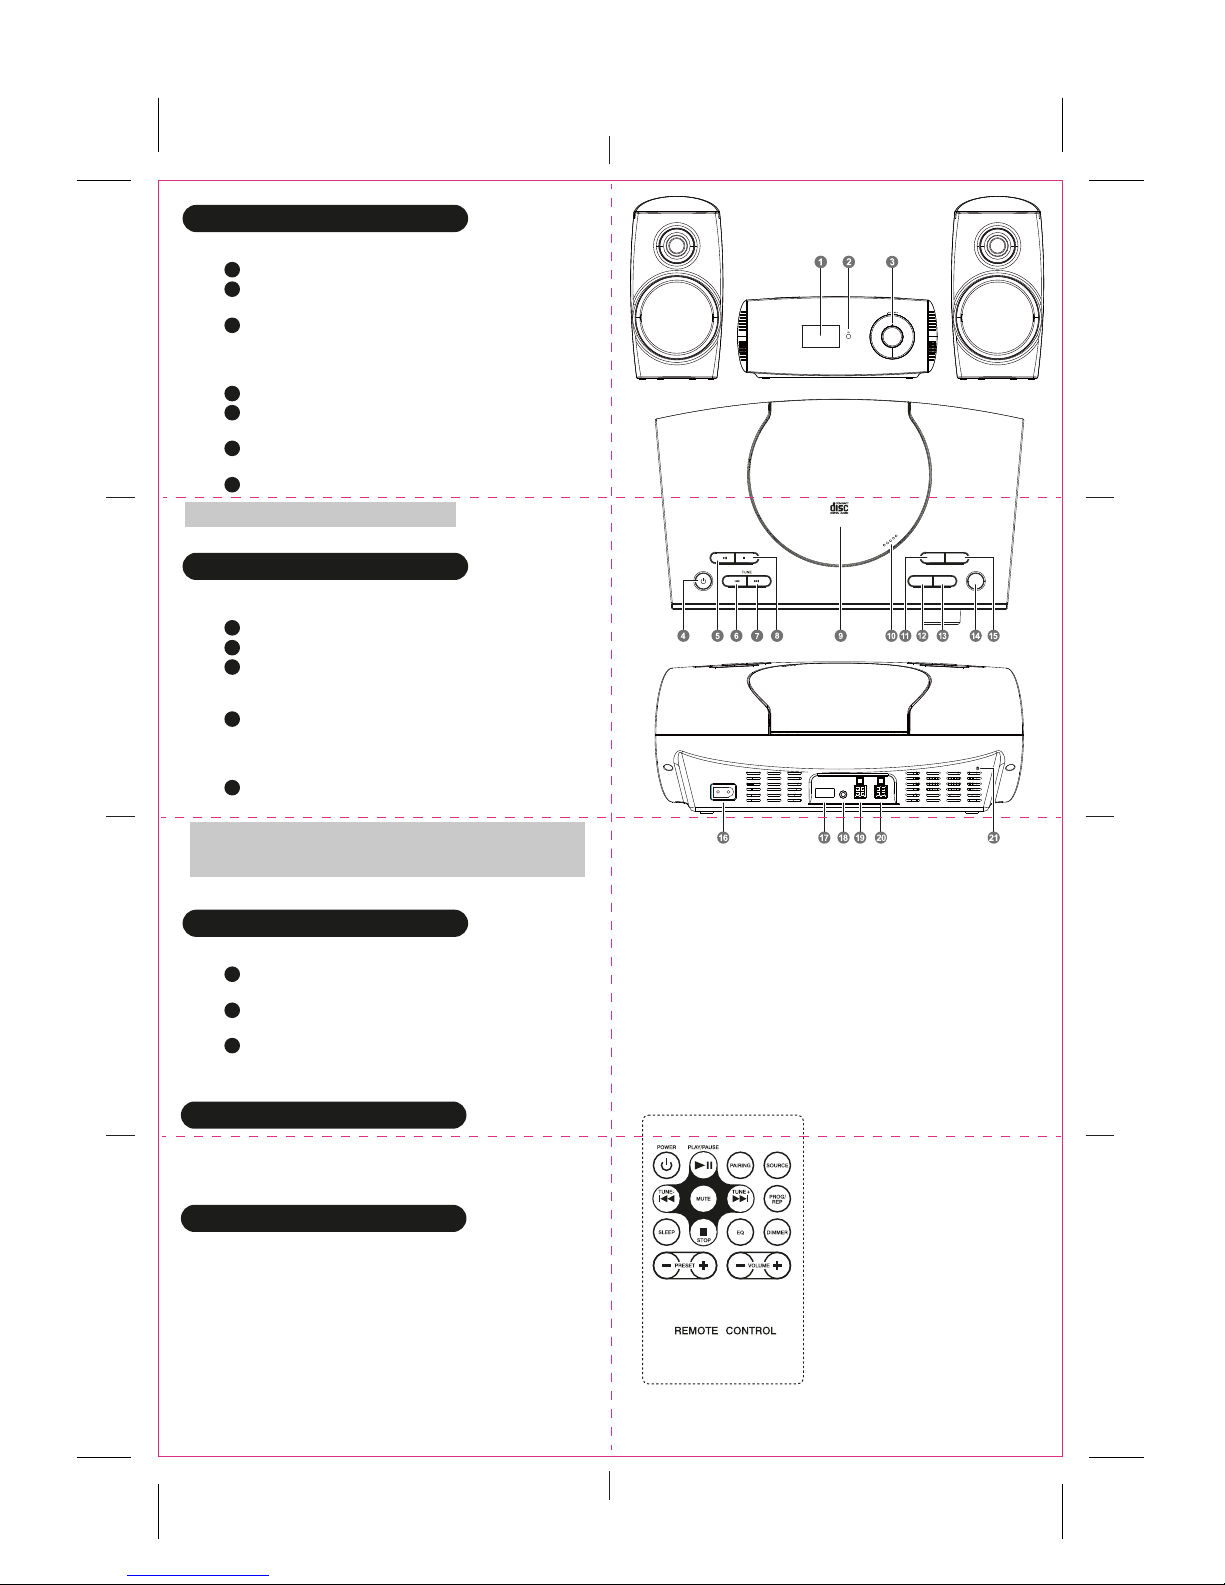
1. LCD Display
2. IR Sensor
3. VOLUME +/–
4. POWER Button
5. PLAY/PAUSE Button
6. TUNE – / SKIP – Button
7. TUNE + / SKIP + Button
POWER - Turn unit on/o.
PLAY/PAUSE (CD mode) - Press to play
or pause a loaded CD.
PLAY/PAUSE (Radio mode) - Press to
recall the saved FM preset radio stations.
PAIRING (BT mode) - Press to disconnect
the current Bluetooth audio device.
SOURCE - Press to switch between CD,
Tuner, AUX-In and Bluetooth modes.
TUNE/SKIP (Radio mode) - Press to tune
to desired radio frequency.
TUNE/SKIP (CD mode) - Press to select
tracks. Press and hold to fast search.
MUTE - Press to silence volume.
PROG/REP (CD or Radio mode) - Press
to enter programming mode.
SLEEP - Press to set sleep timer.
STOP (CD mode) - Press to stop playback.
EQ - Press to switch between Classic,
Rock, Jazz or Pop equalizer settings.
PRESET+/– (CD mode) - Press to select
saved programmed tracks.
PRESET+/– (Radio mode) - Press to
select from preset radio stations.
Volume - Press to increase or decrease
the volume level.
8. STOP Button
9. CD Door
10. OPEN AREA
11. SLEEP Button
12. EQ Button
13. DIMMER Display
14. SOURCE button
15. PAIRING Button
16. AC Power Input
17. USB CHARGING Port
18. LINE-IN Jack
19. SPEAKER OUT (R)
20. SPEAKER OUT (L)
21. FM Antenna
PAIRING
EQ
SLEEP
DIMMER
SOURCE
CHARGIN G
LINE IN
AC IN~
REMOTE CONTROL
FUNCTIONS
MAIN UNITLEFT SPEAKER RIGHT SPEAKER
BACK
FOLD
FOLD
FOLD
FOLD
FOLD
FOLD
FOLD
FOLD
 Loading...