

Page 1

Digital Clock Radio
Model: AAABLK100008726
PRODUCT GUIDE
We’d love to hear from you. Scan with you Walmart
app and let us know what you think.
January 16, 2020_V1
Page 2
Information and Safety Instructions
Need help?
We’re here for you ever y day
from 7 a.m . – 9 p.m. CST.
Give us a ca ll at 1-888-516-2630
Important Safety Instructions
• Read these Instructions.
• Keep these Instructions.
• Heed all Warnings.
• Follow all instructions.
• Do not use t his apparatu s near water.
• Clean o nly with a dry cl oth.
• Do not bl ock any ventila tion openin gs. Install in
accordance with the manufacturer’s instructions.
• Do not in stall near any h eat sources such as radiators,
heat register s, stoves, or other a pparatus (inc luding
amplifiers) th at produce he at.
• Do not def eat the safety p urpose of the po larized
or grounding - type p lug. A polarize d plug has two
blades with on e wider than the other. A grou nding
type p lug has two bla des and a third gro unding
prong. The wid e blade or the third pron g are provided
for your s afety. When the provided plug does not fit
into your o utlet, consul t an electric ian for replac ement
of the obsolete outlet.
• Protect th e power cord from be ing walked on
or pinched particularly at plugs, convenience
recepta cles, and the point where they exi t from the
apparatus.
• Only use attachments/accessories specified by the
manufacturer.
• Unpl ug this apparatus dur ing lightnin g storms or when
unuse d for long peri ods of time.
• Refer al l servicin g to qualified servi ce personne l.
Serv icing is requ ired when the ap paratus has be en
damaged in any way, such as power-supp ly cord or
plug is d amaged, liquid has been spill ed or objects
have fal len into the app aratus, the app aratus has
been exposed to ra in or moisture, d oes not operate
normally, or has been dropped.
FCC Warnings
Warnin g: Changes or m odification s to this unit not ex pressly
approve d by the party respons ible for comp liance coul d
void the u ser’s authority to ope rate the equipm ent.
NOTE: This equipment h as been tested a nd found to
compl y with the limits for a Class B digi tal device, pursuant
to Part 15 of t he FCC Rules. Th ese limits are d esigned to
provide reason able protecti on against harmfu l interference
in a resid ential instal lation. Thi s equipment g enerates, use s,
and can ra diate radio fre quency ene rgy and, if not ins talled
and use d in accordance with the instructio ns, may cause
harmf ul interfere nce to radio comm unication s. However,
there is n o guarantee tha t interference will n ot occur in a
particular installation. If this equipment does cause harmful
interf erence to radio o r television receptio n, which can be
determ ined by turnin g the equipm ent o and on, the user
is enco uraged to try to co rrect the inter ference by one o r
more of the follow ing measures:
• Reori ent or relocate th e receiving a ntenna.
• Incre ase the separation bet ween the equipment a nd
rec ei ver.
• Connect the e quipment into an outl et on a circuit
diere nt from that to whic h the receiver is c onnected.
• Consu lt the dealer o r an experienced radio/TV
technician f or help.
Additional Warnings and Precautions
• CAUTION: TO PRE VENT ELECTRIC SHOCK, MATCH WIDE
BLAD E OF PLUG TO WIDE SLOT, FULLY INSERT.
• Mains p lug is used as di sconnect d evice and it sho uld
remai n readily operable during i ntended use. In
order to discon nect the appa ratus from the ma ins
compl etely, the mains p lug should be disco nnected
form the m ains socket outlet com pletely.
• Caution mark ing is located a t the rear or botto m of the
apparatus.
• WARNING: To reduce th e risk of fire or ele ctric shock,
do not exp ose this appara tus to rain, mois ture,
dripping, or splashing.
• CAUTION: Use of controls o r adjustments or
performance of procedures other than those specified
may resu lt in hazardous ra diation exposure.
• WARNING: Changes or modific ations to this un it
not expre ssly approved by the par ty responsible for
compl iance could void the u ser’s authority to ope rate
the equipment.
• WARNING: Do not place this unit d irectly onto fu rniture
surfa ces with any typ e of soft, porous , or sensitive
finish . As with any rubber compound made wi th oils,
the feet c ould cause ma rks or stainin g where the feet
reside. We recomm end using a protective b arrier such
as a cloth o r a piece of glass b etween the unit and th e
surfa ce to reduce the ri sk of damage an d/or staini ng.
• CAUTION: Danger of explosio n if battery is incorre ctly
replaced. Re place only wi th the same or equivalent
type.
• WARNING: Shock hazard - Do Not Ope n.
• Battery sha ll not be exposed to excessi ve heat such as
sunshine, fire or the like.
• Keep new and used b atteries away from children. If the
battery compartment does not close securely, stop
using the prod uct and keep it awa y from childre n.
• WARNING: DO NOT INGEST BATTERY, CHEMICAL
BURN HA ZARD. If you thi nk batteries might h ave been
swallowed or pl aced inside a ny part of the bod y, seek
imme diate medica l attention.
• If the coi n/button cell ba ttery supp lied with this
product is swal lowed, it can cau se severe intern al
burns i n just 2 hours and can le ad to death.
• Completely re place all old b atteries with n ew ones.
• Batteries sh ould be recycl ed or dispose d of as per
state and local guidelines.
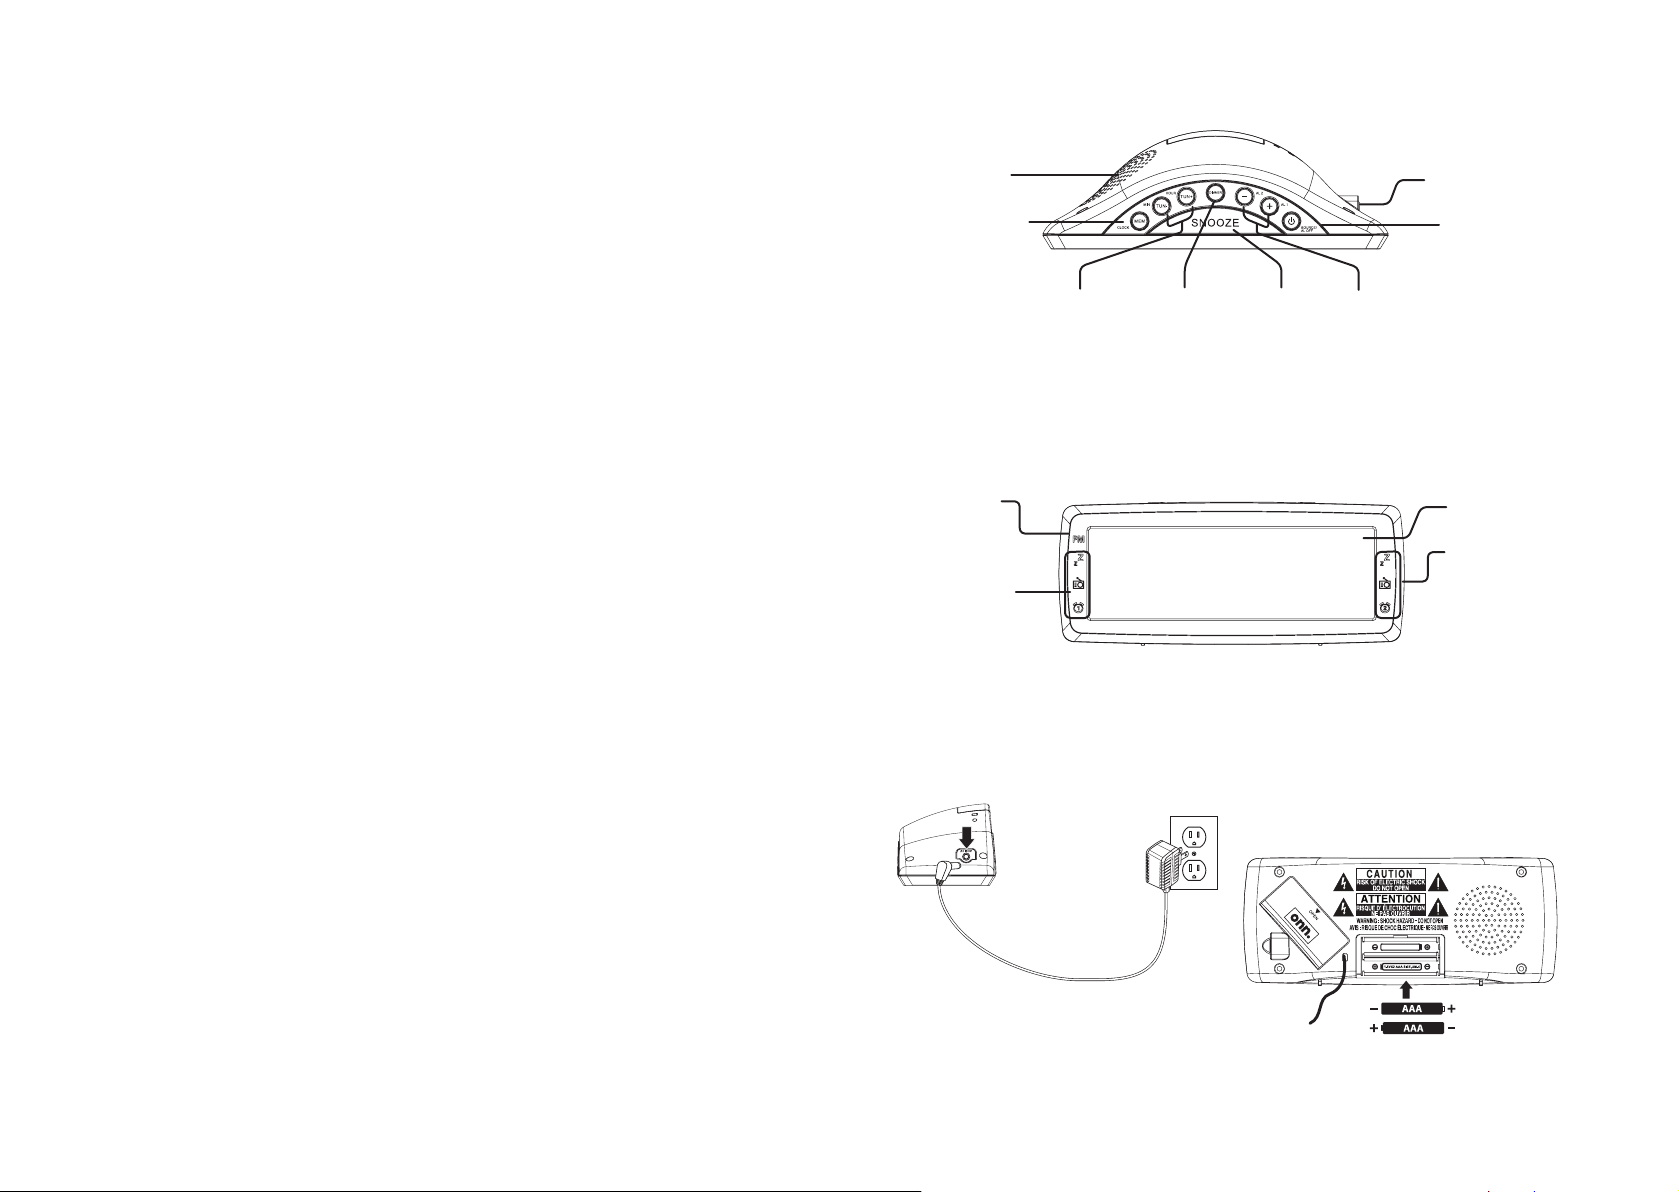
Overview
Speaker (side)
Clock/Mem
In O mode, press
and hold to begin
setting the time.
In Radio Mode,
press
to cycle through
preset stations.
Tuning/Min/
Hour
Press to tune
Dimmer
Press to dim
the di sp lay.
the radio.
Press to adjust
the minute
or hour when
setting the
clock or alarm.
PM Indicator
Lights when
the time is in
the PM.
Alarm 1: Buzzer/
Radio Indicator
Lights when the
alarm 1 is on and
set to buzzer or
radio.
Power & Batteries
To power the unit, plug the AC adaptor on the
back of the unit into a standard power outlet.
AC In (side)
Power/Source/
AL O
Press to turn the
unit on.
Snooze/
Sleep
Press to
snooze the
alarm after
it sounds.
Press
repeatedly
to set
the sleep
tim er.
Volume/
AL1/AL2
Press to
adjust
the volume.
Press to
begin
setting
Alarm 1 or
Alarm 2.
Press and hold to
turn o the radio.
Press to turn
o the alarm.
Press repeatedly to
select AM, FM.
LED Display
Alarm 2: Buzzer/
Radio Indicator
Lights when the
alarm 2 is on and
set to buzzer or
radio.
To power the unit using battery power, insert 2
AAA batteries (not Included). The battery backup
is intended for short power outages only. The clock
radio’s primary functions cannot run on battery
backup alone.
Note: Do not m ix old and new ba tteries and Do n ot mix
alkaline, standard (carbon-zinc) or rechargeable (ni-cad,
ni-mh, etc .) batteries
.
January 16, 2020_V1 January 16, 2020_V1
Page 3

Clock & Sleep Timer
Setting the Clock
1. If in Radio Mode, press and hold the
Power/Source/Al O button to
turn the unit o.
2. Press and hold the Clock/Mem button until
the display begins to blink, then release
the button.
3. Press the Hour button to adjust the hour.
The PM indicator will light when the hour is
set in the PM.
4. Press the Min button to adjust the minute.
5. Press the Clock/Mem button to finish
setting the time.
Setting the Sleep Timer
Note: There may be up to a 1 minute deviation in
the sleep timer.
1. Press the Snooze/Sleep button repeatedly
to set the sleep timer ( 90, 80, 70, 60, 50, 40,
30, 20, 10 or OFF ).
2. Once the set sleep time has expired the
clock radio will automatically power o.
Alarm
Setting the Alarm
1. If in Radio Mode, press and hold the Power/
Source/Al O button to turn the unit o.
2. Press the AL1 or AL2 button until the display
begins to blink.
3. Press the Hour button to adjust the hour.
The PM indicator will light when the hour is
set in the PM.
4. Press the Min button to adjust the minute.
5. Press the AL1 or AL2 buttons repeatedly to
switch between Radio and Buzzer.
6. Once the set alarm time is reached, the
alarm will sound.
7. To set the other alarm, follow the above
steps and choose the alarm not currently
set.
Disabling the Alarm
• Press the A L1 or AL2 buttons repeatedly until
the indicator is no longer lit.
Snooze and Alarm Reset
After the alarm sounds:
• Press the Snooze/Sleep button to delay the
alarm for several minutes.
• Press the Power/Source/Al O button to
turn the alarm o until the set alarm time is
reached again.
Radio
Tuning the AM or FM Radio
1. Press the Power/Source/Al O button to
turn the clock radio on.
2. Press the Power/Source/Al O button
again to switch between AM and FM Radio
Mode.
3. Press the Tun+/- buttons to adjust the radio
to the desired frequency.
4. Press and hold the Tu n +/- buttons to
search for the next available frequency.
5. Press the V o l +/- buttons to adjust the
volume.
6. Press and hold the Power/Source/Al O to
turn the radio o.
Saving and Tuning to a Station as
a Preset
1. Tune to the desired station.
2. Press the Clock/Mem button to cycle
through preset radio stations.
3. Press Tun +/Tun- to select which preset
you want to save the station to. Up to 10
stations can be saved.
4. Press the Clock/Mem to save selected
station.
5. To cycle through presets press the Clock/
Mem button and press the Tun+/Tu n- to
select which preset you want to listen to.
Radio Reception
A wired FM antenna is built into the clock radio and
exits from the rear of the unit. To improve radio
reception, adjust the position of the antenna, or if
need be, adjust the position of the clock radio.
January 16, 2020_V1
 Loading...